
Sam Turnbull's Blog, page 41
January 20, 2019
Vegan Alphagetti
Who has fond memories of the kid-friendly comfort food in a can called Alphagetti? Or perhaps it was Zoodles, or Spaghetti-O’s for you. Or some other cute name to describe a simple pasta dish in a can. This recipe is inspired by the original canned pasta- but made vegan, healthier, and so much tastier too! Win!

Only 9 ingredients and 30 minutes to make your homemade vegan alphagetti. Perfect for a quick and easy lunch, whether it be while watching cartoons, to take to school, or to take to work. (Hey I don’t judge, I’m a kid at heart myself).

When first testing this recipe I tried to make it a one-pot recipe, but I found cooking the alphabet pasta in the sauce didn’t work super well, and the noodles kept sticking to the bottom of the pan no matter how often you stirred it. So instead I boil the pasta separately. But I discovered this means that you can make as much of the sauce as you like and freeze some for later. Then when you are ready to reheat the sauce, boil some fresh pasta at the same time for a perfectly fresh pot of vegan alphagetti!

To make vegan alphagetti: heat the olive oil in a soup pot over medium-high heat. When hot add the onion and garlic and saute until the onion turns translucent and begins to brown, 3 – 5 minutes.
Stir in crushed tomatoes, vegetable broth, sugar, salt, and pepper. Bring to a simmer and cook for 20 – 25 minutes until the sauce has thickened and is flavourful.
*Optionally, you can use an immersion blender to combine the sauce so it’s completely smooth, but I find that as long as the onion is chopped fine enough, this isn’t necessary.

In the meantime, bring a large pot of water to a boil. Prepare pasta according to package directions. Drain the pasta and stir it into the tomato base. Serve hot or let cool and store in an air-tight container for 3 – 4 days in the fridge.

Vegan Alphagetti

Homemade, kid-friendly alphabet pasta- just 9 ingredients and 30 minutes to make. Healthier, dairy-free, easy to make.
1 tablespoon olive oil
1 yellow onion, (finely chopped or grated)
3 cloves garlic, (minced)
1 28 oz (769ml) can crushed tomatoes ((3 1/4 cups))
2 1/2 cups vegetable broth
2 teaspoons white sugar
1/4 teaspoon salt
1/4 teaspoon black pepper ((optional))
1 cup alphabet pasta ((gluten-free if preferred) )
Heat the olive oil in a soup pot over medium-high heat. When hot add the onion and garlic and saute until the onion turns translucent and begins to brown, 3 – 5 minutes.
Stir in crushed tomatoes, vegetable broth, sugar, salt, and pepper. Bring to a simmer and cook for 20 – 25 minutes until the sauce has thickened and is flavourful. Optionally, you can use an immersion blender to combine the sauce so it’s completely smooth, but I find that as long as the onion is chopped fine enough, this isn’t necessary.
In the meantime, bring a large pot of water to a boil. Prepare pasta according to package directions. Drain the pasta and stir it into the tomato base. Serve hot or let cool and store in an air-tight container for 3 – 4 days in the fridge.
If you want to make this ahead, you can freeze the sauce without the pasta. Then when you are ready to reheat the sauce, boil some fresh pasta at the same time for a perfectly fresh pot of vegan alphagetti!
Bon appetegan!
Sam.


This post Vegan Alphagetti appeared first on It Doesn't Taste Like Chicken


January 13, 2019
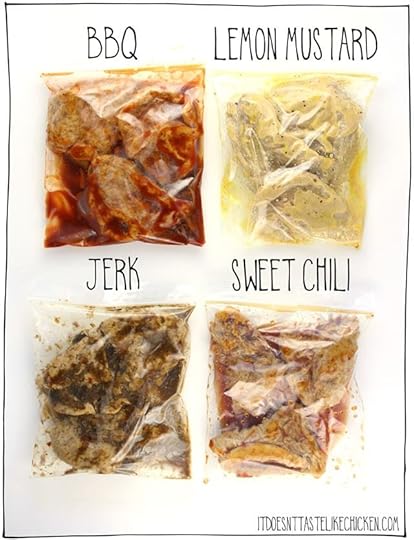
12 Seitan or Tofu Marinades
We got 12 seitan or tofu marinades in the house!!!!! …well, more specifically in the freezer for the most part. After making my Vegan Seitan Tenders (a recipe designed to be similar to chicken), I’ve been having fun playing around with so many different flavour combinations and enjoying my seitan everywhere: on sandwiches, salads, pasta, as the main dish, in tacos or burritos, stir-fry, everywhere! Serving up my seitan with endless flavour combinations. SO MUCH YUM!

With these marinade recipes on hand, you are on your way to some seriously scrumptious meals. Each recipe takes less than 5 minutes to prepare and makes enough to marinate 2 seitan tenders (or about 1 block of tofu), but you can make more or less as needed. Then just pop these in the fridge until ready to use- the flavours get even better the longer you marinate. Or you can put them straight in the freezer to save for another day.
12 Seitan or Tofu Marinades
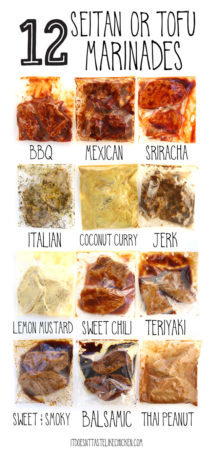
Each marinade takes less than 5 minutes to prepare using pantry staples you might already have on hand. Let your seitan or tofu marinate in the fridge for up to 4 days, or you can freeze them for later.
BBQ Marinade:
6 tablespoons BBQ sauce, ((check to make sure it's vegan))
1/2 teaspoon liquid smoke
Lemon Mustard Marinade:
2 tablespoon lemon juice
2 tablespoon dijon mustard
1 tablespoon maple syrup or agave
1/8 teaspoon black pepper
Jerk Marinade:
3 tablespoons jerk marinade, hot or mild ((I like to do a combination of both))
2 tablespoons water
Sweet Chili Marinade:
1/4 cup sweet chili sauce
soy sauce
Sriracha Marinade:
2 tablespoons Sriracha
1 tablespoon soy sauce
t tablespoon agave or maple syrup
Italian Marinade:
2 tablespoons olive oil
2 tablespoon lemon juice or white wine vinegar
1 teaspoon dried rosemary
1 teaspoon dried basil
1/4 teaspoon garlic powder
1/4 teaspoon salt
1/8 teaspoon black pepper
Balsamic Marinade:
2 tablespoons olive oil
2 tablespoons balsamic vinegar
1/2 teaspoon garlic powder
Thai Peanut Marinade:
3 tablespoons peanut butter
1 1/2 tablespoon soy sauce
1 1/2 tablespoon lime juice
2 teaspoon agave
1/2 teaspoon garlic powder
1/2 teaspoon powdered ginger
Coconut Curry Marinade:
1/2 cup full-fat coconut milk
2 tablespoon soy sauce
2 teaspoon curry powder
Mexican Marinade:
2 tablespoons light oil
2 tablespoons lime juice
1 tablespoon agave
2 teaspoons chili powder
1 teaspoon smoked paprika
1/2 teaspoon garlic powder
Sweet and Smoky Marinade:
2 tablespoons olive oil
2 tablespoons maple syrup or agave
2 tablespoons soy sauce
1 teaspoon liquid smoke
1/2 teaspoon garlic powder
1/2 teaspoon chili powder
Teriyaki Marinade:
2 tablespoons brown sugar
2 tablespoons soy sauce
2 tablespoons orange juice or water
1/2 teaspoon garlic powder
1/2 teaspoon powdered ginger
For any marinade you choose, simply add all of the ingredients to a resealable bag or airtight container, mix, then add your seitan tenders or sliced or cubed tofu. Let marinate for a minimum of 15 minutes or up to 4 days.
These marinades are designed to be used with my Vegan Seitan Tenders recipe, but the marinades would also work gorgeously with tofu, or another seitan recipe that calls for a marinade.
If using tofu, use a medium, firm, or extra-firm tofu. It’s also recommended to press the tofu first before marinating.
Each recipe makes enough to marinate 2 seitan tenders or 1 block of tofu. Feel free to multiply or reduce the recipe as needed.
I designed each recipe to be SUPER quick and easy to make- no chopping, mincing or cooking. Each recipe uses pantry staples- sauces, spices, and seasonings that you likely already have on hand. That said if you would like to sub in fresh herbs, garlic, or ginger, instead of the powdered versions, feel free to do so.
Marinate your seitan or tofu for a minimum of 15 minutes, but up to 4 days in the fridge for maximum flavour or you can toss these in the freezer. The seitan freezes beautifully, but tofu changes texture when frozen (it gets kind of spongey), so freeze tofu only if you enjoy that texture (personally, I’m not a fan).
If you prefer oil-free marinades, sub any oil in these recipes for water, vegetable broth, or aquafaba.
Once marinated, cook up your seitan or tofu any way you like! Pan fry, grill, BBQ, bake. My favourite is to pan fry the seitan tenders over medium-high heat, a couple minutes per side so the seitan gets a bit crispy on the outside, and hot all the way through.
Bon appetegan!
Sam.
This post 12 Seitan or Tofu Marinades appeared first on It Doesn't Taste Like Chicken
January 6, 2019
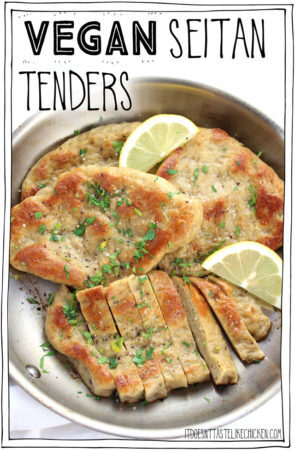
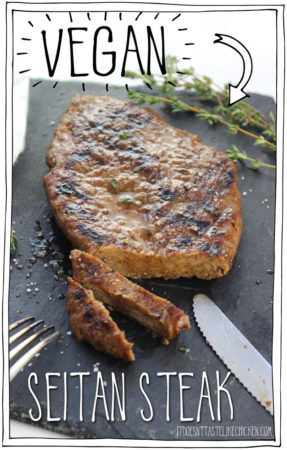
Vegan Seitan Tenders
After the popularity of my Vegan Seitan Steak, which ended up being one of the top 10 recipes of 2018, I wanted to start this year off with an exciting follow-up recipe. Many of you requested a seitan chicken style recipe… well, ask and you shall receive. I introduce to you my Vegan Seitan Tenders! …And yes, it does taste like chicken. Ba dum dum tsk!

It took many, many, many rounds of recipe testing to get these vegan seitan tenders just right, but I finally nailed it. It was important to me that this vegan chicken recipe was more tender in texture than my vegan steaks (which have a chewier texture similar to traditional steak). The tenders needed to be lighter in colour, tasty but still basic enough that you could season them any way you like, easy to make, and of course incredibly delicious.
I tried baking the seitan and boiling it, but in the end, I still preferred my method of steaming the seitan which allows for the best juicy texture without being weirdly squishy (which can happen with boiling). I tried adding chickpeas to the seitan but that made it too mealy and I discover instead, that the key was adding soft tofu which makes the cutlets delicate enough to cut with the side of your fork, but still strong and meaty enough to toss on a grill. I played around with ratios and seasonings until I got it juuuussst so.

The final result: vegan seitan tenders that are, you guessed it, tender. They are juicy and succulent. The tenders are easy to make and can be prepared ahead of time and stored in the fridge for several days, or in the freezer so you can have them on hand whenever you like. Then, the best part is that when you are ready to serve, you can fry them, grill them, marinate them, bake them, or treat them any way you would have treated a chicken dish.
Serve a vegan seitan tender on a bun, bread or crust them, slice them for salad, pasta, or stir fry, cut them into nuggets and fry or bake, add them to burritos, tacos, sandwiches- the options are endlessly delicious!
Just 8 ingredients, 40 minutes to make plus an hour of cooling. 1 recipe makes 6 tenders and each one contains 156 calories, 8g carbohydrates, 26g protein, and 2g fat. Boom!
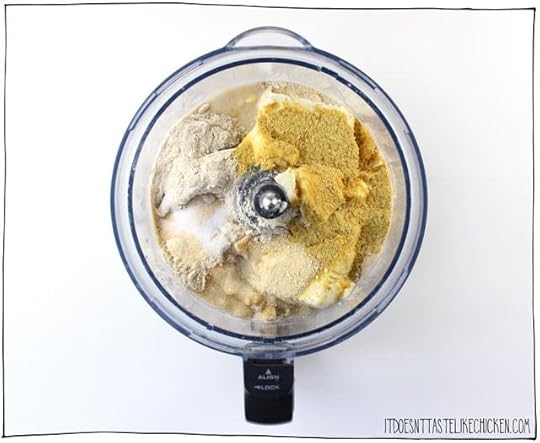
To make vegan seitan tenders: add all of the ingredients to a food processor and combine.

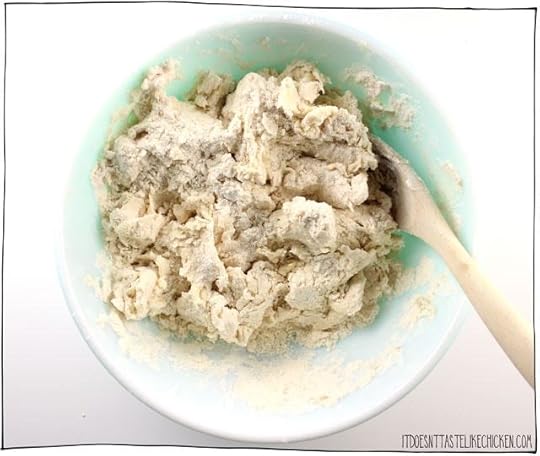
Continue to mix the dough until everything is well combined and the dough forms a ball.
Alternatively, if you do not have a food processor you can mix everything together in a large bowl working the dough until it forms a ball.
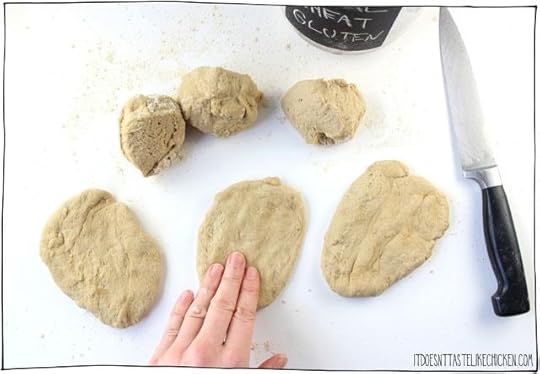
Lightly dust a clean work surfaces with a bit of the vital wheat gluten. Turn the dough ball onto the surface and lightly dust the top with a little more vital wheat gluten. The dough will be soft and very sticky so this will help it from sticking to your hands. Cut the dough ball into 6 pieces and use the tips of your fingers to press each piece of dough into an oval shape about 5″ x 6″.

Add several inches of water to a large pot with a steamer basket and bring to a simmer. Lightly grease the steamer basket and lay the tenders in the basket. If the tenders need to overlap each other, spray the tenders with a bit of oil to stop them from sticking together. Cover and steam at a simmer for 25 minutes, flipping halfway through so they steam evenly. They will double in size.
*If the end appearance of the tenders is important to you, make sure to allow lots of room around each tender to expand. You may want to steam the tenders in batches as when they overlap each other they can sometimes end up as weird shapes. This won’t matter if you plan on slicing them, but you can consider it if you plan to serve the tenders whole.

Once steamed, remove the tenders and let cool. Cover or put in an airtight container and chill in the fridge for a minimum of 1 hour, or for up to 3 – 4 days. You can either chill the tenders without any additional seasoning, or you could toss the tenders in your favourite marinade. The tenders shrink and firm up a bit when chilled and this results in the best texture.
Once chilled, the tenders are now ready to cook with and enjoy. You can treat them any way that you might prepare a chicken breast. Make a vegan seitan tender burger, bread or crust them, slice them for salad, pasta, or stirfry, cut them into nuggets and fry or bake, add them to burritos, tacos, or sandwiches.
In these photos, I fried them in a bit of vegan butter, and seasoned with salt, pepper, parsley, and a squeeze of lemon. This makes the outside crispy and the insides stays nice and tender and juicy. Perfection!

Vegan Seitan Tenders
This homemade vegan seitan chicken recipe is easy to make, just 8 ingredients, can be made ahead of time, and once prepared can be used any way that you might have cooked chicken- marinate, bread, fry, crust, bake, grill, BBQ, the options are endless!!!
For the vegan seitan steaks:
1 1/2 cups vital wheat gluten, (plus more for dusting)
300 g soft or silken tofu ((1 1/4 cups))
2 tablespoons water
2 tablespoons nutritional yeast
1 tablespoon onion powder
2 teaspoons vegetable broth powder, (vegetable instant stock mix powder, or 1 vegetable boullion cube)
1 teaspoon garlic powder
1/2 teaspoon salt
Add all of the ingredients to a food processor and pulse to combine until everything is well mixed and the dough forms a ball. Alternatively, if you do not have a food processor you can mix everything together in a large bowl working the dough until it forms a ball.
Lightly dust a clean work surfaces with a bit of the vital wheat gluten. Turn the dough ball onto the surface and lightly dust the top with a little more vital wheat gluten. The dough will be soft and very sticky so this will help it from sticking to your hands. Cut the dough ball into 6 pieces and use the tips of your fingers to press each piece of dough into an oval shape about 5″ x 6″.
Add several inches of water to a large pot with a steamer basket and bring to a simmer. Lightly grease the steamer basket and lay the tenders in the basket. If the tenders need to overlap each other, spray the tenders with a bit of oil to stop them from sticking together. Cover and steam at a simmer for 25 minutes, flipping halfway through so they steam evenly. They will double in size.
Once steamed, remove the tenders and let cool. Cover or put in an airtight container and chill in the fridge for a minimum of 1 hour, or for up to 3 – 4 days. You can either chill the tenders without any additional seasoning, or you could toss the tenders in your favourite marinade. The tenders shrink and firm up a bit when chilled and this results in the best texture. Once chilled, the tenders are now ready to cook with and enjoy. You can treat them any way that you might prepare a chicken breast. Make a vegan seitan tender burger, bread or crust them, slice them for salad, pasta, or stirfry, cut them into nuggets and fry or bake, add them to burritos, tacos, or sandwiches.
*If the end appearance of the tenders is important to you, make sure to allow lots of room around each tender to expand. You may want to steam the tenders in batches as when they overlap each other they can sometimes end up as weird shapes. This won’t matter if you plan on slicing them, but you can consider it if you plan to serve the tenders whole.
*For oil-free you can skip greasing the steamer basket and tenders. The tenders will expand and stick together when steaming and may tear when you try to separate them, but the end result will still be equally delicious.
December 30, 2018
Top 10 Vegan Recipes of 2018!
It’s that time of the year again, where we take a look back and discover which dishes made the list of the top 10 vegan recipes of 2018!
It’s been a fantastic year! My cookbook Fuss-Free Vegan received well over 200 5-star reviews on Amazon. I dove deep into my YouTube channel for the first time and gained 24 thousand subscribers and just under 800 thousand views. This blog has received well over 10 million (!!!) pageviews. And on a personal note, I ran my first 1/2 marathon and found out afterwards that I had a broken ankle the whole time. It has been a crazy amazing year, I’m sad to see it go, but can’t wait to see what surprises 2019 will bring.

Here on my blog, I publish a LOT of brand new recipes throughout the year, and I love each and every one of them, but for me, it’s so much fun to look back and see what YOU loved most. Whether you know it or not you voted for these recipes, by cooking them up, sharing them on social media, or just drooling all over the pictures. Check out the previous top recipe roundups from 2017, 2016, 2015, and 2014 for more fan favourites.
Now without further ado… a countdown to the most popular recipes. (Click on the title of the recipe or photo to take you directly to the full recipe).

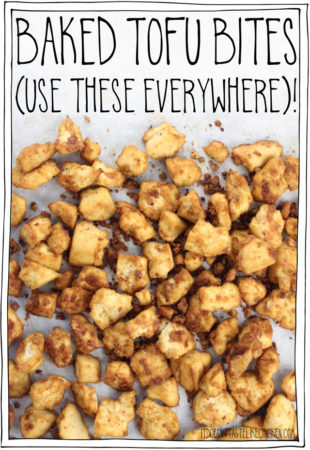
10. Baked Tofu Bites
With a 4.74 (out of 5) rating from 60 votes, 122 comments, and 8 thousand shares, these baked tofu bites have become a staple in many kitchens. So versatile they can be used anywhere that you might have used chicken. A lot of people even describe them as tasting like chick-fil-a!
“Sam, I want to tell you that these are THE best tofu bites I have ever eaten! My husband, daughter (22) & son (14) love them. I can’t make them fast enough before they’re all gone again. I highly recommend that everyone try these. They will not be disappointed. We’ve used them in “chicken” salad for sandwiches, Buddha bowls, “chicken” and rice casserole. There is no limit to the different ways to use these golden bites of yumminess. Thanks for sharing this recipe!” ~Christine Jost ⭐️⭐️⭐️⭐️⭐️

9. The Ultimate Vegan Breakfast Sandwich
This sandwich had fewer shares and comment, (3 thousand shares, and 50 comments), but for those who did try it, it was met with RAVE reviews 4.96 (out of 5) rating. I’m a big fan of this sandwich and often serve it as breakfast for dinner, letting the tofu marinade all day or even overnight for maximum flavour.
“Oh my goodness gracious! I can’t even with this recipe! By far my favorite breakfast of all time. The tofu marinade is on point and that sauce is a perfect compliment! Thank you so much for sharing and planning my weekday breakfasts til the end of time
December 16, 2018
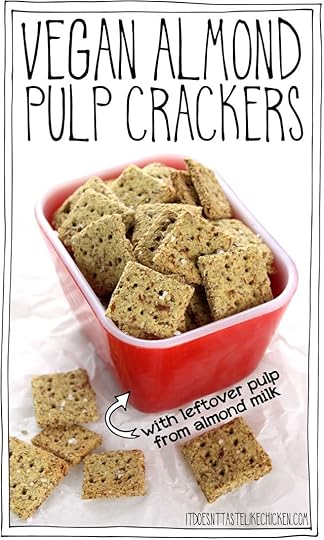
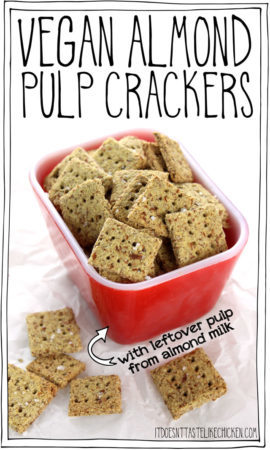
Vegan Almond Pulp Crackers
I’m thrilled to say that this recipe for Vegan Almond Pulp Crackers is sponsored by Almond Cow who I love for their awesome plant-based milk making machine!! Seriously, so cool. See more about it below, or hop over to their site and use discount code: SAMTURNBULL for $15 off!
Now that I’m using my shiny cool Almond Cow all the time and making homemade almond milk, I end up with lots of leftover almond pulp.
It seems like such a waste to throw it away, so I started looking for ideas of how I could use up this leftover almond pulp. Almond Cow has a ton of leftover pulp recipes on their site here, including granola, cookies, vegan cheese, hummus, and energy balls (to name a few).
I was craving something savoury and snacky, so I started playing around with the pulp and I ended up making the most addictively delicious, crispy, leftover vegan almond pulp crackers.

They may look like ordinary crackers, but they are so scrumptious that I’m now looking for ways to use up more almond milk, just so I have an excuse to make more of these delicious crackers!
These cheesy, garlicky crackers are fantastic just on their own, but you can also dip them into hummus or spread them with vegan cheese. Yum! Not only are they scrumptious, but they are entirely gluten-free with an oil-free option too. A win for everybody!

To make vegan almond pulp crackers, start by making homemade almond milk. Soak almond for about 4 hours or overnight.
I tried the boiling nut hack that I use when softening nuts for a cheese or dip recipes, and while it worked, I preferred the slow soak method for making almond milk. The flavour of the milk was a bit better, and the boiled almonds also tended to make the milk a little brown in colour. Not cute.

Use one cup of the softened almonds to make homemade almond milk. If you want to add any additional flavourings or sweeteners, stir them in after the pulp is removed, so that the crackers don’t take on those flavours.
If you are new to Almond Cow then let me introduce you. Isn’t it pretty!? This super simple machine makes almond milk (or any kind of plant-based milk), in a flash, no straining needed. Just add water and almonds, press the little Almond Cow button and…
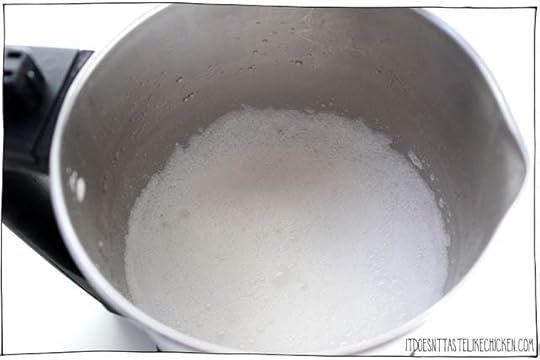
Foamy, rich, glorious almond milk appears. Not only does this machine take the hassle out of making nut milk, but it’s so easy to clean as well, which I love.
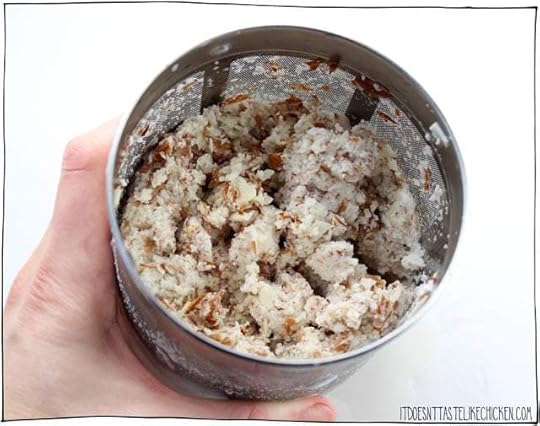
Then you have the leftover almond pulp in this little container. Just like that! I didn’t want to bother with drying the pulp out first, (too much hassel) so once you have your wet pulp, you can make crackers right away.

In a medium bowl, add all of the ingredients and mix well.
For extra-strong flavoured crackers, you can optionally add an extra tablespoon of nutritional yeast and an extra 1/4 teaspoon of garlic powder.

Scoop the cracker mixture onto a sheet of parchment paper, and place another sheet of parchment paper on top so that the cracker mixture is sandwiched in between. Use a rolling pin to gently roll the dough out to about 1/8″ thick. The dough will be very soft.

Remove the top sheet of parchment and use a pizza cutter or knife to cut the dough into a grid of crackers. Use a fork to poke each cracker.

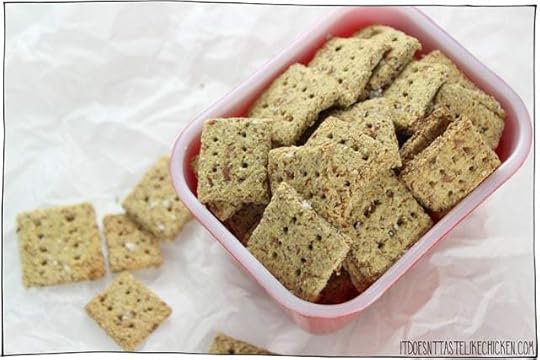
Pick up the parchment with the rolled dough on it and place on a baking tray. Bake for 25 – 30 minutes until the edges start to brown. Remove from the oven and separate the crackers. You may need to cut them again and use a spatula to release them from the parchment. Remove any browned pieces and set aside. Return the tray with the now spread out crackers to the oven and bake for an additional 5 – 15 minutes until lightly golden and crispy. It will take more or less time depending on how wet your pulp was when you began. Let crackers cool and enjoy as you please!
Vegan Almond Pulp Crackers
Made from leftover almond pulp from making almond milk. So easy to make and super delicious. Gluten-free with an oil-free option.
Recipe adapted from Detoxinista’s Easy Almond Pulp Crackers.
1 cup wet almond pulp ((the amount leftover from making almond milk with 1 cup of almonds))
2 tablespoons nutritional yeast
2 tablespoons ground chia or ground flax seeds
1 tablespoon olive oil (*omit for oil free)
1/2 teaspoon baking powder
1/4 teaspoon garlic powder
1/4 teaspoon salt
1/4 teaspoon black pepper
Preheat your oven to 350F (180C).
In a medium bowl, add all of the ingredients and mix well.
Scoop the cracker mixture onto a sheet of parchment paper, and place another sheet of parchment paper on top, so the cracker mixture is sandwiched in between. Use a rolling pin to gently roll the dough out to about 1/8″ thick. The dough will be very soft. Remove the top sheet of parchment and use a pizza cutter or knife to cut the dough into a grid of crackers. Use a fork to poke each cracker.
Pick up the parchment with the rolled dough on it and place on a baking tray. Bake for 25 – 30 minutes until the edges start to brown. Remove from the oven and separate the crackers. You may need to cut them again and use a spatula to release them from the parchment. Remove any browned pieces and set aside. Return the tray with the now spread out crackers to the oven and bake for an additional 5 – 15 minutes until lightly golden and crispy. It will take more or less time depending on how wet your pulp was when you began. Let crackers cool and enjoy as you please!
*For oil-free you can simply omit the oil. I do like adding the oil as it makes the crackers a little crisper, but they are still good without it.
**For extra-strong flavoured crackers add an extra tablespoon of nutritional yeast and an extra 1/4 teaspoon of garlic powder.
Bon appetegan!
Sam.
This post Vegan Almond Pulp Crackers appeared first on It Doesn't Taste Like Chicken
December 9, 2018
Easy Vegan Cinnamon Buns
Grab yourself a napkin because you might be drooling a little while reading this recipe. I’ve got Easy Vegan Cinnamon Buns for you today, and this recipe is a game changer. I hacked this recipe so these vegan cinnamon rolls are as easy as possible to make. No yeast. No rising. Only 10 ingredients. No weird ingredients. Freezable. Completely addictive ← you have been warned.

I figured out a way to make tender, moist, pull apart, vegan cinnamon buns without messing around with yeast. Sure, these cinnamon rolls have several steps to prepare them (that’s the nature of cinnamon rolls I’m afraid), but I made sure to include lots of pictures of each step so that you can see for yourself that every step is actually pretty easy.
And then you get to eat these ↓↓↓

Drooooooool…
Not only are these vegan cinnamon rolls easy to make, but they will keep fresh for several days. I even tested freezing them finished with icing and all, and you know what? I left them on the counter to thaw and they came back perfectly to fluffy, tender, icing glazed life. YUM!

To make easy vegan cinnamon buns: In a large bowl, whisk together the flour, baking powder, and salt. Add in the vegan butter cubes and use a pastry cutter or fork to cut the butter into the flour until you reach a grainy texture.
Pour in the non-dairy milk and combine to make a shaggy dough.

Either in the bowl or on a clean work surface use your hands to knead the dough together incorporating any leftover dry ingredients until it all comes together into a nice ball. Let the dough rest in the bowl for 10 – 15 minutes before proceeding. Resting allows the dough to get stretchy which is a must for gorgeous pull apart cinnamon buns!
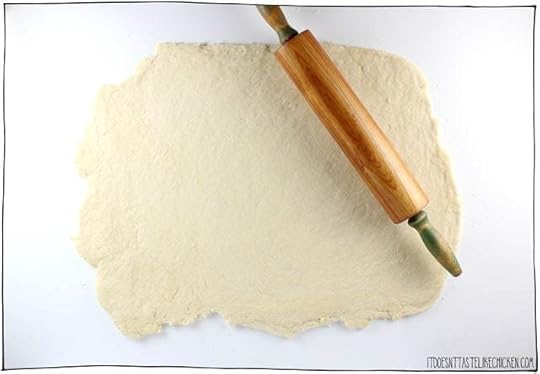
Once the dough has rested, lightly flour a clean work surface and roll the dough with a rolling pin until you get a rectangle about 19″ x 14″.

Pour the melted vegan butter over the rolled out dough and use a pastry brush or the back of a spoon to spread evenly over the dough. In a small bowl mix together the brown sugar and cinnamon, then sprinkle the cinnamon sugar evenly over the melted butter.

Starting from a longer side of the dough rectangle, use your hands to gently roll the dough up.

Once rolled, use a sharp knife to cut 12 cinnamon rolls by gently sawing with the knife.
*I like to mark out each bun by lightly scoring the surface of the roll before doing the final cuts, to ensure even sized cinnamon buns.

Place the cinnamon buns in the baking dish, swirl side up, and bake for 24 – 28 minutes until puffed up and lightly golden. Let cool for 10 minutes before serving.

If making the icing (and you should make the icing), combine the powdered sugar, vegan butter, vanilla extract, and lemon juice or non-dairy milk in a small bowl.
*I like using lemon juice to add a little bit of tang to the icing- similar to cream cheese frosting, but if you want an all sweet icing opt for non-dairy milk.
Spread the icing roughly over the still warm cinnamon buns. The icing will melt into the cinnamon buns a little. YUM!

Easy Vegan Cinnamon Buns

No yeast. No rising. Only 10 ingredients. No weird ingredients. Freezable. Completely addictive!! No one will know they’re vegan.
For the vegan cinnamon bun dough:
4 1/2 cups all-purpose flour
2 tablespoons baking powder
1 teaspoon salt
1 cup vegan butter, (cut into small cubes)
1 1/4 cup non-dairy milk ((such as soy or almond))
For the cinnamon sugar filling:
1/4 cup vegan butter, (melted)
1 cup brown sugar
1 tablespoon cinnamon
For the icing (optional):
1 cup powdered sugar
2 tablespoons vegan butter
1 teaspoon vanilla extract
3 teaspoons lemon juice or non-dairy milk*
Preheat your oven to 400F (200C). Line with parchment paper or grease a 9″x 12″ baking dish.
Make the dough: In a large bowl, whisk together the flour, baking powder, and salt. Add in the vegan butter cubes and use a pastry cutter or fork to cut the butter into the flour until you reach a grainy texture. Pour in the non-dairy milk and combine to make a shaggy dough.
Either in the bowl or on a clean work surface use your hands to knead the dough together incorporating any leftover dry ingredients until it all comes together into a nice ball. Let the dough rest in the bowl for 10 – 15 minutes before proceeding for the best dough texture. Resting allows the dough to get stretchy which is a must for gorgeous pull apart cinnamon buns!
Roll the dough: Once the dough has rested, lightly flour a clean work surface and roll the dough with a rolling pin until you get a rectangle about 19″ x 14″.
Cinnamon sugar filling: Pour the melted vegan butter over the rolled out dough and use a pastry brush or the back of a spoon to spread evenly over the dough. In a small bowl mix together the brown sugar and cinnamon, then sprinkle the cinnamon sugar evenly over the melted butter.
Roll your cinnamon buns: Starting from a longer side of the dough rectangle, use your hands to gently roll the dough up. Once rolled, use a sharp knife to cut 12 cinnamon rolls by gently sawing with the knife. I like to mark out each bun by lightly scoring the surface of the roll before doing the final cuts, to ensure even sized cinnamon buns.
Bake: Place the cinnamon buns in the baking dish, swirl side up, and bake for 24 – 28 minutes until puffed up and lightly golden. Let cool for 10 minutes before serving.
Optional icing: Combine the powdered sugar, vegan butter, vanilla extract, and lemon juice or non-dairy milk together in a small bowl. *I like using lemon juice to add a little bit of tang to the icing- similar to cream cheese frosting, but if you want an all sweet icing opt for non-dairy milk. Spread the icing roughly over the still warm cinnamon buns. The icing will melt into the cinnamon buns a little. YUM!
Store leftover cinnamon buns covered at room temperature for 2 – 3 days. Cinnamon buns can be frozen (with icing and all) in an air-tight container, then let thaw completely at room temperature.
Bon appetegan!
Sam.


This post Easy Vegan Cinnamon Buns appeared first on It Doesn't Taste Like Chicken
December 2, 2018
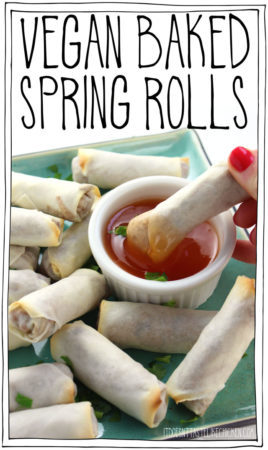
Vegan Baked Spring Rolls
Oh my, oh my, oh my! Practically guilt-free vegan spring rolls are here and they are my new favourite meal… er… snack! How can spring rolls possibly be guilt-free? These spring rolls are not deep fried at all. These are vegan baked spring rolls with almost no oil used- totally oil-free if you prefer! Even though they are baked instead of fried, they come out of the oven crispy, flakey, and totally addictive just as a good spring roll should be.

For this recipe, I did a multitude of tests to see how I could get vegan baked spring rolls crispy in the oven and after much trial and error, I figured out the secrets:
Bake the spring rolls on a wire rack so that air can circulate around all sides of the rolls. Cripsy all the way around!
Apply absolutely nothing to the outside of the rolls. Nothing!
I tested brushing the spring rolls with oil, spraying with oil, brushing with non-dairy milk, and brushing with a mix of water and sweet & sour sauce. But the spring rolls that turned out the crispiest were the ones that were left completely naked! Sure they aren’t as golden brown as deep fried ones but considering this makes the spring rolls practically guilt-free, that’s a compromise I’m willing to make.

Not only are my vegan baked spring rolls guilt-free, but you can even prepare and roll them ahead of time, and either store in the fridge for 1 – 2 days, or you can even freeze them. Then just bake when ready to serve, making them a perfect make-ahead appetizer.
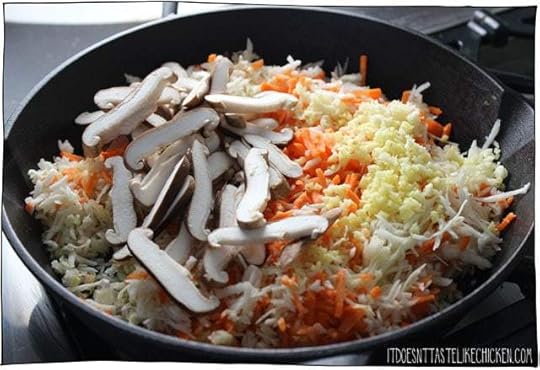
To make Vegan Baked Spring Rolls: in a large skillet or frying pan, heat the sesame oil over medium-high heat. When hot, add the cabbage, carrots, shiitake mushrooms, garlic, and ginger.

Cook for about 5 minutes stirring frequently until the vegetables and mushrooms are cooked, about 5 minutes. Stir in the hoisin and soy sauce and cook 1 minute more. Remove from heat and let cool before assembling the spring rolls. You can pop it in the fridge to cool faster if you like.
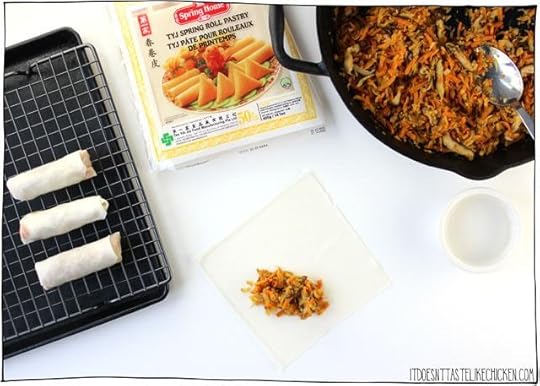
Set up a workstation with your spring roll wrappers, spring roll filling, a small bowl of water, and a baking tray fitted with a wire rack.
*I found my spring roll wrappers in the freezer section of my local grocery store. Make sure you buy spring roll wrappers (which are vegan), and not egg roll wrappers (which aren’t vegan).
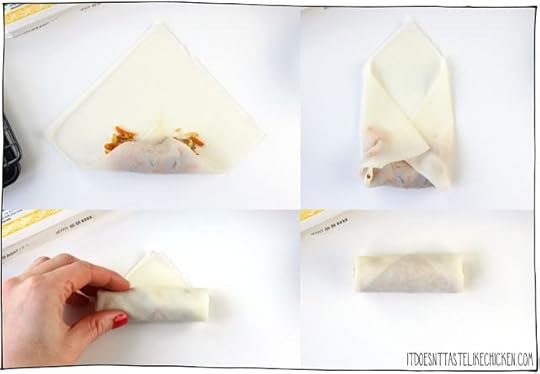
To assemble the spring rolls, take a spring roll wrapper and place it on your work surface with a corner pointing up (diamond shape). Put about 2 tablespoons of the spring roll filling near the bottom corner of the wrapper. Fold up the bottom corner around the filling, then fold in both sides. Wet your finger or use a brush to wet the top edges with water to seal the spring roll. Finish rolling up the spring roll, then place on the wire rack with point side down.

Repeat with remaining wrappers until all of the filling is used up. Bake about 25 minutes until golden around the edges. Serve hot with sweet & sour sauce.

Vegan Baked Spring Rolls
Guilt-free spring rolls! Baked instead of fried means these spring rolls are a healthier alternative. Easy to make, and can be made ahead of time and frozen. Perfect appetizer for a party! Oil-free option.
1 tablespoon sesame oil (*omit for oil-free)
250 g green cabbage (about 2 cups), (shredded)
2 medium carrots (about 1 1/2 cups), (peeled and grated)
100 g shiitake mushrooms (about 1 1/2 cups), (destemmed and sliced)
3 cloves garlic, (minced)
1 inch piece fresh ginger, (minced)
1 tablespoon hoisin sauce
1 tablespoon soy sauce
16 spring roll wrappers (6" x 6"), (defrosted (not egg rolls))
water ((for sealing spring rolls))
Sweet & sour sauce, for serving ((optional))
Preheat your oven to 400F (200C). Line a large baking sheet with a wire rack.
In a large skillet or frying pan, heat the sesame oil over medium-high heat. When hot, add the cabbage, carrots, shiitake mushrooms, garlic, and ginger. Cook for about 5 minutes stirring frequently until the vegetables and mushrooms are cooked, about 5 minutes. Stir in the hoisin and soy sauce and cook 1 minute more. Remove from heat and let cool before assembling the spring rolls. You can pop it in the fridge to cool faster if you like.
Set up a workstation with your spring roll wrappers, spring roll filling, a small bowl of water, and a baking tray fitted with a wire rack.
To assemble the spring rolls, take a spring roll wrapper and place it on your work surface with a corner pointing up (diamond shape). Put about 2 tablespoons of the spring roll filling near the bottom corner of the wrapper. Fold up the bottom corner around the filling, then fold in both sides. Wet your finger or use a brush to wet the top edges with water to seal the spring roll. Finish rolling up the spring roll, then place on the wire rack with point side down. Repeat with remaining wrappers until all of the filling is used up. Bake about 25 minutes until golden around the edges. Serve hot with sweet & sour sauce.
*For oil-free, omit oil and do a water or broth sauté.
*If making the spring rolls ahead of time, assemble them, then store in an air-tight container in the fridge for 1 – 2 days, or in the freezer. Bake spring rolls from frozen (no defrosting). They may need an extra 5 – 10 minutes in the oven if baked from frozen.
Bon appetegan!
Sam.

This post Vegan Baked Spring Rolls appeared first on It Doesn't Taste Like Chicken
November 25, 2018
Vegan Butternut Squash Pasta
You see all that glorious creaminess down there in that pasta picture? ↓ That creaminess comes from butternut squash. That’s it. No cashews, no non-dairy milk, no thickened sauces, nadda. That’s all vegetable down there just being it’s amazingly impressive self. I’m still blown away by how gorgeously creamy this vegan butternut squash pasta is, yet SO simple and easy to make.

The sauce is made from onions, garlic, butternut squash, vegetable broth, salt and pepper. Now that may sound a little too simple and a little too plain, but trust me, this pasta is anything but plain. Then, to make this pasta seem fancy x 100, just fry up some fresh sage leaves in a little vegan butter (trust me on this, it’s a must). Place them on top of each serving of vegan butternut squash pasta, and voila! Restaraunt quality pasta, on your table in 30 minutes.

I can hear it now: “fried leaves? That’s sooooo vegan.”
Nah man, be prepared to get your dukes up, because everyone is going to be fighting over those crispy, salty, flavour-bursting sage leaves.

To make vegan butternut squash pasta: bring a large pot of water to a boil and cook the pasta according to package directions.
In a large saucepan, melt the vegan butter over medium-high heat. Add the onion and garlic and sauté for about 5 minutes until the onion turns translucent and begins to brown. Add the butternut squash, vegetable broth, salt, and pepper. Cover and cook 10 – 15 minutes until the butternut squash is very tender when pierced with a fork.
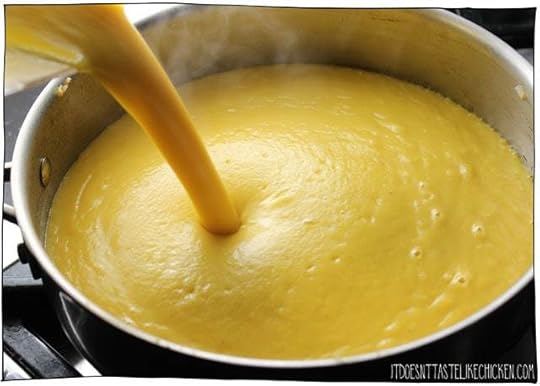
Use an immersion blender or standing blender to blend the butternut squash mixture until it’s completely smooth and creamy. If using a standing blender, be careful not to fill the blender too high so it doesn’t erupt. If your sauce is too thick, you can add another 1/4 cup of vegetable broth.

Return the sauce the pan, and add the cooked pasta to the sauce and toss well to coat.
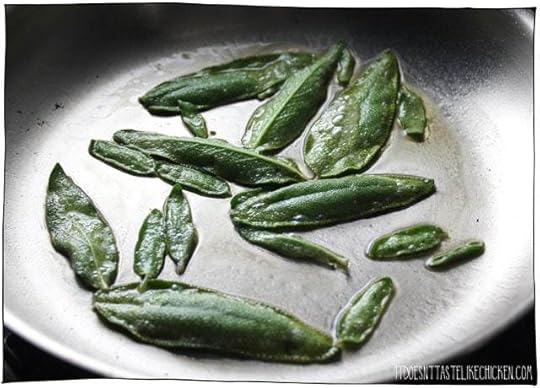
To fry the sage: melt the vegan butter in a frying pan then add the sage leaves. Fry the sage leaves for 1 – 2 minutes until they stop sizzling so much, or the edges just start to brown, and they are crispy.

Remove from heat and set on a paper towel or a clean dish towel to drain. You may have to do this in batches. Serve the pasta with a few fried sage leaves on top of each portion. Trust me when I say, that everyone will be fighting over those crispy sage leaves!

Vegan Butternut Squash Pasta
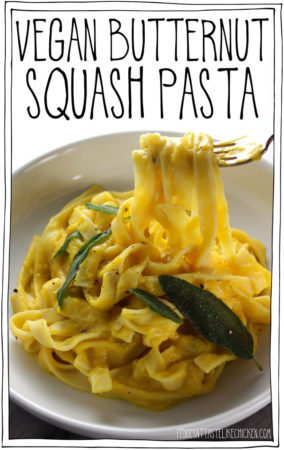
This pasta comes together in just 30 minutes and tastes AMAZING! Butternut squash makes the pasta insanely creamy, then top with crispy fried sage leaves. You won’t believe how simple this dish is to make but tastes like it’s from a fancy restaurant!
For the vegan butternut squash pasta:
500 g pasta of choice ((tagliatelle, fettuccine, linguini, etc.), gluten-free if preferred)
2 tablespoons vegan butter
1 yellow onion, (chopped)
4 cloves garlic, (minced)
1 medium butternut squash (950g) (7 cups) (peeled, deseeded, and chopped into 2 inch cubes)
1 1/4 – 1 1/2 cups vegetable broth
3/4 teaspoon salt
1/4 teaspoon black pepper
For the fried sage:
2 tablespoons vegan butter
1 bunch fresh sage leaves ( (about 20 leaves))
Bring a large pot of water to a boil and cook the pasta according to package directions.
In a large saucepan, melt the vegan butter over medium-high heat. Add the onion and garlic and sauté for about 5 minutes until the onion turns translucent and begins to brown. Add the butternut squash, vegetable broth, salt, and pepper. Cover and cook 10 – 15 minutes until the butternut squash is very tender when pierced with a fork.
Use an immersion blender or standing blender to blend the butternut squash mixture until it’s completely smooth and creamy. If using a standing blender, be careful not to fill the blender too high so it doesn’t erupt. If your sauce is too thick, you can add another 1/4 cup of vegetable broth. Return the sauce the pan, and add the cooked pasta to the sauce and toss well to coat.
To fry the sage: melt the vegan butter in a frying pan then add the sage leaves. Fry the sage leaves for 1 – 2 minutes until they stop sizzling so much, or the edges just start to brown, and they are crispy. Remove from heat and set on a paper towel or a clean dish towel to drain. You may have to do this in batches. Serve the pasta with a few fried sage leaves on top of each portion.
Bon appetegan!
Sam.
This post Vegan Butternut Squash Pasta appeared first on It Doesn't Taste Like Chicken
November 11, 2018
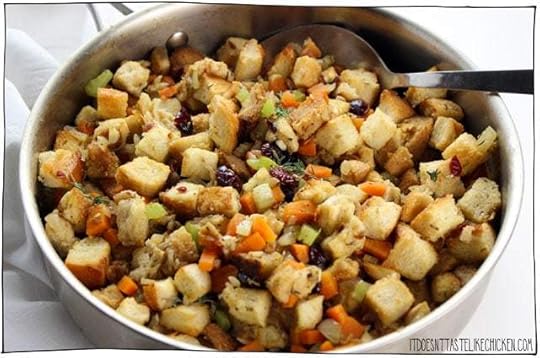
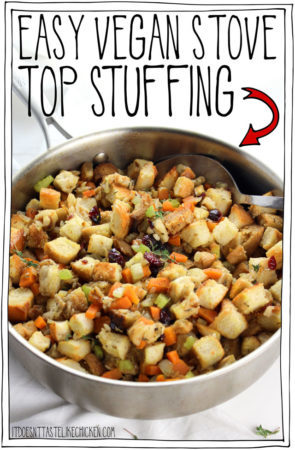
Easy Vegan Stove Top Stuffing
Why is stuffing so incredibly delicious? No really, think about it -it’s just dried bread cubes, some veg, some spices, and a bit of broth- that’s pretty much it. But put that simple combination together and magic happens. The most amazingly perfect, seasoned, fluffy Thanksgiving or Christmas side dish ever. Stuffing always seems to be the first dish to disappear at my family’s holiday celebrations. That’s why my easy vegan stove top stuffing is so perfectly genius (if I do say so myself).

You see, not only is this vegan stove top stuffing very easy to prepare (just toast bread cubes, saute veg, combine and let sit for 10 mins), but you can make a giant pot of it. So if you’re lucky, there might even be some leftovers. …I mean this has never happened in my family, but one can dream, right?
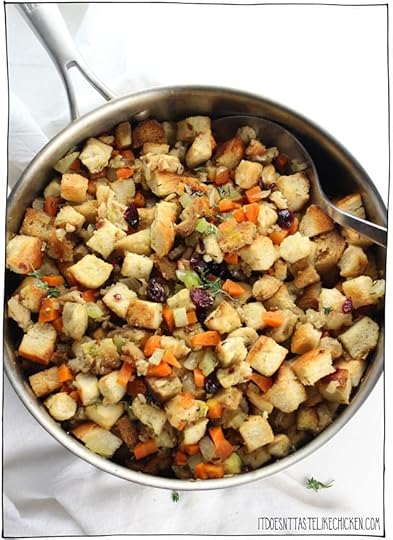
This is a traditional flavoured stuffing with sage, thyme, rosemary, and some dried cranberries for a little pop of sweetness and chew. This stuffing can also be made ahead and reheated with a splash more vegetable broth as needed, making it the perfect stress-free side. Bring on the vegan stuffing!!

To make easy vegan stove top stuffing: start by toasting the bread. Spread the bread cubes across two large baking sheet. Bake for about 5-8 minutes until dried out and very lightly browned.

To make the stuffing: melt the vegan butter in a large skillet or pan over medium-high heat. When melted add the carrots, celery, onion, and garlic. Sauté for about 5 minutes until the veggies soften and begin to brown.

Stir in the thyme, rosemary, sage, salt, and pepper. Then add the toasted bread cubes, vegetable broth, and dried cranberries -no need stir at this point. Remove the pan from heat and cover, then let sit for 10 – 15 minutes until softened. Once softened it will be easy to stir, so stir well to combine and serve hot
Easy Vegan Stove Top Stuffing
The perfect traditional stuffing for Thanksgiving or Christmas. Just 30 minutes and can be made ahead of time. Perfectly seasoned, fluffy, with sage, thyme, rosemary and dried cranberries.
10 slices (450g) bread of choice – I used sourdough (gluten free if preferred) (cut into 1 inch cubes)
2 tablespoons vegan butter
2 carrots, (peeled and chopped)
2 stalks celery, (chopped)
1 yellow onion, (chopped)
4 cloves garlic, (minced)
1/2 teaspoon dried thyme leaves
1/2 teaspoon dried rosemary leaves
1/2 teaspoon powdered sage
1/2 teaspoon salt
1/4 teaspoon black pepper
1 cup vegetable broth ((more if needed)*)
1/3 cup dried cranberries
To toast the bread: Preheat your oven to 400F (200C).
Spread the bread cubes across two large baking sheet. Bake for about 5-8 minutes until dried out and very lightly browned.
To make the stuffing: Melt the vegan butter in a large skillet or pan over medium-high heat. When melted add the carrots, celery, onion, and garlic. Sauté for about 5 minutes until the veggies soften and begin to brown.
Stir in the thyme, rosemary, sage, salt, and pepper. Then add the toasted bread cubes, vegetable broth, and dried cranberries -no need stir at this point. Remove the pan from heat and cover, then let sit for 10 – 15 minutes until softened. Once softened it will be easy to stir, so stir well to combine and serve hot. *I find some types of bread are more absorbent than others so if 1 cup of vegetable broth was not enough to reach desired texture, add a splash more, cover and let sit again until desired texture is reached.
This stuffing can also be made ahead and reheated with a splash more vegetable broth as needed, making it the perfect stress-free side.
Bon appetegan!
Sam.
This post Easy Vegan Stove Top Stuffing appeared first on It Doesn't Taste Like Chicken
November 4, 2018
45 Vegan Holiday Potluck Recipes
Today I’ve rounded up 45 Vegan Holiday Potluck Recipes to get you through this holiday season with a smile on your face and a happy belly! The holiday season is upon us and whether you are celebrating Thanksgiving, Christmas, or any other occasion, it’s great to have a handy-dandy list of scrumptious vegan dishes you can bring along with you. I’ve collected recipes from my blogging friends across the net and included everything from appetizers, salads, sides, mains, and desserts! This year, the holiday season will be a breeze! (A delicious breeze).

Just click on the photo or the title of the dish to take you directly to the vegan holiday potluck recipe.
Appetizers:

Veggies Don’t Bite: ROASTED CARROT WHITE BEAN HUMMUS

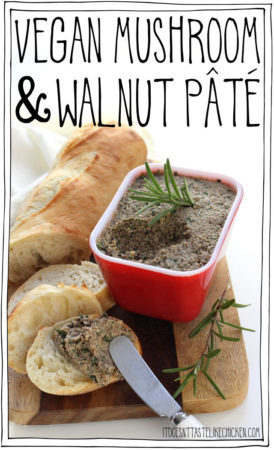
It Doesn’t Taste Like Chicken (that’s me!): Vegan Mushroom & Walnut Pâté

Vegan Heaven: EASY PUMPKIN HUMMUS

Brand New Vegan: EASY DEVILED POTATOES

Karissa’s Vegan Kitchen: CREAMY HOT BROCCOLI DIP
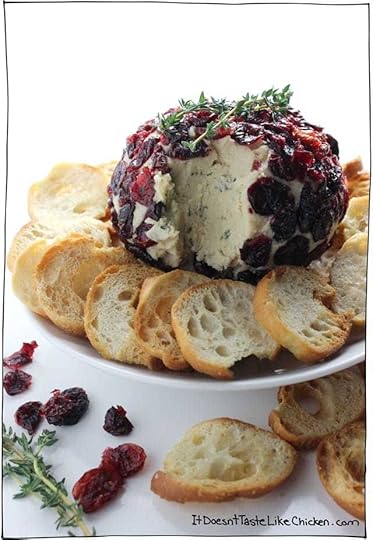
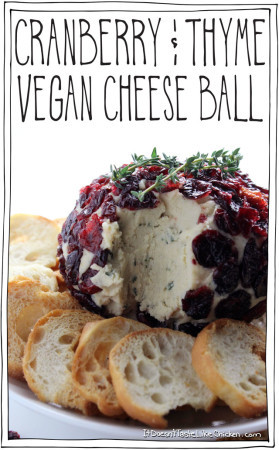
It Doesn’t Taste Like Chicken (that’s me!): Cranberry & Thyme Vegan Cheese Ball

Minimalist Baker: CHICKPEA SHAWARMA DIP

The Baking Fairy: GARLIC-STUFFED OLIVES IN A BLANKET
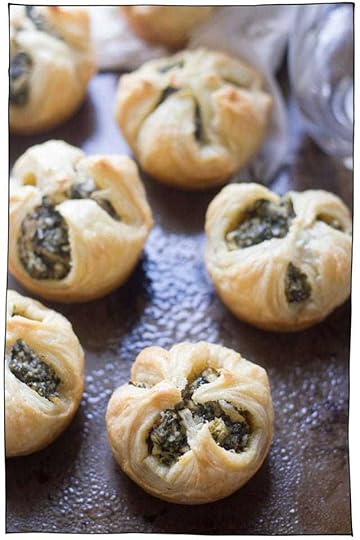
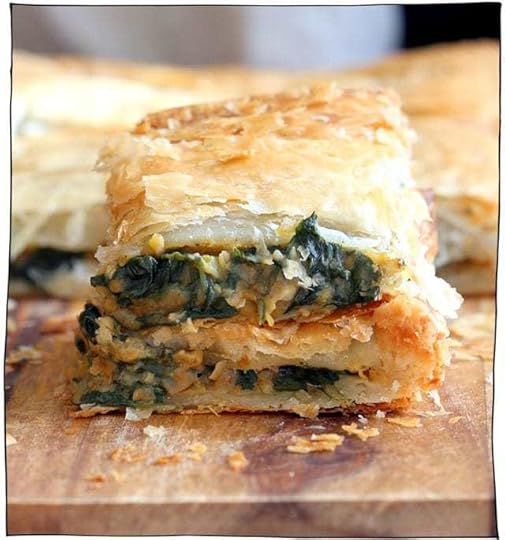
Connoisseurus Veg: VEGAN SPINACH PUFFS

It Doesn’t Taste Like Chicken (that’s me!): How to make a vegan snack board
Salads:

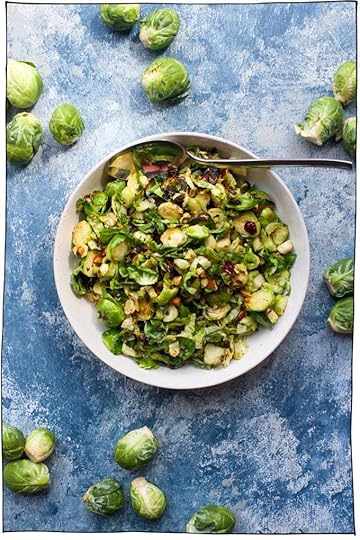
Vegan Yack Attack: Brussels Sprout Butternut Squash Salad with Creamy Dressing
Champagne Taste: SHAVED BRUSSELS SPROUTS SALAD
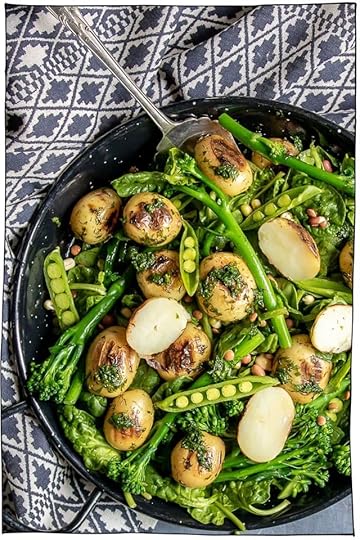
Running on Real Food: FALL HARVEST SALAD WITH MAPLE TAHINI DRESSING
Veggie Desserts: THE BEST BROCCOLI SALAD WITH POTATOES AND HERBS

Rabbit and Wolves: Vegan Fall Pasta Salad

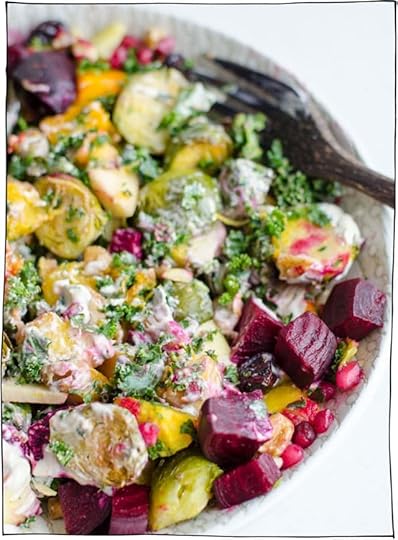
Girl Heart Food: HARVEST WILD RICE SALAD
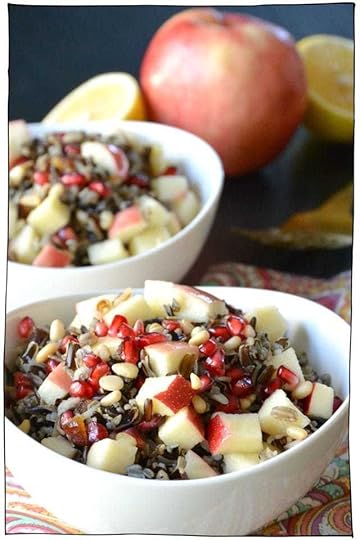
Veggies Save the Day: WILD RICE SALAD WITH APPLE AND POMEGRANATE
SIDES:

This Healthy Kitchen: Creamy Autumn Soup w/ Squash & Pumpkin

Vegan Heaven: FESTIVE VEGAN FALAFEL WITH CRANBERRY PEAR DIP

It Doesn’t Taste Like Chicken (that’s me!): Creamy Vegan Coconut Potatoes

Contentedness Cooking: MASHED CAULIFLOWER GREEN BEAN CASSEROLE

Vegan Huggs: CHEESY VEGAN CAULIFLOWER CASSEROLE

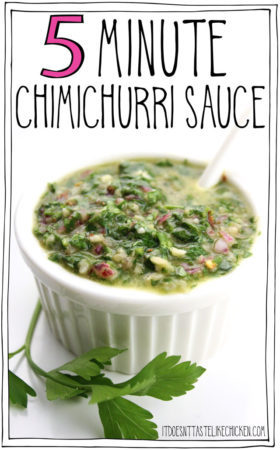
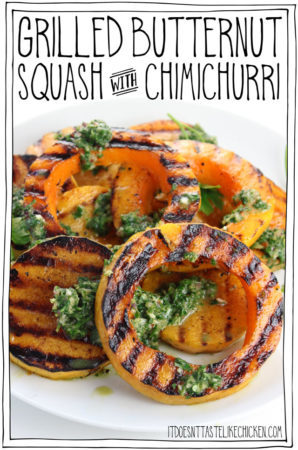
It Doesn’t Taste Like Chicken (that’s me!): Grilled Butternut Squash with Chimichurri

Catching seeds: WHOLE ROASTED CARROTS WITH MAPLE TAHINI
Vegan Richa: CHICKPEA SPINACH PIE WITH BERBERE SPICE
Mains:

Delicious everyday: vegan mushroom wellington recipe

The Veg Space: GRÖNSAKSBULLAR (SWEDISH VEGAN MEATBALLS)

Yummy mummy kitchen: THE BEST VEGAN LASAGNA RECIPE

Veganosity: SMOKY SOUTHERN-STYLE MEATLESS MEATLOAF
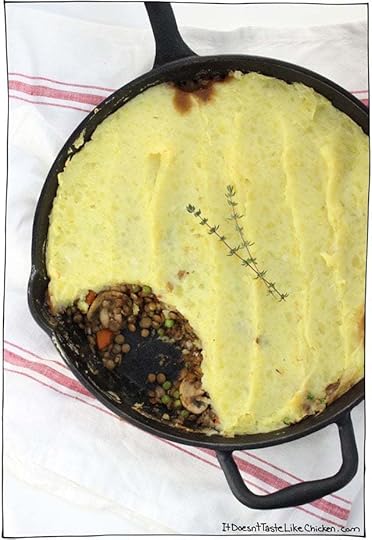
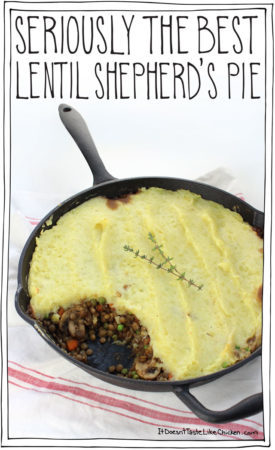
It Doesn’t Taste Like Chicken (that’s me!): Seriously the best lentil shepherd’s pie
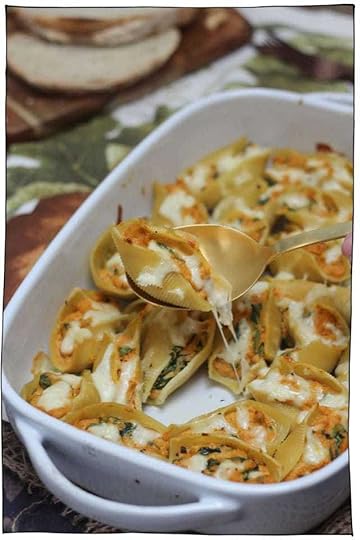
Abbey’s Kitchen: VEGAN STUFFED BUTTERNUT SQUASH SHELLS WITH SAGE CASHEW CREAM SAUCE

Occasionally eggs: vegan holiday pie with hot water pastry
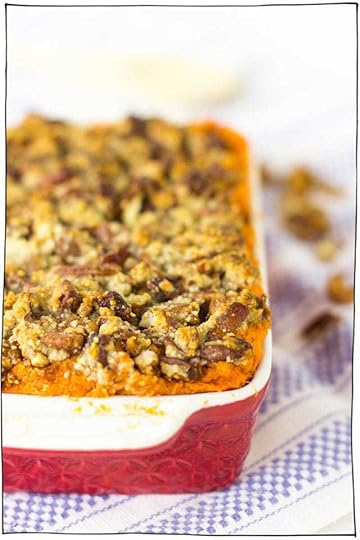
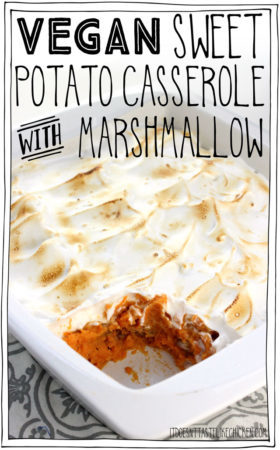
Jessica in the kitchen: Vegan Sweet Potato Casserole with Maple Pecan Topping

It Doesn’t Taste Like Chicken (that’s me!): Classic Vegan Baked Ziti

Oh my veggies: Creamy Wild Rice Mushroom Casserole
Desserts:

Vegan Yack Attack: Apple Pie Cinnamon Cupcakes
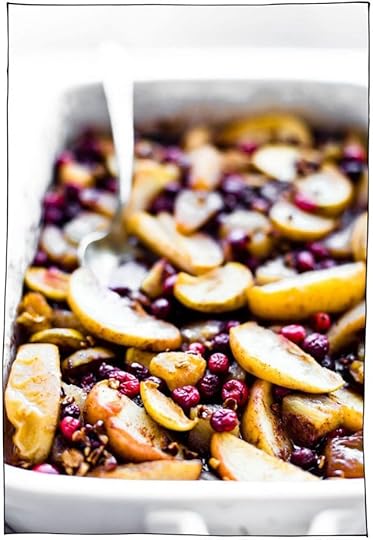
Cotter crunch: Easy Spiced Hot Fruit Bake

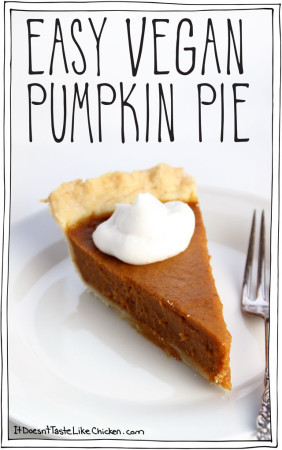
It Doesn’t Taste Like Chicken (that’s me!): Easy Vegan Pumpkin Pie

Rabbit and Wolves: Vegan Apple Pie Bread
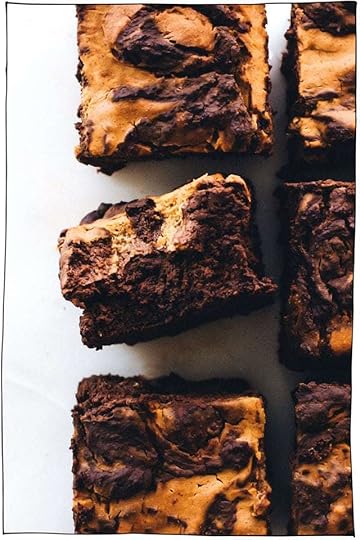
Feasting on fruit: VEGAN PUMPKIN SWIRL BROWNIES

It Doesn’t taste like chicken (that’s me!): Vegan cranberry pistachio loaf

A Virtual Vegan: Cranberry Apple Pear Vegan Crumble

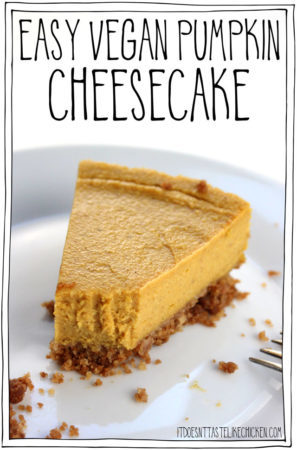
It Doesn’t taste like chicken (that’s me!): Easy vegan pumpkin cheesecake

My Goodness Kitchen: no-bake peanut butter chocolate oat squares | 4-ingredients

Happy Healthy Mama: Vegan salted caramel apple pie bars

It Doesn’t Taste Like Chicken (that’s me!): Easy vegan butter tarts
This post 45 Vegan Holiday Potluck Recipes appeared first on It Doesn't Taste Like Chicken
Sam Turnbull's Blog

- Sam Turnbull's profile
- 35 followers

