
Sam Turnbull's Blog, page 40
March 31, 2019
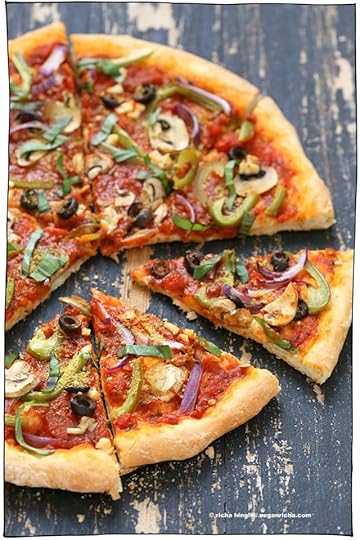
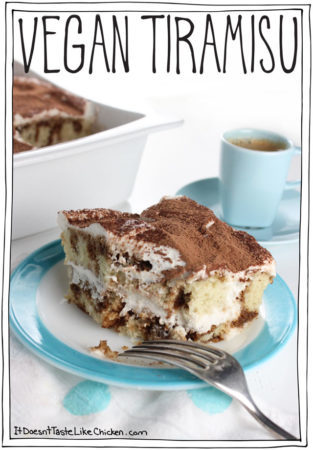
25 of the Best Vegan Pizza Recipes!
25 of the Best Vegan Pizza recipes coming at you! Whether you prefer classic toppings such as melty vegan cheeses, tomato sauces, and basil, or you’re into more adventurous pizza toppings like nacho pizza, coconut pizza, jalapeno popper pizza, and breakfast pizza, I’ve got the best vegan pizza recipes on the net for you right here.
Sure, delivery is fine, but it’s so much more fun to make your own vegan pizzas so you can really go adventurous with the toppings. If you’re up for making your own pizza dough, my favourite recipe is in my cookbook, then just top to your heart’s content! You can follow any of these recipes exactly, or feel free to be inspired by the recipes and have a DIY pizza assembly station where everyone can make their own pizzas and top them how they choose.

Check out all of the glorious vegan pizzas below. To view the full recipe click on the picture of the pizza you like or the title of the recipe, to take you to the full recipe write up. Some pizzas are my own recipes, but many are from amazing food bloggers across the net. Endless vegan pizza deliciousness to discover!

My Quiet Kitchen: Vegan Stuffed Crust Pizza With Homemade Mozzarella and Herb Crust
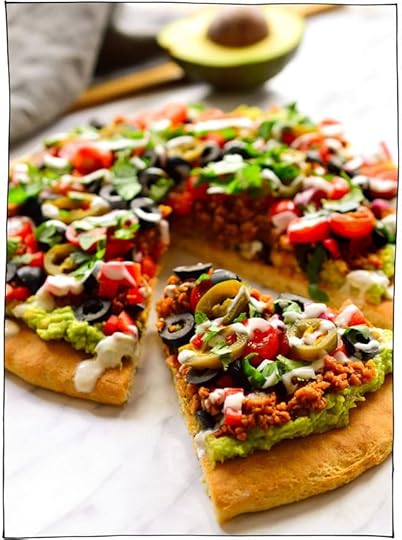
The Stingy Vegan: Vegan Nacho Pizza

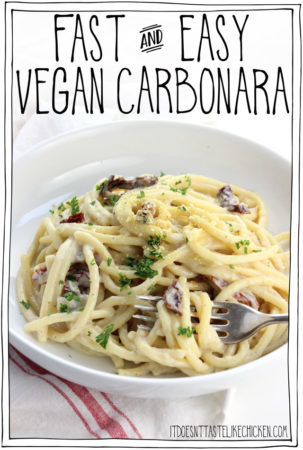
It Doesn’t Taste Like Chicken (that’s me!): Creamy Vegan Coconut Pizza
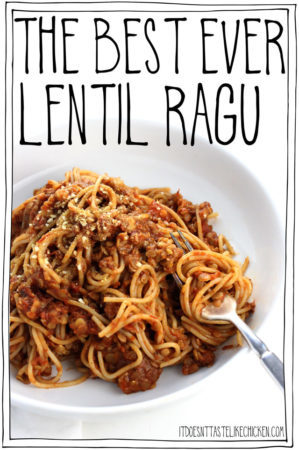
Vegan Yack Attack: Grilled BBQ Lentil Pizza

Connoisseurus Veg: Vegan Greek Pizza

Rabbit and Wolves: Vegan Jalapeno Popper Pizza
My Darling Vegan: GRILLED VEGAN PIZZA MARGHERITA

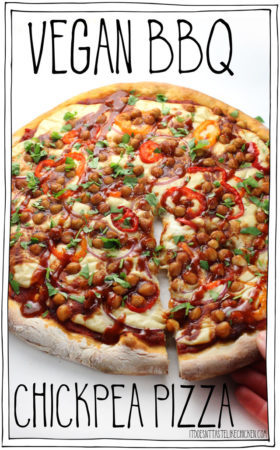
It Doesn’t Taste Like Chicken: Vegan BBQ Chickpea Pizza

Connoisseurus Veg: PINEAPPLE & SMOKY BAKED TOFU PIZZA WITH SPICY HOISIN BARBECUE SAUCE

Homemade Vegan: BBQ CAULIFLOWER PIZZA

Vegan Heaven: BBQ PIZZA WITH CRISPY CAULIFLOWER (VEGAN)

The Savory Vegan: VEGAN ROASTED CAULIFLOWER BBQ PIZZA
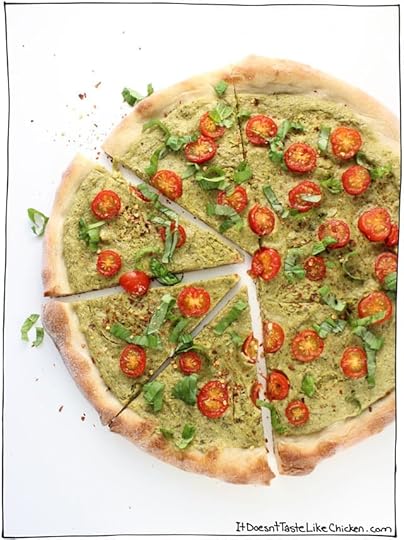
It Doesn’t Taste Like Chicken (that’s me!): Vegan Creamy Pesto Pizza

Contentedness Cooking: VEGAN PEPPERONI PIZZA

Elephantastic Vegan: Vegan Breakfast Pizza

ElaVegan: VEGAN DEEP DISH PIZZA

The Curious Chickpea: CRISPY KALE, ROASTED TOMATO, AND VEGAN CHICKEN WHITE SAUCE PIZZA
Vegan Richa: EASY VEGGIE VEGAN PIZZA

It Doesn’t Taste Like Chicken (that’s me!): Roasted Butternut Squash Pizza

The Curious Chickpea: VEGAN CARAMELIZED MUSHROOM PIZZA

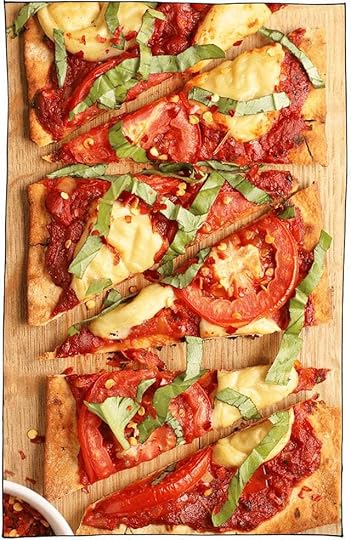
Blissful Basil: VEGAN CAPRESE PIZZA
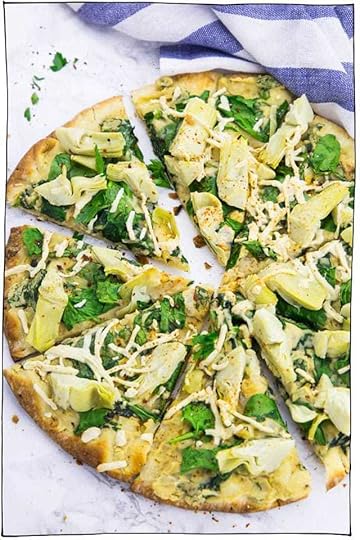
Vegan Heaven: SPINACH ARTICHOKE PIZZA (VEGAN)

Blissful Basil: SWEET POTATO PIZZA CRUST | VEGAN & GLUTEN-FREE

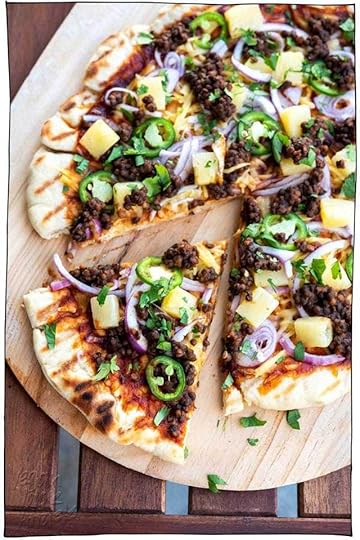
Create Mindfully: VEGAN HAWAIIAN BBQ PIZZA

Minimalist Baker: MY FAVORITE VEGAN PIZZA
Vegan pizza add-ons!


This post 25 of the Best Vegan Pizza Recipes! appeared first on It Doesn't Taste Like Chicken


March 24, 2019
The Best Vegan Lasagna Soup
I’m going to let you in on a little secret: I’ve never had lasagna soup before. It’s just not really thing I’d ever grown up with. But it’s apparently a thing that some of you have grown up with because I’ve been getting requests to veganize this recipe for some years now.
I admit it, I put it off, it just didn’t really sound super yum to me. Well, I finally decided to give it a go this week, and let me tell you, it’s actually the best. It’s THE BEST!!! Vegan lasagna soup is this marvellous combination of all my favourite things and I didn’t even realize it: pasta, tomato sauce, my beefy tofu crumbles, and melty vegan cheese, all in a bowl of pure comfort food bliss. I have totally fallen in love and this will become a new go-to meal for me. I introduce you to the best vegan lasagna soup ever! (In my opinion).

…and in my boyfriend Adam’s opinion too. He’d never had lasagna soup before either but was blown away by its scrumptiousness. We both agreed that we like vegan lasagna soup even more than actual lasagna! No for real. It’s so saucy delicious. If you are one of those people who would add extra sauce to your serving of lasagna, then this dish is for you. Adam was delighted when I told him we would be having it for dinner two nights in a row, and you know a dish has got to be really good when it’s on repeat in a cooks house!

This isn’t the quickest recipe to prepare and it’s not the shortest list of ingredients either, but every step is super easy and is totally worth the effort. I use my tofu crumbles, a technique I have used in my bolognese, chili, and tacos, so you may already be familiar with it. Then from there, it’s just a very simple tomato soup base, the pasta noodles get cooked right in the soup, and you can decorate the soup with whatever toppings you like! Vegan cheeses, fresh basil, or crushed red chili flakes.

To make the best vegan lasagna soup ever: mix the nutritional yeast, soy sauce, olive oil, chili powder, garlic powder, and liquid smoke together in a large bowl. It will make a brown paste-like texture. Crumble the block of tofu with your fingers into the bowl along with the seasoning. Mix the tofu crumbles with the seasoning making sure all of the tofu is evenly coated.
Spread the tofu crumbles evenly over the pan. Bake for 35 to 45 minutes, stopping to stir the tofu every now and then. Keep a close eye on it towards the end so that it doesn’t burn. You want the tofu to be nice and browned. The smaller crumbles will be darker than the larger crumbles, and that’s ok because it will provide a variety of texture.
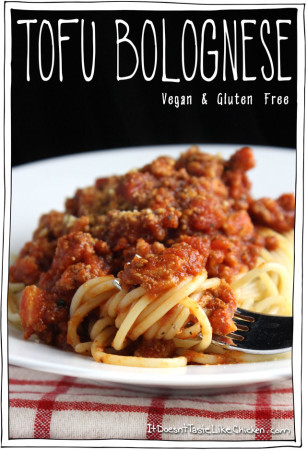
If you want to see a few more pictures on how to do this, hop over to my Tofu Bolognese recipe which uses the exact same crumbles.

In the meantime, in a large soup pot, heat the oil over medium-high heat. When hot, add the onion and garlic and sauté for about 5 minutes until the onions have turned translucent and begin to brown. Stir in 6 cups of vegetable broth, the crushed tomatoes, oregano, and basil. Bring to a simmer and cook for 10 minutes.
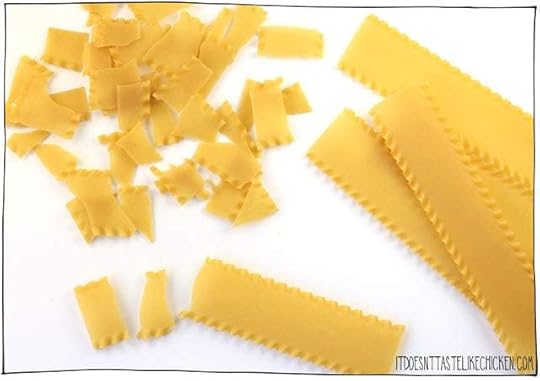
After 10 minutes, stir the broken lasagna noodles into the soup and continue to cook for 7 – 10 minutes until the noodles are al dente, stirring often so they don’t stick to each other.
*If you are using a gluten-free noodle, cook the noodles separately according to the package directions and then stir them in. Some gluten-free noodles can get kind of slimy when cooked straight in the soup.
*If you plan to prepare this soup ahead of time, I also recommend cooking the noodles separately closer to when you are ready to serve, as they will continue to get softer the longer they sit in the soup.
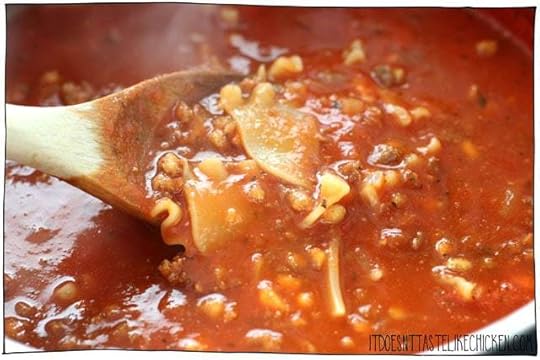
Lastly, stir in prepared tofu crumbles and cook for 1 more minute to heat through. The tofu crumbles and pasta will soak up the soup so if it gets too thick, feel free to add more vegetable broth or water as needed to reach the desired consistency. I found that I didn’t need any added salt or pepper as there was plenty in the vegetable broth I used, but of course, feel free to season to taste.
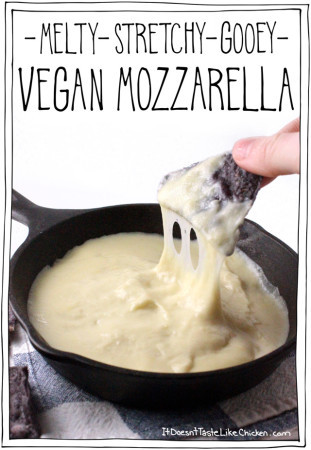
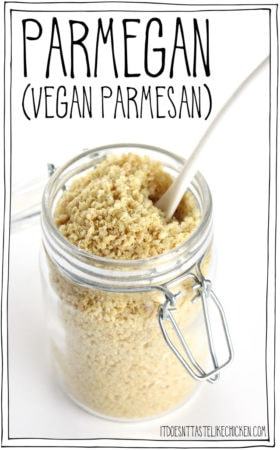
To serve, divide among bowls and garnish with toppings of choice. I topped mine with dollops of my vegan mozzarella, a sprinkle of parmegan, and fresh basil. But this vegan lasagna soup is so tasty that I have enjoyed it as is without any added toppings.

Bon appetegan!
Sam.
The Best Vegan Lasagna Soup
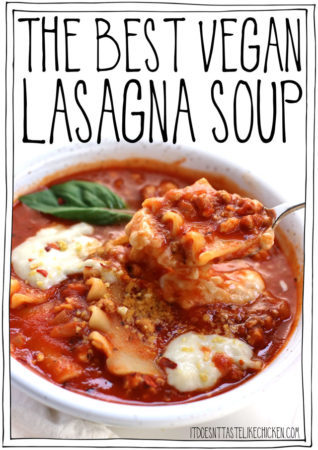
This easy to prepare soup is made with homemade beefy tofu crumbles, a simple tomato soup base, and lasagna noodles cooked right in the soup. Top with melty dairy-free cheese and fresh basil, all in a bowl of pure comfort food bliss!
For the tofu crumbles:
2 tablespoons nutritional yeast
1 tablespoon soy sauce ((gluten-free if preferred))
1 tablespoon olive oil
1 teaspoon chili powder
1/2 teaspoon garlic powder
1/4 teaspoon liquid smoke
350g block extra-firm tofu, (crumbled)
For the soup:
1 tablespoon olive oil
1 yellow onion, (chopped)
4 cloves garlic, (minced)
6 cups vegetable broth (1 1/2 litres), (plus more if needed)
1 (28oz) can crushed tomatoes (3 1/4 cups)
1 teaspoon dried oregano
1 teaspoon dried basil
10 uncooked lasagna noodles (215g), (broken into large pieces *see notes)
Optional toppings:
Melty Stretchy Gooey Vegan Mozzarella ((or store-bought vegan mozzarella))
Parmegan (vegan parmesan)
Fresh basil leaves
To make the tofu crumbles:
Preheat your oven to 350F (180C). Line with parchment paper or lightly grease a large baking sheet.
Mix the nutritional yeast, soy sauce, olive oil chili powder, garlic powder, and liquid smoke together in a large bowl. It will make a brown paste-like texture. Crumble the block of tofu with your fingers into the bowl along with the seasoning. Mix the tofu crumbles with the seasoning making sure all of the tofu is evenly coated.
Spread the tofu crumbles evenly over the pan. Bake for 35 to 45 minutes, stopping to stir the tofu every now and then. Keep a close eye on it towards the end so that it doesn’t burn. You want the tofu to be nice and browned. The smaller crumbles will be darker than the larger crumbles, and that’s ok because it will provide a variety of texture.
To make the vegan lasagna soup:
In the meantime, in a large soup pot, heat the oil over medium-high heat. When hot, add the onion and garlic and sauté for about 5 minutes until the onions have turned translucent and begin to brown. Stir in 6 cups of vegetable broth, the crushed tomatoes, oregano and basil. Bring to a simmer and cook for 10 minutes.
After 10 minutes, stir the broken lasagna noodles into the soup and continue to cook for 7 – 10 minutes until the noodles are al dente, stirring often so they don’t stick to each other. Lastly, stir in prepared tofu crumbles and cook for 1 more minute to heat through. The tofu crumbles and pasta will soak up the soup so if it gets too thick, feel free to add more vegetable broth or water as needed to reach the desired consistency. To serve, divide among bowls and garnish with toppings of choice.
If you are using a gluten-free noodle, cook the noodles separately according to the package directions and then stir them in. Some gluten-free noodles can get kind of slimy when cooked straight in the soup.
If you plan to prepare this soup ahead of time, I also recommend cooking the noodles separately closer to when you are ready to serve, as they will continue to get softer the longer they sit in the soup.

This post The Best Vegan Lasagna Soup appeared first on It Doesn't Taste Like Chicken
March 17, 2019
The Best Cashew Coffee Creamer
This past week there was a coffee creamer shortage across Canada. I have no idea why, but I sure know that I didn’t like it. My sweet creamy coffee is a daily joy for me. Black coffee is not my thing (I don’t know how you people do it). Regular non-dairy milks are too thin and sometimes even curdle when you add them to coffee… ew.
This was a problem I had to resolve immediately, and so I hit the kitchen and set to making my own coffee creamer. And then it happened. Somehow, a magical combination of morning pre-coffee haze and a toss-things-into-the-blender approach resulted in the best cashew coffee creamer ever!! No seriously, no more store-bought for me, homemade cashew coffee creamer from now on. Yassssss!!

This is legit. This cashew coffee creamer is incredibly rich and creamy, so easy to make, totally customizable to your own taste preferences, and if you are lucky enough to have a high-powered blender (such as a Blendtec, Vitamix, or Breville) you can whip this up in the time it takes to boil the kettle. So as long as you have raw cashews on hand, you will never run out of delicious coffee creamer again!
Don’t worry, if you have a regular blender that isn’t quite as strong, you can still make cashew coffee creamer too, you will just need to set some time aside for soaking cashews.

If you do own a high-powered blender, this step isn’t necessary as the blender will be powerful to make a very smooth cream without soaking. If you do not own a high-powered blender, I recommend starting by softening the cashews for the creamiest coffee creamer.
To soak the cashews: add the cashews to a bowl, and cover with water. Let soak for a minimum of 6 hours and up to 48 hours until very tender. Drain and rinse cashews before using.

Add the cashews, water, sweetener (if using), vanilla extract (if using), and salt to a blender. Blend until completely smooth and super creamy with no graininess.

The key is to blend way more than you think you need to. I blend mine for 3 – 5 minutes in my very high-powered blender to ensure maximum creaminess and no pulpiness is left. By the time I’m done the cashew cream is actually a little warm from the friction.
Pour into a bottle and store in the fridge until ready to use. That’s it! No straining needed. The cashews are a soft enough nut that they should turn into smooth creaminess and blend right in. Just give the creamer a shake before using, and stir into your coffee for dreamy perfection.

The Best Cashew Coffee Creamer

Make your own homemade non-dairy easy coffee cream recipe in just 5 minutes. Super rich and creamy. Customize to your own taste preferences for the best coffee creamer you’ll ever taste!
1 cup raw cashews, (softened if needed (see instructions))
1 1/4 – 2 cups water (*see notes)
1 – 6 tablespoons sweetener of choice- agave, maple syrup, brown sugar, white sugar, low calorie sweetener ((optional) *see notes)
1/2 – 1 teaspoon vanilla extract ((optional))
1/8 teaspoon salt
To soften the cashews (optional):
If you do own a high-powered blender, this step isn’t necessary as the blender will be powerful to make a very smooth cream without soaking. If you do not own a high-powered blender, I recommend starting by softening the cashews for the creamiest coffee creamer.
To soak the cashews: add the cashews to a bowl, and cover with water. Let soak for a minimum of 6 hours and up to 48 hours until very tender. Drain and rinse cashews before using.
To make the cashew coffee creamer:
To make the best cashew coffee creamer: Add the cashews, water, sweetener (if using), vanilla extract (if using), and salt to a blender. Blend until completely smooth and super creamy with no graininess. The key is to blend way more than you think you need to. I blend mine for 3 – 5 minutes in my very high-powered blender to ensure maximum creaminess and no pulpiness is left. By the time I’m done the cashew cream is actually a little warm from the friction.
Pour into a bottle and store in the fridge until ready to use. Always give the creamer a shake before using.
For the water: I recommend starting with 1 1/4 cups water which will make a very rich cream, and adding more water if needed to reach desired consistency.
For the flavourings: sweeteners and vanilla are optional. I recommend starting with smaller amounts of sweetener and vanilla to start as you can always add more to taste later.
My personal favourite proportions are 1 1/4 cups water, 4 tablespoons sweetener, and 1 teaspoon of vanilla extract for an extra-rich sweet French vanilla creamer.
Bonus flavours: pick different coffee syrups or extracts for endless flavour combinations. Hazelnut, chocolate mint, and peppermint all sound super delish! Just make sure to check that it’s vegan before purchasing.
*Calories are based on one serving (about 2 tablespoons) without added sugars since they can vary in calories.
Bon appetegan!
Sam.
This post The Best Cashew Coffee Creamer appeared first on It Doesn't Taste Like Chicken
March 10, 2019
3 Vegan Pizza Dips – Creamy Garlic, Spicy Marinara, and Garlic Butter
While ordering vegan pizza has gotten pretty easy these days with so many pizzerias providing dairy-free cheese options (yay!), vegan pizza dips on the other hand, are not nearly as common. Especially the creamy or buttery variety. If you don’t have vegan pizza dips whatever do you do with the crust!? I knew I must remedy this problem so I whipped up these 3 vegan pizza dipping sauces to save the day!

Super quick and easy to make with just a few ingredients each, you can make all three in the time it takes to order a pizza or cook your own! And that is exactly what I do.
No crust shall be left un-dipped!
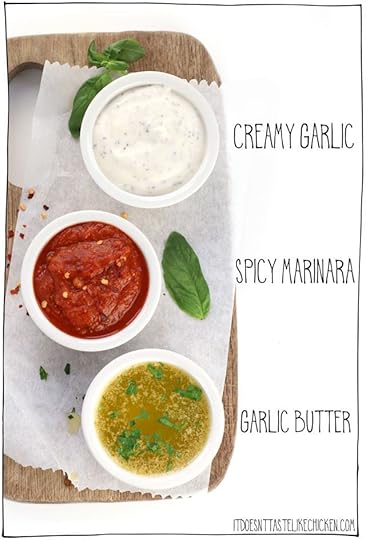
First up, vegan creamy garlic. The fan favourite for dipping your crusts. This can be whipped up in less than 5 minutes. You can use a store-bought vegan mayonnaise which is easily found in stores or online, or you can use my homemade vegan mayonnaise recipe from Fuss-Free Vegan.
Second, we have spicy marinara. I always have leftover tomato sauce somewhere in the fridge from using it as a pizza base, or from pasta nights. This is the perfect way to use up that sauce! I just give it a flavour boost for dipping perfection.
And last we have garlic butter (probably my favourite if I had to choose). Only 3 ingredients, takes 5 minutes, and if you have a handy dandy garlic press it can be even quicker!
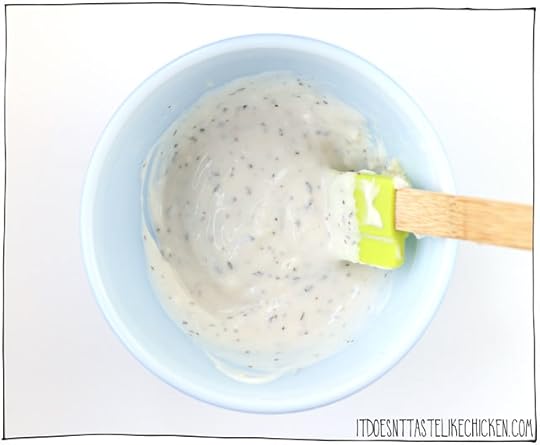
To make creamy garlic dip: mix all of the ingredients together in a small bowl. Done!

For the spicy marinara dip: if your tomato sauce is lumpy, you might want to start by using an immersion blender or small standing blender to make a smoother sauce for easier dipping. Then simply add all of the ingredients together in a small bowl and stir to combine. Optionally, you can heat it in the microwave or in a small pot on the stove before serving.

To make garlic butter: melt the vegan butter in a small saucepan over medium heat. Once melted, add the garlic and cook for 1 – 2 minutes until fragrant. Remove from heat and stir in the parsley.
Serve with pizza or breadsticks and dive in!

3 Vegan Pizza Dips – Creamy Garlic, Marinara, and Garlic Butter
Quick and easy to make with just a few ingredients each, you can make all three in the time it takes to order a pizza or cook your own!
Creamy Garlic:
1/2 cup vegan mayonnaise
2 cloves garlic, (finely minced or pressed)
1 1/2 teaspoons apple cider vinegar
1/4 teaspoon dried basil
1/4 teaspoon salt
Spicy Marinara:
1/2 cup tomato sauce, ((leftover sauce from pizza or pasta works great))
1/4 – 1/2 teaspoon crushed red chili flakes ((optional for spicy marinara))
1/2 teaspoon onion powder
1/4 teaspoon garlic powder
Garlic Butter
1/2 cup vegan butter
4 cloves garlic, (minced or pressed)
2 teaspoons fresh parsley, (chopped)
For the Creamy Garlic:
Mix all of the ingredients together in a small bowl.
For the Spicy Marinara:
Optionally, if your tomato sauce is lumpy, you might want to start by using an immersion blender or small standing blender to make a smoother sauce for easier dipping. Then simply add all of the ingredients together in a small bowl and stir to combine. If you prefer a hot marinara, heat it in the microwave or in a small pot on the stove before serving.
For the Garlic Butter:
Melt the vegan butter in a small saucepan over medium heat. Once melted, add the garlic and cook for 1 – 2 minutes until fragrant. Remove from heat and stir in the parsley.
*2 tablespoons of the creamy garlic is 182 calories. 2 tablespoons of spicy marinara is 8 calories. 2 tablespoons of garlic butter is 169 calories.
Bon appetegan!
Sam.

This post 3 Vegan Pizza Dips – Creamy Garlic, Spicy Marinara, and Garlic Butter appeared first on It Doesn't Taste Like Chicken
March 3, 2019
Easy Vegan Seitan Pepperoni
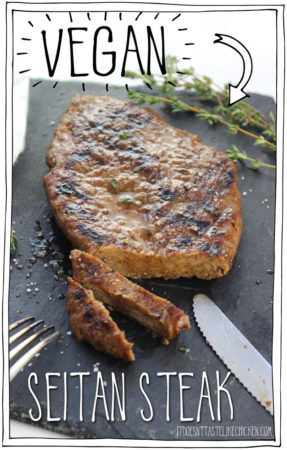
I’ve been on a seitan roll!!! First with my vegan seitan steaks, then my seitan tenders, followed by sticky garlic & buffalo seitan bites. It took me a while and a whole lot (like a really a whole lot… (like I’m talking years)) of recipe testing before I got the hang of making my own seitan. But now that I’ve nailed the technique, I just can’t stop making vegan meaty deliciousness! Luckily, you guys seem to be loving it too, as my steak recipe has become one of my most popular recipes on the blog, and the tenders are quickly catching up. All hail seitan!

Next up, my Easy Vegan Seitan Pepperoni recipe. I had a craving for a classic pepperoni pizza, and normally my go to would be my Smoky Sun-Dried Tomato Pizza in Fuss-Free Vegan cookbook, which is a super easy recipe where the sun-dried tomatoes are soaked in a marinade to make them taste like pepperoni. Perfect for if you are gluten-free or for a quick vegan pepperoni hack. But for a classic pepperoni taste, texture, and look, it was time to make vegan seitan pepperoni.

This recipe is my easiest seitan recipe yet, no food processor involved and no need to marinade. Just mix everything together in a bowl, roll up in foil, steam, cool, and enjoy! This can be made ahead of time and stored in the fridge for up to two weeks, or freeze them to save for another time.
It’s sensational on a pizza, but it’s also great to enjoy as a snack on a vegan cheese board or even just with some crackers.
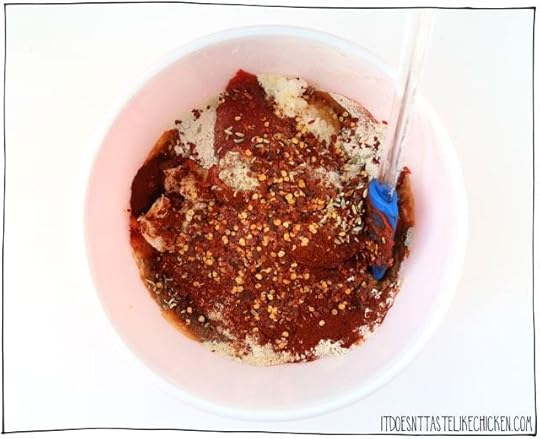
To make easy vegan seitan pepperoni: mix together all of the ingredients in a large bowl.
This recipe makes 2 vegan pepperoni logs, but feel free to half or multiply the recipe as needed to make however many pepperoni logs you like!

Once the mixture starts to come together, finish mixing by hand, kneading the dough for 2 – 3 minutes to make sure it’s combined well. Kneading will also make the seitan have a chewier texture which works well with this pepperoni recipe.

Divide the dough into two pieces then roll the dough pieces into two logs about 6 inches long each. Roll each log up loosely in a piece of aluminum foil then twist the ends closed.
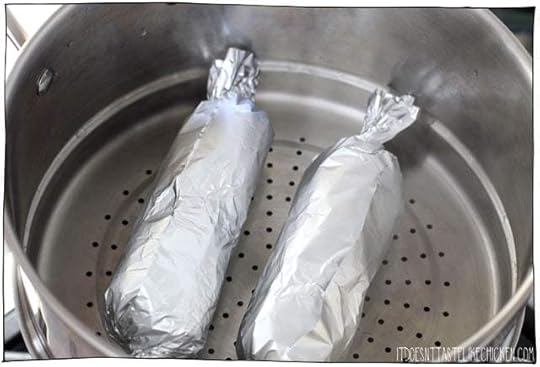
Add several inches of water to a large pot with a steamer basket and bring to a boil. Steam for 30 minutes. Oil may release during steaming and appear in the steamer basket and water, and that’s ok. After 30 minutes, remove the logs from the steamer and allow to cool completely in the fridge. The logs will have puffed up in the foil and become tight. Once cooled, remove the foil and they are ready to slice and enjoy as you like!

This vegan pepperoni works great on a pizza or served on a snack board.

Easy Vegan Seitan Pepperoni
Perfect to top your pizza. It’s surprisingly easy to make, tastes way better than store-bought. Can be stored in the fridge or freezer so you have it on hand whenever you need vegan pepperoni.
Recipe adapted from my Vegan Seitan Steaks, but shout out goes to The Easy Vegan‘s version for the funniest video.
1 1/2 cups vital wheat gluten
1/3 cup tomato paste
1/3 cup soy sauce
1/4 cup refined coconut oil, (cooled so that it's solid)
1/4 cup water
1 tablespoon whole fennel seeds
1 tablespoon garlic powder
1 tablespoon smoked paprika
2 teaspoon crushed red pepper flakes ((reduce or omit for less spice))
Add several inches of water to a large pot with a steamer basket and bring to a boil.
In the meantime, mix together all of the ingredients in a large bowl. Once the mixture starts to come together, finish mixing by hand, kneading the dough for 2 – 3 minutes to make sure it’s combined well. Kneading the seitan will also give the vegan pepperoni a chewier texture.
Divide the dough into two pieces then roll the dough pieces into two logs about 6 inches long each. Roll each log up loosely in a piece of aluminum foil then twist the ends closed. Steam for 30 minutes. Oil may release during steaming and appear in the steamer basket and water, and that’s ok. After 30 minutes, remove the logs from the steamer and allow to cool completely in the fridge. The logs will have puffed up in the foil and become tight. Once cooled, remove the foil and they are ready to slice and enjoy as you like.
*The coconut oil should be solid to make this recipe and get the best texture. To make sure your coconut oil is solid, store it in a cool place or the fridge. If needed you can replace the coconut oil for olive oil. If you use olive oil, omit the water. The olive oil pepperoni will have a grainier texture but will still taste good.
*Make these pepperoni’s ahead and store them in the fridge for up to 2 weeks or in the freezer for longer.
*If you prefer, you can wrap the logs in parchment paper before wrapping them in the foil.
*666 calories are for 1 whole log of pepperoni.
Bon appetegan!
Sam.
This post Easy Vegan Seitan Pepperoni appeared first on It Doesn't Taste Like Chicken
February 24, 2019
Easy Vegan Caramel Corn
Popcorn is by far one of my most favourite treats. I love it plain with just vegan butter and salt. Sometimes I add a pinch (ok fistful) of nutritional yeast. Occasionally I go fancy with my rosemary and lemon popcorn, and other times I’m all about my sweet and salty peanut butter popcorn recipe. Today, inspired by the Oscars, I wanted to make golden easy vegan caramel corn!
Caramel = liquid gold.
Popcorn = addictive snack.
Caramel + popcorn = sweet crispy bliss.

Crunchy, candied popcorn with a pinch of salt, this easy vegan caramel corn is so incredibly tasty that I may or may not have eaten an entire batch myself. Sorry/ not sorry.
I’ll be enjoying this vegan caramel corn during the Academy Awards, but you could also put it in a nice container for a fantastic homemade gift, or save it for yourself for a scrumptious snack.
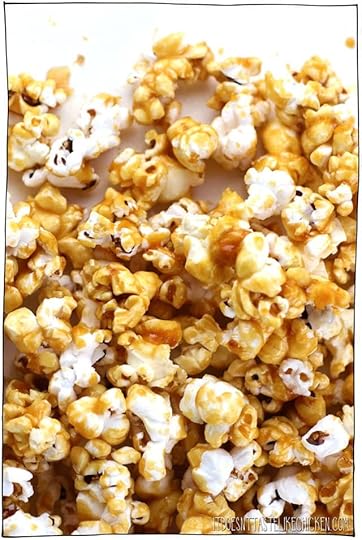
I like my caramel corn mostly coated with caramel but with a few pieces that have less caramel on them which, to me, is the perfect balance of sweet, (as seen in the photo above). But if you prefer your caramel corn heavily coated, you can double the caramel sauce while keeping the popcorn amount the same for some seriously candy coated corn.
This recipe is surprisingly easy to make. It does take some time to make, a little over 1 hour, but it should stay crisp for up to a week when kept in an airtight container or sealable bag, so it’s great for a make-ahead treat.
To make Easy Vegan Caramel Corn: pop the popcorn in an air popper, or pop with whatever method you normally use (stove top or in the microwave works fine too). Spread the popcorn over the baking sheets. Pick out and discard any unpopped kernels.
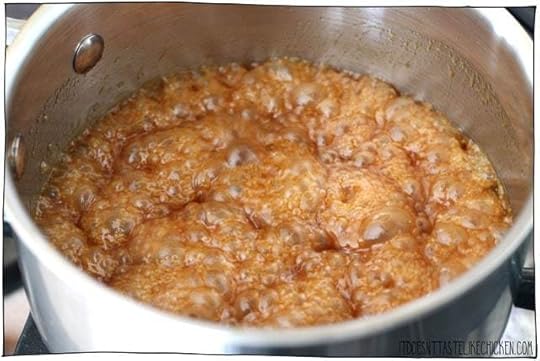
In a small saucepan, mix together the brown sugar, vegan butter, agave, salt, and cream of tartar. Put over medium heat and once you reach a foamy boil (as seen above), cook for 1 to 2 minutes longer, stirring often with a non-stick spatula, being careful not to burn the sugar. Remove from heat and stir in the baking soda. The caramel will get lighter in colour and become very foamy. (The photo above is before adding the baking soda).

Pour the caramel over the popcorn, then stir the popcorn to coat. It’s ok if the caramel isn’t evenly distributed yet, you can continue to mix it as it bakes.
Bake to popcorn for 1 hour, stopping to stir every 20 minutes to help evenly coat the popcorn. Let cool on the baking sheet, then break apart and store in an airtight container. It should stay fresh for up to a week… but I doubt you can resist it that long.
February 17, 2019
Cheesy Vegan Garlic Bread
Health food? Nah. Amazing gooey vegan cheese on top of crispy on the outside, tender in the middle fluffy bread, smothered with garlic infused butter? YES!
Cheesy Vegan Garlic Bread is happening right now, and I’m happy about it. VERY happy about it.

I used my Melty Stretchy Gooey Vegan Mozzarella recipe to top this loaf in vegan cheese yumminess, but if you prefer a classic vegan garlic bread, simply omit the cheese. It’s fantastic either way, and will be devoured immediately.

To foil or not to foil? I prefer baking my garlic bread without foil which results in a crispy crust on the outside and fluffy bread on the inside. If you prefer bread that soft all the way through then you can cover the pan in foil before baking, making sure to leave a bit of space so the foil doesn’t stick to the cheese.

This cheesy vegan garlic bread pairs perfectly with soups, chili, and of course with your favourite pasta. I like to have it prepped with the oven preheated and ready to go, Then when there is about 12 minutes left of cooking time on the pasta, I pop it in the oven so that they are both ready to serve at the same time.

To make cheesy vegan garlic bread: in a small bowl, mix together the vegan butter, garlic, parsley, and salt.

Spread the butter evenly over the surface of each loaf half. For cheesy vegan garlic bread, divide the Melty Stretchy Goeey Vegan Mozzarella evenly among the two loaf halves and spread the cheese. It’s ok if it isn’t perfect, it will be easier to spread once baked a little.
This time, I decided to do one half covered in vegan cheese, and the other half as classic garlic bread without the cheese.
Bake uncovered for 10 minutes. If needed you can use a knife or spoon to spread the cheese a little more after baking. You can optionally brown the cheese by turning your oven to broil, and placing it under the broiler for 1 – 2 minutes. Keep a close eye on it so it doesn’t burn. There is no need to broil the classic cheeseless version. Slice into strips and serve alongside your favourite pasta, or soup, or chili.

Cheesy Vegan Garlic Bread
This dairy-free garlic bread is quick and easy to make. Smothered in a homemade vegan cheese, perfect paired with your favourite Italian pasta dish. There’s also an option for classic garlic bread (without cheese).
6 tablespoons vegan butter, (softened if needed)
6 cloves garlic, (minced or pressed)
2 tablespoons fresh parsley, (finely chopped )
1/4 teaspoon salt ((or to taste))
1 loaf French bread or similar loaf, (cut in half lengthwise (gluten-free if preferred) )
1 batch Melty Stretchy Gooey Vegan Mozzarella (or sub 1 1/2 cups store-bought vegan cheese (optional for cheesy garlic bread))
Preheat your oven to 350F (180C).
In a small bowl, mix together the vegan butter, garlic, parsley, and salt. Spread the butter evenly over the surface of each loaf half. For classic garlic bread without the cheese, skip to the baking step. For cheesy vegan garlic bread, divide the Melty Stretchy Goeey Vegan Mozzarella evenly among the two loaf halves and spread the cheese. It’s ok if it isn’t perfect, it will be easier to spread once baked a little.
Bake uncovered for 10 minutes. If needed you can use a knife or spoon to spread the cheese a little more after baking. You can optionally brown the cheese by turning your oven to broil, and placing it under the broiler for 1 – 2 minutes. Keep a close eye on it so it doesn’t burn. There is no need to broil the classic cheeseless version. Slice into strips and serve alongside your favourite pasta, or soup, or chili.
To foil or not to foil? I prefer baking my garlic bread without foil which results in a crispy crust on the outside and fluffy bread on the inside. If you prefer bread that soft all the way through then you can cover the pan in foil before baking, making sure to leave a bit of space so the foil doesn’t stick to the cheese.
Bon appetegan!
Sam.
This post Cheesy Vegan Garlic Bread appeared first on It Doesn't Taste Like Chicken
February 10, 2019
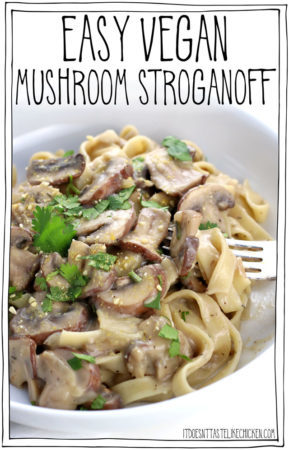
Easy Vegan Mushroom Stroganoff
Hot pasta + tender and juicy mushrooms + creamy vegan sauce = February comfort food heaven.
Am I right!? I’m right. This Easy Vegan Mushroom Stroganoff is the belly-warming goodness that I need in this fridged February weather. (Currently typing away during yet another severe weather warning in Toronto). But this vegan mushroom stroganoff makes everything feel a-ok.

I come up with this recipe when I had nothing left in the fridge but mushrooms. I certainly was not going to brave the ice storm to go get more groceries, so I took to the pantry to see what I could cook up for dinner. Well, let me tell you, this decadent pasta was just what I needed to combat ice storm woes. It’s every bit as rich and luscious as it looks, but of course, in my most favourite style of cooking, it’s super easy to make too and only takes 25 minutes. Yas!

Whether you want to make this for a special occasion (Valentine’s day is just around the corner) or you want to make this for some serious binge TV watching, this easy vegan mushroom stroganoff will be the perfect warming dish.

To make easy vegan mushroom stroganoff: bring a large pot of water to a boil and cook the pasta according to package directions. Traditionally, stroganoff is served over egg noodles which aren’t vegan, so I just subbed for an egg-free pasta noodle. Today I used tagliatelle. You could alternatively serve this over rice.
In a large measuring cup or medium bowl whisk together the vegetable broth, non-dairy milk, flour, dried thyme, salt, and pepper. Set aside.

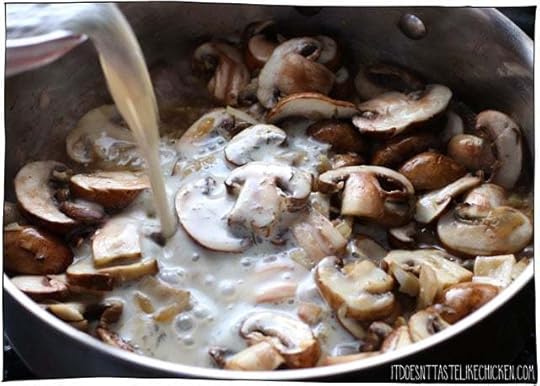
Melt the vegan butter in a large skillet or pot. When hot add the onion and garlic and sauté for about 5 minutes until the onion turns translucent and begins to brown. Reduce the heat to medium and add the mushrooms.

Continue to cook for about 5 minutes until the mushrooms have softened and begin to release their juices.
Pour in the broth and non-dairy milk mixture and continue to cook, stirring as needed for about 3 to 5 minutes until the sauce thickens.

If the sauce gets too thick, add more vegetable broth or water if needed to thin. If the sauce is too thin, simply cook a little longer until you reach desired consistency.
Add in the cooked pasta and toss well to combine. Divide among plates and serve, garnishing with parsley and Parmegan to taste.

Easy Vegan Mushroom Stroganoff
This comfort food recipe only takes 25 minutes to make. Perfectly creamy and luscious all while being dairy-free with a gluten-free option. Serve over pasta or rice.
For the vegan mushroom stroganoff:
250 g pasta of choice, ((check to make sure it's vegan, use gluten-free if preferred))
1 cup vegetable broth ((plus more if needed))
1 cup non-dairy milk, ((such as soy or almond))
1/4 cup all-purpose flour ((use gluten-free if preferred))
1 teaspoon dried thyme leaves
1 teaspoon salt
1/4 teaspoon black pepper
2 tablespoons vegan butter ((sub olive oil if preferred) )
1 yellow onion, (chopped)
4 cloves garlic, (minced)
454 g brown or white button mushrooms (, sliced (about 6 cups sliced))
For garnish:
1 handful fresh parsley, (roughly chopped)
Parmegan (vegan parmesan)
Bring a large pot of water to a boil and cook the pasta according to package directions.
In a large measuring cup or medium bowl whisk together the vegetable broth, non-dairy milk, flour, dried thyme, salt, and pepper. Set aside.
Melt the vegan butter in a large skillet or pot. When hot add the onion and garlic and sauté for about 5 minutes until the onion turns translucent and begins to brown. Reduce the heat to medium and add the mushrooms. Continue to cook for about 5 minutes until the mushrooms have softened and begin to release their juices.
Pour in the broth and non-dairy milk mixture and continue to cook, stirring as needed for about 3 to 5 minutes until the sauce thickens. If the sauce gets too thick, add more vegetable broth or water if needed to thin. If the sauce is too thin, simply cook a little longer until you reach desired consistency.
Add in the cooked pasta and toss well to combine. Divide among plates and serve, garnishing with parsley and Parmegan to taste.
Traditionally stroganoff is served over egg noodles which aren’t vegan, so I just subbed for an egg-free pasta noodle. Today I used tagliatelle. You could alternatively serve this over rice.
Bon appetegan!
Sam.
This post Easy Vegan Mushroom Stroganoff appeared first on It Doesn't Taste Like Chicken
February 3, 2019
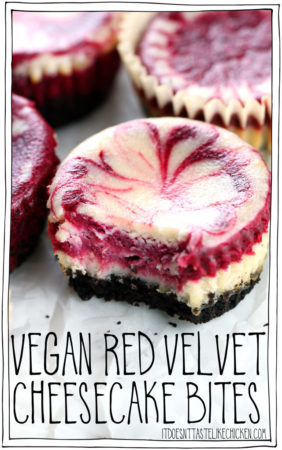
Vegan Red Velvet Cheesecake Bites
So pretty, so swirly, so creamy, so decadent, so surprisingly easy to make. These vegan red velvet cheesecake bites look fancy pantsy, and while they do have a few steps to make them, I assure you that each and every step is easy to do. These make the perfect Valentine’s day gift or special occasion treat.

The buttery chocolate cookie crumb crust is topped with swirls of lemon vegan cheesecake and rich red velvet vegan cheesecake. It’s so cool how these bites have the same texture as classic cheesecake but the base is made simply from raw cashews and coconut milk. No weird ingredients!

Make these ahead of time, let them set in the fridge and then serve when ready. Be prepared for applause and to take a bow!

To make vegan red velvet cheesecake bites: crumble the chocolate wafer cookies in a food processor, blender, or by placing them in a sealable bag and crushing them with a rolling pin.
In a medium bowl mix together the cookie crumbs with the melted vegan butter. Divide evenly among the cupcake liners then use your spoon or the bottom glass to firmly pack the crumbs down. Bake for 5 minutes then remove from the oven.

Add the softened cashews, sugar, cornstarch, apple cider vinegar, vanilla extract, and salt to a blender. Blend until the mixture is completely smooth, stopping to scrape the sides as needed. Divide the cheesecake base evenly among two bowls.
For the lemon swirl: in one bowl add the lemon zest and lemon juice. Stir to combine.
For the red velvet swirl: add the cocoa powder and red food colouring to the remaining bowl and mix well. You may need more or less food colouring depending on the intensity of your food colouring, and the desired colour.

To assemble the cheesecake bites: spoon some of the lemon swirl onto the chocolate crusts. Follow with a spoonful of the red velvet swirl. Alternate between the two colours until the cupcake liner is almost full, dividing the cheesecake among all the liners evenly.

For the final touch, use a toothpick to swirl the top layers of colours together in any design you like.

To bake the cheesecakes: bake for 23 – 26 minutes until the cheesecakes are puffy and may have cracked a little. Let cool at room temperature- they will fall a bit as they cool. Finish by letting them cool completely in the fridge to set, minimum 30 minutes.

Vegan Red Velvet Cheesecake Bites
Swirls of lemon and red velvet cheesecake with a chocolate crumb crust. Easy to make, and no weird ingredients! Perfect for Valentine’s day or a special occasion.
For the chocolate crust:
1 1/2 cup crushed chocolate wafer cookies, ((check to make sure they are vegan))
1/4 cup vegan butter, (melted)
For the vegan cheesecake base:
1 1/2 cups raw cashews, (softened (see below))
1 cup full-fat coconut milk
3/4 cup white sugar
2 tablespoon cornstarch
2 teaspoon apple cider vinegar
1 teaspoon vanilla extract
1/4 teaspoon salt
For the lemon swirl:
1 lemon zested
1 1/2 tablespoons lemon juice
For the red velvet swirl:
1 tablespoon cocoa powder
1 tablespoon vegan red food colouring
For the chocolate crust:
Preheat your oven to 350F (180C). Line a muffin baking pan with 12 cupcake liners, or lightly grease it.
Crumble the chocolate wafer cookies in a food processor, blender, or by placing them in a sealable bag and crushing them with a rolling pin. In a medium bowl mix together the cookie crumbs with the melted vegan butter. Divide evenly among the cupcake liners then use your spoon or the bottom glass to firmly pack the crumbs down. Bake for 5 minutes then remove from the oven.
For the vegan cheesecake:
To soften the cashews: you can either boil or soak the cashews. To boil the cashews (the fast method): add the cashews to a small pot, cover with water, and boil for about 10 minutes until the cashews are very tender. To soak the cashews: add the cashews to a bowl, and cover with water. Let soak for 4 hours or overnight until tender. Drain and rinse cashews before using.
Add the cashews, sugar, cornstarch, apple cider vinegar, vanilla extract, and salt to a blender. Blend until the mixture is completely smooth, stopping to scrape the sides as needed. Divide the cheesecake base evenly amoung two bowls.
For the lemon swirl: in one bowl add the lemon zest and lemon juice. Stir to combine. For the red velvet swirl: add the cocoa powder and red food colouring to the remaining bowl and mix well. You may need more or less food colouring depending on the intensity of your food colouring, and the desired colour.
To assemble the cheesecake bites: spoon some of the lemon swirl onto the chocolate crusts. Follow with a spoonful of the red velvet swirl. Alternate between the two colours until the cupcake liner is almost full, dividing the all the cheesecake among all the liners evenly. For the final touch, use a toothpick to swirl the top layers of colours together in any design you like.
To bake the cheesecakes: bake for 23 – 26 minutes until the cheesecakes are puffy and may have cracked a little. Let cool at room temperature- they will fall a bit as they cool. Finish by letting them cool completely in the fridge to set, minimum 30 minutes.
Bon appetegan!
Sam.


This post Vegan Red Velvet Cheesecake Bites appeared first on It Doesn't Taste Like Chicken
January 27, 2019
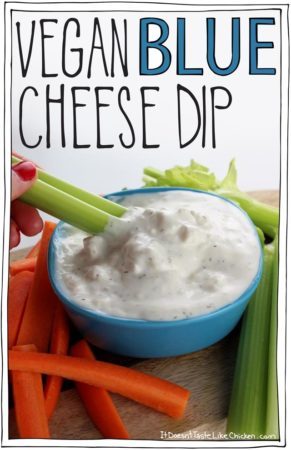
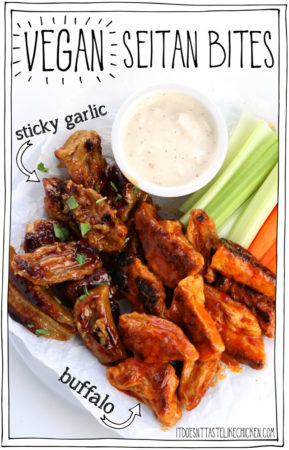
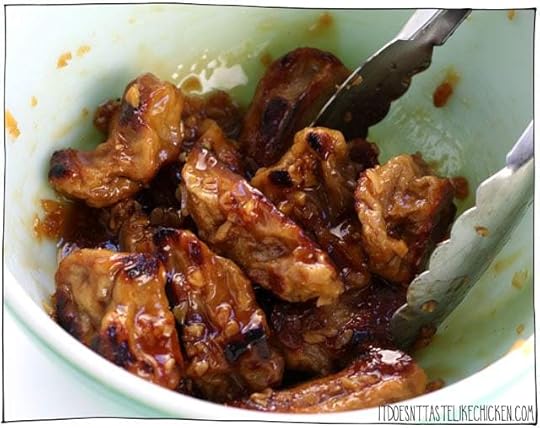
Vegan Seitan Bites – Sticky Garlic & Buffalo
Just a reminder that all of my recipes are always 100% vegan, just in case I scared you a little with that picture. Because hot dang those vegan seitan bites are looking a whole lot like chicken wings. Fear not, no chickens were harmed in the making of these vegan chicken wings. But they sure are sauce drippingly, sticky finger, scrumptious nibbles with vegan blue cheese dip for dunking those seitan bites in. Ooooh yeah, this is some quality bar food right here.

Coming at you in two flavours: sticky garlic, and buffalo (or you could do all one flavour if you prefer). These vegan seitan bites make a mighty fine feast for Superbowl Sunday, game night, pub night, or just about any night you want to dive into some classic party food deliciousness.

The seitan bites can be made ahead of time, and so can the sauces. When you are ready to feast you can just fry up the seitan bites and toss in the premade sauces. Or they actually reheat very well too! Meaning you could even make the seitan bites fully prepared with sauces and all, then just reheat, covered in a pot along with the sauce, over medium-low heat. How easy is that!?

To make Vegan Seitan Bites: start by making the recipe for Vegan Seitan Tenders. Instead of forming the seitan into oval shapes, use scissors to cut the dough into small wing sized pieces (they will almost double in size, so keep them on the smaller size). One batch of seitan tenders should make about 25 to 30 wing sized pieces.

Spread the pieces out on a well-greased steamer basket. Use spray oil to generously coat the seitan bites to stop them from sticking to each other as you layer them. Steam at a simmer for 25 minutes. The seitan bites will merge together into one lump, but don’t worry, let the seitan cool and shrink up a bit. Once cool you will be able to pull apart the seitan bites from each other. If any stick, simply use a knife or scissors to cut pieces.
*Alternatively, if you have already prepared Vegan Seitan Tenders, you can use a knife or scissors to chop the tenders into wing sized pieces.
Let cool, covered in the fridge for a minimum of 30 minutes or up to 3 – 4 days before frying

To fry the vegan seitan bites, heat two tablespoons of light oil in a large skillet or frying pan over medium-high heat. When hot, add the bites and fry a couple minutes per side, turning as needed until they are golden brown all over. You may need to do this in batches depending on the size of your pan, adding more oil if needed.
To make the sticky garlic sauce, in a small pot, whisk together the garlic, syrup of choice, apple cider vinegar, soy sauce, and corn starch while everything is still cold. Turn on the heat to medium, and cook for about 5 minutes, being careful not to burn, whisking often until the sauce thickens a bit. Toss half of the fried seitan bites in the sticky garlic sauce.

To make the buffalo sauce, whisk together the hot sauce with the melted vegan butter. Toss the remaining half of the seitan bites in the buffalo sauce.
Serve hot with celery and carrots sticks, my vegan blue cheese dip, and a lot of napkins!

Vegan Seitan Bites – Sticky Garlic and Buffalo
This classic bar food served with vegan blue cheese dip and all! Make ahead recipe. Perfect for Superbowl Sunday, game night, or a party appetizer.
For the seitan wings:
1 recipe Vegan Seitan Tenders, (cut into wing sized pieces *see step 1)
2 tablespoons light oil ((such as canola or vegetable), more if needed)
Sticky garlic sauce:
6 cloves garlic, (minced)
1/3 cup agave, maple syrup or corn syrup
2 tablespoons apple cider vinegar
2 tablespoons soy sauce
1/2 tablespoon corn starch
Spicy buffalo sauce:
1/3 cup Franks red hot ((or similar hot sauce))
2 tablespoons vegan butter, (melted)
To make the seitan into bite sized pieces:
Make the recipe for Vegan Seitan Tenders. Instead of forming the seitan into oval shapes, use scissors to cut the dough into small wing sized pieces (they will almost double in size, so keep them on the smaller size). One batch of seitan tenders should make about 25 to 30 wing sized pieces.
Spread the pieces out on a well-greased steamer basket. Use spray oil to generously coat the seitan bites to stop them from sticking to each other as you layer them. Steam at a simmer for 25 minutes. The seitan bites will merge together into one lump, but don’t worry, let the seitan cool and shrink up a bit. Once cool you will be able to pull apart the seitan bites from each other. If any stick, simply use a knife or scissors to cut pieces.
*Alternatively, if you have already prepared Vegan Seitan Tenders, you can use a knife or scissors to chop the tenders into wing sized pieces.
Let cool, covered in the fridge for a minimum of 30 minutes or up to 3 – 4 days before frying.
To prepare the seitan bites for serving:
Make the sticky garlic sauce: in a small pot, whisk together the garlic, syrup of choice, apple cider vinegar, soy sauce, and corn starch while everything is still cold. Turn on the heat to medium, and cook for about 5 minutes, being careful not to burn, whisking often until the sauce thickens a bit. Toss half of the fried seitan bites in the sticky garlic sauce.
Make the buffalo sauce: whisk together the hot sauce with the melted vegan butter.
Fry the vegan seitan bites: heat two tablespoons of light oil in a large skillet or frying pan over medium-high heat. When hot, add the bites and fry a couple minutes per side, turning as needed until they are golden brown all over. You may need to do this in batches depending on the size of your pan, adding more oil if needed.
Toss half of the fried seitan bites in the sticky garlic sauce, and the remaining half in the buffalo sauce. Serve hot with vegan blue cheese dip, celery and carrot sticks.
*If you would prefer your seitan bites to be all one flavour, make a double batch of the sauce of your choice, and skip the other sauce recipe. Toss all of the seitan bites in your double batch of sauce.
*The seitan bites can be made ahead of time, and so can the sauces. So when you are ready to feast you can just fry up the seitan bites and toss in the premade sauces. Or they actually reheat very well too! Meaning you could even make the seitan bites fully prepared with sauces and all, then just reheat, covered in a pot along with the sauce, over medium-low heat
Bon appetegan!
Sam.

This post Vegan Seitan Bites – Sticky Garlic & Buffalo appeared first on It Doesn't Taste Like Chicken
Sam Turnbull's Blog

- Sam Turnbull's profile
- 35 followers

