
Sam Turnbull's Blog, page 43
August 26, 2018
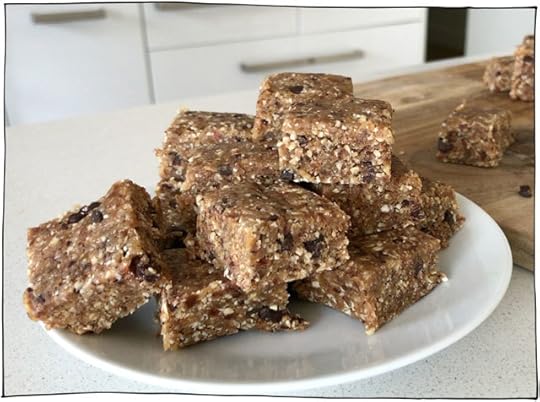
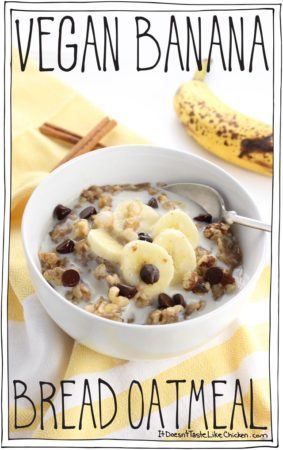
35 Vegan Recipes for Kids
I’ve been told many times that I have a youthful spirit, I feel as though I’m a kid at heart most of the time, and I do love desserts coated in sprinkles. But that said, I’m not a kid, I don’t have any kids, and I’m actually kind of awkward around kids. So to put this post together I reached out my lovely assistant Jess, who is not only super helpful but who is also a mom of two beautiful girls. She helped me find 35 Vegan Recipes for Kids for all you amazing veg-forward parents out there.

These kid-friendly recipes are pulled from amazing bloggers across the net. Everything from breakfast. lunch, afternoon snack, and dinner are included. To check out a recipe just click on the title of the recipe or the photo. I hope you enjoy all these vegan recipes for kids!
Breakfast:

Fragrant Vanilla Cake: Vegan Blueberry Pop-Tarts

Vegan Huggs: EASY VEGAN PROTEIN MUFFINS

Fork & Beans: RAINBOW PANCAKE TACOS

SunnysideHanne: ONE BOWL PUMPKIN PIE BREAKFAST COOKIES

Veggies Save the Day: TOFU SCRAMBLE TATER TOT CASSEROLE

Strength & Sunshine: Gluten-Free Cinnamon French Toast Bites
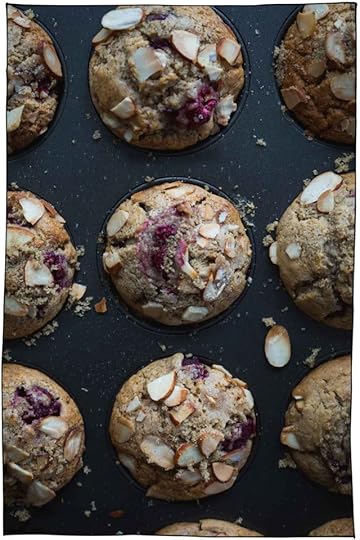
my goodness kitchen: VEGAN ALMOND BUTTER RASPBERRY MUFFINS

It Doesn’t Taste Like Chicken (that’s me!): Super Easy Vegan Croissants
Lunch:
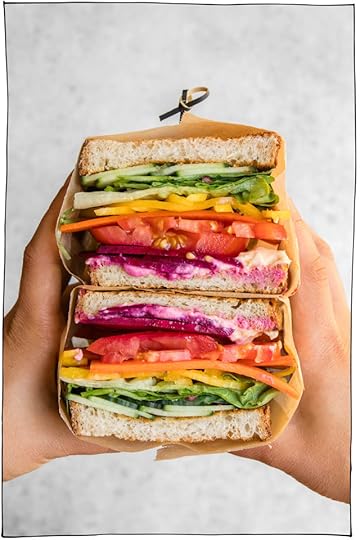
From My Bowl: RAINBOW VEGGIE SANDWICHES WITH HUMMUS

Strength & Sunshine: Homemade Gluten-Free Pizza Lunchables

Veggie Inspired: TORTILLA ROLLUPS WITH DAIRY FREE VEGGIE CREAM CHEESE

Wee Little Vegans: VEGAN CRANBERRY APPLE CHICKPEA SALAD SANDWICH
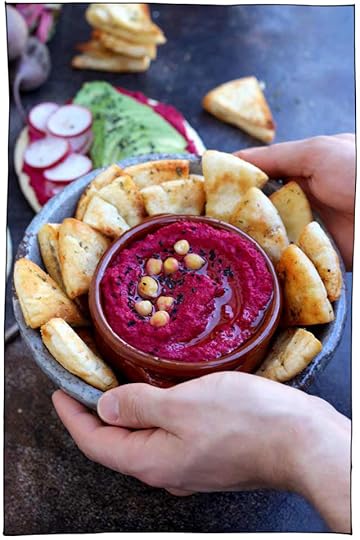
Happy Kitchen Rocks: Roasted Beetroot Hummus with Pita Chips

It Doesn’t Taste Like Chicken (that’s me!): Baked Vegan Corn Dogs

Vegan Richa: TACO SPICE VEGAN WHITE BEAN QUESADILLA WITH PEPPER JACK

Rhian’s Recipes: MUFFIN TIN SUSHI CUPS
Afternoon Snack:

Happy Healthy Mama: 2-ingredient vegan “caramel” dip

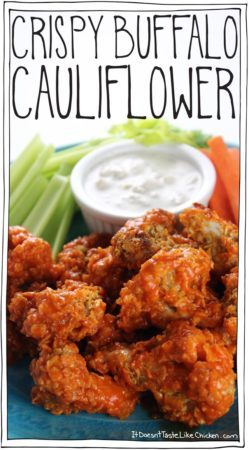
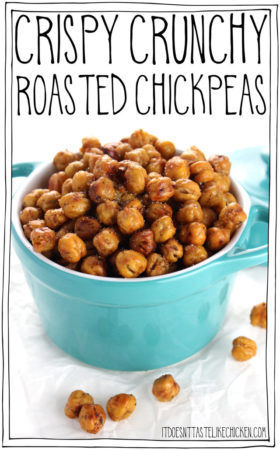
It Doesn’t Taste Like Chicken (that’s me!): Crispy Crunchy Roasted Chickpeas

This Healthy Kitchen: Sweet Potato Cookies

Fork & Beans: COOKIE DOUGH HUMMUS LUNCHABLES

SunnysideHanne: SUPER CHEESY BAKED VEGAN KALE CHIPS
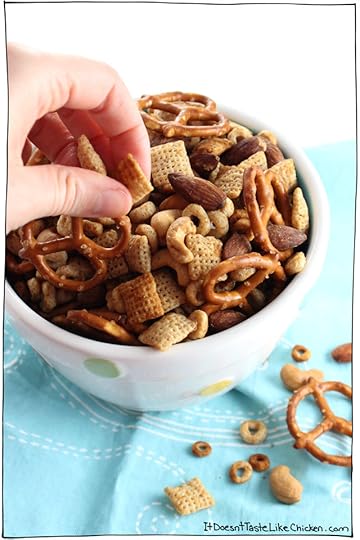
It Doesn’t Taste Like Chicken (that’s me!): Scrumptious Vegan Chex Mix
Active Vegetarian: chocolate chip cookie dough bites

It Doesn’t Taste Like Chicken (that’s me): Vegan Funfetti Cake
Dinner:

Moon and Spoon and Yum: BAKED GARLIC PEPPER POLENTA FRIES

Strength & Sunshine: Homemade Spaghetti O’s

It Doesn’t Taste Like Chicken (that’s me!): Carrot Fingers

The Petite Cook: BAKED VEGGIE SWEET POTATO FRITTERS

Rabbit and Wolves: Vegan Potato Chip Crusted Chicken Nuggets with Fry Sauce

It Doesn’t Taste Like Chicken (that’s me!): Thai Mango Chickpea Curry

Glue & Glitter: Vegan Chicken Stew in the Instant Pot (or on the stove!)

TINNED TOMATOES: BEST EVER VEGAN SLOPPY JOES RECIPE

VNutrition: AIR FRYER POPCORN TOFU

It Doesn’t Taste Like Chicken (that’s me!): Tofu Bolognese

Woman in Real Life: Easy Vegan Chickpea Patties

This post 35 Vegan Recipes for Kids appeared first on It Doesn't Taste Like Chicken


August 19, 2018
Carrot Fingers
Fish fingers? No thank you. Chicken fingers? Pssshhhh. Carrot Fingers? Um yes please, so crispy, so dippable, so yummy!

I was craving a crispy crunchy snack on the healthier side of things and I thought of my Crispy Buffalo Cauliflower recipe, but as someone who is always on a food adventure, I wanted to try something new. I wondered if carrots would be the answer… and let me tell you, these carrot fingers are 100% the answer I was looking for.
Carrot sticks are coated in a savoury seasoned crispy corn flake crust with a hint of maple syrup sweetness. Baked to crunchy golden perfection, these are anything but plain old carrot sticks, these carrot fingers are addictively scrumptious! The perfect kid-friendly and adult-friendly snack. Serve along with your favourite sauce for dipping, and don’t be surprised when the entire tray is gone in lightning speed.

To make Carrot Fingers: grab three medium bowls.
Bowl 1: add the flour.
Bowl 2: mix together the water, chia, and maple syrup.

Bowl 3: add the corn flakes, garlic powder, onion powder, and salt to a food processor. Pulse several times until broken down, but there is still some texture. Pour the corn flake mixture into the last bowl.

Peel the carrots and cut them into finger sized pieces so that all of the carrot sticks are roughly the same size. Take a handful of carrot sticks at a time and drop them in the flour and toss to coat. Next drop them in the chia mixture and toss to coat. Finally, toss them in the corn flake mixture. Lay them on the parchment paper lined baking sheet so that they aren’t touching. Repeat with all of the carrots until you have used up all of your ingredients.
Bake 25 – 30 minutes, until golden brown and crusty, and the carrots are cooked. You can test doneness by piercing a carrot with a knife to see if it’s tender all the way through. Serve the carrot fingers with whatever sauce you desire, such as ketchup, Vegan Blue Cheese Dip, Cashew Caesar Dressing.

Carrot Fingers

Fish fingers? No thank you. Chicken fingers? Pssshhhh. Carrot Fingers? Um yes please, I’ll eat the entire tray to myself, thanks! Carrot sticks are coated in a savoury seasoned crispy corn flake crust with a hint of maple syrup sweetness. Baked to crunchy golden perfection, these are anything but plain old carrot sticks, these carrot fingers are addictively scrumptious! The perfect kid-friendly and adult-friendly snack.
Adapted from my Crispy Buffalo Cauliflower.
4 – 6 medium carrots, (peeled and cut into fingers *see instructions)
Bowl 1:
1/2 cup all-purpose flour (or all-purpose gluten-free flour blend)
Bowl 2:
3/4 cup warm water
2 tablespoons ground chia or ground flax
1 tablespoons maple syrup or agave
Bowl 3:
4 cups corn flakes cereal
1/2 teaspoon garlic powder
1/2 teaspoon onion powder
1/2 teaspoon salt
Preheat your oven to 375F (190C). Line a baking sheet with parchment paper.
Grab three medium bowls. Bowl 1: add the flour. Bowl 2: mix together the water, chia, and maple syrup. Bowl 3: add the corn flakes, garlic powder, onion powder, and salt to a food processor. Pulse several times until broken down, but there is still some texture. Pour the corn flake mixture into the last bowl.
Peel the carrots and cut them into finger sized pieces so that all of the carrot sticks are roughly the same size. Take a handful of carrot sticks at a time and drop them in the flour and toss to coat. Next drop them in the chia mixture and toss to coat. Finally, toss them in the corn flake mixture. Lay them on the parchment paper lined baking sheet so that they aren’t touching. Repeat with all of the carrots until you have used up all of your ingredients.
Bake 25 – 30 minutes, until golden brown and crusty, and the carrots are cooked. You can test doneness by piercing a carrot with a knife to see if it’s tender all the way through. Serve the carrot fingers with whatever sauce you desire such as ketchup, Vegan Blue Cheese Dip, Cashew Caesar Dressing.
Bon appetegan!
Sam


This post Carrot Fingers appeared first on It Doesn't Taste Like Chicken
August 12, 2018
Thai Mango Chickpea Curry
Sweet juicy mango, hearty chickpeas, in a coconut milk sauce infused with aromatic Thai yellow curry on a bed of steamy, fluffy rice. It sounds all sorts of fancy, and it tastes that way too, but this Thai Mango Chickpea Curry is EASY to make.

No really, you gotta believe me on this one. It’s Easy with a capital “E”. Just 25 minutes for a perfect weeknight meal.
A can of chickpeas, a can of coconut milk, a few tablespoons of store-bought Thai yellow curry paste, chop an onion, red pepper, garlic and ginger, and some mango. Presto! And dude, I even have another hack for you. I made this recipe with fresh mango, but you could totally make it with frozen mango chunks, saving you the prep time. Yeah I know, that just made it even easier!
This is a sweet curry, meaning the spice is minimal and kid-friendly but if you are a fan of spicy, feel free to add hot sauce or sauté sliced hot chili peppers along with the red peppers and onions. The combo of sweet and spicy is killer… (in a good non-violent vegan way).
August 8, 2018
VEGANIZED: Black Ice Cream
This summer I noticed the trend of black ice cream. There are lineups everywhere for this stuff in Toronto, but I haven’t seen vegan black ice cream available anywhere. So with my new YouTube series I decided to try making my own recipe.

I put a poll on Instagram @itdoesnttastelikechicken and you voted for a chocolate flavoured black ice cream. So I set up my camera, and filmed myself making a DIY black ice cream!
Strange looking for sure, but it was actually quite tasty! If you ever want to make the recipe for yourself I have written it down below.
VEGANIZED: Black Ice Cream
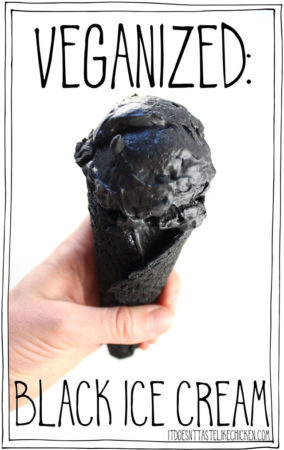
I took the viral food trend of black ice cream and made it vegan! This DIY charcoal ice cream is crazy looking but tastes delicious.
For the sweetened condensed coconut milk:
1 400ml can full-fat coconut milk
1/3 cup white sugar
For the vegan black ice cream base:
6 tablespoons cocoa powder
3 tablespoons food safe activated charcoal
1 teaspoon vanilla extract
1/4 teaspoon salt
For the whipping cream:
1 400ml can premium coconut milk (see notes), (chilled in the fridge overnight)
1 tablespoon food safe activated charcoal
To make sweetened condensed coconut milk: mix together the full-fat coconut milk and white sugar in a saucepan. Put over medium heat and bring to a simmer until it’s reduced by half. About 15 minutes. Remove from heat and let cool in fridge or freezer.
To make the vegan black ice cream base: In a large bowl mix together the cooled sweetened condensed coconut milk with the cocoa powder, 3 tablespoons activated charcoal, vanilla extract, and salt.
To make the whipping cream: scoop all the hardened coconut cream from the can of chilled premium coconut milk, leaving the coconut water behind. Add the coconut cream to a large bowl with 1 tablespoon of activated charcoal. Beat the coconut cream lightly until it is fluffy.
Fold in half of the whipping cream into the black ice cream base, then once combined fold the remaining half. Pour into a loaf pan and freeze for 3 to 4 hours until set. If you freeze it for longer you may need to let it soften on the counter for 20 minutes or more until it’s scoopable.
Make sure you get coconut cream or premium coconut milk. A good test to see if the coconut milk is rich enough for this recipe is to shake the can. If you can’t hear any liquid sloshing around, or very little liquid then that’s probably a good brand. I recommend Thai Kitchen Premium Coconut Milk.
Bon appetegan!
Sam.

This post VEGANIZED: Black Ice Cream appeared first on It Doesn't Taste Like Chicken
August 5, 2018
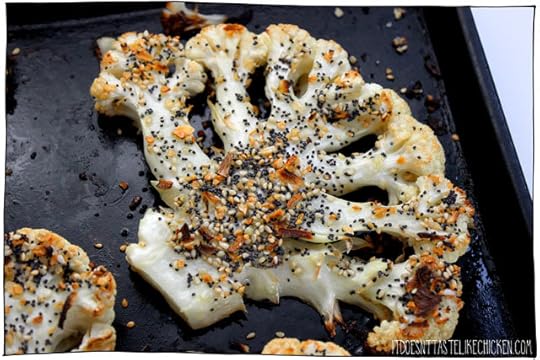
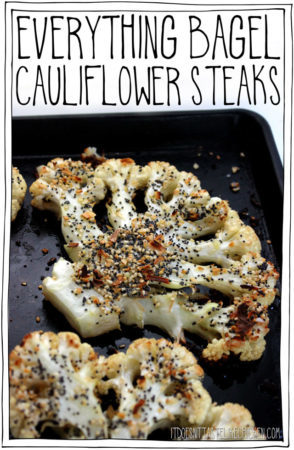
Everything Bagel Cauliflower Steaks
Last week I made a recipe for Everything Bagel Seasoning, and let me tell you, I have been sprinkling that gloriousness on just about every food I have been eating. Hummus, avocado toast, salad, popcorn… the amount of yum is endless. But then genius happened when I generously sprinkled this seasoning over some cauliflower steaks and roasted them up.

The cauliflower steaks were tender, juicy, a little crisp around the edges, and the everything seasoning sang wonders when toasted in the oven. I could NOT stop eating these everything bagel cauliflower steaks!

No really, it was a bit of a problem. I really couldn’t restrain myself, not even while doing the food photography. The smaller florets were entirely devoured by the time I was done my photography session. I just kept zooming in so that no one would be able to see the missing pieces. Whoops!

To make Everything Bagel Cauliflower Steaks: start by cutting a head of cauliflower into 1-inch steaks. I find the easiest way to do this is to leave all of the greens and stem on the cauliflower which will help it hold together when slicing. You can then trim off any greens once cut into steaks. You should get about 4 -6 steaks depending on the size of your cauliflower.
Lay the cauliflower steaks along with any leftover florets on the baking sheet. Liberally brush each cauliflower steak with olive oil or non-dairy milk of choice.
The olive oil will result in a slightly richer and more golden cauliflower steak, but non-dairy milk is a great option for oil-free or anyone watching their calorie intake. I experimented with using coconut milk which added a lovely additional layer of flavour. Both methods cook up beautifully.

Once the cauliflower is coated, sprinkle about 1 1/2 teaspoons of Everything Bagel Seasoning onto each steak. Bake for 18 – 25 minutes until the cauliflower is golden on the edges and tender all the way through. Serve hot with desired sides.
Everything Bagel Cauliflower Steaks
Tender, juicy, a little crisp around the edges, and the everything seasoning is toasted in the oven making this cauliflower irresistible! I could NOT stop eating these!
1 head cauliflower, (sliced into steaks (see instructions))
2 – 4 tablespoons olive oil or non-dairy milk
6 – 8 teaspoons Everything Bagel Seasoning
Preheat your oven to 400F (200C). Lightly grease a baking sheet or line it with parchment paper. 18- 25 minutes
To slice your cauliflower: slice the cauliflower into 1-inch steaks. I find the easiest way to do this is to leave all of the greens and stem on the cauliflower which will help it hold together when slicing. You can then trim off any greens once cut into steaks. You should get about 4 – 6 steaks depending on the size of your cauliflower.
Lay the cauliflower steaks along with any leftover florets on the baking sheet. Liberally brush each cauliflower steak with olive oil or non-dairy milk of choice. Then sprinkle about 1 1/2 teaspoons of Everything Bagel Seasoning onto each steak. Bake for 18 – 25 minutes until the cauliflower is golden on the edges and tender all the way through. Serve hot with desired sides.
Bon appetegan!
Sam.

This post Everything Bagel Cauliflower Steaks appeared first on It Doesn't Taste Like Chicken
July 29, 2018
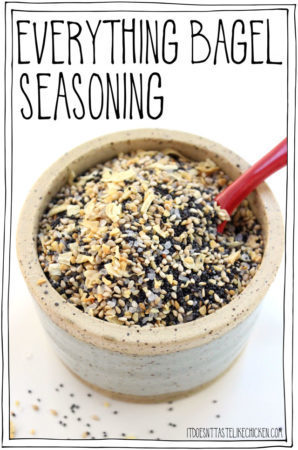
Everything Bagel Seasoning
This seasoning is EVERYTHING. See what I did there? So clever. ~Pats self on back~
I’ve been noticing that Everything Bagel Seasoning is trending just about everywhere right now, and I wanted it. I wanted it BAD! You can buy this topping at Trader Joe’s, but here in Canada, we don’t have Trader Joe’s. I looked up and down the aisles of my grocery store, but nada. ~Sigh~

So you know what I decided to do? I bet you can guess, you clever minx you. Yep, I made my own Everything Bagel Seasoning mix. I was surprised at how simple the ingredients were. It’s not really everything, it’s just some things. 5 some things to be exact. Sesame seeds, poppy seeds, dehydrated chopped onion, dehydrated minced garlic, and flaked sea salt.
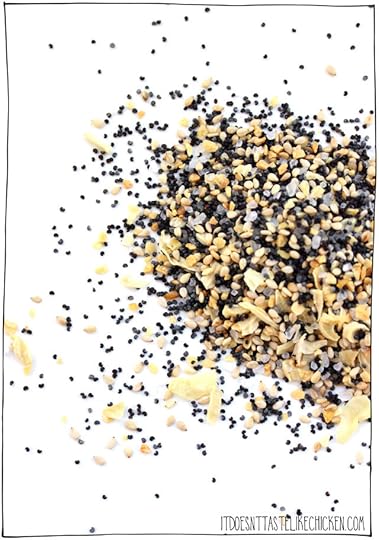
So I mixed up a batch, which just requires a few shakes in a jar, it couldn’t be easier, and then I sprinkled it everywhere…
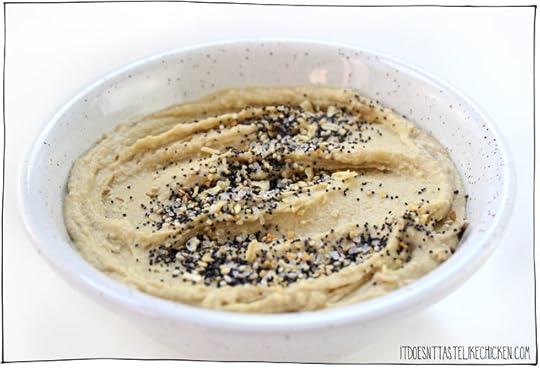
On top of store-bought hummus. Aren’t you looking all sassy, hummus?

I garnished my salad. A little pizzaz!

And even sprinkled everything bagel seasoning over my vegan buttery popcorn. Popcorn is my favourite after all.

Everything Bagel Seasoning
You can make your own topping at home and then use it on all your favourite foods: salads, hummus, popcorn, avocado toast, tofu scramble, everywhere!
2 tablespoons poppy seeds
2 tablespoons white sesame seeds
1 1/2 tablespoons dehydrated chopped onion
1 tablespoon dehydrated minced garlic
1/2 tablespoon flaked sea salt
Add all the ingredients to a small jar and shake or stir to combine. Use as desired.
Bon appetegan!
Sam.

This post Everything Bagel Seasoning appeared first on It Doesn't Taste Like Chicken
July 25, 2018
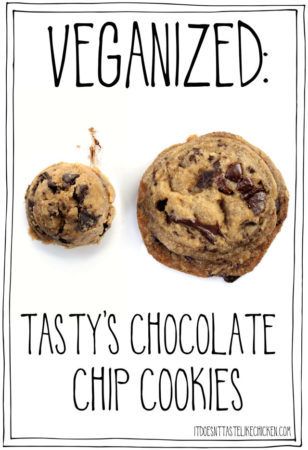
VEGANIZED: Tasty’s Chocolate Chip Cookies
The other day I was randomly watching YouTube videos when I stumbled upon a viral video by Tasty on How to Make the Perfect Chocolate Chip Cookies. I think chocolate chip cookies are my most favourite dessert ever so I had some serious cookie cravings when watching this video. But there was a problem… this recipe wasn’t vegan!

A problem I could fix! I thought it would be fun to show you how I play around in the kitchen to veganize a recipe so I set up my camera and filmed the whole thing…
Sometimes recipes can be very easy to veganize and other times it can take me many, many attempts before I end in a result that I’m totally happy with. I think I finally nailed it with this one, the final cookies were crispy on the outside, chewy in the middle. Super duper rich with a ton of different flavours going on. I’m talking caramel, espresso, salt, toasted nuts, and extra-chocolate.
If you have an idea of what trending recipe I should veganize next, let me know in the comments!

VEGANIZED: Tasty's Chocolate Chip Cookies
I took the viral cookie recipe and made it vegan. All the same flavours and textures, without eggs and dairy-free.
Adapted from Tasty Perfect Chocolate Chip Cookie recipe.
Dry ingredients:
3 tablespoons almond flour or ground almonds ((or other ground nut))
1 cup bread flour
3/4 cup all-purpose flour
1 teaspoon baking soda
1 teaspoon espresso powder
1 teaspoon salt
Wet Ingredients:
1 cup cold vegan butter
1 cup dark brown sugar
1/2 cup white sugar
2 teaspoons vanilla extract
1/2 cup vegan chocolate chips
5 ounces vegan dark chocolate, (chopped)
Preheat the oven to 350˚F (180˚C). Line a large baking sheet with parchment paper.
Add the almond flour to a small pot and put over medium-low heat. Toast the almond flour until it lightly browns and smells fragrant, stirring frequently so it doesn’t burn, about 3 minutes. Remove from heat and immediately pour the toasted almond into a large mixing bowl to stop the cooking.
Sift the bread flour, all-purpose flour, baking soda, espresso powder, and salt into the large mixing bowl along with the toasted almond flour. Whisk to combine.
In another large bowl, use a hand mixer to beat together the vegan butter, dark brown sugar, white sugar, and vanilla extract. Mix until fluffy.
Add the wet ingredients to the dry ingredients and mix until just combined. Stir in the chocolate chips and chopped dark chocolate.
Scoop about 3 tablespoons of cookie dough into a ball and place on the prepared baking sheet, spacing each cookie 2-3 inches apart. Bake for 12 to 14 minutes until the cookies are browned on the edges. Let cool on the pan for about 10 minutes.
Bon appetegan!
Sam.


This post VEGANIZED: Tasty’s Chocolate Chip Cookies appeared first on It Doesn't Taste Like Chicken
July 22, 2018
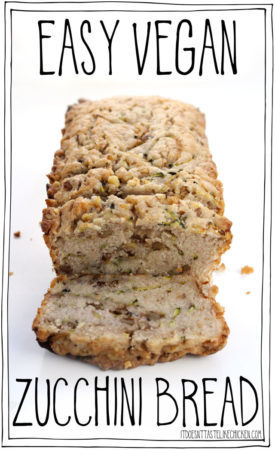
Easy Vegan Zucchini Bread
I remember the first time I ever had zucchini bread. I was a kid visiting my friend Danielle and her mom Caron baked up a loaf. I thought the idea was revolting. Who wants veggies in their bread!? But I’ve always been open and interested to try new foods so I hesitantly sampled it and… pure bliss.

The bread didn’t really taste like zucchini at all. Or even bread for that matter. It tasted just like banana bread except without the bananas. It was lightly sweet, with a hint of cinnamon, a walnut crunch, and the best part (and the magic zucchini provides), it was extra-extra-moist. I fell in love and have ever since been a huge fan. Thanks, Caron!

My recipe for Easy Vegan Zucchini Bread is, you guessed it, easy and vegan. All the same flavours of traditional zucchini bread but even better. The zucchini adds so much delicious moistness that this bread needs to hang out in the oven for quite a long time to cook all the way through. The perfect time in my oven was 75 minutes, which means my entire house was filled with sweet scents of baked goodness. Now, this is how you win the hearts of zucchini haters!

To make Easy Vegan Zucchini Bread: in a large bowl whisk together the dry ingredients.

In a medium bowl whisk together the non-dairy milk, light oil, lemon juice or apple cider vinegar, and vanilla extract.

Pour the wet ingredients into dry and stir until the batter just starts to come together. Add in the grated zucchini and walnuts if using and mix just a few more times to combine. Don’t over mix.

Scoop the batter into the loaf pan and smooth down. Bake for 70 – 80 minutes until golden on the top and edges and a toothpick inserted in the center comes out clean. Let cool in the pan.
Enjoy easy vegan zucchini bread plain (which doesn’t taste plain at all) or with a smear of vegan butter.

Easy Vegan Zucchini Bread
Tastes just like banana bread except without the bananas. It’s lightly sweet, with a hint of cinnamon, a walnut crunch, and the best part (and the magic zucchini provides), it’s extra-extra-moist. The best vegan zucchini bread recipe and a great way to use up extra zucchini!
Dry ingredients:
2 cups all-purpose flour
1 cup white sugar
2 teaspoons baking powder
1 teaspoon cinnamon
1/2 teaspoon salt
Wet ingredients:
3/4 cup non-dairy milk ((such as soy or almond))
3/4 cup light oil ((such as canola or vegetable))
1 tablespoon lemon juice or apple cider vinegar
1 teaspoon vanilla extract
1 1/2 cups grated zucchini ((about 2 small zucchinis))
1/2 cup chopped walnuts ((optional))
Preheat your over to 350F (180C). Lightly grease an 8″ x 4″ loaf pan or you can line it with parchment paper.
In a large bowl whisk together the dry ingredients.
In a medium bowl whisk together the non-dairy milk, light oil, lemon juice or apple cider vinegar, and vanilla extract. Pour the wet ingredients into dry and stir until the batter just starts to come together. Add in the grated zucchini and walnuts if using and mix just a few more times to combine. Don’t over mix.
Scoop the batter into the loaf pan and smooth down. Bake for 70 – 80 minutes until golden on the top and edges and a toothpick inserted in the center comes out clean. Let cool in the pan.
Bon appetegan!
Sam.
This post Easy Vegan Zucchini Bread appeared first on It Doesn't Taste Like Chicken
July 15, 2018
Vegan Korean Bibimbap
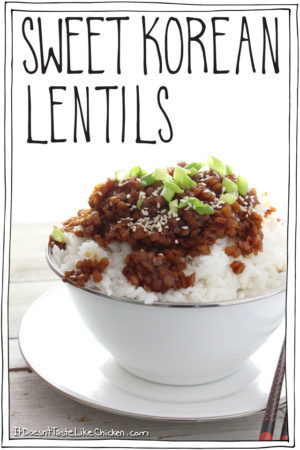
Bibimbap will always remind me of Ashley, (who was my roommate from college), hangovers, and California. You see I did my Masters of Fine Art at the California Institute of the Arts (CalArts), in LA, where I lived with Ashley for 3 years. It became a routine that when we had our typical beer pong type hangovers we would go to this tiny little Korean restaurant where Ashley would order a sweet and savoury soup, and I always opted for bibimbap. So it was due time I bring this dish back into my life and make Vegan Korean Bibimbap.

Now, of course, this dish isn’t actually traditionally Korean as lentils aren’t used in Korean cooking, but I’ve used all of the same flavours to get that amazing Korean vibe. I use my recipe for Sweet Korean Lentils, and my Vegan Toast Dipping Sauce (which is like an egg yolk). Then just sauté up some spinach, grab a jar of vegan-friendly kimchi and pair it all together on a bed of rice with some fresh carrots and cucumbers. Let’s just say I polished off this giant bowl of deliciousness in record time.

I’m so happy to bring back bibimbap comfort into my life again (hopefully enjoyed without the hangover). The sweet and savoury lentils, spicy and tangy kimchi, and the rich egg yolk sauce make this dish total mouth heaven!

To make Vegan Korean Bibimbap: prepare the Sweet Korean Lentils and Vegan Toast Dipping Sauce according to the directions. These two dishes along with the rice can be prepared ahead of time and reheated before serving if desired.

To make the spinach, add the sesame oil to a skillet or frying pan and put over medium heat. When hot add the spinach and soy sauce. Stir and cook for 1 – 2 minutes just to wilt the leaves, don’t overcook. Remove from heat.
To assemble the bowls, divide the rice evenly among the bowls. Follow the rice with the Sweet Korean Lentils, cooked spinach, carrots, cucumber, kimchi, and the drizzle the Vegan Toast Dipping Sauce in the middle of the bowl (or anywhere that you want it, omnomnom). Garnish with sesame seeds and hot sauce if desired.

Vegan Korean Bibimbap
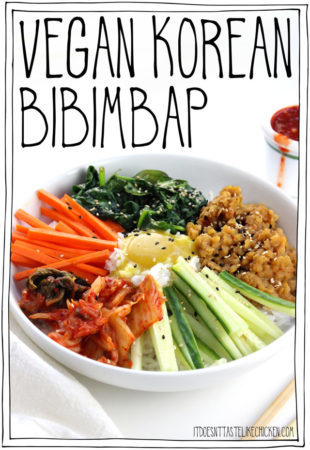
Vegan Korean Bibimbap with a vegan egg yolk! This Korean inspired vegan bibimbap is full of flavour with sweet and savoury lentils, sautéed spinach, kimchi, fresh carrots and cucumbers, and a rich and easy to make vegan egg yolk sauce.
4 cups cooked rice ((white or brown))
1 recipe Sweet Korean Lentils
1 recipe Vegan Toast Dipping Sauce
For the sautéed spinach:
2 teaspoons sesame oil
6 cups fresh spinach
2 teaspoons soy sauce ((gluten-free if preferred) )
For the toppings:
2 medium carrots, (peeled and matchsticked)
1/2 medium cucumber, (matchsticked)
1/2 cup kimchi ((check to make sure it's vegan))
1 tablespoon sesame seeds ((optional))
Sambal (, Sriracha, or other hot sauce (optional))
Prepare the Sweet Korean Lentils and Vegan Toast Dipping Sauce according to the directions. These two dishes along with the rice can be prepared ahead of time and reheated before serving if desired.
To make the spinach, add the sesame oil to a skillet or frying pan and put over medium heat. When hot add the spinach and soy sauce. Stir and cook for 1 – 2 minutes just to wilt the leaves, don’t overcook. Remove from heat.
To assemble the bowls, divide the rice evenly among the bowls. Follow with the Sweet Korean Lentils, cooked spinach, carrots, cucumber, kimchi, and the drizzle the Vegan Toast Dipping Sauce in the middle of the bowl. Garnish with sesame seeds and hot sauce if desired.
Bon appetegan!
Sam.


This post Vegan Korean Bibimbap appeared first on It Doesn't Taste Like Chicken
July 8, 2018
30 Vegan Recipes for Weight Loss
First, I want to start by saying that I think everyone should be whatever size they like as long as it makes them happy. Rock your bod anyway you like it! Second, I want to say that I lost 10 pounds over the last couple of months, plus I’m pretty dang sure I gained muscle while doing it. ~flexes measly bicep~ I was happy with my bod a couple months ago, but I was starting to realize my potato chip to vegetable ratio was a little off, so I thought it was time to do something about it.
On average, vegans have a lower BMI than meat eaters or even vegetarians. The reason? Whole plant foods are low in calories, high in fiber (a calorie-free filler upper), have a high water content (another calorie-free filler upper), and are nutrient dense, so your body will feel nutritionally satisfied (aka no cravings). Whereas animal products, especially meat and cheese, tend to be high in calories, lower in nutrients, and contain zero fiber. So it’s definitely easier to stay slim as a vegan, but just because on average vegans weight less, it doesn’t mean all vegans are super thin. Afterall, potato chips are vegan too (as my love handles discovered).

After reading Proteinaholic (I highly recommend this book), where I learned about North America’s needless obsession with protein, I learned the simple truth (science-backed): the ONLY way to lose weight is to consume fewer calories than you put out. Period. No matter what the macronutrient ratios you strive for, whether it be low carb, high carb, high fat, low fat, high protein, low protein. No matter what fancy name you give your diet, Paleo, Keto, Weight Watchers, 80/10/10, it doesn’t actually matter when it comes to weight loss. The reason you lose weight is because you consume fewer calories than you put out, whether you realize it or not. Don’t believe me? Read Proteinaholic.
Sam Turnbull's Blog

- Sam Turnbull's profile
- 35 followers

