
Sam Turnbull's Blog, page 38
September 1, 2019
Vegan Baloney (Bologna)
Today I’m bringing you a homemade vegan baloney recipe! Do you say baloney or do you call it bologna? Either way, these vegan deli slices are so easy to make, and so tasty too! Perfect as a snack, to layer in sandwiches, and it even fries up beautifully just like the traditional version!

I think I may be turning into a vegan butcher these days. I’ve gotten into this streak of posting one meaty vegan recipe after another… and I’m loving it! Vegan steak, chicken, chicken wings, chicken nuggets, Italian sausages, chorizo, pepperoni, fried fish, and now vegan baloney!
It’s such a fun challenge for me try and remember what animal products used to taste like (it’s been almost 7 years since I’ve eaten meat) and then to try and recreate those flavours and textures. And some people say vegan cooking is boring… nuh uh!

It’s probably been even more than 7 years since I’ve eaten bologna as I really enjoyed it more as a kid, but let me tell you, making a fried vegan baloney sandwich with vegan mayonnaise, some yellow mustard and a bit of lettuce brought me right back to those childhood sandwiches! The kid in me was overjoyed, and so was the adult in me. Tas-tee! These slices are fantastic for your lunch box no matter what your age.
To make vegan baloney:

In a food processor add the tofu, ketchup, nutritional yeast, soy sauce, onion powder, garlic powder, smoked paprika, mustard powder, and nutmeg.
*Nutmeg may sound like an odd addition and it is totally optional if you want, but nutmeg is traditionally one of the ingredients in baloney that gives it it’s classic taste.
Mix until smooth as possible, stopping to scrape the sides as needed. 
Add the vital wheat gluten and pulse several times to incorporate, scraping the sides as needed. It will form a crumbly dough.

Turn the mixture out onto a clean work surface and knead together to form a dough. Shape into a large log that will fit in your steamer basket.
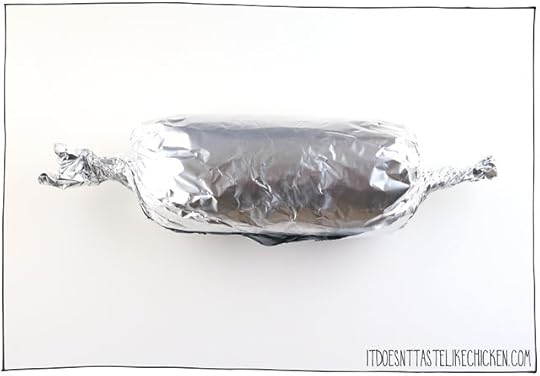
Roll the log up in foil twisting the ends closed so it looks like a large candy.

Place in the steamer basket and cover. Steam for 1 hour. The vegan baloney will have expanded in the foil making a tight log. Remove from the steamer basket and allow it to cool. Chill in the fridge until completely cold. Now it is ready to slice an enjoy! Store in the fridge in an airtight container for up to 1 week.

This vegan bologna is great as a snack, but it’s also fantastic fried or layered in a sandwich.
Bon appetegan!
Sam.
Vegan Baloney (Bologna)

Easy to make and tastes better than store-bought! Make this bologna ahead of time and then have it ready to slice for a snack or sandwiches. It's even great fried! Great for your kids lunch box.
1, 454g block extra-firm tofu, (drained)
1/2 cup ketchup
1/4 cup nutritional yeast
3 tablespoons soy sauce
1 1/2 tablespoons onion powder
1 1/2 tablespoons garlic powder
1 tablespoon smoked paprika
1 tablespoon mustard powder
1/4 teaspoon nutmeg
1 3/4 cups vital wheat gluten
Add several inches of water to a large pot with a steamer basket and bring to a boil.
In a food processor add the tofu, ketchup, nutritional yeast, soy sauce, onion powder, garlic powder, smoked paprika, mustard powder, and nutmeg. Mix until smooth as possible, stopping to scrape the sides as needed. Add the vital wheat gluten and pulse several times to incorporate, scraping the sides as needed. It will form a crumbly dough.
Turn the mixture out onto a clean work surface and knead together to form a dough. Shape into a large log that will fit in your steamer basket. Roll the log up in foil twisting the ends closed so it looks like a large candy. Place in the steamer basket and cover. Steam for 1 hour. The vegan baloney will have expanded in the foil making a tight log.
Remove from the steamer basket and allow it to cool. Move to the fridge and chill completely before serving. When ready to serve just slice an enjoy! Store in the fridge in an airtight container for up to 1 week
* If you prefer to avoid aluminum foil, roll the baloney up in parchment paper, and then roll the parchment paper wrapped baloney up in cheesecloth and tie the ends closed.
*This recipe makes a lot of vegan bologna slices so instead of a serving, the nutrition is for the entire log of vegan bologna.


This post Vegan Baloney (Bologna) appeared first on It Doesn't Taste Like Chicken


August 25, 2019
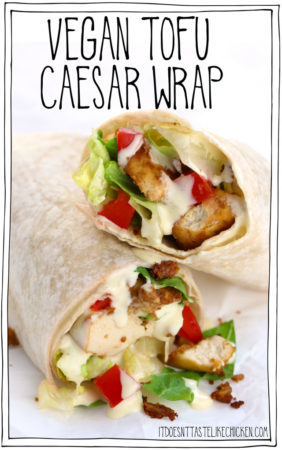
Vegan Tofu Caesar Wraps
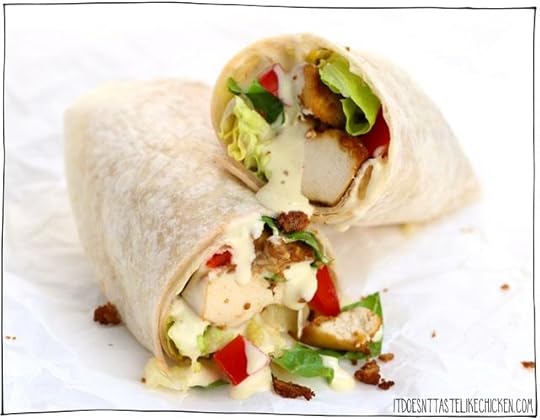
Like it or not, back to school time is almost here. If you don’t like it, then I’ve got a recipe that will make everything alright. And if you do like it then this recipe is only going to make back to school time even better! Get your lunchboxes ready by making these Vegan Tofu Caesar Wraps. You can make the tofu and dressing ahead of time so these wraps can be super quick to prepare, perfect for bringing to work, school, for an easy lunch or weeknight meal.

Oh yeah, look at that gorgeous seasoned tofu and that creamy Caesar sauce.
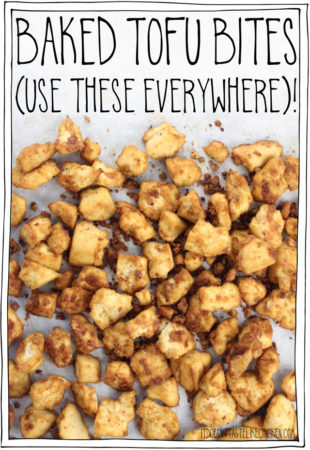
This sandwich is made using my all-time favourite Baked Tofu Bites (is there anything these tofu bites can’t do)? I also use these bites in my hearty vegan tofu salad sandwich if you want another take on tofu sandwich deliciousness.
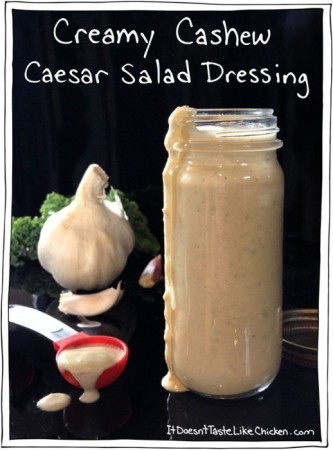
The Caesar dressing takes less than 5 minutes to make and can also be made ahead of time and stored in the fridge. Then it’s just a matter of adding veg and rolling them up. Prepare for crunchy, chewy, savoury, saucy, Ceasar-y deliciousness.
To make vegan tofu Caesar wraps:
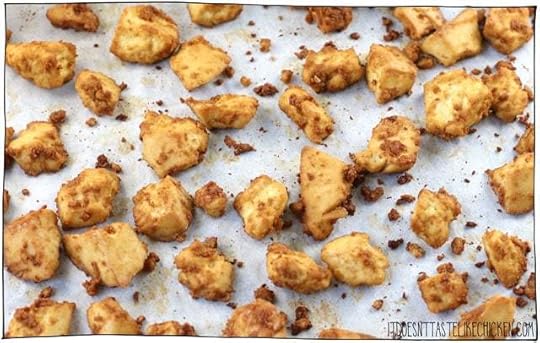
Make my recipe for Baked Tofu Bites. You will only need to make 1/2 of the recipe to make these sandwiches which is equivalent to one block of tofu. But let me tell you that I never ever regret making extra tofu bites as they can be used everywhere- if they survive me eating most of them directly from the pan!
These bites can be made ahead of time and stored in the fridge until ready to use.

Next, make the Caesar dressing. Simply add the ingredients to a small bowl or jar and combine. This too can be made ahead of time and stored in the fridge until ready to assemble the wraps.
For an oil-free version: Instead of the vegan mayonnaise-based Caesar dressing I have listed in this recipe use my Creamy Cashew Caesar Salad Dressing which is oil-free. If you make it ahead of time it will thicken up more in the fridge.

Then when ready to assemble the sandwiches, fill a wrap with tofu bites, chopped romaine lettuce, chopped tomatoes, and the Caesar dressing. You can also add any additional veggies or toppings you like. Then roll it up like a burrito and enjoy your tofu Caesar wrap fresh, or pack it for lunch for later.
If taking for lunch, I like to have all the ingredients prepped and ready to go in the fridge, then I assemble mine in the morning so that it stays fresh and doesn’t get soggy. Roll up the wrap and then roll in wax paper, twisting the ends closed to seal it in. Pop it in your lunch bag and you’re good to go.
Bon appetegan!
Sam.
Vegan Tofu Caesar Wrap
You can make the tofu and dressing ahead of time so these wraps can be super quick to prepare, perfect for bringing to work, school, for an easy lunch or weeknight meal. See notes for the oil-free option.
For the vegan caesar dressing:
1/2 cup vegan mayonnaise (*see notes for oil-free version)
1 tablespoon nutritional yeast
1 tablespoon lemon juice
1 teaspoon Dijon mustard
3/4 teaspoon caper or pickle brine ((the liquid from a jar of capers or pickles))
1/4 teaspoon garlic powder
For the tofu wraps:
4 large flour tortillas ((sub gluten-free wrap if preferred))
1/2 recipe Baked Tofu Bites ((1 block of tofu))
4 cups romaine lettuce, (chopped)
1 tomato, (sliced)
For the vegan Caesar dressing:
Add all of the ingredients to a jar or small bowl and stir to combine.
To make the tofu wraps:
Fill each wrap with the baked tofu bites, romaine lettuce, tomato, and any additional veggies or toppings you like. Top with Ceasar dressing as desired. Wrap the tortillas around the filling like a burrito and enjoy right away, or pack for lunch later.
*Time does not include the time it takes to make the Baked Tofu Bites. The tofu bites can be made ahead of time and kept in the fridge for up to until ready to use.
*Nutrition is based on one wrap and 1/4 of the Caesar dressing. Recipe makes 4 wraps
*For oil-free make my Creamy Cashew Caesar Salad Dressing recipe instead of the dressing listed here.
This post Vegan Tofu Caesar Wraps appeared first on It Doesn't Taste Like Chicken
August 18, 2019
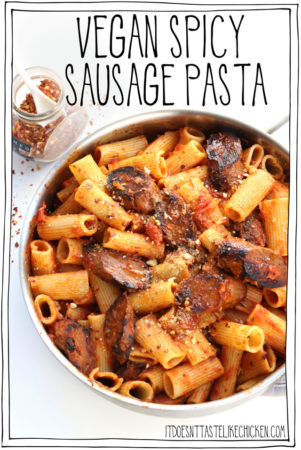
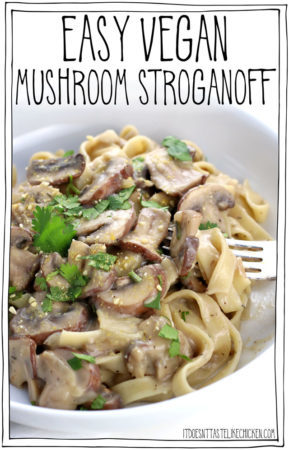
Vegan Spicy Sausage Pasta
Before I went vegan, a spicy sausage tomato-based pasta was one of my absolute favourite dishes. So, when I made my Vegan Italian Seitan Sausage recipe, I knew just what to do with it. Oh man, talk about a throwback to totally blissful pasta, I can’t believe it took me so long to veganize this recipe! This recipe for Vegan Spicy Sausage Pasta is everything I ever wanted and more. Thick slices of vegan sausage with a spicy tomato sauce all tossed together with any kind of pasta you like.
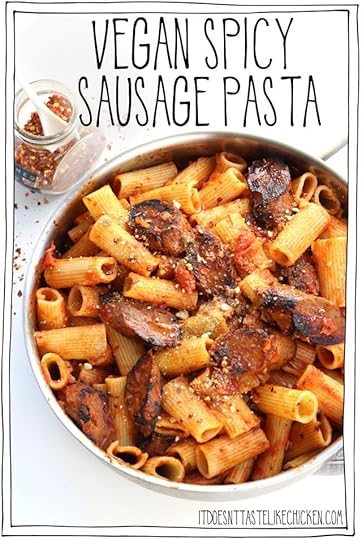
If you make your seitan sausages ahead of time, this dish is super duper quick to prepare as well making it a wonderful weeknight meal. I use a jar of store-bought tomato pasta sauce but amp it up with sautéd onions, garlic, and red pepper flakes to make this recipe super simple to toss together. And then you get to dine on this…

Yeah, I’m drooling too.
Of course, if you prefer you could purchase premade vegan sausages, and toss those in here instead, but if you haven’t tried making seitan from scratch before, it’s so much fun, so much cheaper, and so much tastier when homemade. I love it so much!
How to make Vegan Spicy Sausage Pasta:

Slice the sausages diagonally into thick slices. In a large pan, heat 1 tablespoon of olive oil over medium heat. When hot, add the sliced sausages and fry a couple of minutes on each side until browned. Remove the sausages from the pan and set aside.

Return the pan to the heat and add the remaining tablespoon of olive oil. Add the onion and garlic and sauté for about 4 minutes until the onions start to turn translucent. Add the crushed red pepper flakes and continue to cook for another minute until the onion begins to brown.
*If you prefer a non-spicy pasta you can omit or reduce the crushed red pepper flakes.

Add the tomato sauce and heat through.
*I love adding freshly sautéd onions and garlic to a store-bought sauce to enhance the flavours and make it taste homemade. If you made your tomato sauce from scratch you can choose to omit the extra onions and garlic if you wish.

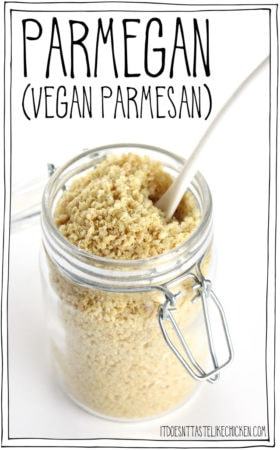
Once the sauce is hot, add the pasta and sausage slices to the sauce and toss well to coat. Serve with a sprinkle of Parmegan if desired.
Bon appetegan!
Sam.
Vegan Spicy Sausage Pasta
Total Italian comfort food! Homemade vegan seitan sausages tossed in a spicy tomato sauce for a perfect hearty weeknight meal.
450 g rigatoni or pasta of choice ((gluten-free if preferred))
3 prepared Vegan Italian Seitan Sausages ((1/2 the recipe))
2 tablespoons olive oil, (divided)
1/2 yellow onion, (chopped)
3 cloves garlic, (minced)
1/2 teaspoon crushed red pepper flakes ((reduce or omit if preferred) )
650 ml jar tomato pasta sauce ((or 2 3/4 cups homemade))
Parmegan ((optional for garnish))
Bring a large pot of water to a boil and prepare the pasta according to package directions.
Slice the sausages diagonally into thick slices. In a large pan, heat 1 tablespoon of olive oil over medium heat. When hot, add the sliced sausages and fry a couple of minutes on each side until browned. Remove the sausages from the pan and set aside.
Return the pan to the heat and add the remaining tablespoon of olive oil. Add the onion and garlic and sauté for about 4 minutes until the onions start to turn translucent. Add the crushed red pepper flakes and continue to cook for another minute until the onion begins to brown. Add the tomato sauce and heat through.
*I love adding freshly sautéd onions and garlic to a store-bought sauce to enhance the flavours and make it taste homemade. If you made your tomato sauce from scratch you can choose to omit the extra onions and garlic if you wish.
Once the sauce is hot, add the pasta and sausage slices to the sauce and toss well to coat. Serve with a sprinkle of Parmegan if desired.
*nutrition is based on one serving which is 1/6 of the recipe.
*time for the recipe does not include the time to make the seitan sausages.
This post Vegan Spicy Sausage Pasta appeared first on It Doesn't Taste Like Chicken
August 11, 2019
Vegan Italian Seitan Sausages
I’ve made seitan steaks, I’ve made seitan chicken inspired tenders, I’ve made seitan wing inspired bites, I’ve made seitan pepperoni, and now it’s time to share my recipe for Vegan Italian Seitan Sausages. Clearly, I’m obsessed with seitan recipes. These Italian style sausages have that perfect meaty texture, that classic sausage shape, that flavourful burst of Italian seasoning, and they’re just really damn good!

It’s actually a bit weird how meaty these turn out, but because I made them in my own kitchen, I know they are also 100% vegan! There is even an oil-free option for those who prefer it.
The secret to taking these vegan sausages from good to really damn good is to add bits of sun-dried tomato and sautéed onion. You know how traditional sausages have those little fat speckles throughout that help add texture and flavour, well that’s exactly what the sun-dried tomatoes and sautéd onions do. Even though they are just bits of veg it provides a very similar texture. So cool!

These sausages are best made the day ahead and chilled in the fridge overnight for the ideal texture. When they are cold they will be quite firm, but when you heat them- grill, fry, etc.- they will soften slightly for the most amazingly perfect texture. Then you can use them anywhere you like!
Where to use vegan sausages:
Grill the sausages and serve on a bun, hot dog style.
Fry and serve with potatoes and vegan gravy.
Cut into thick slices or small chunks and top on soups, salad, or pasta.
Toss into pasta sauces.
Slice thinly or crumble to use on pizza.
Prepare sausages with peppers and onions.
Anywhere else you want to use these vegan sausages!
To make Vegan Italian Seitan Sausages:
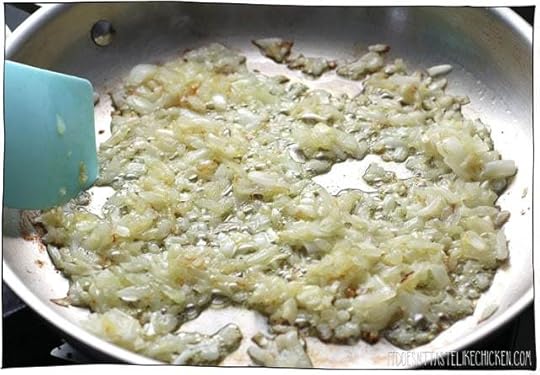
Heat the olive oil in a medium frying pan or skillet over medium heat and when hot add the onions and garlic. Sauté until the onions turn translucent and begin to brown, about 5 minutes. Remove from heat and set aside.

In a large bowl whisk together the vegetable broth, tomato paste, and white miso pasted until smooth. Now add the sun-dried tomatoes, nutritional yeast, dried basil, brown sugar, fennel seeds, dried rosemary, salt, crushed red pepper flakes, liquid smoke, and all of the sautéd onions and garlic along with any oil leftover in the pan, and stir to combine.

Oil-free option: if you prefer to make oil-free vegan Italian sausages simply sauté the onions and garlic in water or broth. Then for the sun-dried tomatoes, use the dry kind that aren’t in oil. Chop them up and then soak them in hot water for about 20 minutes to soften the tomato bits. Drain, and proceed with the recipe as normal.
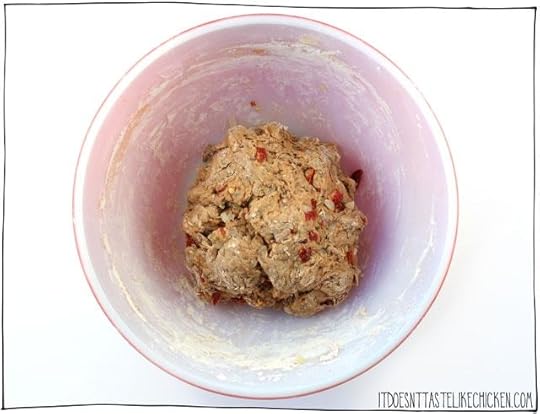
Lastly, add the vital wheat gluten and combine to make a dough. Knead the dough to make sure it’s all combined, but once combined, stop kneading. The more you knead the tougher the sausages will get so only do as much as is needed to incorporate the vital wheat gluten.

Cut the dough into 6 equal-sized pieces. Take one of the pieces of dough and place it on a sheet of aluminium foil. Shape the dough into a rough sausage shape, but don’t worry about making it look pretty or neat. Some pieces of onion and sun-dried tomato may fall out but just tuck them near the dough and it will all incorporate and shape up nicely as it cooks.

Roll the sausage up loosely in a piece of aluminium foil then twist the ends closed. Repeat with the remaining pieces of dough to make 6 sausages.

Add several inches of water to a large pot with a steamer basket and bring to a boil. Once boiling, add the sausages to the steamer basket and steam for 40 minutes. After steaming remove the sausages from the steamer and allow to cool completely in the fridge, overnight is best. The logs will have puffed up in the foil and become tight.

Once cooled, remove the foil and they are ready to enjoy as is or you can fry, grill, slice, or enjoy them any way you like.
Bon appetegan!
Sam.
Vegan Italian Seitan Sausages
Easy to make with oil-free option. Perfect for the grill, BBQ, to toss on pasta, pizzas, salads, soups, on a bun, or to use anywhere you like!
Recipe adapted from Plant-Based Meats cookbook
2 tablespoons olive oil ((see notes for oil-free version))
1 yellow onion, (chopped)
3 cloves garlic, (minced)
3/4 cup vegetable broth
1/4 cup tomato paste
1/4 cup white miso paste
1/4 cup sun-dried tomatoes (the kind in oil), (finely chopped)
2 tablespoons nutritional yeast
1 tablespoon dried basil
2 teaspoons brown sugar
2 teaspoons fennel seeds
1 teaspoon dried rosemary
3/4 teaspoon salt
1/2 teaspoon crushed red pepper flakes ((optional for spice))
1/4 teaspoon liquid smoke
2 cups vital wheat gluten
Heat the olive oil in a medium frying pan or skillet over medium heat and when hot add the onions and garlic. Sauté until the onions turn translucent and begin to brown, about 5 minutes. Remove from heat and set aside.
In a large bowl whisk together the vegetable broth, tomato paste, and white miso pasted until smooth. Now add the sun-dried tomatoes, nutritional yeast, dried basil, brown sugar, fennel seeds, dried rosemary, salt, crushed red pepper flakes, liquid smoke, and all of the sautéd onions and garlic along with any oil leftover in the pan, and stir to combine. Lastly, add the vital wheat gluten and combine to make a dough. Knead the dough to make sure it’s all combined, but once combined, stop kneading. The more you knead the tougher the sausages will get so only do as much as is needed to incorporate the vital wheat gluten.
Cut the dough into 6 equal-sized pieces. Take one of the pieces of dough and place it on a sheet of aluminium foil. Shape the dough into a rough sausage shape, but don’t worry about making it look pretty or neat. Some pieces of onion and sun-dried tomato may fall out but just tuck them near the dough and it will all incorporate and shape up nicely as it cooks. Roll the sausage up loosely in a piece of aluminium foil then twist the ends closed. Repeat with the remaining pieces of dough to make 6 sausages.
Add several inches of water to a large pot with a steamer basket and bring to a boil. Once boiling, add the sausages to the steamer basket and steam for 40 minutes. After steaming remove the sausages from the steamer and allow to cool completely in the fridge, overnight is best. The logs will have puffed up in the foil and become tight. Once cooled, remove the foil and they are ready to enjoy as is or you can fry, grill, slice, or enjoy them any way you like.
* For the oil-free version, sauté the onions and garlic in water or broth instead of oil. Use the sun-dried tomatoes (the dry kind, not in oil), but soften them before adding them to the mixture by soaking them in hot water, and then draining the water once they are softened.
*Nutrition is based on one sausage. Recipe makes 6 sausages.
* If you prefer to avoid aluminum foil, roll the sausages up in parchment paper, and then roll the parchment paper wrapped sausages up in cheesecloth and tie the ends closed.
*These freeze wonderfully as well. Once cooled completley in the fridge, transfer them to an air-tight freezer container and toss in the freezer. Before using, allow them to thaw completley and then cook with them as you like.


This post Vegan Italian Seitan Sausages appeared first on It Doesn't Taste Like Chicken
August 4, 2019
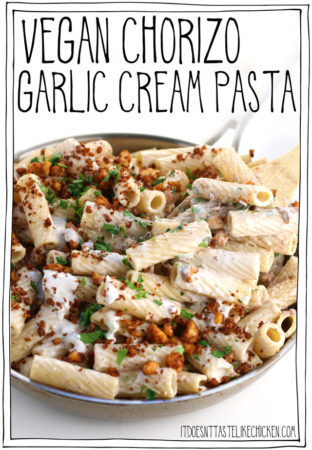
Vegan Chorizo Garlic Cream Pasta
Chewy flavour-packed homemade vegan tofu chorizo, paired with a 5-minute dairy-free garlic cream sauce, all tossed together with hot pasta. Yes, yes, and more yes!!! This vegan chorizo garlic cream pasta is the stuff of my pasta dreams! Easy to make and even easier to eat.

Ever since I developed my recipe for vegan chorizo tofu crumbles, I have been obsessed with using them everywhere. Bursting with spice these chewy little bites take any dish from bland to bold.
I had an idea to pair them with creamy pasta and let me tell you, that was a good idea!

Since the chorizo already has so much flavour, I kept the cream sauce very simple with just 4 ingredients, cashews, water, garlic, and salt. That’s it! If you have a high-powered blender you can make the sauce portion in just 5 minutes! It’s so easy I won’t be surprised if you start pouring this simple sauce all over everything.

How to make Vegan Chorizo Garlic Cream Pasta:
First, make a batch of my vegan chorizo tofu crumbles. This recipe can be made and used right away, or it can be prepared up to 4 days in advance and stored in the fridge until ready to use.

Next make this 5-minute vegan garlic cream sauce by adding the raw cashews, water, garlic, and salt to a high-powered blender until the sauce is completely smooth and creamy.
If you wish you can also make this sauce ahead of time and store it in the fridge for up to 1 day.
*If you don’t have a high-powered blender, you might want to boil the cashews first to ensure they are tender enough to blend into a smooth sauce. To do this add the cashews to a small pot and cover with water. Bring to a boil and cook for about 10 minutes until the cashews are very tender. Drain and rinse with cold water. You can now proceed to make the sauce in the blender by adding the raw cashews, followed by 1 cup of water, the garlic and salt and blend until smooth and creamy.
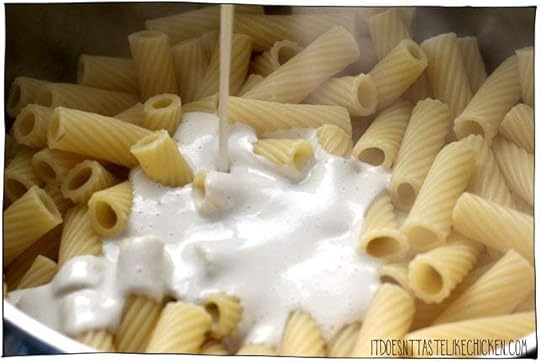
To prepare the pasta, bring a large pot of water to a boil and cook your pasta of choice. I used rigatoni, but any shape will work just fine. Once pasta is cooked, drain and return to the pot. Pour over the garlic cream and about half of the chorizo crumbles and stir to combine. If you find that your sauce gets too thick, you may add water as needed to thin.
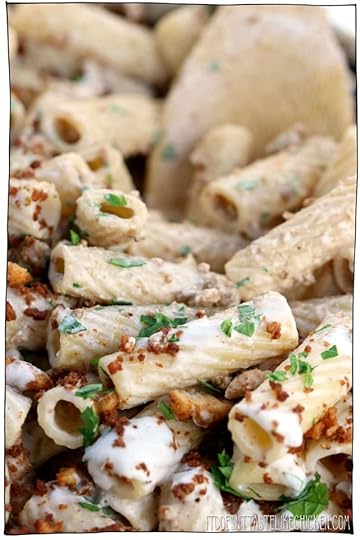
To serve, sprinkle the remaining chorizo crumbles over top along with freshly chopped parsley. Serve hot!

Enjoy alone or serve with a simple side salad.
Bon appetegan!
Sam.
Vegan Chorizo Garlic Cream Pasta
Chewy flavour-packed easy homemade vegan tofu chorizo, paired with a 5-minute dairy-free garlic cream sauce, all tossed together with hot pasta. Yes, yes, and more yes!!! Easy to make and even easier to eat.
1 batch Vegan Chorizo Tofu Crumbles
450 g pasta of choice, ((gluten-free if preffered), )
1 cup raw cashews
1 cup water ((plus more if needed))
2 cloves garlic
1 teaspoon salt
1 handful parsley, (roughly chopped (optional for garnish))
For the chorizo:
First, make a batch of my vegan chorizo tofu crumbles. You can prepare this ahead of time or prepare it fresh.
For the garlic cream sauce:
Next make this 5-minute vegan garlic cream sauce by adding the raw cashews, water, garlic, and salt to a high-powered blender until the sauce is completely smooth and creamy.
*If you don’t have a high-powered blender, you might want to boil the cashews first to ensure they are tender enough to blend into a smooth sauce. To do this add the cashews to a small pot and cover with water. Bring to a boil and cook for about 10 minutes until the cashews are very tender. Drain and rinse with cold water. You can now proceed to make the sauce in the blender by adding the raw cashews, followed by 1 cup of water, the garlic and salt and blend until smooth and creamy.
For the pasta:
To prepare the pasta, bring a large pot of water to a boil and cook your pasta of choice. I used rigatoni, but any shape will work just fine. Once pasta is cooked, drain and return to the pot. Pour over the garlic cream and about half of the chorizo crumbles and stir to combine. If you find that your sauce gets too thick, you may add water as needed to thin. Sprinkle the remaining chorizo crumbles over top along with freshly chopped parsley. Serve hot!
Vegan chorizo crumbles can be made and used right away, or it can be prepared up to 4 days in advance and stored in the fridge until ready to use.
Garlic cream sauce can be made ahead of time and store it in the fridge for up to 1 day.
Nutrition is based on 1/6th of the prepared pasta.


This post Vegan Chorizo Garlic Cream Pasta appeared first on It Doesn't Taste Like Chicken
July 28, 2019
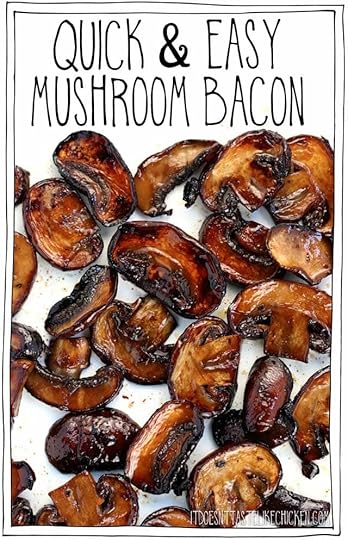
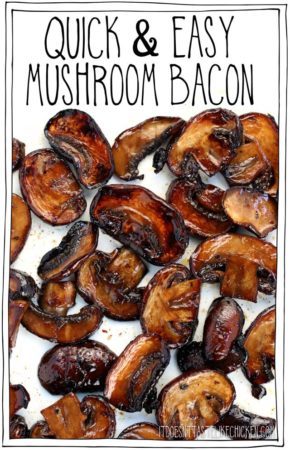
Quick & Easy Mushroom Bacon
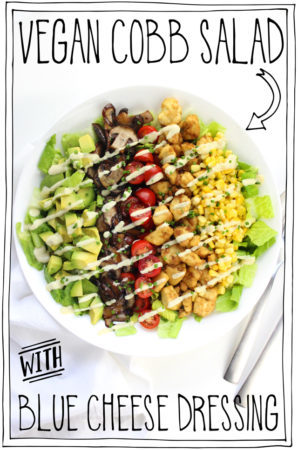
Chewy, smoky, salty, quick & easy mushroom bacon is getting served up today! While I love inventing new and adventurous recipes like my seitan steaks, I sometimes forget that not everyone knows the basics. I have been whipping up this vegan mushroom bacon for years but it just occurred to me that I’ve never shared it with you! How terrible is that!? How dare I not share this deliciousness with you!? Mean, Sam. You’re being a meany.
Well, I did sort of share the recipe as part of my cobb salad, (although it was tweaked a bit), but as this bacon can be used everywhere it deserves its own dedicated post. So meany no more.
This mushroom bacon is quick to make. Most mushroom bacon is baked in the oven, and while you can totally do that (I provide those instructions too), I generally prefer to toss it in a skillet as it’s faster and easier.
This vegan mushroom bacon is so simple too with just 5 ingredients. It’s so quick and easy to make that I often make it as a last-minute add on to amp up any dish.

Mushroom bacon isn’t as crispy as my coconut bacon or rice paper bacon (both of which are found in my cookbook), or even my banana peel bacon, but the meaty texture of mushrooms is so satisfying that it really has that bacon vibe.
Where to use mushroom bacon:
Sprinkle it over pasta such as my carbonara recipe.
Add it to salads.
Layer it onto a sandwich.
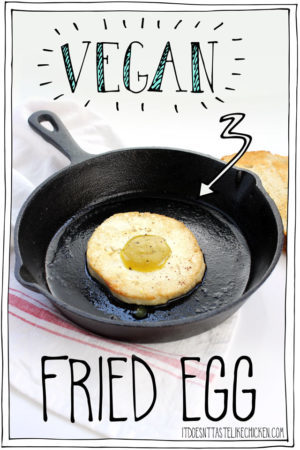
Serve it with my tofu scramble or vegan fried egg.
Add extra oomph to my breakfast sandwich.
Top a pizza.
Garnish potato soup.
Eat it straight from the pan.

How to make mushroom bacon:
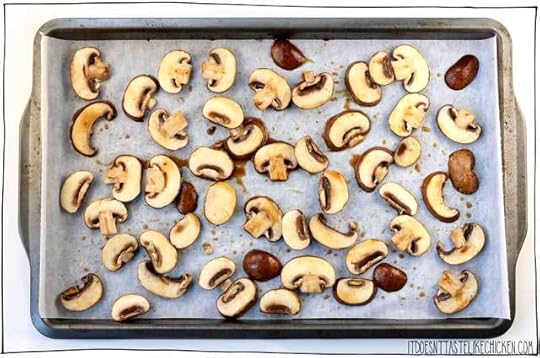
Slice the mushrooms. I used cremini mushrooms but almost any other kind of mushroom would work well too. Portobellos, button, shiitake, or king oyster would all be yummy and provide different texture and size of bacon bits.

In a medium bowl, mix together the olive oil, soy sauce, maple syrup, and liquid smoke.

Add the sliced mushrooms to the bowl and gently toss to evenly coat the mushrooms.

For Fried Mushroom Bacon:
Heat a large skillet or non-stick frying pan over medium-high heat. When the pan is hot add the mushrooms and any leftover marinade.
Tip: If your pan is not that large, you may want to work in batches as you will get the best results if the mushrooms are in a single layer on the bottom of the pan.
Fry 5 – 10 minutes letting them get golden on one side before flipping. Try not to stir the mushrooms too much as letting them rest will allow them to really brown up. It may get a little smoky, so be sure to turn on your hood fan.
For Baked Mushroom Bacon:
Spread the mushrooms slices in a single layer over a parchment paper-lined baking sheet, and pour over any leftover marinade. Add to the oven and bake for 18 – 25 minutes until dark golden and reduced in size.

Mushroom bacon is most delicious enjoyed still warm but it can also be enjoyed cold. Store in an air-tight container in the fridge up to 4 days. Reheat if needed.
Bon appetegan!
Sam.
Quick & Easy Mushroom Bacon
Just 5 ingredients and toss it in a skillet to fry up smoky, chewy, salty, mouthwatering vegan and vegetarian-friendly bacon. Use as a topping on soups, salads, sandwiches, pasta, pizza, or serve it with tofu scramble for a vegan breakfast.
1 1/2 tablespoons olive oil
1 1/2 tablespoons soy sauce
1/2 tablespoon maple syrup or agave
1/2 teaspoon liquid smoke
8 oz cremini or other type of mushrooms, (sliced )
In a medium bowl, mix together the olive oil, soy sauce, maple syrup, and liquid smoke. Add the sliced mushrooms to the bowl and gently toss to evenly coat the mushrooms.
For Fried Mushroom Bacon (the quicker method):
Heat a large skillet or non-stick frying pan over medium-high heat. When the pan is hot add the mushrooms and any leftover marinade. Tip: If your pan is not that large, you may want to work in batches as you will get the best results if the mushrooms are in a single layer on the bottom of the pan. Fry 5 – 10 minutes letting them get golden on one side before flipping. Try not to stir the mushrooms too much as letting them rest will allow them to really brown up. It may get a little smoky, so be sure to turn on your hood fan. Remove from the pan and enjoy!
For Baked Mushroom Bacon:
Preheat your oven to 375F (190C). Line a large baking sheet with parchment paper.
Spread the mushrooms slices in a single layer over the prepared baking sheet, and pour over any leftover marinade. Add to the oven and bake for 18 – 25 minutes until dark golden and reduced in size.
Mushroom bacon is most delicious enjoyed still warm but it can also be enjoyed cold. Store in an air-tight container in the fridge up to 4 days. Reheat if needed.
This post Quick & Easy Mushroom Bacon appeared first on It Doesn't Taste Like Chicken
July 21, 2019
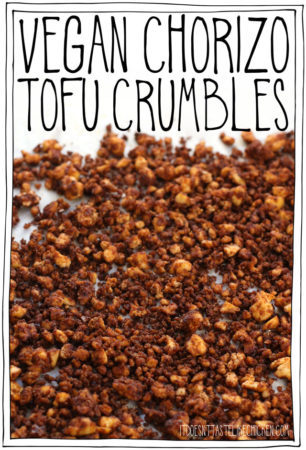
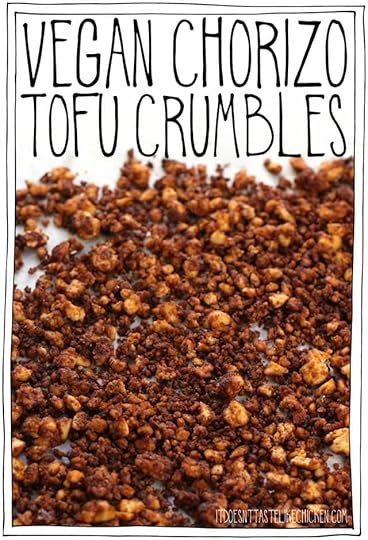
Vegan Chorizo Tofu Crumbles
If you ever uttered the words ‘tofu is bland’, then you haven’t tried these Vegan Chorizo Tofu Crumbles.
Easy to make and can be prepared ahead of time, this vegan chorizo recipe can be used to amp up any dish!
Tofu is one of my most favourite foods ever (I know, I know, how very vegan of me). The thing is that when people say they don’t like tofu, I can pretty much guarantee you that what they should have said was that they don’t like tofu the way they’ve had it prepared so far. Tofu is totally bland and boring straight out of the package, so it needs a little love.
Spices, sauces, breading, baking, frying, whatever you want. These vegan chorizo tofu crumbles are jam-packed full of gorgeous spices, and then they are baked which dries out the tofu a little and makes it chewy. No bland tofu here!
I admit it, I have a tofu crumble addition…
I have used them in my bolognese sauce, my chili, and in tacos. Each time adjusting the spices and seasonings so they suit the recipe. So if you’ve ever made one of those recipes before then you have a pretty good idea of how these vegan chorizo tofu crumbles work, and you likely have a pretty good idea of how insanely delicious these are!
This recipe requires a lot of spices, just like traditional chorizo, but even though the list is pretty long, I assure you this recipe is super easy to make. I love making my vegan chorizo tofu crumbles ahead of time and storing them in an air-tight container in the fridge for up to 4 days, or you can freeze them so they are ready to go for the perfect topping! (That is if you can resist eating them all straight from the pan).
Where to use vegan chorizo:
On pizza
In a taco
In a burrito
On a burrito bowl
On nachos
Stirred into rice
On top of roasted potatoes
On potato soup
In a stuffed pepper
Anywhere that needs a little pick me up!

To make vegan chorizo tofu crumbles:
Mix the oil, soy sauce, vinegar and all of the spices together in a large bowl.
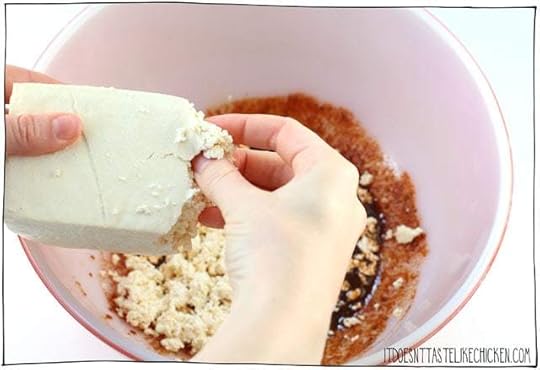
Crumble the block of tofu with your fingers into the bowl with the seasoning.

Mix the tofu crumbles with the seasoning making sure all of the tofu is evenly coated.
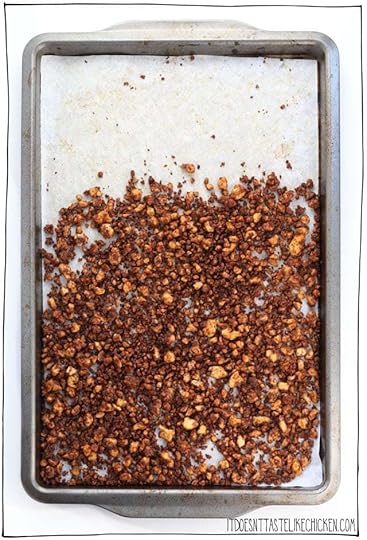
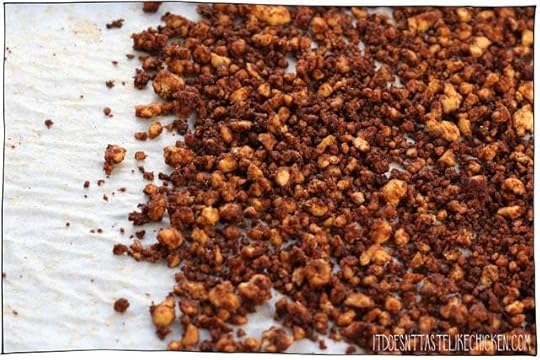
Spread the tofu crumbles evenly over the prepared pan. Bake for 25 to 30 minutes, stopping to stir the tofu every now and then. Keep a close eye on it towards the end so that it doesn’t burn. You want the tofu to be nice and browned. The smaller crumbles will be darker than the larger crumbles, and that’s ok because it will provide a variety of texture.
Baking the tofu makes the crumbles chewy but you could alternatively cook the seasoned crumbles in a skillet over medium-high heat, stirring often until they darken about 10 minutes. They won’t be as chewy this way but the flavour will still be there.
Enjoy however you like, hot or cold.
Bon appetegan!
Sam.
Vegan Chorizo Tofu Crumbles
Easy to make and can be prepared ahead of time, this vegan chorizo recipe can be used to amp up any dish! Sprinkle it on pizza, tacos, in a burrito, in a bowl, on nachos, in rice, on top of roasted potatoes, on soup, in a stuffed pepper, or anywhere you like.
2 tablespoons light oil ((such as canola or vegetable))
2 tablespoons soy sauce
1 tablespoon apple cider vinegar
1 tablespoon chili powder
2 teaspoons smoked paprika
1 teaspoon garlic powder
1 teaspoons oregano
1/2 teaspoon black pepper
1/4 teaspoon ground cumin
1/4 teaspoon ground coriander
1/8 teaspoon ground cloves
1, 350g block extra-firm tofu, (crumbled)
Preheat your oven to 350F (180C). Line a large baking sheet with parchment paper or lightly grease it.
Mix the oil, soy sauce, vinegar and all of the spices together in a large bowl.
Crumble the block of tofu with your fingers into the bowl with the seasoning. Mix the tofu crumbles with the seasoning making sure all of the tofu is evenly coated. Spread the tofu crumbles evenly over the prepared pan. Bake for 25 to 30 minutes, stopping to stir the tofu every now and then. Keep a close eye on it towards the end so that it doesn't burn. You want the tofu to be nice and browned. The smaller crumbles will be darker than the larger crumbles, and that's ok because it will provide a variety of texture. Enjoy hot or cold.
Baking the tofu makes the crumbles chewy but you could alternatively cook the seasoned crumbles in a skillet over medium-high heat, stirring often until they darken about 10 minutes. They won’t be as chewy this way but the flavour will still be there.
This chorizo has a nice lingering spice but if you want to make it even spicier add 1/4 – 1/2 teaspoon cayenne powder along with the other spices.


This post Vegan Chorizo Tofu Crumbles appeared first on It Doesn't Taste Like Chicken
July 14, 2019
Vegan Strawberry Shortcake
There are few things better in life than a basket of freshly picked Ontario strawberries. Oh wait, yes there are, freshly picked Ontario strawberries with a cloud of coconut cream layered between homemade vegan shortcakes. Insert drooling here. Strawberry shortcakes have always been one of my favourite summer treats, so I have no idea why it took me so long to veganize this recipe, but I’m so glad I finally did. These vegan strawberry shortcakes taste just like the traditional recipe, except even better!

Vegan strawberry shortcakes look so gorgeous and fancy but they are actually super easy to make. The biscuit dough can easily be whipped up in a food processor, or if you don’t have one they can be made by hand with just a bowl and a fork.

Another bonus about this recipe is that everything can be made ahead of time. The biscuits can be made 2 – 3 days in advance and kept in an air-tight container in the fridge, or you can even freeze them. The coconut whipped cream and strawberries can be prepared up to 1 day in advance. So when you are ready to serve the vegan strawberry shortcakes, you just cut the biscuits in half, and layer them up with all the toppings. Totally simple and totally delicious.

To make vegan strawberry shortcake you can choose to either use a food processor or to mix by hand.
If you are using a food processor: add the flour, sugar, baking powder, and salt and pulse a few times to whisk. Add the cold vegan butter and pulse several times until the flour mixture looks crumbly.
If mixing by hand: in a large bowl, whisk together the flour, sugar, baking powder, and salt. Cut the vegan butter into small cubes, and scatter them over the flour mixture. Use a pastry cutter or fork to cut the butter into the flour until you reach crumb texture.

Then…
If using a food processor: mix together the non-dairy milk and lemon juice, then pour over the flour mixture. Pulse just 3 – 4 times to mix until the dough is shaggy and there are still lots of crumbs. Be careful not to over mix the dough.
If mixing by hand: cut the vegan butter into small cubes, and scatter them over the flour mixture. Use a pastry cutter or fork to cut the butter into the flour until you reach crumb texture. Mix together the non-dairy milk and lemon juice, then pour over the flour mixture. Gently mix until you have a shaggy dough with lots of crumbs, don’t over mix, it should look quite loose.
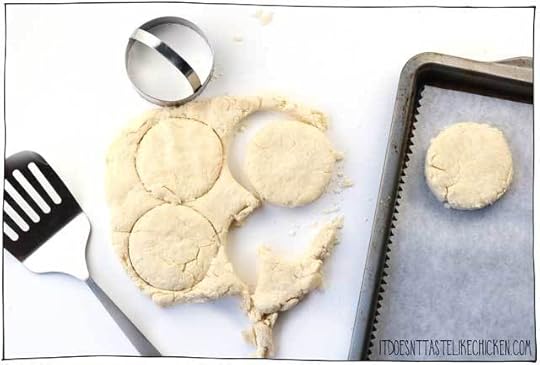
Turn the dough out onto a clean work surface. The dough will be soft, wet, and crumbly. Gather and gently pat the dough together and flatten to about 3/4″ thick. Do not roll it into a ball or knead it, you just need to gently pat it into shape. Use a large circle cutter to cut the dough into rounds, reforming the scraps to make 6 biscuits. Tip: don’t twist the cutter, this will hinder the dough from rising properly. You could alternatively, use a knife to cut the dough into squares, or just gently form the biscuits by hand.

Place biscuits on the prepared baking sheet and bake for 14 – 16 minutes until slightly risen and lightly golden. Let cool.

To prepare the strawberries: gently stir the strawberries with sugar in a medium bowl. Allow the strawberries to rest for 10 – 20 minutes, or even overnight in the fridge so they release their juices.

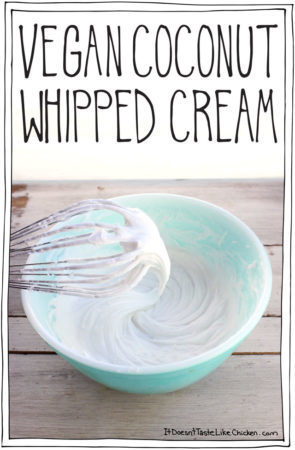
Make the vegan coconut whipped cream according to my recipe. If you like a lot of whipped cream you may want to double the recipe. Alternatively, these days a lot of grocery stores carry pre-made vegan whipped cream if you want to save yourself a step.

To assemble the vegan strawberry shortcakes: carefully slice the cooled biscuits in half. Place the bottom half on a plate, top with strawberries, a dollop of coconut whipped cream, the remaining half of the biscuit, topped with more strawberries and a final dollop of coconut whipped cream. Serve right away.
Bon appetegan!
Sam.
Vegan Strawberry Shortcakes

Easy to make, and can even be prepared ahead of time. Fresh juicy strawberries with a cloud of coconut cream layered between homemade vegan shortcakes. The perfect summer dessert.
For the vegan shortcakes:
1 1/2 cups all-purpose flour
2 tablespoons white sugar
1 tablespoon baking powder
1/4 teaspoon salt
6 tablespoons cold vegan butter
1/2 cup non-dairy milk ((such as soy or almond))
1 teaspoon lemon juice
For the toppings:
4 cups strawberries, (stems removed and sliced)
2 tablespoons white sugar
1 recipe Vegan Coconut Whipped Cream ((or sub store-bought vegan whipped cream) see notes)
Preheat your oven to 425F (220C). Line a large baking sheet with parchment paper.
If using a food processor: add the flour, sugar, baking powder, and salt and pulse a few times to whisk. Add the cold vegan butter and pulse several times until the flour mixture looks crumbly. Mix together the non-dairy milk and lemon juice, then pour over the flour mixture. Pulse just 3 – 4 times to mix until the dough is shaggy and there are still lots of crumbs. Be careful not to over mix the dough.
If mixing by hand: in a large bowl, whisk together the flour, sugar, baking powder, and salt. Cut the vegan butter into small cubes, and scatter them over the flour mixture. Use a pastry cutter or fork to cut the butter into the flour until you reach crumb texture. Mix together the non-dairy milk and lemon juice, then pour over the flour mixture. Gently mix until you have a shaggy dough with lots of crumbs, don't over mix, it should look quite loose.
Form the biscuits: turn the dough out onto a clean work surface. The dough will be soft, wet, and crumbly. Gather and gently pat the dough together and flatten to about 3/4" thick. Do not roll it into a ball or knead it, you just need to gently pat it into shape. Use a large circle cutter to cut the dough into rounds, reforming the scraps to make 6 biscuits. Tip: don't twist the cutter, this will hinder the dough from rising properly. You could alternatively, use a knife to cut the dough into squares, or just gently form the biscuits by hand. Place biscuits on the prepared baking sheet and bake for 14 – 16 minutes until slightly risen and lightly golden. Let cool.
To prepare the strawberries: gently stir the strawberries with sugar in a medium bowl. Allow the strawberries to rest for 10 – 20 minutes, or even overnight in the fridge so they release their juices.
To assemble the vegan strawberry shortcakes: carefully slice the cooled biscuits in half. Place the bottom half on a plate, top with strawberries, a dollop of coconut whipped cream, the remaining half of the biscuit, topped with more strawberries and a final dollop of coconut whipped cream. Server right away.
The biscuits can be made 2 – 3 days in advance and kept in an air-tight container in the fridge, or you can even freeze them. The coconut whipped cream and strawberries can be prepared up to 1 day in advance.
Make the vegan coconut whipped cream according to my recipe. If you like a lot of whipped cream you may want to double the recipe. Alternatively, these days a lot of grocery stores carry pre-made vegan whipped cream if you want to save yourself a step.


This post Vegan Strawberry Shortcake appeared first on It Doesn't Taste Like Chicken
July 7, 2019
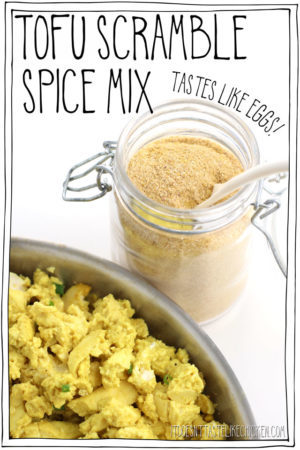
Tofu Scramble Spice Mix – Tastes Like Eggs!
Just 5 ingredients to make your own homemade tofu scramble spice mix that will make your tofu taste like eggs! Make ahead and have it ready to go so breakfast will be ready in a jiffy!

I was browsing Instagram the other day when I came across a pre-made spice mix that was intended to make tofu scramble taste like eggs. The idea was great, but the price tag- not so much. I had a look at the ingredients and realized I had everything already at hand in my kitchen, so I started playing around and made my own tofu scramble spice mix. And you know what, it really does make tofu taste like eggs. I don’t think it’s eggy enough to fool someone completely, but it’s pretty close and definitely tasty!

The secret to this spice mix is black salt which is also called kala namak. It’s the same ingredient I use to make my Vegan Toast Dipping Sauce (which is like a vegan egg yolk).
If your black salt is black in colour, then you have the wrong stuff! Don’t use it in this recipe as it won’t taste correct and will make your tofu a funny green colour. Yuck. The black salt I’m referring to is actually pink in colour and has a very eggy taste. It’s the must-have key ingredient in this tofu scramble spice mix so don’t skip it!
You can find black salt online on Amazon or in Indian grocery stores.
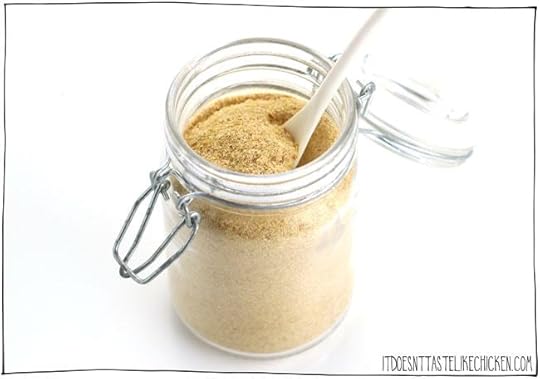
To make the tofu scramble spice mix: add all of the ingredients into a sealable jar and shake well or stir to combine. Store in your pantry until ready to use.
This recipe makes enough for 4 servings but feel free to multiply or reduce the recipe as you see fit.

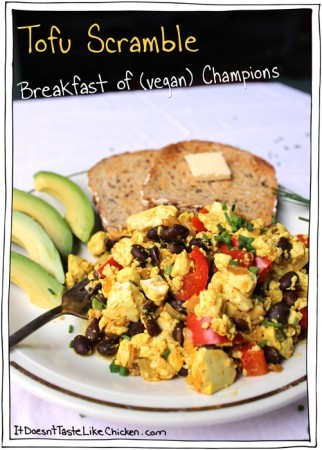
When you are ready to prepare your tofu scramble, add vegan butter or oil to a pan and heat. When hot add your tofu of choice. Medium-firm tofu will result in a creamy and tender scramble, firm tofu will be a bit less tender, and extra-firm tofu is perfect for a dryer scramble. Crumble the tofu of choice into the pan, and sprinkle over 2 tablespoons of the tofu scramble spice mix. Stir to evenly distribute the spice and heat through.

Feel free to amp up your tofu by first sautéing veggies, adding beans, or any garnishes you like. You can enjoy the scramble plain, on toast, in a breakfast burrito, in a bowl, or anywhere you enjoy.
Store the remaining spice mix in a jar in your cupboard to have at the ready for next time.
Bon appetegan!
Sam.
Tofu Scramble Spice Mix – Tastes Like Eggs!
Just 5 ingredients to make your own homemade spice mix that will make your tofu taste like eggs! Make ahead and have it ready to go so breakfast will be ready in a jiffy!
For the tofu seasoning powder:
1/2 cup nutritional yeast
4 teaspoons black salt
3 teaspoons onion powder
1 teaspoon garlic powder
1 teaspoon tumeric
To use the tofu seasoning powder:
1 tablespoon vegan butter or oil ((skip for oil-free))
1, 420g block medium-firm, firm, or extra-firm tofu
2 tablespoons tofu seasoning powder
To make the tofu scramble spice mix:
Add all of the ingredients into a sealable jar and shake well or stir to combine. Store in your pantry until ready to use.
To make a tofu scramble:
Add vegan butter or oil to a pan and heat. When hot add your tofu of choice. Medium-firm tofu will result in a creamy and tender scramble, firm tofu will be a bit less tender, and extra-firm tofu is perfect for a dryer scramble. Crumble the tofu of choice into the pan, and sprinkle over 2 tablespoons of the tofu scramble spice mix. Stir to evenly distribute the spice and heat through.


This post Tofu Scramble Spice Mix – Tastes Like Eggs! appeared first on It Doesn't Taste Like Chicken
June 30, 2019
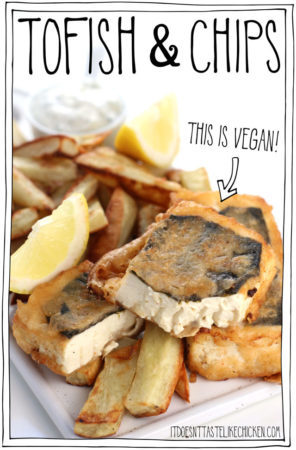
Tofish and Chips (vegan fish and chips)
During my recent trip to London, I tried 3 different vegan fish and chips dishes. They were all good-ish, but none of them were great. The most interesting vegan fish I tried was made from a banana blossom, but banana blossoms aren’t easily available here in Toronto. The other two I tried were both called tofish and chips where the “fish” was made from tofu. These were both only ok. They both used nori (the same seaweed that is used to make sushi rolls) as a kind of fish skin, which was pretty neat. But the tofu itself was way underseasoned and lacked texture.
The good news? I knew I could improve on this greatly to make a tofish and chips that had a ton of flavour and a cool flaky texture. Home cooking for the win!

For the texture, I was inspired my friend The Easy Vegan where he sliced blocks of tofu very thinly to give a flaky-like texture. I took his method and adjusted it slightly to make it my own.
For the flavour, I first pressed the tofu to get as much water out as possible, then I made an umami-packed marinade, letting that soak into the tofu overnight. The thin slices on the tofu had the added benefit of enabling the marinade get deep into the tofu to make for the most flavourful vegan fish and chips.
And to finish it off, just like at the restaurants, I added a piece of nori on top of the tofu before dipping into batter before frying for a kind of skin that has the taste of the sea.
The result: the best tofish and chips I’ve ever had! Hands down. Hands down to pick up your fork and knife so you can eat more tofish.

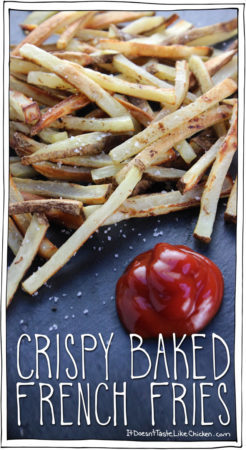
Flaky flavourful tofish in a crispy beer batter (the beer is optional). Serve it with some homemade chips, I used my recipe for crispy baked french fries, but I cut the fries a little thicker for that chip vibe. Then serve it with vegan tartar sauce (page 144 in Fuss-Free Vegan), and slices of lemon. Or use whatever your favourite accompaniments are.

To make tofish and chips (vegan fish and chips): drain and press the tofu for 20 minutes or longer. See my guide on how to press tofu for more info.
Once the tofu is pressed, slice the tofu into four slices about 1″ thick. To make the flaky texture, take one of the tofu pieces and slice the tofu part way through repeatedly about 1/4″ apart. It’s helpful to use chopsticks on either side of the tofu to stop from cutting all the way through the tofu so the slices remain intact.

I like to cut the slices on a slight angle for that extra fishy texture. This technique not only makes the tofu look like fish, but it provides the flaky texture, and it lets the marinade soak through the tofu for maximum flavour!

Mix together the vegetable broth, lemon juice, white miso paste, onion powder, garlic powder, and salt in a flat dish or resealable bag. Add the tofu slices, being careful to handle them gently so they don’t fall apart. Let marinate for a minimum of 1 hour or as long as a few days covered in the fridge. I usually marinate it overnight in the fridge.

To make a fish-like skin I use nori sheets (the same sheets of seaweed you use to roll sushi). Cut rectangles about the same size as the four tofu pieces.

To make the batter, in a medium bowl mix together the flour, paprika, garlic powder, and salt. Add 1 cup of soda water or beer and mix. Add up to 1/4 cup more liquid as needed to reach a thick pancake batter consistency.

For frying the tofish, I prefer to do a shallow fry where only a small amount of oil is used. I’m personally not a big fan of deep frying as it can be quite dangerous. But if you are comfortable you are welcome to deep fry this tofish. Either way, always be extra careful when working with hot oil!
To shallow fry, pour enough oil to generously coat the bottom of a heavy skillet or pot. Put over medium-high heat. When the oil is hot and ready for frying, take a piece of nori and place it on the side of the tofu that doesn’t have cuts. Hold the nori on the tofu and dip the tofu into the batter to coat. Gently place the battered tofu directly into the hot oil, being careful as it may spit. Repeat with the remaining tofu slices. Fry 2 – 3 minutes per side, turning as needed until the batter is golden and crisp all over. 
Drain on paper towel. Serve hot with chips, a squeeze of lemon, and tartar sauce.
Bon appetegan!
Sam.
Tofish and Chips (vegan fish and chips)
The "fish" is made from tofu with a special technique that makes it flaky and full of flavour, all fried up in a homemade beer batter.
For the tofish:
1, 420g block firm tofu, (drained and pressed (see step 1))
1/2 cup vegetable broth or water
2 tablespoons lemon juice
1 tablespoon white miso paste
1/2 teaspoon onion powder
1/2 teaspoon garlic powder
1/4 teaspoon salt
For the batter:
1 cup all-purpose flour
1 teaspoon sweet paprika
1 teaspoon garlic powder
1/2 teaspoon salt
1 – 1 1/4 cups soda water or beer
1 sheet nori, (cut into pieces (see step 4))
oil for frying
Add ons:
1 recipe Crispy Baked French Fries, (cut slightly thicker to make a heartier chip)
1 recipe Vegan Tartar Sauce ((Page 144 in Fuss-Free Vegan))
1 lemon, (sliced into wedges)
Prep the tofu: drain and press the tofu for 20 minutes or longer. See my guide on how to press tofu for more info. Once the tofu is pressed, slice the tofu into four slices about 1" thick. To make the flaky texture, take one of the tofu pieces and slice the tofu part way through repeatedly about 1/4" apart. It's helpful to use chopsticks on either side of the tofu to stop from cutting all the way through the tofu so the slices remain intact. See the photos in the post for a visual guide.
Mix the marinade: mix together the vegetable broth, lemon juice, white miso paste, onion powder, garlic powder, and salt in a flat dish or resealable bag. Add the tofu slices, being careful to handle them gently so they don't fall apart. Let marinate for a minimum of 1 hour or as long as a few days covered in the fridge. I usually marinate it overnight in the fridge.
Make the batter: in a medium bowl mix together the flour, paprika, garlic powder, and salt. Add 1 cup of soda water or beer and mix. Add up to 1/4 cup more liquid as needed to reach a thick pancake batter consistency.
Cut the nori: to make a fish-like skin I use nori sheets (the same sheets of seaweed you use to roll sushi). Cut 4 rectangles that are about the same size as the four tofu pieces. Set aside.
Fry the tofish: pour enough oil to generously coat the bottom of a heavy skillet or pot. Put over medium-high heat. When the oil is hot and ready for frying, take a piece of nori and place it on the side of the tofu that doesn't have cuts. Hold the nori on the tofu and dip the tofu into the batter to coat. Gently place the battered tofu directly into the hot oil, being careful as it may spit. Repeat with the remaining tofu slices. Fry 2 – 3 minutes per side, turning as needed until the batter is golden and crisp all over. Drain on paper towel. Serve hot with chips, a squeeze of lemon, and tartar sauce.


This post Tofish and Chips (vegan fish and chips) appeared first on It Doesn't Taste Like Chicken
Sam Turnbull's Blog

- Sam Turnbull's profile
- 35 followers

