David Gibbins's Blog, page 5
January 24, 2016


January 21, 2016
My kinda scene: David Gibbins on Master and Commander
Click on the link below to read a blog I wrote for one of my publisher's sites on my favourite scene in the film Master and Commander.
http://www.torbooks.co.uk/blog/2015/11/19/my-kinda-scene-david-gibbins-on-master-and-commander
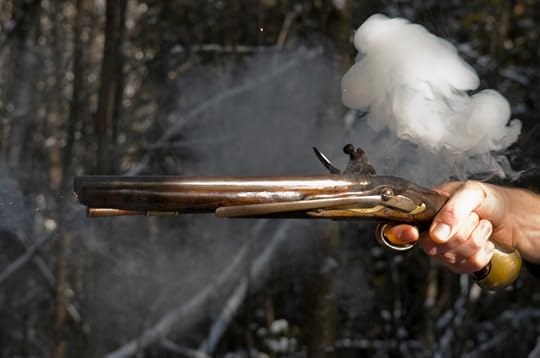
Photo by my brother Alan of me shooting an original Napoleonic period Sea Service pistol of the type depicted in the film Master and Commander. For more images and a video of this pistol, go here.
November 26, 2015
Brothers in Arms: General John Lawrenson, 17th Lancers (1802-83), and Colonel George Lawrenson, C.B., Bengal Horse Artillery (1803-56)
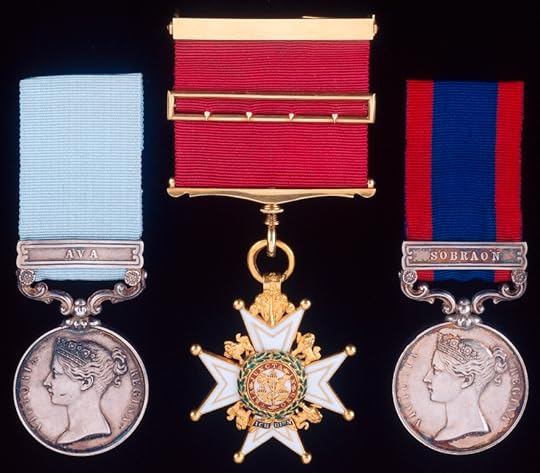
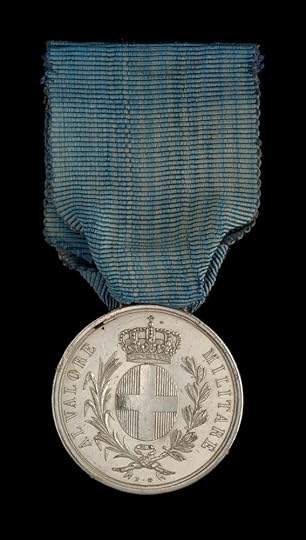
The medals of Colonel George Lawrenson, C.B. (1803-56), comprising the Army of India Medal 1799-1826 with clasp Ava (engraved with his name as Lieut., (1st) Regt. of Arty.), the breast badge of the Companion of the Order of the Bath (silver hallmarked for 1815), and the Sutlej Medal 1845-6 with clasp Sobraon (engraved with his name as Major, 2nd Brigade H. Ay.).
My account a few postings back of the military career of Captain Thomas Edward Gordon, 14th Light Dragoons (my great-great-great grandfather), has led me to look at the careers of two of his wife’s uncles, one an officer in the East India Company Army and the other in the British cavalry. Together the careers of these three men cover most of the big wars of the earlier part of Victoria's reign– the first Anglo-Sikh War of 1845-6 and the second of 1848-9, the Crimean War of 1854-6 and the Indian Mutiny of 1857-9. They encompass some of the most glorified moments of war in the Victorian age, epitomised in Crimea by the 'Thin Red Line' of the 93rd Highlanders and the Charge of the Light Brigade at Balaclava, as well as an increasing realisation of the misery and squalor of war, brought home by vivid reportage and imagery, by the work of Florence Nightingale and by the horrors of civilian slaughter in India during the Mutiny.
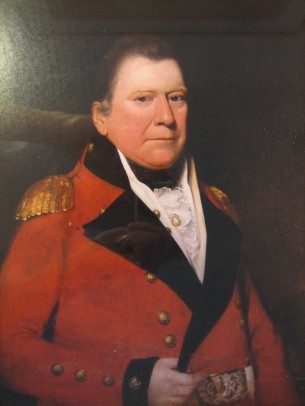
As well as their father, the Lawrenson brothers had an interesting military precedent in their great-uncle David Kerr, pictured here as a Major-General of Militia in Jamaica about 1805. He had gone from Scotland to Jamaica as a doctor, but was commissioned into the Militia aged 29 in 1768 and served in the war against the ‘Maroons’ – the descendants of runaway slaves – in the mid-1790s, by chance at the same time that the elder John Lawrenson was also there with the 18th Light Dragoons. The highlight of Kerr’s military career came in 1805 when the Governor mobilised the Militia against a possible invasion threat by the French, appointing Kerr a Major-General – the French Fleet was thought to be heading to Jamaica, but Nelson was in hot pursuit and in the end the clash took place not in the Caribbean but at Trafalgar (for an excellent account of David Kerr by one of his descendants, see here).
These wars were, of course, far from the stereotyped image of Victorian colonial adventure, with death tolls amounting in the tens and even hundreds of thousands, and with far-reaching geopolitical consequences: the Sikh Wars resulted in the annexation of the Punjab and the final shape of British India, the Mutiny marked the end of East India Company rule and the beginning of the Raj, and the Crimean War –almost a world war – saw Russia held at bay and the Ottoman Empire, ‘the sick man of Europe’, propped up as a buffer zone, with profound implications for the future of the Middle East. These mid-century wars also saw the disjunction between increasingly effective weaponry – in particular, the replacement of the musket by the rifle as the standard infantry arm, first used by to devastating effect by the British in the Crimea – and tactics of close-order battle that were little changed since Waterloo, something that was to see even more horrific carnage in the American Civil War, in the Franco-Prussian War and on the fields of France and Flanders a few generations later.
All of that would have been unimaginable when John and George Lawrenson took up their commissions in 1818-19, only a few years after Waterloo and with Europe at peace for the first time in generations. They had been born, on 2 February 1802 and 9 February 1803 respectively, in Restabrig, near Edinburgh, Scotland, to Margaret and John Lawrenson, who also had six daughters (Sarah, my four-times great grandmother, had been born in 1800). Margaret was the daughter and heir of George Simson of Invereighty, in Forfarshire, and the granddaughter of William Kerr, Provost of Forfar; her uncle David Kerr was a Major-General of militia in Jamaica (see opposite).
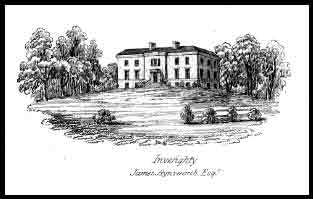
A 19th century image of Invereighty House, the home of Colonel John Lawrenson and his family after his wife inherited it in 1794 on the death of her brother, William Simson (their father George Simson had previously owned it). Invereighty was one of three estates in the parish of Kinnettles, just south of the town of Forfar and about 13 miles north of Dundee. The house was demolished in the 1960s.
The boys' father John Lawrenson, an Irishman, was a Captain in the 18th Light Dragoons at the time of their births, having been with the regiment when it served in Jamaica in 1795-7 and at the Battle of Bergen in Holland on 19 September 1799, one of the last set-piece battles to be fought by the British against Revolutionary France before the advent of Napoleon. Two accounts of this period of the regiment's history including mention of Lawrenson can be read online, Malet's Historical Records of the 18th Hussars (1869) and The Historical Memoirs of the XVIII Hussars (1907), the latter in more detail. The regiment had been raised in Ireland in 1759, eighteen years before Lawrenson first appears on the regimental list as a Cornet, and remained there until going to Jamaica; a fellow Lieutenant in 1792-3 was another Irishmen, Arthur Wellesley, the future Duke of Wellington. John Lawrenson’s name disappears from the list after 1803, when he was appointed Major of Brigade for North Britain (as Scotland was termed). Later he was promoted to Lieutenant-Colonel, but he saw no further regimental service and appears to have lived the remainder of his years on the estate his wife had inherited at Invereighty, passing it on after his death in 1836 aged 78 to his eldest son John (who then sold it out of the family).
Colonel George Lawrenson, C.B.
It would have been an obvious choice, then, for John’s two sons to opt for a military career, and not surprising that they might focus on India. A large proportion of the officers in the East India Company Army were Scottish, and in the Dundee area, near where the boys grew up, there were also many merchants and shippers involved in trade with India. Of the two boys, George may have been the more academically inclined, being educated at St Andrew’s University (the Matriculation Roll shows him there in 1815-16, aged only 14), and at Addiscombe, the military academy of the East India Company (Vibart's Addiscombe: its Heroes and Men of Note shows him there in 1818-19), and then being selected for an artillery commission, which along with the engineers required a generally greater academic aptitude than the infantry or cavalry.
To trace the careers of Company officers we are fortunate to have Hodson’s Lives of the Officers of the Bengal Army, 1758-1834, collating details of service and family background not easily found elsewhere; the volumes are not yet online, but the entry for George is reproduced in the gallery at the bottom of this blog. This shows that after being commissioned into the Bengal Artillery in April 1819 he progressed at the usual slow rate through the ranks, reaching his final rank of Brevet Colonel in 1854. Promotion in the East India Company army was strictly by seniority, with men regardless of ability putting in many years as Lieutenants and Captains, and the only chance of accelerated promotion being the ‘brevet’ or extra-regimental promotions generally given at this period to Captains or Majors as a reward for distinguished service on campaign, or to Lieutenant-Colonels after a certain number of years within that rank to allow them a Colonel's pay and responsibility before they became too old.
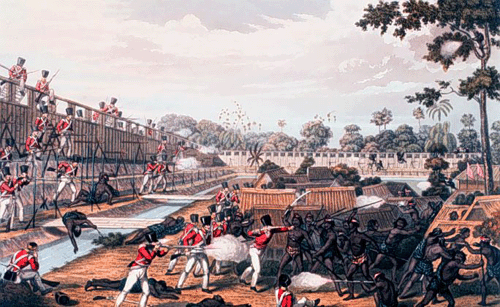
'The Storming of one of the principal Stockades on its inside on the 8th of July 1824', by Lieutenant Joseph Moore (1825-6). Lieutenant Moore of the 89th Foot was present during the Burma campaign, and this aquatint is based on one of his sketches. Although this depiction is based on Moore's experience of the capture of Rangoon in July, it gives an impression of what George Lawrenson might have seen in October with Brigadier McCreagh's force, as described in the text. His artillery would have been used to breach the wooden walls of the stockades and allow the infantry to assault any Burmese defenders remaining inside, using their flintlock muskets and bayonets, as seen here (Lieutenant Joseph Moore, Rangoon Views and Combined Operations in the Birman Empire, handcoloured aquatints published by Kingsbury, Parbury & Allen and T. Clay, London, 1825).
The first active service for George Lawrenson came in 1824 with the outbreak of the Anglo-Burmese War, an attempt by the British to stem the territorial ambitions of the King of Burma and to secure the eastern borders of India. Though successful in its objectives, the war cost over 15,000 British and Indian dead, many from disease, and exposed the British to the first time to the problems of fighting in the Burmese jungle that were to be experienced again in the 1850s and 1880s and during the Second World War . The role of Lieutenant Lawrenson in this campaign is recorded in Chapter XIII of Stubbs’ History of the Organisation, Equipment and War Services of the Regiment of Bengal Artillery, Vol. 2 (1877) and in Buckle's less detailed Memoir of the Services of the Bengal Artillery (1852), both of which can be read online. Having gone out to Burma as Adjutant of the Bengal Artillery in the expedition, he joined a detached force in early October under Brigadier M. McCreagh of some 450 Europeans and 350 Indian infantry, himself commanding an artillery detail of one five and a half inch mortar, one five and a half inch howitzer and one six pounder field gun, on a mission to take several enemy stockades. McCreagh’s Despatch of 14 October, which can be read in the London Gazette, describes how the force passed bodies of fallen soldiers from a previous unsuccessful foray who had been fastened to tree-trunks on the roadside, ‘mangled and mutilated in every manner that savage cruelty could devise.’ He particularly singled out the artillery for praise: ‘The manner in which the Bengal Artillery was forced over the most unfavourable ground and various difficult obstacles, reflects high credit on Lieutenant Lawrenson and his detachment.’ For his part in the campaign, Lawrenson - who had to leave through illness before the expedition was over, like many others - was to receive the Army of India Medal with the clasp “Ava” (the name of the capital of upper Burma), though not until 1851 when a medal for campaigns in India from 1803-26 was finally authorised.
George Lawrenson was not involved in the Bengal Army’s next great military adventure, the disastrous war in Afghanistan in 1839-42, but he did distinguish himself a few years later during the far more successful campaigns to defeat the Sikh kingdom of the Punjab and extend British rule towards the border with Afghanistan. By now a Major, and commander of the 2nd Brigade, Bengal Horse Artillery, he took part under Sir Harry Smith in the Battles of Aliwal on 28 January 1846 and Sobraon on 10 February, his role being recorded in the two regimental histories cited above. After Aliwal, where ‘the troops of horse artillery, under Major Laurenson (sic), dashed almost among the flying infantry, committing great havoc’, Sir Harry Smith begged in his official Despatch to ‘call his Excellency’s marked attention to Major Laurenson, commanding the Artillery.’ A popular history (Our Soldiers: Gallant Deeds of the British Army during Victoria's Reign) described how ‘… the Sikh guns were keeping up a heavy fire, and Major Lawrenson, not having time to send for orders, at once galloped with his horse artillery up to within a certain distance of the enemy's guns, unlimbered, and by his fire drove the enemy's gunners from their guns. This promptitude of the gallant officer saved many lives.’
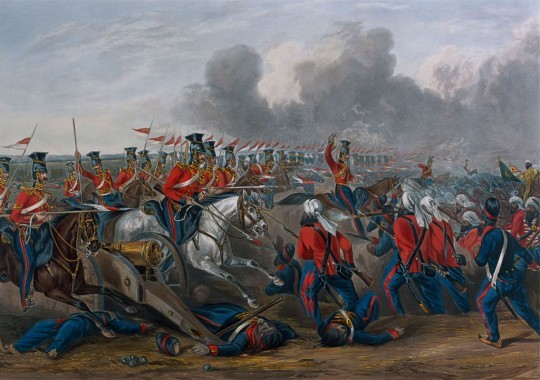
‘Charge of the 16th (Queen’s Own) Lancers at the Battle of Aliwal, January 1846’, showing an overrun Sikh field gun in the foreground. This gives a vivid image of the battle in which Major Lawrenson and his artillerymen distinguished themselves. Sir John Smith’s force was made up of a mix of British regiments, as shown here, and units of the East India Company army (British officered but with native sepoys), numbering altogether about 10,000 men with 24 guns (coloured aquatint by J. Harris after H. Martens, published by Rudolph Achermann, 1847. National Army Museum, Accession No. 1971-02-33-24).
At Sobraon less than two weeks later Lawrenson was again singled out for praise by Smith for his command of a battery of six eighteen-pounders. For his participation in the war Lawrenson received the Sutlej Medal (the campaign medal for the first Anglo-Sikh War, named after the main river in the battle area), with his first battle, Aliwal, being engraved directly on the reverse of the medal, and the clasp Sobraon added for the second. As well as being mentioned in despatches he was made a Companion of the Order of the Bath (C.B.), at that date the only decoration available to officers for gallantry or distinguished conduct in the field. You can see these actual medals and his Army of India medal at the top of this blog. Three years later he was promoted to Lieutenant-Colonel and five years after that to Brevet Colonel, his final rank. The Battle of Sobraon in 1846 was to be his last action, at a time when his older brother John was still almost eight years away from his first experience of battle.
General John Lawrenson
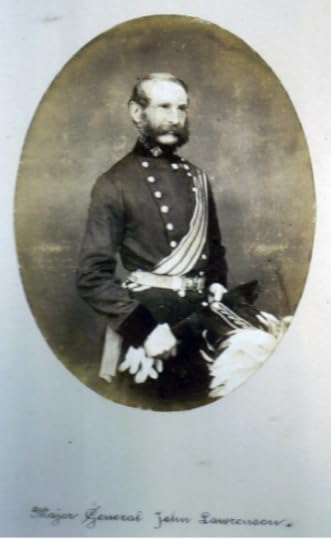
In this photo taken after his promotion to Major-General in 1860 he wears the ribbons of his two campaign medals (the Crimea Medal and the Turkish Crimea Medal) and two decorations (The Sardinian Medal for Valour and the Turkish Order of the Medjidie).
George’s brother John had the distinction of commanding one of the regiments of the Light Brigade in the Crimea in the leadup to the Battle of Balaclava, but in missing the famous Charge by only two days as a result of illness. This accident of fate, which may well have saved his life, had no apparent effect on his career progression – he went on to hold the highest cavalry command in the Crimea, and later one of the highest at home as well – but it may well have dogged him in other ways, and may help to account for the fact that he never received the knighthood that might otherwise have come his way. Like his brother he had begun his career in India, but instead of entering the East India Company Army he went out with a King’s regiment, the 13th Light Dragoons, joining them in England as a Cornet aged 16 in November 1818 and departing for the five-month voyage to India on 9 February. His commission was purchased, at a time when there was no requirement for new officers in cavalry regiments to have undergone any form of military training or education. However, the biography reproduced at the bottom of this blog reveals a lifelong passion for horses, including riding to hounds when he was on leave and half-pay in England; given his father’s background he may well have been an experienced horseman already by the time he joined the army.
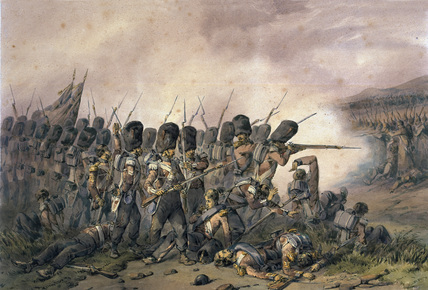
‘Battle of Alma, 1854’ by Orlando Norie, showing the Coldstream Guards. The Alma was best known for the achievements of the Highland Brigade, one of whose regiments, the 93rd, was to find further fame at Balaclava, after William Howard Russell – the celebrated war correspondent for The Times – described their defensive line as a ‘thin red streak’, later to enter popular parlance as the ‘Thin Red Line.’ This image could have come straight from the Napoleonic Wars, except that the British soldiers are firing percussion rifles – loaded from the muzzle in the same way as the smoothbore muskets of their Russian opponents, but far more accurate and with a greater range. The artist (one of the most prolific military painters of the 19th century) is thought to have based his Crimea watercolours on the sketches of his uncle Frederick Norie, who accompanied the Sardinian Army in 1854-5 (National Army Museum, Accession No. 1968-06-321-2).
Barrett’s History of the XIII Hussars (1911), which can be read in full online, shows that the regiment reached Madras on 13 June 1819 and was soon in its station at Arcot, beginning a twenty year period in which they saw no active service, despite the 1824 war in Burma (see above) and the 1826 siege of Bhurtpore. In September 1822 Lawrenson exchanged into the 4th Dragoon Guards, then in Ireland (see Historical Record of the 4th Dragoon Guards (1839), also online), so left India after only three years. The annual Army List shows his subsequent promotions and his transfer to the 17th Lancers - also based in Ireland – in March 1827. Unlike his brother George, whose promotion was entirely based on seniority, John was able to advance through purchase and exchange, resulting in him being a Captain aged only 23 in August 1825, ten years before his brother reached that rank (though Lieutenants in the Bengal Army had more responsibility than those in the King’s Army, commanding companies, squadrons and batteries).
After 18 years with the 17th he returned in 1845 as a Lieutenant-Colonel to his original regiment, the 13th Hussars – by then back in England – commanding it until going on half-pay in June 1848. Half-pay for an officer of his age and rank was often one step to retirement, and thus like many in the wake of the Napoleonic Wars whose regiments were based in Britain he would have completed a full career without once seeing active service.
This, however, was not to be, as in June 1851 he came out of half-pay on being given command of his old regiment, the 17th Light Dragoons, soon to be known as the ‘Death or Glory Boys’, and three years later he embarked with them to the Black Sea to face the Russians in the Crimean peninsula. Because his regiment was part of the Light Brigade – Tennyson’s Six Hundred who rode into the Valley of Death, ‘Theirs not to reason why, Theirs but to do or die’- there are many first-hand accounts that mention Lawrenson, including the Journal of fellow regimental commander Lord Paget of the 4th Light Dragoons. They show that Lawrenson was present with the regiment on 20 September at the Battle of the Alma, the first major battle of the war and the first between European powers for almost forty years, since Waterloo. The cavalry were largely held in reserve that day, but the battle resulted in more than 9,000 casualties on both sides, a foretaste of the slaughter to come in the other great battles of the war - at Balaclava and at Inkerman that autumn and at Chernaya and the other clashes the following year during the Siege of Sevastopol.
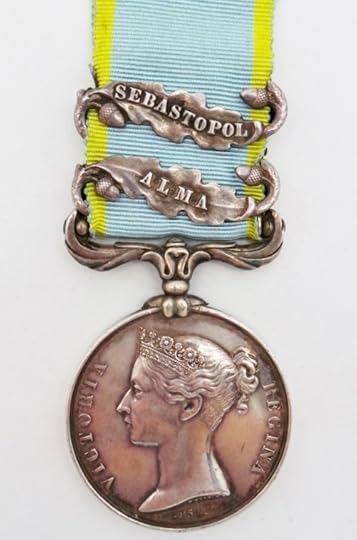
The whereabouts of General Lawrenson's medals are unknown, but this example of the British Crimea Medal bearing the same two clasps as his own shows why Lord Paget and other officers derided them as looking like decanter labels, by contrast with the more sober appearance of earlier campaign medals such as that of George Lawrenson for the Sikh War shown at the top of this blog. The Crimea Medal was authorised in 1855 while the war was still ongoing, so was distributed to soldiers still in the field as well as to the sick and wounded who had come home.
The cavalry were, famously, not held back at Balaclava, but by the time of the Charge of the Light Brigade on 25 October – after which only 38 of the 145 men of the 17th Lancers who had set out could be accounted for – John Lawrenson was already on his way back to England, one of many thousands of British soldiers to fall ill during the campaign. There can be little doubt of the culprit, the biggest killer in the Crimea: one man later described how Lawrenson had ridden at the Alma almost doubled up with the cramps of cholera, and one of his officers, Captain George England, wrote in a letter on 30 September to his mother that ‘ … the camp is slowly filling with the wounded, and their moaning at night can be quite fearful. We lose yet more to cholera and to dysentery - why, Col. Lawrenson himself has been taken so ill that he has been forced to leave the Front. He is a fine man, and no doubt the whole 17th is praying for his speedy recovery.’
He had recovered well enough by the following July to return as a Brigadier-General to command the Heavy Brigade, by then severely depleted by casualties and disease, and he still held this command when the Russians finally evacuated Sevastopol on 8 September and the fighting came to an end. He then succeeded Sir James Scarlett in December as overall commander of the cavalry in the Crimea, up to the time of the British withdrawal in early 1856. On 22 August 1855 Lawrenson had commanded the Heavy Brigade in the final – and bloodiest - set-piece battle of the war, the Battle of the Chernaya River, when a force of French, Sardinian and Ottoman infantry defeated the Russians, the British cavalry again being held in reserve. One of the Russian officers present was Count Leo Tolstoy, whose anger at the incompetence he saw, and the needless slaughter (a sentiment also expressed by the philosopher Frederick Engels in his report on the battle for the New York Daily Tribune), was to shape the image of war in his novels. The nearly 10,000 casualties at Chernaya added to more than half a million of both sides during the war, including nearly 5,000 British troops killed in action or died of wounds and more than 16,000 who died of disease during the campaign.
In his Journal entry for 17 September 1855, Colonel Lord Paget - by then commander of the Light Brigade - reported the arrival for distribution of the Crimea Medal, a 'vulgar looking thing,' according to another officer quoted in Lord Angelsey's A History of British Cavalry, and disparaged by Paget for clasps that looked like decanter labels: 'I think the man whose taste the clasps were ought to be obliged to wear one. They already call them here "Port". "Sherry" and "Claret".' John Lawrenson had already received his medal with the clasp "Alma" from Queen Victoria at a special ceremony in London on 18 May while he was on sick leave, and was to add the clasp "Sebastopol" for his service after returning to take up command of the Heavy Brigade. The medal roll citations for the original award and the second clasp are reproduced in the gallery below. In addition, he received the Turkish Crimea Medal - given by the Ottoman Sultan to all British, French and Sardinian troops who took part - and the Turkish Order of the Medjidie (4th Class), and he was one of 400 British soldiers selected to receive the Sardinian War Medal for Military Valour awarded by the King of Piedmont-Sardinia in 1857.
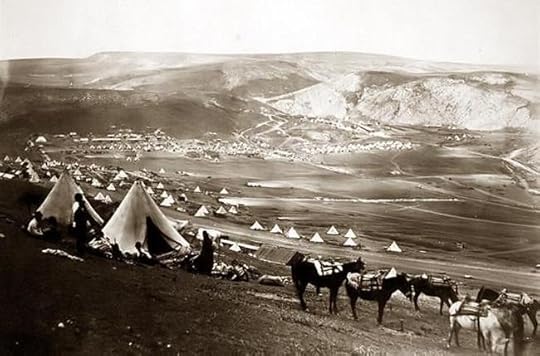
‘Cavalry camp, looking towards Kadikoi,’ by Roger Fenton (1855). Along with the use of the telegraph, allowing the reports of William Howard Russell and other correspondents to reach the newspapers at something close to ‘real time’, immediacy for the British public was given by the 350-odd photographs taken by barrister-turned photographer Roger Fenton during his time in the Crimea from March-June 1855 (many were converted into woodblocks and published in the Illustrated London News). The officer portraits he took do not include John Lawrenson, who at this period was still convalescing in England, but this image shows one of the large cavalry camps to which Lawrenson would have returned in July when he was appointed commander of the Heavy Brigade (U.S. Library of Congress Fenton Crimean War photographs collection),
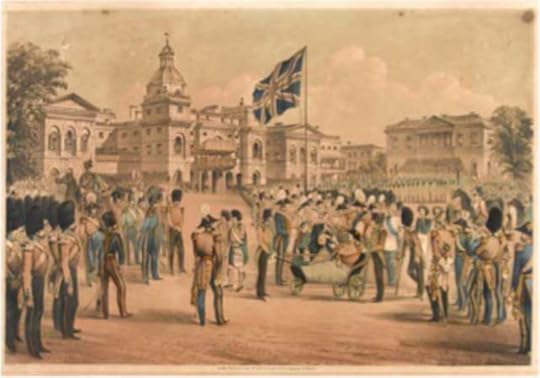
While George Fenton was taking photographs at the Front, John Lawrenson was one of four officers of the 17th Lancers present on 18 May 1855 at Horse Guards Parade in London to receive their Crimea Medal from the Queen, in a ceremony for wounded and sick soldiers who had been sent home. A list of all the officers receiving medals was widely published in the newspapers at the time. This is one of several contemporary depictions of the event to show the Queen with Colonel Troubridge, who was wheeled out in a bath chair - he had lost one leg and the other foot at the Battle of Inkerman. As discussed here, the Queen in her journal recorded her satisfaction in touching the hand of every soldier there, whether private or officer; it was said that some soldiers were reluctant to give up their medals for engraving, fearful that they would not get back the one touched by the hand of their Sovereign (Unknown artist, 'Distribution of War Medals by the Queen', coloured lithograph published by Read & Co., 8 June 1855. National Army Museum).
The Sardinian Medal for Valour, from the collection of the National Maritime Museum. This example is fitted with a loop and ribbon as originally issued, but some recipients had theirs refitted privately with a suspension bar and ornate suspension arms more in keeping with the appearance of British medals (as was done with the Turkish Crimea Medal too).
John's brother George Lawrenson had died in Cape Town on 26 June 1856 during one of three recorded leaves he took during his career in southern Africa, a common place of respite for officers in Indian service and a staging post before the opening of the Suez Canal on the long voyage to and from Britain. He had married twice, first aged 19 in 1822 in Mauritius to Mary Anne Mather, who died in Calcutta less than three years later aged only 22 (they had a daughter, who appears to have died young), and second to Charlotte Brown, daughter of an officer of the 41st Regiment, who died in Cheltenham in 1868. John, meanwhile, remained in the Army after the Crimea, serving as Inspector-General of Cavalry from 1860-65, and in the largely honorary positions of Colonel of the 8th Hussars from 1865 and of the 13th Hussars from 1868. He was promoted to Major-General in 1860, Lieutenant-General in 1868 and full General in 1875, two years before his retirement in 1877, aged 75, and he died in London on 30 October 1883, aged 83. He had not married.
John Lawrenson was to receive no British decoration in his later career despite his high command - something not unprecedented among men even of high rank who were disinclined to push themselves or to cultivate political patrons, or had some perceived black mark against them (conceivably, had Lawrenson ridden in the charge at Balaclava, and survived, things might have been different), but which in his case was seen as sufficiently unjust to provoke the protestation you can read in the 'letter to the editor' reproduced in the gallery below alongside an obituary that appeared widely in the newspapers.
Note
Lawrenson is also variously spelled Laurenson, Simson is spelled Simpson and Invereighty is Inverighty. Images of the original birth records for the Lawrenson brothers and their siblings, their parents' marriage and death records and records related to their Simson and Kerr forbears in Forfarshire can be found on the official Scottish records website, scotlandspeople.gov.uk. It seems probable that the elder John Lawrenson was from the Lawrensons of Capponellan, Durrow, Queen's County (modern Co. Laois), the only family of that name in Ireland in the mid-late 18th century to appear in the records.
I'm grateful to Captain Mick Holtby of the Queen's Royal Lancers and Nottinghamshire Yeomanry Museum for providing me with a copy of the photo of General Lawrence with the identifying label. Another photo of him, though possibly the same one, is in an album in the collections of the(Accession No. 1982-04-413), which also holds nine pieces of correspondence from Brigadier-General John Lawrenson to Sir William Codrington (commanding British forces in the Crimea) from December 1855-April 1856, as part of the Codrington Papers.
Selected documents
Click on the following to enlarge. From left, the first part of the Crimea Medal Roll for the 17th Lancers (UK National Archives, WO 100/24) listing John Lawrenson and his entitlement to the clasp 'Alma'; second, the Roll showing his additional entitlement to the clasp 'Sevastopol'; third, part of an article in the London Evening Standard of 19 May 1855, reporting on the Crimea Medal presentation by the Queen at Horse Guards Parade listing all of the officer recipients, with Lawrenson under 17th Lancers; and fourth, an extract from the List of Officers, Non-Commissioned Officers and men selected to receive the 400 War Medals for Military Valour presented by His Majesty the King of Sardinia to the British Army engaged in the late War in the East (Her Majesty's Stationery Office, 1857), showing the three recipients selected from the 17th Lancers, including Lawrenson (for the full list, go here). The National Army Museum holds a printed list from July 1857 of all British officers recommended for the Order of Medjidie.


A biography of General John Lawrenson in Baily's Magazine of Sports and Pastimes 41: 367-9 and 429 (December 1883-January 1884):


Below left, an obituary of General Lawrenson syndicated from The Times (this one the York Herald, 3 November 1883); centre, a letter to the editor of the London Morning Post lamenting the failure to award Lawrenson a knighthood; right, a biography of John's brother Colonel George Lawrenson from Hodson, V.C.P., List of the Officers of the Bengal Army, 1758-1834 (London, 1927-46).


November 10, 2015
Photographing prehistoric stones at Avebury, England
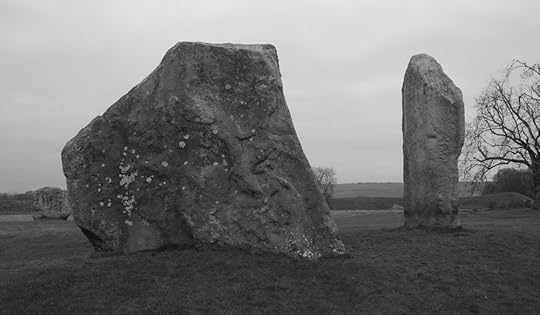
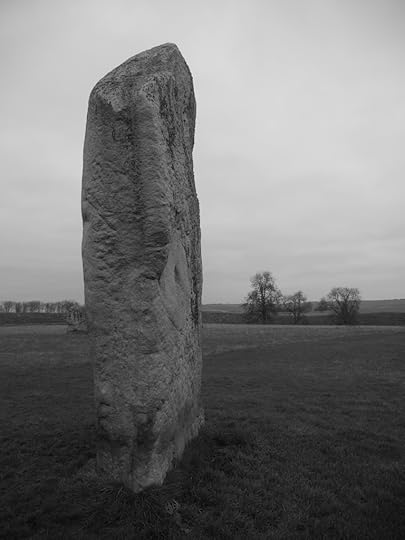
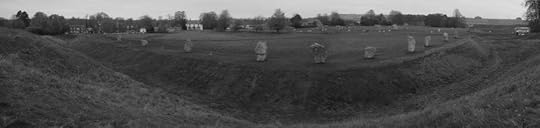
I had to take my daughter to Wiltshire yesterday and had a few hours at Avebury, probably the most impressive prehistoric site in Britain - indeed anywhere in the world. It was a windswept, overcast afternoon, good for black and white photography. Several of the stones you see here had fallen and have been re-erected, but some have stood since they were first raised almost five thousand years ago. That's about the same period as the Egyptian pyramids, and it's worth reflecting that one of the stones at Avebury - the huge slab in the image above - weights at least 100 tonnes, some 40 times the average weight of the blocks in the pyramids. You don't have to go to exotic lands to marvel at the capabilities of prehistoric people, and their ability to put enormous effort into works with no apparent practical purpose. That's one of many points of similarity between these sites and medieval cathedrals. Another, the sense of containment - of security from the world outside - seems particularly apparent within a well-preserved henge such as Avebury, with its original ditch far deeper than the moats of many medieval castles and the surrounding mound blocking off the view of all but the distant ridges of the hills beyond.
For me, used to a pretty good internal compass, walking around the stones can induce an unfamiliar sense of disorientation, something probably brought on by the offset location of part of the village within the circle and by the fairly uniform horizon of the surrounding hills. In an overcast sky, it can be difficult to find your bearings. Perhaps this 'otherness', and not only celestial alignments, was what made these places work, and allowed a spiritual world to be more easily accessed - not much different from the purpose of the church you can see beyond the stones in the final photo below.
Click on the images to enlarge.


September 29, 2015
Diving the wreck of the James C. King (1867), Tobermory, Canada, September 2015
Another highlight of our recent expedition to film the wrecks of Fathom Five National Marine Park was the James C. King, a schooner built in East Saginaw, Michigan, in 1867, and wrecked in 1901 in the same storm that wrecked the Wetmore - in fact, she was one of two ships under tow by the Wetmore, all three of the vessels carrying cargoes of timber. Unlike the Wetmore, which sank in shallow water, the King slid down a steep rocky slope with her bow coming to rest in 27 metres, at the beginning of the barren silted plain that characterises much of the deep-water lakebed in this area. On the day of our dive the upper part of the site was swept by a strong current that caused a silt fallout down the slope, reducing the visibility, and my focus during our limited bottom time was on being flimed by my brother - so I only took a few photos myself. The first picture shows us pulling our way along the line against the current from the boat to the buoy before beginning our descent. The second and third pictures show the steep slope of the site, and the others show Alan filming on the deeper reaches of the wreck and then at our 6 metre decompression stop.
Click on the images to enlarge.


September 27, 2015
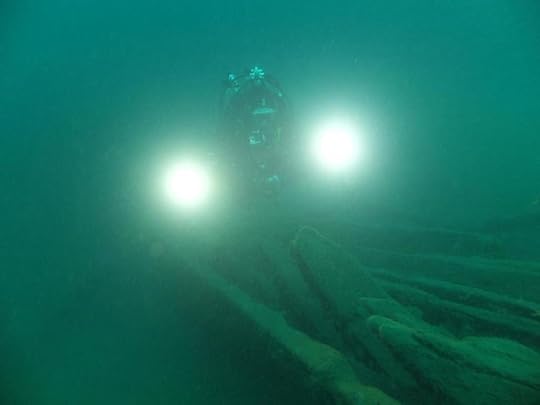
Diving the wreck of the Wetmore (1871), Tobermory, Canada, September 2015
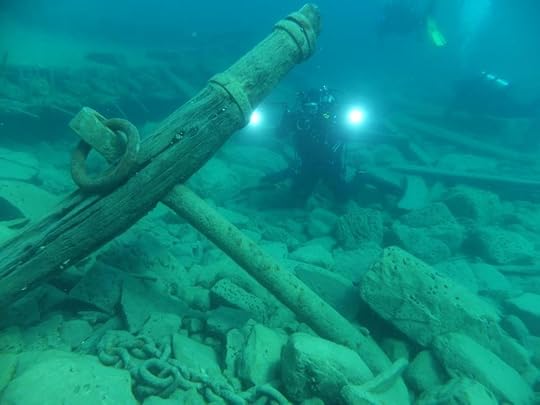
I took these photos in September 2015 on the wreck of the W.L. Wetmore during a trip with my brother Alan (seen here and below with video camera) to film the wrecks of Fathom Five National Marine Park off Tobermory, in Lake Huron, Canada. The Wetmore was a wooden-hulled steamer built in Ohio in 1871 and wrecked during a November snowstorm in 1901 while carrying timber through the treacherous channels to the north of Tobermory. The engine and cargo were salvaged but much of the ship remains on the lakebed, including large sections of hull, an impressive anchor and chain, the boiler, the unusual four-bladed screw and the rudder. In several of these pictures you can see the dolomite limestone that underlies the wreck, smoothed by glaciers during the Ice Age and swept clear of sediment by current and storms. The Wetmore is one of the most visited wrecks in the Park because of its preservation and shallow depth, with most of the remains lying in only 5 to 6 metres of water.
Click on the images to enlarge.


September 21, 2015
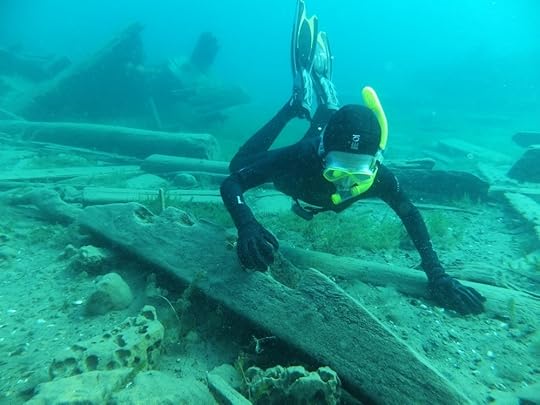
Free-diving on wrecks at Tobermory, Lake Huron, Canada, August 2015
Click on photos to enlarge
For the third year running my daughter and I have had a couple of days free-diving on the shipwrecks of Tobermory, in Fathom Five Provincial Park, Lake Huron, Canada. The picture above shows her examining a wooden element from a wreck in 5 metres depth at 'The Tugs' site, also shown in the gallery below. The first three pictures show the Alice G, one of the best-preserved of the 22 known wrecks in the Park. I blogged about that wreck here following our 2013 dives at the site. The other photos are from two other wrecks close by, the Robert K and the John and Alex. The timbers from all of these wrecks are exceptionally well-preserved in the cold, fresh waters of the lake.


On the day following our shore dive at the Tugs site we did an excellent two-dive boat trip on board Deep Obsession from Diver's Den, one of two dive operators in Tobermory. Our first site off Cove Island to the north of Tobermory was the Charles P. Minch, a three-masted schooner built in Ohio in 1867 and wrecked in Tecumseh Cove off the island in 1898 while carrying a cargo of timber. Her remains lie in 8 to 15 metres and make an excellent site for free-diving. You can see further pictures of the wreck, from our 2014 dive, here.


From the Minch we motored back towards Tobermory to Big Tub Harbour to dive on the Sweepstakes, one of the best-preserved 19th century Great Lakes schooner wrecks - as you can see from the pictures below, the windlass, forward deck planking, bow structure and much else remains largely intact from when the ship sank in 1885 in only 7 metres of water. She is probably the most visited wreck in the Park, with recent years seeing a big increase in the number of snorkel and diving trips to her during the summer. Some of the efforts made to protect the wreck from damage caused by divers can be seen here, including the wire grates below the deck openings to prevent penetration inside the hull.


From the Sweepstakes it's a short swim to the City of Grand Rapids, a wooden steamer sunk in 1907 in even shallower water, with parts of the upper structure only a metre or so deep. In the slightly warmer water of the shallows and with more sunlight, it has more life on it than most of the Tobermory wrecks - the nearest to an octopus's (well, crayfish) garden that you'll see. The wreck is subject to damage from snorkelers pulling themselves along the shallow timber frames as well as from the thick ice that covers both of these wrecks during the winter months. I've included a few more pictures in this gallery because the City is less often photographed, yet is a very pretty site.


We look forward to more free-diving in the Great Lakes next year!


August 4, 2015
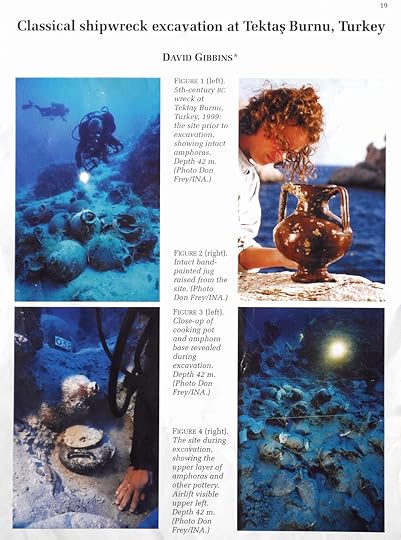
A 5th century BC Greek shipwreck excavation off Turkey
I wrote this article for the 2000 edition of the journal Antiquity, following the first season of excavation by the Institute of Nautical Archaeology (INA) of a classical Greek shipwreck off the west coast of Turkey at Tektas Burnu. I was very fortunate to participate in both the 1999 and the 2000 season at this site, carrying out more than a hundred dives to 45 metres and excavating some wonderful artefacts - including intact painted Greek vases of the 5th century BC. At the time I was still working in my academic teaching job in Britain, and was also an Adjunct Professor of INA. Since then much post-excavation work and further publication has been completed on the site, including a National Geographic article and TV feature and a detailed report by Deborah Carlson in the 2003 volume of The American Journal of Archaeology. You can read more about the wreck and see many superb images of the excavation work on the INA website. Artefacts from the wreck are displayed in the Bodrum Museum of Underwater Archaeology.
July 1, 2015
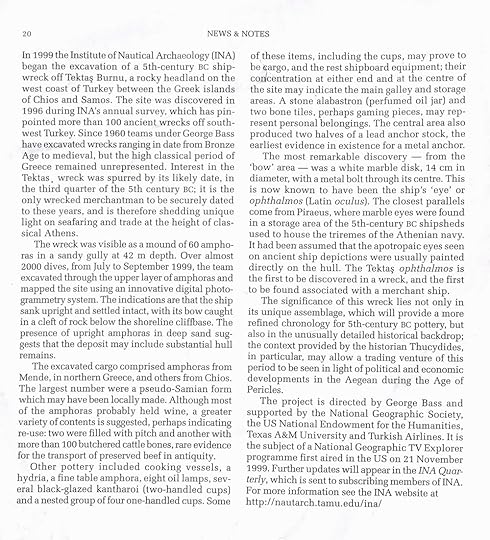
9th Lancers 'vulture party' on the Somme, July 1916
My grandfather, Tom Verrinder, seated second row down far left, with his Troop of the 9th Lancers in France in 1916. All of these men are privates (the term 'trooper' was not used in Lancer regiments until after the war). The distinctive 9th Lancers cap badge can clearly be seen. Several of the men wear Good Conduct stripes (reverse chevrons on the lower left sleeve), awarded to Privates and Lance-Corporals for at least two years' service without being subject to formal discipline, and showing that these men had been with the regiment since 1914. The two men on the right also have the vertical wound stripe on the same sleeve. Since the wound stripe was first authorised by Army Order 206 of 6 July 1916, this gives a terminus post quem for the photograph, which was almost certainly taken late in the year as my grandfather was away from the regiment with a dismounted party from the start of the Somme offensive on 1 July for almost five months (photo from my grandfather's collection).
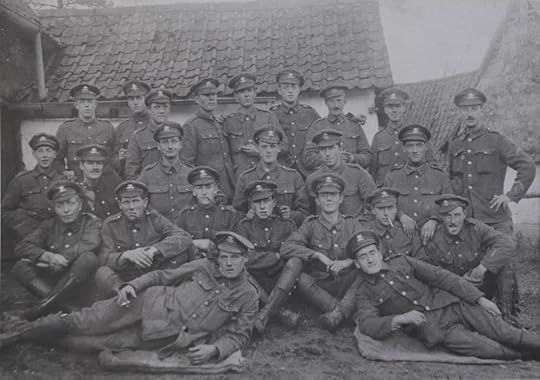
British army lancers - the regiment unidentified, but very possibly the 9th Lancers - on the move on a side track off the Albert-Amiens road, July 1916 (photo: Lt John Warwick Brooks, Imperial War Museum (IWM) Q 4054).
On 1 July 1916 the 9th Queen's Own Lancers, part of the 2nd Brigade of the 1st British Cavalry Division, were saddled up behind the front line south-west of the French town of Albert waiting for the breakthrough that was expected to follow the first hours of the British Somme offensive. All of the men had trained for up to five months at Tidworth and in the New Forest learning to use lance, sword and rifle from horseback, and for some the Battle of the Somme was the be their first experience of war. In the event, the breakthrough never happened and the first of July 1916 became the most calamitous single day in British military history, with almost 20,000 men killed – mainly from machine-gun fire – in those first few hours. Once the pattern of the battle was set, the men of the 1st Cavalry Division were ‘stood down’ and many of them used for other purposes. Their training and the continuing expectation that cavalry would win the war made them too valuable to be expended as assault troops, but as dismounted infantry and pioneers they dug trenches, manned sectors of the front line, helped to build narrow-gauge railways and cleared newly-won sectors of the battlefield.
Among the soldiers to join the regiment early that summer were my grandfather, Tom Harold Verrinder, and his older brother, Edgar Walter Rollings Verrinder. They had enlisted in the 12th Lancers in January 1916, been transferred to the 21st Lancers for the duration of their cavalry training and then been assigned to the 9th Lancers after their arrival at the Cavalry Depot in Rouen. My grandfather was immediately detailed to join a dismounted working party for the opening of the Somme campaign, and remained with them for five months in the battle area until rejoining the mounted regiment in November.
The 'dismounted party' in my grandfather's account - later that year to be formalised as the regimental Pioneer Company, part of the Divisional Pioneer Battalion - was organised at the Divisional level, and included officers and men from all of the constituent cavalry regiments who might be assigned for a long period or relieved and replaced as circumstances dictated. Among other work, the grim task of battlefield clearance fell to the dismounted parties of the 1st Cavalry Division from early July. The participation of the 9th Lancers in this work can be reconstructed from the regimental War Diary and the regimental history, The Ninth Queen’s Royal Lancers, 1715-1936, by Major E.W. Sheppard (Gale and Polden, 1939), which contains eyewitness accounts not available elsewhere. The bodies of many of the infantrymen killed in the first waves of he offensive remained on the battlefield for days afterwards, and in the heat of that July the consequences can be imagined. On 4 July, the 9th Lancers party – ghoulishly called a ‘vulture party’ by one of the officers – moved forward to help clear the Fricourt area of the battlefield, where there had been over 8,000 British casualties. The entry below from the 9th Lancers War Diary shows that the party comprised two officers and 63 other ranks, part of a Divisional detail of 600 men, and was at work that day from dawn until early evening:

The 9th Lancers War Diary makes repeated reference to men being detailed to the Divisional working party, including two officers and 53 other ranks on 5 July, two officers and 67 other ranks sent near Fricourt on 24 July, one officer and 51 other ranks on 21 August and two officers and 51 other ranks on 8 October, with the 'regimental dismounted party' finally rejoining on 21 October - an event noted by Major Shepperd in the regimental history as the return of the vulture party', 'after their prolonged absence.' The casualties suffered by the regiment during the five months of the battle were all among the dismounted parties, including 7 men wounded and one killed (Private W.R.W. Bell) on 30 July, five wounded and one died of wounds (Private C.H. Smart) on 2 August, and 7 wounded and one killed (Private Charles Edward Ridges) on 15 September.
One of the officers involved with dismounted parties from June to the end of the battle, 19-year old 2nd Lieutenant Martin Hunter, mentioned in the Diary in July for returning with a dismounted party on the 5th and going out with another on 15th, wrote a personal diary - reproduced by Major Sheppard in his account of the Somme battle in the regimental history - that shows the dangers of working so close to the front line. The published account is undated, but the reference to six casualties means that it must refer to the few days surrounding the time when Private Smart was fatally wounded, noted above, on 2 August:
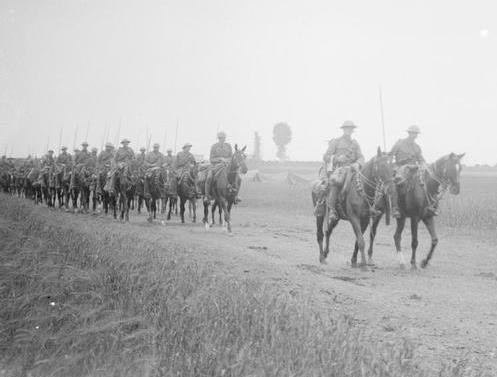
Fricourt, showing British troops clearing away the debris, July 1916 (photo: Royal Engineers No 1 Printing Company, IWM Q 135).
It is by no means an easy party we have got on. We had quite a merry night. Old Fritz would not leave us alone; he kept on sending over ‘coal-boxes’ and high explosive and shrapnel all night. About the middle of the night we got tear gas and shells; you cannot imagine the row that goes on all the time.
Stayed up all night. Bosches sent over a lot of ‘coal-boxes’, 5.9’s and high explosives. Hell of a night, no cover in trenches, no rations, six casualties, one gassed.
Shelled most of the night, and gas-attack.
Things got a bit too hot; one 5.9 landed about twenty yards from us and covered us all with mud, so we moved into dugout. Rats awful.
A renewed British infantry attack on 14 July saw the 9th Lancers once again poised for mounted action, waiting south-west of Albert. Elements of the 2nd Indian Cavalry Division ‘got into the retreating Germans with the lance’ at High Wood, but the opportunity passed and the 9th Lancers were again stood down, leaving a ‘vulture party’ still at work in the Fricourt area. During the final British offensive of the battle on 14 September the mounted regiment was again stood-to close behind the front line in the Carnoy valley where the first British tanks went into action, an event witnessed by my grandfather and also described in the regimental history.
Although the 9th Lancers were not to experience mounted action on the Somme in 1916, it was in the same area almost two years later that they were to see their biggest single engagement of the war, fighting a rearguard action during the German Spring offensive that cost the regiment 159 casualties – one of them Lieutenant Martin Hunter, who died of wounds on 11 April 1918. The fighting that my grandfather experienced then, as well as at Arras, Ypres and Cambrai in 1917, was more extensive than any action the regiment saw on the Somme in 1916, but there can be no doubt that for the men fresh to the front that summer – when my grandfather was only 19, the same age as Lieutenant Hunter – the experience of joining a ‘vulture party’ would have been a sickening introduction to the realities of war.


These two photos (click to enlarge) from the Imperial War Museum collection, the same source as the other two photos above, show, to the left, British cavalrymen of one of the Lancers regiments resting in a field near Fricourt in September 1916, and, to the right, British cavalrymen of one of the Lancers regiments cleaning their lances near Amiens, 1916. There is a very good chance that these are the 9th Lancers (photos: Lt Ernest Brooks. IWM 1228 and 1289).
June 29, 2015
Campaigning in India and New Zealand, 1848-66: Captain Thomas Edward Gordon, 14th Light Dragoons
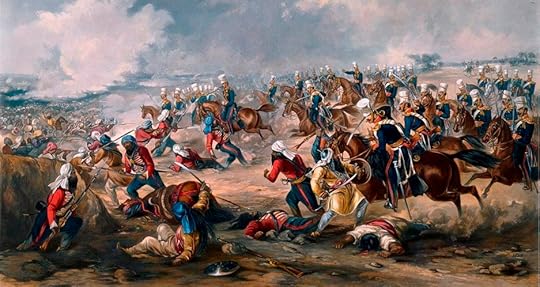
This famous image of the charge of the 14th Light Dragoons at the Battle of Ramnuggur in 1848 - in which the commanding officer, Colonel Havelock, and 11 of his troopers were killed - is the only contemporary depiction of the regiment in action during the Punjab War or the Indian Mutiny (coloured aquatint by J. Harris after H. Martens, published by Rudolf Ackermann, 26 January 1851; this example in the National Army Museum).
My great-great-great grandfather, Captain Thomas Edward Gordon, 14th Light Dragoons, had the unusual distinction of fighting in the Punjab War of 1848-9, the Indian Mutiny of 1857-8 and – as a colonial volunteer - the New Zealand War in 1866, and of thus being one of a small number of men to receive the medals for all three campaigns. Skelton and Bullock’s Gordons under Arms (Aberdeen University Press, 1912) summarises his British army career as follows, based on the biographical details in Hart’s Army List of 1849-63:
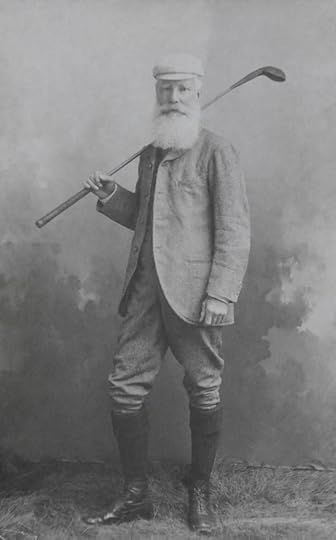
Captain Thomas Edward Gordon, late 14th Light Dragoons, in Bideford, Devon, where he lived in retirement and played golf at the famous Westward Ho! links (photo about 1900-1910, from my grandfather's collection).
1848, October 17, Cornet, 14th Light Dragoons. 1848-9, served in Punjab campaign, including battles of Chillianwallah and Goojerat, pursuit of enemy across the Jhelum and of the Afghans over the Indus, through the Khyber Pass (medal and clasps). 1850, September 17, Lieutenant. 1857, September 18, Captain. 1858-9, served with Central India field force under Sir Hugh Rose, present at siege and capture of Chandeyrie, siege and capture of Jhansi, battle of Koonch, affair during advance on Calpee and action of Golowlee, capture of Calpee and pursuit, action of Morar, several engagements on the heights before Kotakaserai and Gwalior, recapture of the fort and city of Gwalior and pursuit of rebels (Despatches, medal and clasp). 1862, exchanged to 6th Inniskilling Dragoons; retired.
The involvement of the 14th Light Dragoons in these two wars is detailed in two books by former commanders of the regiment, Colonel Henry Blackmore Hamilton’s Historical Record of the 14th (King’s) Hussars, 1715-1900 (the regiment was renamed Hussars in 1861), and The Ramnuggur Boys: 14th/20th King’s Hussars 1715-1992 by Colonel John Pharo-Tomlin, the title being derived from the nickname given to the regiment after a famous charge at the Battle of Ramnuggur on 22 November 1848. Gordon joined the regiment as a 20-year-old a month before the battle and was present in all subsequent actions involving the regiment. The Punjab War – also known as the Second Sikh War – resulted in the annexation of the Punjab as part of British India, at a time when India was still nominally ruled by the East India Company but the British government was increasingly involved, with Crown forces such as the 14th Light Dragoons fighting alongside the company’s regiments.
Like Ramnuggur, Chillanwallah and Goojerat (the spellings are those of the time) were huge set-piece battles, in which the East India Company infantry still using flintlock muskets and cavalry charged with sabre and lance, little changed from the time of Waterloo. The battle of Goojerat was one of the few occasions when the British inflicted a resounding defeat on the Afghans, who had crossed the Indus to fight alongside the Sikh empire. A particular fascination for me of Gordon’s involvement in this war is the image of dragoons chasing the Afghans up the Khyber Pass, only seven years after a large part of the Army of the Indus has been annihilated in the Pass during the First Afghan War, with only one British survivor making it out to bring news of the catastrophe.
The regiment distinguished itself again during the numerous bloody engagements of the Indian Mutiny in the Central India campaign, when cavalry charges resulted in many casualties among the enemy. Captain Gordon is noted in both regimental histories for being Mentioned in Despatches during the capture of Koonch (at the time, some thirty years before the inception of the Distinguished Service Order, a ‘Mention’ was the only accolade available for a junior officer, apart from the recently founded Victoria Cross). In his official despatch on the action (reproduced in Hamilton, op.cit.), dated Camp Goolowlee on 24 May 1858, the field force commander, Major-General Sir Hugh Rose, describes how, on observing a ‘large number of Rebel infantry, strongly posted in cultivated ground’, one of his Brigadiers
… moved up Captain Field’s Battery with Captains Thompson’s and Gordon’s Troops of Her Majesty’s 14th Light Dragoons, and a Troop of the 3rd Regiment Hyderabad Cavalry to dislodge them. The Enemy held the position obstinately, and it was not until a portion of the Infantry of the 2nd Brigade moved down on them from another direction, that they retreated, when Captain Gordon, whom I beg to recommend to His Excellency for his conduct on this occasion, with his Troop and the Cavalry above-mentioned, charged and broke the mass, cutting up several of them; topes of trees favoured the escape of the remainder.
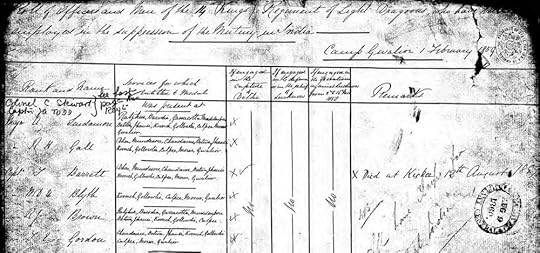
The Indian Mutiny Medal Roll for the 14th Light Dragoons, showing Captain T.E. Gordon and a list of the actions where he was present (UK National Archives, WO 100/35).
No photographs are known of Gordon during his army service, but a painting exists in a private collection showing him sitting in front of his tent during the Mutiny. The artist was Lieutenant Robert Baigrie, a fellow-officer about the same age as Gordon who was Sir Hugh Rose’s Acting Deputy Assistant Quartermaster General. Baigrie was mentioned by Rose in the same despatch after the Battle of Koonch, for having been ‘ … severely wounded by a sword-cut which all but severed two fingers from his hand; notwithstanding he gallantly continued during the action to discharge his duties with as much efficiency as before.’ Fortunately the wound did not end his artistic endeavours, for as well as a successful career in the Bombay Quartermaster’s Department– ending as a Colonel with a C.B. – he went on to see his drawings of the Abyssinian campaign of 1867-8 appear in The Illustrated London News. A catalogue of his work was published in 2007 to accompany an exhibit of his work at the Macmullen Museum of Art at Boston College, which acquired the collection (Sharf, F.A., Abyssinia, 1867-1868: Artists on Campaign).
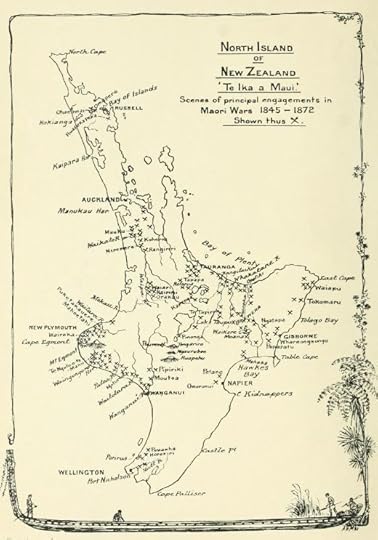
A map of the North Island of New Zealand from the James Cowan's The New Zealand Wars: a History of the Maori campaign and the Pioneering Period (1922), showing Hawke's Bay, the town of Napier, the site of the battle at Ommaruni, and Cape Kidnappers, the location of Clifton Station.
After leaving the army in 1862, Thomas moved to Hawke’s Bay, New Zealand, to join his father James Gillespie Gordon, a Scottish merchant who had made his fortune in Benares (where Thomas had been born in 1828), as well as Thomas’ brother William, also a former cavalry officer. In 1859 James had purchased 13,500 acres that became Clifton Station, part of which continues to be the home of his Gordon descendants in New Zealand to this day.
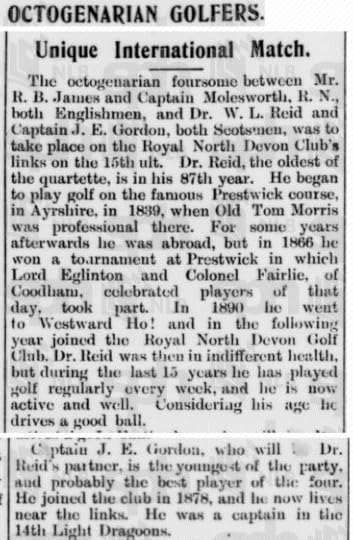
Part of an article in The Straits Times (Singapore) of 10 December 1906 on the 'Octogenarian Foursome', including Captain T.E. Gordon (the initial J is an error). In fact, he was only 78 at the time, though the combined ages of all four men did produce an average age of over 80!
On 20 August 1863 Thomas was commissioned by the Governor as a Captain to command the Napier Volunteer Cavalry, having been asked to raise a troop of mounted men on his arrival in New Zealand. The incentive was renewed conflict with Maori groups that had taken place in the North Island since 1860, though in the event the troop was disbanded and it was not until the ‘Hauhau’ disturbance of October 1866 at Hawke’s Bay that Gordon was called to action. A war-party of some 80 Hauhau had threatened to attack Napier, the local town, and Thomas was asked to reform his men and join a force of militia and loyal Maori who were being mustered for an attack. In the early morning of 11 October, prior to his arrival, the main body of the force confronted the war-party at Omarunni, and in the ensuing gun battle 21 Hauhau were killed, 30 wounded - some of them dying later in hospital - and the remainder captured, for the loss of one militia man, one loyal Maori and several men wounded. Meanwhile Captain Gordon and some 25 mounted volunteers had taken possession of several large canoes at a landing spot on the coast, taking the men with them into custody, and on arrival at Omarunni after the battle they rode after a number of the Hauhau who had fled, recapturing eleven of them and suffering one volunteer having his horse shot out from under him. An eyewitness report of these events can be read online in The Hawke's Bay Herald of 15 October, and an authoritative historical account in James Cowan's The New Zealand Wars: a History of the Maori Campaign and the Pioneering Period (1922).
In later years Thomas enjoyed shooting, particularly pig-hunting on his land in Hawke’s Bay, and also golf, a passion of his after he left management of Clifton Station to others and moved to Bideford in Devon close to Westward Ho!, the famous golf links. In 1906 he was one of an ‘Octogenarian Foursome’ in a competition that was followed avidly by The Times and in newspapers around the world. One of his sons, Edward, also became a cavalry officer, serving with the 9th Lancers during the Boer War and also being Mentioned in Despatches; his biography can also be found in Gordons under Arms. Thomas lived at Porthill, a large country house overlooking Bideford, where my grandfather as a boy visited him many times with his mother – Thomas’ granddaughter, through his oldest daughter Agnes Georgina – before Thomas’ death in 1917, aged 89.
I’m very grateful to my cousin Angus Gordon, of Clifton Station, Hawke’s Bay, New Zealand, also a descendant of Thomas, for giving me a copy of his book In the Shadow of the Cape: A history of the Gordon family of Clifton, the basis for my account of Thomas’ early years in New Zealand.
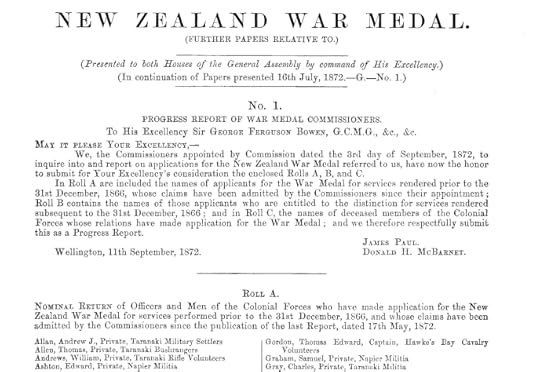
Captain Thomas Edward Gordon shown in the Roll of the New Zealand Medal (Appendix to the Journals of the New Zealand House of Representatives, 1873).