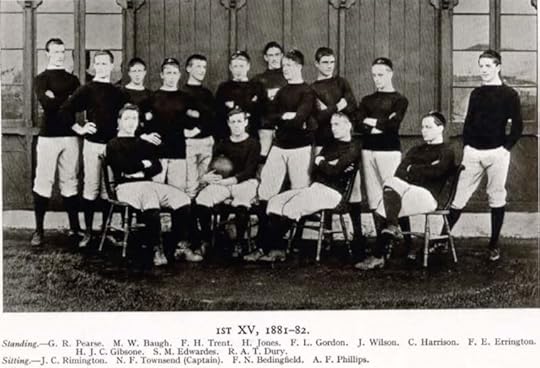
David Gibbins's Blog, page 3
October 14, 2019
A dated two-pound Amsterdam blokgewicht (block weight) from the Mullion Pin Wreck (1667), off Cornwall, England

Fig.1 Two-pound blokgewicht from the Mullion Pin Wreck (1667), showing the date stamps (top to bottom) 1664, 1663 and 1665. Scale in cm. (photo: David Gibbins)

Fig. 2 Two-pound blokgewicht from the Mullion Pin Wreck (1667), showing another view of the date stamps in Fig. 1. (photo: David Gibbins)
I discovered the artefact in these photos in 2018 while diving on the Mullion ‘Pin Wreck’, a mid-17th century merchantman wrecked off the west coast of the Lizard peninsula in Cornwall, England. It is a two-pound Amsterdam blokgewicht (block weight), a type of copper-alloy weight shaped like a truncated cone that was used by Dutch merchants from the 17th to the 19th century (Nagel 2013, 2019; van Diest 2016, 2019). 17th century examples are rarely found, and this is one of the oldest known. The earliest blokgewichten from the early 17th century were usually of bronze, and have relatively straight sides with only a notch near the top for gripping; later ones have a protruding shoulder as an improved gripping edge. Rings were incised around them for decoration, as here. This is an example of the largest of the blokgewichten, which came in six sizes from two pounds down to one half ounce or one lood of c. 15 grams. The actual weight of the artefact, 899.60 grams, is 88.58 grams short of two Amsterdam pounds, indicating that it has lost some 9% of its mass through erosion. It measures approximately 4.4 cm across the top, 5.2 cm across the bottom and 4.9 cm high, with the greatest erosion evident on the upper surface. The wreck site is a shallow, high-energy environment in which artefacts are exposed to abrasion from loose shingle and rocks, and this artefact is in good condition compared to many others from the wreck.
The most striking feature of this weight is the three dates deeply stamped in the top – 1663, 1664 and 1665. These were annual verification marks punched in Amsterdam by the ijkmeester (verifier). Two of these date stamps, 1663 and 1664, are paralleled on a similar two-pound Amsterdam block weight found at Bodegraven, Holland (Nagel 2013: 3863, fig. 2), but the stamp for 1665 is otherwise unknown. Stamped below the dates were the crowned coat of arms of Amsterdam and the initials of the ijkmeester, in this case Jan Adriannsz van Keulen (initials IA)(in office 1653-1683), but only a faint impression of these marks remains. Whereas the date marks were typically deeply punched, the verifier’s stamp was more detailed and more care was taken with the punching iron, with the stamp being less deeply impressed.

Fig. 3 Two-pound blokgewicht from the Mullion Pin Wreck (1667), showing the faint impression of the verifier’s stamp (crowned coat of arms of Amsterdam flanked by letters I and A) (photo: David Gibbins)
As well as being of great intrinsic interest as an artefact and as evidence for mercantile activity on board the ship, the weight now provides the best dating evidence for the wreck. Prior to this, the best evidence among published artefacts was a silver medallion dated 1653 commemorating the coronation of Ferdinand IV of Bavaria, found during the first season of work at the wreck shortly after its discovery in 1969 (McBride et al. 1972: 139, fig. 6). Having nicknamed the site the ‘Pin Wreck’ after the numerous brass clothing pins found in the excavations, the original team established beyond reasonable doubt that the wreck was the Santo Christo de Castello, a Genoese merchantman newly-built in Amsterdam and 'splitt to pieces and cast away neere Mullion' on 5 October 1667 (National Archives, HCA 13/270; McBride et al., 1974: 71).
The weight gives the clearest support for this identification that one could possibly hope to find – the final date stamp of 1665 is consistent with the weight being brought on board at Amsterdam when the ship was fitted out in 1666, and being part of the ship’s equipment during her fateful maiden voyage in 1667.
Copyright © 2019 David Gibbins
Acknowledgements
I am very grateful to Ritzo Holtman, editor of the journal Meten & Wegen (www.gmvv.org) and webmaster of www.muntgewicht.nl, for identifying this weight and sending me copies of published comparisons.
A full report on our investigations at the Mullion Pin Wreck in 2018-19 is currently in preparation. For the latest finds and research follow www.facebook.com/CornwallMaritimeArchaeology. For two other blogs on artefacts from the site, including more weights, see Gibbins 2019a and 2019b.

Fig. 4 View of the Mullion Pin Wreck in 2019, showing two cannons and the findspot of the blokgewicht close to the diver. (photo: Ben Dunstan)
References
HCA = High Court of Admiralty Records, UK National Archives
Gibbins, David, 2019a. A copper-alloy crucified Christ from the Mullion Pin Wreck (1667), off Cornwall, England. http://davidgibbins.com/journal/2019/10/23/a-copper-alloy-crucified-christ-from-the-mullion-pin-wreck-cornwall-england-1667
Gibbins, David, 2019b. Three more marked merchants’ weights from the Mullion Pin Wreck (1667), off Cornwall, England. http://davidgibbins.com/journal/2019/10/29/three-more-marked-merchants-weights-from-the-mullion-pin-wreck-1667-cornwall-england
McBride, P., Larn, R. and Davis, R., 1972. A mid-17th century merchant ship found near Mullion Cove, Cornwall. An interim report. International Journal of Nautical Archaeology 1.1: 135-42
McBride, P., Larn, R. and Davis, R., 1974. The mid-17th century merchant ship found near Mullion Cove, Cornwall: Second interim report. International Journal of Nautical Archaeology 3.1: 67-79
Nagel, J.H, 2013. Blokgewichten. Meten & Wegen 162 (June 2013): 3862-6
Nagel, J.H., 2019. Bijzondere blokgewichten – deel 8. Meten & Wegen 186 (June 2019): 4438
van Diest, Ad, 2016. Blokgewichten: Reactie op het artikel ‘Blokgewichten’. Gepubliceerd op pp. 3862-3866. Meten & Wegen 176 (December 2016): 4191-4203
van Diest, Ad, 2019. IJkmerken op enkele blokgewichten uit Amsterdam. Meten & Wegen 186 (June 2019): 4439-41


A dated two-pound Amsterdam blokgewicht (block weight) from the Mullion ‘Pin Wreck’, a mid-17th century merchantman off Cornwall, England
Fig.1 Two-pound blokgewicht from the Mullion Pin Wreck (1667), showing the date stamps (top to bottom) 1664, 1663 and 1665. Scale in cm. (photo: David Gibbins)
Fig. 2 Two-pound blokgewicht from the Mullion Pin Wreck (1667), showing another view of the date stamps in Fig. 1. (photo: David Gibbins)
I discovered the artefact in these photos in 2018 while diving on the Mullion ‘Pin Wreck’, a mid-17th century merchantman wrecked off the west coast of the Lizard peninsula in Cornwall, England. It is a two-pound Amsterdam blokgewicht (block weight), a type of copper-alloy weight shaped like a truncated cone that was used by Dutch merchants from the 17th to the 19th century (Nagel 2013, 2019; van Diest 2016, 2019). 17th century examples are rarely found, and this is one of the oldest known. The earliest blokgewichten from the early 17th century were usually of bronze, and have relatively straight sides with only a notch near the top for gripping; later ones have a protruding shoulder as an improved gripping edge. Rings were incised around them for decoration, as here. This is an example of the largest of the blokgewichten, which came in six sizes from two pounds down to one half ounce or one lood of c. 15 grams. The actual weight of the artefact, 899.60 grams, is 88.58 grams short of two Amsterdam pounds, indicating that it has lost some 9% of its mass through erosion. It measures approximately 4.4 cm across the top, 5.2 cm across the bottom and 4.9 cm high, with the greatest erosion evident on the upper surface. The wreck site is a shallow, high-energy environment in which artefacts are exposed to abrasion from loose shingle and rocks, and this artefact is in good condition compared to many others from the wreck.
The most striking feature of this weight is the three dates deeply stamped in the top – 1663, 1664 and 1665. These were annual verification marks punched in Amsterdam by the ijkmeester (verifier). Two of these date stamps, 1663 and 1664, are paralleled on a similar two-pound Amsterdam block weight found at Bodegraven, Holland (Nagel 2013: 3863, fig. 2), but the stamp for 1665 is otherwise unknown. Stamped below the dates were the crowned coat of arms of Amsterdam and the initials of the ijkmeester, in this case Jan Adriannsz van Keulen (initials IA)(in office 1653-1683), but only a faint impression of these marks remains. Whereas the date marks were typically deeply punched, the verifier’s stamp was more detailed and more care was taken with the punching iron, with the stamp being less deeply impressed.
Fig. 3 Two-pound blokgewicht from the Mullion Pin Wreck (1667), showing the faint impression of the verifier’s stamp (crowned coat of arms of Amsterdam flanked by letters I and A) (photo: David Gibbins)
As well as being of great intrinsic interest as an artefact and as evidence for mercantile activity on board the ship, the weight now provides the best dating evidence for the wreck. Prior to this, the best evidence among published artefacts was a silver medallion dated 1653 commemorating the coronation of Ferdinand IV of Bavaria, found during the first season of work at the wreck shortly after its discovery in 1969 (McBride et al. 1972: 139, fig. 6). Having nicknamed the site the ‘Pin Wreck’ after the numerous brass clothing pins found in the excavations, the original team established beyond reasonable doubt that the wreck was the Santo Christo de Castello, a Genoese merchantman newly-built in Amsterdam and 'splitt to pieces and cast away neere Mullion' on 5 October 1667 (National Archives, HCA 13/270; McBride et al., 1974: 71).
The weight gives the clearest support for this identification that one could possibly hope to find – the final date stamp of 1665 is consistent with the weight being brought on board at Amsterdam when the ship was fitted out in 1666, and being part of the ship’s equipment during her fateful maiden voyage in 1667.
Copyright © 2019 David Gibbins
Acknowledgements
I am very grateful to Ritzo Holtman, editor of the journal Meten & Wegen (www.gmvv.org) and webmaster of www.muntgewicht.nl, for identifying this weight and sending me copies of published comparisons.
A full report on our investigations at the Mullion Pin Wreck in 2018-19 is currently in preparation. For the latest finds follow www.facebook.com/CornwallMaritimeArchaeology
Fig. 4 View of the Mullion Pin Wreck in 2019, showing two cannons and the findspot of the blokgewicht close to the diver. (photo: Ben Dunstan)
References
HCA = High Court of Admiralty Records, UK National Archives
McBride, P., Larn, R. and David, R. 1972. A mid-17th century merchant ship found near Mullion Cove, Cornwall. An interim report. International Journal of Nautical Archaeology 1.1: 135-42
McBride, P., Larn, R. and Davis, R., 1974. The mid-17th century merchant ship found near Mullion Cove, Cornwall: Second interim report. International Journal of Nautical Archaeology 3.1: 67-79
Nagel, J.H, 2013. Blokgewichten. Meten & Wegen 162 (June 2013): 3862-6
Nagel, J.H., 2019. Bijzondere blokgewichten – deel 8. Meten & Wegen 186 (June 2019): 4438
van Diest, Ad, 2016, Blokgewichten: Reactie op het artikel ‘Blokgewichten’. Gepubliceerd op pp. 3862-3866. Meten & Wegen 176 (December 2016): 4191-4203
van Diest, Ad, 2019, IJkmerken op enkele blokgewichten uit Amsterdam. Meten & Wegen 186 (June 2019): 4439-41
September 29, 2019
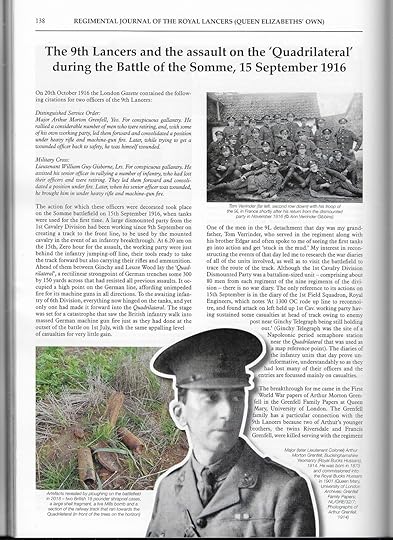
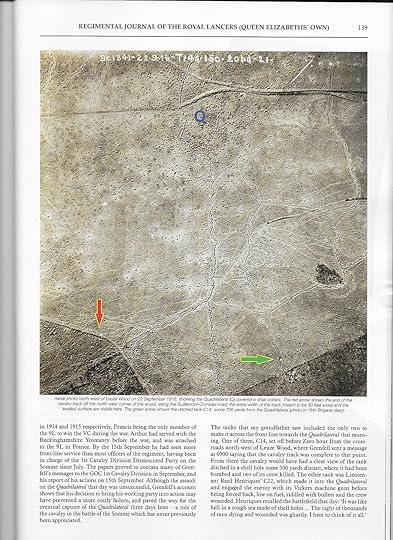
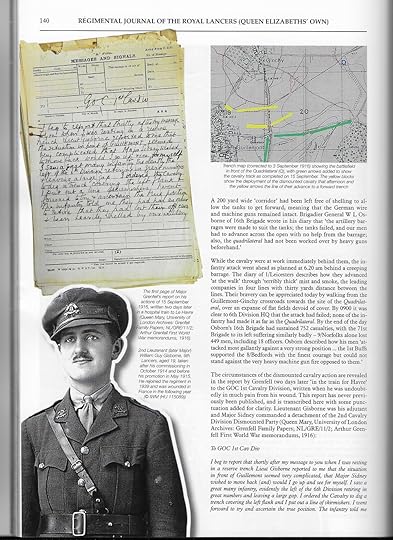
The 9th Lancers and the assault on the 'Quadrilateral' during the Battle of the Somme, 15 September 1916
I wrote this article for the 2018 edition of the Chapka, the Regimental Journal of The Royal Lancers (the Chapka was the distinctive helmet adopted by British lancers in the late 19th century). The Royal Lancers incorporates the 9th (Queen’s Royal) Lancers, the regiment of my grandfather Tom Verrinder and his brother Edgar during the First World War, and this article is based on their experiences on 15 September 1916 during the Battle of the Somme - the day that tanks were first used in action. A comprehensive account of my grandfather’s experiences with the 9th Lancers during the war forms the basis of a book currently in preparation.

The article contains acknowledgements to all who helped in the research and preparation of this piece, as well as for copyright material. I would again express my thanks to Angela Tarnowski of the 9th/12th Lancers Museum, to Stephanie Rolt and Nicola Wood of Queen Mary, University of London Archives, to my mother Ann Verrinder Gibbins, her brother David Verrinder and their cousin Irene Joan Parker, respectively the daughter and son of Tom and the the daughter of Edgar Verrinder, and to Lieutenant Colonel Patrick Lort-Phillips, Major Arthur Morton Grenfell’s grandson. The war diaries quoted here are in the National Archives; Basil Henriques’ accounts are in his memoir The Indiscretions of a Warden (1937) and in a manuscript in the University of Southampton Special Collections (MS 132 AJ 195/3/9); and Major Grenfell’s papers are quoted and illustrated courtesy of Queen Mary, University of London Archives (Grenfell Family Papers; NL/GRE/112; Arthur Grenfell First World War Memorandums, 1916).
The citation for this article is:
Gibbins, D.J.L., 2018, The 9th Lancers and the assault on the ‘Quadrilateral’ during the Battle of the Somme, 15 September 1916. The Chapka (Regimental Journal of the Royal Lancers (Queen Elizabeth’s Own)) 4: 138-41.
The Chapka is published by Crest Publications on behalf of the Regiment.
This article and all of the text within it is Copyright © 2018 David Gibbins. Click on the scanned pages to enlarge.

June 12, 2019
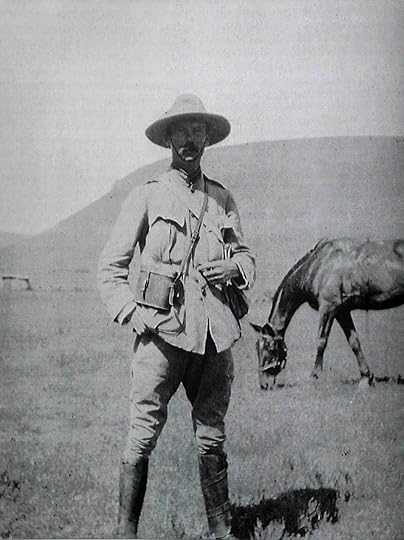
Major Edward Robertson Gordon, 9th Lancers: photographs from the Boer War (1899-1902)

This photograph, entitled ‘Reconaissance from Modder River’, shows a group of officers of the 9th Lancers resting in South Africa during the Boer War - including Captain Edward Robertson Gordon and Major Forrester Farnell Colvin, authors of Diary of the Ninth Lancers in South Africa 1899-1902, and Lieutenant Eustace Abadie, also the author of a diary (see below). It was taken between 28 November 1899, when Colvin arrived with the regiment, and 13 December 1899, when Gordon left to become Brigade-Major of the 1st Cavalry Brigade, and may have been taken on 29 November when Colvin and Gordon’s diary records the regiment reconnoitering Modder River and village (copyright 9th/12th Lancers Regimental Museum, Accession No 2090-16-49).
Captain Edward Robertson Gordon, 9th Lancers, in South Africa during the Boer War (1899-1902) (family collection).
Major Edward Robertson Gordon was my great-great-great uncle, the eldest son of Captain Thomas Edward Gordon of the 14th Light Dragoons, an Indian Mutiny veteran. He was born in New Zealand on 24 February 1864, educated at United Services College in Devon and saw extensive action with the 9th Lancers over almost two and a half years during the Boer War, when he commanded a squadron, briefly commanded the regiment, was wounded and was Mentioned in Despatches. After the war he and Lieutenant Colonel F.F. Colvin co-authored Diary of the Ninth Lancers in South Africa 1899-1902 (London, Cecil Roy, 1904), based on their own private diaries. Gordon is also mentioned in a diary by another 9th Lancers officer, Lieutenant Eustace Abadie, who was present with the regiment in South Africa from the outbreak of the war until February 1900, and which has only recently been published (Spies, S.B., 1989, A soldier in South Africa: the experiences of Eustace Abadie, 1899-1902. Houghton, South Africa, the Brenthurst Press). The two regimental histories encompassing the Boer War also mention Gordon and contain detailed accounts of the actions in which he fought. The first, by a former 9th Lancers officer, was published in the same year as Colvin and Gordon’s Diary (Reynard, Captain Frank H., 1904, The Ninth (Queen’s Royal) Lancers 1715-1903. Edinburgh and London, Blackwell & Sons). The second, published in 1939, was based on that book and on the Diary but also contains additional material, including a first-hand account by Lieutenant Colonel F.H. Allhuson of the battles of Enslin and Magersfontein in December 1899 (Major E.W. Sheppard, 1939, The Ninth Queen’s Royal Lancers 1715-1936, Aldershot, Gale & Polden). That book can be read in full at the website of the 9th/12th Lancers Regimental Museum.
The volume Gordons under Arms: a Biographical Muster Roll of Officers named Gordon (C.O. Skelton and J.M. Bullock, Aberdeen University, 1912) contains a summary of Edward Gordon’s military career, alongside that of his father and his uncle William Cracroft Gordon, who had been an officer in the 9th Lancers in the 1850s. The details are drawn from the Army Lists, which include an officer’s dates of promotion, regiment and any active service, as well as from The London Gazette. They show that Edward was commissioned first into the 3rd (Militia) Battalion of the Royal Warwickshire Regiment, on 23 February 1884, and then transferred on 25 November 1885 to the 2nd Dragoon Guards (The Queen’s Bays), being gazetted as a Lieutenant in the regiment on that date. The 2nd Dragoon Guards went to India in the following year, being based successively in Umballa, Sialkot and Rawalpindi until 1895, and then from 1895-6 formed part of the British garrison in Egypt. Gordon was promoted to Captain on 18 September 1895, and on the return of the regiment to England he transferred to the 9th Lancers, joining on 16 December 1896. Four months before that the main body of the regiment had embarked for South Africa, where they were stationed until moving to Muttra in India in October 1898. They were ordered back to South Africa in 1899 in anticipation of conflict with the Boers, arriving on 10-11 October - the day that the war began - and leaving again for India on 13 March 1902, having been in South Africa for all but the final two months of the war.
Edward Robertson Gordon as a Lieutenant in the 2nd Dragoon Guards in 1888, when the regiment was in Umballa, India (1st the Queen’s Dragoon Guards Regimental Museum).
Edward Robertson Gordon as a Captain in the 9th Lancers, to which he transferred in that rank in 1896. The photo dates before 1902 as he does not yet wear his Boer War campaign medals and has the two stars of a Captain on his epaulettes (increased to three by Army reforms of 1902); as as he was in the field from 1899 to 1902 it seems most likely that the photo was taken before then (copyright 9th/12th Lancers Regimental Museum, Accession No 2090-16-42).
The Boer War was named after the itinerant farmers of Dutch origin whose ancestors had occupied coastal south Africa before the British took over from the Dutch in 1806. Seeking new pasturage and dissatisfied with British rule, especially the anti-slavery laws, the Boers trekked north from the 1830s to found Orange Free State and the South African Republic, also known as Transvaal. The immediate cause of the war was the discovery of diamonds at Kimberley near the border of Orange Free State in 1866 and especially of gold in the South African Republic in 1886, both of which drew ‘uitlanders’, foreigners, to the region, most of them British, in numbers that threatened to swamp the local Boer population. The war was fought from the Boer side to protect the sovereignty of the republics, and from the British side to protect the interests of the ‘uitlanders’ and advance those of British speculators and imperialists who could see gain in annexing the Boer states.
The 9th Lancers were present in all three phases of the conflict that ensued - the first in October-December 1899 when the Boers inflicting a series of defeats on the British and besieged Kimberley and other towns, the second in January-September 1901 when the British went on the offensive, resulting in nominal British control of both republics, and the third from then until May 1902 when the Boers conducted a guerrilla war and the British responded with a ‘scorched earth’ policy in which farms were destroyed and their occupants interned. The Boers, organised into ‘commandos’, proved to be formidable opponents, and by the end of the war over half a million British and colonial troops had served in the war. Some 20,000 British and colonial troops and over 6,000 Boers died in the conflict , as well as over 46,000 civilians from disease and starvation in the internment camps - at least 20,000 Africans and 26,000 Boers, many of them women and children.
The Army List for 1906 contains the following summary of Edward Gordon’s Boer War service:

Captain Edward Robertson Gordon of the 9th Lancers during the Boer War, probably taken after 22 September 1900 when he was put in command of D Squadron (Colvin, Lieutenant Colonel F.F. and Gordon, Captain E.R., 1904, Diary of the Ninth Lancers in South Africa 1899-1902. London, Cecil Roy, p. 199).
Colvin and Gordon’s Diary and Abadie’s diary give further details. The ship carrying the squadron to which Gordon was attached, D Squadron, arrived at Durban on 10 October 1899, and the regiment first came under fire on 10 November at Luipers Kop. He was appointed Brigade-Major to Major-General J.M. Babington, the highly regarded commander of the 1st Cavalry Brigade, on 13 December, and continued in that role until 7 February 1900. Abadie recorded that ‘Gordon is now Brigade-Major and is doing excellently well; I hope he gets a brevet for the war - it will make all the difference to him.’ On 16 February he was wounded when the Boers opened a ‘heavy fire’ near Dronfield, and he did not return to the regiment until 11 April. Abadie noted that Gordon was hit in the neck, though not ‘seriously’. On 7 May he was put in charge of the regimental Maxim machine gun, taking it into action on 19 July and then on 31 August near Quaggafontein. He was Mentioned in Despatches in Lord Robert’s Despatch of 4 September 1901 (The London Gazette, 10 September 1901, p. 5929), along with Colvin and several other officers and enlisted men of the regiment (before the introduction of the Military Cross in 1914, a ‘Mention in Despatches’ was the only award available to officers below the rank of Major other than rare awards of the Distinguished Service Order - normally for Majors and above - and the even rarer Victoria Cross; the ‘brevet’ mentioned by Abadie was an unpaid advance in rank given for meritorious service).
From 22 September 1900 until the 9th Lancers left South Africa – the last action for the regiment was on 3 March 1902 – Gordon was in command of D Squadron, one of three squadrons of the regiment. In late December 1901 he temporarily took over command of the regiment, and on 2 January 1902 he led it and the Cape Mounted Rifles on a reconnaissance. For much of this period the regiment formed part of a mobile ‘column’ that swept the countryside and carried out raids. Colvin and Gordon’s diary first mentions the regiment carrying out farm burning on 17 October 1900, and then mentions it frequently until May 1901, as ‘burning’, ‘destruction’ or ‘clearance’, including the burning of grain. On 28 May 1901 the column of which the regiment was part included ‘from 25,000 to 30,000 sheep and nearly 1,000 cattle, besides families.’ A photograph in the diary entitled ‘Farm clearing by “A” Squadron’ shows soldiers overseeing women outside a building tying up their belongings in sheets.
Captain Edward Robertson Gordon and Captain J.V. Forrest (later Colonel, C.B., C.M.G.), the regiment’s medical officer, during the Boer War, probably in 1901 (Colvin, Lieutenant Colonel F.F. and Gordon, Captain E.R., 1904, Diary of the Ninth Lancers in South Africa 1899-1902. London, Cecil Roy, p. 239).
Of many actions in which D Squadron was involved during this period, one singled out in the regimental histories, mentioning his name, was the capture of ‘Lotter’s Commando’ on 5 September 1901, when A and D Squadrons encircled a farm which the commando had occupied. At a cost of 9 men killed and 9 wounded, the Lancers and a squadron of the Cape Mounted Rifles ‘fought it out muzzle to muzzle’ with the Boers, killing 13, wounding 46 and capturing the remaining 74 men, in one of the more successful British actions of this nature in the later part of the war. By this time the cavalry had become highly skilled on the terrain, having learned from the Boers and becoming proficient at travelling long distances for reconnaissance, raids and ambushes.
The regiment covered more than 8,500 miles during the war, not including reconnaissance and patrolling. Altogether it sustained 225 casualties, including six officers and 65 other ranks killed or died of wounds or disease and 15 officers and 115 other ranks wounded, as well losing many horses – including almost a hundred killed or washed overboard during a storm in the passage from India. These casualties represent a considerable part of the regiment, which at one point in September 1901 was down to 15 officers, 150 men and 36 fit horses (they had left Muttra with 16 officers, 475 men and 518 horses).

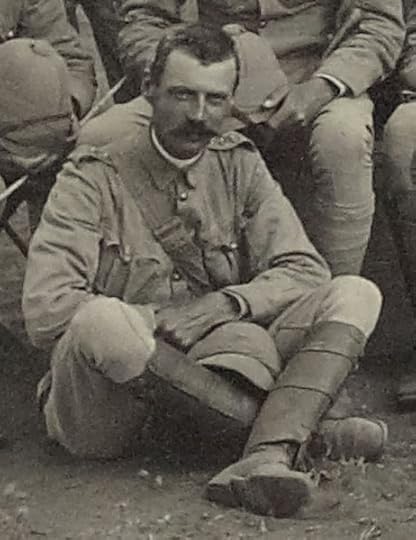
Officers of the 9th Lancers at Muttra in India in 1899 shortly before deploying to South Africa for the Boer War, including Captain Thomas Edward Gordon (front row, third left) (copyright 9th/12th Lancers Regimental Museum, Accession No 2090-16-37).
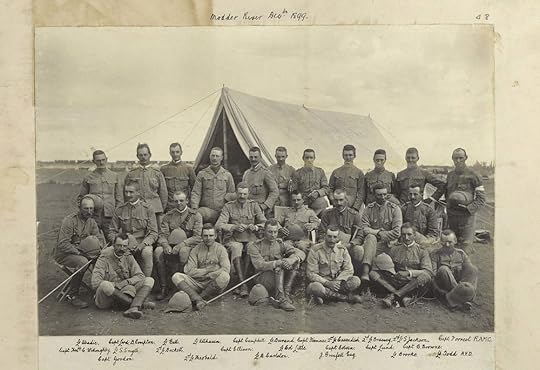
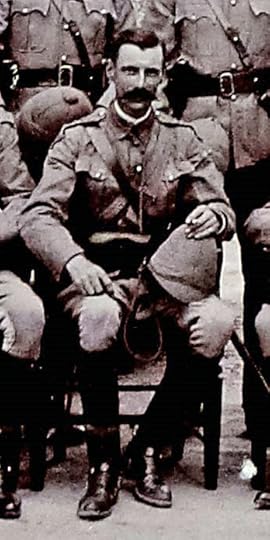
Officers of the 9th Lancers at the Modder River, South Africa, in December 1899, including Captain Edward Robertson Gordon (lower left), Major Colvin and Lieutenant Abadie, authors of the diaries cited here. Of this group, Brassey was killed, Ellison died of disease, Cambell, Gordon, Durand, Cavendish, Sadleir-Jackson, Little and Brooke were wounded, and Theobald became a prisoner of war. J. Grenfell Esq’ is likely to be John Pascoe Grenfell, a Lieutenant in the Buckinghamshire Yeomanry and brother of Captain Francis Octavius Grenfell, who won the V.C. with the 9th Lancers during the First World War (copyright 9th/12th Lancers Regimental Museum, Accession No 2090-16-48).
Close-up of photo above showing Captain Thomas Edward Gordon at Muttra in India in 1899 (copyright 9th/12th Lancers Regimental Museum, Accession No 2090-16-37).
Close-up of photo above showing Captain Thomas Edward Gordon at the Modder River in South Africa in December 1899 (copyright 9th/12th Lancers Regimental Museum, Accession No 2090-16-48).
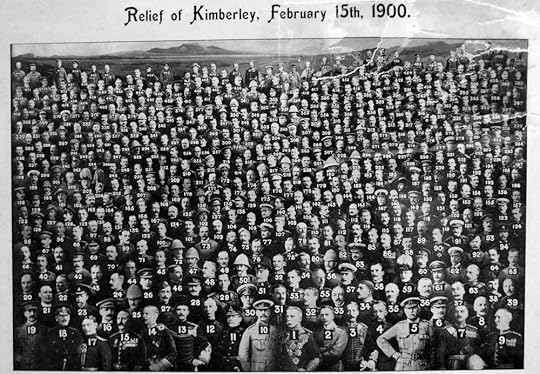
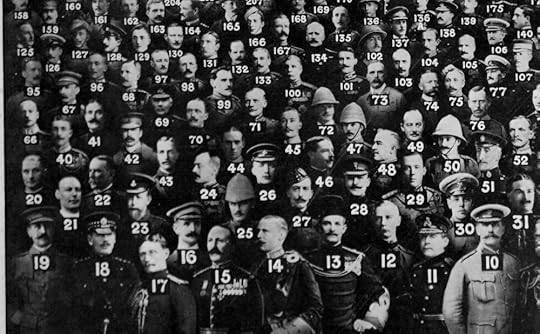
This image and the close-up below shows almost 500 officers present at the Relief of Kimberley. Captain E.R. Gordon is identified in the caption as No 167. Several copies of this photomontage are known to exist (family collection).
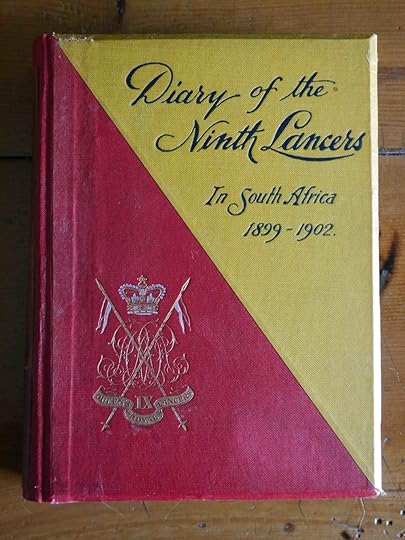
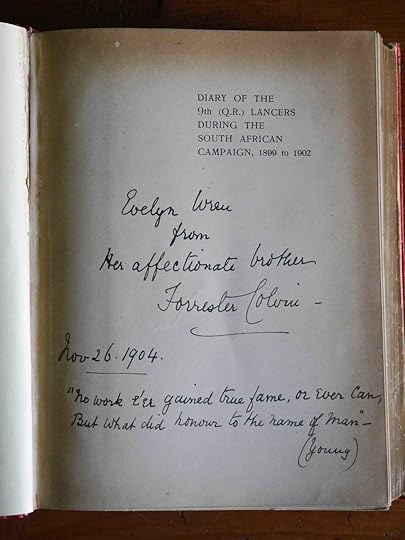
This copy of Colvin and Gordon’s Diary is signed by Colvin to his sister. Forrester Farnell Colvin (1860-1936) commanded the 9th Lancers in South Africa from July 1900 to February 1901. He retired as a Lieutenant Colonel and was awarded a C.B.E. following re-employment as a staff officer during the First World War, when one of his jobs was to decide the fate of British cavalry horses in Germany in 1919 (family collection).
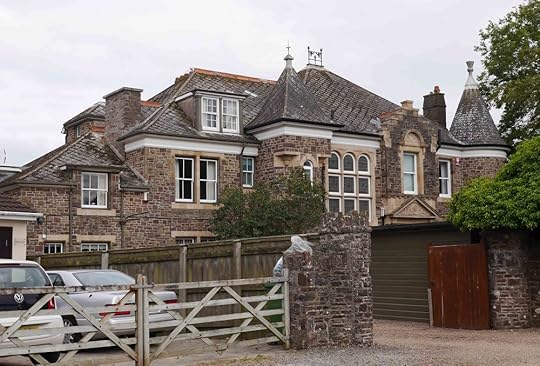
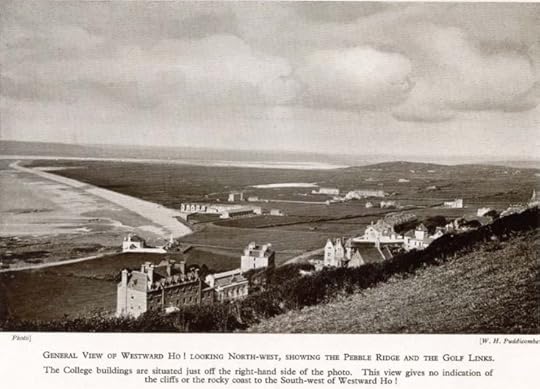
Cluden Bank, in Northam, Devon, where Edward lived with his father and two of his sisters after his return from New Zealand in 1910. The house was built in 1909 by his father and named after the ancestral Gordon home near Dumfries in Scotland. It was less than a mile from United Services College at Westward Ho!, where Edward and his two brothers went to school. My grandfather Captain Lawrance Wilfred Gibbins remembered spending time at this house as a boy with his Gordon relatives before and during the First World War.
From The Broad Arrow: the Naval and Military Gazette, 11 December 1914, p. 676.
Edward Gordon was promoted to Major in India on 15 March 1904 and retired from the Army after the regiment returned once again to South Africa in 1906, when he left to run his part of the family’s 11,860 acre sheep station at Hawke’s Bay in New Zealand. He left there in December 1910 to live with his father at Northam in Devon, where he died in 1914. His nephew John Gordon also served as an officer in the 9th Lancers, joining them in Italy in 1945 near the end of the Second World War.
As a result of its extensive Boer War service, the 9th Lancers had considerable campaigning experience among its senior officers and N.C.O.s at the outbreak of the First World War compared to many other regiments in the British Army. On my mother’s side, my grandfather Tom Verrinder and his brother Edgar served in the 9th Lancers during the First World War, and my grandfather told me that he knew men in the regiment who were Boer War veterans. These included both of the commanding officers during his service, Lieutenant Colonels H.M. Durand and R.H.R. Brocklebank, and Brigadier D.J.E. Beale-Brown, commanding officer of the 2nd Cavalry Brigade, all of whom had been fellow-officers of Edward Gordon in South Africa. Durand was wounded alongside Gordon in the action at Dronfield in February 1900. The diarist Lieutenant (later Major) Abadie, who won the D.S.O. in South Africa, died of wounds following the action of the 9th Lancers at Messines on 31 October 1914, when the regiment suffered more officers killed in one day than they had in the entire Boer War.
Acknowledgements
I’m very grateful to Angela Tarnowski, curator of the 9th/12th Royal Lancers Museum in Derby, for allowing me to reproduce the photographs from the regimental collection shown here; to Ian Gill, former curator of the 1st Dragoon Guards Museum in Cardiff, for the photograph of Gordon in the Queen’s Bays; and to my cousin Angus Gordon of Clifton Station, Hawke’s Bay, New Zealand, for providing much information about the Gordon family history.
References
Colvin, Lieutenant Colonel F.F. and Gordon, Captain E.R., 1904, Diary of the Ninth Lancers in South Africa 1899-1902. London, Cecil Roy (available as a Naval and Military Press reprint).
Reynard, Captain Frank H., 1904, The Ninth (Queen’s Royal) Lancers 1715-1903. Edinburgh and London, Blackwell and Sons.
Shepperd, Major E.W., 1939, The Ninth Queen’s Royal Lancers 1715-1936. Aldershot, Gale & Polden (online here).
Skelton, C.O. and J.M. Bullock, 1912, Gordons under Arms: a Biographical Muster Roll of Officers named Gordon in the Navies and Armies of Britain, Europe, America and in the Jacobite Risings. Aberdeen University (online here).
Spies, S.B., 1989, A soldier in South Africa: the experiences of Eustace Abadie, 1899-1902. Houghton, South Africa, the Brenthurst Press.
Whyte, F. and Alteridge, A.H., 1930, A History of the Queen’s Bays (the 2nd Dragoon Guards) 1685-1929. London, Jonathan Cape.
Major Edward Robertson Gordon, 9th Lancers in the Boer War (1899-1902)
Captain Edward Robertson Gordon, 9th Lancers, in South Africa during the Boer War (1899-1902) (family collection).
Major Edward Robertson Gordon was my great-great-great uncle, the eldest son of Captain Thomas Edward Gordon of the 14th Light Dragoons. Edward was born in New Zealand on 24 February 1864, educated at United Services College in Devon and saw extensive service with the 9th Lancers during the Boer War. During the war he commanded D Squadron, briefly commanded the regiment in the field in January 1902, was wounded and was Mentioned in Despatches. Following the war he and Lieutenant Colonel F.F. Colvin co-authored Diary of the Ninth Lancers in South Africa 1899-1902 (London, Cecil Roy, 1904), one of the most detailed regimental histories to emerge from the Boer War; in it Gordon’s involvement can be traced over two and a half years of active service in South Africa.
The volume Gordons under Arms: a Biographical Muster Roll of Officers named Gordon (C.O. Skelton and J.M. Bullock, Aberdeen University, 1912) contains a summary of his service, alongside that of his father and of his uncle William Cracroft Gordon (who had been an officer in the 9th Lancers during the 1850s). The details are drawn from the Army Lists, which include an officer’s dates of promotion, regiment and any active service. They show that he was commissioned first into the 3rd (Militia) Battalion of the Royal Warwickshire Regiment, on 23 February 1884. A militia commission was an alternative to Sandhurst as a route to a commission in a regular infantry or cavalry regiment, which he achieved on 25 November 1885 when he became a Lieutenant in the 2nd Dragoon Guards (The Queen’s Bays). He spend much of the next decade with the regiment in India, first at Umballa and then at Sialkot, and was promoted to Captain on 18 September 1895. After the 2nd Dragoon Guards returned to England he transferred to the 9th Lancers, on 16 December 1896, and went with them to South Africa - where they were stationed from August 1896 to March 1898 and then on to Muttra in India. The 9th Lancers returned to South Africa in October 1899 soon after the outbreak of war and did not sail back to India until March 1902. Gordon was promoted to Major on 15 March 1904 and retired from the Army after the regiment returned to England in 1906, when he left to run his father’s sheep station at Hawke’s Bay in New New Zealand.
The Army List for 1906 contains the following summary of his war service:

The 9th Lancers suffered 203 casualties during the war, killed or otherwise died, wounded or missing - about one in three of the normal complement - as well as many horses, including almost a hundred lost during a storm in the passage from India to South Africa. The regiment covered more than 8,500 miles during the campaign, not including reconnaissance and patrolling. As a result of their Boer War experience the 9th Lancers were considered ‘battle-hardened’ at the outbreak of the First World War, though the experience of skirmishing and chasing Boers across the veldt was little preparation for the machine guns and artillery of the Western Front. On my mother’s side, my grandfather Tom Verrinder and his brother both served in the 9th Lancers during the First World War, and my grandfather knew a number of the older enlisted men and officers of the regiment who had served during the Boer War at the same time as Edward Gordon.
This blog is a work in progress and will be expanded as more photographs are added.
PhotographsThis image and the close-up below it shows almost 500 officers present at the Relief of Kimberley. Several copies are known to exist, including one in the Gordon family collection. Captain E.R. Gordon is identified in the caption as No. 167.
June 6, 2019
Rudyard Kipling, the Gordon brothers and United Services College
Rudyard Kipling, centre, with an unidentified group at United Services College about 1880 (source: Kipling family photographs, Bateman’s, East Sussex: National Trust Collections NT 761434.19)
In January 1892 the writer Rudyard Kipling, then aged 25, wrote an exuberant letter to his uncle following his trip to New Zealand:
Source: The Letters of Rudyard Kipling, Volume 2: 1890-99
‘O.U.S.C.s’ were Old Boys of United Services College, the boarding school in Devon that Kipling had attended from 1878 to 1882. The College had been founded in 1874 at Westward Ho! near Bideford, in a row of converted houses that Kipling described as ‘that white barrack by the sea.’ The boys were mainly the sons of army officers and many of them went on to have military careers, including several who reached high rank and six who won the Victoria Cross. Kipling in this and many other respects was an unusual boy at the school – his poor eyesight disbarred him from games and any prospect of a military career, and led to him being bullied (he was called ‘Gigs’ after the lamps on either side of a gig-carriage). Nevertheless, his remarkable ability with English was recognised and encouraged at the school, and he made a number of close friends. The school was the basis for his fictional schoolboy stories in Stalky & Co (1899), in which several of his masters and contemporaries can be recognised.
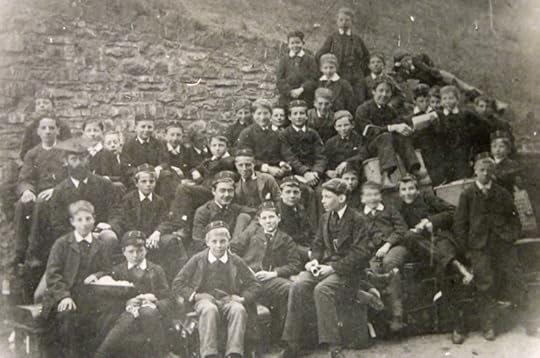
Among his friends were the Gordon brothers mentioned in the letter – my great-great-great uncles Edward Robertson Gordon (1863-1915), Frank Lindsay Gordon (1865-1938) and Charles Leith Travers Gordon (1868-1935). They were the sons of Captain Thomas Edward Gordon, a retired cavalry officer who had gone with his father from India to New Zealand after the Indian Mutiny and established a large sheep station at Cape Kidnappers at Hawkes Bay. The boys were all born in New Zealand but went with their father to England to be educated. Captain Gordon himself settled near Bideford, living in a succession of large houses there from 1875 – Richmond House in Appledore from 1875, Porthill in Northam from 1885 and nearby Cluden Bank from 1909. Edward Robertson Gordon, the elder son, returned to live there with his father after retiring from the Army in 1906, and the Gordon connection with Bideford did not end until Cluden Bank was sold in in 1921. The other two boys returned to New Zealand where Kipling visited them at Clifton Station at Cape Kidnappers, where Frank’s descendants continue to live to this today.
The following photographs showing the Gordon boys at United Services College in the early 1880s are from Major H.A. Tapp’s United Services College 1874-1911: A Short Account of Rudyard Kiplings’ old school at Westward Ho! (for private circulation), also the source of the photo of the school above. ‘Gordon’ is Edward, ‘Gordon (ii)’ is Frank and ‘Gordon (iii)’ is Charles.
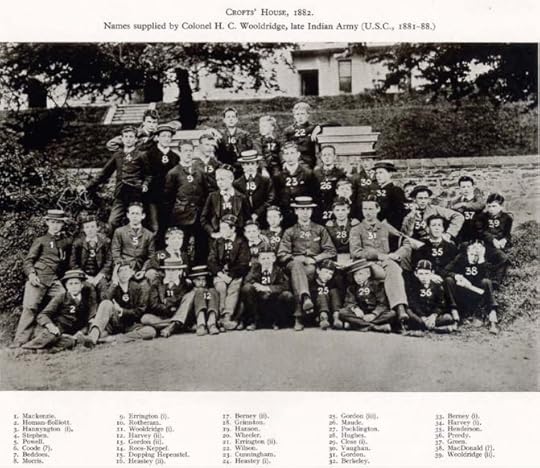
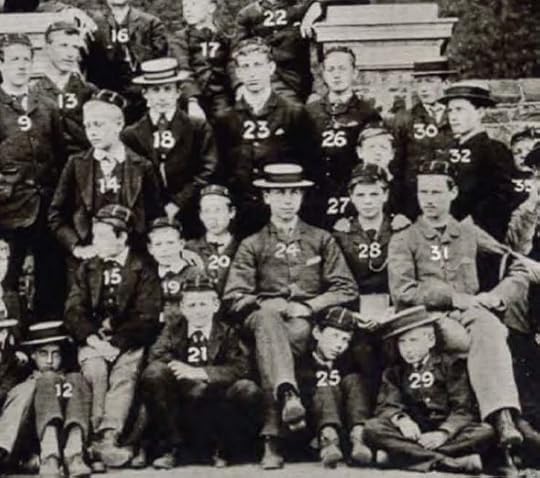
A close-up of the photo above, showing the brothers Edward (31), Frank (13) and Charles (25) Gordon.
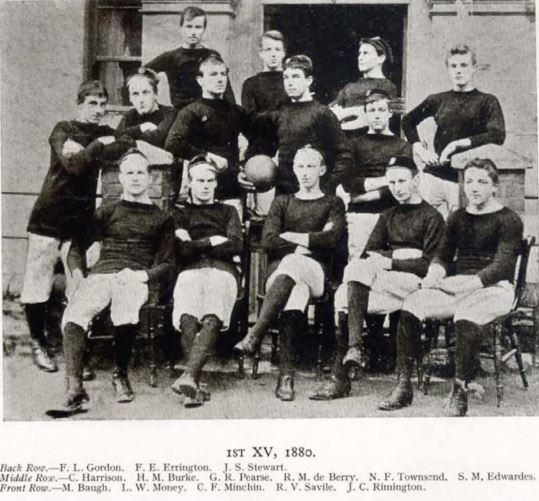
Frank Gordon, top left.
Frank Gordon, top row fifth from left.
Charles Gordon, top row second from right.
Dawn over the Somme battlefield, Guillemont
I took this panorama (click to enlarge) in April this year some 500 metres south-east of Guillemont in France, looking south-west in the direction of Albert. It shows, to the left, Leuze Wood beneath the rising sun, and to the right Trones Wood beneath the moon, separated by a distance of about four kilometres. This is one of the most attractive parts of the 1916 Somme battlefield, with beautiful woods, wide expanses of fields and a valley dropping just off to the left, and was utterly tranquil that morning. Yet during August 1916 that was the scene of some of the worst carnage of the First World War, as the British attempted repeatedly to assault the German line in front of Guillemont. My grandfather Tom Verrinder was here with a working party of the 9th Lancers creating a ‘cavalry track’ in the days leading up to the renewed offensive on 15 September, when the 1st Cavalry Division were poised to follow the anticipated breakthrough to the east of Guillemont - a forlorn hope with the infantry that day suffering losses on a similar scale to those of 1 July, as they walked into massed German machine gun fire.
April 2, 2019
HMS Anson in Torbay, 1807
This oil on canvas (55.3 by 86.4 cm) by Thomas Luny sold in Bonham's Marine Sale on 14 September 2004 for £33,460, captioned 'A First Rater, believed to be Nelson's flagship H.M.S. 'Victory' at anchor in Tor Bay, saluting the arrival of the frigate H.M.S. 'Anson' signed 'Luny' and dated 1807 (lower left).' Thomas Luny (British, 1759-1837), born in Cornwall, was a prolific marine artist who was commissioned by the East India Company among others to paint ships and from 1807 was based in Teignmouth in Devon. That fact of his place of residence, and the date of the painting - the year in which Anson was wrecked, off Loe Bar in Cornwall on 29 December - suggest that this painting may well have been of a scene that he witnessed, with Torbay being just south of Teignmouth.
Moreover, with Luny being a highly regarded marine artist, employed by the EIC and others knowledgeable about ships, there is every reason for believing that he would have tried to be as accurate as he could be in the portrayal of individual named vessels and not just painted a generic type. If the caption is accurate, this could therefore be the best image to survive of Anson, painted only a short time before she was wrecked. Anson was a ‘razéed’ ship of the line, originally of 64 guns but converted to a 44-gun frigate by the removal of the upper deck and armament, creating vessels of a distinct appearance as shown in this depiction with a restructured quarterdeck and forecastle formed from the original upper deck. This depiction also accurately shows the main deck armament of 26 guns (24-pounders), 13 to a side. A detailed account of Anson’s history can be found here.
At the time of this image Anson would recently have returned with despatches from Curaçao in the Dutch West Indies, captured on 1 January 1807. Several depictions of her in the attacking squadron (with Arethusa and Latona) exist, but none show the ship in as much detail as Luny’s painting. This image has particular resonance for me as within the last week I've stood on the deck of Victory and snorkelled over the wreck of Anson!
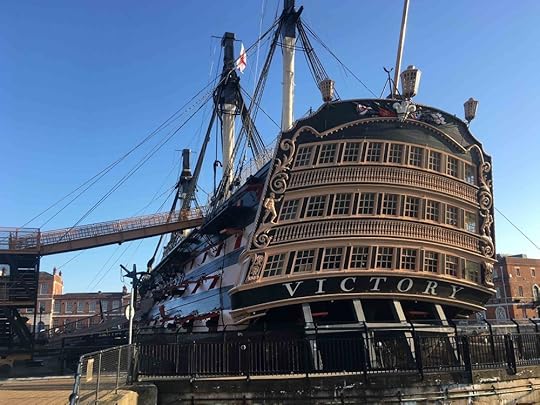
HMS Victory in Portsmouth in March 2019, showing the stern as depicted in the 1807 Luny painting.
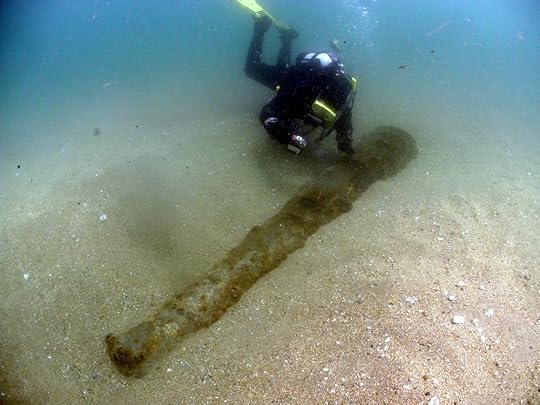
Photo of me on the wreck of HMS Anson in 2018, showing one of the ship’s main armament of 24-pounders - perhaps one of the guns visible in the gunports in Luny’s painting. The wreck lies buried most of the time under deep sand and over many visits we have only ever seen this one gun. Several 24-pounders were salvaged from the site between the late 19th century and the 1960s, including two now mounted on gun carriages at the nearby port of Porthleven, one outside the museum in Helston and two outside the west entrance to RNAS Culdrose nearby (photo: Mark Milburn)..
March 13, 2019
A blended Somme trench image, 1916/2018
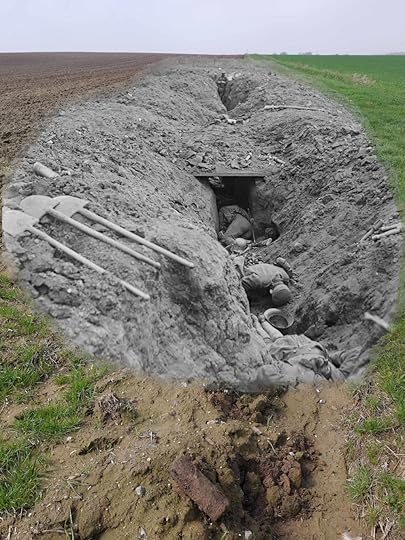
I created this image by blending two photos, one taken during the Battle of the Somme in 1916 and the other by me on the battlefield in 2018. While researching in the Imperial War Museum collections I had been struck by the 1916 photo, which seemed to encapsulate much about the battle, and war in general – the bleak vista, the almost casual litter of death, and – looking at it from an archaeologist’s perspective - how much of that could still lie just under the surface, buried in filled-in trenches such as this one.
I decided on my next visit to the battlefield to try to find a present-day vista that might come close to matching that view. The exact location of the trench is unknown – the caption states ‘Battle of Flers-Courcelette. German dead in their front line trench. 15th September 1916’ – but I felt certain that I could find a similar view and angle at a known trench site on that part of the battlefield. Eventually I found this spot near Courcelette looking east at the site of Regina Trench, where the field boundary follows the line of the trench as it abuts the Miraumont Road. On 21 October 1916, the day that the stretch of trench visible in my photograph was taken by the British 53rd Infantry Brigade, the view may well have been similar to the 1916 photo – some 250 Germans had been killed in and around the trench that afternoon, and the surrounding battlefield would have reflected the terrible carnage of the previous weeks as Canadian troops tried over and over again to take the trench.
I have a vested interest in this spot because my grandfather Tom Verrinder was at exactly this location in Regina Trench on the following day digging dugouts and a First Aid Post with his unit of dismounted cavalry. It was only after I had taken the photo and returned to look at the original that I spotted a remarkable coincidence - both images showed 18-pounder shrapnel casings, among the most common finds on the Somme battlefield, one at my feet in my photo and one off to the left in the 1916 photo. From my viewpoint as an archaeologist, fascinated by the detritus of battle, the presence of these artefacts seemed to bind these two images together across the century since the war.
Credit for the 1916 photo: photographer unknown, Royal Engineers No 1 Printing Company, © IWM (Q 189).


March 12, 2019
Gunner Charles Gerald Cook, Royal Garrison Artillery (183, 93 and 224 Siege Batteries), 1916-19
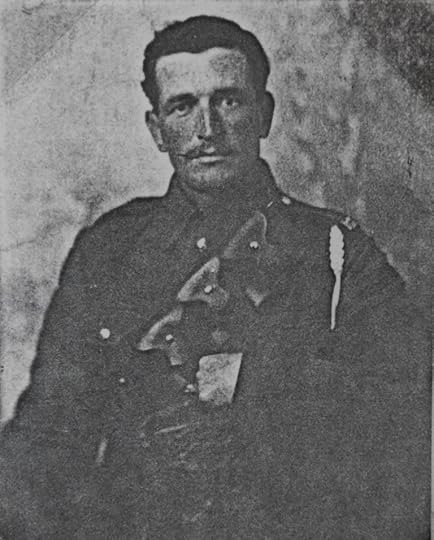
Charles Gerald Cook during the First World War. He wears the bandolier used by British artillerymen and cavalrymen to carry small-arms ammunition, a ready way to distinguish these men in photos from infantry.
Charles Gerald Cook – Gerald to his family – was born on 28 November 1880 in Billingsley, Shropshire, the son of a coal miner. His parents ran the sub-post office in Billingsley, and at the age of 14 he started work as an Auxiliary Postman. His elder brother John, my mother’s grandfather, was in the Shropshire Rifle Volunteers and fought in the Boer War, but Gerald was only 18 in 1899 and would probably have been considered too young to go. He was certified as a qualified Postman by the Civil Service Commission in 1901. He married Annie Mason in 1905 in Bridgnorth and they had three children, Hector Charles, Winnifred Annie and Doris May. Tragically, Annie died in March 1915, leaving their three children without a mother, the youngest of them only two years old. They were looked after by family members in Billingsley while Gerald was away in the war.
He attested for the army on 11 December 1915 and enlisted on 9 June 1916, joining the Royal Garrison Artillery (R.G.A.) in Gosport, Hampshire. His service papers have survived, allowing his war record to be reconstructed in some detail. On 23 June 1916 he was allocated to the 183rd Siege Battery, one of ten new Siege Batteries of the R.G.A. authorised by the Army Council. One of the other recruits to the Battery was the writer Wyndham Lewis, who wrote in his letters about training with the 83rd before leaving to take up a commission. On 26 September the Battery sailed for France, with Cook’s record showing that he departed from Folkstone and arrived at Boulogne. Once there, they travelled immediately to the Somme battlefield, arriving on 28 September and joining the 27th Heavy Artillery Group (H.A.G.) the following day.
The Siege Batteries operated howitzers, weapons with shorter barrels and higher elevation than guns, designed to send large-calibre high-explosive shells at high trajectories; the plunging fire that resulted was especially suited to penetrating trenches and to counter-battery work, and howitzers became a mainstay of warfare on the Western Front. The 183rd Siege Battery operated four 9.2 inch howitzers, the most common calibre along with 8 inch and 6 inch howitzers. Much of the work for the Battery involved hauling these weapons into place and between positions, and bringing up the 290 lb shells and propellant charges. A figure for 1916 gives the establishment of a 9.2 inch Siege Battery as six officers and 254 enlisted men, divided between 156 gunners and 98 transport personnel, as well as thirty riding and 130 heavy draught horses. A remarkable eight-minute film taken in January 1916 showing the loading and firing of a 9.2 inch howitzer in the destruction of a German blockhouse can be seen here.
In France most of the Siege Batteries were organised into Heavy Artillery Brigades, called Heavy Artillery Groups (H.A.G.s) from April 1916. Some Batteries remained with the same H.A.G. for months, while others were reallocated frequently. Only a few Batteries kept their own war diaries, so the main source of information on particular Batteries is the diaries of the H.A.G.s. If the Battery number for a soldier is known, it can be looked up in an allocation list in the National Archives that records the H.A.G.s to which the Battery belonged and the dates. Unfortunately, a number of the H.A.G. diaries are missing or only partly preserved, and those that do survive vary greatly in content with some giving detailed Battery-by-Battery accounts and others only a broad summary.
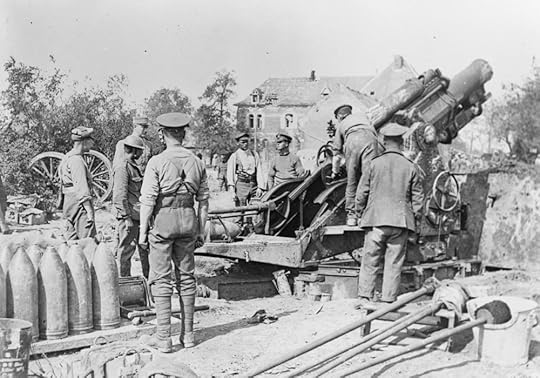
A 9.2 inch howitzer of the Royal Garrison Artillery in firing position near Maricourt during the Battle of the Somme, September 1916 (French Official Photographer, © IWM (Q 58449)).
The diary of the 27th H.A.G. shows that it was based near Mametz at the time of the arrival of the 183rd, with the Group HQ having moved forward to the south-west corner of Mametz Wood on the previous day. The Group had been extensively engaged in support of the Somme offensive from its outset in early July 1916, and continued to be so throughout the nearly six weeks that the 183rd was with the Group. The diary contains only three brief lines of entry for this entire period so it is not possible to reconstruct any detail.
The allocation list shows that the Battery transferred to the 66th H.A.G. on 21 October, the 30th on 30 November, the 3rd on 28 January 1917, the 66th on 10 February and the 59th on 8 May. Of these, only the diary of the 59th H.A.G. survives. However, some reconstruction of the Battery’s deployment with 66th H.A.G. is possible through the casualty records of the Commonwealth War Graves Commission, which shows that seven men of the Battery were killed on 4 April and one on 5 April near Arras, in the days immediately preceding the opening of the offensive there on 9 April. Clusters of deaths like this among gunners in the same Battery might have come about through German counter-battery fire or as a result of a premature detonation and burst barrel, a hazard for all artillerymen and the cause of frequent casualties.
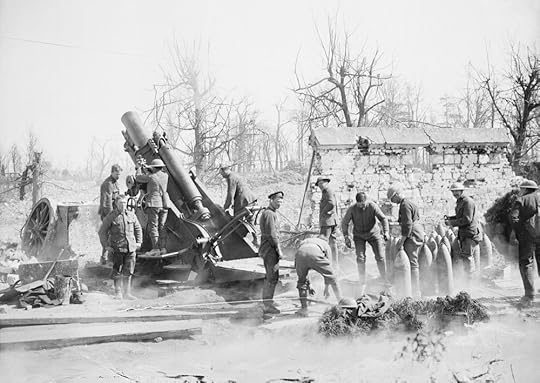
A 9.2 inch howitzer of the Royal Garrison Artillery in action in the ruins of Tilloy-les-Mofflaines, near Arras, April 1917 (photo: Lieutenant John Warwick Brooke, © IWM (Q 5221)).
The likelihood that the Battery was near Arras at the outset of the battle is strengthened by the diary of their next Group, 59th H.A.G., which shows that the 183rd was opposite Wancourt only 4 miles south-east of Arras during their 40 days with this Group. From 8 May to 15 June 1917 the battery fired 1,050 rounds on the Hindenburg Line, targeting trench junctions, dugouts and strongpoints and machine gun emplacements. The location of the Battery from June to December is unknown as the diary of its next Group, 54th H.A.G., is missing. On 12 August Cook was ‘slightly wounded’, but ‘remained at duty.’ He went on leave to the UK from 2 to 11 November, and after the Battery had a period of rest it was broken up on 16 December with one of its sections (i.e. two guns) going to the 91st Siege Battery and the other to the 93rd, with Cook joining the latter.
The diaries of the two Brigades (officially renamed from Groups again after December 1917) to which he was attached for the remainder of the war both survive, and give detailed accounts. From 21-26 March the 93rd took part in defensive bombardments during the German Spring Offensive, on several occasions having to move at short notice to prevent the Germans from overruning their positions. ‘The usual form of firing was to concentrate on an area for 10 minutes and then search back along likely lines of approach.’ The Battery was at Guivry at the start of the offensive and moved from there to Maucourt, Porquericourt and Estrée St Denis, after which they went into rest until rejoining the Brigade on 14 May.
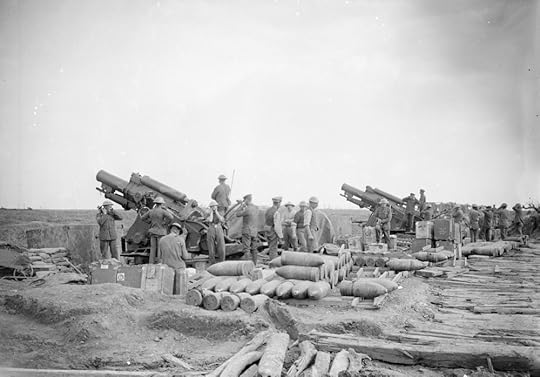
Two 9.2 inch howitzers of the Royal Garrison Artillery about to fire, 4 October 1917 (photo: Lieutenant John Warwick Brooke, © IWM (Q 7269)).
On 4 July 1918 the 93rd took part in the Battle of Hamel, in which British artillery and tanks supported Australian and U.S. infantry in their assault on the town of Le Hamel, part of the attempt to push the Germans back again in the western Somme area following the Spring Offensive. The Siege Batteries were positioned as far forward as possible at Zero hour for the infantry assault, and at some point during the day Cook received a gunshot wound to the left shoulder and face. After being evacuated he spent time in several hospitals – he was in the General Hospital at Rouen on 6 July, the General Hospital at Frouville on 8 July and a hospital at Dover on 24 July - but he had recovered enough to be back in France at the Base Depot on 30 July.
Five days later he was back in the Somme area allocated to another battery, 224th Siege Battery, part of 62nd Heavy Artillery Brigade - this time operating 6 inch howitzers. On the day that he joined, the Brigade HQ was at Forceville some six miles north-west of Albert on the old Somme battlefield. After being devastated in 1916, the battlefield had again seen extensive action during the March 1918 German offensive and was about to be fought over yet again in the follow-up to the Battle of Amiens on 8 August, with the Brigade shelling the retreating Germans and also carried out counter-battery work. Cook was granted 14 days leave to the UK via Boulogne on 21 August, so missed their move forward on the 26th to the old battleground at Courcelette, ‘from which position good execution was done on the retreating enemy’, after the Brigade had bombarded Miraumont, High Wood and Flers.
By the time he rejoined on 4 September 1918 the Battery had moved beyond the Somme towards Cambrai. From then until the Armistice on 11 November they supported the infantry in the ‘Hundred Days Offensive’, crossing the Canal du Nord on 29 September and reaching their final position at Le Plat de Bois, St Waast, some 13 miles south-west of Mons, on 7 November. Cook was in hospital in Frouville for part of this time, from 26 September to 4 October, but he was with the Battery continuously after that. Over this period they carried out many bombardments in support of infantry attacks as well as destructive shoots on hostile batteries, often with aeroplane liaison for observation. From 1 November the Battery fired 1180 rounds on hostile Batteries and in harrassing fire on roads and approaches, with their final 76 rounds of the war being fired on the morning of 7 November. One of the howitzers had been with the Battery since January 1917 and had fired a total of 16,905 rounds. The final two months of the war had cost the Battery one officer and seven men killed, 12 men wounded and one gassed, their final casualties having been on 17 September.
Gerald Cook was demobilised at Dover on 2 March 1919 and returned to his civilian life as a rural postman in Bridgnorth, where he remarried that year. He received the British War Medal and the Victory Medal, and in 1940 was awarded the Imperial Service Medal for completing 45 years of service with the Post Office. He died in 1946.
Note
His surname is variously spelled Cooke and Cook in his service papers, but the family had adopted the spelling Cook so that is used here.
Acknowledgements
I’m grateful to my mother Ann for her comments, and especially to my cousin Jeanette Preece for having the foresight to photocopy the picture of Gerald - subsequently destroyed with other family photos in a house clearance - and for her interest in the Cook family history.
References
(All WO references are to the UK National Archives. Note that none of the war diaries here are included in the collection on Ancestry.co.uk.)
Service Papers, 92293 Charles Gerald Cooke (National Archives, available on Ancestry.co.uk)
Medal Card of Cooke, Charles G. (WO 372/4/245878)
Service Medal and Award Rolls, Royal Garrison Artillery (award of British War Medal and Victory Medal to 92293 Gunner Cooke, Charles Gerald, certified 21 December 1919)
London Gazette, 27 August 1901: 5677 (notice of qualification as Postman)
London Gazette, 20 December 1940: 7110 (award of Imperial Service Medal)
War Diary, 27th Heavy Artillery Group (WO95/471/1)
War Diary, 59th Heavy Artillery Group (WO95/322/1)
War Diary, 62nd Heavy Artillery Group (WO95/394/3)
War Diary, 69th Heavy Artillery Group (WO95/474/8)
List of Royal Artillery, Royal Medical Corps and other units, including allocation lists to Groups and Brigades for Royal Garrison Artillery Batteries (WO95/5494)
Rose, W.K., 1963, The letters of Wyndham Lewis. London: Methuen
Ruffell, E., 1919, Roll of service of those who have served with the 93rd Siege Battery, R.G.A. Abingdon: Burgess and Sons (in the Imperial War Museu
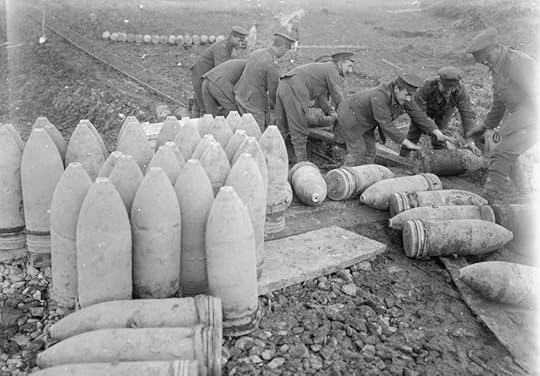
British troops loading 9.2-inch howitzer shells onto a light railway trolley, Fricourt, September 1916 (photo: Lieutenant Ernest Brooks, © IWM (Q 1470)).