
Cassey Ho's Blog, page 33
February 21, 2023
What Is the Viral 12-3-30 Workout?

So, I’m a little late to the party on the workout.
I live under a rock called motherhood, and I’m admittedly more of a Peloton girly when it comes to cardio. But, I also need to switch up my routine pretty often so I don’t get bored. So when Cassey posted about trying this treadmill workout, I needed to know more.
What is the 12-3-30 workout?Coined in 2019 by Lauren Giraldo, the 12-3-30 treadmill workout gives a good cardio burn like a run, without having to actually run. Her video about the workout and how it changed her body went viral, eventually catching the attention of celebs like Kylie Jenner. NBD, right!?
Here’s the setup:12% incline3 mph30 minutes
You can do this workout on any treadmill that has an incline function! If you don’t have a treadmill, I’ve seen variations for an elliptical. You could also take the gist of this and walk some hills outside.
 K, but what’s the 12-3-30 hype?
The way this workout gets your heart rate up is sneaky! You’re “just” walking, right? Wrong.
When Cassey tried it out for the first time, she noted that her heart rate was around 145 beats per minute (bpm), which she said was higher than it gets on runs sometimes.
It’s the incline that makes your heart work harder. Although 3 mph is a doable pace for most, the incline makes it more like hiking uphill at this pace, for 30 minutes. Your heart is definitely getting a workout.
Increasing your heart rate is a great way to strengthen your heart, which can help lower blood pressure and cholesterol. Putting in the cardio work can also lower your resting heart rate, which generally means better cardiovascular fitness.
Your muscles will feel it tooI mean, your muscles are working when you walk a flat road. But during a 12-3-30, the incline works as resistance. Just imagine walking a decently steep hill for 30 minutes with no breaks and you can kind of feel the work your legs are about to endure.
That resistance will help strengthen mainly your calves, hamstrings, and glutes, which aren’t targeted as much when you walk on zero incline.
What you won’t feel as much is joint pain. Walking at an incline is lower impact than running, which means it’s easier on your joints.
You’ll get a good calorie burnThis makes sense, right? Your heart is working harder and you’re using more muscles, so you burn more calories! The metabolic equivalent of this workout could be close to actually jogging, which is cool! But also keep in mind that there are plenty of workouts that can give you that same burn, if this one isn’t for you!
Plus I feel like this is a good time to say that walking, even without an incline, is an amazing workout. This article by one of the Blogilates designers inspired (read: influenced) me to try an under desk treadmill while I work. I’m a few months in and LOVING it.
It boosts your moodWe love to see it.
Regular exercise improves your mood and stress levels, period. Sometimes the key is just finding the right workout that you enjoy enough to do consistently! The 12-3-30 might be the one.
Give it a shot!View this post on Instagram
A post shared by twelve three thirty (@twelvethreethirty)
12-3-30 is a great alternative for people who hate running but still enjoy a challenge on the treadmill. Or people like me who just need some variety… maybe while watching your fave show or finally finishing that audiobook?
If you give it a try, start slow and work your way up! A lot of people are surprised at just how challenging it is to hold a 3 mph pace at such a steep incline 30 minutes. After you do it a few times, it will feel easier (ahem, you will be STRONGER!)
And as always, make sure your healthcare provider is cool with you trying something new.
30 minutes and doneThis is a great workout if you’re like me, telling yourself to “just do 5 minutes” because you know starting is the hardest part. Before you know it, 30 minutes will be up.
Just be ready to sweat.
If you try it or weren’t late to this treadmill party like I was, comment what you think and if you can do the whole thing without holding on 


Pickleball made me cry.
Today, pickleball made me cry.
View this post on Instagram
A post shared by Cassey Ho (@blogilates)
Growing up my childhood was all about academics and tennis tennis tennis. My dad was a USTA coach and I trained so much I hated it. Sure he taught me beautiful form and technique, but I never learned how to have fun. Even though it’s been years since I’ve stopped competing, I can still hear the yelling anytime I step on a court and my ball hits the net or goes out.
Winning was winning. But losing wasn’t losing. It was failing. Failing my coach, my dad, my team, and myself.
I cold turkey stopped playing tennis after HS because mentally, it gave me too much anxiety. Plus physically, I couldn’t play like I used to anymore. I had badly injured my wrist my sophomore season. My career on the court was over.
But today, many many lifetimes later – something in me asked to try something new.
It asked to try pickleball. Same-ish concept as tennis but smaller racquet, smaller court, and lighter ball.
At first, I was getting so frustrated at my timing bc the ball was bouncing differently and I was literally missing the ball and swinging at air! I kept yelling at myself the same way my coaches used to.
Later that night, Sam asked if I wanted to play a game and my immediate response was “absolutely not because it will ruin our relationship.”
Wow.
For the next 2 hrs we peeled the onion and man, there is a lot of trauma I need to work thru.
When Sam was asking me to play, he thought it would be a fun game.
But what I HEARD was he wanted to beat me. And if he beat me, it would mean me losing. And me losing, means me failing. And me failing means me being worthless. And worthless was how I felt anytime I lost a game.
Then he said something that brought me to tears. He said “You need to learn how to lose.”
When I heard that, I realized, omg. I had never been told it’s ok to fail. I’ve only ever been coached how to win, never how to lose…without losing my self worth. I started crying.
I’ll always be grateful for my dad and my tennis journey but today I need to begin undoing my past in order to move forward.


PS: I’m wearing the POPFLEX Mockneck shruggie (s/m), corset bra (xs) + pirouette skort (s). I’m 5’5”.
February 17, 2023
Habit Stacking is Helping Us Make Changes That Actually Stick
Now that we’re 2 months into 2023, maybe you’re starting to reflect on how you wanted to better yourself this year. Perhaps you’re ready to build onto what you’ve started.
It doesn’t matter what your goals are— whether it’s maintaining a more challenging fitness routine, boosting daily productivity, or just having a more organized home. Big changes are hard for everyone. So instead of trying to change everything all at once, you could consider habit stacking.
 What is habit stacking?
Habit stacking is just like it sounds – adding one habit to another one. Think small here. Let’s say after you make your morning coffee (a habit), you sit down and write a gratitude list. Yes, it can really be that simple.
Another example of this is adding five minutes of independent stretching or cardio after your daily workout. Habit stacking should be easy and come somewhat naturally.
“Instead of trying to course correct everything all at once, which is what happens to most people, I simply look at one habit at a time that needs to change, remove it and replace it with a better habit, at least one per week or every other week,” says founder, writer, and podcaster Matt Gottesman.
Every single person can make the effort to improve at least one or two “bad habits.” One habit that many of us have (raising my hand here) is scrolling social media while eating breakfast. Instead of scrolling, we can substitute this for journaling, looking at your planner, or perhaps even writing down five things you’re grateful for.
The trick to habit stacking is only choosing sustainable habits. This can be different for everyone. For example, if you have kids that need your attention during your morning coffee time, it might be hard to keep up with a gratitude list. However, you can commit to writing a gratitude list at night after the kids go to bed.
The little things become the big things
@elleleonardofficial Habit Stacking Hack #livingleonard ♬ Blue Blood – Heinz Kiessling
The good news with habit stacking is that all of these little changes add up to an improved version of yourself. “In eight to twelve weeks, you have a whole different set of behaviors that are happening, but they happened at an easier pace,” says Gottesman.
Habit stacking has personally changed his life. “I never thought I’d be a guy who follows a strict daily schedule (three two-hour sprints of deep work), cooking (constantly building on good nutrition), meditation, prayer, ice baths, infrared sauna, five days a week working out, and more. I have afternoons and evenings free. I get up at 5:00 am and go hard until 12:30 or 1:00 pm. Then, I’m done if I want to. Good habits and discipline actually gave me freedom.”
Remember, if you’re going to stack habits, the key is not to make a bunch of intense lifestyle changes all at once. Gottesman suggests starting small. Add things in five-minute increments such as five minutes of journaling, breathwork, meditation, or mobility work.
@shelbysacco5 #stitch with @trainingforamazing Comment one way you are going to #habitstack this week! #sadtosavage #shelbysacco #healthyhabits #habitstacking ♬ Monkeys Spinning Monkeys – Kevin MacLeod & Kevin The Monkey
Tips to get started with habit stacking
First, think about your goals. What changes are you hoping to see? Do you want to use your time more wisely? Be more productive? Find more time for self-care? Be more present?
Then, identify the “bad” habits that seem to hold you back. Maybe it’s hitting snooze too many times every morning, or scrolling aimlessly certain times of the day. Maybe there are so many things you want to accomplish in a day that you just feel frozen.
James Clear, who resurfaced the concept of habit stacking (and made it go viral) in his book Atomic Habits, calls these situations “triggers.” He actually takes this a step further, saying that any habit you do every single day can be a trigger.
He then recommends stacking the trigger with a new habit that you want to start.
Write it outStart by writing down all of your triggers. Then, make a list of some new habits you want to start. Lastly, find ways to pair them together. Here are some examples:
Scrolling TikTok (trigger) while you walk on the treadmill (new habit)Listening to an audio book (new habit) during your commute to work (trigger)Writing in a gratitude journal (new habit) while you eat breakfast (trigger)Drinking a glass of water (new habit) when you alarm goes off in the morning (trigger)
There’s a ton of space in the Fit Planner to brainstorm AND track new habits. Habit stacking makes change easier to achieve, but we still love to track and celebrate when we actual stick to it!
Start smallAgain, don’t try to change everything at once! Start with one habit and give it some time before adding another.
So what do you think? Are you going to give habit stacking a shot?
February 14, 2023
I Tried the Always Sold Out Supersculpt Legging. Here’s What Happened
Psst: POPFLEX is a sister brand of Blogilates, but all the following opinions in this Supersculpt Legging review are my own. So, let’s get into it, shall we?
I’d like to say I’m too old for children’s games, but I’ve been playing hide and seek with the perfect pair of leggings for years. Whether I look online, in my friends’ closets, or on the racks of Ross (which have usually treated me well), I could never find a pair that had it all.
I’m a thighs girl, so most pairs always get pulled down, leaving me to hike them up when I just want to hike. Full stop. Either that or they’re see-through when I bend over, which isn’t exactly the vibe I’m going for during a sesh at LA Fitness.
I’ve purged about 70% of my closet this year, but I’m determined to rebuild from the basics up. Since I want to keep my wardrobe to a minimum, I need products that can pull a double shift.
For leggings, that means a pair able to hang with all my workouts and anchor a girls’ day ‘fit. I’d seen all of Cassey’s videos about her journey to design the perfect leggings, so I decided to give POPFLEX Supersculpt Leggings a whirl.
 Unpacking
As expected of Cassey, the delivery was très cute. The plastic bag is biodegradable, the cozy sticker was an added bonus for my water bottle, and the L for limitless detail on the tag was such a random moment of empowerment. Love that for me and POPFLEX shoppers.
There was a moment when I thought it was all too cute to be true, and that moment was when the waistband got up to my thighs. You know that moment where you’re like, “Oh no! I don’t know if it’s going to fit?”
That was me, but I decided to trust in the fabric, which seemed durable but still had some stretch. Once they were up, they didn’t feel too tight, so I chalked up the initial struggle to the leggings needing a light breaking-in. (I also did some stretches for good measure, and everything was good to go.)
 Supersculpt Legging Test Drive
After my first impressions, I packed up my new leggings for a girls’ trip where I’d be hiking, shopping, and lounging. First up was a morning of thrifting, and by this time, pulling up the pants wasn’t an issue. It was still a bit of a squeeze, but that was a small price to pay for how secure I felt in them throughout the day.
One downside was how often the high waistband rolled down my stomach, which meant I had to unroll it back up so that it didn’t create a bulge at my panty line. This happens with all high-waisted leggings that I’ve tried, and I figure it’s due to the combination of my slight-pudgy stomach and wider hips pushing everything down. It happened more often when I went from standing to sitting, likely because of how my abdomen contorts, but if you have that issue with high-waisted pants, I think you’ll have the same issue here.
The next day I went for a hike, and the leggings did everything they needed to: kept me supported without feeling restricted and hid my bright panties when I climbed uphill. I’ve never had major cameltoe issues, but it was nice to not have to worry about that at all since the Supersculpt Leggings don’t have a front seam.
Though what I do always pay attention to is pockets because I do not like carrying bags if I can avoid it. The pockets comfortably held my phone on one side and car keys on the other without dragging down the waistband.
By the end of the weekend, I had hiked, walked, bar-hopped, and done some light yoga in the Supersculpts without much to complain about. The material does pick up lint often, but it’s also extremely soft to the touch, so it’s a small price to pay for a lasting feeling of coziness.
(Since writing this, I’ve heard that the newly restocked leggings have a new fabric that doesn’t pick up lint or dog hair!)
 PraisesSuper soft, supple fabricComfortably snug fitAnti-cameltoePockets!!!Anti-see-through (so no peep shows in spin class)Control top-style waistband
ProposalsI don’t even know if the high-waist band rolling down is a specific issue to me, but if anyone can figure it out, I’m sure it’s Cassey.
 Final Thoughts
A decent pair of black leggings seems like it should be easy to find, but it really isn’t—especially if you’ve got some curves. Overall, the Supersculpt Leggings from POPFLEX do what they need to do, and they do it well. They’re comfortable, functional, and seem built to last you at least a few years if properly cared for.

February 13, 2023
Hip Mobility Exercises: What They Are and Why You Should Do Them
A few minutes of hip mobility work could help you break out of a fitness plateau.

While scrolling through TikTok or looking around the gym, you may see some unusual-looking exercises. Think slow leg circles, or sitting while gently moving the knees and torso side to site.
It may not look like it’s doing a whole lot for the body, but this kind of move is actually so important! Whole body health is trending (yay!), so more people are understanding the importance of hip mobility and adding it to their fitness routine.
We’ll break down the basics for you in this article… and show you some example moves to try!
What is hip mobility and why is it important?The hips are the stable base that makes sure the spine is upright while also allowing movement in our lower body. Poor hip mobility is when the hips can’t move in their full range of motion. Not only is the feeling of tight hips uncomfy, but it can also create poor posture, which often leads to injury.
Mobility is key if you want to improve your workouts.
Better hip mobility means better squats and deadlifts! Tight hips cause discomfort during these moves and can really restrict your range of motion. Doing a few minutes of hip mobility work is a great way to warm up on leg day. Over time, you’ll squat deeper and perfect your deadlift hinge.
What causes tight hips?If your hips are tight, it means there’s tension in your hip flexor muscles. Some people naturally have more tightness than others, but sitting for long periods of time is a huge factor when it comes to hip pain.
About one in four Americans sit for more than 8 hours per day. That’s a lot of sitting, which means a lot of tightness in the hips!
Tips to improve hip mobilityThe good news is, you can gain range of motion in your hips, decrease your risk for injury, AND improve your workout.
Hip mobility exercises help you move your joints through their full range of motion. Doing these dynamic exercises can also help loosen up and strengthen muscles that have gotten tight and weak from hours of sitting at a desk.
These moves may seem simple, but don’t let them fool you. They can really burn! That’s because they strengthen muscles that are often overlooked.
While popular in the world of physical therapy, it wasn’t until recently that hip mobility became a part of the mainstream.
Hip mobility is all over the fitness side of social media. #hipmobility on TikTok has over 385 million views and #hipmobilitychallenge has almost 50 million views! Users are seeing the benefits of doing these exercises not just for post-injury therapy, but to prevent injury in the first place!
Ready to start your journey to greater hip mobility?Everyone can benefit from hip mobility work, whether you spend hours in the gym or zero. Taking just a few minutes each week to improve your mobility can really improve your overall health.
Here are some example exercises for you to start your hip mobility journey. These exercises are beginner-friendly and you can do them anywhere.
Cossack Squat
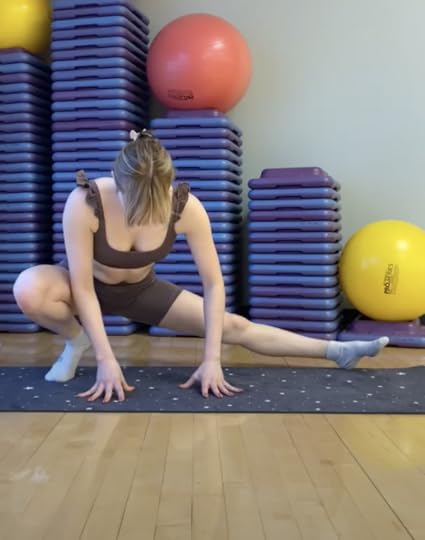
Spread your legs wide and lunge deeply from one side to the other, being sure to keep the lunging knee in line with your toes. If you can’t get super low, don’t sweat it! Your flexibility and range of motion will improve if you stay consistent. Start with 5 per side, holding each rep for 1 or 2 seconds.
90-90 Hip Rotation
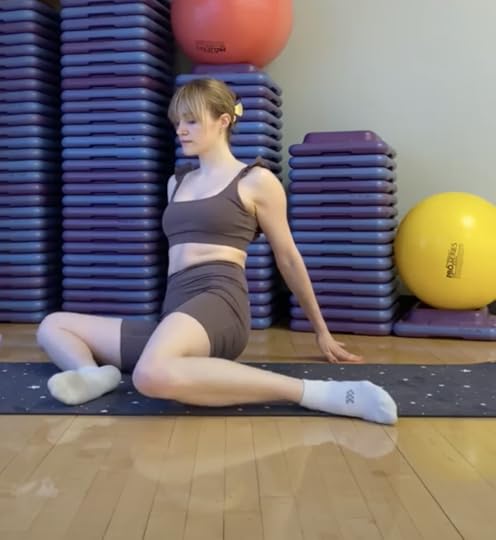
Sit with both legs bent at a 90 degree angle, one hip rotated internally and one rotated externally (the pic above can help guide you!). Gently lift your knees and rotate from one side to another, keeping your back as straight as possible. Continue slowly moving from side to side, keeping the hips as steady as possible and your front leg parallel for about 20 seconds.
Fire Hydrant Circles
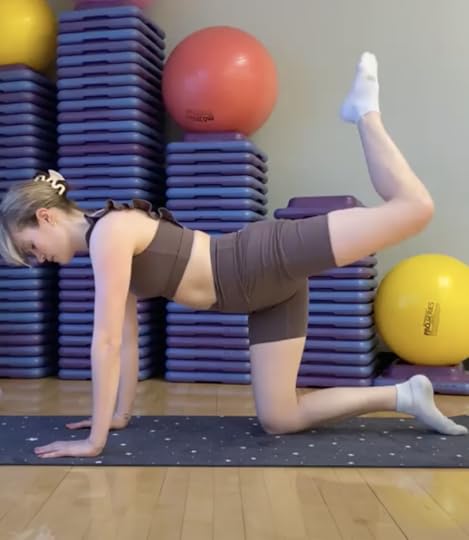
On all fours, carefully lift one leg up and to the side so your knee and hip are in line, bending at a 90 degree angle. Slowly draw imaginary circles with your knee, doing your best to keep your hips square to the ground. Start with 20 seconds per side.
Up for a hip mobility challenge?Try this hip mobility challenge from Cassey! As you work on your mobility, you can repeat this challenge and see how you’ve improved!
We want to see your favorite moves!
@blogilates I actually did it 15 more times after this to see if i could do it without falling but perfection isso i am posting this instead. Outfit from @POPFLEX #hipmobilitychallenge #fitnesschallenge ♬ BOOM Doja cat – You seem lost, follow me

Snap some pics or videos of you trying them out and tag @blogilatesdotcom. Let’s inspire each other on our movement journeys!
February 12, 2023
The 2000s Aesthetic is Resurrecting Digital Cameras
*This dive into 2000’s aesthetic and digital cameras may contain referral links for products we love, and all opinions are our own. We earn a small commission from these links, at no additional cost to you.

Do you remember the days when your friends and family would snap a picture with their point and shoot cameras? Whether at a family party or gathering, someone always had a camera on their wrist ready to snap a photo at a moment’s notice — for me, it was my great aunt (she was the designated picture taker.)
And you might think that since phones have become more advanced over the last decade that digital cameras are a thing of the past. However, that’s not true — at least during these past few months. Digital cameras are actually making a comeback all over social media. Yes, you read that right. People are dusting off their old point and shoots and getting to work (you’ve probably also noticed a rise in Polaroid cameras, too.)
@nadish_life My new Hobby#photographer#digitalcamera#digitalphotography#digiclub#digicam#62digiclub#cutecamera#cutecam#camcover#samsungcamera#samsungcam#цифроваякамера#самсунг#cutecamcorder#oldcamera#oldcameras#fyp#aesthetic#aesthetic#эстетика#fypシ#рек #врек ♬ maybe im in love – flo
TikTok’s obsession with 2000’s aesthetic
Similar to most comebacks these days, the uptick in digital camera usage comes from TikTok users and celebrities who can’t seem to get enough of this nostalgic device. The hashtag #digitalcamera has over 240.4M views on TikTok, where users are using these cameras to capture moments on solo travels, at weddings, and even during their day to day activities. And celebrities like Charli D’Amelio, Bella Hadid, and Emily Ratajkowski have been spotted with tiny point and shoots bringing them to the forefront.
While TikTok might be a part of the resurgence of digital cameras, many cameras have more settings to effectively capture pictures in a way that a traditional smartphone can’t — think composition and the trendy 2000’s aesthetic that everyone is trying to achieve.
Personally, I haven’t hopped back on the digital camera trend, but that’s not to say I haven’t thought about it. I’m always looking to be ITK and at the cusp of the latest social media trends, but this one seems to be out of my scope (at least for now.) I know myself enough to know that I’d buy a camera just to have it sit around and use my phone because of convenience. With that said, I think if people are keen on getting a digital camera to stay relevant and look cool, then it’s well worth the buy.
The perks of a point and shoot
@bettyboobp #friends #camera #pics #pictures #111 #333 #phone #digitalcamera ♬ original sound – 𝔼𝕚𝕒𝕟
Photographer, director, and storyteller Sophie Elgort says that although an iPhone camera never hurt anyone with its easy-to-use format, they still don’t provide the same effect as a traditional point and shoot.
“An iPhone photo looks like just that – an iphone photo, and therefore looks like everyone else’s photos,” says Elgort. “I think people are going back to digital cameras to get a different look to their pictures, to create something unique.”
You might get a different angle.
Additionally, many people have become so used to others taking phone pictures, that the reaction you get out of subjects with a traditional point and shoot may not be what you (or them) were expecting. It can be memorable and even fun to experiment with it.
“I’ll go as far as saying that maybe you’ll even get a different reaction from your subject when they find themselves in front of a camera versus a phone,” says Elgort.
If you want to put that idea to the test, then next time you see your friends, whip out your point and shoot and see their reaction. I bet they’ll either laugh, smile, or look confused — but either way it’ll be a moment that everyone involved will remember.
Not only may the reaction be different, but how the photo is taken is different. “Things look different through a viewfinder so you may choose to shoot something differently than you would have with your iPhone,” says Elgort.
If you have to look through a little viewfinder, then you might decide to change up the focal point and have a different picture as a result. For example, you might find a different angle of a flower you’d like to shoot that looks better than a head-on shot from an iPhone for instance.
Is it worth hopping on the trend? Probably.And the best news is point and shoot cameras aren’t as expensive as they used to be — remember when you went to Best Buy as a kid and saw them on stands for hundreds of dollars? That may ring true for some more higher-end cameras, but for the most part, you can find quality handheld cameras for less from well known brands like Polaroid, Kodak, etc.
What kind of digital camera should you get?
Keep on reading to see a few of our favorite picks for basic cameras you can use to hop on this 2000’s aesthetic trend while it’s hot.
Polaroid 16MP Waterproof Digital Camera
Take this point and shoot camera with you on vacation since it’s waterproof for up to 10 feet. That means you can take it in the ocean as you snorkel or in the pool at your fancy hotel pool. It’s small and lightweight so you can carry it with you around without lugging around extra weight.
Vahoiald Digital Camera
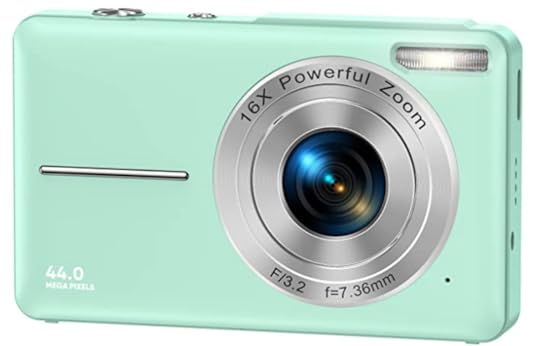
At less than $50, snag this camera from Amazon which is a great affordable option for those who want to hop on the 2000’s aesthetic trend without spending lots of money. It has 16x zoom so you can get up close to your subject and has 1080p resolution to capture high quality video. Available in pink, green, and black.
Kodak PIXPRO Friendly Zoom Digital Camera

With an LCD screen, look at your pictures right on the camera after you take them to see how they turned out. The wide-angle lens makes it easy to capture an entire scene whether that’s a family picture or an image of your backyard garden. This camera is perfect for taking pictures in your favorite POPFLEX activewear, if we say so ourselves.
Minolta Wifi Digital Camera

This is a relatively more expensive option, but it’s still not too shabby, especially considering it connects to WiFi and bluetooth connectivity for easy uploads and navigation. And the three-inch screen makes it easy to view images after taking them to make sure you’re getting the look you want.

Love the 2000’s Aesthetic? Get a Digital Camera
*This dive into 2000’s aesthetic and digital cameras may contain referral links for products we love, and all opinions are our own. We earn a small commission from these links, at no additional cost to you.
Do you remember the days when your friends and family would snap a picture with their point and shoot cameras? Whether at a family party or gathering, someone always had a camera on their wrist ready to snap a photo at a moment’s notice — for me, it was my great aunt (she was the designated picture taker.)
And you might think that since phones have become more advanced over the last decade that digital cameras are a thing of the past. However, that’s not true — at least during these past few months. Digital cameras are actually making a comeback all over social media. Yes, you read that right. People are dusting off their old point and shoots and getting to work (you’ve probably also noticed a rise in Polaroid cameras, too.)
@nadish_life My new Hobby
TikTok’s obsession with 2000’s aesthetic
Similar to most comebacks these days, the uptick in digital camera usage comes from TikTok users and celebrities who can’t seem to get enough of this nostalgic device. The hashtag #digitalcamera has over 240.4M views on TikTok, where users are using these cameras to capture moments on solo travels, at weddings, and even during their day to day activities. And celebrities like Charli D’Amelio, Bella Hadid, and Emily Ratajkowski have been spotted with tiny point and shoots bringing them to the forefront.
While TikTok might be a part of the resurgence of digital cameras, many cameras have more settings to effectively capture pictures in a way that a traditional smartphone can’t — think composition and the trendy 2000’s aesthetic that everyone is trying to achieve.
Personally, I haven’t hopped back on the digital camera trend, but that’s not to say I haven’t thought about it. I’m always looking to be ITK and at the cusp of the latest social media trends, but this one seems to be out of my scope (at least for now.) I know myself enough to know that I’d buy a camera just to have it sit around and use my phone because of convenience. With that said, I think if people are keen on getting a digital camera to stay relevant and look cool, then it’s well worth the buy.
The perks of a point and shoot
@bettyboobp #friends #camera #pics #pictures #111 #333 #phone #digitalcamera ♬ original sound – 𝔼𝕚𝕒𝕟
Photographer, director, and storyteller Sophie Elgort says that although an iPhone camera never hurt anyone with its easy-to-use format, they still don’t provide the same effect as a traditional point and shoot.
“An iPhone photo looks like just that – an iphone photo, and therefore looks like everyone else’s photos,” says Elgort. “I think people are going back to digital cameras to get a different look to their pictures, to create something unique.”
You might get a different angle.
Additionally, many people have become so used to others taking phone pictures, that the reaction you get out of subjects with a traditional point and shoot may not be what you (or them) were expecting. It can be memorable and even fun to experiment with it.
“I’ll go as far as saying that maybe you’ll even get a different reaction from your subject when they find themselves in front of a camera versus a phone,” says Elgort.
If you want to put that idea to the test, then next time you see your friends, whip out your point and shoot and see their reaction. I bet they’ll either laugh, smile, or look confused — but either way it’ll be a moment that everyone involved will remember.
Not only may the reaction be different, but how the photo is taken is different. “Things look different through a viewfinder so you may choose to shoot something differently than you would have with your iPhone,” says Elgort.
If you have to look through a little viewfinder, then you might decide to change up the focal point and have a different picture as a result. For example, you might find a different angle of a flower you’d like to shoot that looks better than a head-on shot from an iPhone for instance.
Is it worth hopping on the trend? Probably.And the best news is point and shoot cameras aren’t as expensive as they used to be — remember when you went to Best Buy as a kid and saw them on stands for hundreds of dollars? That may ring true for some more higher-end cameras, but for the most part, you can find quality handheld cameras for less from well known brands like Polaroid, Kodak, etc.
What kind of digital camera should you get?
Keep on reading to see a few of our favorite picks for basic cameras you can use to hop on this 2000’s aesthetic trend while it’s hot.
Polaroid 16MP Waterproof Digital CameraTake this point and shoot camera with you on vacation since it’s waterproof for up to 10 feet. That means you can take it in the ocean as you snorkel or in the pool at your fancy hotel pool. It’s small and lightweight so you can carry it with you around without lugging around extra weight.
Vahoiald Digital Camera
At less than $50, snag this camera from Amazon which is a great affordable option for those who want to hop on the 2000’s aesthetic trend without spending lots of money. It has 16x zoom so you can get up close to your subject and has 1080p resolution to capture high quality video. Available in pink, green, and black.
Kodak PIXPRO Friendly Zoom Digital Camera
With an LCD screen, look at your pictures right on the camera after you take them to see how they turned out. The wide-angle lens makes it easy to capture an entire scene whether that’s a family picture or an image of your backyard garden. This camera is perfect for taking pictures in your favorite POPFLEX activewear, if we say so ourselves.
Minolta Wifi Digital Camera
This is a relatively more expensive option, but it’s still not too shabby, especially considering it connects to WiFi and bluetooth connectivity for easy uploads and navigation. And the three-inch screen makes it easy to view images after taking them to make sure you’re getting the look you want.
February 8, 2023
3 Pretty Mocktail Recipes For Valentine’s Day
3 Valentine’s Day mocktail ideas – something flirty, something spicy, and something sweet. All very pretty.

I’m back with more festive mocktails! The ones we made for the holidays were so much fun, I knew I had to come up with some options for Valentine’s Day.
People go about V-Day in many different ways. Some of us go full force into romance, while others get a little spicy. And some of us just grab hold of any opportunity to celebrate our true ride-or-dies: our galentines.
You’ll find something here for everyone – something sweet, something spicy, and something more flirty. These mocktails have personality, ok?
Even if you think Valentine’s Day is kind of a sham, these drinks are fun for any occasion. It’s nice to have a pretty drink recipe in your back pocket for hosting friends or a casual at-home date night. Or for the Super Bowl, since that is this weekend too.
 No skill required for these mocktails recipes!
I am no mixologist, so if I can put these concoctions together, so can you! You don’t need a cocktail shaker (I use a jar with a lid), or really any special equipment at all.
The most complicated step out of all of these recipes is making your own jalapeño simple syrup. I know it sounds like more work than you might want, but trust me when I say it’s soo easy. I avoided making my own simple syrups for so long before I realized it’s literally just simmering sugar and water, then adding the flavor you want to infuse.
If you’re still like…nah. Not for me. That’s ok! You can buy whatever you need. No stress here, only fun.
Now, are you ready to unleash your inner mixologist?! Let’s make some pretty Valentine’s Day mocktails!
Rose Gin & TonicA gin and tonic, but make it flirty.
I added rose-infused simple syrup, which you can find on Amazon. But to be honest, I think it’s totally optional! If you leave it out, I would replace it with a plain simple syrup or another sweetener.
Isn’t the shimmer in this drink so mesmerizing?! Can confirm that the edible glitter is 100% worth it, especially if you want to impress your guests with an aesthetic mocktail that requires basically no time or effort.
 PrintRose Gin & Tonic Mocktail#wprm-recipe-user-rating-0 .wprm-rating-star.wprm-rating-star-full svg * { fill: #343434; }#wprm-recipe-user-rating-0 .wprm-rating-star.wprm-rating-star-33 svg * { fill: url(#wprm-recipe-user-rating-0-33); }#wprm-recipe-user-rating-0 .wprm-rating-star.wprm-rating-star-50 svg * { fill: url(#wprm-recipe-user-rating-0-50); }#wprm-recipe-user-rating-0 .wprm-rating-star.wprm-rating-star-66 svg * { fill: url(#wprm-recipe-user-rating-0-66); }linearGradient#wprm-recipe-user-rating-0-33 stop { stop-color: #343434; }linearGradient#wprm-recipe-user-rating-0-50 stop { stop-color: #343434; }linearGradient#wprm-recipe-user-rating-0-66 stop { stop-color: #343434; }Course DrinksCuisine AmericanKeyword mocktail, non-alcoholic, drink, holiday party, glitter, sparkly drink, galentine, ginPrep Time 5 minutesTotal Time 5 minutesServings 2Ingredients4 oz non-alcoholic gin I like Nkd Ldy or Ritual Zero Proof1 oz rose simple syrup or regular simple syrup¼ tsp edible glittertonic watericeInstructionsPrepare 2 glasses with ice (if preferred)Combine NA gin, simple syrup, and ice in a cocktail shaker or jar with a lid. Shake to combine.Add edible glitter to jar and stir.Pour into glasses, admire the glitter swirl, and serve! Spicy Blood Orange Margarita Mocktail
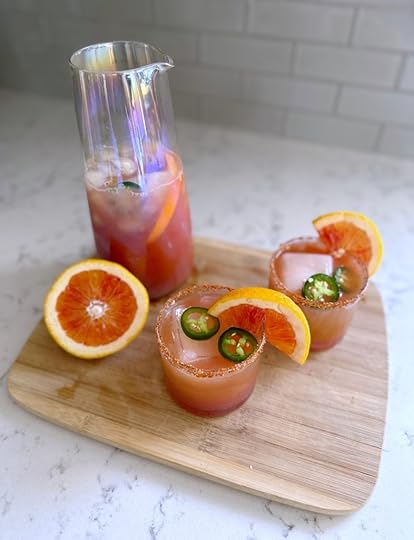
I love a spicy marg, no matter the occasion. I used blood orange juice to make life easier, but you can absolutely use the deep red juice from fresh blood oranges – they’re in season in a lot of areas right now!
I love the tart orange flavor combined with a little lime juice, plus then the spice from the jalapeño simple syrup. YUM.
I left the jalapeños in the syrup while it chilled in the fridge and whew, it definitely had a kick! But in a good way. Feel free to take them out after the syrup thickens if you want to keep this more mild.
This pretty mocktail recipe mocktail is perfect for Galentine’s Day or maybe a Valentine’s Day double date. I can also see myself sipping on this poolside.
It makes a decent size batch (and is easy to double), AND looks so beautiful in a carafe. I just got the iridescent set in the picture above and I cannot wait to serve this for our friends!

 PrintSpicy Blood Orange Margarita Mocktail#wprm-recipe-user-rating-1 .wprm-rating-star.wprm-rating-star-full svg * { fill: #343434; }#wprm-recipe-user-rating-1 .wprm-rating-star.wprm-rating-star-33 svg * { fill: url(#wprm-recipe-user-rating-1-33); }#wprm-recipe-user-rating-1 .wprm-rating-star.wprm-rating-star-50 svg * { fill: url(#wprm-recipe-user-rating-1-50); }#wprm-recipe-user-rating-1 .wprm-rating-star.wprm-rating-star-66 svg * { fill: url(#wprm-recipe-user-rating-1-66); }linearGradient#wprm-recipe-user-rating-1-33 stop { stop-color: #343434; }linearGradient#wprm-recipe-user-rating-1-50 stop { stop-color: #343434; }linearGradient#wprm-recipe-user-rating-1-66 stop { stop-color: #343434; }Course DrinksKeyword mocktail, non-alcoholic, margarita, tequila, spicy, blood orangePrep Time 10 minutesTotal Time 10 minutesEquipmentice cube trayIngredientsJalapeño Simple Syrup1/2 jalapeño sliced1 cup water1 cup granulated sugarMocktail8 oz blood orange juice6 oz non-alcoholic tequila I like Ritual Zero Proof1 limeice1 blood orange sliced, for garnish1/2 jalapeño sliced, for garnish1 tbsp Tajín or salt, for rimInstructionsJalapeño Simple SyrupCombine sugar, water, and sliced jalapeño in a small saucepan over medium high-heat. Stir while bringing to a boil, and then reduce heat to simmer. Continue to simmer for 3-4 minutes, and then remove from heat.Let the syrup cool to room temp. It should thicken as it cools. Then transfer to a bottle or container (strain if you like) and refrigerate. MocktailIn a carafe, combine blood orange juice, non-alcoholic tequila, juice of one lime, and 1 oz jalapeño simple syrup.Add ice, extra jalapeño slices and blood orange slices (if desired).Prepare glasses by running a lime wedge along the rim of each glass, and then gently roll into Tajín on a plate or shallow bowl.Pour your Spicy Blood Orange Margarita Mocktail into the prepared glasses and serve! White Chocolate Martini Mocktail

This is the perfect dessert drink for Valentine’s Day. Or any time really…just switch out the sprinkles for the occasion!
Alcoholic chocolate martinis use chocolate liqueur for flavor. For this recipe, you just slowly heat white chocolate in your milk of choice to make the base. After it chills, just add non-alcoholic gin and serve in some pretty glasses!
 PrintWhite Chocolate Martini Mocktail#wprm-recipe-user-rating-2 .wprm-rating-star.wprm-rating-star-full svg * { fill: #343434; }#wprm-recipe-user-rating-2 .wprm-rating-star.wprm-rating-star-33 svg * { fill: url(#wprm-recipe-user-rating-2-33); }#wprm-recipe-user-rating-2 .wprm-rating-star.wprm-rating-star-50 svg * { fill: url(#wprm-recipe-user-rating-2-50); }#wprm-recipe-user-rating-2 .wprm-rating-star.wprm-rating-star-66 svg * { fill: url(#wprm-recipe-user-rating-2-66); }linearGradient#wprm-recipe-user-rating-2-33 stop { stop-color: #343434; }linearGradient#wprm-recipe-user-rating-2-50 stop { stop-color: #343434; }linearGradient#wprm-recipe-user-rating-2-66 stop { stop-color: #343434; }A sweet, dessert-like mocktail for Valentine's DayCourse Dessert, DrinksCuisine AmericanKeyword dessert, mocktail, martini, white chocolatePrep Time 5 minutesCook Time 5 minutesChill Time 2 hoursTotal Time 2 hours 10 minutesServings 2EquipmentCoupe glassesIngredients1 cup white chocolate chips, divided2 cups milk any kindpinch saltsprinkles for rim of glasses (optional)4 oz non-alcoholic gin I like Ritual Zero Proof or Nkd LdyInstructionsSit 2 Tbsp of white chocolate chips aside. In a saucepan over medium heat, combine the remaining chocolate chips and milk, whisking constantly until the mixture reaches a simmer. Remove from heat, add salt, and continue to whisk until the chocolate is melted and everything is combined.Pour white chocolate mixture into a heatproof bowl or jar and refrigerate for 2 hours.Meanwhile, melt 2 Tbsp white chocolate chips in a shallow bowl or plate. Carefully roll the rim of your glasses in the white chocolate. Then, roll the rim in some sprinkles. Set glasses aside.Once white chocolate mixture is chilled, pour into a cocktail shaker (or use the jar you chilled it in) and add the non-alcoholic gin. Shake to combine.Carefully pour your White Chocolate Martini Mocktail into the prepared glasses, top with sprinkles if desired, and serve immediately.Which Valentine’s Day mocktail is calling your name?
Are you feeling flirty, spicy, or sweet? Let me know in the comments!
If you’re extending Dry January, interested in embarking on a sober curious journey, or just love a good mocktail, check out my non-alcoholic drink reviews!
February 7, 2023
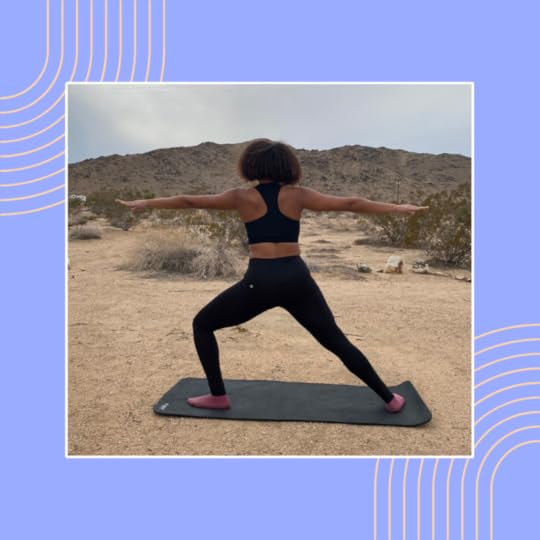
My Joints Have Never Loved a Product More: A Peek at the CloudCushion Yoga Mat
This story features my personal opinion on a product from POPFLEX, Blogilates’ sister brand. All thoughts are based on my honest individual experience with the CloudCushion Yoga Mat, including what I love and didn’t love.
As a yoga teacher, certified personal trainer and just an avid fitness enthusiast who loves a sweaty HIIT workout or a lengthening pilates routine, I’ve tried a handful of yoga mats throughout the years as I sought out a surface that was supportive, comfy and grippy all at the same time.
My sweat sessions have taken place on everything from ultra-thin dollar section mats to fun and funky cork mats to brightly patterned department store finds to high-end athletic mats — and of course, whatever was offered at the chain gym I found myself in. And, after heavy trial and error over the years, I can confidently confirm: the mat matters.
So, after a few months of dealing with a sore spine, bruised knees and stiff wrists from the hardwood floors felt beneath my previous thin mat, I knew it was time to switch up my training locale and shift to a firmer, thicker mat.
Enter the POPFLEX CloudCushion Vegan Suede Yoga Mat. The luxe, thick mat caught my eye, and after reading reviews, I knew I had to give it a test run.
 New Mat, Who Dis?
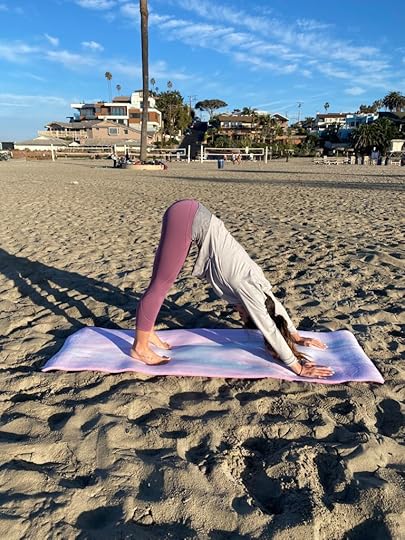
After I busted open the huge box that arrived on my doorstep, I was drawn into the CloudCushion Vegan Suede Yoga Mat’s aesthetic. The bold, sherbet-like colors are stunning, and I immediately felt encouraged to start on a set of sun salutations. Just like a new workout set motivates you to sign up for that hard strength workout or push yourself during sprints, a new mat motivates me. Who knew?!
Not only did the color pattern catch my eye, the mat’s cushy comfort did too. The CloudCushion mat is thick (rather, thicc) – measuring in at 0.5” of ultra-soft cushion. It feels plush and squishy, in the best way possible.
 The Heart of the Mat-ter
We all know that a product can look great — and end there. I was pleasantly surprised that the eco-friendly CloudCushion Vegan Suede Yoga Mat has the chops to back its cute looks up.
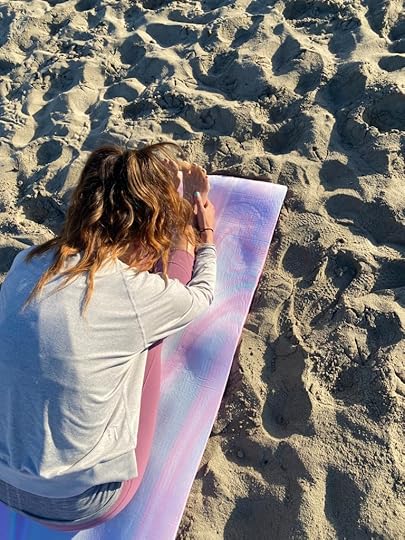
My spine, knee and wrist pain are now non-existent during my yoga flows and pilates sets — even if I’m applying deep pressure on any of my joints. Who knew my cat-cow, downward dogs and donkey kicks could feel so comfortable? And, if I’m feeling in the mood for restorative or yin yoga, this mat feels like the grounded version of a cloud: plush, soft, relaxing and cozy. I may or may not have fallen asleep during my last class…
Not only is the mat cushiony for a supportive feel, it’s still grippy so you’re not straining your wrists or ankles to stay stable and upright. Most thick mats lose their anti-slip qualities in favor of pillow-like comfort, but the CloudCushion mat stays supportive even in the sweatiest of hot yoga classes.
The velvety microfiber actually gets grippier as you sweat, making those last few poses or reps slightly less painful. If you are doing a low-impact, no-sweat workout, though, I recommend lightly spraying the mat with water or getting your hands wet prior to working out to activate this supportive, grippy quality and avoid any slips.
In this case, looks really do matter.
 Gets a BIG Thumbs Up For…Super thick and ultra-comfy cushionVibey prismatic shadingMat pattern doesn’t fade away or rub off with use Anti-slip during sweaty workoutsEco-friendly and PVC-freeComes with cotton carrying strap
 What I Didn’t Love About the CloudCushion Yoga Mat…Bulky to store and hard to transport to a gym Have to spray with water to get better grip at the start of a workoutGets dirty quickly (I recommend sticking to barefoot or socks only to avoid this!) Challenging to completely flatten
In the last few weeks, I’ve noticed an uptick in my motivation to do an extra set of bicycle crunches or add in one more chaturanga. Using the CloudCushion Mat has added a pop of vibrance during dark morning workouts (any other early birds out there?) — and the extra fitness push I didn’t know I needed. Plus, I’ve noticed myself getting lost in the the vibey prismatic shading as I hold longer stretches — offering a meditation of sorts (don’t knock it til you try it!).
And, my pain-free joints speak for themselves. End of story. This statement mat has been their dream come true.
Have you tried the CloudCushion mat? Tell me what you think in the comments!

.post-prod-slider{
padding-bottom: 130px;
position: relative;
width: 90%;
margin: auto;
}
.post-prod-slider .challenge-content h3 a{
font-size: 16px;
line-height: 25px;
}
.post-prod-slider .design_product_slider .challenge-img{
height: 290px!important;
}
.post-prod-slider .swiper-button-next, .swiper-button-prev{
transform: translate(-50%, 0);
top: 50%;
display: flex;
align-items: center;
justify-content: center;
background: #000;
padding: 10px 8px;
width: 40px;
height: 45px;
}
.post-prod-slider .swiper-button-next{
right: -10%;
}
.post-prod-slider .swiper-button-prev{
left: -5%;
}
.post-prod-slider .my_designs_title:before{
height: 220px;
position: relative;
content: none!important;
background-image: url(https://www.blogilates.com/wp-content...
position: absolute;
width: 50px;
height: 50px;
right: -140px;
top: -4px;
background-size: 100% 100%;
}
.post-prod-slider .swiper-button-prev:before,
.post-prod-slider .swiper-button-next:before{
content: 'prev';
font-family: swiper-icons;
font-size: var(--swiper-navigation-size);
text-transform: none!important;
letter-spacing: 0;
font-variant: initial;
line-height: 1;
display: block;
font-size: 26px;
color: #fff;
}
.post-prod-slider .swiper-button-next:before{
content: 'next';
}
.post-prod-slider .my_designs_main h3.my_designs_title{
z-index: 1;
font-size: 50px;
}
@media screen and (min-width: 767px)
{
.post-prod-slider .design_product_slider .challenge-content {
height: 220px;
position: relative;
}
}
@media screen and (max-width: 767px){
.post-prod-slider{
padding-bottom: 125px;
}
.post-prod-slider .swiper-button-next, .swiper-button-prev{
top: 30%;
}
.post-prod-slider .my_designs_main h3.my_designs_title {
font-size: 30px;
}
.post-prod-slider .swiper-button-prev {
left: 4%;
}
.post-prod-slider .swiper-button-next {
right: -8%;
}
.post-prod-slider .swiper-button-prev:before,
.post-prod-slider .swiper-button-next:before{
content: none!important;
}
}
@media (min-width: 768px) and (max-width: 1024px) {
.post-prod-slider .design_product_slider{
padding-bottom: 40px;
}
.post-prod-slider {
padding-bottom: 60px;
padding-left: 15px;
padding-right: 15px;
}
.post-prod-slider .swiper-button-prev {
left: -4%;
}
}
Products We Love

CloudCushion Vegan Suede Yoga Mat – Black
$ 79
Buy Now

CloudCushion Vegan Suede Yoga Mat – Cool Cosmos
$ 79
Buy Now

CloudCushion Vegan Suede Mat – Prismatic
$ 79
Buy Now

Blogilates Sweat Resistant Hat – Taupe
$ 17.99
Buy Now

Belladonna Duffle – Navy
$ 195.00
Buy Now
var swiper = new Swiper(".post-prod-slider .design_product_slider", {
slidesPerView: 1,
spaceBetween: 10,
loop: true,
navigation: {
nextEl: ".blogilates-button-next",
prevEl: ".blogilates-button-prev",
},
pagination: {
el: ".blogilates-pagination",
clickable: true,
},
breakpoints: {
480: {
slidesPerView: 1,
},
568: {
slidesPerView: 2,
spaceBetween: 30,
},
768: {
slidesPerView: 3,
spaceBetween: 30,
},
1024: {
slidesPerView: 4,
spaceBetween: 45,
},
1350: {
slidesPerView: 4,
spaceBetween: 55,
},
},
});
Air Fryer Truffle Crusted Chicken Tenders
These Truffle Crusted Chicken Tenders are perfect as a meal or appetizer while you watch the game. Make them in the air fryer to save time!

We love a good “hack,” and this Truffle Crusted Chicken Tenders recipe is all that and a bag of chips (or in this case, Trader Joe’s Parmesan Cheese Bites With Black Truffles)!
It’s not just the fact that this healthy, inexpensive recipe puts dinner on your plate in 20 minutes. This chicken is so crispy and full of flavor that you may never go back to making chicken tenders any other way.
My Go-To Game Day AppTHIS is what you serve at your Super Bowl party. Trust me. Just work in batches and you can make a giant platter of these crispy tenders ready for a house full of hungry football fans.
 Truffle Crusted Chicken Ingredients
The two main ingredients include Trader Joe’s “Oven Baked Cheese Bites With Black Summer Truffles” and their incredibly tasty Truffle Hot Sauce. Grinding up the crisps creates the perfect coating for the chicken.
Not only does it impart a tangy, crunchy and truffle-essence flavor, but it keeps the entire meal super high in protein. The dipping sauce is only mild in spice with a slight sweetness and more truffle goodness.
Trader Joe’s carries the crisps year-round. The sauce might be seasonal, so if you find it, buy a few bottles! A great alternative is Truff hot sauce.
How to Make Air Fryer Chicken TendersIf you’ve ever made coated chicken before, you know all about dredging and dipping in egg before coating with your crispy component. Usually that involves panko or some type of crispy breading. For this, you’re using the cheese crisps, which you’ll grind in a mini blender until fine, like sand.
After the first dredge in flour, the next step is a quick dip in egg. The last step is coating with your crushed truffle crisps. You can totally make these in a regular oven. Just bake at 400 degrees for about 15 minutes or until cooked through. But to cut time and make them even crisper, use an air fryer, if you have one, which is how we prefer to make this recipe!

 PrintTruffle Crusted Chicken Tenders#wprm-recipe-user-rating-1 .wprm-rating-star.wprm-rating-star-full svg * { fill: #343434; }#wprm-recipe-user-rating-1 .wprm-rating-star.wprm-rating-star-33 svg * { fill: url(#wprm-recipe-user-rating-1-33); }#wprm-recipe-user-rating-1 .wprm-rating-star.wprm-rating-star-50 svg * { fill: url(#wprm-recipe-user-rating-1-50); }#wprm-recipe-user-rating-1 .wprm-rating-star.wprm-rating-star-66 svg * { fill: url(#wprm-recipe-user-rating-1-66); }linearGradient#wprm-recipe-user-rating-1-33 stop { stop-color: #343434; }linearGradient#wprm-recipe-user-rating-1-50 stop { stop-color: #343434; }linearGradient#wprm-recipe-user-rating-1-66 stop { stop-color: #343434; }Course Main CourseCuisine AmericanKeyword vegan cheesecake, trader joe's, chicken, air fryer, truffle, hot sauce, crispy, game dayPrep Time 10 minutesCook Time 8 minutesTotal Time 18 minutesServings 2Equipment1 Air fryerIngredients¾ lb chicken tenders, about six1 package Oven Baked Cheese Bites With Black Truffle2 tbsp almond flour3 tbsp flour paleo baking flour (or g-free or all-purpose flour)1 large egg¼ cup Truffle Hot SauceInstructionsPat dry the chicken tenders.Add the crisps to a mini blender and process until fine, like sand.Add the almond flour to the blender and pulse to combine, then pour into a shallow dish.Add the other flour (paleo, gluten-free, or regular all-purpose) to another shallow dish.Whisk the egg in a shallow bowl.Dredge each chicken tender into the flour, followed by the egg, allowing excess to fall off. Then coat all side in the crisps. Coat an air fryer with cooking spray, add all the chicken pieces and set to 400 degrees F. Cook for 8 minutes. Remove and serve with sauce.Are you a truffle fan?
Let us know if you make this!

Cassey Ho's Blog

- Cassey Ho's profile
- 49 followers

