
Becca Hillburn's Blog, page 55
August 9, 2015
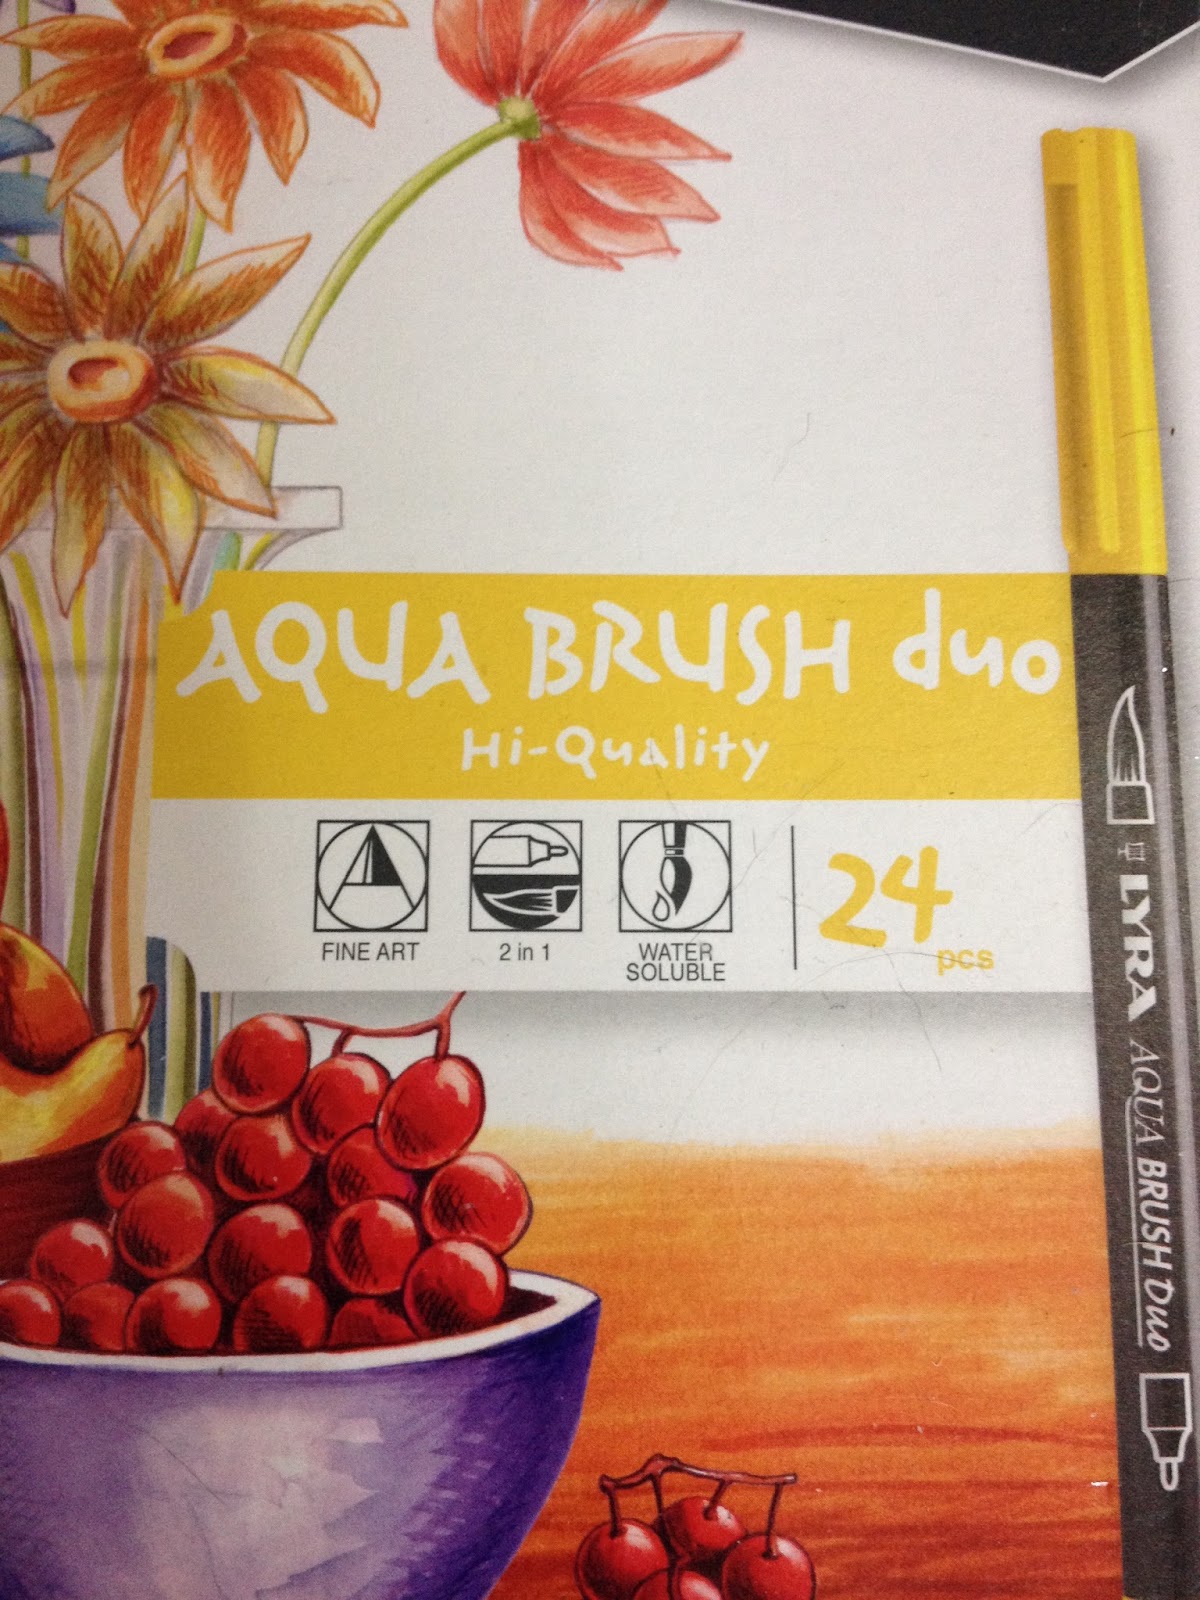
Watercolor Brush Pen Review: Lyra Aqua Brush duo
When I ordered the docrafts watercolor marker set from Amazon, I did a bad, bad thing and ALSO tossed a 24 pack of Lyra Aqua Brush duo watercolor markers into my cart. For some reason, cheap art supplies drive me bonkers- I need to find out just how bad they are, I suppose, or maybe I'm looking for an affordable alternative that can also serve as a fallback for forgotten art supplies. I think I'm also an art supply pusher deep down- if I can convert/coerce/convince someone to the dark side of art toy obsession, and then begin pushing my supply hoard off onto them, I will. I'd had high hopes of converting my mom, who enjoys coloring pages and would probably be into Zentangles, but she has so far thwarted me (although I roped her into helping me review my upcoming Walmart Art Supply haul, mostly through uncredited observations). I have, I think, found a convert with my college best bud, Ashley, and I'll be sending her a care package of supplies, so hopefully I'll be able to add some second opinions to some of my initial reviews.
Like the docrafts watercolor markers, I didn't have high hopes for the Lyra Aqua Brush duo's performance. I've casually purchased Lyra products in the past (from Office Depot, I think), and I hadn't been impressed with them. Lyra is a German art supply company (complete with a German website!), and while I can't find an English site for Lyra, I can find American stores that sell Lyra products, including Blick. They make all sorts of goodies like graphite sticks, crayons, pencils, pastels, and of course, watercolors, although I have to admit that the sight of their pan watercolors doesn't fill me with delight. Lyra appears to be a student grade brand- good enough for doodling, but not intended for professional use.
You can buy your own set of Lyra Aqua Brush duo watercolor markers from Amazon for $23.98 and in the process, help financially support this blog with your purchase by clicking the affiliate link below! As with most of my reviews, I purchased this product for review purposes out of my own funds, but your purchase from Amazon (or your donation to my Paypal, or your kindly written letter to my favorite manufacturers on my behalf) would really mean the world to me, and would enable me to continue writing this blog.
The Package


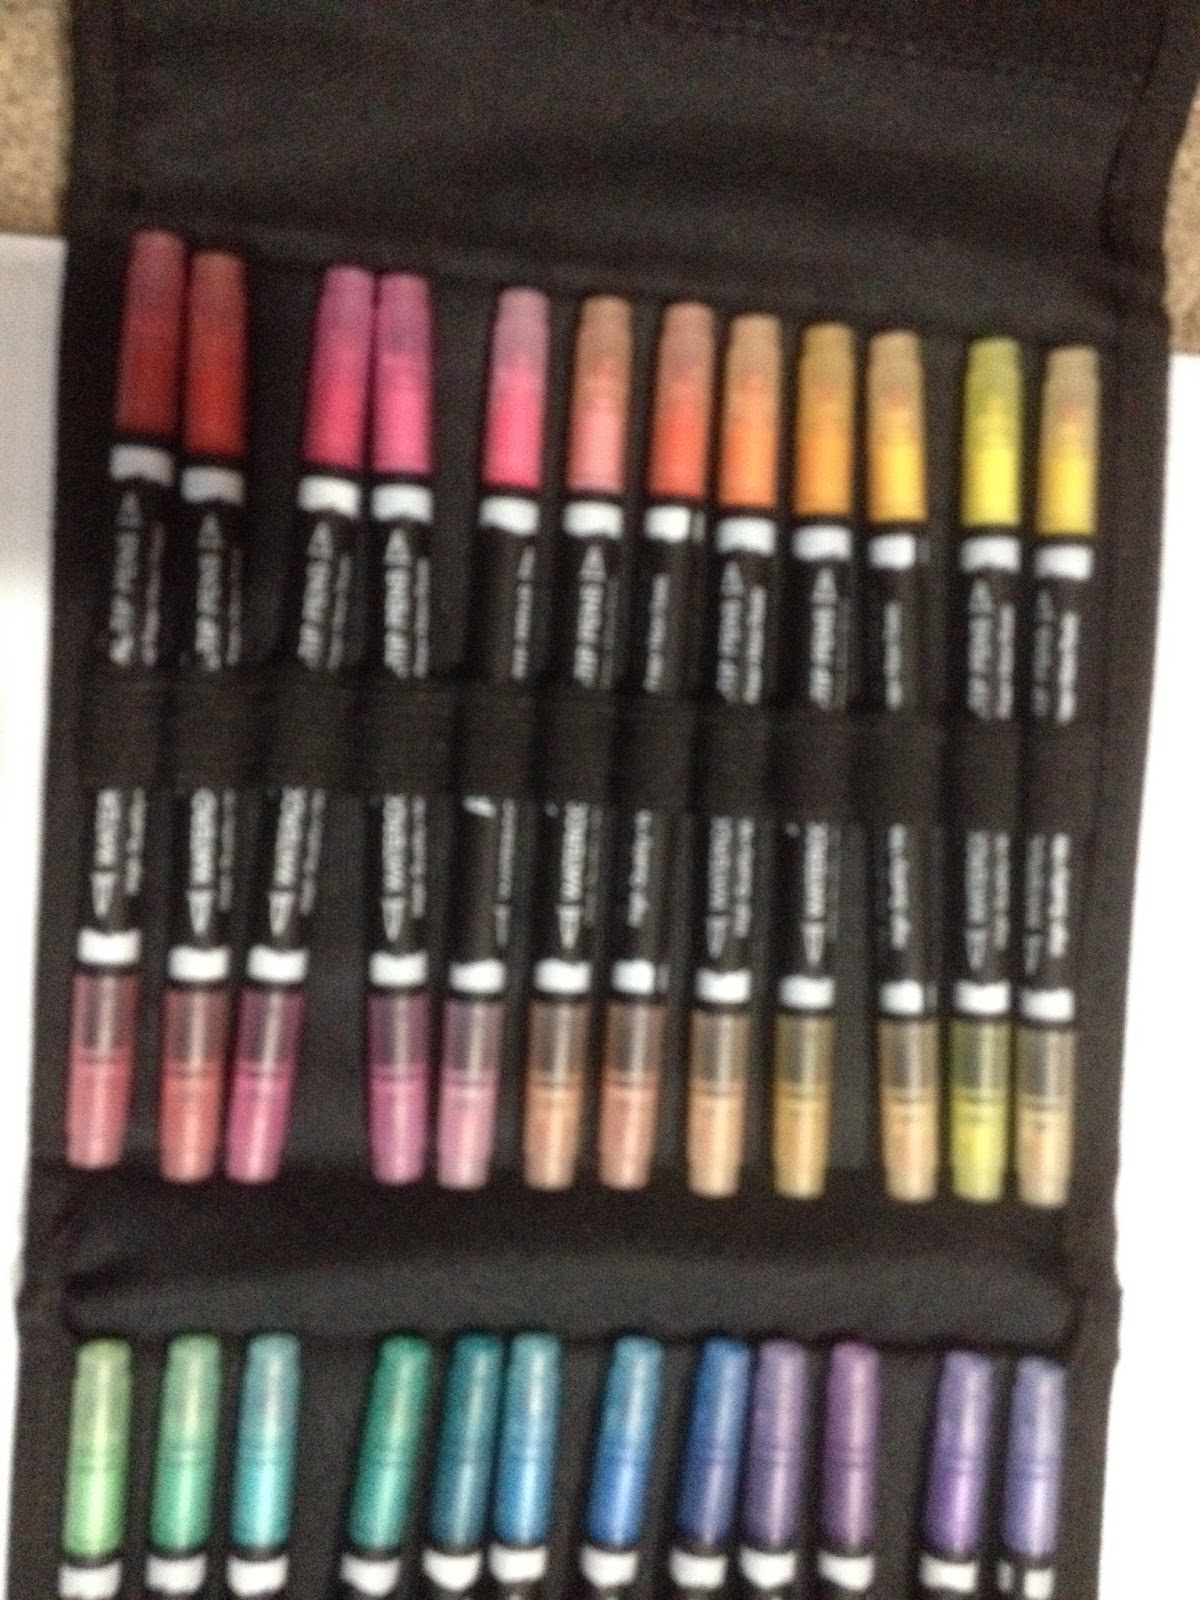
I ordered the 24 pack of Lyra Aqua Brush duo watercolor markers (brush pens?) off Amazon for under $28 using my Prime membership, but you can get a pack for as little as $12 for 12, if you dont want to commit to a big pack. You can also get them through Blick for slightly more, plush even more slightly more for shipping. My set came in a cardboard box with two flimsy plastic trays to hold the pens, which is sort of a let down after docraft's fantastic easel.
The Pens

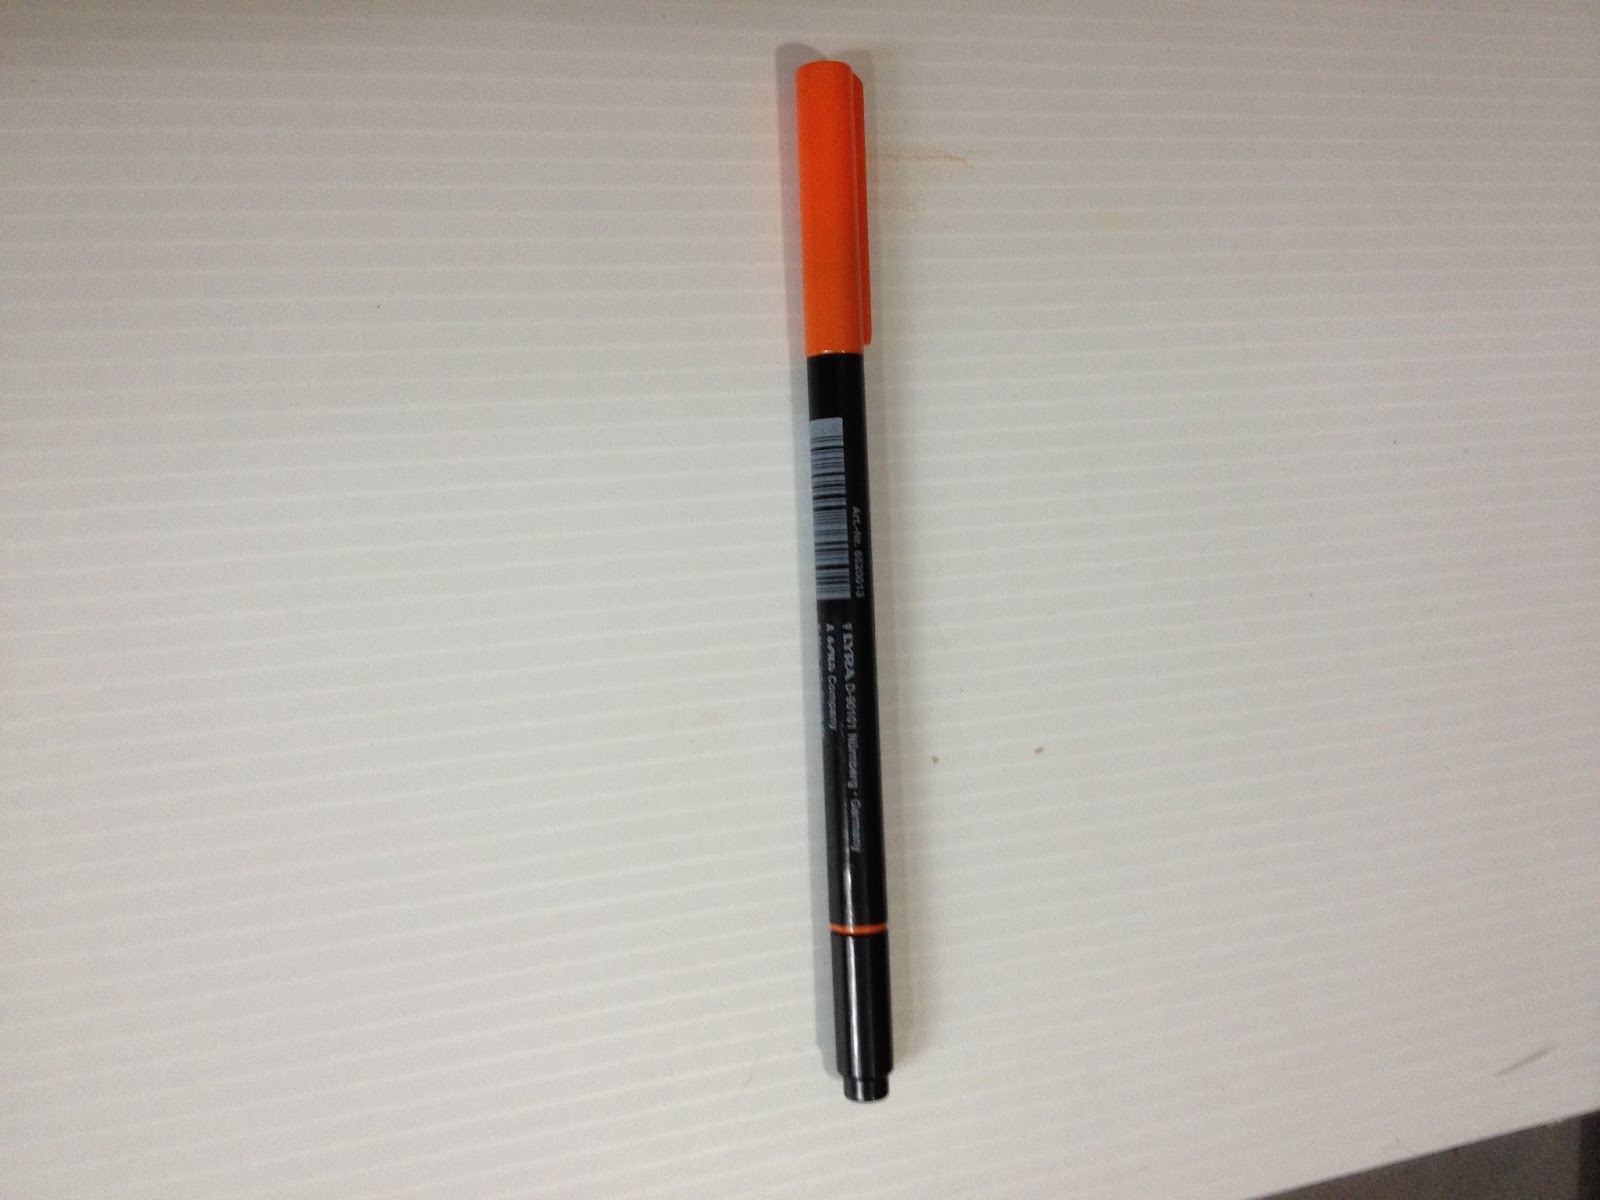
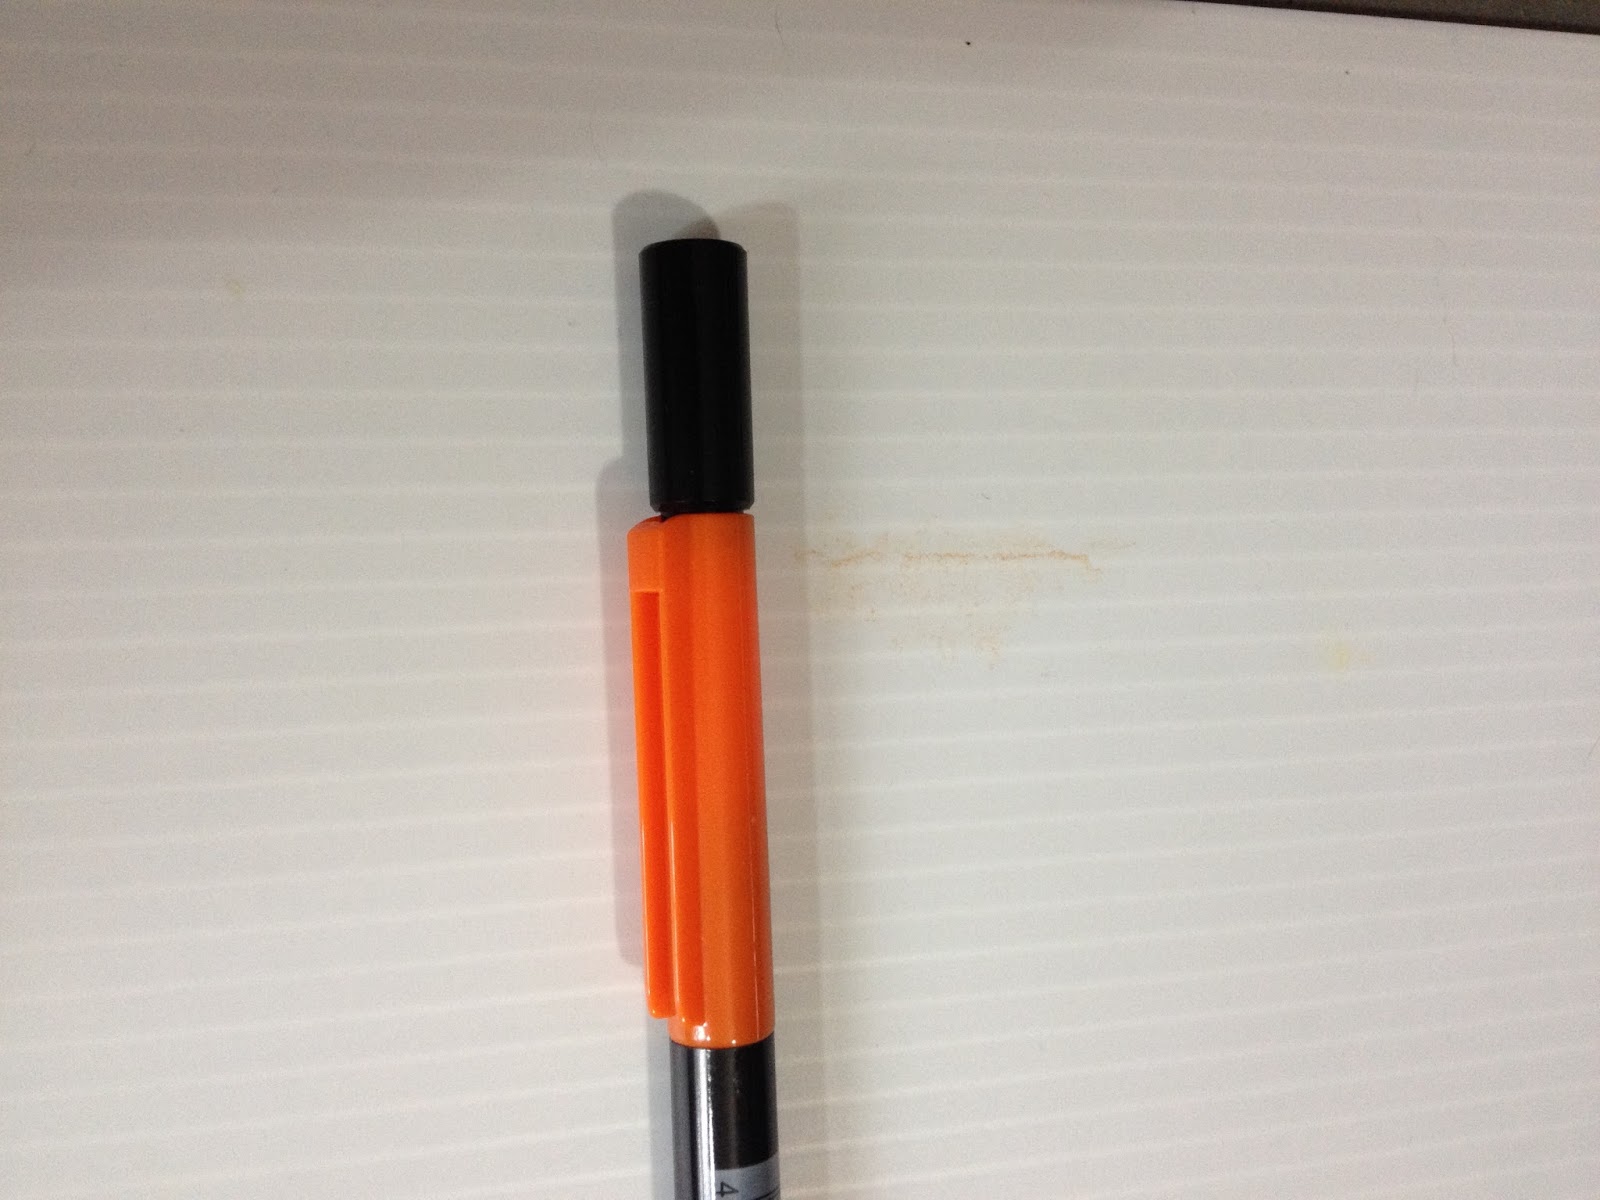
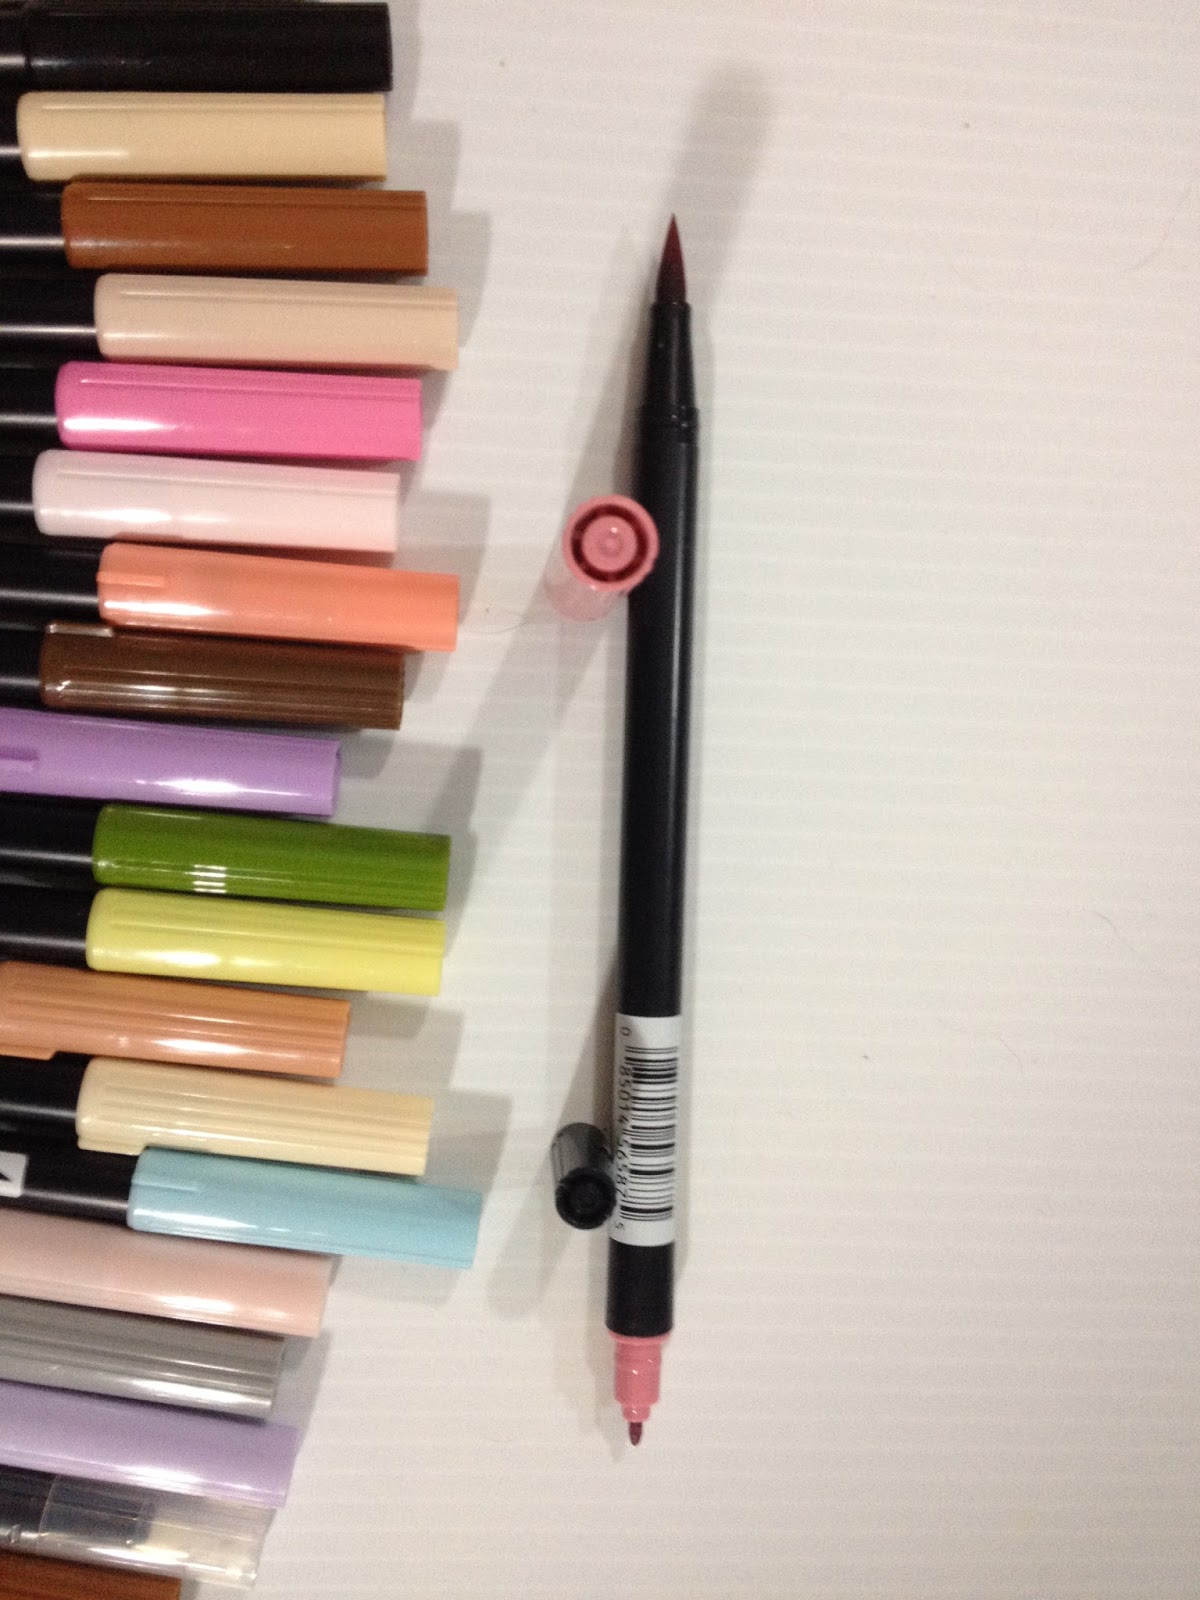
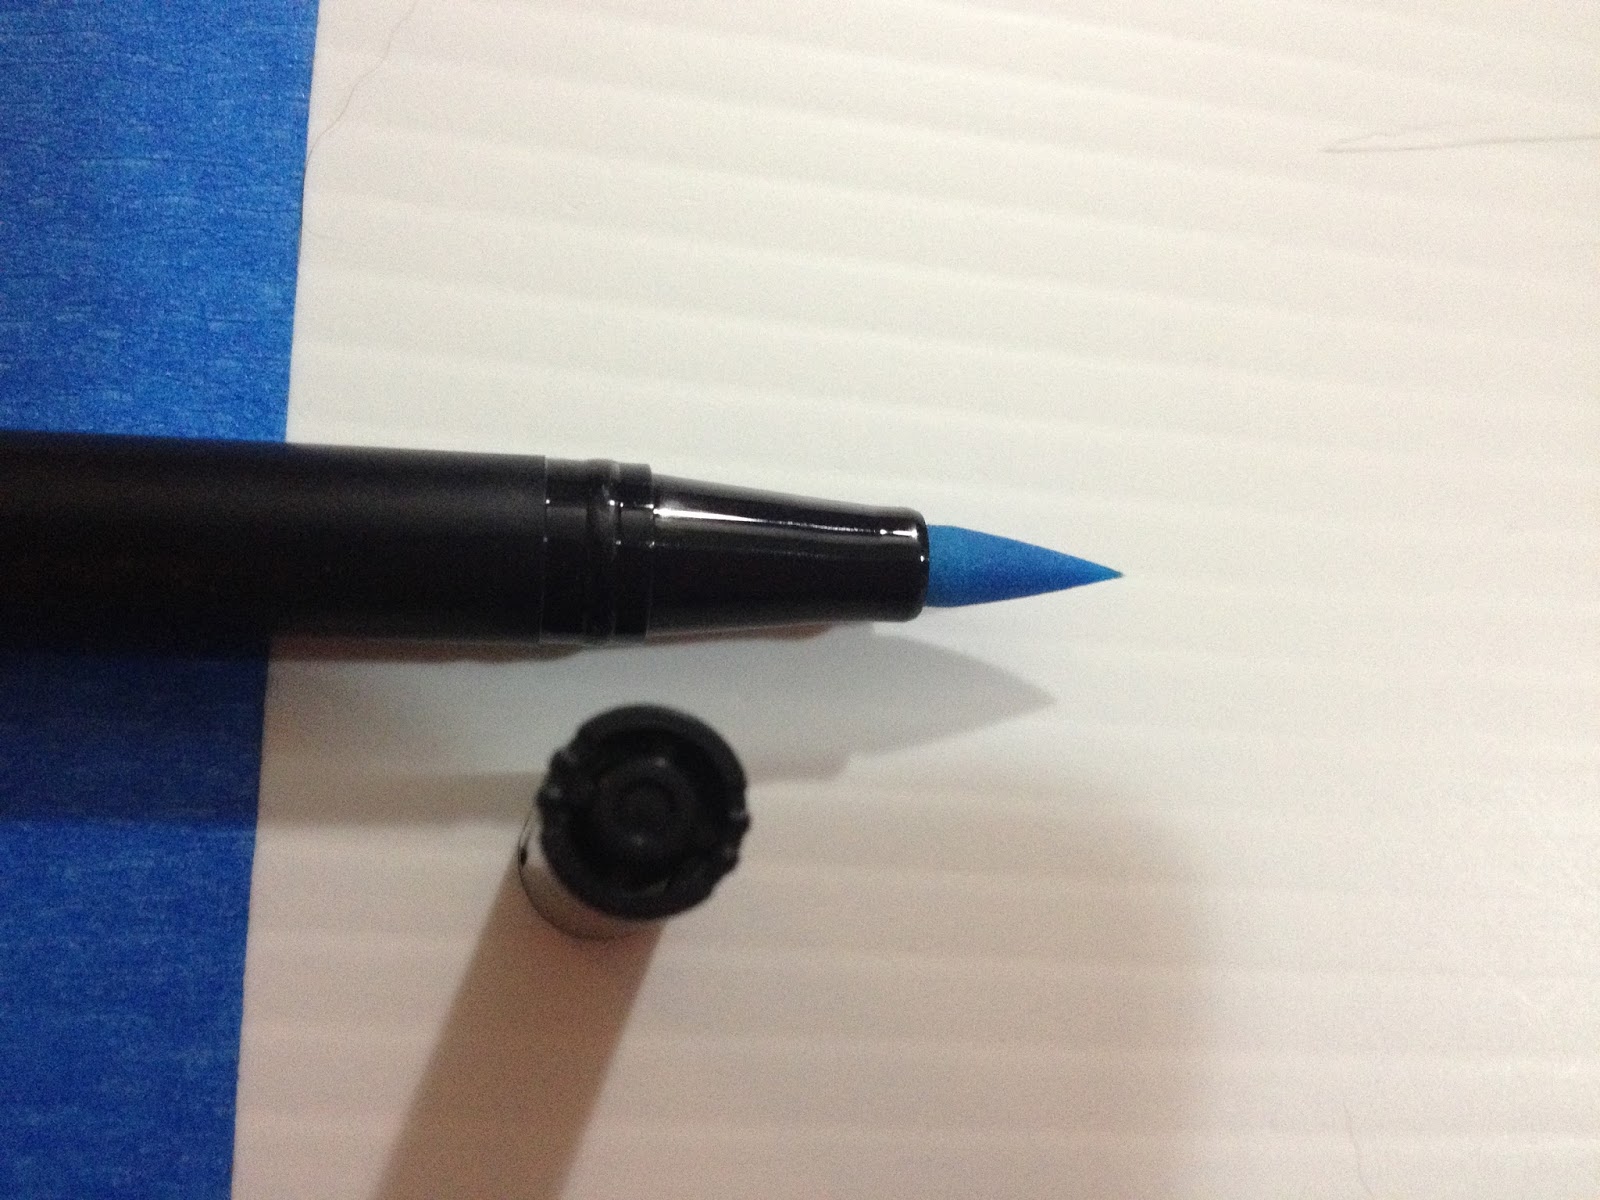
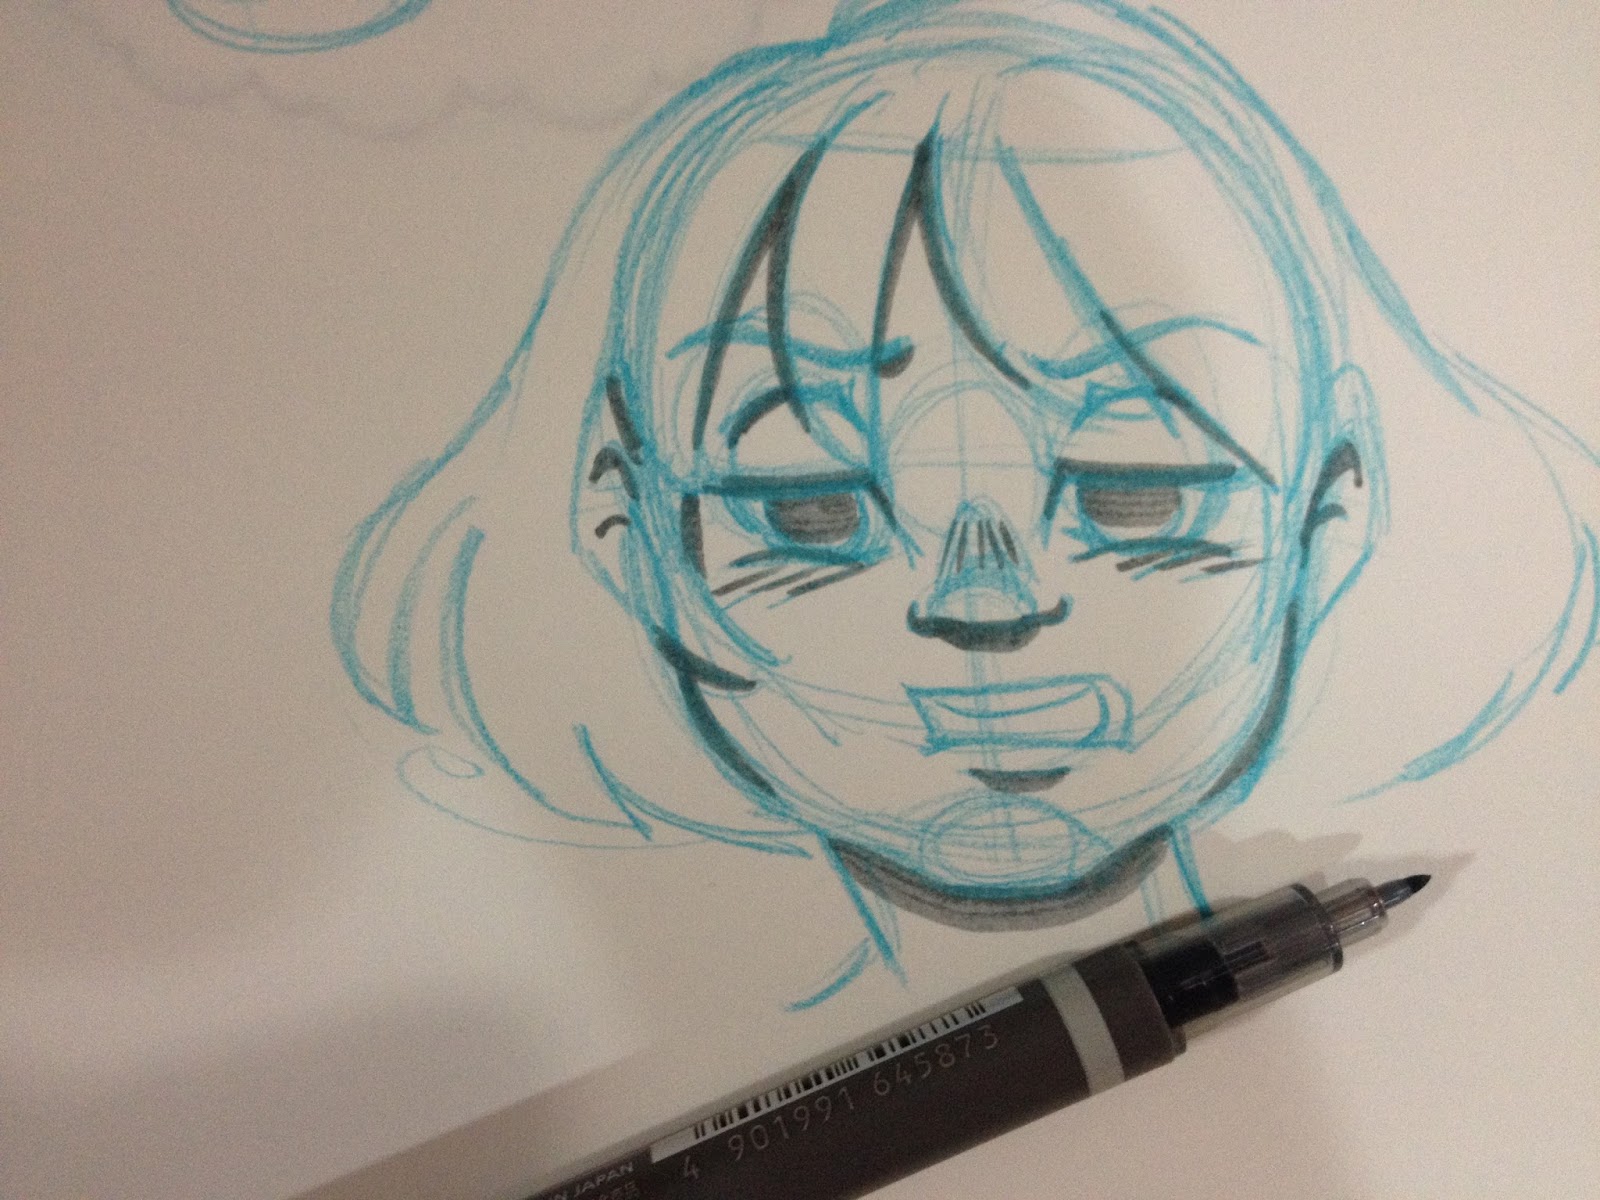
The cap looks almost identical from both the capping end and the posting end.


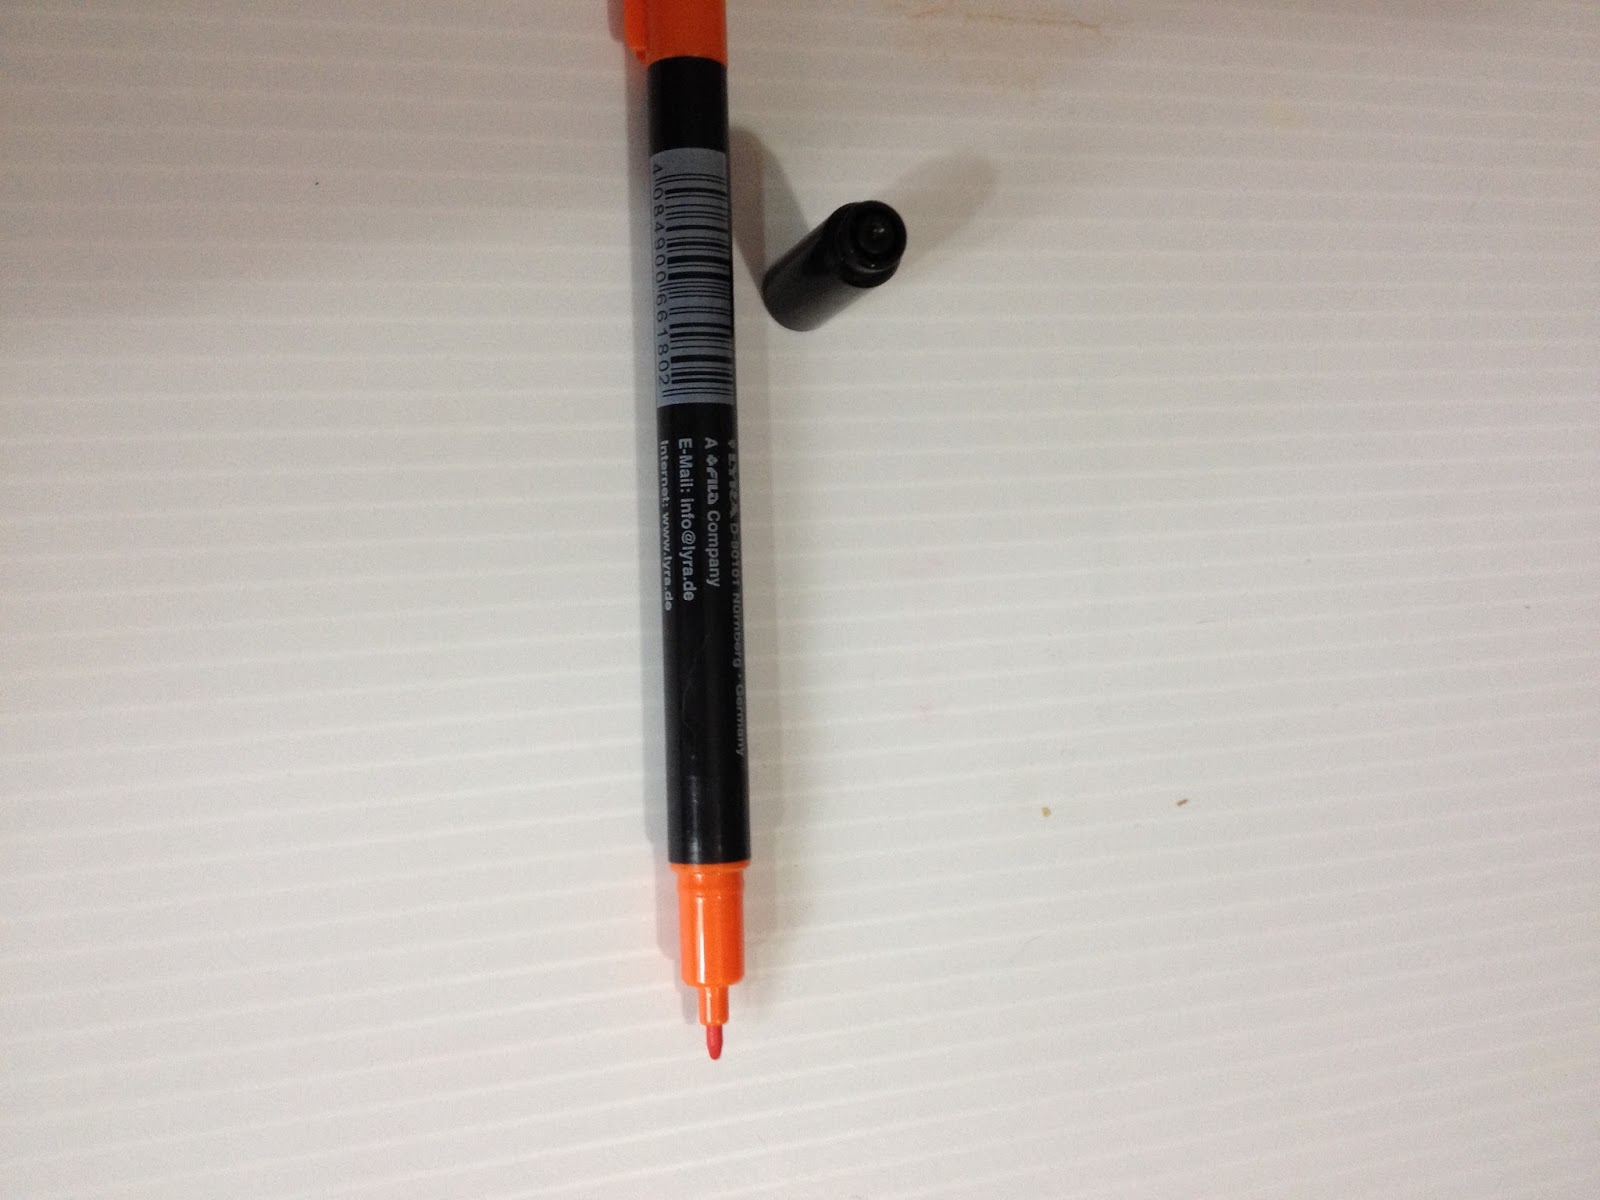
The trend for dual tipped brush pens seems to be to make the bullet nib have a colored tip, rather than a colored cap, and Lyra follows that trend.


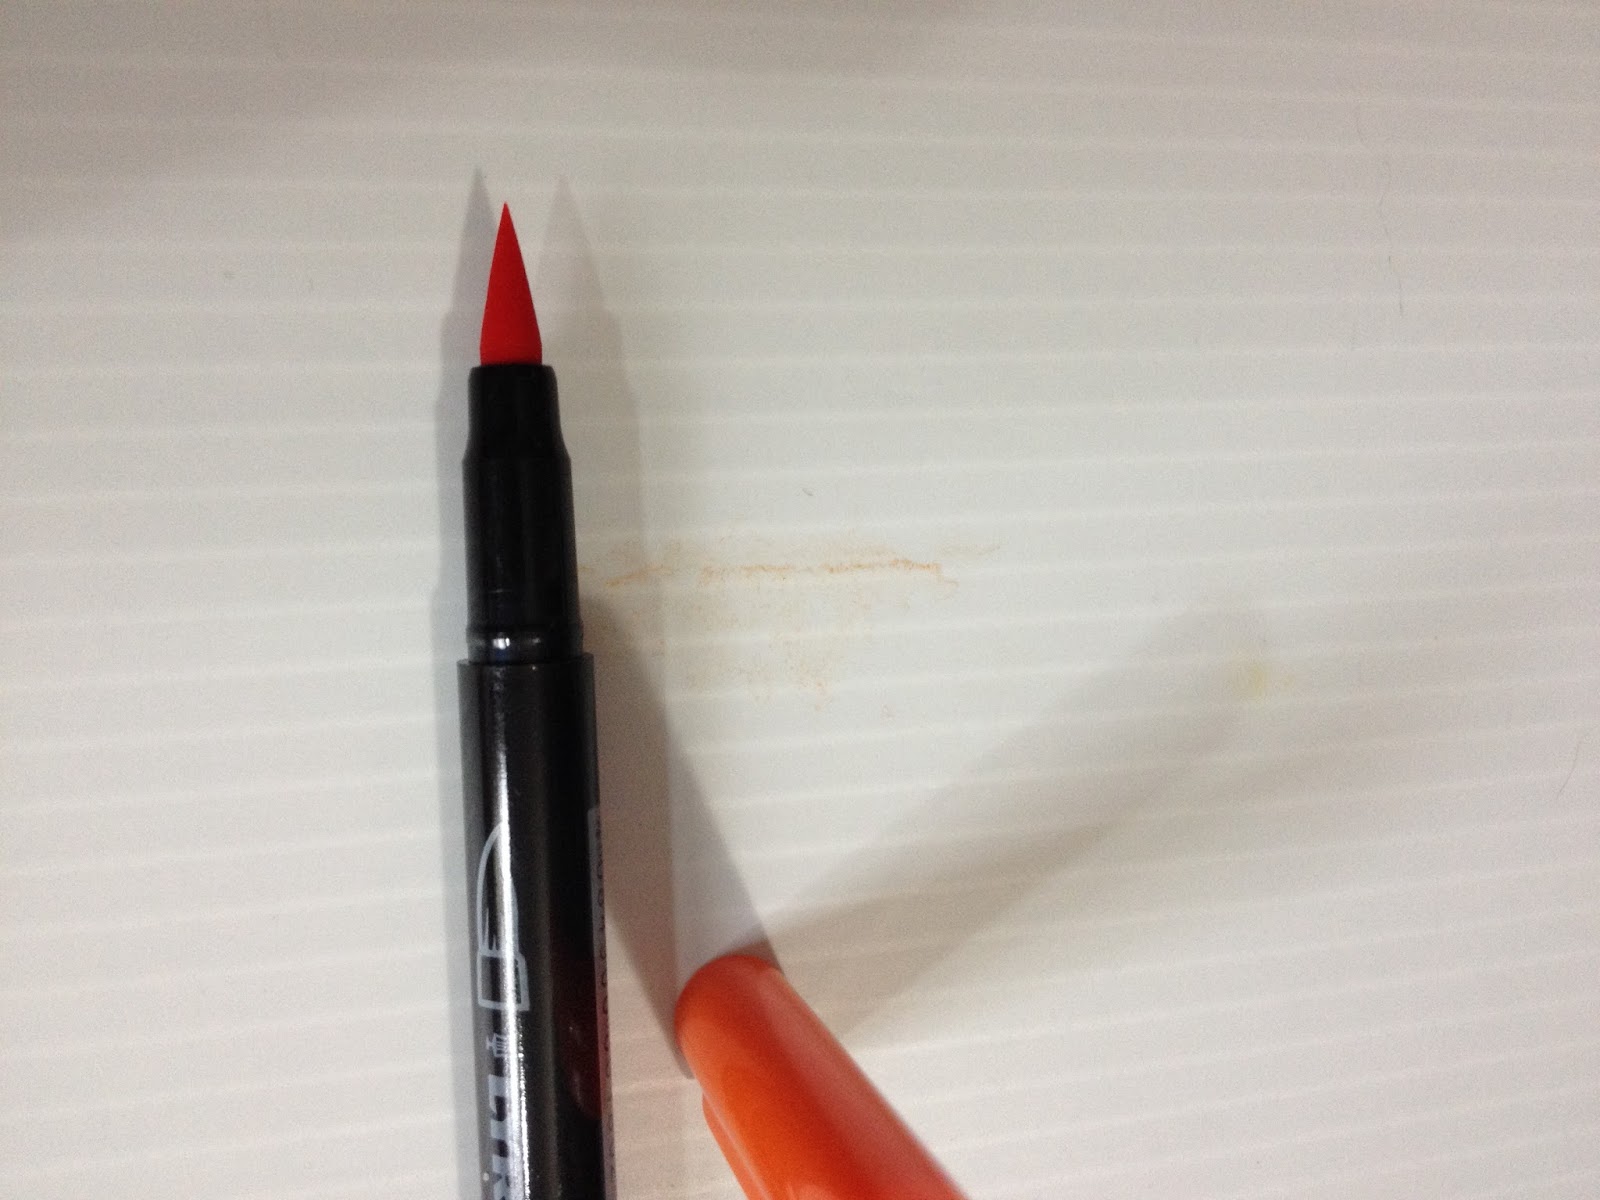
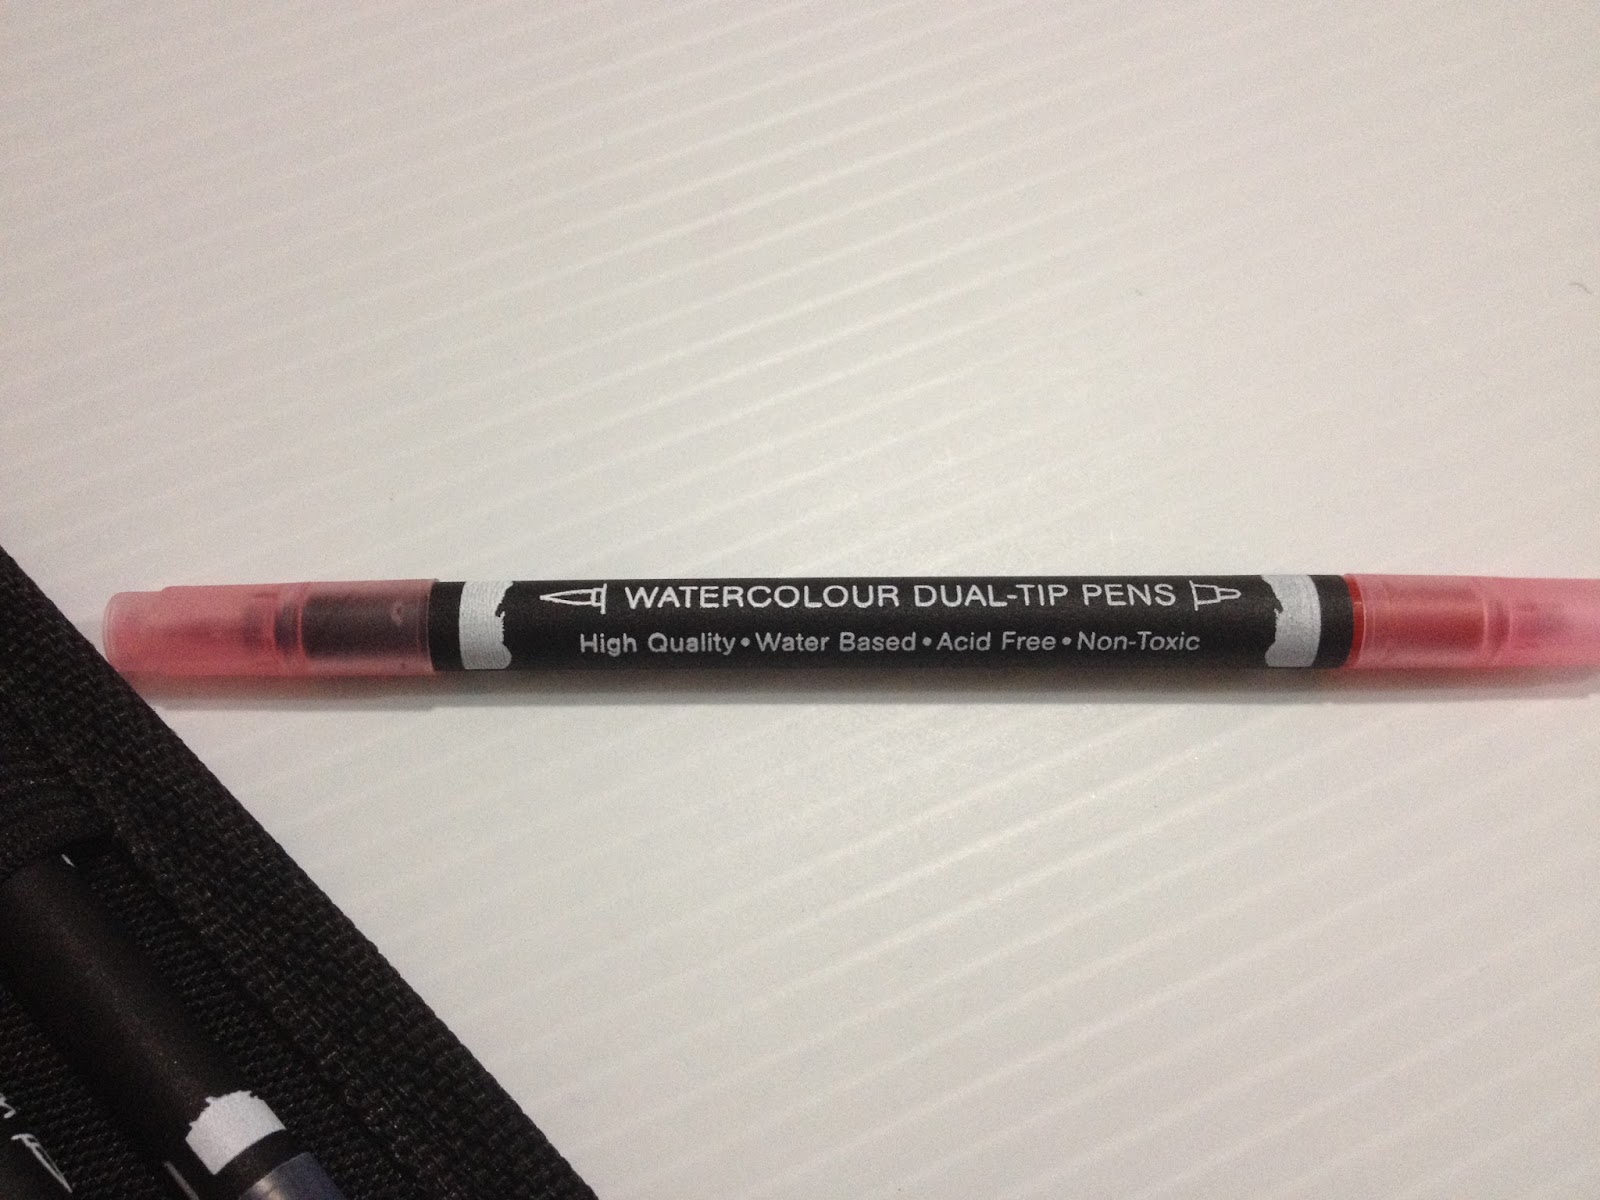
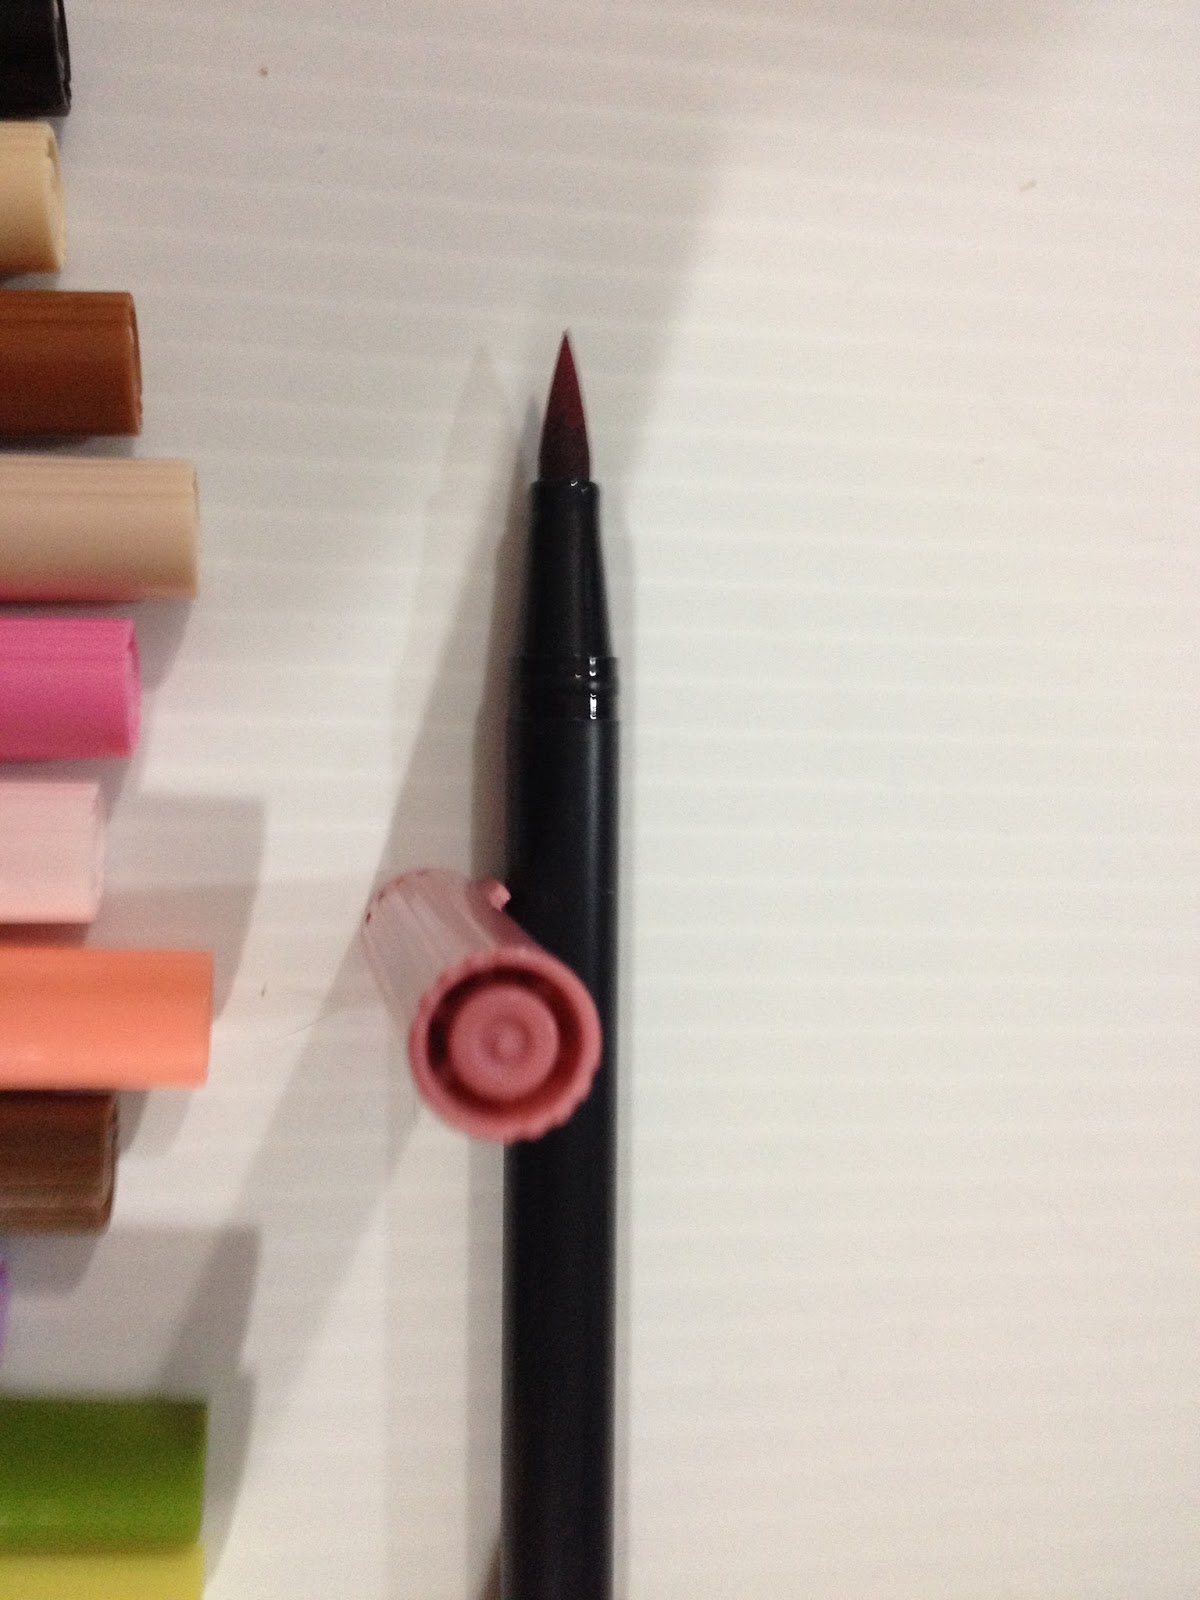
The caps on the Lyra Aqua Brush duo pens don't actually clip, but they do prevent the very round, smooth pens from just rolling off your desk if they're capped or posted. The cap is very snug, and often difficult to remove by pulling, I suggest twisting to loosen it a bit. It also looks almost identical from both ends, so if you're not careful, you may end up just jamming your brush into the closed end of the cap, ruining it. The brush on these pens is conical, and fairly juicy and flexible. The bullet nib is a bullet nib, not really worth commenting on very much, I'm afraid. The pens don't have color names or numbers, so you may find it beneficial to keep your box to keep your pens organized, for easy color reference.
It seems like most watercolor dual tipped markers follow the same recipe when it comes to pen design
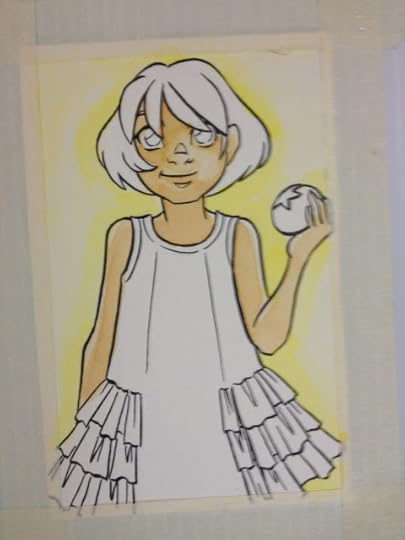
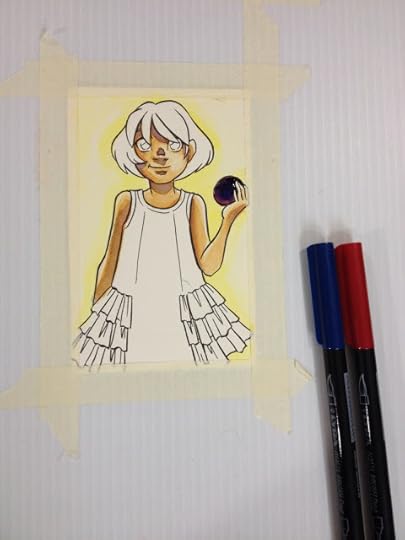
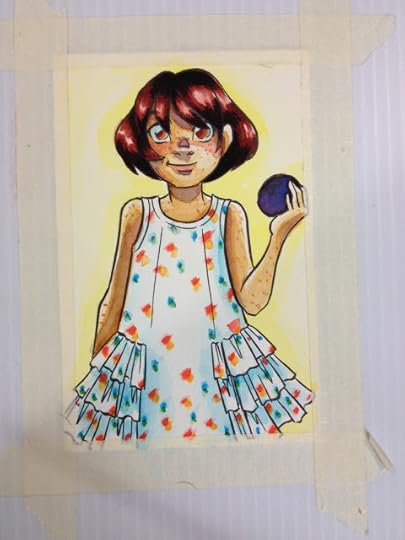
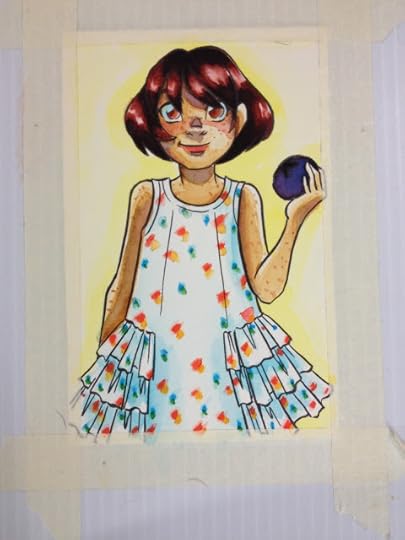
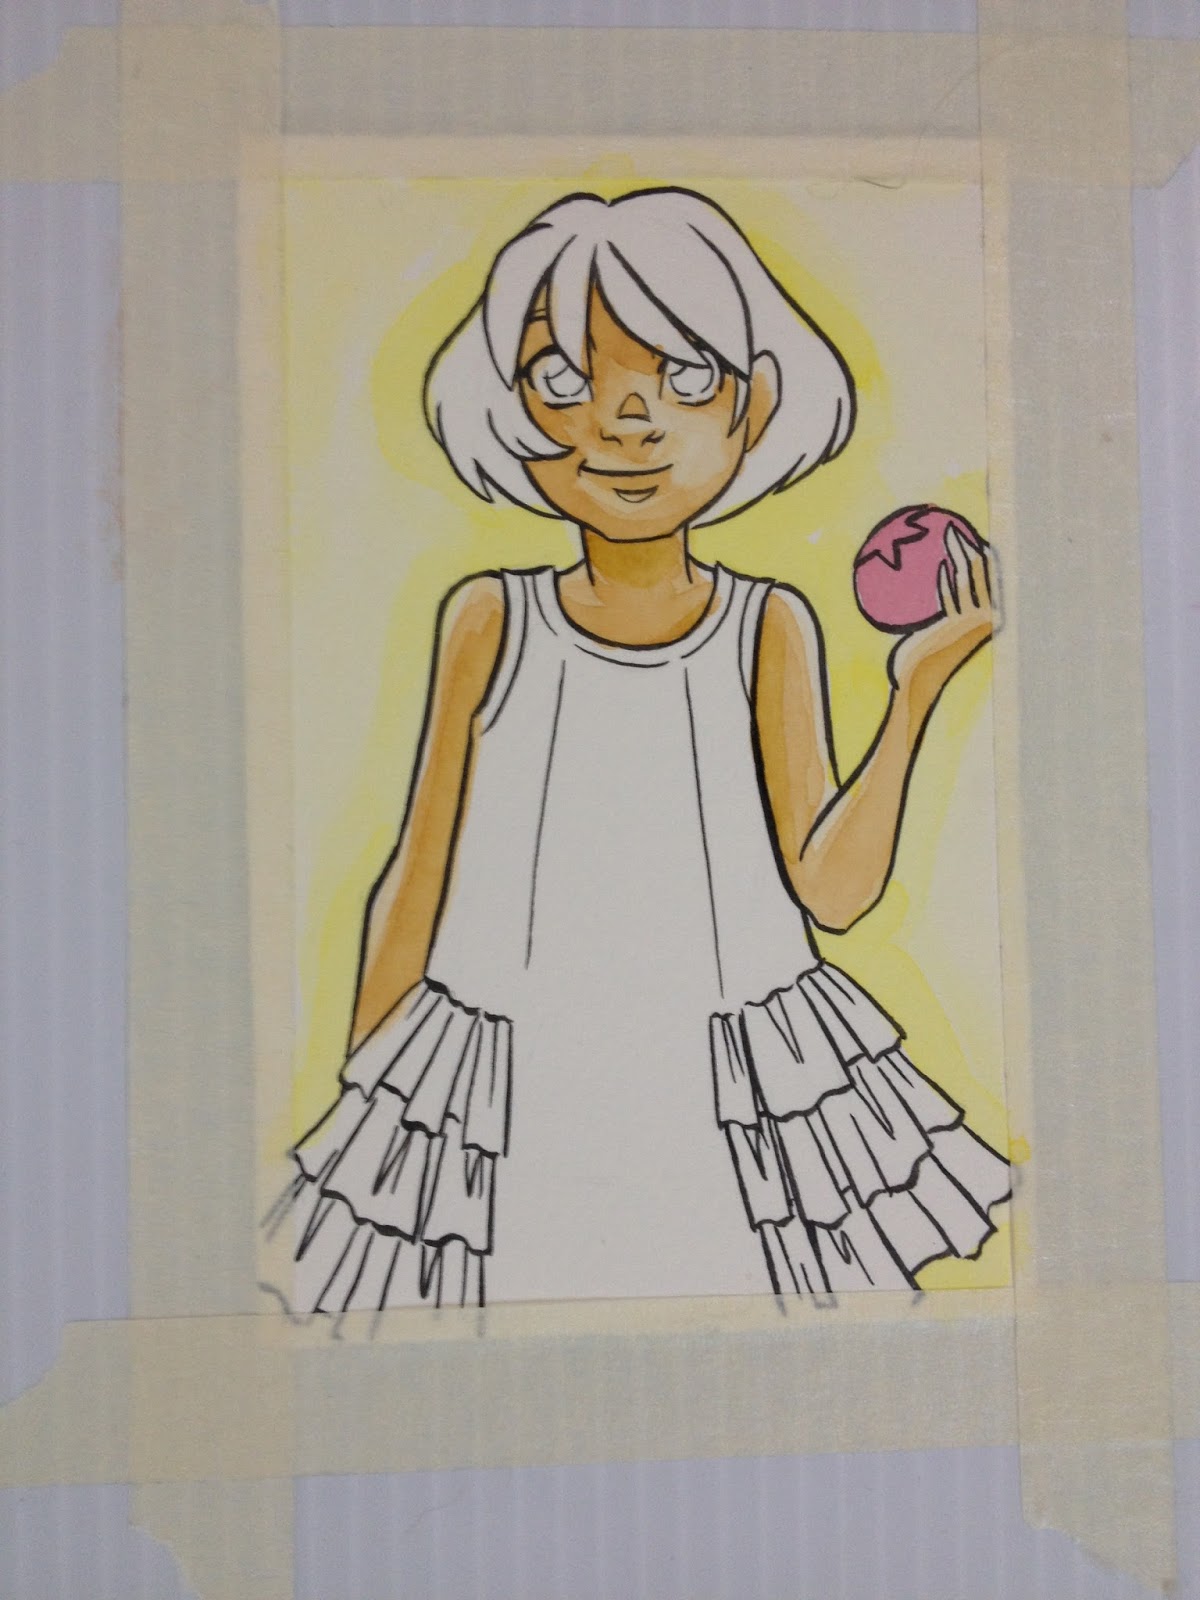
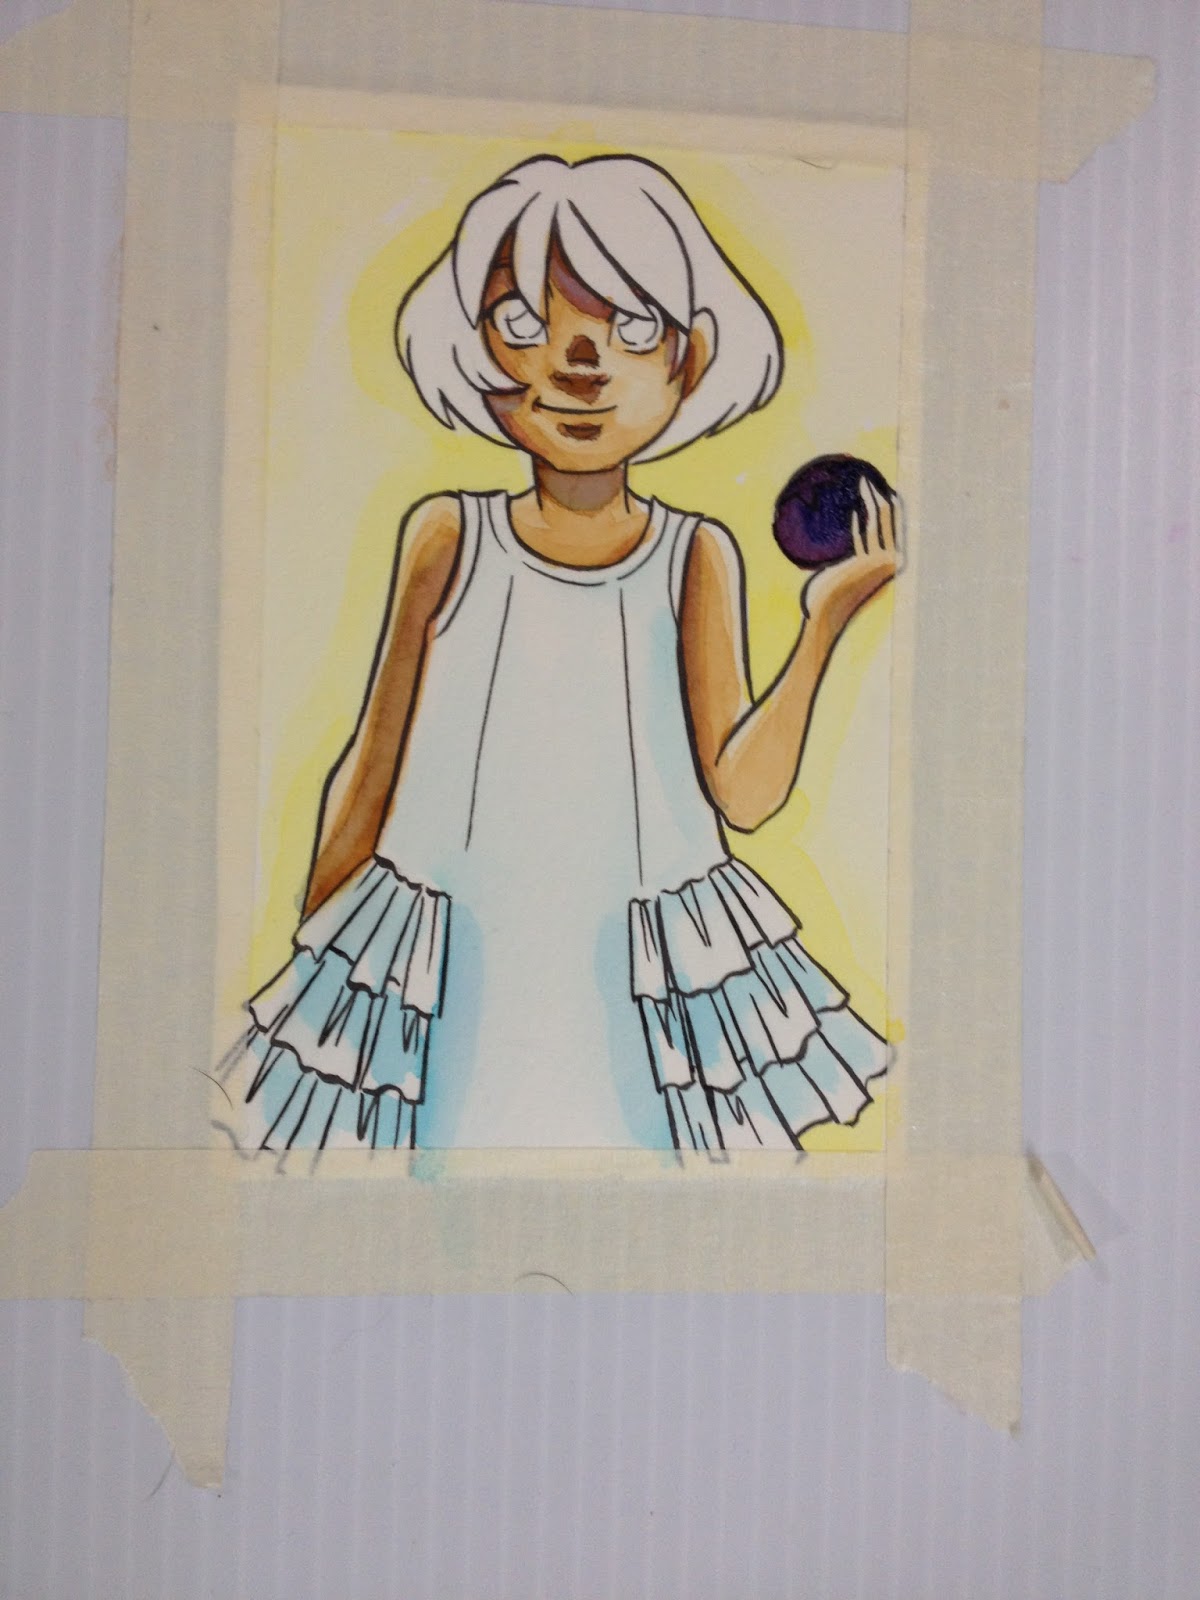
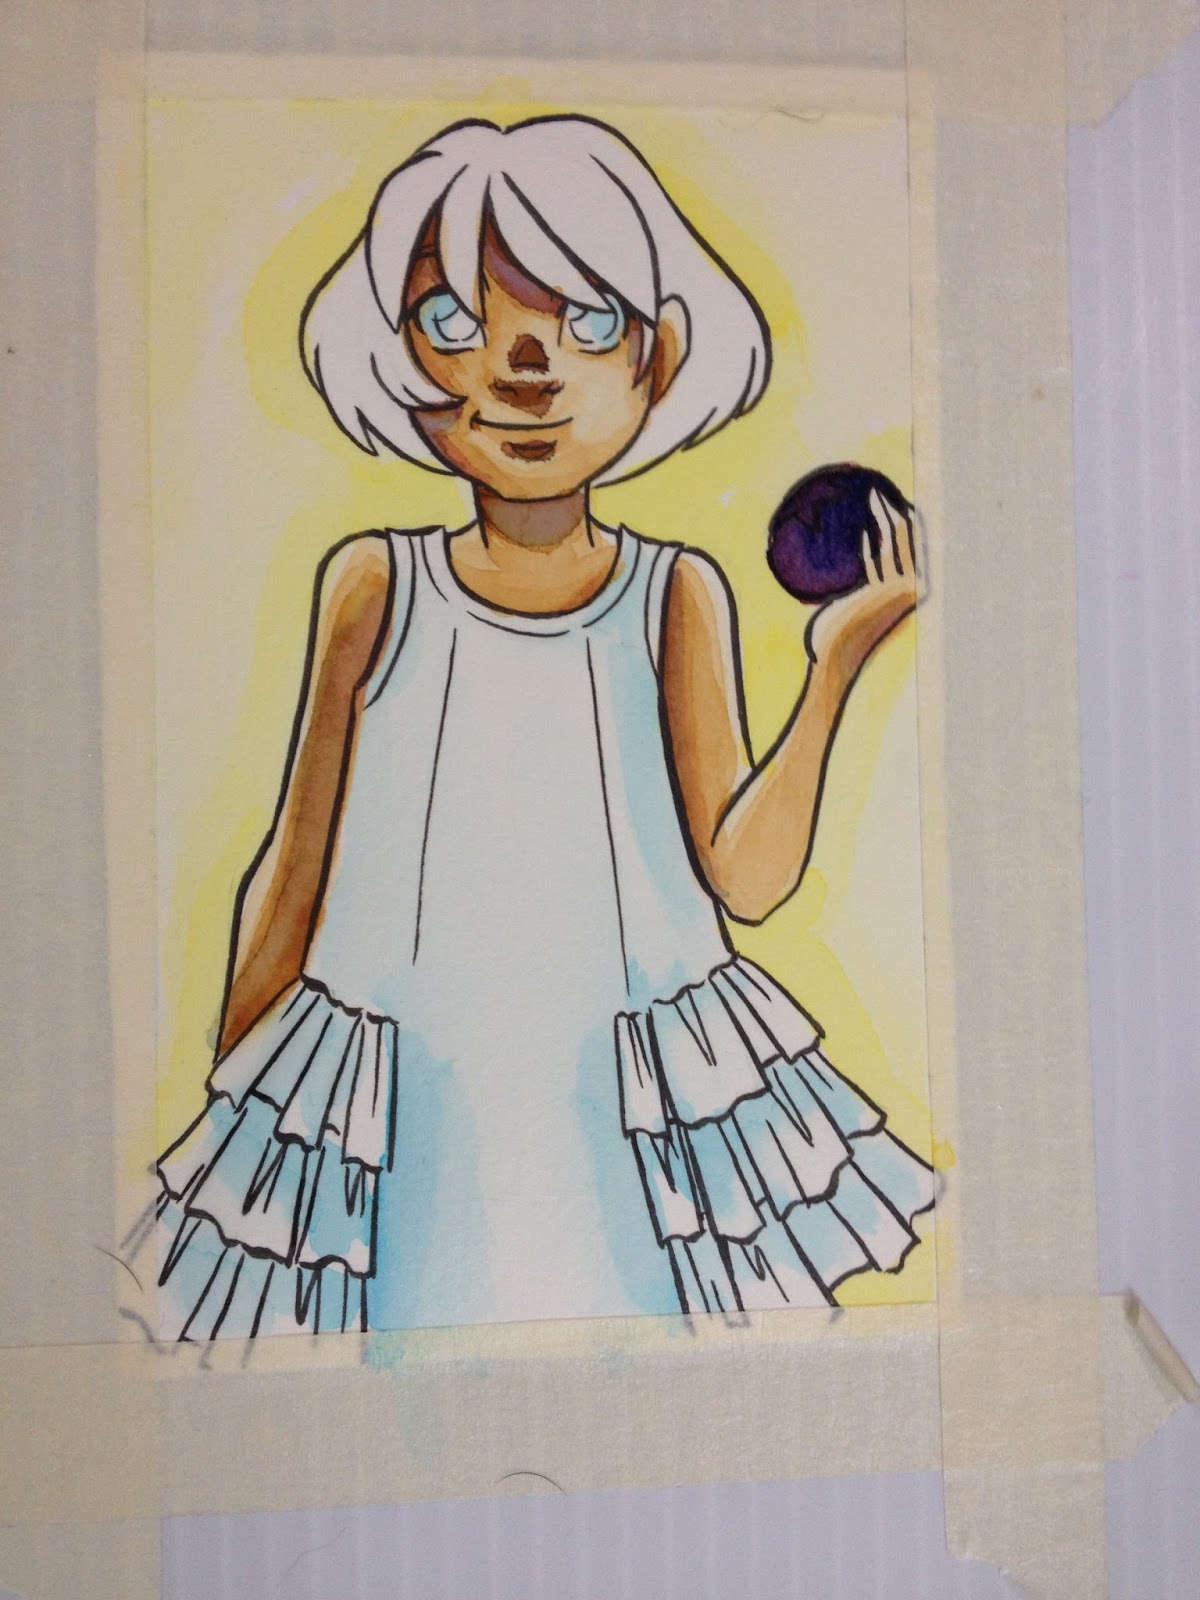
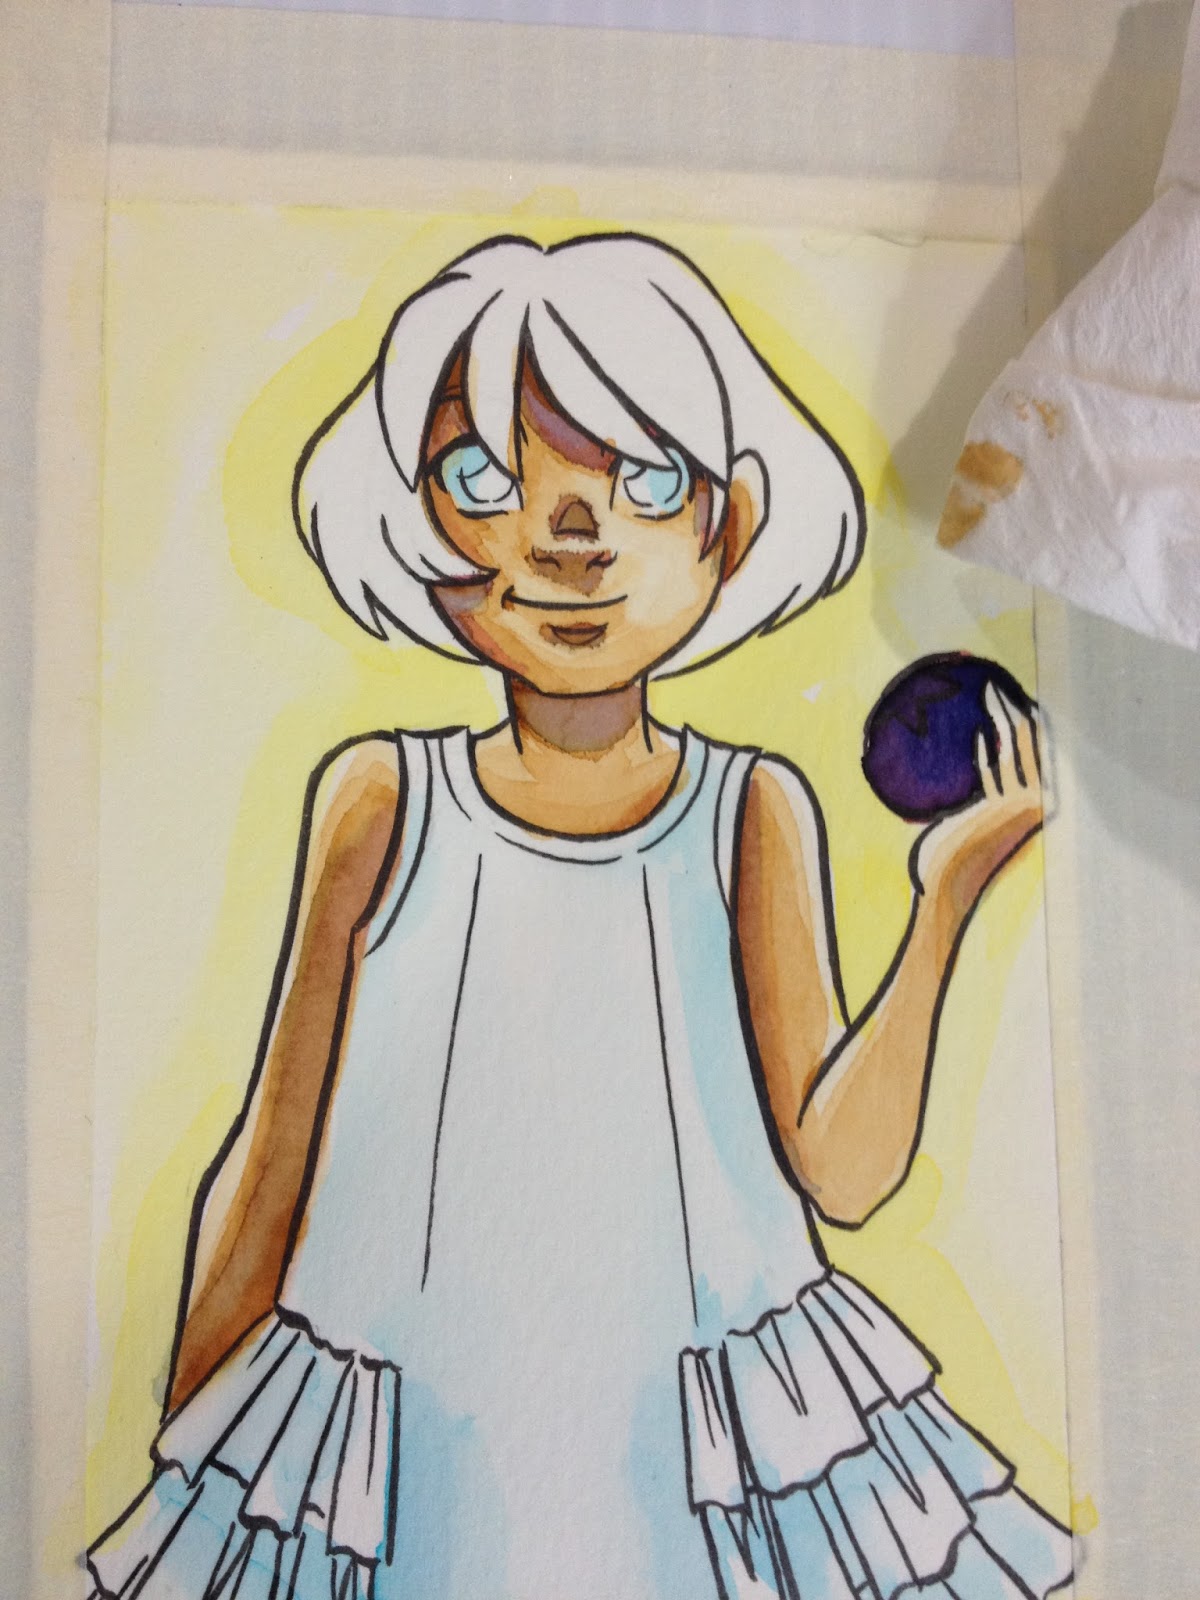
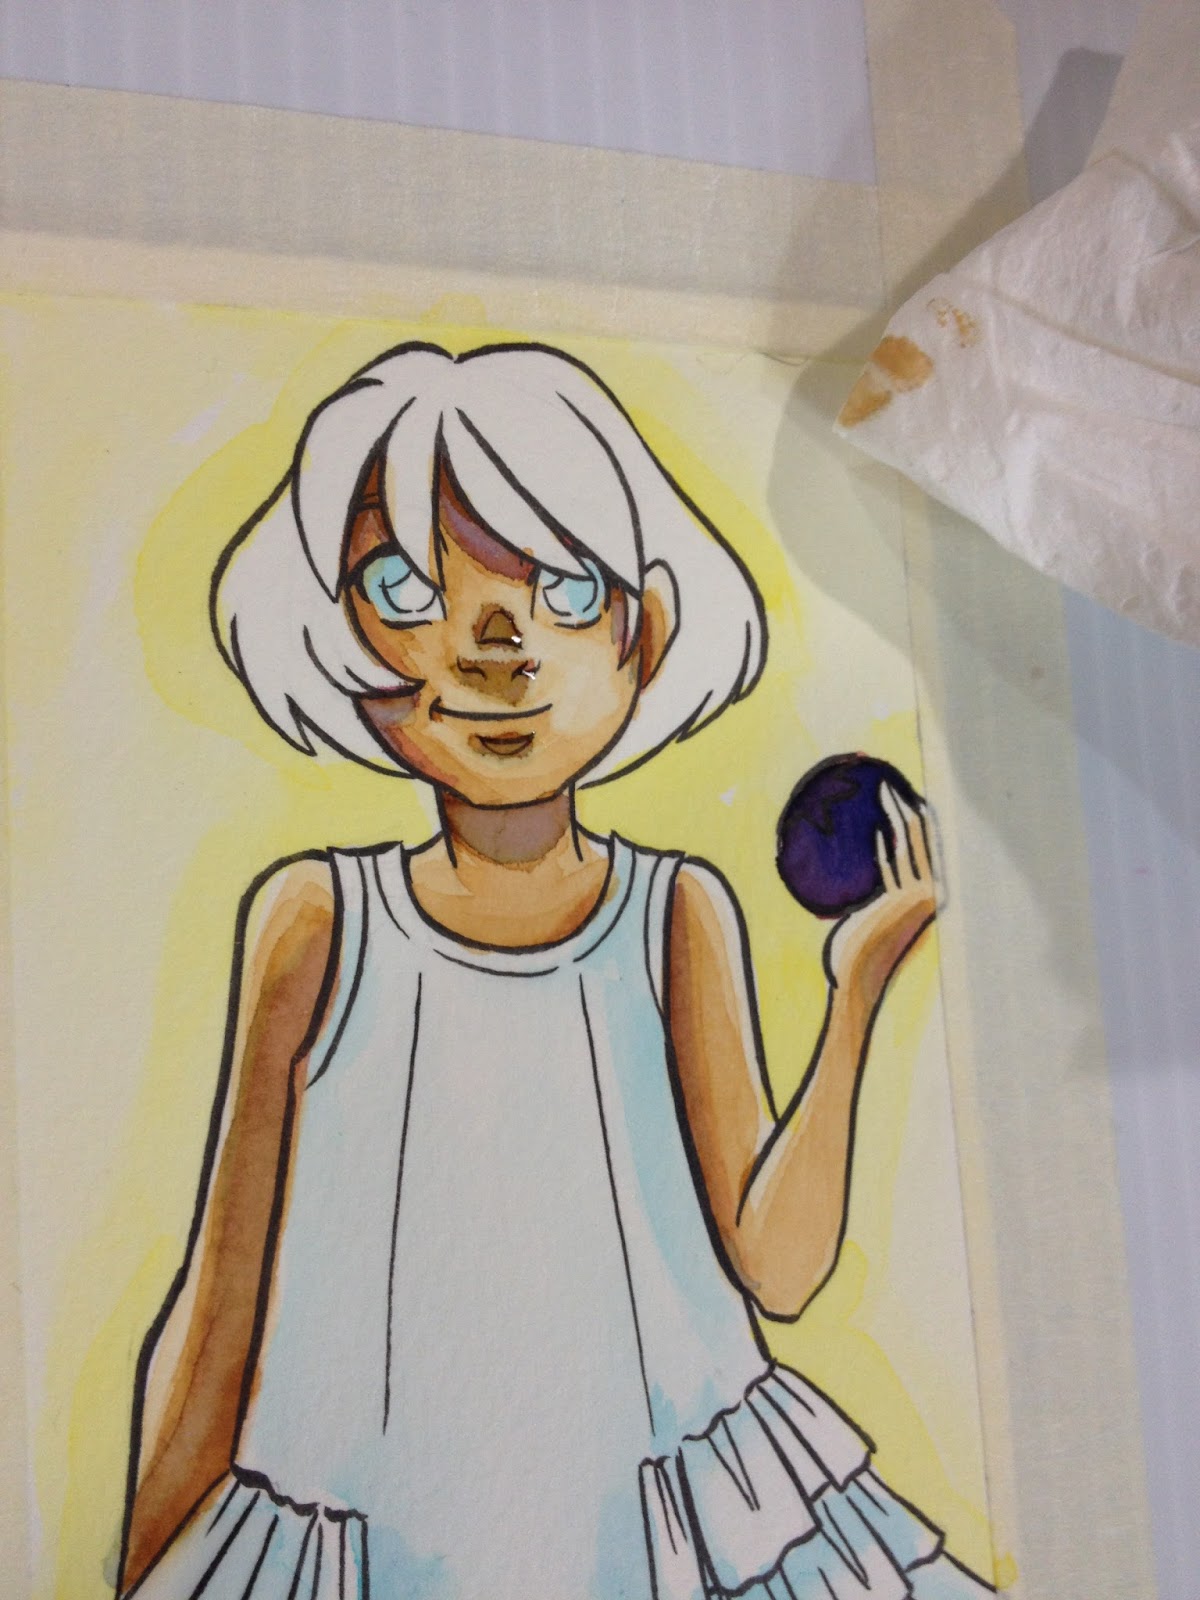
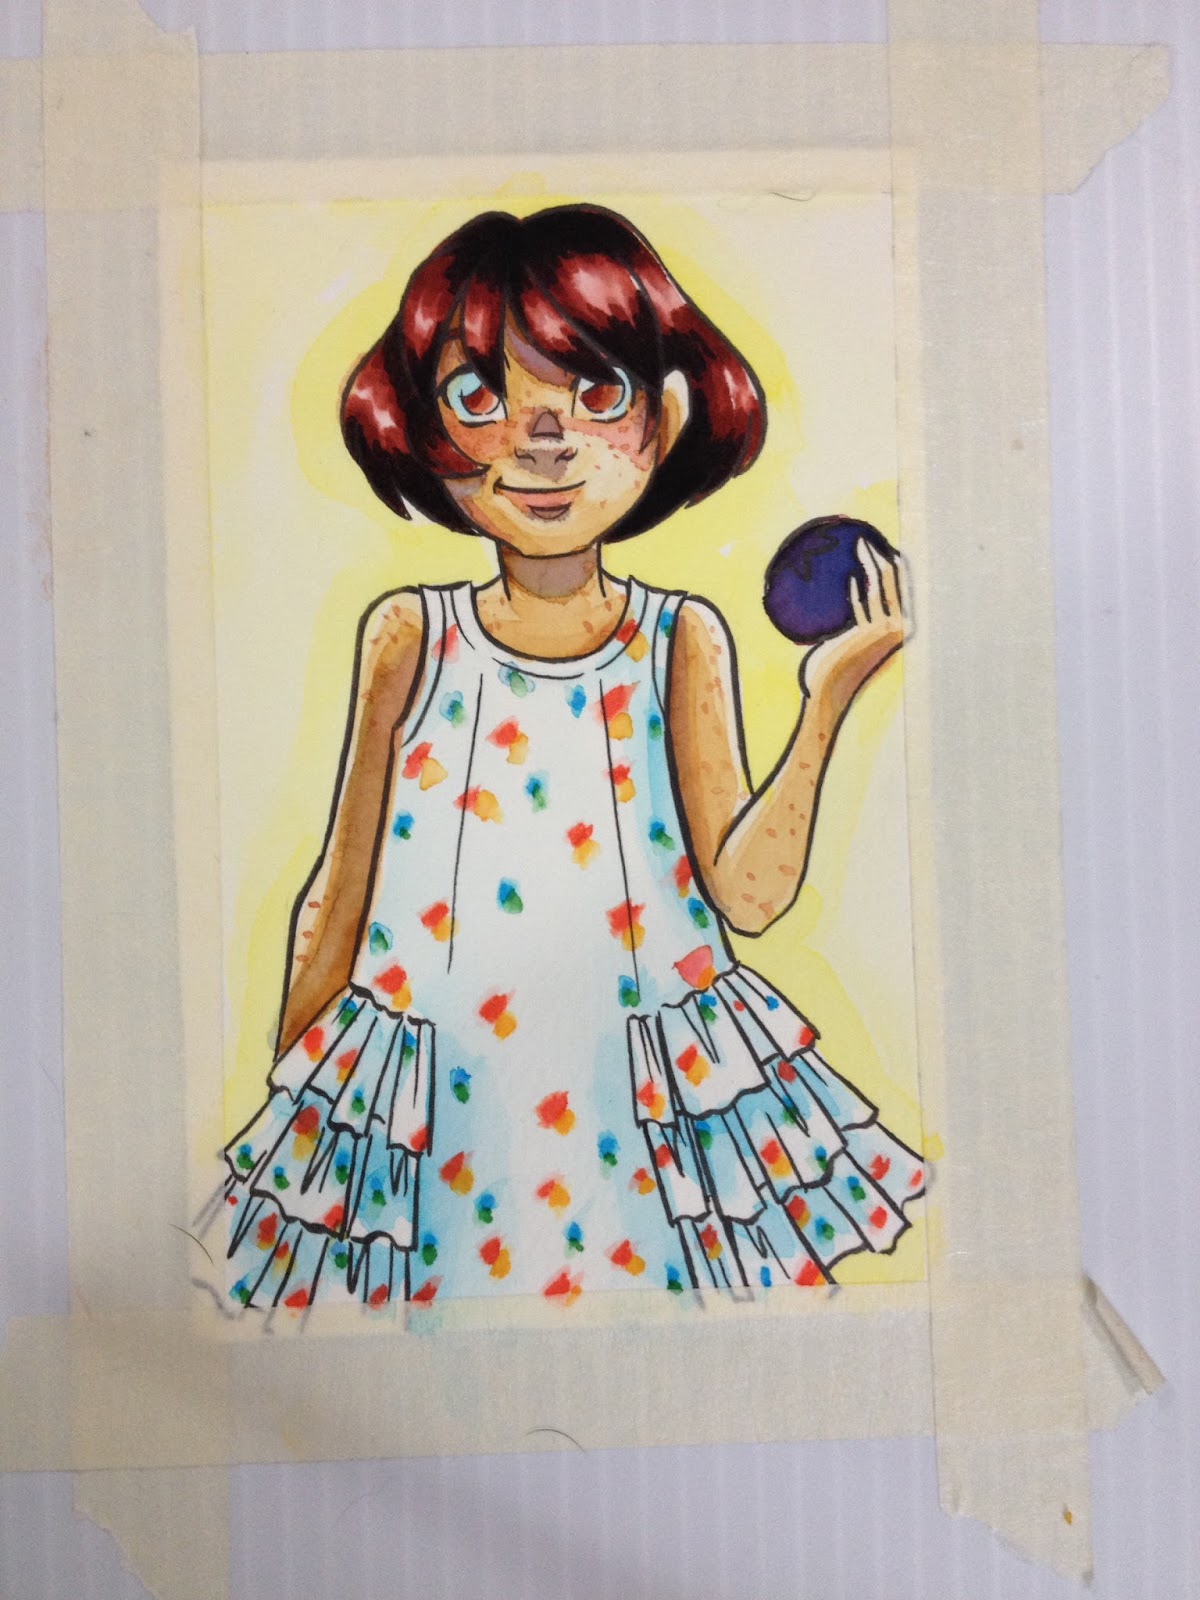
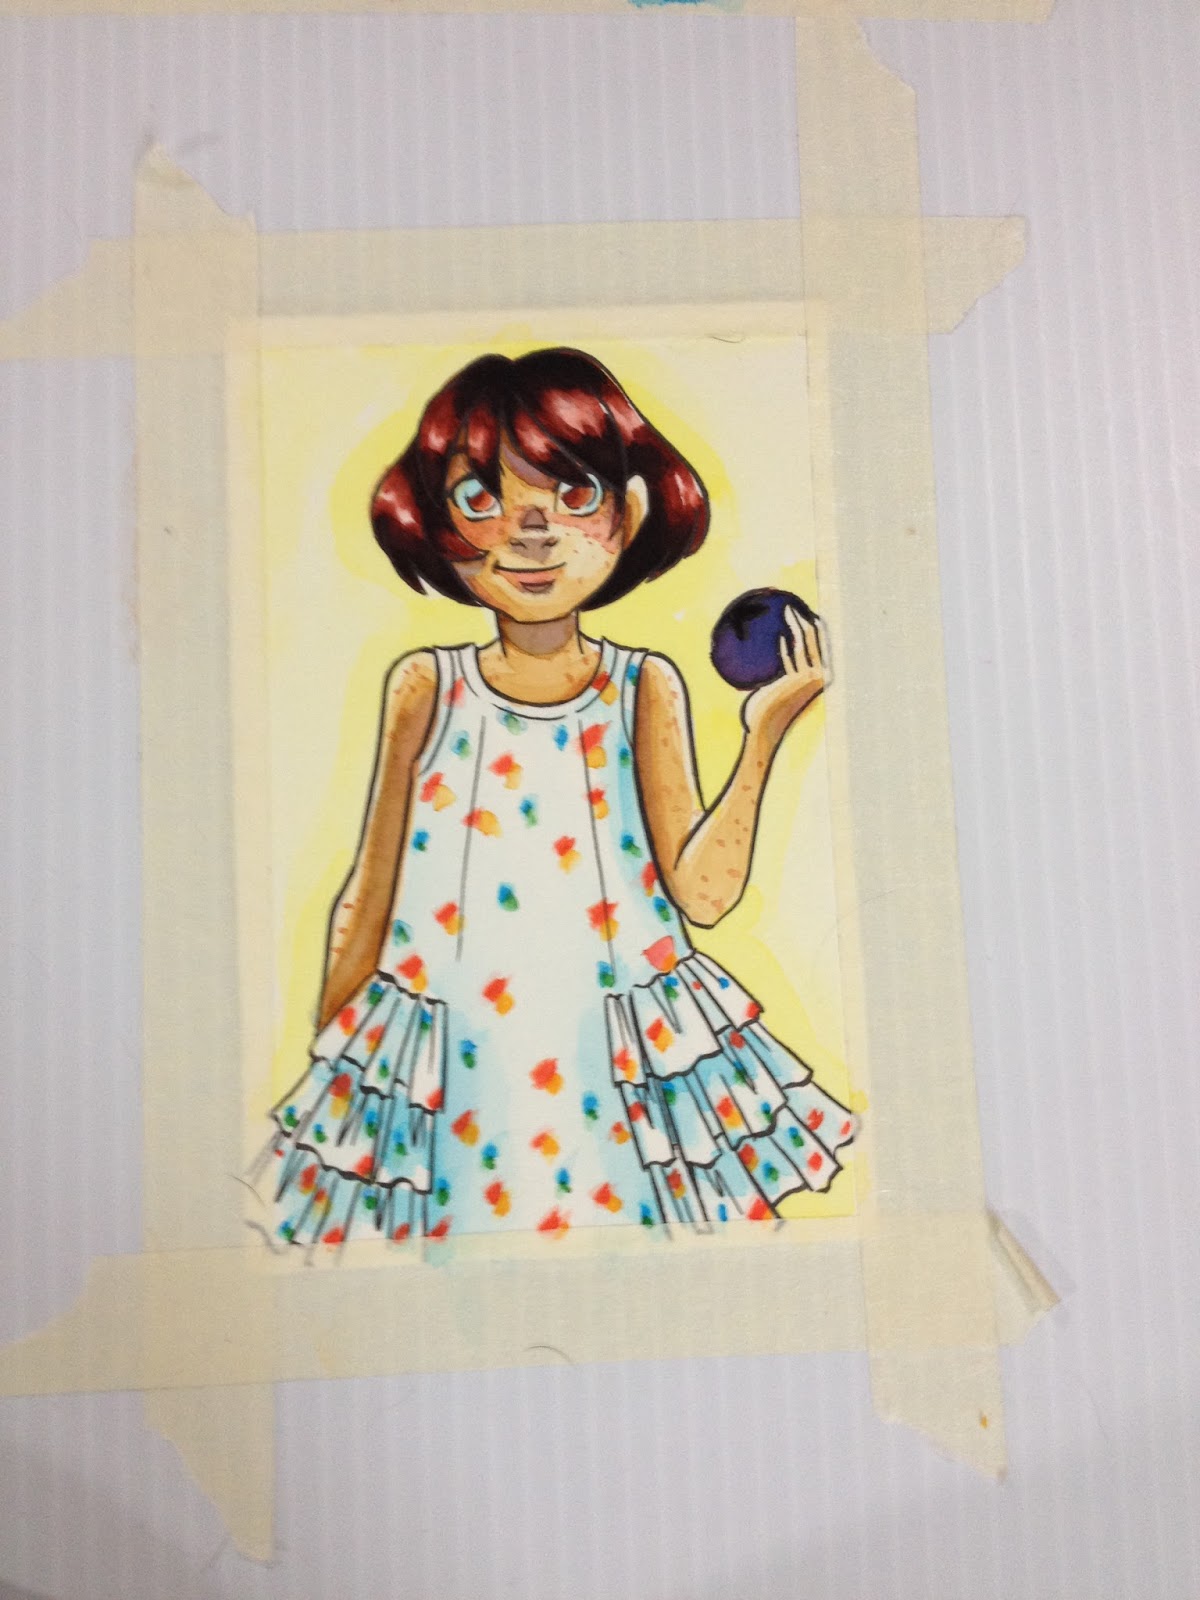
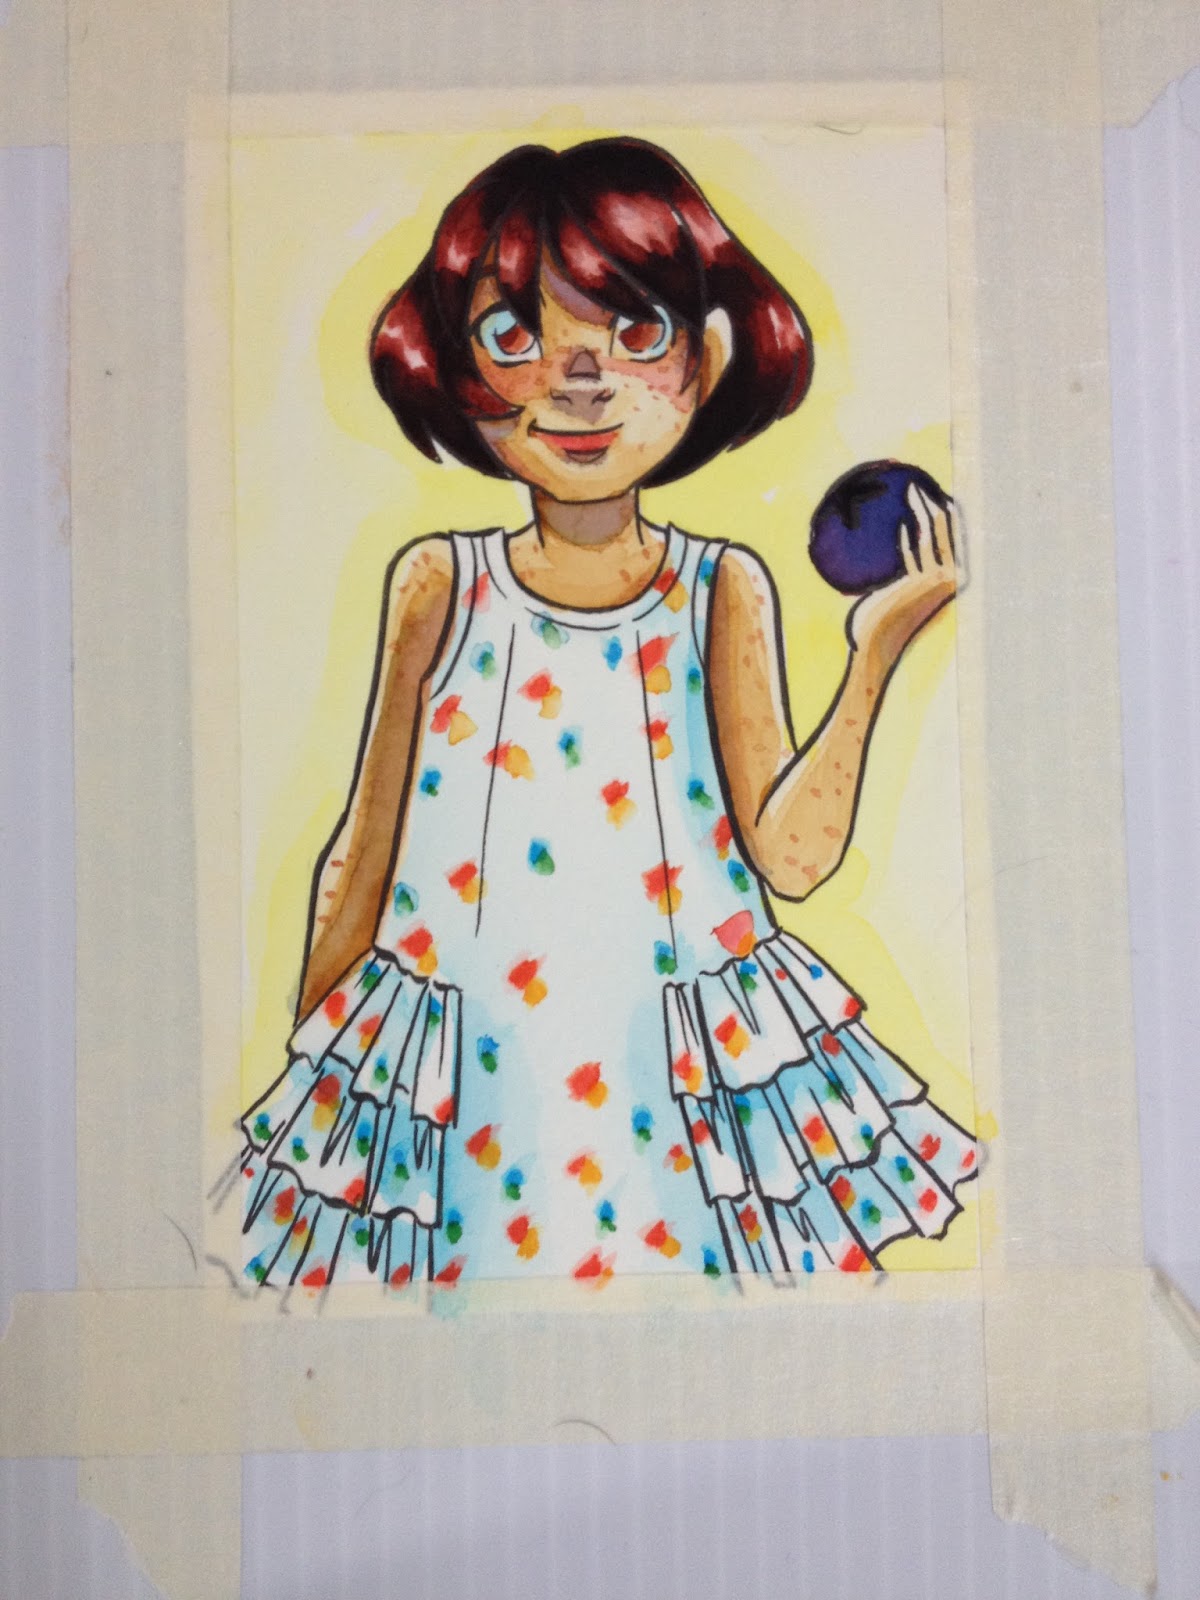
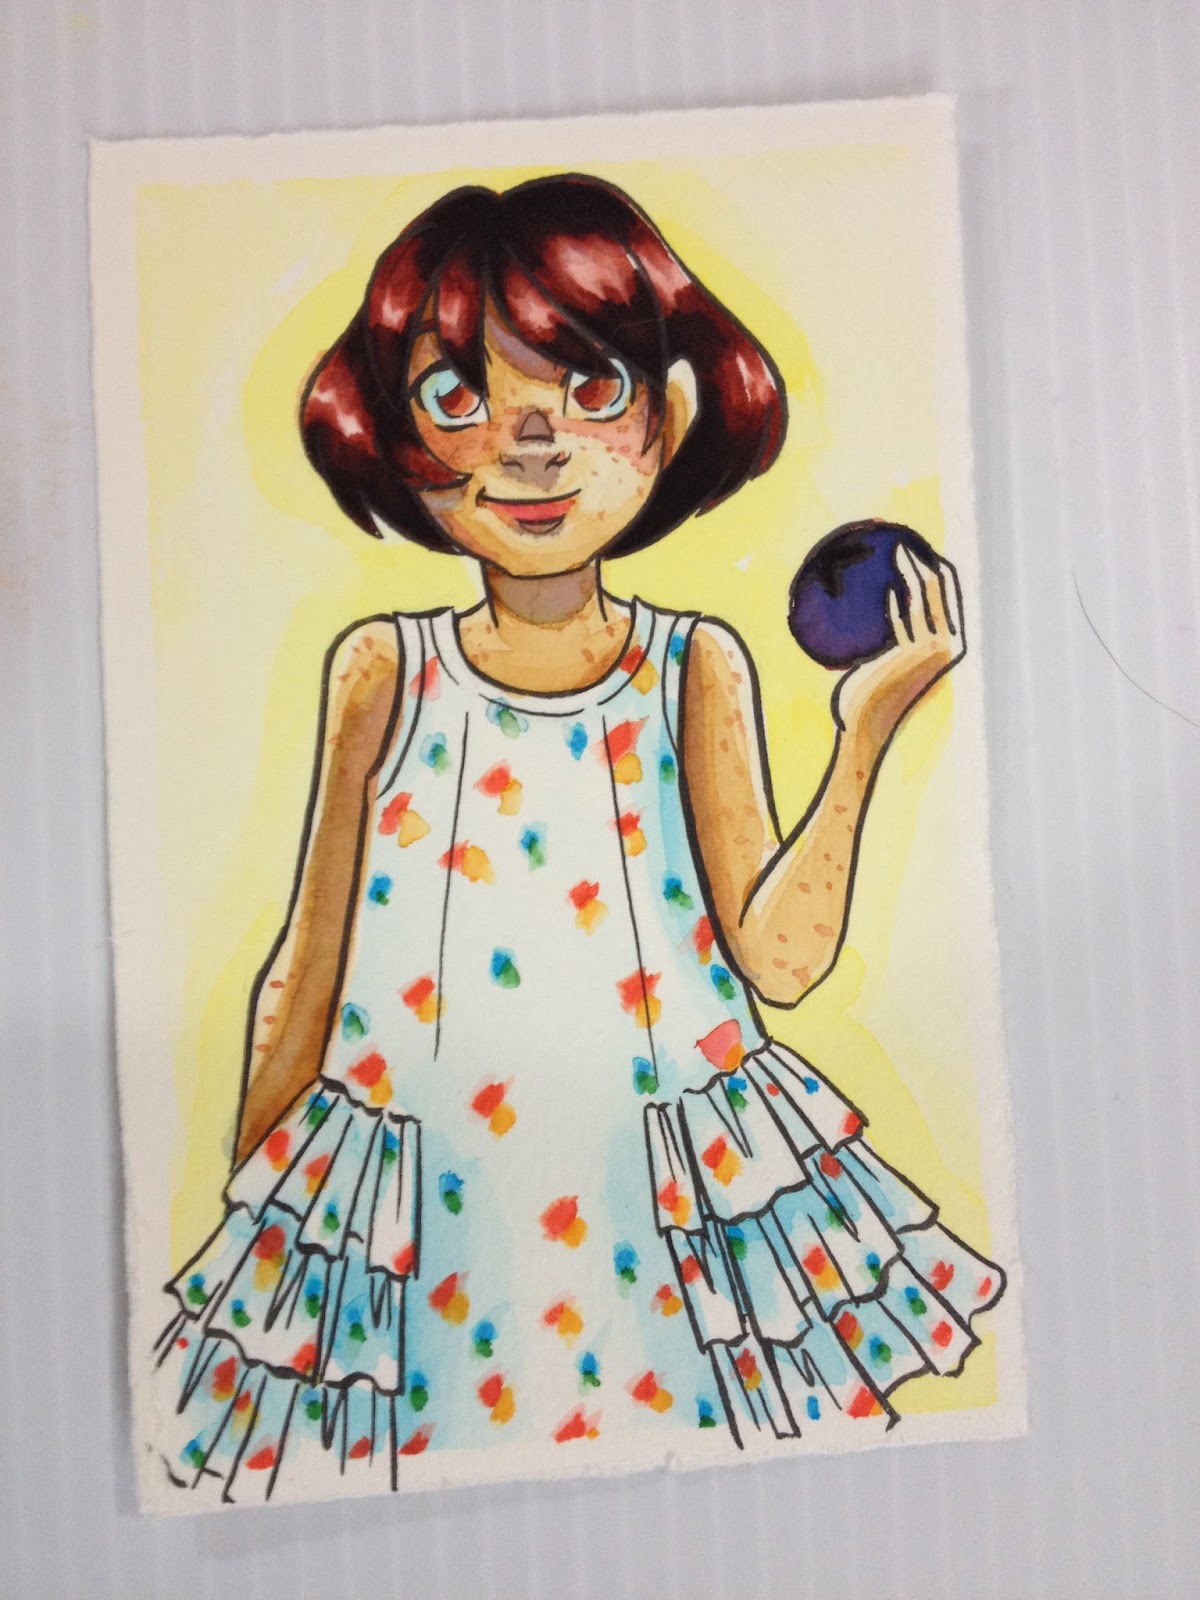
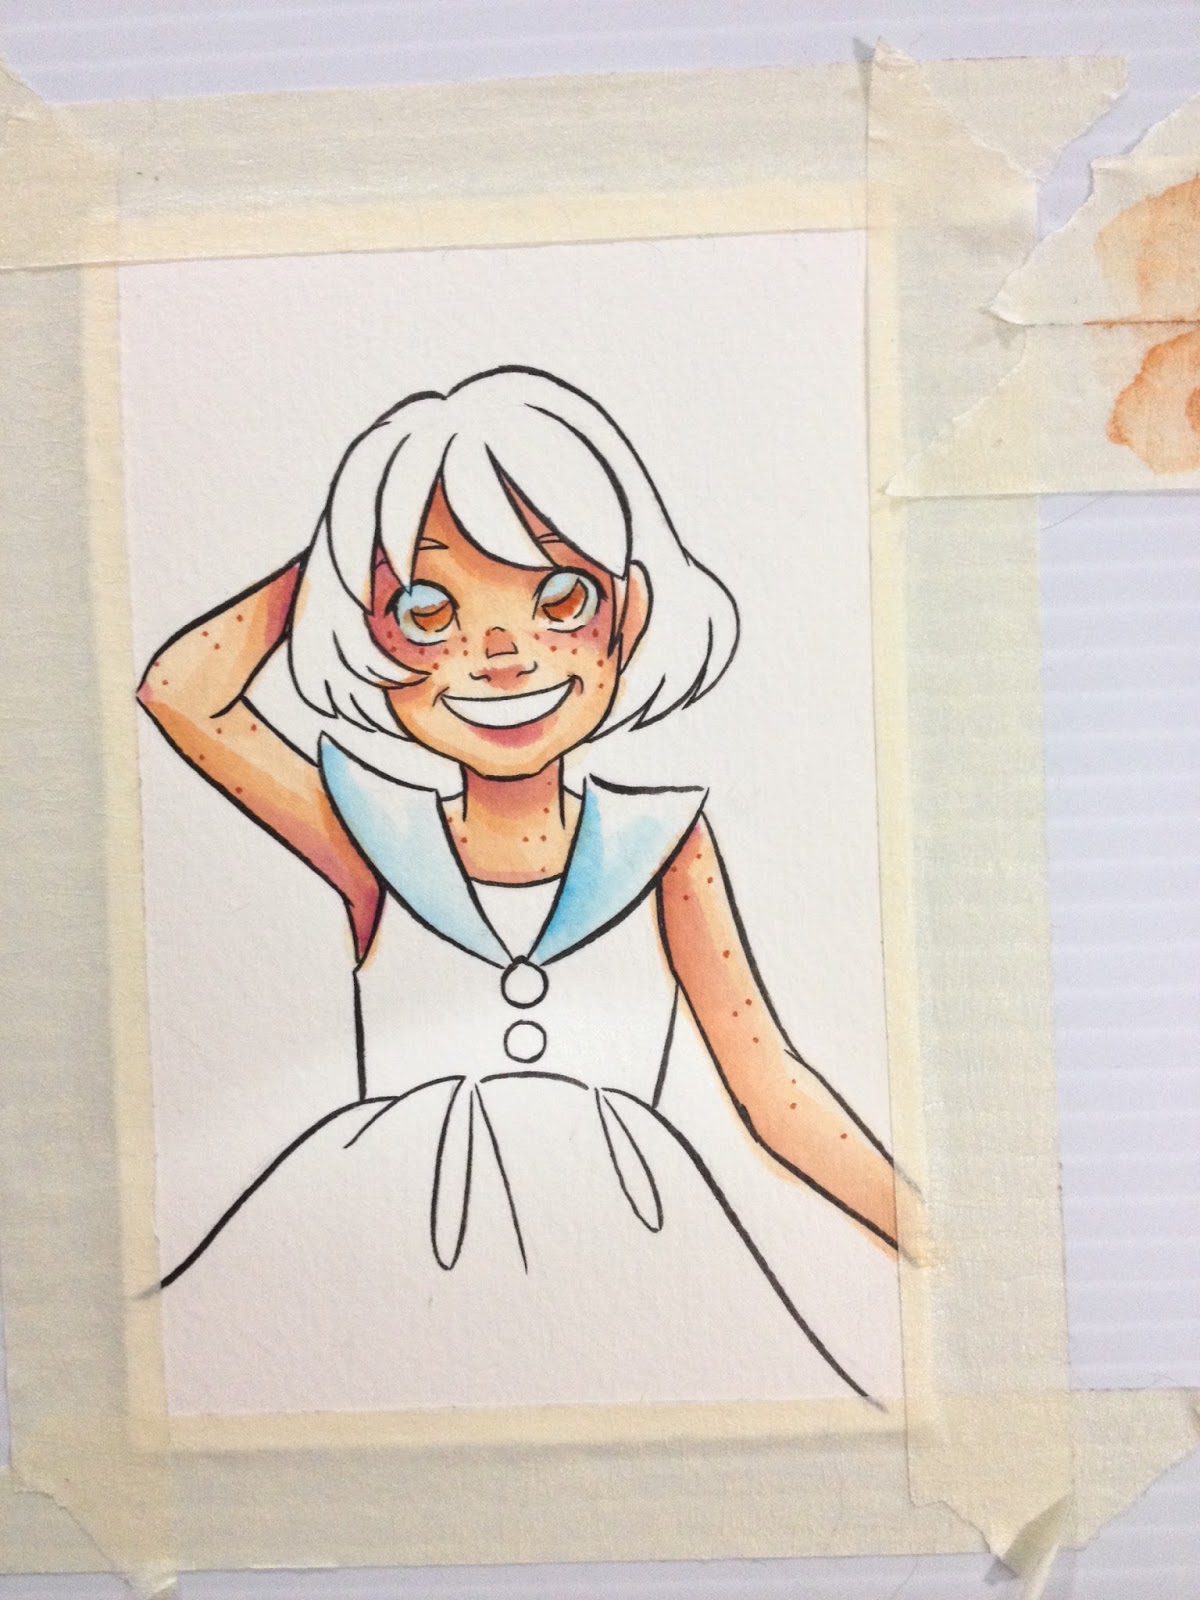
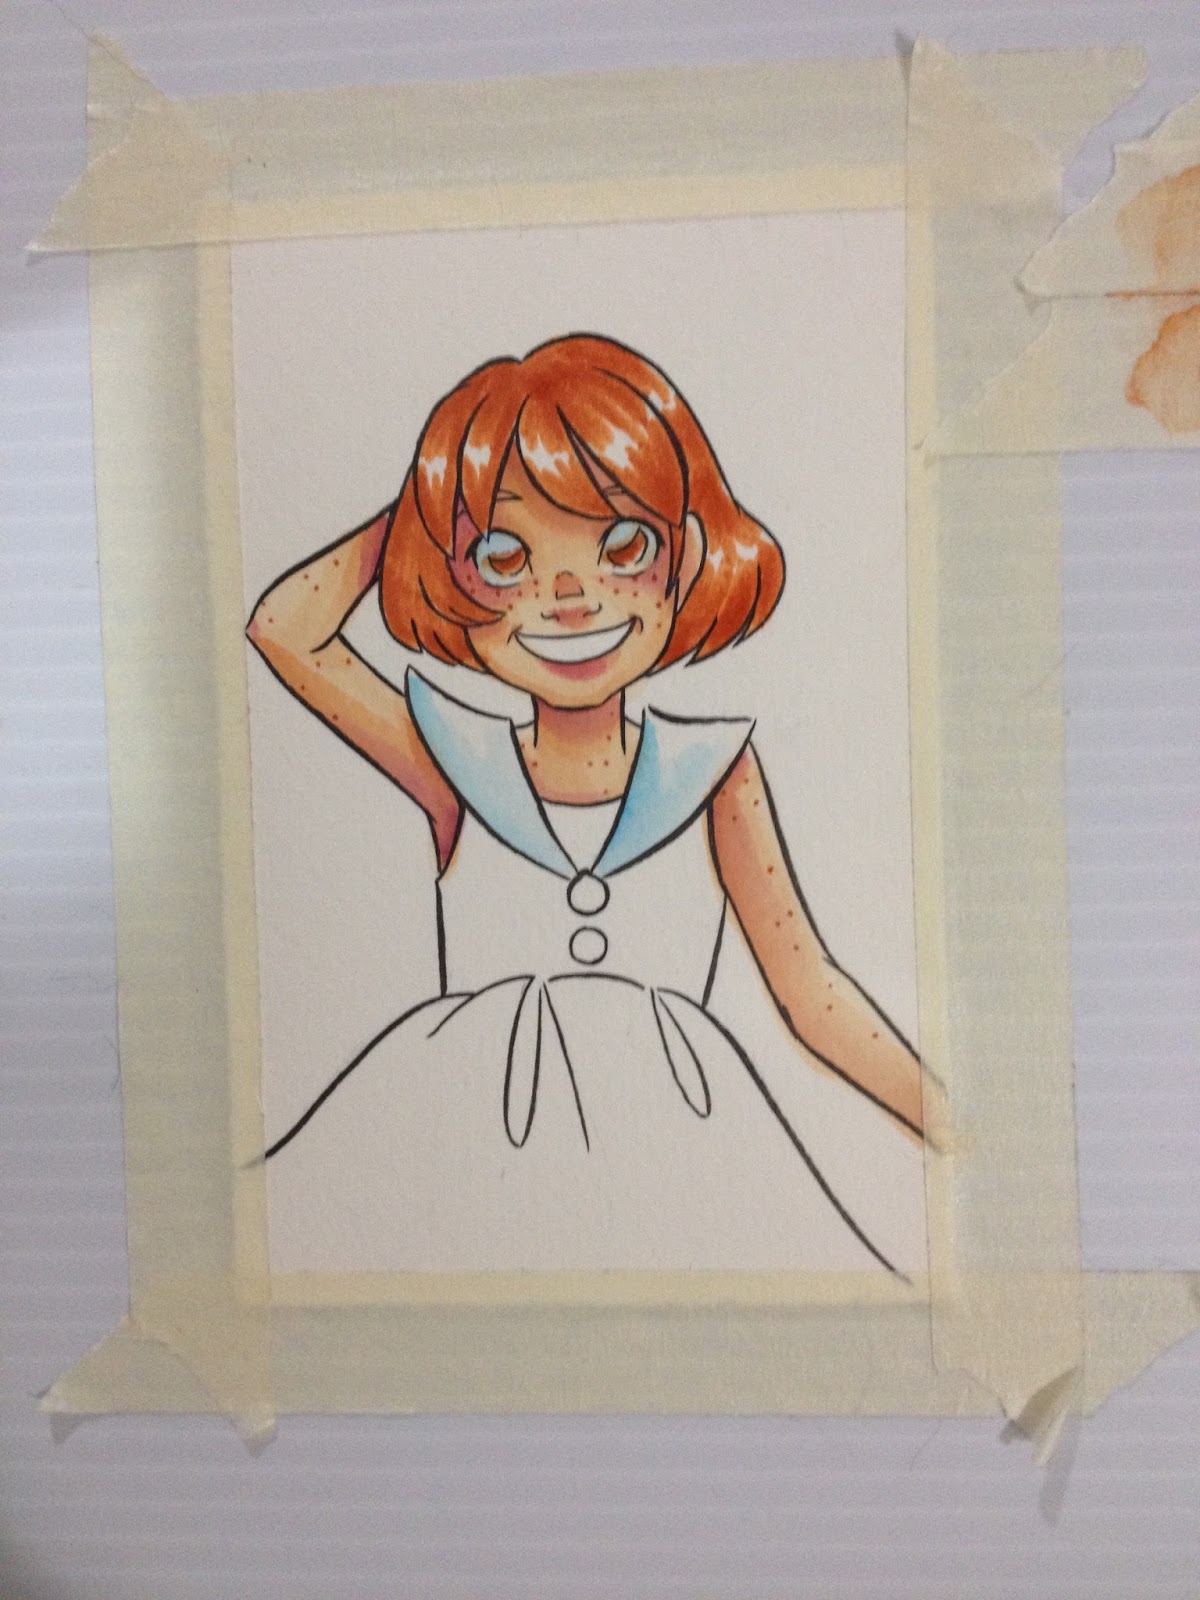
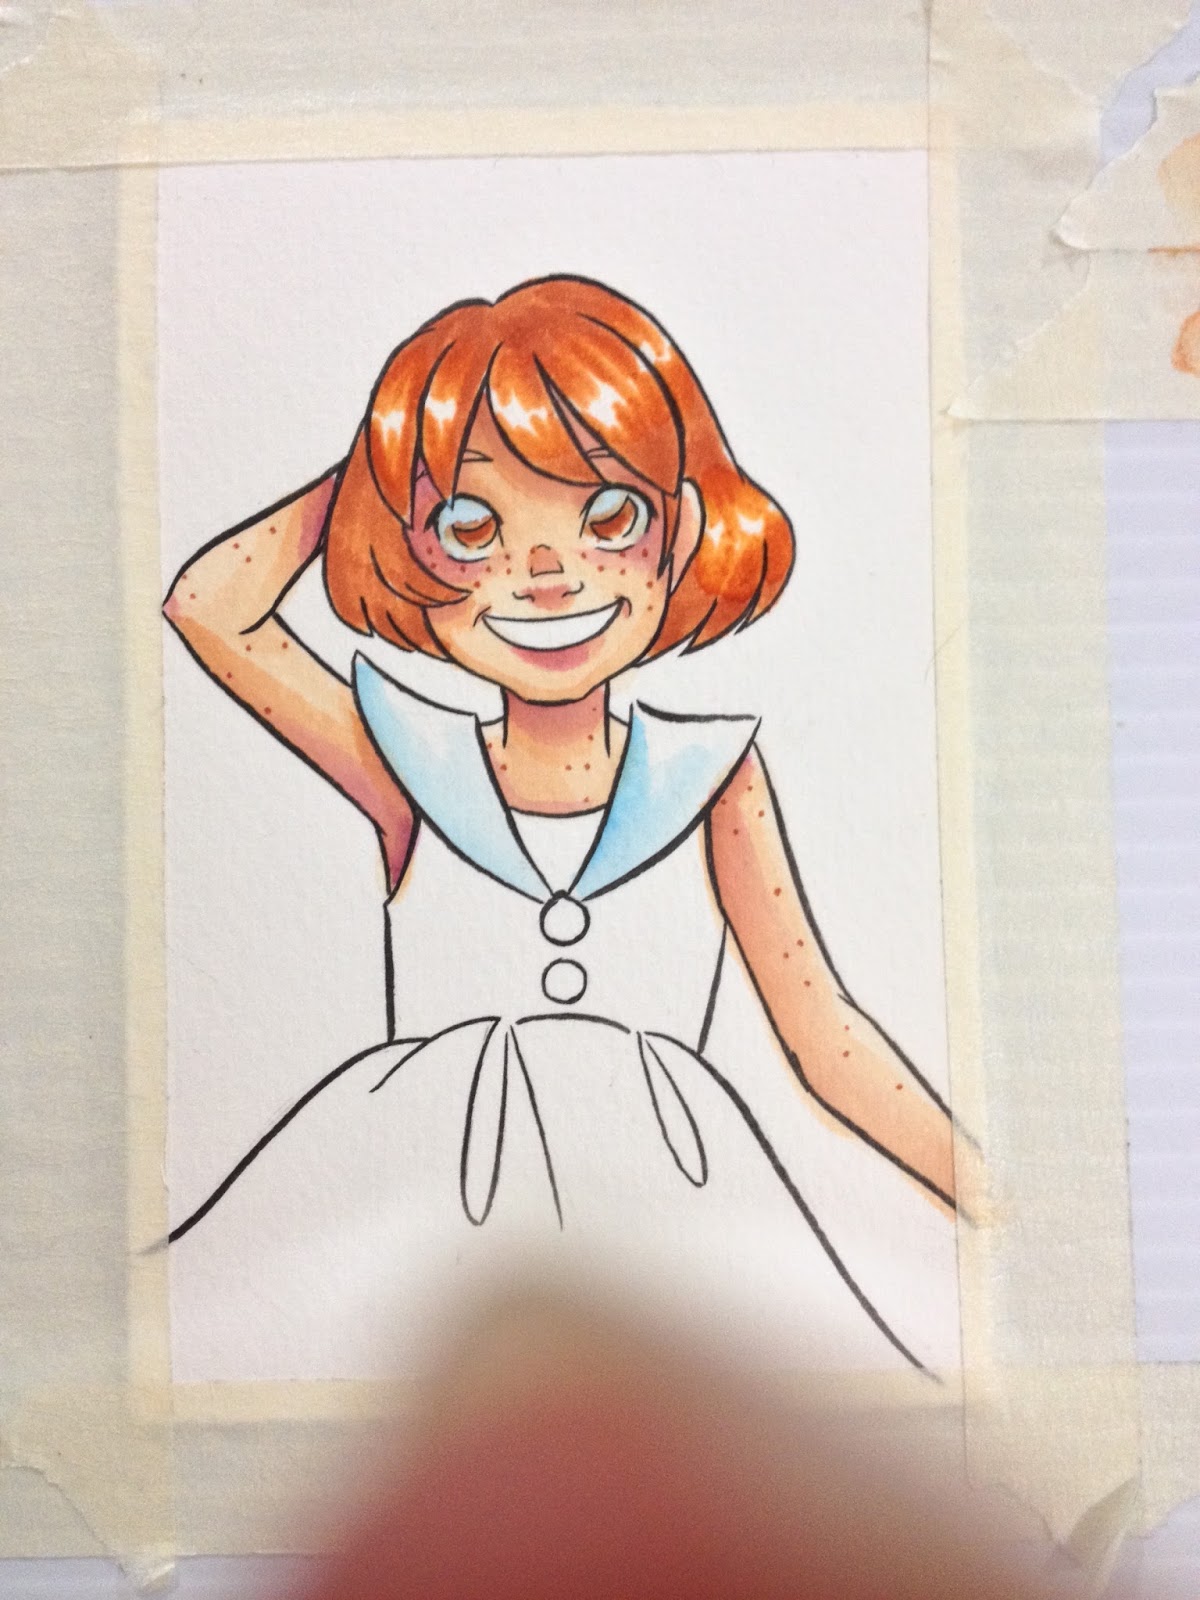
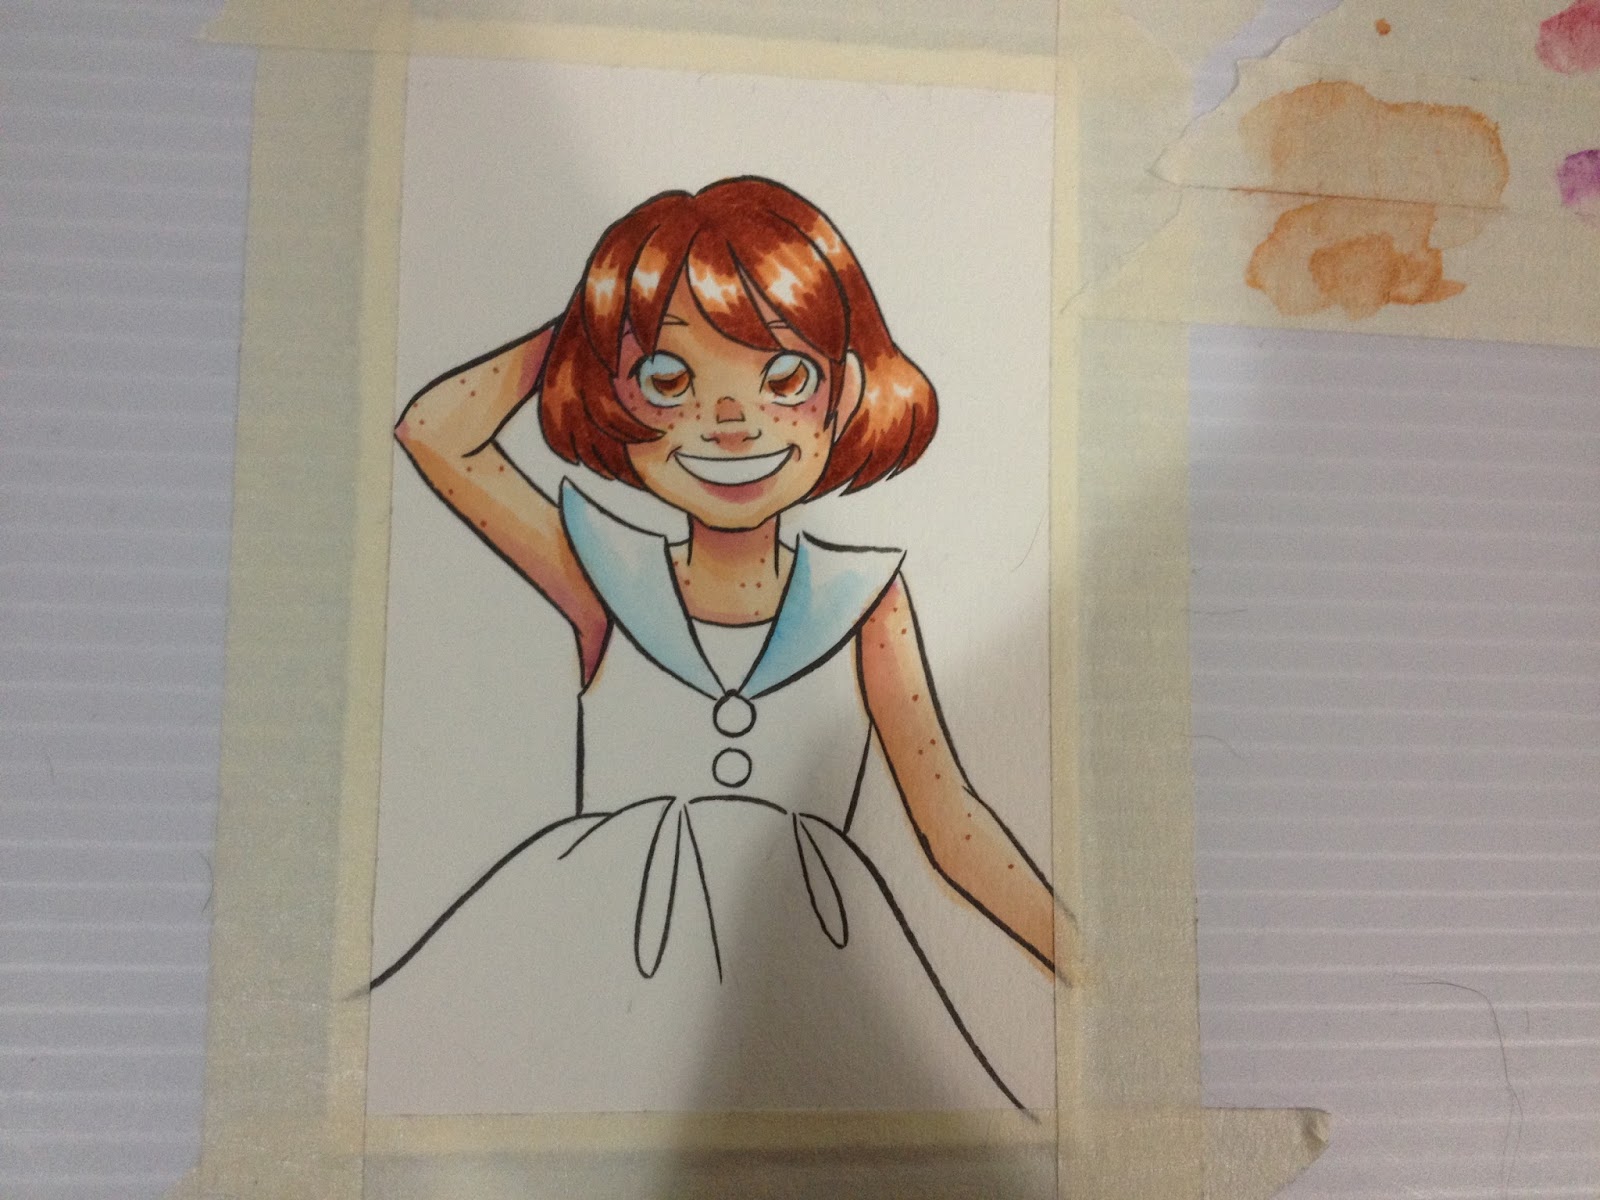
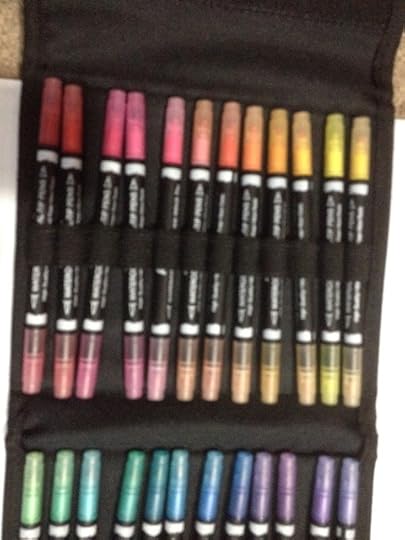
Strangely, this 24 piece set does not include a purple, violet, or mauve, but a surprising number of browns- which makes this set a little more flexible in terms of skin colors.
The Field Test
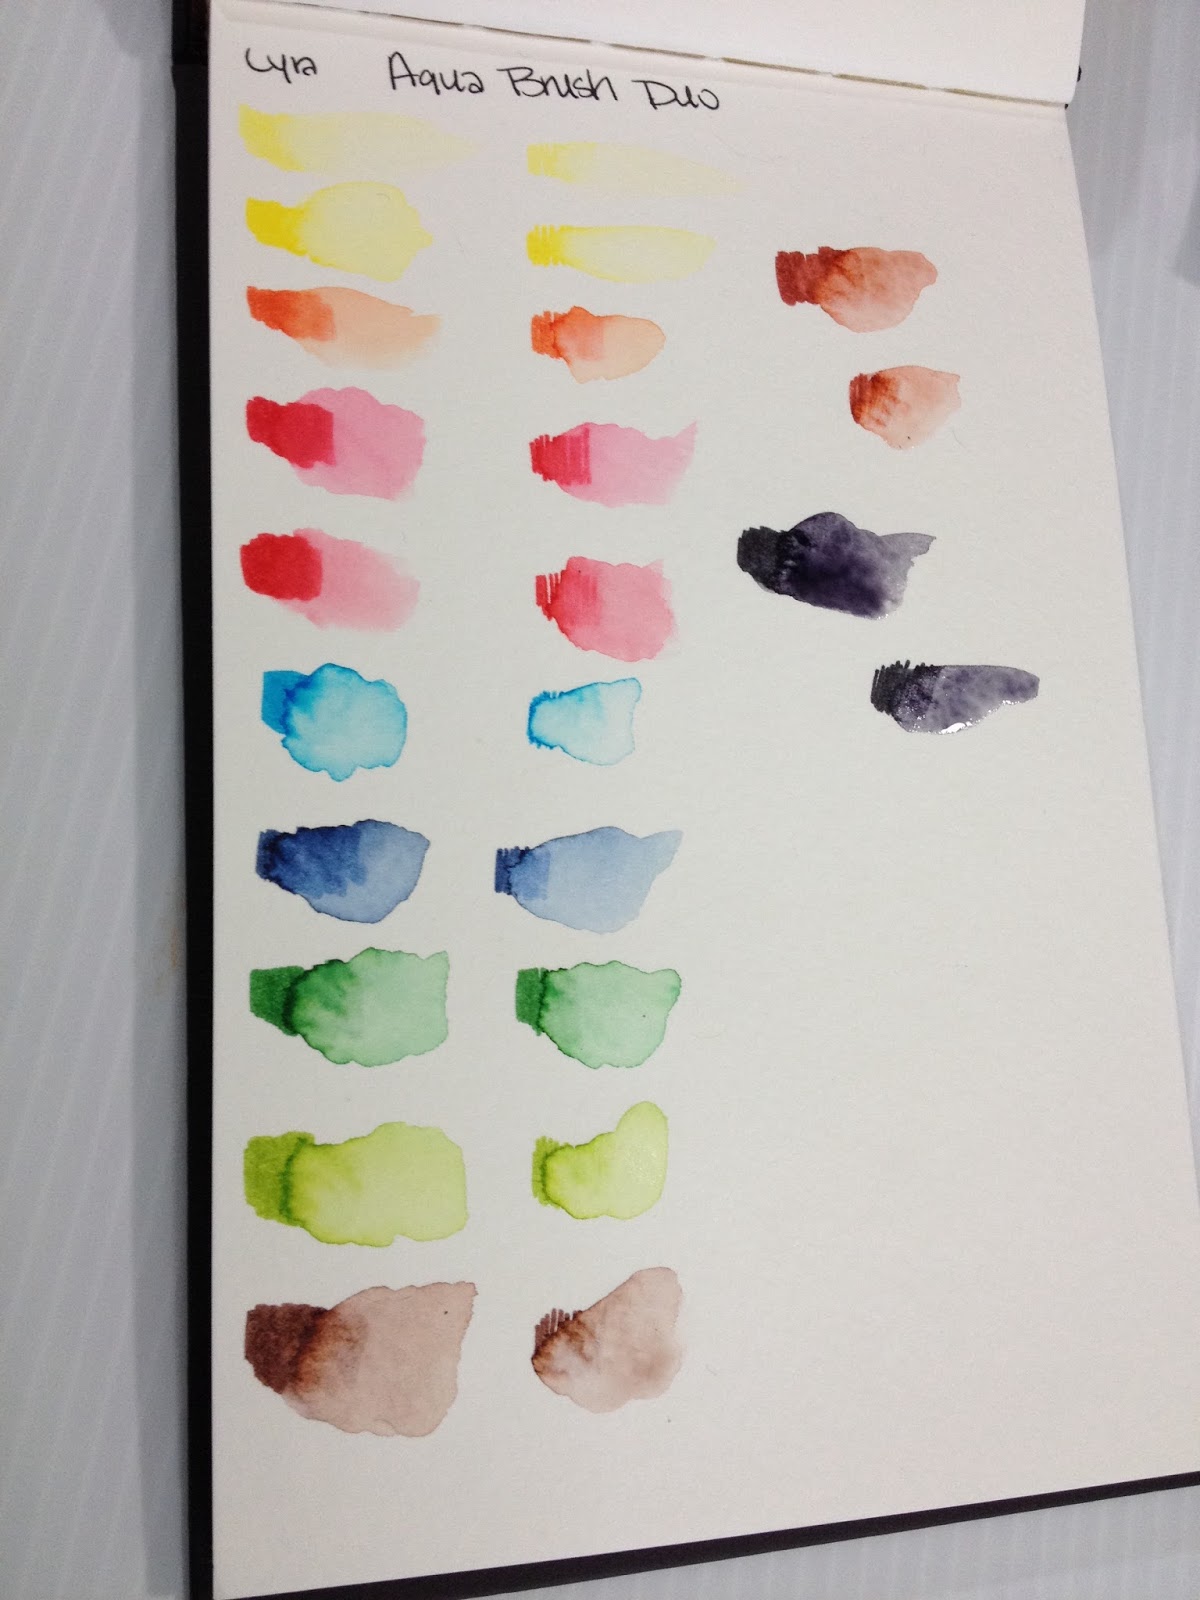
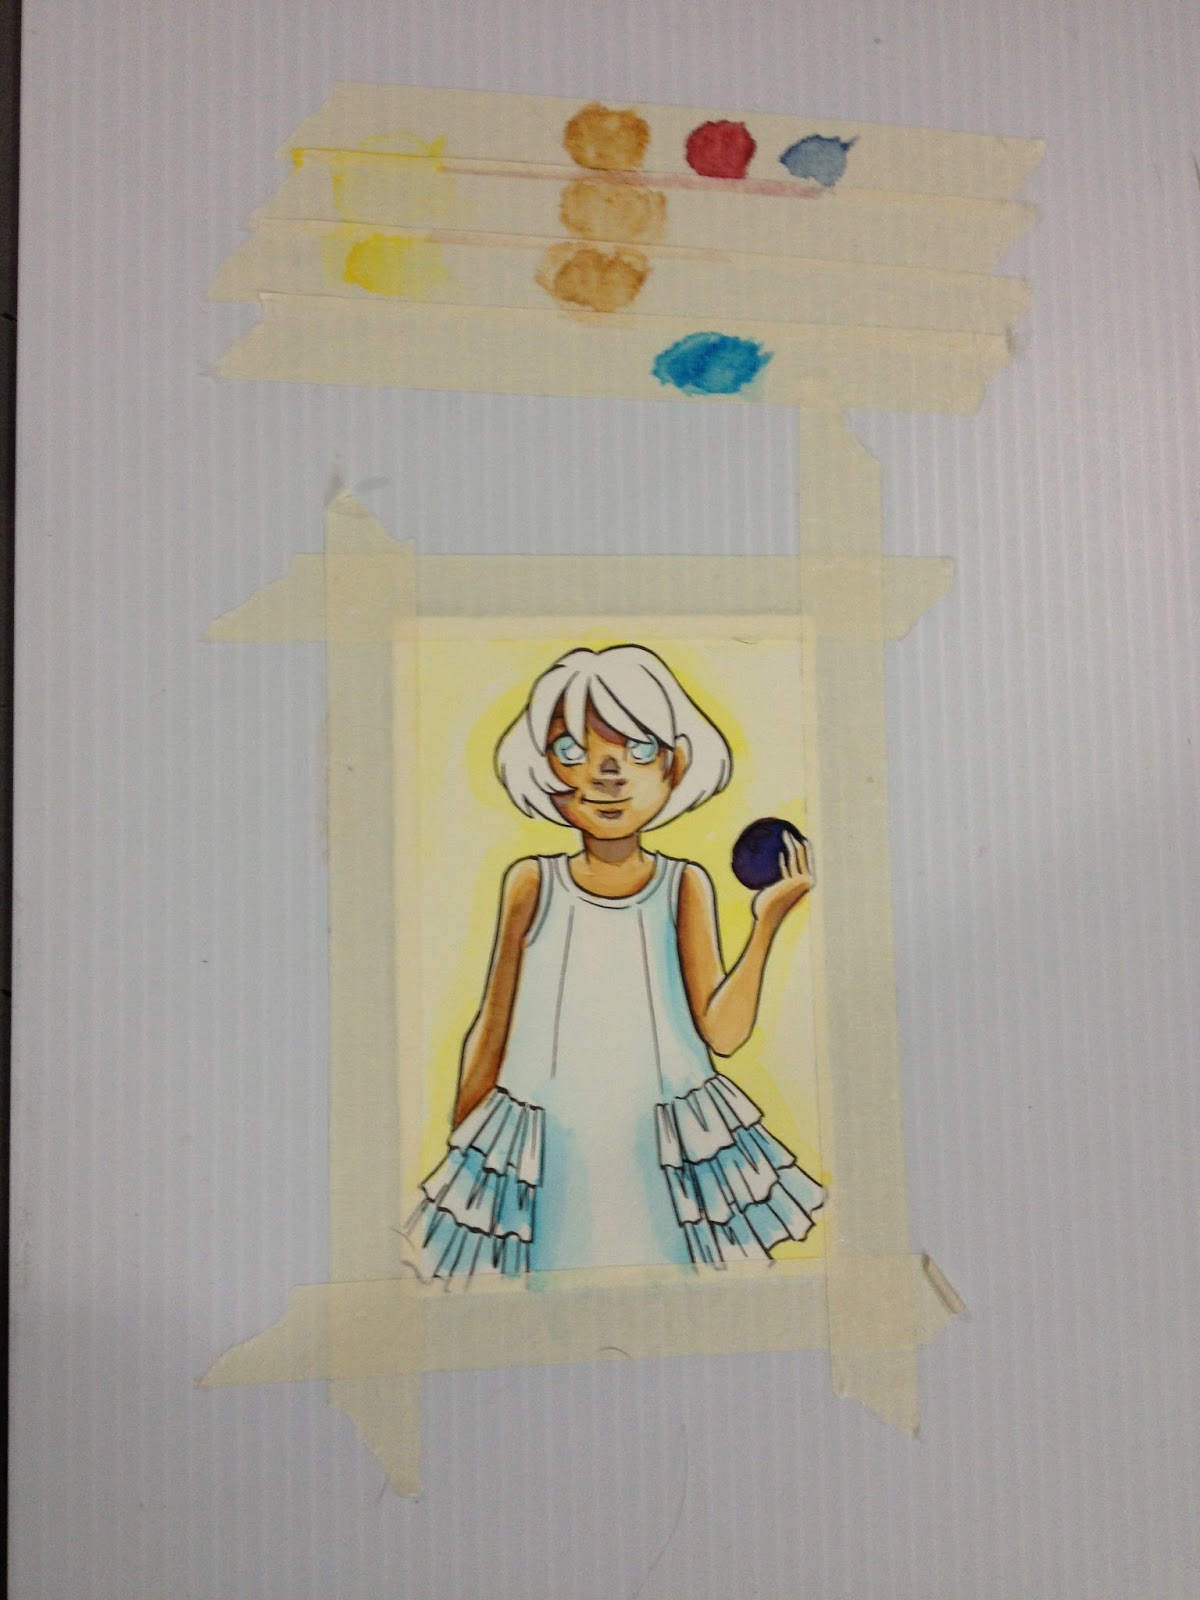
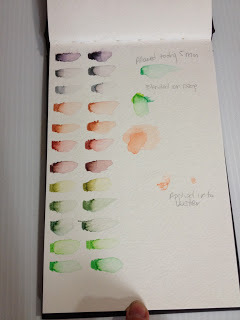
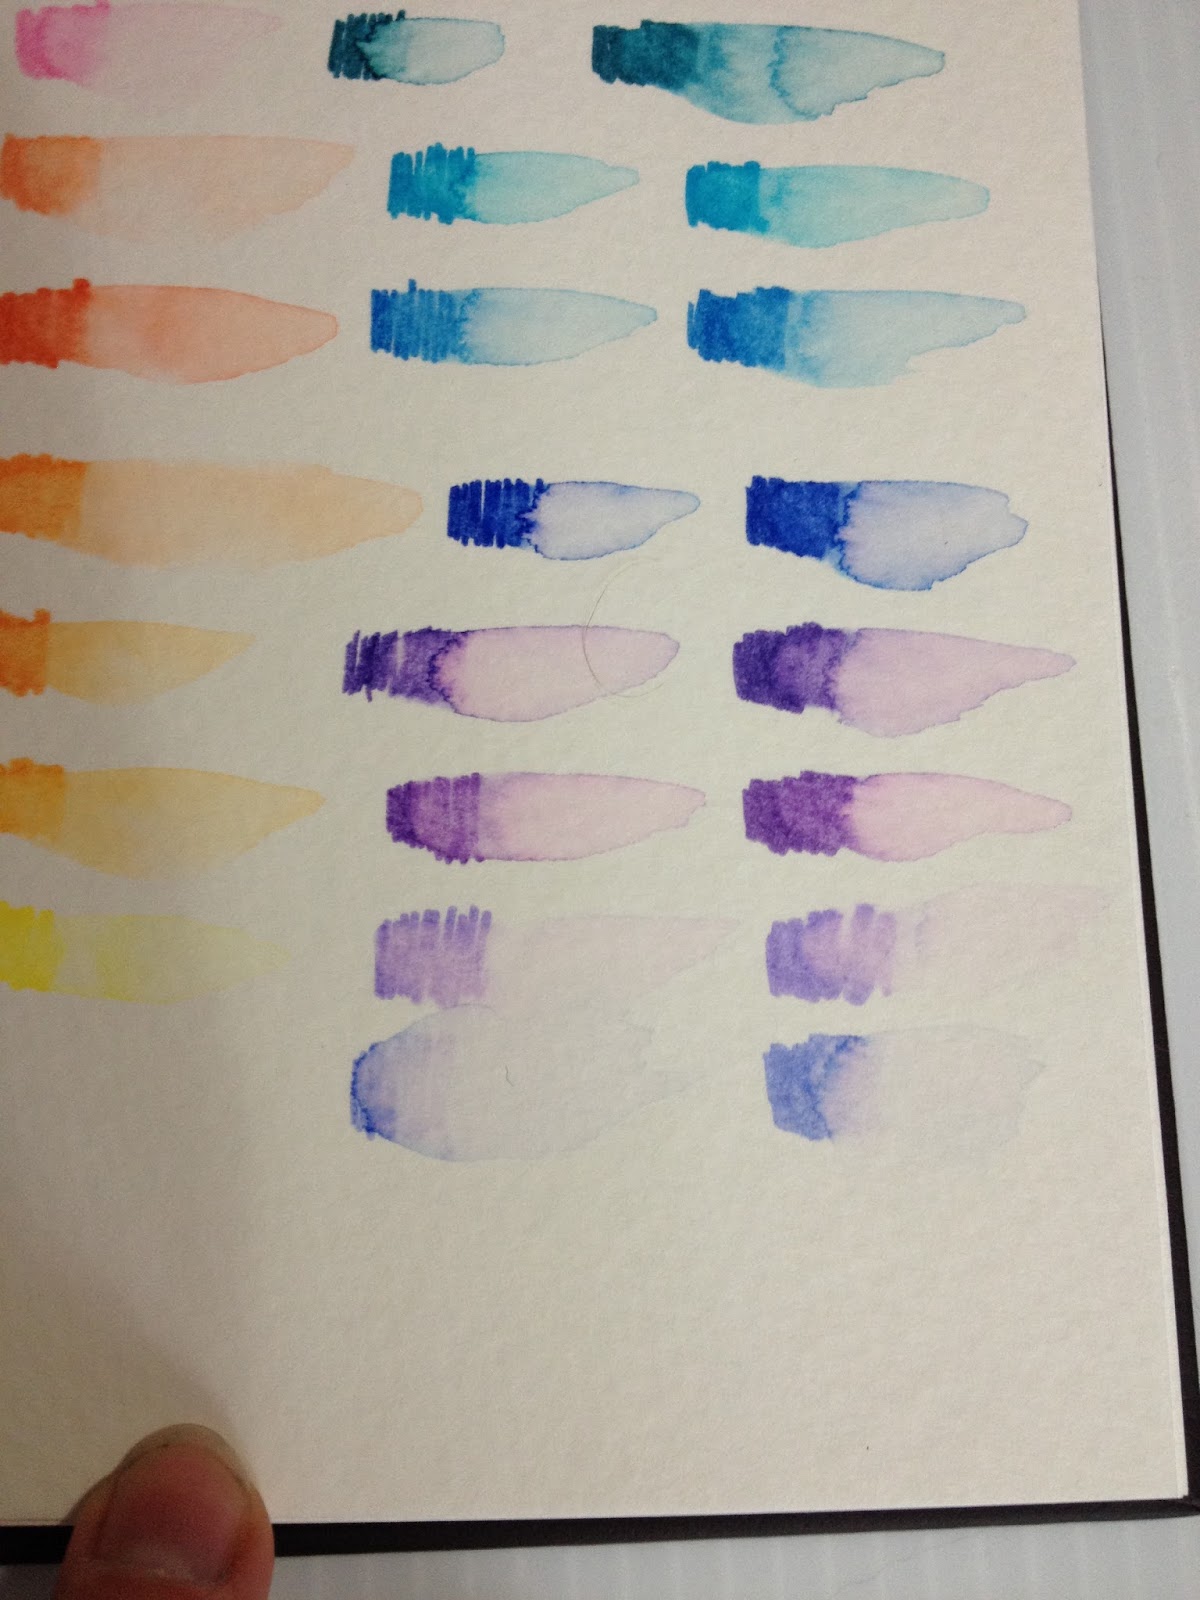
The Swatches
While wet


After drying


Blendability
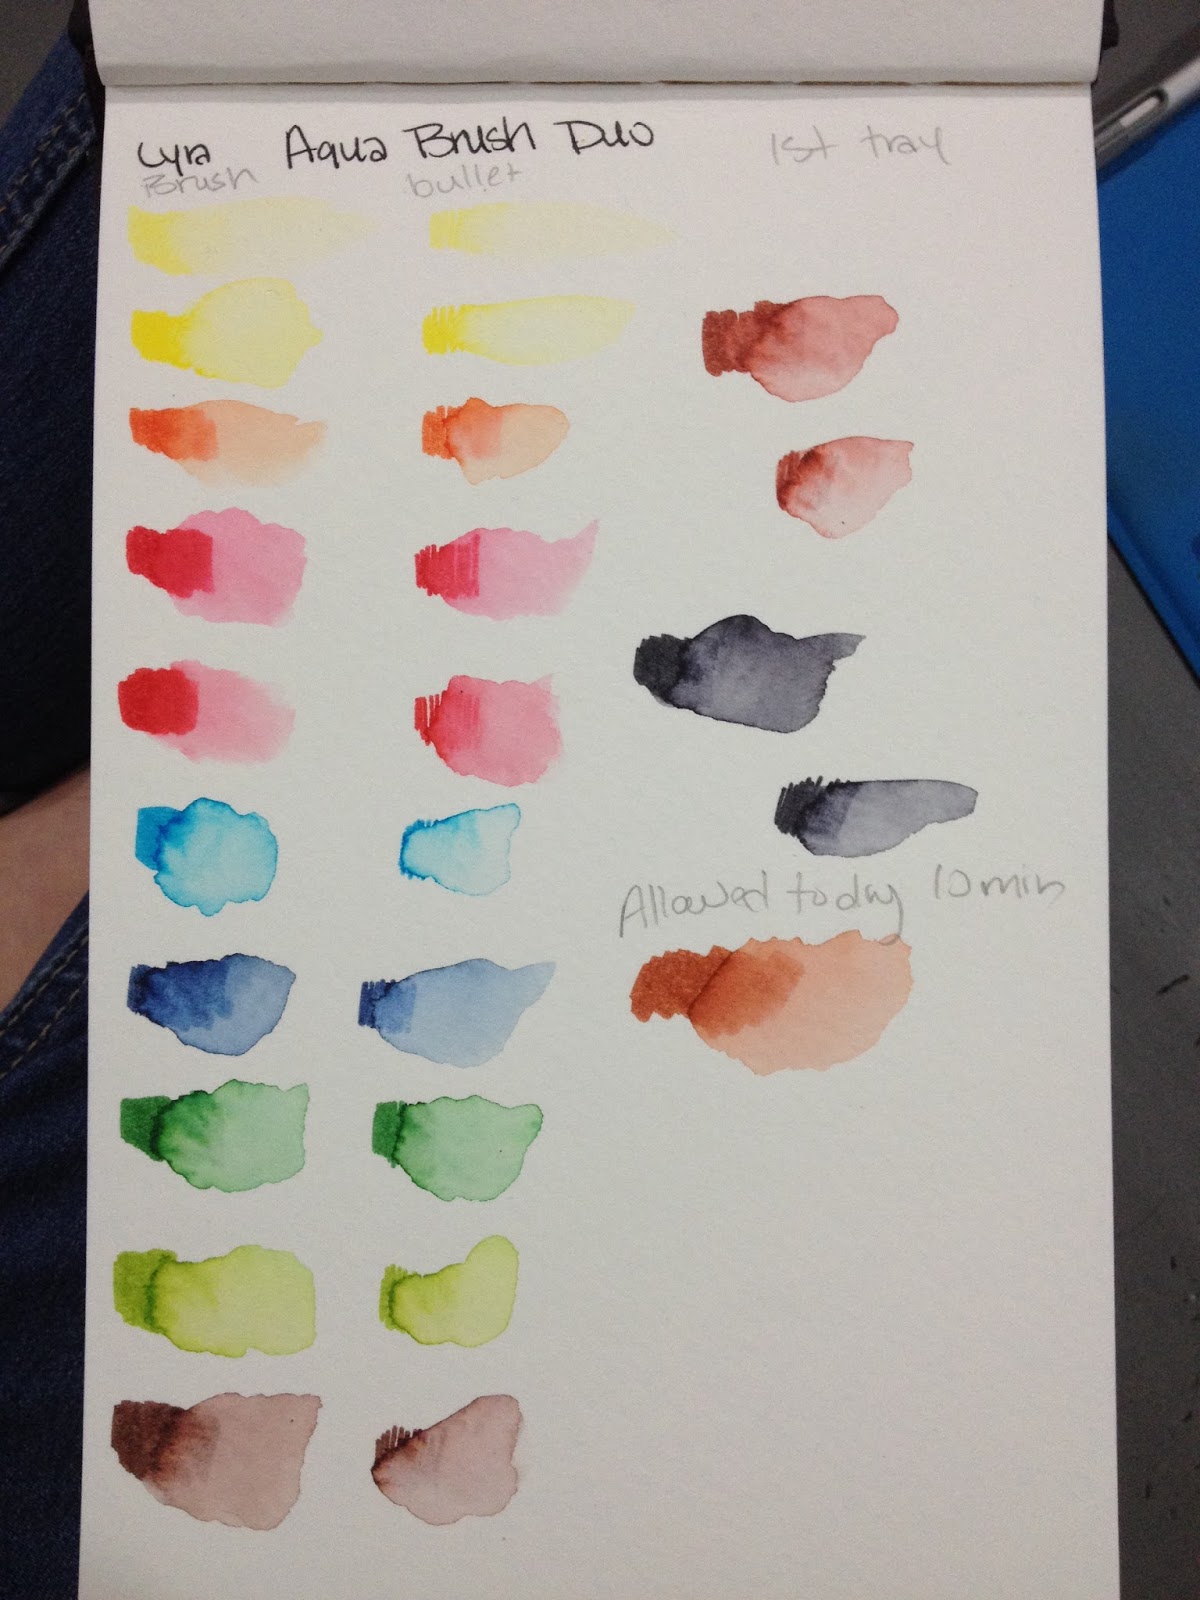
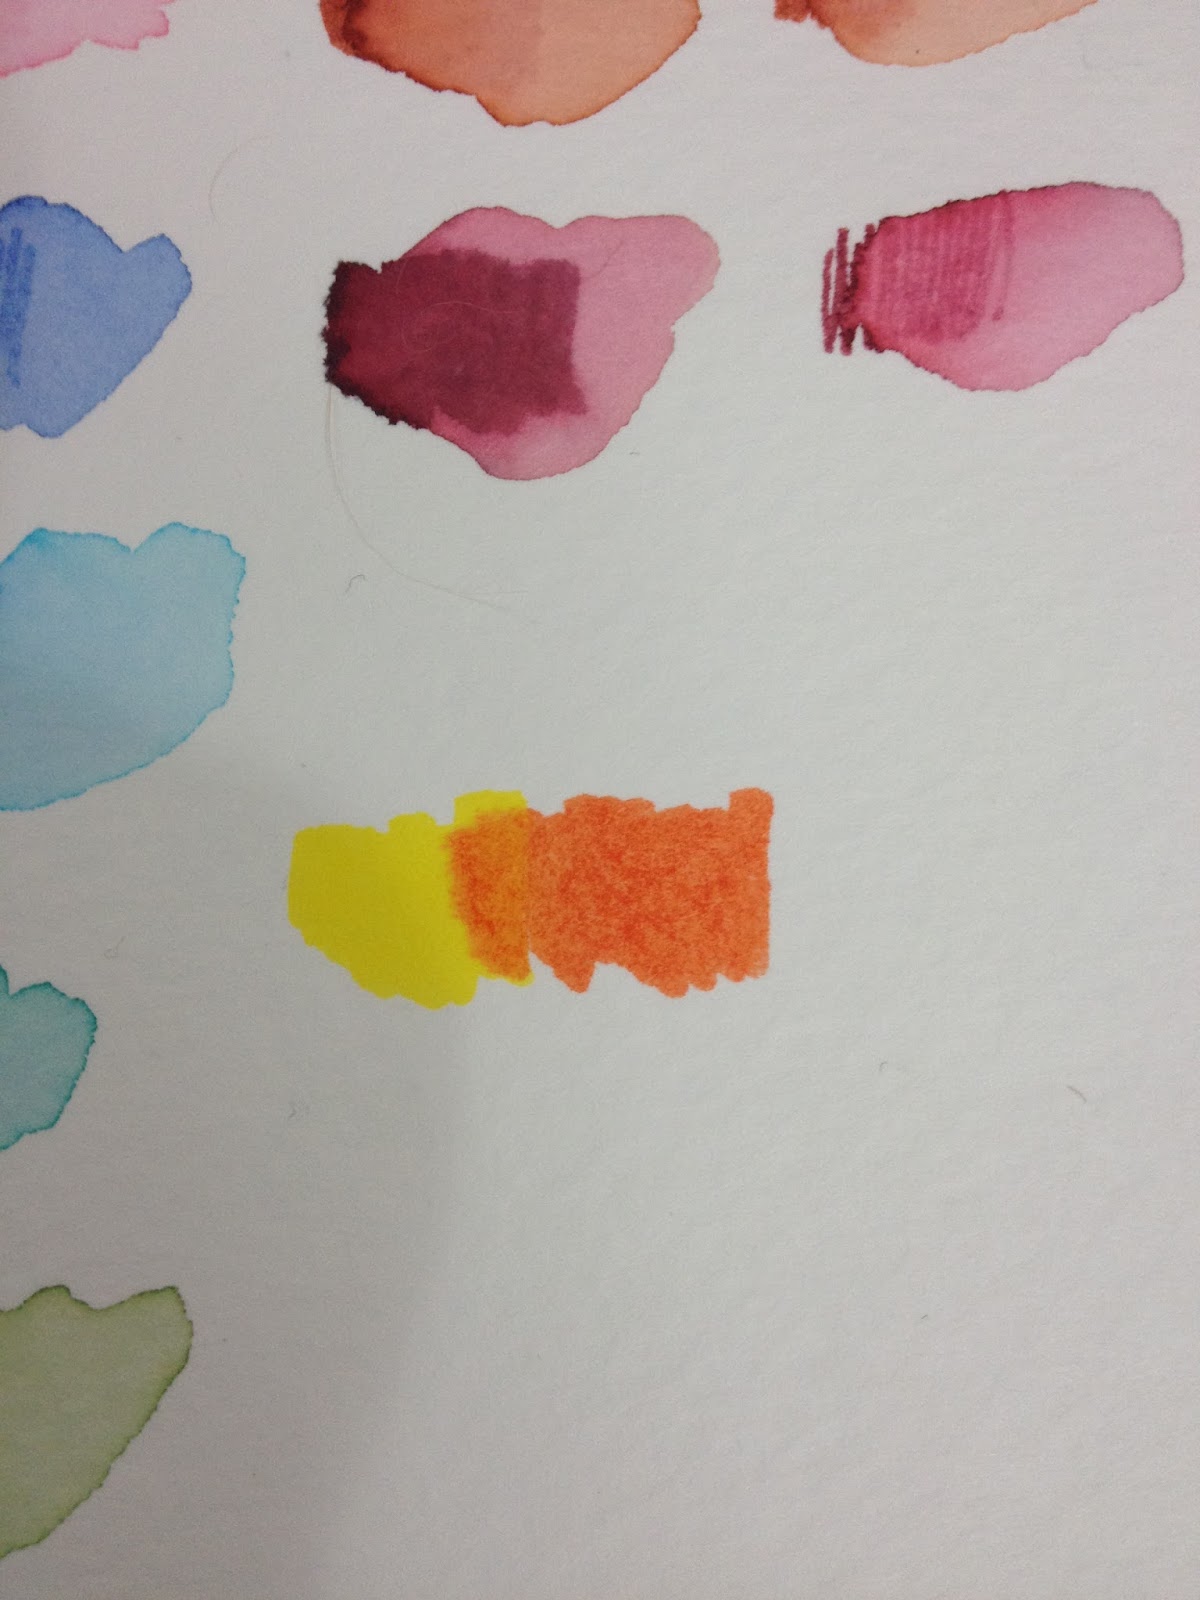
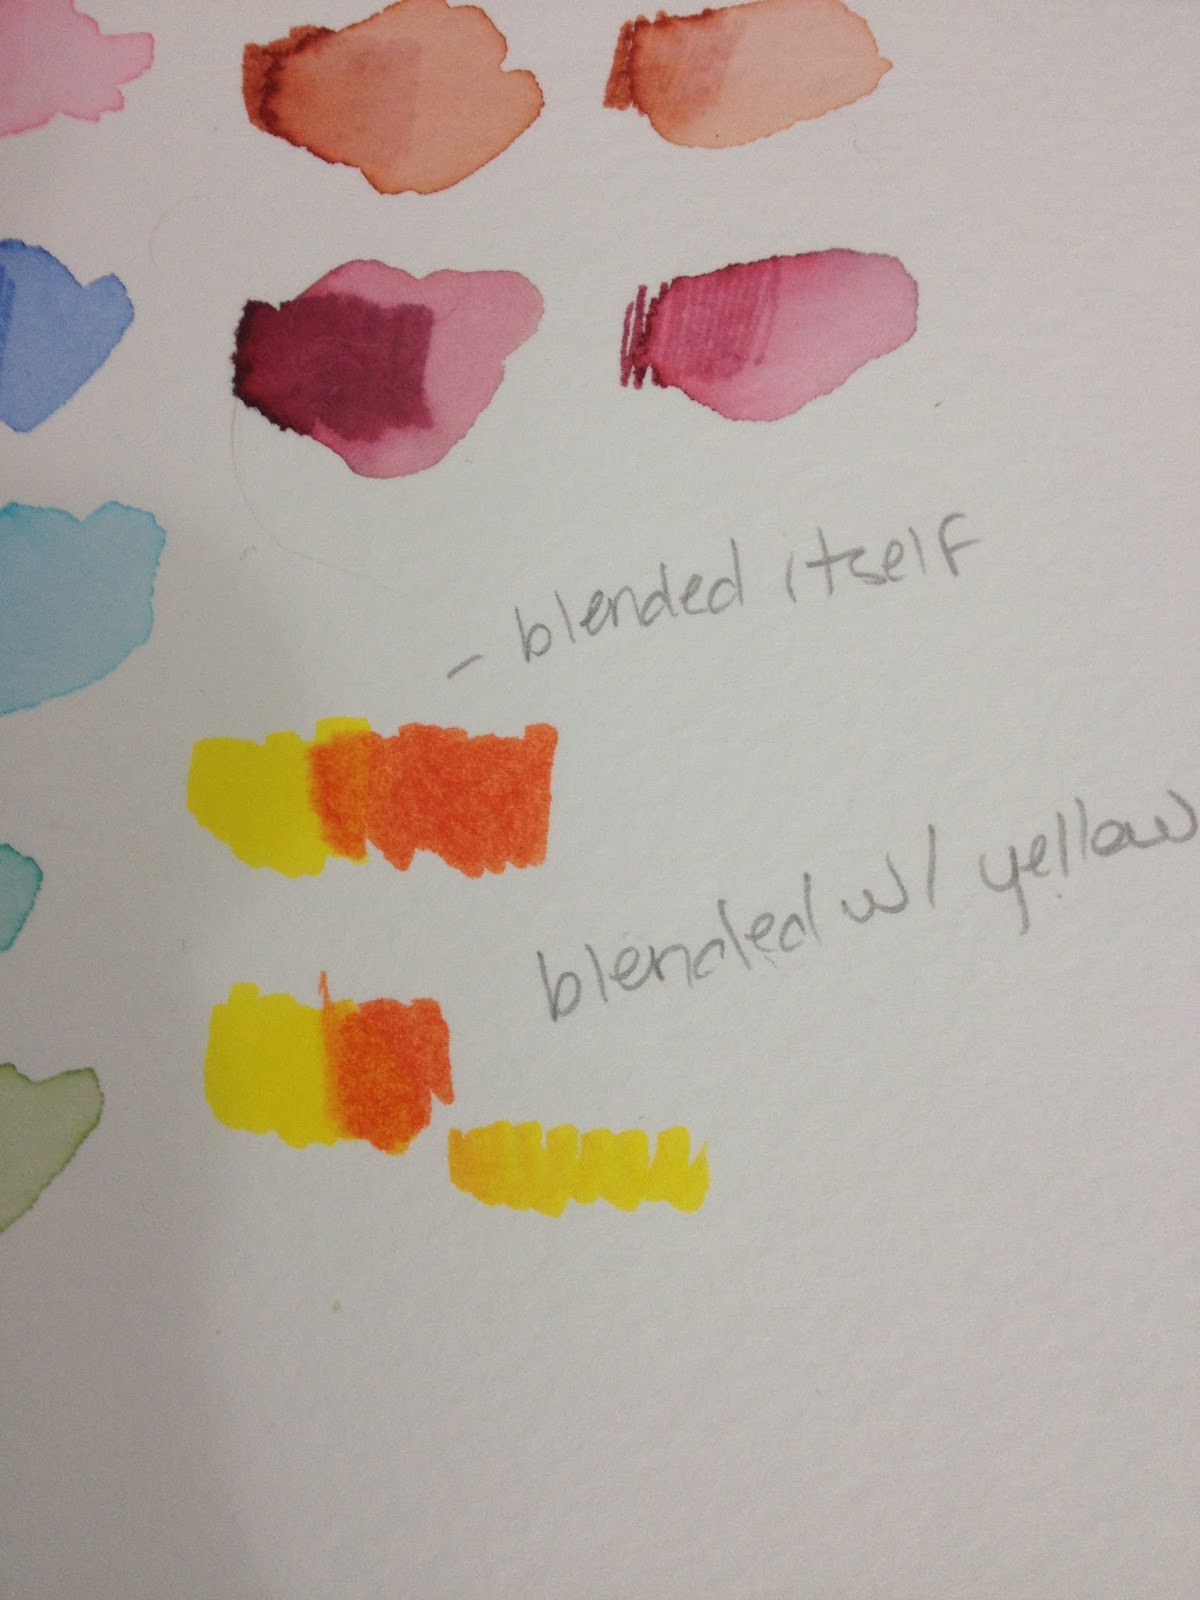
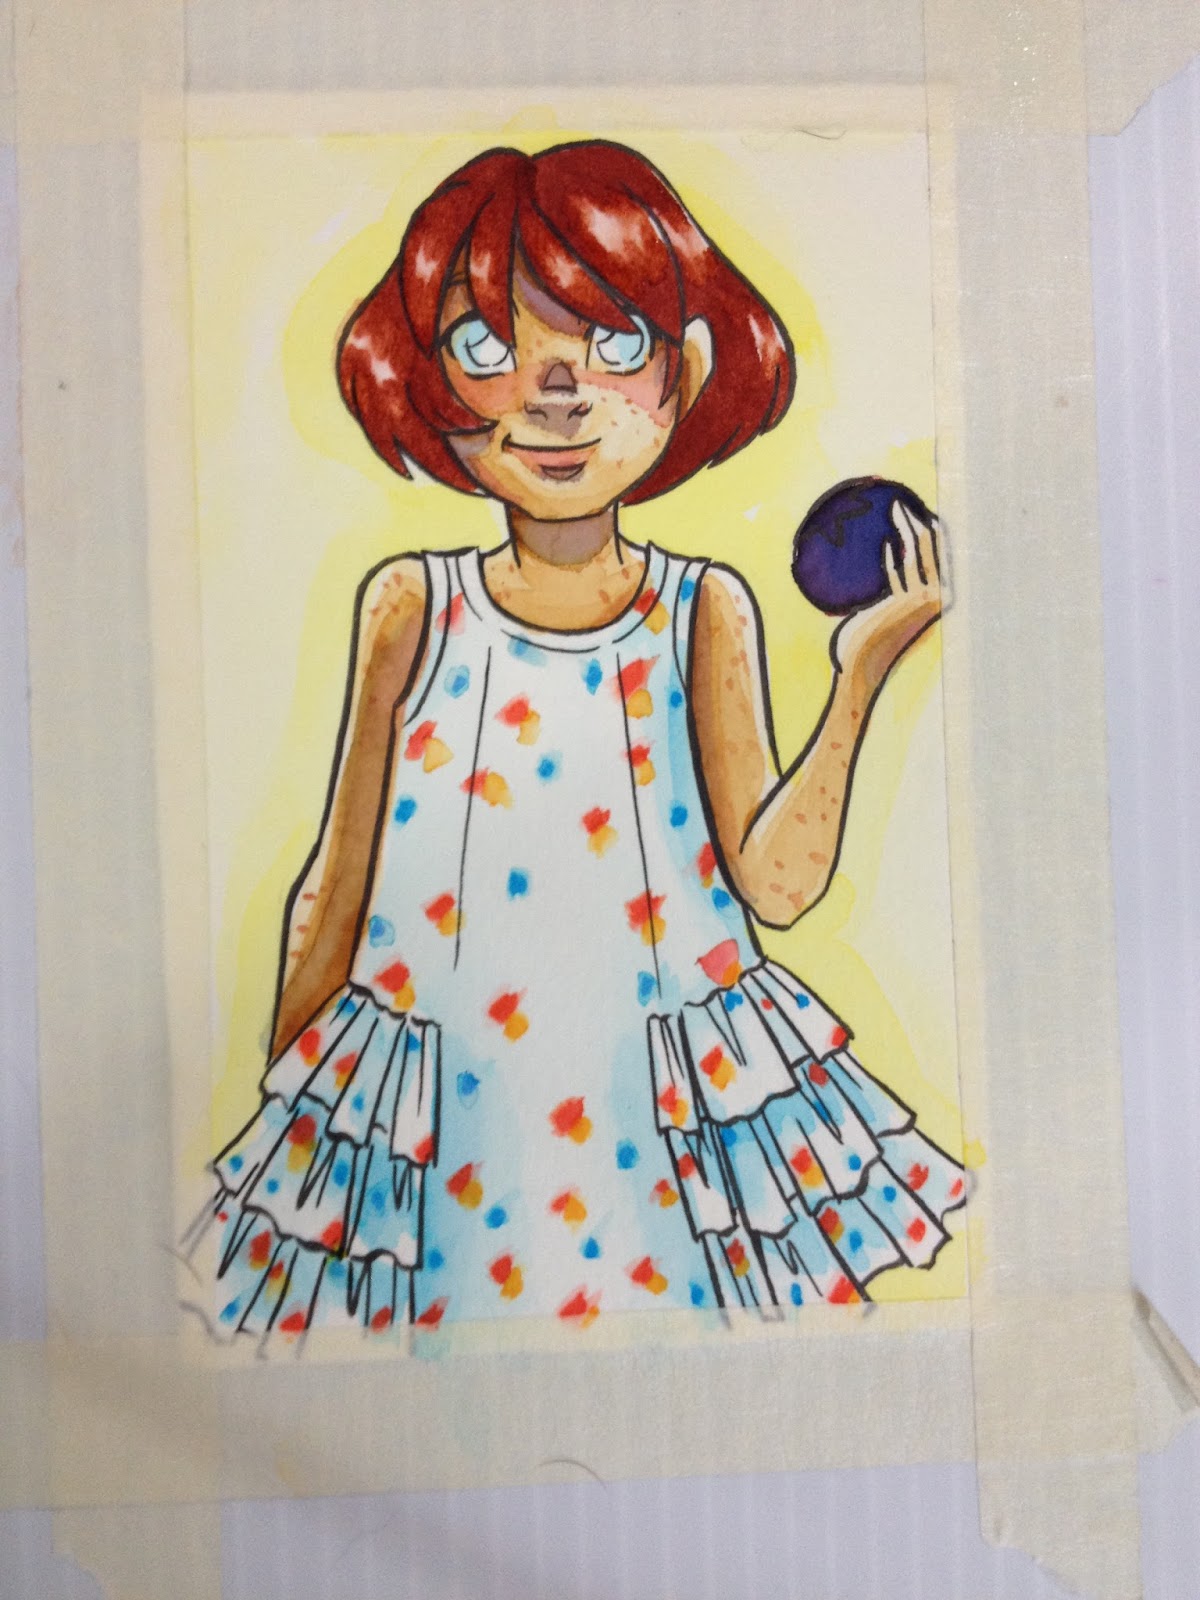
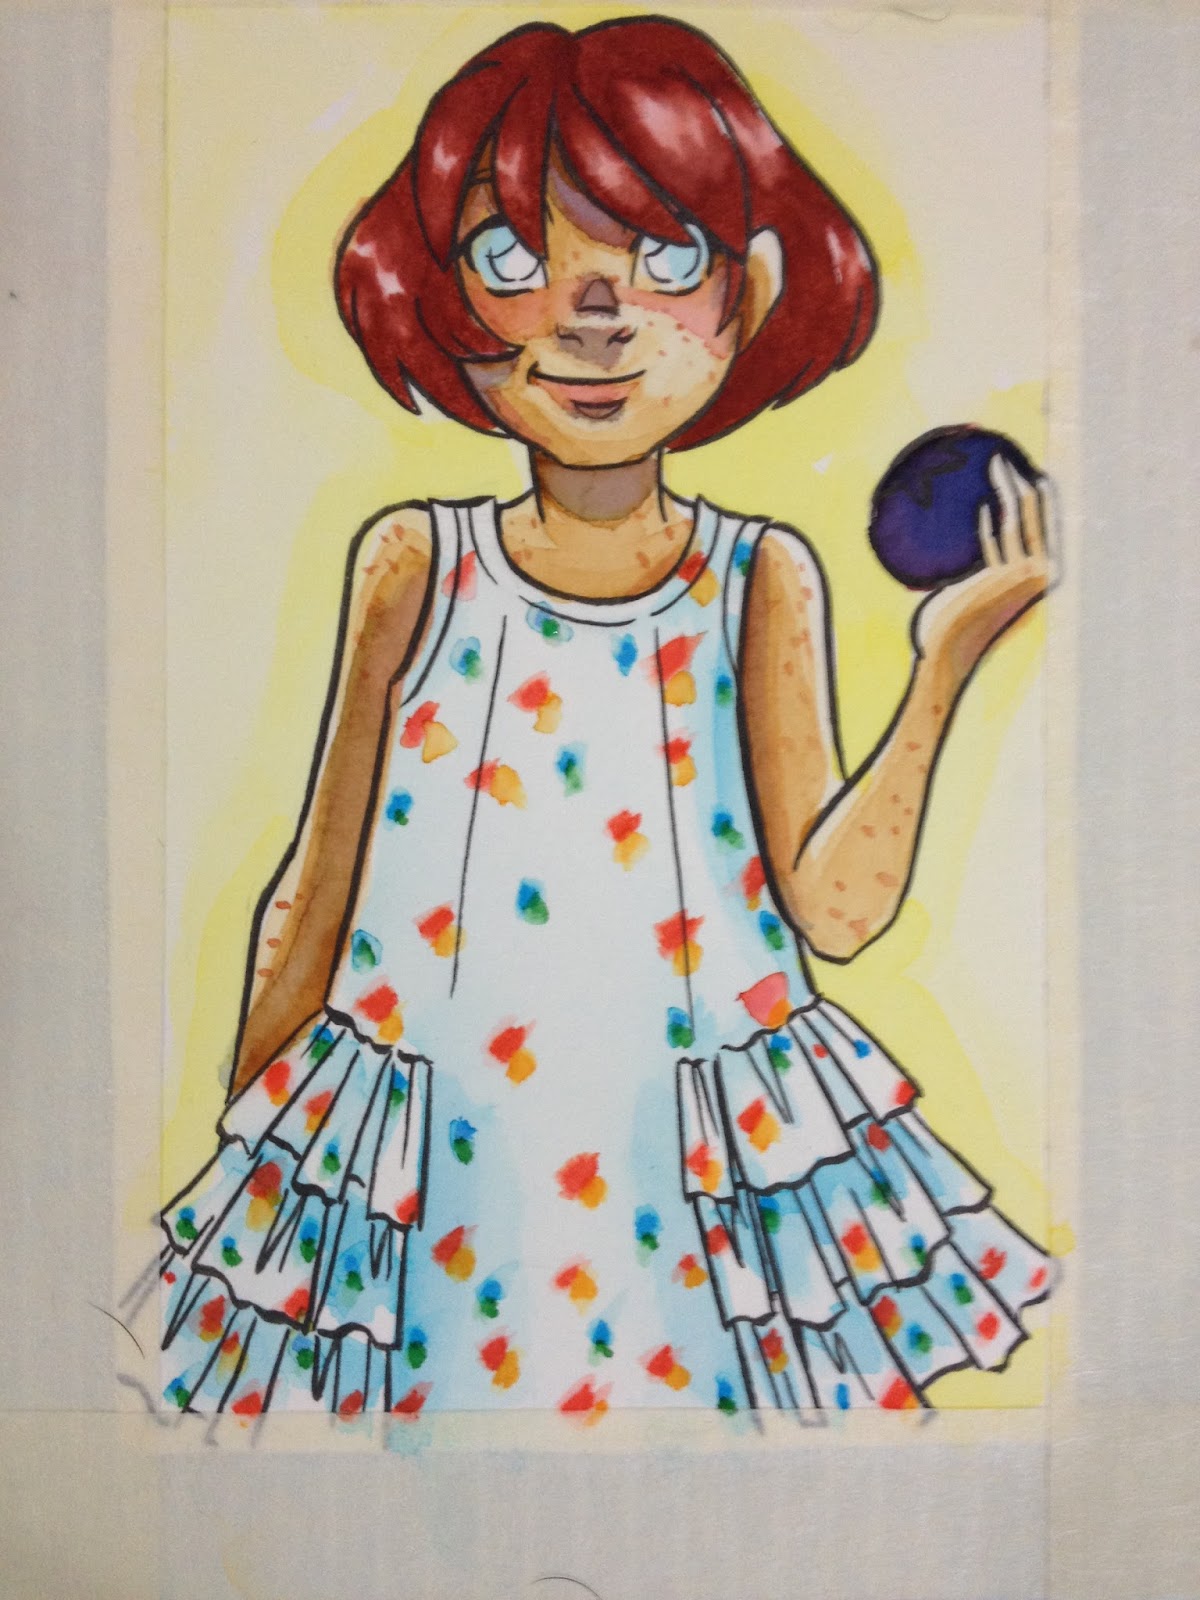
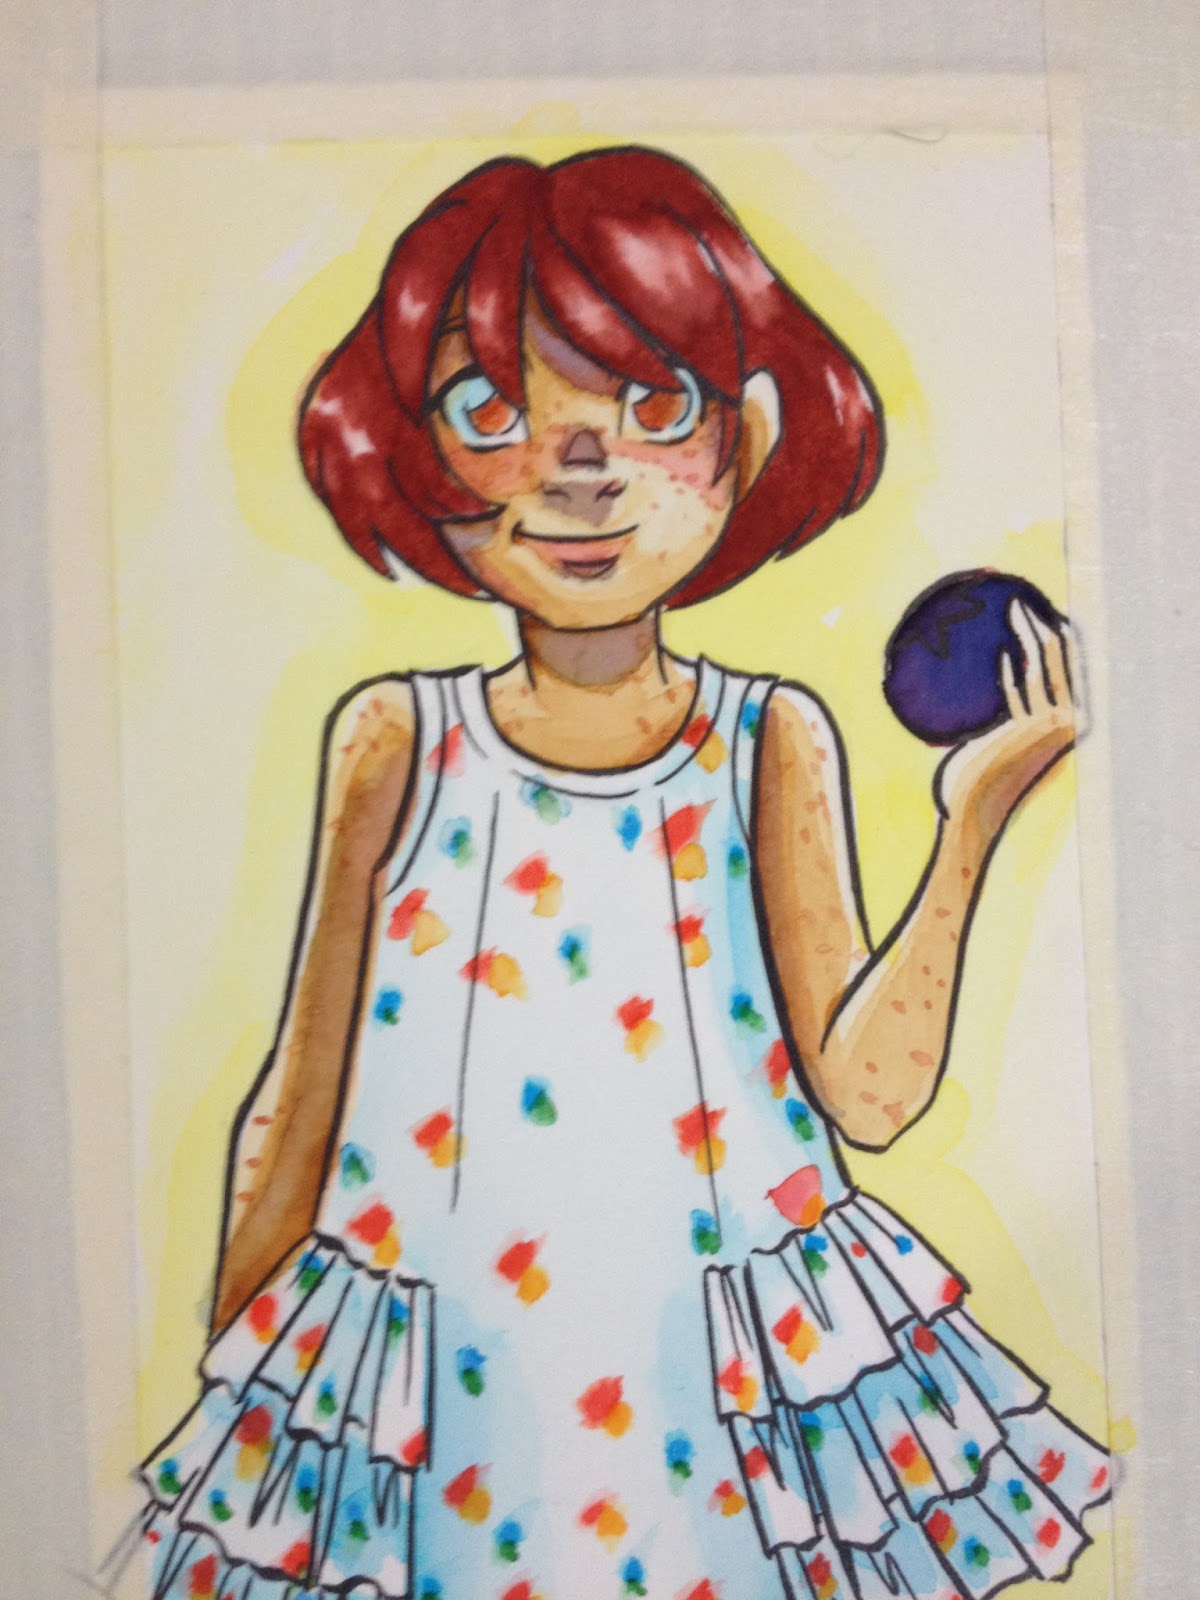
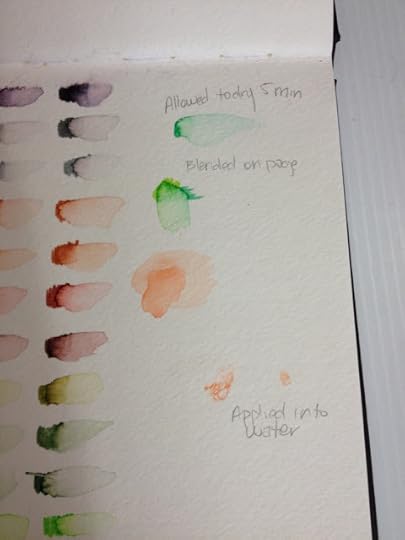
Markers were blended so that the yellow and the orange were just barely touching. These markers self blend quite easily without the need for water or a blending marker.

And these were blended into each other a little bit, and then I used the yellow to blend into the red. Beneath that is me cleaning the brush, demonstrating yet another blending technique.

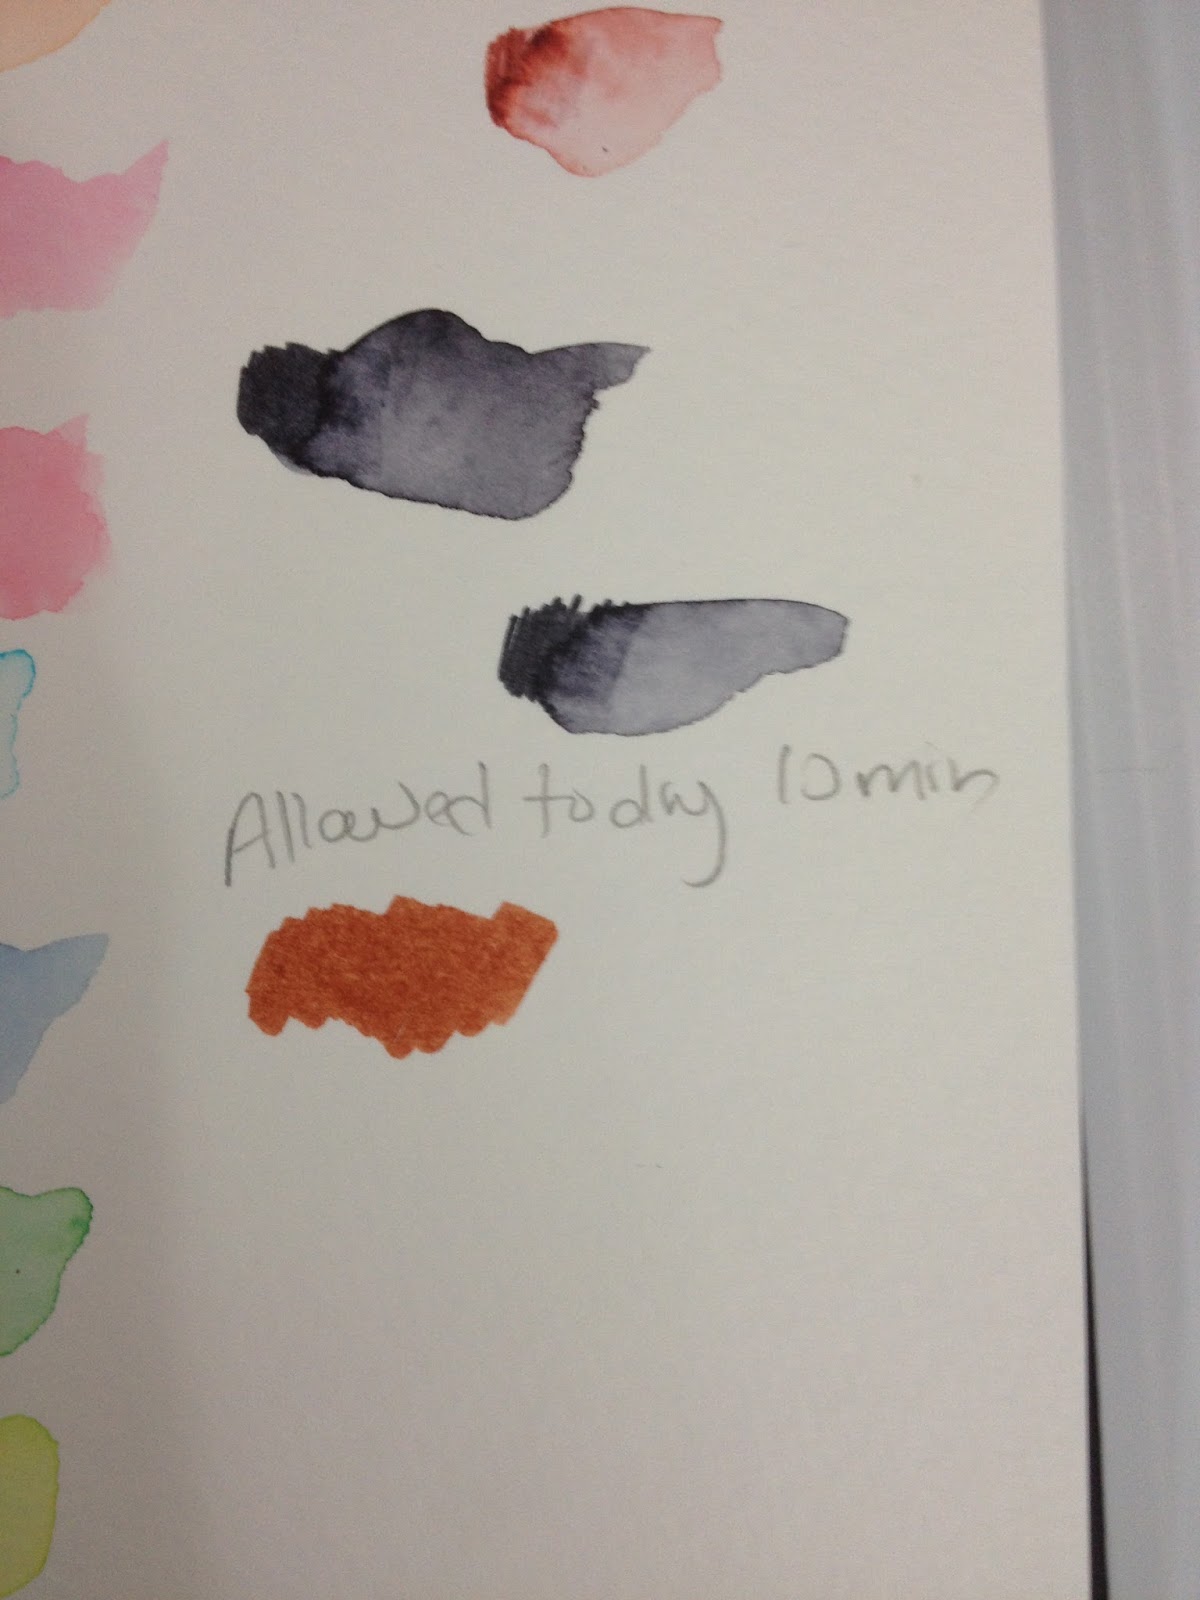
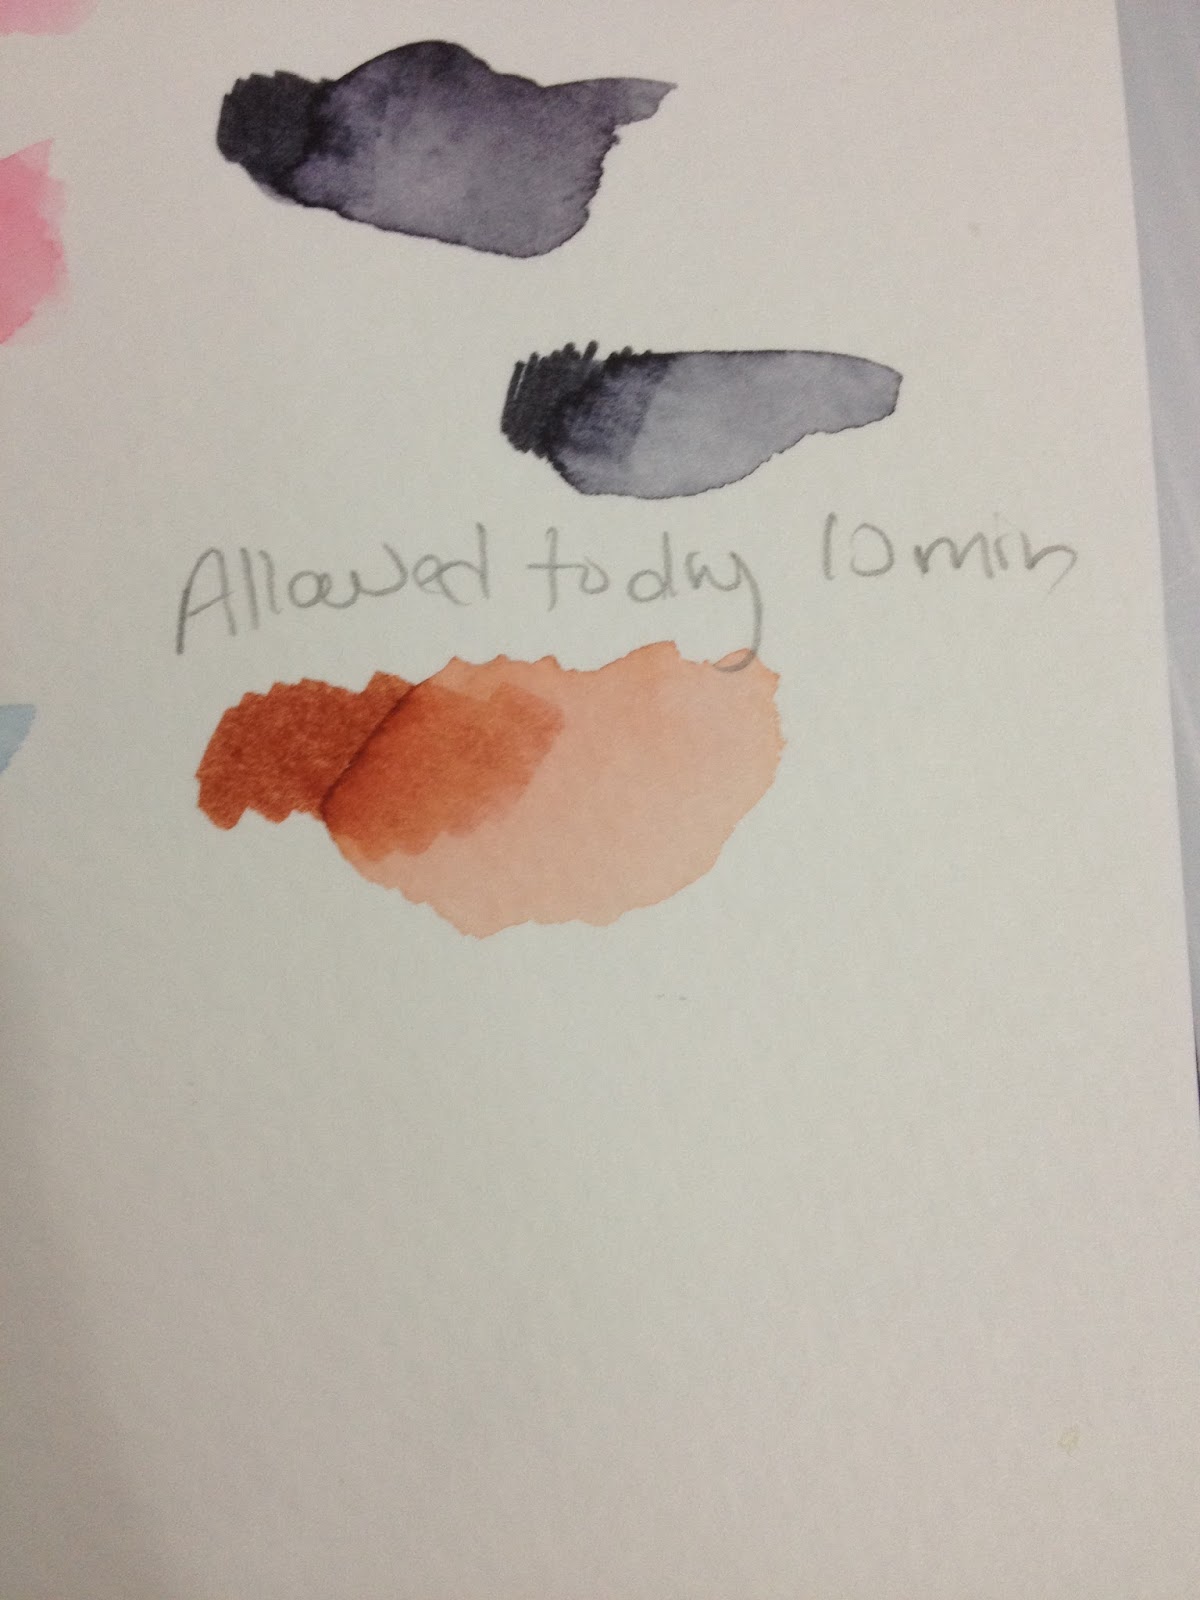
The brown swatch was allowed to fully dry for ten minutes.


Although it's harder to blend out the marker after it has been allowed to dry, it still releases a fair amount of pigment with very little effort.

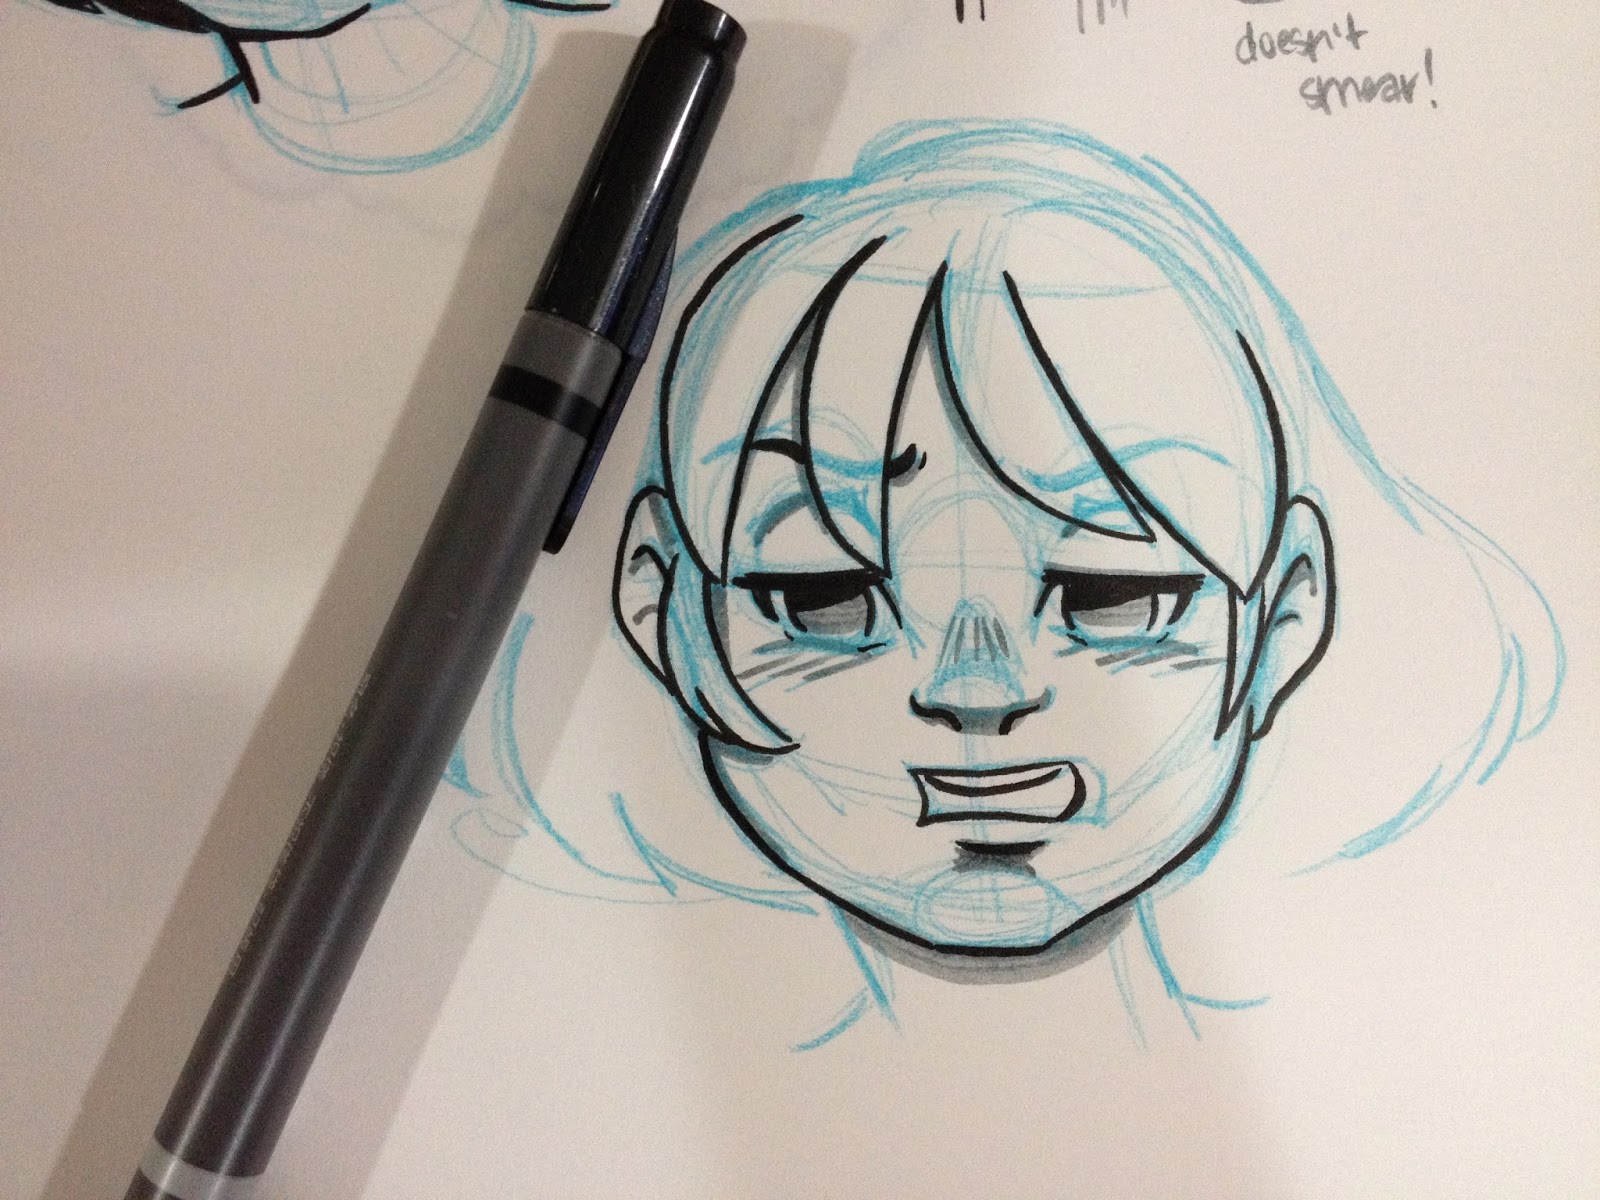
These pens are so slick, it's a little hard to get them uncapped quickly, so if you're trying to do a time sensitive technique, keep that in mind. The conical brush reminds me of the Letraset Flexmarker and Aqua marker, and while it isn't as flexible as I'd like, so far it performs decently well, and is fairly juicy. The colors require very little scrubbing to activate them (except for the blues), and the amount of color released is fairly generous. The color from the bullet and brush ends is consistent, unlike many of Winsor & Newton's Watercolor markers.
Practical Test
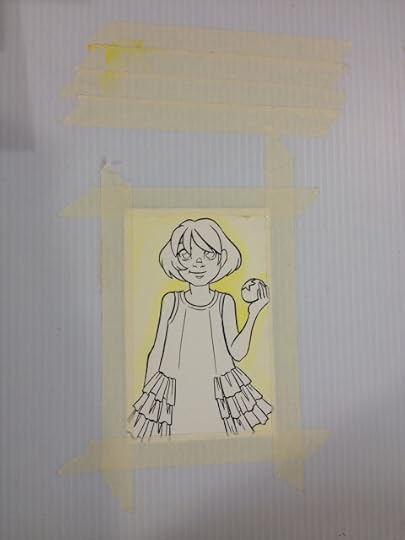
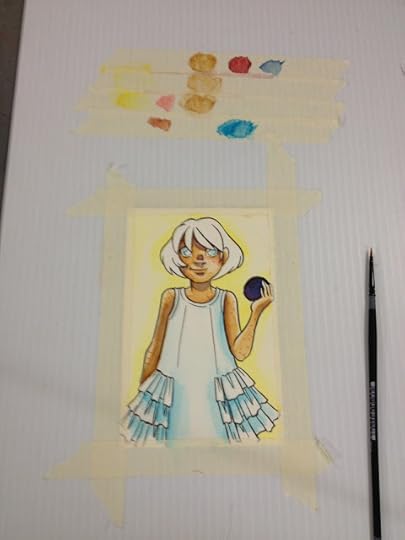
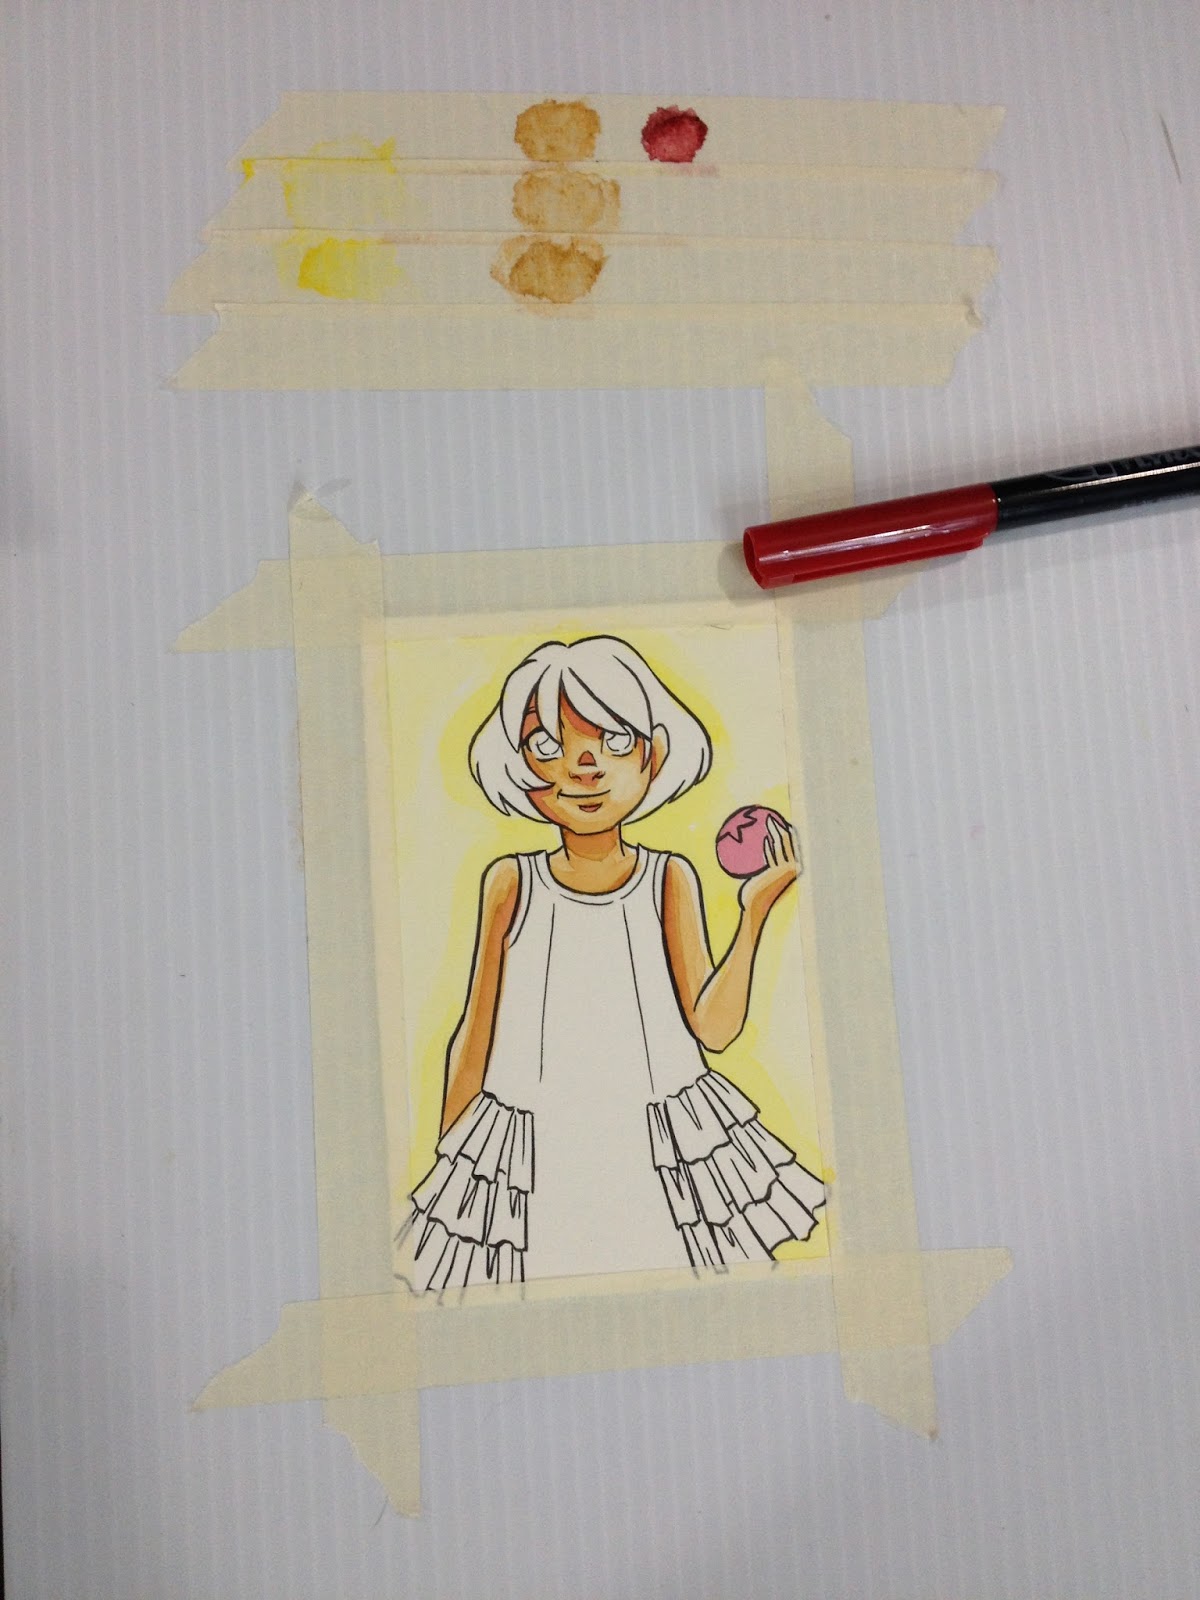
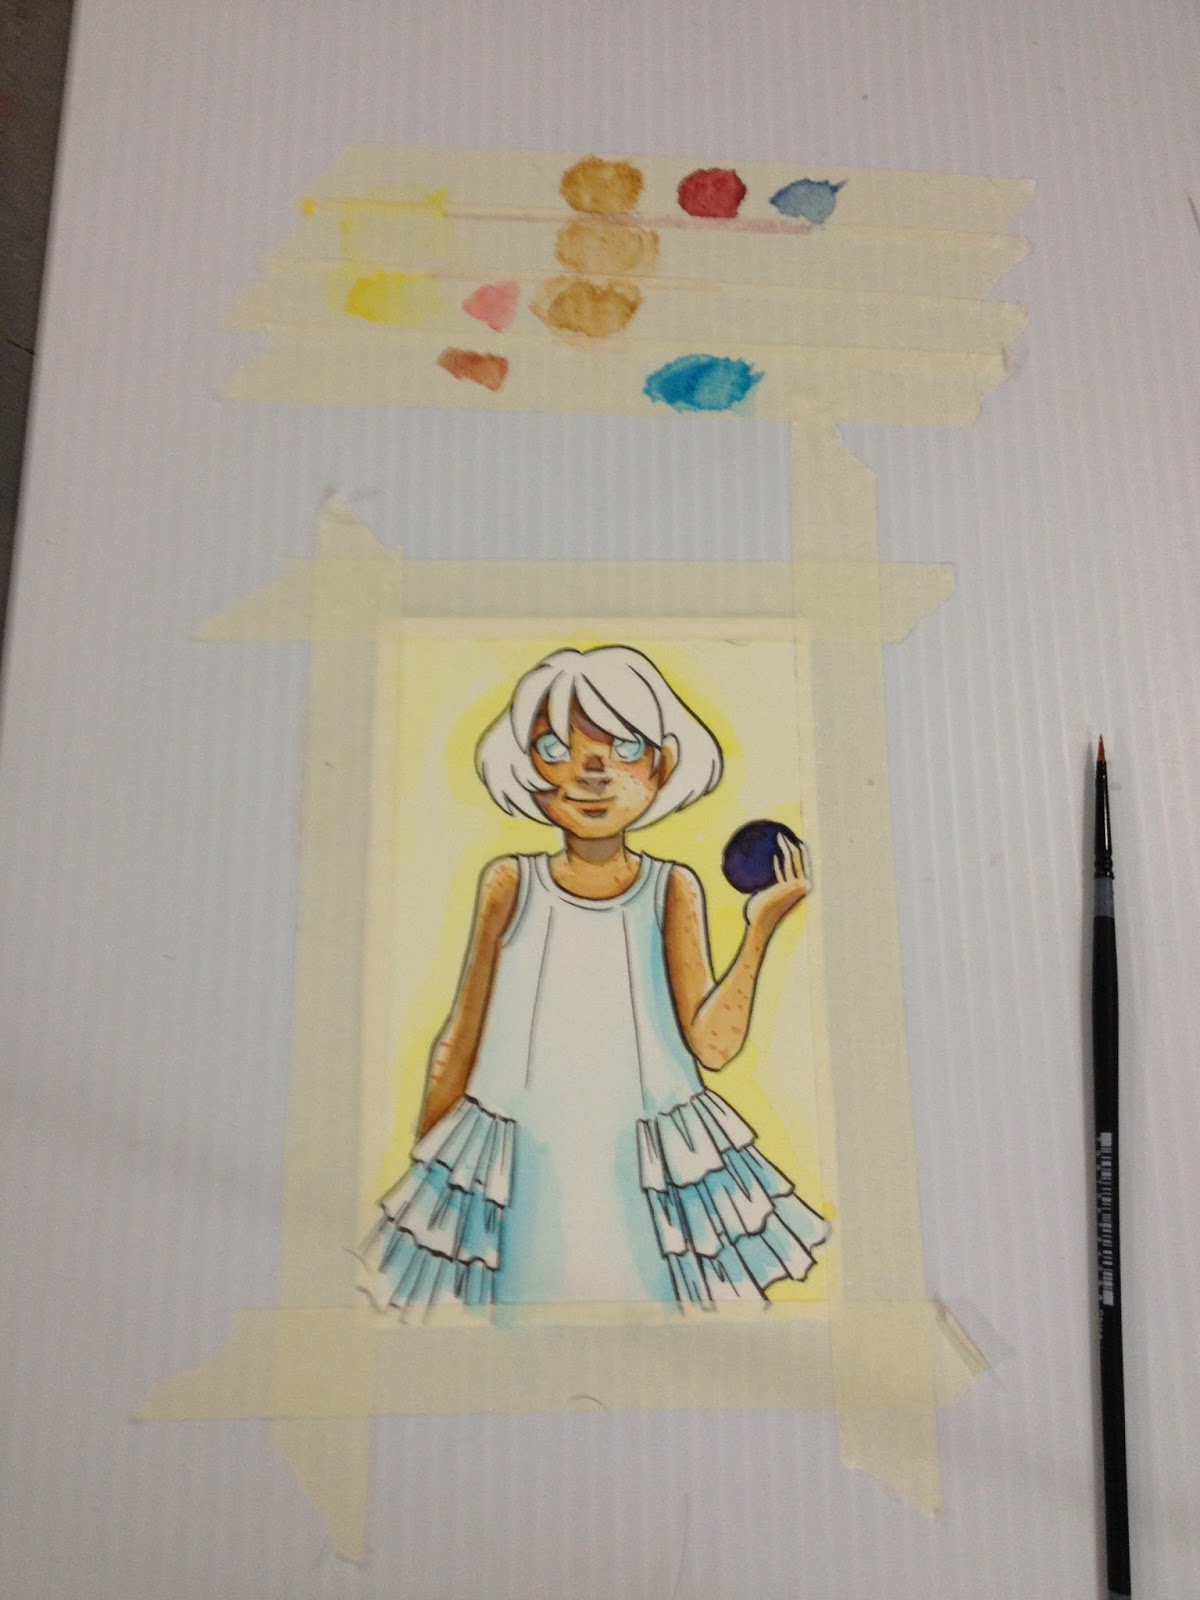
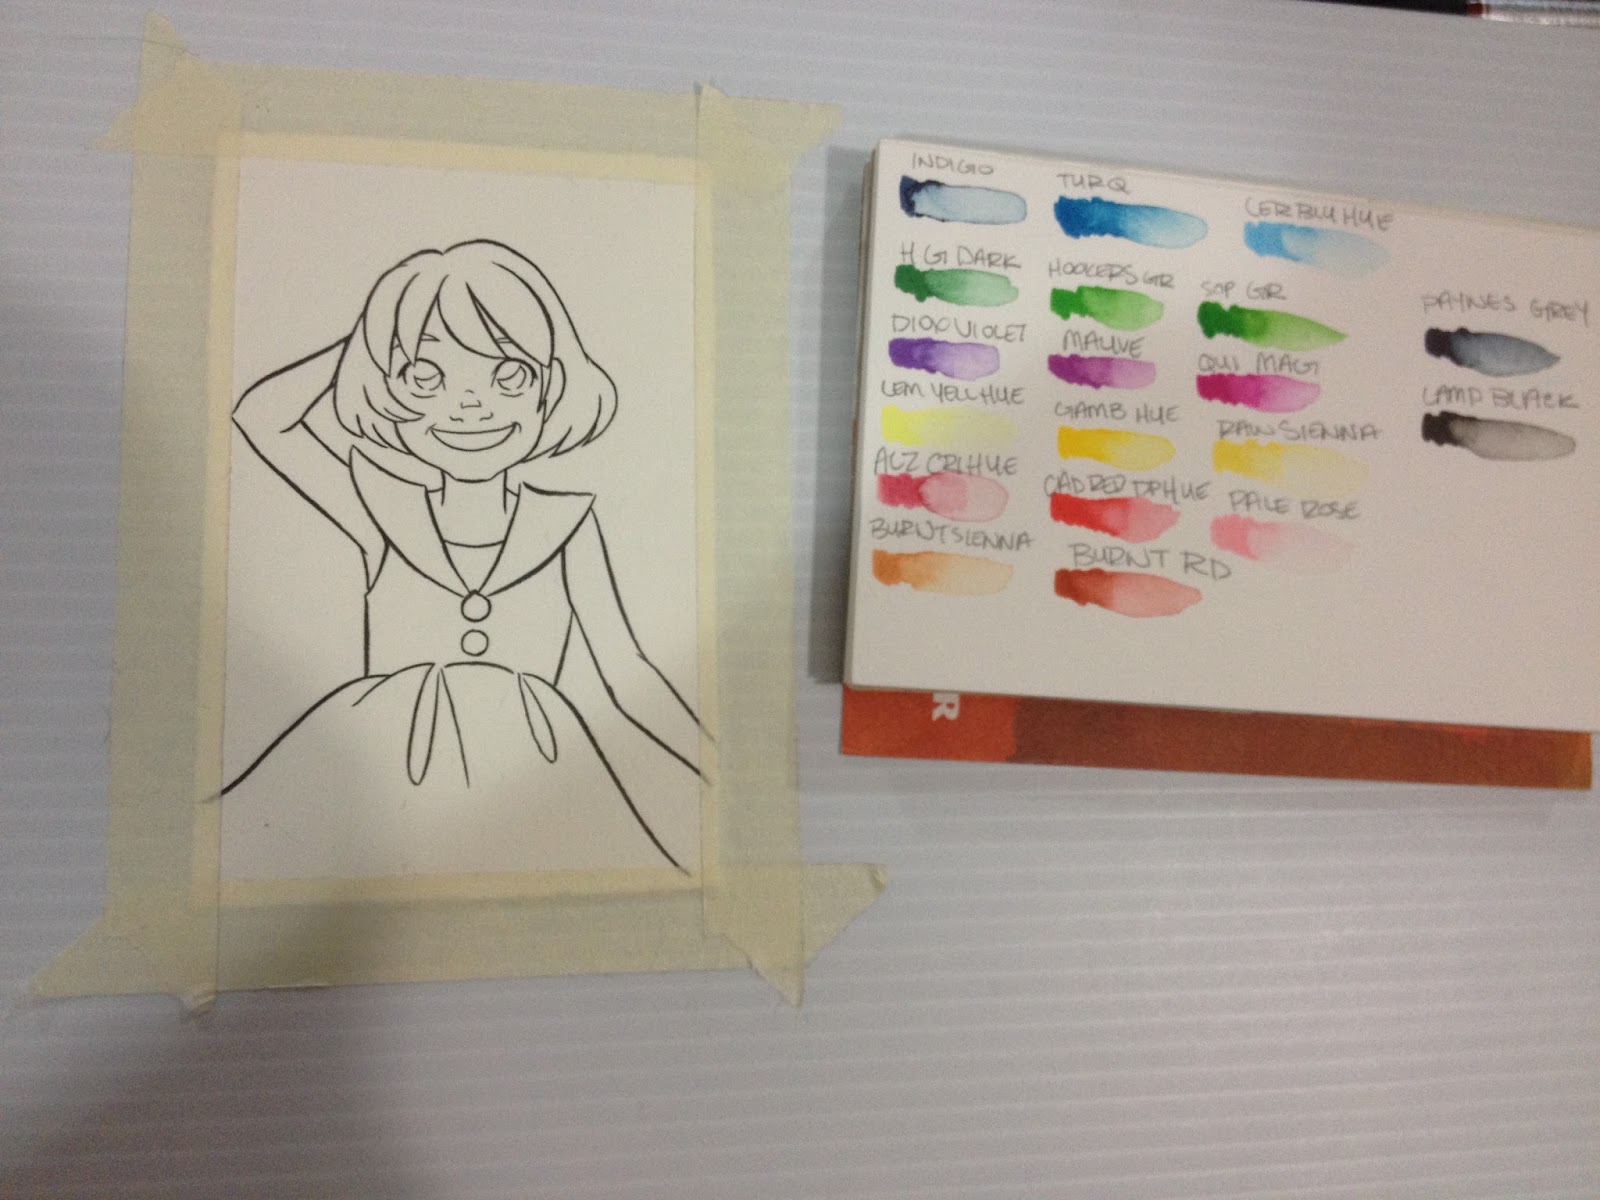
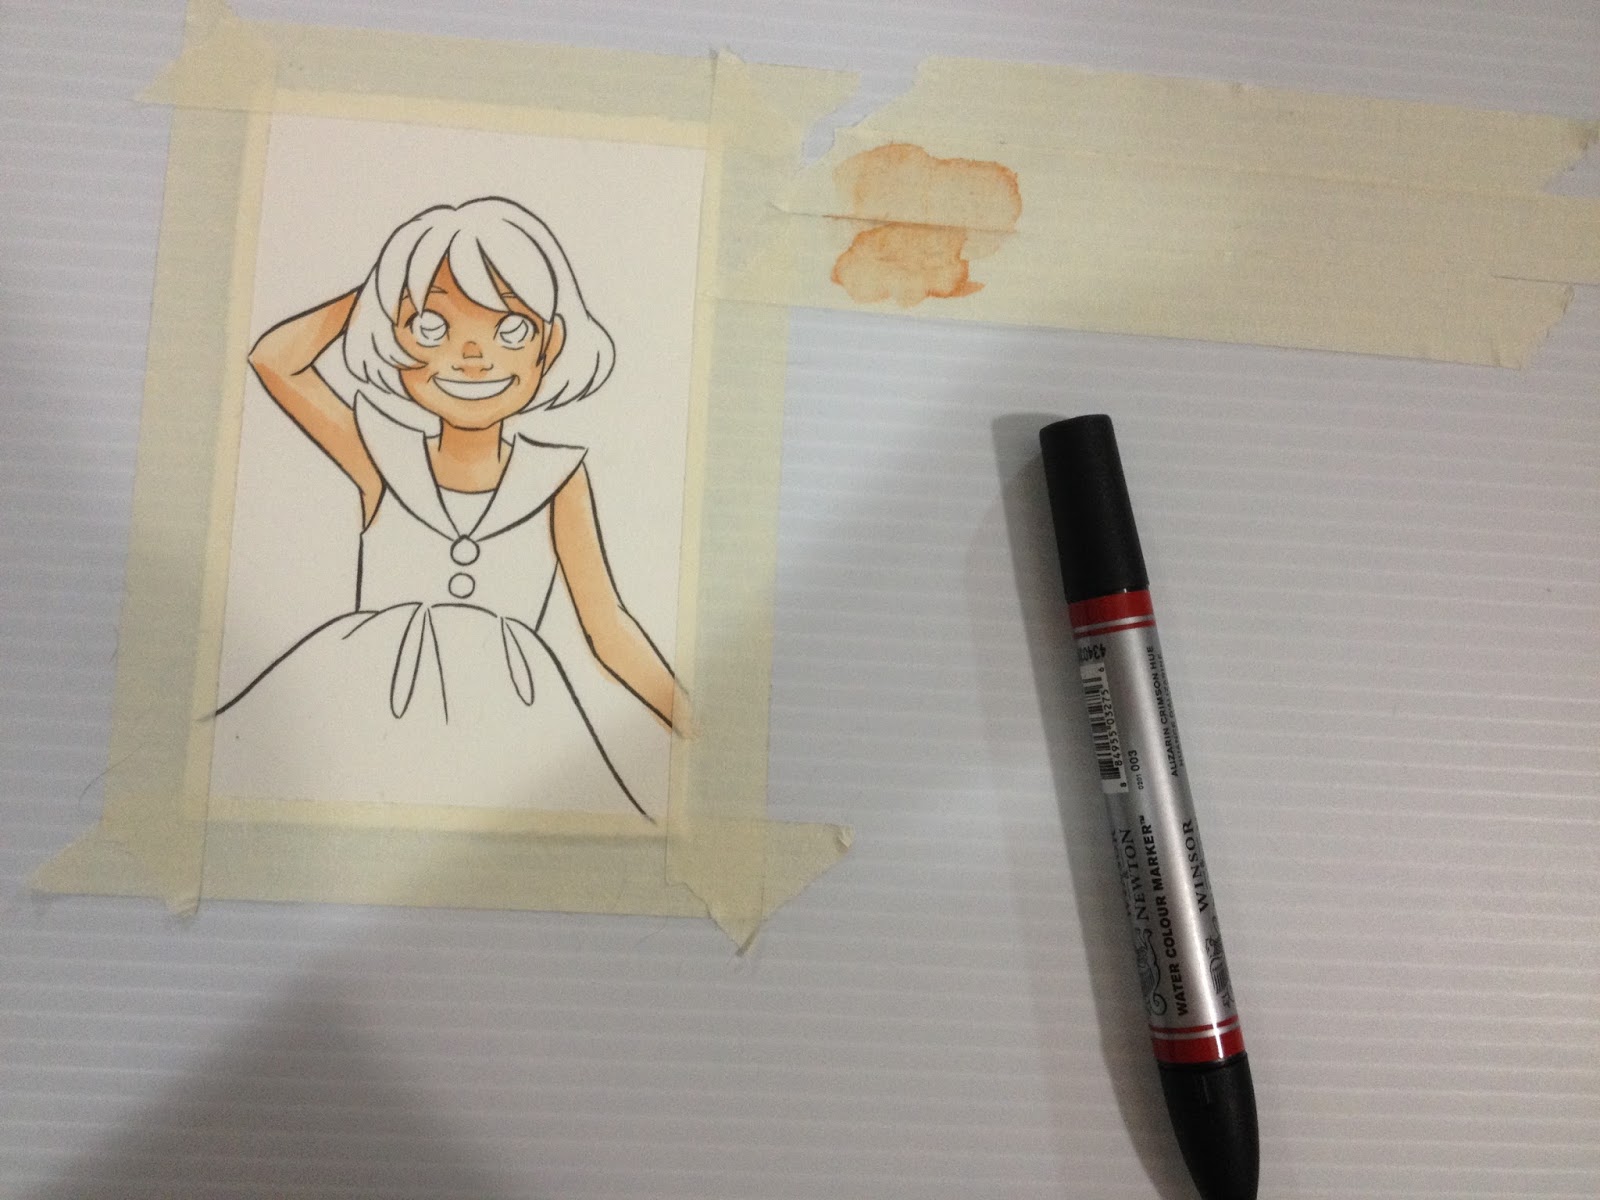
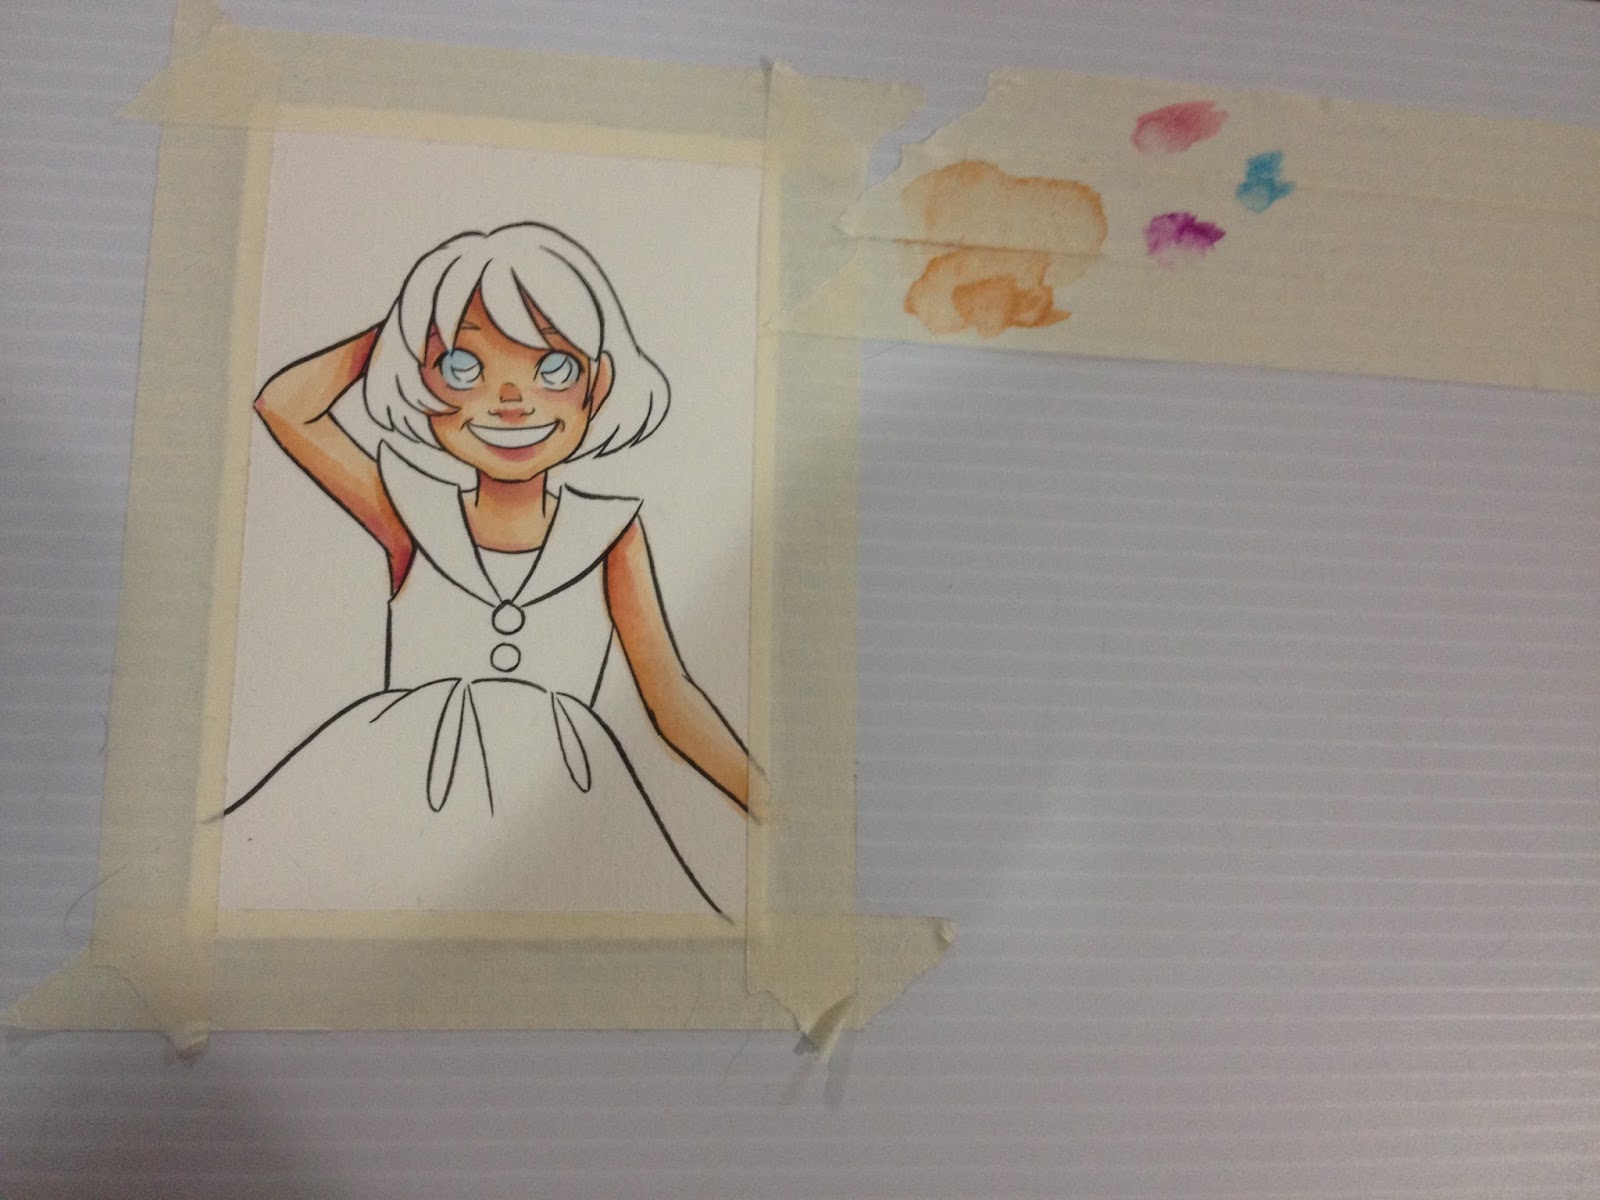
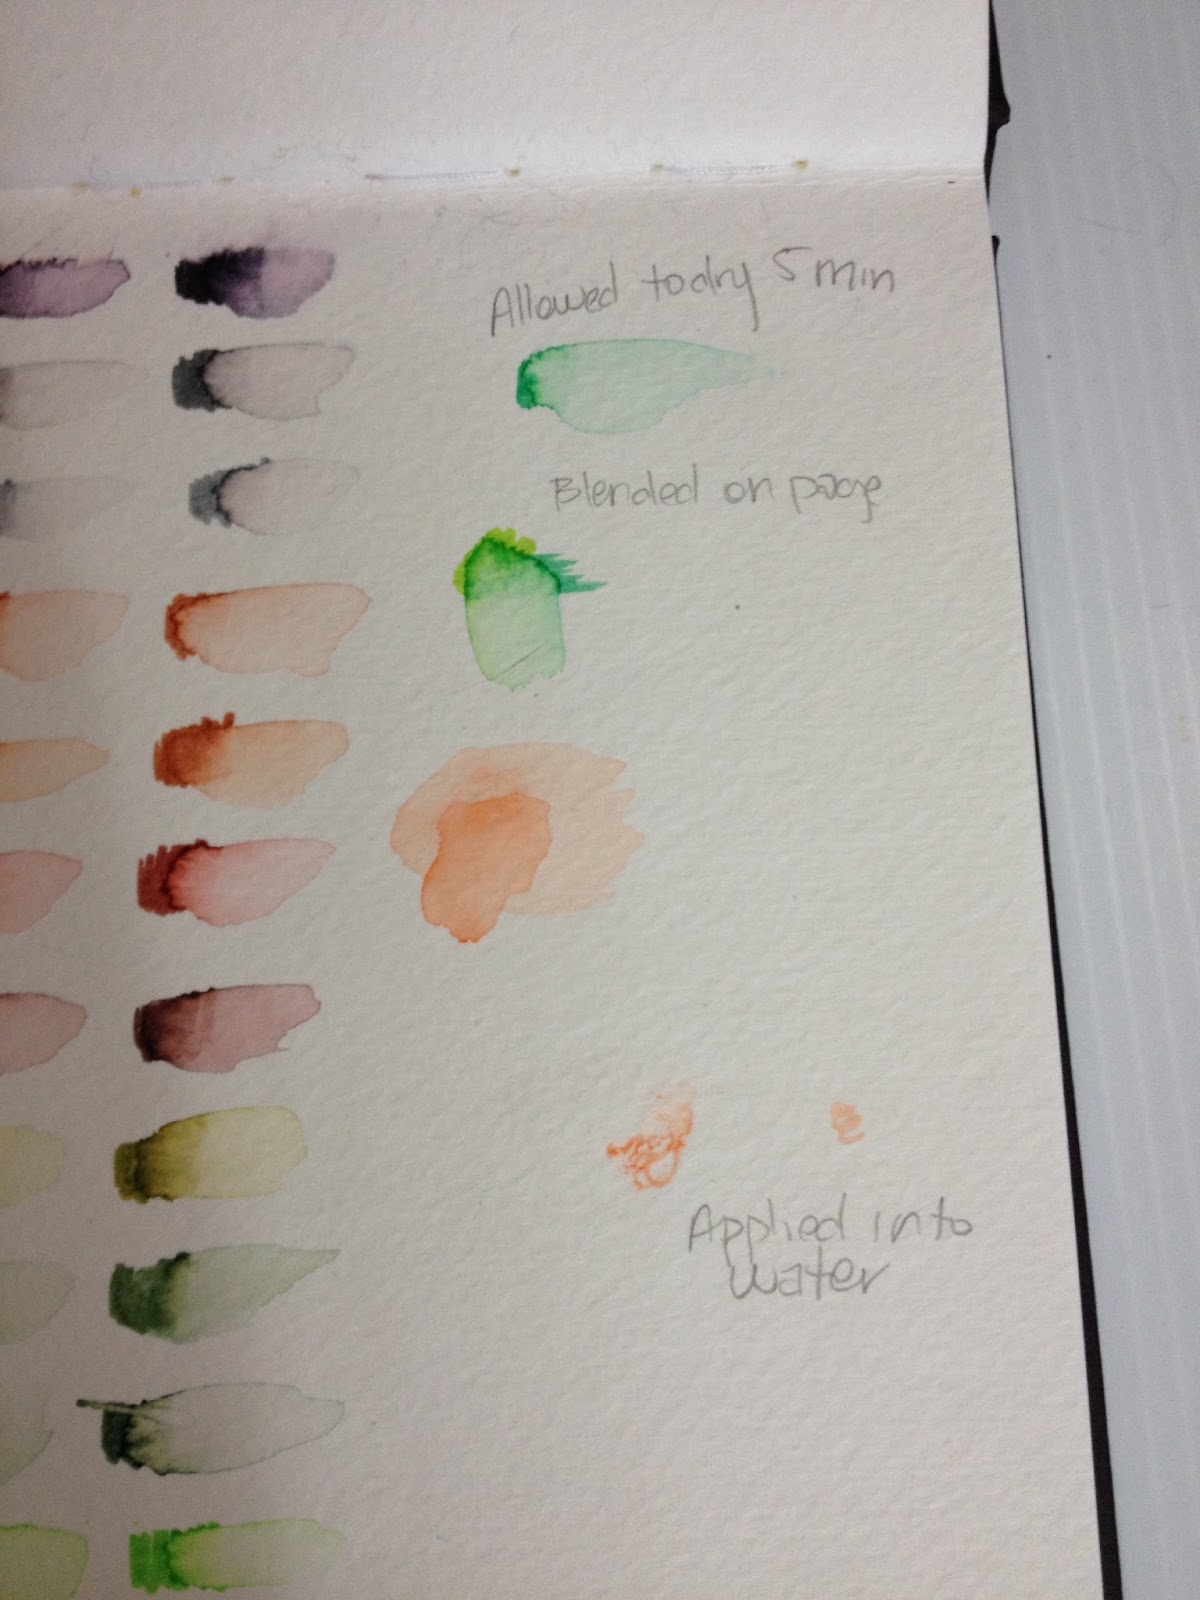
This is what my basic testing setup looks like. I sit on an antifatigue mat so my hips don't take as much pressure as they used to, I have my swatchbook in front of me for color reference, a cup of clean water, masking tape, and the inked test piece. The test piece was inked with a Sailor Mitsuo Aida from Jetpens, and allowed to dry fully overnight before I even erased the pencil lines.


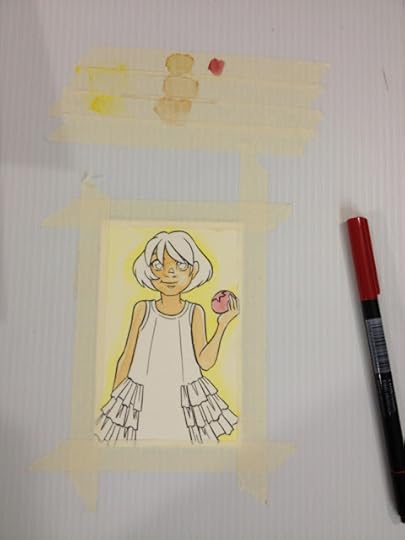


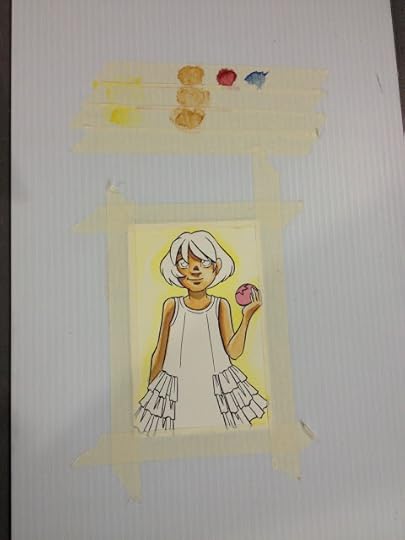


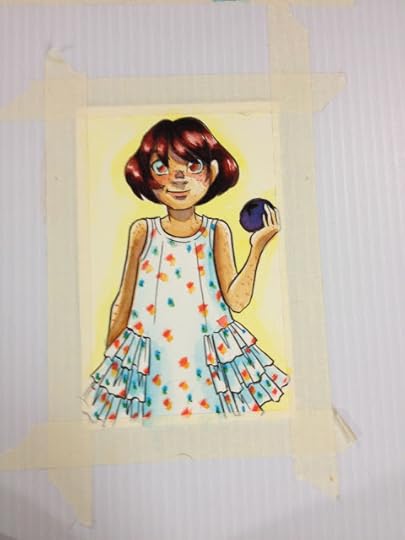
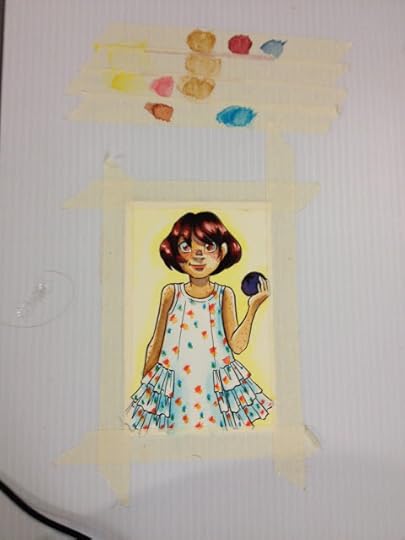

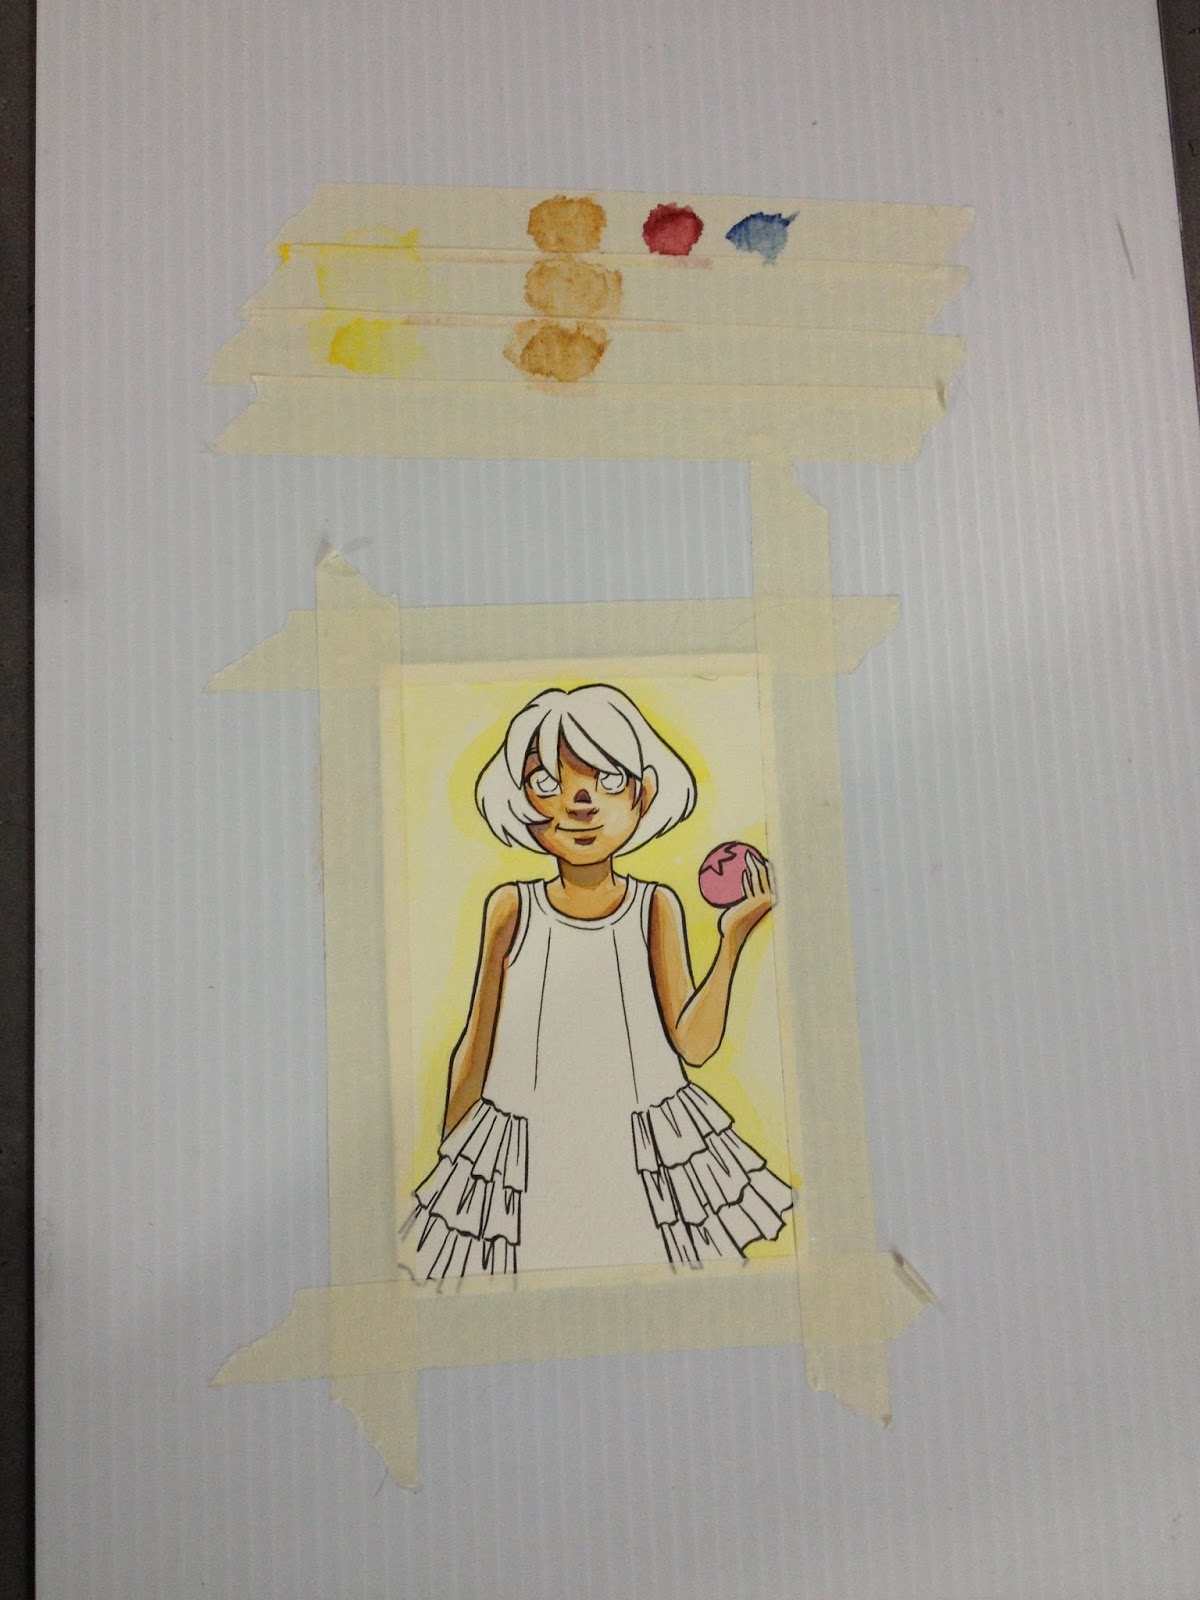
The color dispersion is fairly generous, even when applied to my impromptu masking tape palette.
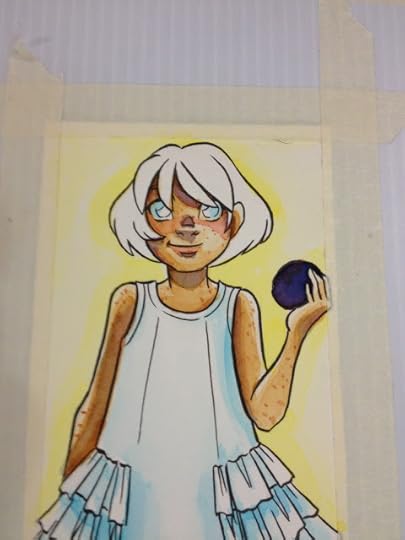
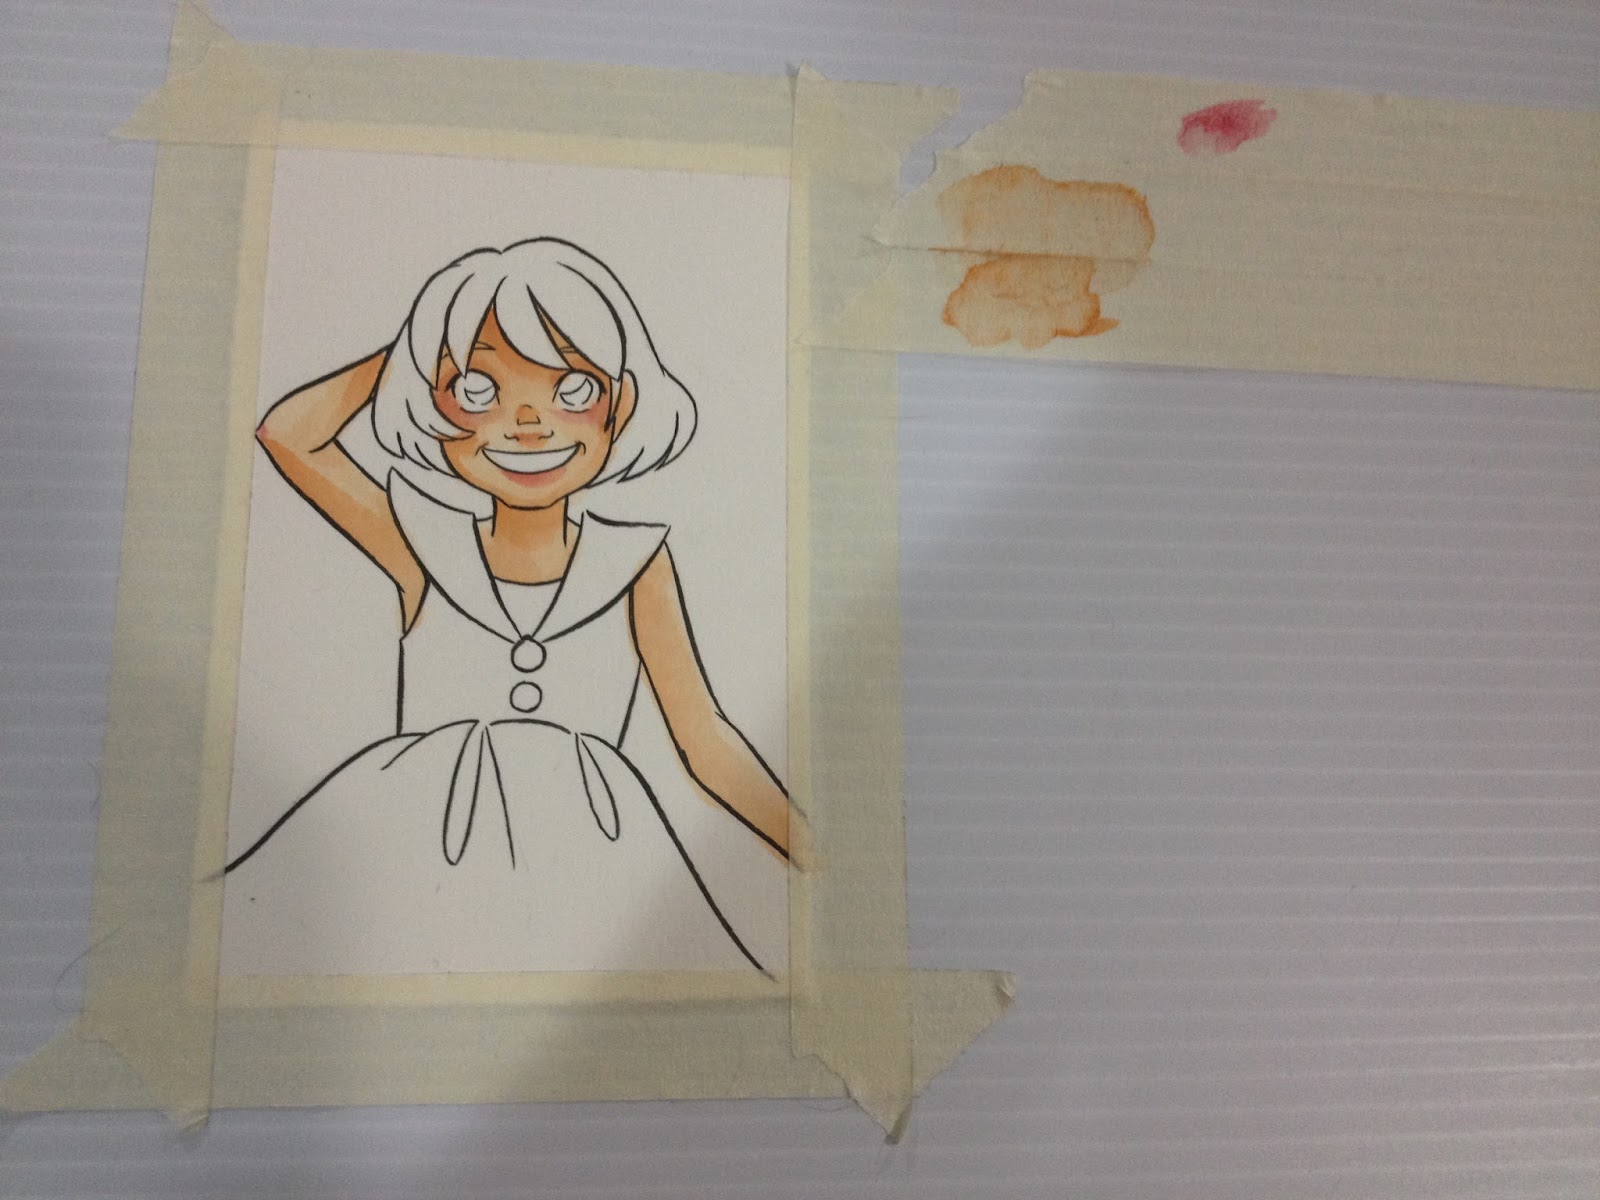
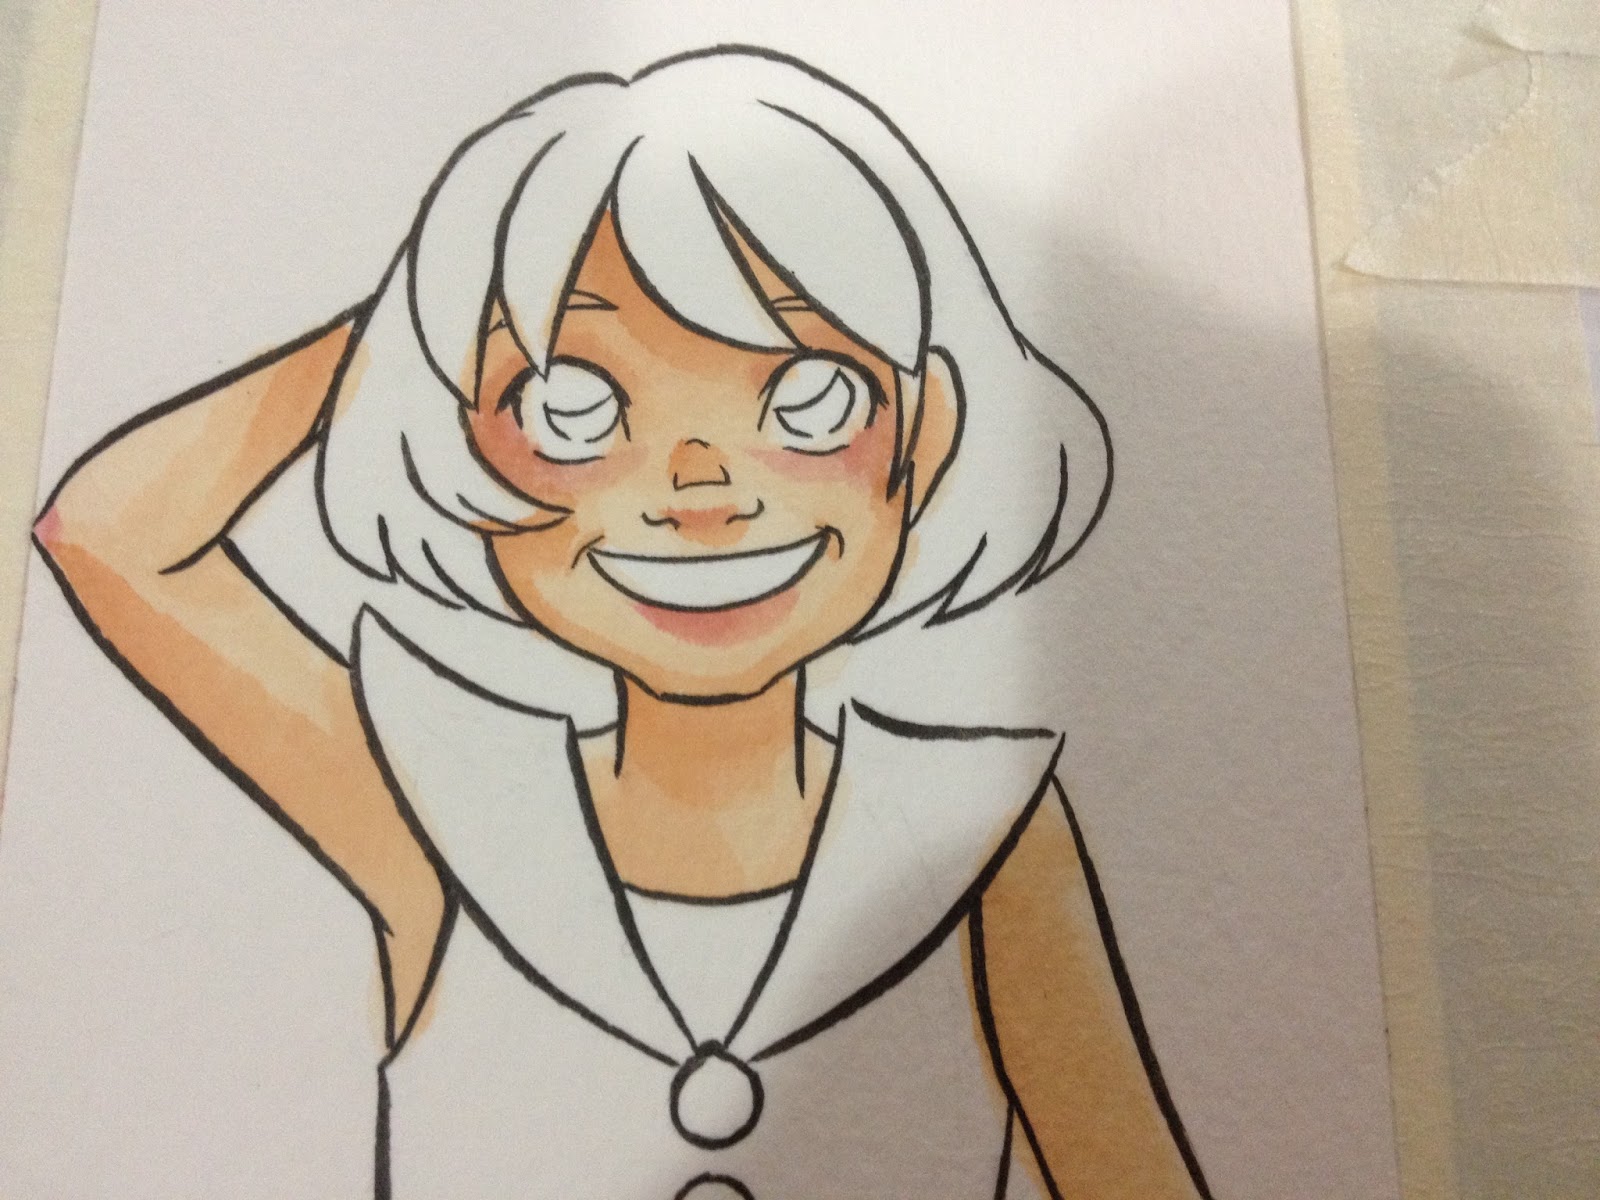
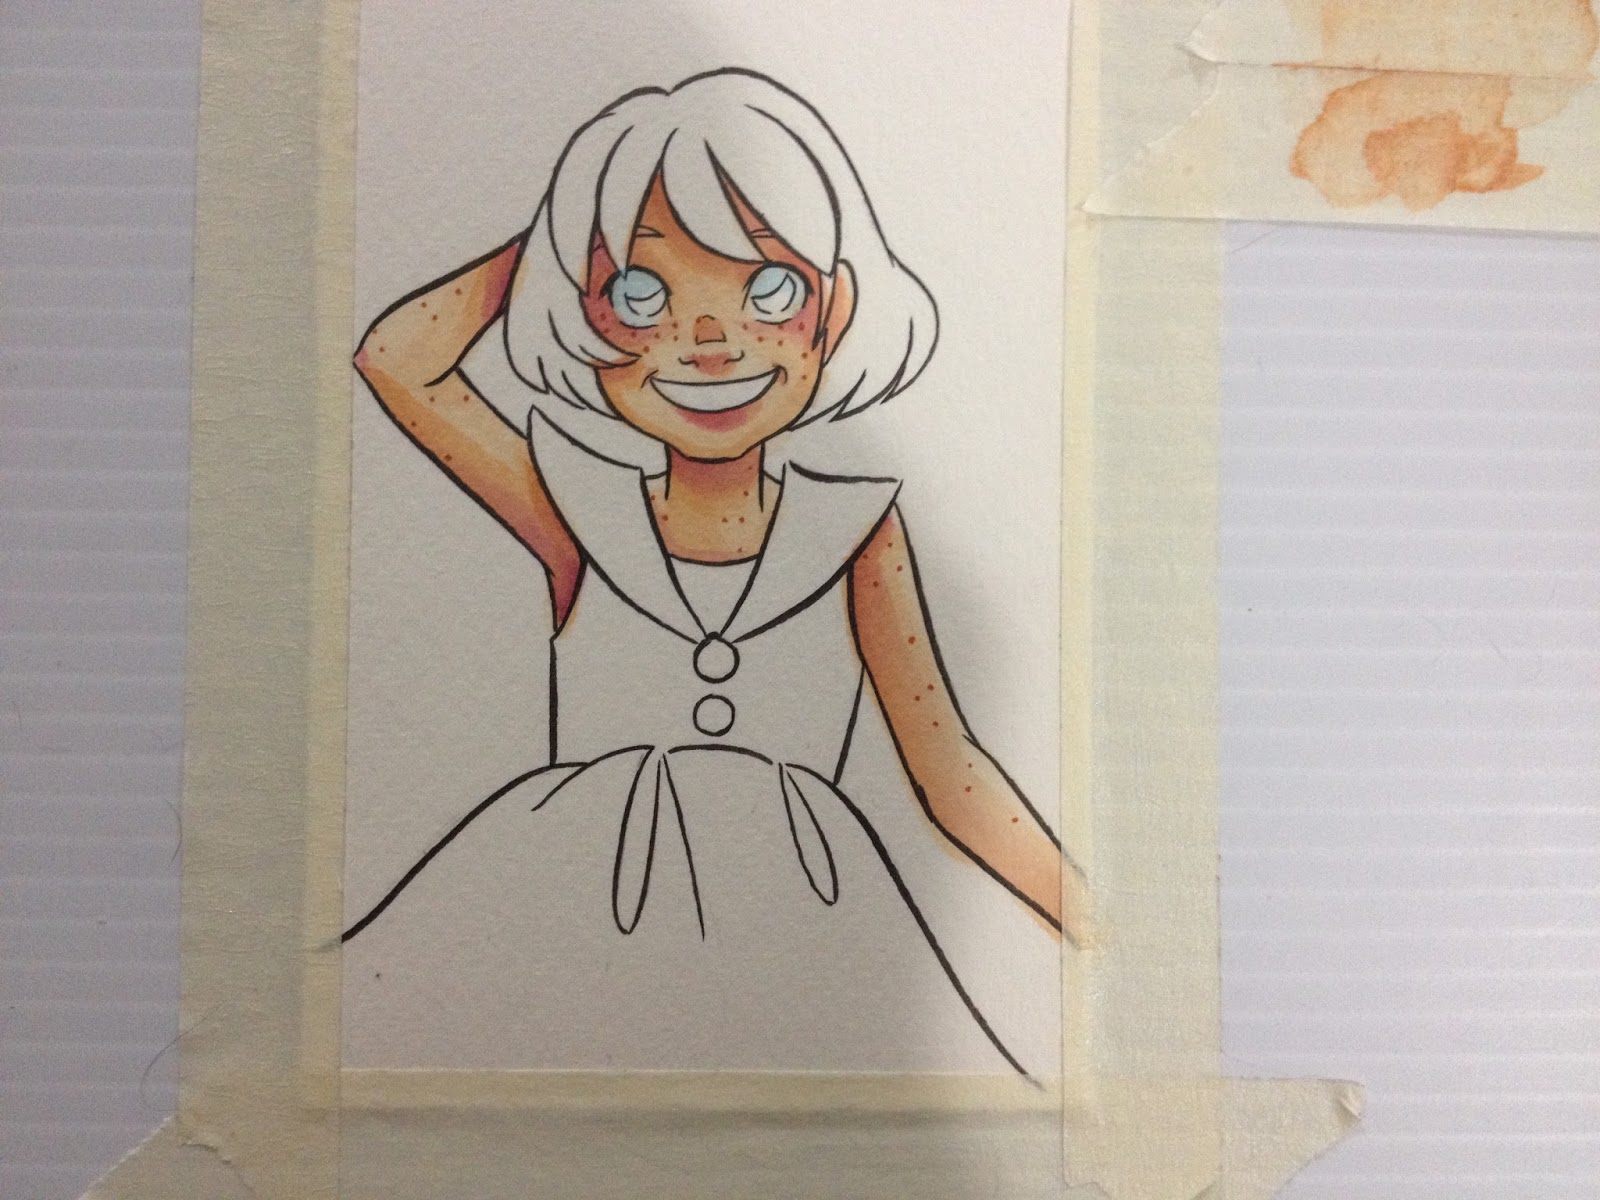
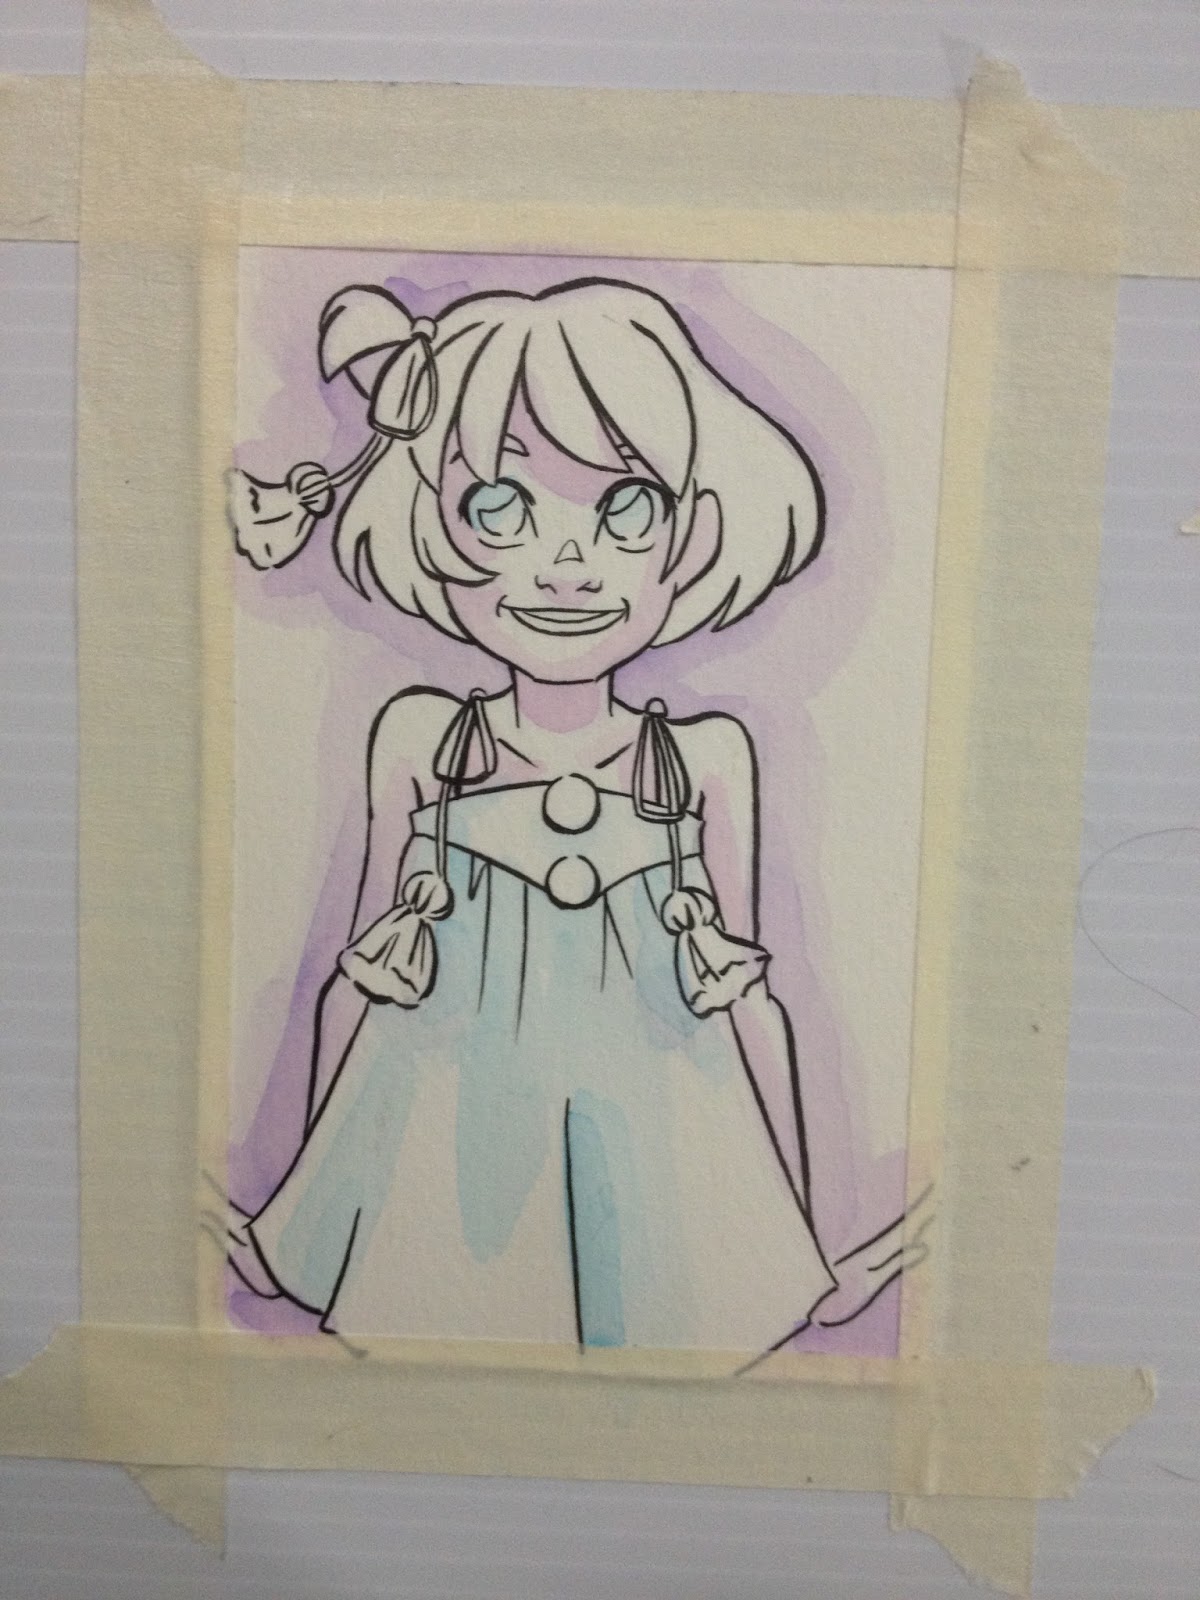
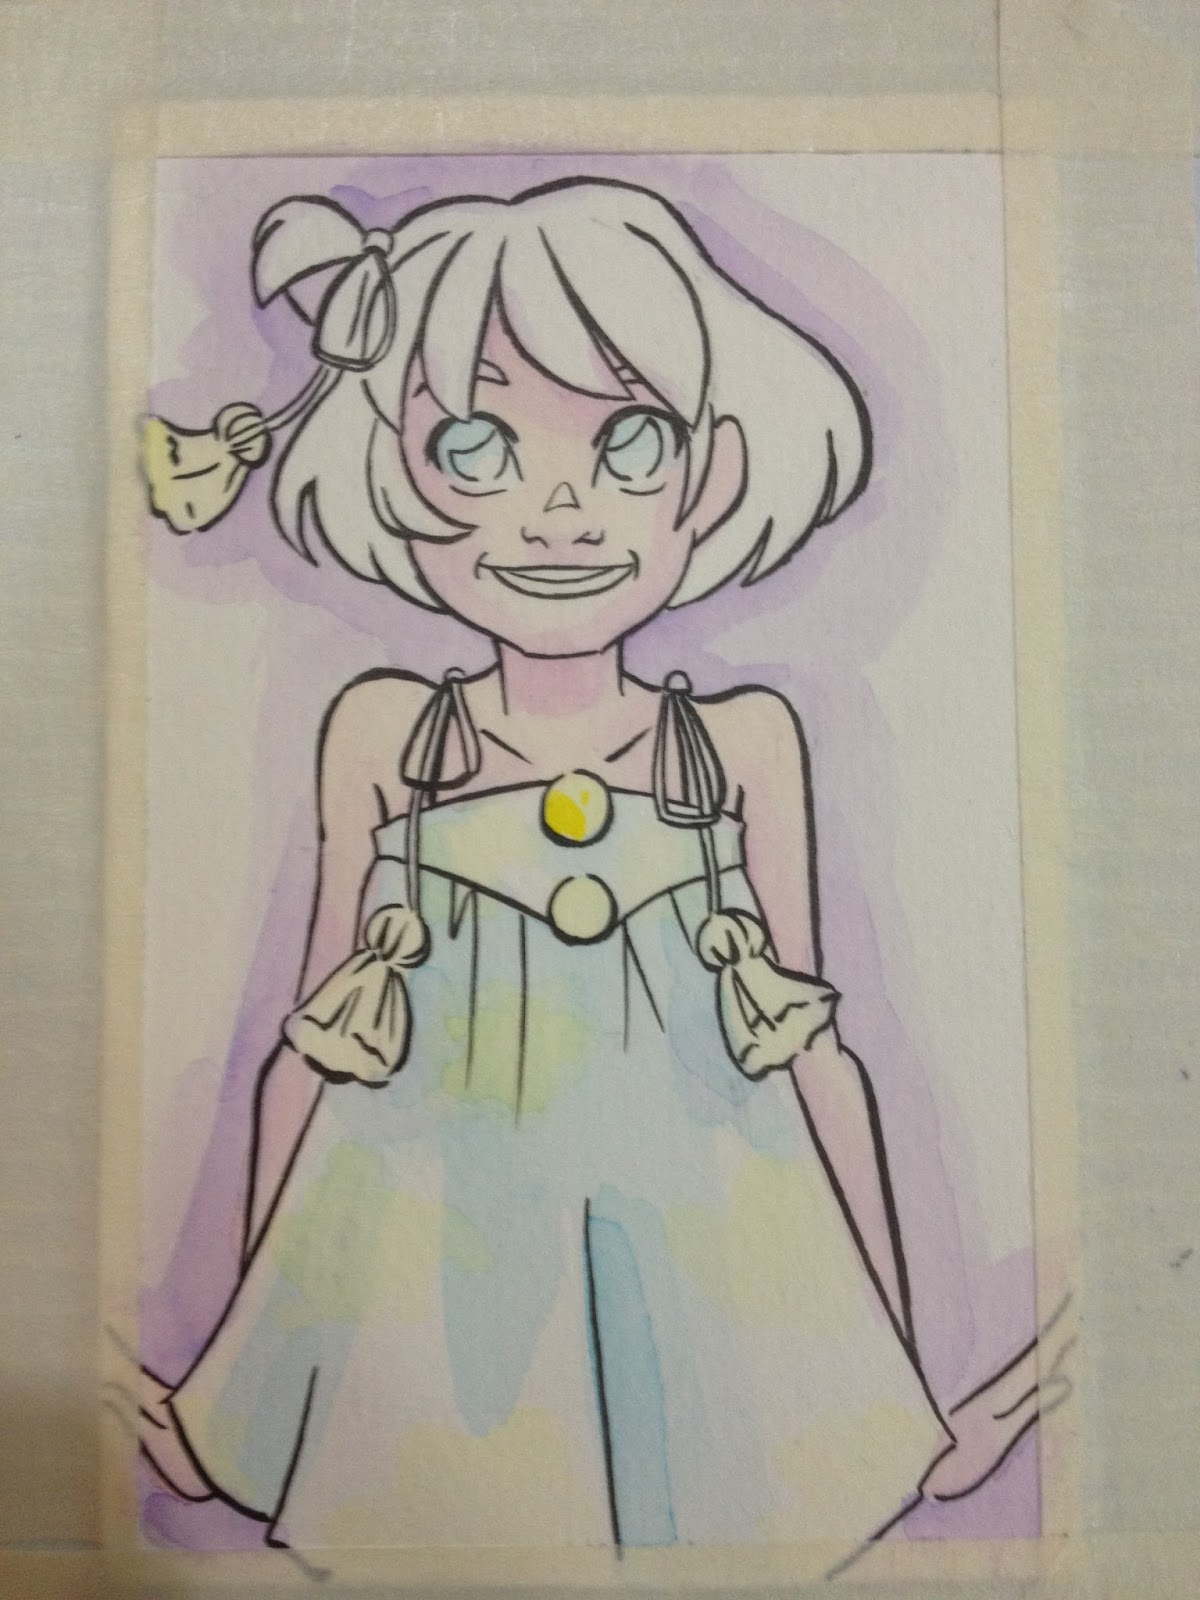
I'm not sure if it's me, or the color I'm using, or the brush I've got for the test, but I'm having a hard time laying down skincolor. These colors can be blended out when dry, unlike some (Neopiko 4) which refuse to budge as soon as the paper has dried.
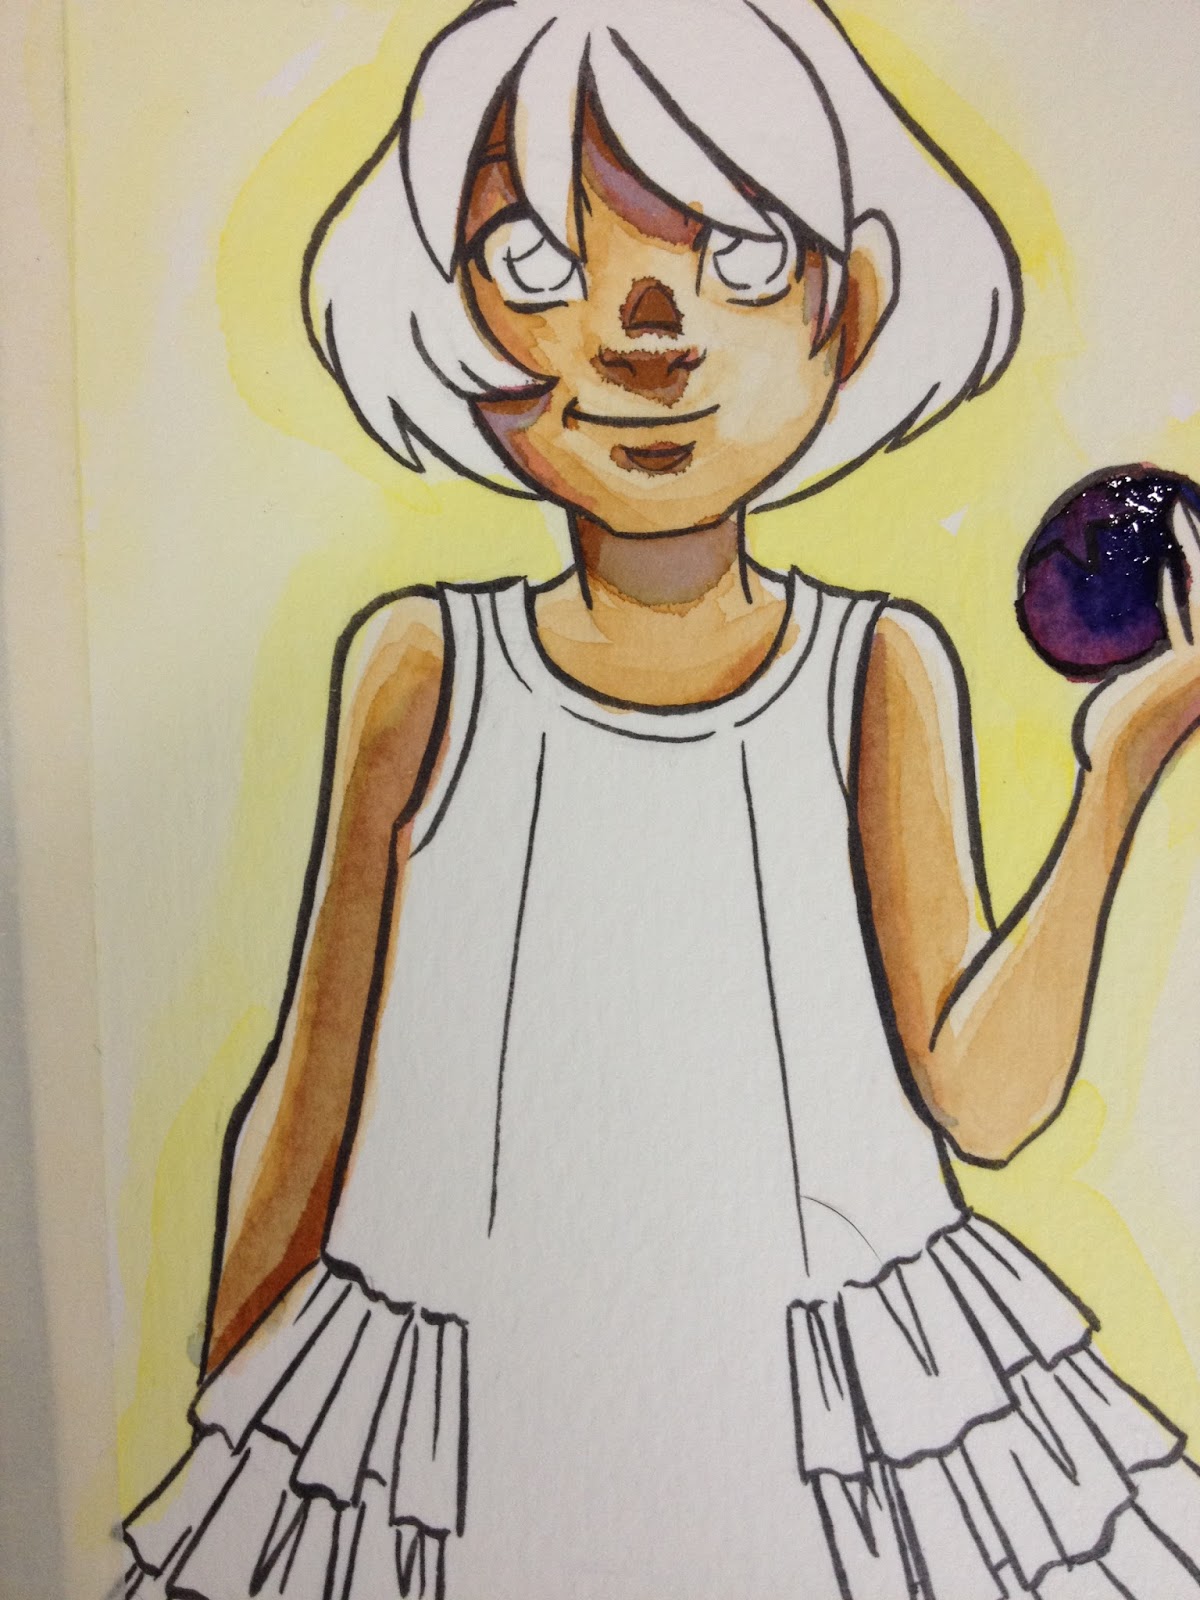
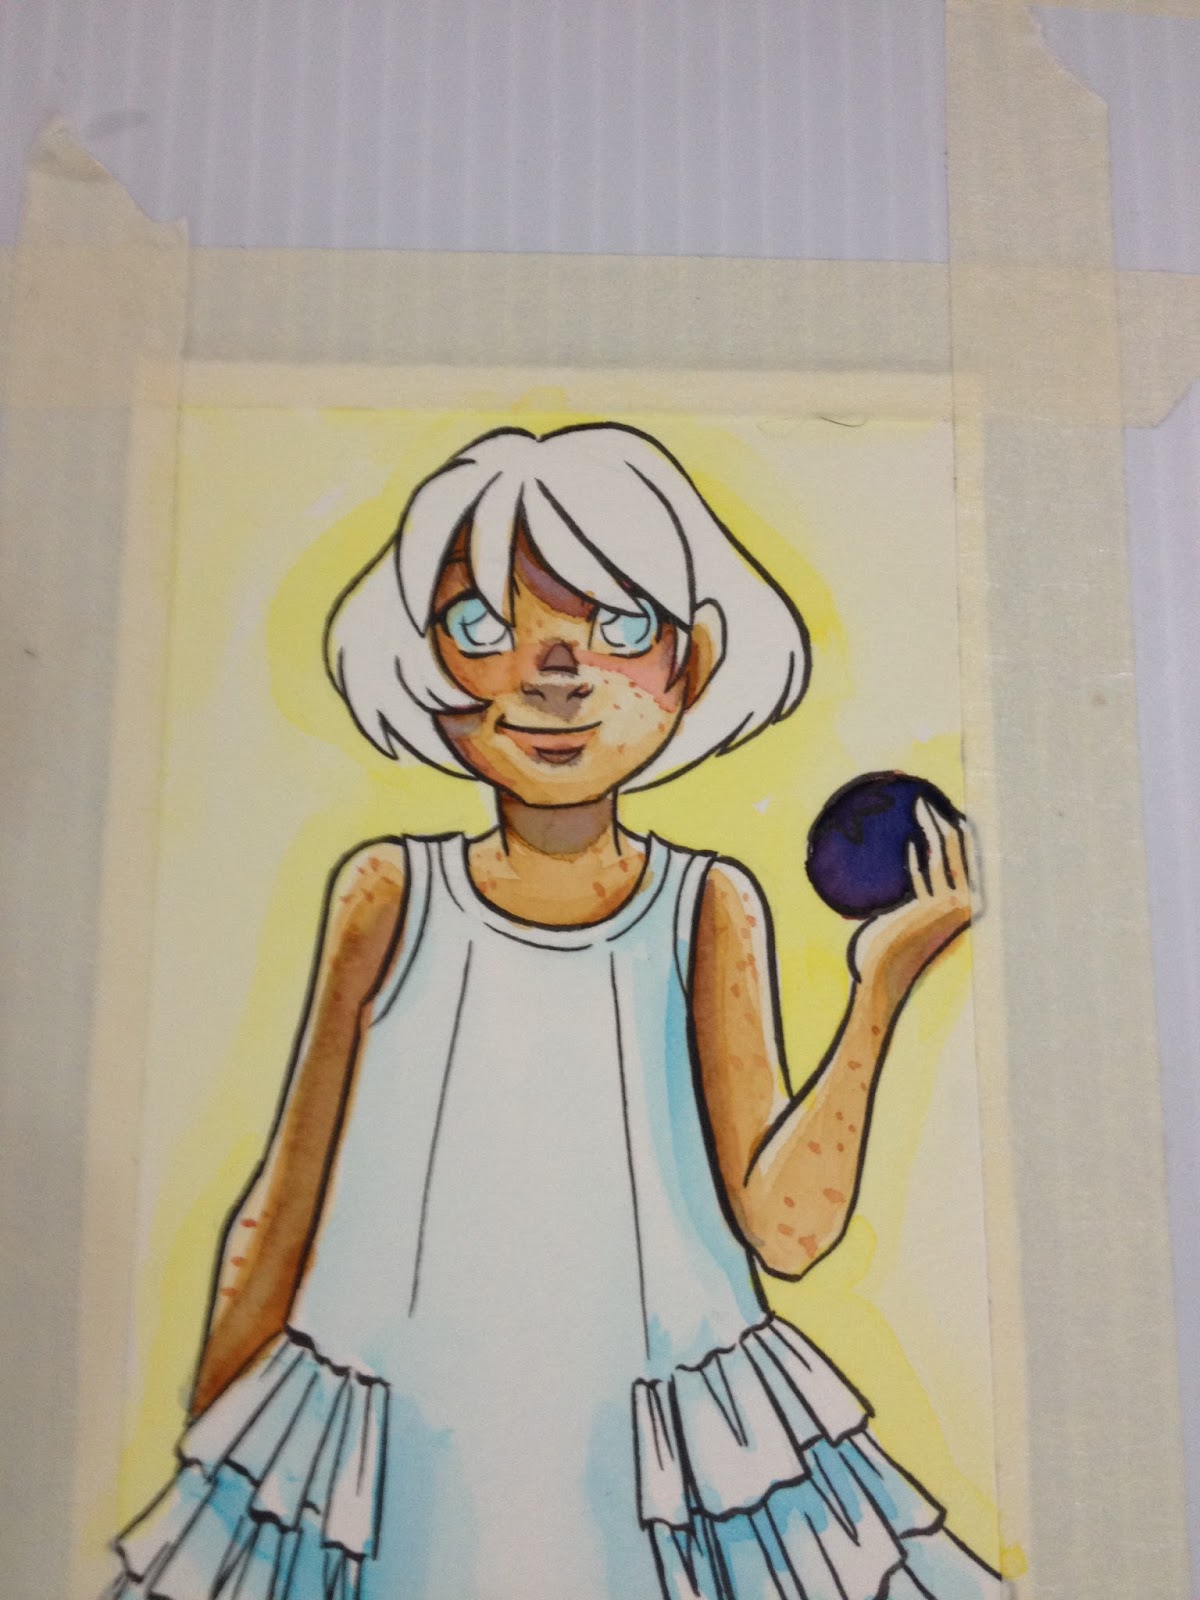
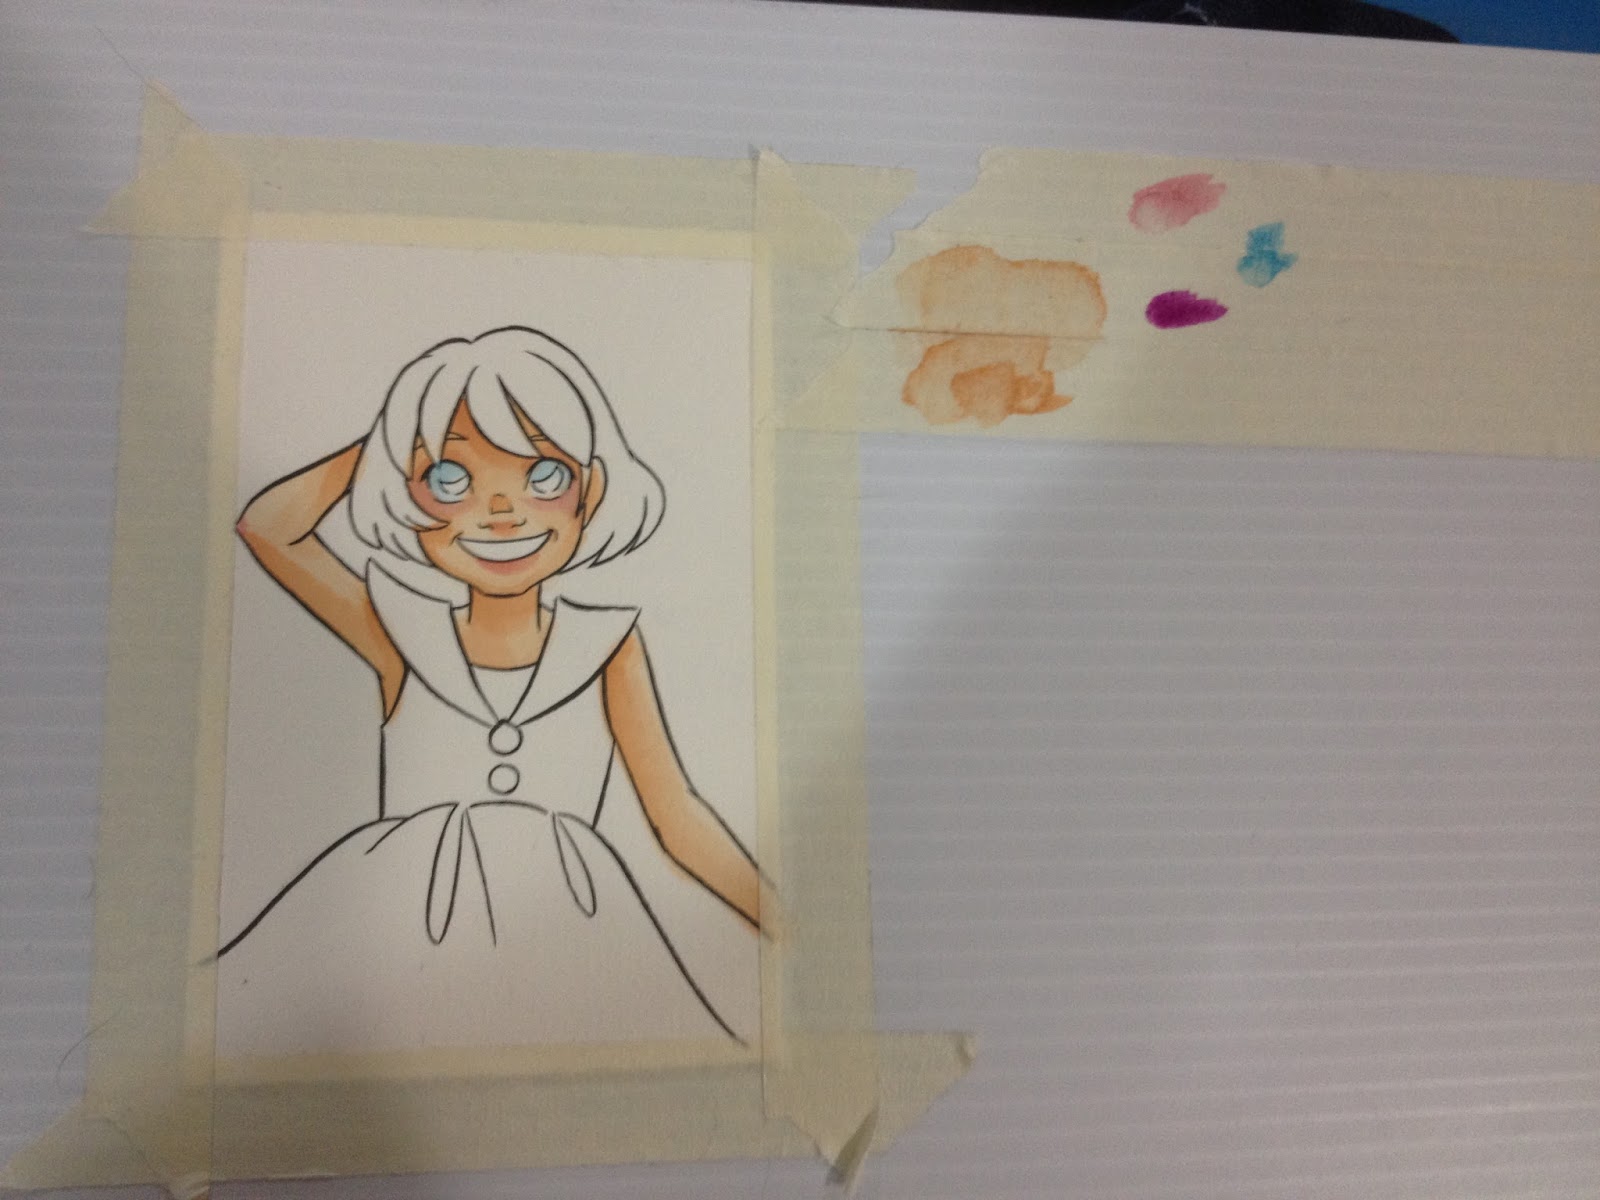
Because there are no violets, purples, or mauves, I opted to use a burgundy for Kara's skin shadows, which really didn't work out that well. You could mix a purple on your side palette, but its still frustrating that not even one premixed purple is included in such a large set. Mixing on the page itself with an indigo yielded unsatisfactory results, and rewetting preexisting layers leads to some pick up.
Many of the watercolor markers I review poorly started their downward descent when it came to skintones, or applying color to skintones. For what I do (watercolor comics) skintones and shading are a big part of what makes something work or not, and having difficultly getting the control and effect I want from a product can really affect my opinion of a product's quality. The longer I noodle with it trying to get what I want, the worse it looks, so these are definitely not the sort of thing you play around with until you get what you want.
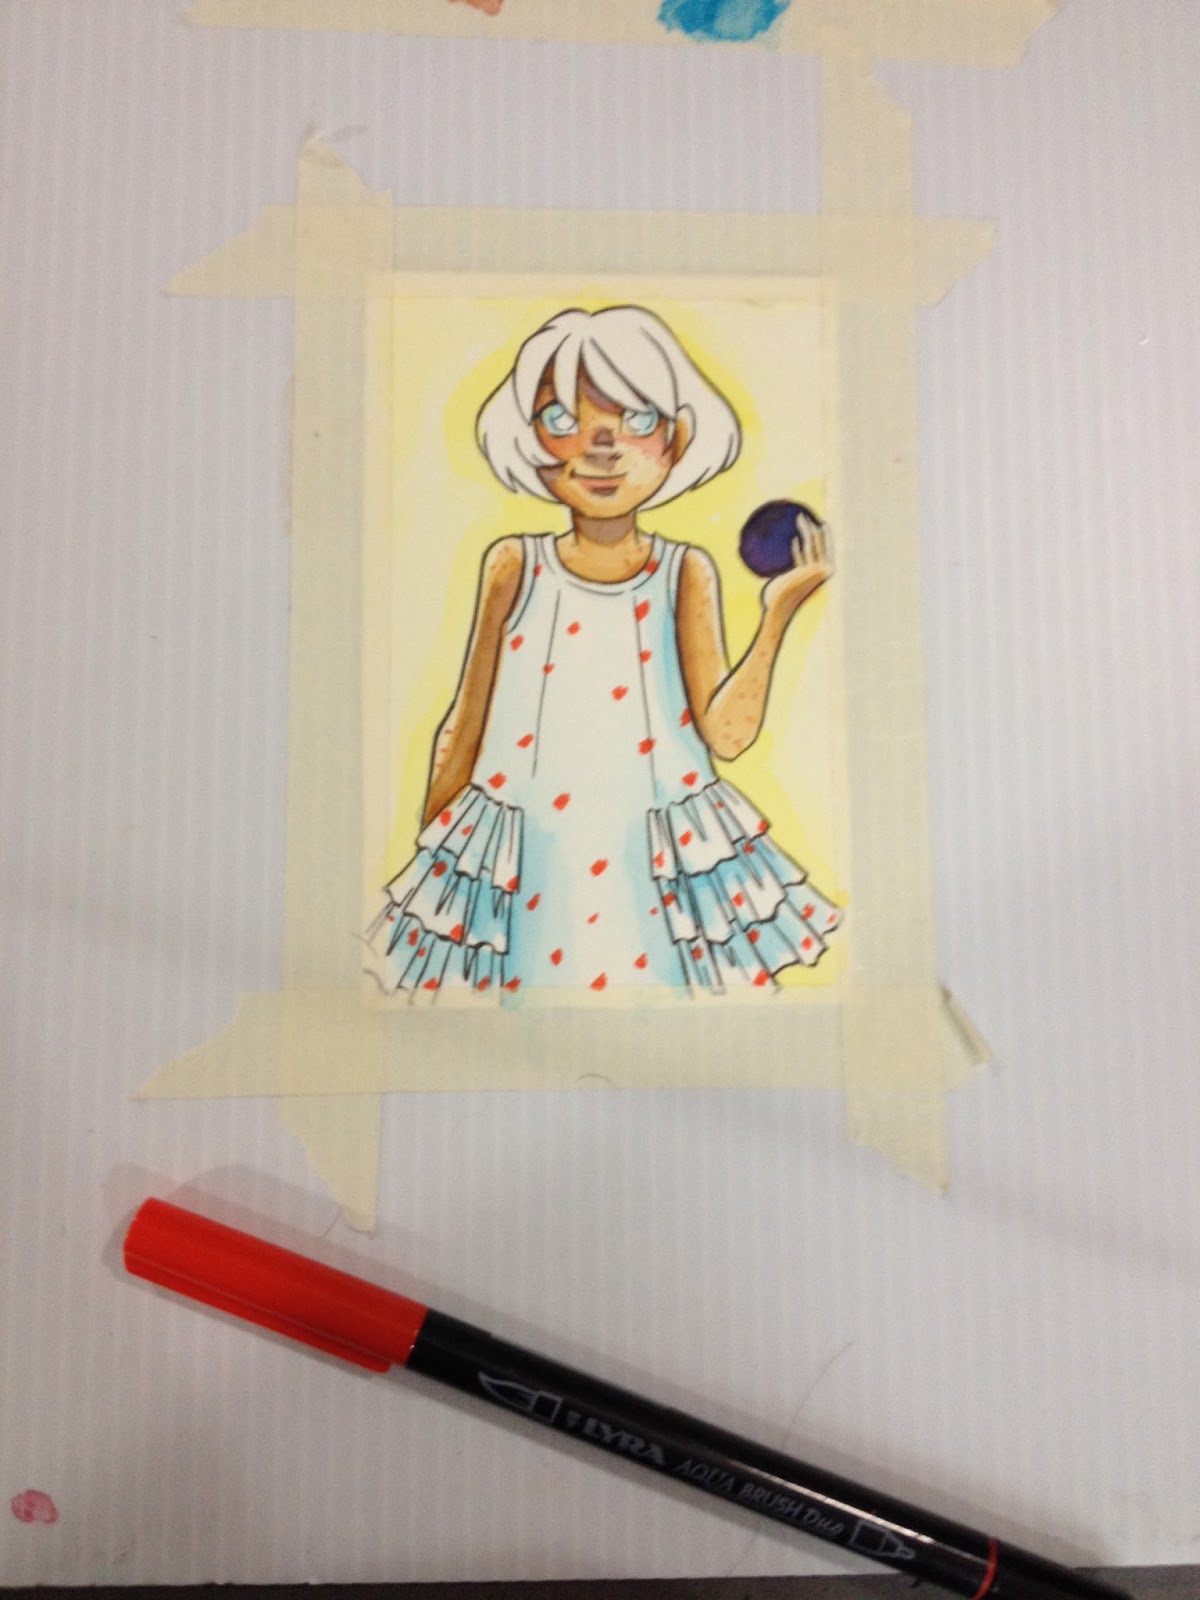
The Verdict
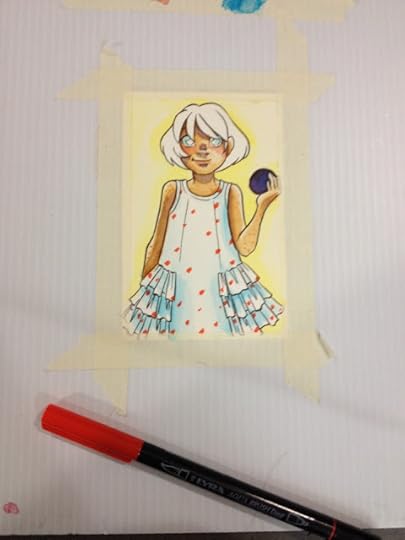
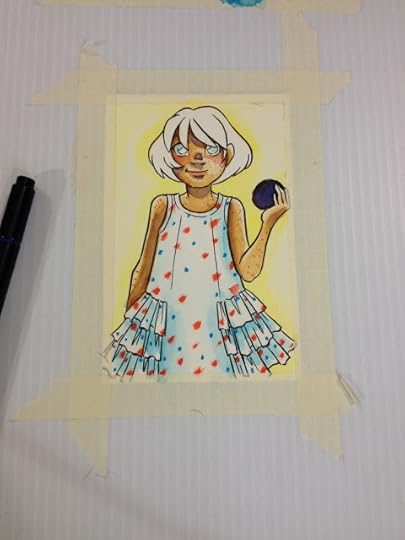
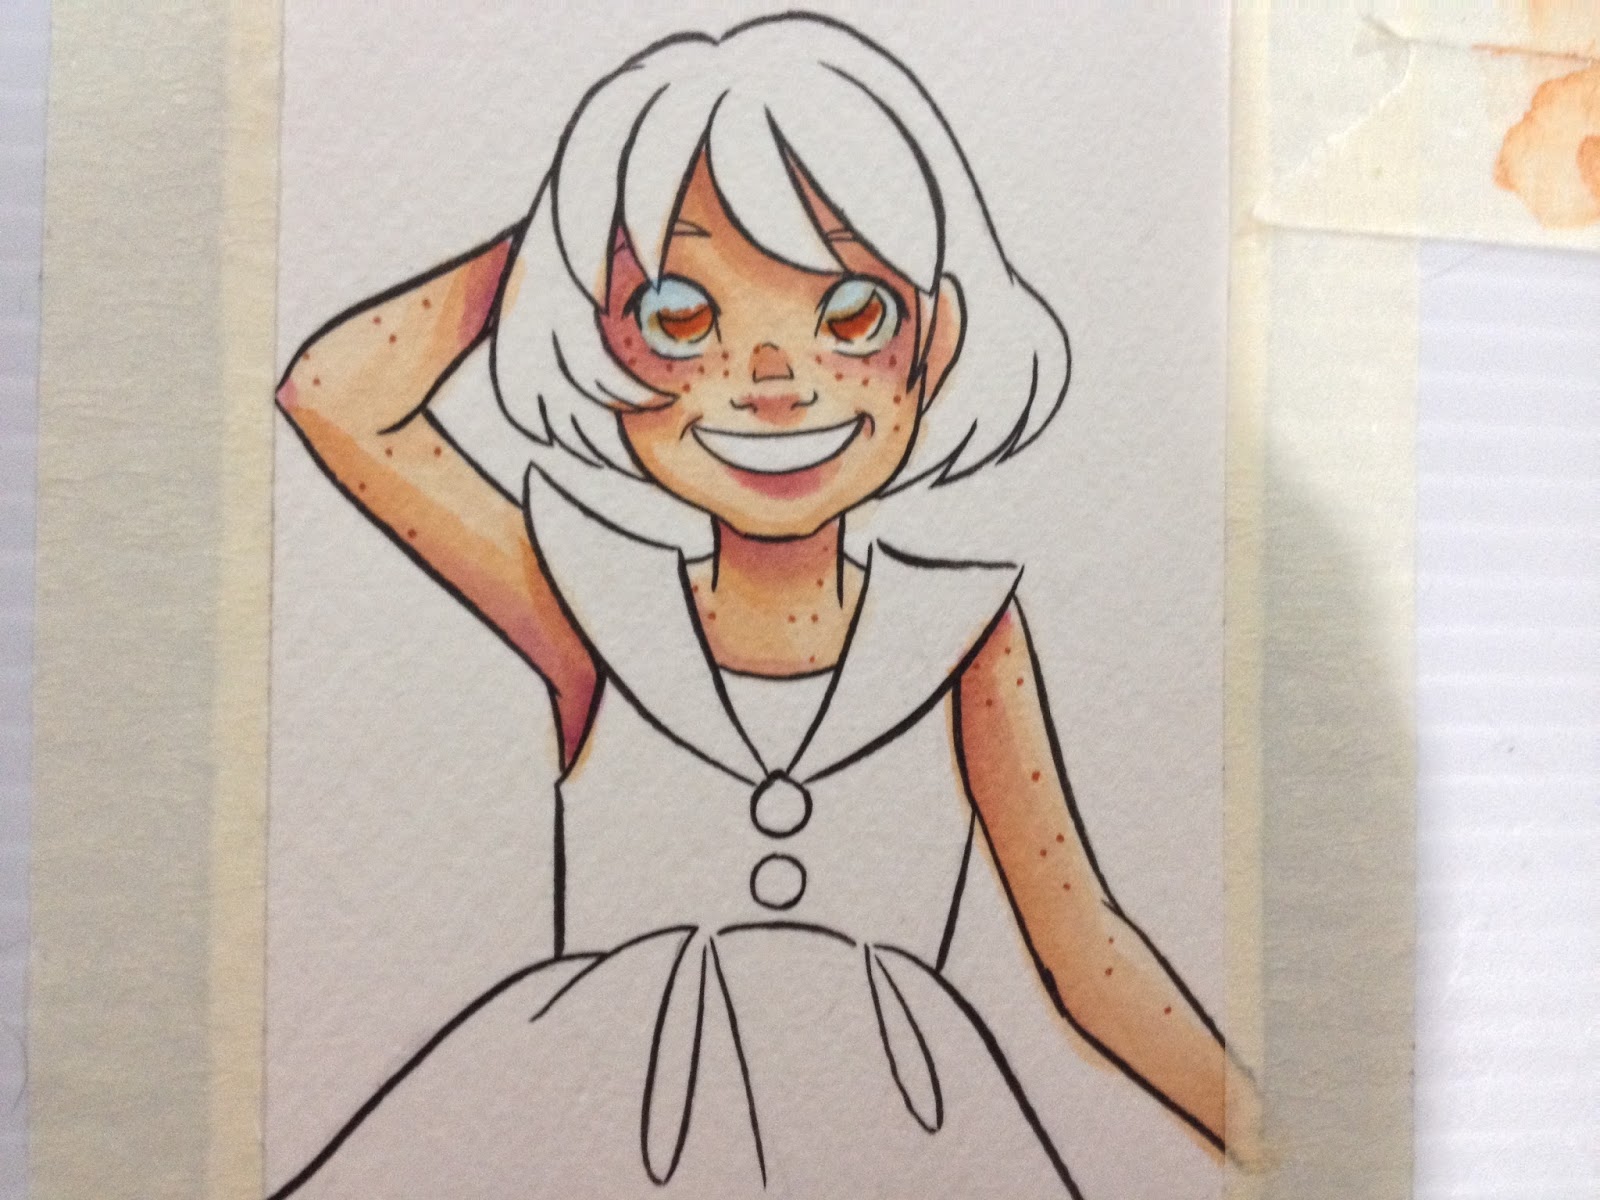
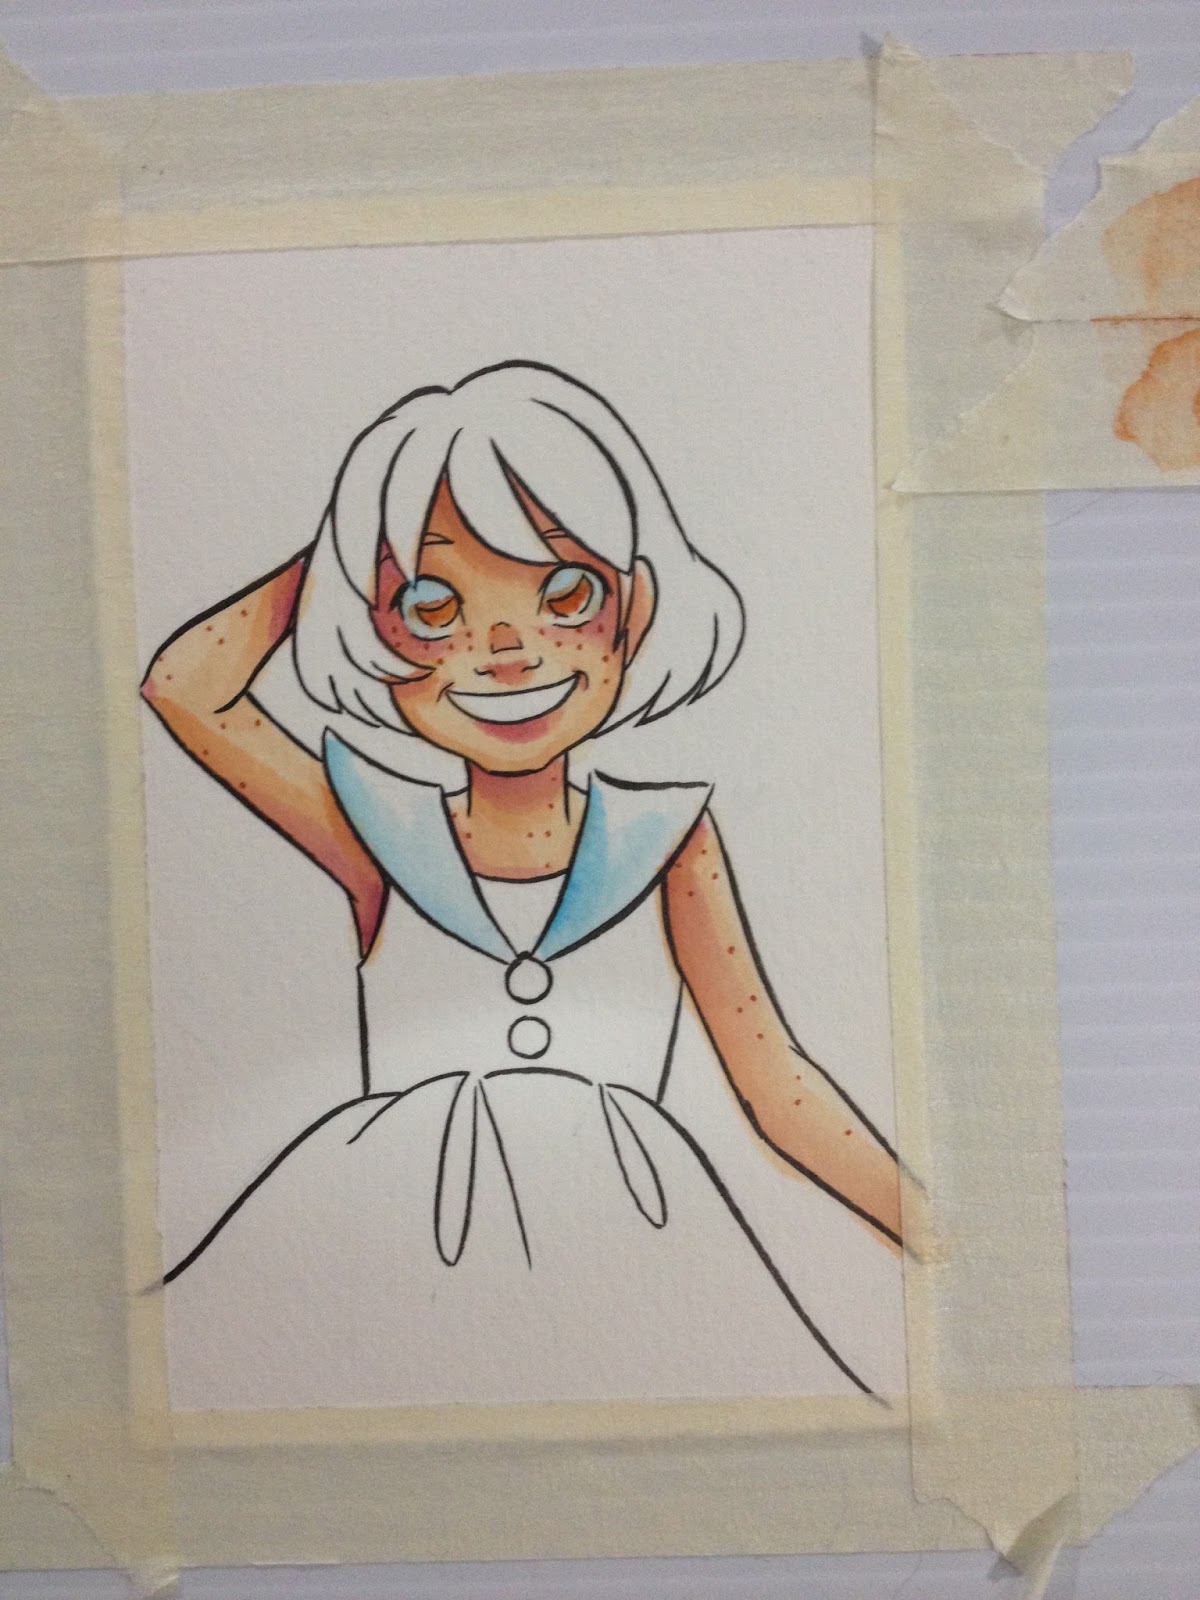
If you could buy additional colors openstock, I could give these markers a much better review. As it is, the lack of an in-set purple is a huge failing in my opinion, and makes these colors harder for me to use. The 24 piece set also doesn't come with a pre mixed skintone, which is fine, but I found the yellow ochre I used to be a bit TOO tan for Kara. I could've mixed a little pink or red in on my side palette, but it would've been hard to get consistent skintones, as I would have had to constantly remix.
This is a very affordable set, and if you can't get a docrafts Artiste watercolor marker set, the Lyra Aqua Brush duo set isn't a bad introduction to watercolor markers. Depending on what you'd like to use them for, they perform more consistently than many other watercolor markers on the market, including Winsor and Newton's watercolor markers.
Please consider donating to this blog or purchasing from Natto-shop (http://nattosoup.com/shop) if you want me to continue publishing quality content. All materials tested were purchased from my own pocket. Keep on Truckin' Nattosoup is not under any sponsorship.
Like the docrafts watercolor markers, I didn't have high hopes for the Lyra Aqua Brush duo's performance. I've casually purchased Lyra products in the past (from Office Depot, I think), and I hadn't been impressed with them. Lyra is a German art supply company (complete with a German website!), and while I can't find an English site for Lyra, I can find American stores that sell Lyra products, including Blick. They make all sorts of goodies like graphite sticks, crayons, pencils, pastels, and of course, watercolors, although I have to admit that the sight of their pan watercolors doesn't fill me with delight. Lyra appears to be a student grade brand- good enough for doodling, but not intended for professional use.
You can buy your own set of Lyra Aqua Brush duo watercolor markers from Amazon for $23.98 and in the process, help financially support this blog with your purchase by clicking the affiliate link below! As with most of my reviews, I purchased this product for review purposes out of my own funds, but your purchase from Amazon (or your donation to my Paypal, or your kindly written letter to my favorite manufacturers on my behalf) would really mean the world to me, and would enable me to continue writing this blog.
The Package


I ordered the 24 pack of Lyra Aqua Brush duo watercolor markers (brush pens?) off Amazon for under $28 using my Prime membership, but you can get a pack for as little as $12 for 12, if you dont want to commit to a big pack. You can also get them through Blick for slightly more, plush even more slightly more for shipping. My set came in a cardboard box with two flimsy plastic trays to hold the pens, which is sort of a let down after docraft's fantastic easel.
The Pens
The cap looks almost identical from both the capping end and the posting end.

The trend for dual tipped brush pens seems to be to make the bullet nib have a colored tip, rather than a colored cap, and Lyra follows that trend.

The caps on the Lyra Aqua Brush duo pens don't actually clip, but they do prevent the very round, smooth pens from just rolling off your desk if they're capped or posted. The cap is very snug, and often difficult to remove by pulling, I suggest twisting to loosen it a bit. It also looks almost identical from both ends, so if you're not careful, you may end up just jamming your brush into the closed end of the cap, ruining it. The brush on these pens is conical, and fairly juicy and flexible. The bullet nib is a bullet nib, not really worth commenting on very much, I'm afraid. The pens don't have color names or numbers, so you may find it beneficial to keep your box to keep your pens organized, for easy color reference.
It seems like most watercolor dual tipped markers follow the same recipe when it comes to pen design
Strangely, this 24 piece set does not include a purple, violet, or mauve, but a surprising number of browns- which makes this set a little more flexible in terms of skin colors.
The Field Test
The Swatches
While wet

After drying

Blendability
Markers were blended so that the yellow and the orange were just barely touching. These markers self blend quite easily without the need for water or a blending marker.
And these were blended into each other a little bit, and then I used the yellow to blend into the red. Beneath that is me cleaning the brush, demonstrating yet another blending technique.
The brown swatch was allowed to fully dry for ten minutes.

Although it's harder to blend out the marker after it has been allowed to dry, it still releases a fair amount of pigment with very little effort.
These pens are so slick, it's a little hard to get them uncapped quickly, so if you're trying to do a time sensitive technique, keep that in mind. The conical brush reminds me of the Letraset Flexmarker and Aqua marker, and while it isn't as flexible as I'd like, so far it performs decently well, and is fairly juicy. The colors require very little scrubbing to activate them (except for the blues), and the amount of color released is fairly generous. The color from the bullet and brush ends is consistent, unlike many of Winsor & Newton's Watercolor markers.
Practical Test
This is what my basic testing setup looks like. I sit on an antifatigue mat so my hips don't take as much pressure as they used to, I have my swatchbook in front of me for color reference, a cup of clean water, masking tape, and the inked test piece. The test piece was inked with a Sailor Mitsuo Aida from Jetpens, and allowed to dry fully overnight before I even erased the pencil lines.


The color dispersion is fairly generous, even when applied to my impromptu masking tape palette.
I'm not sure if it's me, or the color I'm using, or the brush I've got for the test, but I'm having a hard time laying down skincolor. These colors can be blended out when dry, unlike some (Neopiko 4) which refuse to budge as soon as the paper has dried.
Because there are no violets, purples, or mauves, I opted to use a burgundy for Kara's skin shadows, which really didn't work out that well. You could mix a purple on your side palette, but its still frustrating that not even one premixed purple is included in such a large set. Mixing on the page itself with an indigo yielded unsatisfactory results, and rewetting preexisting layers leads to some pick up.
Many of the watercolor markers I review poorly started their downward descent when it came to skintones, or applying color to skintones. For what I do (watercolor comics) skintones and shading are a big part of what makes something work or not, and having difficultly getting the control and effect I want from a product can really affect my opinion of a product's quality. The longer I noodle with it trying to get what I want, the worse it looks, so these are definitely not the sort of thing you play around with until you get what you want.
The Verdict
If you could buy additional colors openstock, I could give these markers a much better review. As it is, the lack of an in-set purple is a huge failing in my opinion, and makes these colors harder for me to use. The 24 piece set also doesn't come with a pre mixed skintone, which is fine, but I found the yellow ochre I used to be a bit TOO tan for Kara. I could've mixed a little pink or red in on my side palette, but it would've been hard to get consistent skintones, as I would have had to constantly remix.
This is a very affordable set, and if you can't get a docrafts Artiste watercolor marker set, the Lyra Aqua Brush duo set isn't a bad introduction to watercolor markers. Depending on what you'd like to use them for, they perform more consistently than many other watercolor markers on the market, including Winsor and Newton's watercolor markers.
Please consider donating to this blog or purchasing from Natto-shop (http://nattosoup.com/shop) if you want me to continue publishing quality content. All materials tested were purchased from my own pocket. Keep on Truckin' Nattosoup is not under any sponsorship.


August 6, 2015
Paradis Library Drawing Demo
My Mechacon recap post is coming soon, but in the meantime, enjoy this video of my drawing demo for kids 2-8 at the Paradis branch of the St Charles Parish Library system, during Storytime.
This is the youngest group I've ever drawn for, and while I couldn't really teach them concrete drawing skills (given how rowdy some of the younger audience members were, and how long they'd already sat during Storytime), I could draw for them, and encourage an enjoyment of art and illustration. I drew all the kids who volunteered to be drawn, some 8 or so children, and as my focus was getting those sketches done and into little hands fast, I sadly don't have any photos of the sketches done. Every volunteer got to take their drawing- which was china marker in either blue or black on 11x14 sketchbook paper- home with them.
I performed this service free of charge, because I feel strongly about improving art education access in Louisiana, especially in St Charles Parish, where I grew up. When I was growing up, although there was a school art program that focused on introducing students to skills and materials, you had to test into it, and I never seem to cut it. Especially gifted students could qualify to attend NOCCA, I didn't qualify as talented enough for talented art, and I certainly didn't qualify as talented enough for NOCCA. I've always been stubborn, and I wasn't going to let other people determine what I was capable of, and as you can see, I'm still pursuing that dream to this day. That's why it's important to me to present learning opportunities to ANY child who wishes to learn, regardless of perceived ability. I firmly believe that anyone can learn to draw and paint, so long as they're willing to put the years of study it may take into honing the craft, and I'm very interested in learning teaching methods that make art and illustration accessible to others.
If you are a parent, librarian, or educator who is interested in scheduling lessons for your kids, I can do visits (for the Nashville area almost any time, or for South East Louisiana, please schedule far in advance), or I can do Google Hangout or Skype Calls. Just check out my Info tab for contact information and more details.
Please consider donating to this blog or purchasing from Natto-shop (http://nattosoup.com/shop) if you want me to continue publishing quality content. All materials tested were purchased from my own pocket. Keep on Truckin' Nattosoup is not under any sponsorship.
August 3, 2015
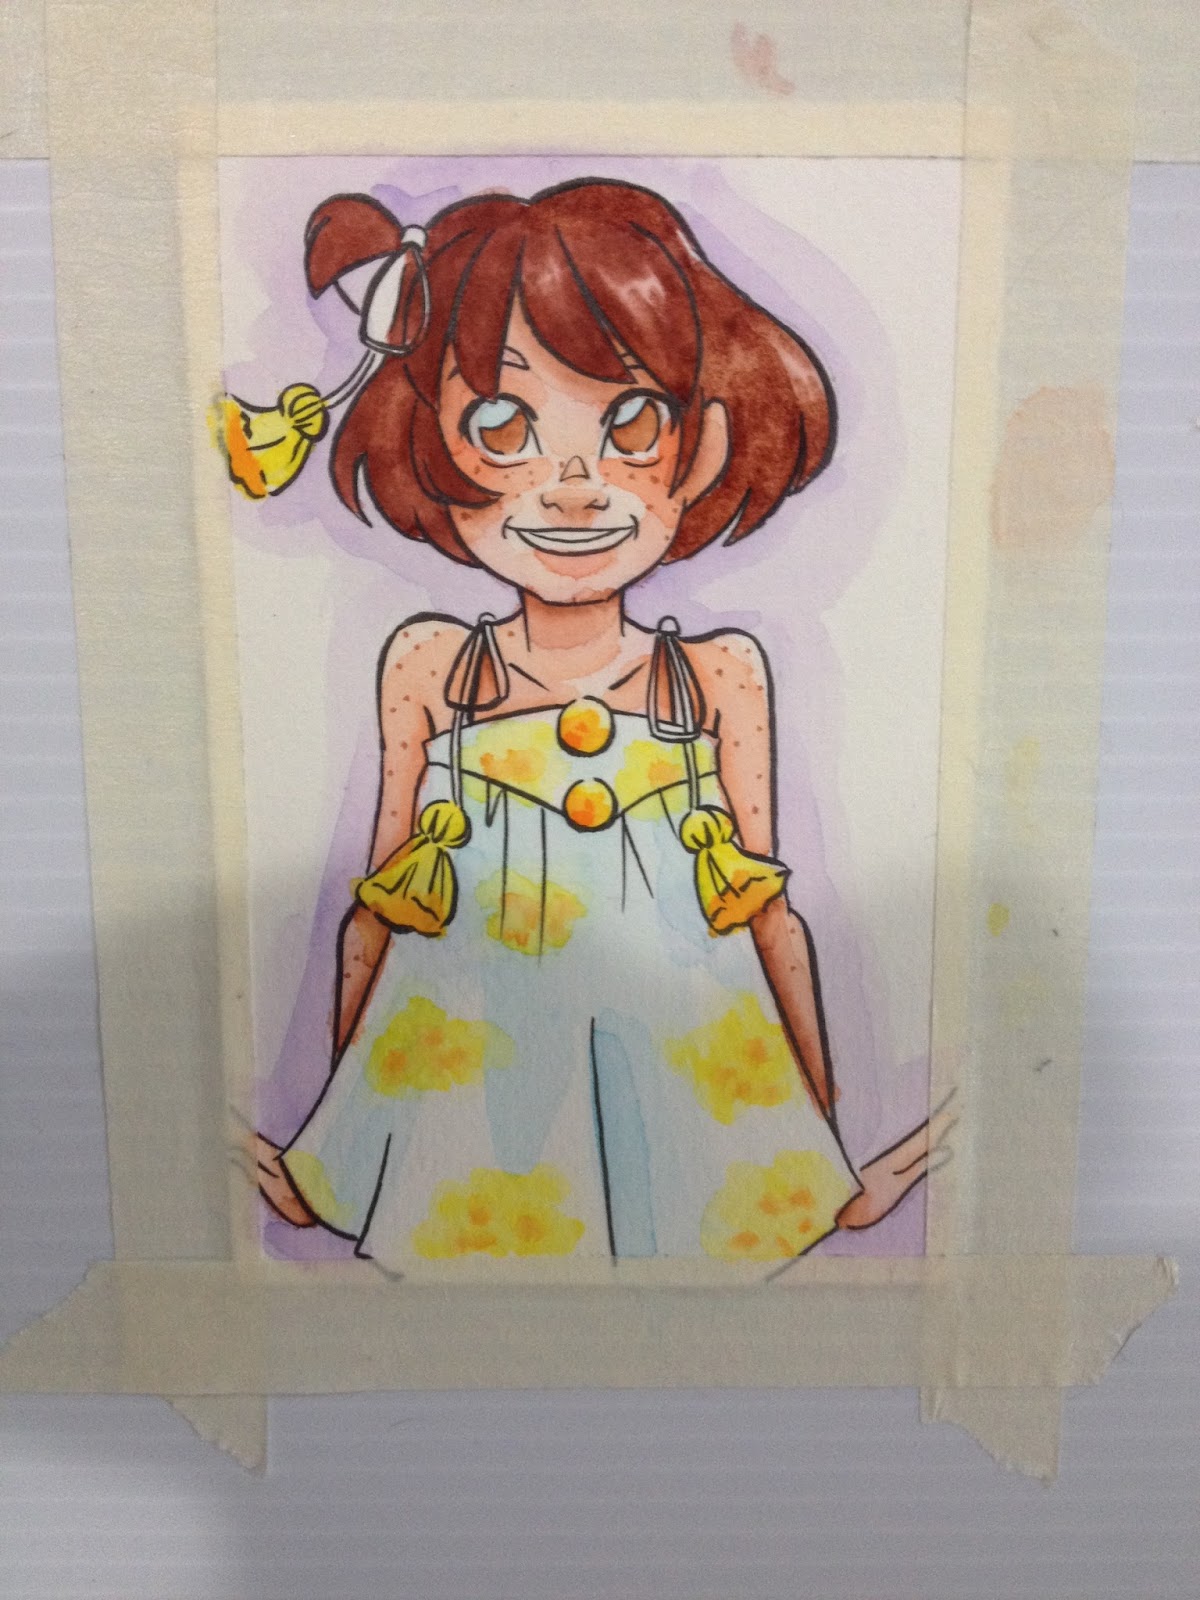
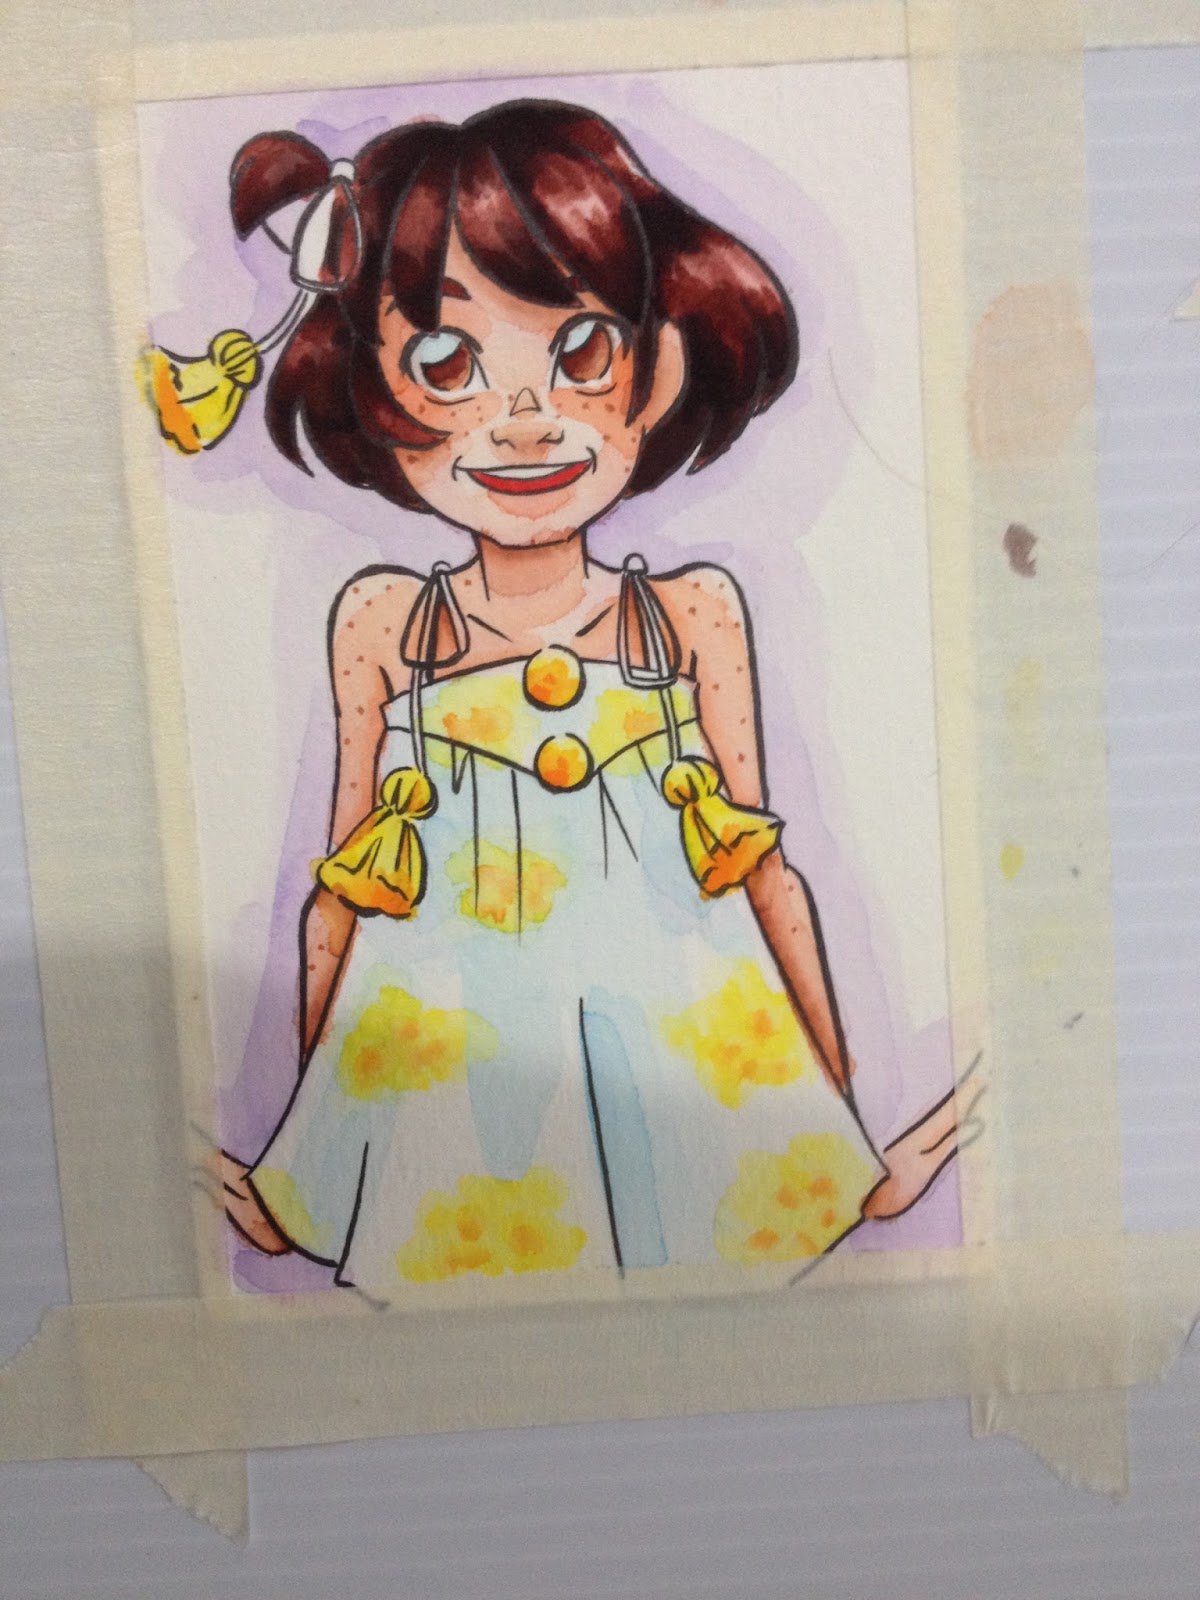
My Work: Kara Sitting in Flowers
 Kara sitting with Spring Flowers. Watercolor on Canson Arches Watercolor paper.I've posted so many reviews lately, I haven't really had much of an opportunity to just share some of the things I've been working on between conventions. I DO post in progress stuff to my Tumblr when I can, and it used to update pretty often, but I've been so busy with bigger projects that I haven't really had a chance to post much since Mechacon.
I like to paint multiple pieces at a time, and I needed a horizontal Kara hero image, so I painted this while working on a batch of Gizmo Grandma pages. Since people have asked what I use for my real illustrations, I used a couple of self assembled dried watercolor palettes that contain a variety of Holbein Irodori , Winsor and Newton (both pans and tubes), Daniel Smith, and SoHo Urban Watercolors. I purchase empty pans and my palette is a metal palette similar to the ones at the bottom of this page. A metal palette like this is a lifetime investment- you really only need to buy it once, as long as you take care of it, it'll last. My palette allows for me to put my own pans in, and I make sure they stay in place when I travel with a little bit of double sided tape on the underside of the plastic pan. I paint with a variety of watercolor brushes, both natural and synthetic, from a variety of places, although these days I like to catch brush sales at my local Jerry's Artarama, because I really like their Creative Mark Rhapsody brushes.
This was painted on Canson Arches watercolor paper, which is one of my favorite papers for illustration.
Please consider donating to this blog or purchasing from Natto-shop (http://nattosoup.com/shop) if you want me to continue publishing quality content. All materials tested were purchased from my own pocket. Keep on Truckin' Nattosoup is not under any sponsorship.

Kara sitting with Spring Flowers. Watercolor on Ca...
Kara sitting with Spring Flowers. Watercolor on Canson Arches Watercolor paper.I've posted so many reviews lately, I haven't really had much of an opportunity to just share some of the things I've been working on between conventions. I DO post in progress stuff to my Tumblr when I can, and it used to update pretty often, but I've been so busy with bigger projects that I haven't really had a chance to post much since Mechacon.I like to paint multiple pieces at a time, and I needed a horizontal Kara hero image, so I painted this while working on a batch of Gizmo Grandma pages. Since people have asked what I use for my real illustrations, I used a couple of self assembled dried watercolor palettes that contain a variety of Holbein Irodori , Winsor and Newton (both pans and tubes), Daniel Smith, and SoHo Urban Watercolors. I purchase empty pans and my palette is a metal palette similar to the ones at the bottom of this page. A metal palette like this is a lifetime investment- you really only need to buy it once, as long as you take care of it, it'll last. My palette allows for me to put my own pans in, and I make sure they stay in place when I travel with a little bit of double sided tape on the underside of the plastic pan. I paint with a variety of watercolor brushes, both natural and synthetic, from a variety of places, although these days I like to catch brush sales at my local Jerry's Artarama, because I really like their Creative Mark Rhapsody brushes.
This was painted on Canson Arches watercolor paper, which is one of my favorite papers for illustration.
Please consider donating to this blog or purchasing from Natto-shop (http://nattosoup.com/shop) if you want me to continue publishing quality content. All materials tested were purchased from my own pocket. Keep on Truckin' Nattosoup is not under any sponsorship.
July 30, 2015
Winsor & Newton Watercolor Markers Field Test
A long time ago, I reviewed Winsor and Newton's watercolor markers, but since I've upped my review standards to include a practical test (coloring a small sample image) in addition to swatches, I wanted to reopen the W&N watercolor marker review. However, these practical tests are fairly time consuming, and I didn't want to go to all that effort just to update an older post, so I decided to just post it separately and link them all together.
Original Winsor and Newton Marker Review
List of Individual Markers and how well they work
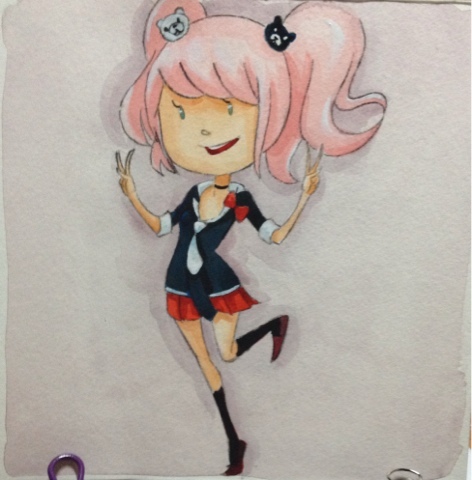
The Practical Test
Setting Up The Test
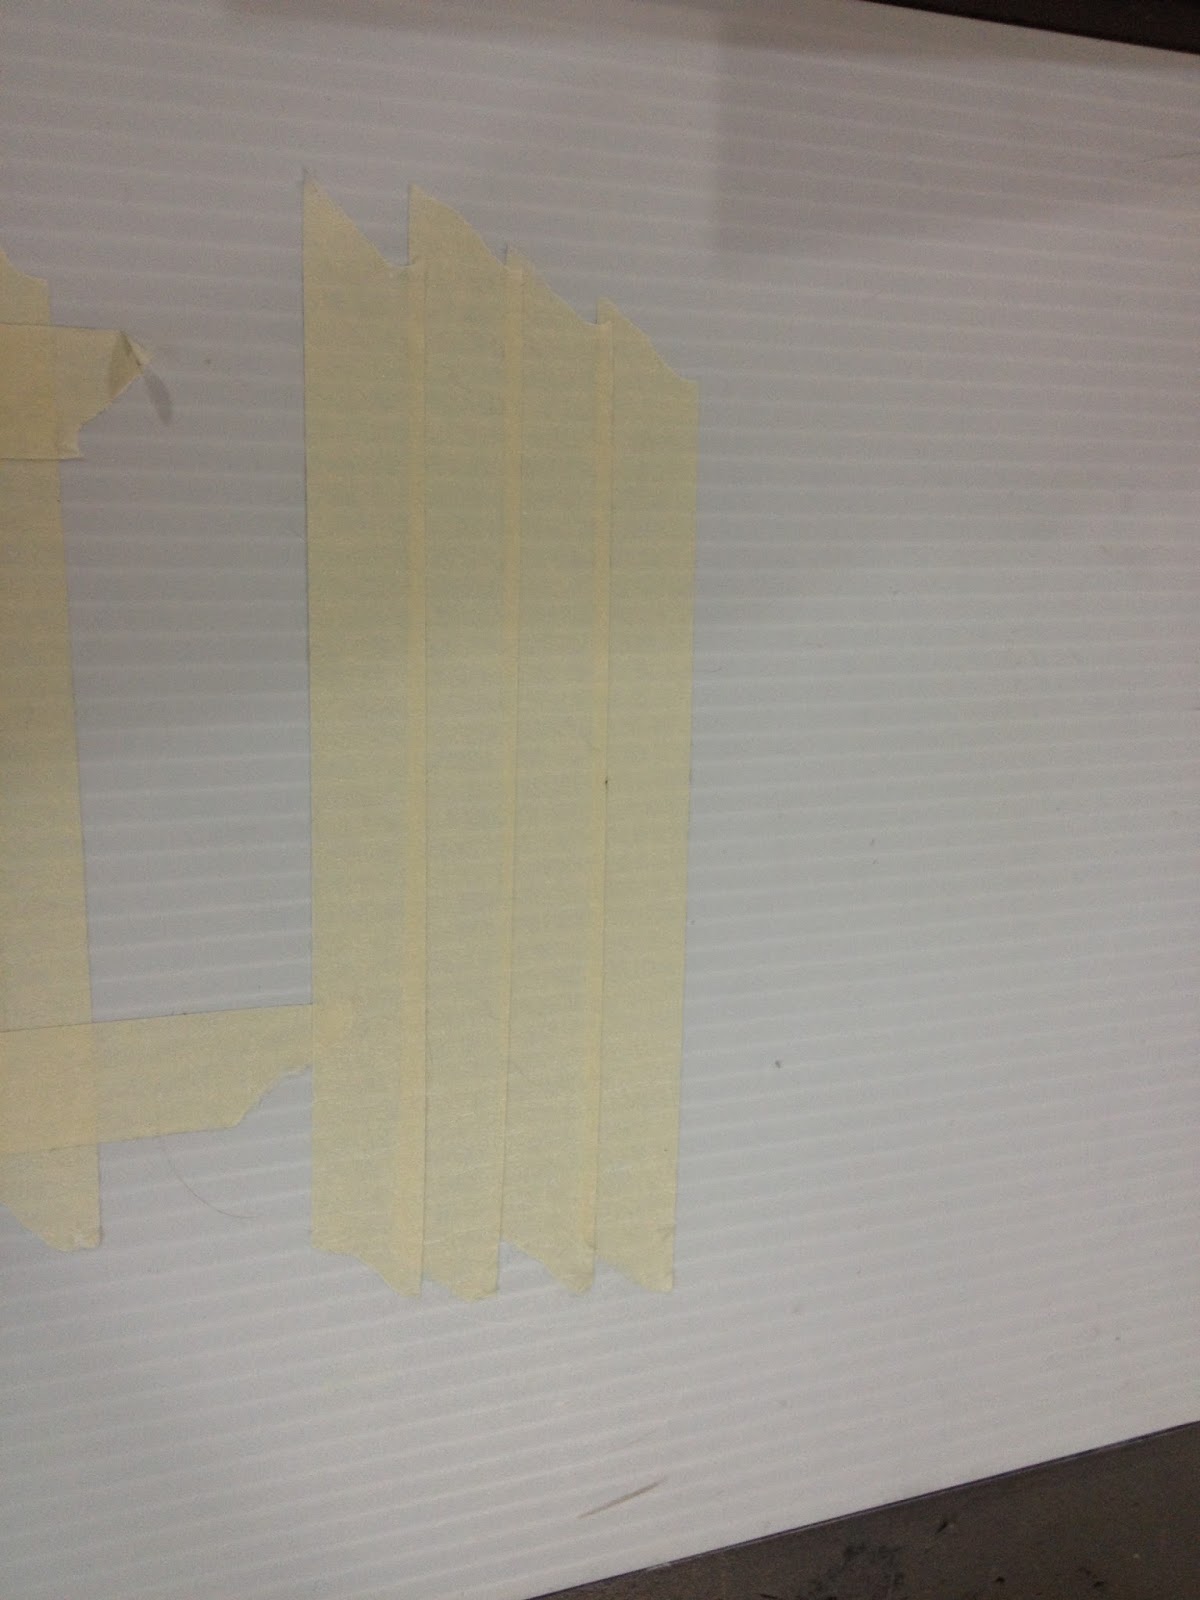
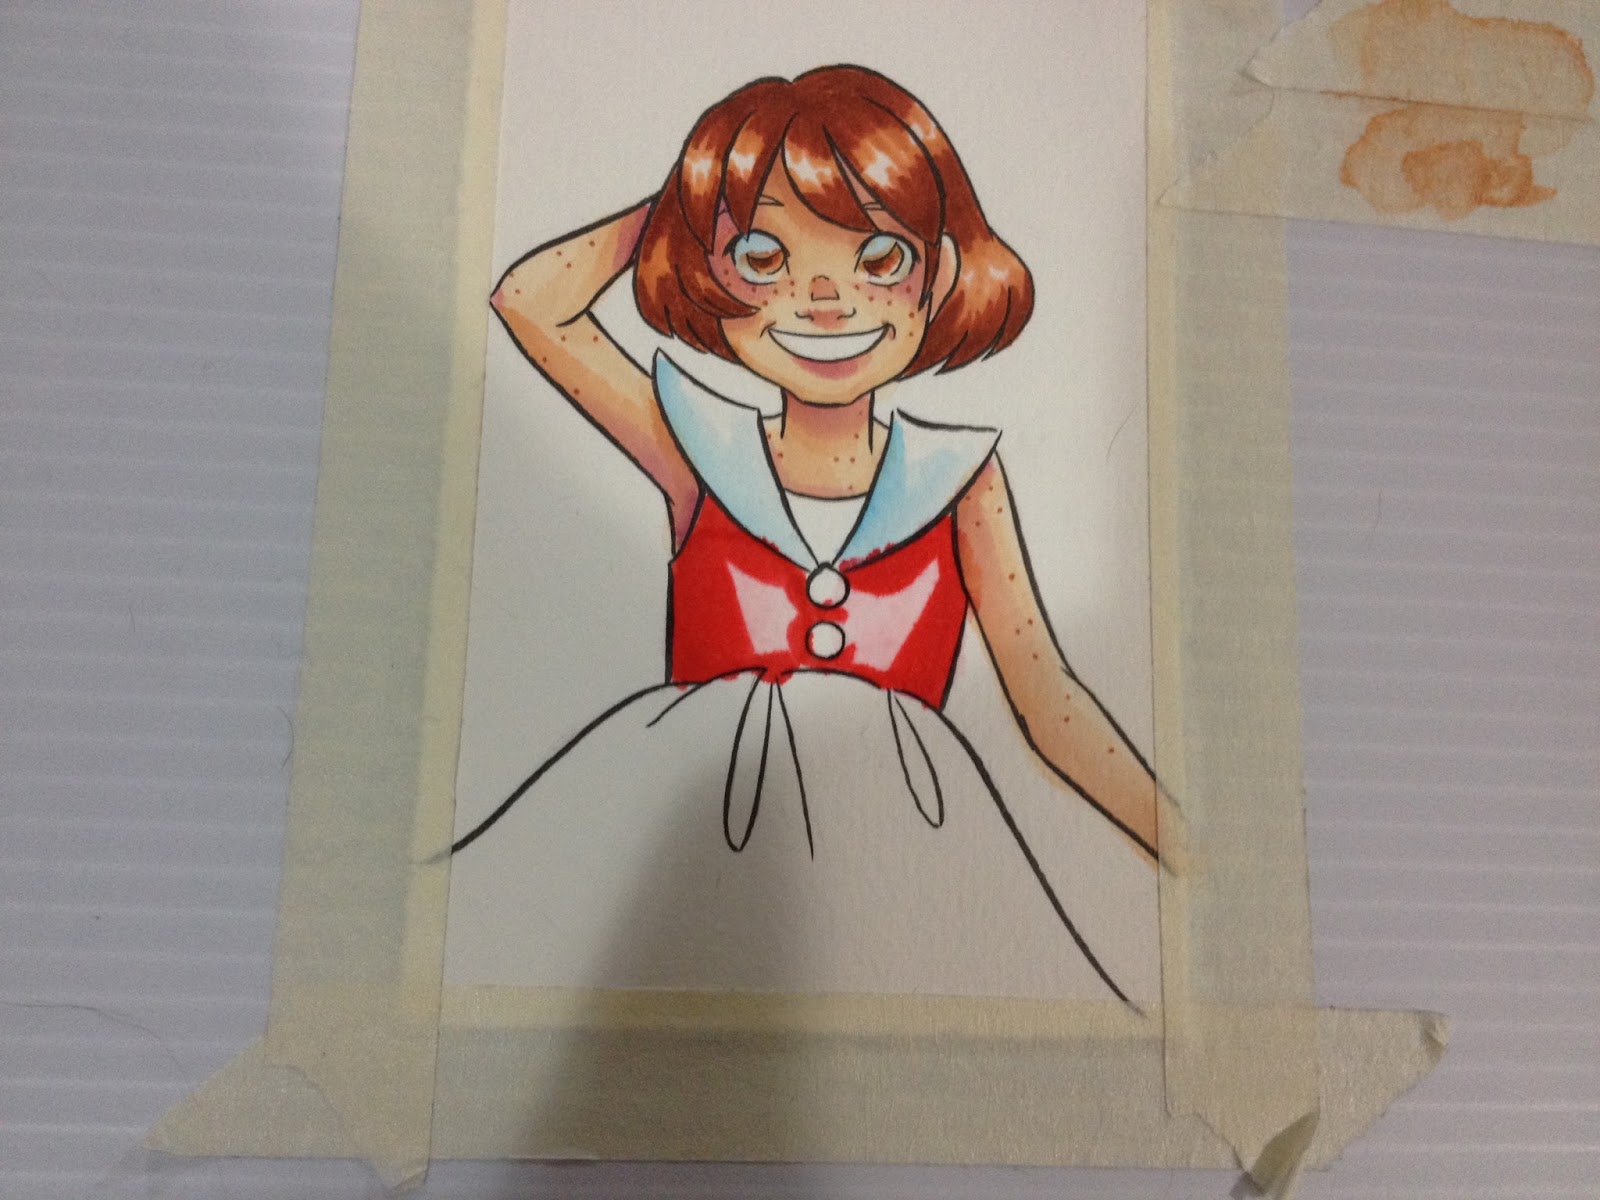
First I made a reference palette on a 4"x6" piece of Fluid watercolor paper to keep with the markers at all times. I do this for all watercolors I use regularly. The color is swatched, blended out with water, and labelled. I also tapped down the piece I'll be working on, which has been inked with a Sailor Mitsuo Aida waterproof brushpen from Jetpens.

I also prepare a 'side palette' for blending and color selection by applying a few strips of masking tape to my gator board.

This palette is useful if you don't want to apply color directly to the paper, either because it will be too saturated, or because direct application never blends out enough. You then wet this color application with a wet brush, swish it to activate all the ink, and begin applying to the paper.


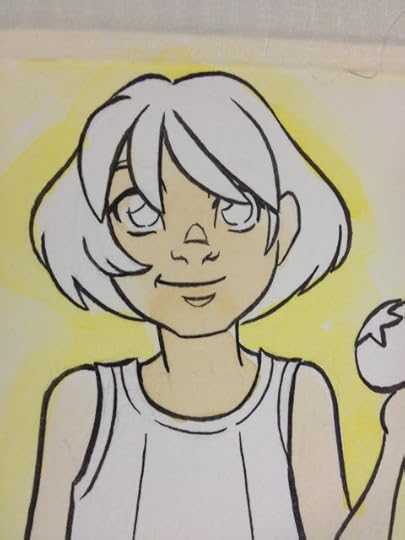
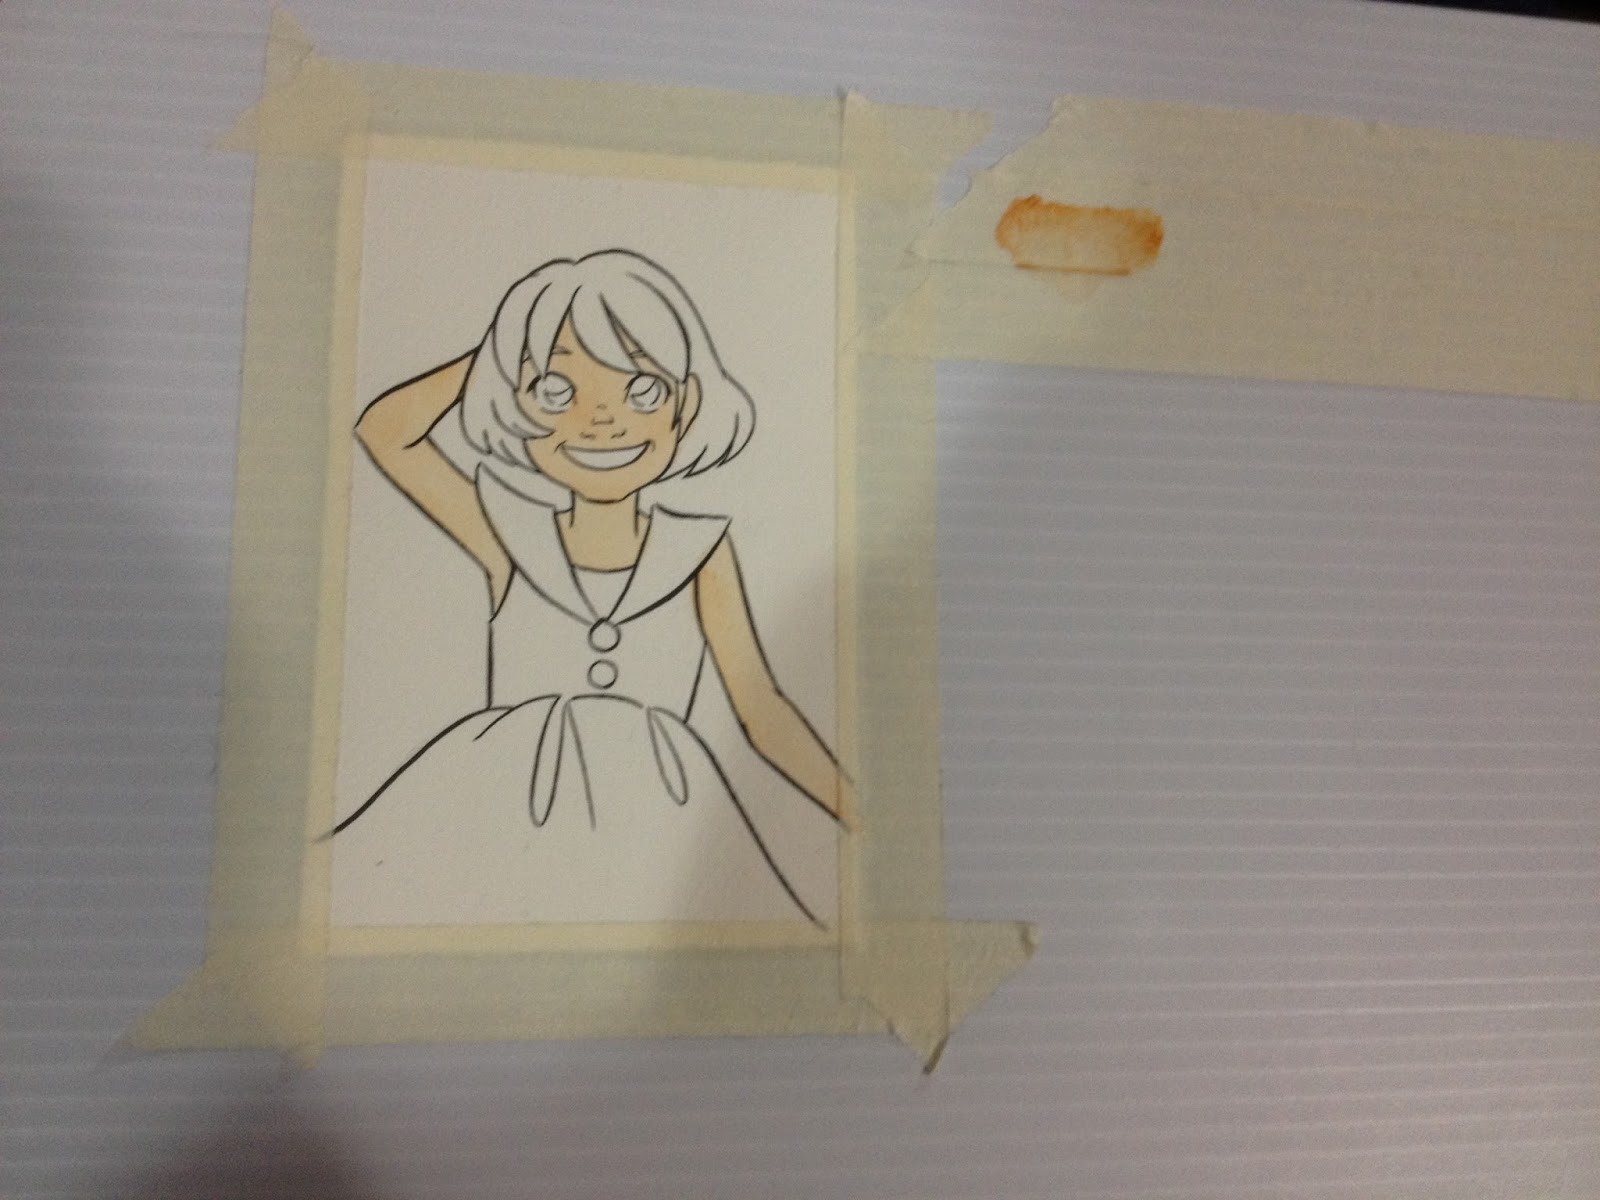
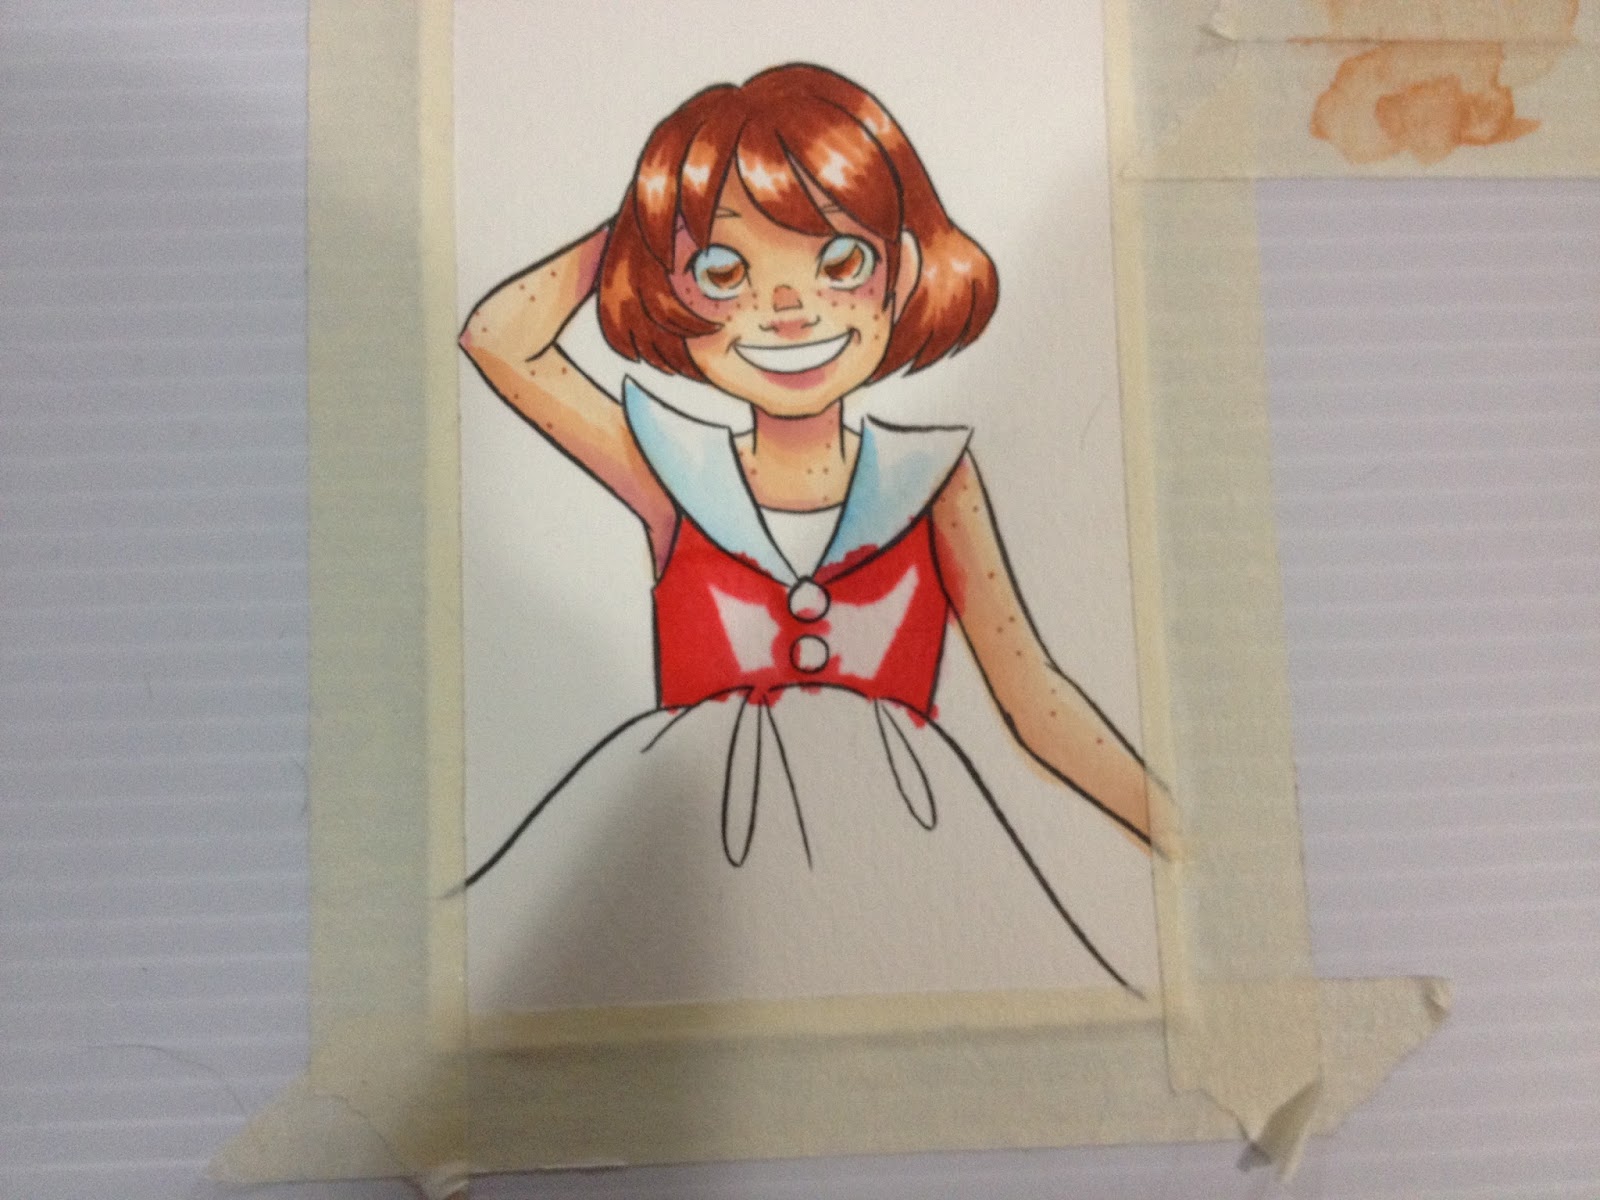
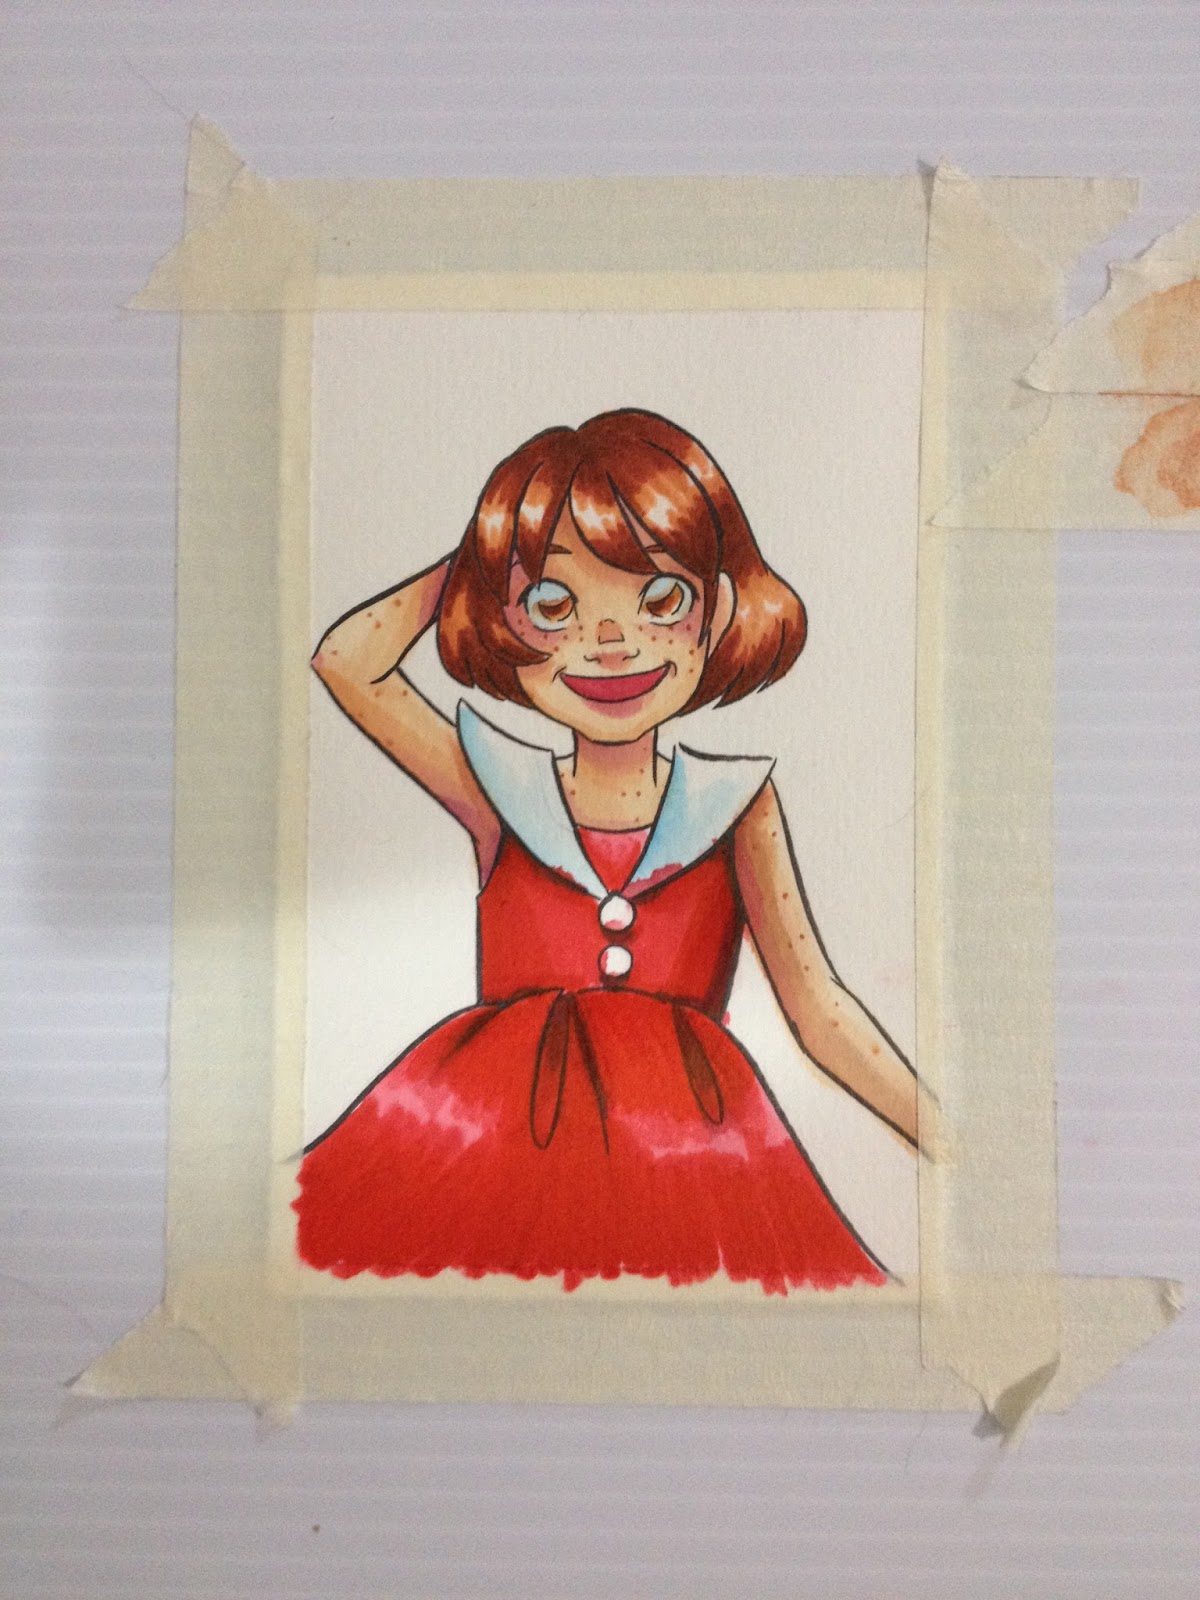
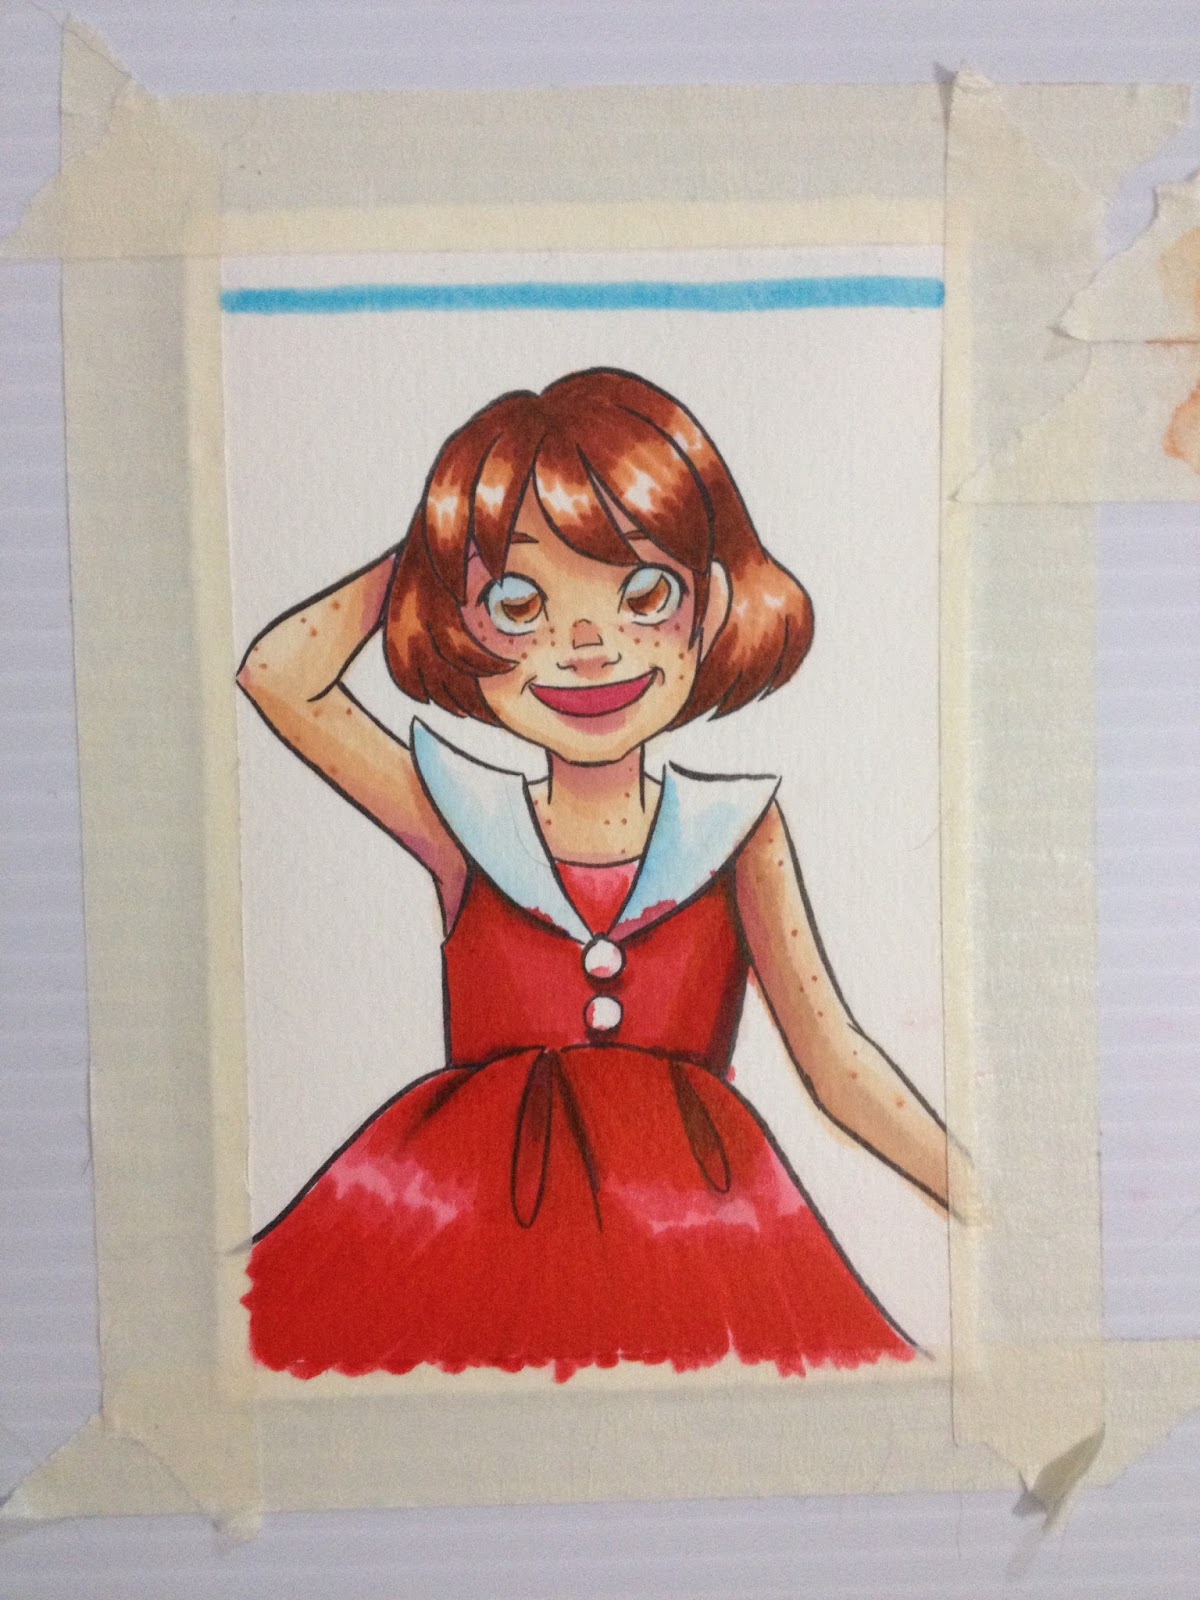
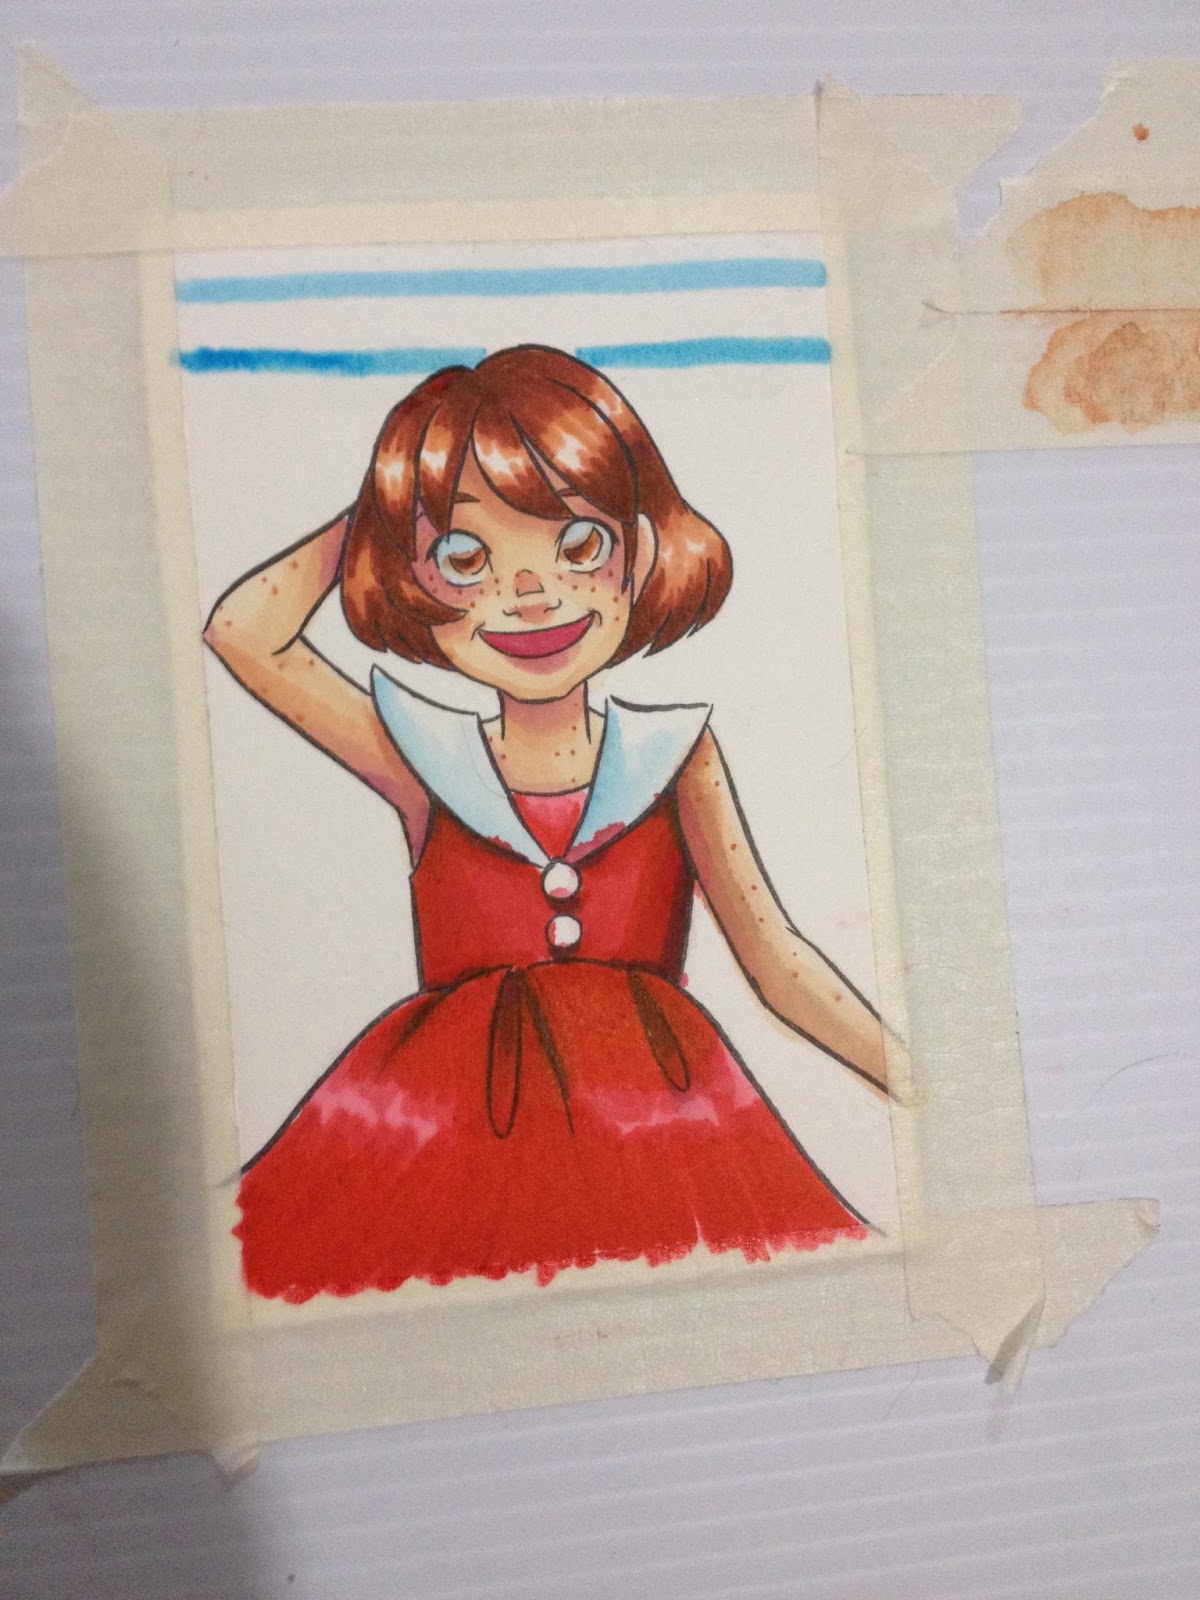
I applied the watercolor marker directly to her collar, and blended it out with water.


And did the same for her hair and eyes.


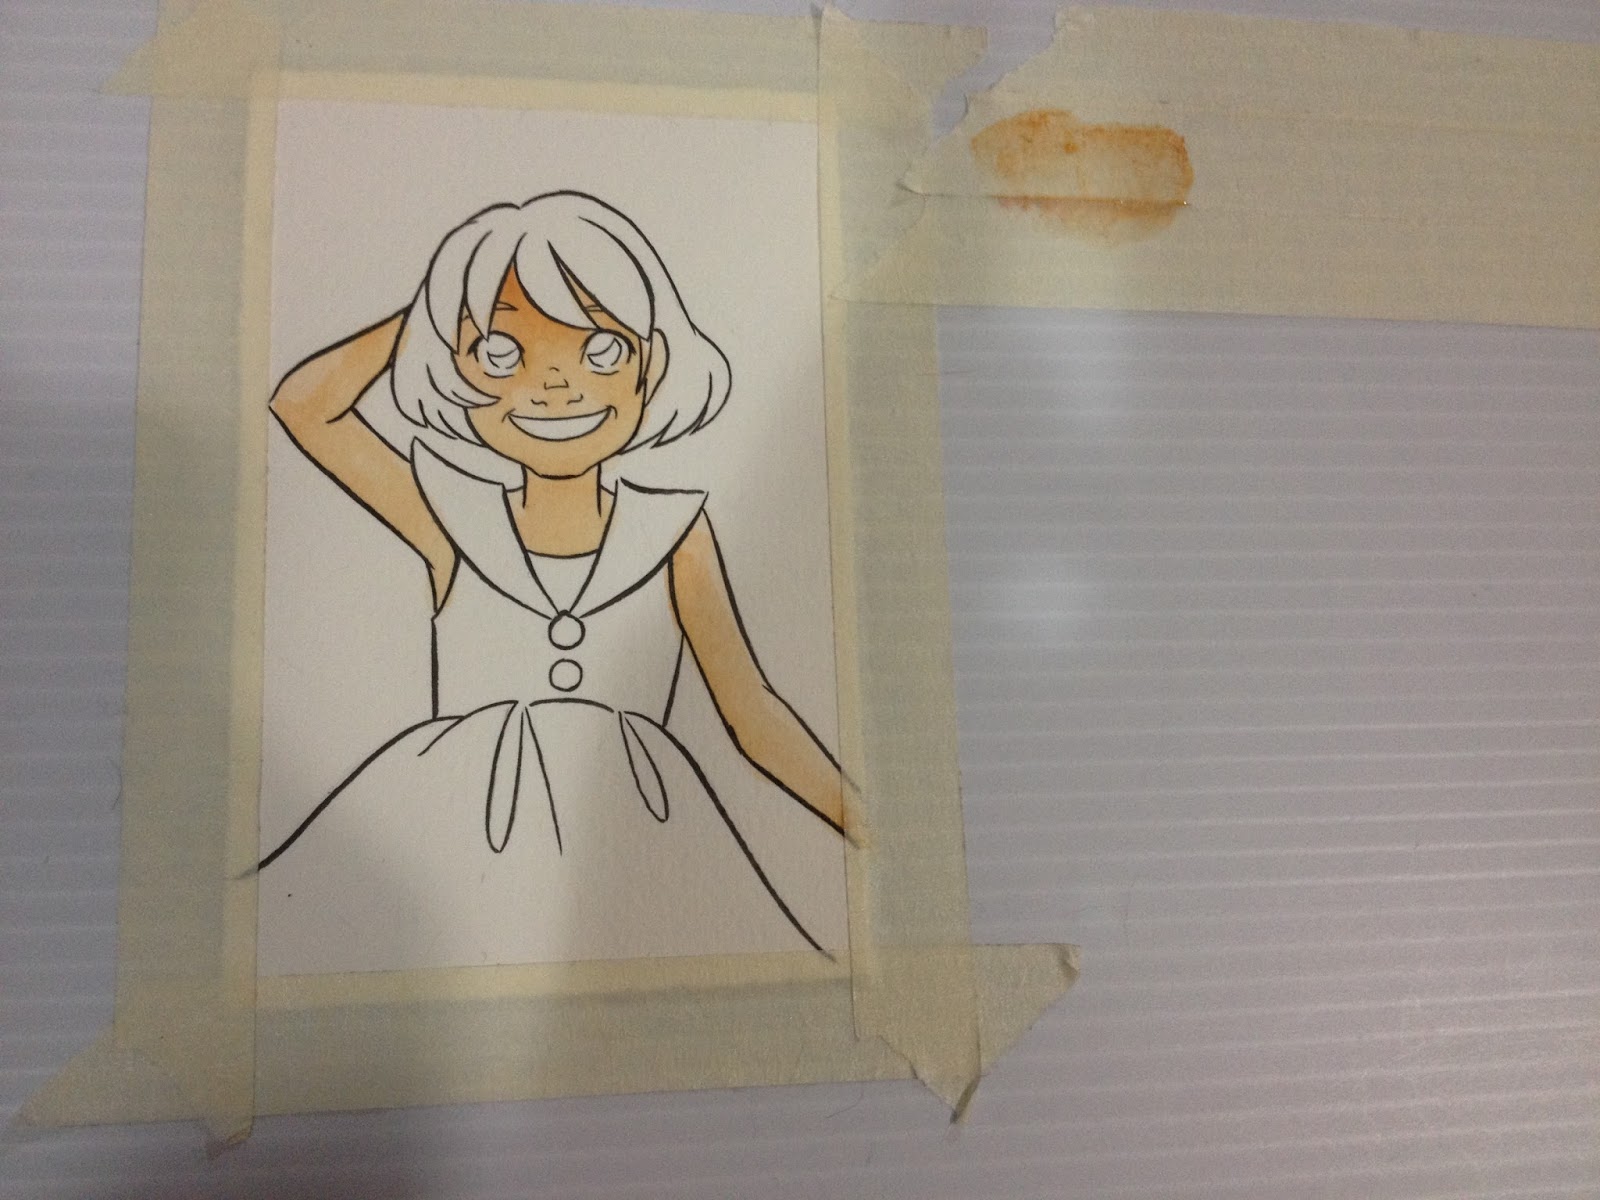
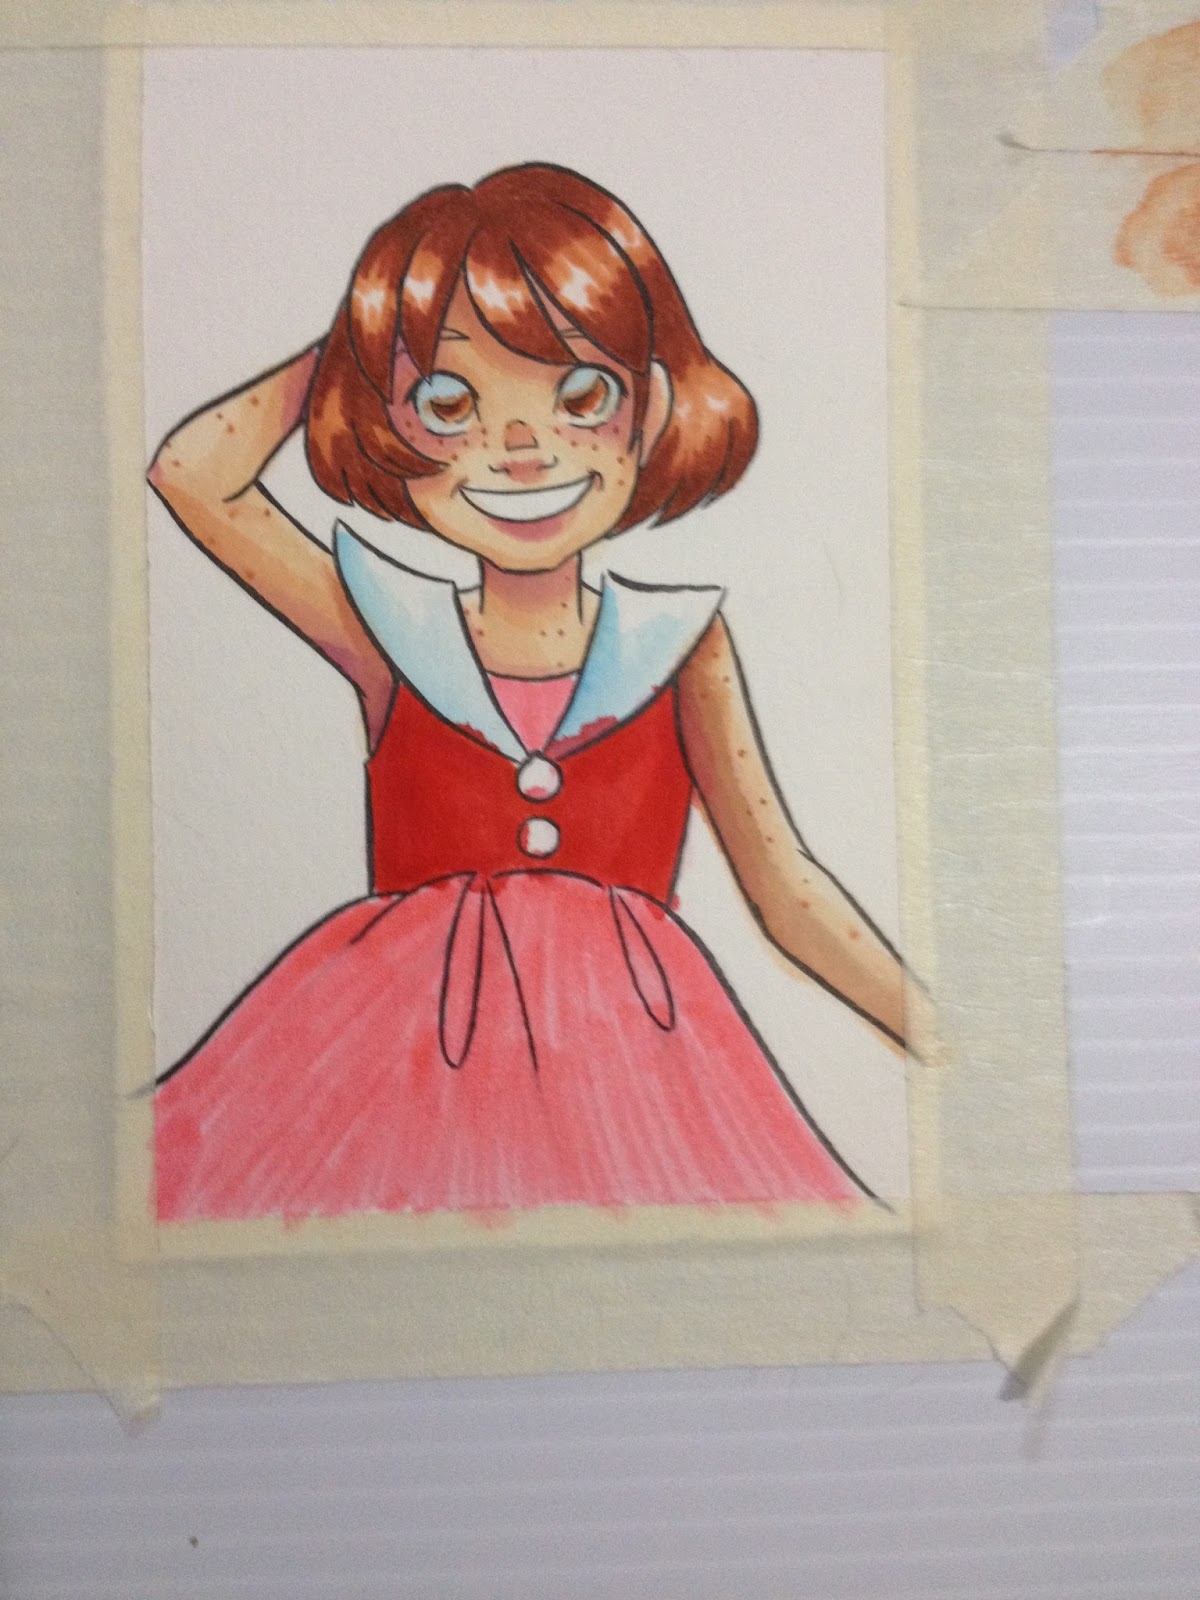
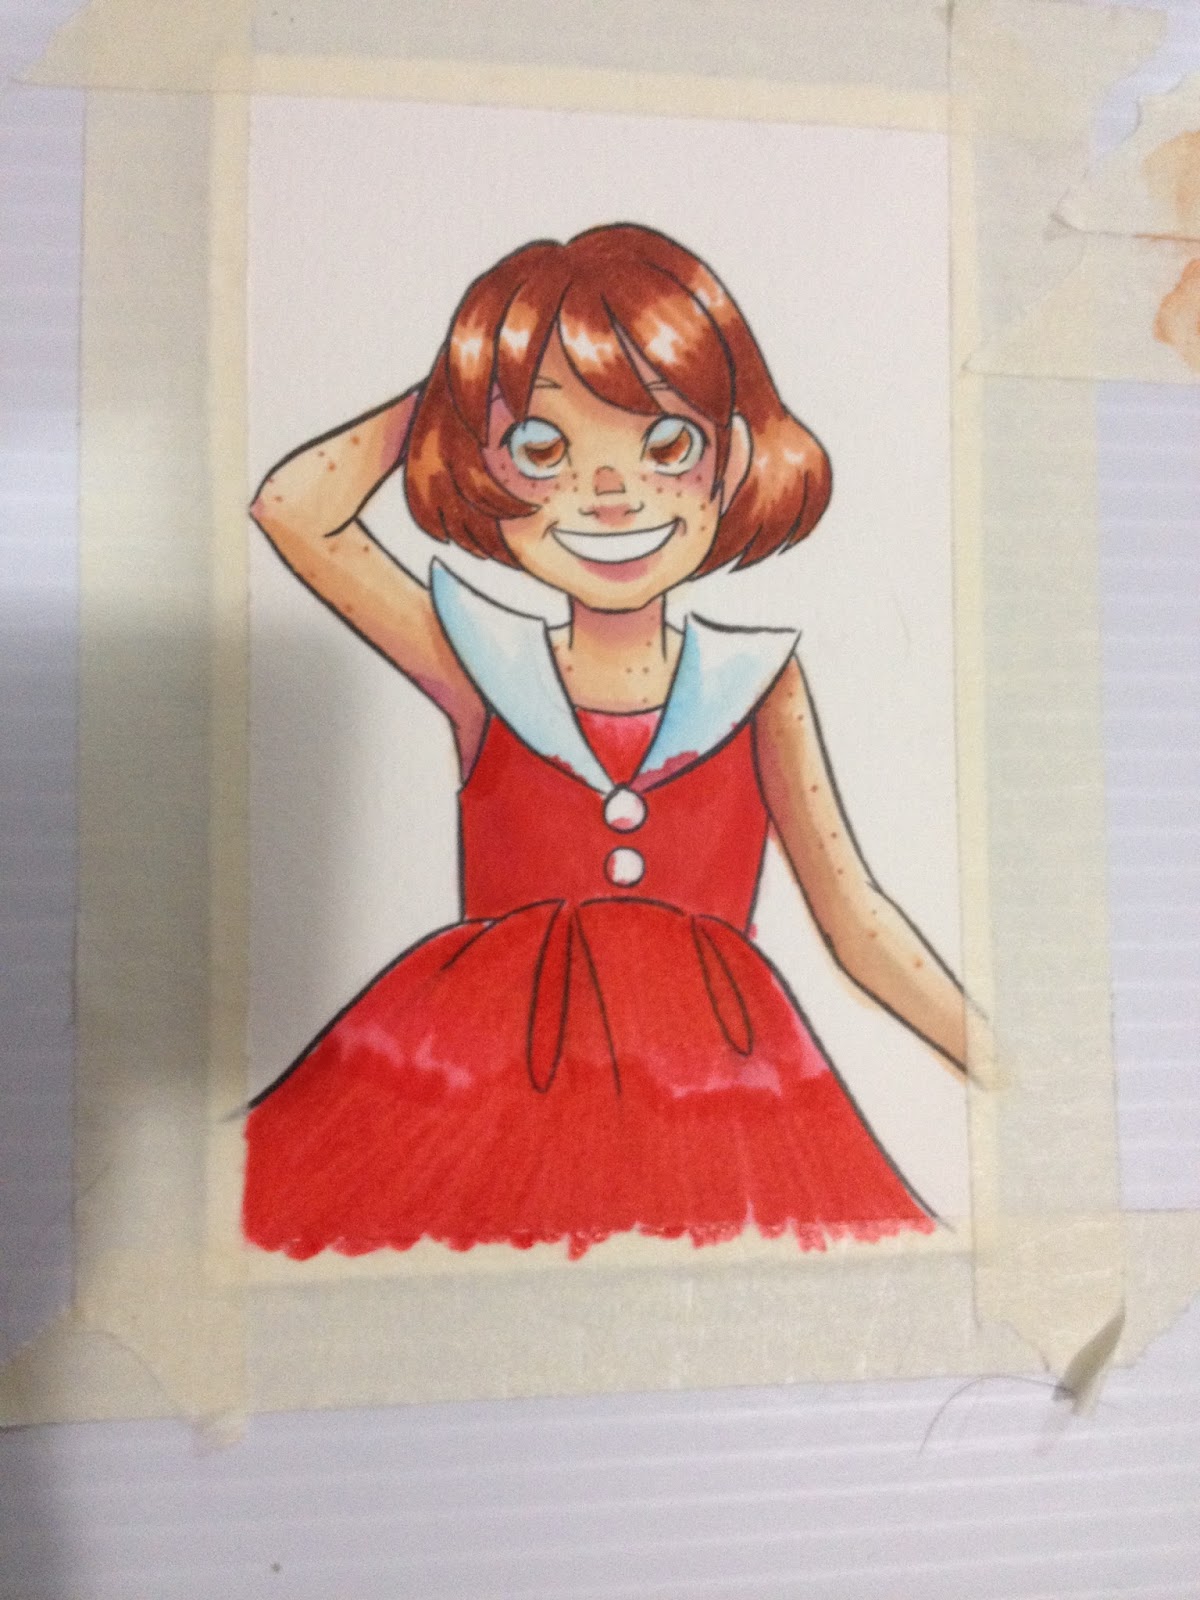
I tried to blend out with the red of her dress, but the red didn't want to disperse.


So I ended up going to a lighter color- pink- to fill the entire area, and then use the red for shadows.


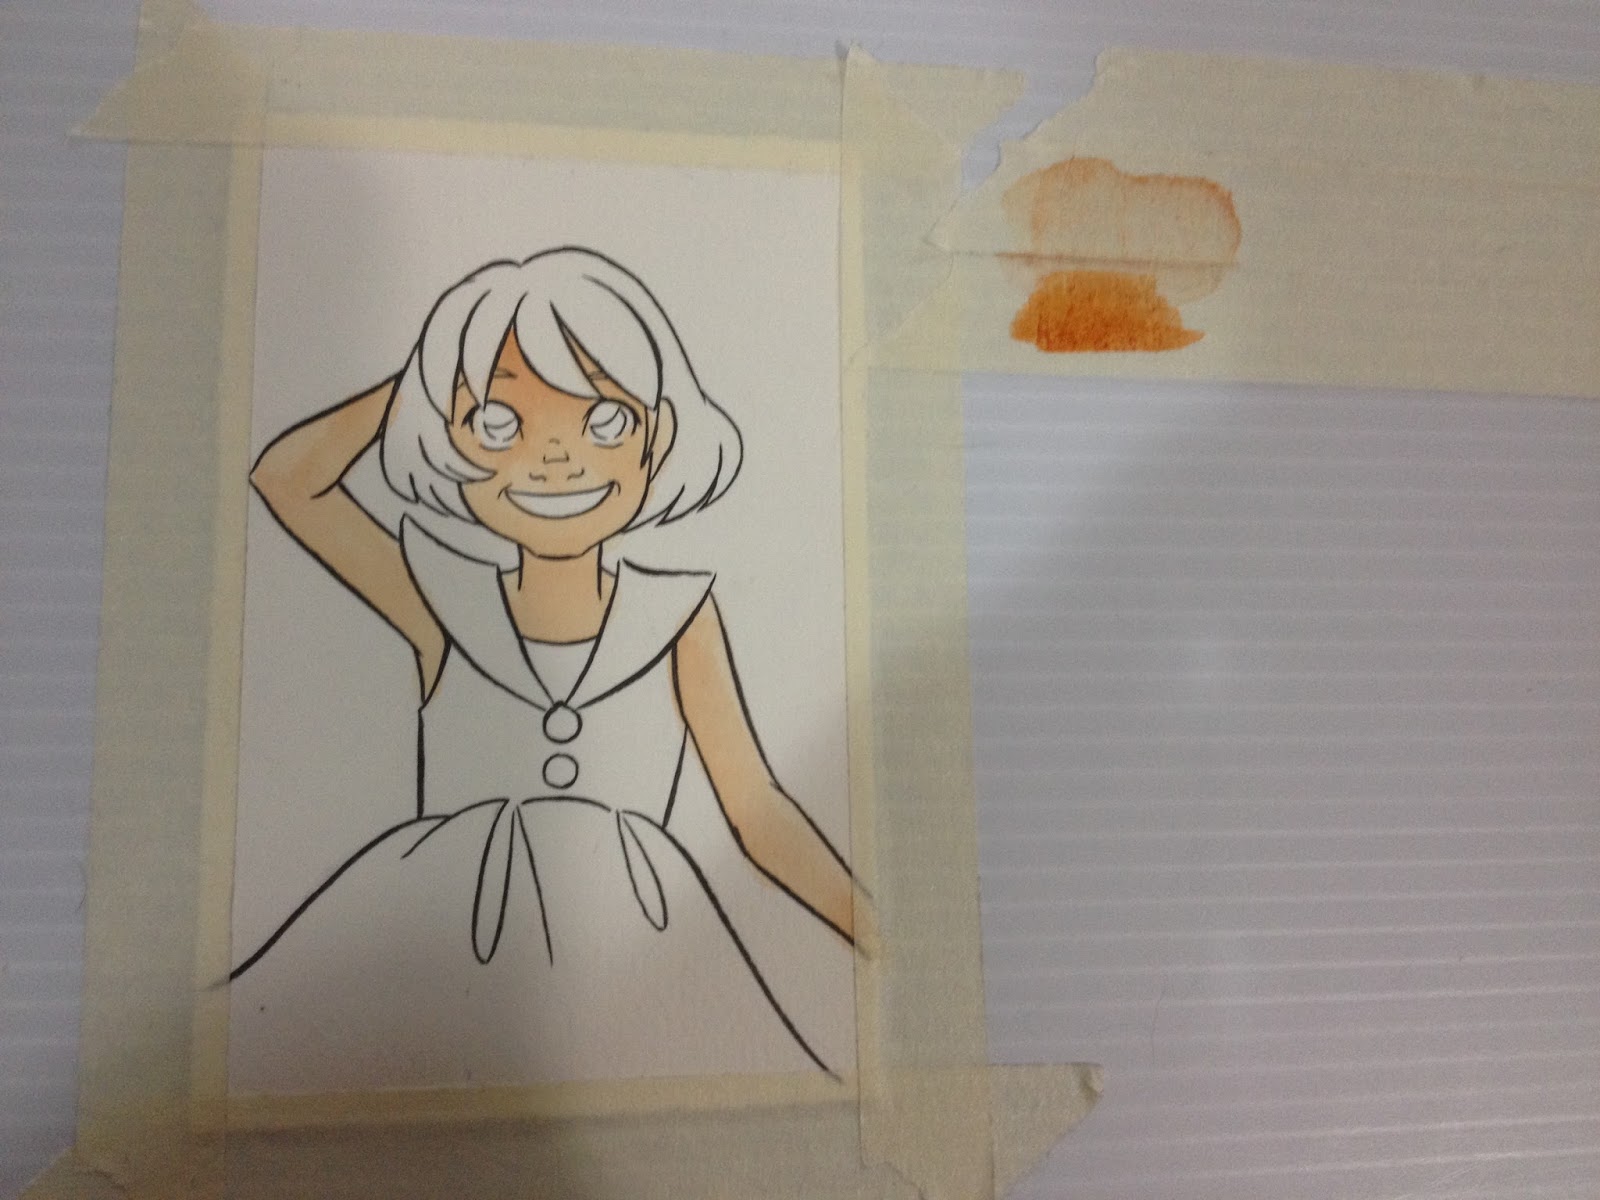
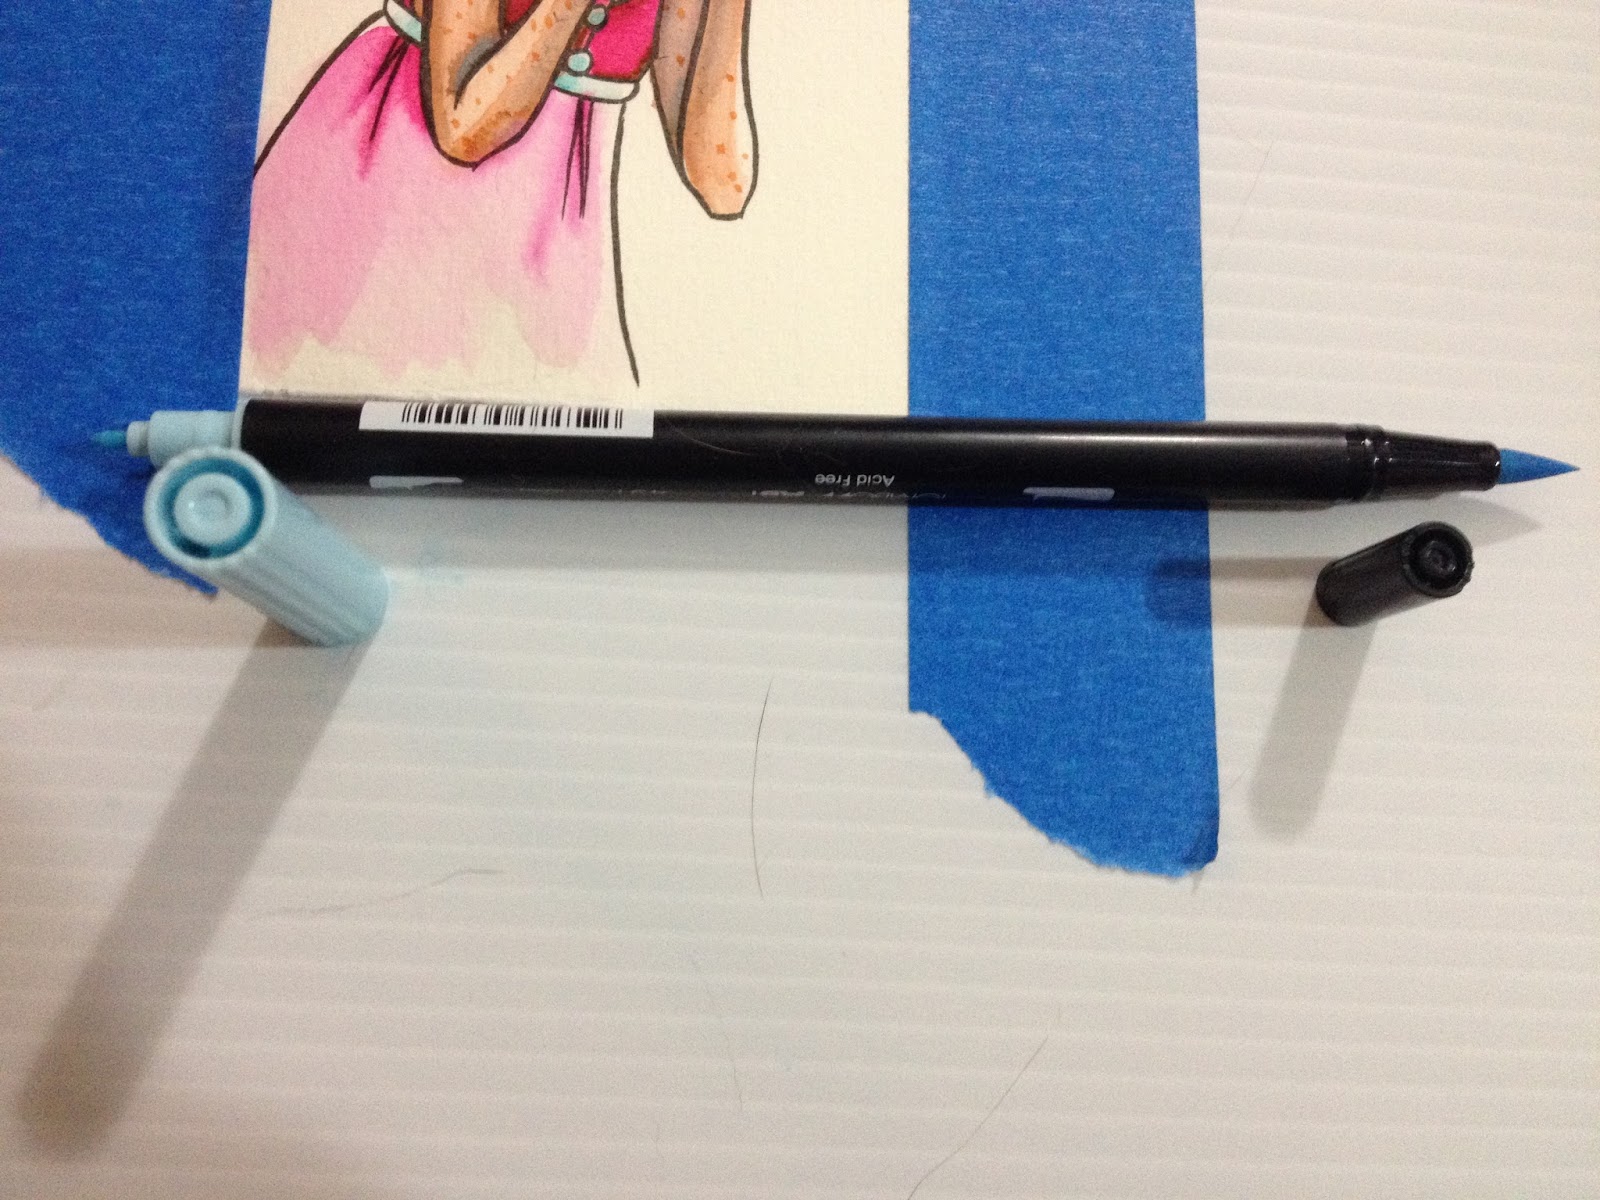
To continue with the nautical theme, I decided to add stripes of blue to the background. I applied the marker directly to the paper, then streaked a wet brush across to soften the line.


The Verdict
I'm still working on growing my Winsor & Newton watercolor collection, as there are some serious gaps in what I own which make these markers not quite ready to serve as an on-the-go watercolor replacement, but these markers are the closest I've come to actual watercolors in a marker form. They're affordable, available in sets or open stock, and sold at most art supply stores, so I highly recommend you pick up a few and give them a shot. Hopefully Winsor & Newton will introduce even more colors.
Please consider donating to this blog or purchasing from Natto-shop (http://nattosoup.com/shop) if you want me to continue publishing quality content. All materials tested were purchased from my own pocket. Keep on Truckin' Nattosoup is not under any sponsorship.
Original Winsor and Newton Marker Review
List of Individual Markers and how well they work
The Practical Test
Setting Up The Test
First I made a reference palette on a 4"x6" piece of Fluid watercolor paper to keep with the markers at all times. I do this for all watercolors I use regularly. The color is swatched, blended out with water, and labelled. I also tapped down the piece I'll be working on, which has been inked with a Sailor Mitsuo Aida waterproof brushpen from Jetpens.
I also prepare a 'side palette' for blending and color selection by applying a few strips of masking tape to my gator board.

This palette is useful if you don't want to apply color directly to the paper, either because it will be too saturated, or because direct application never blends out enough. You then wet this color application with a wet brush, swish it to activate all the ink, and begin applying to the paper.


I applied the watercolor marker directly to her collar, and blended it out with water.
And did the same for her hair and eyes.


I tried to blend out with the red of her dress, but the red didn't want to disperse.
So I ended up going to a lighter color- pink- to fill the entire area, and then use the red for shadows.

To continue with the nautical theme, I decided to add stripes of blue to the background. I applied the marker directly to the paper, then streaked a wet brush across to soften the line.


The Verdict
I'm still working on growing my Winsor & Newton watercolor collection, as there are some serious gaps in what I own which make these markers not quite ready to serve as an on-the-go watercolor replacement, but these markers are the closest I've come to actual watercolors in a marker form. They're affordable, available in sets or open stock, and sold at most art supply stores, so I highly recommend you pick up a few and give them a shot. Hopefully Winsor & Newton will introduce even more colors.
Please consider donating to this blog or purchasing from Natto-shop (http://nattosoup.com/shop) if you want me to continue publishing quality content. All materials tested were purchased from my own pocket. Keep on Truckin' Nattosoup is not under any sponsorship.
July 27, 2015
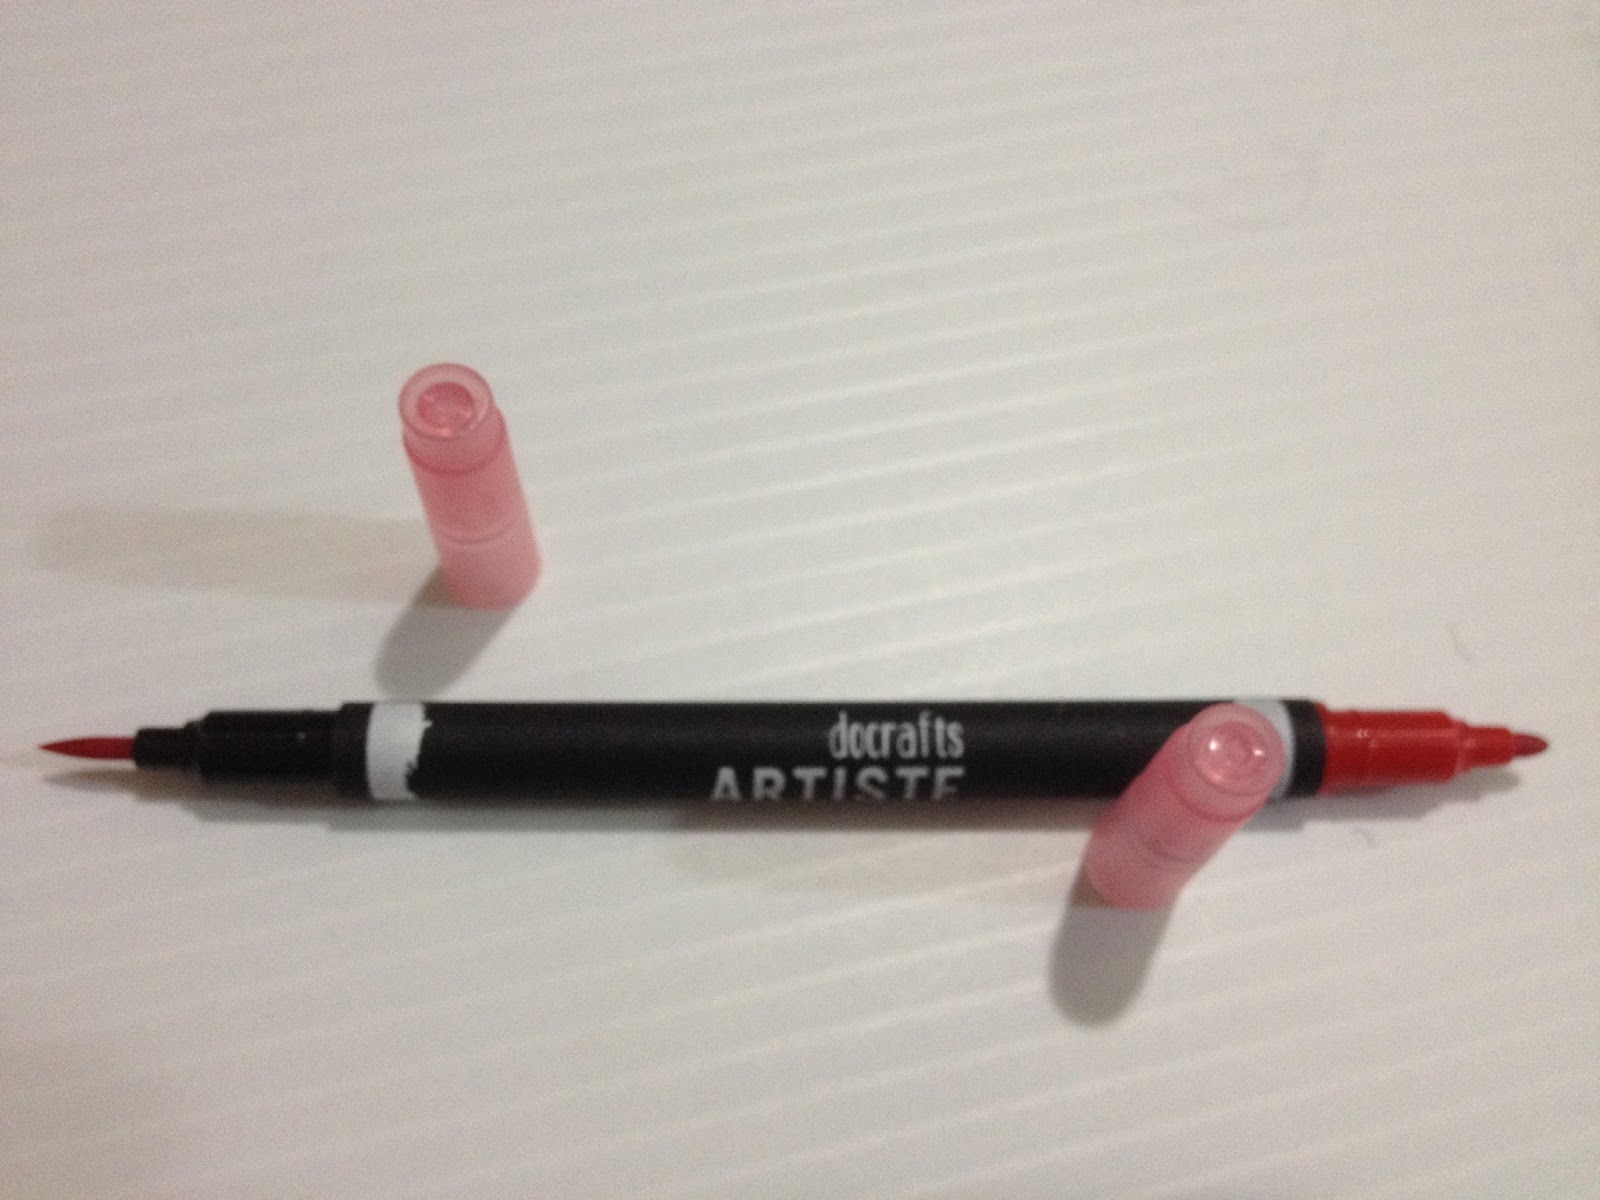
Watercolor Brush Pen Review: Docrafts Artiste Watercolor Markers
I've mentioned on this blog in the past that I love to be proved wrong. I am a bit of a pessimist by nature, but I'm a fool of a pessimist, because I'm always optimistically hoping that the best will happen, and that I predicted the situation incorrectly. I really like when this happens with conventions and art supplies- when my pessimism is kicked right out the door, and I start to believe the best in people (and art supplies).
Let's be honest here. The brand Docrafts with the subset of Artiste doesn't inspire a lot of hope when it comes to legitimate art supplies. At least, it didn't really inspire a lot of hope in me, when I saw the listing on Amazon for their watercolor dual tip markers. And you know what? If I'd actually been in the market to buy JUST ONE brand of watercolor markers, I probably would've stopped at Akashiya Sai, thrown in the towel, and stomped out the watercolor marker door. But this blog does art reviews, so it's easy for me to justify testing out new products, especially when I plan on sharing with you guys. And at $39.99 for 36 markers, it was just the sort of deal with the devil (too cheap to be good, too cheap to pass up) that I have trouble resisting. Unfortunately for you guys, that listing is gone (for now), but you can try out a 12 pack of Docrafts Artiste watercolor markers $20.49.
The Packaging
 My Docrafts Artiste Watercolor Markers arrived organized in a storage easel that was packaged in a clear plastic box. The box was pretty easy to open.


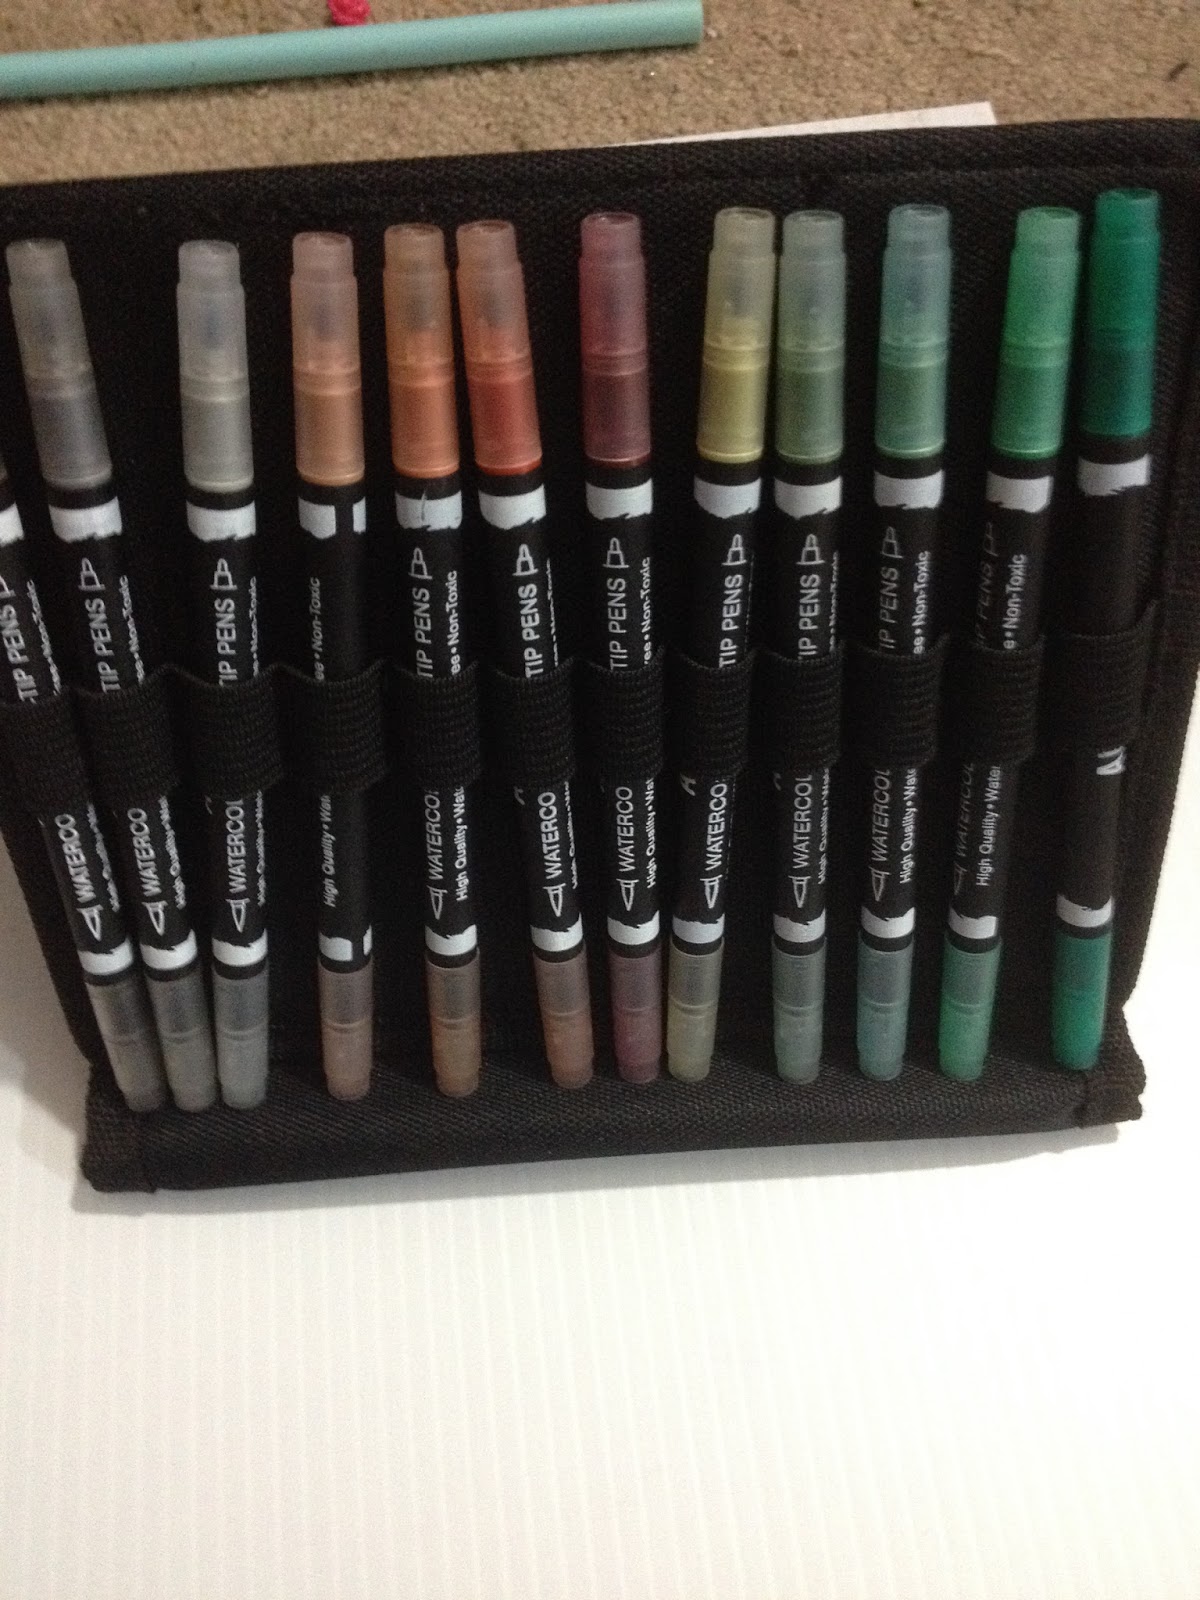
The Docrafts Artiste Watercolor Markers come in their own foldable easel, which can be folded into a triangle, or spread out open. The individual markers arrived sorted by color, and are held in place by elastic. I figure if I dislike how these perform, I can always salvage the case for other uses.
The Pens
So I am torn- these markers look REALLY cool, and the case is actually very neat, but at $39.99 it definitely seems way too good to be true for 36 watercolor markers. I've never seen this brand in stores before, but that doesn't necessarily mean much- these could be European, Korean, or Chinese and I wouldn't necessarily be familiar with the brand. When I first found out about Shin Han Twin Touches, they were ridiculously cheap, and I was very impressed with their quality given the price. The low price was mainly because they were so unknown that I was able to get them on a deep sale, but now that they're becoming more popular, they've risen in price.
The markers don't have color names marked on the barrels, and with 36 colors, it may be very easy to lose track of which color is exactly which. While the caps are fairly close to the color in most instances, it would be nice to have uses marked off on the black case, something I may do in the future. These 'markers' are also very thin and fairly small, so really more like brushpens than like markers, which I tend to think of as being chunky in the hand to hold all that ink. These markers are also not refillable, and feature a matte finish on the barrel that feels pretty decent in the hand. There's nothing but the portfolio style case they came in to keep them from rolling off your desk, so keep that in mind when using these markers.

 To left: Japanese Brush Nib. To Right: Bullet Nib
I'm worried though- I'm so excited about these markers that they're bound to disappoint, right? This is going to be another Akashiya Sai situation. The exception is that I'd had experience using and liking Akashiya's But docrafts claims that they are 'connoisseurs of colour', so how can I go wrong, right?
 The Japanese Brushnib This

The brushnib is the weirdest brushnib I've seen yet, but that doesn't reaally mean a whole lot. The other side is your standard bullet nib- I'd really love to encounter a GOOD watercolor brushpen/marker that has a fude nib instead of a bullet nib, and a super brush for the brush nib, but this isn't that marker, so my search must continue.
The Field Test
Swatching


The bullet nib isn't really noteworthy, but the brush tip is actually flexible and pretty decent, sort of like a weird, long fude nib. The small fude-esque nib probably makes it harder to cover large surfaces with color.
My initial swatches were made by applying the ink, then quickly going over the ink with a wet brush. With the swatches, only one or two colors SORTA separated into individual pigments- if you looked really closely, you could see the colors start to break down (the black, two of the purples), but it's not nearly as bad as the Akashiya Sai watercolor brushpens separated. It honestly doesn't really bother me all that much right now, but future testing may prove it to be unbearable, and I'll have to amend this post to note that. While the colors go down saturated, the color quickly fades out as you add water, but that's also the issue of going from saturated pigment to watered down pigment.
Unlike MANY of the other watercolor markers I've used (actually almost all), Docrafts Artiste watercolor markers can be blended even if allowed to dry. Regardless of drying time, initial application of pigment will still be the darkest area of pigment, so take this into account.
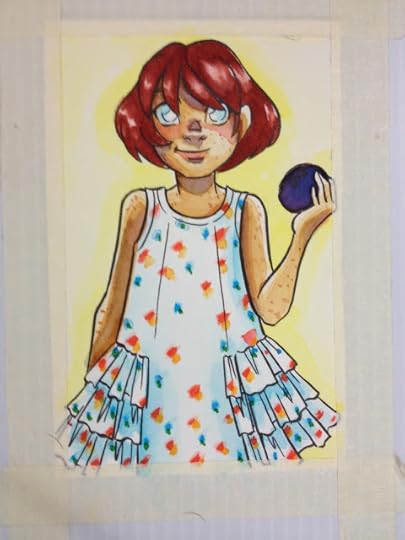
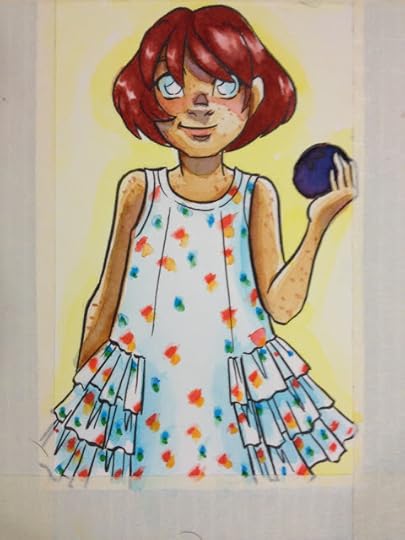
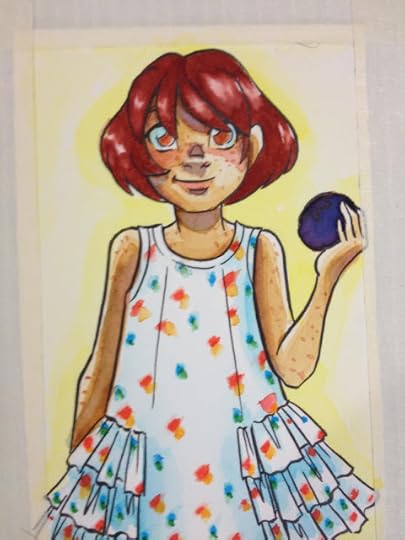
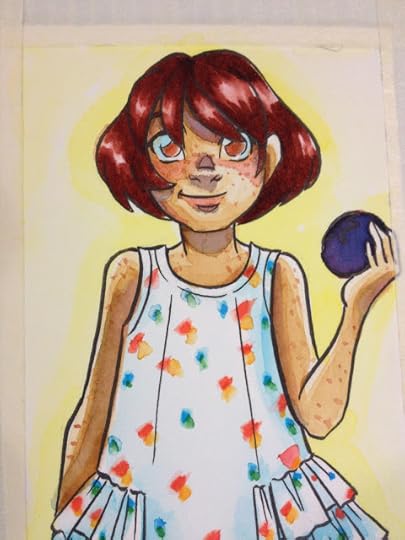
You can use the side masking tape palette to also mix colors by applying one on top of the other before adding water. I did this to mix the skin shadows for the field test illustration- usually I apply shadows last, but I thought it might be easier to handle if I applied the red violet skin shadows first. These markers don't have color names, so I can't list them, but I mixed a hot magentaish pink with a reddish purple.
Keep in mind that the inks reactivate when you apply additional layers of color, which may make them difficult to work with if you're like me, and apply A LOT of layers to build up color.
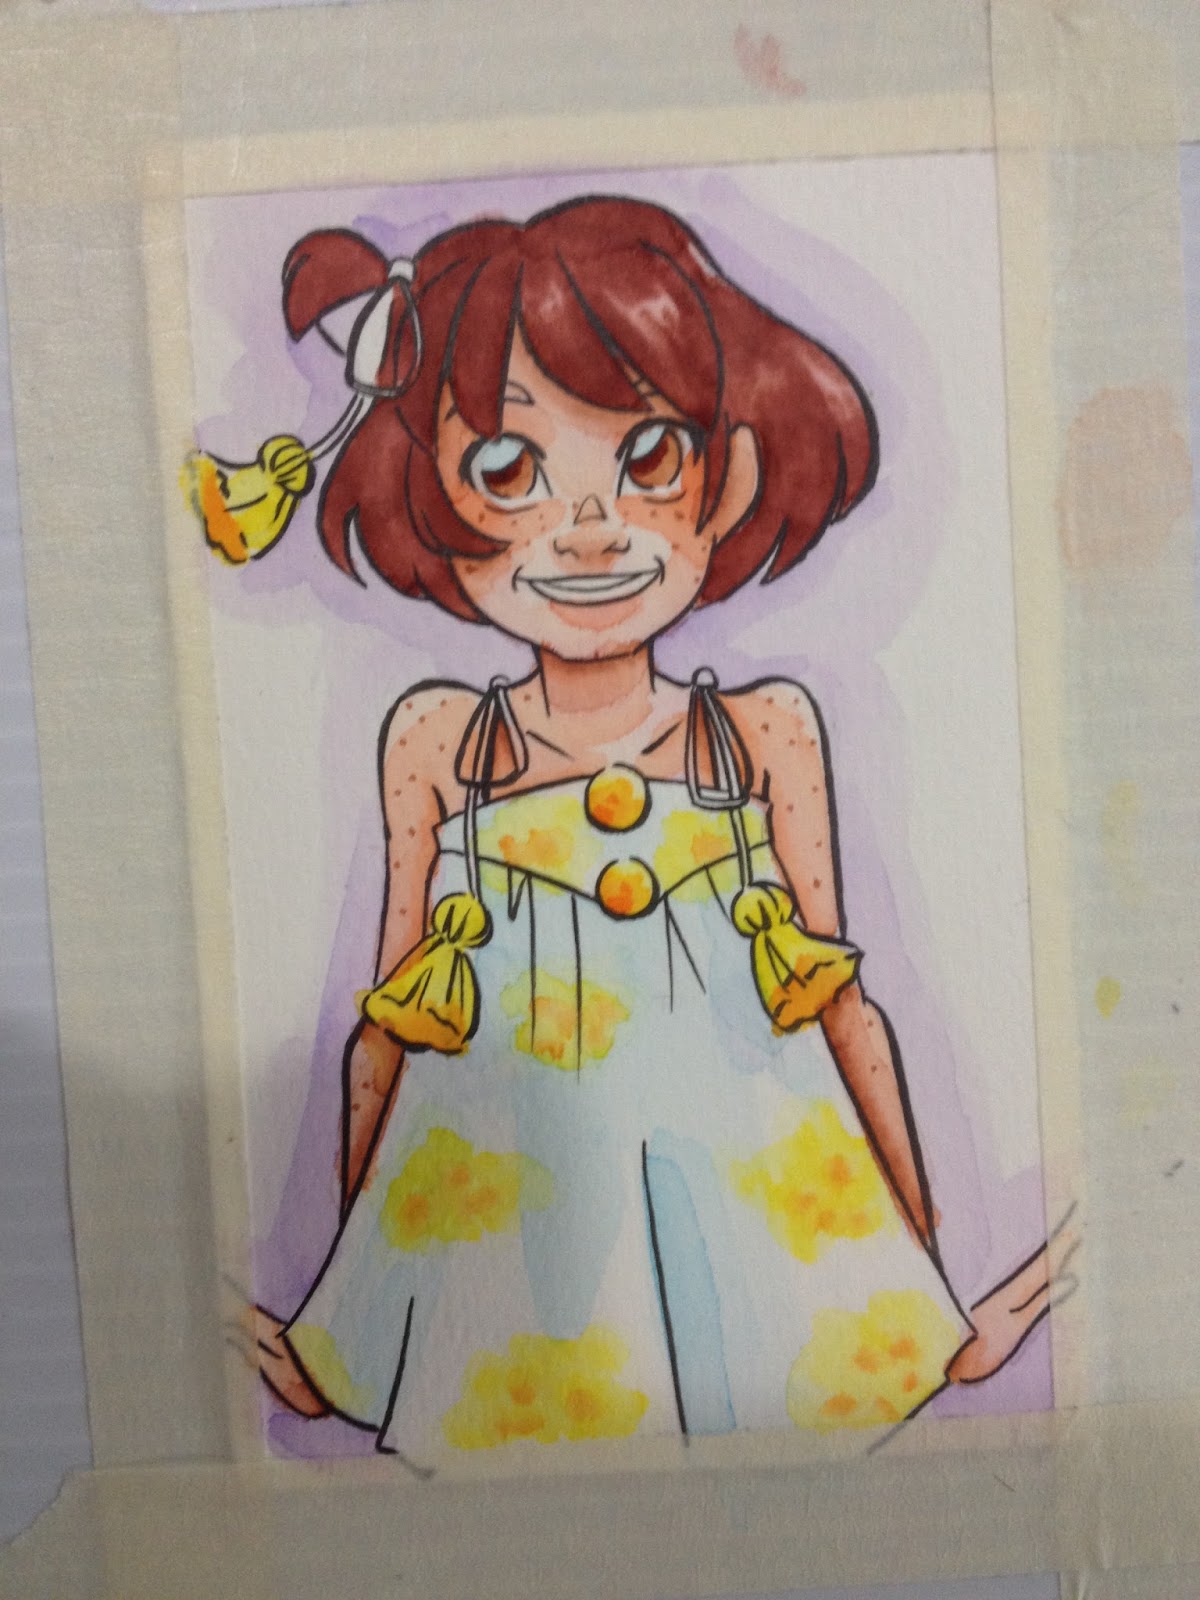
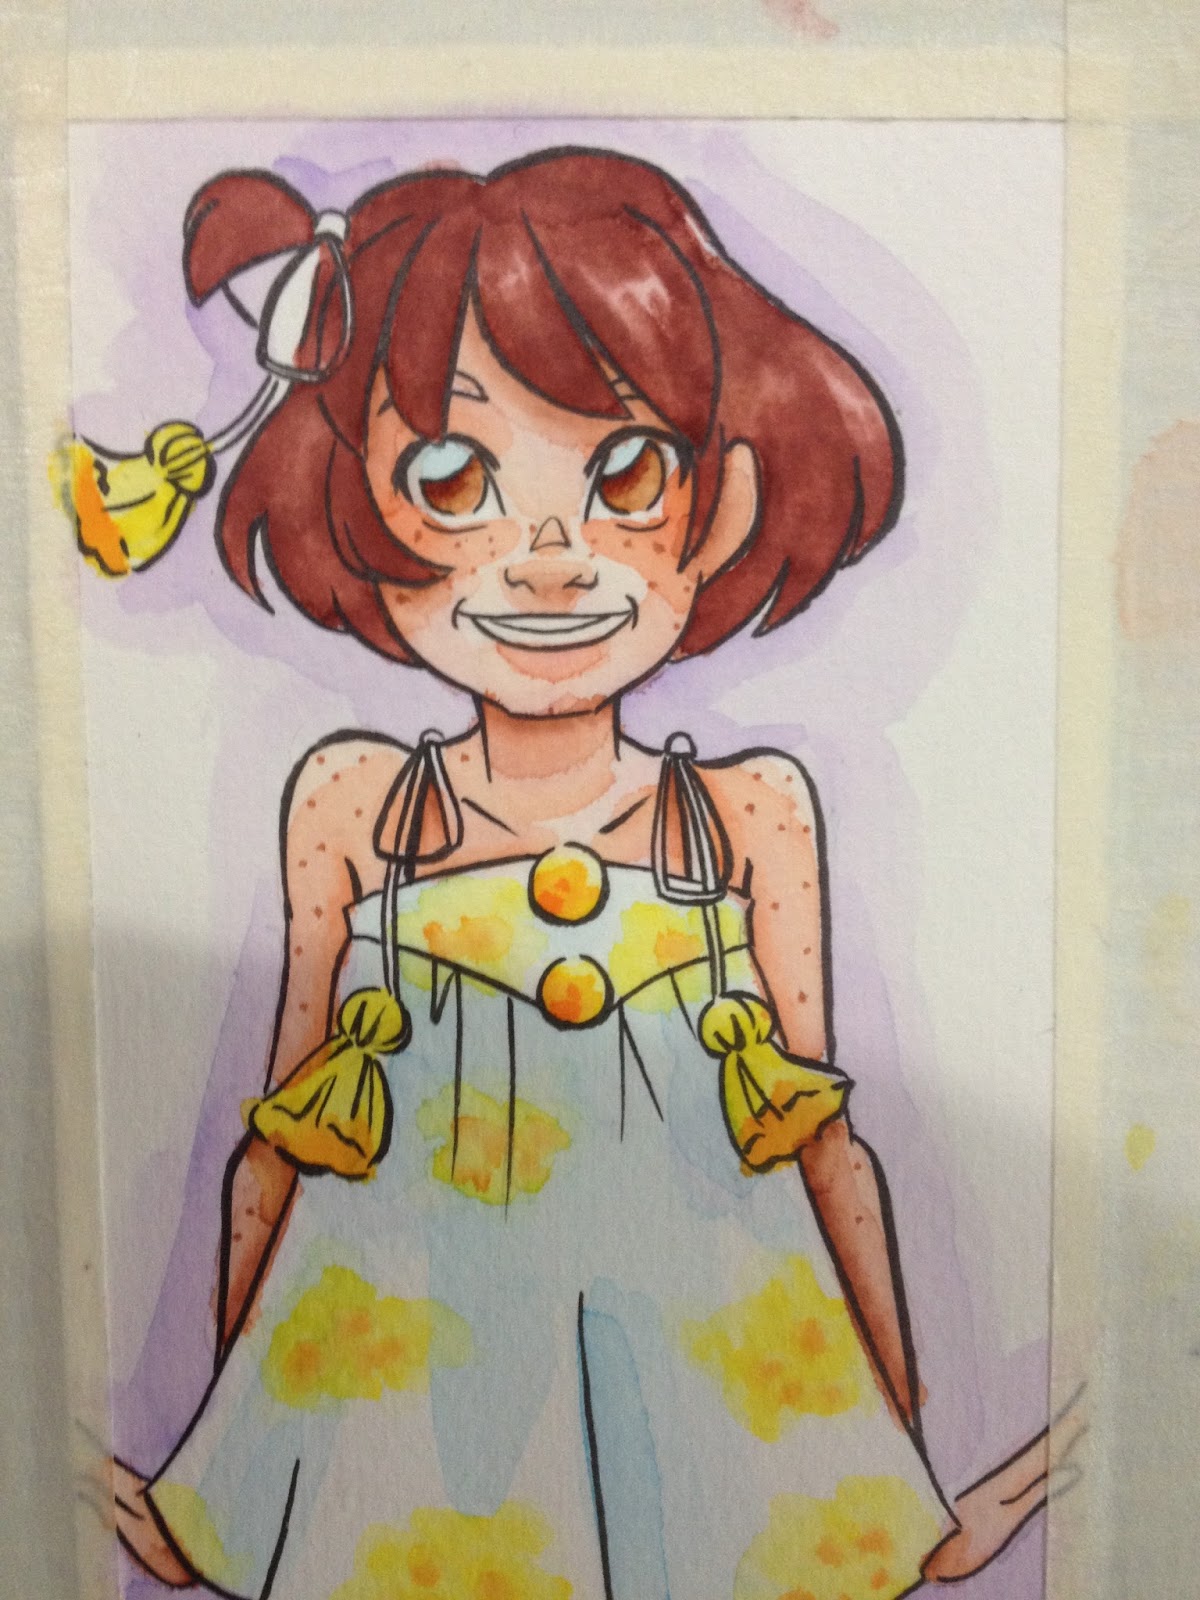
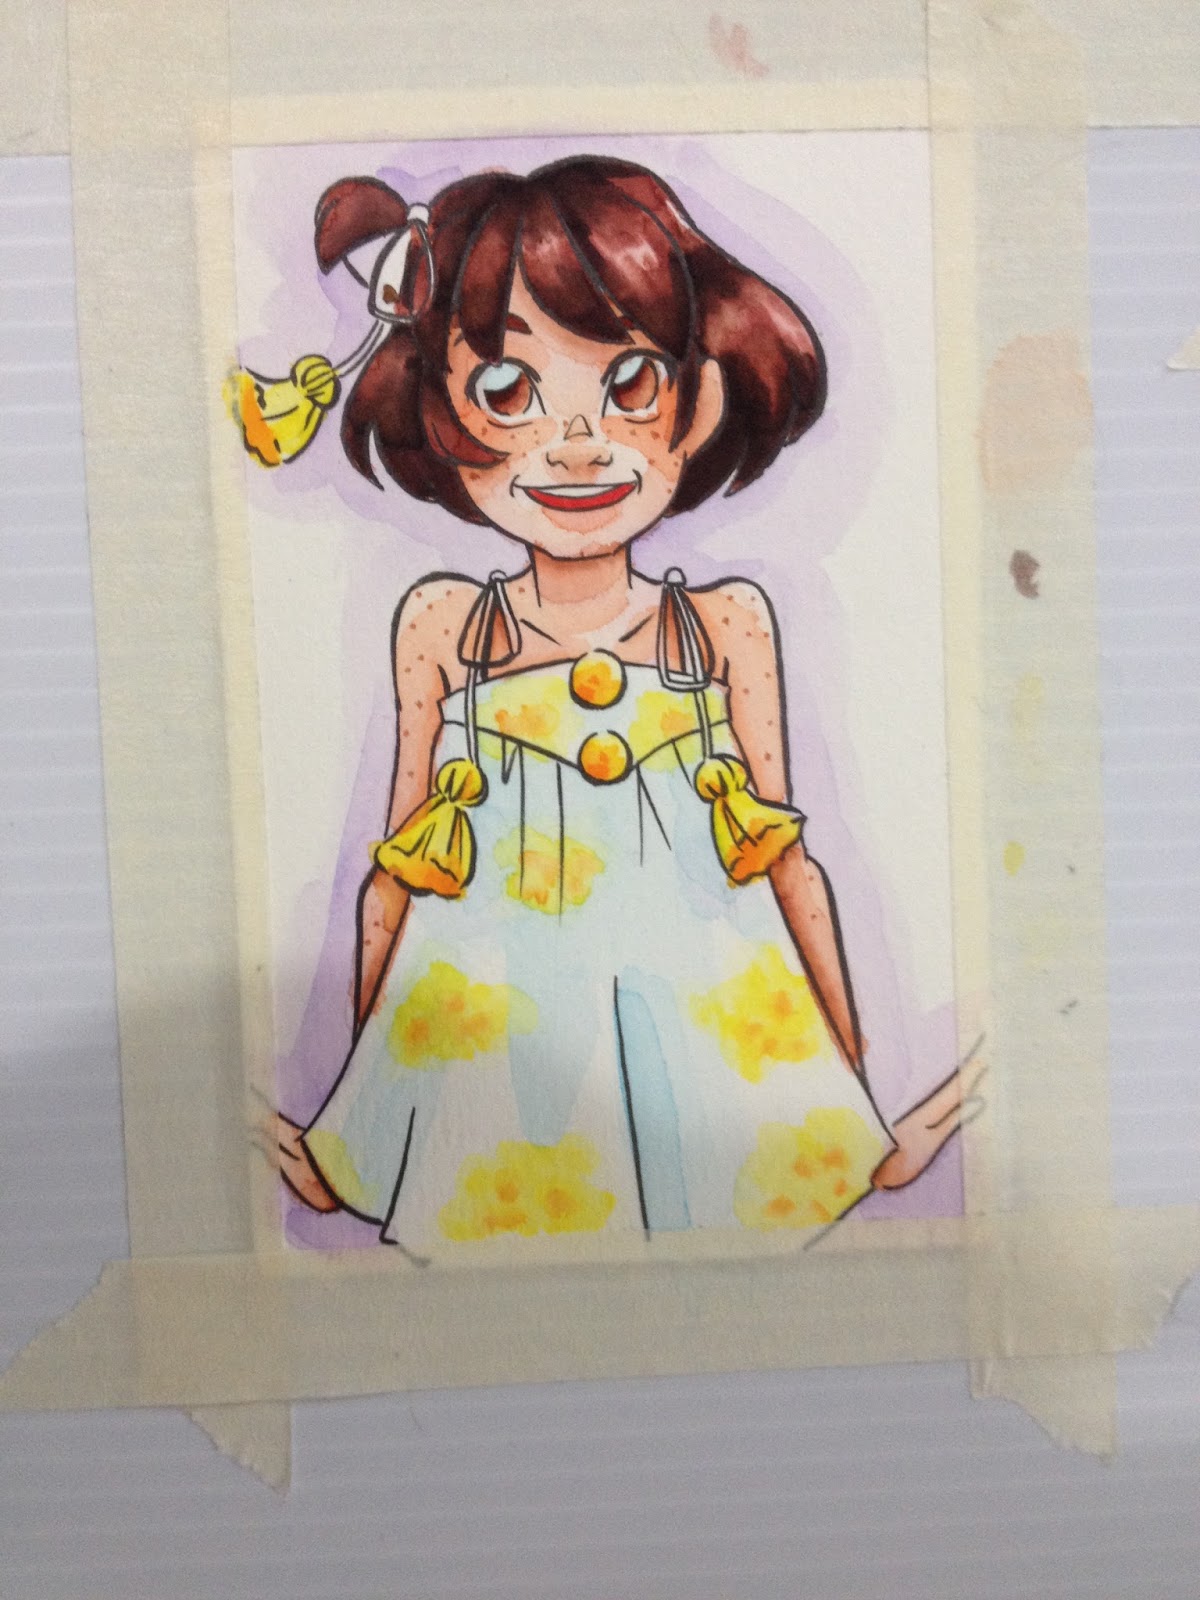
In Practice
Recently I put the Winsor & Newton Watercolor Markers through their paces on watercolor paper, and I made a mini palette to pull from using masking tape applied to the side of my gatorboard support. I used this technique for the Docrafts Artiste Watercolor markers as well.
The swatches I made in my swatchbook really come in handy when actually painting, because the caps on the markers, while really cute, are too translucent to really be color accurate, and the colors do change slightly when water is applied and brushed out.
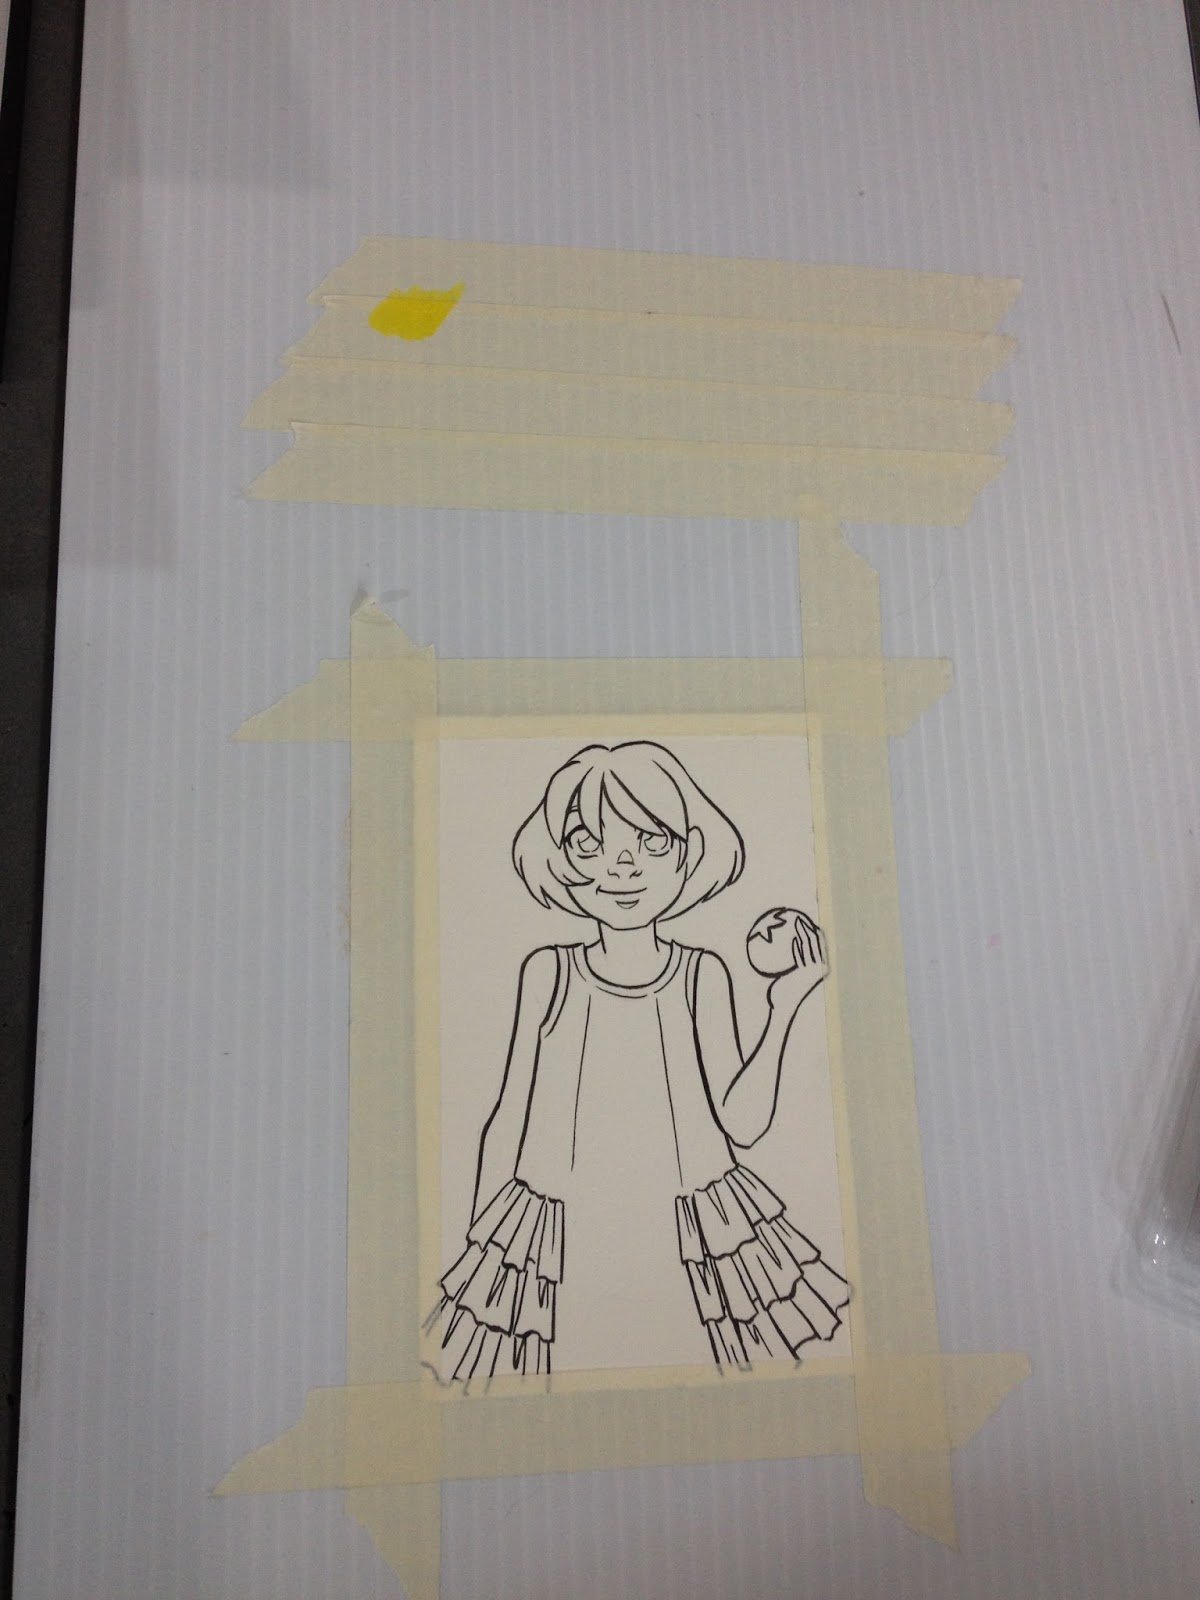
I set up a mini palette using masking tape on the side, so I had the option of applying color directly, or mixing and diluting it first.
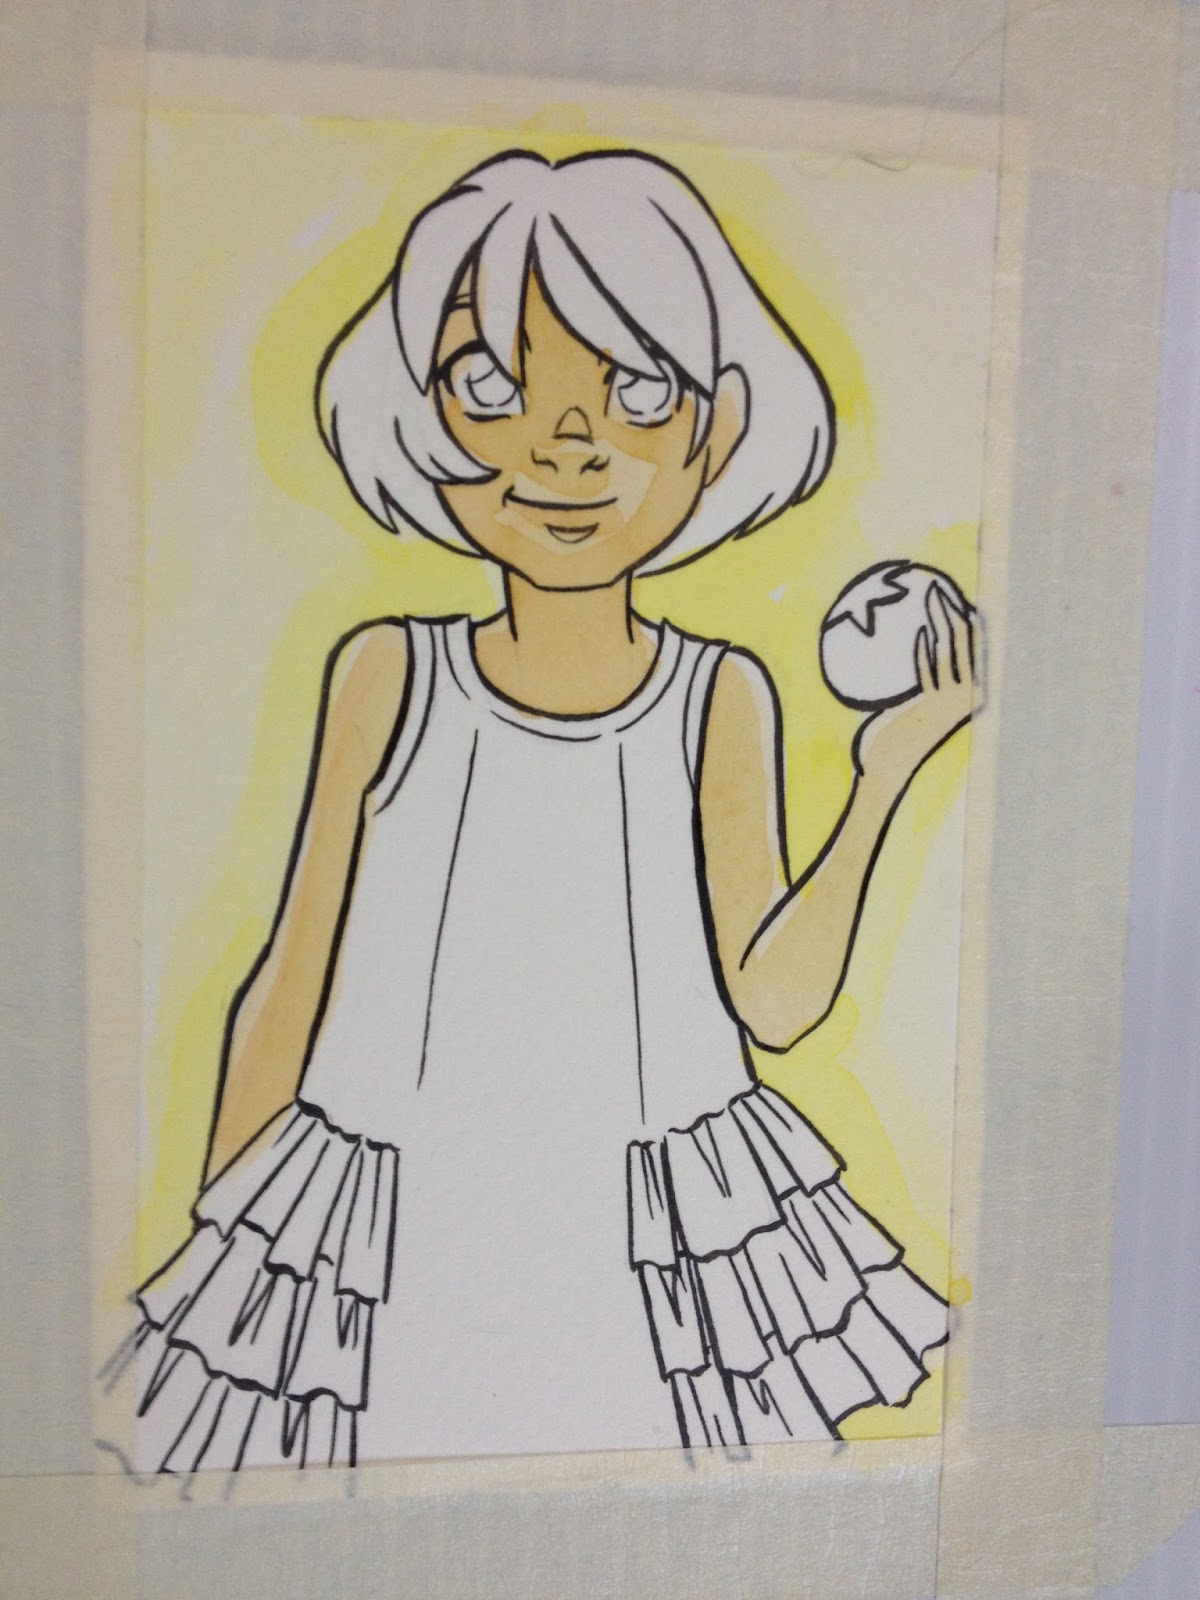
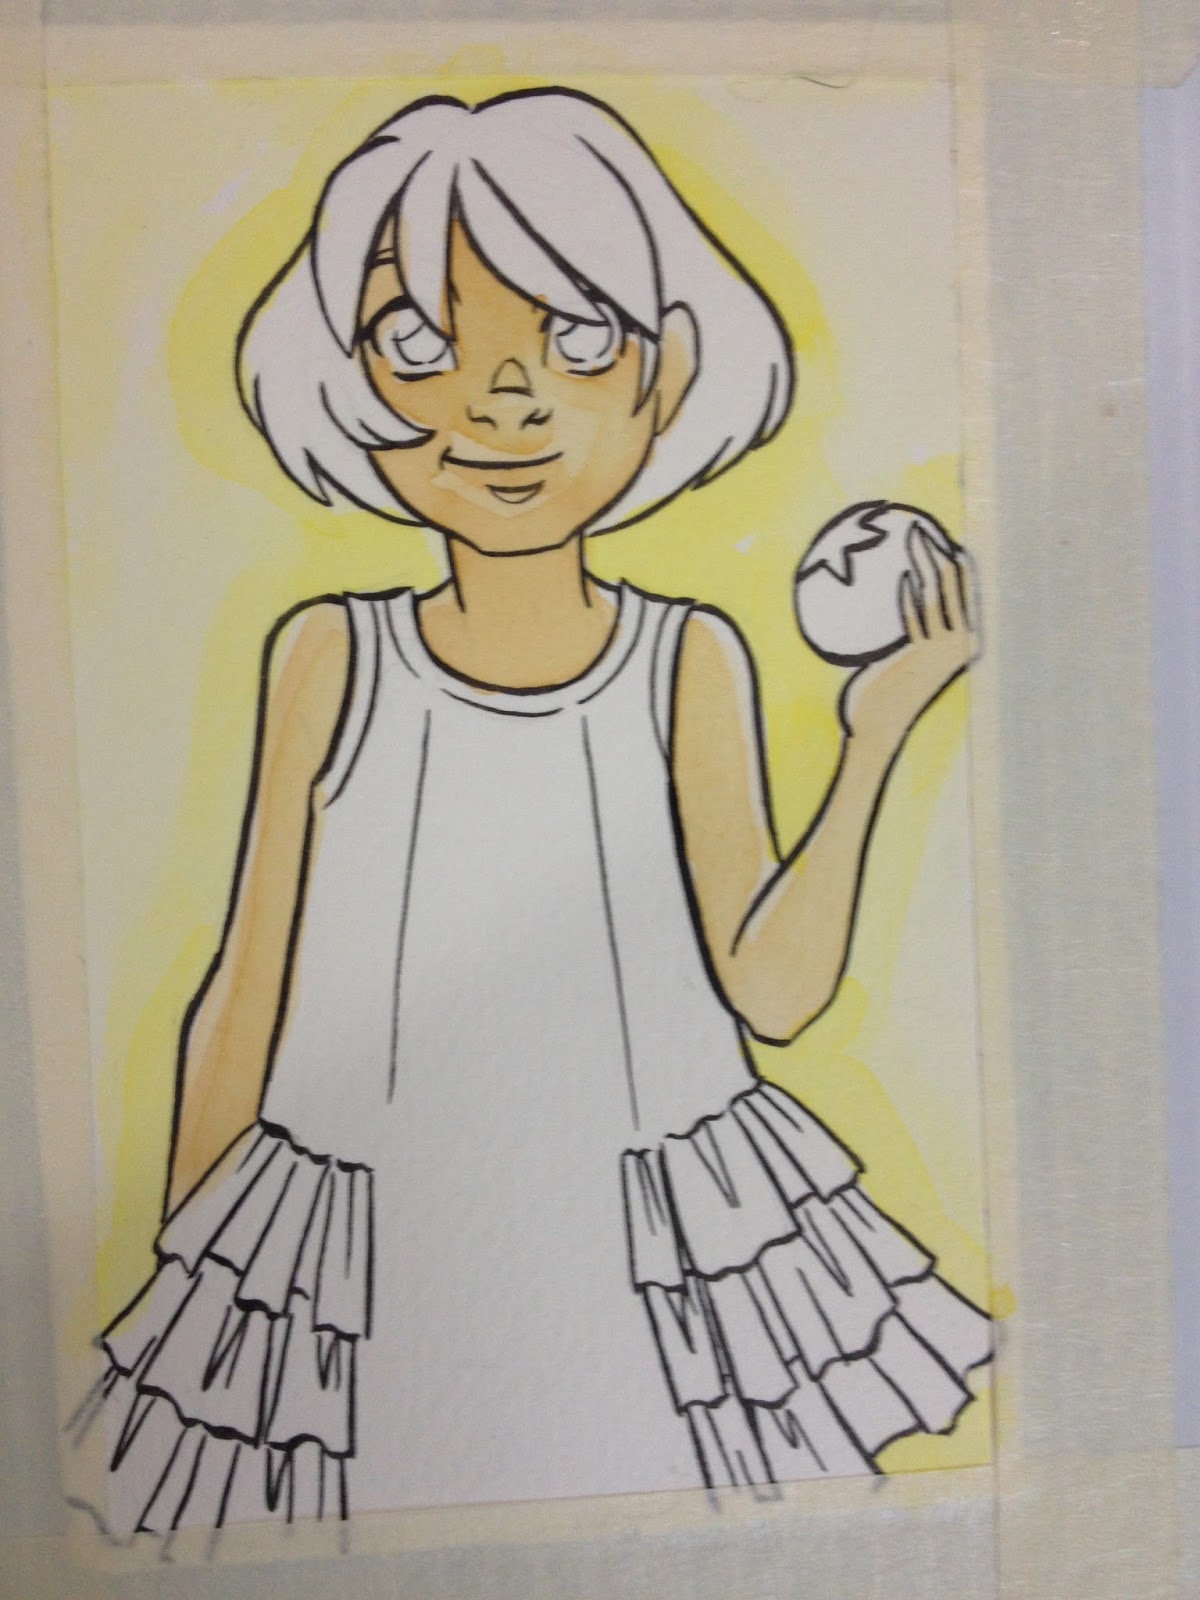
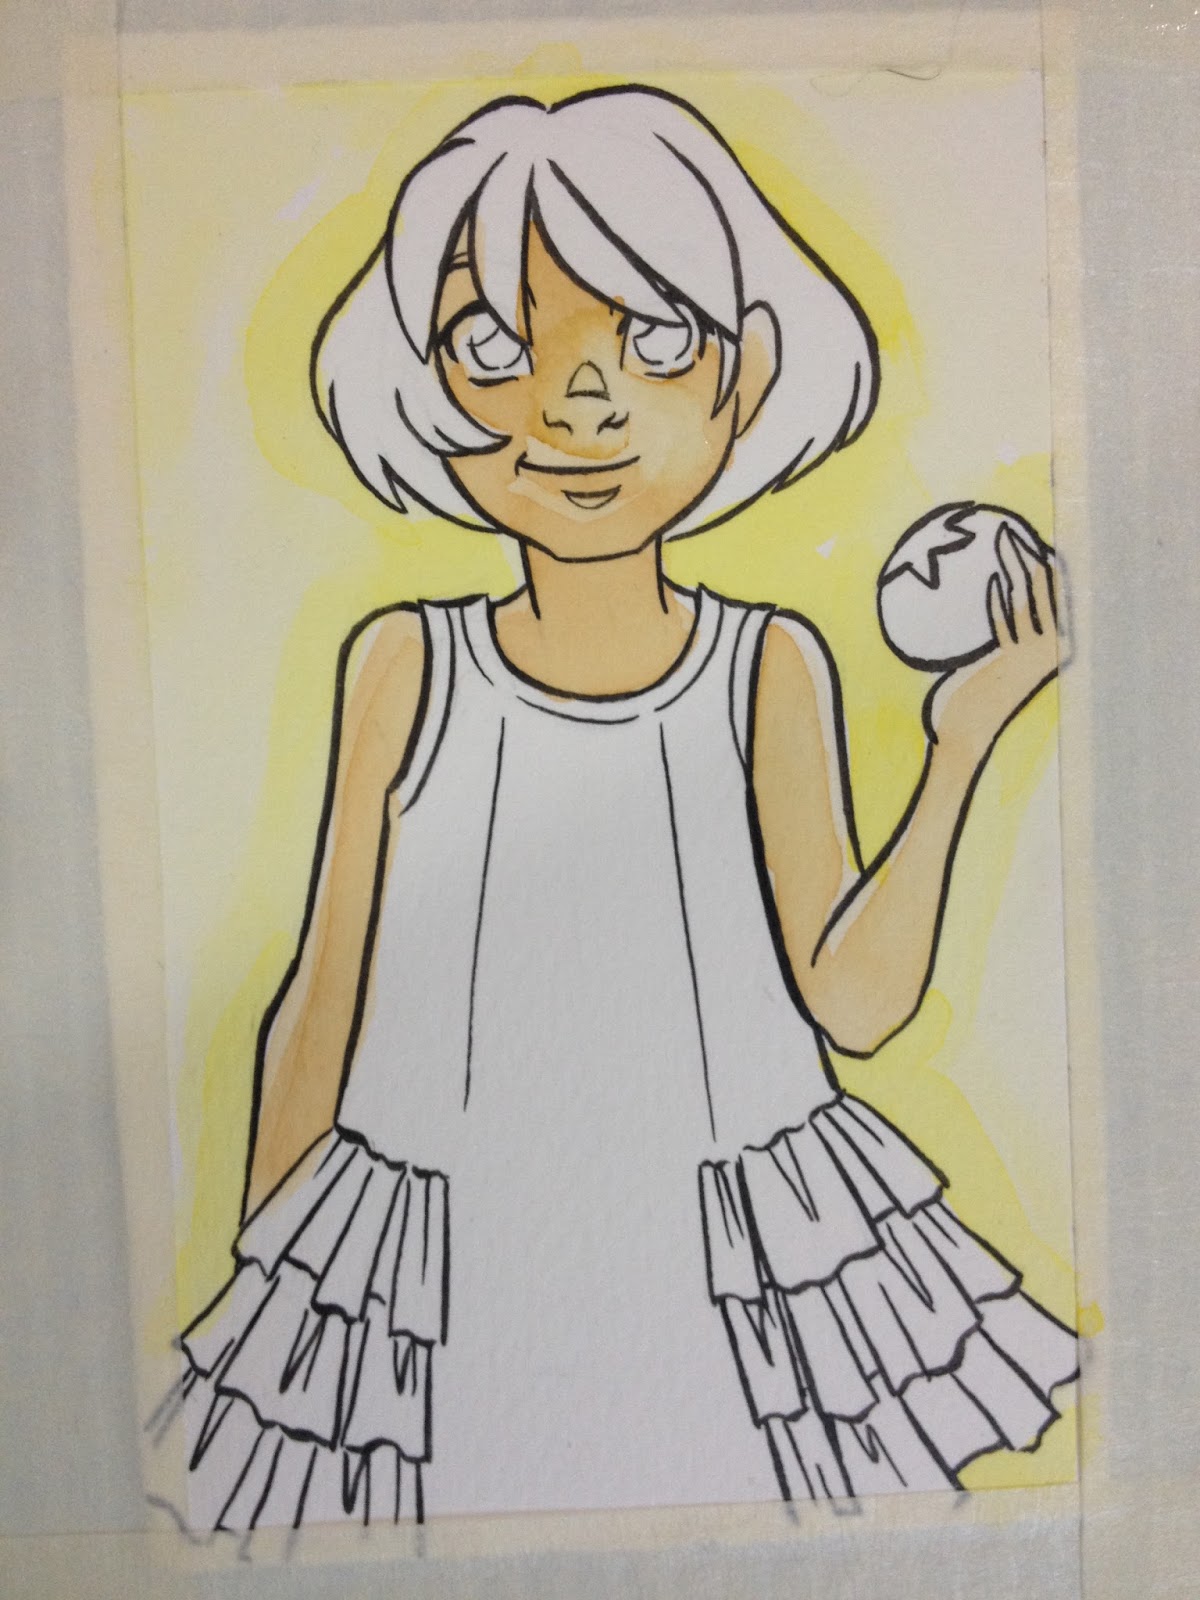
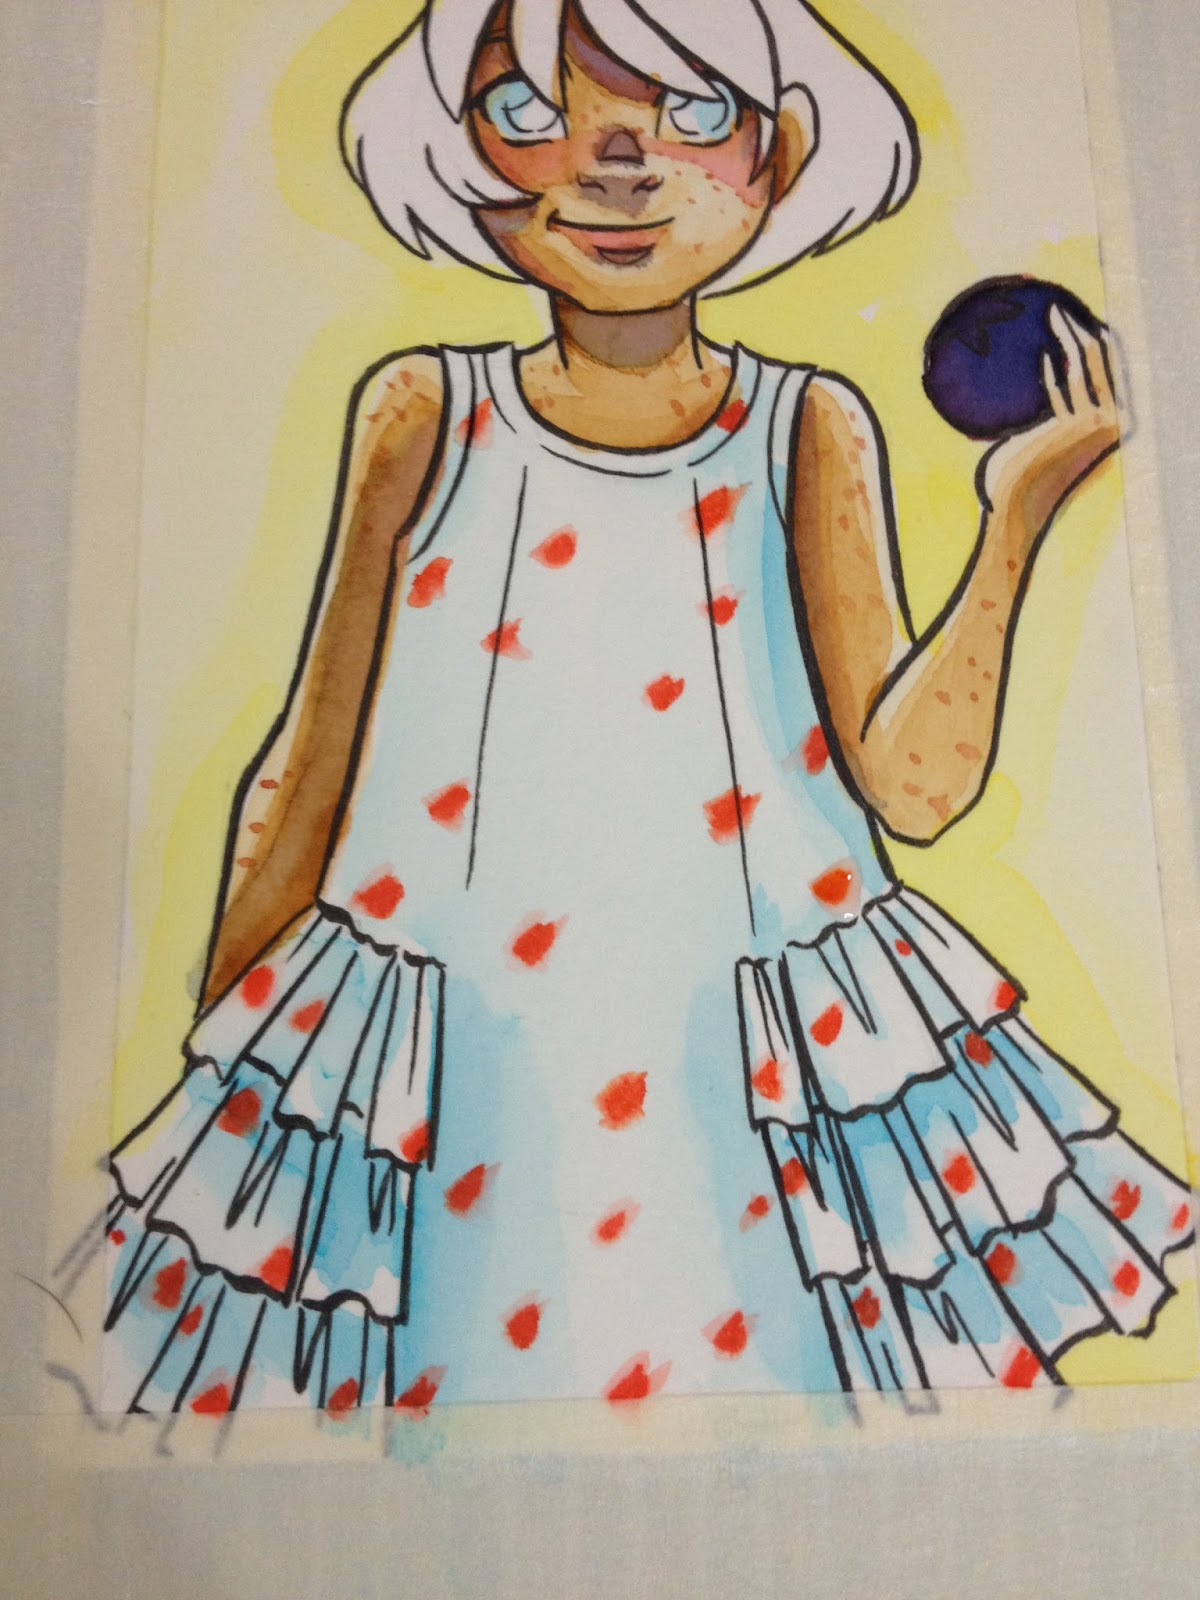
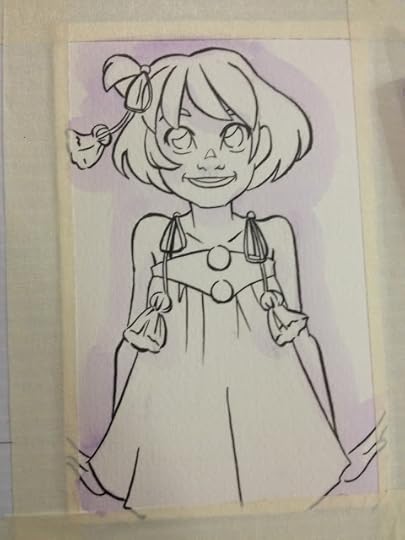
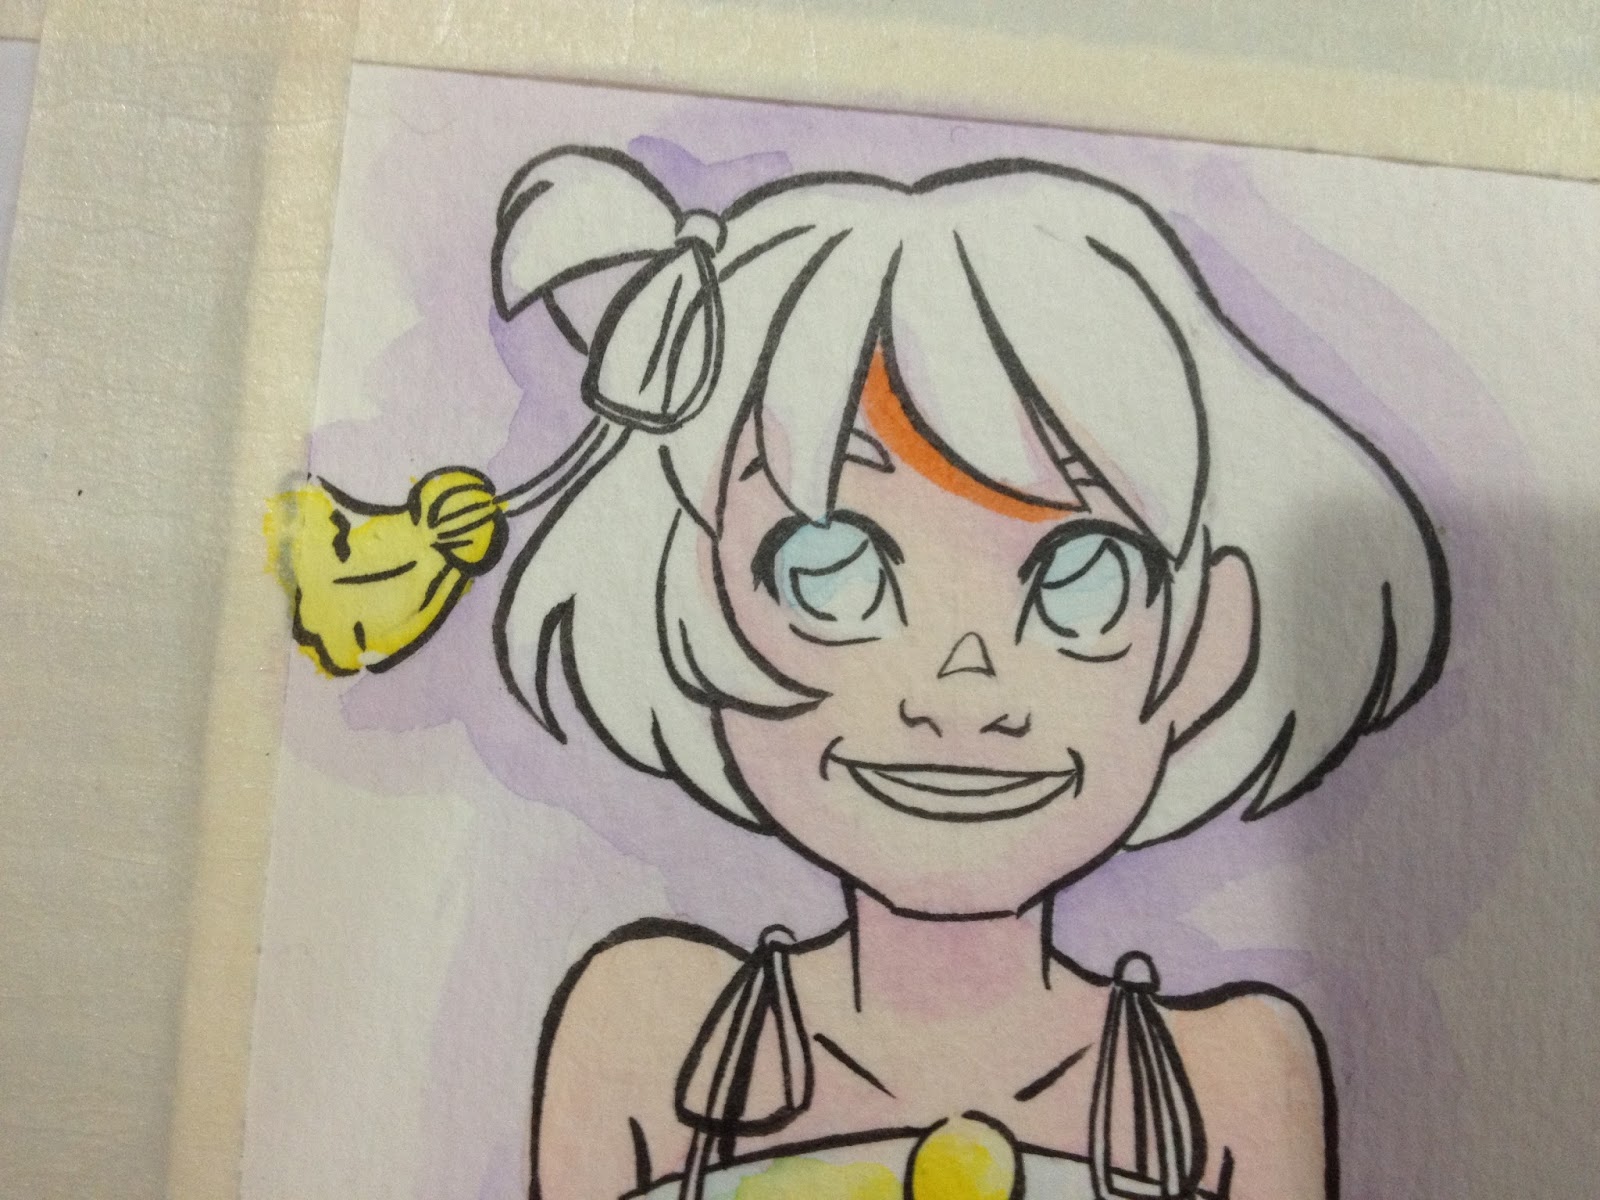
 I opted to apply the background first: A nice violet to contrast with the yellow I planned on using for the dress. I applied the color using the bullet nib on the masking tape, and then used a wet brush to mix the color and apply it to the paper.

I also applied some preliminary shadows to Kara and her dress.

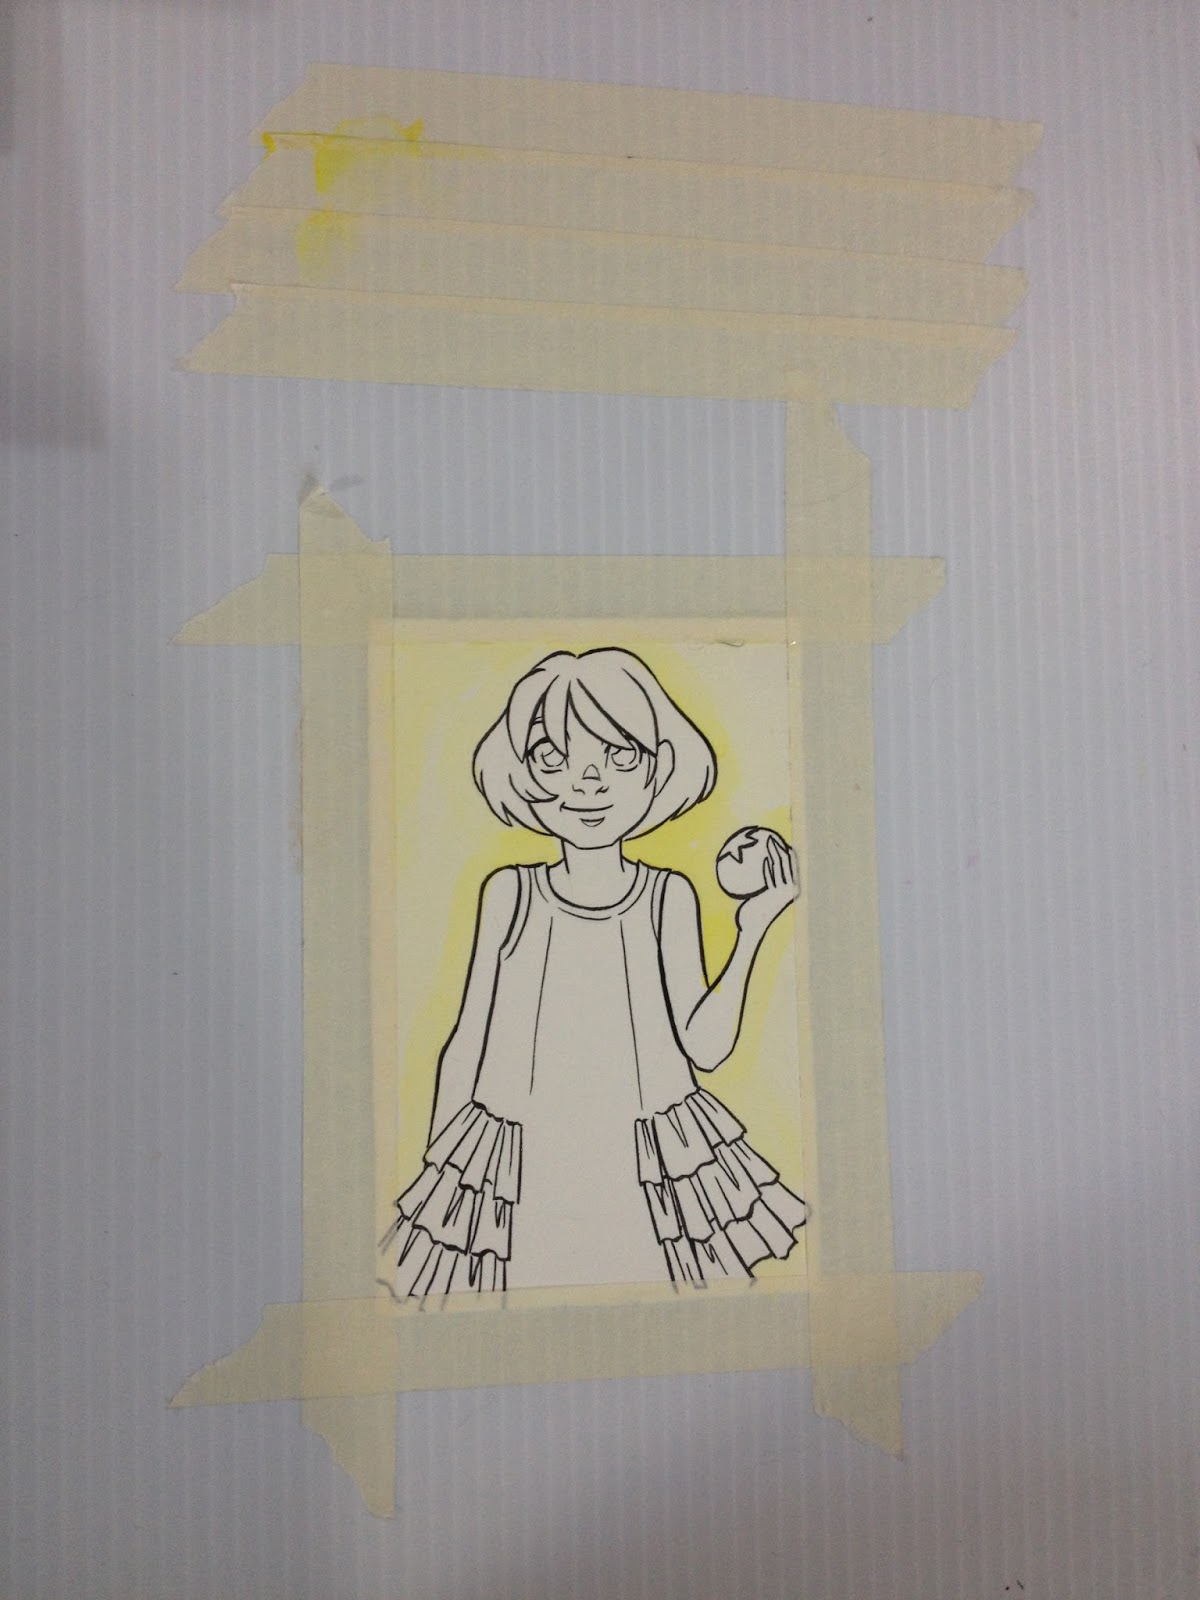
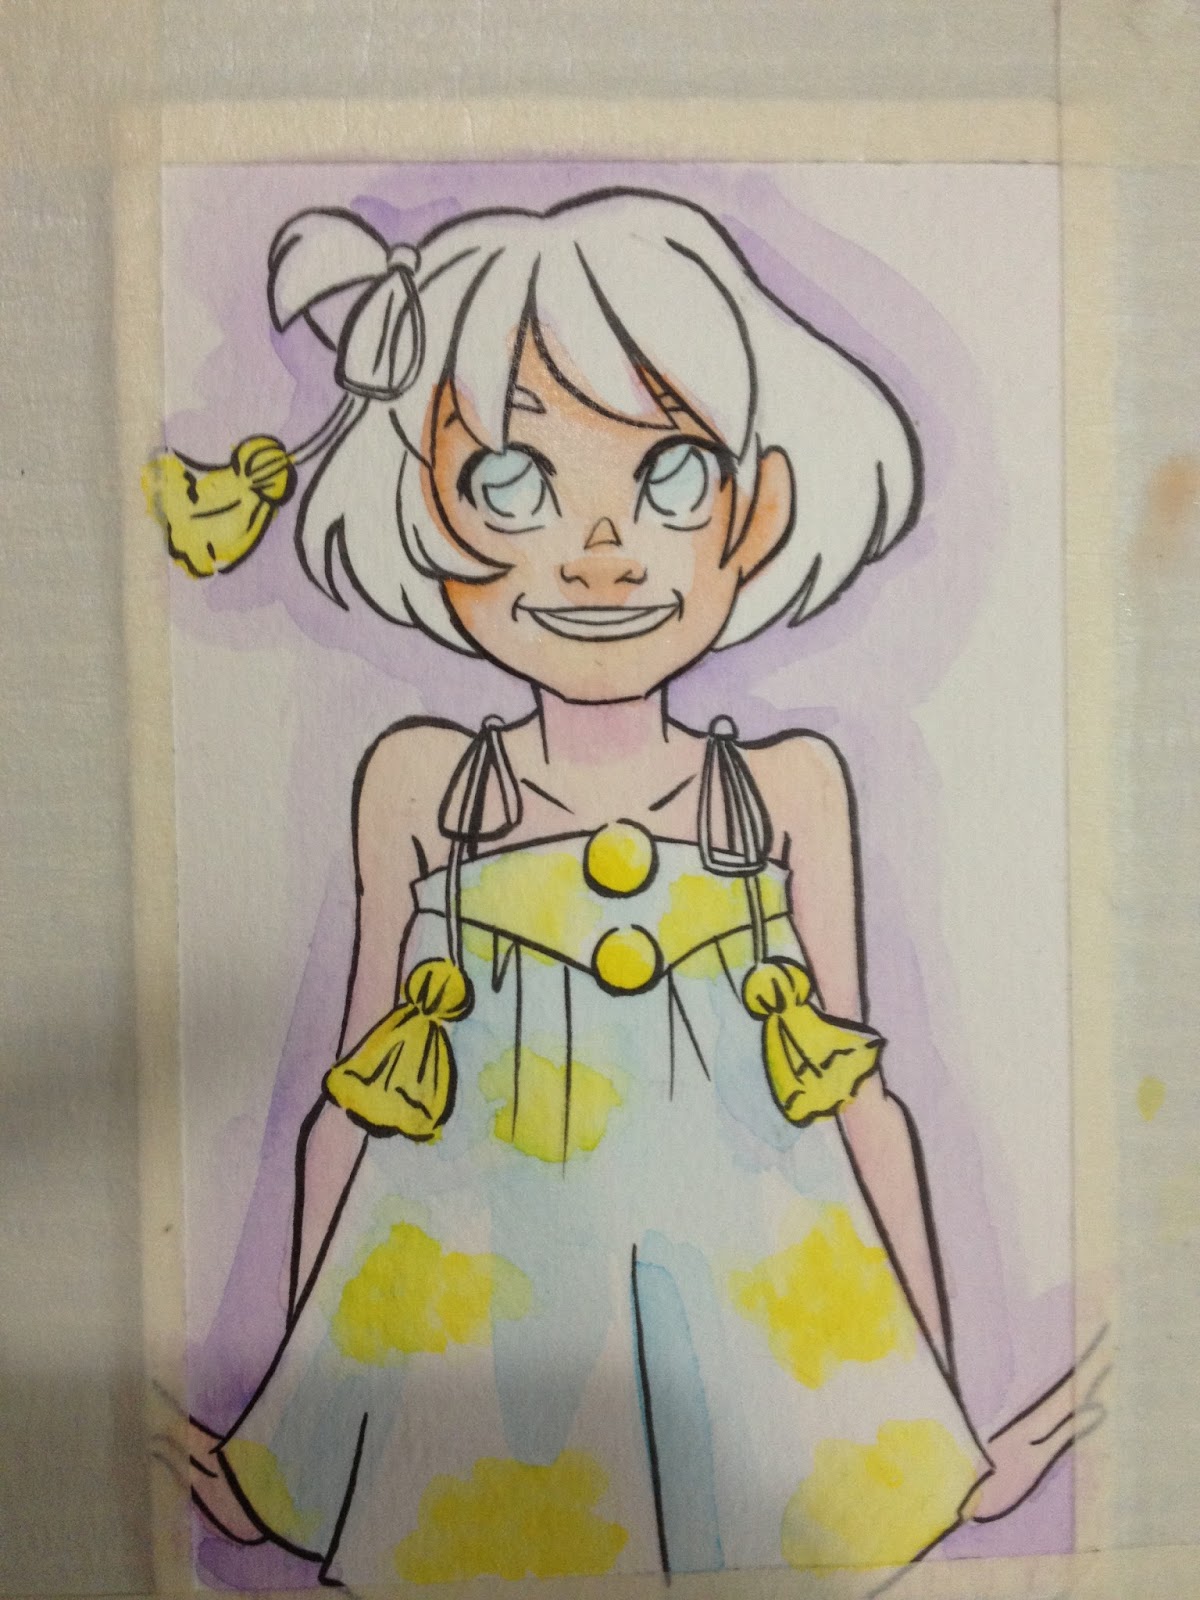
Once my first layer dried, I applied additional layers of violet.

After the violet had dried, I started applying shadows to Kara's dress using a light blue diluted on my side palette.


After the blue was dry, I started applying skintones, again using the side palette.

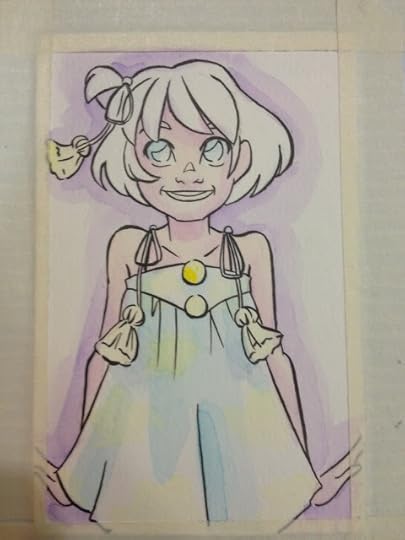
And I started blocking in the yellows on the dress.
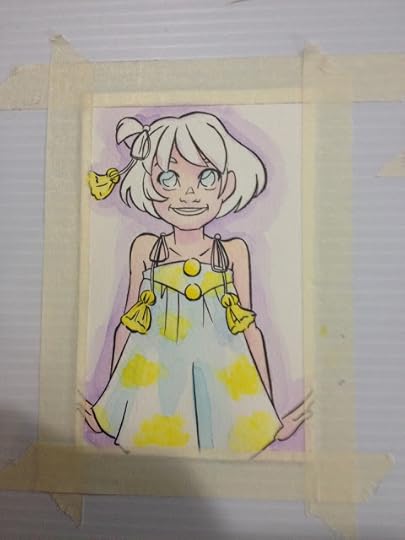

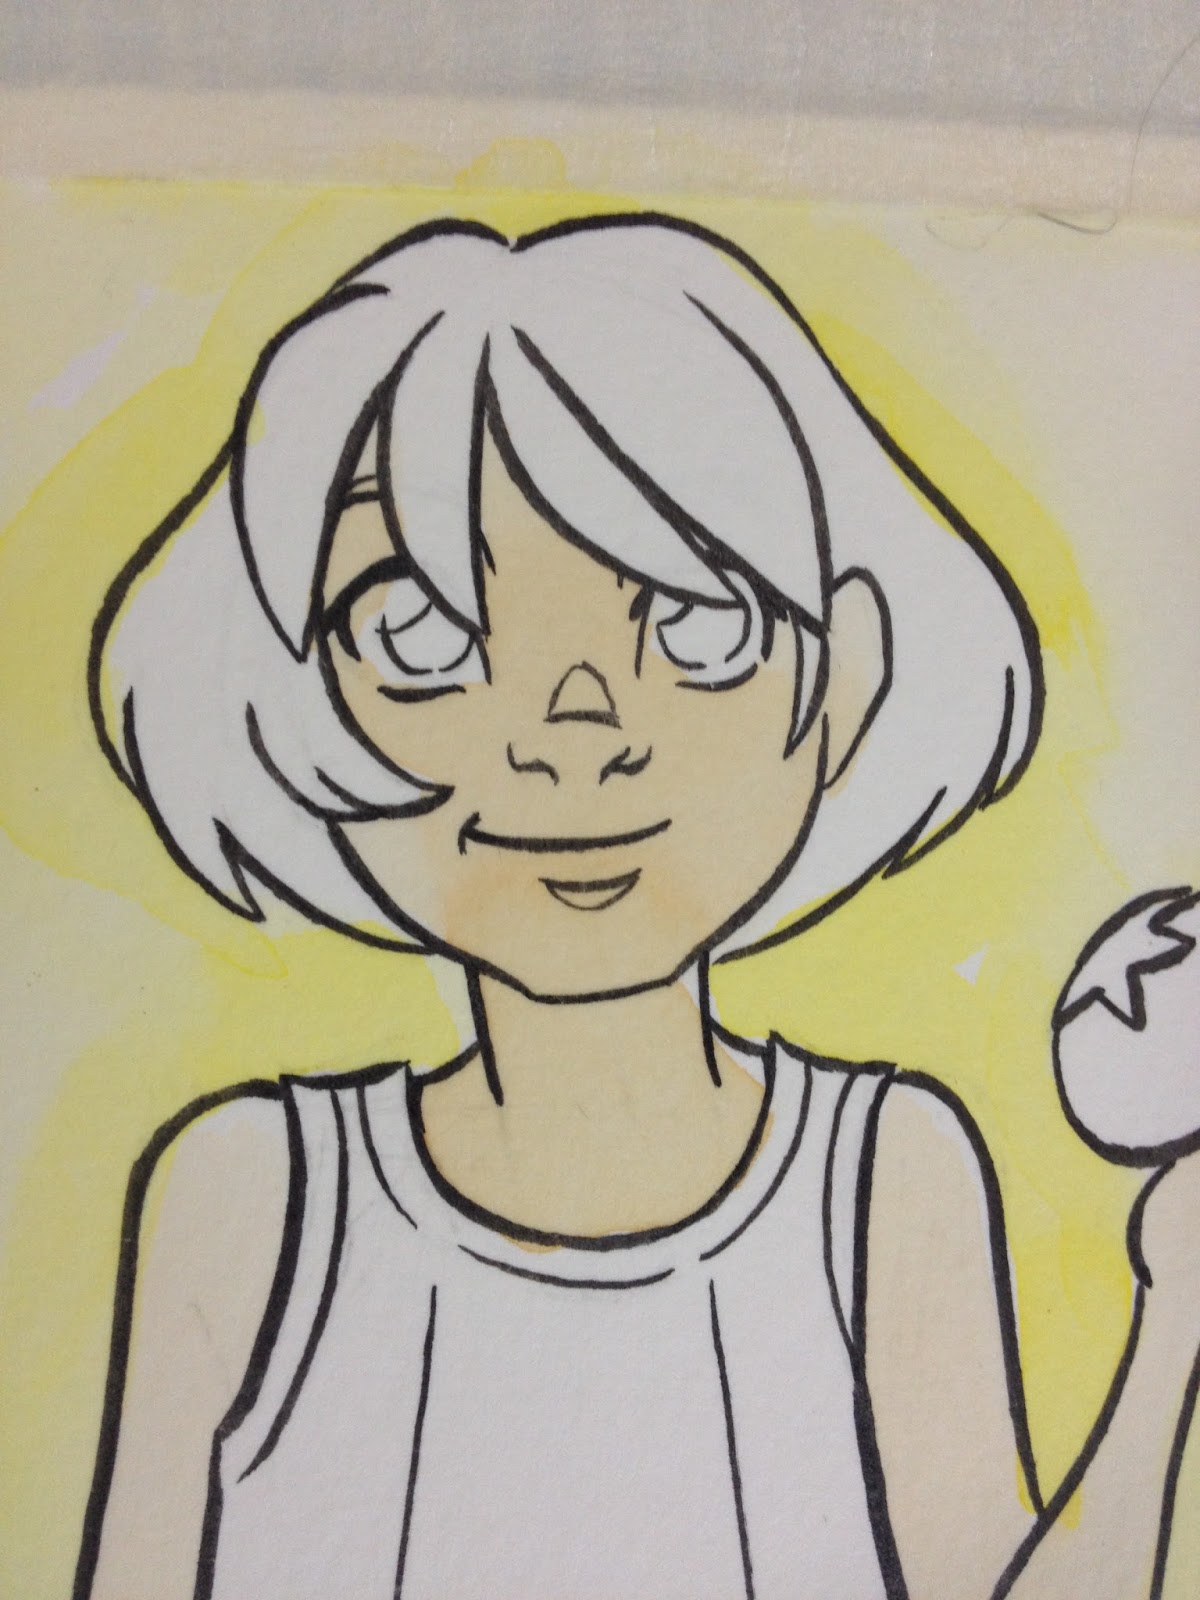
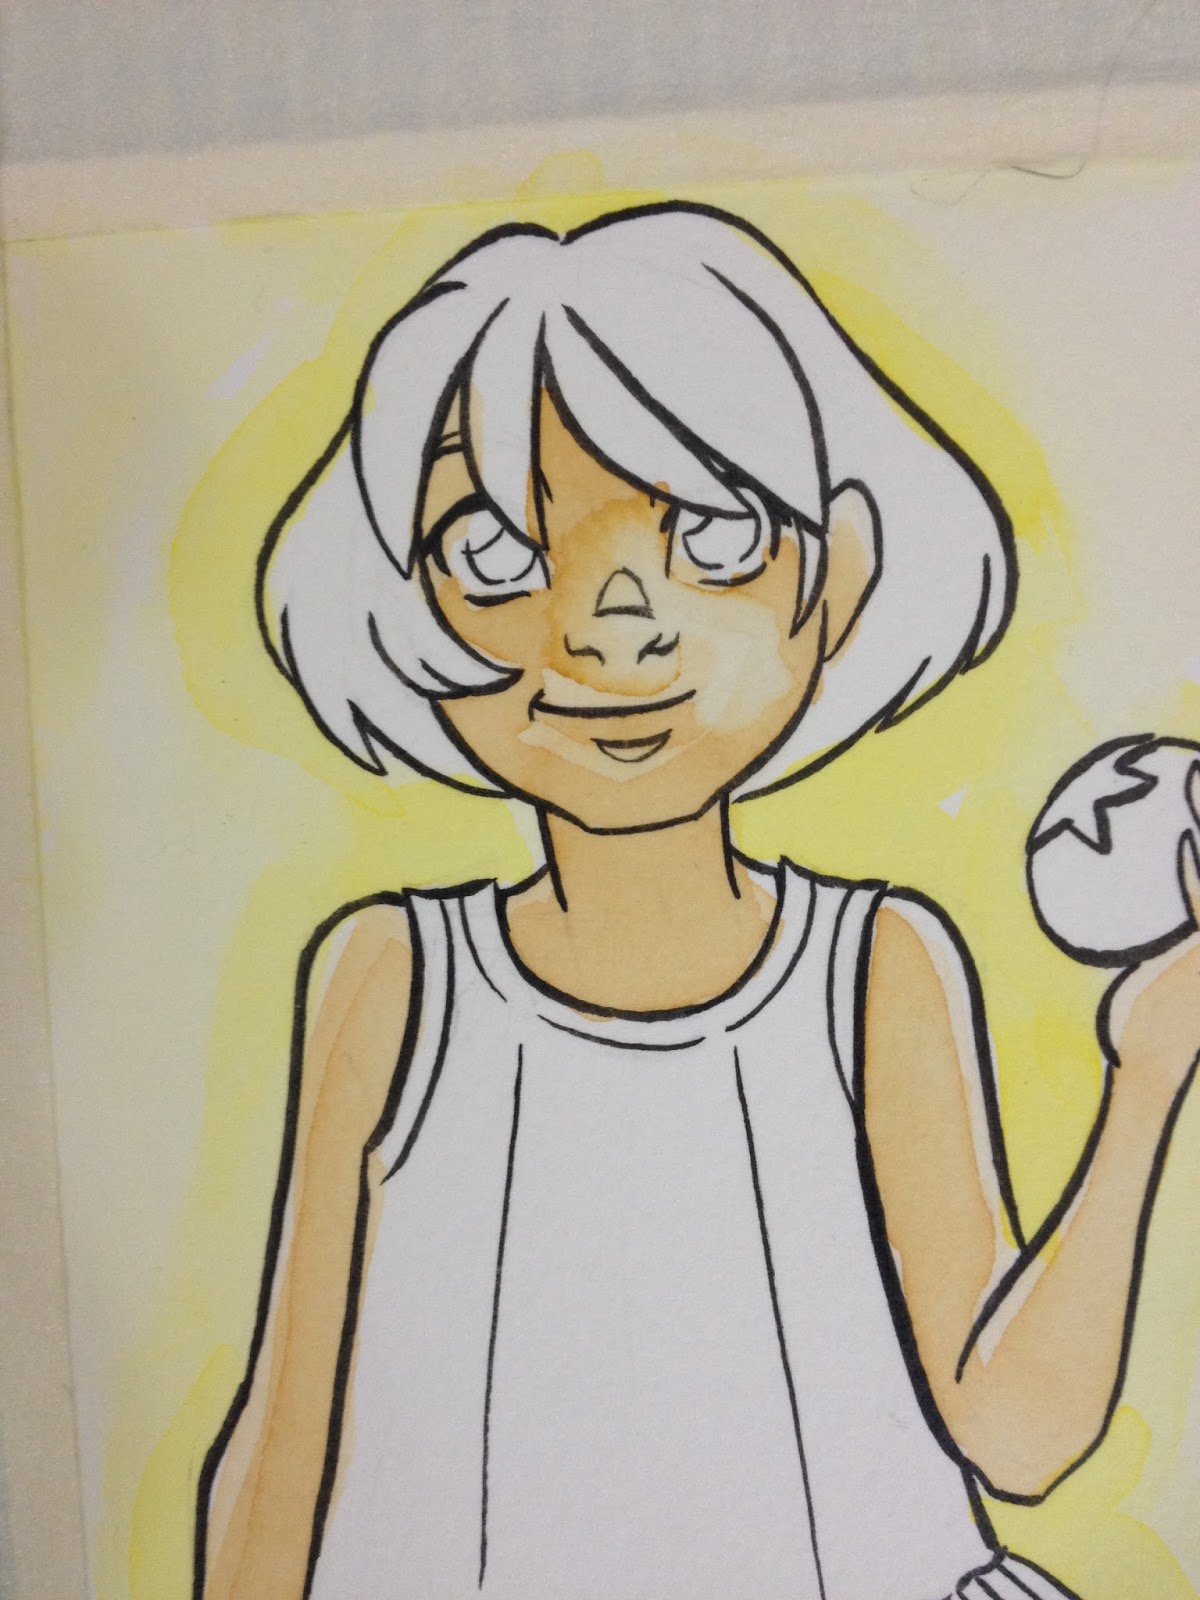
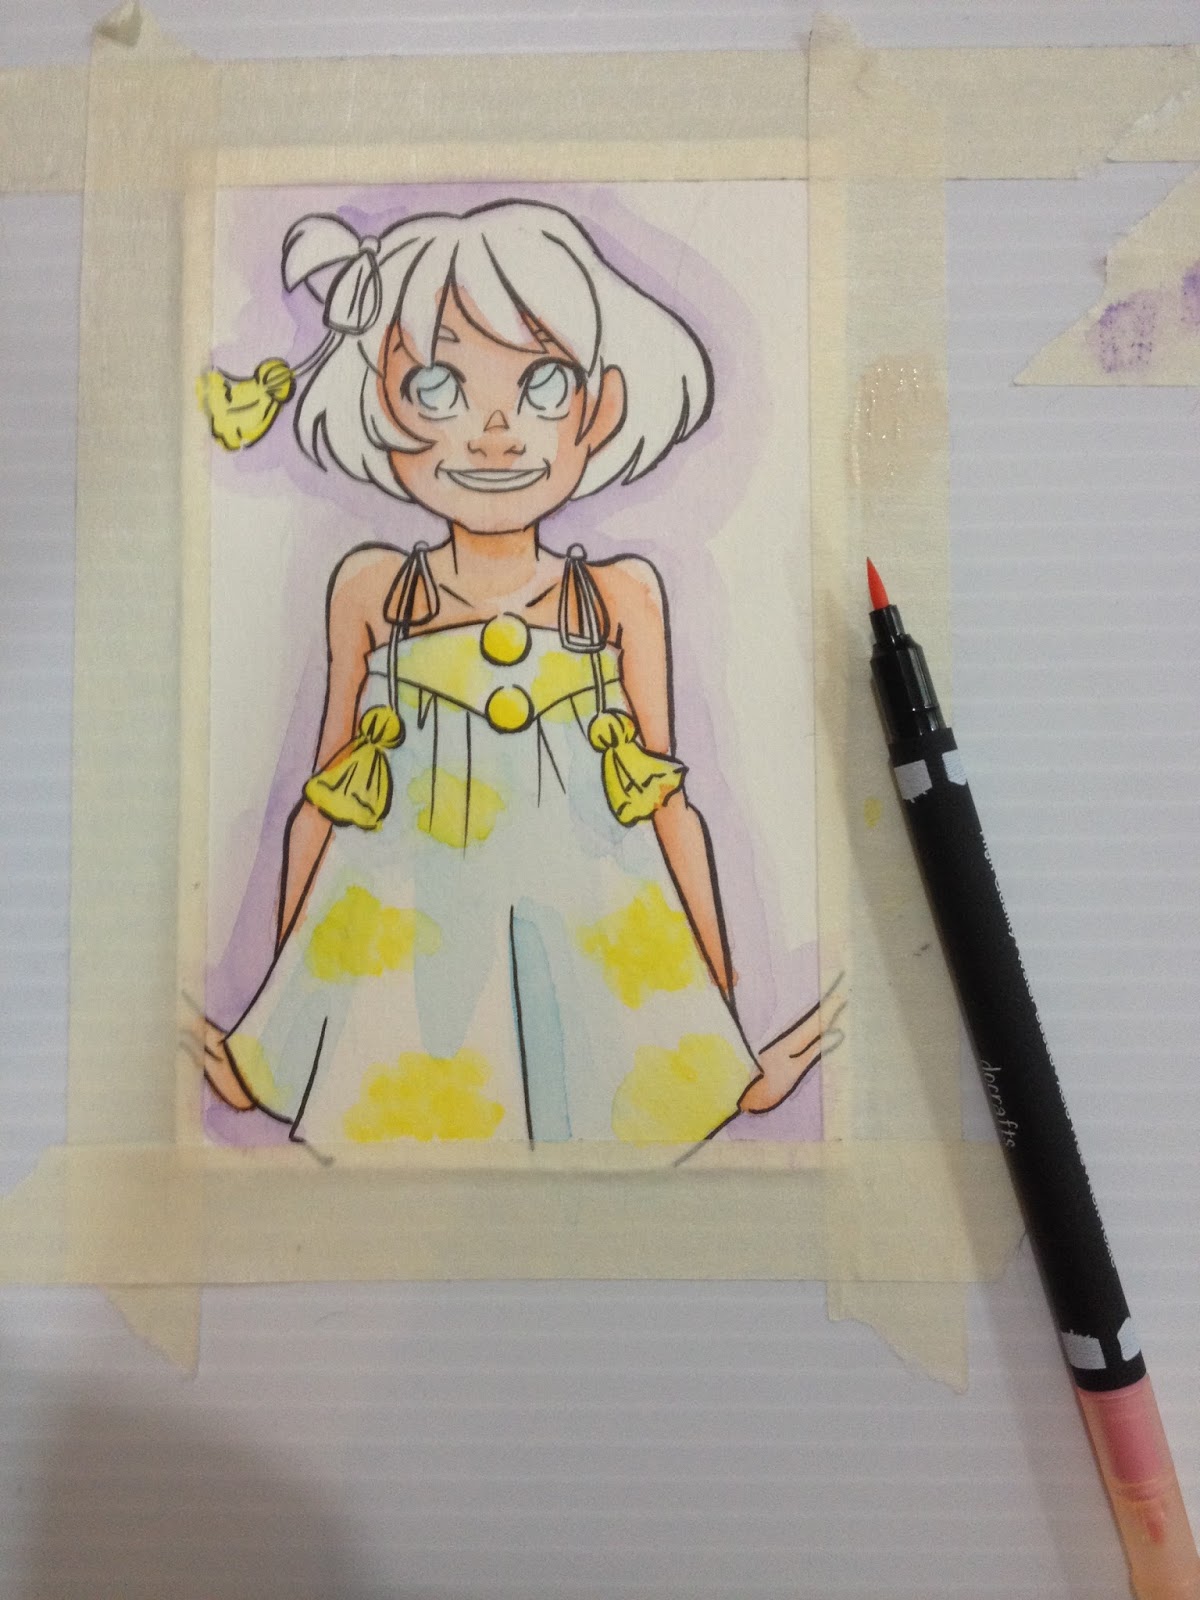
I was a little frustrated by how light the skintones were laying down when applied using the palette, so I also started applying them directly to Kara's face using the Japanese Brush (the bullet is too stiff, and will tear up the paper), and softening and blending the lines using a wet round brush.


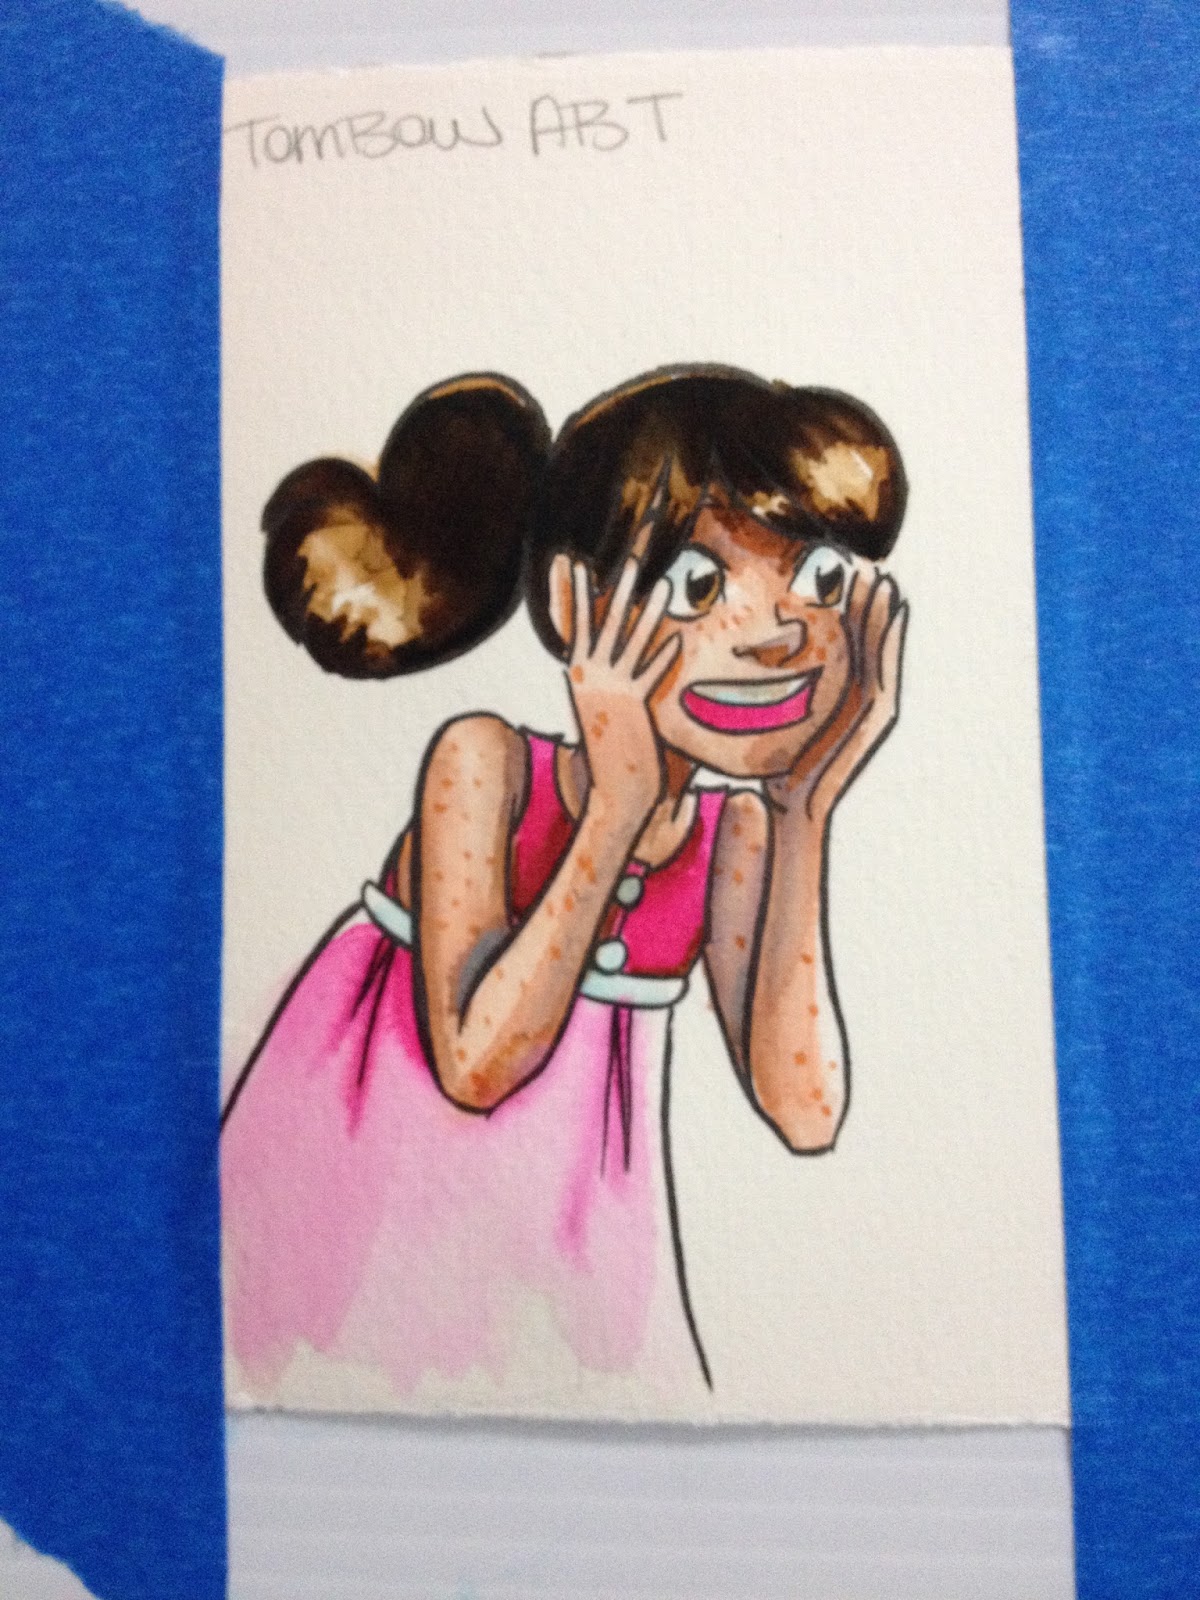
The end result, carefully applied, worked out well.

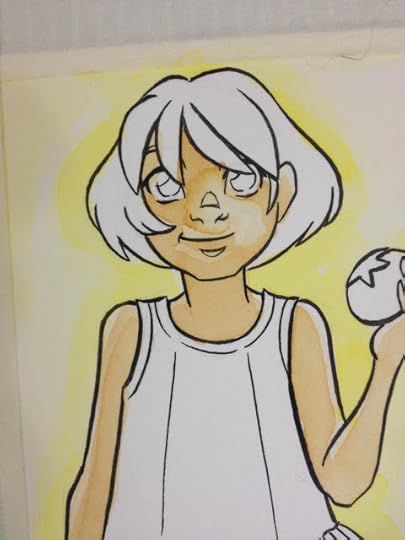
I also applied blush using a light pink- both applied to the palette and mixed with water, and also applied directly to Kara's cheeks and blended out. Because these markers are pigment based, you need to let everything dry very thoroughly before you add additional water, or it'll bleed into that area.

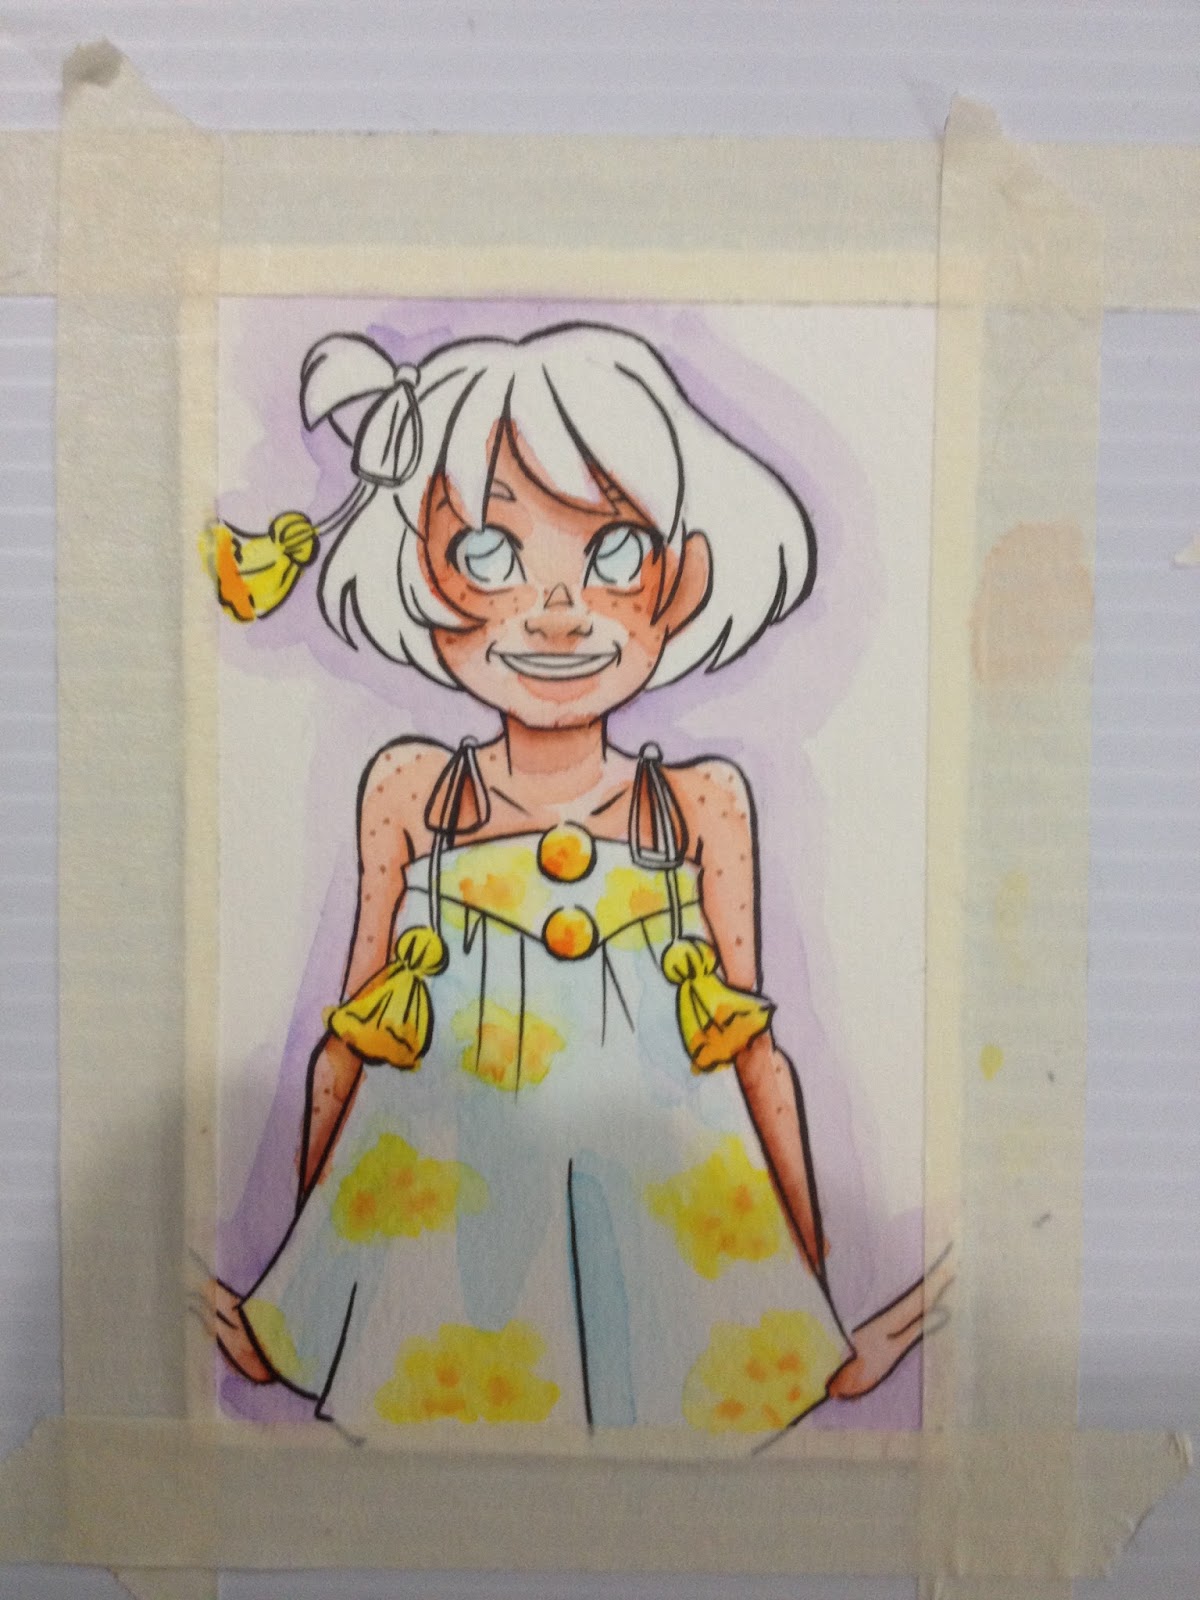
As you can see, some of the skintone started bleeding into the hair. I knew this wouldn't be much of an issue, though, as Kara has such dark hair, it'd cover the mistake.

I applied the hair color directly to the paper using the Japanese nib.

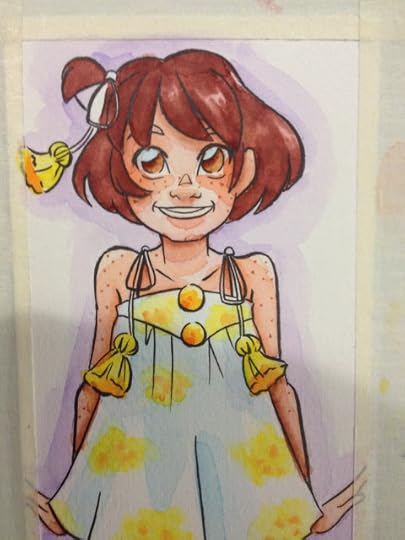


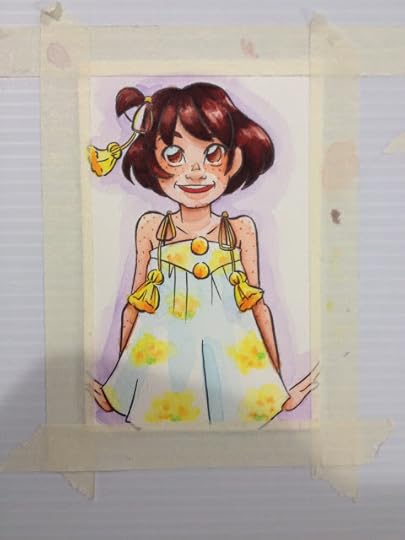
I was surprised by how much I liked using these watercolor markers and how well they handled, given the price tag. Honestly, I would probably reach for these again happily (and probably will do so)- they're easier to use than the Tombow ABT markers (review coming soon), and cheaper than Neopiko 4's.
The Verdict
While these markers are made for, and really marketed to crafters, they aren't bad watercolor markers by a long shot. They're cheaper than Neopiko 4 markers, take water application better than Akashiya Sai watercolor brush pens, but may be harder to find than Winsor Newton watercolor markers, which are becoming pretty common in art supply stores. You just need to make sure everything is dry before applying subsequent layers, otherwise the dye based color will bleed a lot.
Please consider donating to this blog or purchasing from Natto-shop (http://nattosoup.com/shop) if you want me to continue publishing quality content. All materials tested were purchased from my own pocket. Keep on Truckin' Nattosoup is not under any sponsorship.
Let's be honest here. The brand Docrafts with the subset of Artiste doesn't inspire a lot of hope when it comes to legitimate art supplies. At least, it didn't really inspire a lot of hope in me, when I saw the listing on Amazon for their watercolor dual tip markers. And you know what? If I'd actually been in the market to buy JUST ONE brand of watercolor markers, I probably would've stopped at Akashiya Sai, thrown in the towel, and stomped out the watercolor marker door. But this blog does art reviews, so it's easy for me to justify testing out new products, especially when I plan on sharing with you guys. And at $39.99 for 36 markers, it was just the sort of deal with the devil (too cheap to be good, too cheap to pass up) that I have trouble resisting. Unfortunately for you guys, that listing is gone (for now), but you can try out a 12 pack of Docrafts Artiste watercolor markers $20.49.
The Packaging
 My Docrafts Artiste Watercolor Markers arrived organized in a storage easel that was packaged in a clear plastic box. The box was pretty easy to open.
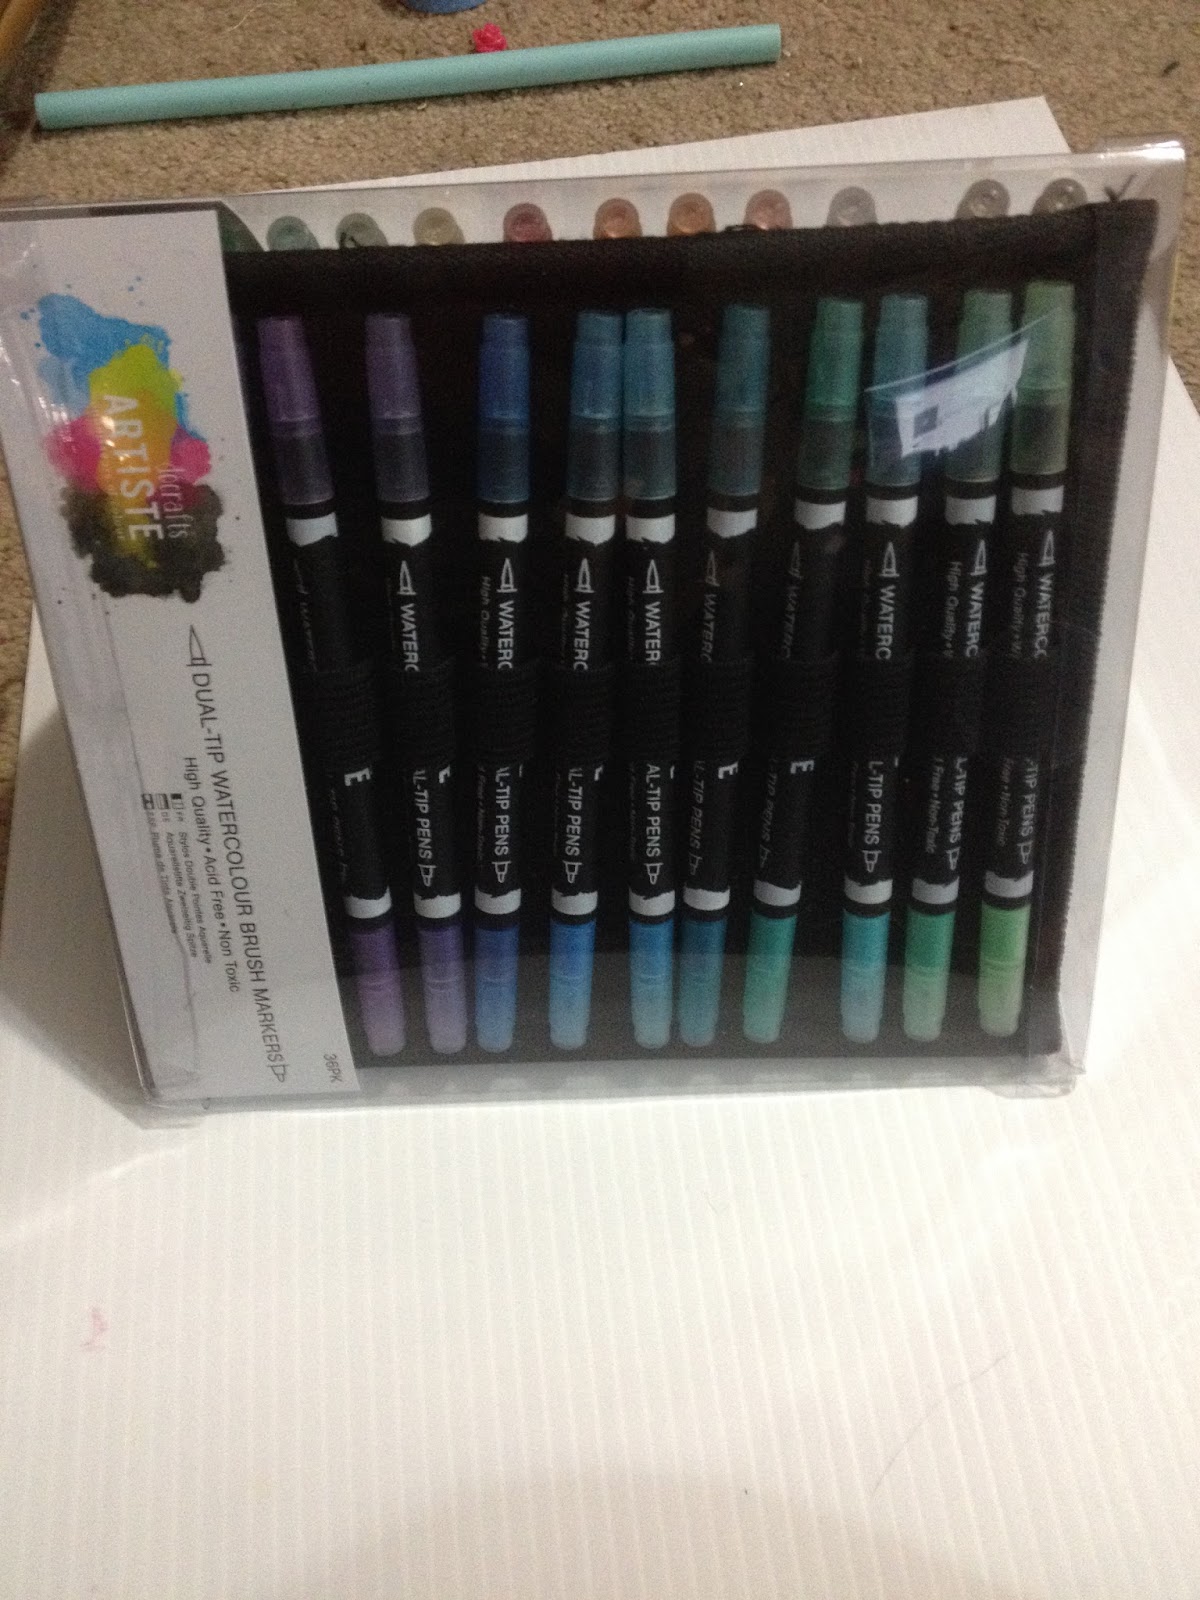


The Docrafts Artiste Watercolor Markers come in their own foldable easel, which can be folded into a triangle, or spread out open. The individual markers arrived sorted by color, and are held in place by elastic. I figure if I dislike how these perform, I can always salvage the case for other uses.
The Pens
So I am torn- these markers look REALLY cool, and the case is actually very neat, but at $39.99 it definitely seems way too good to be true for 36 watercolor markers. I've never seen this brand in stores before, but that doesn't necessarily mean much- these could be European, Korean, or Chinese and I wouldn't necessarily be familiar with the brand. When I first found out about Shin Han Twin Touches, they were ridiculously cheap, and I was very impressed with their quality given the price. The low price was mainly because they were so unknown that I was able to get them on a deep sale, but now that they're becoming more popular, they've risen in price.
The markers don't have color names marked on the barrels, and with 36 colors, it may be very easy to lose track of which color is exactly which. While the caps are fairly close to the color in most instances, it would be nice to have uses marked off on the black case, something I may do in the future. These 'markers' are also very thin and fairly small, so really more like brushpens than like markers, which I tend to think of as being chunky in the hand to hold all that ink. These markers are also not refillable, and feature a matte finish on the barrel that feels pretty decent in the hand. There's nothing but the portfolio style case they came in to keep them from rolling off your desk, so keep that in mind when using these markers.

 To left: Japanese Brush Nib. To Right: Bullet Nib
I'm worried though- I'm so excited about these markers that they're bound to disappoint, right? This is going to be another Akashiya Sai situation. The exception is that I'd had experience using and liking Akashiya's But docrafts claims that they are 'connoisseurs of colour', so how can I go wrong, right?
 The Japanese Brushnib This
The brushnib is the weirdest brushnib I've seen yet, but that doesn't reaally mean a whole lot. The other side is your standard bullet nib- I'd really love to encounter a GOOD watercolor brushpen/marker that has a fude nib instead of a bullet nib, and a super brush for the brush nib, but this isn't that marker, so my search must continue.
The Field Test
Swatching


The bullet nib isn't really noteworthy, but the brush tip is actually flexible and pretty decent, sort of like a weird, long fude nib. The small fude-esque nib probably makes it harder to cover large surfaces with color.
My initial swatches were made by applying the ink, then quickly going over the ink with a wet brush. With the swatches, only one or two colors SORTA separated into individual pigments- if you looked really closely, you could see the colors start to break down (the black, two of the purples), but it's not nearly as bad as the Akashiya Sai watercolor brushpens separated. It honestly doesn't really bother me all that much right now, but future testing may prove it to be unbearable, and I'll have to amend this post to note that. While the colors go down saturated, the color quickly fades out as you add water, but that's also the issue of going from saturated pigment to watered down pigment.
Unlike MANY of the other watercolor markers I've used (actually almost all), Docrafts Artiste watercolor markers can be blended even if allowed to dry. Regardless of drying time, initial application of pigment will still be the darkest area of pigment, so take this into account.
You can use the side masking tape palette to also mix colors by applying one on top of the other before adding water. I did this to mix the skin shadows for the field test illustration- usually I apply shadows last, but I thought it might be easier to handle if I applied the red violet skin shadows first. These markers don't have color names, so I can't list them, but I mixed a hot magentaish pink with a reddish purple.
Keep in mind that the inks reactivate when you apply additional layers of color, which may make them difficult to work with if you're like me, and apply A LOT of layers to build up color.
In Practice
Recently I put the Winsor & Newton Watercolor Markers through their paces on watercolor paper, and I made a mini palette to pull from using masking tape applied to the side of my gatorboard support. I used this technique for the Docrafts Artiste Watercolor markers as well.
The swatches I made in my swatchbook really come in handy when actually painting, because the caps on the markers, while really cute, are too translucent to really be color accurate, and the colors do change slightly when water is applied and brushed out.
I set up a mini palette using masking tape on the side, so I had the option of applying color directly, or mixing and diluting it first.
 I opted to apply the background first: A nice violet to contrast with the yellow I planned on using for the dress. I applied the color using the bullet nib on the masking tape, and then used a wet brush to mix the color and apply it to the paper.
I also applied some preliminary shadows to Kara and her dress.


Once my first layer dried, I applied additional layers of violet.

After the violet had dried, I started applying shadows to Kara's dress using a light blue diluted on my side palette.

After the blue was dry, I started applying skintones, again using the side palette.

And I started blocking in the yellows on the dress.

I was a little frustrated by how light the skintones were laying down when applied using the palette, so I also started applying them directly to Kara's face using the Japanese Brush (the bullet is too stiff, and will tear up the paper), and softening and blending the lines using a wet round brush.
The end result, carefully applied, worked out well.

I also applied blush using a light pink- both applied to the palette and mixed with water, and also applied directly to Kara's cheeks and blended out. Because these markers are pigment based, you need to let everything dry very thoroughly before you add additional water, or it'll bleed into that area.
As you can see, some of the skintone started bleeding into the hair. I knew this wouldn't be much of an issue, though, as Kara has such dark hair, it'd cover the mistake.
I applied the hair color directly to the paper using the Japanese nib.


I was surprised by how much I liked using these watercolor markers and how well they handled, given the price tag. Honestly, I would probably reach for these again happily (and probably will do so)- they're easier to use than the Tombow ABT markers (review coming soon), and cheaper than Neopiko 4's.
The Verdict
While these markers are made for, and really marketed to crafters, they aren't bad watercolor markers by a long shot. They're cheaper than Neopiko 4 markers, take water application better than Akashiya Sai watercolor brush pens, but may be harder to find than Winsor Newton watercolor markers, which are becoming pretty common in art supply stores. You just need to make sure everything is dry before applying subsequent layers, otherwise the dye based color will bleed a lot.
Please consider donating to this blog or purchasing from Natto-shop (http://nattosoup.com/shop) if you want me to continue publishing quality content. All materials tested were purchased from my own pocket. Keep on Truckin' Nattosoup is not under any sponsorship.
July 23, 2015
Watercolor Brushpen Review: Tombow ABT
Editor's Note: Google Drive has failed to upload a large number of the process photos for the Field Test, so I've had to retake the photos that I can. Even worse, Blogspot ate the original post for this, so I'm rewriting it.
It's probably not a secret, but I am a hoarder of art supplies. I'm also a hoarder of comics, but that topic rarely comes up on this blog, I just felt it was worth mentioning. As a hoarder of art supplies, sometimes I purchase things, with the intention of reviewing them, and I don't get around to it for a long time. I bought two different packs of Tombow ABT watercolor markers from the DickBlick on Broughton St in Savannah, GA, back in 2013, and I didn't get around to reviewing them until recently.
I have two legitimate obsessions that I write about on this blog: Brush pens, and watercolor markers. Sadly for me, it's my alcohol marker reviews that bring in the most pageviews, but hopefully in a couple years, that'll even out with my watercolor marker reviews, which I feel are better rounded and more useful. I've reviewed Neopiko 4's, Marvy LePlume II's, Docraft Artiste Watercolor markers, Winsor & Newton Watercolor Markers, and Letraset's Aquamarkers, and it seems like I'm always discovering new watercolor markers to test out. These Tombow ABT's have been on the market for awhile, and I've had a mixed relationship with Tombow Products, but I hoped that these markers would work well, both with and without water.
There are a couple ways to blend Tombow ABT markers: Using the blender marker (shown in this review, but these photos were taken after the initial tests were done, so I'll have to revisit these markers) and using water and brushes. You can also use a waterbrush, if you like, but I feel this falls under the water and brushes category of blending. I'm not sure what's inside their blender pen (hopefully I'll find out soon!), but I hope it offers different blending techniques than just water.
For this review, I'm taking the brush and water route, using a traditional sable brush and a good old cup of water. Not shown: How many times I had to chase my cat, Bowie, out of the water cup.
The Pens
As stated before, the pens shown in this review are really two sets: Although I purchased them from a brick and mortar DickBlick, they no longer carry the 10 piece set I purchased. They do, however a variety of other sets. I did manage to find the same 10 piece portrait set on Amazon. This set was later augmented by a pastel set, which doesn't seem to be easily attained anymore. No matter, it's not like the pastel set was the best thing since sliced bread, I just happened to like pastels.
These Watercolor Brushpens are dual tipped- one end is a Japanese brush, the other is a bullet nib. I really wish marker companies would just give us two brushes- a big one and a small one, but I'm probably just spoiled. I also hate bullet nibs. These markers are not refillable, and the nibs are not meant to be replaced.


The barrels of Tombow ABT markers feature the color number, as well as indicators for the large brush nib and the small bullet nib.

The bullet nib end's cap is the same black as the body of the pen, but the Japanese brush end has a cap that is roughly the color of the ink inside,

As with my prior Tombow dual brush pen review,the nib LOOKS like it would be squishy and flexible, but sadly it's fairly stiff, and prone to getting broken in and mushy. One of my markers had also dried out over the two years it sat, but the others were still lively.
 From Left to Right: Tombow ABT, Marvy LePlumeII, Kuretake CleanColor, Sakura Koi Here's a lineup of some of the watercolor markers I own, most if which I still need to test. Not shown: Neopiko 4, Winsor Newton Watercolor markers, or the Letraset AquaMarkers, or the Akashiya Sai watercolor brushpens.
 From Left to Right: Tombow ABT, Marvy LePlume II, Kuretake CleanColor, Sakura Koi It's fairly common for watercolor markers or brushpens to have solid felt tips, rather than individual bristles. If the marker is running dry, or the nib is too stiff, these solid nibs can cause damage to wet watercolor paper.


The caps are capable of posting on both ends, with the colored cap posting over the black cap entirely, or the black cap posting to the end of the colored cap. Without their caps, these markers tend to roll a lot, so be careful.
The Field Test
Swatches

Color was applied to the paper, and water was used to blend it out. I want to revisit these markers using the shown Tombow Blending kit, and see if I can't do a better job of things. With water, there isn't much pigment or dye separation when water is applied, which is a good sign.
In Practice
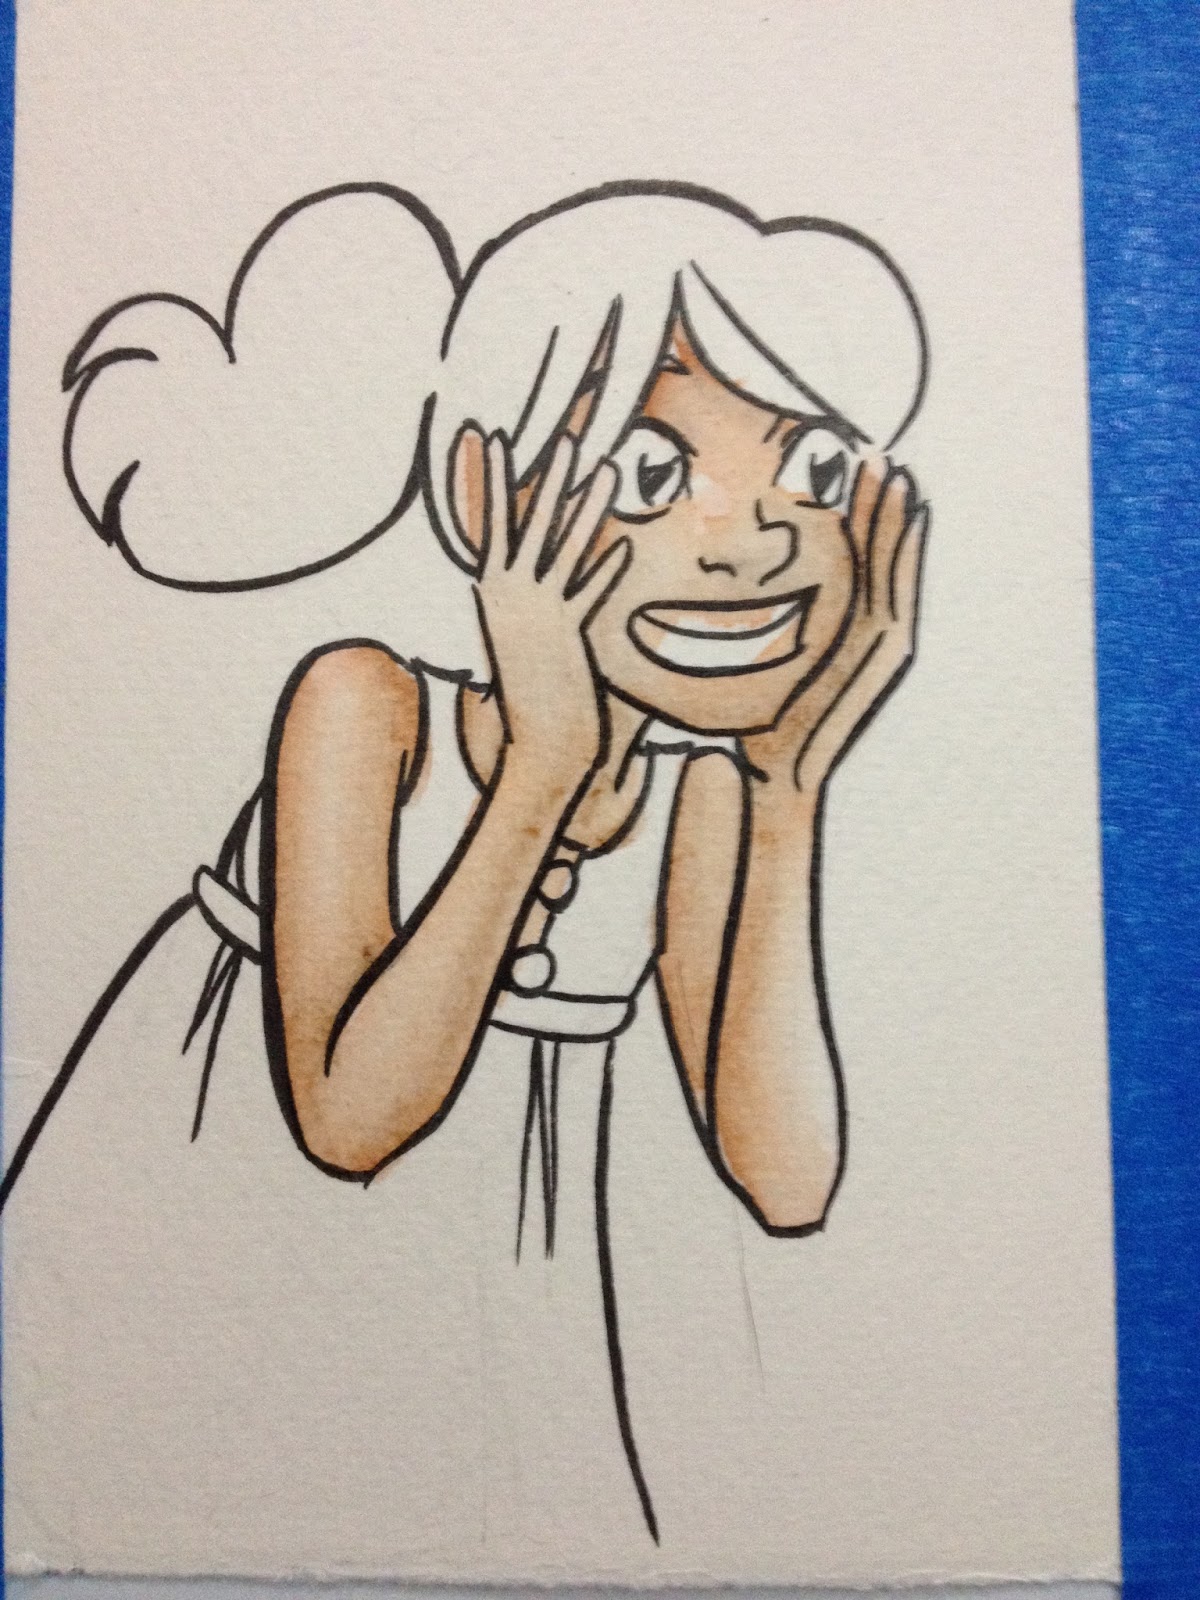
The sample piece was inked with a Sailor Mitsuo Aida brushpen from Jetpens.

Unlike in the Docrafts Artiste review, I applied the color directly to the paper, and then used a brush and water to try and blend the color out.


As you can see, applying color while the paper is still wet caused some surface damage to this Fabriano watercolor paper. At the time this post was written, I hadn't considered utilizing a side palette, and you can see that color saturation is localized to where the color was first applied, regardless of how much water is applied afterwards. The Tombow Blending kit comes with a laminated card, blending pen, and spritzer, and I'm excited to see if this kit will help solve some of the issues I came across with Tombow ABT watercolor markers while doing this review.

While working with these watercolor brushpens, I had a lot of trouble with blending, bleeding, and color replacement (like the shadows on Kara's arms, for example, the lavender completely pushed out the layers of peach, rather than layering on top, and the difference in color is harsh). I also had issues with paper surface degradation from the stiffness of the Japanese brush nib, which kept me from working on this test as long as I normally would. I've mentioned previously that I'm dissatisfied with the results of this test, and I would like to revisit it with different techniques later on.
The Verdict
While initial swatches proved somewhat hopeful, I was really unhappy with how these pens handled in practice. The nibs were stiff and pulled at the watercolor paper, which caused the watercolor paper I used to pill. This is a common issue with this soft cotton based Fabriano watercolor paper, so if you like using watercolor markers, you may want to use something paper pulp based, like Fluid pads.
I also discovered Tombow blending kits, and a method of creating a side palette, after I tested these watercolor markers, so I want to revisit Tombow ABT in the future and see if my opinion changes any.
Please consider donating to this blog or purchasing from Natto-shop (http://nattosoup.com/shop) if you want me to continue publishing quality content. All materials tested were purchased from my own pocket. Keep on Truckin' Nattosoup is not under any sponsorship.
It's probably not a secret, but I am a hoarder of art supplies. I'm also a hoarder of comics, but that topic rarely comes up on this blog, I just felt it was worth mentioning. As a hoarder of art supplies, sometimes I purchase things, with the intention of reviewing them, and I don't get around to it for a long time. I bought two different packs of Tombow ABT watercolor markers from the DickBlick on Broughton St in Savannah, GA, back in 2013, and I didn't get around to reviewing them until recently.
I have two legitimate obsessions that I write about on this blog: Brush pens, and watercolor markers. Sadly for me, it's my alcohol marker reviews that bring in the most pageviews, but hopefully in a couple years, that'll even out with my watercolor marker reviews, which I feel are better rounded and more useful. I've reviewed Neopiko 4's, Marvy LePlume II's, Docraft Artiste Watercolor markers, Winsor & Newton Watercolor Markers, and Letraset's Aquamarkers, and it seems like I'm always discovering new watercolor markers to test out. These Tombow ABT's have been on the market for awhile, and I've had a mixed relationship with Tombow Products, but I hoped that these markers would work well, both with and without water.
There are a couple ways to blend Tombow ABT markers: Using the blender marker (shown in this review, but these photos were taken after the initial tests were done, so I'll have to revisit these markers) and using water and brushes. You can also use a waterbrush, if you like, but I feel this falls under the water and brushes category of blending. I'm not sure what's inside their blender pen (hopefully I'll find out soon!), but I hope it offers different blending techniques than just water.
For this review, I'm taking the brush and water route, using a traditional sable brush and a good old cup of water. Not shown: How many times I had to chase my cat, Bowie, out of the water cup.
The Pens
As stated before, the pens shown in this review are really two sets: Although I purchased them from a brick and mortar DickBlick, they no longer carry the 10 piece set I purchased. They do, however a variety of other sets. I did manage to find the same 10 piece portrait set on Amazon. This set was later augmented by a pastel set, which doesn't seem to be easily attained anymore. No matter, it's not like the pastel set was the best thing since sliced bread, I just happened to like pastels.
These Watercolor Brushpens are dual tipped- one end is a Japanese brush, the other is a bullet nib. I really wish marker companies would just give us two brushes- a big one and a small one, but I'm probably just spoiled. I also hate bullet nibs. These markers are not refillable, and the nibs are not meant to be replaced.


The barrels of Tombow ABT markers feature the color number, as well as indicators for the large brush nib and the small bullet nib.
The bullet nib end's cap is the same black as the body of the pen, but the Japanese brush end has a cap that is roughly the color of the ink inside,
As with my prior Tombow dual brush pen review,the nib LOOKS like it would be squishy and flexible, but sadly it's fairly stiff, and prone to getting broken in and mushy. One of my markers had also dried out over the two years it sat, but the others were still lively.
 From Left to Right: Tombow ABT, Marvy LePlumeII, Kuretake CleanColor, Sakura Koi Here's a lineup of some of the watercolor markers I own, most if which I still need to test. Not shown: Neopiko 4, Winsor Newton Watercolor markers, or the Letraset AquaMarkers, or the Akashiya Sai watercolor brushpens.
 From Left to Right: Tombow ABT, Marvy LePlume II, Kuretake CleanColor, Sakura Koi It's fairly common for watercolor markers or brushpens to have solid felt tips, rather than individual bristles. If the marker is running dry, or the nib is too stiff, these solid nibs can cause damage to wet watercolor paper.

The caps are capable of posting on both ends, with the colored cap posting over the black cap entirely, or the black cap posting to the end of the colored cap. Without their caps, these markers tend to roll a lot, so be careful.
The Field Test
Swatches

Color was applied to the paper, and water was used to blend it out. I want to revisit these markers using the shown Tombow Blending kit, and see if I can't do a better job of things. With water, there isn't much pigment or dye separation when water is applied, which is a good sign.
In Practice
The sample piece was inked with a Sailor Mitsuo Aida brushpen from Jetpens.

Unlike in the Docrafts Artiste review, I applied the color directly to the paper, and then used a brush and water to try and blend the color out.

As you can see, applying color while the paper is still wet caused some surface damage to this Fabriano watercolor paper. At the time this post was written, I hadn't considered utilizing a side palette, and you can see that color saturation is localized to where the color was first applied, regardless of how much water is applied afterwards. The Tombow Blending kit comes with a laminated card, blending pen, and spritzer, and I'm excited to see if this kit will help solve some of the issues I came across with Tombow ABT watercolor markers while doing this review.
While working with these watercolor brushpens, I had a lot of trouble with blending, bleeding, and color replacement (like the shadows on Kara's arms, for example, the lavender completely pushed out the layers of peach, rather than layering on top, and the difference in color is harsh). I also had issues with paper surface degradation from the stiffness of the Japanese brush nib, which kept me from working on this test as long as I normally would. I've mentioned previously that I'm dissatisfied with the results of this test, and I would like to revisit it with different techniques later on.
The Verdict
While initial swatches proved somewhat hopeful, I was really unhappy with how these pens handled in practice. The nibs were stiff and pulled at the watercolor paper, which caused the watercolor paper I used to pill. This is a common issue with this soft cotton based Fabriano watercolor paper, so if you like using watercolor markers, you may want to use something paper pulp based, like Fluid pads.
I also discovered Tombow blending kits, and a method of creating a side palette, after I tested these watercolor markers, so I want to revisit Tombow ABT in the future and see if my opinion changes any.
Please consider donating to this blog or purchasing from Natto-shop (http://nattosoup.com/shop) if you want me to continue publishing quality content. All materials tested were purchased from my own pocket. Keep on Truckin' Nattosoup is not under any sponsorship.
July 17, 2015
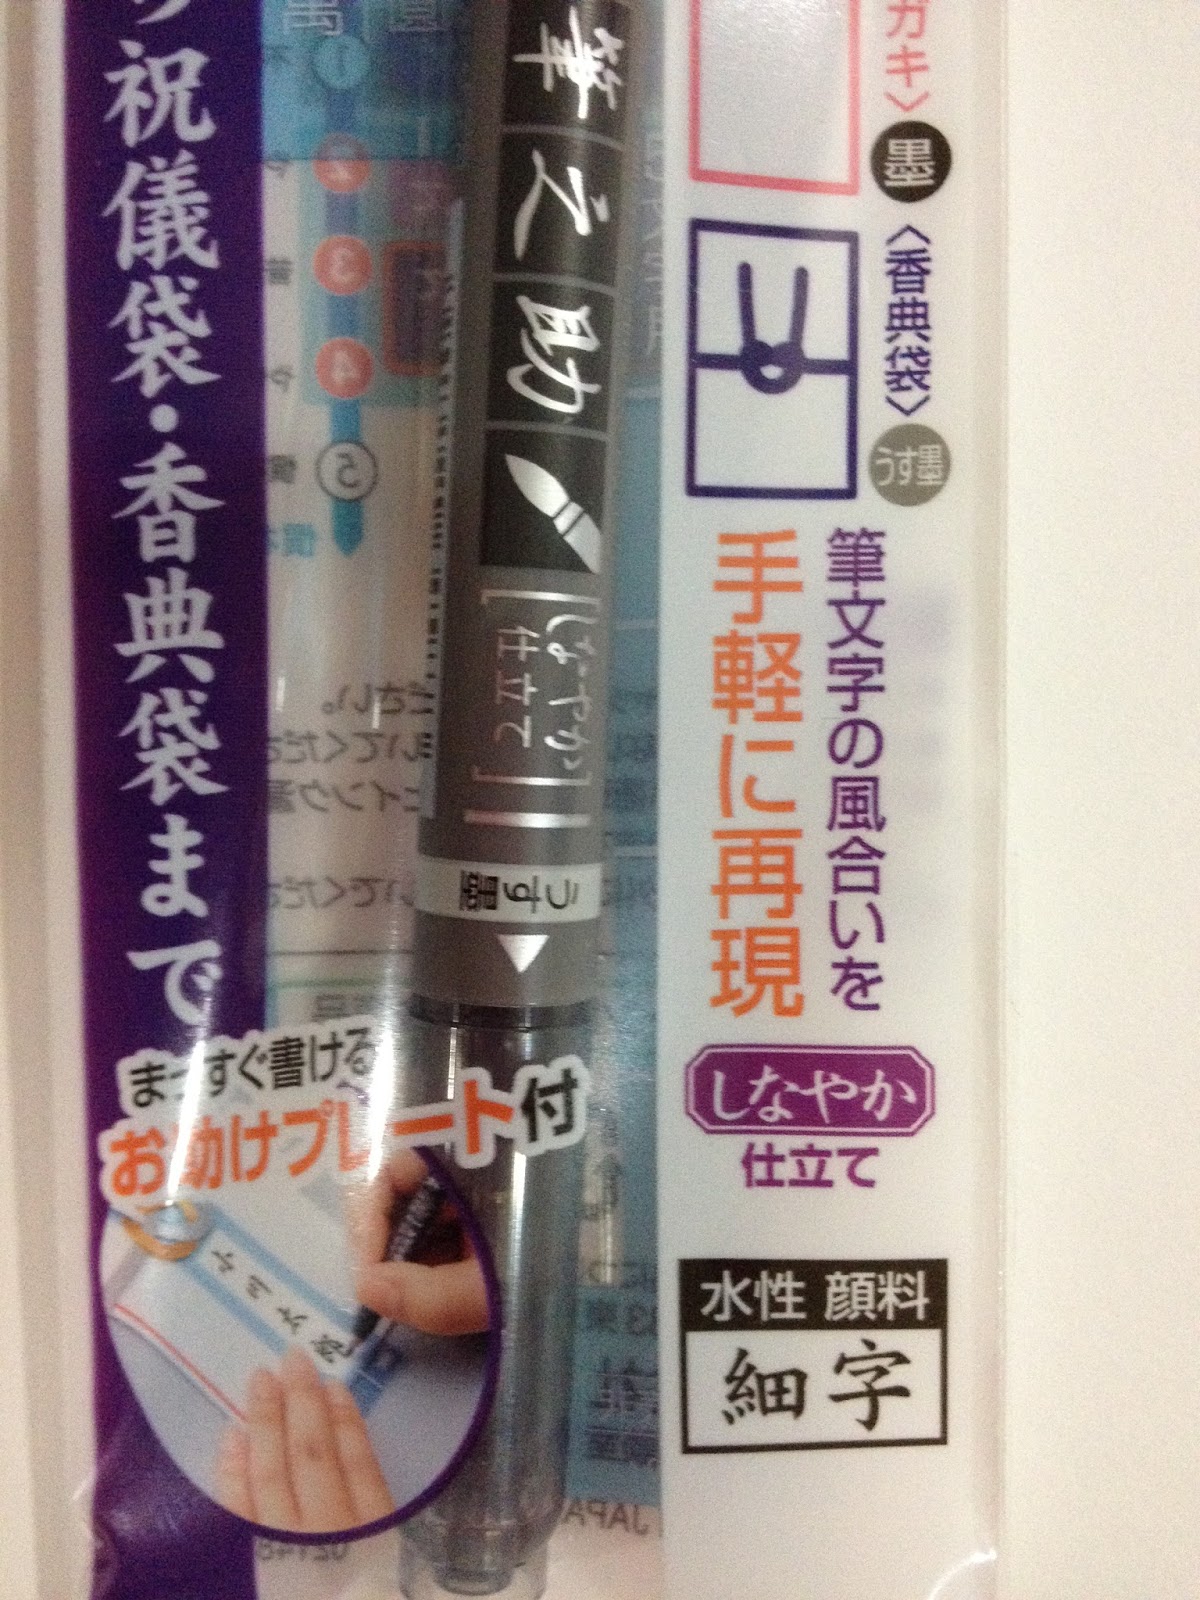
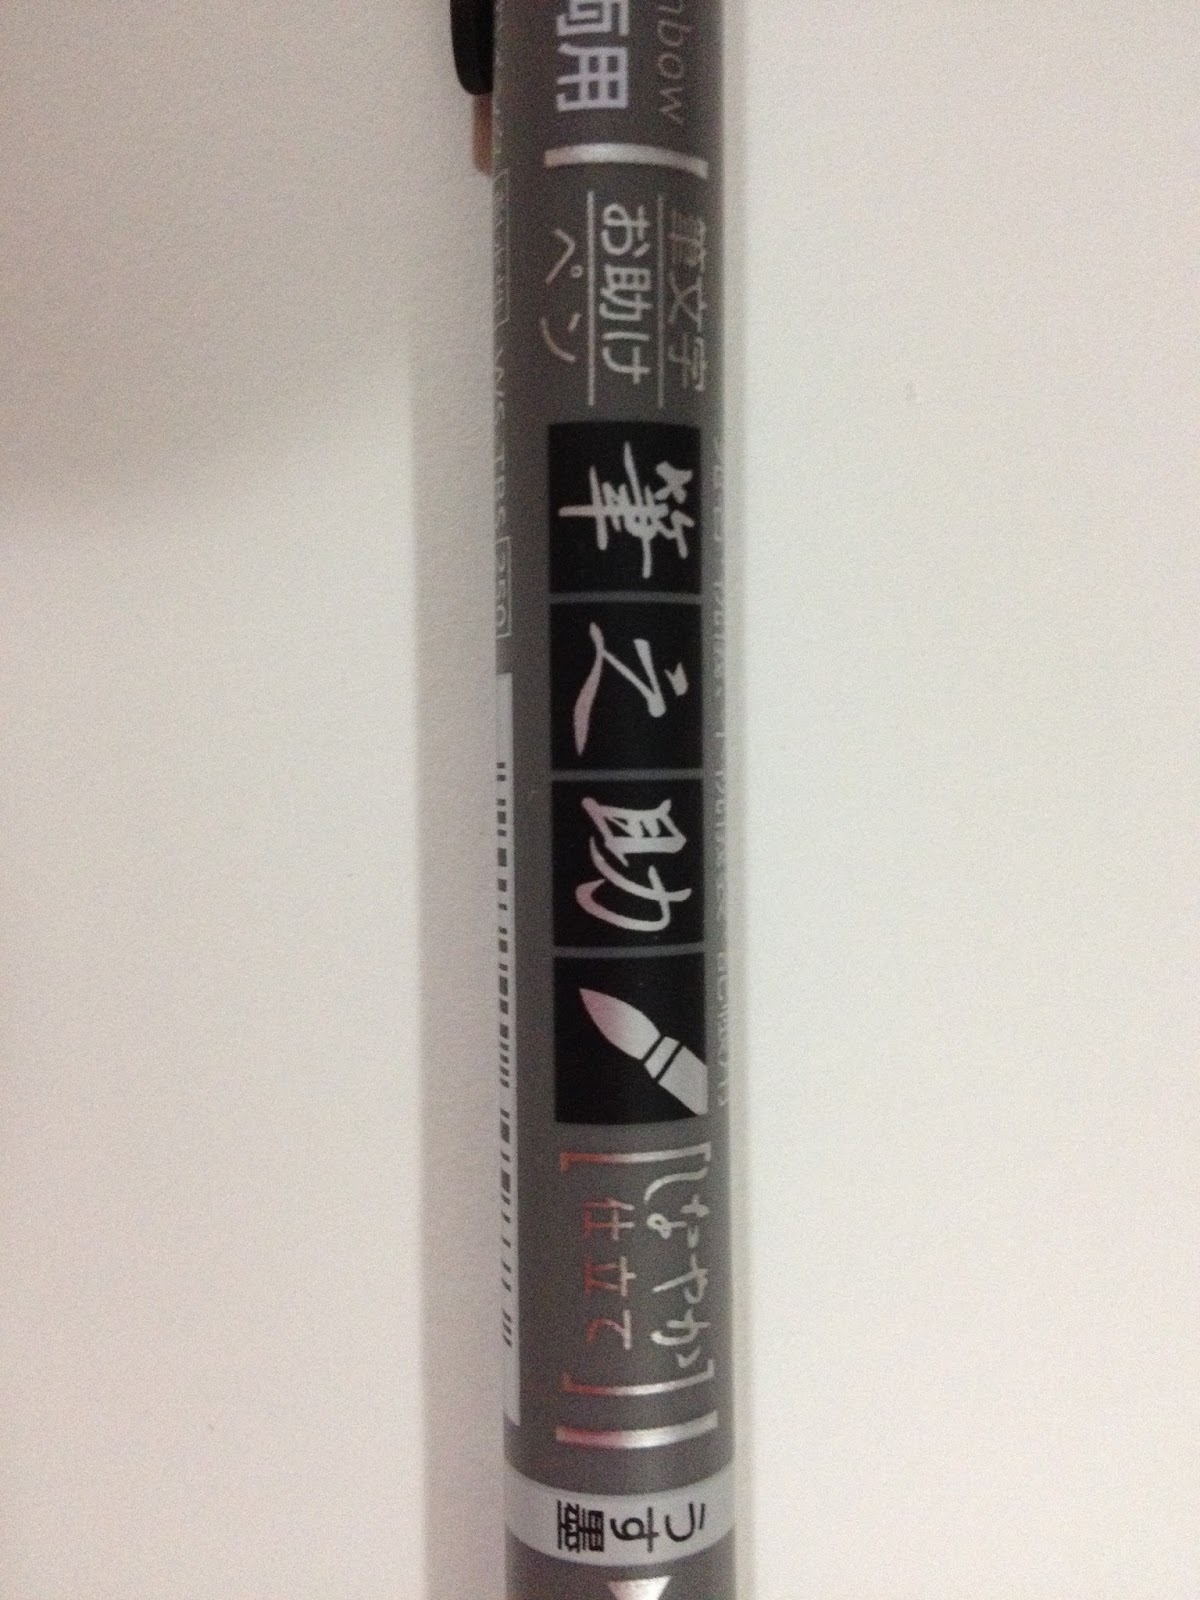
Fude Pen Review: Tombow Fudenosuke Brush Pen - Twin Tip - Gray & Black Ink
In the not terribly distant past, I bought a BUNCH of pens from Jetpens, and proceeded to work my way through reviewing all of them. Of course, this takes time, and brain power, and when several items are very similar, I can get sorta burnt out. I try to space my reviews out so I can dedicate plenty of processing power to each pen I review, and sometimes that means a pen gets neglected for a really long time.
This pen was not one of the pens kindly provided by Jetpens to review, but one I purchased using money earned selling at conventions. If you like this blog, and enjoy the reviews, you can always help out by donating, purchasing something from my shop, and of course, spreading the word. At this time, the blog is entirely paying-ad free, and I'd like to keep it that way.
Today I'm reviewing the Tombow Fudenosuke Brush Pen. It's a twin tipped brush pen that features two small fude style nibs in a gray ink and a black ink. I've reviewed a few brushes like this in the past, such as the Pilot Futayaku. I've also reviewed Tombow products in the past, like the Tombow Dual Brush. My experiences with Tombow haven't always been stellar, so honestly the bar was set pretty low for the Tombow Fudenosuke Brush pen.
The Packaging

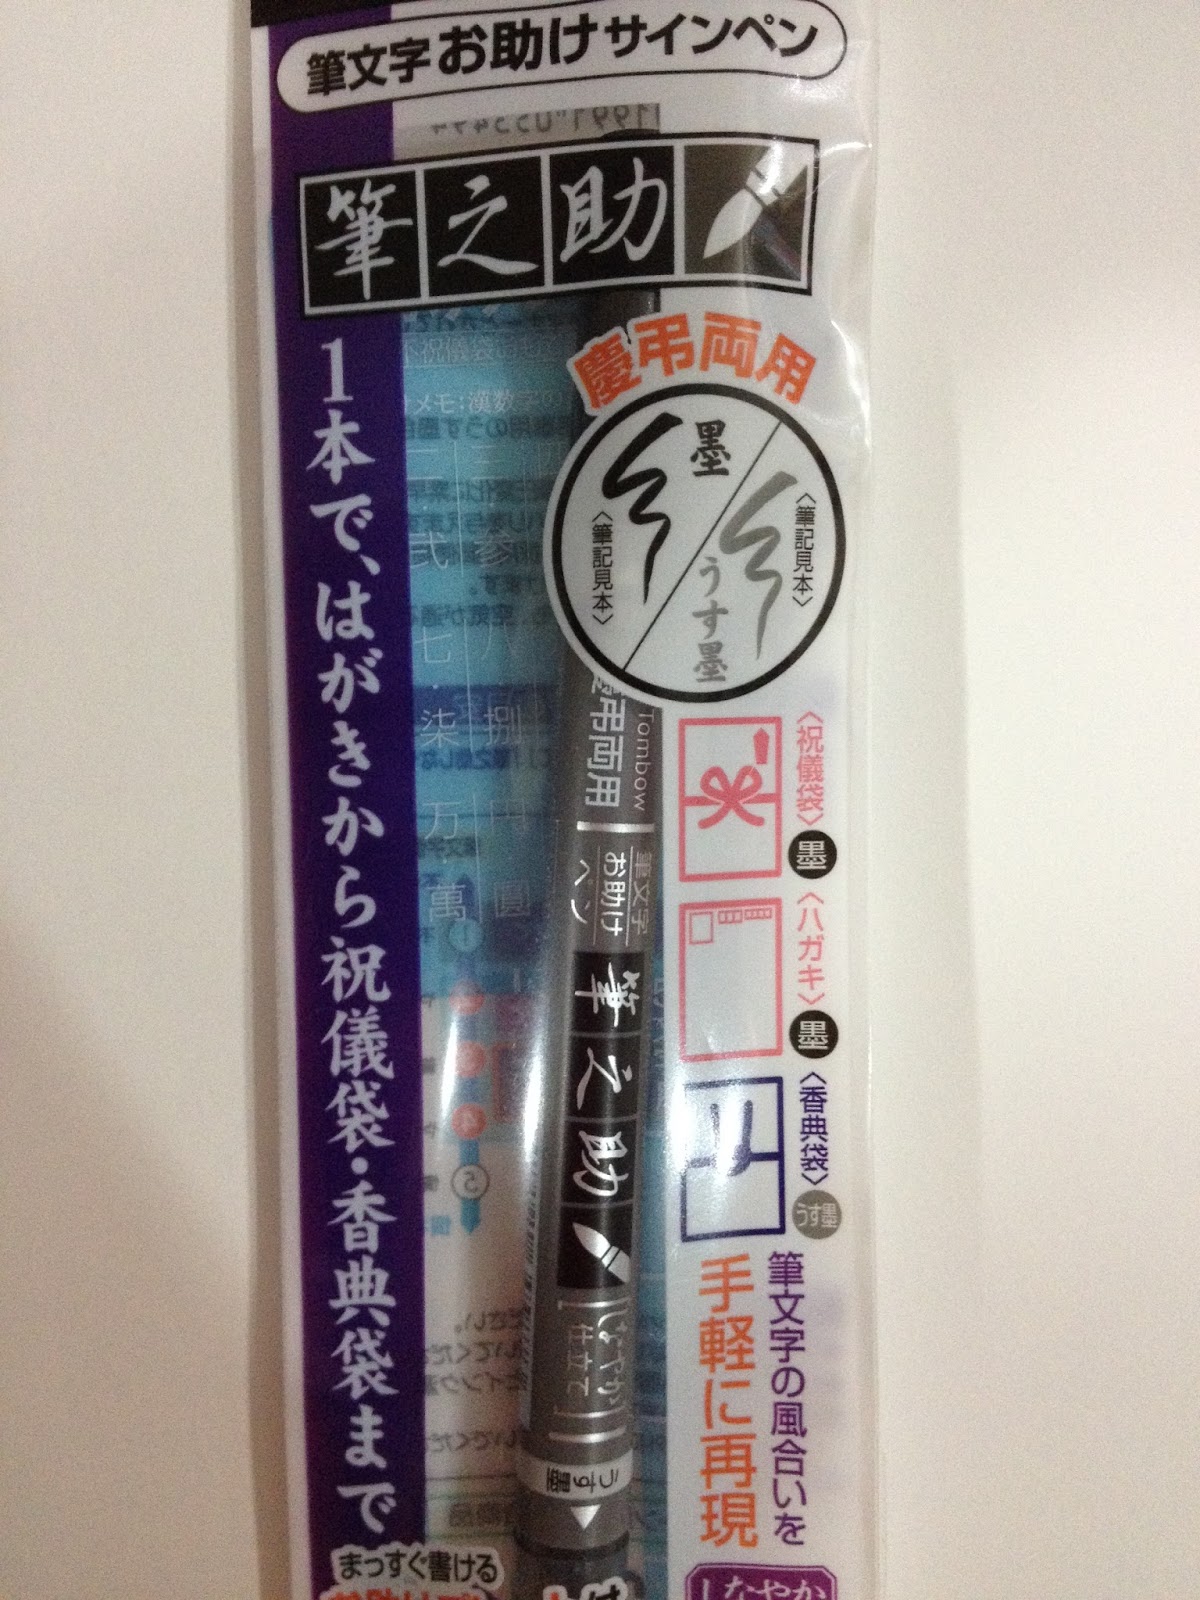
The package has a whole lot of information going on. I can't really read any of it, but you an tell from the package that it's made by Tombow, that it's got twin tips, and that one tip is black and the other is gray.


It seems like there's all sorts of useful information on the back of the package, it's a real shame I can't read any of it! If you can, and you're feeling generous, feel free to translate it in the comments, and I'll add it to this post, giving you credit!
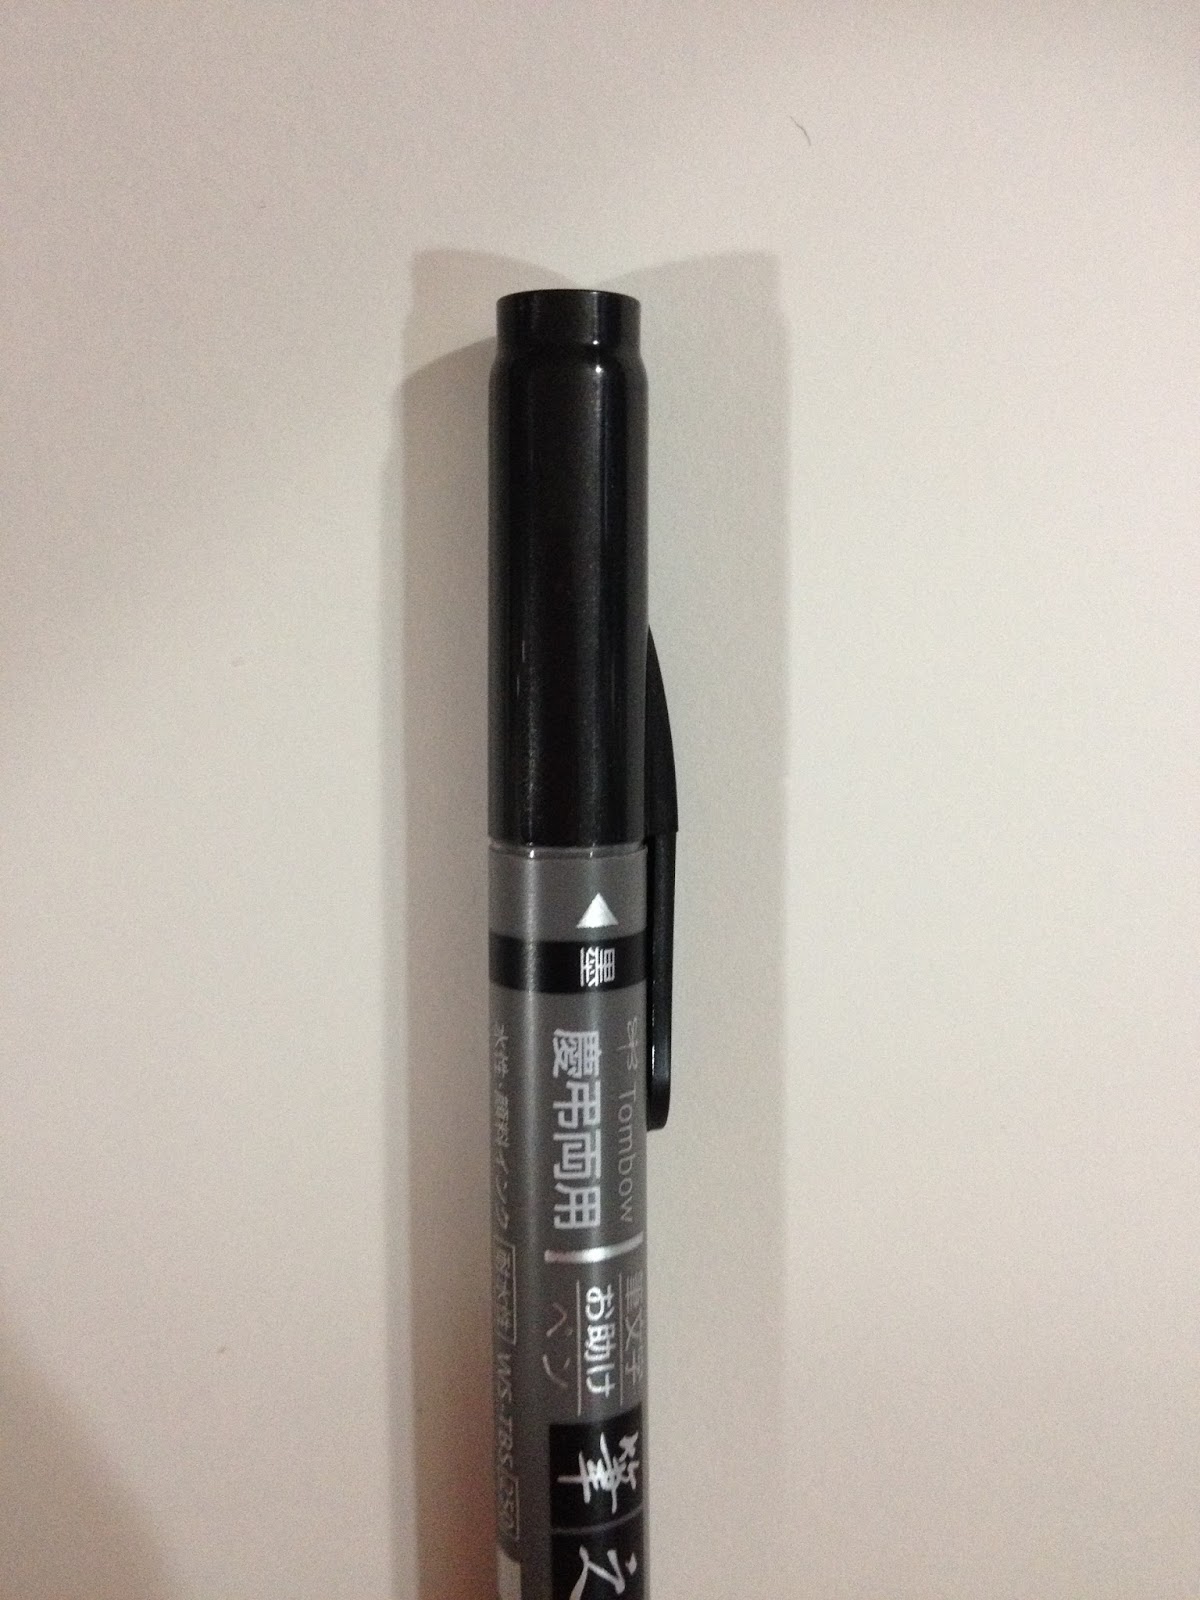
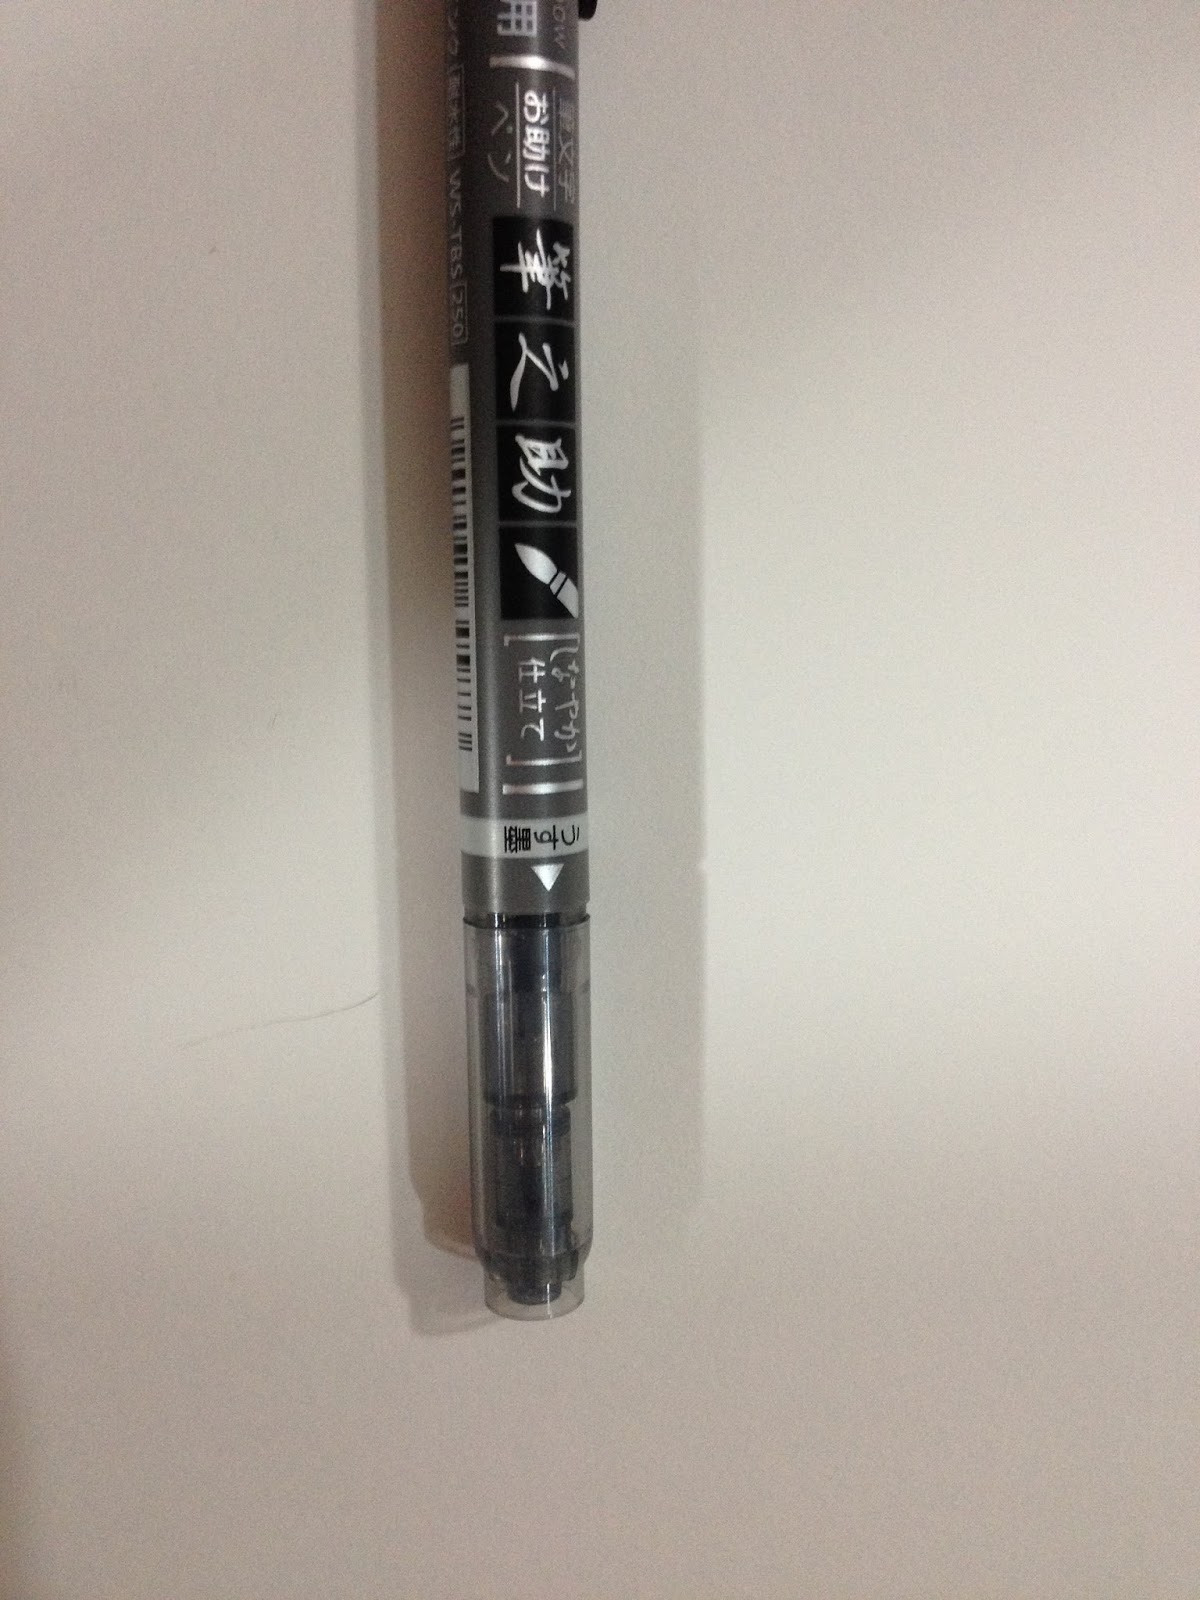
The Pen Itself
I've come to assume this is the standard look for double sided pens. The 'main' side has the end with the paper clip, the secondary end has a lighter cap and no clip. While the clip helps keep the pen from rolling WHILE CAPPED, if you don't cap the pen or post the cap, it's going to roll all over the place.


The black cap signifies the black nib, the gray translucent lid of course signifies the gray nib.

Something kinda neat about this pen is that the black end has a translucent barrel.


The caps post to one another, which is handy as it keeps the cap from rolling away, but a little unwieldy and insecure.
 The Field Test
My previous experiences with Tombow pens always left a little something to be desired, so I didn't have high hopes for the Fudenosuke.


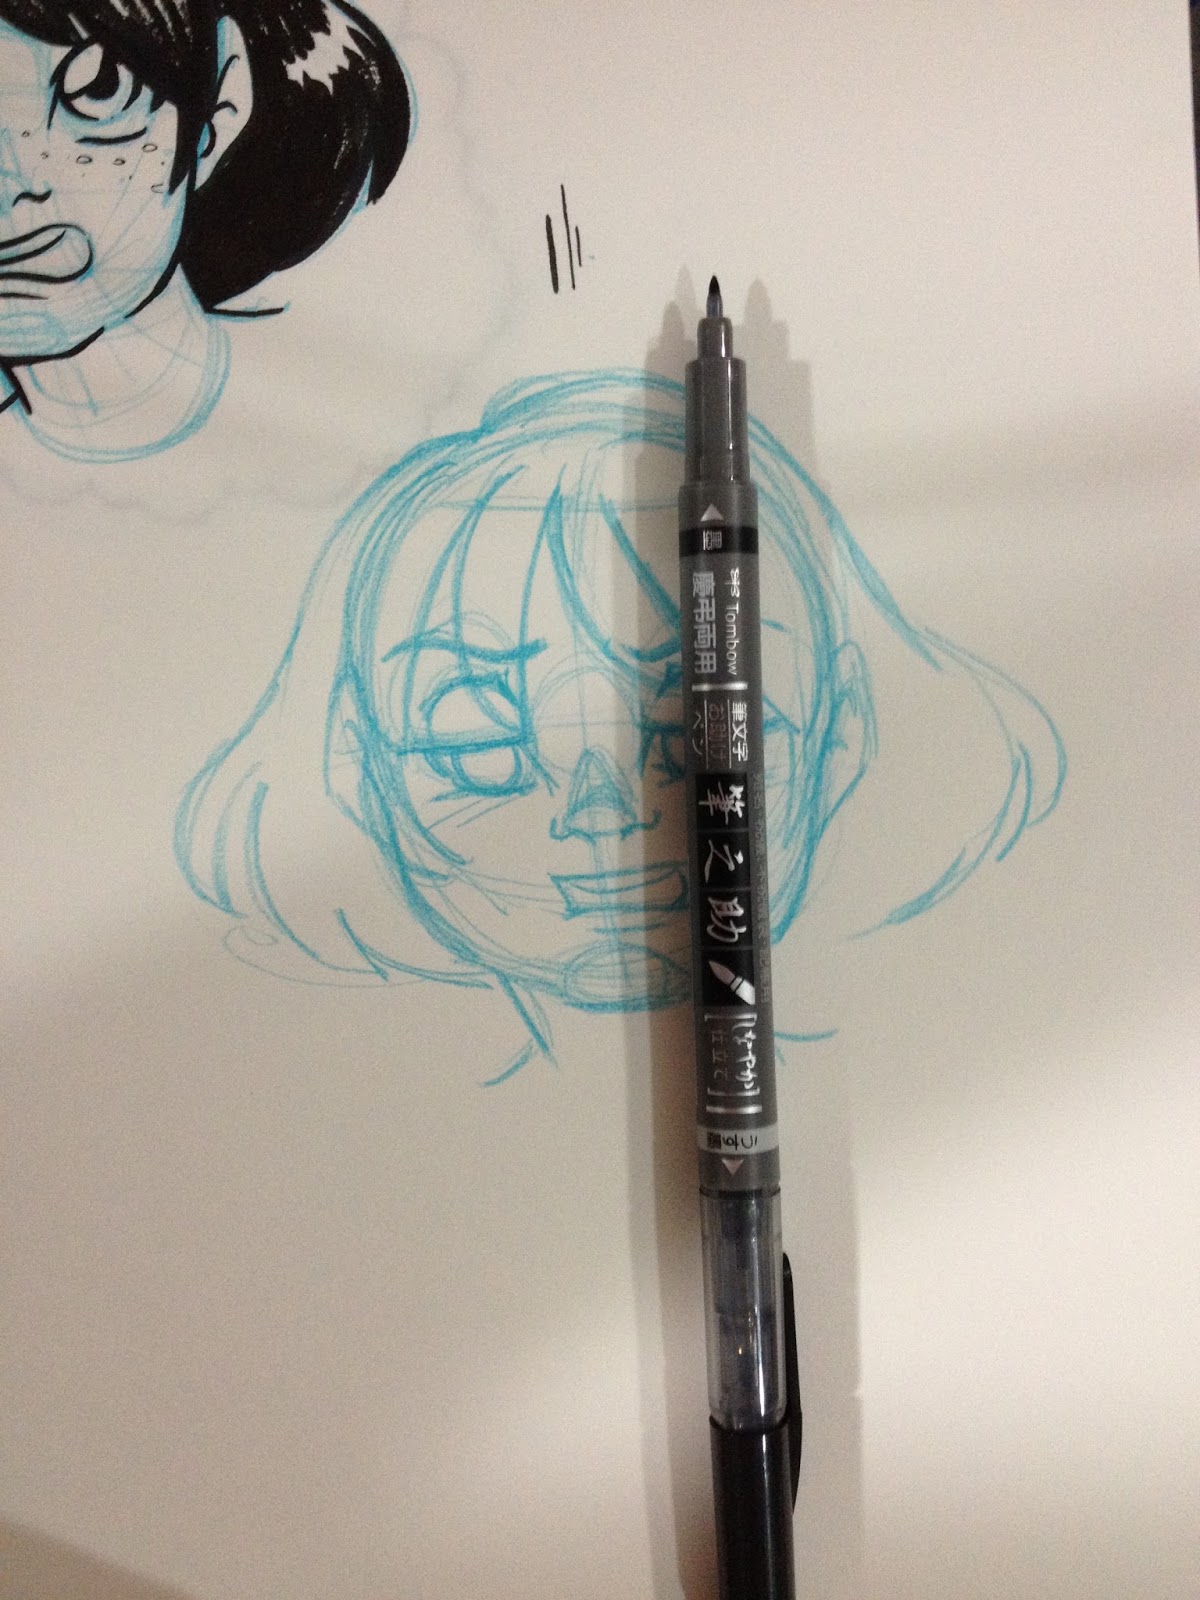
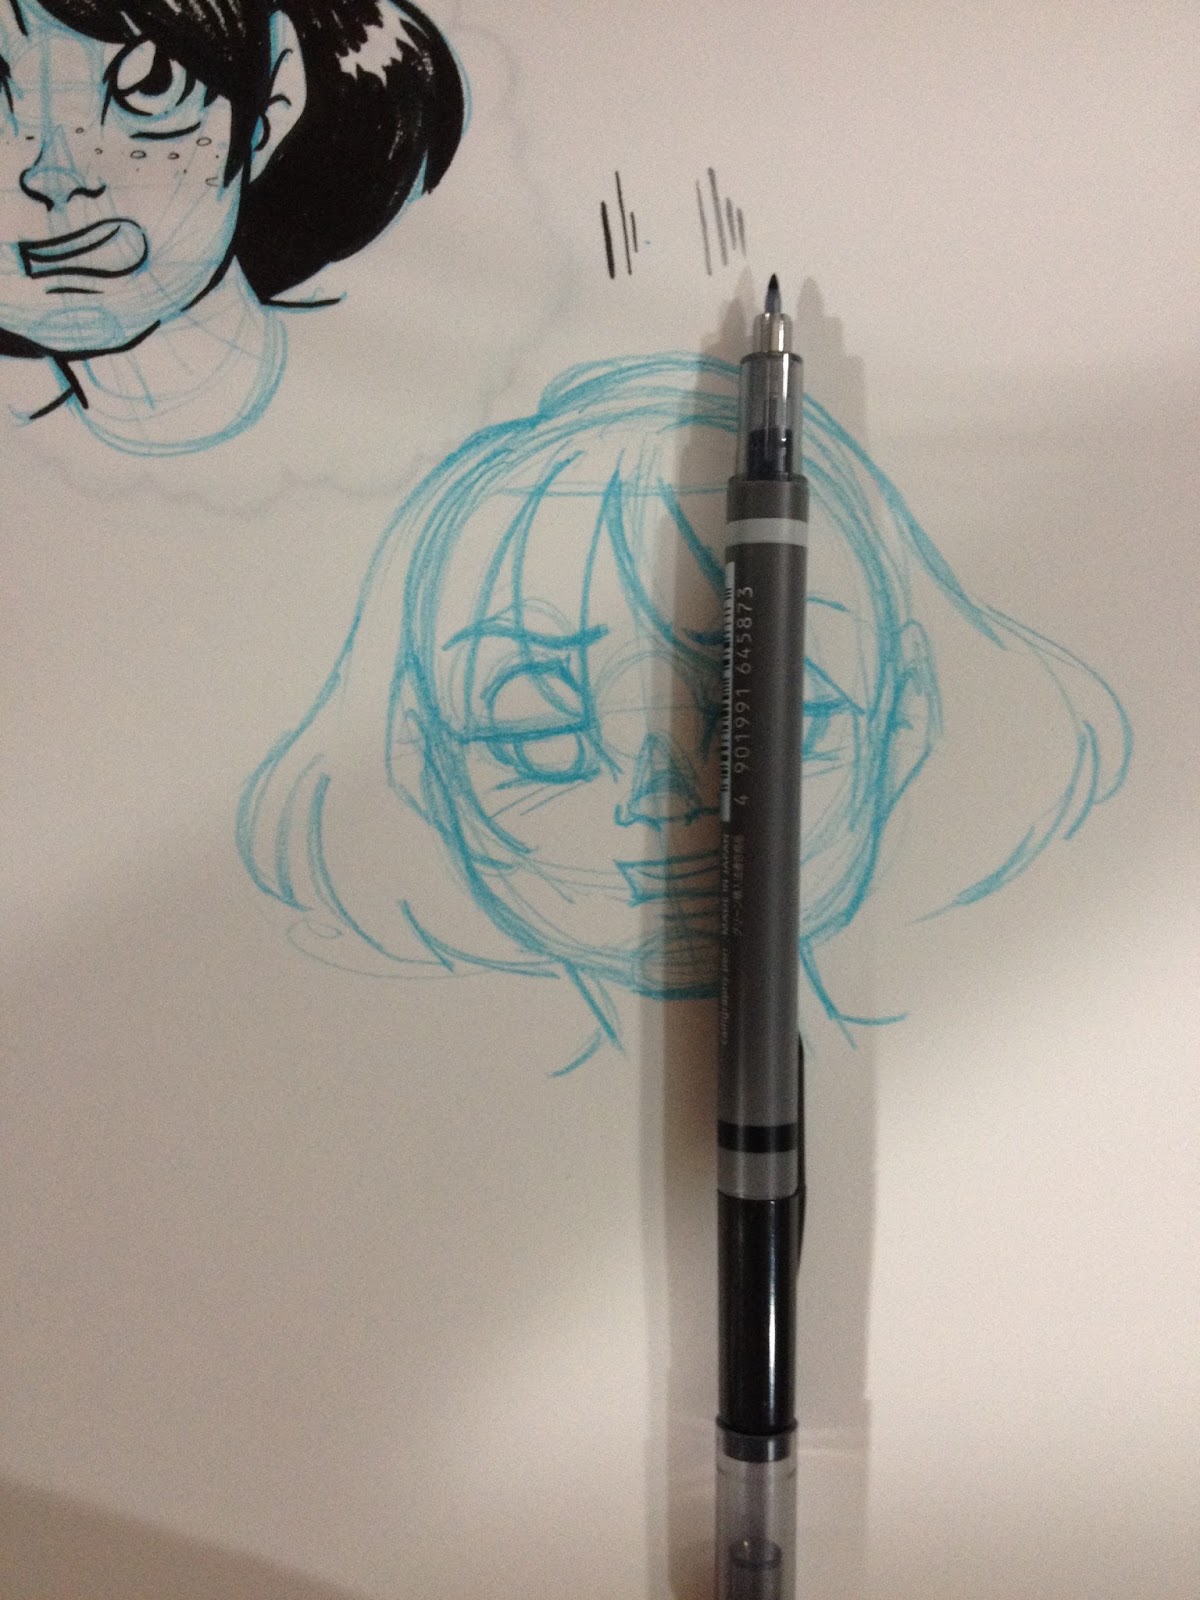
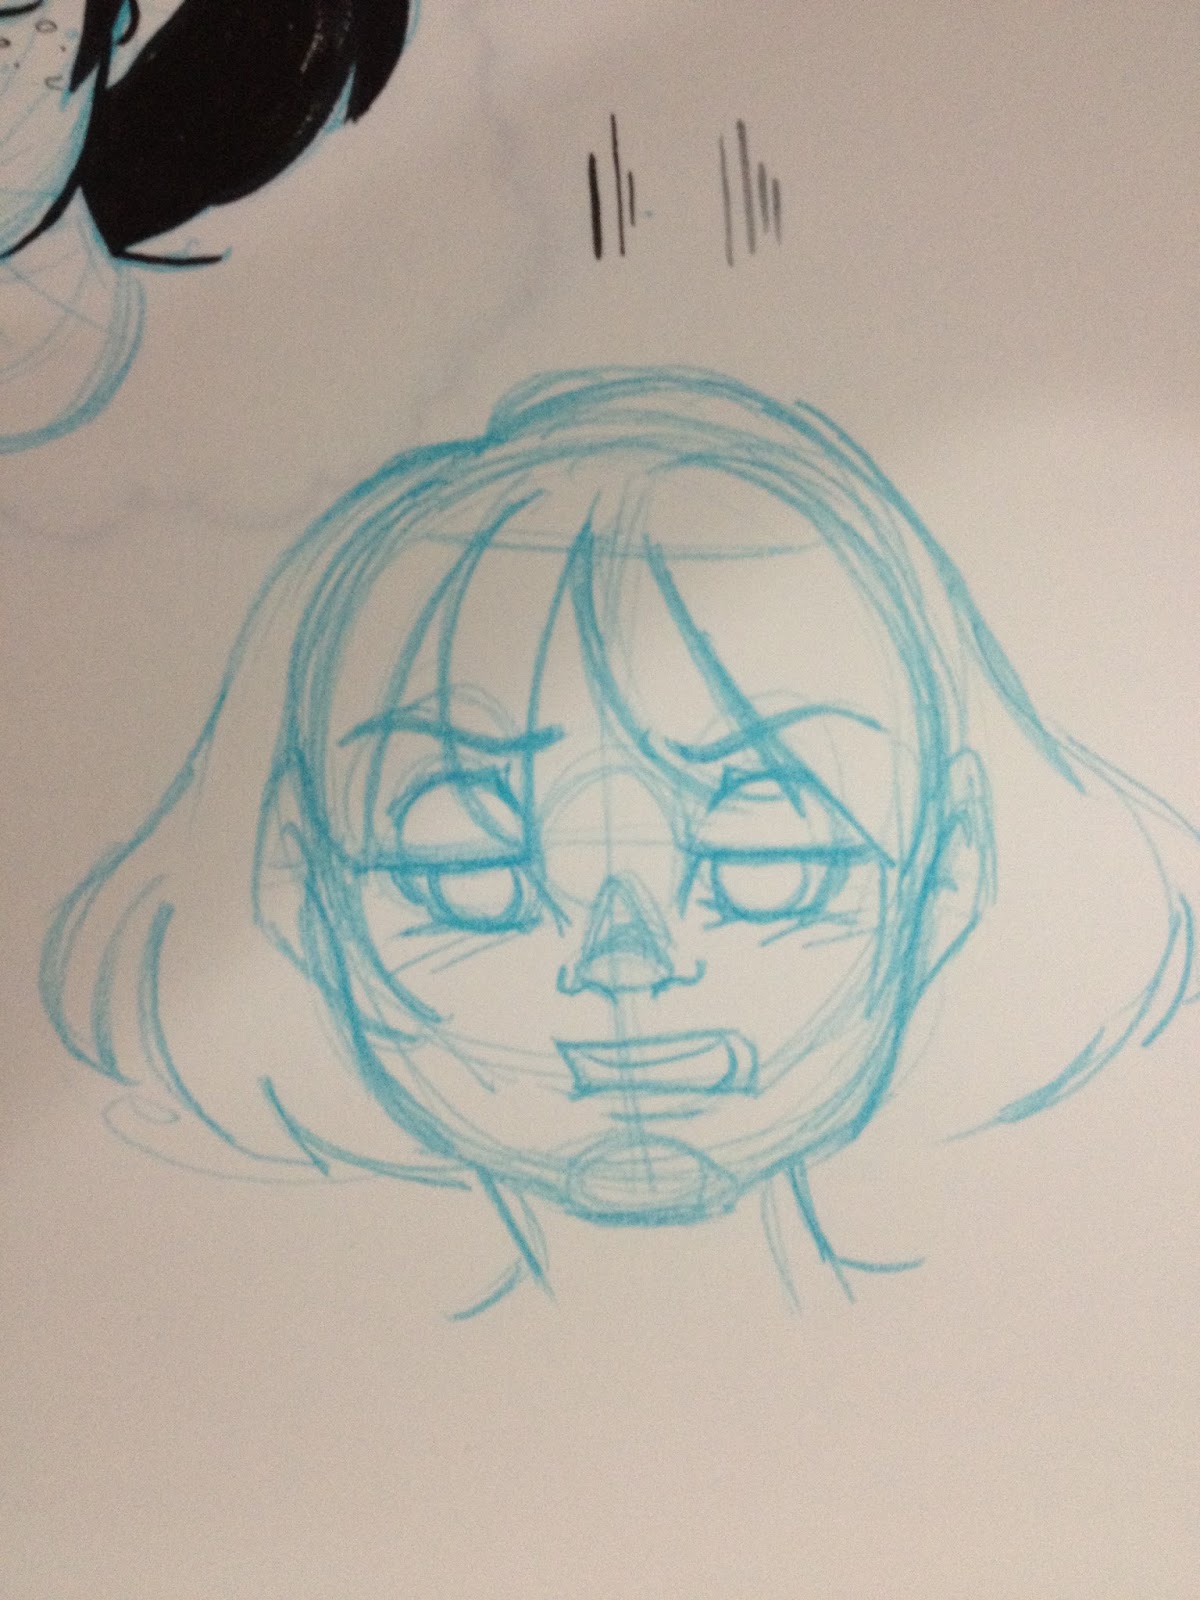
I went ahead and used a toning technique I've used in the past- apply the shadows first, then tighten up with the black ink. I think this is a really fun technique, and I tend to like my inks a lot better afterwards too.


The Fudenosuke ended up surprising me regarding it's performance. Both fude nibs were responsive and flexible, the Fudenosuke is a fun pen to ink with. The gray is a great shade- not too light, but not so dark that it visually competes with the black. Since you're getting two pens in one, the $4.25 price tag isn't too steep, especially if you're only looking to dabble in using a fude pen for your work.
Please consider donating to this blog or purchasing from Natto-shop (http://nattosoup.com/shop) if you want me to continue publishing quality content. All materials tested were purchased from my own pocket. Keep on Truckin' Nattosoup is not under any sponsorship.
This pen was not one of the pens kindly provided by Jetpens to review, but one I purchased using money earned selling at conventions. If you like this blog, and enjoy the reviews, you can always help out by donating, purchasing something from my shop, and of course, spreading the word. At this time, the blog is entirely paying-ad free, and I'd like to keep it that way.
Today I'm reviewing the Tombow Fudenosuke Brush Pen. It's a twin tipped brush pen that features two small fude style nibs in a gray ink and a black ink. I've reviewed a few brushes like this in the past, such as the Pilot Futayaku. I've also reviewed Tombow products in the past, like the Tombow Dual Brush. My experiences with Tombow haven't always been stellar, so honestly the bar was set pretty low for the Tombow Fudenosuke Brush pen.
The Packaging

The package has a whole lot of information going on. I can't really read any of it, but you an tell from the package that it's made by Tombow, that it's got twin tips, and that one tip is black and the other is gray.

It seems like there's all sorts of useful information on the back of the package, it's a real shame I can't read any of it! If you can, and you're feeling generous, feel free to translate it in the comments, and I'll add it to this post, giving you credit!
The Pen Itself
I've come to assume this is the standard look for double sided pens. The 'main' side has the end with the paper clip, the secondary end has a lighter cap and no clip. While the clip helps keep the pen from rolling WHILE CAPPED, if you don't cap the pen or post the cap, it's going to roll all over the place.

The black cap signifies the black nib, the gray translucent lid of course signifies the gray nib.

Something kinda neat about this pen is that the black end has a translucent barrel.
The caps post to one another, which is handy as it keeps the cap from rolling away, but a little unwieldy and insecure.
 The Field Test
My previous experiences with Tombow pens always left a little something to be desired, so I didn't have high hopes for the Fudenosuke.
I went ahead and used a toning technique I've used in the past- apply the shadows first, then tighten up with the black ink. I think this is a really fun technique, and I tend to like my inks a lot better afterwards too.

The Fudenosuke ended up surprising me regarding it's performance. Both fude nibs were responsive and flexible, the Fudenosuke is a fun pen to ink with. The gray is a great shade- not too light, but not so dark that it visually competes with the black. Since you're getting two pens in one, the $4.25 price tag isn't too steep, especially if you're only looking to dabble in using a fude pen for your work.
Please consider donating to this blog or purchasing from Natto-shop (http://nattosoup.com/shop) if you want me to continue publishing quality content. All materials tested were purchased from my own pocket. Keep on Truckin' Nattosoup is not under any sponsorship.
July 15, 2015
Mechacon Announcement Post
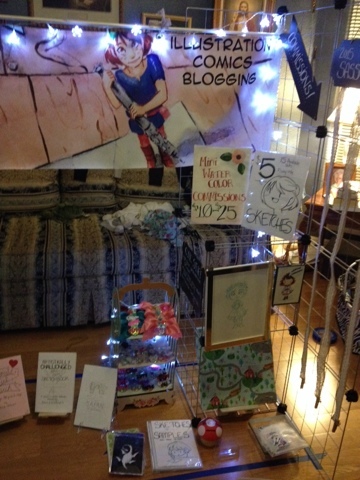
This weekend, I'll be tabling in the artist alley at Mechacon, an anime convention in my hometown of New Orleans, La.

I'm in the back at table 506, the last table in the aisle facing the doors, across from Industry Row. This placement makes me a little nervous, because if circulation is bad, it may mean nobody comes to see me in the back there. If you like seeing me there, and enjoy buying from me in person, or just chatting, please help make this year a standout year, and make it a point to stop by and say hi. I have lots of really cute new things I'm debuting this year, including
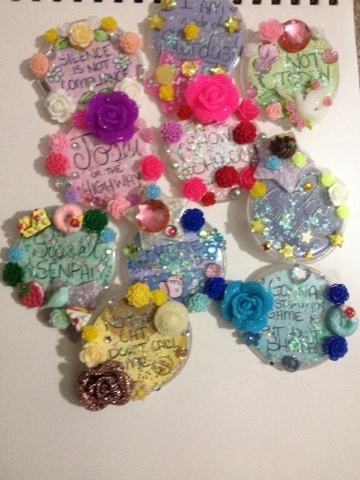
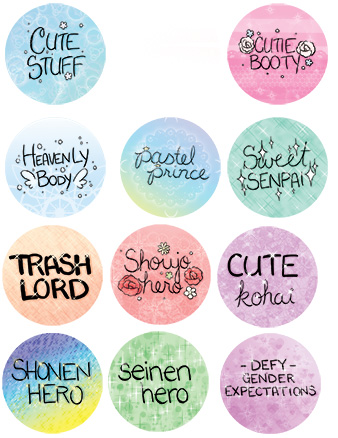
Approximately 36 Brand New, Never Before Sold Sassy Buttons
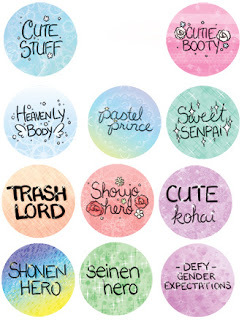
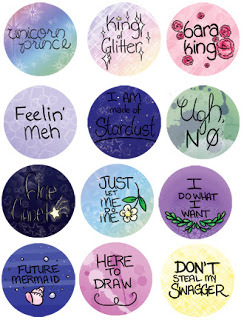
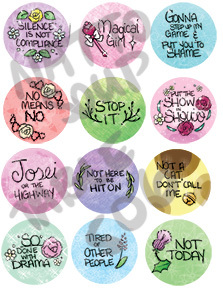
I'm testing new designs, so I have one of each (save for a couple designs people notified me about wanting on Tumblr), so if you like one in particular, make sure you swing by on Friday to get it. I'll also have plenty of the original 13 designs, all super glittery and cute, that should be available all weekend. Sassy buttons are $4 each, or any three designs that I have for $10.

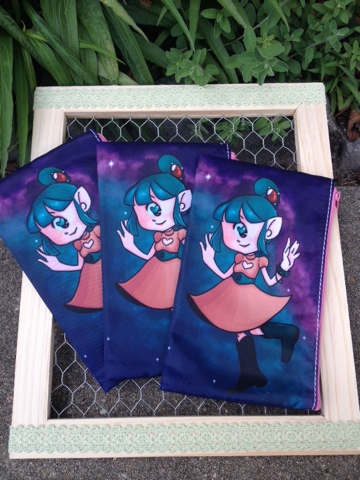
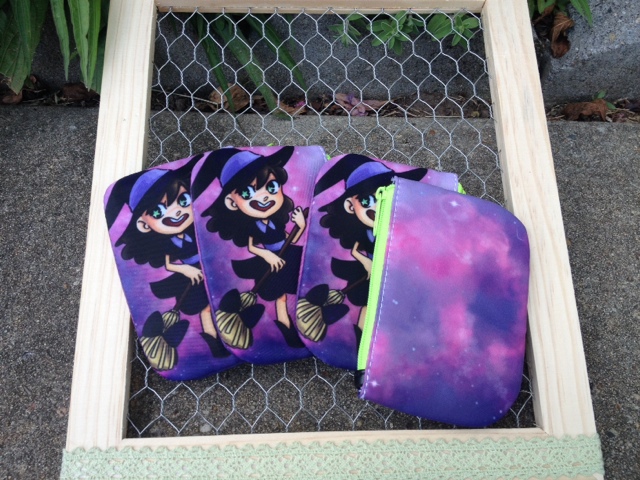
New Cosmetic/Pencil Bag Designs
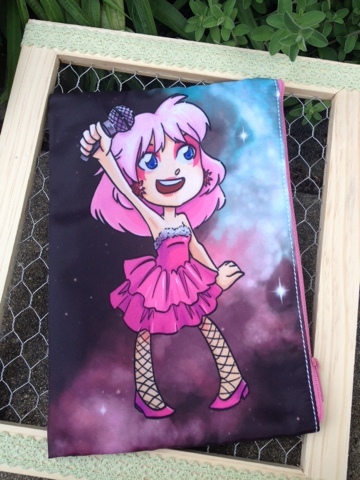
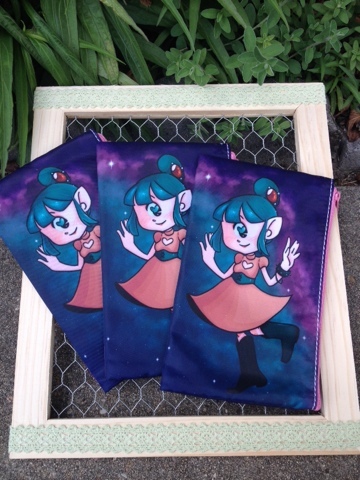
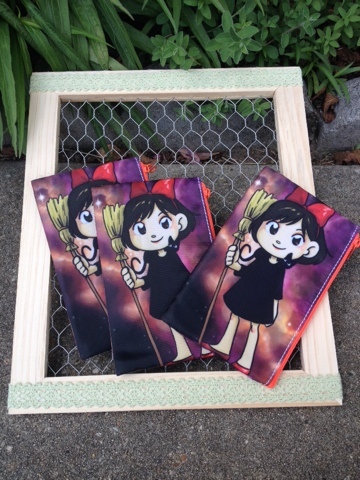
I first introduced zippered bags at MTAC, but I have two new designs for Mechacon- Jem from Jem and the Holograms, and Kiki from Kiki's Delivery Service. I also have my cute cyclops, witch, and Usagi Tsukino bags for sale.

Kawaiimasks
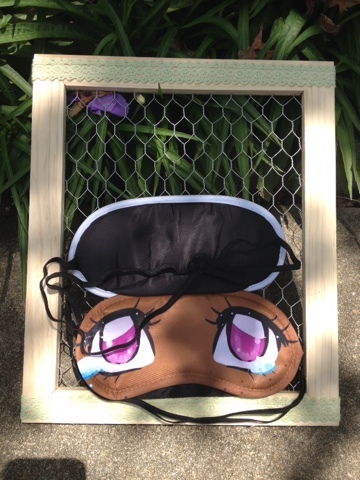
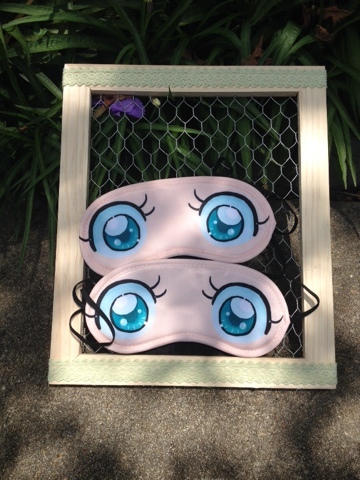
Kawaiimasks are sleep masks that feature adorable wide awake eyes. Kaieaiimasks are $7 each.
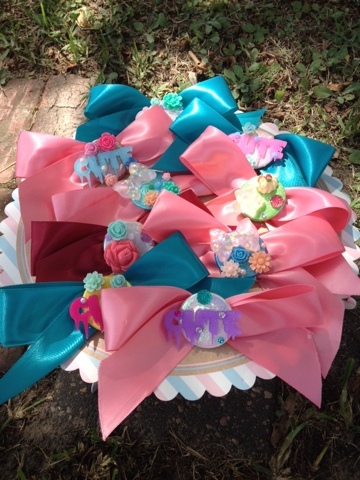
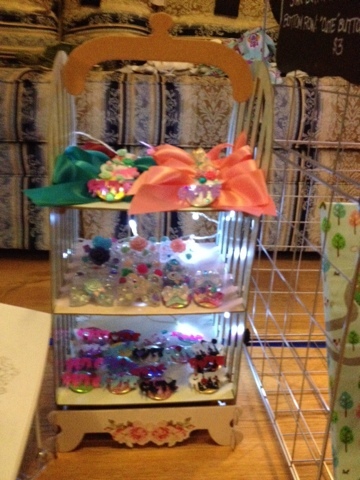
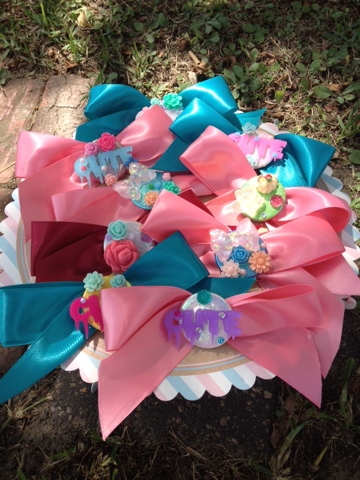
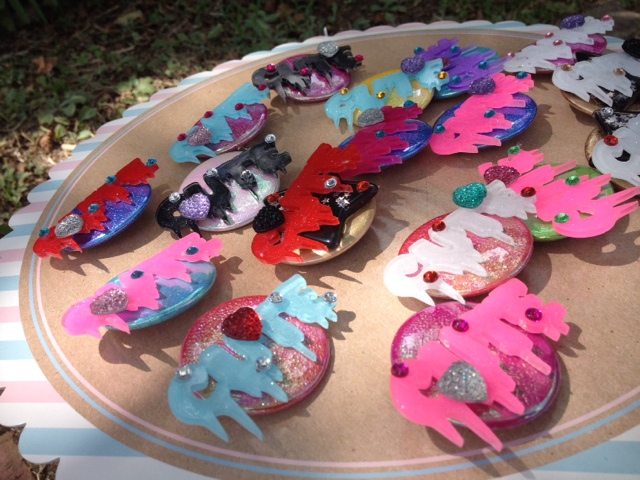
Super Adorable Resin and Acrylic buttons and hair bows


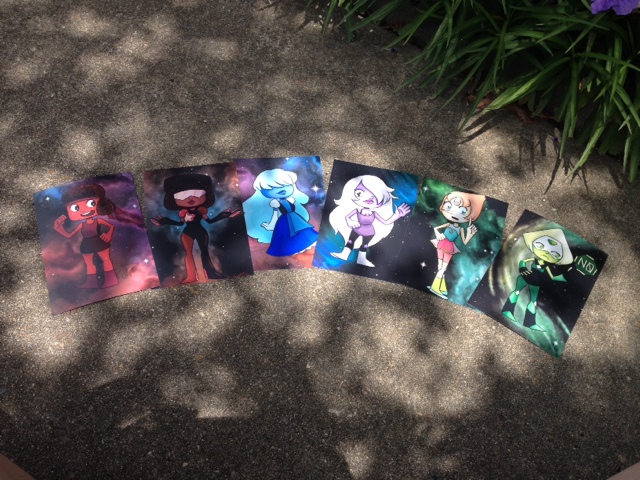
New Steven Universe Mini Prints

Lots of super cute sticker designs
Including Steven Universe sticker packs
New Mini Watercolors


As always, my mini watercolors are originals- once sold, it's gone unless you opt to commisison a similar piece. Pieces start at $10.
Wooden Charms
My wooden charms are cherry veneer, and are available as necklaces or keychains. Charms are $6 each, 2 for $10, or a Kara charm is free with the purchase of Volume 1 of 7" Kara.
The Test Run Setup
Since I'm in a bad corner, I decided to utilize a little attention grabbing light!

Artist Alley Hours have also changed- they've gotten MUCH longer, and while I can't promise I'll be there the entire time, I will be at the table as long as sales are steady and I'm able to function. Hours are:
Friday-1:00PM-11:00 PM
Saturday-10:00 AM- 11:00 PM
Sunday-10:00 AM- 5:00 PM
I'll be taking as many at con sketch commissions as possible, but I highly recommend stopping by Friday or Saturday to place yours, as Sundays tend to be me mostly filling any I couldn't finish on Saturday night. I'll also be taking mail in commissions weekend, including Sunday. Mail in commisisons are place order and pay at the show, and I'll mail your piece within two weeks.
For those of you who can't make it to Mechacon this year, I have an online shop, and if you see something on here that you want that isn't in the shop, just send me an email and we'll make arrangements through Paypal.
Please consider donating to this blog or purchasing from Natto-shop (http://nattosoup.com/shop) if you want me to continue publishing quality content. All materials tested were purchased from my own pocket. Keep on Truckin' Nattosoup is not under any sponsorship.

I'm in the back at table 506, the last table in the aisle facing the doors, across from Industry Row. This placement makes me a little nervous, because if circulation is bad, it may mean nobody comes to see me in the back there. If you like seeing me there, and enjoy buying from me in person, or just chatting, please help make this year a standout year, and make it a point to stop by and say hi. I have lots of really cute new things I'm debuting this year, including
Approximately 36 Brand New, Never Before Sold Sassy Buttons


I'm testing new designs, so I have one of each (save for a couple designs people notified me about wanting on Tumblr), so if you like one in particular, make sure you swing by on Friday to get it. I'll also have plenty of the original 13 designs, all super glittery and cute, that should be available all weekend. Sassy buttons are $4 each, or any three designs that I have for $10.


New Cosmetic/Pencil Bag Designs


I first introduced zippered bags at MTAC, but I have two new designs for Mechacon- Jem from Jem and the Holograms, and Kiki from Kiki's Delivery Service. I also have my cute cyclops, witch, and Usagi Tsukino bags for sale.
Kawaiimasks


Kawaiimasks are sleep masks that feature adorable wide awake eyes. Kaieaiimasks are $7 each.
Super Adorable Resin and Acrylic buttons and hair bows

New Steven Universe Mini Prints
Lots of super cute sticker designs
Including Steven Universe sticker packs
New Mini Watercolors


As always, my mini watercolors are originals- once sold, it's gone unless you opt to commisison a similar piece. Pieces start at $10.
Wooden Charms

My wooden charms are cherry veneer, and are available as necklaces or keychains. Charms are $6 each, 2 for $10, or a Kara charm is free with the purchase of Volume 1 of 7" Kara.
The Test Run Setup
Since I'm in a bad corner, I decided to utilize a little attention grabbing light!


Artist Alley Hours have also changed- they've gotten MUCH longer, and while I can't promise I'll be there the entire time, I will be at the table as long as sales are steady and I'm able to function. Hours are:
Friday-1:00PM-11:00 PM
Saturday-10:00 AM- 11:00 PM
Sunday-10:00 AM- 5:00 PM
I'll be taking as many at con sketch commissions as possible, but I highly recommend stopping by Friday or Saturday to place yours, as Sundays tend to be me mostly filling any I couldn't finish on Saturday night. I'll also be taking mail in commissions weekend, including Sunday. Mail in commisisons are place order and pay at the show, and I'll mail your piece within two weeks.
For those of you who can't make it to Mechacon this year, I have an online shop, and if you see something on here that you want that isn't in the shop, just send me an email and we'll make arrangements through Paypal.
Please consider donating to this blog or purchasing from Natto-shop (http://nattosoup.com/shop) if you want me to continue publishing quality content. All materials tested were purchased from my own pocket. Keep on Truckin' Nattosoup is not under any sponsorship.
July 14, 2015
Watercolor Pen Review: Marvy LePlume II
I really love going to art supply stores. I love the way they smell, I love the aisles of art supplies I haven't yet tried, I love touching the individual pencils, the brushes, the tubes of paint. I could spend hours perusing the right art supply store.
I was sorta aimlessly wandering around the drafting section of my semi-local Jerry's Artarama when I came across these Marvy LePlume II's. At first, I thought they were Tombow ABT's, and I beelined to the blender pen because I'm pretty sure my Tombow set doesn't have one. It was only after I'd picked the pen up that I realized that these weren't Tombow ABT's but something else. I'd read about Marvy LePlume II's a couple times- first in my alcohol based marker showdown when I covered the Marvy LePlumes. The second time I encountered the Marvy LePlume II's was when I was doing some background research for the Marvy LePens I recently covered.
Marvy LePlume II are Marvy's waterbased, "watercolor" marker. They're unusual in that there's a fineliner nib rather than a bullet nib, and a "Japanese" brush nib. I can't seem to find them on the Jerry's Artarama website, but they're available on Amazon, and tend to run $2.50 a marker openstock at an actual Jerry's location, making them quite affordable. I noodled around with them in the store on the tester paper, and liked what I saw- easy bendability, the blender marker seems to work, so I bought several in common tones and brought them home to test.
These aren't the first waterbased, watercolor markers I've tested on this blog. I've also tested the Akashiya Sai watercolor brushpen set available on Jetpens, as well as the Neopiko 4. I've also tested markers that are more similar to traditional watercolors, such as Winsor & Newton's watercolor markers, and Letraset's Aquamarker. I don't expect these to perform like true watercolor markers, but more like a watercolor/alcohol based marker hybrid. I also demand that my watercolor markers NOT separate into the dyes that comprise each color, something the Akashiya Sai watercolor brushpens had difficulty with.
The Markers

So I bought a decent handful of Marvy Le Plume II's, mostly Kara colors. Two skintones, a blushy pink, two hairshades, two gray scales, one blender. I figured if these worked out, I could branch out to a better rounded collection that focused on a variety of skintones.

These markers are really unusual, at least to me, as one end is a fineliner and the other is a large brush nib. I was really hoping the large brush nib would be as flexible as the Copic's Super Brush, but unfortunately, it's pretty stiff.


 So far so good. All the colors I purchased stay pretty true, even when water has been added. Not all of them distribute their pigments equally (dark grey is a bit resistant), so that's something to keep in mind if you want to use these for 'painting'.
On Watercolor Paper, Using Water to Blend
For the purposes of this review, I sketched out a little Kara, inked her with the Sailor Mitsuo Aida, as it's waterproof and a fude pen, and let that dry for 24 hours before erasing the pencil. I then taped that sucker down, and started laying down some color. I used Fabriano Medioevalis 208 S, because I have a 100 pack of these little cards, which is a fairly soft watercolor paper.


So even though I allowed the ink to dry overnight, and the ink itself is waterproof (and Copic-proof, thanks to Heidi's swatching one evening),the stiff brush nib caused the ink to smear. This is pretty common with drying-out Copics, and doesn't necessarily indicate an issue with the ink, but an issue with the brush nib or the marker itself.

For this test, I wanted to emulate watercoloring with these waterbased markers, so I used a cup of clean water and a watercolor brush for blending.


The Marvy LePlume II's felt tipped large brush isn't nearly as flexible as I would like, and I feel like that's affecting my ability to use it as a brush. Because the brushes are so stiff and a little dry, they pull on the ink (even if it's dried 24 hours) the same way a dried out Copic will, smearing the black ink. This is REALLY noticeable with skintones.


In many respects, the Marvy Le Plume II's handle somewhat like Neopiko 4's- they can blend out with water (although some colors require a little scrubbing), they can be layered for deeper tones, and the initial application area tends to be the darkest.


Unfortunately you can't see it, but repeated application while the paper is still fairly wet did cause pilling. I'm not sure if it's the stiff Japanese brush on the Marvy LePlumeII, or the fault of the watercolor paper itself. I SUPPOSE THIS REQUIRES EVEN FURTHER TESTING at some point.

On Multimedia Paper, Using The Blender to Blend
For this test, I wanted to use something that was more geared towards dry media, but I didn't want to grab the plate Bristol or Copic paper just yet. I was thinking about cardstock, but I ended up settling on this Multi-Media sketch paper from Art Alternatives. I think I was given this as a sample a few years ago, so no better time to test than years later, right?


While still recovering from vicious Animazement con crud, I whipped out this sketch and inked it with the waterproof Sailor Mitsuo Aida double sided pen. I let the ink dry overnight.
I intended to start coloring this piece today with the Marvy Le Plume II's, but fortunately, I did some swatches on the paper beforehand, and had an unpleasant surprise.

The blender pen causes pilling and wrecks the paper! YAY!
 And the blender doesn't really do much blending. What solvent is Marvy LePlumeII using in this anyway? If it's just a waterpen, a better solution would be a refillable waterbrush, or an actual brush.
 Given how these markers performed in just a test, I decided NOT to use them on my test illustration. I tell a trainwreck is a trainwreck before the train even hits the cow.
The Verdict
I hate to admit, I'm honestly really disappointed with the Marvy LePlume II's. I'm not sure if the issue is me or the markers themselves, but the blender pen always seems to tear up the paper I try to use it on. I just really wanted these pens to work, and while I've tried a few papers, I haven't find one that works yet. The inked sketch I generated to test the dry usage of these pens is too nice to waste on pens that will just eat up the paper, so I'm going to use my Neopiko 4's on it instead, and change that test to a test of the 'multi media' quality of the Art Alternatives Sketch paper. If you can use the Marvy LePlume II's successfully, or know of someone who does, I'd really appreciate if you linked me to a process post, because I'd really like to start using waterbased markers in addition to alcohol based markers in my work. Given how many of these kinds of markers are on the market (Marvy, Tombow, Zig- I'll be reviewing those soon), surely SOMEONE can get them to work, and I probably just haven't hit on the rigtht paper and the right process. However, if you intend to use them the way I've shown here, I strongly advise that you avoid them.
Waterbased markers tend to be quite a bit cheaper than all but the very cheapest of alcohol based markers (the Finecolour's, I believe), and I think if I could just get the hang of them, I could turn a lot of broke artists on to them. I like the colors, I like the brands that DON'T separate into individual dyes, but I'm having trouble finding a brand/paper/process that works. If you don't mind spending just a bit more, I still highly recommend the Neopiko 4's as a waterbased addition to your marker collection, or the Winsor & Newton Watercolor markers if you want a nice hybrid that utilizes real watercolor pigments.
Please consider donating to this blog or purchasing from Natto-shop (http://nattosoup.com/shop) if you want me to continue publishing quality content. All materials tested were purchased from my own pocket. Keep on Truckin' Nattosoup is not under any sponsorship.
I was sorta aimlessly wandering around the drafting section of my semi-local Jerry's Artarama when I came across these Marvy LePlume II's. At first, I thought they were Tombow ABT's, and I beelined to the blender pen because I'm pretty sure my Tombow set doesn't have one. It was only after I'd picked the pen up that I realized that these weren't Tombow ABT's but something else. I'd read about Marvy LePlume II's a couple times- first in my alcohol based marker showdown when I covered the Marvy LePlumes. The second time I encountered the Marvy LePlume II's was when I was doing some background research for the Marvy LePens I recently covered.
Marvy LePlume II are Marvy's waterbased, "watercolor" marker. They're unusual in that there's a fineliner nib rather than a bullet nib, and a "Japanese" brush nib. I can't seem to find them on the Jerry's Artarama website, but they're available on Amazon, and tend to run $2.50 a marker openstock at an actual Jerry's location, making them quite affordable. I noodled around with them in the store on the tester paper, and liked what I saw- easy bendability, the blender marker seems to work, so I bought several in common tones and brought them home to test.
These aren't the first waterbased, watercolor markers I've tested on this blog. I've also tested the Akashiya Sai watercolor brushpen set available on Jetpens, as well as the Neopiko 4. I've also tested markers that are more similar to traditional watercolors, such as Winsor & Newton's watercolor markers, and Letraset's Aquamarker. I don't expect these to perform like true watercolor markers, but more like a watercolor/alcohol based marker hybrid. I also demand that my watercolor markers NOT separate into the dyes that comprise each color, something the Akashiya Sai watercolor brushpens had difficulty with.
The Markers
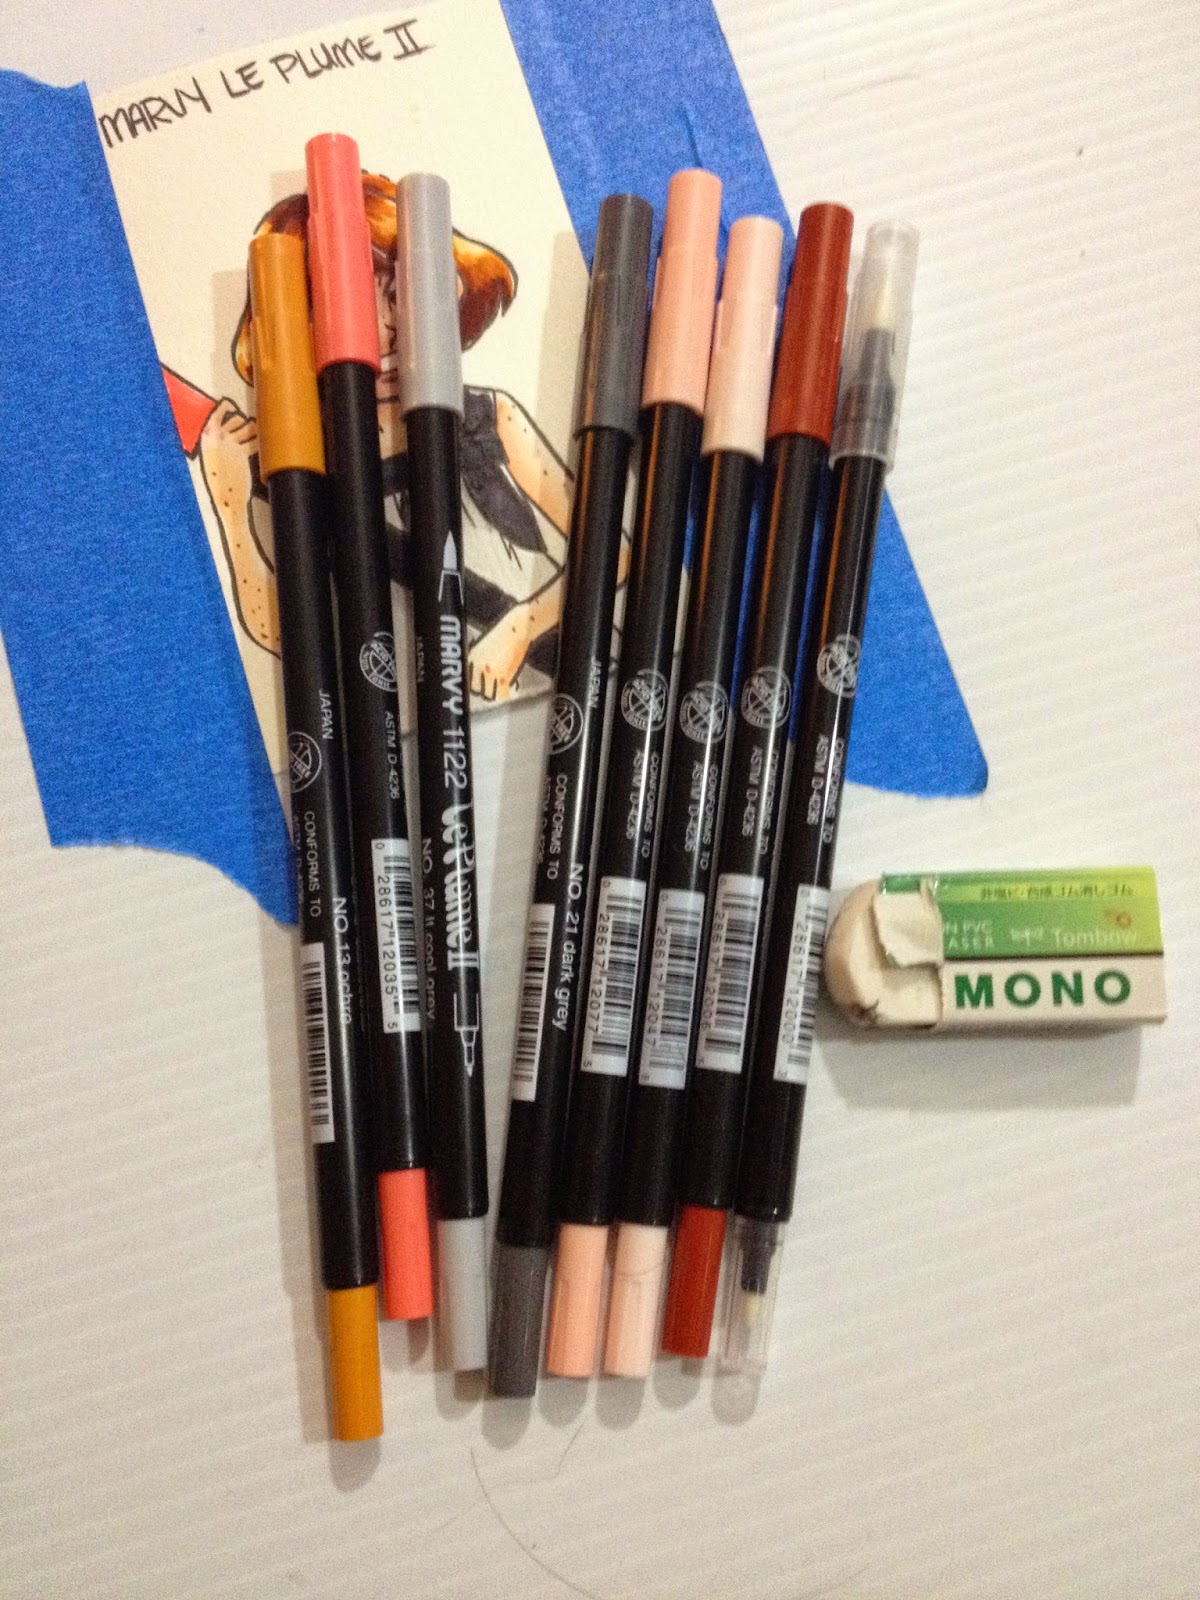
So I bought a decent handful of Marvy Le Plume II's, mostly Kara colors. Two skintones, a blushy pink, two hairshades, two gray scales, one blender. I figured if these worked out, I could branch out to a better rounded collection that focused on a variety of skintones.

These markers are really unusual, at least to me, as one end is a fineliner and the other is a large brush nib. I was really hoping the large brush nib would be as flexible as the Copic's Super Brush, but unfortunately, it's pretty stiff.
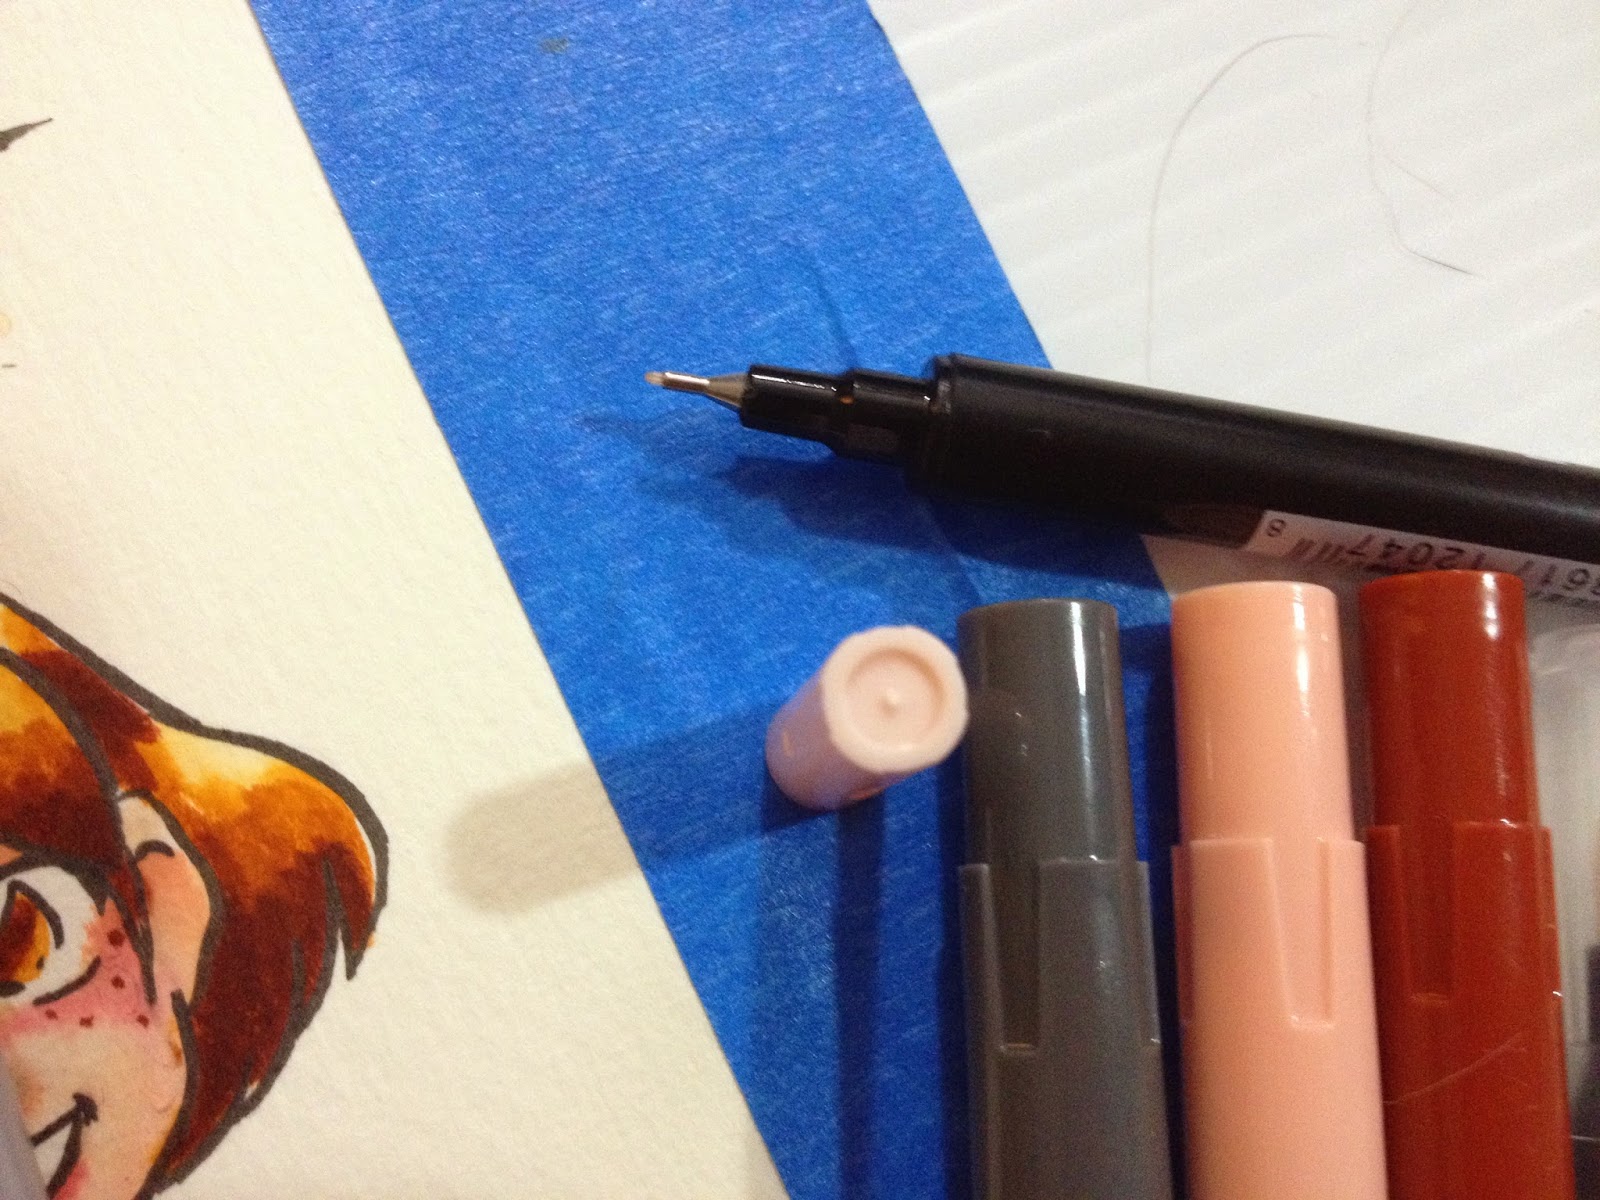
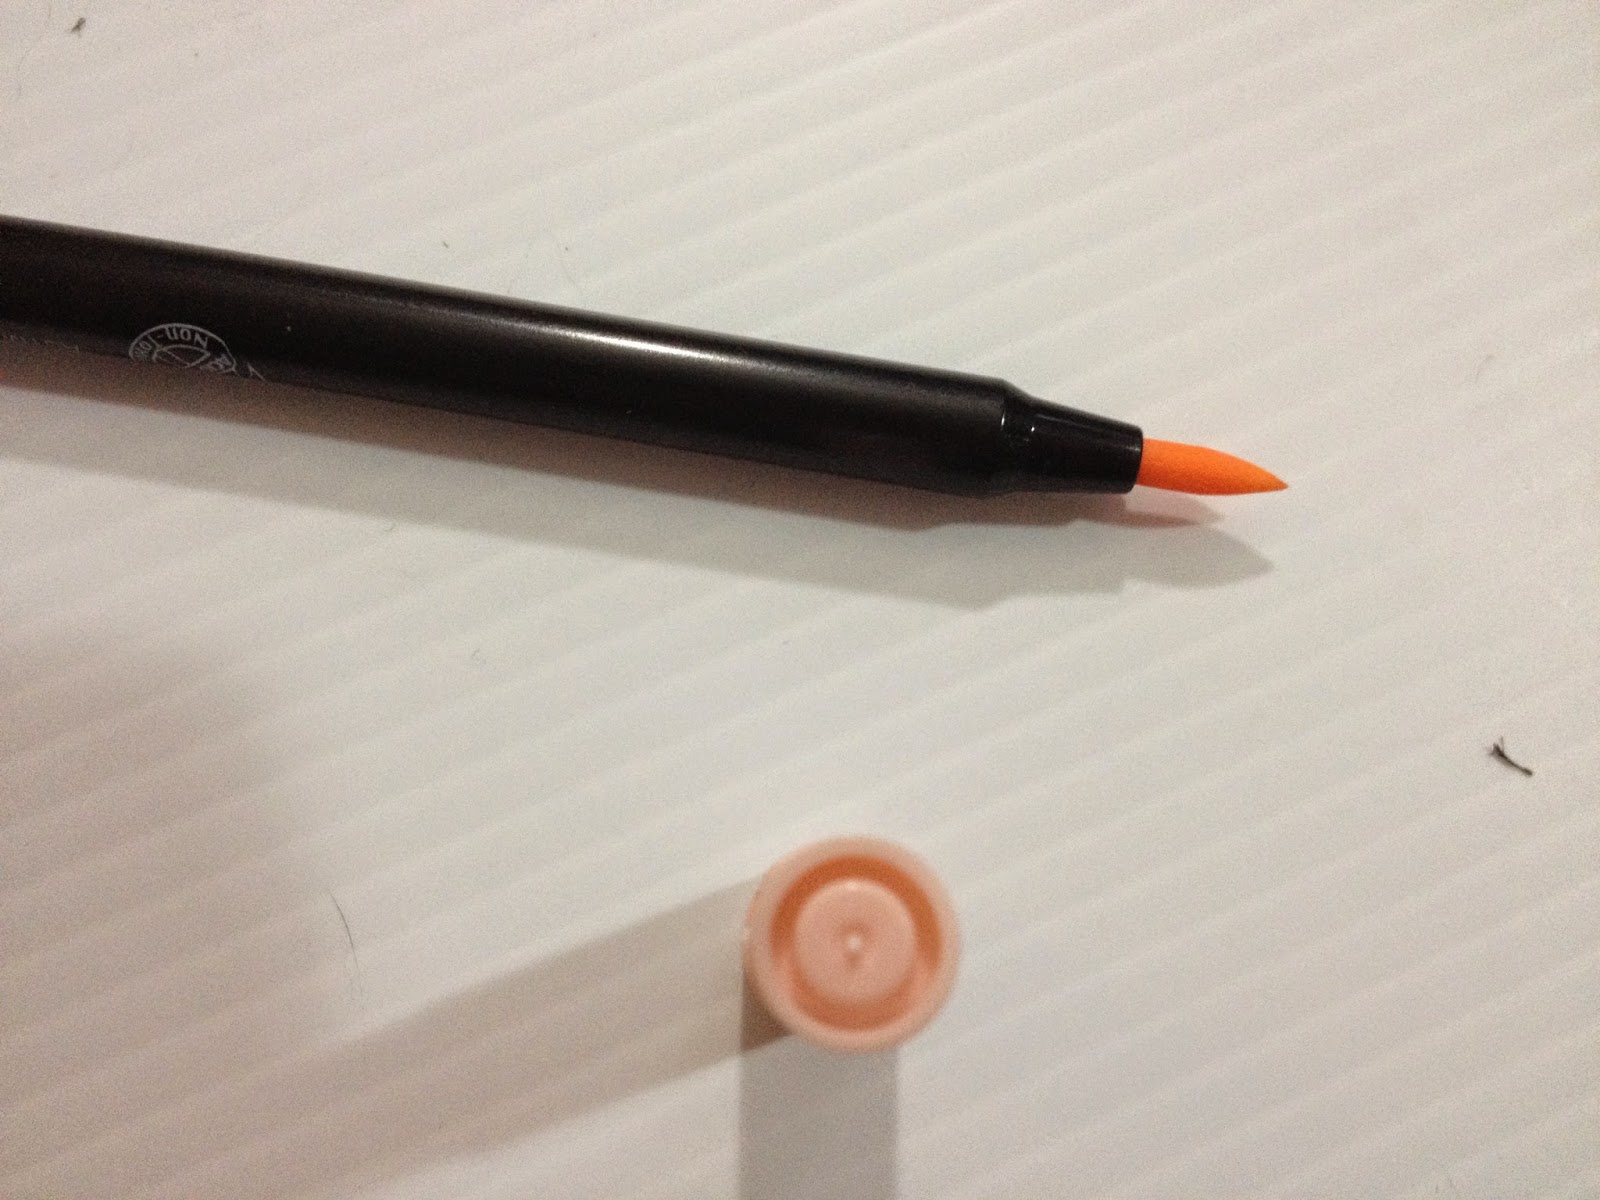
 So far so good. All the colors I purchased stay pretty true, even when water has been added. Not all of them distribute their pigments equally (dark grey is a bit resistant), so that's something to keep in mind if you want to use these for 'painting'.
On Watercolor Paper, Using Water to Blend
For the purposes of this review, I sketched out a little Kara, inked her with the Sailor Mitsuo Aida, as it's waterproof and a fude pen, and let that dry for 24 hours before erasing the pencil. I then taped that sucker down, and started laying down some color. I used Fabriano Medioevalis 208 S, because I have a 100 pack of these little cards, which is a fairly soft watercolor paper.
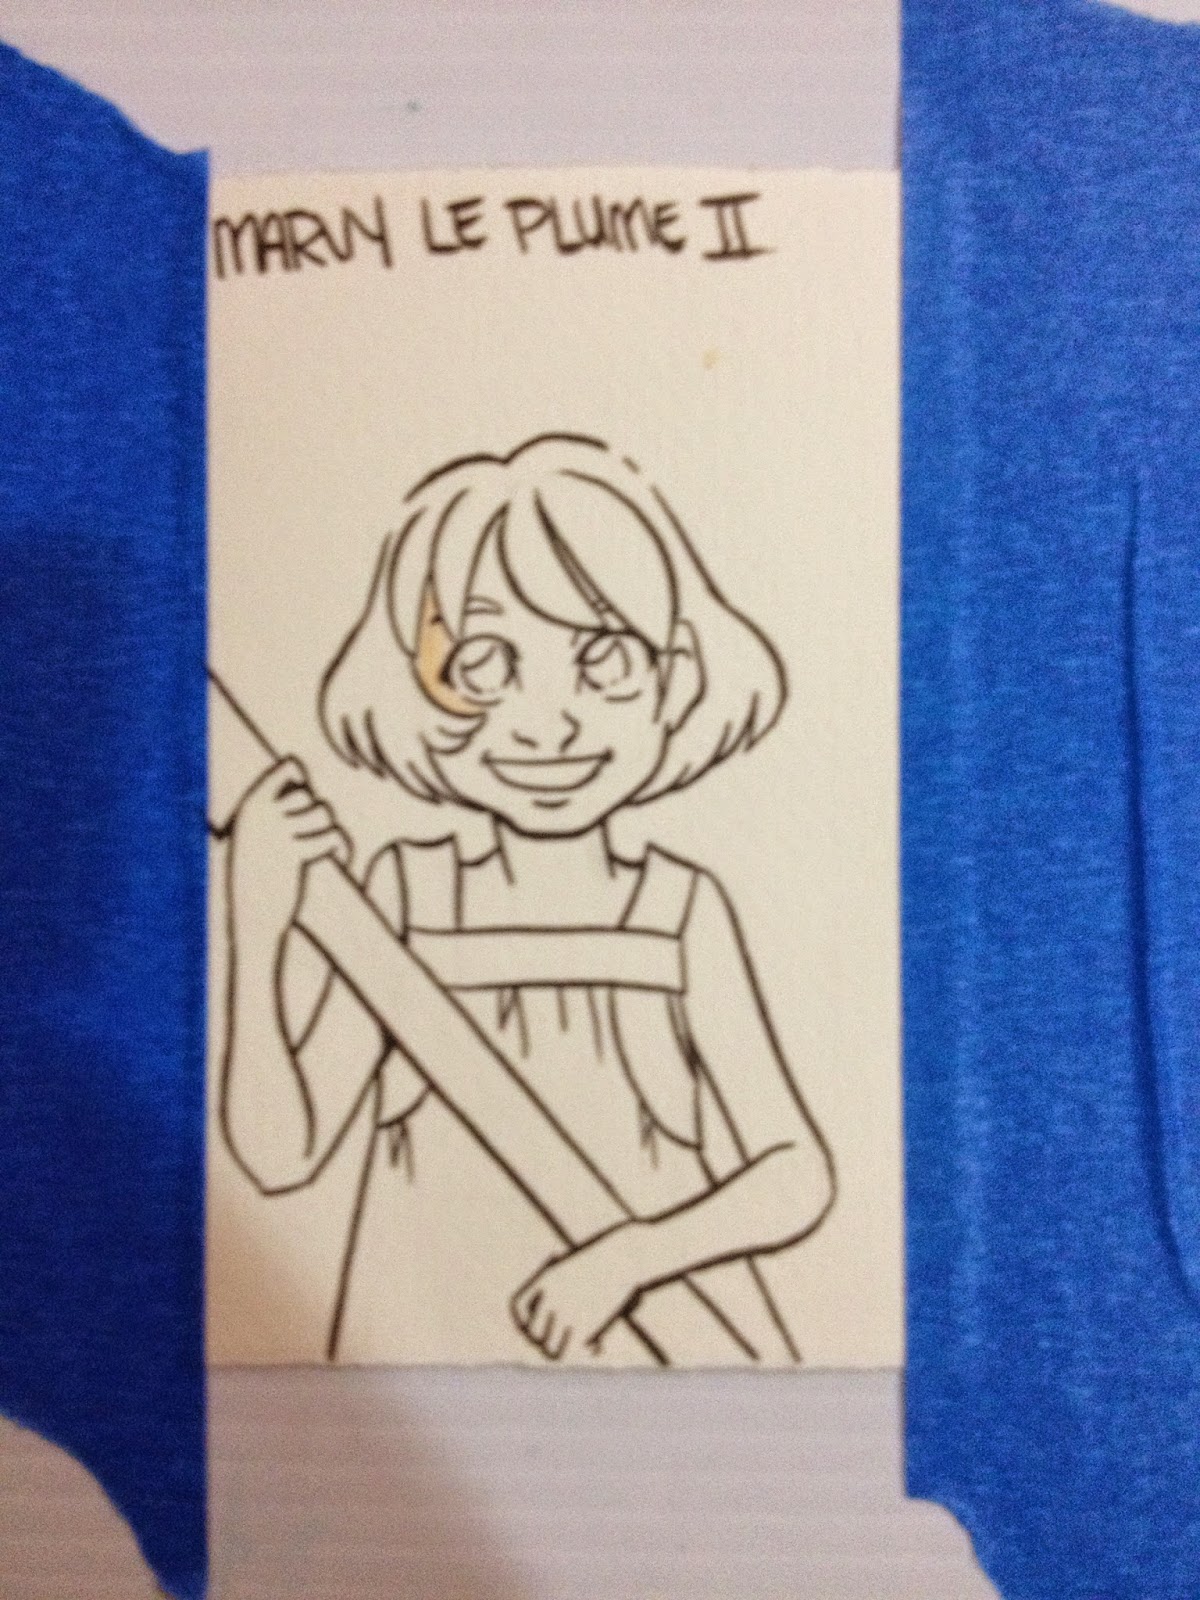
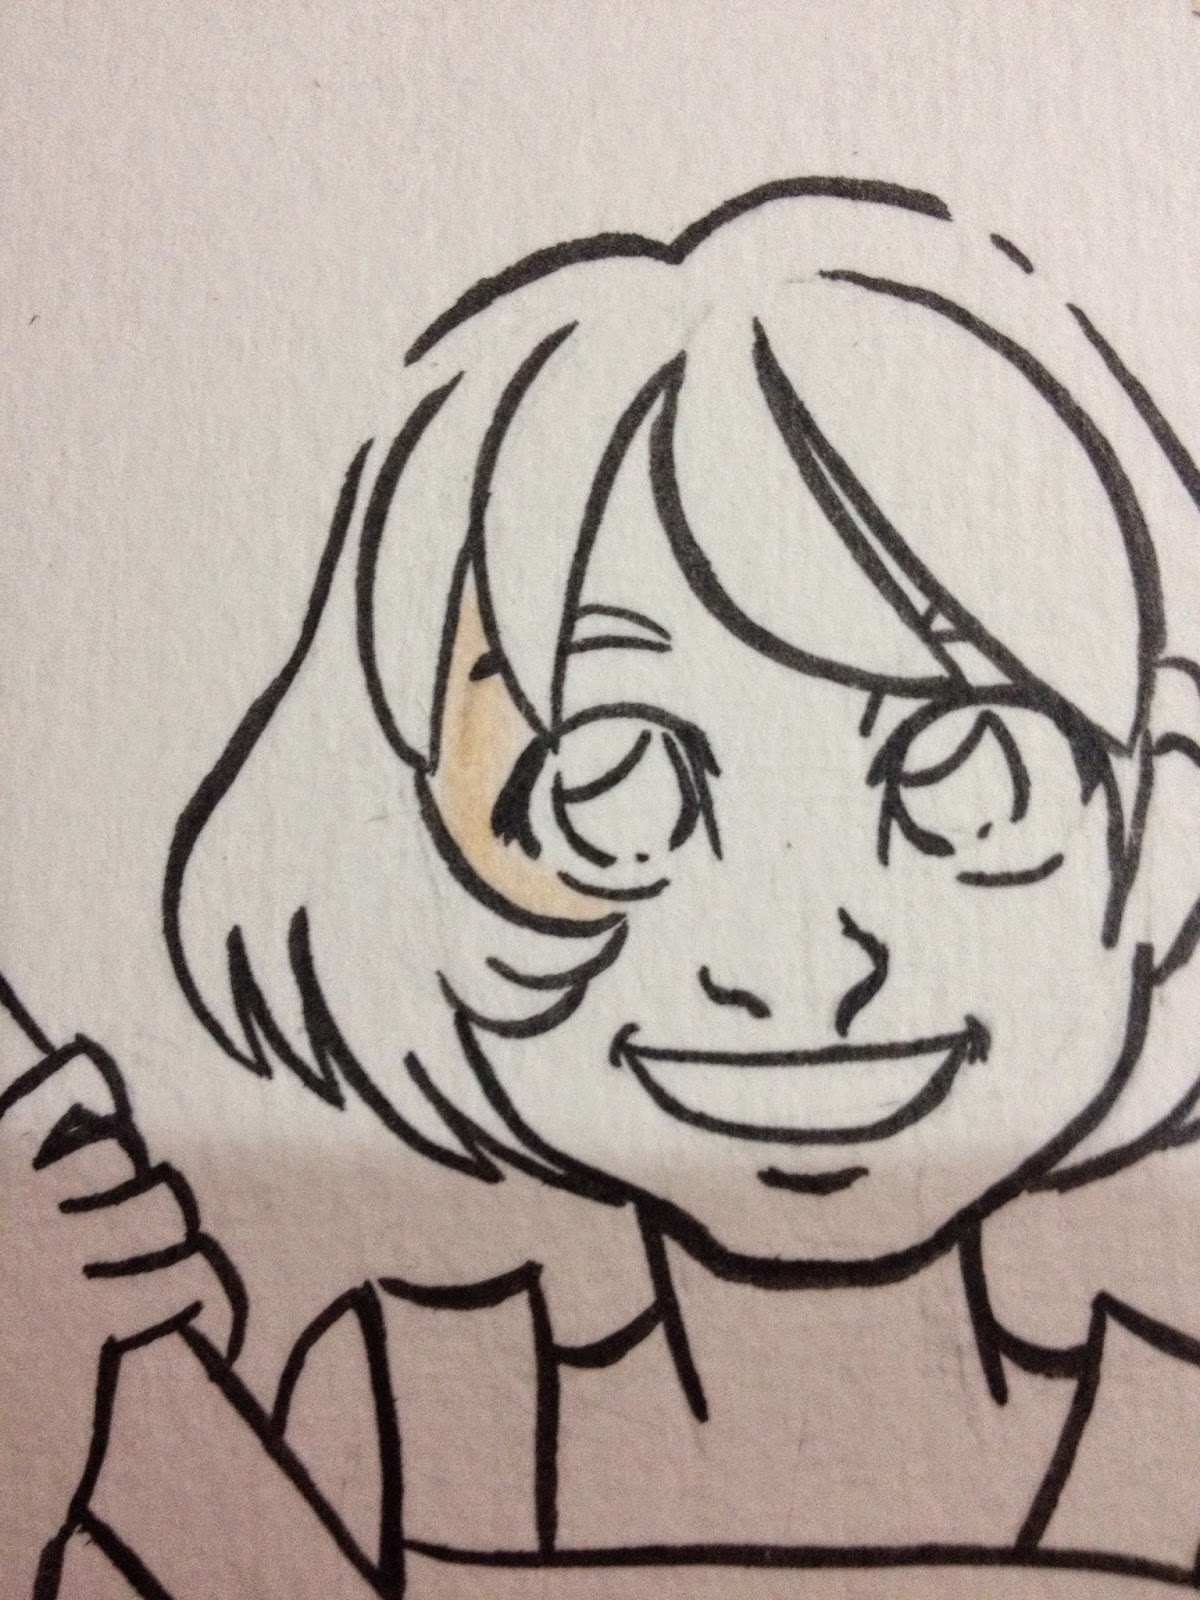
So even though I allowed the ink to dry overnight, and the ink itself is waterproof (and Copic-proof, thanks to Heidi's swatching one evening),the stiff brush nib caused the ink to smear. This is pretty common with drying-out Copics, and doesn't necessarily indicate an issue with the ink, but an issue with the brush nib or the marker itself.
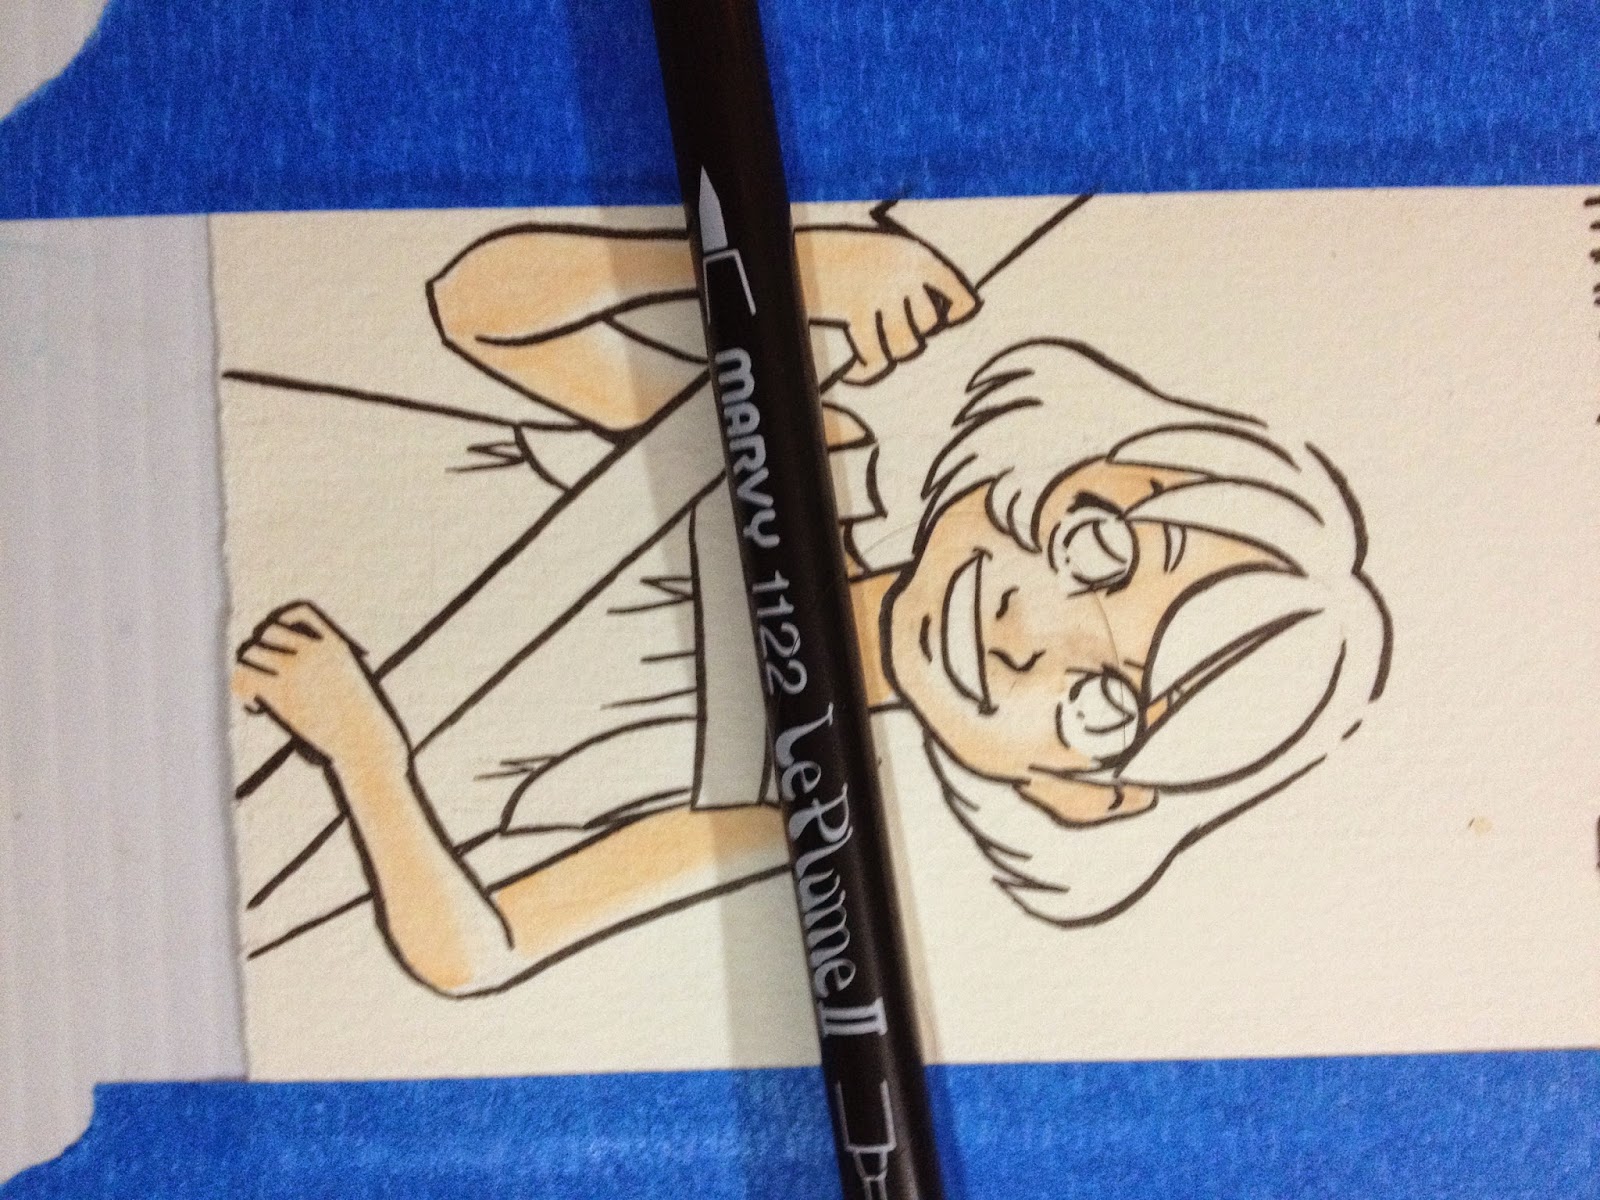
For this test, I wanted to emulate watercoloring with these waterbased markers, so I used a cup of clean water and a watercolor brush for blending.
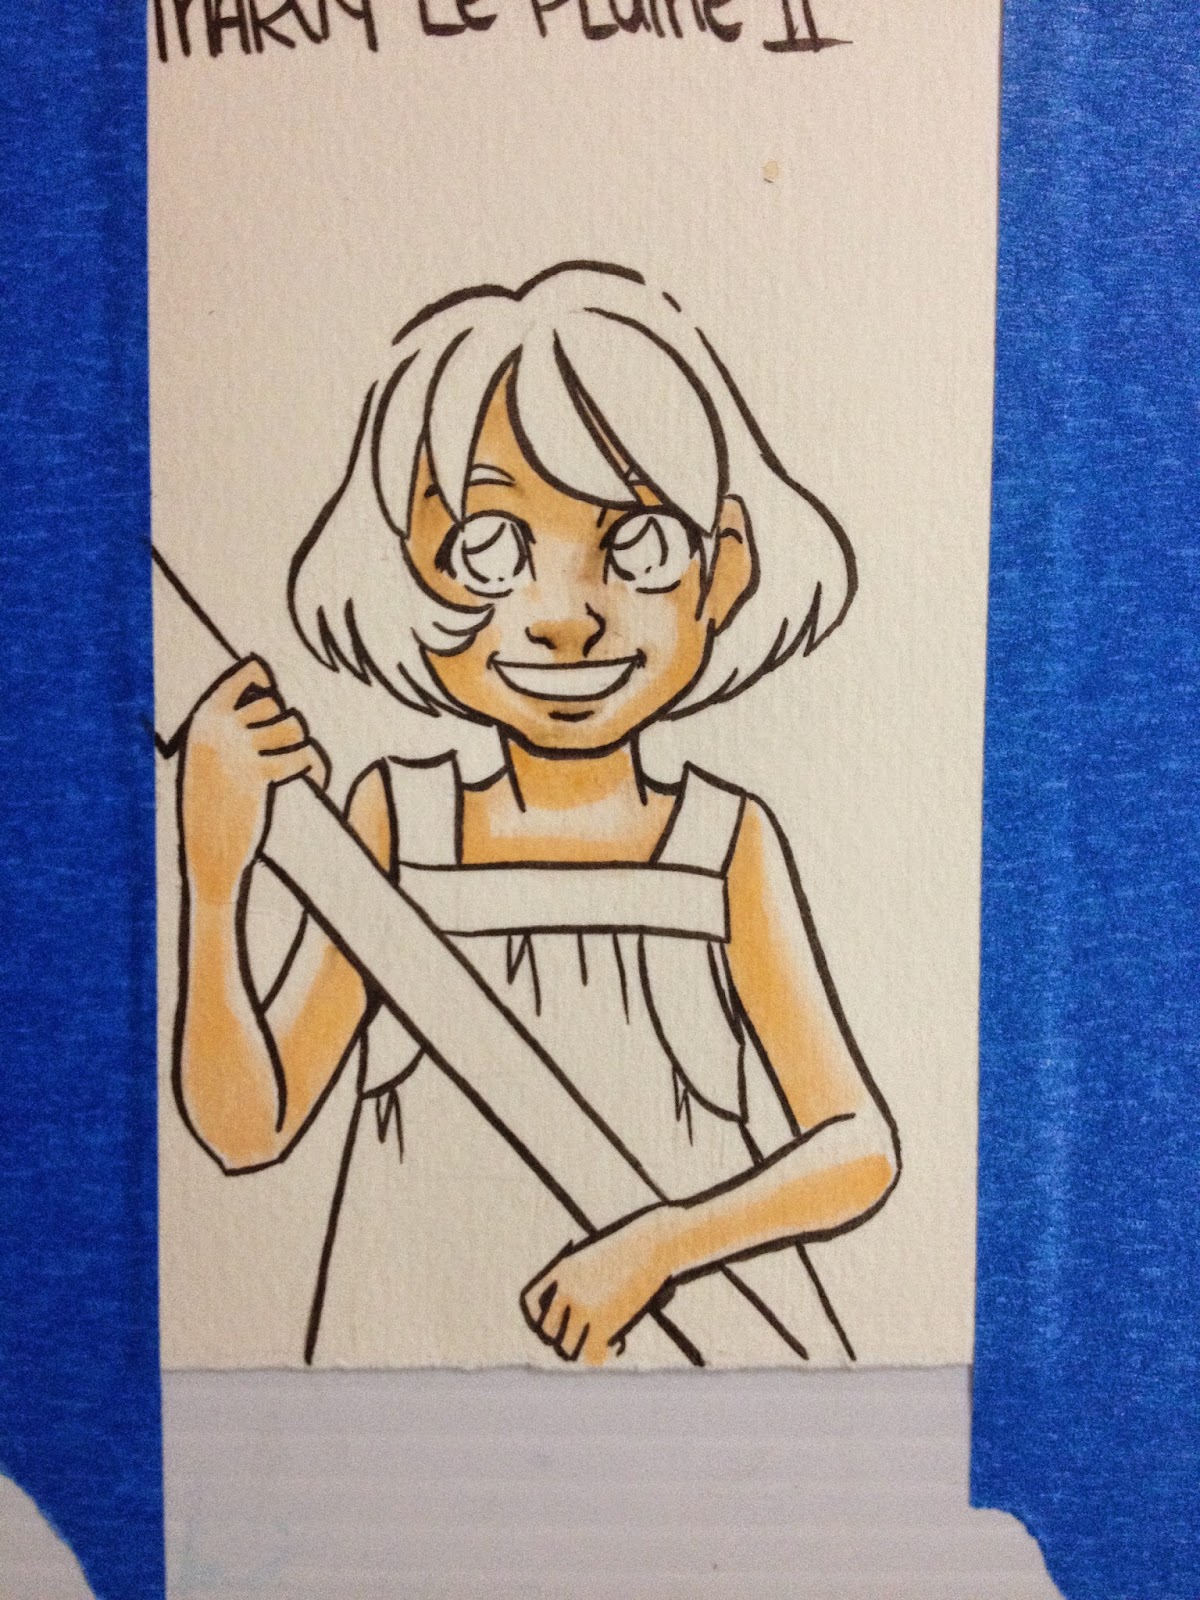
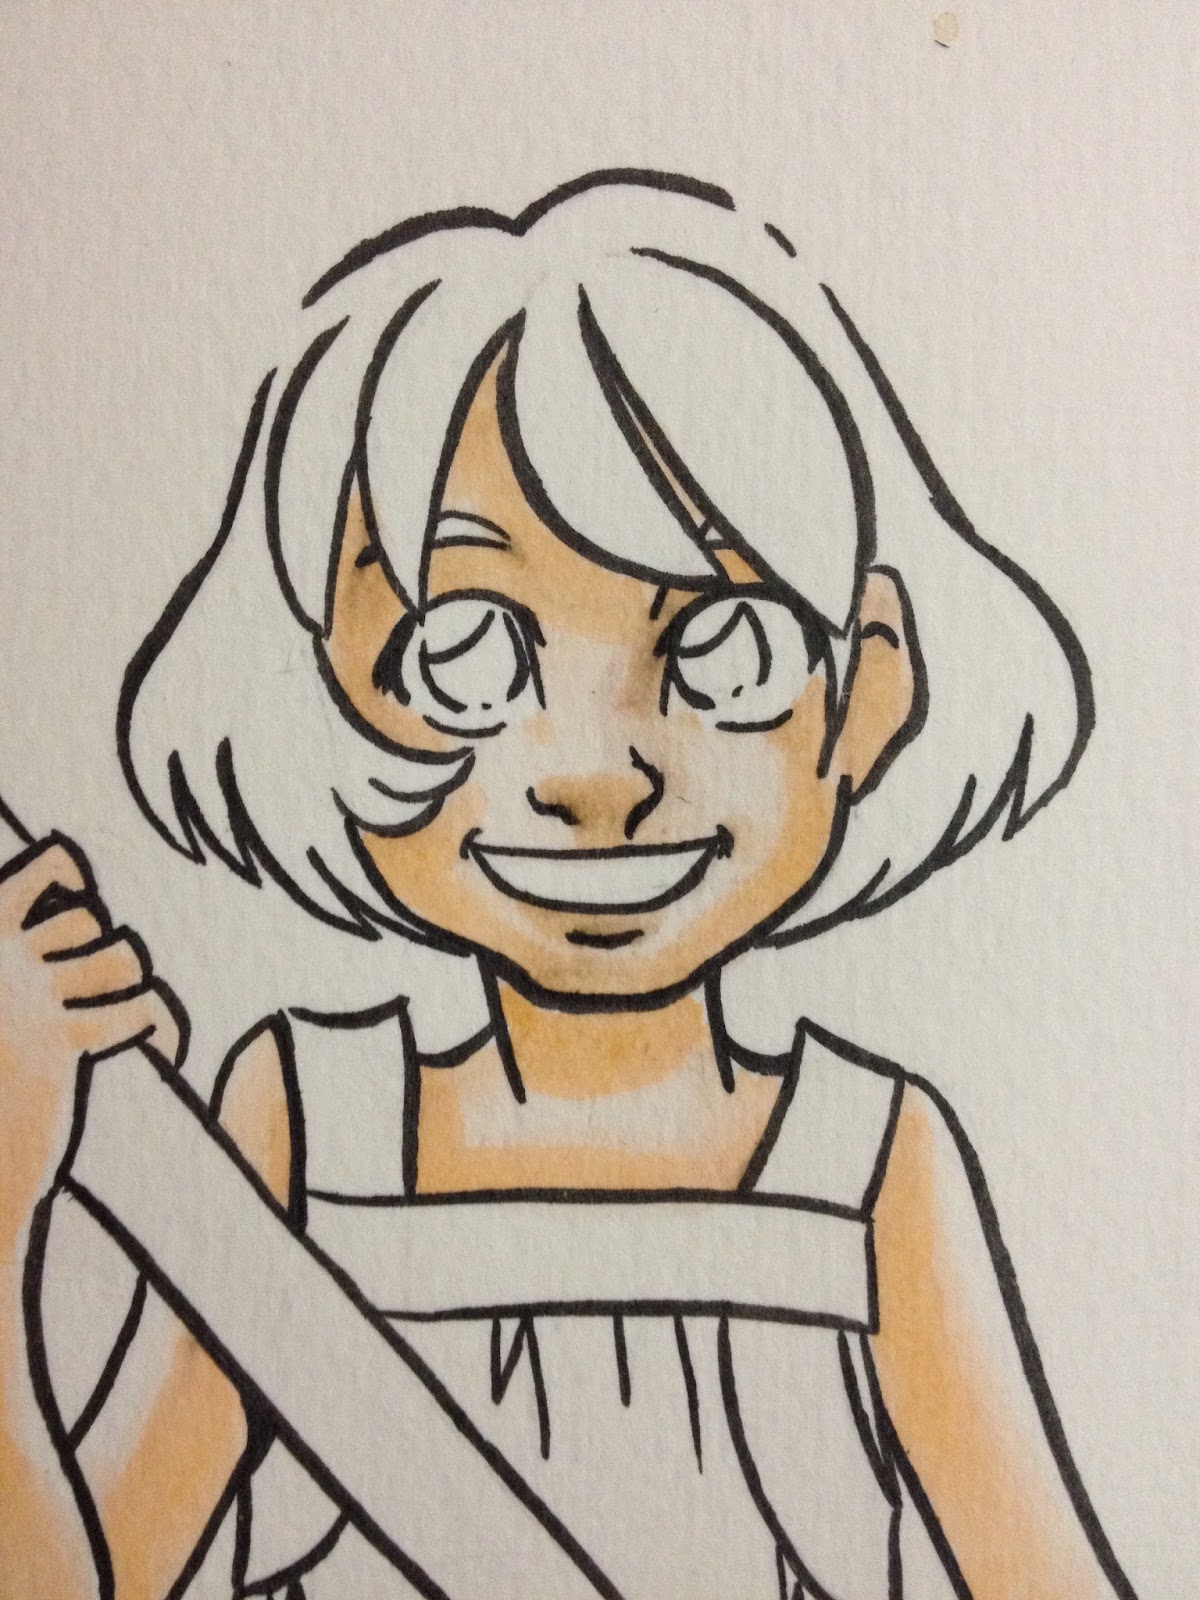
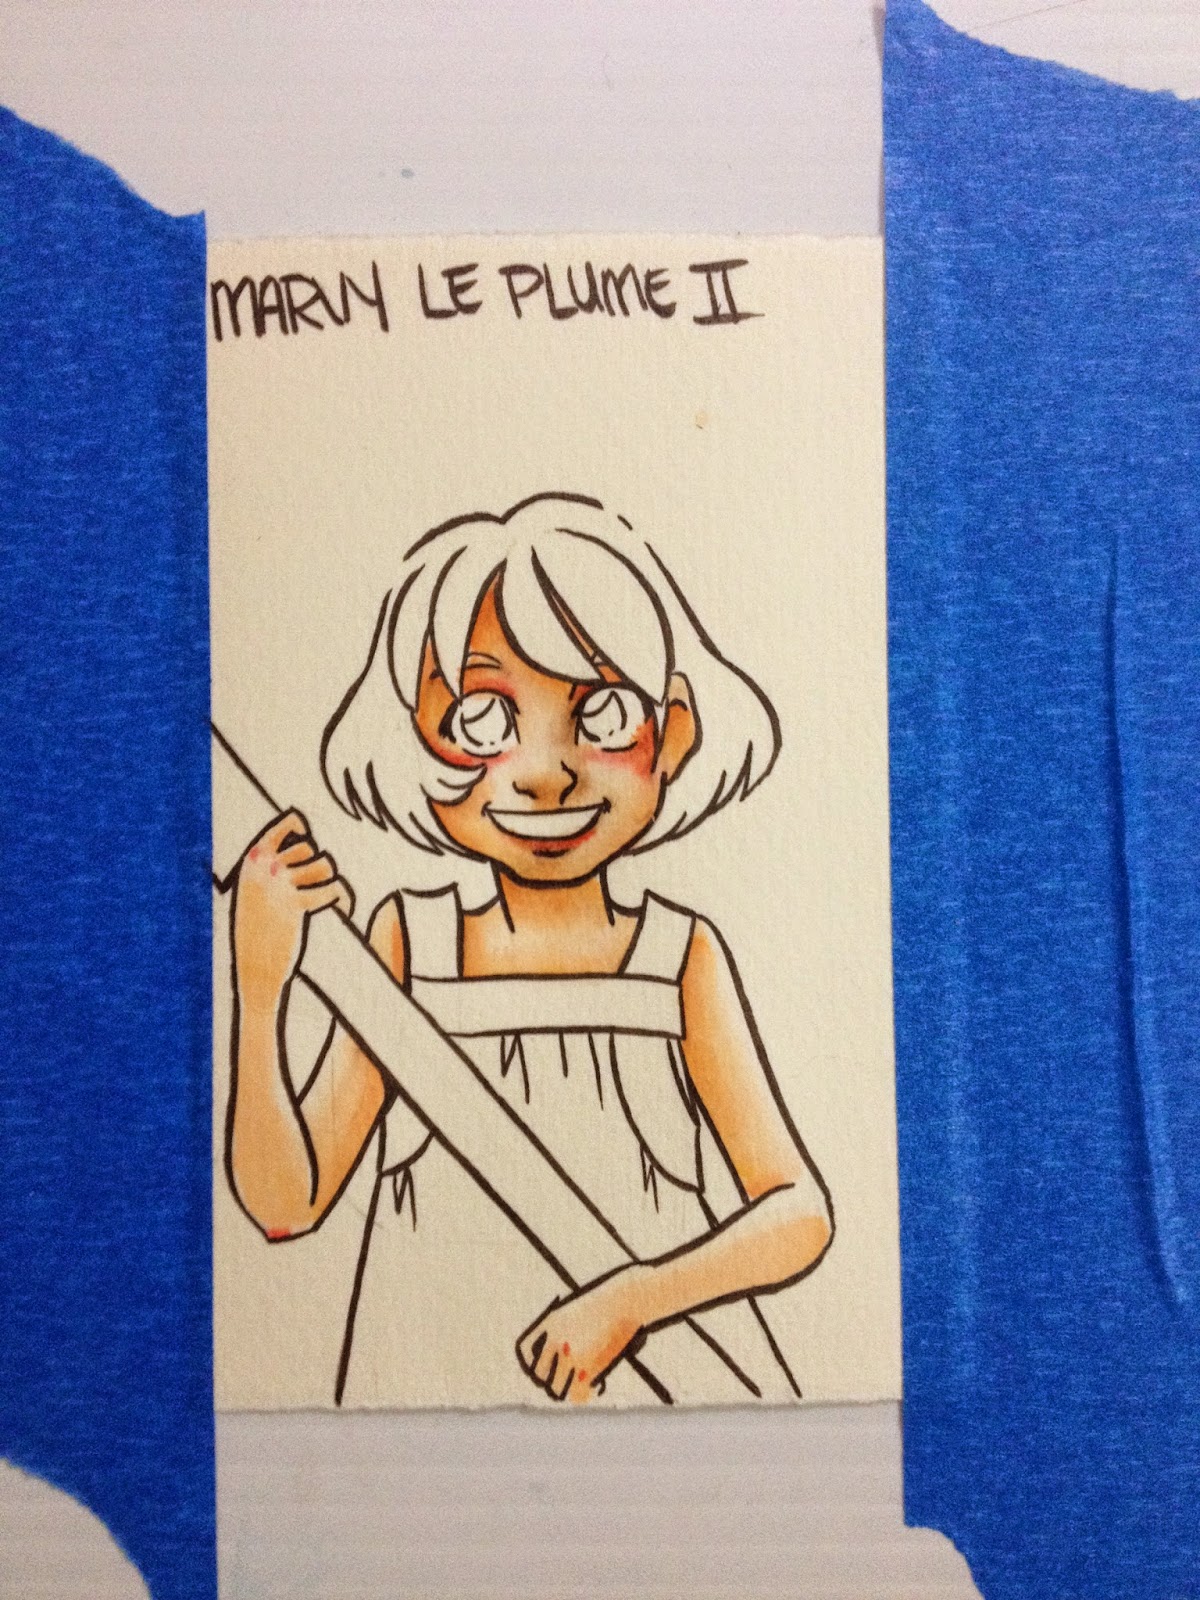
The Marvy LePlume II's felt tipped large brush isn't nearly as flexible as I would like, and I feel like that's affecting my ability to use it as a brush. Because the brushes are so stiff and a little dry, they pull on the ink (even if it's dried 24 hours) the same way a dried out Copic will, smearing the black ink. This is REALLY noticeable with skintones.

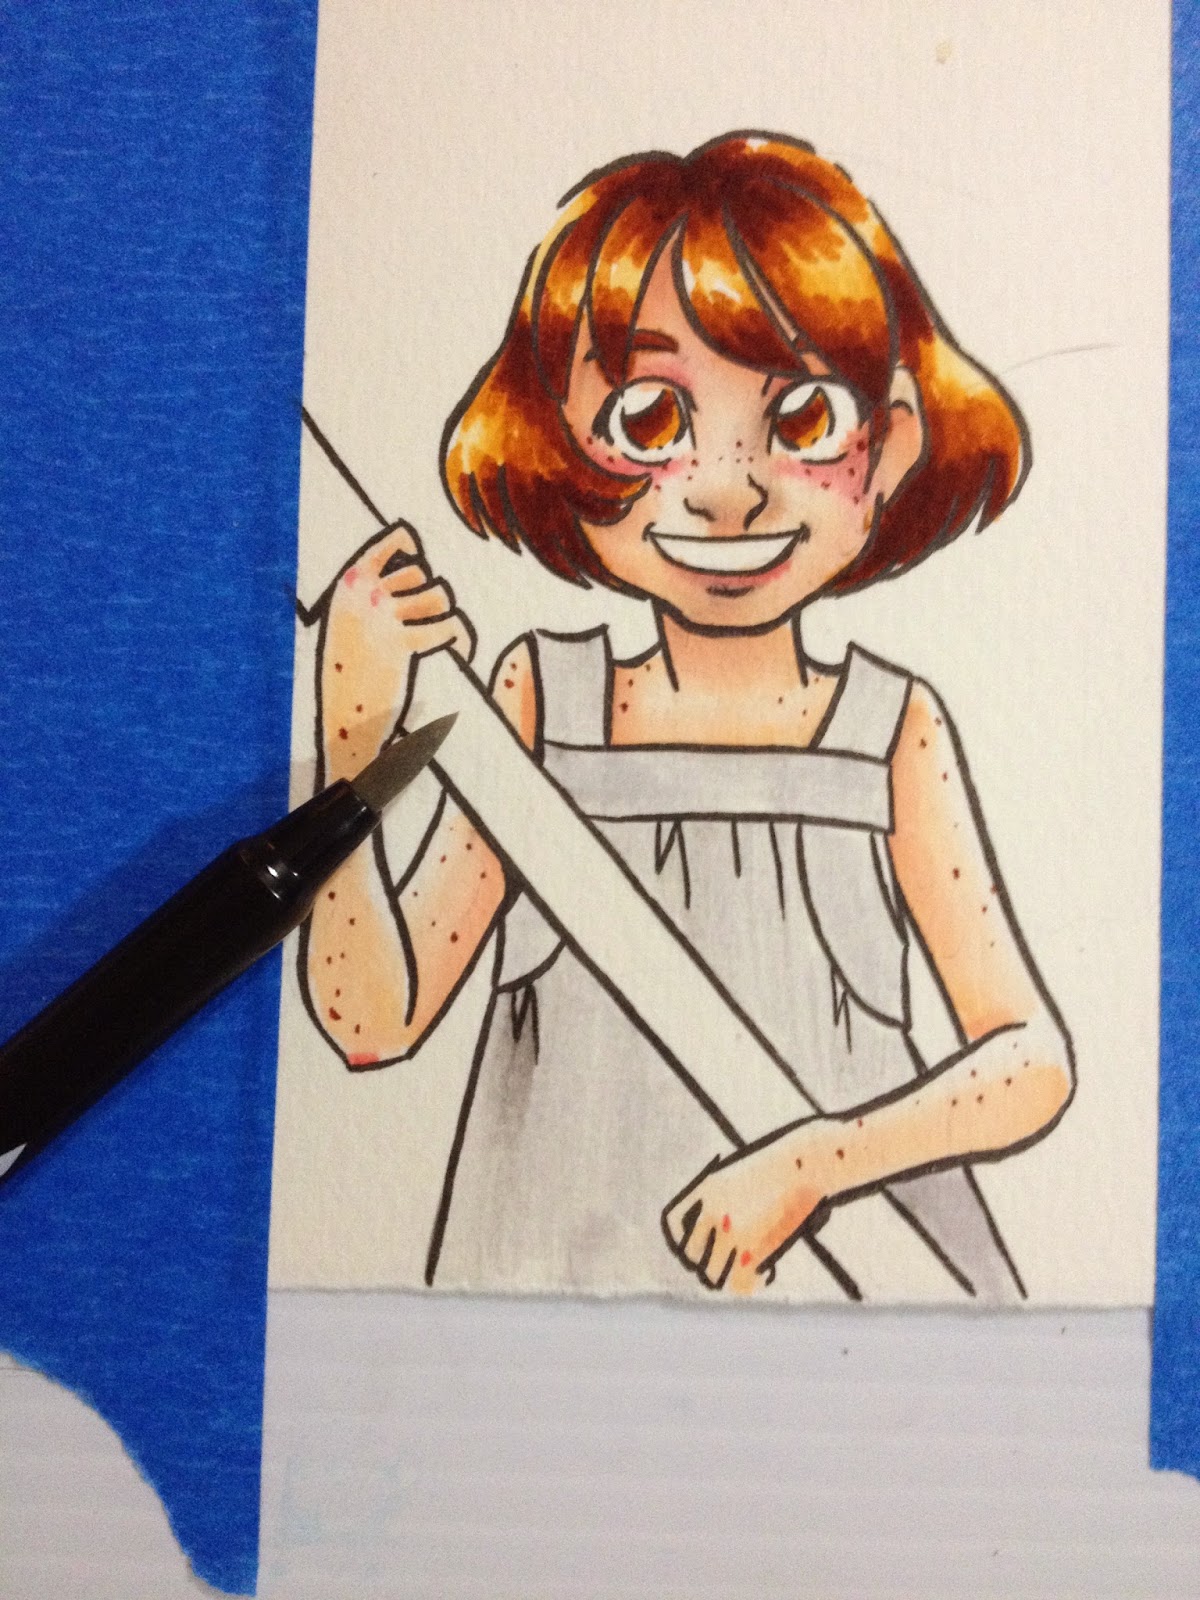
In many respects, the Marvy Le Plume II's handle somewhat like Neopiko 4's- they can blend out with water (although some colors require a little scrubbing), they can be layered for deeper tones, and the initial application area tends to be the darkest.


Unfortunately you can't see it, but repeated application while the paper is still fairly wet did cause pilling. I'm not sure if it's the stiff Japanese brush on the Marvy LePlumeII, or the fault of the watercolor paper itself. I SUPPOSE THIS REQUIRES EVEN FURTHER TESTING at some point.
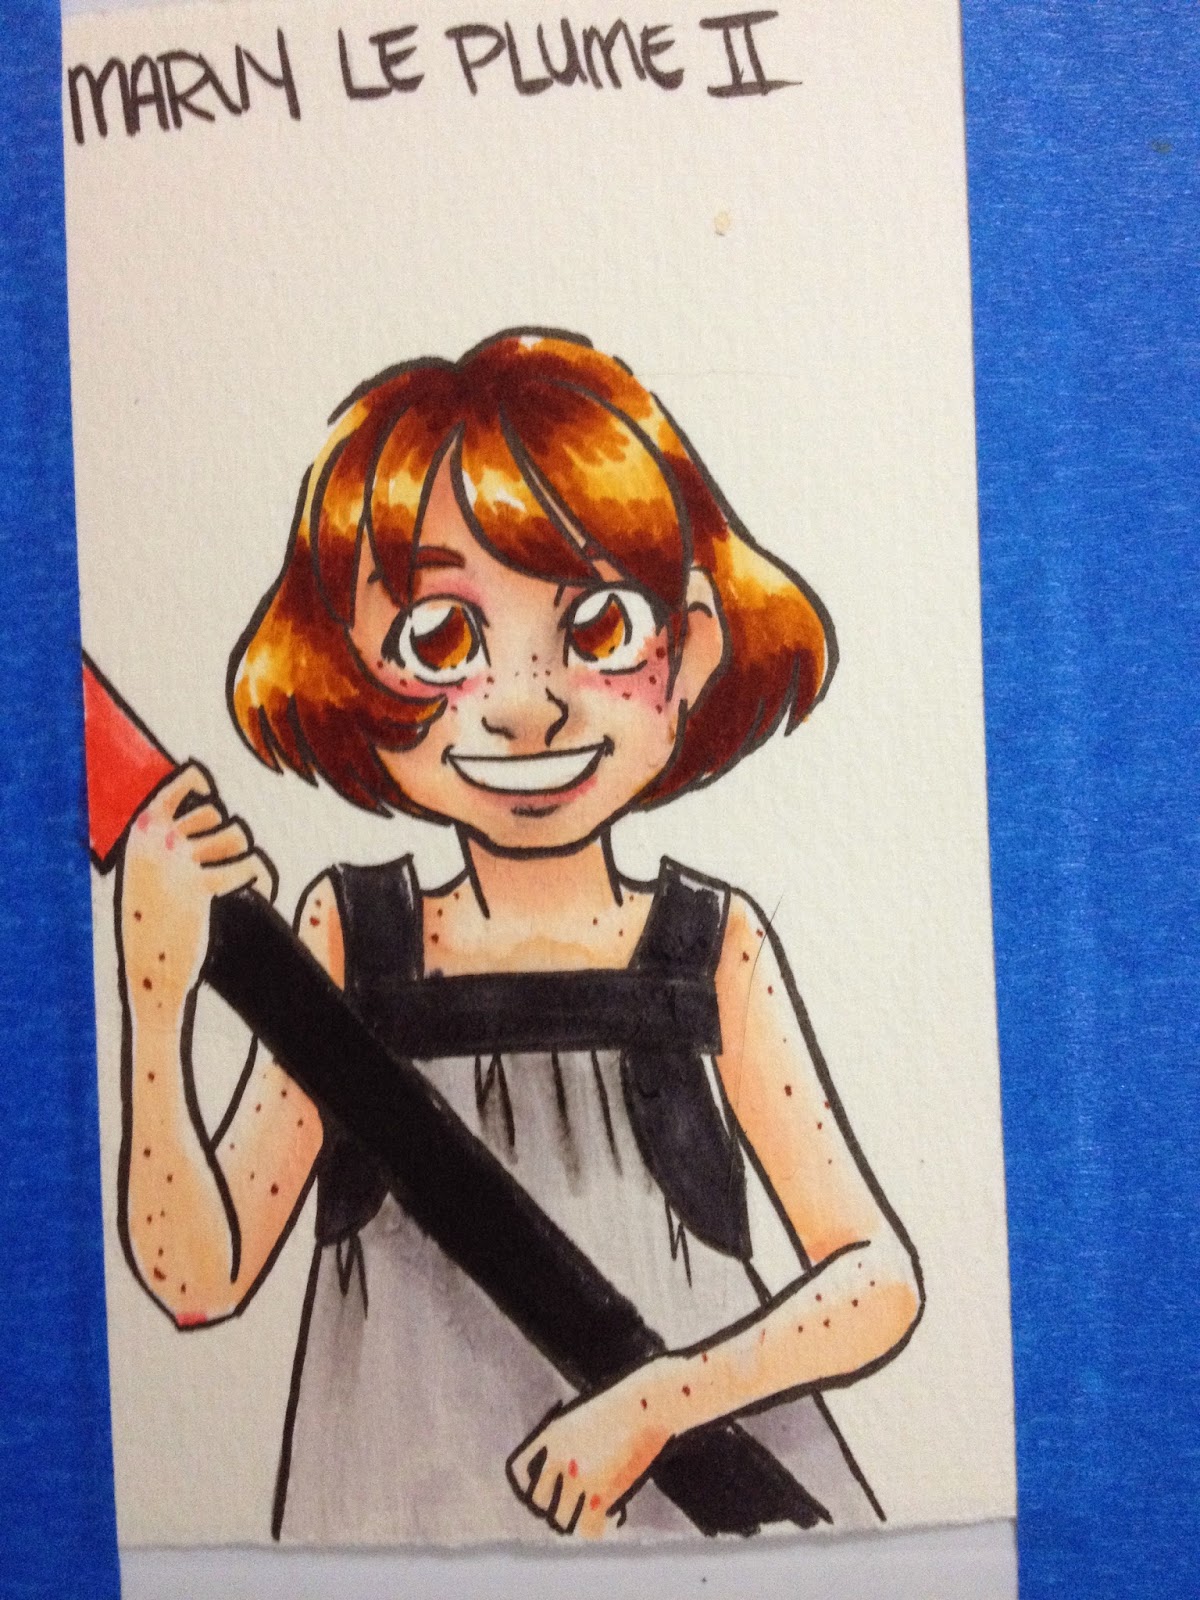
On Multimedia Paper, Using The Blender to Blend
For this test, I wanted to use something that was more geared towards dry media, but I didn't want to grab the plate Bristol or Copic paper just yet. I was thinking about cardstock, but I ended up settling on this Multi-Media sketch paper from Art Alternatives. I think I was given this as a sample a few years ago, so no better time to test than years later, right?

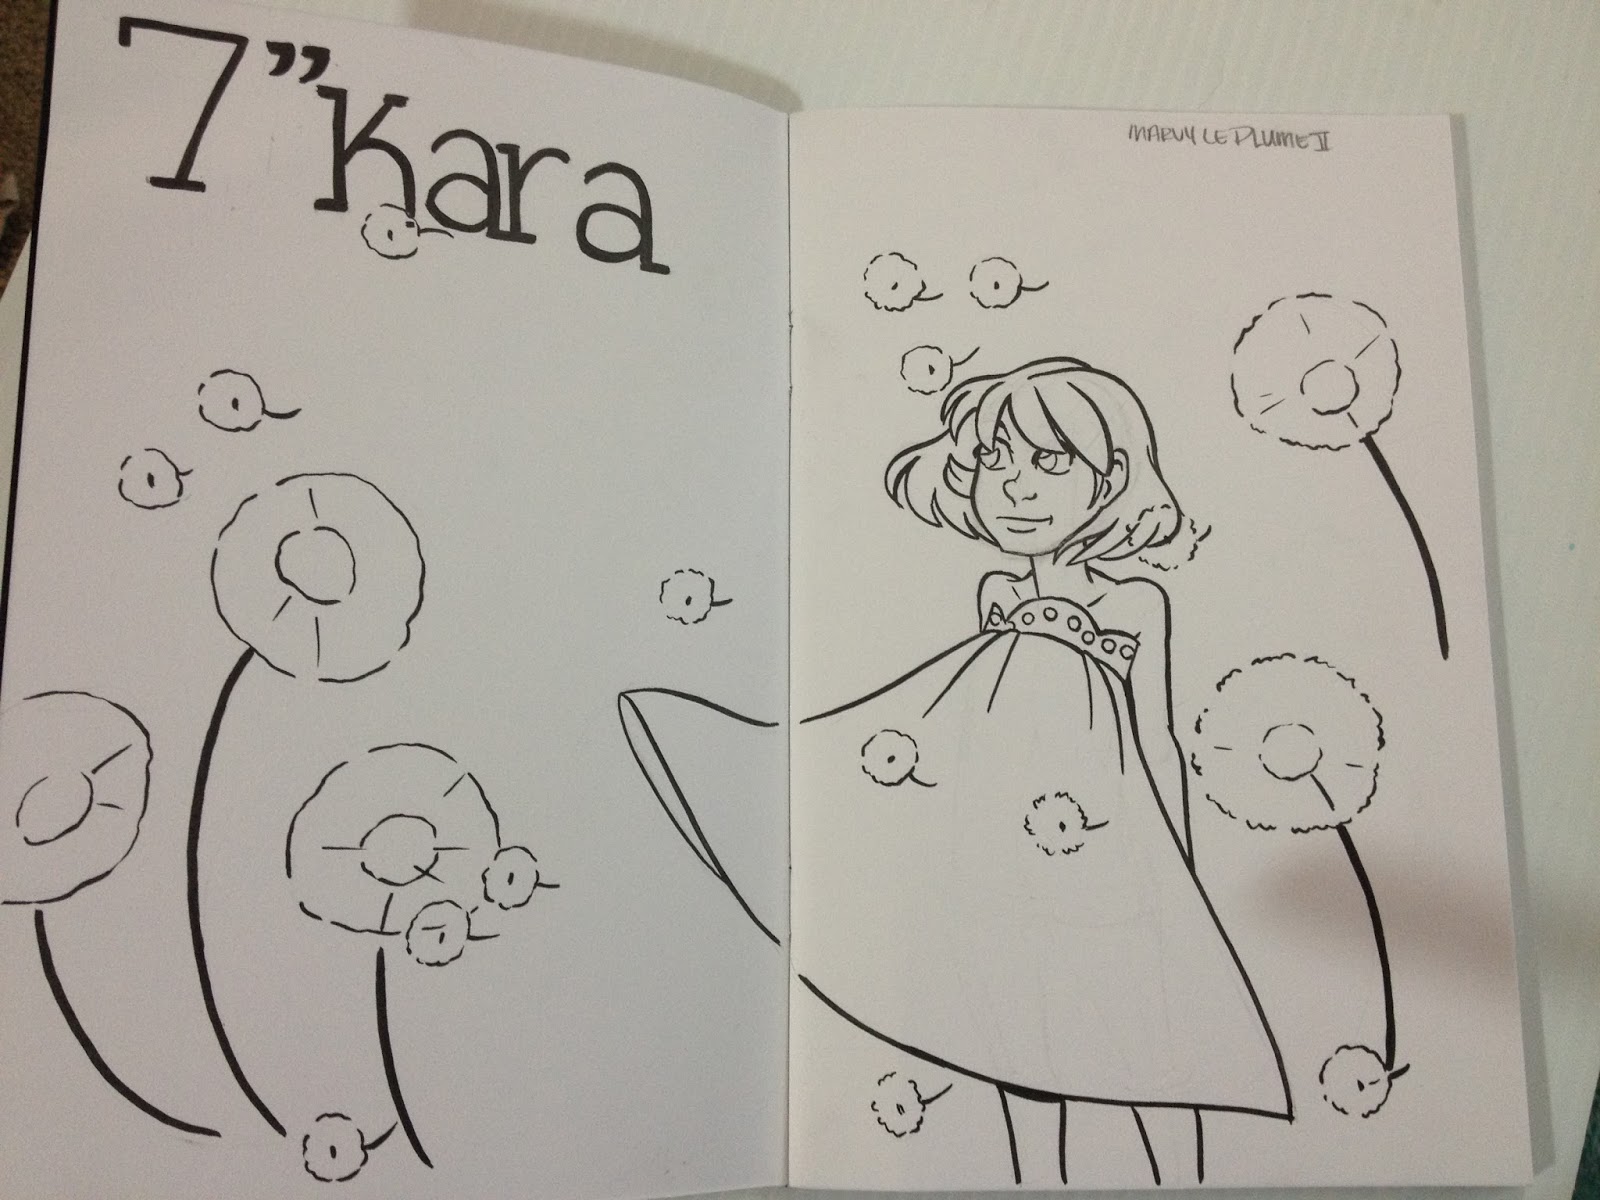
While still recovering from vicious Animazement con crud, I whipped out this sketch and inked it with the waterproof Sailor Mitsuo Aida double sided pen. I let the ink dry overnight.
I intended to start coloring this piece today with the Marvy Le Plume II's, but fortunately, I did some swatches on the paper beforehand, and had an unpleasant surprise.
The blender pen causes pilling and wrecks the paper! YAY!
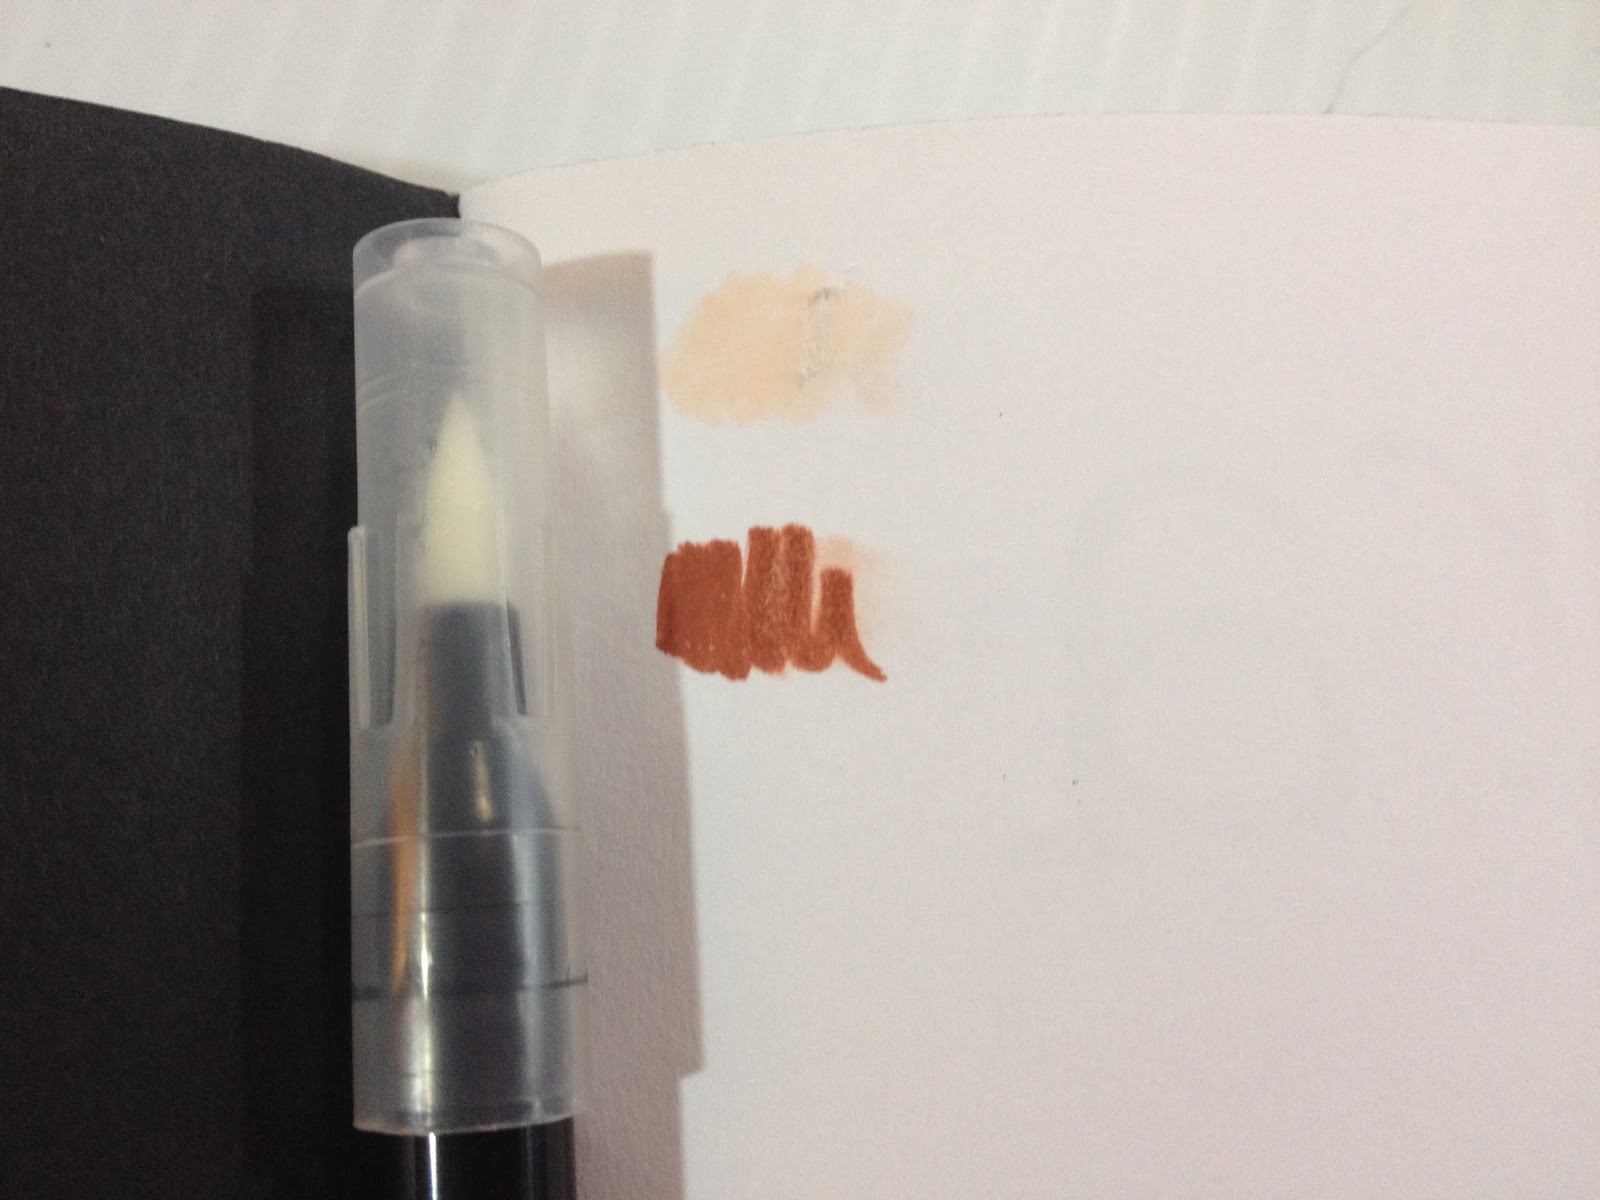 And the blender doesn't really do much blending. What solvent is Marvy LePlumeII using in this anyway? If it's just a waterpen, a better solution would be a refillable waterbrush, or an actual brush.
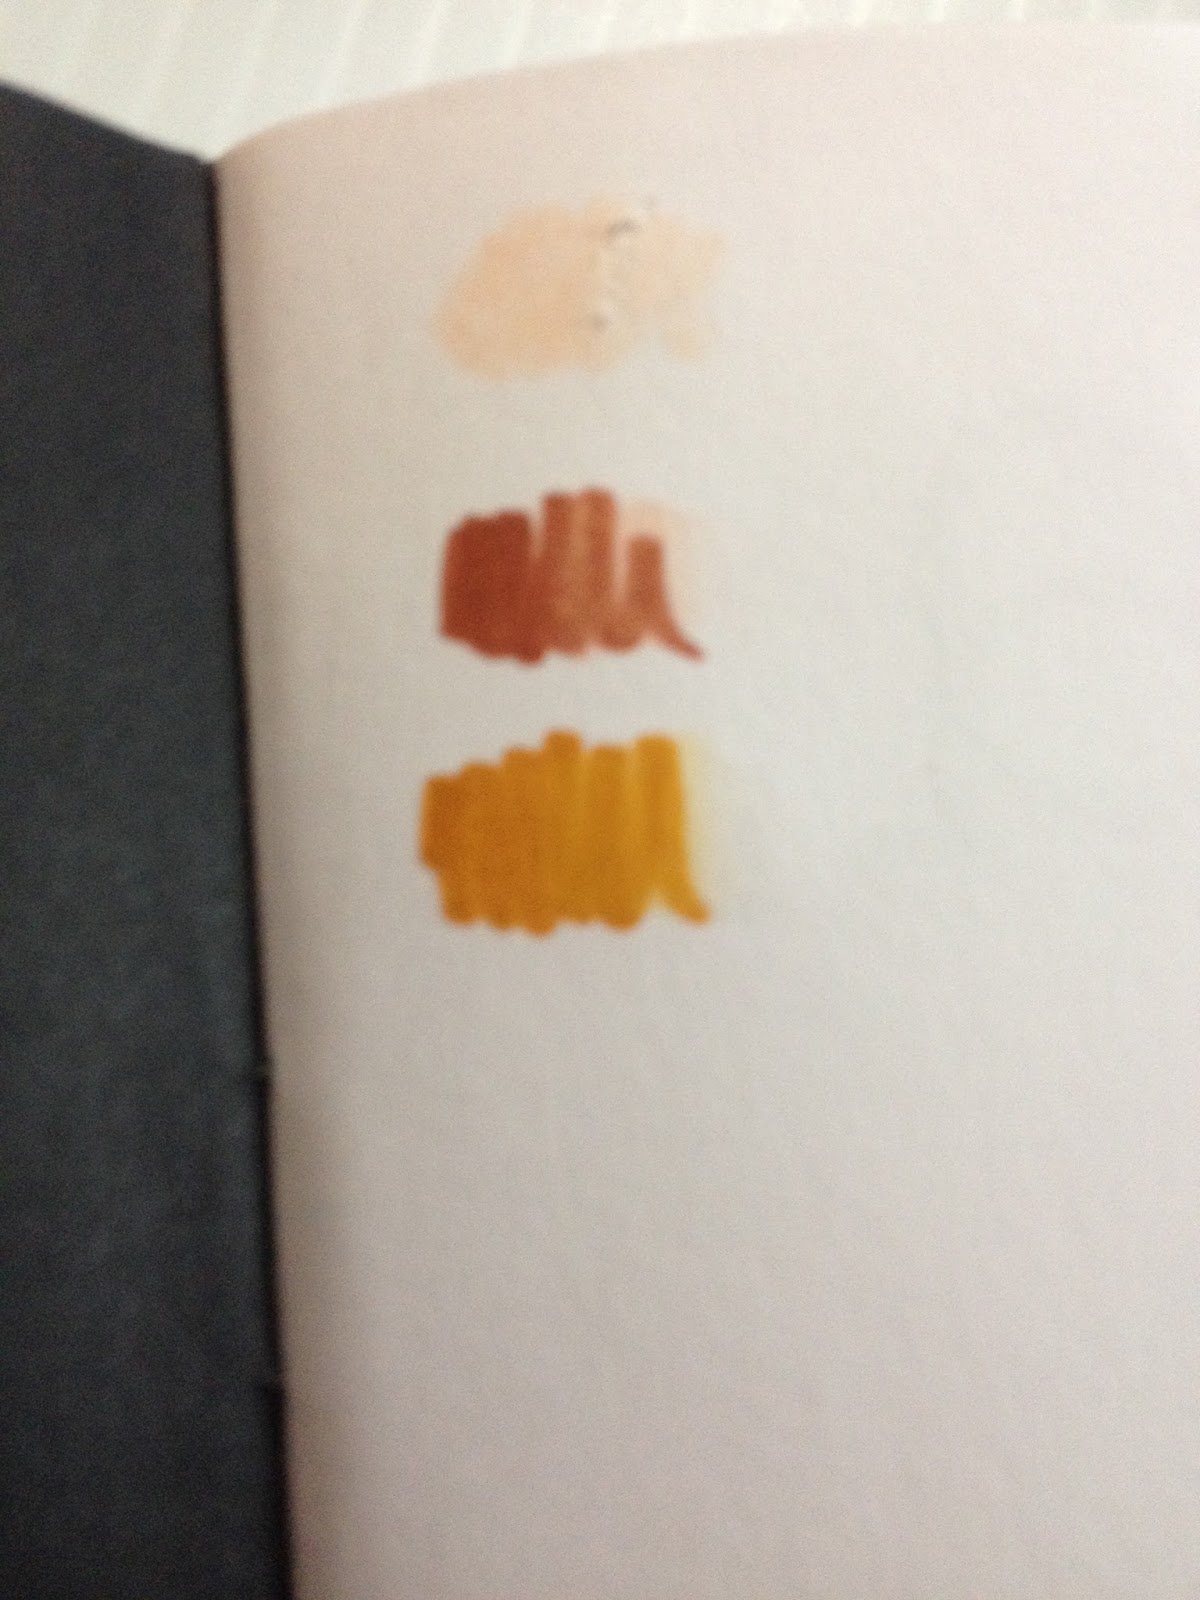 Given how these markers performed in just a test, I decided NOT to use them on my test illustration. I tell a trainwreck is a trainwreck before the train even hits the cow.
The Verdict
I hate to admit, I'm honestly really disappointed with the Marvy LePlume II's. I'm not sure if the issue is me or the markers themselves, but the blender pen always seems to tear up the paper I try to use it on. I just really wanted these pens to work, and while I've tried a few papers, I haven't find one that works yet. The inked sketch I generated to test the dry usage of these pens is too nice to waste on pens that will just eat up the paper, so I'm going to use my Neopiko 4's on it instead, and change that test to a test of the 'multi media' quality of the Art Alternatives Sketch paper. If you can use the Marvy LePlume II's successfully, or know of someone who does, I'd really appreciate if you linked me to a process post, because I'd really like to start using waterbased markers in addition to alcohol based markers in my work. Given how many of these kinds of markers are on the market (Marvy, Tombow, Zig- I'll be reviewing those soon), surely SOMEONE can get them to work, and I probably just haven't hit on the rigtht paper and the right process. However, if you intend to use them the way I've shown here, I strongly advise that you avoid them.
Waterbased markers tend to be quite a bit cheaper than all but the very cheapest of alcohol based markers (the Finecolour's, I believe), and I think if I could just get the hang of them, I could turn a lot of broke artists on to them. I like the colors, I like the brands that DON'T separate into individual dyes, but I'm having trouble finding a brand/paper/process that works. If you don't mind spending just a bit more, I still highly recommend the Neopiko 4's as a waterbased addition to your marker collection, or the Winsor & Newton Watercolor markers if you want a nice hybrid that utilizes real watercolor pigments.
Please consider donating to this blog or purchasing from Natto-shop (http://nattosoup.com/shop) if you want me to continue publishing quality content. All materials tested were purchased from my own pocket. Keep on Truckin' Nattosoup is not under any sponsorship.


