
Becca Hillburn's Blog, page 38
September 28, 2016
Inking Basics: Nibs
Inktober is right around the corner! To help you guys get ready, I'm working on several resources (video and blog posts) that will demonstrate various inking tools, techniques, and tips to help you get off on the right foot! Today we're talking about something most artists have dabbled with, but relatively few use regularly- nibs!
In this post, we're going to cover nib types and their uses.
Inking with a nib is very much about personal preference. First off, you may not enjoy it at all, preferring brushes, brush pens, or technical pens to nibs. Secondly, you might enjoy the act of inking with a nib, but hate the maintenance that nibs require. Thirdly, you may discover that you prefer some nibs to others, so I recommend you experiment widely. Even amongst nib types, there are certain brands that work better than others.
Nib Stores:
Paper and Ink Arts
Jetpens
Main Categories of NibsFlexible
Fixed Width
Flexible
Spoon/GlobeG/StudentCrowquill

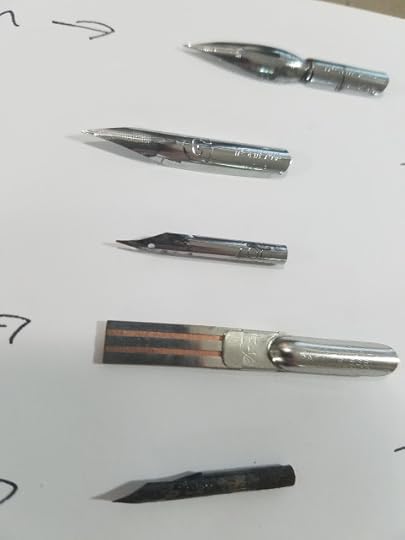
Your flexible nibs can be Western (crowquills, mapping, certain calligraphy nibs) or from Japan (G, Saji, tanks), but what really matters most is your preference towards how your work looks with those nibs.
For cartoony styles that rely on bouncy line weights, I recommend you try:
Crowquill
Tachikawa G nib
Tachikawa Tank Nib
Mapping
For thinner, more delicate line weights I recommend:
Saji and other spoon nibs
Crowquill
Mapping
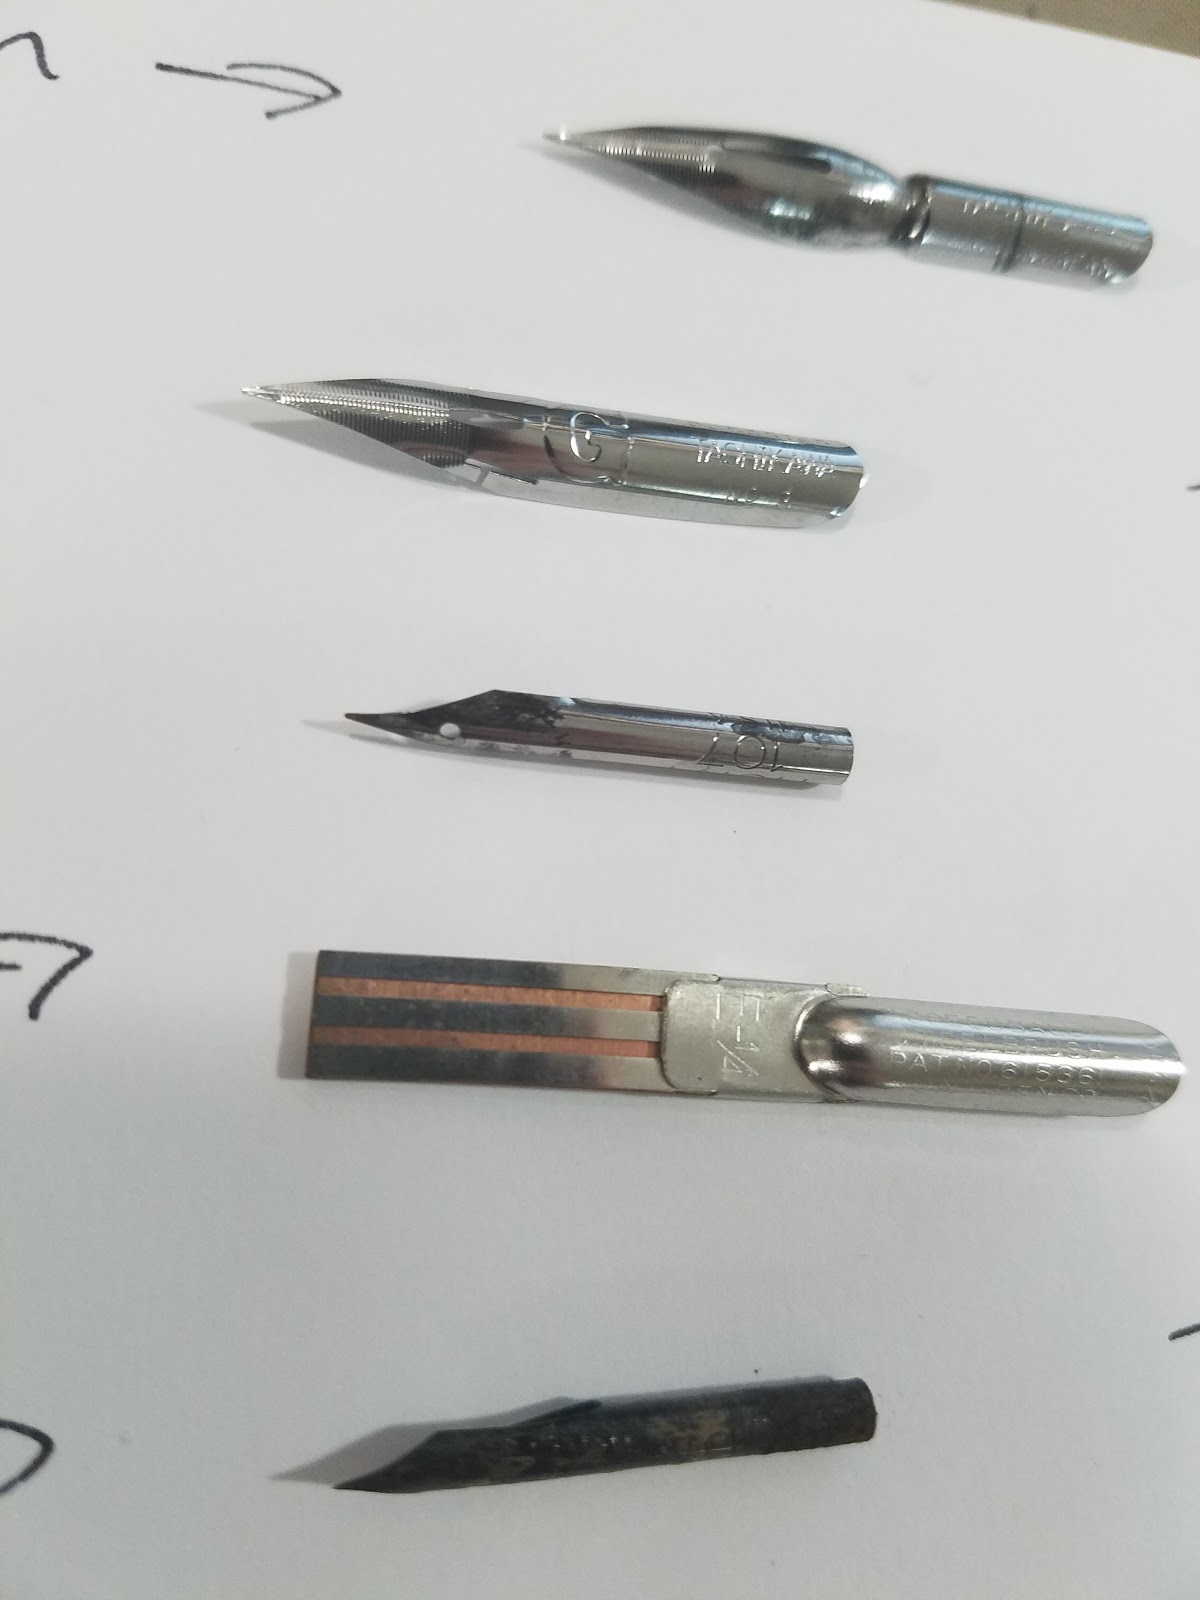
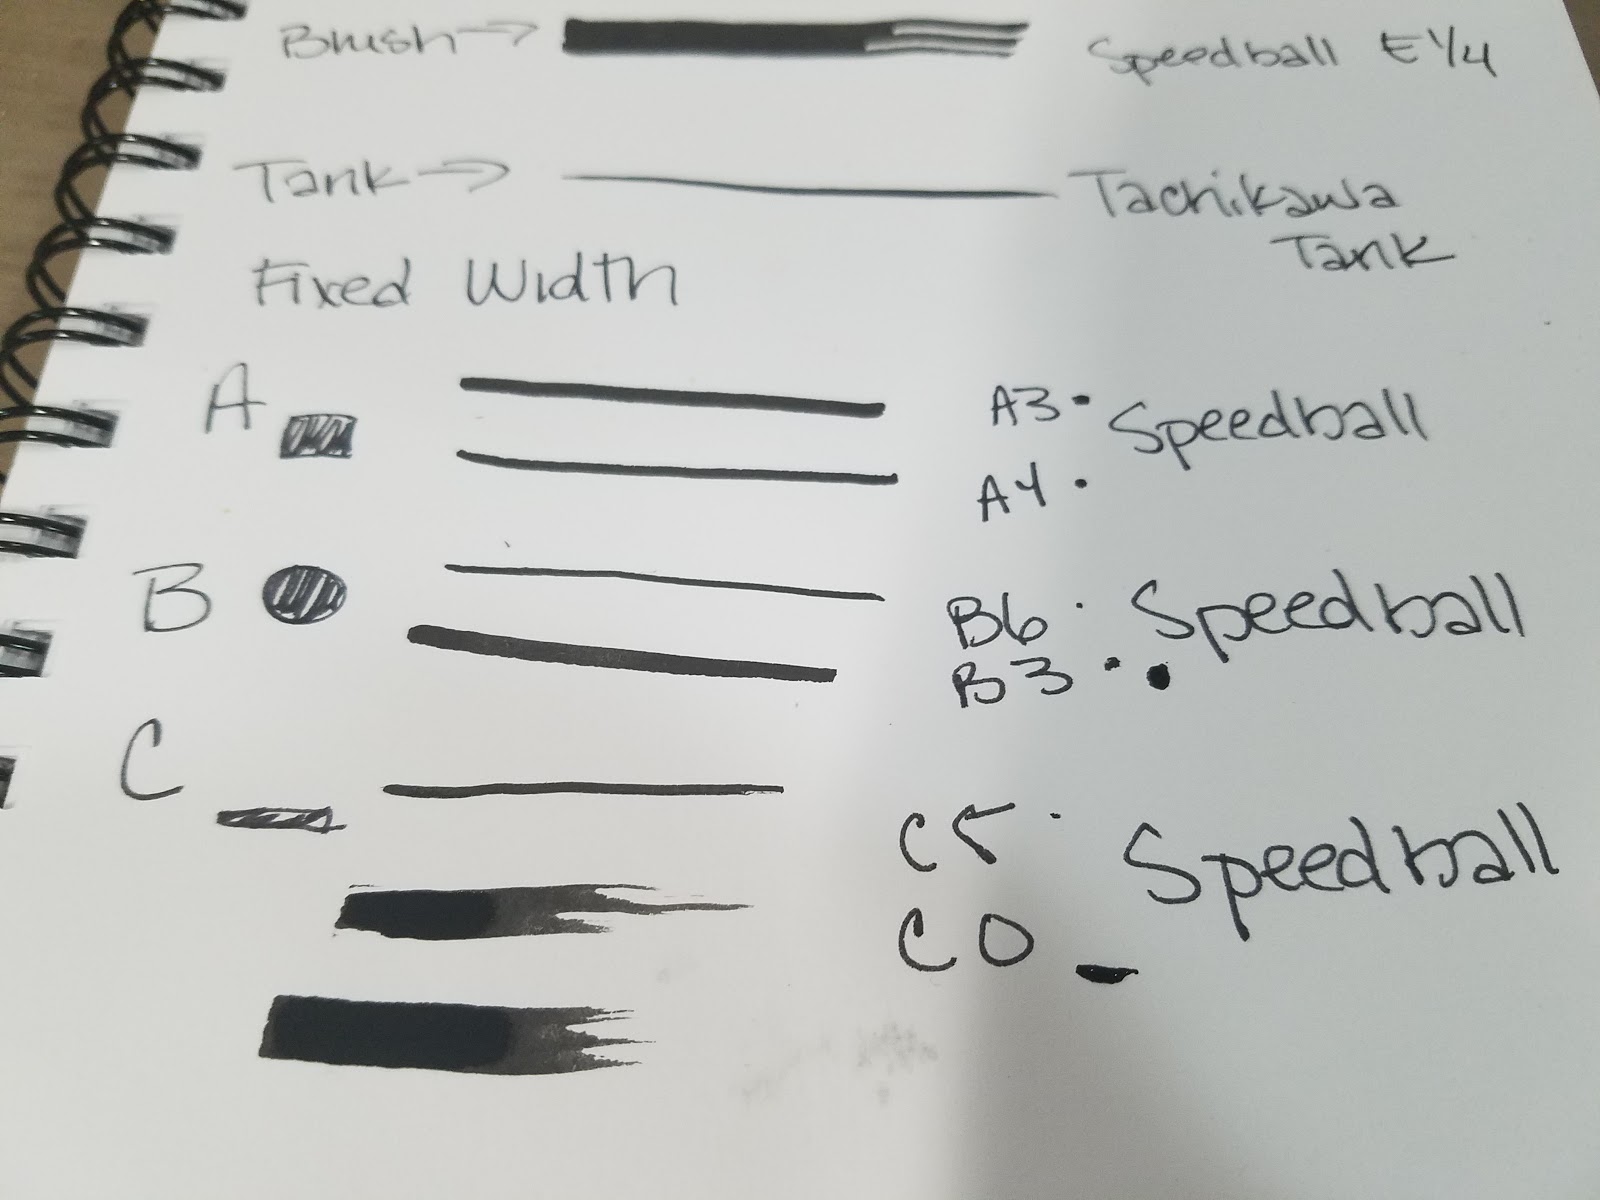
Although flexible, this brush nib is not really flexible in the way we think of flexibility for lineart- it produces a solid single width. This is more of a border and lettering tool than a tool for inking lineart.
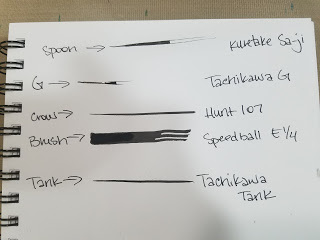 Most of these nibs don't hold much ink, so you'll have to dip often or use an ink cage. The crowquill nib and the tank nib both hold a fair amount, and may be preferable if you dislike dipping often.
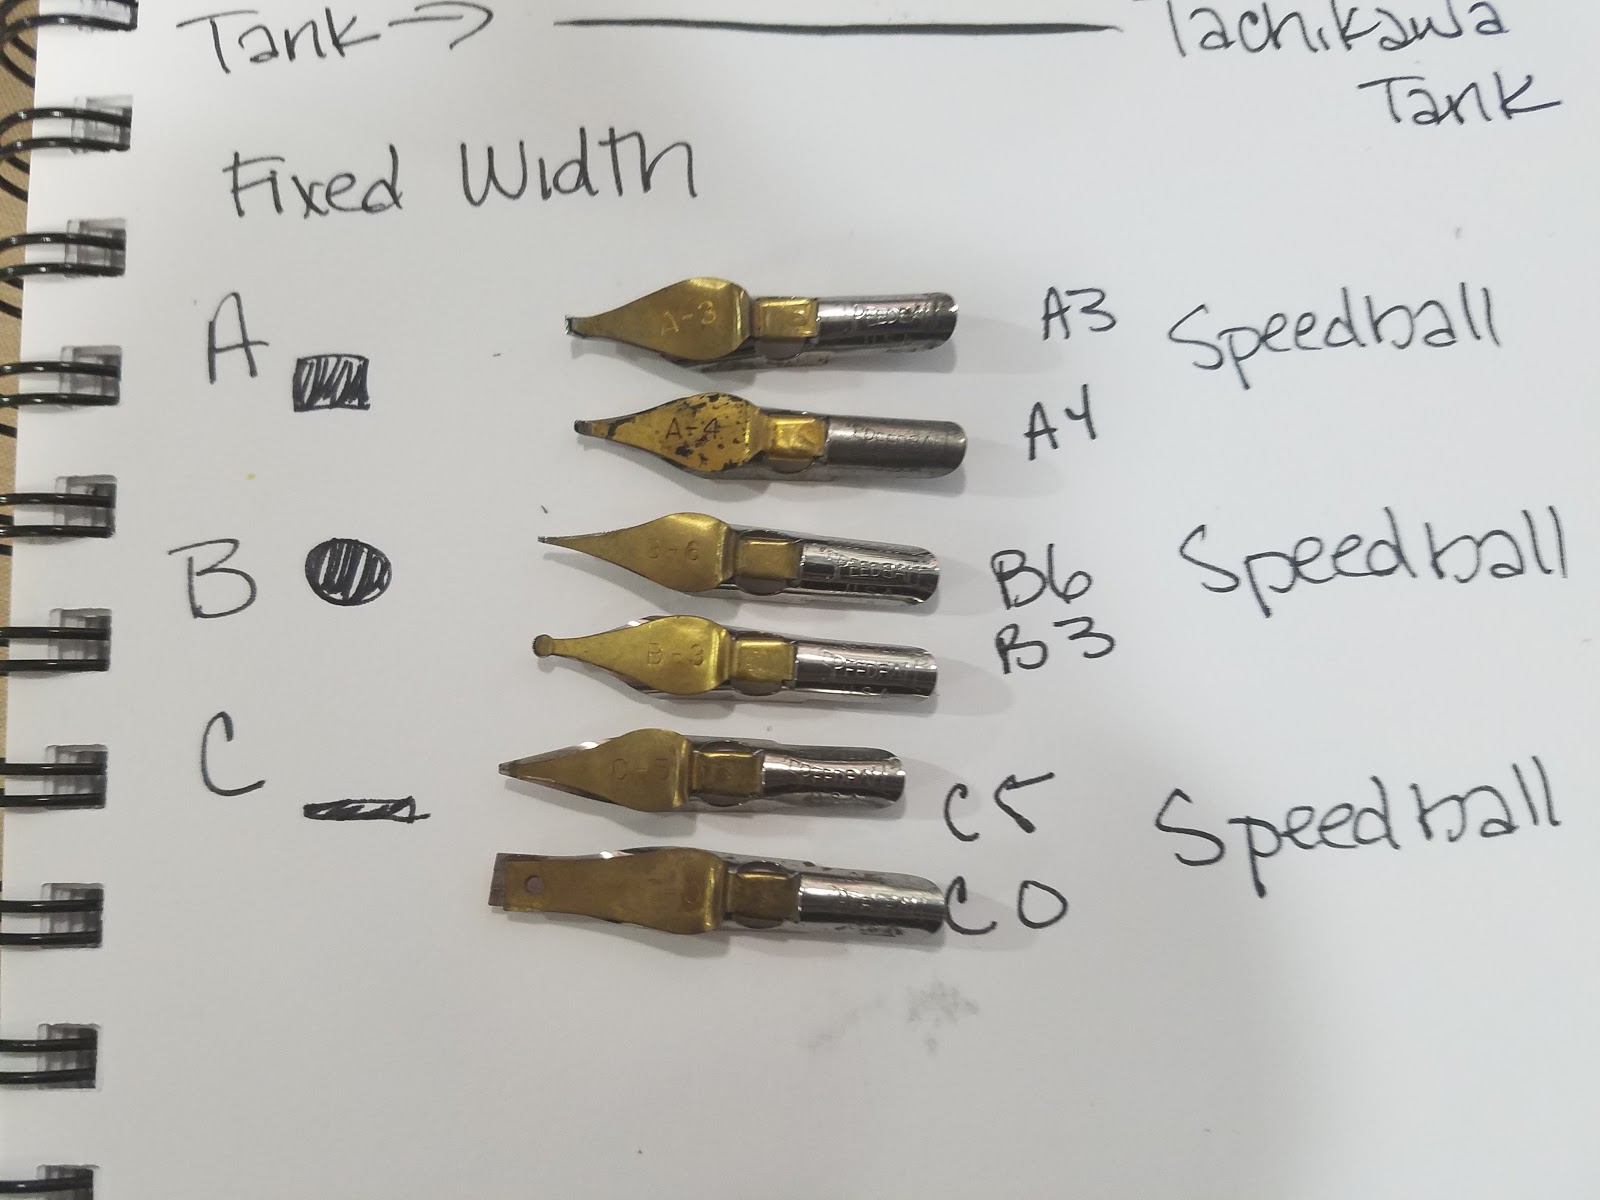
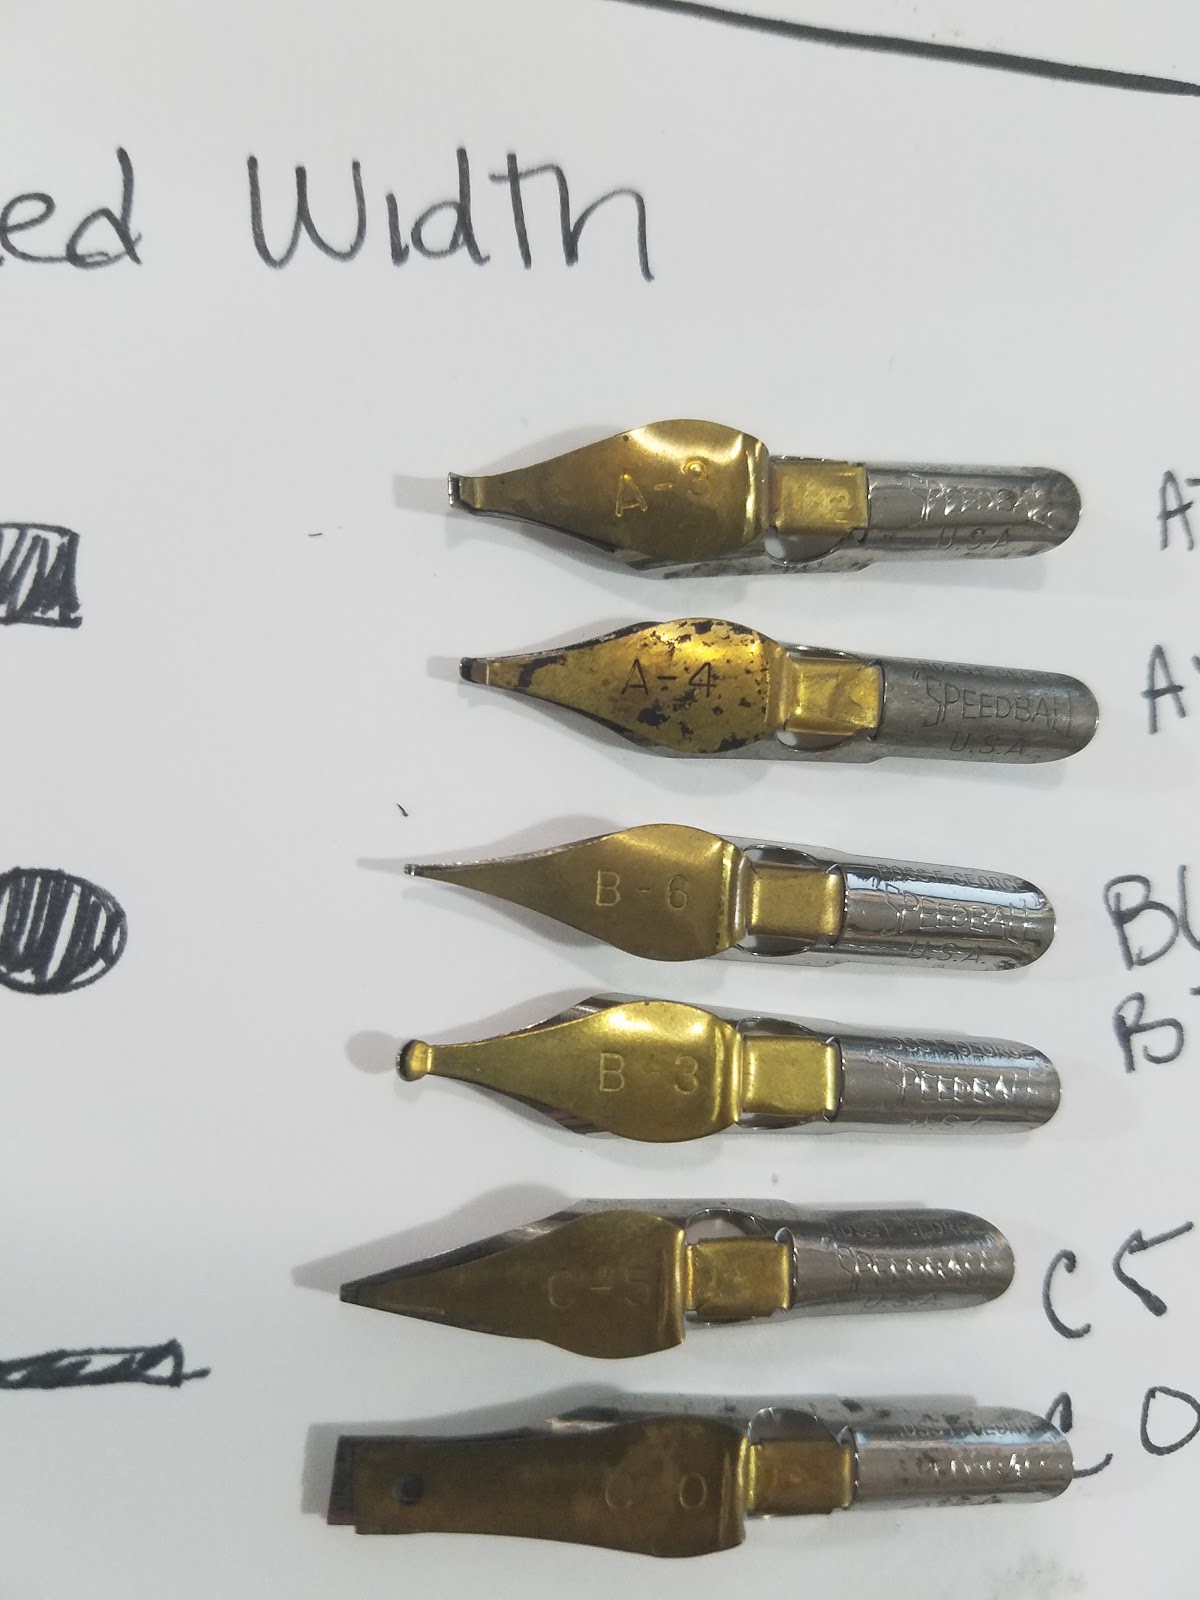
Fixed Width
Useful for lettering or dead lineweights4 basic types- A, B, C, D, with D being very difficult to findLower numbers indicate larger tip, with 0 being largestA and C are useful for borders, B was my favorite for lettering. I have never had the pleasure of owning any D nibs.

A, B, and C all have different shaped tips. I sketched the basic tip shape for you next to the letter- my preference for inking lineart is B. C may be more useful for calligraphic lettering than for inking lineart.


A and C nibs are great for borders on comic pages if you want to go old school, and B is useful for handlettering comic fonts.
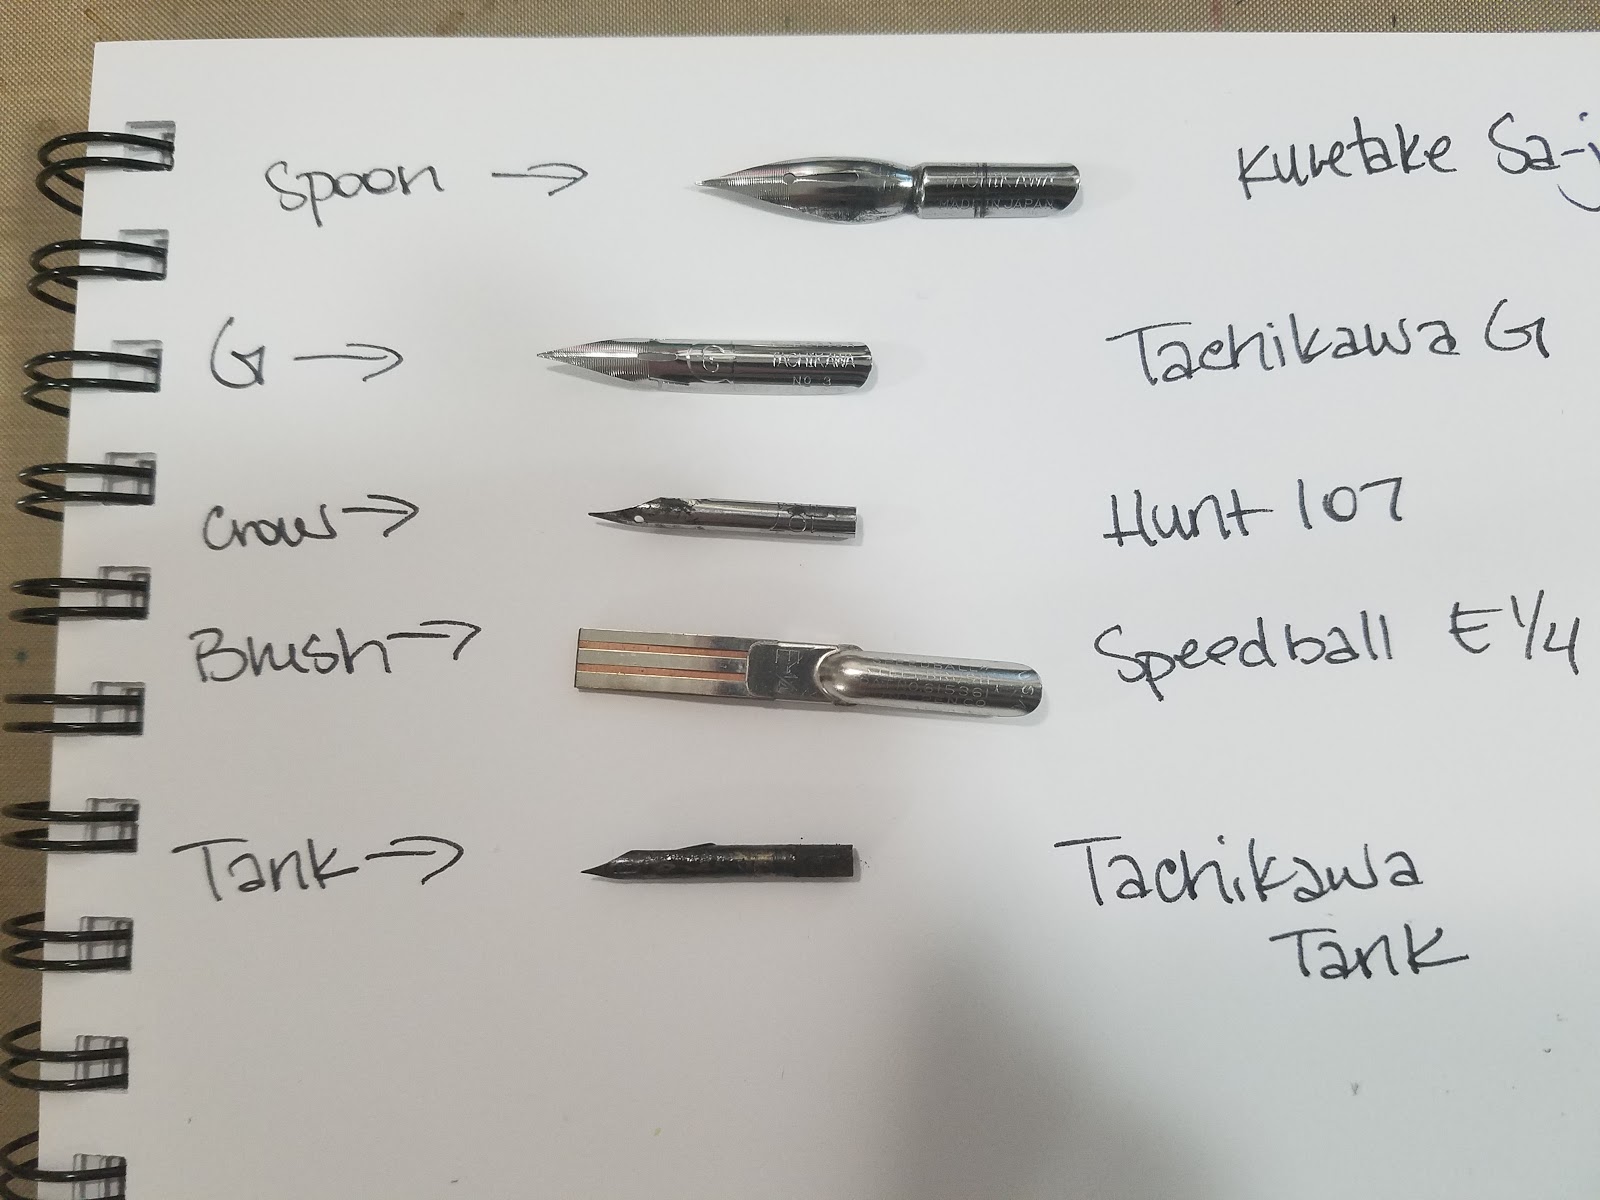
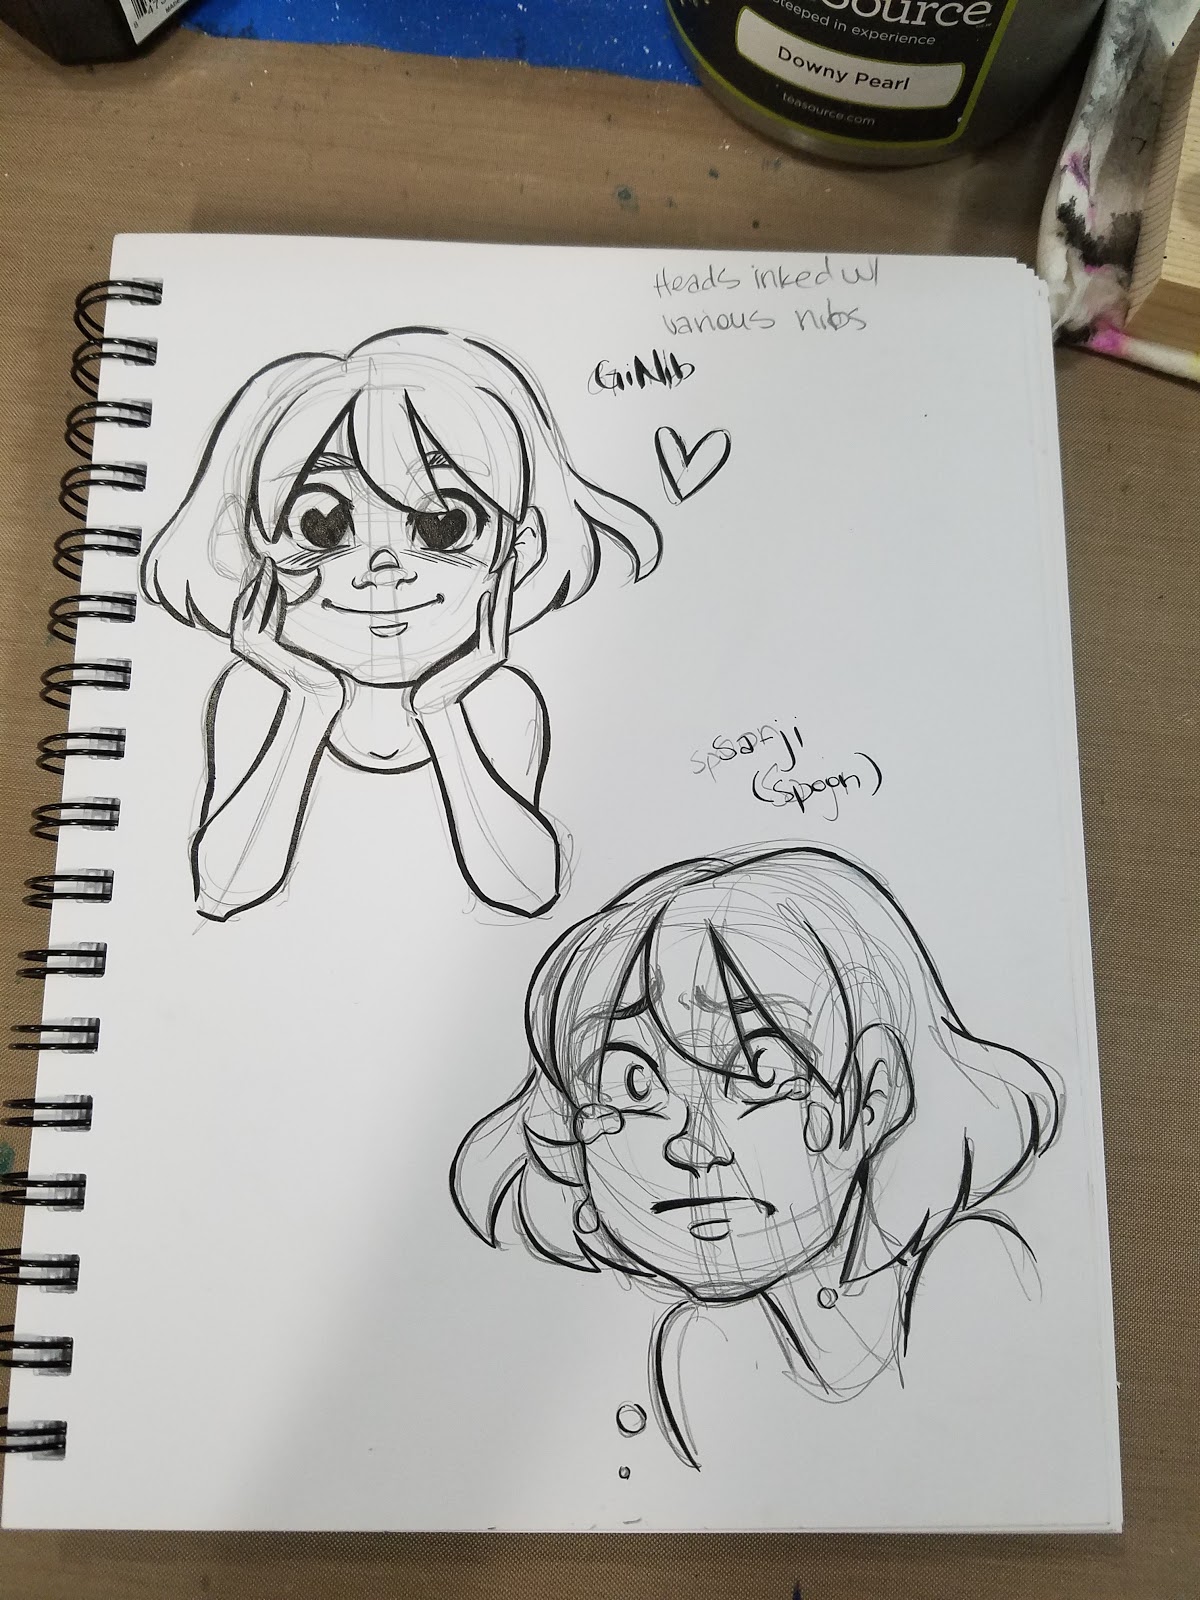
Select Nib Demonstration
To view these nibs in action, and to hear commentary, please keep an eye on my YouTube channel for this upcoming video demonstration!
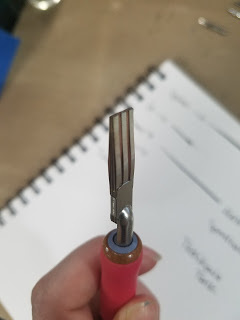
 Top: Tachikawa G Nib
Bottom: Kuretake Saji Nib
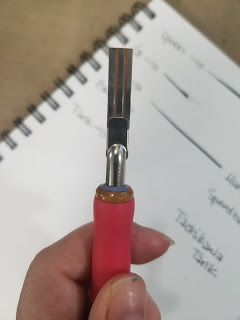
 Top: Speedball B nib (5)
Bottom: Crowquill
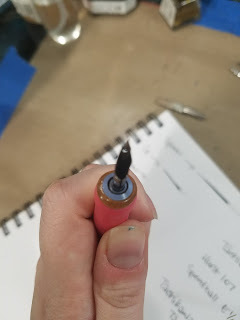
 Top: Mapping NibBottom: Tachikawa Tank
Other Nib Resources
Back when I took Advanced Inking Techniques at SCAD, I wrote several excellent posts to help acquaint others with the materials taught in the class. I highly recommend these older posts.
In the Inking Supply Box- Nibs
The Inking Compendium
ArtSnacks Inktober Overview- Second half of video goes over places to buy these materials, how to prepare them for first use, and demonstrations. Full of mini tutorials
Outside Nib Resources
Guide to Manga Pen Nibs
Difference between G-pen, Maru, Saji / Tama Nib Demo - Comic / Manga Fountain Pen Nib Tutorial
DIP PENS 101 (Why do artists still use them?)Ink Tutorial: G-Pens, Maru Pens, Pilot Ink, Kaimei Ink, Deleter InkManga drawing lesson "002 Pen skills" (Japanese with subtitles)
If you enjoyed this post, and want to learn more about inking with a nib, please check out my YouTube channel- I have many videos queued up to help you prep for inking with nibs this Inktober. If you haven't yet, I highly recommend you subscribe for regular updates.
If you are an art educator and you use this blog as an educational resource, please let me know! I'd love the opportunity to talk to your class /students via Skype about anything covered on this blog. Email me, and we can also discuss in person visits, if that suites your needs better. And if you enjoyed this post for any reason, please consider helping support future content via our Patreon- a little goes a long way to keeping the blog up and running! You can also help support the blog by sharing this post with your friends and family on social media using the handy buttons below- your good word really means a lot to me!
Please consider donating to this blog or purchasing from Natto-shop (http://nattosoup.com/shop) if you want me to continue publishing quality content. All materials tested were purchased from my own pocket. Keep on Truckin' Nattosoup is not under any sponsorship.
In this post, we're going to cover nib types and their uses.
Inking with a nib is very much about personal preference. First off, you may not enjoy it at all, preferring brushes, brush pens, or technical pens to nibs. Secondly, you might enjoy the act of inking with a nib, but hate the maintenance that nibs require. Thirdly, you may discover that you prefer some nibs to others, so I recommend you experiment widely. Even amongst nib types, there are certain brands that work better than others.
Nib Stores:
Paper and Ink Arts
Jetpens
Main Categories of NibsFlexible
Fixed Width
Flexible
Spoon/GlobeG/StudentCrowquill
Your flexible nibs can be Western (crowquills, mapping, certain calligraphy nibs) or from Japan (G, Saji, tanks), but what really matters most is your preference towards how your work looks with those nibs.
For cartoony styles that rely on bouncy line weights, I recommend you try:
Crowquill
Tachikawa G nib
Tachikawa Tank Nib
Mapping
For thinner, more delicate line weights I recommend:
Saji and other spoon nibs
Crowquill
Mapping

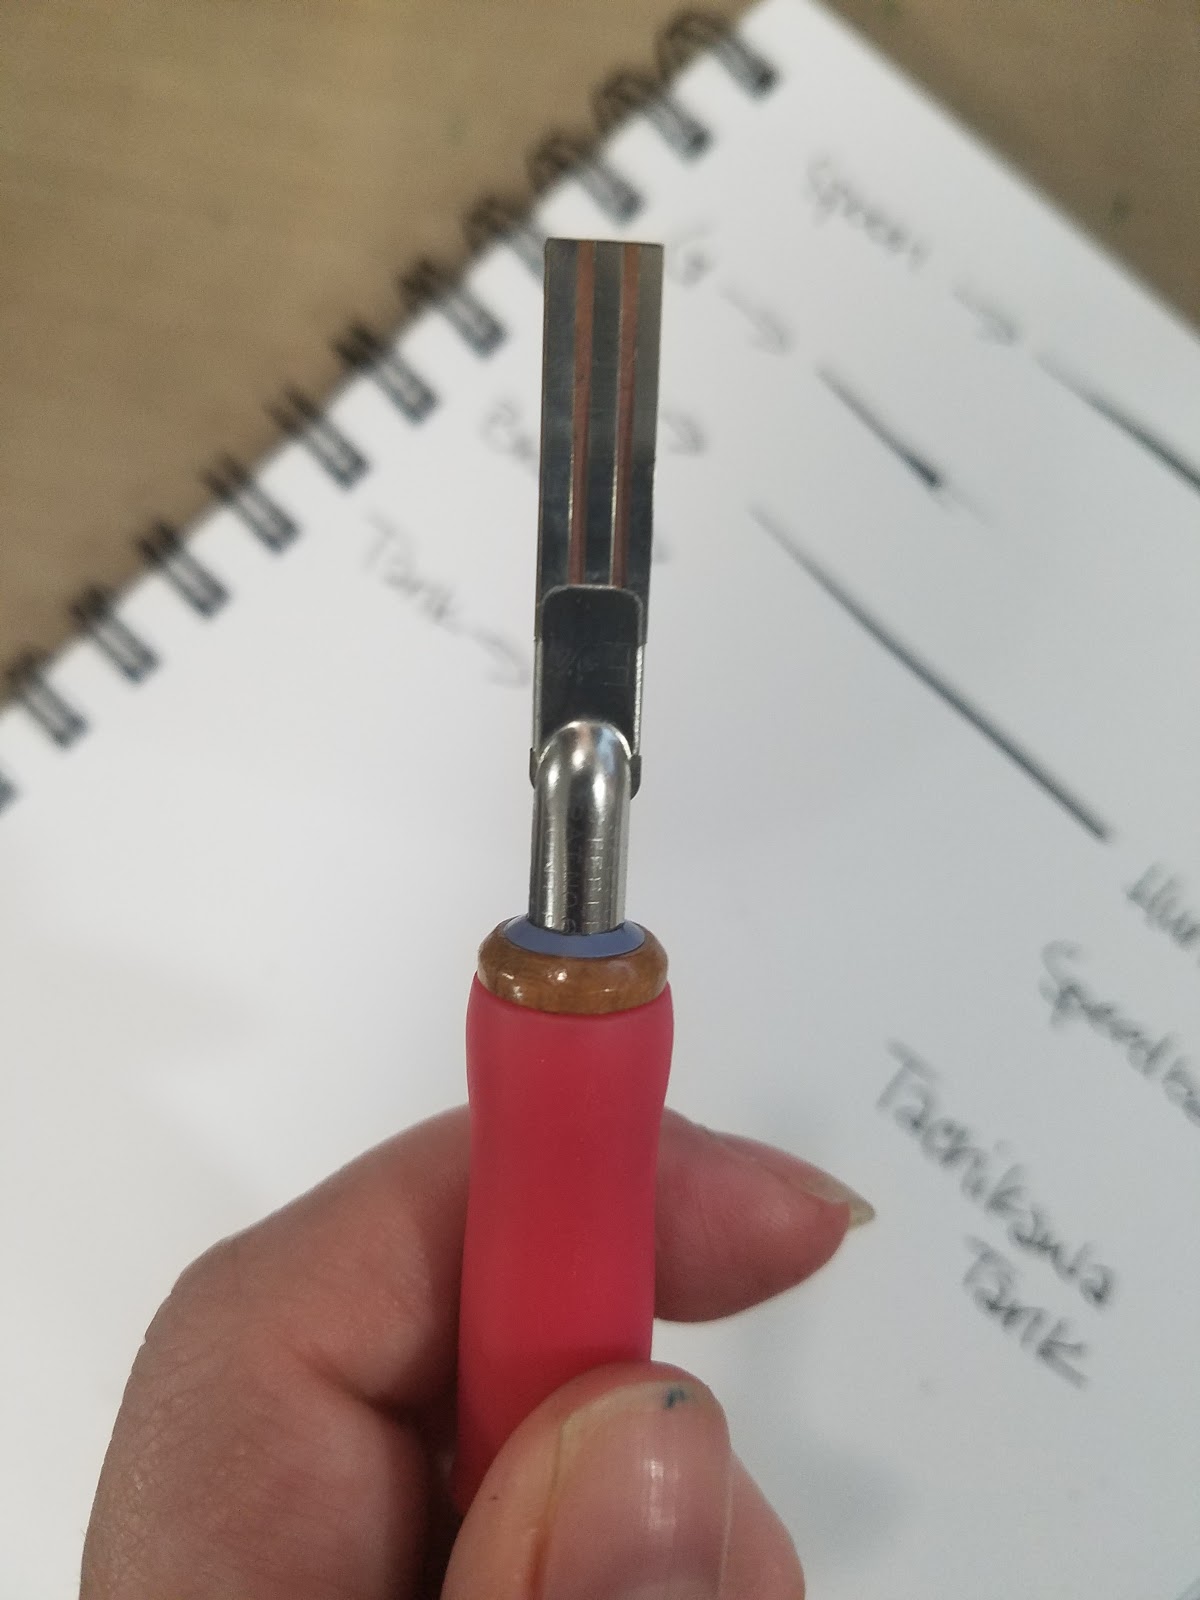
Although flexible, this brush nib is not really flexible in the way we think of flexibility for lineart- it produces a solid single width. This is more of a border and lettering tool than a tool for inking lineart.

 Most of these nibs don't hold much ink, so you'll have to dip often or use an ink cage. The crowquill nib and the tank nib both hold a fair amount, and may be preferable if you dislike dipping often.
Fixed Width
Useful for lettering or dead lineweights4 basic types- A, B, C, D, with D being very difficult to findLower numbers indicate larger tip, with 0 being largestA and C are useful for borders, B was my favorite for lettering. I have never had the pleasure of owning any D nibs.
A, B, and C all have different shaped tips. I sketched the basic tip shape for you next to the letter- my preference for inking lineart is B. C may be more useful for calligraphic lettering than for inking lineart.
A and C nibs are great for borders on comic pages if you want to go old school, and B is useful for handlettering comic fonts.
Select Nib Demonstration
To view these nibs in action, and to hear commentary, please keep an eye on my YouTube channel for this upcoming video demonstration!
 Top: Tachikawa G Nib
Bottom: Kuretake Saji Nib
 Top: Speedball B nib (5)
Bottom: Crowquill
 Top: Mapping NibBottom: Tachikawa Tank
Other Nib Resources
Back when I took Advanced Inking Techniques at SCAD, I wrote several excellent posts to help acquaint others with the materials taught in the class. I highly recommend these older posts.
In the Inking Supply Box- Nibs
The Inking Compendium
ArtSnacks Inktober Overview- Second half of video goes over places to buy these materials, how to prepare them for first use, and demonstrations. Full of mini tutorials
Outside Nib Resources
Guide to Manga Pen Nibs
Difference between G-pen, Maru, Saji / Tama Nib Demo - Comic / Manga Fountain Pen Nib Tutorial
DIP PENS 101 (Why do artists still use them?)Ink Tutorial: G-Pens, Maru Pens, Pilot Ink, Kaimei Ink, Deleter InkManga drawing lesson "002 Pen skills" (Japanese with subtitles)
If you enjoyed this post, and want to learn more about inking with a nib, please check out my YouTube channel- I have many videos queued up to help you prep for inking with nibs this Inktober. If you haven't yet, I highly recommend you subscribe for regular updates.
If you are an art educator and you use this blog as an educational resource, please let me know! I'd love the opportunity to talk to your class /students via Skype about anything covered on this blog. Email me, and we can also discuss in person visits, if that suites your needs better. And if you enjoyed this post for any reason, please consider helping support future content via our Patreon- a little goes a long way to keeping the blog up and running! You can also help support the blog by sharing this post with your friends and family on social media using the handy buttons below- your good word really means a lot to me!
Please consider donating to this blog or purchasing from Natto-shop (http://nattosoup.com/shop) if you want me to continue publishing quality content. All materials tested were purchased from my own pocket. Keep on Truckin' Nattosoup is not under any sponsorship.


September 25, 2016
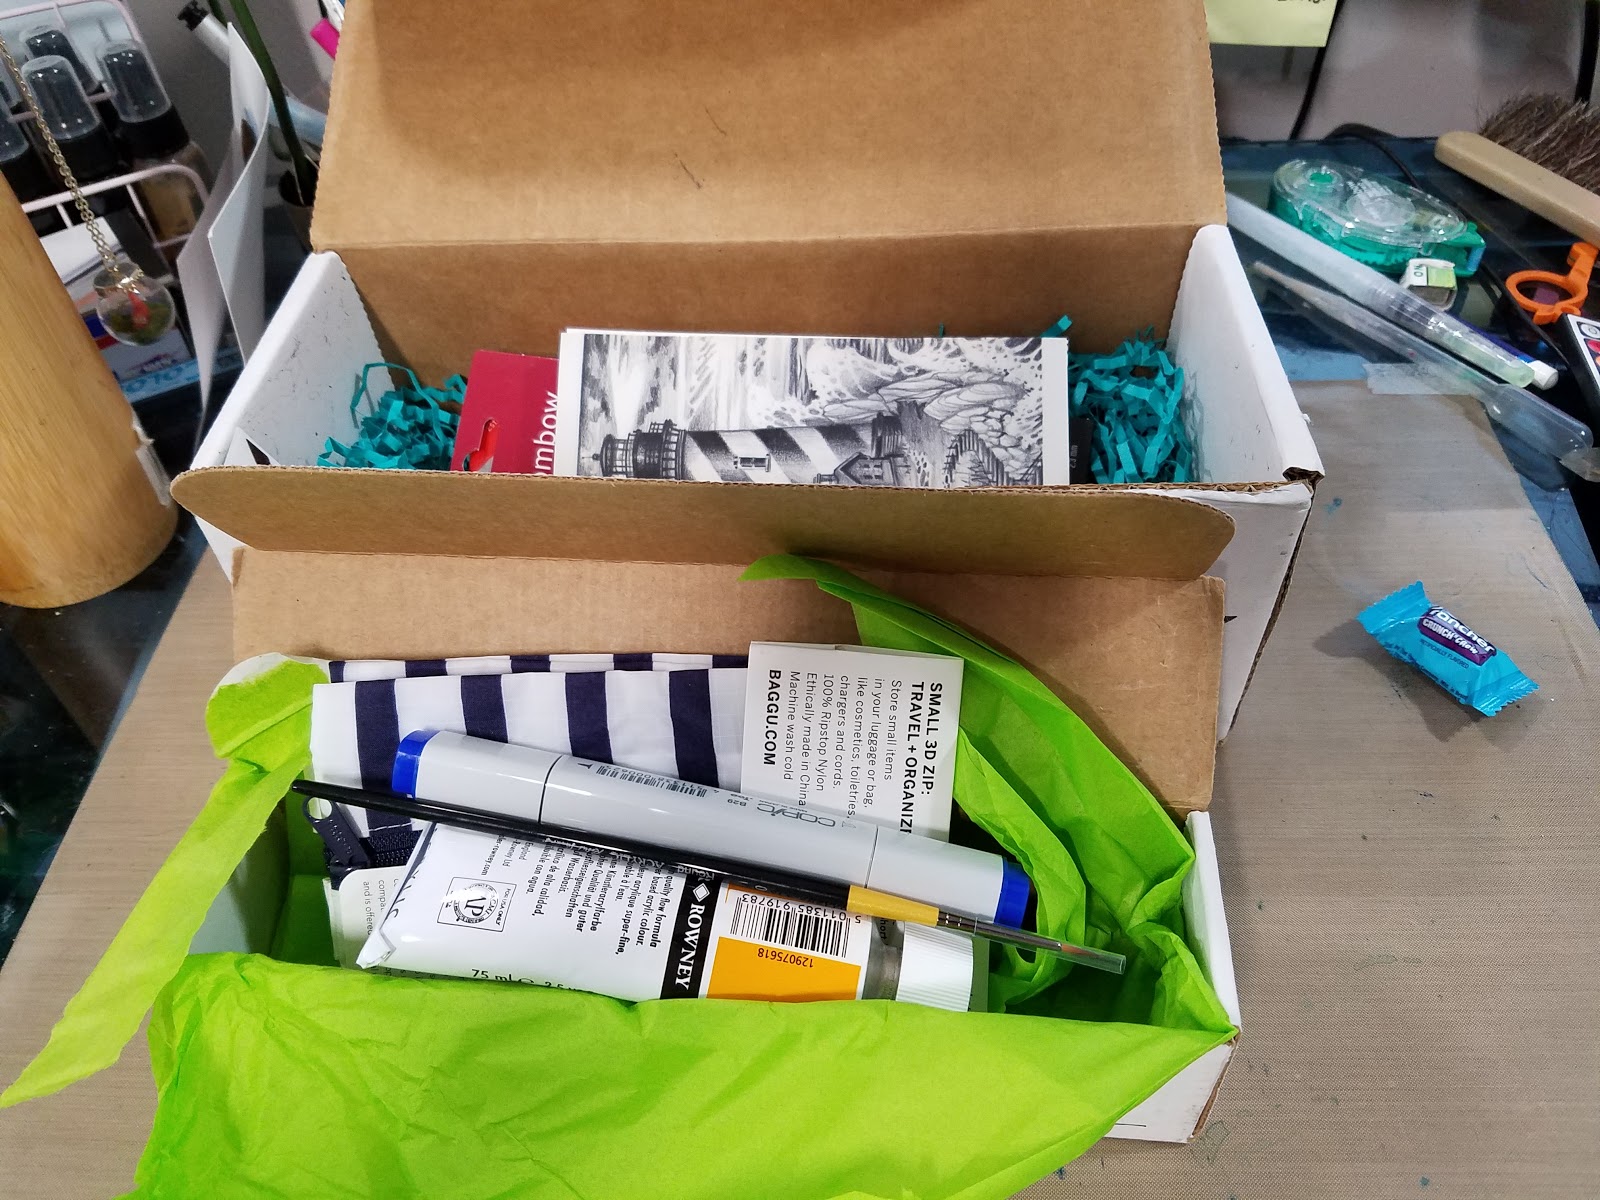
August ArtSnacks Vs SketchBox
Thanks to Denise Hillburn (my mother) for the gift of ArtSnacks for the year! SketchBox Basic subscription purchased by me out of personal funds. If you would like to help support this blog, and continue posts like this, please consider donating to my Paypal, or contributing to my Patreon . Future unboxings and reviews are unlocked to the public at the $15 level each month, but backers have access regardless of funds raised. Posts like this are only possible through the support of my Backers, so if you enjoy this content, please check it out and consider joining.
Special July Thanks To My Patreon BackersSamantha Newell
Andrew BenedictC. EllisJessica PhillipsYolaine
Entreat
ChrisVirginia Williams
HoffWayne Norris
Yusagi
Michael SurianoLeeRyanRistroChandraG.S. Davis
These ArtSnacks Vs. SketchBox posts (and videos!) are only made possible due to the generosity of my Patrons. Their kindness and support are much appreciated, and serve as a source of inspiration and motivation.
If you enjoy these posts, please take a moment to watch the included videos- they cover information often not covered in the post itself. In the Overview video, I demonstrate and explain the products, and the Challenge videos involve tutorials and problem solving that are often not covered in these posts.
If now isn't an ideal time to watch video (say you're reading while at work, you bad thing), please take a moment to Subscribe to my YouTube channel to watch the videos at your leisure. All ArtSnacks, SketchBox, and ArtSnacks vs. Sketchbox videos are organized into playlists, for easy binge viewing. And there's so much more than ArtSnacks vs. SketchBox! Twice a week I upload a new review, tutorial, demonstration, or overview to help you guys knick the knack of art.
Previous SketchBox Vs. ArtSnacks
January- Winner: ArtSnacks
February- Winner: SketchBox
March- Winner: ArtSnacks
April- Winner: ArtSnacks
May- Winner: ArtSnacks
June- Winner: SketchBox
July- Winner: SketchBox
SketchBox: $25mo/$240 yr
ArtSnacks: $20mo/$200 yr
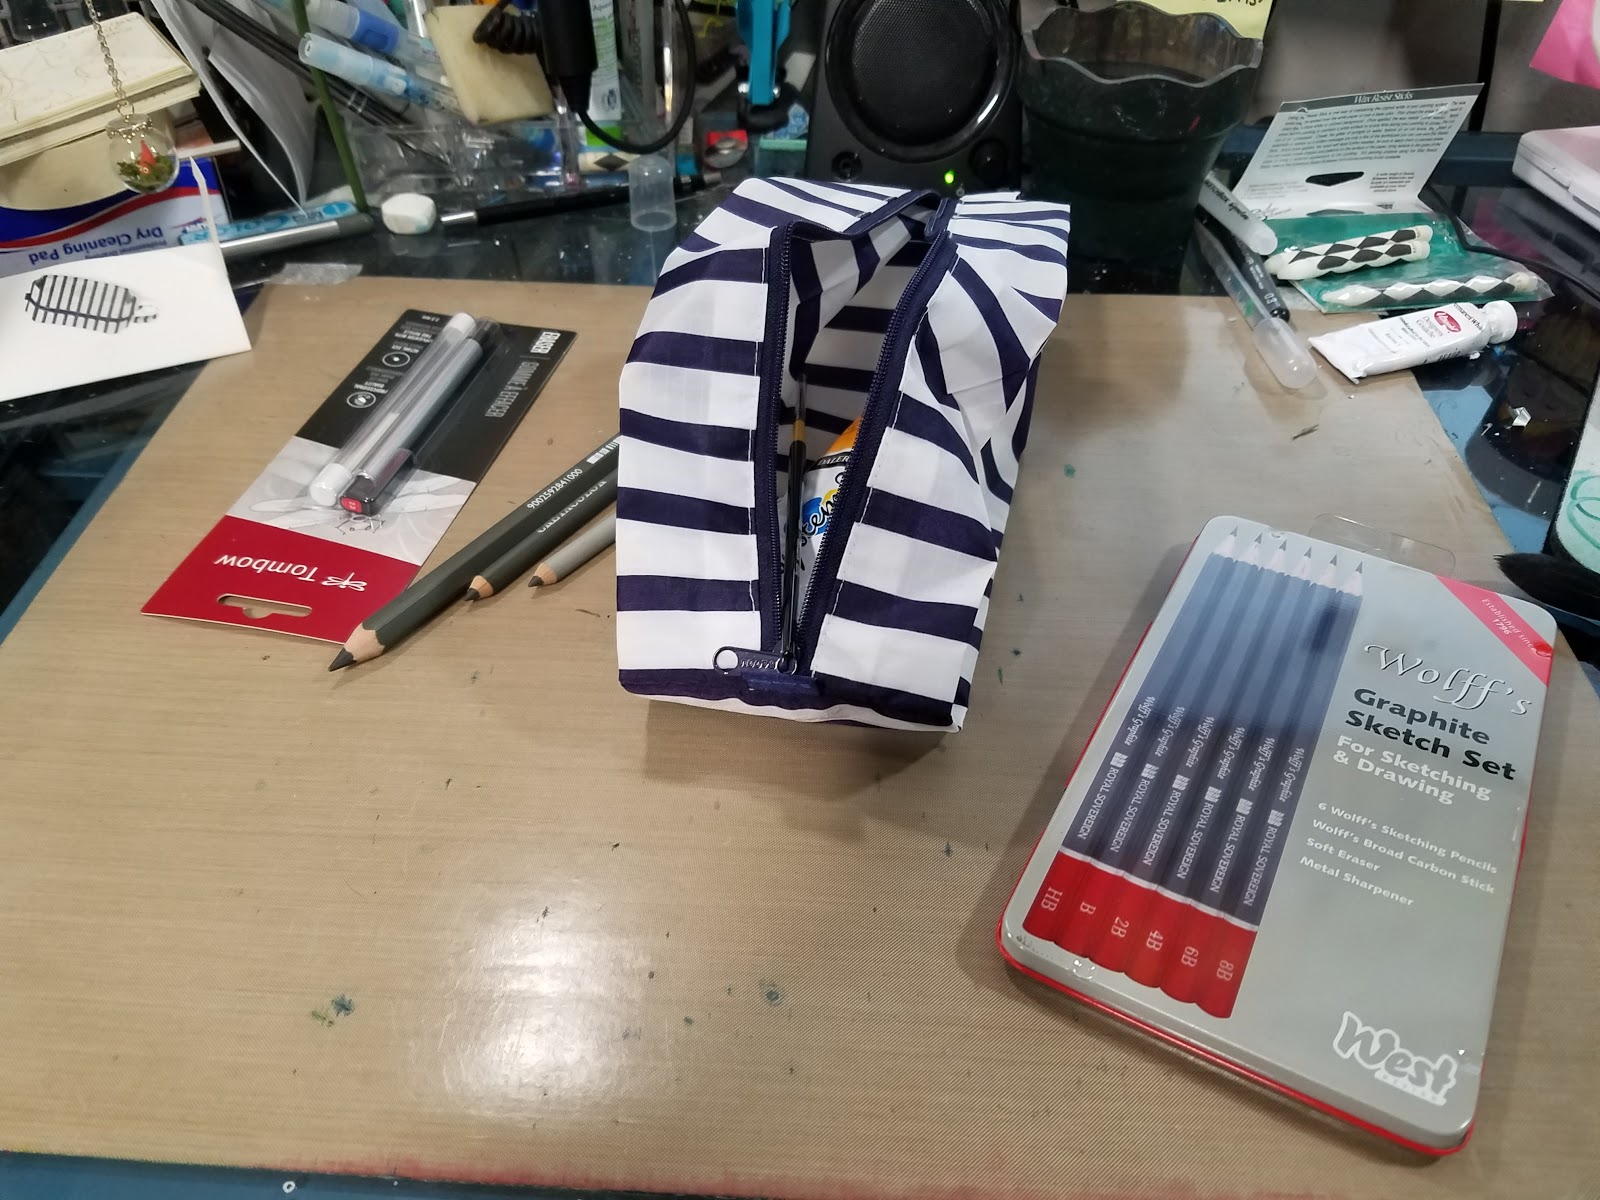
ArtSnacksThis Month's Brands
Baggu
System 3 (Daler-Rowney)
Copic
Unboxing
August ArtSnacks V SketchBox Basic Unboxing-Becca Hillburn


Overview
August SketchBox Basic Vs ArtSnacks Overview-Becca Hillburn
Please watch the video for a demonstration of the materials included inside my ArtSnacks August box.
The Included Cards
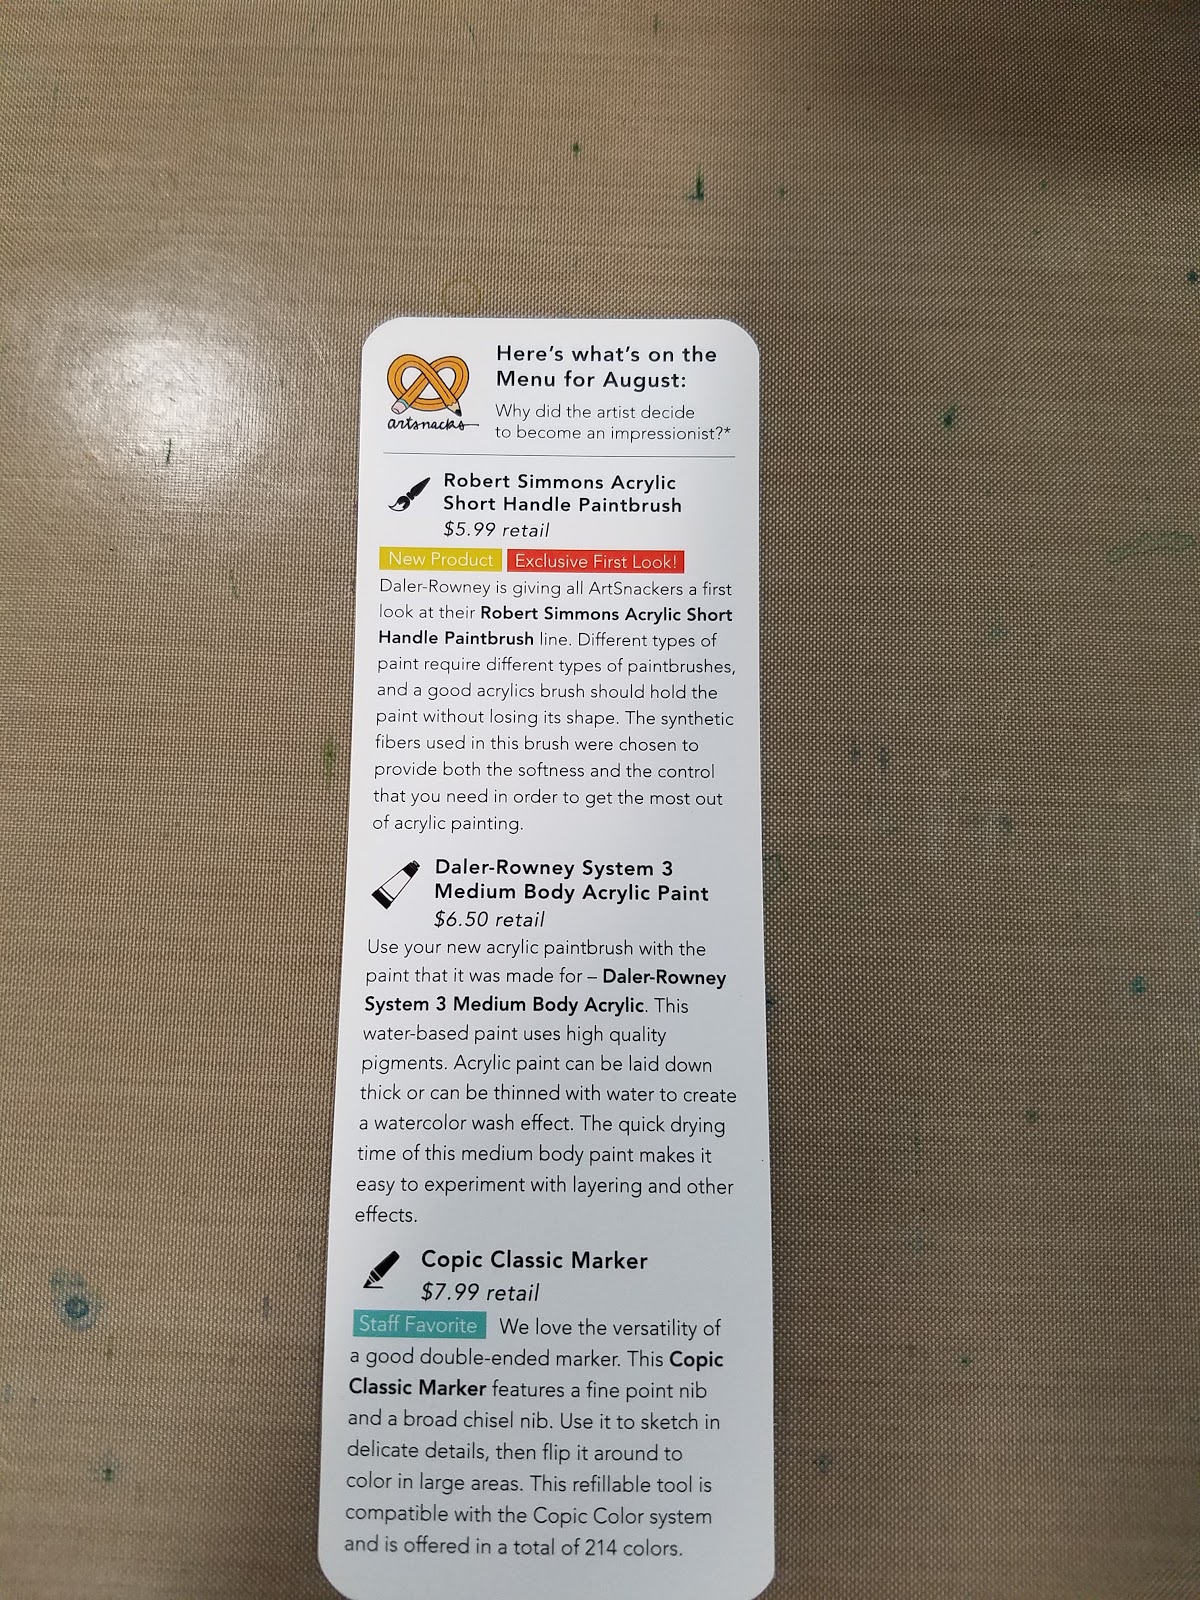
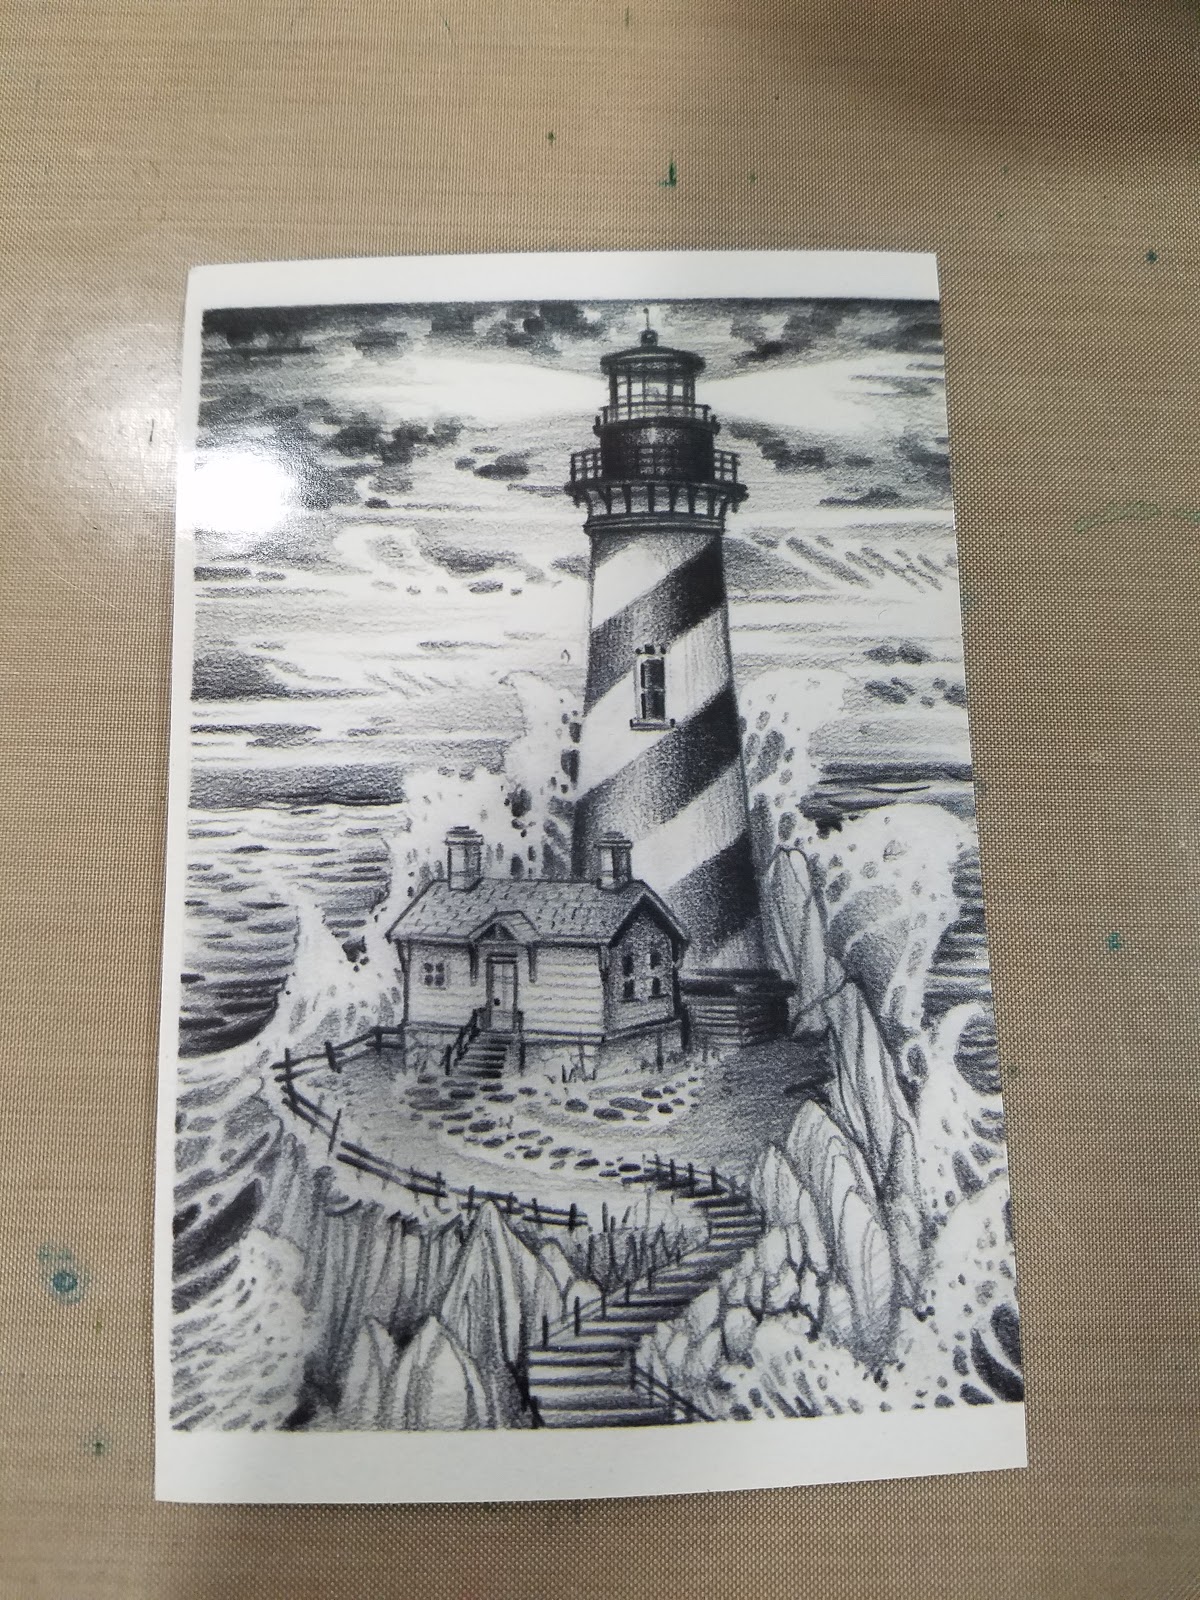
Here's what's on the Menu for August
Why did the artist decide to become an impressionist?
Robert Simmons Acrylic Short Handle Paintbrush
$5.99 retail
New Product Exclusive First Book
Daler-Rowney is giving all ArtSnackers a first look at their Robert Simmons Acrylic Short Handle Paintbrush line. Different types of paint require different types of paintbrushes, and a good acrylic brush should hold the paint without losing its shape. The synthetic fibers used in this brush were chosen to provide both the softness and the control that you need in order to get the most out of acrylic painting.
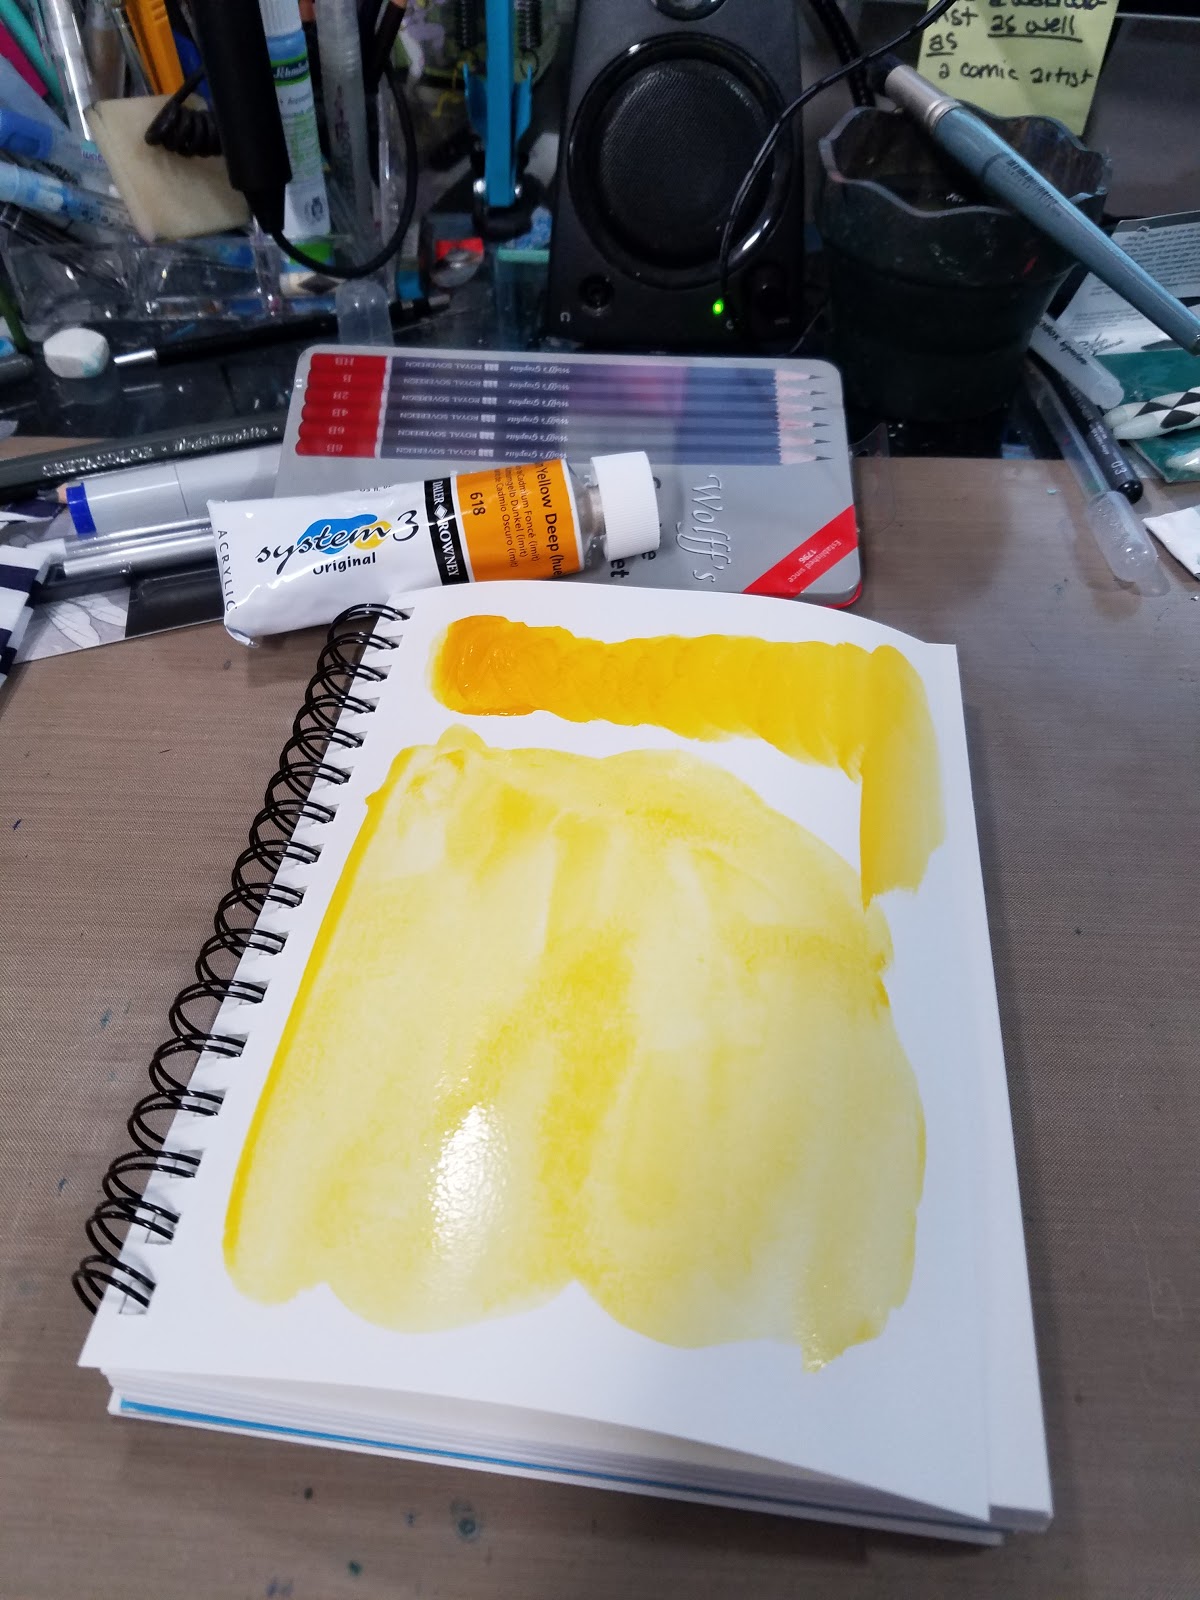
Daler-Rowney System 3 Medium Body Acrylic Paint
$6.50 retail
Use your new acrylic paintbrush with the paint that it was made for- Daler-Rowney System 3 Medium Body Acrylic. This water-based paint uses high quality pigments. Acrylic paint can be laid down thick or can be thinned with water to create a watercolor wash effect. The quick drying time of this medium body paint makes it easy to experiment with layering and other effects.
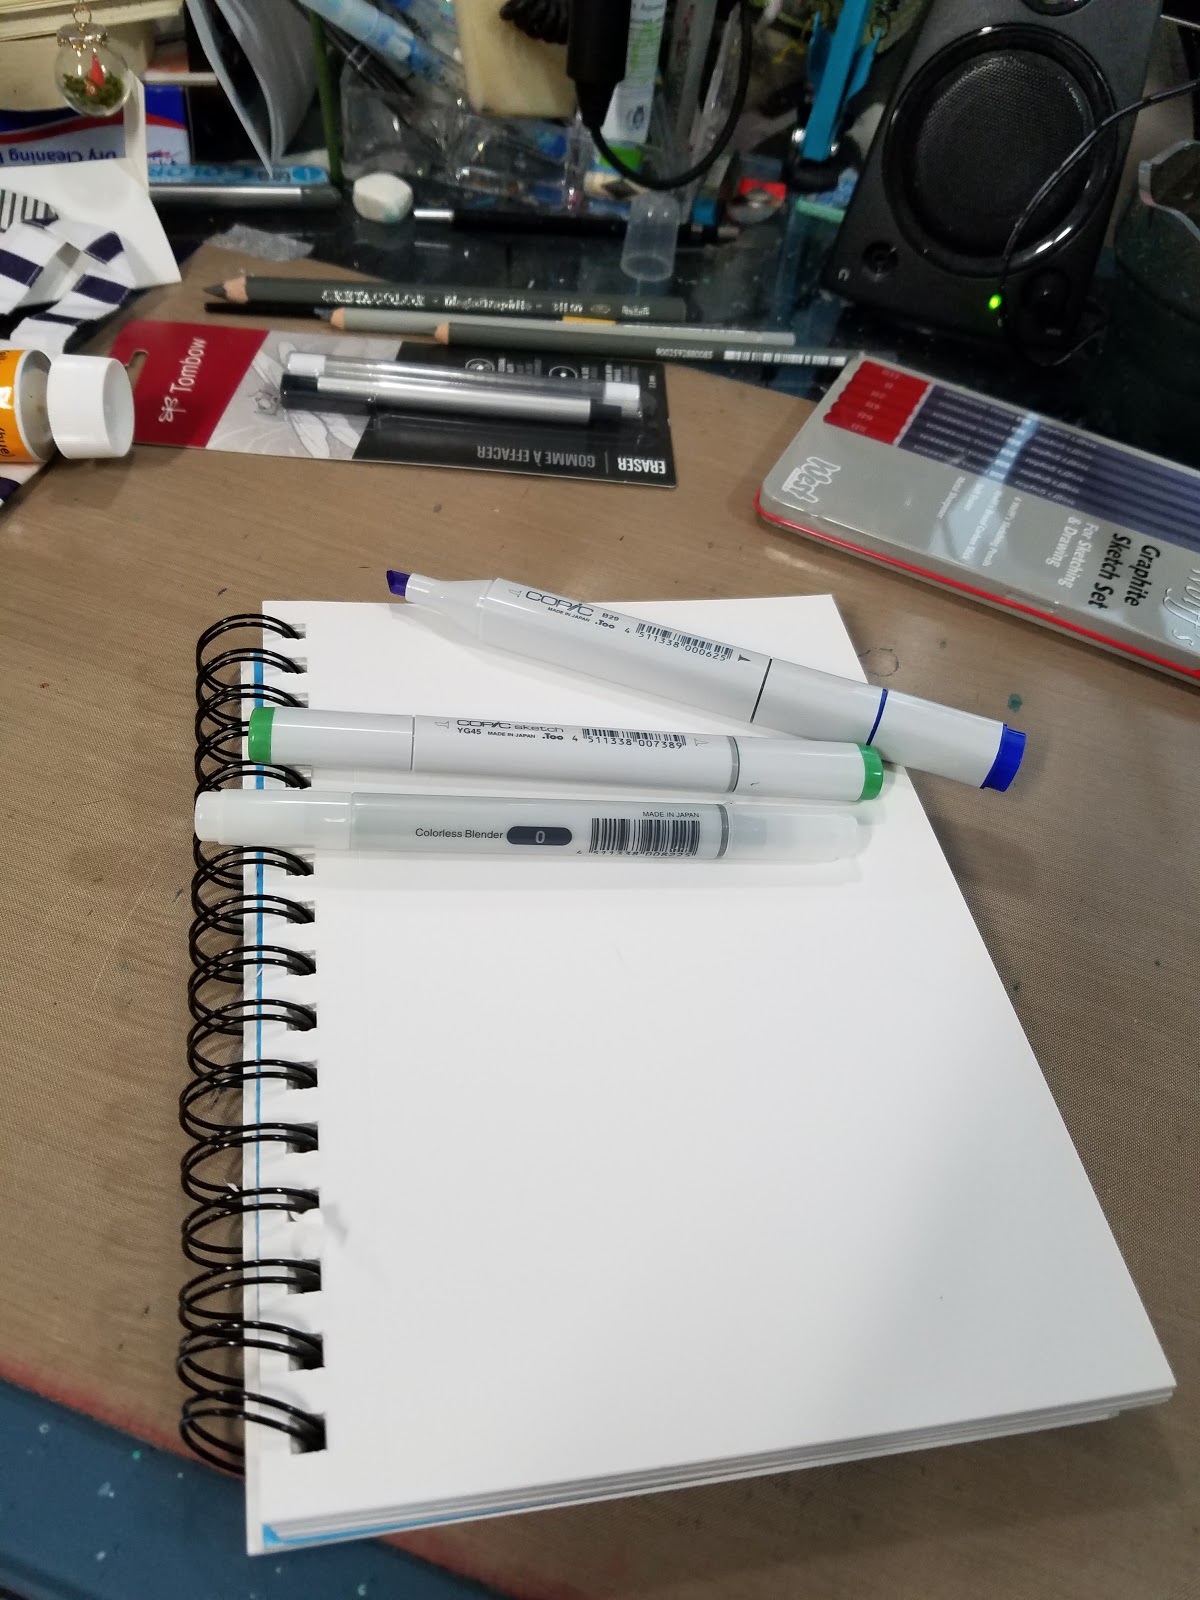
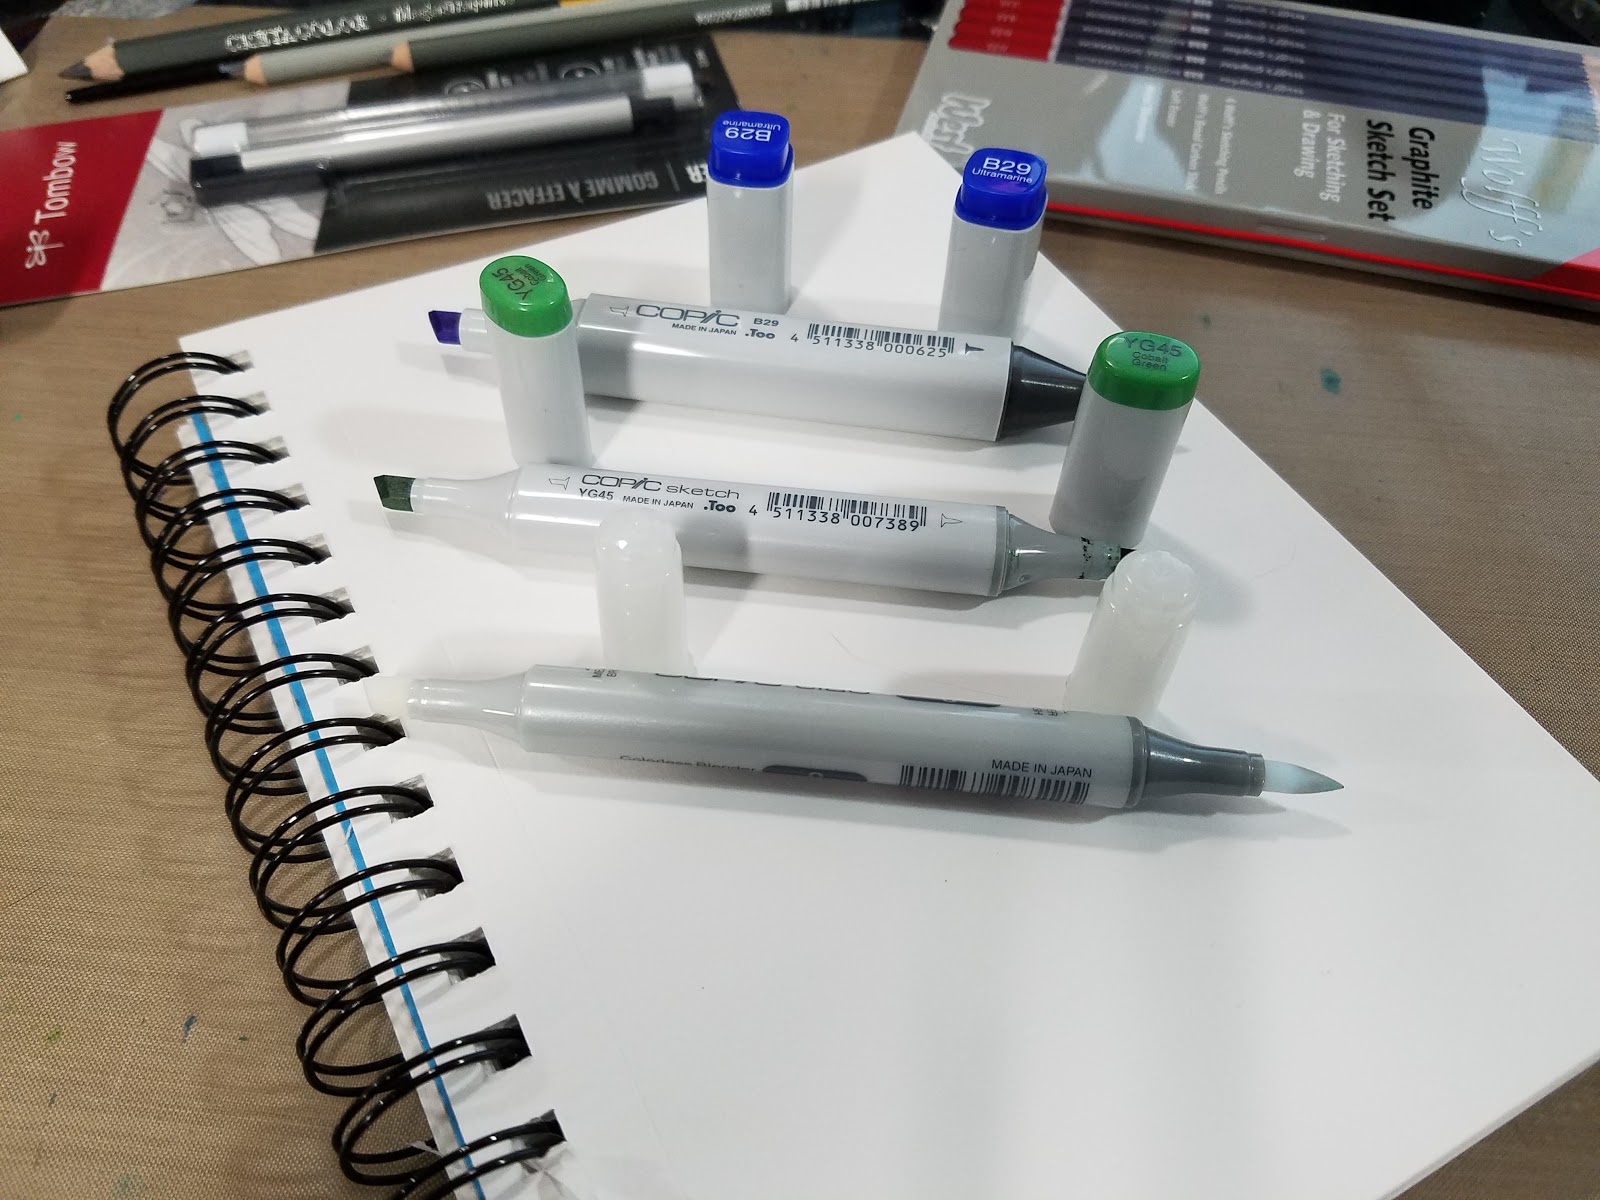
Copic Classic Marker
$7.99 retail
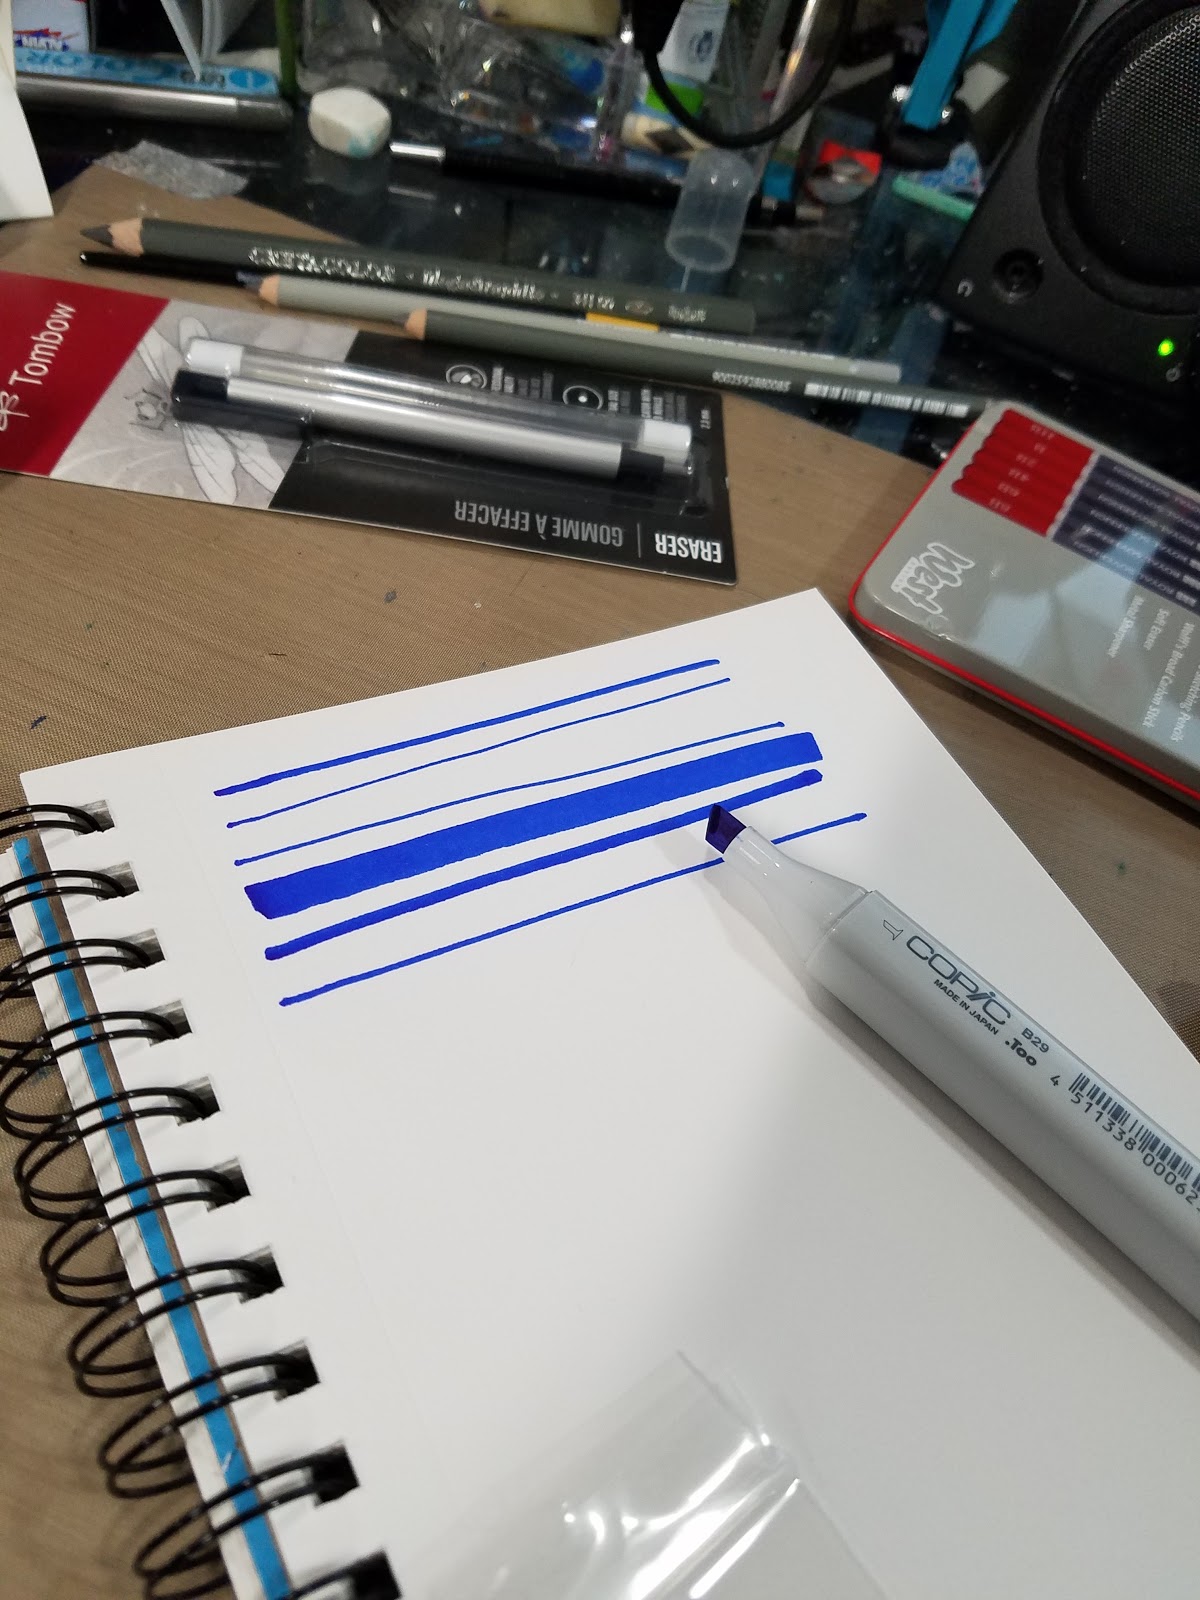
Staff Favorite We love the versatility of a good double-ended marker. The Copic Classic Marker features a fine point nib and a broad chisel nib. Use it to sketch in delicate details, then flip it around to color in large areas. The refillable tool is compatible with the Copic Color system and is offered in a total of 214 colors.
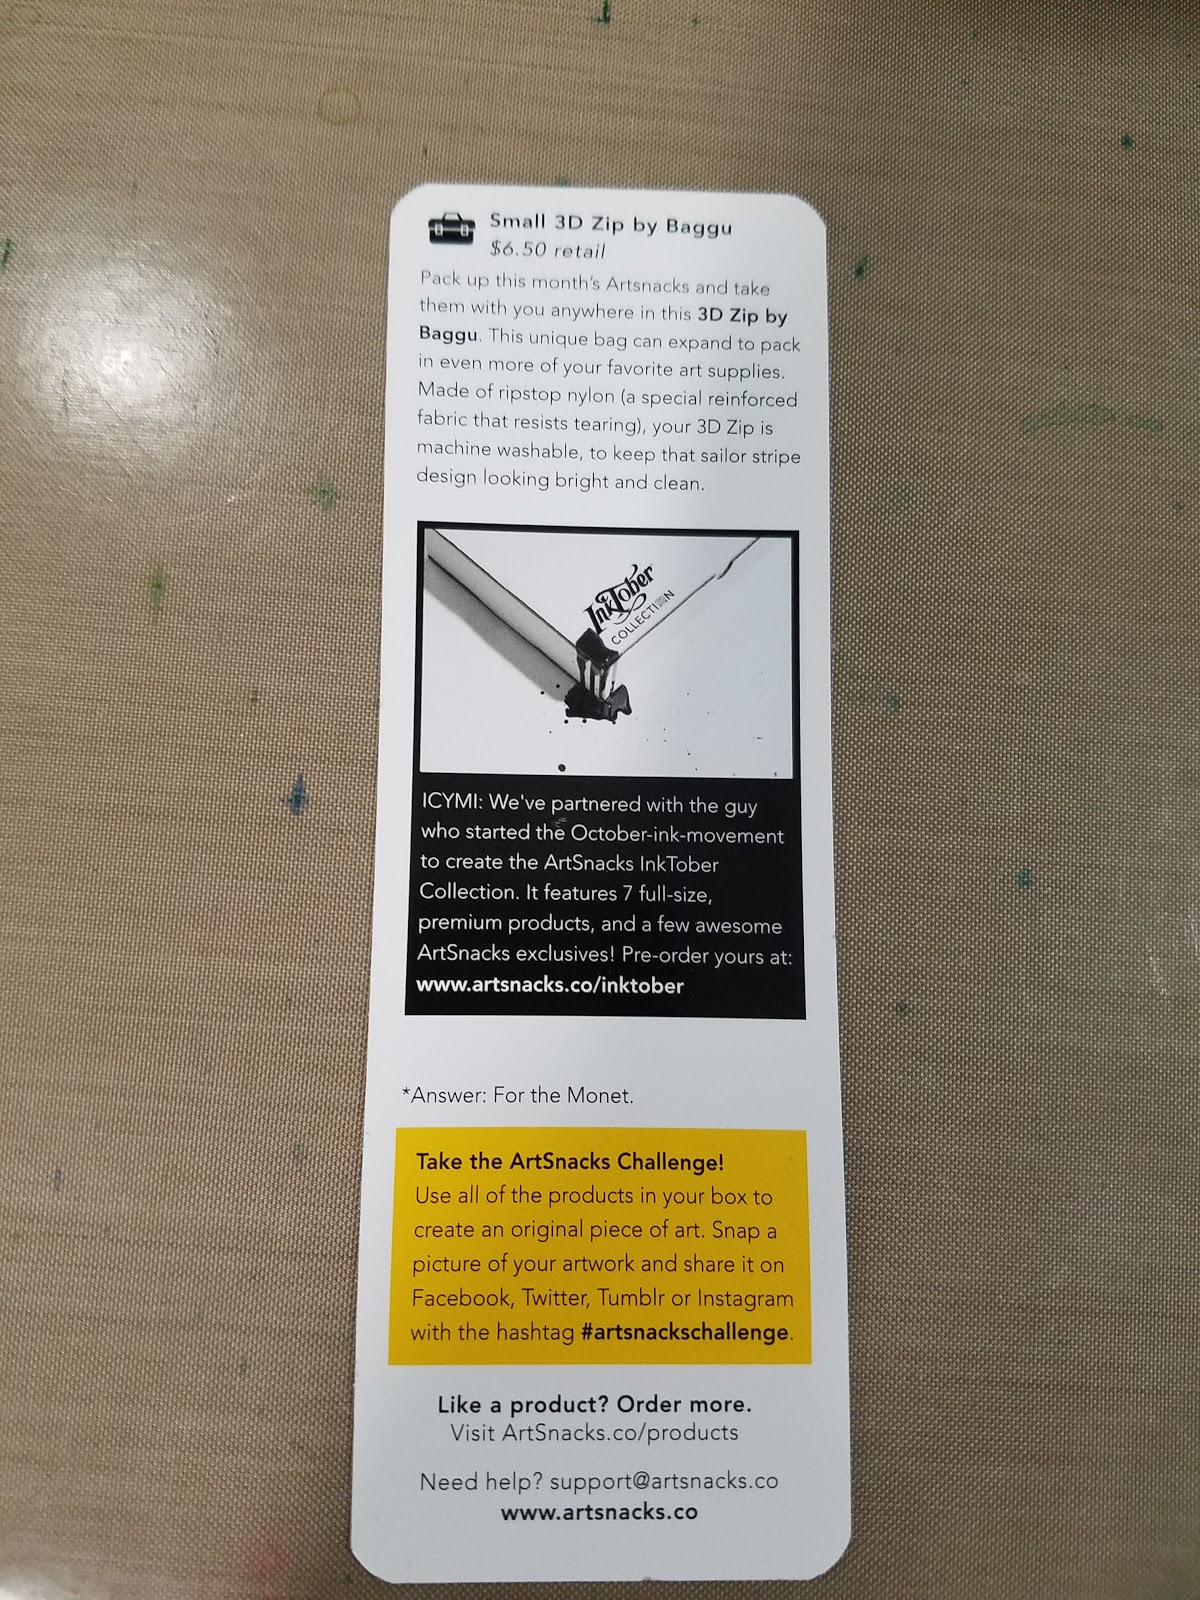
Small 3D Zip by Baggu
$6.50 retailPack up this month's ArtSnacks and take them with you anywhere in this 3D Zip by Baggu. This unique bag can expand to pack in even more of your favorite art supplies. Made of ripstop nylon (a special reinfornced fabric that resists tearing), your 3D Zip is machine washable, to keep that sailor stripe design looking bright and clean.
ICYMI: We've partnered with the guy who started the October-ink-movement to create the ArtSnacks InkTober Collection. It features 7 full-size, premium products. Pre-order yours at www.artsnacks.co/inkotober
*Answer: For the Monet.
Take the ArtSnacks Challenge!
Use all of the products in your box to create an original piece of art. Snap a picture of your artwork and share it on Faceook,Twitter, Tumblr, or Instagram with the hashtag #artsnackschallenge
Like a product? Order more.
Visit ArtSnacks.co/products
Need help? support@artsnacks.co
www.artsnacks.co
Authors Note: Interested in seeing me review the Inktober collection? I've placed the pre-order, head on over to the Patreon to show your interest by pledging some support! These extra boxes are not only very expensive, but require a significant time investment, so the additional support would help a lot.

Price Breakdown
Baggu Small 3D Zip
Listed MSRP $6.50 retail
$7.00 on the Baggu Site
$8.00 on Jetpens
System 3 Cadmium Yellow Deep Medium Body Acrylic
2.5 US fl. oz
Listed MSRP $6.50 retail
$2.71 on DickBlick
$5.99 on HobbyLobby
Daler Rowney Color Chart and Sizes:
Simmons Acrylic Short Handled Paintbrush
0 Round
Listed MSRP $5.99 retail
This is new, so I could not find prices online
Copic Classic Marker
Ultramarine
MSRP $7.99 retail
$7.99 on the Copic Site
$5.24 on DickBlick
Total MSRP: $26.98
Lowest Price Found Online: $20.94
ArtSnacks $20 a month inclu shipping
The Supplies Inside
Daler Rowney Acrylic Short Handle Paintbrush
If I didn't know better, I would think this was a synthetic watercolor brush, because it's very similar to the Princeton brush I received in the July ArtSnacks. Both have a short handle (of course), are rounds, and have synthetic fibers with the same amount of flex and give. In undergrad, we worked mostly with goat hair and hog bristle brushes for acrylics, and while I dimly knew that synthetics could be used (and would have been great for the smooth, synthetic look I wanted for my later paintings), I've never experienced an acrylic brush as soft as this one. In tests, I found this brush might be ideal for lettering or very fine details, but its no substitute for a flat.
System 3 Medium Body Acrylic
As mentioned in a previous ArtSnacks/SketchBox, I'm really not a fan of acrylics. That's personal preference on my part, but I do feel like mediums like acrylics benefit from more structured media, and it would have been nice if ArtSnacks could have included canvas paper or a mini canvas, rather than a teensy brush or the Baggu.
3D Zip Baggu
The Baggu is fairly nice and well constructed, but unlined,so if your art supplies leak (say ink or acrylic), there's a good chance of leakage in the bag. The bag doesn't have much internal structure, so your supplies will jostle around inside unprotected.
Copic Original
In the video, I demonstrated how to switch out the Copic Chisel nib for a Copic Brush nib, as I prefer brush tipped alcohol markers. I also showed you guys how to recycle the used nib into alcohol ink, so I highly recommend you watch the video if that sounds interesting.
Comparison between Copic Original, Copic Sketch, and Copic Ciao


ArtSnacks August Challenge
For the August ArtSnacks Challenge, please keep an eye on the YouTube Channel.

Since ArtSnacks didn't provide any media to actually paint UPON, I grabbed one of the mini Art Alternatives canvases I have floating around my convention merch. This one has a cute mini frame.

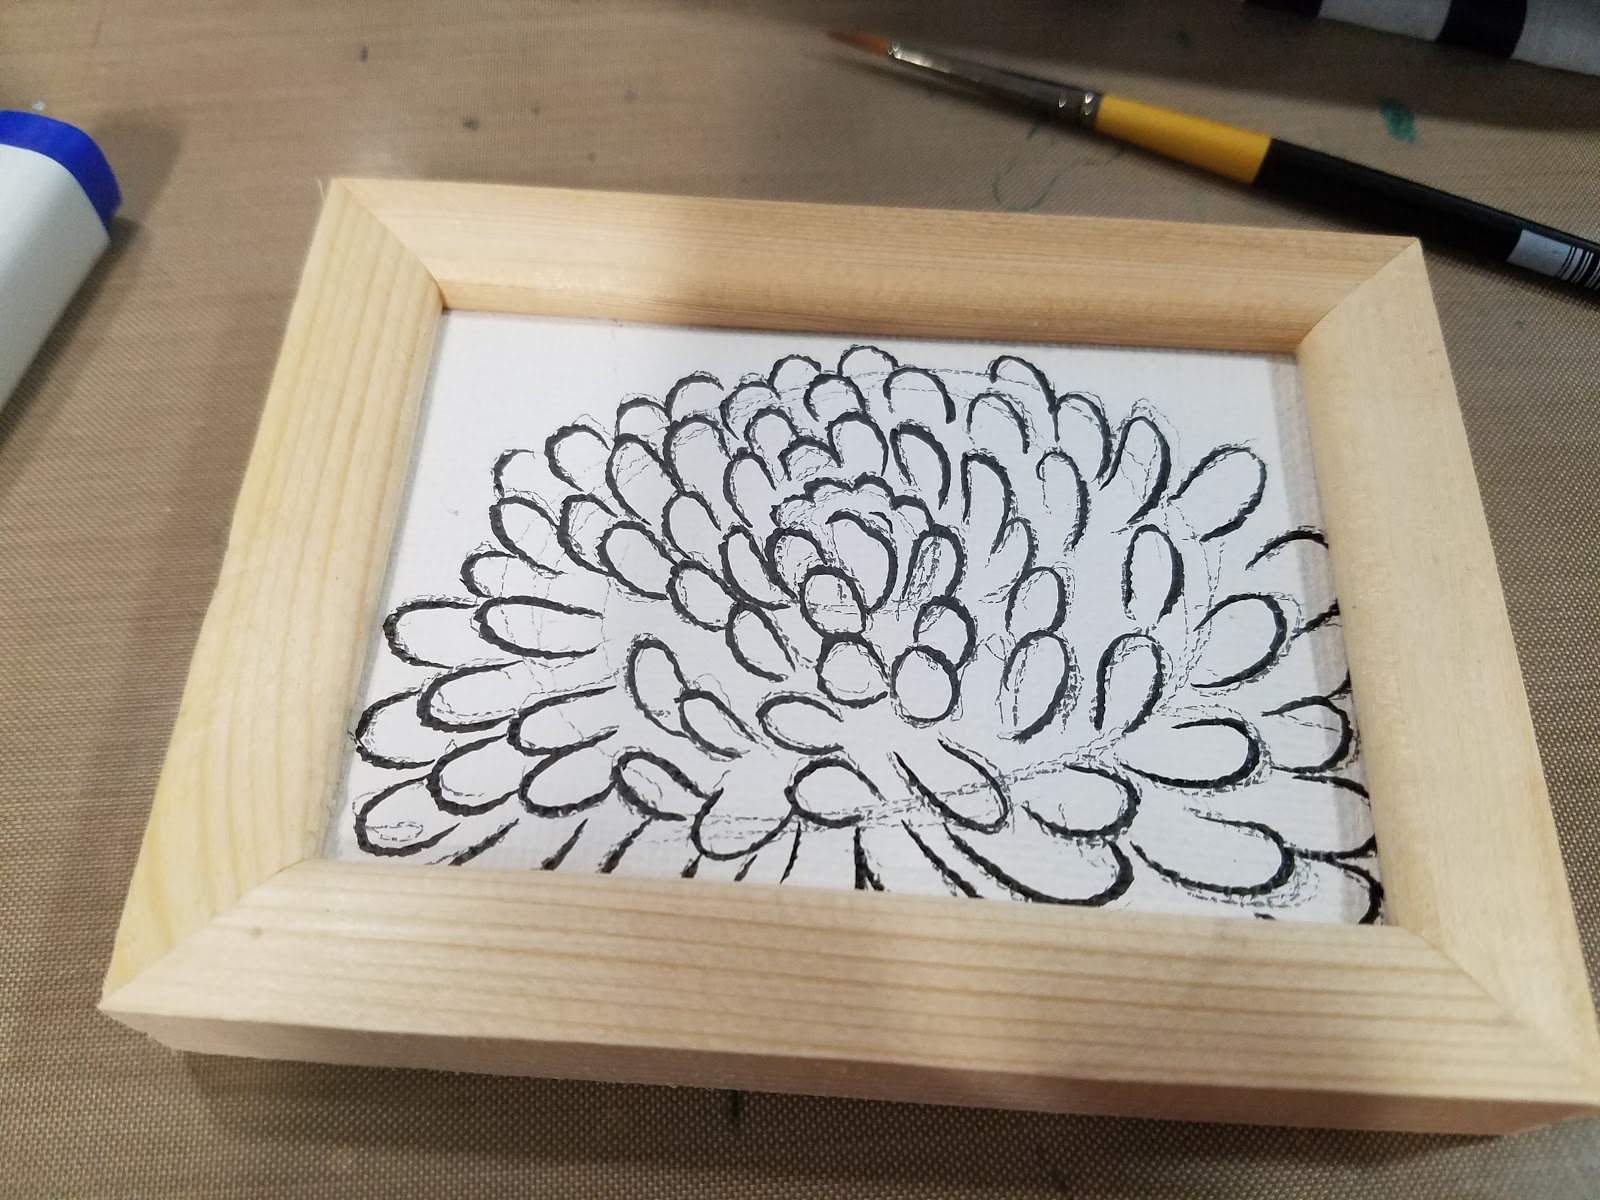


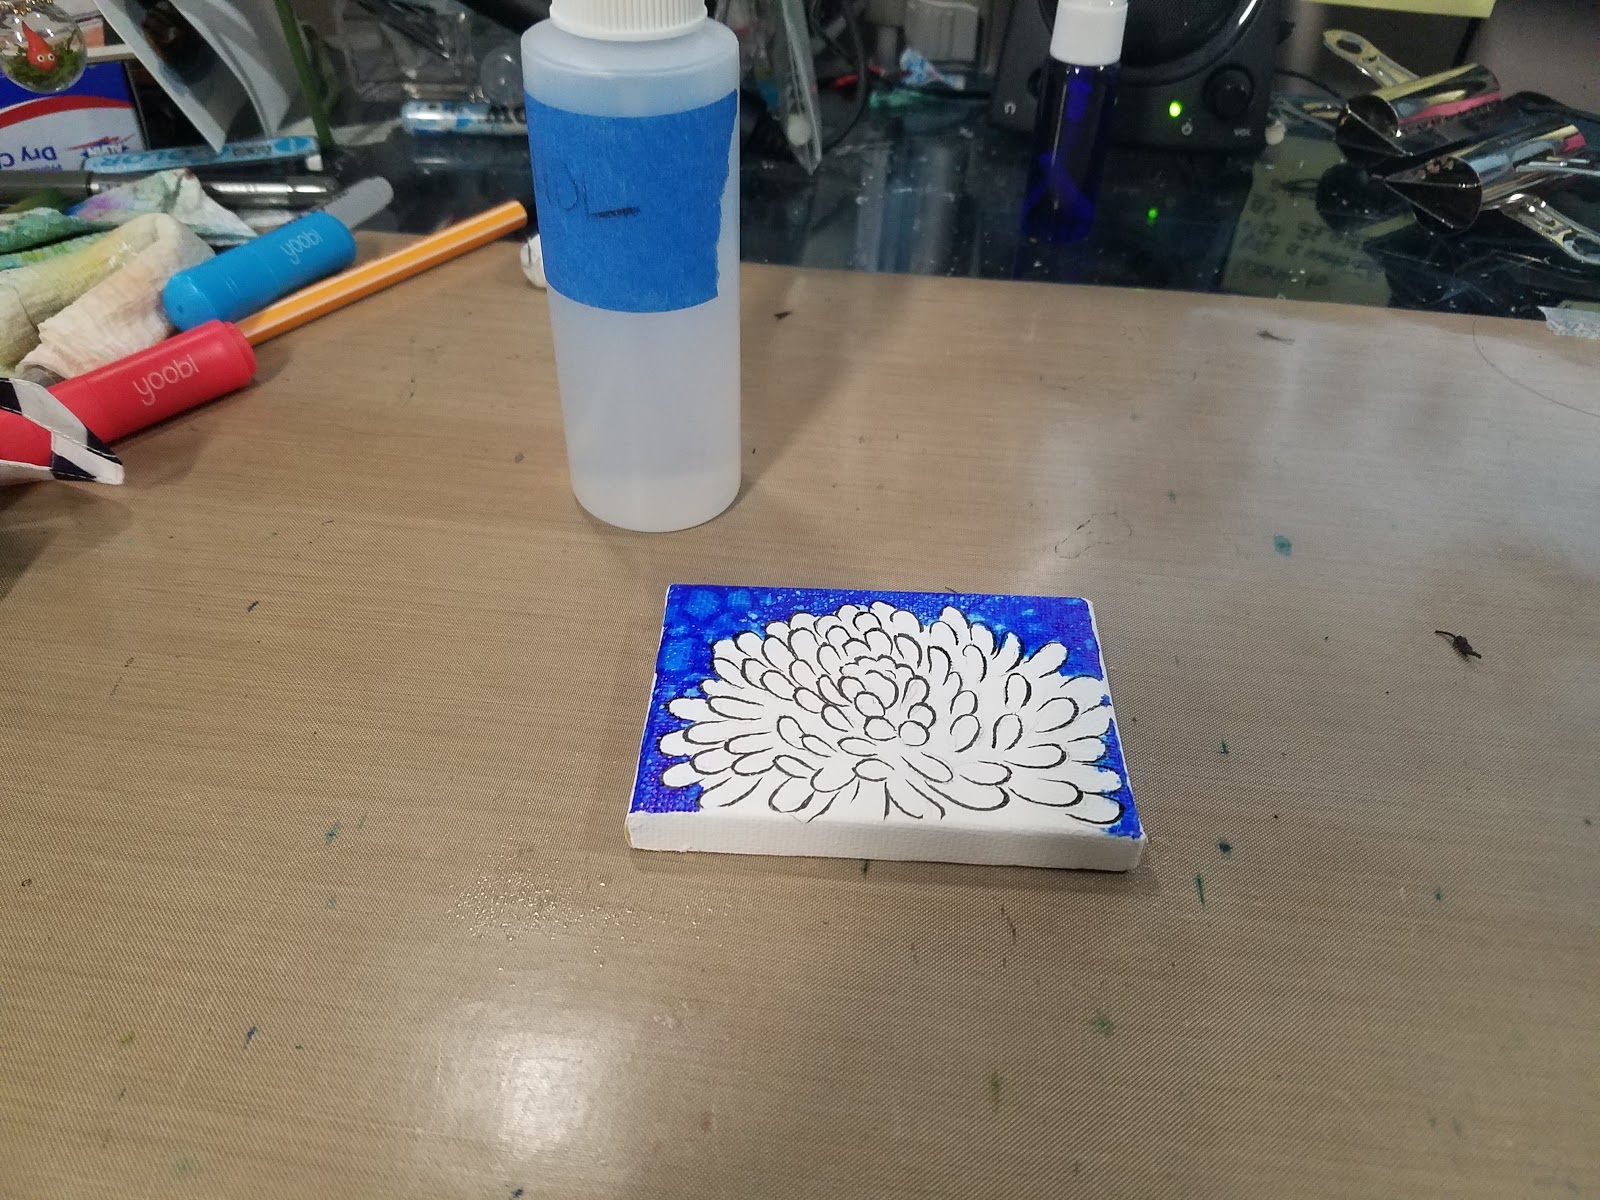
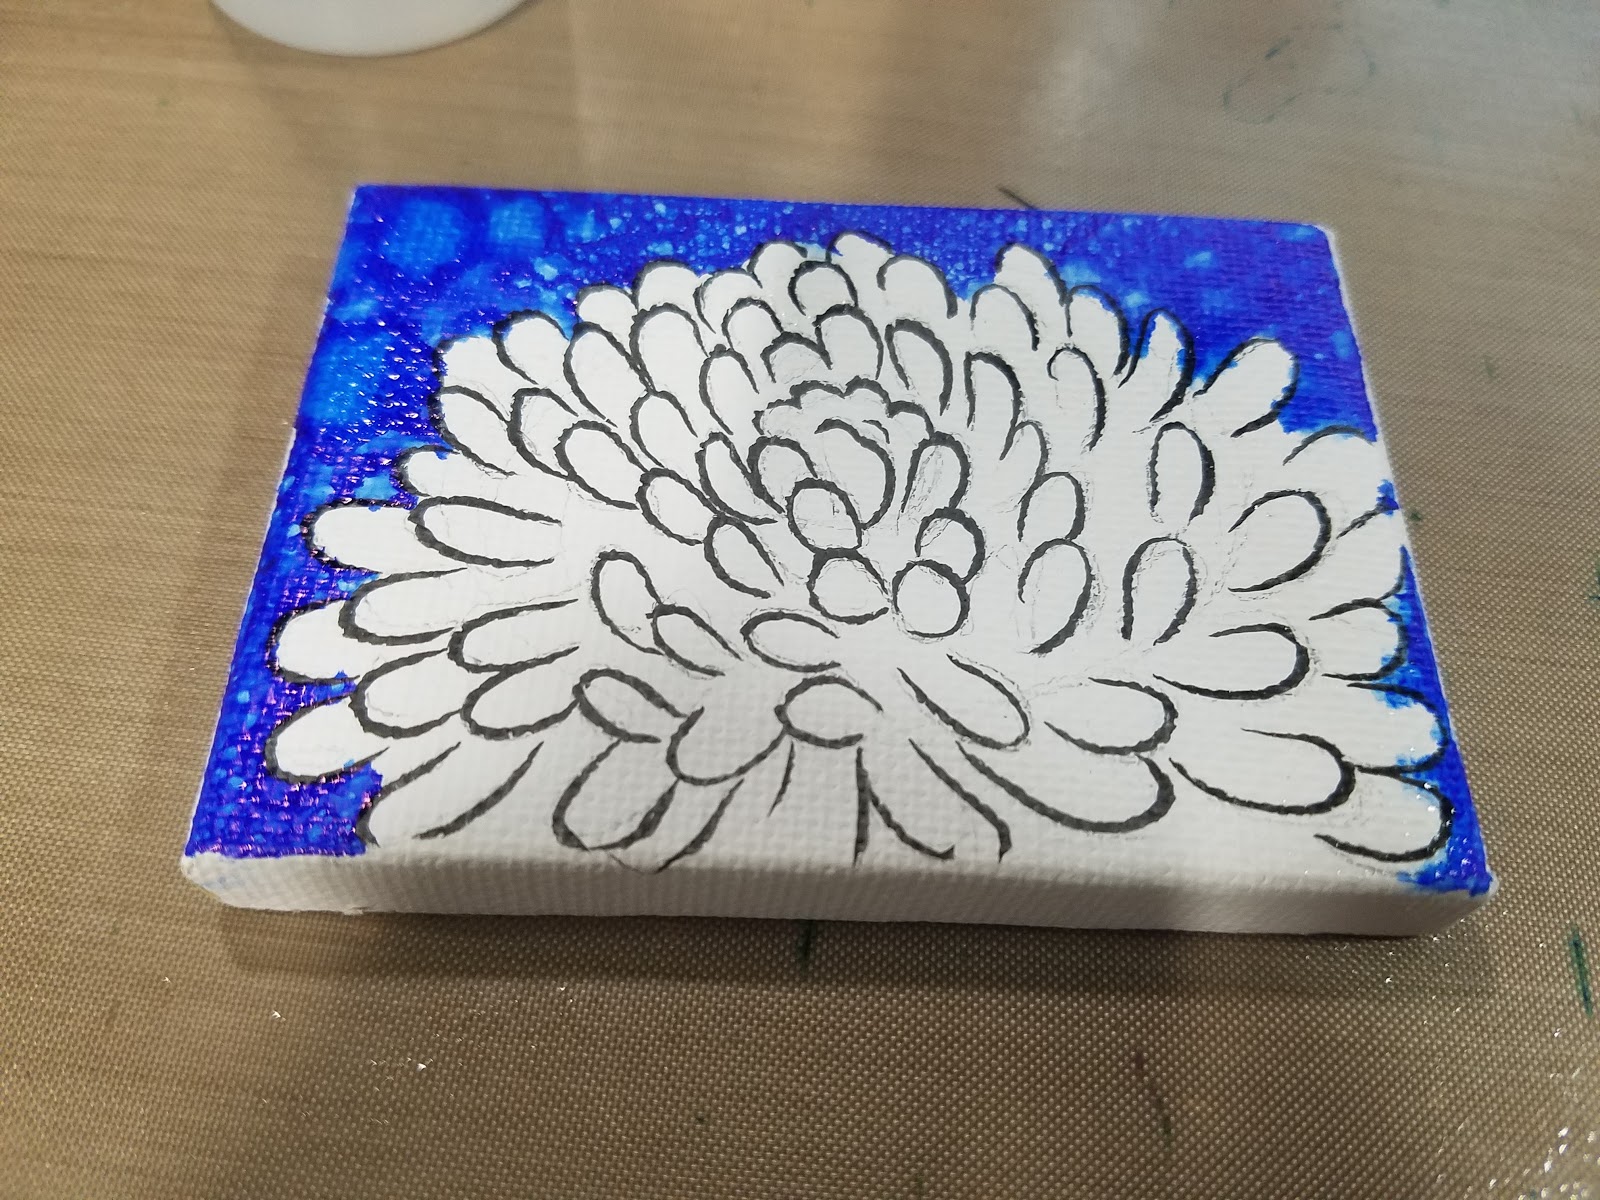


The yellow acrylic didn't have enough range for glazing to be an effective technique.
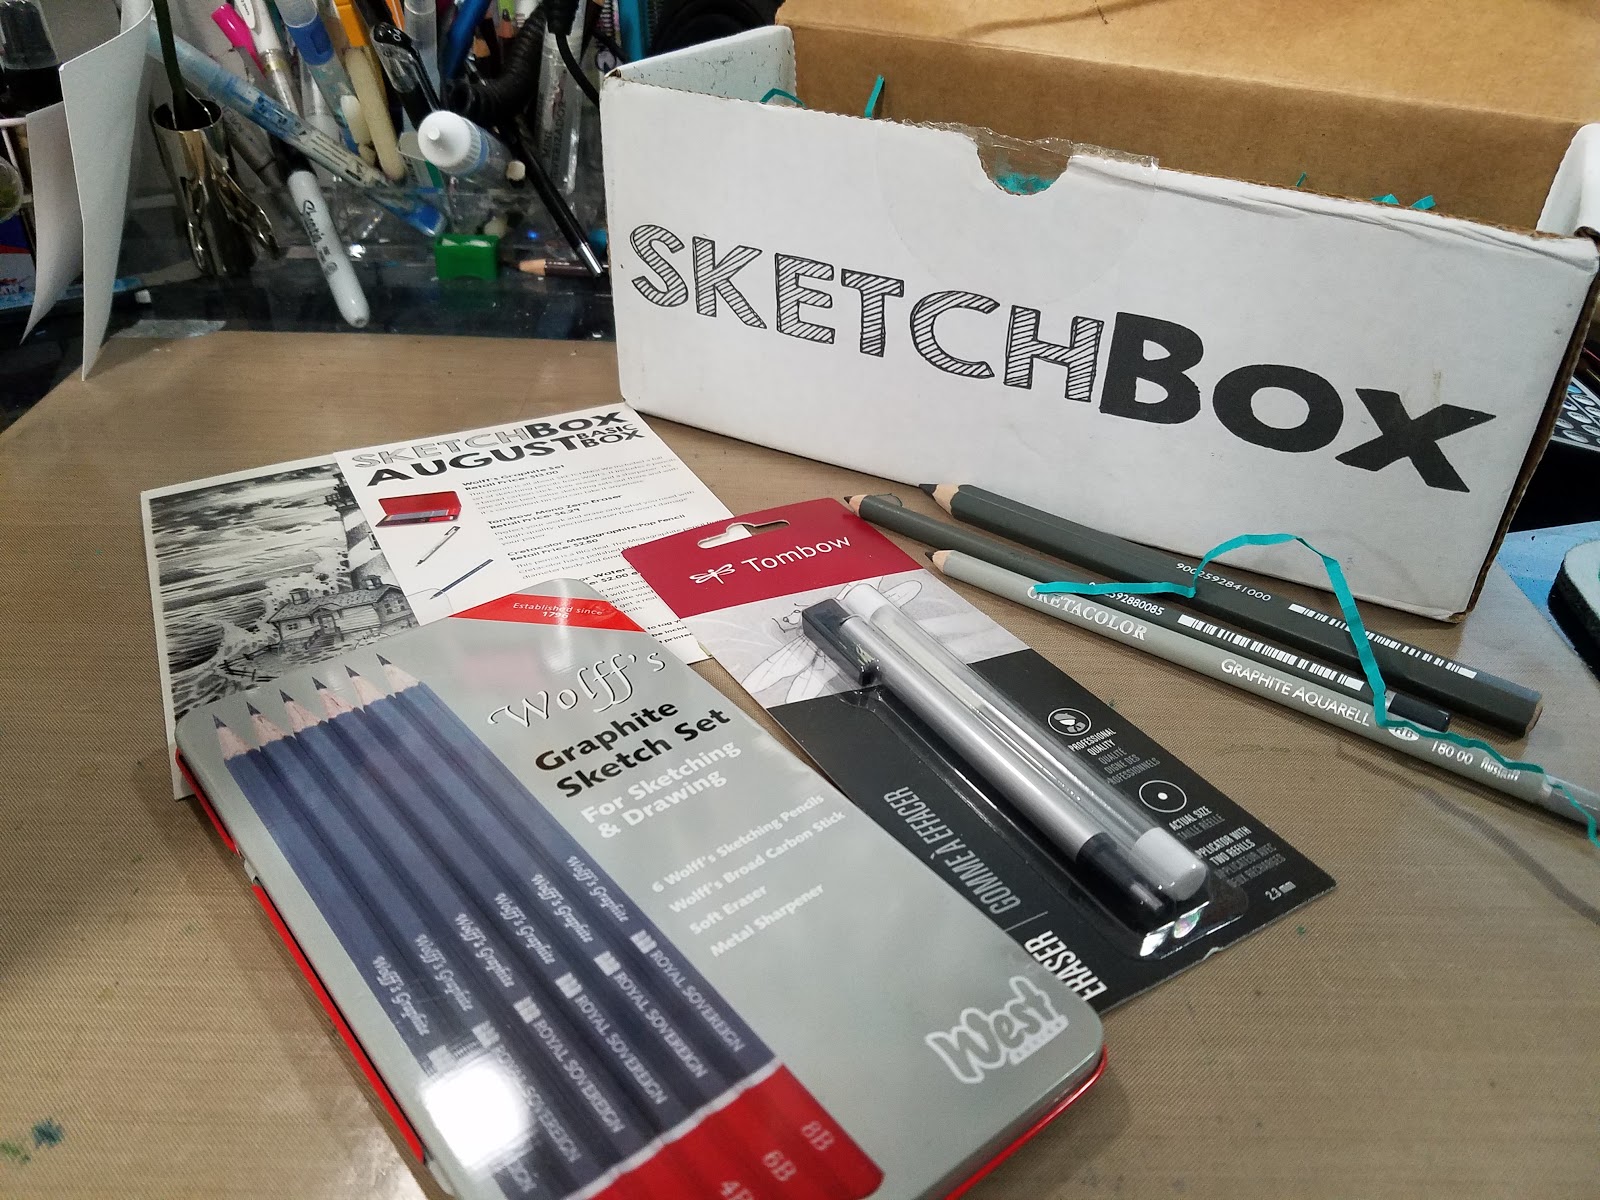
SketchBox BasicThe Brands
Wolff's
Tombow
Cretacolor
The Unboxing
August ArtSnacks Vs SketchBox Basic-Becca Hillburn
The Box Reads
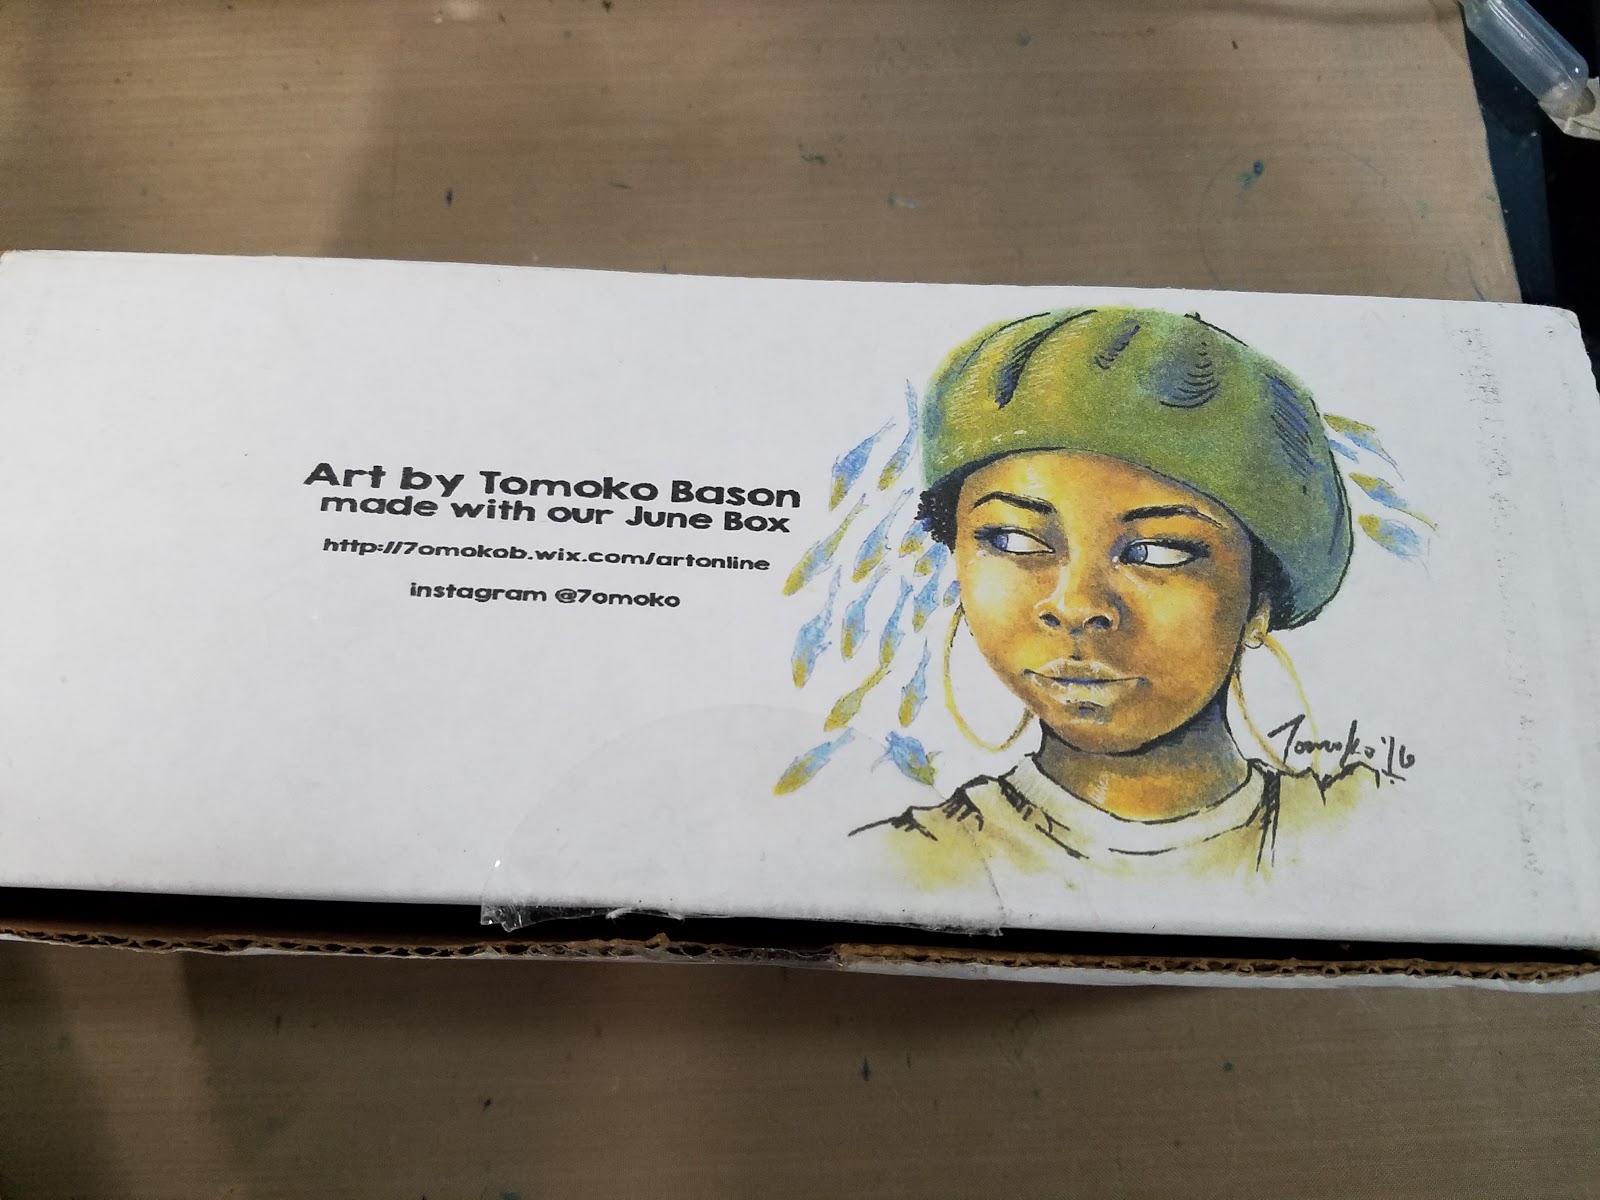
Art by Tamako Bason
made with our June Box
http://7mokob.wix.com/artonline
intstagram @7omoko
The Overview
August ArtSnacks Vs SketchBox Basic Overview-Becca Hillburn
The Cards Read

SketchBox
August Featured Artist
Roger LaDouceur
I was fortunate to have great art teachers growing up in MA. They taught me a wide array of styles and forms of media. It is because of their teaching that I was selected into the illustrator/draftsman rate in the US Navy.
After completing my service I turned my artistic passion toward tattooing. I served a three year apprenticeship and worked in several studios up and down the east coast. In 2006 I opened up Star City Tattoo in Roanoke, VA. I paint in oil, acrylic, pastels, but enjoy colored pencil the most. Using multiple forms of media has nutured my need for artistic growth. Every day that I am able to open my eyes is an opportunity to push a little harderinto the areas of art that I have yet to uncover. I am thankful for the little box of joy that shows up on my doorstop at the beginning of each month. I know that I will be off on another artistic adventure as soon as my SketchBox arrives.
Thank you SketchBox!
website: www.starcitytattoo.com
instagram: @roger4202
Facebook: facebook.com/tat2roger & facebook.com/starcitytattoosWe're so thankful for the talent that Roger shared with us. If you'd like your own art featured- email an example of your work to us at:
info@getsketchbox.com

SketchBox
August Basic Box
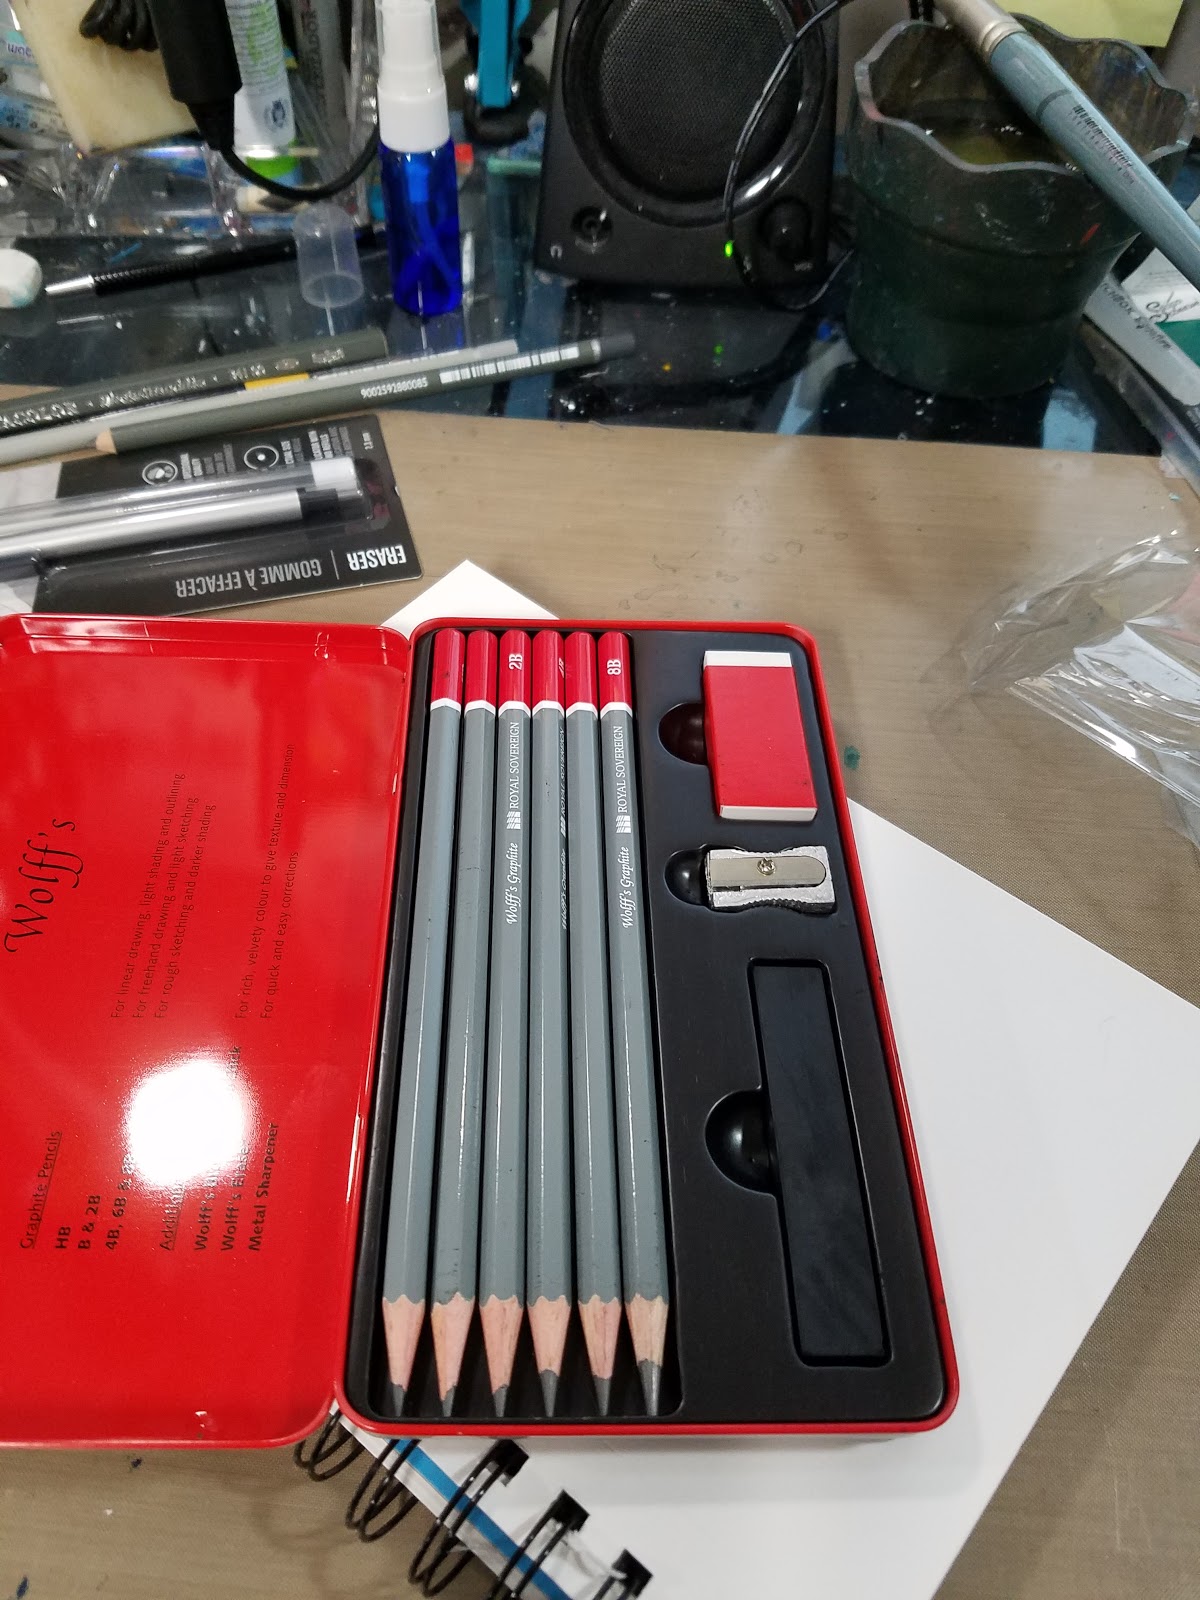
Wolff's Graphite Set
Retail Price $13.00This month is all about SKETCHING! We included a full set of sketching pencils from Wolff's. It includes 6 pencils, a broad carbon tick, their eraser, and a sharpener. It's one of the best value sketching sets out there and with it's convienent tin you can take it anywhere.
Tombow Mono Zero Eraser
Retail Price: $6.29Protect your work and erase only what you need with a high quality, precision eraser that won't damage your paper.
Cretacolor Monographite Pop Pencil
Retail Price: $2.50The pencil is a BIG deal. The Megagraphite pencil from Cretacolor has a polished black extra-wide 10mm diameter body and 6mm HB lead.
Cretacolor Water-Soluble Graphite HB& 8B
Retail Price: $2.00 eachDid you get our water brush last month? These pencils can be blended with water to create unique effects and transparent graphite washes. We included the HB and 8Bso you could get a real feel for the possibilities of these unique pencils.
Have fun and remember to tag your art with #SketchBoxAUGUST if you'd like to be included in our monthly contest- the winner gets their art printed on a future box lid.
Price Breakdown
Wolff's Graphite Sketch Set
6 Sketching PencilsSoft EraserCarbon StickMetal SharpenerTin Case
Listed MSRP $13.00
$12.95 on DickBlick
$15.49 on Jerry's Artarama
Tombow Mono Eraser
Comes with refills2.3mm tip
Listed MSRP $6.29
$4.49 on Tombow Site (doesn't THAT count as MSRP??)
$4.07 on DickBlick
Cretacolor Megagraphite Pop Pencil
Listed MSRP $2.50
I had difficulty finding this pencil online, checking Art Supply Warehouse, Jerry's Artarama, DickBlick, and Amazon with no results.
Cretacolor Water-Soluble Graphite HB & 8B
Listed MSRP $2.00 each
$5.86 for three on Jet
Outside reviews: http://brokeforart.tumblr.com/post/48213786328/cretacolor-watersoluble-graphite-detail-review
Total MSRP: $25.79
Lowest Price Found Online: $23.94
SketchBox Basic- $25+$5 shipping, SketchBox Premium $35+$5
The Supplies Inside
Wolff's Sketching Set
In the Overview video, I go over everything included in the Wolff's sketching tin in detail, but my overwhelming impression of this set is how cheap and scratchy everything inside feels and performs. The SketchBox card claims this is one of the best deals for a sketching set, and this might be due to the cheap materials used to put this set together.
It's a little difficult to find manufacturer information for Wolff's- much of the information available online is through stores, and that has to be taken with a grain of salt. According to Raw Materials Art Supplies,
Wolff's pencils are known for their smoothness and consistency. This specialized graphite pencil set includes one each of graphite pencils: HB, B, 2B, 4B, 6B and 8B. Void of hard spots, they make line drawing effortless.
and Jerry's Artarama promises
These pencils uniquely combine the attributes of graphite and charcoal to deliver a precise, yet rich and velvety mark that can be blended or smudged to achieve ideal tonal effects.
And the two reviews on Blick's site are both positive. So perhaps my experiences with these pencils are limited, maybe I got a bad batch, or perhaps I am unable to overcome my bias. When I was an undergraduate, my Drawing Studio IV body of work consisted entirely of realistic graphite portraits, so I've spent a lot of time with wooden graphite pencils. At that time, I was fond of Mono's darker B and softer graphite pencils, and I find the Wolff pencils do not compare.
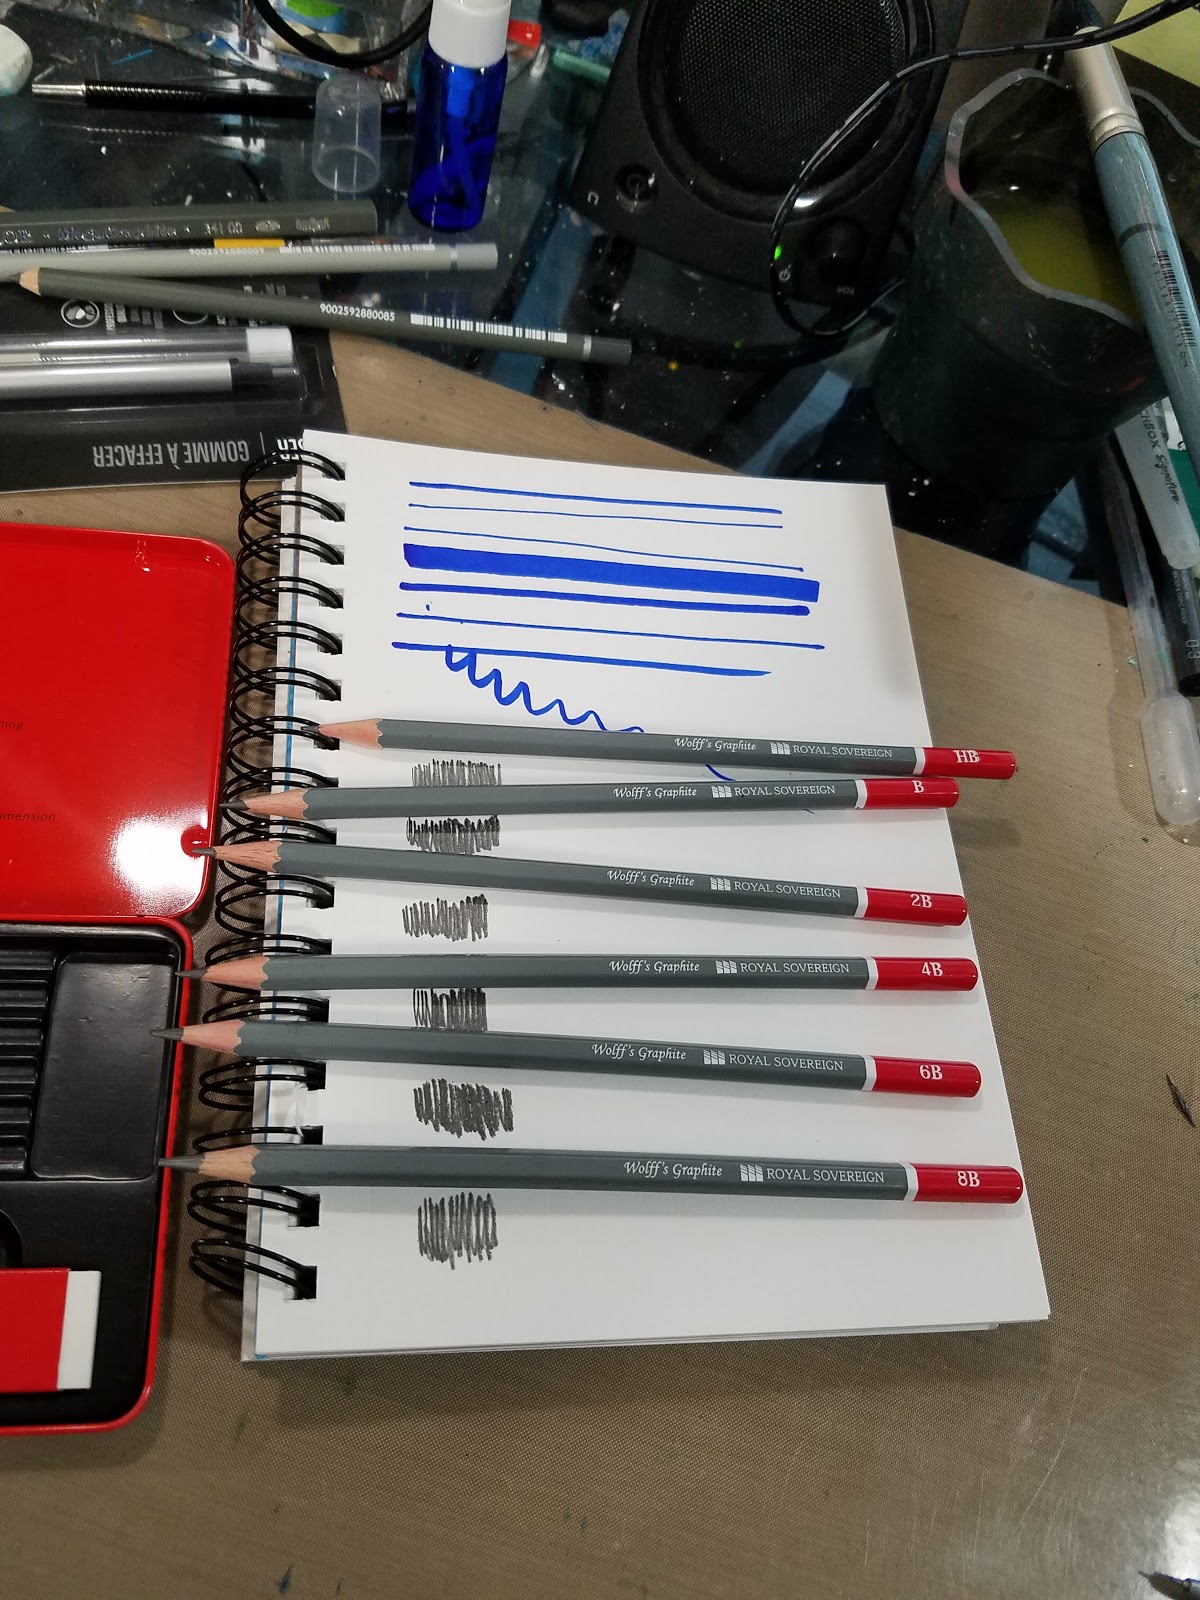


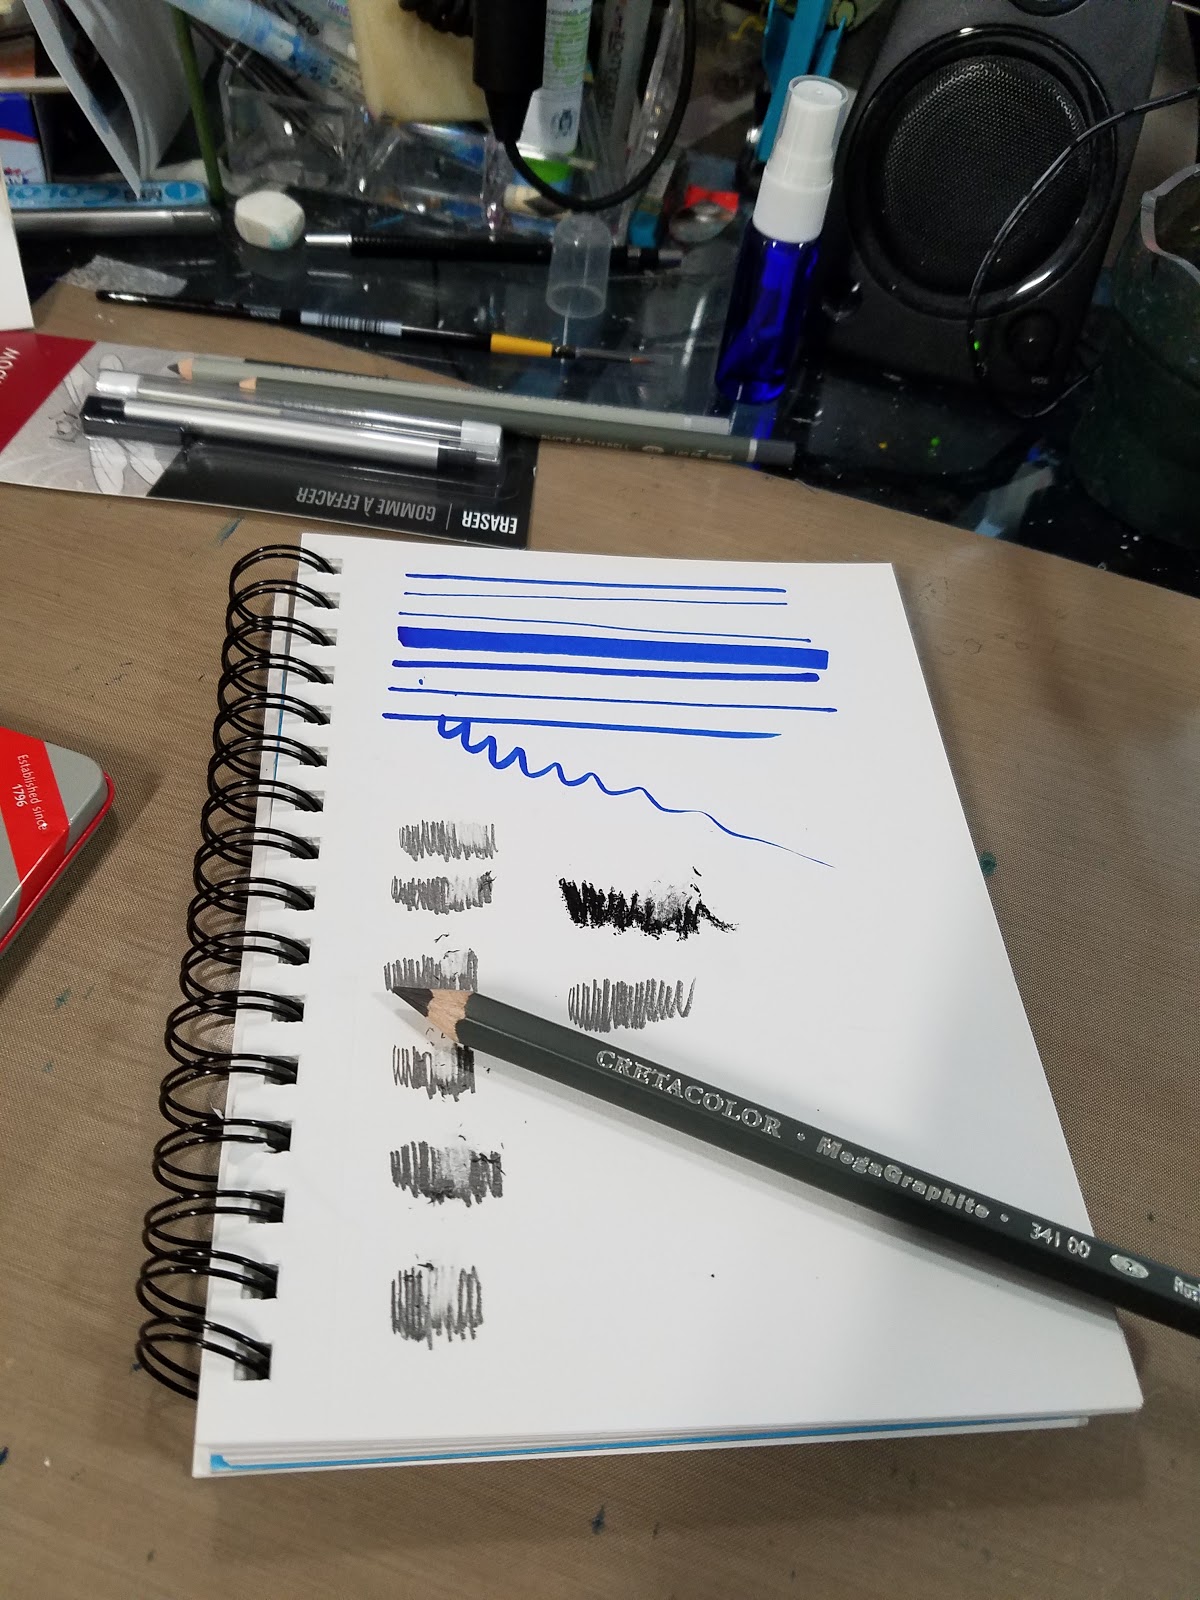
Cretacolor Megagraphite
In general, I don't have much use for oversized pencils, so I found my self gravitating away from the Megagraphite.
 Cretacolor Water-Soluble Pencils
The most exciting materials in August's Basic Box were the two water-soluble Cretacolor graphite pencils included in the box. Although I have a set of Derwent's colored water soluble graphite, I haven't experimented with it much.
The SketchBox (Basic) Challenge
Please keep an eye on the YouTube channel for the August SketchBox Challenge.


I gripe about it frequently in the video, but as it's not up yet, you guys should know, I'm not a fan of rendering with graphite at this point. I had plenty of experience with it while in undergrad, but I greatly prefer working with color than in black and white. This is entirely personal preference.
What isn't personal is my opinion of Wolff's. These pencil felt cheap, and the sharpener and eraser felt even cheaper. I would not recommend these pencils to other artists.
SketchBox Premium
SKETCHBOX August 2016-Doodlebonez
NOTE: MSRP prices given below taken from Doodlebonez description to the above video. Online retail prices are mine.
Faber Castell Pitt Master Graphite Set: $24.94 MSRP/ $44.49 on Jerry's Artarama
Cretacolor Water-Soluble Graphite #8B:$2.00 MSRP/ $7.10 on Amazon
Cretacolor Paper Blending Stick: $2.95 MSRP/ couldn't find online
Cretacolor Monolith Eraser: $1.20 MSRP/ 1.49 on DickBlick
General's Pencil Art Gum Eraser: $1.20 MSRP/.69 at CheapJoes
General's Pencil Art Kneaded Eraser: $1.29 MSRP/- Priced by size on DickBlick
General's Pencil Sketch and Wash Pencil: $1.35 MSRP/ $1.29 on DickBlick
Derwent Water-Soluble Sketching Pencil: $1.99 MSRP/ $1.23 on DickBlick
It's difficult to find individual items like Cretacolor Water-soluble Graphite, Paper Blending Sticks, or their Monolith Eraser, possibly because these are usually included in larger sets or are only sold open stock in stores.
Total MSRP: $34.43
Total Retail: $60.53
Cretacolor Drawing Sets
I had no difficulty finding prices for the General's products, regardless of status- it seems General's offers much of their line openstock online through sites like DickBlick and CheapJoes.
Yet again, it seems like the Basic Box was used to find the much more expensive Premium Box, which is wholly unfair to the Basic Box subscribers.
The Verdict
 The Verdict
The point of boxes like this is to introduce you to new materials and to push artists out of their comfort zones. Although I used graphite extensively for illustration during my undergraduate years, I've grown to dislike it, and have since almost entirely abandoned it for finished illustration. This month's SketchBox forced me to utilize graphite, and although I took the coward's way out (relying mostly on the water soluable graphite), I still explored a media I had long abandoned. Will I return to graphite? No way- I find it scratchy, time consuming, and messy- no competition for luscious color like watercolor or markers.
I found the Wolff graphite pencils to be disappointingly cheap and scratchy compared to the Mono pencils I used towards the end of my graphite interest. I enjoyed playing around with the Cretacolor watersoluble pencils, but I haven't much personal use for jumbo pencils.
I thought ArtSnacks's collection this month was a bit light in terms of actual art supplies included, and am noticing a trend where they include one premium item (in this case the Baggu), and the other items suffer a bit. Speaking from the future, this is a trend you guys will see continued in September, and I have mixed feelings about it. While it is nice to receive ArtSnacks exclusive items or higher quality items, this means the box is light for the month, and this makes completing the challenges difficult.
For this month, I have to hand the win to SketchBox, despite the disappointing performance of the Wolff set, as it was a more cohesive box.
The Winner: SketchBox
Please consider donating to this blog or purchasing from Natto-shop (http://nattosoup.com/shop) if you want me to continue publishing quality content. All materials tested were purchased from my own pocket. Keep on Truckin' Nattosoup is not under any sponsorship.

September 22, 2016
Progress on the Home Front
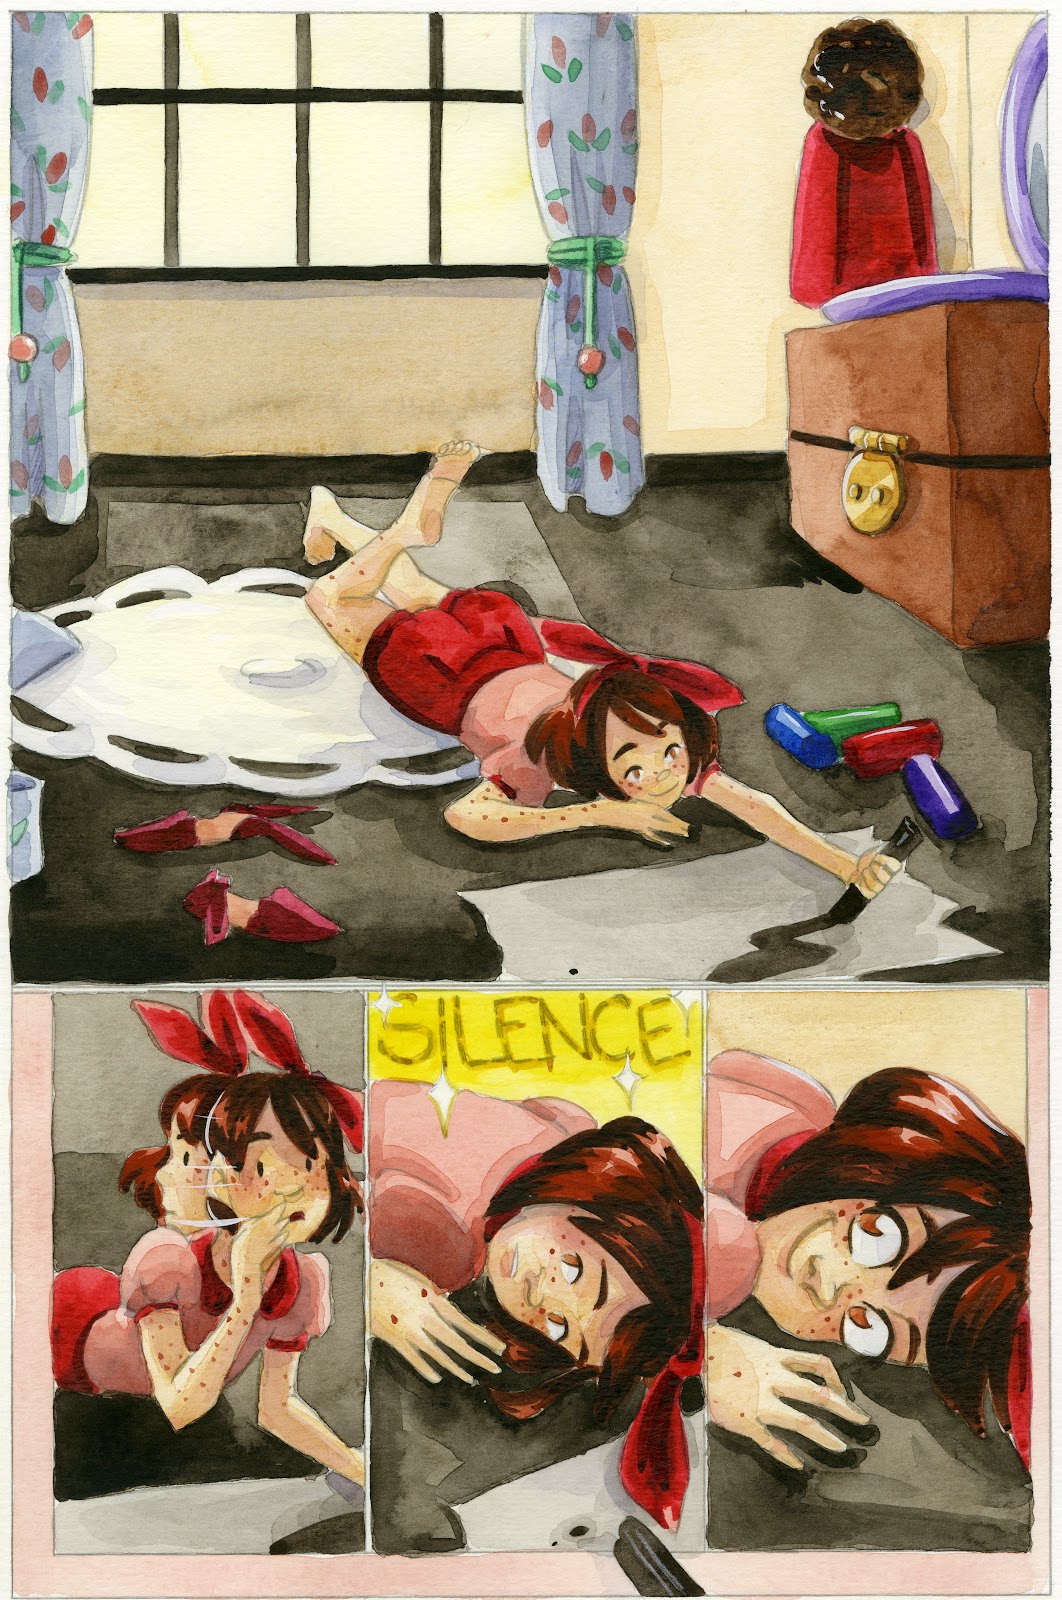
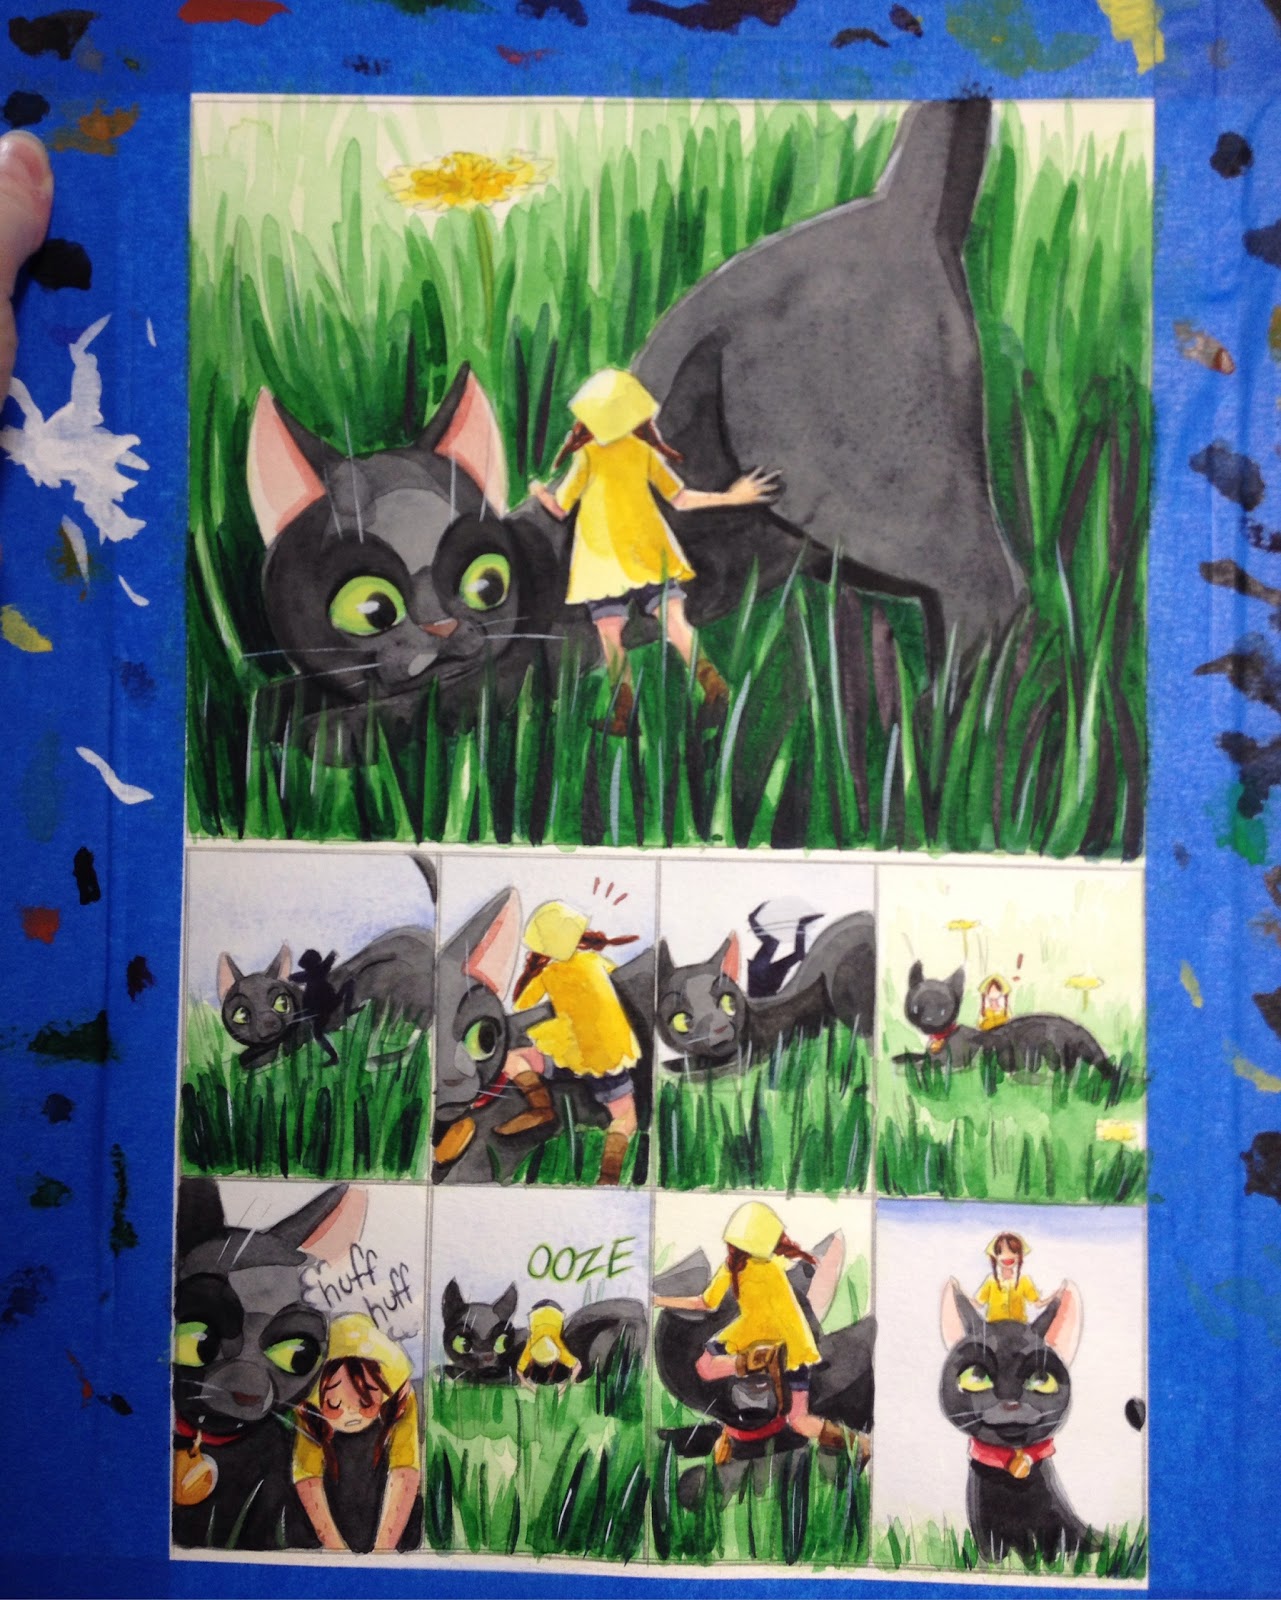
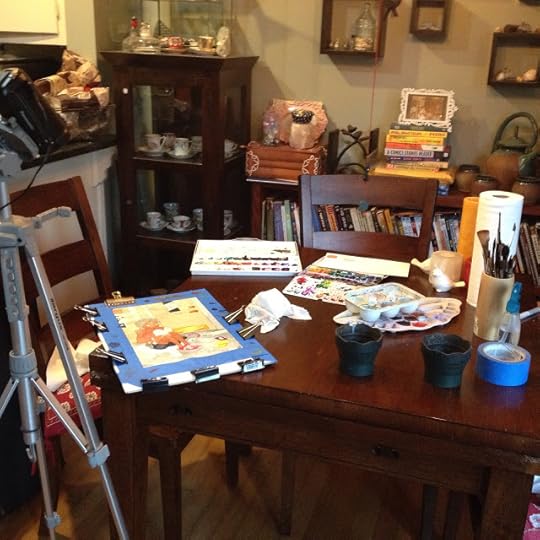
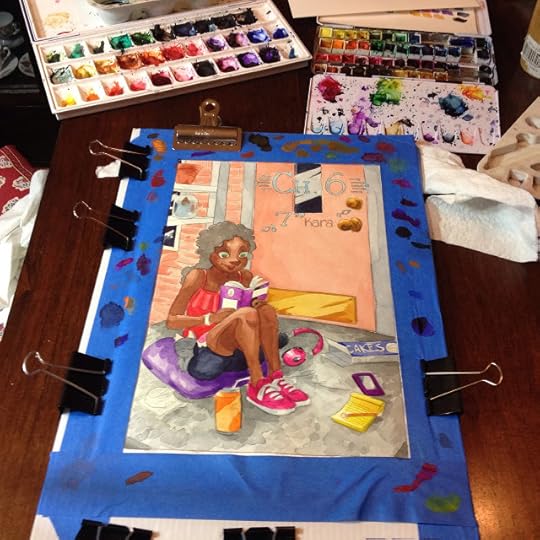
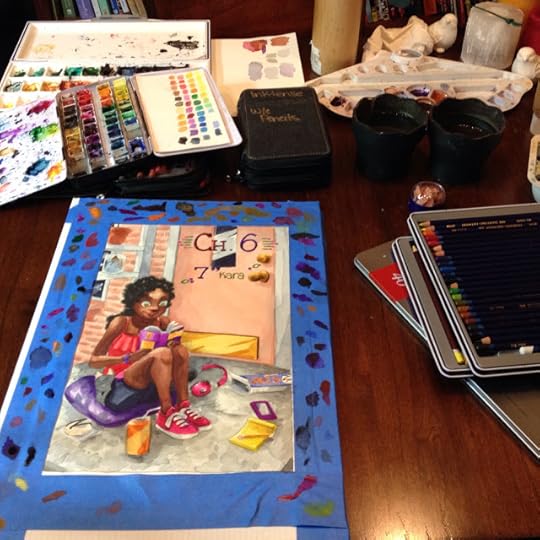
Chapter 6 Scanned Pages
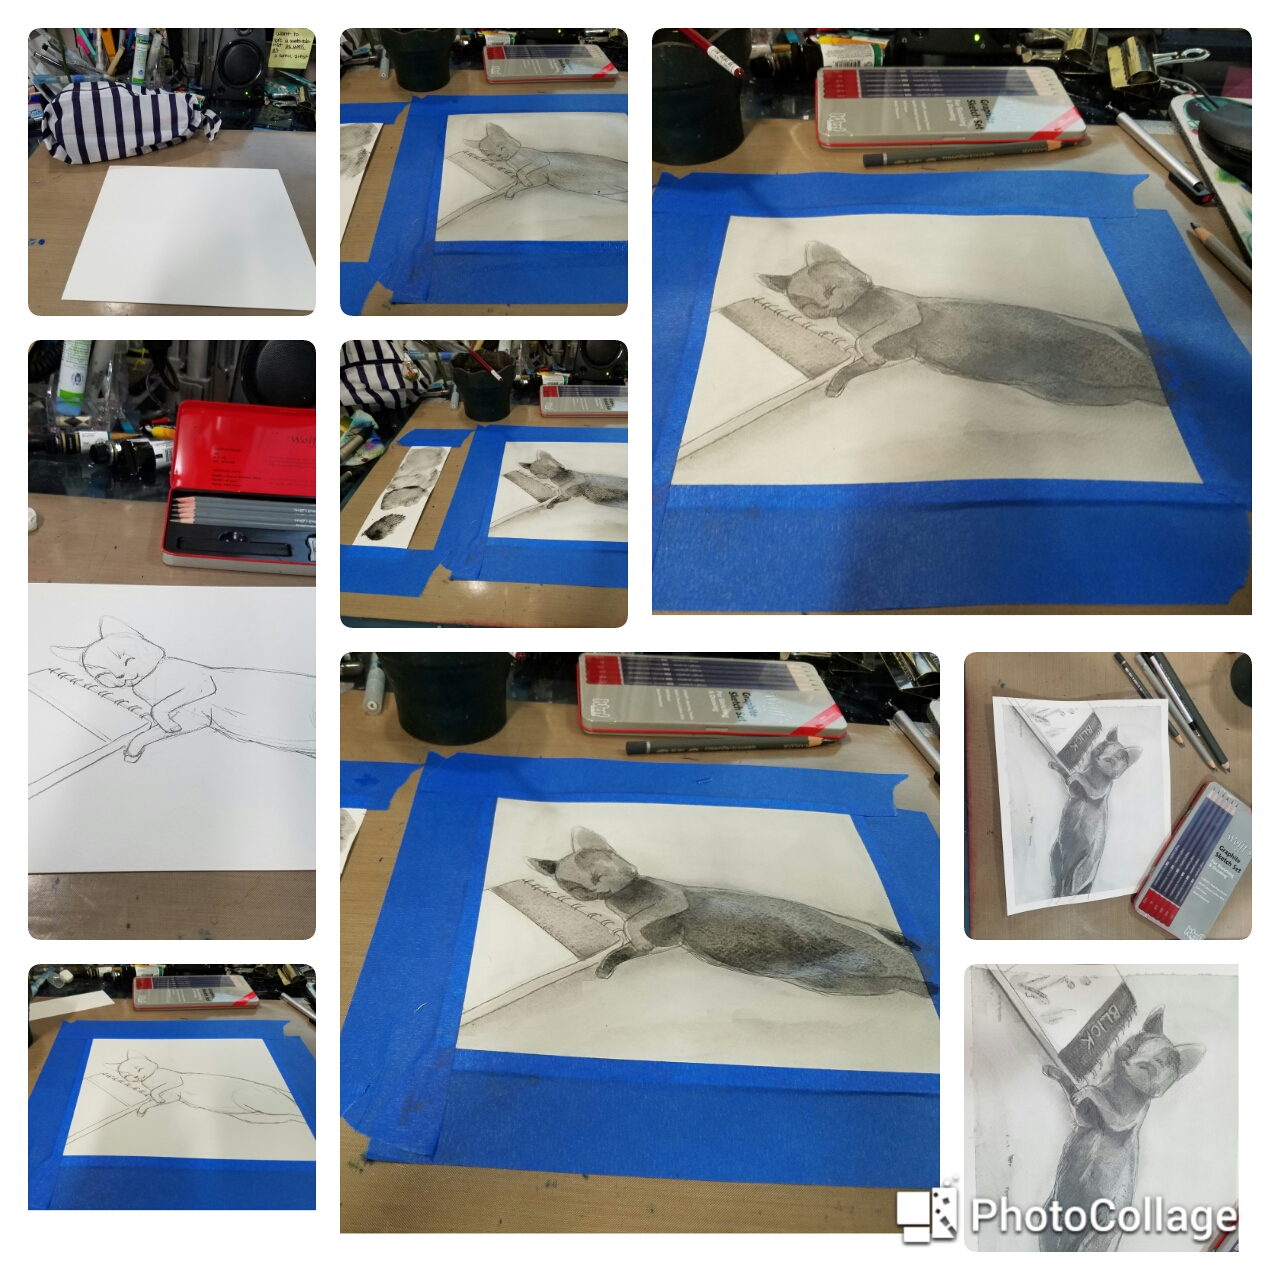
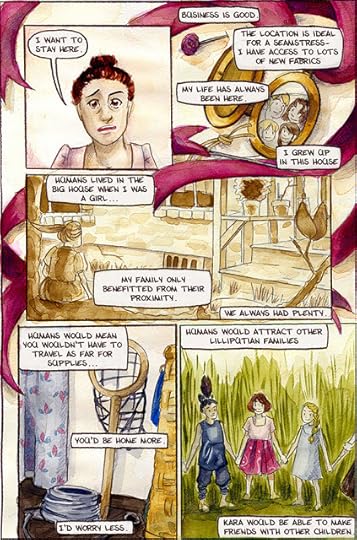
Note: These pages are just 600 DPI scans-no color correction, digital correction, or lettering have been applied. Those are a future update that I hope you look forward to.
In an upcoming Watercolor Basics post, I plan on discussing my Chapter 6 process with you guys in detail, but for now, I just wanted to take a moment to celebrate a small victory. Comic chapters take such a long time for me, especially painting the pages, and represent weeks work and sometimes hundreds of tiny illustrations throughout the pages. Comics as a medium are labor intensive, watercolor comics moreso, but when a chapter comes together, it feels very rewarding. Unfortunately, with the way I've structured this blog, I don't celebrate my comic achievements as much as I should.


 If these pages have piqued your interest, why not check out Volume 1 of 7" Kara in my shop or through my Gumroad? And if you're already a fan, why not sign up for the 7" Kara email newsletter to find out the latest and greatest comic news?
Please consider donating to this blog or purchasing from Natto-shop (http://nattosoup.com/shop) if you want me to continue publishing quality content. All materials tested were purchased from my own pocket. Keep on Truckin' Nattosoup is not under any sponsorship.
September 19, 2016
Making Inktober 2016 a Month To Remember
With the start of Inktober just a bit under a month away, I thought I'd help get you guys off on the right foot by sharing some resources and inspiration for this year's Inktober.
8 Ways to Make Your First Inktober a Success
Past Inktobers:
Inktober 2015 Inks (this was later compiled into Favorite Fictional Femmes)
Inktober 2014 Retrospective
September/Early October Sketchdump (2013)
Inking Related Resources
Creating Digital Bluelines
How to Drop Out Your Bluelines
7" Kara Cover Process (Includes splatter masking tutorial)
The Inking Compendium
Materials and Techniques- Inking
Guest Tutorial: Sarah Benkin- Inking Textures
Using a Fude Brush to Ink
Things to Ink About
Brush and Nib Care
This blog is full of resources to help get you inking, but did you guys know our sister YouTube channel is full of great resources as well? Here are some videos to inspire and inform you, just in time to start putting together your Inktober inking kits.
Here's a video overview of my favorite fude and brushpens, to inspire you to try something new with confidence:
Here's a brushpen demonstration:
Here're some tips on inking with one of my favorite fude pens, the Sailor Mitsuo Aida:
A timelapse inking video with the Sailor Mitsuo Aida
Another timelapse inking demonstration with the Sailor Mitsuo Aida:
An inking demonstration using a Kuretake Fudegokochi, from one of my Patreon Sponsored Backer Request Livestreams:
For you traditionalists, here's a demonstration of how to ink with a brush, from last Inktober
A timelapse brush inking demonstration from last Inktober:
Here's a realistic rendition of a chinchilla, inked with a brush for Advanced Inking Techniques:
And here's a timelapse inking video of a realistic house, again inked with brush:
Make sure you check out our Reviews section for links to fude and brush pen reviews to help you find the pen that's right for you!
Once Inktober begins, remember to share your inky darlings to Twitter, Facebook, Instagram, and Tumblr, and make sure you tag your work with #Inktober and #Inktober2016 to participate!
You can follow my work this Inktober over on my Instagram. Give me a poke if you'd like me to follow along with your progress too, and we can cheer each other on!
Please consider donating to this blog or purchasing from Natto-shop (http://nattosoup.com/shop) if you want me to continue publishing quality content. All materials tested were purchased from my own pocket. Keep on Truckin' Nattosoup is not under any sponsorship.
September 16, 2016
Watercolor Basics: How To Tear Large Sheets
There are many watercolor papers on the market, but sometimes the one you want isn't availble in pads or blocks, or may not be available in the size you prefer to work. Fear not, it' easy to tear your watercolor paper at home, so go head, buy those sheets!
Other Entries in the Watercolor Basics Series
IntroductionWhy WatercolorWatercolor Terms You Should KnowThe Difference Between Watercolor for Illustration, Watercolor for Fine ArtThe Great Brush OffMaterials You'll Need to Get StartedAll About That PaperPick a Palette- Selecting Paints for your Needs
Materials Needed:
Large sheet of cardboard (to use as cutting surface. If you have a huge cutting mat, that works too)Large metal rulerRotary cutter (to score paper)PencilYour watercolor paper

Measure your paper and mark where you want to cut it

Score your paper along that line using your ruler. Don't press hard enough to cut through, just hard enough to score a line down the paper.


Fold your paper in half.
 Unfold your paper, and using your ruler as a guide and a hard edge, press the ruler against the paper and tear along that edge. Now you have a deckled, hand torn edge that matches the rest of your edges.
Now that you know how to tear large watercolor sheets, you're probably going to need somewhere to store those sheets until you can tear them! I recommend a large cardboard portfolio- inexpensive and will protect your paper until you can use it.
If you enjoy the Watercolor Basics series, please do me a huge favor and check out some of my other work. I cut my teeth on watercolor painting Volume 1 of my ongoing comic,7" Kara, and you can find Volume 1 physically in my online shop or through Amazon, and digitally through Gumroad. It's a beautiful all ages watercolor comic that follows the adventure of Kara, a 7 inch tall girl, as she discovers the larger outside world. If you've enjoyed Volume 1, you can follow progress on Volume 2 through my Instagram, and if you have a moment, please leave a review on Goodreads to help others find the book. If you enjoy educational art content including reviews, tutorials, demonstrations, and unboxings, I highly recommend you check out and then subscribe to my YouTube channel for even more arty goodness, including live watercolor demonstrations. If you want to help this blog out, please take a moment to share any post you've found helpful to your social networks like Facebook, Twitter, Tumblr, or Pinterest. Giving me a shoutout on your YouTube channel would also be much appreciated as well. If you'd like to help fund more tutorials like this, please visit our Patreon for information on how to join the Nattosoup Community.
Please consider donating to this blog or purchasing from Natto-shop (http://nattosoup.com/shop) if you want me to continue publishing quality content. All materials tested were purchased from my own pocket. Keep on Truckin' Nattosoup is not under any sponsorship.
September 14, 2016
Watercolor Basics: Selecting A Paper for Your Comics
If you're a fan of watercolor comics, comics in general, beautiful children's books, or even this blog, you should check out my published, full watercolor comic, 7" Kara Volume 1. It's available in dead tree format through Amazon and my shop, or in bits and bytes through Gumroad. If you enjoyed reading Volume 1, please keep a lookout for in-progress Volume 2 (you can follow progress over on my Instagram), and please leave a review over on Goodreads and Amazon. It would be a huge help, and much appreciated! And of course, if you enjoyed it, please tell your friends, family, and local library to check it out!
In All About the Paper, I went over a variety of watercolor papers and covered my favorite uses. In The Importance of Stretching, we went over methods to prevent those papers from buckling. Now that you're passingly familiar with watercolor paper, the types, and the textures, it's time to pick one that's right for you.
Although I have some experience with watercolor for illustration and watercolor for fine art, I am most familiar with watercolor for comics, so all advice given below is relevant to that use. I encourage you to experiment to find the papers that work best for you, but hope to give you a starting point.
Other Useful Posts in the Watercolor Basics Series:
Introduction
Why Watercolor
Watercolor Terms You Should Know
The Difference Between Watercolor for Illustration, Watercolor for Fine Art
The Great Brush Off
Materials You'll Need to Get Started
All About That Paper
Pick a Palette
For watercolor comics, you want to look for a paper that is the following:
AffordableTape BoundThe Right Size140lb weightA surface treatment you like (generally cold or hot press)Recommended Papers:
 Image Source
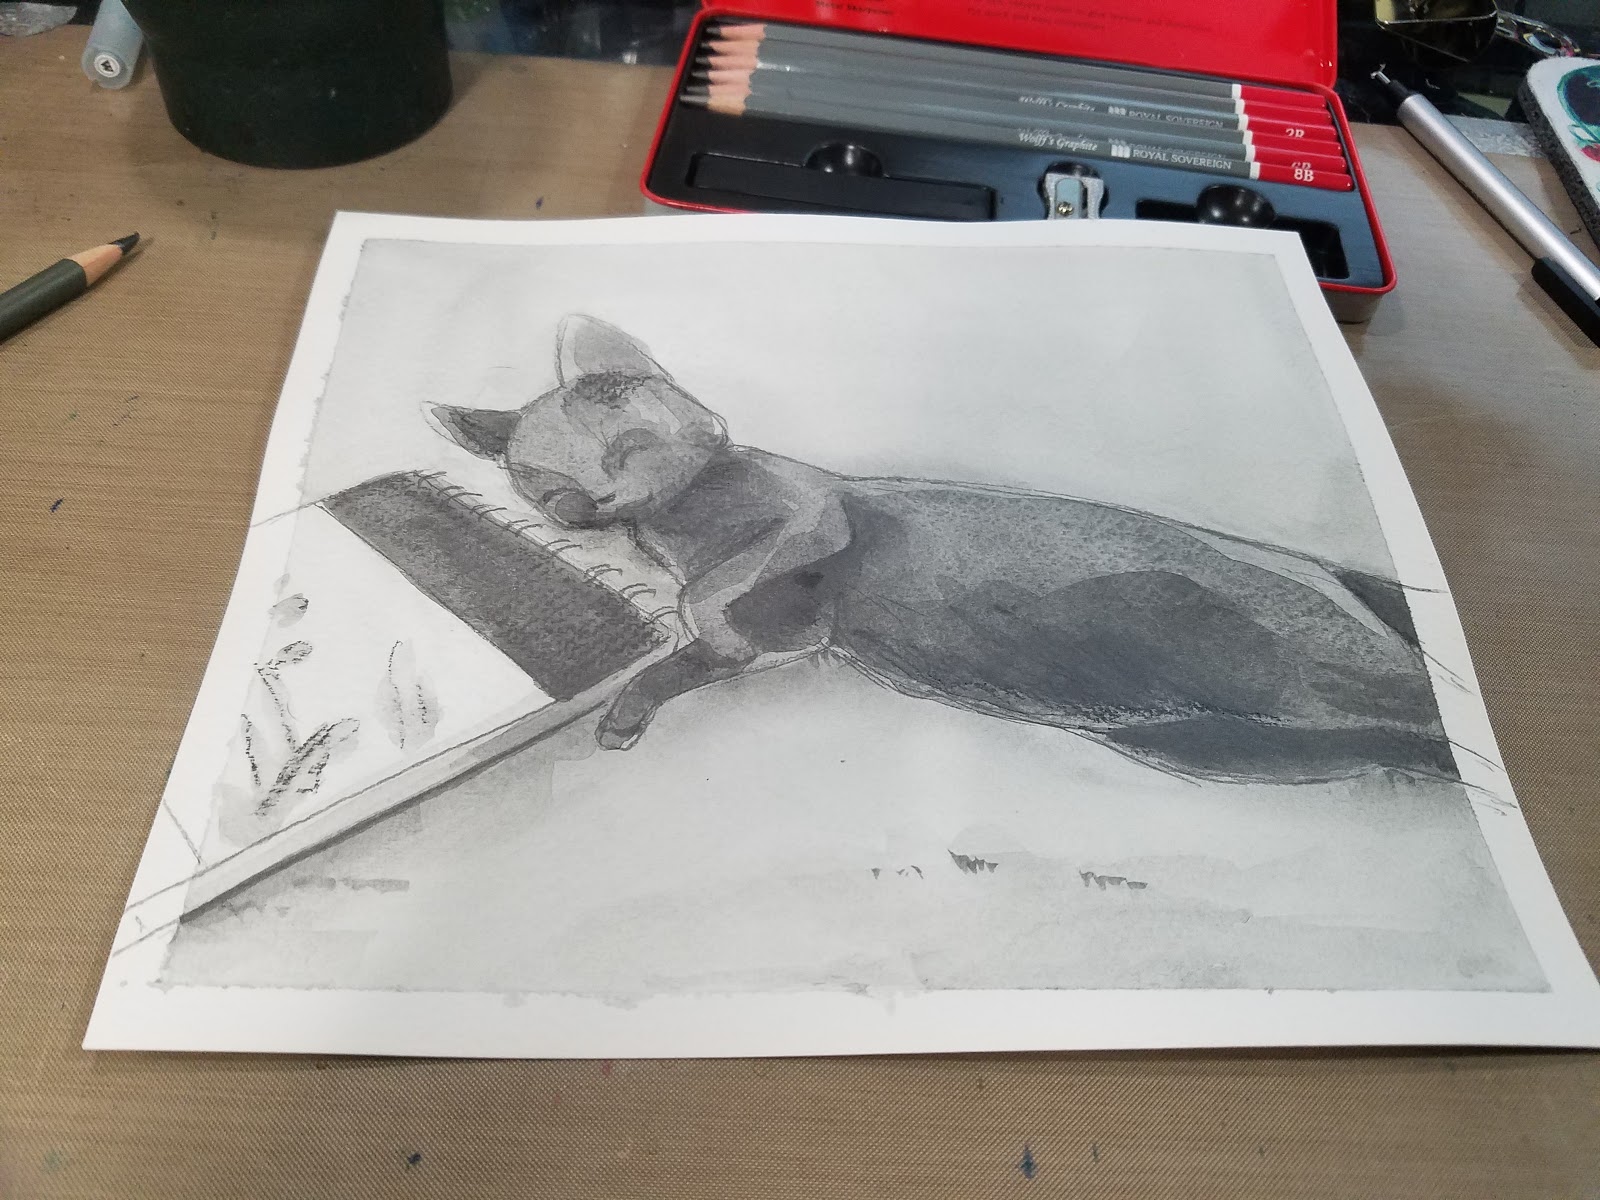
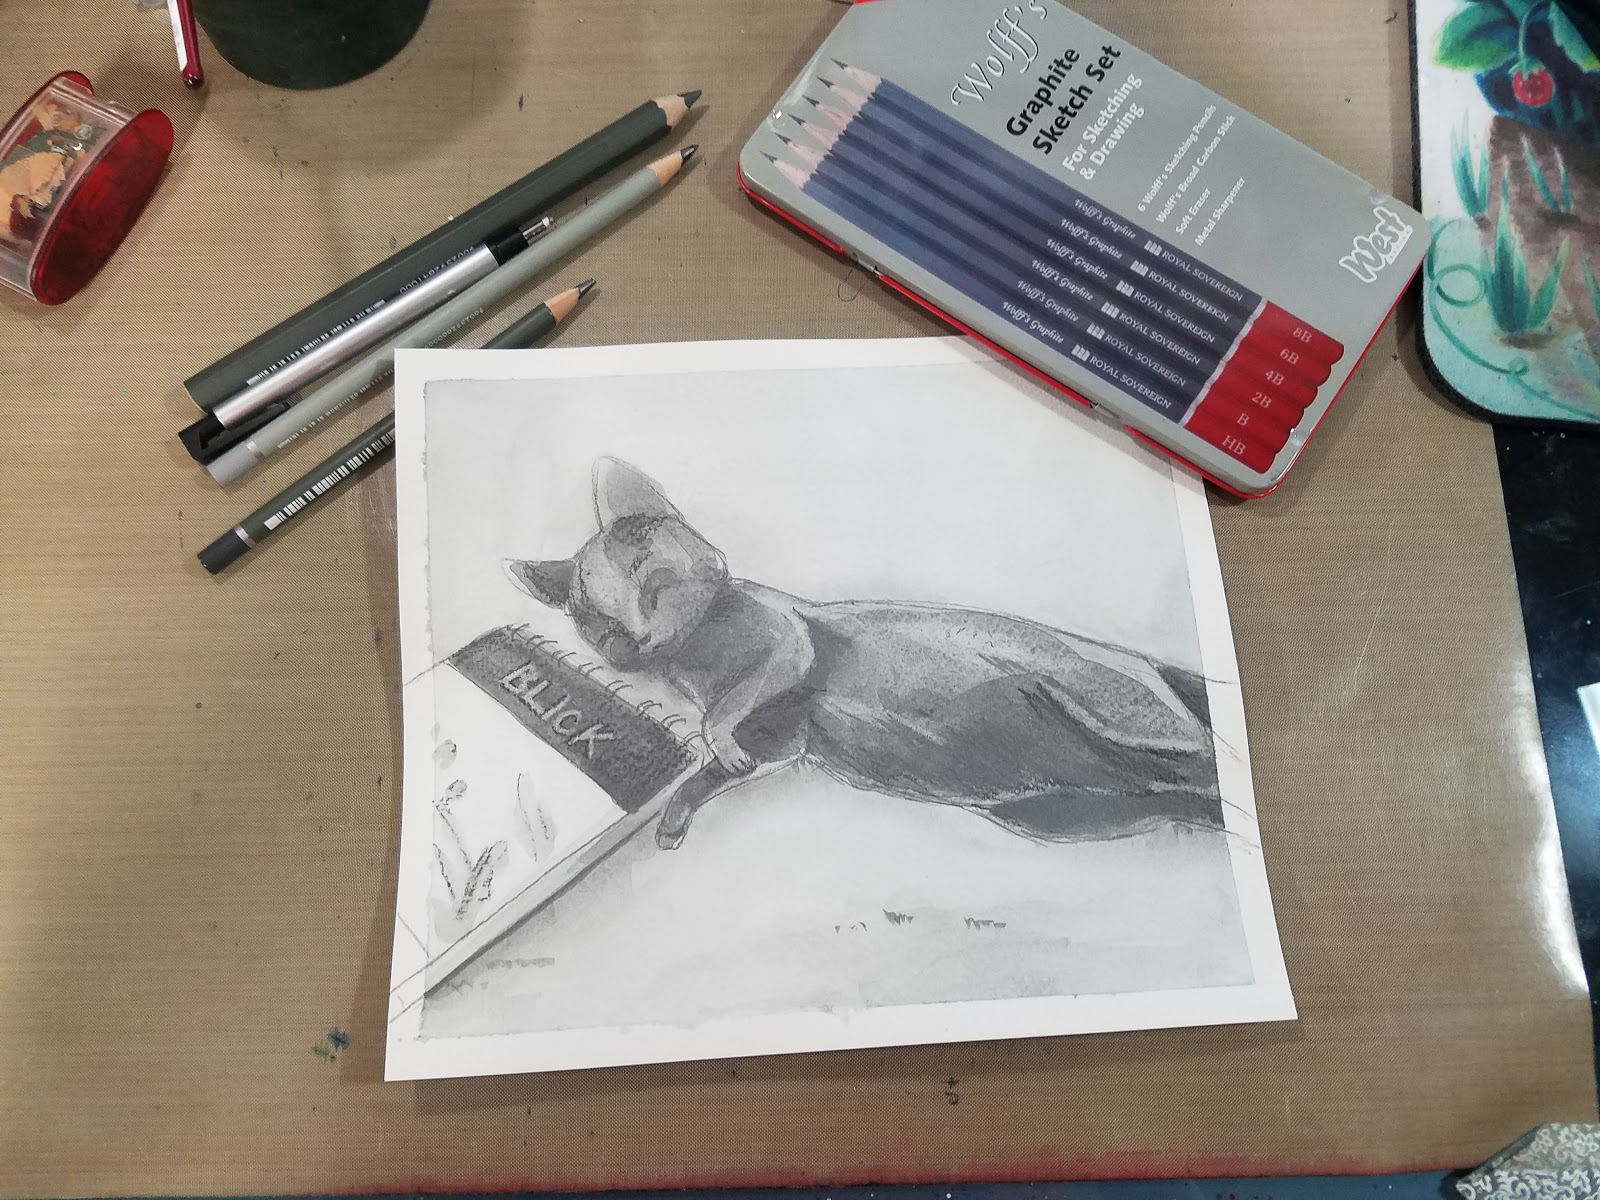
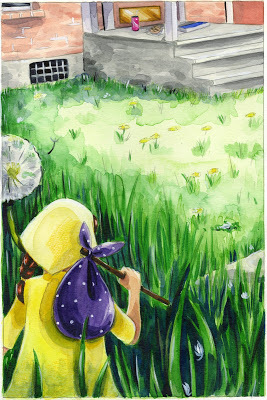
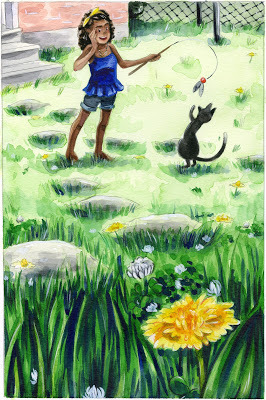
 Recent page from 7" Kara,Chapter 6,painted on Canson Montval watercolor paper
For me, that paper is currently Canson Montval. I can order it through Dick Blick (it can be annoying to find in stores, so I order several pads at a time), it comes in the right size (10"x15", which scales well for the comic page format I use). The 140lb paper is thicker than the 90lb student grade watercolor paper I used for Chapter 1 of 7" Kara, and although it does require stretching for the amount of water I put on a page, it's fairly sturdy but still goes through my Canon Pro 9000 Mark II printer, my large format comic printer of choice. Being tape bound, sheets are easy to remove for running through the paper.
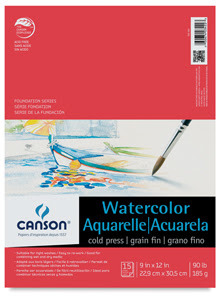 Image Source
 Page from 7" Kara, Chapter 1, painted on Canson Foundation Watercolor Paper.
I started 7" Kara with Canson Foundation Watercolor paper, because at the time,I didn't have a clue as to what I needed, and found it prone to buckling despite stretching, prone to muddy watercolors, and difficult to control. This 90lb paper is student grade, and not recommended by the author.
 Image Source
[image error] Cast of Characters page from Gizmo Grandma: A Twisty Tale. The cast of characters illustrations were originally painted on Blick Studio paper, and were digitally composited later.
I have also painted a number of illustrations on Blick Studio watercolor paper (http://www.dickblick.com/p/14035). These affordable pads work well enough-they are tape bound, affordable, available in 140lb, and available in 11"x15" (http://www.dickblick.com/items/10180-... worked well for Gizmo Grandma illustrations. For awhile they were only available in stores, so I also used Canson XL paper.
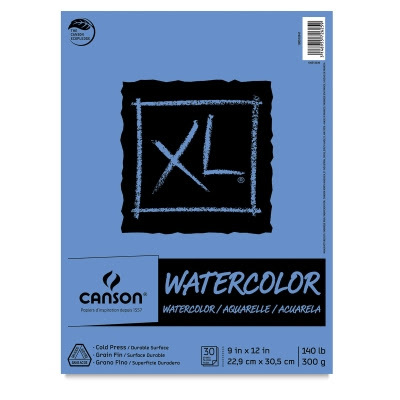 Image Source
[image error] Illustration from Gizmo Grandma: A Twisty Tale, written by Lenore Salazar and illustrated by me.
Canson XL watercolor paper (http://www.dickblick.com/p/12916) is another contender for affordable watercolor paper. Tape bound, 140lb, and also available in 11"x15", it is a suitable substitute for Dick Blick's Studio Watercolor paper.
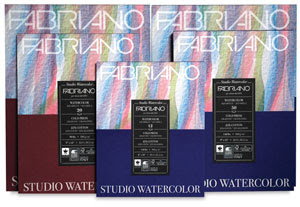 Image Source
[image error] Illustration of Laura Ingalls, drawn and inked for last year's Inktober mini comic, Favorite Fictional Femmes, available in print or digitally.
If you enjoy papers with more pronounced textures, Fabriano's Studio Watercolor pads offer a cold press paper with more tooth,and is available in both cold press and hot press options. Fabriano Studio watercolor paper not available in 10"x14" or 11"x15", but 11"14", and could be cut down for a comic page ratio.
There are many other watercolor papers out on the market that might be suitable for watercolor comics, but the above papers are papers I have used regularly and have experience with. If you'd like to recommend I try a paper, you can send me an email using the lefthand email field, or donate the cost of the paper via the Paypal tip jar- just make sure you link the paper in your message section.
I hope this post helped you decide on a watercolor paper to begin with, and maybe helped you rule some out as unsuitable before you spent your money. If you enjoyed this post, please take a moment to share it to your social networks- Twitter, Tumblr, Instagram, or even give me a shout out on YouTube! Your kind words go a long way, and really mean a lot to me, and I thrive on your praise. You can find some handy social network sharing buttons below the post. If you'd like to help fund future posts like this, please check out my Patreon for information on how to join the Nattosoup community. And if you'd like more content including live demonstrations, please subscribe to our YouTube channel.
Please consider donating to this blog or purchasing from Natto-shop (http://nattosoup.com/shop) if you want me to continue publishing quality content. All materials tested were purchased from my own pocket. Keep on Truckin' Nattosoup is not under any sponsorship.
In All About the Paper, I went over a variety of watercolor papers and covered my favorite uses. In The Importance of Stretching, we went over methods to prevent those papers from buckling. Now that you're passingly familiar with watercolor paper, the types, and the textures, it's time to pick one that's right for you.
Although I have some experience with watercolor for illustration and watercolor for fine art, I am most familiar with watercolor for comics, so all advice given below is relevant to that use. I encourage you to experiment to find the papers that work best for you, but hope to give you a starting point.
Other Useful Posts in the Watercolor Basics Series:
Introduction
Why Watercolor
Watercolor Terms You Should Know
The Difference Between Watercolor for Illustration, Watercolor for Fine Art
The Great Brush Off
Materials You'll Need to Get Started
All About That Paper
Pick a Palette
For watercolor comics, you want to look for a paper that is the following:
AffordableTape BoundThe Right Size140lb weightA surface treatment you like (generally cold or hot press)Recommended Papers:
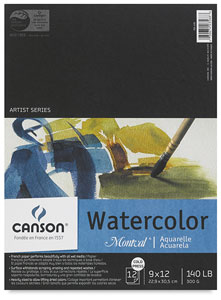 Image Source
 Recent page from 7" Kara,Chapter 6,painted on Canson Montval watercolor paper
For me, that paper is currently Canson Montval. I can order it through Dick Blick (it can be annoying to find in stores, so I order several pads at a time), it comes in the right size (10"x15", which scales well for the comic page format I use). The 140lb paper is thicker than the 90lb student grade watercolor paper I used for Chapter 1 of 7" Kara, and although it does require stretching for the amount of water I put on a page, it's fairly sturdy but still goes through my Canon Pro 9000 Mark II printer, my large format comic printer of choice. Being tape bound, sheets are easy to remove for running through the paper.
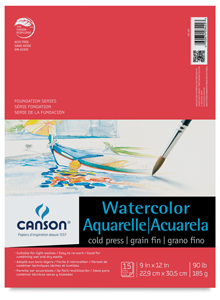 Image Source
 Page from 7" Kara, Chapter 1, painted on Canson Foundation Watercolor Paper.
I started 7" Kara with Canson Foundation Watercolor paper, because at the time,I didn't have a clue as to what I needed, and found it prone to buckling despite stretching, prone to muddy watercolors, and difficult to control. This 90lb paper is student grade, and not recommended by the author.
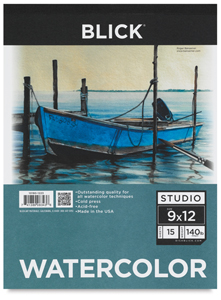 Image Source
[image error] Cast of Characters page from Gizmo Grandma: A Twisty Tale. The cast of characters illustrations were originally painted on Blick Studio paper, and were digitally composited later.
I have also painted a number of illustrations on Blick Studio watercolor paper (http://www.dickblick.com/p/14035). These affordable pads work well enough-they are tape bound, affordable, available in 140lb, and available in 11"x15" (http://www.dickblick.com/items/10180-... worked well for Gizmo Grandma illustrations. For awhile they were only available in stores, so I also used Canson XL paper.
 Image Source
[image error] Illustration from Gizmo Grandma: A Twisty Tale, written by Lenore Salazar and illustrated by me.
Canson XL watercolor paper (http://www.dickblick.com/p/12916) is another contender for affordable watercolor paper. Tape bound, 140lb, and also available in 11"x15", it is a suitable substitute for Dick Blick's Studio Watercolor paper.
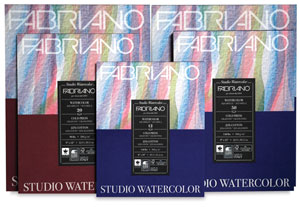 Image Source
[image error] Illustration of Laura Ingalls, drawn and inked for last year's Inktober mini comic, Favorite Fictional Femmes, available in print or digitally.
If you enjoy papers with more pronounced textures, Fabriano's Studio Watercolor pads offer a cold press paper with more tooth,and is available in both cold press and hot press options. Fabriano Studio watercolor paper not available in 10"x14" or 11"x15", but 11"14", and could be cut down for a comic page ratio.
There are many other watercolor papers out on the market that might be suitable for watercolor comics, but the above papers are papers I have used regularly and have experience with. If you'd like to recommend I try a paper, you can send me an email using the lefthand email field, or donate the cost of the paper via the Paypal tip jar- just make sure you link the paper in your message section.
I hope this post helped you decide on a watercolor paper to begin with, and maybe helped you rule some out as unsuitable before you spent your money. If you enjoyed this post, please take a moment to share it to your social networks- Twitter, Tumblr, Instagram, or even give me a shout out on YouTube! Your kind words go a long way, and really mean a lot to me, and I thrive on your praise. You can find some handy social network sharing buttons below the post. If you'd like to help fund future posts like this, please check out my Patreon for information on how to join the Nattosoup community. And if you'd like more content including live demonstrations, please subscribe to our YouTube channel.
Please consider donating to this blog or purchasing from Natto-shop (http://nattosoup.com/shop) if you want me to continue publishing quality content. All materials tested were purchased from my own pocket. Keep on Truckin' Nattosoup is not under any sponsorship.
September 11, 2016
Watercolor Basics: Its Important to Stretch (Your Watercolor Paper)
Recently I covered different types of watercolor paper on the market, as well as my favorite brands. But now that you have your watercolor paper, what else do you need to know to get started? Why, how to stretch, of course!
I've written about stretching watercolor paper a couple times in the past, so rather than beat a dead horse, I'm going to point you to this excellent post of mine, written in November, on how I stretch watercolor comic pages. Not only does this post include photos and step by step written instructions, but it also links to the Watercolor Panel Heidi Black and I presented at Mechacon 2014, which includes a live stretching demo.
Materials Used:
Gatorboard (coroplast)
Papertowels (I recommend Viva without a texture)
Size 4 Bulldog Clips
Large Binder Clips
Spray Bottle
Mop Watercolor Brush (synthetic is fine)
Clean Water
The methods outlined in the above post are a combination of techniques learned from various sources. While taking printmaking (four classes worth), we were taught to soak our printmaking paper in a cold water bath for 20 minutes to prepare it to accept ink. Most artist quality papers have sizing (generally gelatin based) on the outside and interior of the paper to give it structure- stretching your watercolor paper using the methods described in the above linked post and covered in my Mechacon Panel will not dissolve the gelatin in the paper as we're using cold water. In general, you do not ever want to use hot or warm water in relation to watercolors- hot water will dissolve the glue that holds the hairs in your brushes, hot water will dissolve your sizing, hot water can effect your paints differently than cold. So as long as you stick with cold water, you should be fine for stretching. Post UNO, I continued to pursue my interest in watercolor, and studied under David Gildersleeve while at SCAD, as well as pursuing watercolor education online and via books. My stretching methods are a combination of the above.
I use a particular brand of crepe paper blue masking tape- 3M Blue- as I've tested several other brands of masking and artists tape (including watecolor tape) and find that this brand works best for the papers I use, with minimal ripping. Watercolor tape is not meant to be removed from the paper- you are intended to cut your paper away- which does not work for my method of creating watercolor comics. I started out using lapboards as a stretching surface, but have found corrugated plastic Gatorboard (like political sign boards) to be superior- non absorbent, will not splinter, lightweight, very cheap, can easily be cut to size.
If you are painting watercolor comic pages like I do, and are using 11"x15" or 11"x14" watercolor paper, simply cutting a 30"x24" sheet of Gatorboard in half will provide you with two stretcher boards.
Different artists have different ways of stretching watercolor paper for painting, and the above references are how I stretch almost everything I paint- from 7" Kara pages to Gizmo Grandma illustrations, to larger commissions. It's a method that works well for me, but it may not work for you. If you find that it does not, don't feel like you have to use it- what's important is finding a method that works well for the work you produce. I've linked alternate methods at the bottom of the post, if you need help finding other resources. If you have an alternate method you would like to share that is not covered below or in my Outside Resources, please let me know, I'd love to check it out and give your work a signal boost!
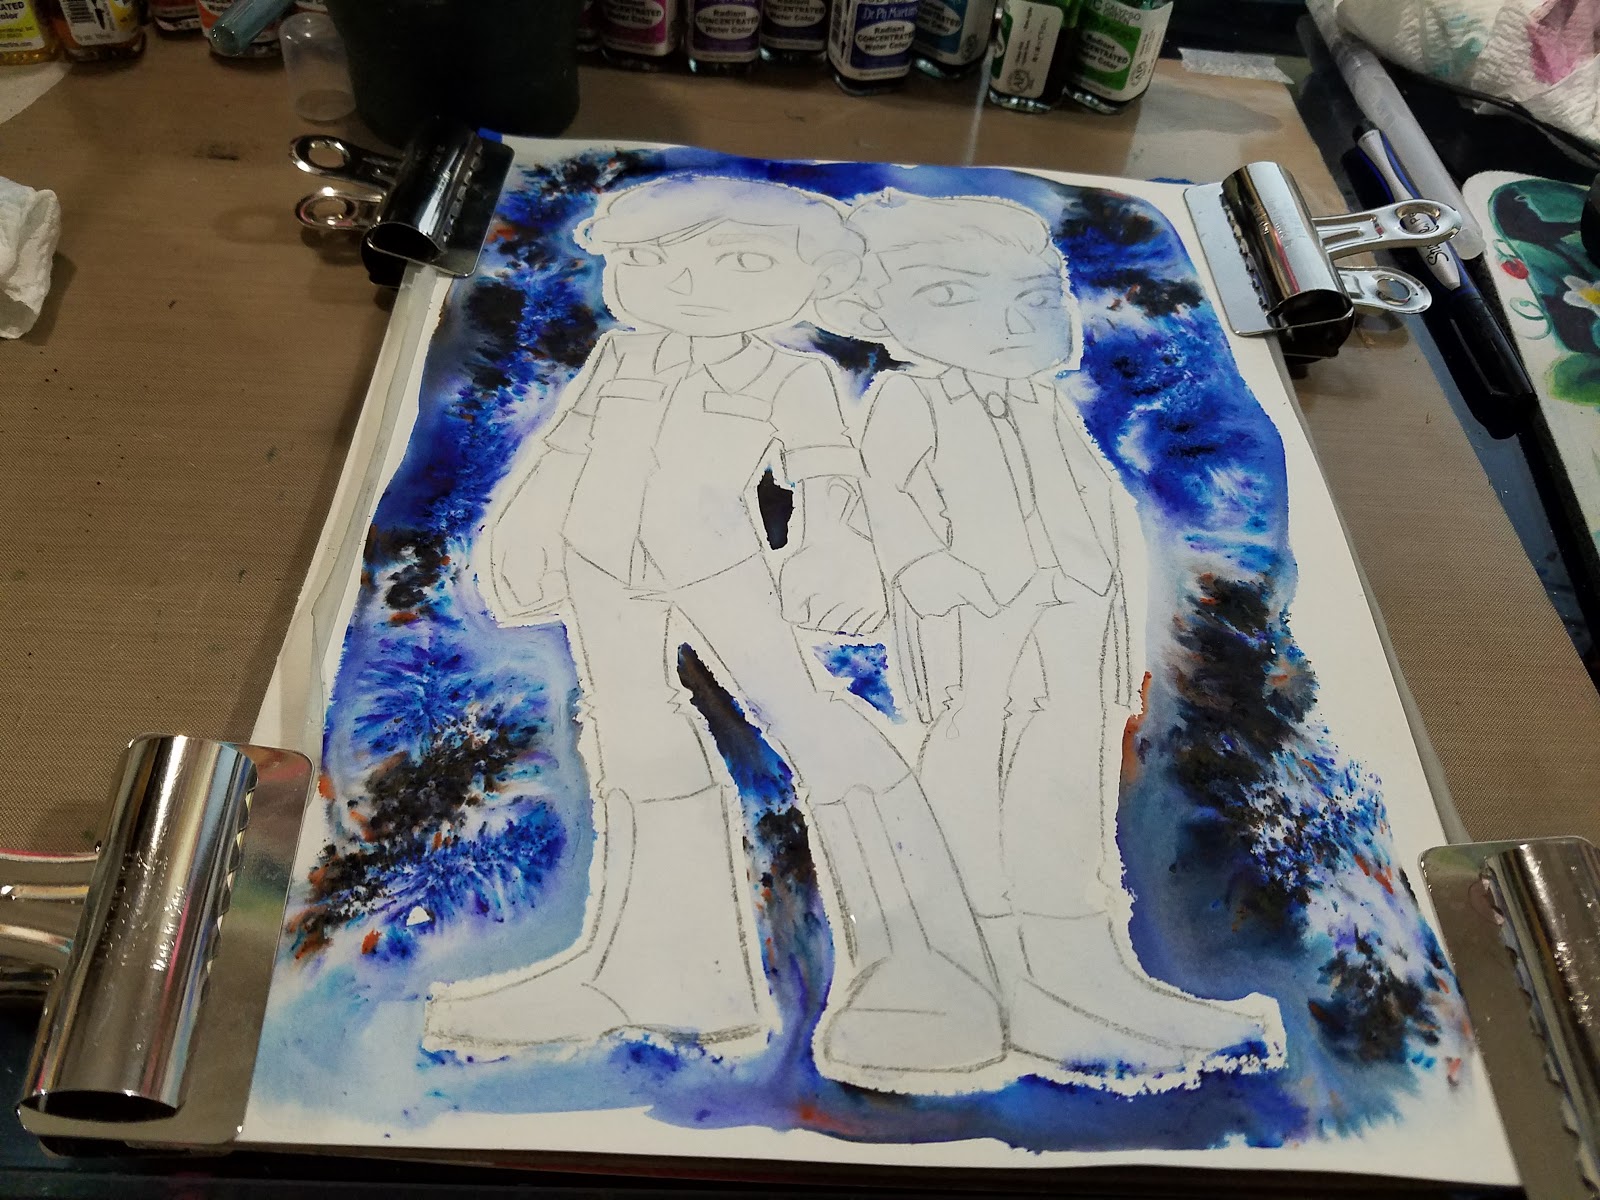
Watercolor Page In Progress That Has Been Properly Stretched


 Chapter 6 cover featuring Naomi, from 7" Kara, my ongoing watercolor comic.
When you properly stretch your pages, they may buckle a little bit while soaked, but will dry straight. These pages are easier to work with while painting, easier to scan, and easier to store.
What happens when you don't properly stretch your watercolor paper beforehand:
 Your paper buckles, and paint pools unevenly, making it difficult to control.Stretching your watercolor paper can make a huge difference in how your finished pieces look.
Some things to consider before you stretch:
If your paper is on a block, it's already stretched, so you're ready to start painting!Stretching your watercolors will make the graphite on your paper permanent, so you don't need to use inks if you don't wish, but you also can't easily make corrections to your lineart.If you want to print your bluelines using a desktop printer (non toner based) make sure you do so before stretching the paper, and finalize your lineart (either inks or pencils) beforehand, as stretching it will reactivate the printer ink and wash it away.
Since you guys should be familiar with my preferred stretching method, I'm going to introduce some alternate methods used by myself or by friends for the rest of this post.
Foamcore (or gatorboard) and bulldog clips
 The art on this watercolor paper is by the fabulous Eve Milady, and is used with permission. Go check out her work on Instagram!This method works well for small pieces- just clip your piece down on all sides with some strong bulldog clips! The clips should hold the paper taut enough that the paper won't be buckled when dry, but this technique is best if you have a light hand with water.
Pre-Stretched Gum Bound Pads (Blocks)


Watercolor blocks are gummed on at least two sides, often four sides, to hold your paper taut. These are perfect for field work or quick commissions, as you don't need to spend time stretching your watercolor paper.
These may not run through your printer, so you'll have to either do a graphite transfer or sketch on the paper surface directly.
Many watercolor papers come in block form, a few of my favorites are
Fluid (woodpulp based)Fluid 100 (cotton rag)ArchesFabriano Artistico
Sometimes watercolor blocks don't do a great job of holding the paper down, so you may need to augment with some handy bulldog and binder clips, as shown with the commission below.

Working on 300lb Watercolor Paper, Art Boards, Illustration Boards
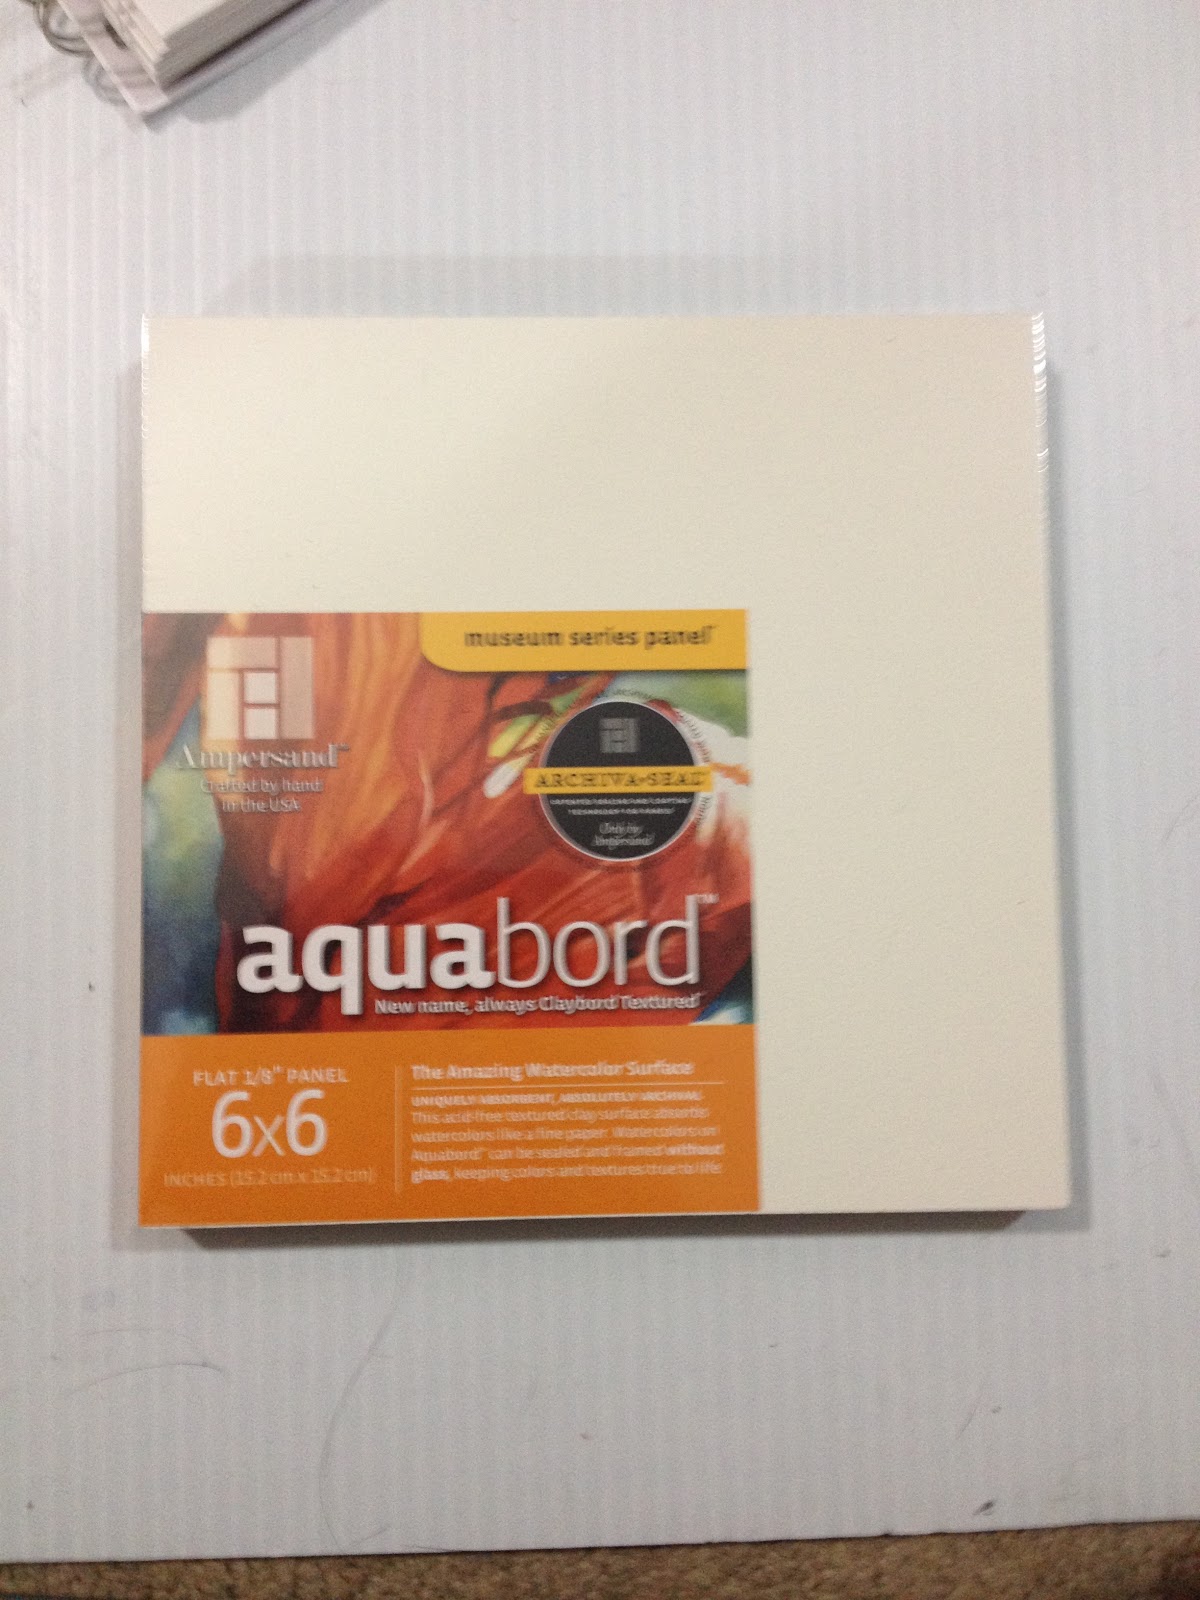
These types of boards all have sufficient internal structure to prevent your watercolors from warping and buckling the paper. Some are a combination of watercolor paper+chipboard, others are watercolor paper throughout. Some are even watercolor ground on masonite board, like Aquabords.
Aquabord
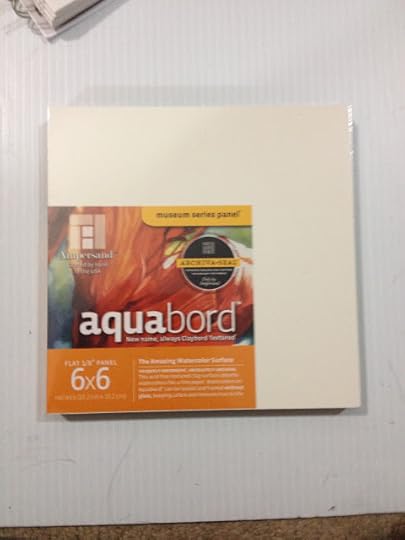
Since this isn't watercolor paper at all, but watercolor medium or gesso applied to masonite board, the watercolors do not actually absorb into the ground.
Aquabords take ink readily if you don't mind the textured surface (more like sandpaper than Cold or Rough press).
Art Boards
 Canson Artboard with Montval watercolor paper
Although this Montval Art board did not warp, the artboard is only as good as the paper on it, and Montval isn't a particularly high quality watercolor paper. Artboards are ideal for field work.
Taping Your Watercolor Paper Directly To Your Desk Without Stretching

This works decently well for smaller pieces or pieces that I intend to use as a demo. If you watch my YouTube channel, you'll notice that I utilize this technique. I don't always use wide blue tape to secure my illustrations to a hard surface, nor do I always attach them to Gatorboard.

Sometimes, like for this handmade Shinzen watercolor paper, I just tape the edges, so I have as much space as possible to paint.
And I often use regular white crepe masking tape.

Which can also be used as a palette of sorts to blend watercolor markers on.
Combination of Tombow Removable Adhesive (on back of piece) and Washi Tape
 You can purchase the original from my shop,and help support this blog.
This method did not work particularly well in the above example as the water seeped through the Lantgon Prestige watercolor paper, making the Tombow removable adhesive less prone to sticking. I eventually had to tape the corners down with Washi Tape, which are also low-tack.
I hope you found these alternative options for stretching watercolors (as well as the traditional options) helpful, but if not, below are some alternatives to the methods shown in this post and the methods I've covered on the blog in the past.
Second Opinions
The Importance of Stretching Water Colour Paper
Stretching Paper Buckling the Buckle
Wetting and Stretching Watercolor Paper
Fine Art Friday: How to Stretch Watercolor Paper
How to stretch watercolour paper...properly
Enjoying my Watercolor Basics series? Why not send some encouragement my way by dropping me a kind line? I'd love to hear from you! You can contact me via the handy form on the left hand sidebar- it only takes a moment. And if you'd like to help support this sponsor-free blog, please take a moment to share my work to your social media. There are handy button below every post that makes sharing posts super easy! It'd mean so much to me if you shared my work to your favorite art-related forums and communities- your good word goes a long way! Want to see more of my work? Swing by my YouTube channel for more tutorials, tips, demonstrations, and techniques, my Gumroad online shop for digital downloads of sketchbooks (both in black and white and color), downloadable lineart and digi stamps for you to use at home, and comics, or check out my Natto-shop for physical copies of 7" Kara Volume 1, mini comics, and more! Your purchases go to supporting this blog. Want to do more? Swing on by my Patreon for information on how you can join the Nattosoup community.
Please consider donating to this blog or purchasing from Natto-shop (http://nattosoup.com/shop) if you want me to continue publishing quality content. All materials tested were purchased from my own pocket. Keep on Truckin' Nattosoup is not under any sponsorship.
I've written about stretching watercolor paper a couple times in the past, so rather than beat a dead horse, I'm going to point you to this excellent post of mine, written in November, on how I stretch watercolor comic pages. Not only does this post include photos and step by step written instructions, but it also links to the Watercolor Panel Heidi Black and I presented at Mechacon 2014, which includes a live stretching demo.
Materials Used:
Gatorboard (coroplast)
Papertowels (I recommend Viva without a texture)
Size 4 Bulldog Clips
Large Binder Clips
Spray Bottle
Mop Watercolor Brush (synthetic is fine)
Clean Water
The methods outlined in the above post are a combination of techniques learned from various sources. While taking printmaking (four classes worth), we were taught to soak our printmaking paper in a cold water bath for 20 minutes to prepare it to accept ink. Most artist quality papers have sizing (generally gelatin based) on the outside and interior of the paper to give it structure- stretching your watercolor paper using the methods described in the above linked post and covered in my Mechacon Panel will not dissolve the gelatin in the paper as we're using cold water. In general, you do not ever want to use hot or warm water in relation to watercolors- hot water will dissolve the glue that holds the hairs in your brushes, hot water will dissolve your sizing, hot water can effect your paints differently than cold. So as long as you stick with cold water, you should be fine for stretching. Post UNO, I continued to pursue my interest in watercolor, and studied under David Gildersleeve while at SCAD, as well as pursuing watercolor education online and via books. My stretching methods are a combination of the above.
I use a particular brand of crepe paper blue masking tape- 3M Blue- as I've tested several other brands of masking and artists tape (including watecolor tape) and find that this brand works best for the papers I use, with minimal ripping. Watercolor tape is not meant to be removed from the paper- you are intended to cut your paper away- which does not work for my method of creating watercolor comics. I started out using lapboards as a stretching surface, but have found corrugated plastic Gatorboard (like political sign boards) to be superior- non absorbent, will not splinter, lightweight, very cheap, can easily be cut to size.
If you are painting watercolor comic pages like I do, and are using 11"x15" or 11"x14" watercolor paper, simply cutting a 30"x24" sheet of Gatorboard in half will provide you with two stretcher boards.
Different artists have different ways of stretching watercolor paper for painting, and the above references are how I stretch almost everything I paint- from 7" Kara pages to Gizmo Grandma illustrations, to larger commissions. It's a method that works well for me, but it may not work for you. If you find that it does not, don't feel like you have to use it- what's important is finding a method that works well for the work you produce. I've linked alternate methods at the bottom of the post, if you need help finding other resources. If you have an alternate method you would like to share that is not covered below or in my Outside Resources, please let me know, I'd love to check it out and give your work a signal boost!
Watercolor Page In Progress That Has Been Properly Stretched


 Chapter 6 cover featuring Naomi, from 7" Kara, my ongoing watercolor comic.
When you properly stretch your pages, they may buckle a little bit while soaked, but will dry straight. These pages are easier to work with while painting, easier to scan, and easier to store.
What happens when you don't properly stretch your watercolor paper beforehand:
 Your paper buckles, and paint pools unevenly, making it difficult to control.Stretching your watercolor paper can make a huge difference in how your finished pieces look.
Some things to consider before you stretch:
If your paper is on a block, it's already stretched, so you're ready to start painting!Stretching your watercolors will make the graphite on your paper permanent, so you don't need to use inks if you don't wish, but you also can't easily make corrections to your lineart.If you want to print your bluelines using a desktop printer (non toner based) make sure you do so before stretching the paper, and finalize your lineart (either inks or pencils) beforehand, as stretching it will reactivate the printer ink and wash it away.
Since you guys should be familiar with my preferred stretching method, I'm going to introduce some alternate methods used by myself or by friends for the rest of this post.
Foamcore (or gatorboard) and bulldog clips
 The art on this watercolor paper is by the fabulous Eve Milady, and is used with permission. Go check out her work on Instagram!This method works well for small pieces- just clip your piece down on all sides with some strong bulldog clips! The clips should hold the paper taut enough that the paper won't be buckled when dry, but this technique is best if you have a light hand with water.
Pre-Stretched Gum Bound Pads (Blocks)
Watercolor blocks are gummed on at least two sides, often four sides, to hold your paper taut. These are perfect for field work or quick commissions, as you don't need to spend time stretching your watercolor paper.
These may not run through your printer, so you'll have to either do a graphite transfer or sketch on the paper surface directly.
Many watercolor papers come in block form, a few of my favorites are
Fluid (woodpulp based)Fluid 100 (cotton rag)ArchesFabriano Artistico
Sometimes watercolor blocks don't do a great job of holding the paper down, so you may need to augment with some handy bulldog and binder clips, as shown with the commission below.
Working on 300lb Watercolor Paper, Art Boards, Illustration Boards
These types of boards all have sufficient internal structure to prevent your watercolors from warping and buckling the paper. Some are a combination of watercolor paper+chipboard, others are watercolor paper throughout. Some are even watercolor ground on masonite board, like Aquabords.
Aquabord
Since this isn't watercolor paper at all, but watercolor medium or gesso applied to masonite board, the watercolors do not actually absorb into the ground.
Aquabords take ink readily if you don't mind the textured surface (more like sandpaper than Cold or Rough press).
Art Boards
 Canson Artboard with Montval watercolor paper
Although this Montval Art board did not warp, the artboard is only as good as the paper on it, and Montval isn't a particularly high quality watercolor paper. Artboards are ideal for field work.
Taping Your Watercolor Paper Directly To Your Desk Without Stretching
This works decently well for smaller pieces or pieces that I intend to use as a demo. If you watch my YouTube channel, you'll notice that I utilize this technique. I don't always use wide blue tape to secure my illustrations to a hard surface, nor do I always attach them to Gatorboard.

Sometimes, like for this handmade Shinzen watercolor paper, I just tape the edges, so I have as much space as possible to paint.

And I often use regular white crepe masking tape.

Which can also be used as a palette of sorts to blend watercolor markers on.
Combination of Tombow Removable Adhesive (on back of piece) and Washi Tape
 You can purchase the original from my shop,and help support this blog.
This method did not work particularly well in the above example as the water seeped through the Lantgon Prestige watercolor paper, making the Tombow removable adhesive less prone to sticking. I eventually had to tape the corners down with Washi Tape, which are also low-tack.
I hope you found these alternative options for stretching watercolors (as well as the traditional options) helpful, but if not, below are some alternatives to the methods shown in this post and the methods I've covered on the blog in the past.
Second Opinions
The Importance of Stretching Water Colour Paper
Stretching Paper Buckling the Buckle
Wetting and Stretching Watercolor Paper
Fine Art Friday: How to Stretch Watercolor Paper
How to stretch watercolour paper...properly
Enjoying my Watercolor Basics series? Why not send some encouragement my way by dropping me a kind line? I'd love to hear from you! You can contact me via the handy form on the left hand sidebar- it only takes a moment. And if you'd like to help support this sponsor-free blog, please take a moment to share my work to your social media. There are handy button below every post that makes sharing posts super easy! It'd mean so much to me if you shared my work to your favorite art-related forums and communities- your good word goes a long way! Want to see more of my work? Swing by my YouTube channel for more tutorials, tips, demonstrations, and techniques, my Gumroad online shop for digital downloads of sketchbooks (both in black and white and color), downloadable lineart and digi stamps for you to use at home, and comics, or check out my Natto-shop for physical copies of 7" Kara Volume 1, mini comics, and more! Your purchases go to supporting this blog. Want to do more? Swing on by my Patreon for information on how you can join the Nattosoup community.
Please consider donating to this blog or purchasing from Natto-shop (http://nattosoup.com/shop) if you want me to continue publishing quality content. All materials tested were purchased from my own pocket. Keep on Truckin' Nattosoup is not under any sponsorship.
September 7, 2016
Some Thoughts About Being a Convention Artist
This year marks my sixth year as an artist whose primary source of artistic income comes from tabling at conventions. I've done dozens of shows all over the country, from anime cons in the American South and Eastern Seaboard to indie cons in New Orleans, San Francisco, New York, and Bethseda, to even a handful of general comic conventions. Over the years, I've found ways to hone my craft, upgrade my setup, and pitch my comic, but there are still things I struggle with. Along with fellow artist Kiriska, I've helped form How to Be a Con Artist, a tumblr dedicated to teaching other artists how to table, offering encouragement, and providing insight.
It certainly hasn't all been easy, and sometimes progress is hard to see. There are still conventions that are a struggle and I still find opportunities for growth as a convention artist. One day, I felt particularly loquatious on Twitter, and shared some advice and insight that is applicable to many, but rarely inquired about on HTBACA.
[View the story "Some Thoughts About Being a Convention Artist" on Storify]
Please consider donating to this blog or purchasing from Natto-shop (http://nattosoup.com/shop) if you want me to continue publishing quality content. All materials tested were purchased from my own pocket. Keep on Truckin' Nattosoup is not under any sponsorship.
September 4, 2016
A Lot of Thoughts on Art School
In 2009, I applied to, and was accepted into the Sequential Art graduate program for SCAD Savannah. Four years later, in early 2013, I graduated with an MFA in Sequential Art and moved to Nashville. I've talked about my experiences with SCAD continuously on this blog during my time there, but here is some more generalized advice I recently shared on my Twitter that I thought some of you might find useful.
[View the story "Some Thoughts About Formal Art Education" on Storify]
Please consider donating to this blog or purchasing from Natto-shop (http://nattosoup.com/shop) if you want me to continue publishing quality content. All materials tested were purchased from my own pocket. Keep on Truckin' Nattosoup is not under any sponsorship.
August 31, 2016
Watercolor Basics: Assembling (Or Cleaning) Your Pan Palette
Last Sunday we covered selecting paints for your palettes, and the virtues of tube vs pan paints. Now that you've got your paints, it's time to assemble your palette if it didn't arrive assembled!
So now that you've got your metal palette and your pans, its time to assemble everything. Wait, you don't have your palette yet? Why not try this one, it's the one I'm using. And when it comes to pans and half pans, you have a few options there as well. I buy both filled and empty pans- I like Winsor and Newton's watercolor pans best, and I fill my empty half pans with Daniel Smith, SoHo, Winsor Newton, and Holbein tube watercolors. For often used colors, I recommend you go with a full pan.
Filling your own pans from your tube watercolors is easy, but it doesn't work for every tube or every brand. Some watercolors will crack and flake out once they've been dried in a pan, others remain liquidy. You'll have to test for yourself to find your favorites. All I do is squeeze my tube into my half pan until the half pan is full, leave it out in front of a fan to dry out for a couple days, and then proceed with filling up my palette, which we're going to cover today!


You can also use this technique to top off pans that are running low before a big project.
So once all your pans are assembled and filled, you're ready to start. The first thing you want to do is determine a color order that works best for you, your palette, and how you paint. This takes some time and experience though, so go ahead and make a best guess and arrange as necessary.
Assembling and Disassembling your metal palette
Most metal watercolor palettes come in two main parts- the box of the palette, and the tray that holds your pans in place. Most palettes will have a few mixing areas- this is handy if you engage in plein air painting, but not so useful for comics.

The materials you'll need to fill your palette are:
Your palette
Filled pans or half pans
Double stick tape or washi tape


Apply the tape of your choice to the bottom of your pan- if you're using double stick, you only need one piece, but if you're using washi tape, make sure to double it over so you have two sticky sides.

Bend the metal tongs outward, place pan in palette, push pan down so tape adheres, push tongs forward to hold pan securely in place.

Continue working your way through your colors

Once you have your set assembled, it's time to swatch! Cut a sheet of watercolor paper to fit the inside of your palette.

Drop a drop of water into each pan to activate the pigments, and allow it time to soak in.

Swatch in the order that your paints are in, and this handy reference can stay in the lid of your palette, ready for you whenever you want to paint.

So what about your used half pans? You can clean them out and refill them! Scrape out the excess paint, and let them soak to remove additional paint. Once they're clean, refill and begin the process anew!
If you enjoyed this post, please do me a huge favor and share it on your social networks like Facebook, Twitter, Pinterest, or Tumblr. Your good word goes a long way towards introducing new people to my blog. It only takes a minute, and the handy social sharing buttons below this post make sharing a snap! If you have any questions, or want to say hi, start a conversation via email (left hand sidebar) or Twitter (@Nattosoup). If you haven't yet, please check out my YouTube channel for even more great art education content. If you like what I do, and want to ensure I make more, there are a few ways you can do that. If you're an artist, musician, writer, or creative type, you can submit a guest post and add a little variety to the mix while benefiting from the audience I've cultivated over the years. Email me with a pitch! You can also email art supply companies on my behalf, starting with the handy list in the right hand sidebar, and let them know how much you appreciate my work! Thirdly, you can help fund this blog- check out my Patreon for information on how to do that.
Please consider donating to this blog or purchasing from Natto-shop (http://nattosoup.com/shop) if you want me to continue publishing quality content. All materials tested were purchased from my own pocket. Keep on Truckin' Nattosoup is not under any sponsorship.


