
Becca Hillburn's Blog, page 37
October 27, 2016
Introduction to Fountain Pens for Sketching
Introduction to Fountain Pens for Sketching- Becca Hillburn (Guest Starring Heidi Black)
Please Note: This video was not sponsored by JetPens. All opinions are our own, and have been formed from years of art education, working as professional artists, and reviewing art supplies. All information given by Heidi was provided voluntarily, as a favor to me and to my audience. Jetpens is not affiliated with, nor a sponsor of this blog or the YouTube channel, and did not provide these pens, inks, or papers for the purposes of review or demonstration on either. Out of respect for Heidi, I am linking Jetpens when applicable, but please keep in mind that purchases from Jetpens do not support the YouTube Channel or the blog, as they do not support affiliate links or programs.

This video was sponsored by the generosity of my Patrons on Patreon. Patrons had early access to this video as a Thank You for their support over the past year. If you enjoy content like this, and would like to ensure that more is created, please join the community at Patreon.
Pens Mentioned In this Video:
Pilot Metropolitan
TWSBI ECO Fountain Pens
TWSBI Website
Pilot Elabo
Pilot Falcon
JinHao
International Standard Cartridges
J. Herbin Poussiere de Lune Ink
Lamy Safari
Pilot Kakuno
Pelikano Jr
Platinum Preppy
Pilot Plumix
Pilot Penmanship
Jetpens Chibi
Other Pens Mentioned in this Video:
Tachikawa G Nib
Tachikawa Sketch Pens
Tachikawa Comic Nib Fountain Pen- G Model Nib: Fine
Papers Mentioned in this Video:
Tomoe River Paper
Rhodia Paper
Inks Mentioned in this Video
Deleter 4 Ink
Kaimei Drawing Sol K
Diamine
Dinky Dips
Iroshizuku
Iroshizuku A
Iroshizuku B
Iroshizuku C
J Herbin
Platinum Carbon Black
Sailor Storia
Noodler's Bulletproof
Noodler's Bernanke
J Herbin Emerald of Chivor Ink
Outside Resources:
Jetpens: How Fountain Pens Work
Jetpens: Guide to Fountain Pen Nibs
Jetpens: Great Beginner Fountain Pens that Wont Break The Bank
Jetpens: How to use a Fountain Pen Piston Converter
Jetpens: How to Use a Fountain Pen Converter
Jetpens: Black Ink Comparison
Jetpens: How to Clean a Fountain Pen
Jetpens: Guide to Choosing a Fountain Pen
Jetpens: Guide to Fountain Pen Nibs: Troubleshooting Tips and Tricks
Jetpens: How to Write with a Fountain Pen
Jetpens: How to do an Eye Dropper Pen Conversion
Jetpens: Pilot Petit1 Fountain Pen Eyedropper Conversion Tutorial
Jetpens: Fountain Pen Paper Recommendations
Parka Blogs: How to use Zebra G Nib on a Fountain Pen
The Pen Addict
Please consider donating to this blog or purchasing from Natto-shop (http://nattosoup.com/shop) if you want me to continue publishing quality content. All materials tested were purchased from my own pocket. Keep on Truckin' Nattosoup is not under any sponsorship.


October 24, 2016
How to Be a Hustler
A comics hustler, that is.
When I decided to pursue comics for a living, I had no idea that I'd end up wearing so many hats. I figured I'd work in-house for a larger studio, saving my personal projects for nights and weekends, and I figured I'd have a steady income. Unfortunately, for many of us, the days of in-house, steady employment are a thing of the past, and we have to find our own path towards paying the bills.
What's Involved in Becca's Comic Hustle:Comics (of course~!): Print only right now, but soon to be web. 7" Kara Volume 1 is available for purchase through my online shop and through Gumroad, Volume 2 is in progress and is the source of inspiration behind the Watercolor Basics series. The majority of my comics are sold in person at conventions.Conventions: You can always find a list of what's coming up in my left hand side bar, and I try to make con announcements the week before on my Twitter, Instagram, Tumblr, Facebook fan page, and here on the blog. After the con, I generally try to write con recaps, which are often posted to How To Be a Con Artist. At a really good con, I'll make about $1,500, but that's before subtracting travel costs, hotel costs, food, table costs, additional badges, or the cost of making what I'm selling at the table. Mini comics, mini prints, original mini watercolors, original illustrations, comics, sassy buttons, stickers, small impulse items all of which require....Design- Designing graphics for this blog and the YouTube channel, book layout and design, product design, designing promotional material like postcards, stickers, banners. I do not offer outside design services.Commissions- Pencil, Ink, Watercolor, Marker, Digital. The majority of these are ordered at conventions and filled after the show, although I offer many commission options through my online shop. As I complete commissions, I post them to my Instagram, tagging the convention they were from, and in an ideal world, drumming up future commissions.Freelance work- usually digital. Pencils, Inks, Flats, Shading for other studios. This used to be a steady addition to my income, but has dried up for now. Comic Anthologies- Anthologies give me an opportunity to collaborate with other artists, promote a larger project, and get involved in the comic community! So far, I have comics in six comic anthologies: Travel, Once Upon a Time, Hana Doki Kira, Chainmail Bikini, 1001 Knights, Ladies Night Volume 6. These days, many anthologies include pay increases for the artists in their stretch goals, so anthologies can be a good way to make a little extra money throughout the year, provided they pay when they say they will, and send out books in a timely fashion. Unfortunately, while my signal boosting and promotion may be great for the anthologies I'm in, the anthologies haven't done much for me career wise. Still, it's fun to write short comics, and it's a great opportunity to collaborate with other creators.This Blog- ads, seeking sponsorship, building an audience, demonstrating skills, creating tutorials, teaching others, reviewing product, knowledge of product, self promotion. Outside of the ad services and Patreon mentioned below, I see no compensation for running this blog.The YouTube Channel- ads, seeking sponsorship, building an audience, demonstrating skills, creating tutorials, teaching others, reviewing product, knowledge of product, editing video, writing descriptions, promoting videos to Twitter, Facebook, Pinterest, Instagram, maintaining a friendly, approachable persona, answering comments in a timely manner, encouraging community. Outside of the ad services and Patreon mentioned below, I see no compensation for running the YouTube channel.Twitter- Interacting with other artists, promoting my work and the work of others like myselfIndividual Illustrations in a variety of media- content for the blog and YouTube, serve as fodder for tutorials and promotion, give me the chance to learn new skills without committing to a longterm project. I offer many of my originals for sale through my online shop and at conventions.Instagram- A way to cultivate an audience based almost solely on my artistic abilities. Instagram seems to be mostly about taking staged photos of art supplies, finding the right hashtags to use, and occasionally posting short videos. Most of what I post is promotional for the YouTube channel or comic progress.Patreon- A direct way for readers to become involved in the Blog and the YouTube. I don't utilize Patreon the way many artists do- many will share sneak peeks and tutorials to their Patrons only. As this would make my workload unbearable, I mostly share weekly recaps, offer them the chance to decide on upcoming content, and release popular videos early. Many artists will release monthly digital sketchbooks to Patron, and this may be something I investigate in the future. I am currently right on the edge of $90 this month, but previous months were much lower. The Patreon makes this blog self sustaining.Google Adsense- Allows me to put ads on this blog, which in theory, should earn me a little bit of money based on how many clicks they get. Unfortunately, if readers are using ad blockers, that doesn't happen. The amount of money I earn through Adsense is pretty miniscule- less than a dollar a month.Amazon Ads- Pretty similar to Google Adsense, but with curated Amazon products. If you're using an adblocker, you won't see these ads, and I won't see that money.Amazon Affiliates- For years, I wrote art supply reviews completely out of my own pocket, with no way to earn any money for my trouble, as Jetpens didn't have an affiliates or reward program. Amazon Affiliates allows me to make a small bounty on every item sold through one of my affiliates links- it doesn't have to be exactly the item linked, without costing the customer any additional money (Amazon pays the bounty out of their cut). Some months, I see as much as $30 from Amazon for my Affiliate Links.Youtube Ads- I try not to select ads that will negatively effect my audience's experience, but since my YouTube videos require a lot of work, I do allow video ads on most of my tutorials, reviews, and unboxing videos. I only see money if the viewer watches at least 30 seconds of the ad, so this is a really cheap way to help support creators on YouTube. I usually see about $20-25 a month from this.Gumroad- My Gumroad is where you can find digital copies of my physical comics and mini comics (7" Kara Volume 1, Magical Girl March, Favorite Fictional Femmes, Let Sleeping Cats Lie, Or They'll Drink Your Watercolor Water) as well as digital assets like Color Along With Me Lineart (lineart from popular tutorials, so you can follow along exactly) and digital design assets like watercolor paper scans, watercolor splotches. Online Shop for physical items-How to be a Con Artist- Doesn't actually make me any money, takes a lot of time to curate properly, and doesn't really promote my work, but hey, we all need to pay it forward somehow, right? These days, Kiriska does the majority of the work by finding relevant articles, keeping the tags and archive in order, and screening for asks.Teaching- In person workshops, demonstrations, and panels at conventions, libraries, and schools.

In a good year, all of these things should cover the majority of my bills (in theory). And all of these things require frequent updates to stay viable, require nurturing and promotion to succeed. The blog requires frequent updates on topics that readers should find interesting, the YouTube requires that AND an engaging personality (something I'm still working on acquiring) And when possible, I try to get multiple uses out of new content, as that content takes so long to create. Illustrations created for YouTube tutorials get shared on Instagram and Twitter. Good Twitter conversations may be the inspiration for blogposts or tutorials, or may be Storified into a post.
 Handout for library and school visits
It took a long time for me to find a way for this blog to pay for itself. Last year I tried contacting companies for sponsorships, and my readers have written in to companies on my behalf for sponsorships, and although we never received a firm 'no', the answer was pretty crystal clear that they were not only not interested, but assumed I only did this for what I could get for free. After sponsorships, I introduced the Paypal tip jar, and after that, ads. I've tried to be tasteful in my ad placement and selection of what I allow- choosing to limit the types of ads displayed (and taking a paycut) in order to ensure that they're appropriate for this blog and my readers.
After doing a large amount of research (generally produced by mommy blogs that benefitted from others signing up for these services), I decided to sign up for Amazon Affiliates and found a way to sign up for an affiliate program that worked with DickBlick. Part of this was born of frustration- I was tired of writing detailed reviews that only served to sell products for someone else- I wanted a commission for my work, or at least some recognition for services rendered. Given Amazon's increasing reach into the art and craft market, using Amazon Affiliates links allows me to see some some compensation for all the hours spent reviewing art supplies. Signing up for Amazon Affiliates is fairly easy- you need a tax ID in good order (so if you have a financial planning company like MetLife handling your investments, you need to make sure they have your social security number correct lest you fall on the wrong side of the IRS), and a place to share those links. It also helps if you have an audience that understands that using those links helps support your work while costing them nothing, and it helps even more if you have an audience willing to use one of your links as their starting point for all Amazon purchases. If you're interested in helping support this blog in that manner, you can set this link as your Amazon starting point.
In November of 2015, tired after a year of trying to find solutions for engagement and monetization for the blog, I branched out onto YouTube. We've shared artist interviews there for years, but due to the lack of interest, I assumed I didn't have anything the YouTube audience would find valuable. This is probably a bit surprising, because even then, I used YouTube as one of my information resources, and I could see that there was a gap in the market for the sort of content I produced (straightforward, no frills tutorials, a deep understanding of both artistic skills and art supplies, and educated art supply reviews not biased by sponsorships or donations). At the encouragement of several friends, I decided to give YouTube a shot.
YouTube offers two things I did not have access to before: An entirely new audience (YouTube is among the top 10 search engines), and better adrates. It also offered me a platform for live demonstrations- all I had to do was leave my camcorder running, I didn't have to stop and take photos or stop and take notes. YouTube is honestly so much easier to keep updated (other than editing, color correction, and audio issues, which are Joseph's domain), that it's easier to update than this blog.
It's worth noting that although YouTube is easier and more profitable in many ways, it's been difficult building up an audience, and I only recently hit 2,500 subscribers. I am constantly thinking of ways to plug and promote it, including the above promotional postcards that I intend to hand out at conventions.
In December, stumped at my mom's demands to know what I wanted for Christmas, I finally settled on a yearlong subscription to ArtSnacks, and opted to purchase a yearlong subscription to SketchBox. I hoped that unboxing, demonstrating, and utilizing the materials inside the monthly boxes in a meticulous manner might attract views to my channel, and wanted to monetize
 YouTube channel header
 Upcoming YouTube endcard
The real turning point came when I finally decided to launch a Patreon. I had a lot of misgivings about doing so- I've had difficulty encouraging audience interaction on this blog, I felt like I couldn't necessarily rely on this audience for support as engagement was hit or miss. When I first launched the Patreon in February 2016, I even asked Joseph to chip in a couple bucks if no on pledged.
Fortunately, he didn't have to toss in a pity pledge, as some of my wonderful online friends saved me from embarrassment (and not hitting that $15 community goal to release ArtSnacks Vs SketchBox videos to the public). Although support for my Patreon has been very encouraging, I am still working to find goals that are sustainable for me to fill, and enticing for potential backers. There's still a lot of work to be done on my Patreon site, including an introduction video, so there's room for growth.
The Patreon has been useful for several things- I'm able to distribute early access videos to my backers (as I've done all October for Inktober tutorials), able to contact them for input on what series to focus on next, and it gives me a specific audience to write and create for. My Patreons are given priority over all other requests, as they're willing to put their money where their support is. That money goes towards purchasing supplies for review, offsetting costs like Google storage (necessarily for hosting the massive amount of photos on this blog), purchasing new equipment like SD cards, card readers, mics, and color correction cards, and if there's anything left over, paying myself a bit of a wage for my hard work. I wasn't sure how monetizing something that is free to the public would be handled, but I think I'm learning some valuable new tricks, and hope to update the campaign next year with some exciting and sustainable new incentives.
Its easy to become discouraged when so much of your life revolves around the goodwill and generosity of your audience. And I often forget to promote what I most love-my comic, 7" Kara. In order to pursue my goals, I have to be a bit of a hustler, a bit of a charmer, and a lot of a barker. This can be difficult with anxiety and depression dragging me down, and sometimes I have to pretend that I'm promoting someone else's work, rather than shaking the same old tree and expecting new fruit. I have to be outgoing, fun, and supportive of other artists even when I feel like my own work isn't up to snuff, and especially at public appearances like cons, I have to wear a grin and fake it til I make it. This is no small feat for me- I do love people, and I do believe in the value of my work, but I'm sensitive and I take things personally. Small setbacks really knock me down, and I'm fortunate to have a fantastic support group of fellow comic creators on Twitter.
And of course, I am massively glossing over in-person appearances like conventions. Longtime readers know I attend many, and know that they as often go pearshaped as they go well. The intersection between YouTube, How to be a Con Artist, this blog, and conventions seems to be non-existent- few blog readers come by to say hi, it's rare that a HTBACA reader will purchase something, most con sales are to new faces- repeat customers tend to be most familiar with my convention persona. I am always interested in creating overlap between my demographics, but have struggled to find ways to do so.
Keeping all these things going, while producing comics and illustrations, is a full time job for me. I'm fortunate to be in a position where I can work from home, and I've worked hard to find ways to achieve a steady income. My goal is to be self sufficient through a combination of the blog, the YouTube channel, conventions, and comics, and while I'm a far way away from that, there are times when the goal seems closer than others.
All this isn't to say that artists who work day jobs are somehow less than artists who don't. It all boils down to privilege- where you live, what your audience is willing to pay, and luck- who you know, who's willing to publicly admit they know you. I know many hardworking artists who are killer comic artists and work a day job, and I know many hardworking artists who are supported by their parents or their spouse. Comics isn't an easy game, and we all do what we need to do to get by.
Working the comics hustle has made me appreciative of others who do so, and has made me sensitive to ways I can help. Although money is usually the most helpful, there are loads of ways you can help support artists and creators whose work you appreciate. In this post, I go over loads of free ways you can help creators from YouTubers to Bloggers, to Webcomic artists, to Game Devs.
Find Me Elsewhere:
For Daily Updates: www.instagram.com/Nattosoup
To chat: www.twitter.com/Nattosoup
For more art tutorials, supply reviews, and con recaps: www.nattosoup.blogspot.com
For convention how-tos: www.howtobeaconartist.tumblr.com
To help support online art education: www.patreon.com/Nattosoup
For my portfolio: www.behance.com/Nattosoup
For digital downloads: www.gumroad.com/nattosoup
For physical goodies: www.nattosoup.com/products
For my comic: www.nattosoup.com/kara-comic
Please consider donating to this blog or purchasing from Natto-shop (http://nattosoup.com/shop) if you want me to continue publishing quality content. All materials tested were purchased from my own pocket. Keep on Truckin' Nattosoup is not under any sponsorship.
When I decided to pursue comics for a living, I had no idea that I'd end up wearing so many hats. I figured I'd work in-house for a larger studio, saving my personal projects for nights and weekends, and I figured I'd have a steady income. Unfortunately, for many of us, the days of in-house, steady employment are a thing of the past, and we have to find our own path towards paying the bills.
What's Involved in Becca's Comic Hustle:Comics (of course~!): Print only right now, but soon to be web. 7" Kara Volume 1 is available for purchase through my online shop and through Gumroad, Volume 2 is in progress and is the source of inspiration behind the Watercolor Basics series. The majority of my comics are sold in person at conventions.Conventions: You can always find a list of what's coming up in my left hand side bar, and I try to make con announcements the week before on my Twitter, Instagram, Tumblr, Facebook fan page, and here on the blog. After the con, I generally try to write con recaps, which are often posted to How To Be a Con Artist. At a really good con, I'll make about $1,500, but that's before subtracting travel costs, hotel costs, food, table costs, additional badges, or the cost of making what I'm selling at the table. Mini comics, mini prints, original mini watercolors, original illustrations, comics, sassy buttons, stickers, small impulse items all of which require....Design- Designing graphics for this blog and the YouTube channel, book layout and design, product design, designing promotional material like postcards, stickers, banners. I do not offer outside design services.Commissions- Pencil, Ink, Watercolor, Marker, Digital. The majority of these are ordered at conventions and filled after the show, although I offer many commission options through my online shop. As I complete commissions, I post them to my Instagram, tagging the convention they were from, and in an ideal world, drumming up future commissions.Freelance work- usually digital. Pencils, Inks, Flats, Shading for other studios. This used to be a steady addition to my income, but has dried up for now. Comic Anthologies- Anthologies give me an opportunity to collaborate with other artists, promote a larger project, and get involved in the comic community! So far, I have comics in six comic anthologies: Travel, Once Upon a Time, Hana Doki Kira, Chainmail Bikini, 1001 Knights, Ladies Night Volume 6. These days, many anthologies include pay increases for the artists in their stretch goals, so anthologies can be a good way to make a little extra money throughout the year, provided they pay when they say they will, and send out books in a timely fashion. Unfortunately, while my signal boosting and promotion may be great for the anthologies I'm in, the anthologies haven't done much for me career wise. Still, it's fun to write short comics, and it's a great opportunity to collaborate with other creators.This Blog- ads, seeking sponsorship, building an audience, demonstrating skills, creating tutorials, teaching others, reviewing product, knowledge of product, self promotion. Outside of the ad services and Patreon mentioned below, I see no compensation for running this blog.The YouTube Channel- ads, seeking sponsorship, building an audience, demonstrating skills, creating tutorials, teaching others, reviewing product, knowledge of product, editing video, writing descriptions, promoting videos to Twitter, Facebook, Pinterest, Instagram, maintaining a friendly, approachable persona, answering comments in a timely manner, encouraging community. Outside of the ad services and Patreon mentioned below, I see no compensation for running the YouTube channel.Twitter- Interacting with other artists, promoting my work and the work of others like myselfIndividual Illustrations in a variety of media- content for the blog and YouTube, serve as fodder for tutorials and promotion, give me the chance to learn new skills without committing to a longterm project. I offer many of my originals for sale through my online shop and at conventions.Instagram- A way to cultivate an audience based almost solely on my artistic abilities. Instagram seems to be mostly about taking staged photos of art supplies, finding the right hashtags to use, and occasionally posting short videos. Most of what I post is promotional for the YouTube channel or comic progress.Patreon- A direct way for readers to become involved in the Blog and the YouTube. I don't utilize Patreon the way many artists do- many will share sneak peeks and tutorials to their Patrons only. As this would make my workload unbearable, I mostly share weekly recaps, offer them the chance to decide on upcoming content, and release popular videos early. Many artists will release monthly digital sketchbooks to Patron, and this may be something I investigate in the future. I am currently right on the edge of $90 this month, but previous months were much lower. The Patreon makes this blog self sustaining.Google Adsense- Allows me to put ads on this blog, which in theory, should earn me a little bit of money based on how many clicks they get. Unfortunately, if readers are using ad blockers, that doesn't happen. The amount of money I earn through Adsense is pretty miniscule- less than a dollar a month.Amazon Ads- Pretty similar to Google Adsense, but with curated Amazon products. If you're using an adblocker, you won't see these ads, and I won't see that money.Amazon Affiliates- For years, I wrote art supply reviews completely out of my own pocket, with no way to earn any money for my trouble, as Jetpens didn't have an affiliates or reward program. Amazon Affiliates allows me to make a small bounty on every item sold through one of my affiliates links- it doesn't have to be exactly the item linked, without costing the customer any additional money (Amazon pays the bounty out of their cut). Some months, I see as much as $30 from Amazon for my Affiliate Links.Youtube Ads- I try not to select ads that will negatively effect my audience's experience, but since my YouTube videos require a lot of work, I do allow video ads on most of my tutorials, reviews, and unboxing videos. I only see money if the viewer watches at least 30 seconds of the ad, so this is a really cheap way to help support creators on YouTube. I usually see about $20-25 a month from this.Gumroad- My Gumroad is where you can find digital copies of my physical comics and mini comics (7" Kara Volume 1, Magical Girl March, Favorite Fictional Femmes, Let Sleeping Cats Lie, Or They'll Drink Your Watercolor Water) as well as digital assets like Color Along With Me Lineart (lineart from popular tutorials, so you can follow along exactly) and digital design assets like watercolor paper scans, watercolor splotches. Online Shop for physical items-How to be a Con Artist- Doesn't actually make me any money, takes a lot of time to curate properly, and doesn't really promote my work, but hey, we all need to pay it forward somehow, right? These days, Kiriska does the majority of the work by finding relevant articles, keeping the tags and archive in order, and screening for asks.Teaching- In person workshops, demonstrations, and panels at conventions, libraries, and schools.
In a good year, all of these things should cover the majority of my bills (in theory). And all of these things require frequent updates to stay viable, require nurturing and promotion to succeed. The blog requires frequent updates on topics that readers should find interesting, the YouTube requires that AND an engaging personality (something I'm still working on acquiring) And when possible, I try to get multiple uses out of new content, as that content takes so long to create. Illustrations created for YouTube tutorials get shared on Instagram and Twitter. Good Twitter conversations may be the inspiration for blogposts or tutorials, or may be Storified into a post.
 Handout for library and school visits
It took a long time for me to find a way for this blog to pay for itself. Last year I tried contacting companies for sponsorships, and my readers have written in to companies on my behalf for sponsorships, and although we never received a firm 'no', the answer was pretty crystal clear that they were not only not interested, but assumed I only did this for what I could get for free. After sponsorships, I introduced the Paypal tip jar, and after that, ads. I've tried to be tasteful in my ad placement and selection of what I allow- choosing to limit the types of ads displayed (and taking a paycut) in order to ensure that they're appropriate for this blog and my readers.
After doing a large amount of research (generally produced by mommy blogs that benefitted from others signing up for these services), I decided to sign up for Amazon Affiliates and found a way to sign up for an affiliate program that worked with DickBlick. Part of this was born of frustration- I was tired of writing detailed reviews that only served to sell products for someone else- I wanted a commission for my work, or at least some recognition for services rendered. Given Amazon's increasing reach into the art and craft market, using Amazon Affiliates links allows me to see some some compensation for all the hours spent reviewing art supplies. Signing up for Amazon Affiliates is fairly easy- you need a tax ID in good order (so if you have a financial planning company like MetLife handling your investments, you need to make sure they have your social security number correct lest you fall on the wrong side of the IRS), and a place to share those links. It also helps if you have an audience that understands that using those links helps support your work while costing them nothing, and it helps even more if you have an audience willing to use one of your links as their starting point for all Amazon purchases. If you're interested in helping support this blog in that manner, you can set this link as your Amazon starting point.
In November of 2015, tired after a year of trying to find solutions for engagement and monetization for the blog, I branched out onto YouTube. We've shared artist interviews there for years, but due to the lack of interest, I assumed I didn't have anything the YouTube audience would find valuable. This is probably a bit surprising, because even then, I used YouTube as one of my information resources, and I could see that there was a gap in the market for the sort of content I produced (straightforward, no frills tutorials, a deep understanding of both artistic skills and art supplies, and educated art supply reviews not biased by sponsorships or donations). At the encouragement of several friends, I decided to give YouTube a shot.
YouTube offers two things I did not have access to before: An entirely new audience (YouTube is among the top 10 search engines), and better adrates. It also offered me a platform for live demonstrations- all I had to do was leave my camcorder running, I didn't have to stop and take photos or stop and take notes. YouTube is honestly so much easier to keep updated (other than editing, color correction, and audio issues, which are Joseph's domain), that it's easier to update than this blog.
It's worth noting that although YouTube is easier and more profitable in many ways, it's been difficult building up an audience, and I only recently hit 2,500 subscribers. I am constantly thinking of ways to plug and promote it, including the above promotional postcards that I intend to hand out at conventions.
In December, stumped at my mom's demands to know what I wanted for Christmas, I finally settled on a yearlong subscription to ArtSnacks, and opted to purchase a yearlong subscription to SketchBox. I hoped that unboxing, demonstrating, and utilizing the materials inside the monthly boxes in a meticulous manner might attract views to my channel, and wanted to monetize
 YouTube channel header
 Upcoming YouTube endcard
The real turning point came when I finally decided to launch a Patreon. I had a lot of misgivings about doing so- I've had difficulty encouraging audience interaction on this blog, I felt like I couldn't necessarily rely on this audience for support as engagement was hit or miss. When I first launched the Patreon in February 2016, I even asked Joseph to chip in a couple bucks if no on pledged.
Fortunately, he didn't have to toss in a pity pledge, as some of my wonderful online friends saved me from embarrassment (and not hitting that $15 community goal to release ArtSnacks Vs SketchBox videos to the public). Although support for my Patreon has been very encouraging, I am still working to find goals that are sustainable for me to fill, and enticing for potential backers. There's still a lot of work to be done on my Patreon site, including an introduction video, so there's room for growth.
The Patreon has been useful for several things- I'm able to distribute early access videos to my backers (as I've done all October for Inktober tutorials), able to contact them for input on what series to focus on next, and it gives me a specific audience to write and create for. My Patreons are given priority over all other requests, as they're willing to put their money where their support is. That money goes towards purchasing supplies for review, offsetting costs like Google storage (necessarily for hosting the massive amount of photos on this blog), purchasing new equipment like SD cards, card readers, mics, and color correction cards, and if there's anything left over, paying myself a bit of a wage for my hard work. I wasn't sure how monetizing something that is free to the public would be handled, but I think I'm learning some valuable new tricks, and hope to update the campaign next year with some exciting and sustainable new incentives.
Its easy to become discouraged when so much of your life revolves around the goodwill and generosity of your audience. And I often forget to promote what I most love-my comic, 7" Kara. In order to pursue my goals, I have to be a bit of a hustler, a bit of a charmer, and a lot of a barker. This can be difficult with anxiety and depression dragging me down, and sometimes I have to pretend that I'm promoting someone else's work, rather than shaking the same old tree and expecting new fruit. I have to be outgoing, fun, and supportive of other artists even when I feel like my own work isn't up to snuff, and especially at public appearances like cons, I have to wear a grin and fake it til I make it. This is no small feat for me- I do love people, and I do believe in the value of my work, but I'm sensitive and I take things personally. Small setbacks really knock me down, and I'm fortunate to have a fantastic support group of fellow comic creators on Twitter.
And of course, I am massively glossing over in-person appearances like conventions. Longtime readers know I attend many, and know that they as often go pearshaped as they go well. The intersection between YouTube, How to be a Con Artist, this blog, and conventions seems to be non-existent- few blog readers come by to say hi, it's rare that a HTBACA reader will purchase something, most con sales are to new faces- repeat customers tend to be most familiar with my convention persona. I am always interested in creating overlap between my demographics, but have struggled to find ways to do so.
Keeping all these things going, while producing comics and illustrations, is a full time job for me. I'm fortunate to be in a position where I can work from home, and I've worked hard to find ways to achieve a steady income. My goal is to be self sufficient through a combination of the blog, the YouTube channel, conventions, and comics, and while I'm a far way away from that, there are times when the goal seems closer than others.
All this isn't to say that artists who work day jobs are somehow less than artists who don't. It all boils down to privilege- where you live, what your audience is willing to pay, and luck- who you know, who's willing to publicly admit they know you. I know many hardworking artists who are killer comic artists and work a day job, and I know many hardworking artists who are supported by their parents or their spouse. Comics isn't an easy game, and we all do what we need to do to get by.
Working the comics hustle has made me appreciative of others who do so, and has made me sensitive to ways I can help. Although money is usually the most helpful, there are loads of ways you can help support artists and creators whose work you appreciate. In this post, I go over loads of free ways you can help creators from YouTubers to Bloggers, to Webcomic artists, to Game Devs.
Find Me Elsewhere:
For Daily Updates: www.instagram.com/Nattosoup
To chat: www.twitter.com/Nattosoup
For more art tutorials, supply reviews, and con recaps: www.nattosoup.blogspot.com
For convention how-tos: www.howtobeaconartist.tumblr.com
To help support online art education: www.patreon.com/Nattosoup
For my portfolio: www.behance.com/Nattosoup
For digital downloads: www.gumroad.com/nattosoup
For physical goodies: www.nattosoup.com/products
For my comic: www.nattosoup.com/kara-comic
Please consider donating to this blog or purchasing from Natto-shop (http://nattosoup.com/shop) if you want me to continue publishing quality content. All materials tested were purchased from my own pocket. Keep on Truckin' Nattosoup is not under any sponsorship.
October 21, 2016
Watercolor Basics: Top Techniques for Watercolor
This post was made possible due to the generosity of my Patrons on Patreon, who are the sponsors of this blog. We see no outside sponsorship beyond the Patreon, and all ad revenue generated from this site goes directly towards maintenance, better equipment, and purchasing further materials for review. By joining out Patreon and becoming a backer, you help support content like this and ensure that it continues. Without backer support, longform series like Watercolor Basics would not be possible, and all support is much appreciated. For information on sponsoring a specific post, please check out my Info page or contact me via email using the sidebar widget.
By now you're probably itching to get to painting. You've got your paper. You've got your paints. You have your brushes, and you know how to stretch watercolors. You're ready to start practicing.
Well fear not, the wait is over! Today we're covering my favorite watercolor techniques for comics, and I've got lots of links below to get you fired up to paint!
Missed a post? Why not catch up?
Other posts in the Watercolor Basics series:
Introduction Why WatercolorWatercolor Terms You Should KnowThe Difference Between Watercolor for Illustration, Watercolor for Fine ArtThe Great Brush OffMaterials You'll Need to Get StartedAll About That PaperPick a Palette- Selecting Paints for your Needs


Paper and paint quality can make a huge difference in how these techniques work for you. With Canson Montval (my paper of choice for comics), wet into wet techniques often result in harsh edges and poor color mixing, but on Arches or Moulin du Roy, wet into wet techniques handle like a dream, and color diffusion is fantastic. With cheap paints, glazing techniques often turn to mud, but with Winsor and Newton paints, Daniel Smith, or Holbein, translucent colors glaze well (although you should reserve applying more opaque watercolors towards the end of your illlustration, as they will turn to mud with glazing regardless of paint or paper quality).


Materials Used in this Demonstration:
Fabriano Studio Watercolor (student grade, but with good texture)
Small welled palette
Variety of paints (Mission Gold, Turner, Holbein)
Handful of synthetic brushes
Clean water
Sharpie Marker
Kosher salt (larger surface area, also what I have on hand)
Masking fluid
Wax resist crayon
Paper towels
Watercolor Techniques
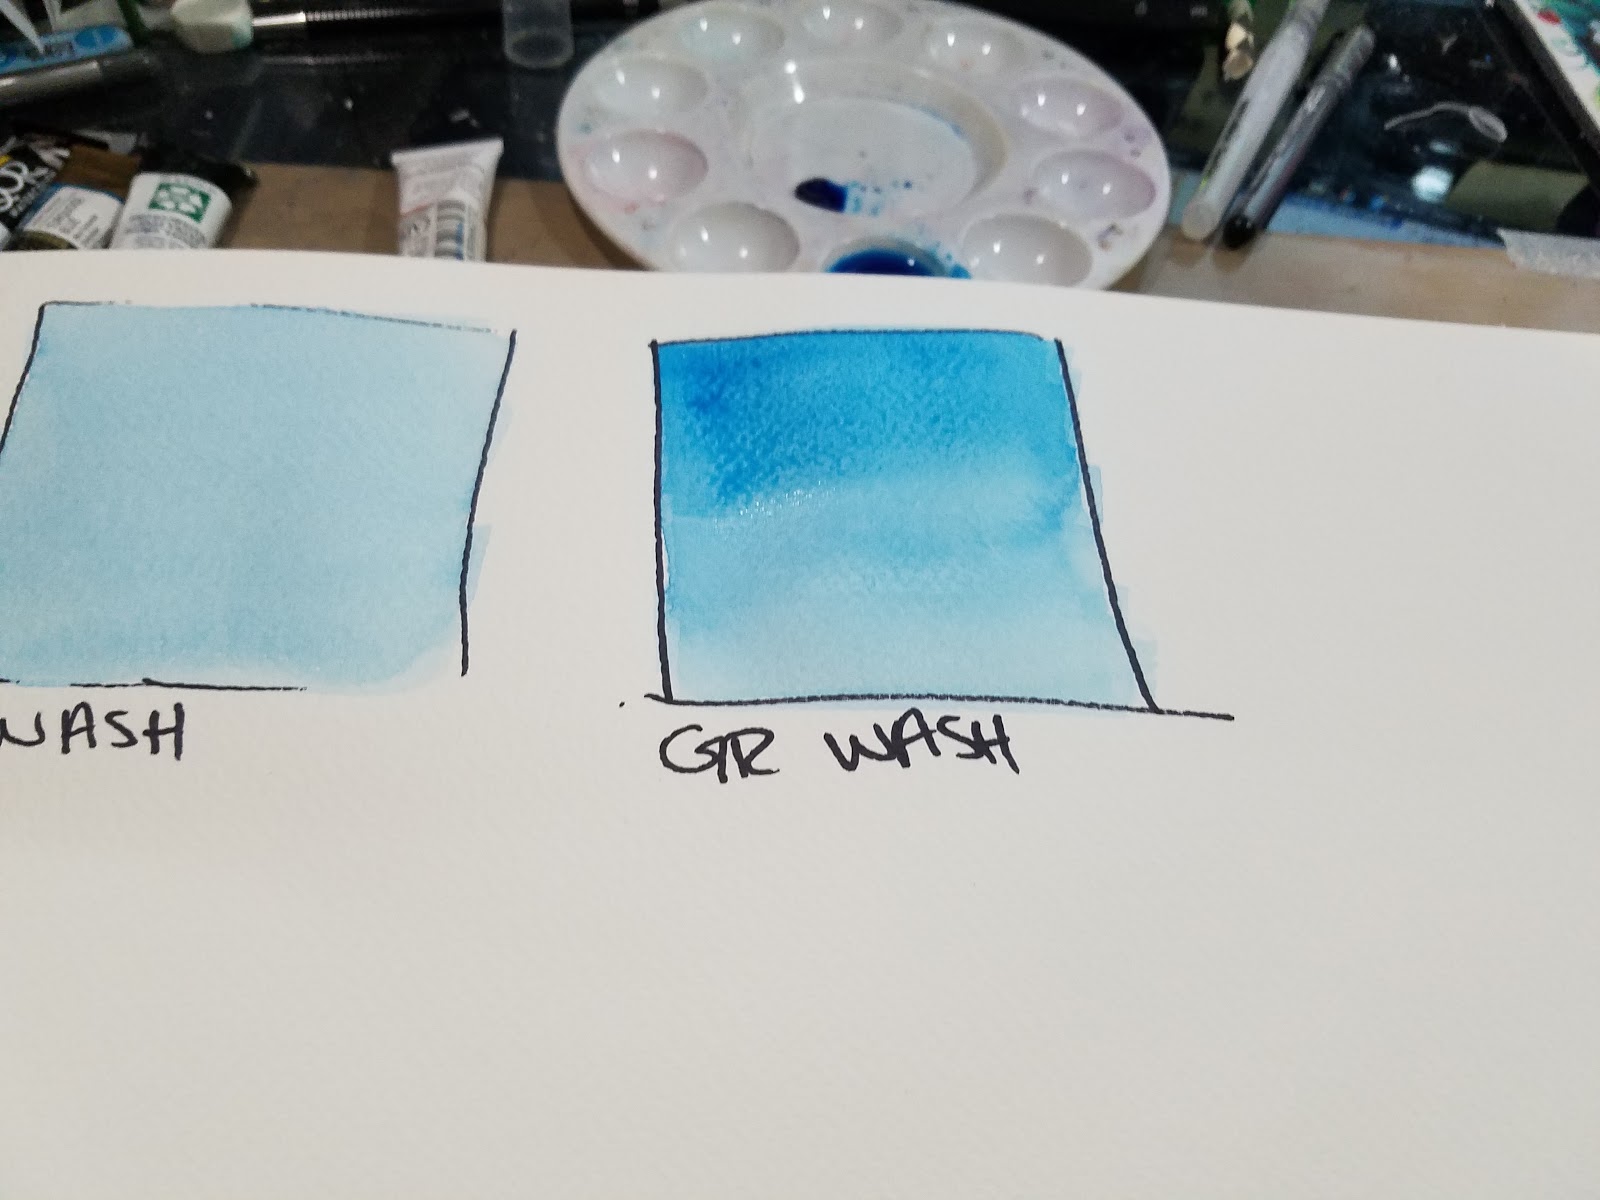
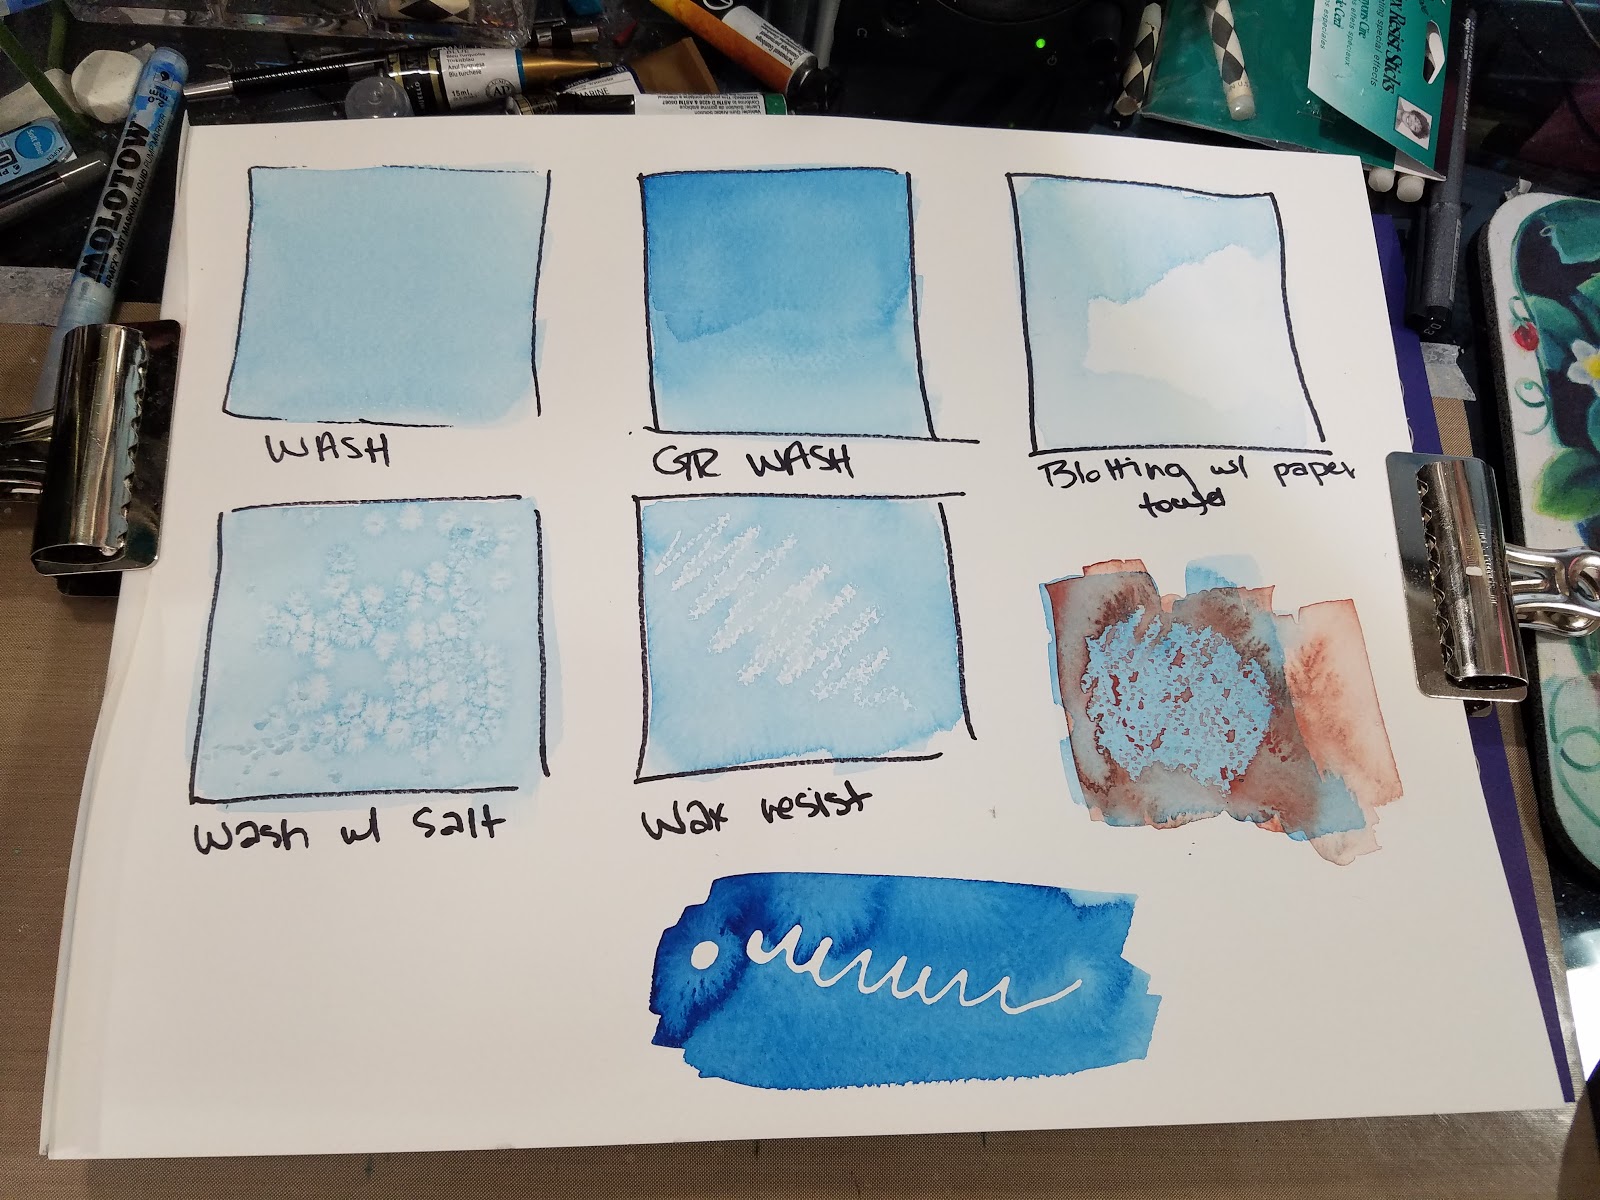
Washes

A wash is one of the most basic techniques- it's the application of pre-mixed paint+water to your paper. For large scale washes, most artists will use either a mop or a flat brush.
Gradiated Wash/Graduated Wash


 A graduated wash is a little more complicated. You apply a layer of either water or paint, and then slowly apply another layer of more saturated color at the top, and allow gravity to help dissolve the new layer into the old. Some papers can handle these types of washes better than others.
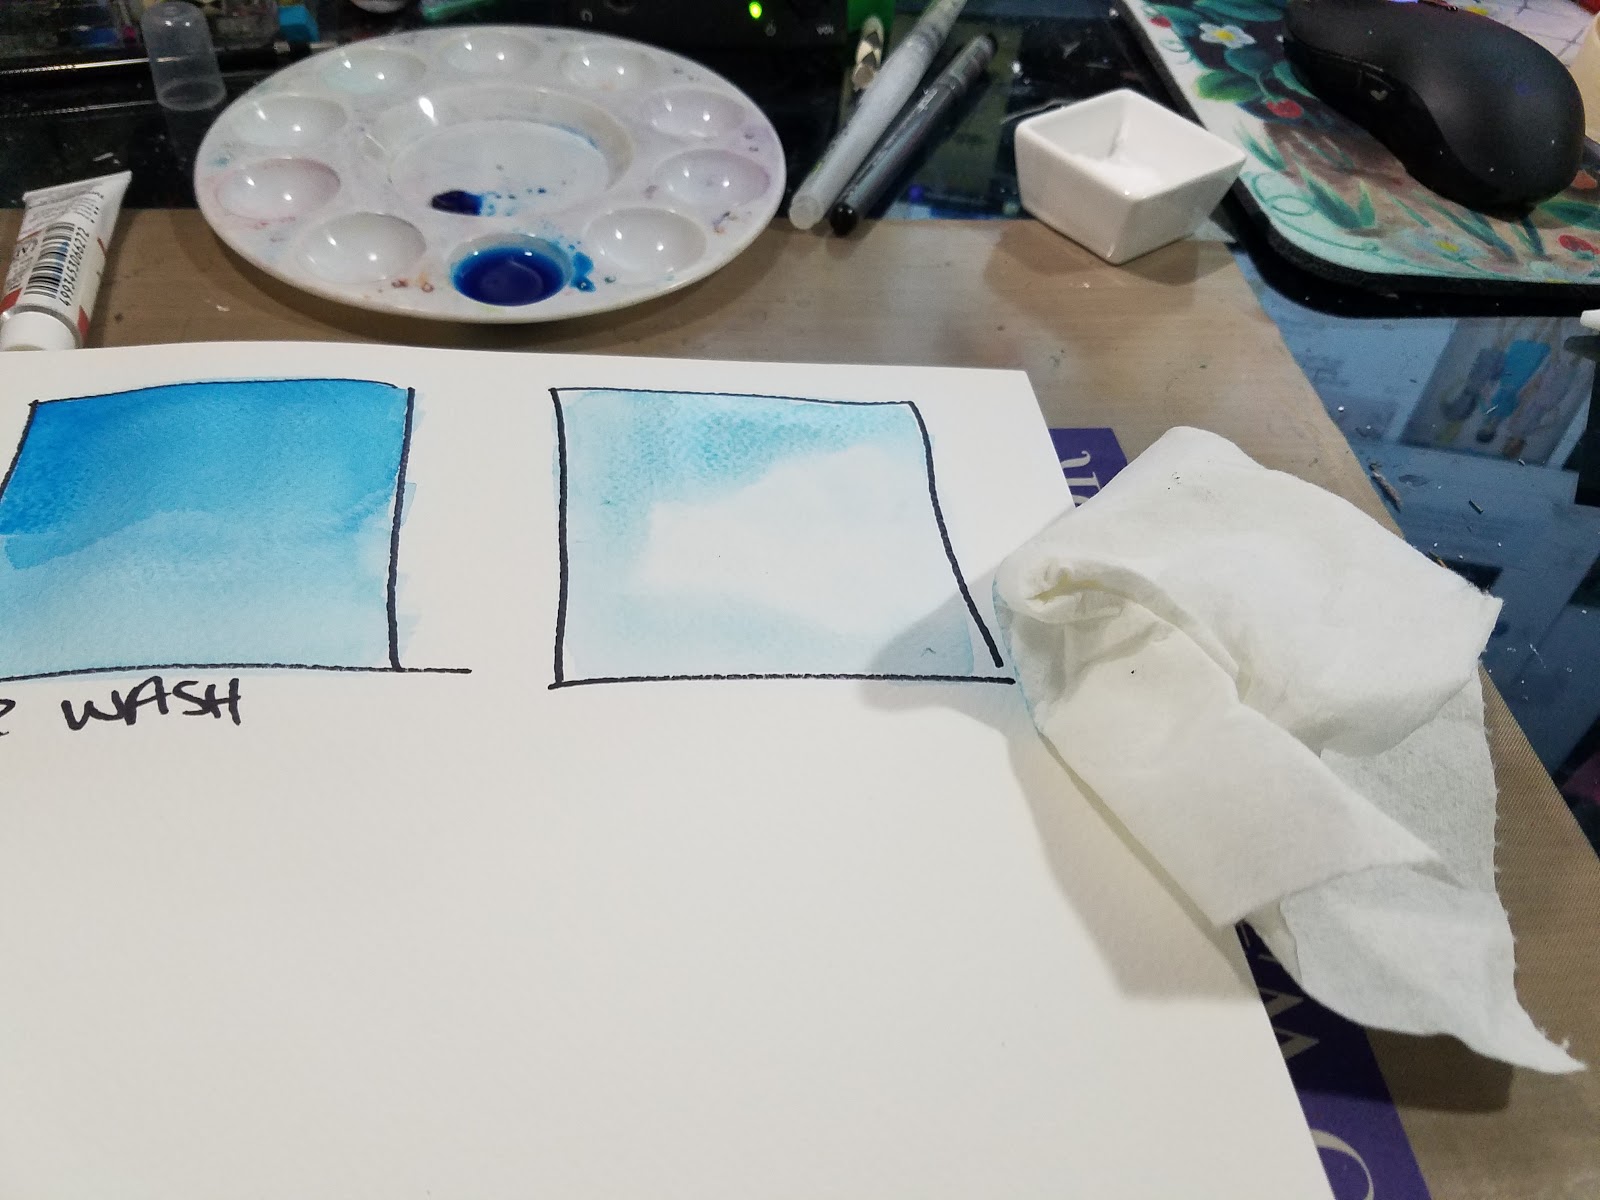
Blotting
 While your paint is still wet, you can use a paper towel or a rag to blot out color. This technique is useful for corrections, clouds, waves, ect.
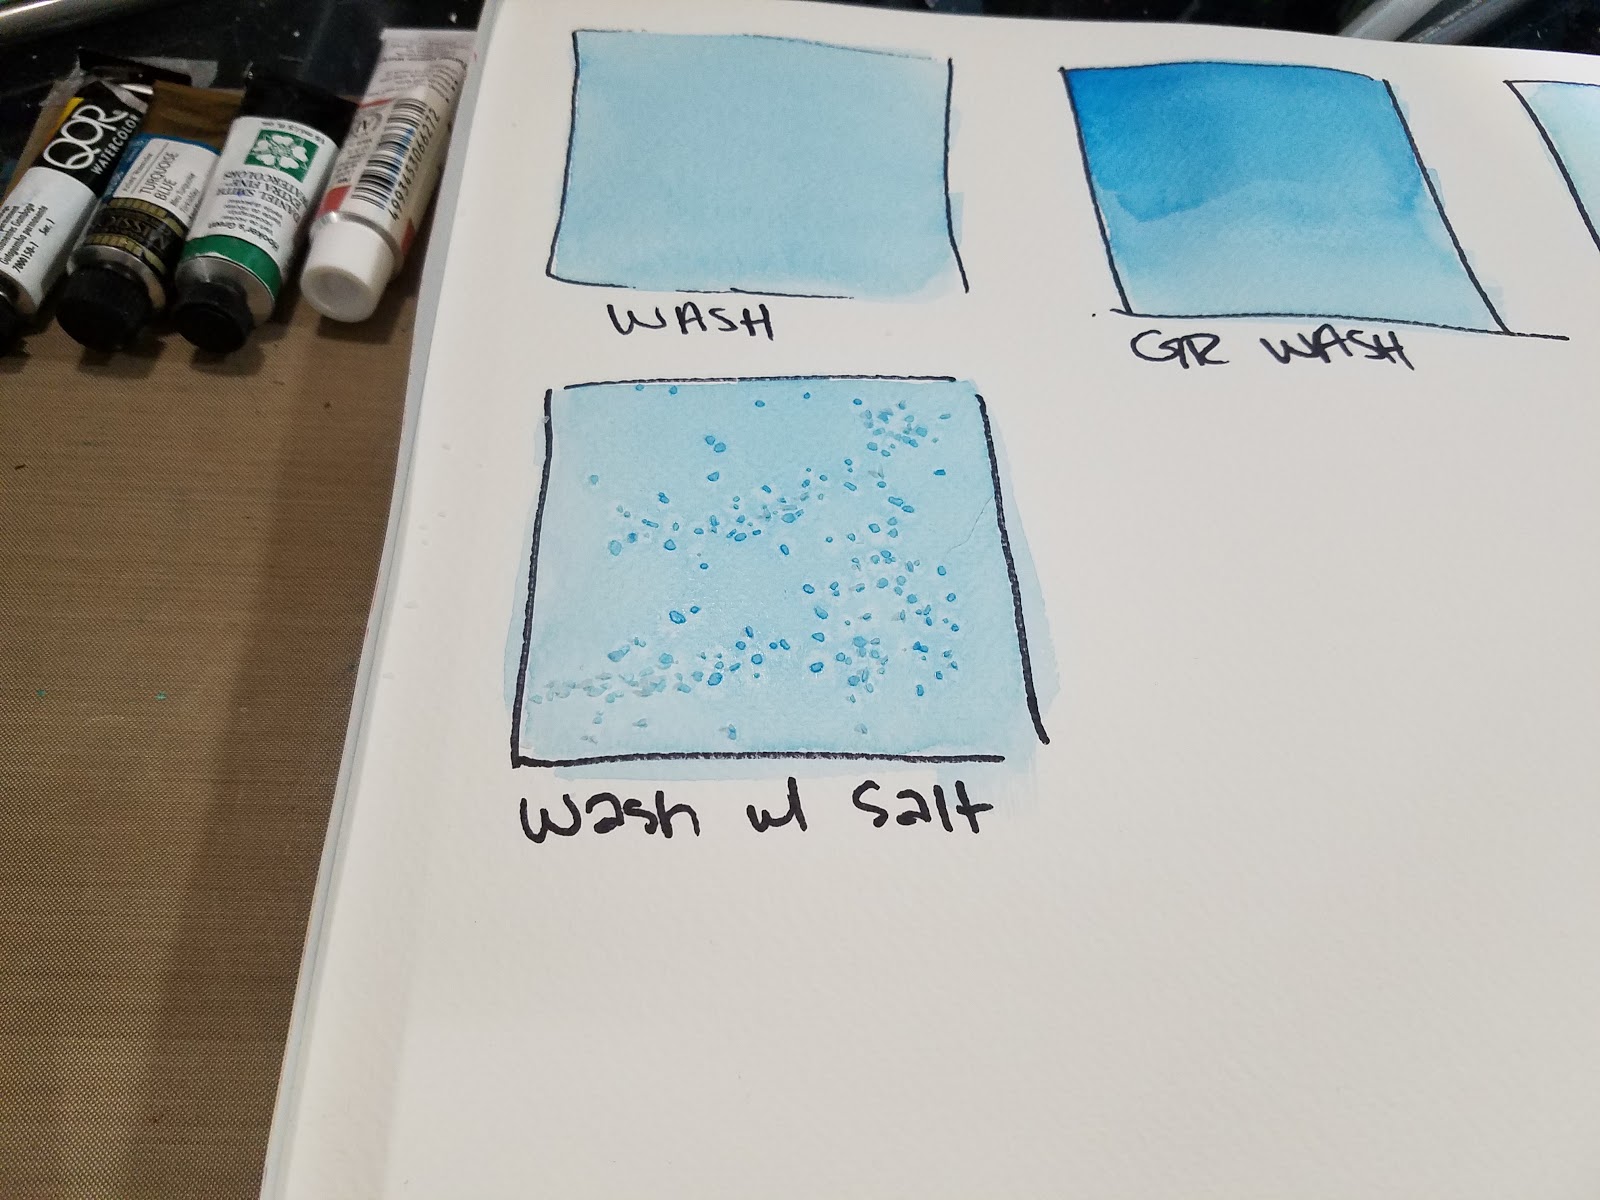
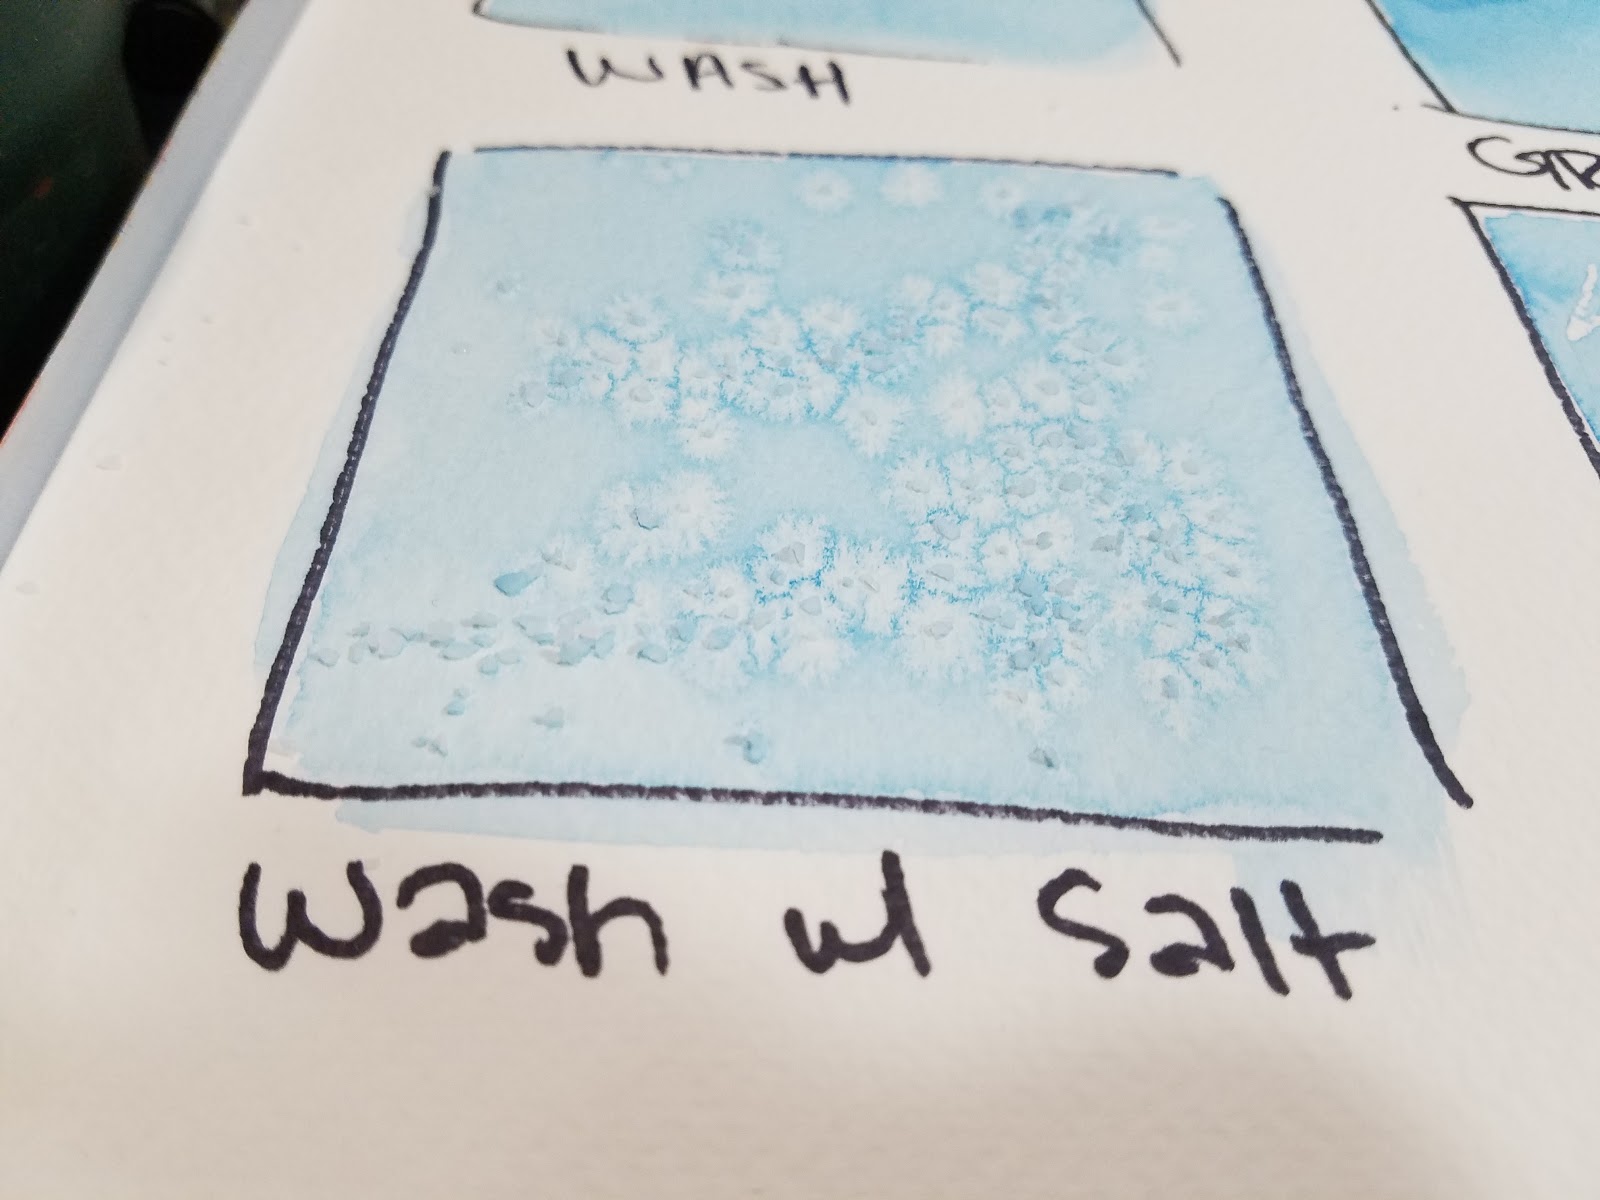
Salt

Sprinkling salt onto damp (not wet) watercolors creates an interesting crystalline effect as the salt absorbs water, drawing pigment towards it.
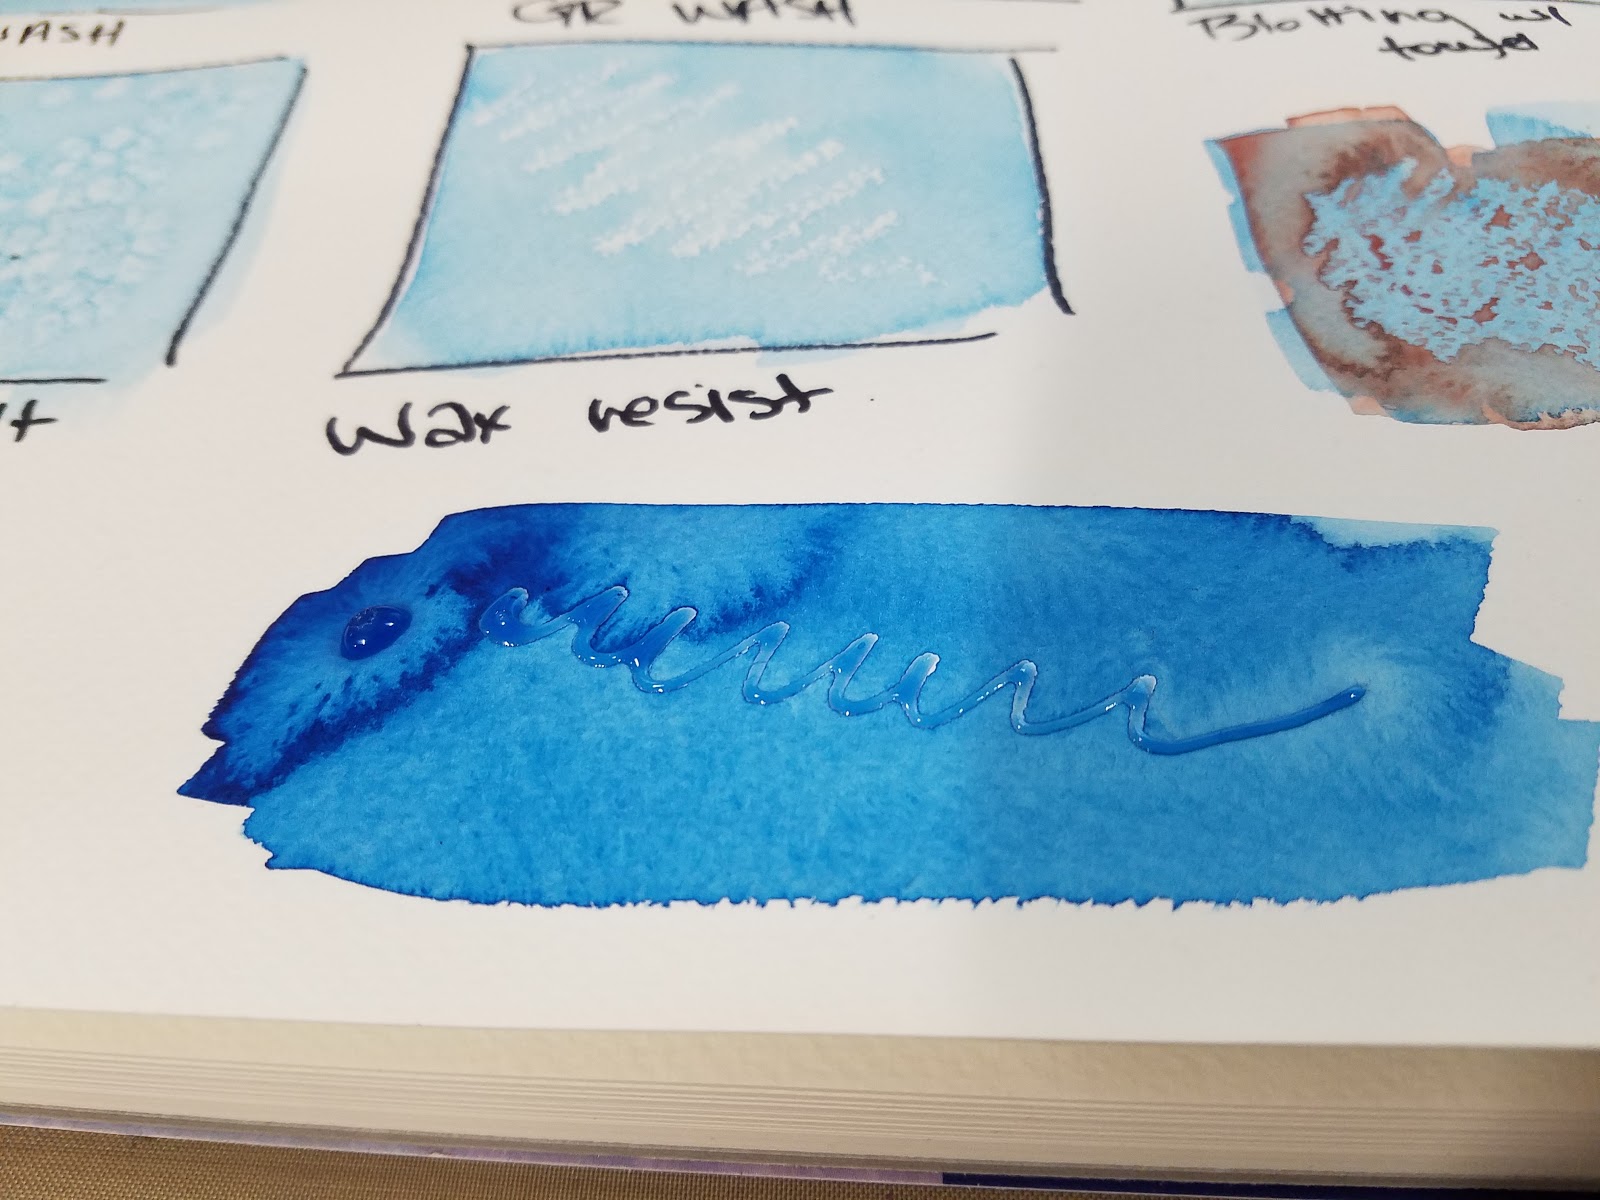
Wax Resist
 Applying wax before applying your color creates a 'resist', preserving the color below the wax (if using a clear wax crayon or candle)


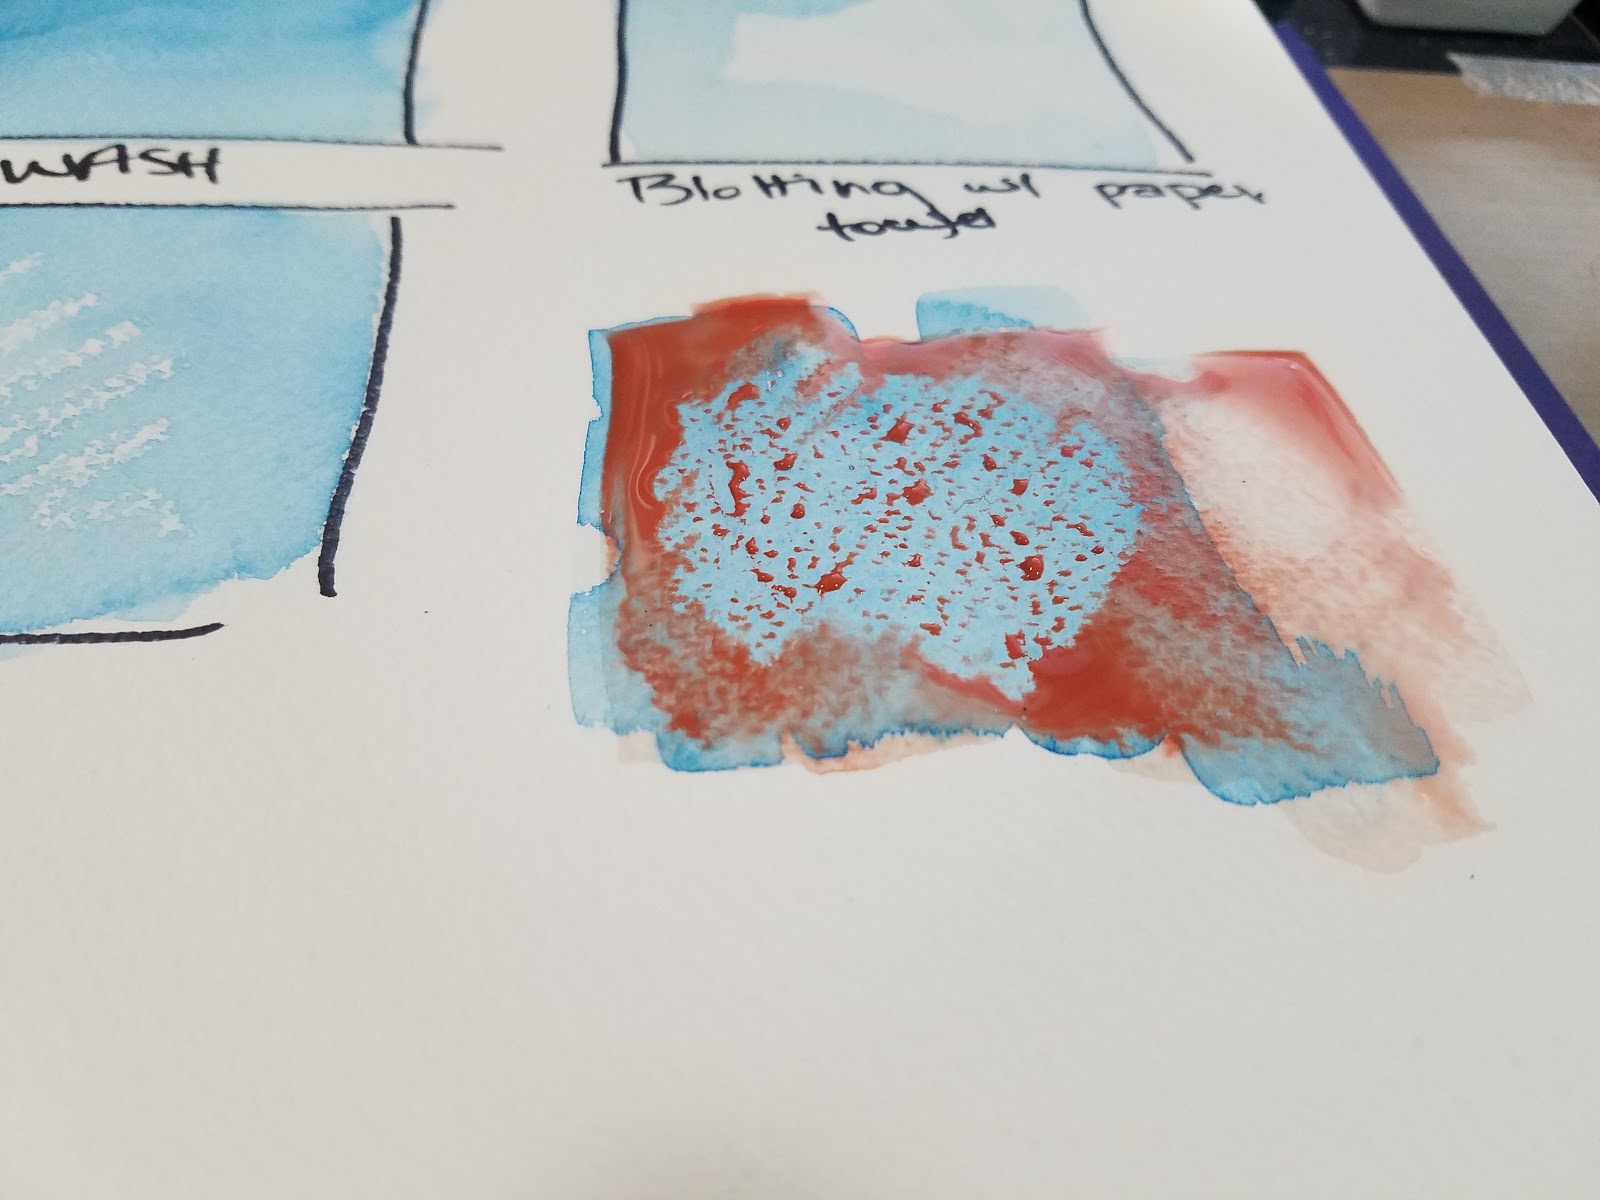
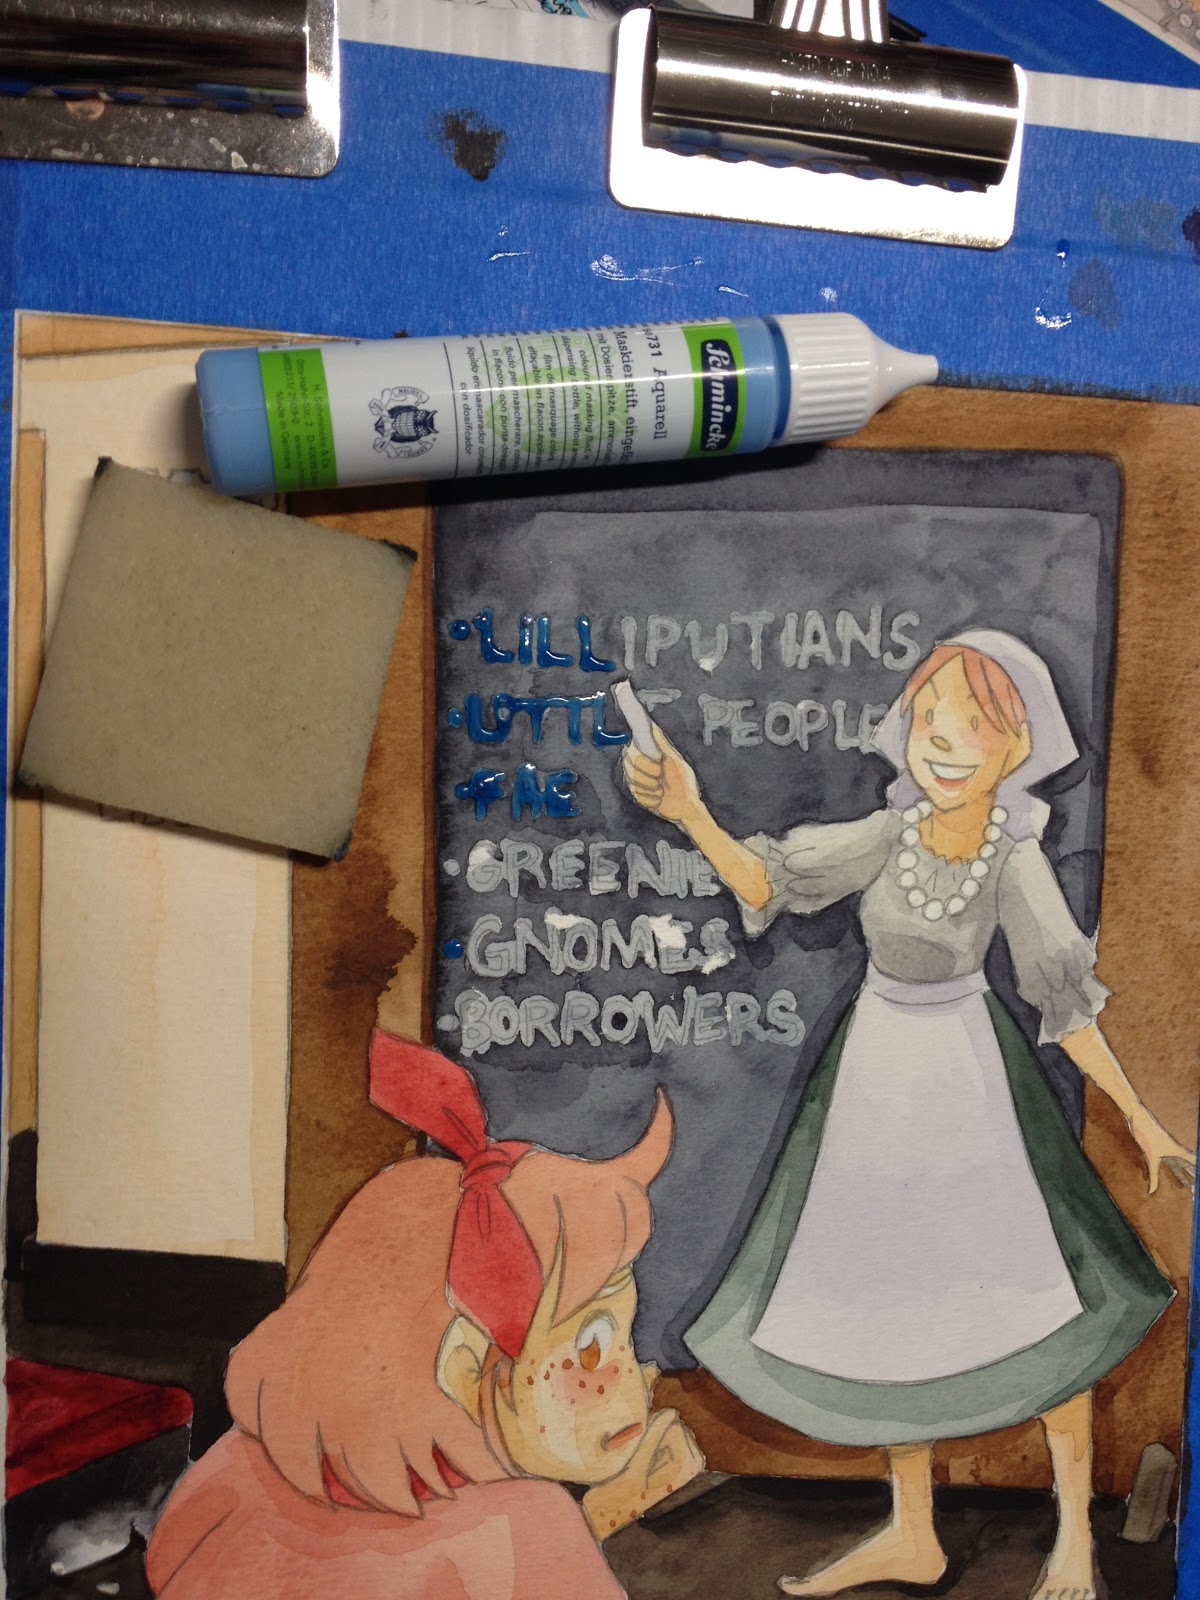
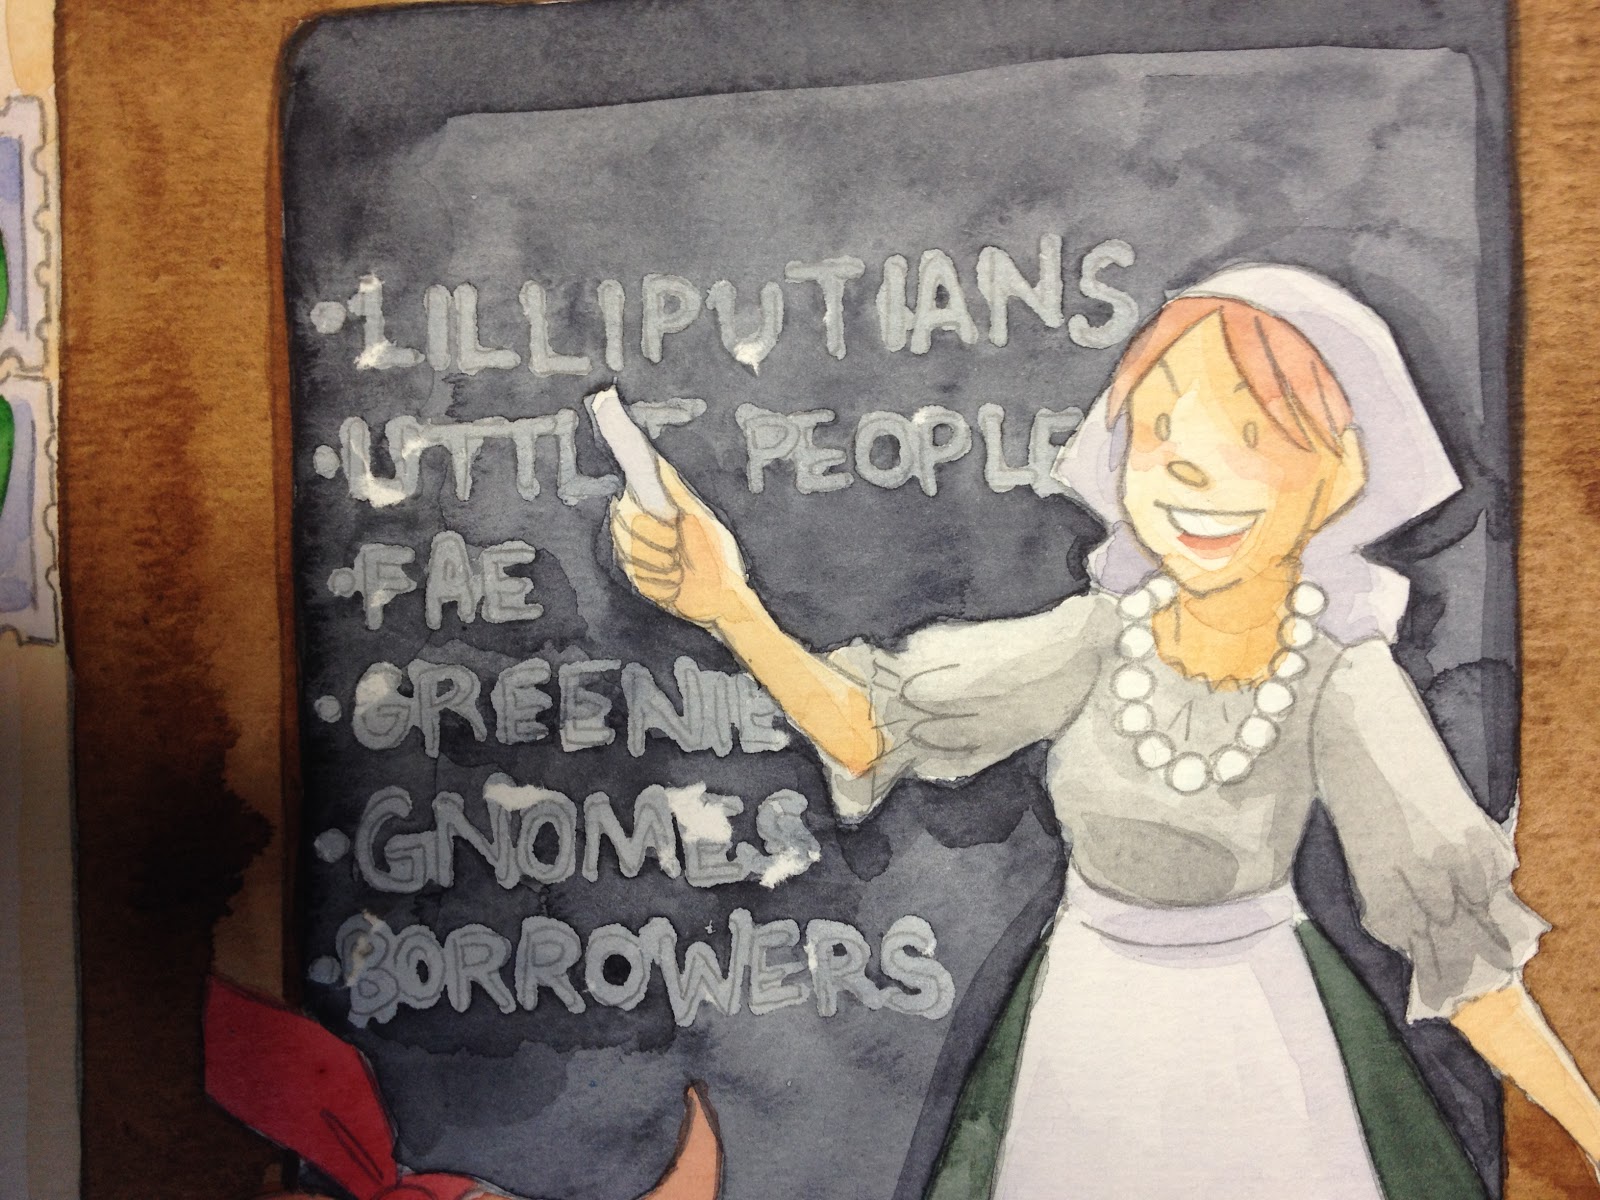
Masking Fluid
 Masking fluid, like wax resist, preserves the color of the area protected by the mask. Unlike wax resist, masking fluid is intended to be removable, although your results may vary (I always seem to have issues with it). Ideal use: apply when paper is completely dry, allow to dry 24 hours before painting over, allow all paint to dry 24 hours before removing. Even in that scenario, I have issues with masking fluid of various brands tearing up my paper (fluids tried: Schminke, shown above, Molotow Grafx, Le Masque)
Watercolor Techniques
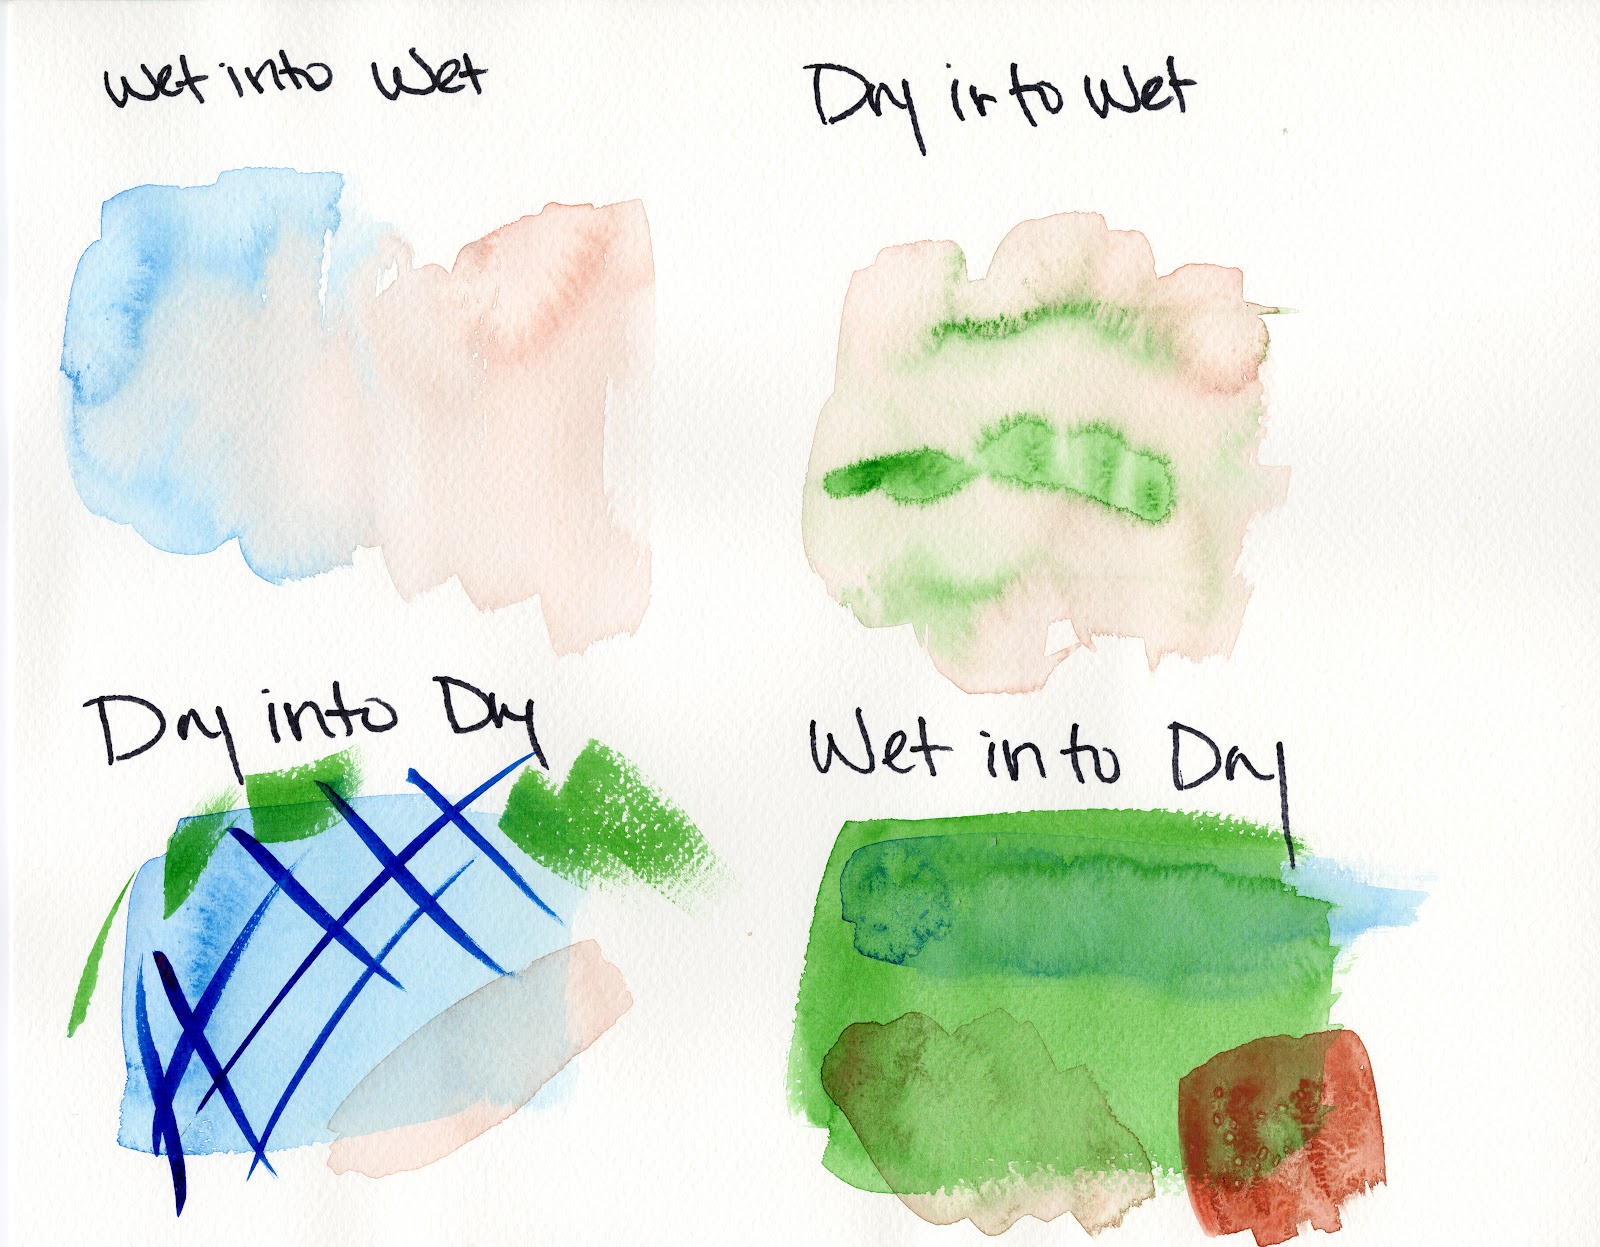
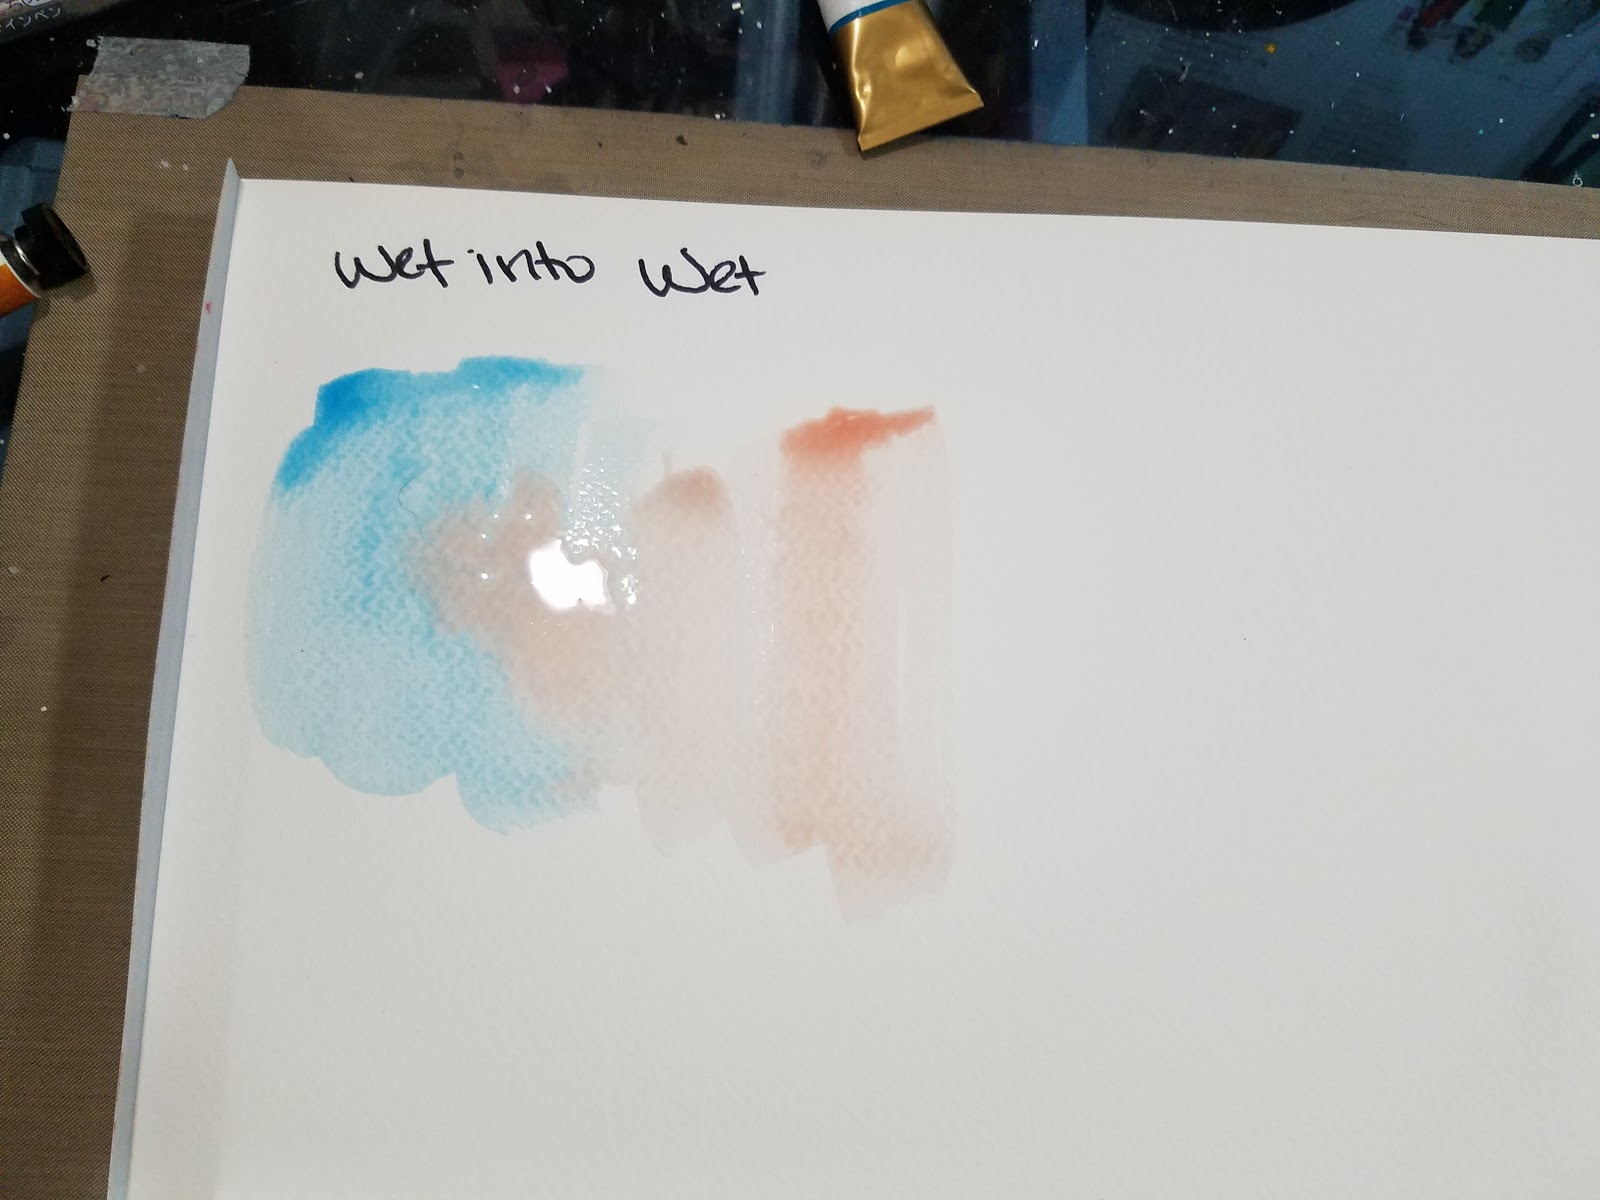
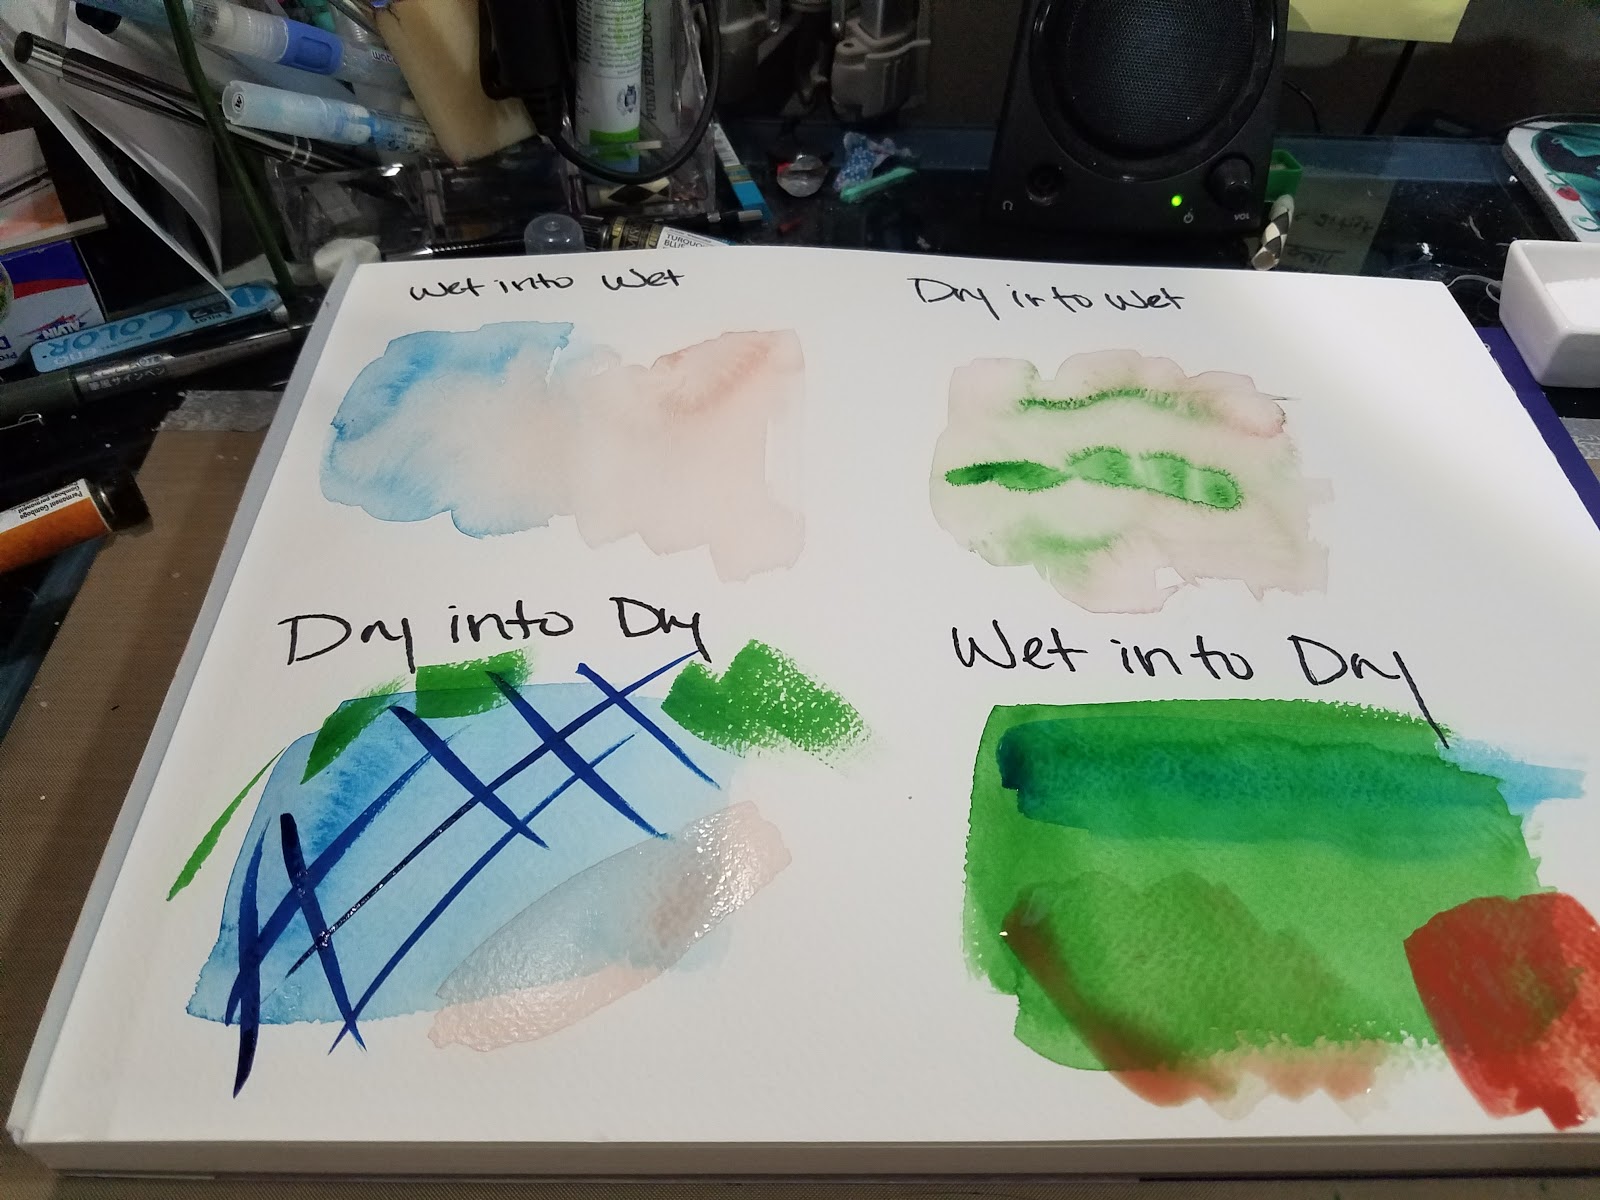
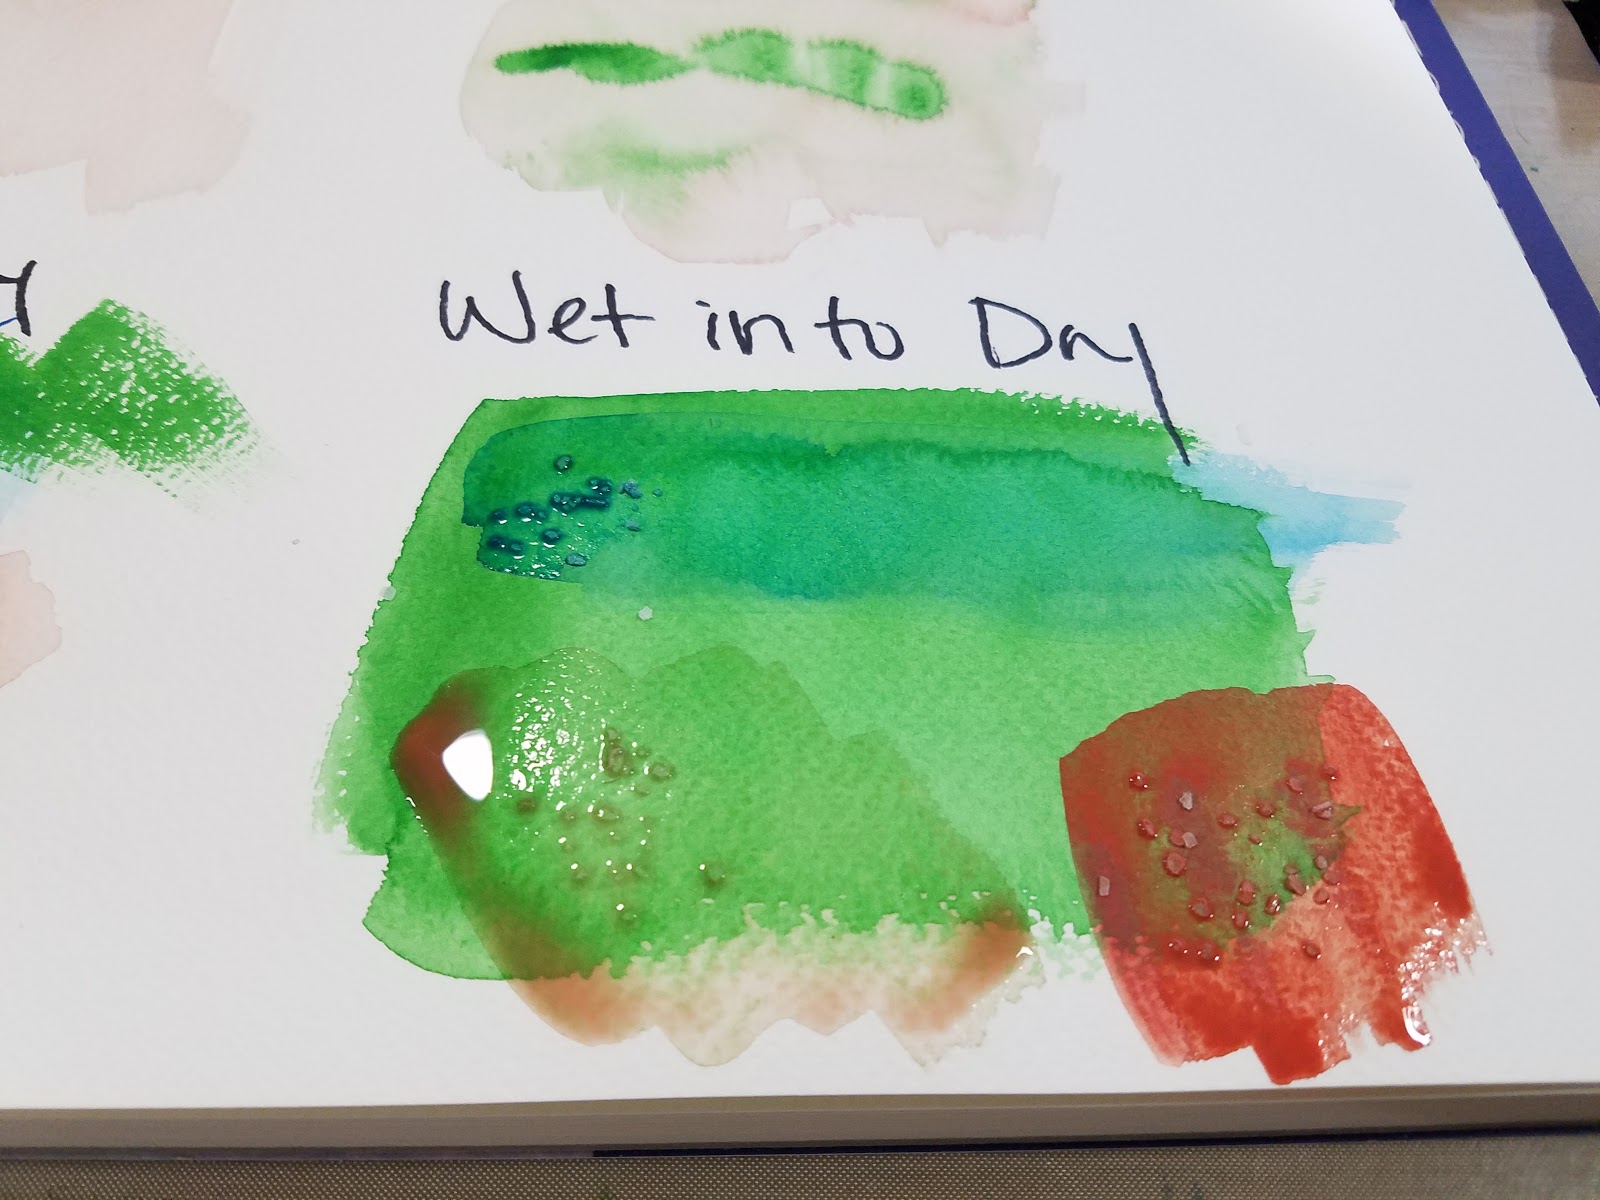
Wet into Wet

Paint is applied into still wet paint to cause blending and blooming effects. Very common in gestural, abstract, or early stages of a piece.
Dry into Wet
 Dry is a bit of a misnomer- you will need water to activate your paints, but your brush is relatively dry, and applying relatively dry pigment into still wet paint. Although the effect is more intense than wet into wet, the 'dry' paint will still diffuse into the wet paint.
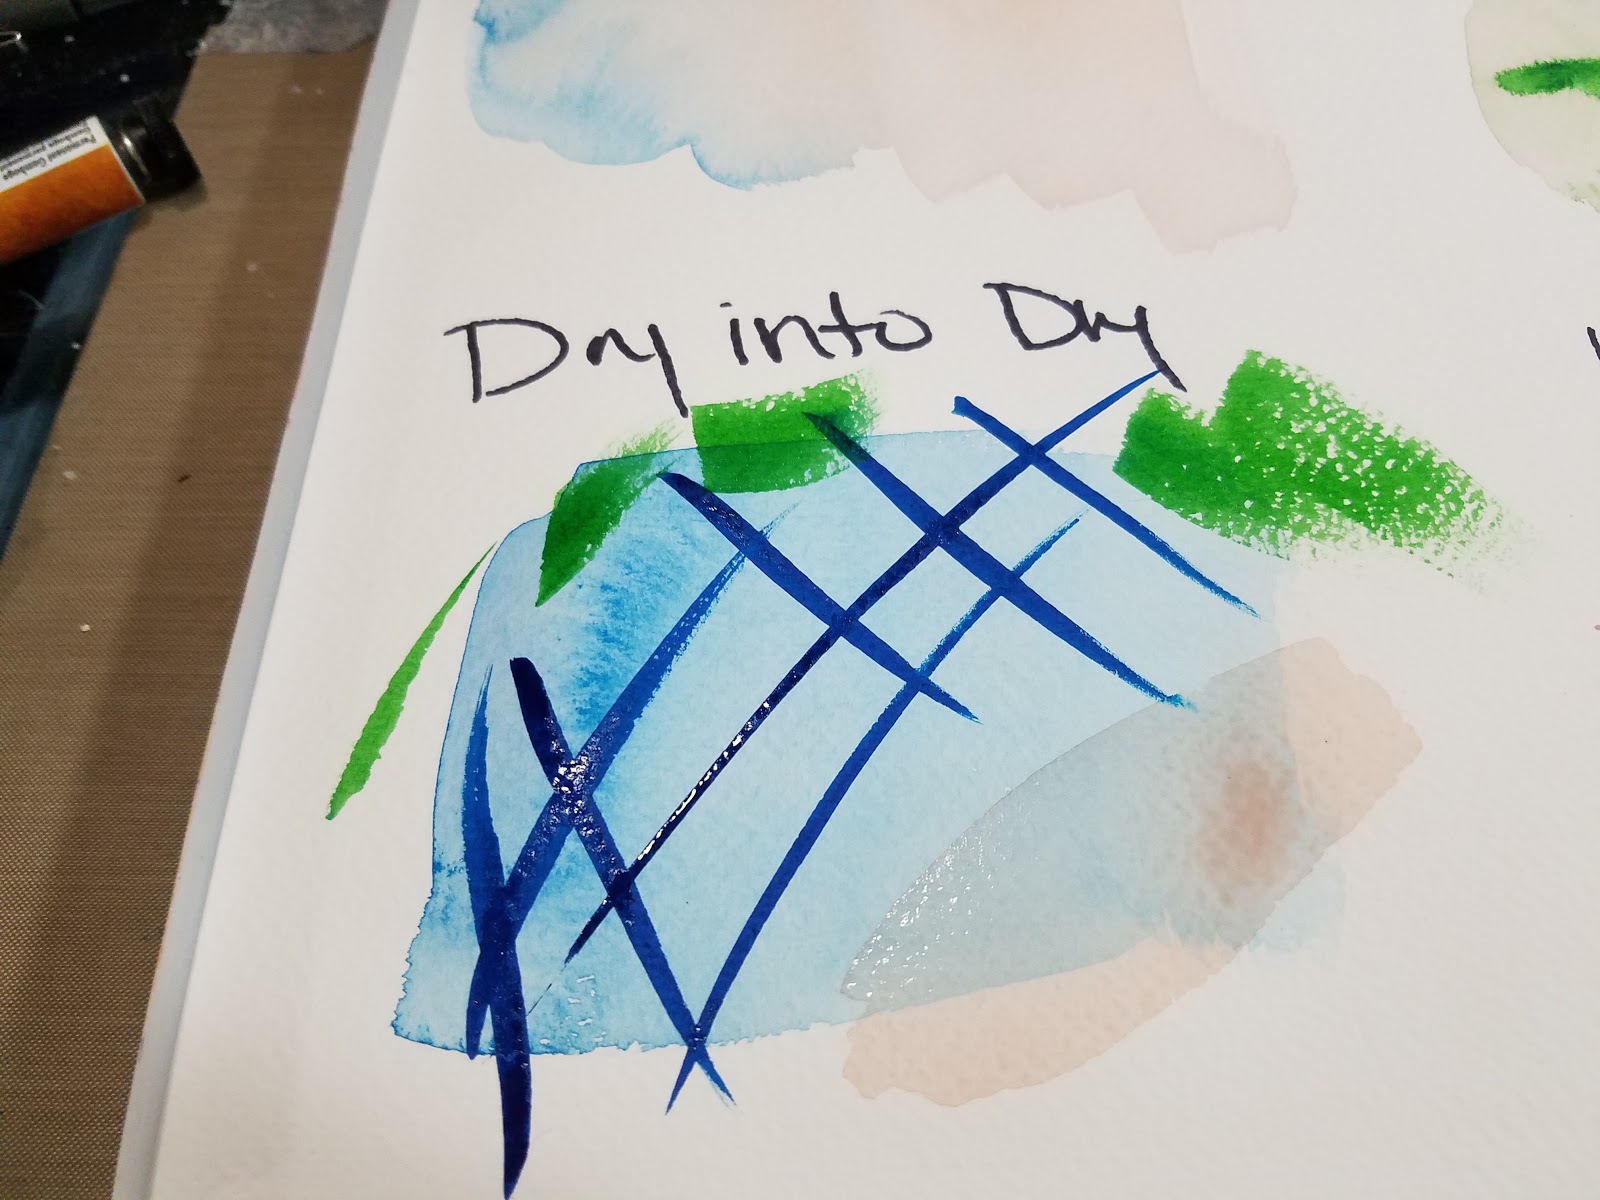
Dry into Dry


Applying relatively dry paint onto actually dried paint. Great for details- usually used towards the end of a painting. Glazing over this may reactivate the paint, causing muddiness.
Wet into Dry


Also commonly referred to as 'glazing'. Applying washes over dried areas of paint. This can influence the color to varying degrees, depending on how saturated the wash is.
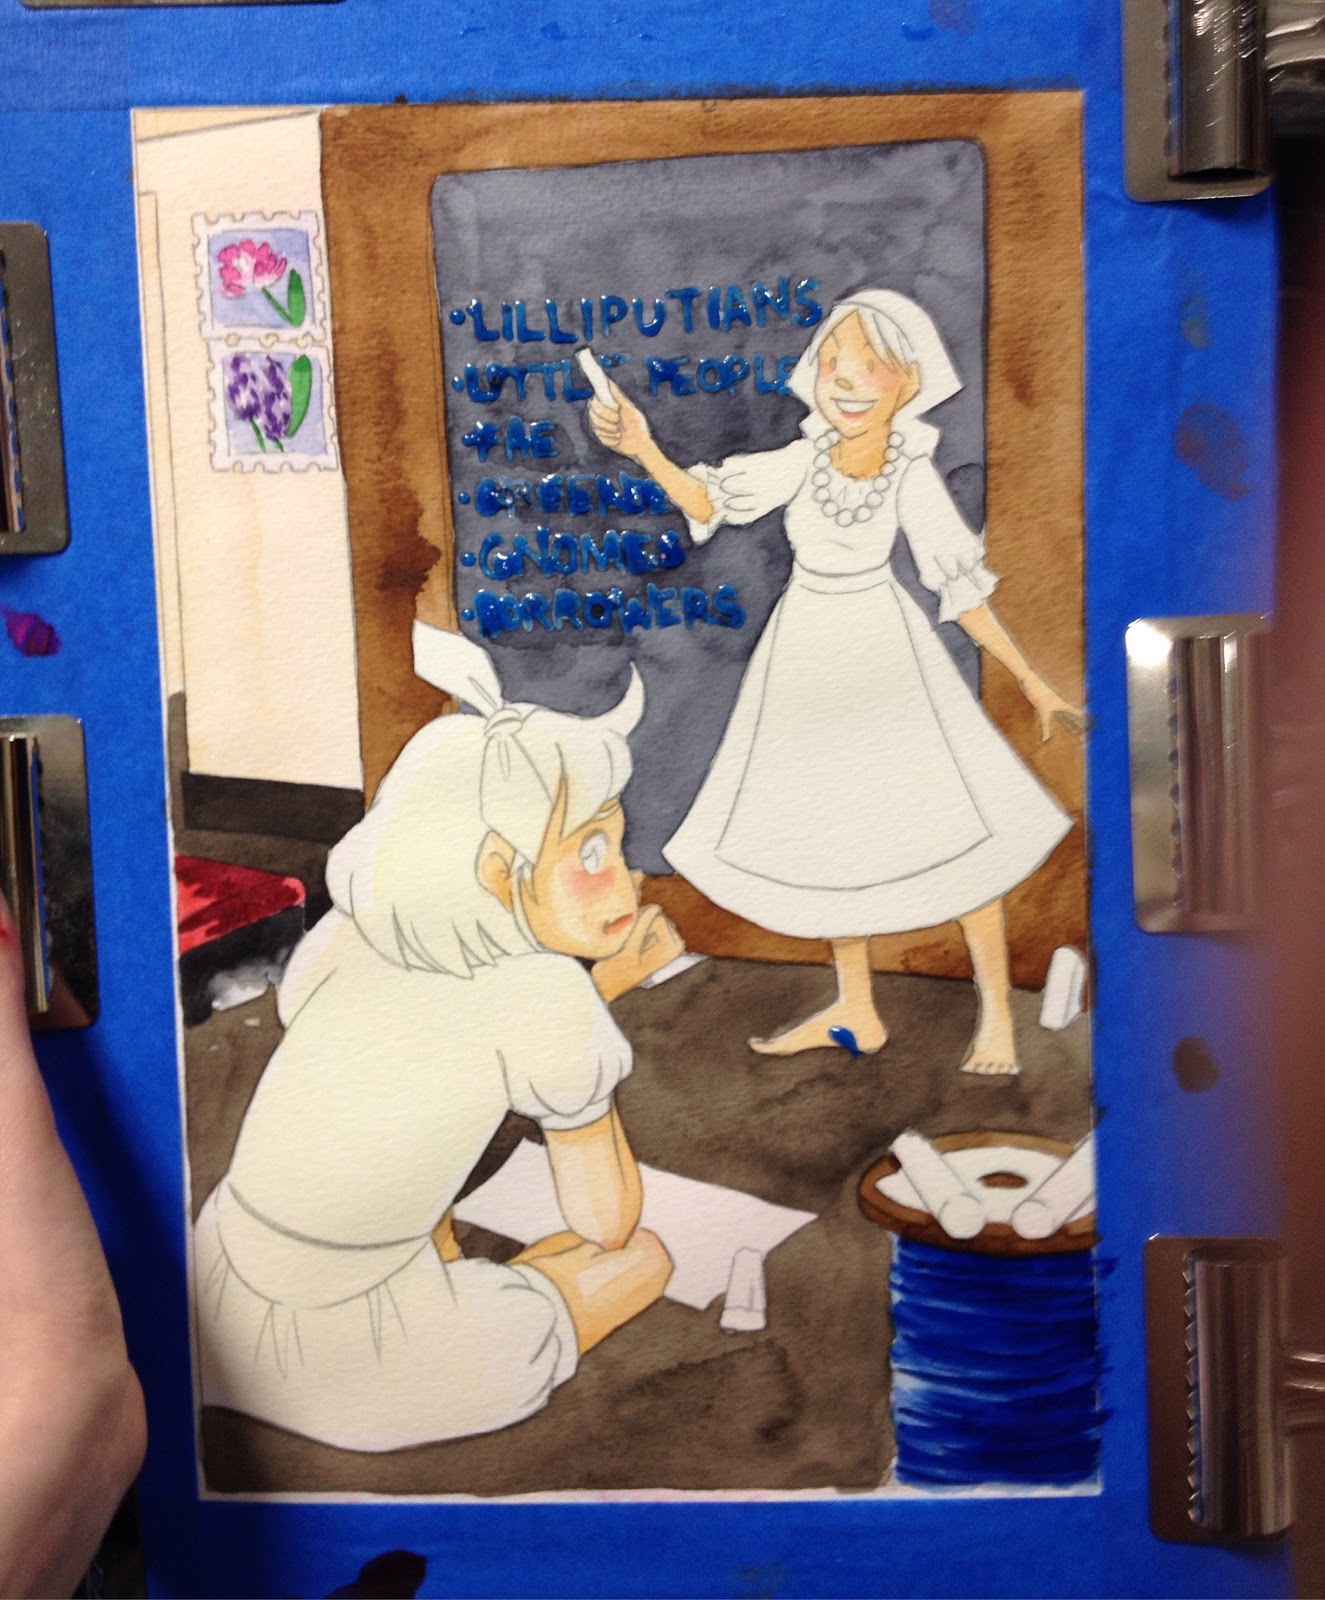
Masking Fluid (In Application)


 As demonstrated, once the masking fluid is removed, it leaves a mark of white paper against blue paint.
In the above video and photos, I demonstrate a few common watercolor techniques as very distinct techniques, but in reality, most artists use a combination of several to achieve the effects they want. You'll probably have a few favorite and most used techniques that work for the majority of what you want to accomplish in your comics and illustrations, and a few that serve quite well for special effects and emotive
As you create pages and complete studies, you'll find out which techniques are your mainstays, and which techniques will on work on certain papers. There are many wet into wet techniques that work well on handmade cotton papers and higher quality mould made papers that are impossible to execute well on Montval cellulose paper, so I cannot use those techniques in my comics. There are techniques that work on cold press papers that will not work on hot press.
For a wider variety of techniques and uses, I highly recommend exploring the links included in the Resources and Second Opinions section. Rather than replicate and redistribute the information they covered, I focused only on my most commonly used techniques.
My Most Commonly Used Techniques
Washes
 Used for: Toning the Page
Wax Resist
 Used for: Preserving white borders around images, creating pools of color
Masking Fluid


 Used for: Reserving areas of white that can later be painted over
Wet over Dry
 Used for: Toning, building up form
Dry Over Dry Used for: Small details, refining
We have a techniques demonstration video in the To Edit queue, so if you need a live action explanation, keep an eye on the YouTube channel for that. If you have any questions, or need further demonstration, don't hesitate to contact me via the email form in the left sidebar.
Resources and Second Opinions:
8 'Techniques' for Beginners
7 Must Know, Widely Used Watercolor Techniques for Beginners
Painting With Watercolors- Watercolor Painting Tips
WatercolorPainting.com-Watercolor Techniques Hub Page
Abstract Watercolor Techniques
Watercolor Techniques: Blending
Watercolor Tips: Salt Lifting
Feathering From Dry Paint
7 Deceptively Simple Watercolor Techniques that will Amaze Your Students
How to Paint Leaf Wreathes (basically dry onto dry techniques)
Watercolors for Beginners: Blending Techniques
Floating Paint
Wet on Wet, Yet Again
Watercolors for Beginners: Fun Techniques
Having Trouble with these Techniques?
Here are some resources to help you troubleshoot or make corrections:
6 Common Watercolor Mistakes and How to Correct Them
5 Simple Solutions for Watercolor Problems
5 Beginner Watercolor Painting Mistakes
Find Me Elsewhere:
For Daily Updates: www.instagram.com/Nattosoup
To chat: www.twitter.com/Nattosoup
For more art tutorials, supply reviews, and con recaps: www.nattosoup.blogspot.com
For convention how-tos: www.howtobeaconartist.tumblr.com
To help support online art education: www.patreon.com/Nattosoup
For my portfolio: www.behance.com/Nattosoup
For digital downloads: www.gumroad.com/nattosoup
For physical goodies: www.nattosoup.com/products
For my comic: www.nattosoup.com/kara-comic
Please consider donating to this blog or purchasing from Natto-shop (http://nattosoup.com/shop) if you want me to continue publishing quality content. All materials tested were purchased from my own pocket. Keep on Truckin' Nattosoup is not under any sponsorship.
By now you're probably itching to get to painting. You've got your paper. You've got your paints. You have your brushes, and you know how to stretch watercolors. You're ready to start practicing.
Well fear not, the wait is over! Today we're covering my favorite watercolor techniques for comics, and I've got lots of links below to get you fired up to paint!
Missed a post? Why not catch up?
Other posts in the Watercolor Basics series:
Introduction Why WatercolorWatercolor Terms You Should KnowThe Difference Between Watercolor for Illustration, Watercolor for Fine ArtThe Great Brush OffMaterials You'll Need to Get StartedAll About That PaperPick a Palette- Selecting Paints for your Needs

Paper and paint quality can make a huge difference in how these techniques work for you. With Canson Montval (my paper of choice for comics), wet into wet techniques often result in harsh edges and poor color mixing, but on Arches or Moulin du Roy, wet into wet techniques handle like a dream, and color diffusion is fantastic. With cheap paints, glazing techniques often turn to mud, but with Winsor and Newton paints, Daniel Smith, or Holbein, translucent colors glaze well (although you should reserve applying more opaque watercolors towards the end of your illlustration, as they will turn to mud with glazing regardless of paint or paper quality).

Materials Used in this Demonstration:
Fabriano Studio Watercolor (student grade, but with good texture)
Small welled palette
Variety of paints (Mission Gold, Turner, Holbein)
Handful of synthetic brushes
Clean water
Sharpie Marker
Kosher salt (larger surface area, also what I have on hand)
Masking fluid
Wax resist crayon
Paper towels
Watercolor Techniques
Washes

A wash is one of the most basic techniques- it's the application of pre-mixed paint+water to your paper. For large scale washes, most artists will use either a mop or a flat brush.
Gradiated Wash/Graduated Wash


 A graduated wash is a little more complicated. You apply a layer of either water or paint, and then slowly apply another layer of more saturated color at the top, and allow gravity to help dissolve the new layer into the old. Some papers can handle these types of washes better than others.
Blotting
 While your paint is still wet, you can use a paper towel or a rag to blot out color. This technique is useful for corrections, clouds, waves, ect.
Salt
Sprinkling salt onto damp (not wet) watercolors creates an interesting crystalline effect as the salt absorbs water, drawing pigment towards it.
Wax Resist
 Applying wax before applying your color creates a 'resist', preserving the color below the wax (if using a clear wax crayon or candle)
Masking Fluid
 Masking fluid, like wax resist, preserves the color of the area protected by the mask. Unlike wax resist, masking fluid is intended to be removable, although your results may vary (I always seem to have issues with it). Ideal use: apply when paper is completely dry, allow to dry 24 hours before painting over, allow all paint to dry 24 hours before removing. Even in that scenario, I have issues with masking fluid of various brands tearing up my paper (fluids tried: Schminke, shown above, Molotow Grafx, Le Masque)
Watercolor Techniques
Wet into Wet
Paint is applied into still wet paint to cause blending and blooming effects. Very common in gestural, abstract, or early stages of a piece.
Dry into Wet
 Dry is a bit of a misnomer- you will need water to activate your paints, but your brush is relatively dry, and applying relatively dry pigment into still wet paint. Although the effect is more intense than wet into wet, the 'dry' paint will still diffuse into the wet paint.
Dry into Dry


Applying relatively dry paint onto actually dried paint. Great for details- usually used towards the end of a painting. Glazing over this may reactivate the paint, causing muddiness.
Wet into Dry

Also commonly referred to as 'glazing'. Applying washes over dried areas of paint. This can influence the color to varying degrees, depending on how saturated the wash is.
Masking Fluid (In Application)


 As demonstrated, once the masking fluid is removed, it leaves a mark of white paper against blue paint.
In the above video and photos, I demonstrate a few common watercolor techniques as very distinct techniques, but in reality, most artists use a combination of several to achieve the effects they want. You'll probably have a few favorite and most used techniques that work for the majority of what you want to accomplish in your comics and illustrations, and a few that serve quite well for special effects and emotive
As you create pages and complete studies, you'll find out which techniques are your mainstays, and which techniques will on work on certain papers. There are many wet into wet techniques that work well on handmade cotton papers and higher quality mould made papers that are impossible to execute well on Montval cellulose paper, so I cannot use those techniques in my comics. There are techniques that work on cold press papers that will not work on hot press.
For a wider variety of techniques and uses, I highly recommend exploring the links included in the Resources and Second Opinions section. Rather than replicate and redistribute the information they covered, I focused only on my most commonly used techniques.
My Most Commonly Used Techniques
Washes
 Used for: Toning the Page
Wax Resist
 Used for: Preserving white borders around images, creating pools of color
Masking Fluid
 Used for: Reserving areas of white that can later be painted over
Wet over Dry
 Used for: Toning, building up form
Dry Over Dry
 Used for: Small details, refining
We have a techniques demonstration video in the To Edit queue, so if you need a live action explanation, keep an eye on the YouTube channel for that. If you have any questions, or need further demonstration, don't hesitate to contact me via the email form in the left sidebar.
Resources and Second Opinions:
8 'Techniques' for Beginners
7 Must Know, Widely Used Watercolor Techniques for Beginners
Painting With Watercolors- Watercolor Painting Tips
WatercolorPainting.com-Watercolor Techniques Hub Page
Abstract Watercolor Techniques
Watercolor Techniques: Blending
Watercolor Tips: Salt Lifting
Feathering From Dry Paint
7 Deceptively Simple Watercolor Techniques that will Amaze Your Students
How to Paint Leaf Wreathes (basically dry onto dry techniques)
Watercolors for Beginners: Blending Techniques
Floating Paint
Wet on Wet, Yet Again
Watercolors for Beginners: Fun Techniques
Having Trouble with these Techniques?
Here are some resources to help you troubleshoot or make corrections:
6 Common Watercolor Mistakes and How to Correct Them
5 Simple Solutions for Watercolor Problems
5 Beginner Watercolor Painting Mistakes
Find Me Elsewhere:
For Daily Updates: www.instagram.com/Nattosoup
To chat: www.twitter.com/Nattosoup
For more art tutorials, supply reviews, and con recaps: www.nattosoup.blogspot.com
For convention how-tos: www.howtobeaconartist.tumblr.com
To help support online art education: www.patreon.com/Nattosoup
For my portfolio: www.behance.com/Nattosoup
For digital downloads: www.gumroad.com/nattosoup
For physical goodies: www.nattosoup.com/products
For my comic: www.nattosoup.com/kara-comic
Please consider donating to this blog or purchasing from Natto-shop (http://nattosoup.com/shop) if you want me to continue publishing quality content. All materials tested were purchased from my own pocket. Keep on Truckin' Nattosoup is not under any sponsorship.
October 19, 2016
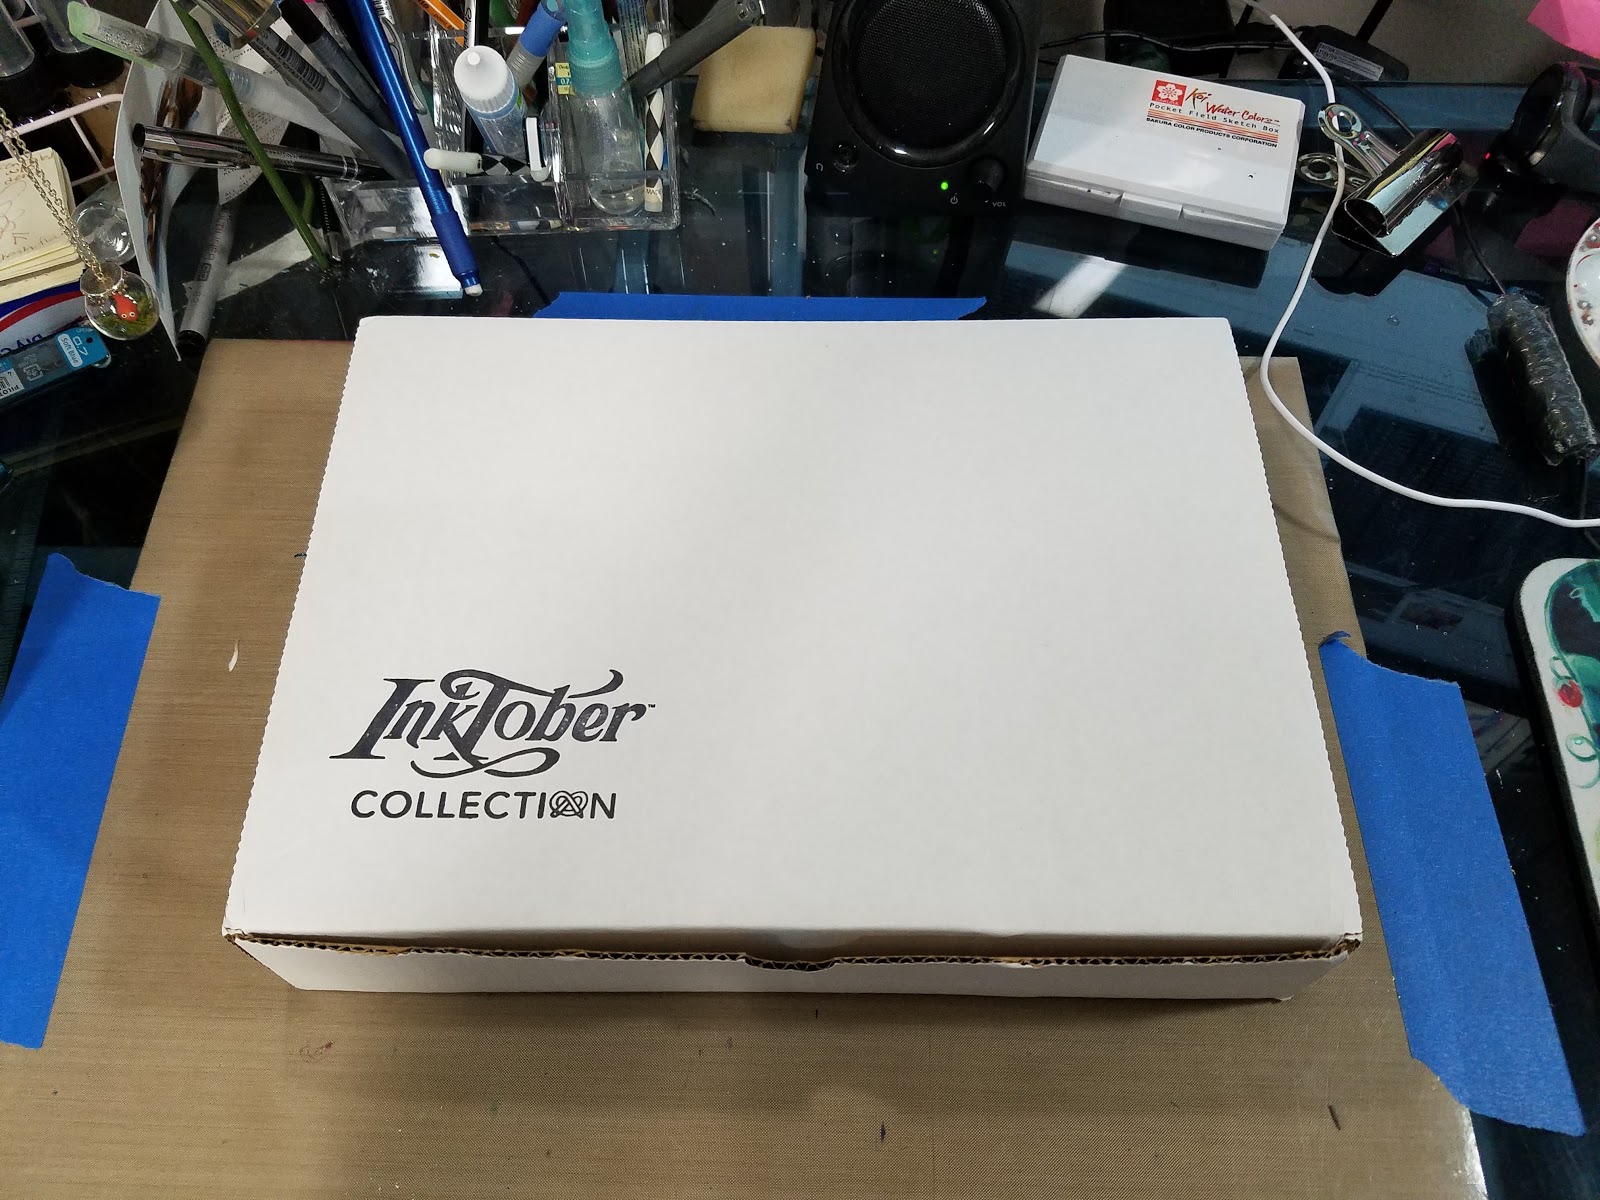
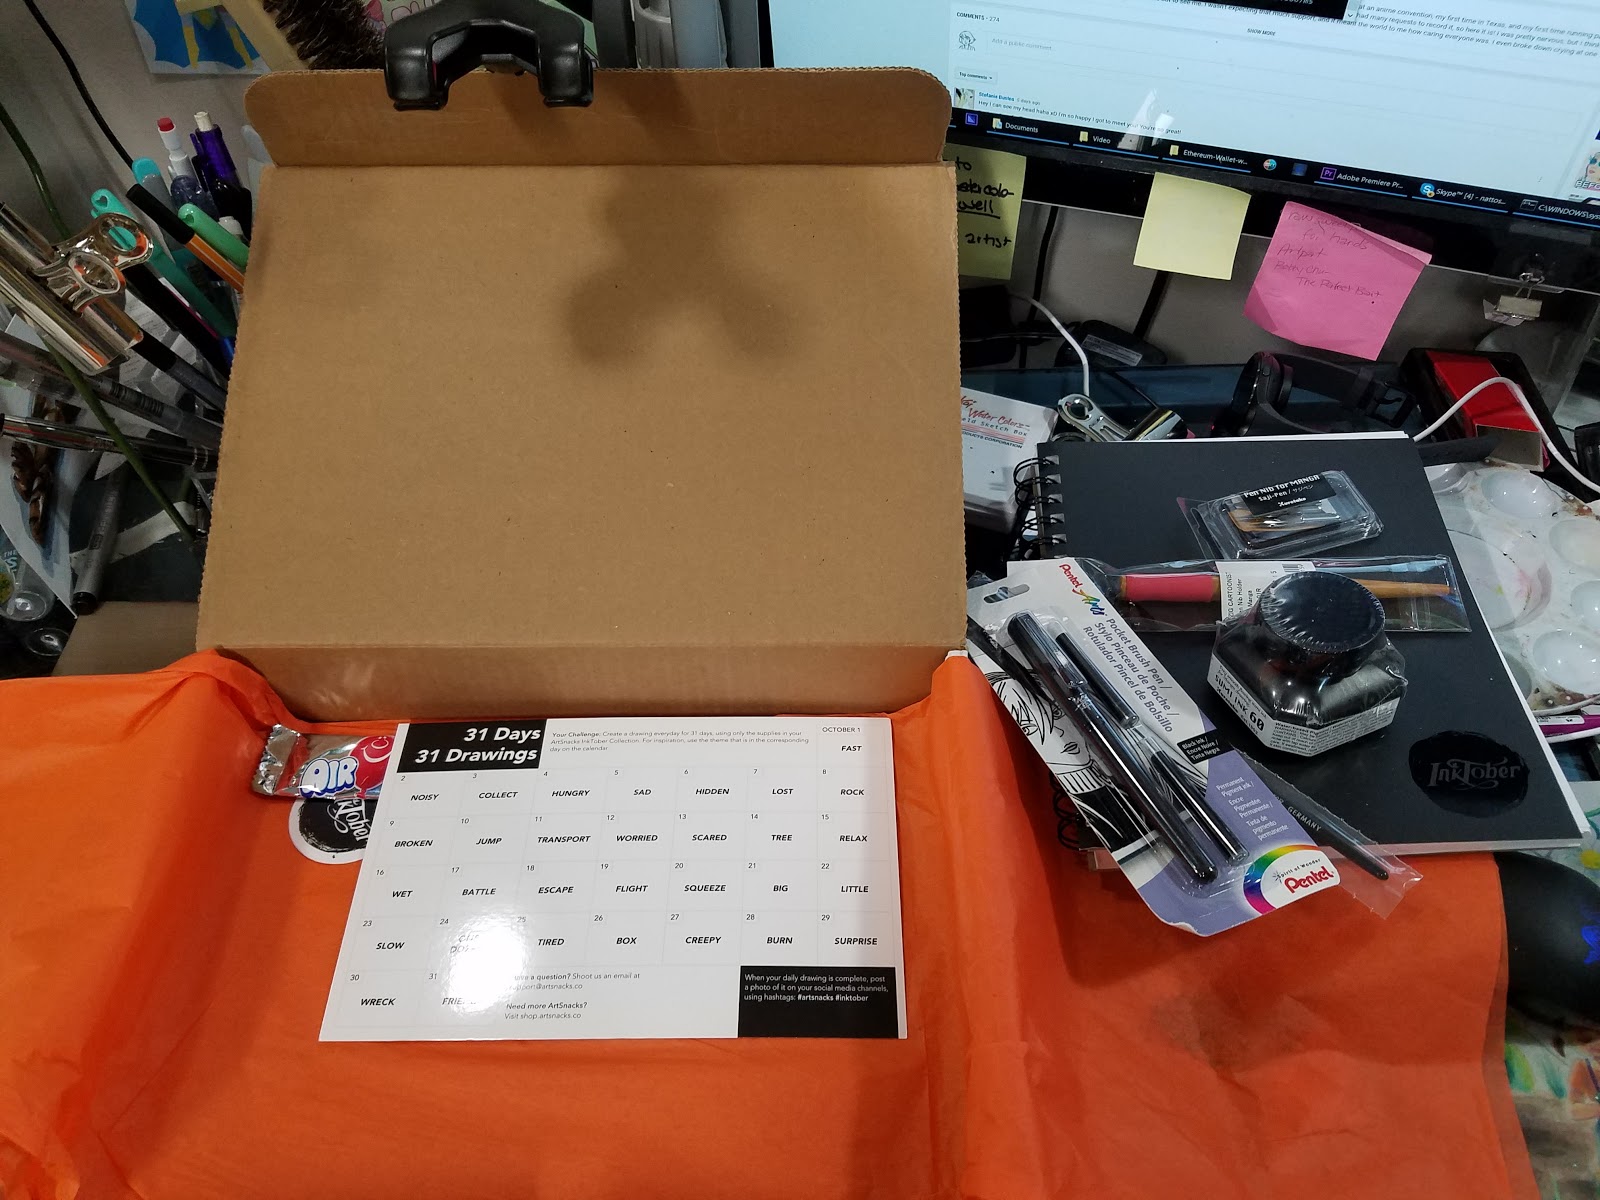
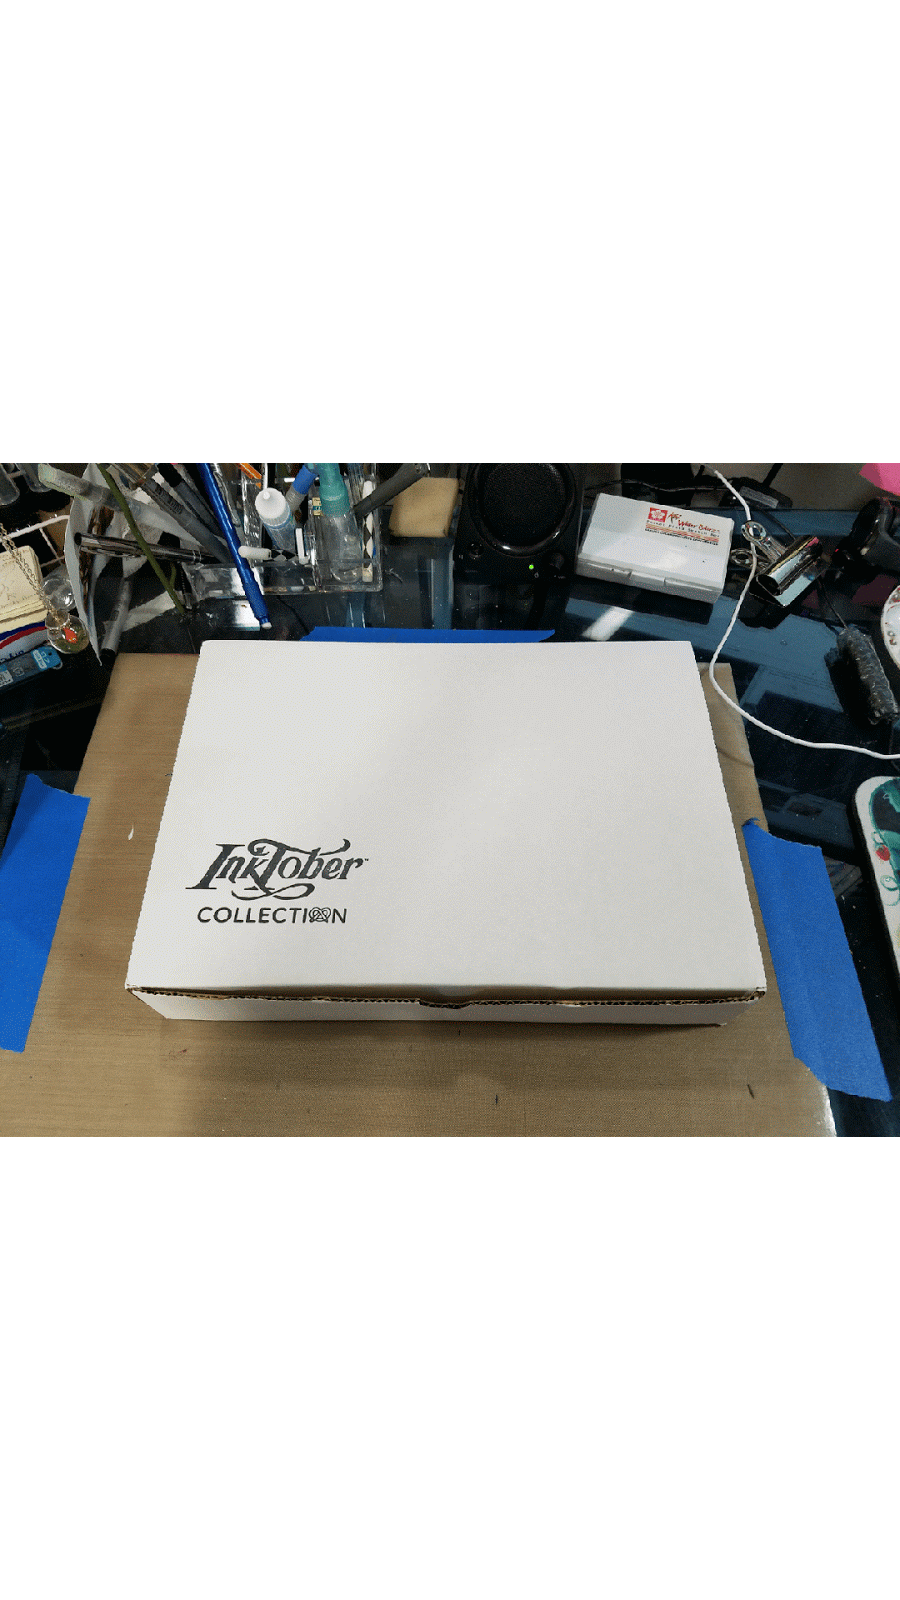
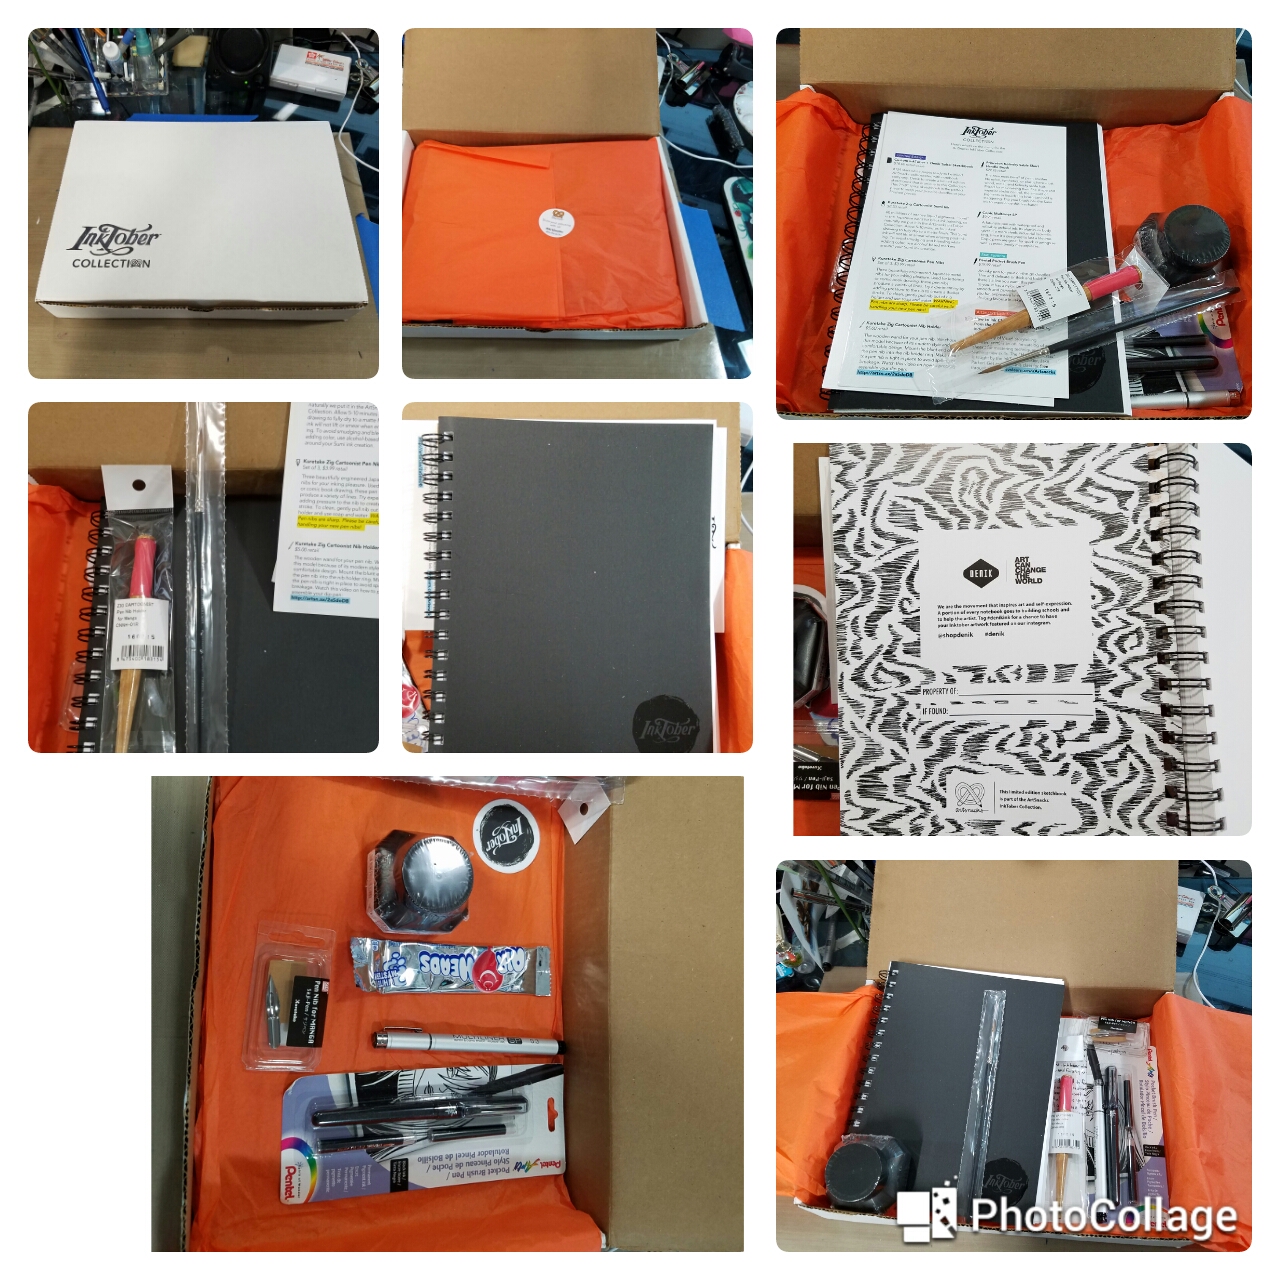
Bonus Box! ArtSnacks Inktober Collection
The ArtSnacks Inktober Collection is special box, and not included with the yearly subscription. This box was purchased out of pocket as a Thank you to my Patrons on Patreon. If you are interested in more specialty boxes like the ArtSnacks Inktober Collection, head on over to my Patreon for information on how to join the community.
You can find it here: http://www.artsnacks.co/inktober/
$99.00
Promises:
7 expertly curated, full-size, premium inky art supplies for the complete InkTober experienceAn exclusive, limited edition sketchbook designed specifically for the ArtSnacks Inktober CollectAn official InkTober Calendar for the "31 Days, 31 Drawings" Inktober ChallengeAn illustrated print by the InkTober creator, Jake Parker
The Hype
From about May until October, ArtSnacks regularly sent out emails hyping their upcoming Inktober collections. There were promises of exclusives and brand new products. Hype was also strong on Twitter and Instagram, and I must admit, I fell hard. I realize that as someone who reviews art supplies, I am hard to impress, so I really looked forward to some surprises in the Inktober Collection.
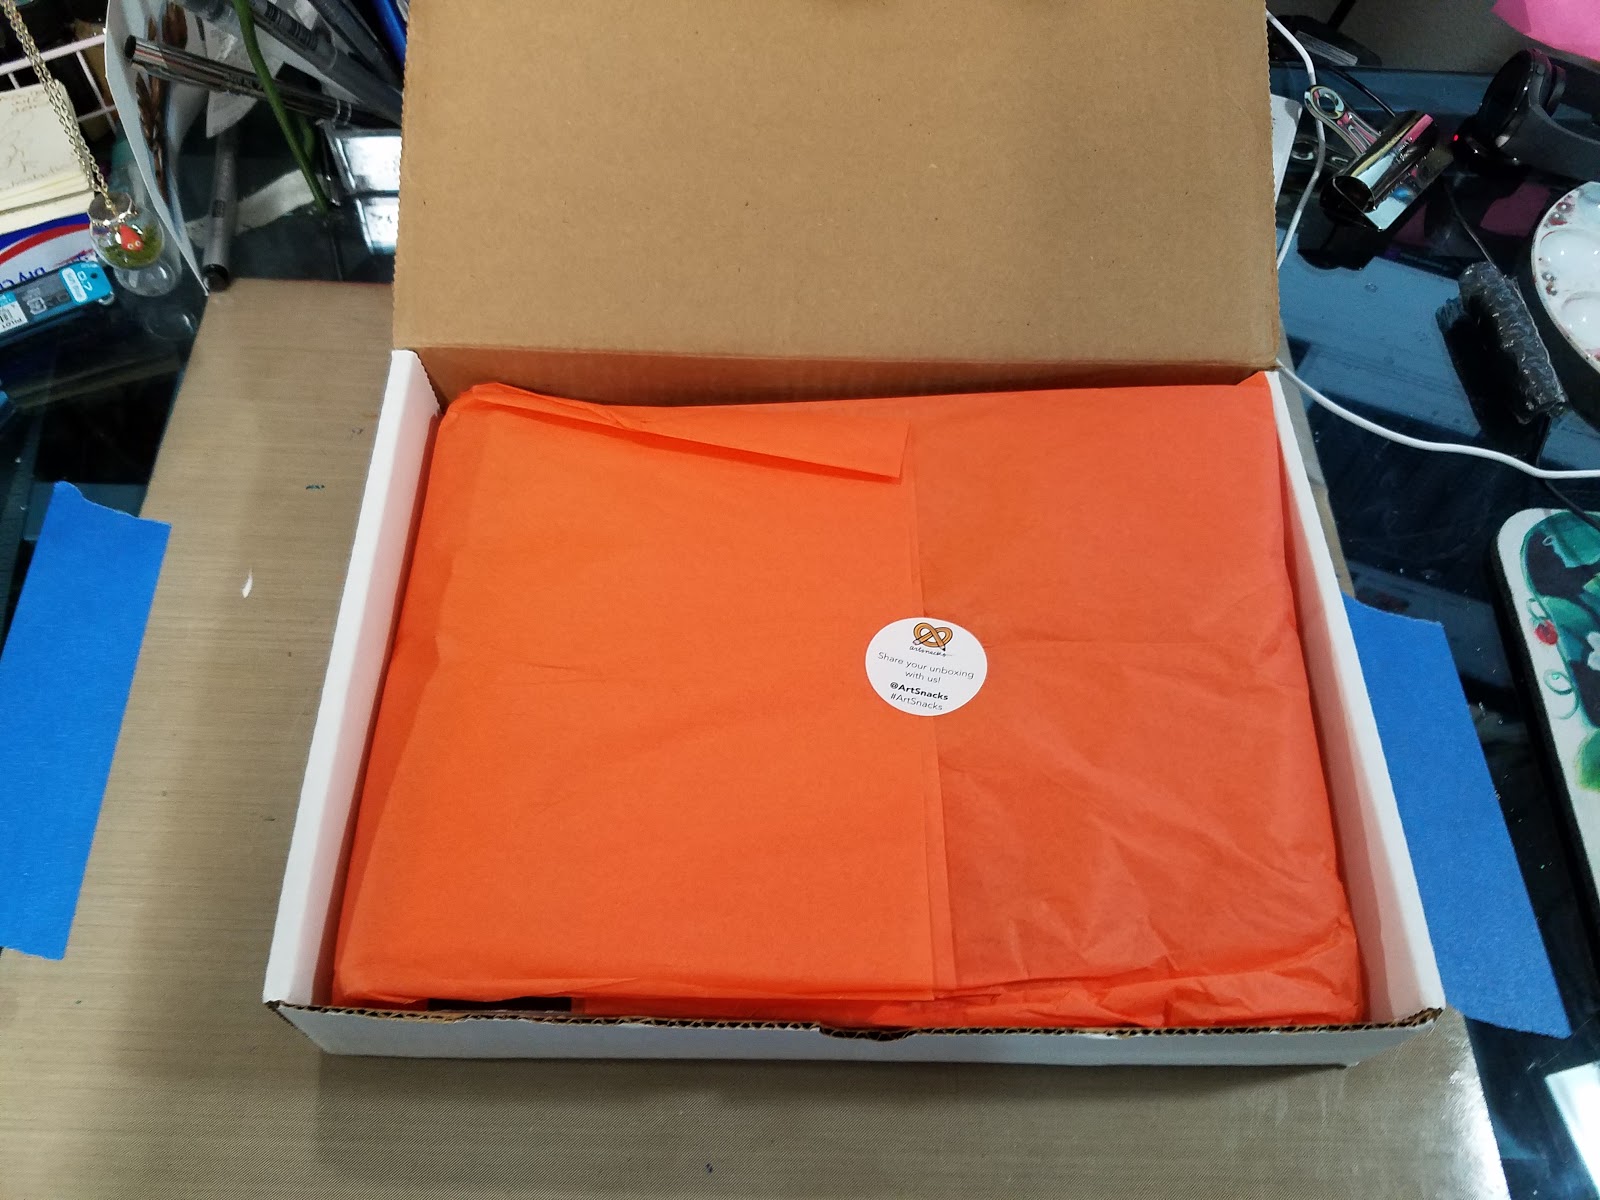
The Unboxing
ArtSnacks Inktober Collection Unboxing- Becca Hillburn


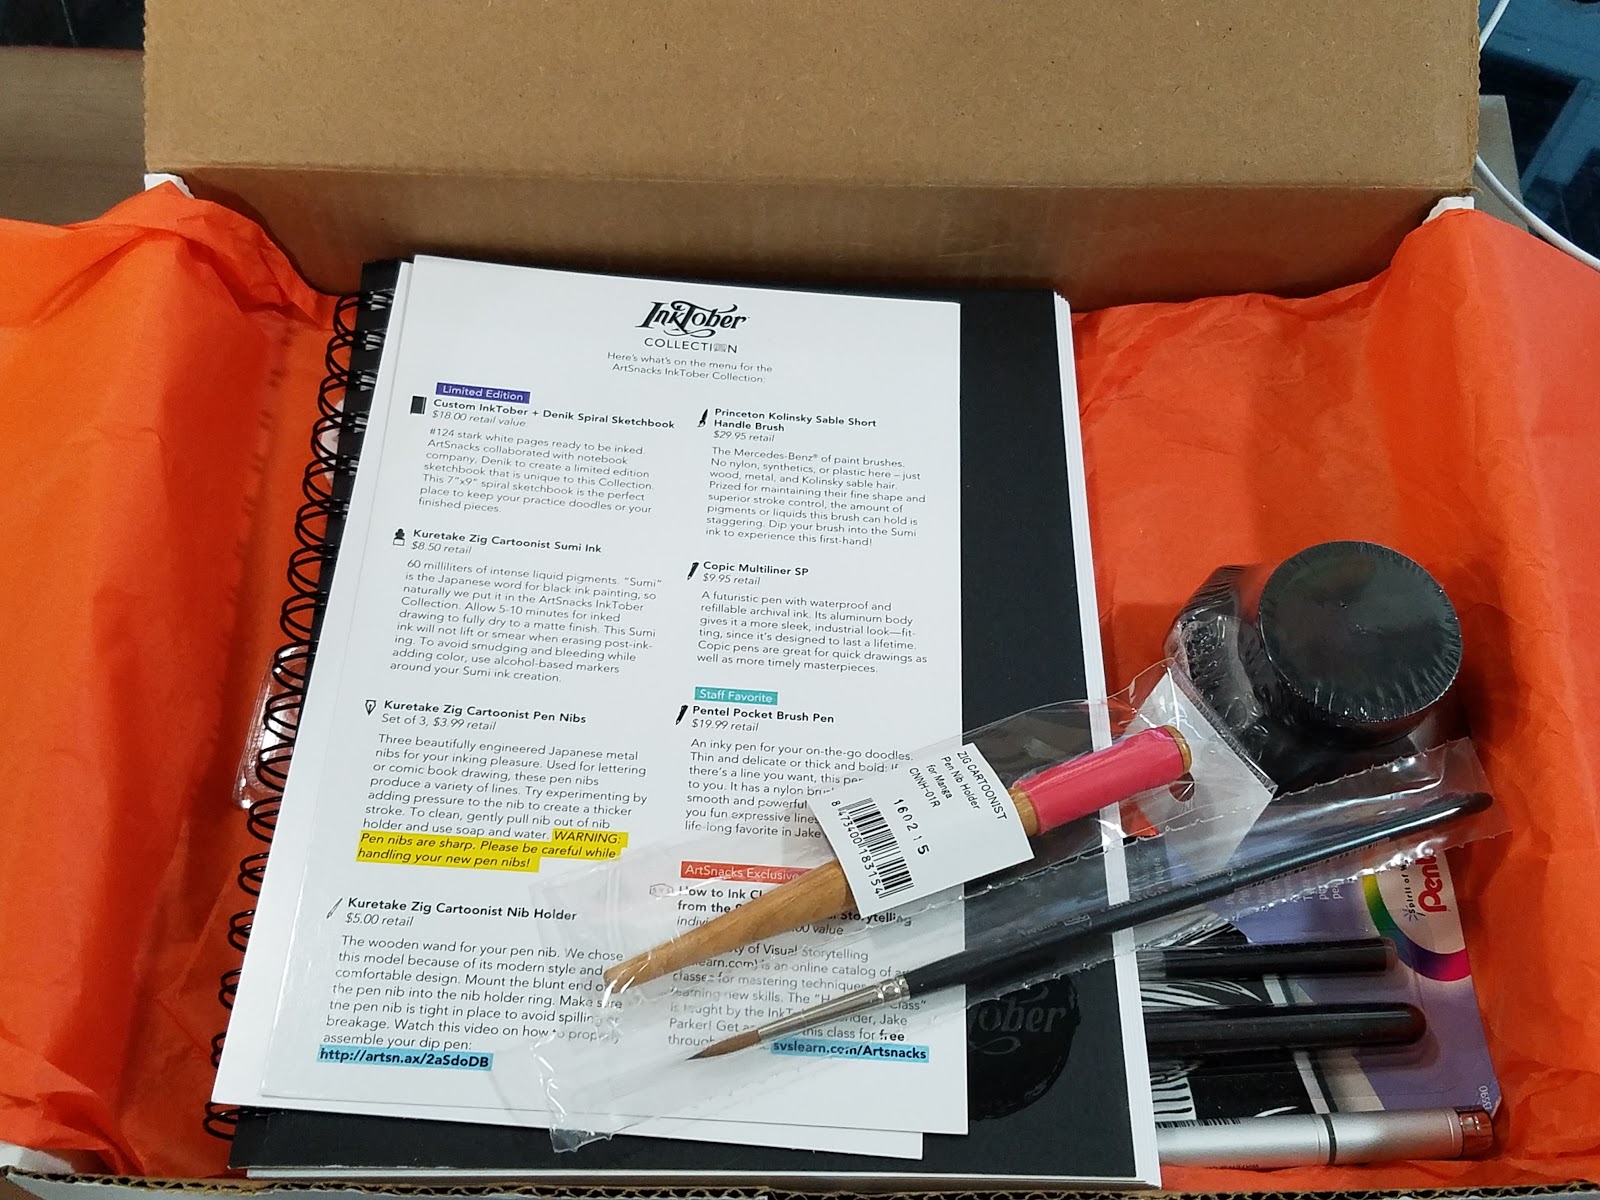
 If you watch the unboxing video, you'll hear some undisguised disappointment in my voice as I realize there isn't much new under the sun in this box. Although the Denik sketchbook is new to me, and exclusive to this ArtSnacks, I'm immediately disappointed by the paper inside- it's like a slick cardstock. And everything else is old hat- spoon nibs, sumi ink, Pentel Pocket Brush, Multiliner SP- there's just nothing inside to impress an experienced inker, let alone someone who reviews art supplies.
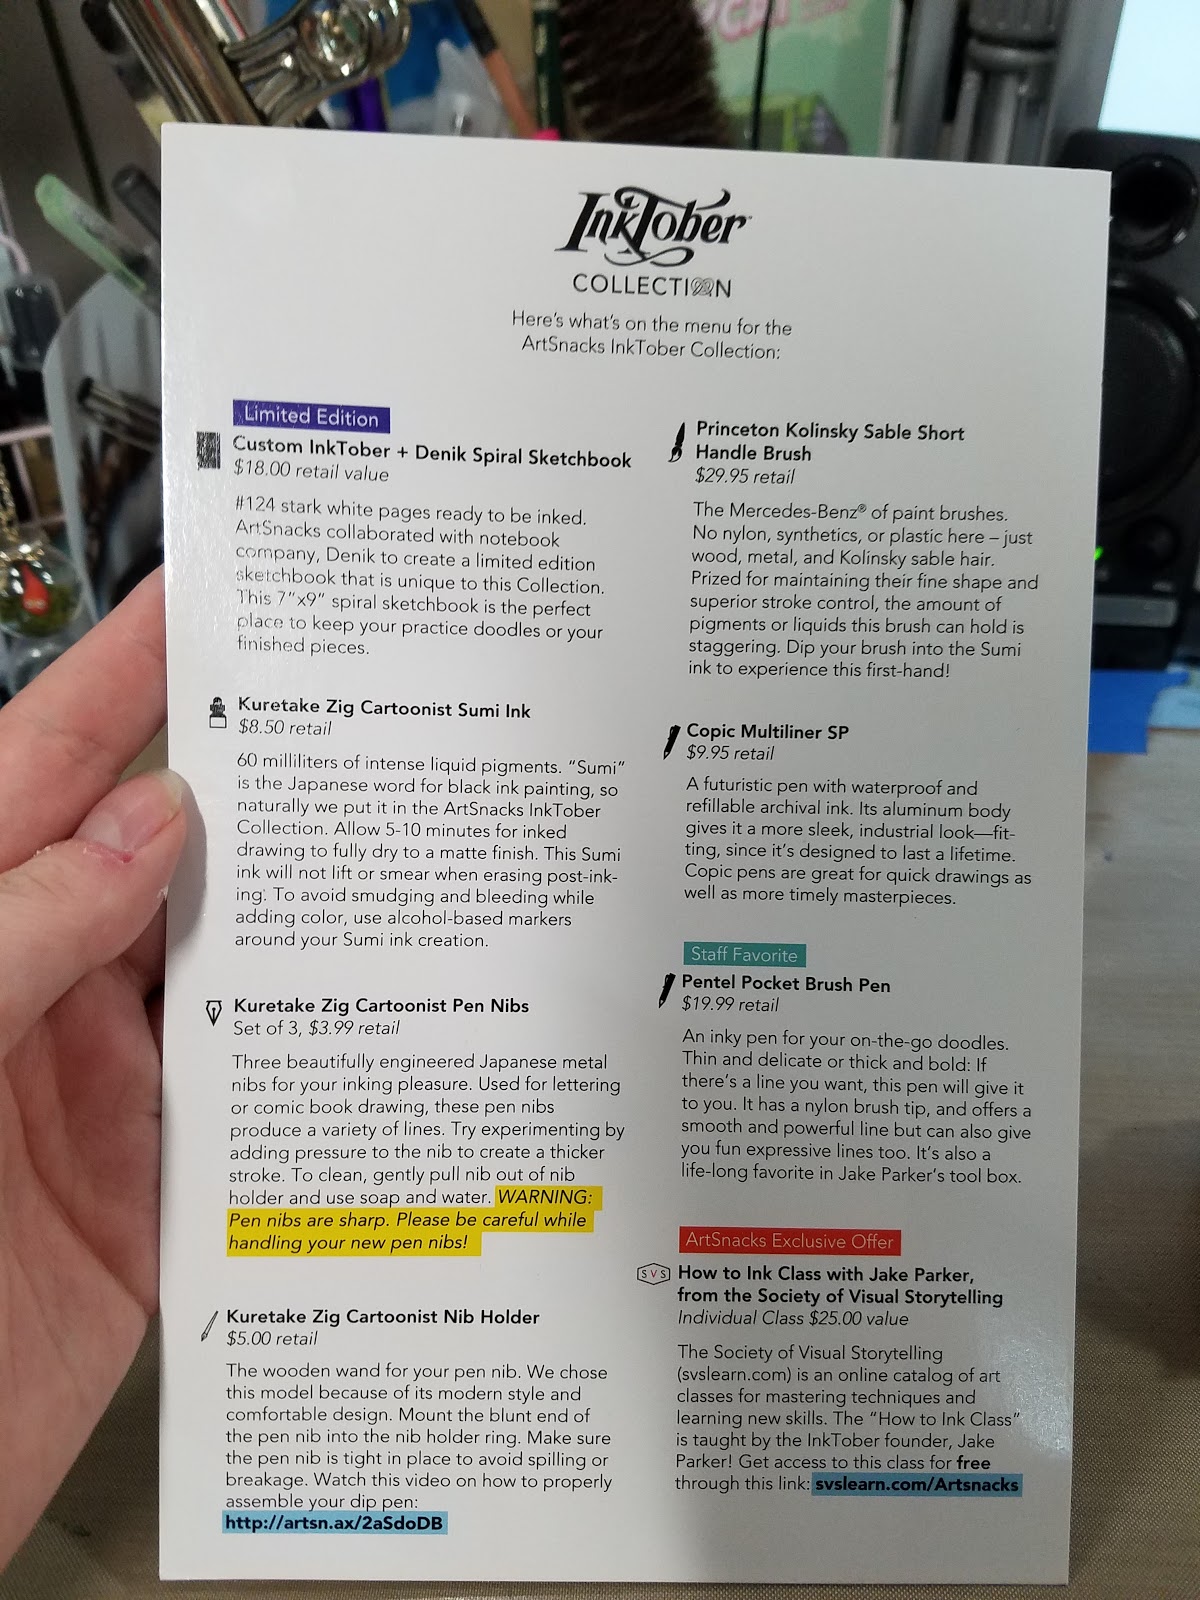
The Card Reads:

Inktober CollectionHere's what's on the menu for the ArtSnacks Inktober Collection:
Limited Edition
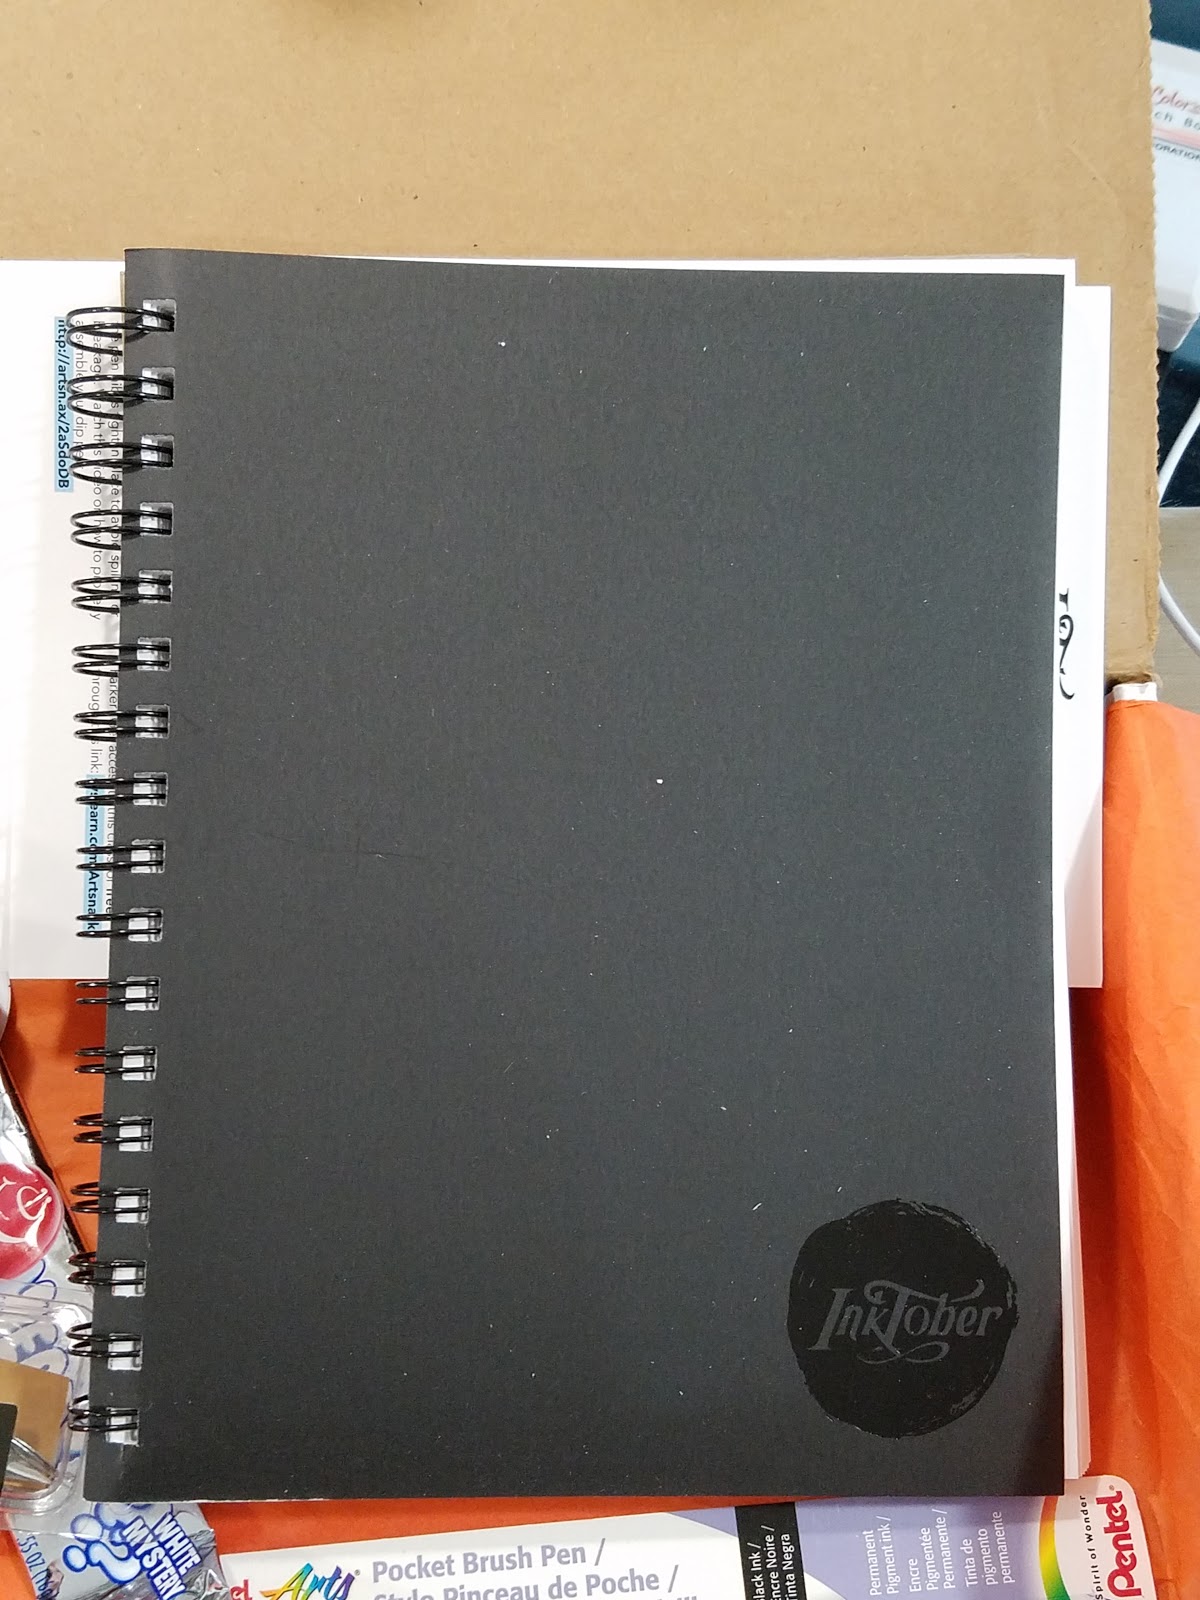
Custom Inktober+Denik Sketchbook
$18.00 retail value
#124 stark white pages ready to be inked. Artsnacks collaborated with notebook company, Denik to create a limited edition sketchbook that is unique to this Collection. This 7"x9" spiral sketchbook is the perfect place to keep your practice doodles or your finished pieces.
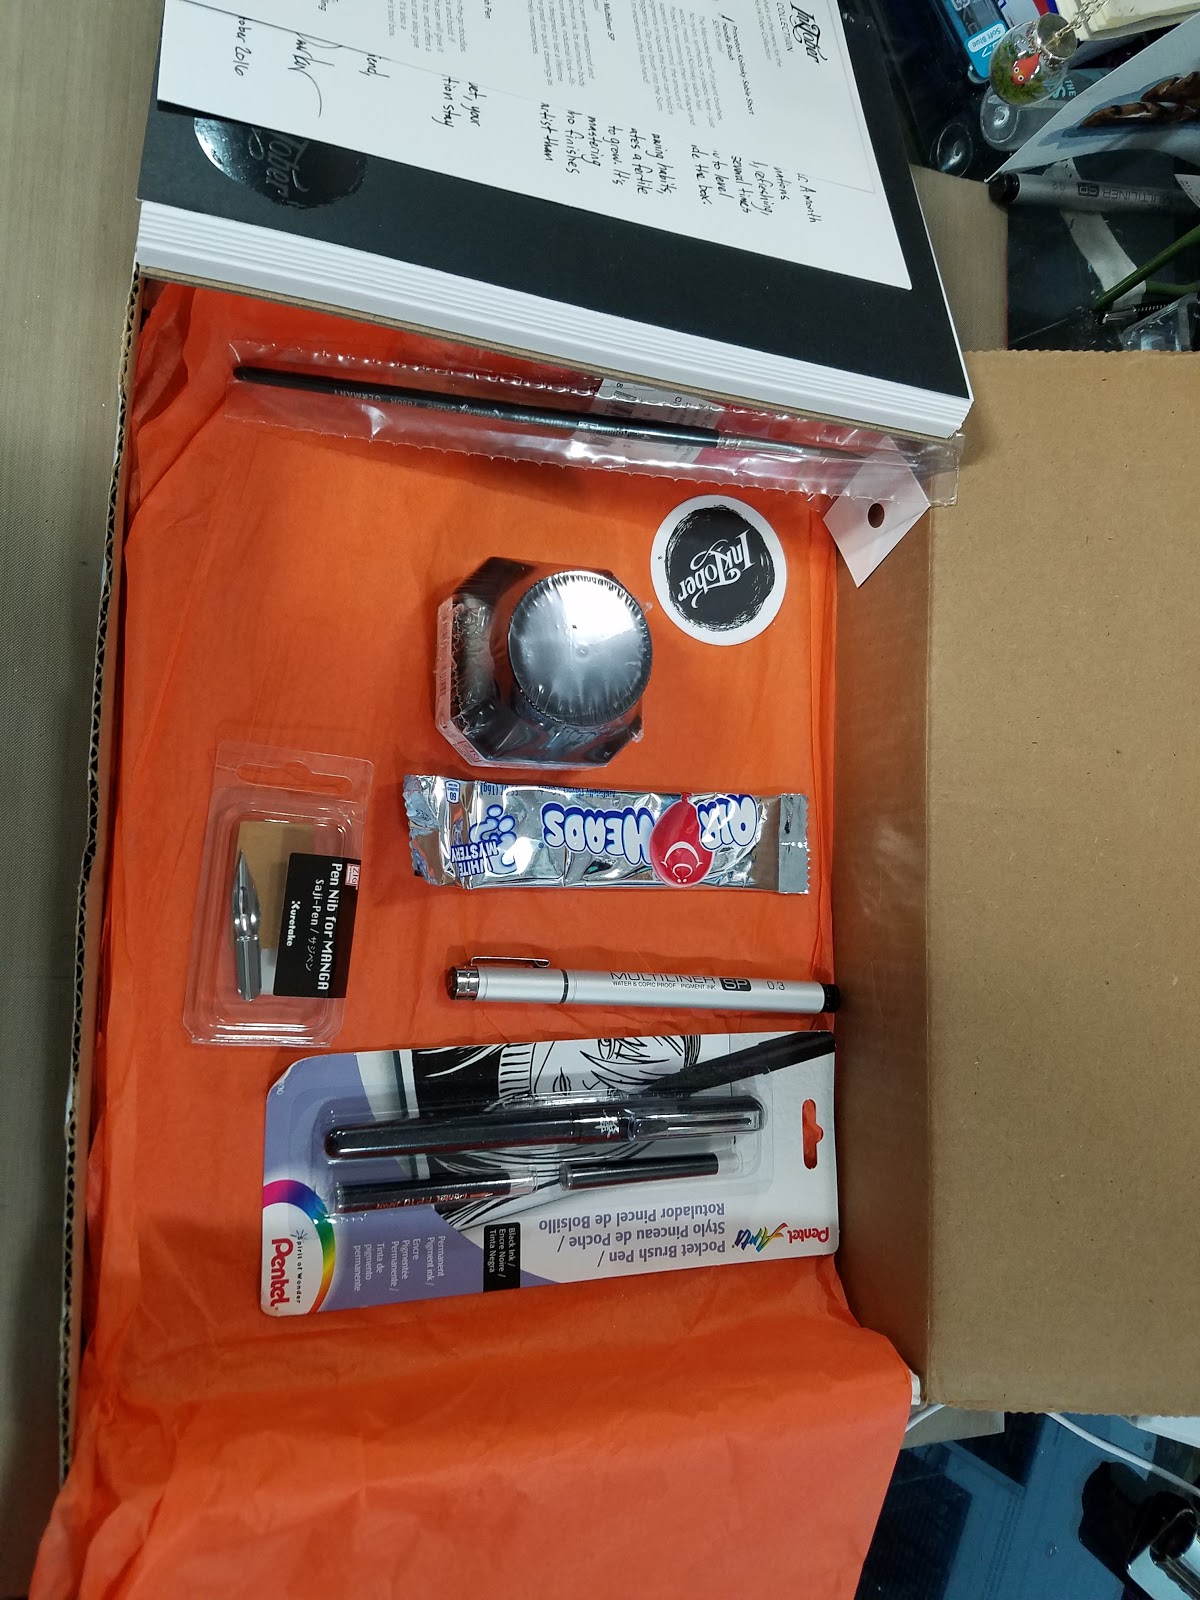
Kuretake Zig Cartoonist Sumi Ink
$8.50 retail
60 milliliters of intense liquid pigments. "Sumi" is the Japanese word for black ink painting, so naturally we put it in the ArtSnacks Inktober Collection. Allow 5-10 minutes for inked drawing to fully dry to a matte finish. This Sumi ink will not lift or smear when erasing post-inking. To avoid smudging and bleeding while adding color, use alcohol-based markers around your Sumi ink creation.
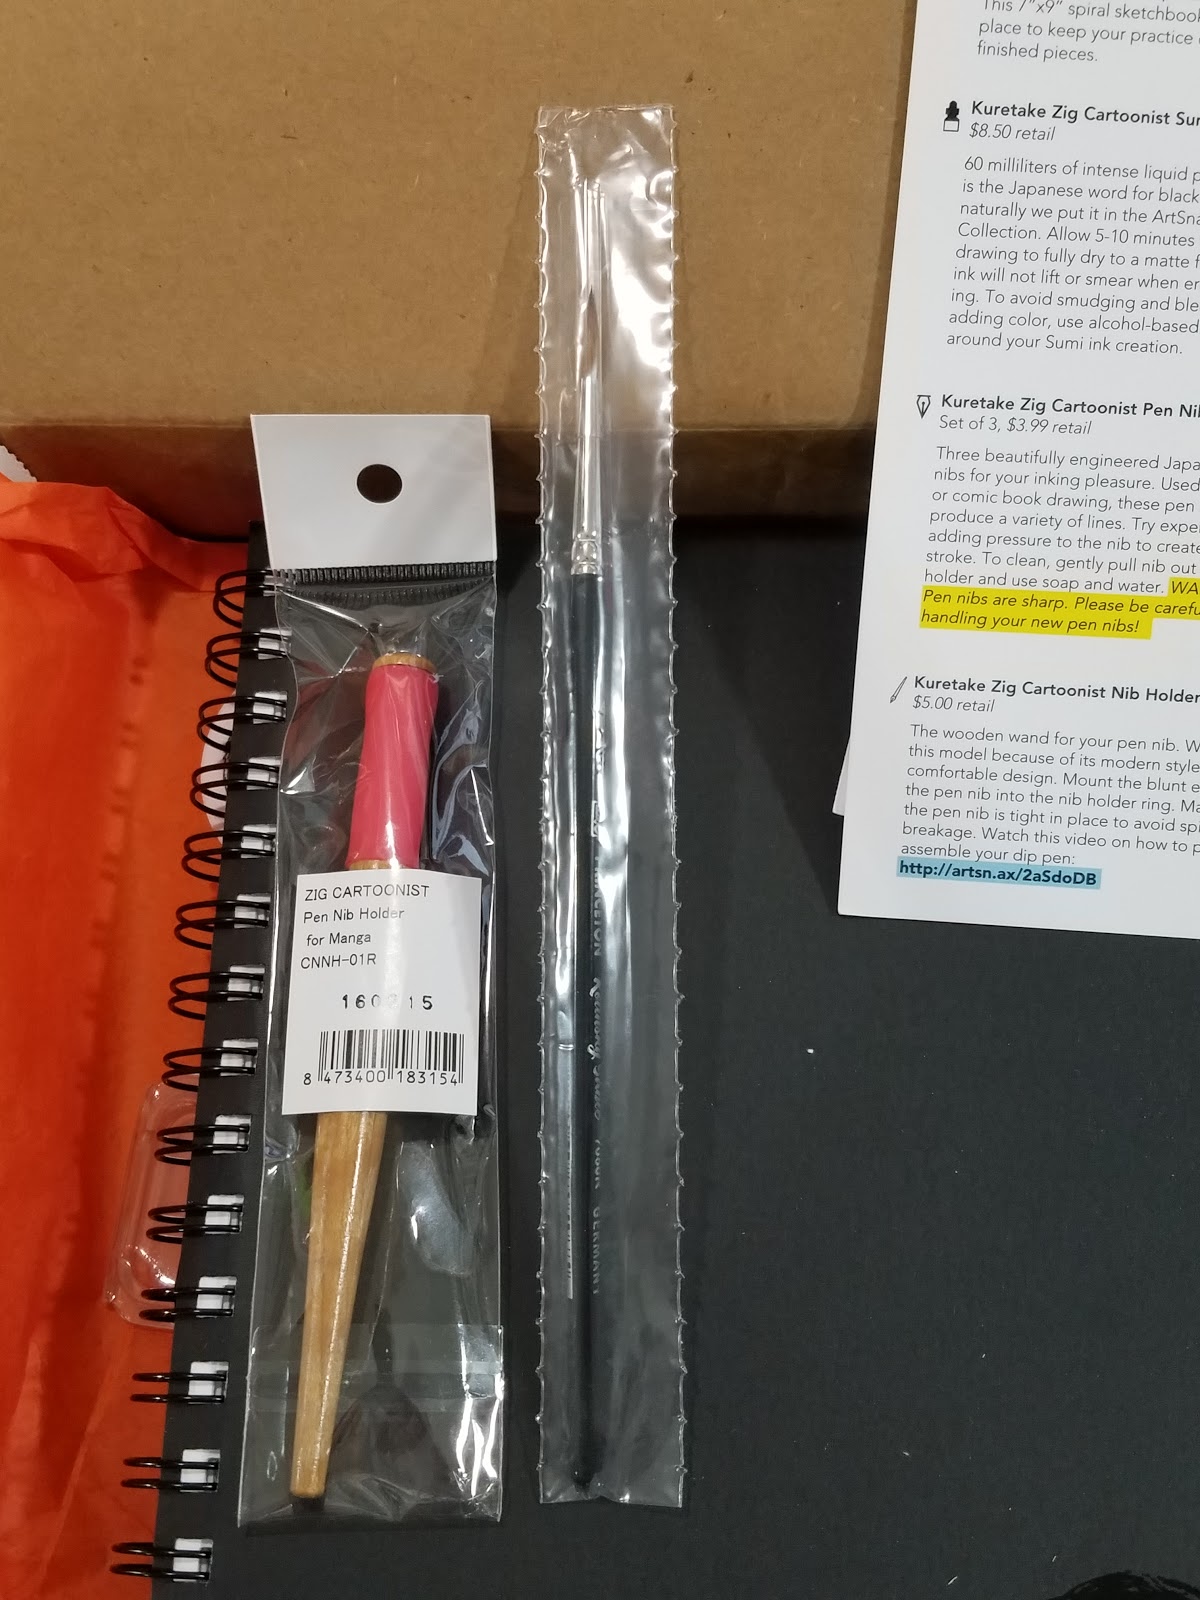
Kuretake Zig Cartoonist Pen Nibs
Set of 3, $3.99 retail
Three beautifully engineered Japanese metal nibs for your inking pleasure. Used for lettering or comic book drawing, these pen nibs produce a variety of lines. Try experimenting by adding pressure to the nib to create a thicker stroke. To clean, gently pull nib out of nib holder and use soap and water. WARNING: Pen nibs are sharp. Please be careful while handling your new pen nibs!
Kuretake Zig Cartoonist Nib Holder
$5.00 retail
The wooden wand for your new pen. We chose this model because of its modern style and comfortable design. Mount the blunt end of the pen nib into the nib holder ring. Make sure the pen nib is tight in place to avoid spilling or breakage. Watch this video on how to properly assemble your dip pen: http://artsn.ax/2aSdoDB
Princeton Kolinsky Sable Short Handle Brush
$29.95 retail
The Mercedes-Benze of paint brushes. No nylon, synthetics, or plastic here- just wood, metal, and Kolinsky sable hair. Prized for maintaining their fine shape and superior stroke control, the amount of pigments or liquids this brush can hold is staggering. Dip your brush into the Sumi ink to experience this first-hand!
Copic Multiliner SP
$9.95 retail
A futuristic pen with waterproof and refillable archival ink. Its aluminum body gives it a more sleek, industrial look- fitting, since it's designed to last a lifetime. Copic pens are great for quick drawing as well as more timely masterpieces.
Staff Favorites
Pentel Pocket Brush Pen
$19.99 retail
An inky pen for your on-the-go doodles. Thin and delicate or thick and bold: If there's a line you want, this pen will give it to you. It has a nylon brush tip, and offers a smooth and powerful line but can also give you fun expressive lines too. It's also a life-long favorite in Jake Parker's tool box.
ArtSnacks Exclusive Offer
How to Ink Class with Jake Parker, from the Society of Visual Storytelling
Individual Class $25.00 value
The Society of Visual Storytelling (svslearn.com) is an online catalog of art classes for mastering techniques and learning new skills. The "How to Ink Class" is taught by the InkTober founder, Jake Parker! Get access to this class for free through this link: redacted

31 Days
31 Drawings
Your Challenge: Create a drawing everyday for 31 days, using only the supplies in your ArtSnacks Inktober Collection. For inspiration, use the theme that is in the corresponding day on the calendar.
When your daily drawing is complete, post a photo of it on your social media channels using hashtags: #artsnacks #inktober
Editors Note: You can use whatever inking supplies you wish for your Inktober, as well as whatever challenges or themes work for you. This is not the only way to officially do Inktober, although I do recommend using the #inktober hashtag.


Hello!
Here we are at the beginning of another Inktober. A month of inky pages, dirty hands, and fired up imaginations await us. Its a month that's all at once hard, refreshing, tedious, and relaxing. Whether you've done it several times or it's your first, Inktober always pushes you to level up your skill, and forces you to think outside the box.
It's a challenge designed to form positive drawing habits, and break you out of creative slumps. It creates a fertile ground for ideas to sprout and techniques to grow. It's a challenge that keeps you ont the path to mastering your craft. I guarantee that the artist who finishes Inktober is a better, wiser, and happier artist than the one who started it.
Have fun this month. May your pen stay wet, your fingers stay inking, and the spark of imagination stay bright in your soul!
Your friend,
Jake Parker
Utah, October 2016
Editors Notes:
Even on the cards, the hype is strong.
Let me clarify a few things-
If you have the time, you should allow ink to dry for at least 1 hour and up to and beyond 24 hours for best results. This will prevent ghosting (lifting up of pigments). Sumi ink, even the Kuretake Sumi Ink 60, is not always waterproof or even water resistant, and you will get some smearing with this ink, regardless of how long you wait. Five to ten minutes is not long enough for ink to cure, especially on coated papers like the Denik paper included with this box.
The Kuretake Zig Cartoonist Pen nibs are Saji nibs, and are a type of spoon nib. Many companies make Spoon nibs, and you can check out some of my prior posts for more information. Spoon nibs have very delicate lines, and very little flex, so if you're interested in a flexible nib that handles like a brush, you should check out G nibs as well. Adding pressure to a spoon nib may result in the nib 'nipping' the paper, which happened frequently when using these Saji nibs on the Denik paper. And let's be clear- saji nibs are typically used for manga, which tends to lean towards the use of tone rather than lineweight to indicate shadow.
For demonstrations and more information on the materials included in this box, I strongly recommend you watch the Overview video included in the post below. Information that should have been included in this box (how to prepare your brush for first use, how to clean the oil off your nibs for first use) has been left out, and I try to cover that in the Overview to ensure that your first use is a smooth one.
And while Kolinksy Sable is considered the end all be all for brushes (for watercolor or inks), Princeton is not a company that has garnered much trust from me over the years. Typically Winsor and Newton series 7 was considered the Mercedes-Benz of brushes, but even they have had some issues with quality over the years. Whenever purchasing a natural hair brush, try to do so in person- look for brushes that come to a point either in package or after wetting the tip, and avoid brushes with stray hairs. Compared to other Kolinsky sable brushes from other brands in similar sizes, this Princeton brush doesn't hold a monumental amount of paint or pigments, and has a rather small 'belly' compared to other Kolinsky sable brushes.
The card neglects to mention that the Copic Multiliner SP (a .3 in this instance) is alcohol marker proof once fully dry, features both replacable ink cartridges AND nibs, and is hard to find open stock in most stores. You are more likely to find the disposable Copic Multiliner, or even the Sakura Micron, both of which are also waterproof, pigment ink, archival, and alcohol marker proof.
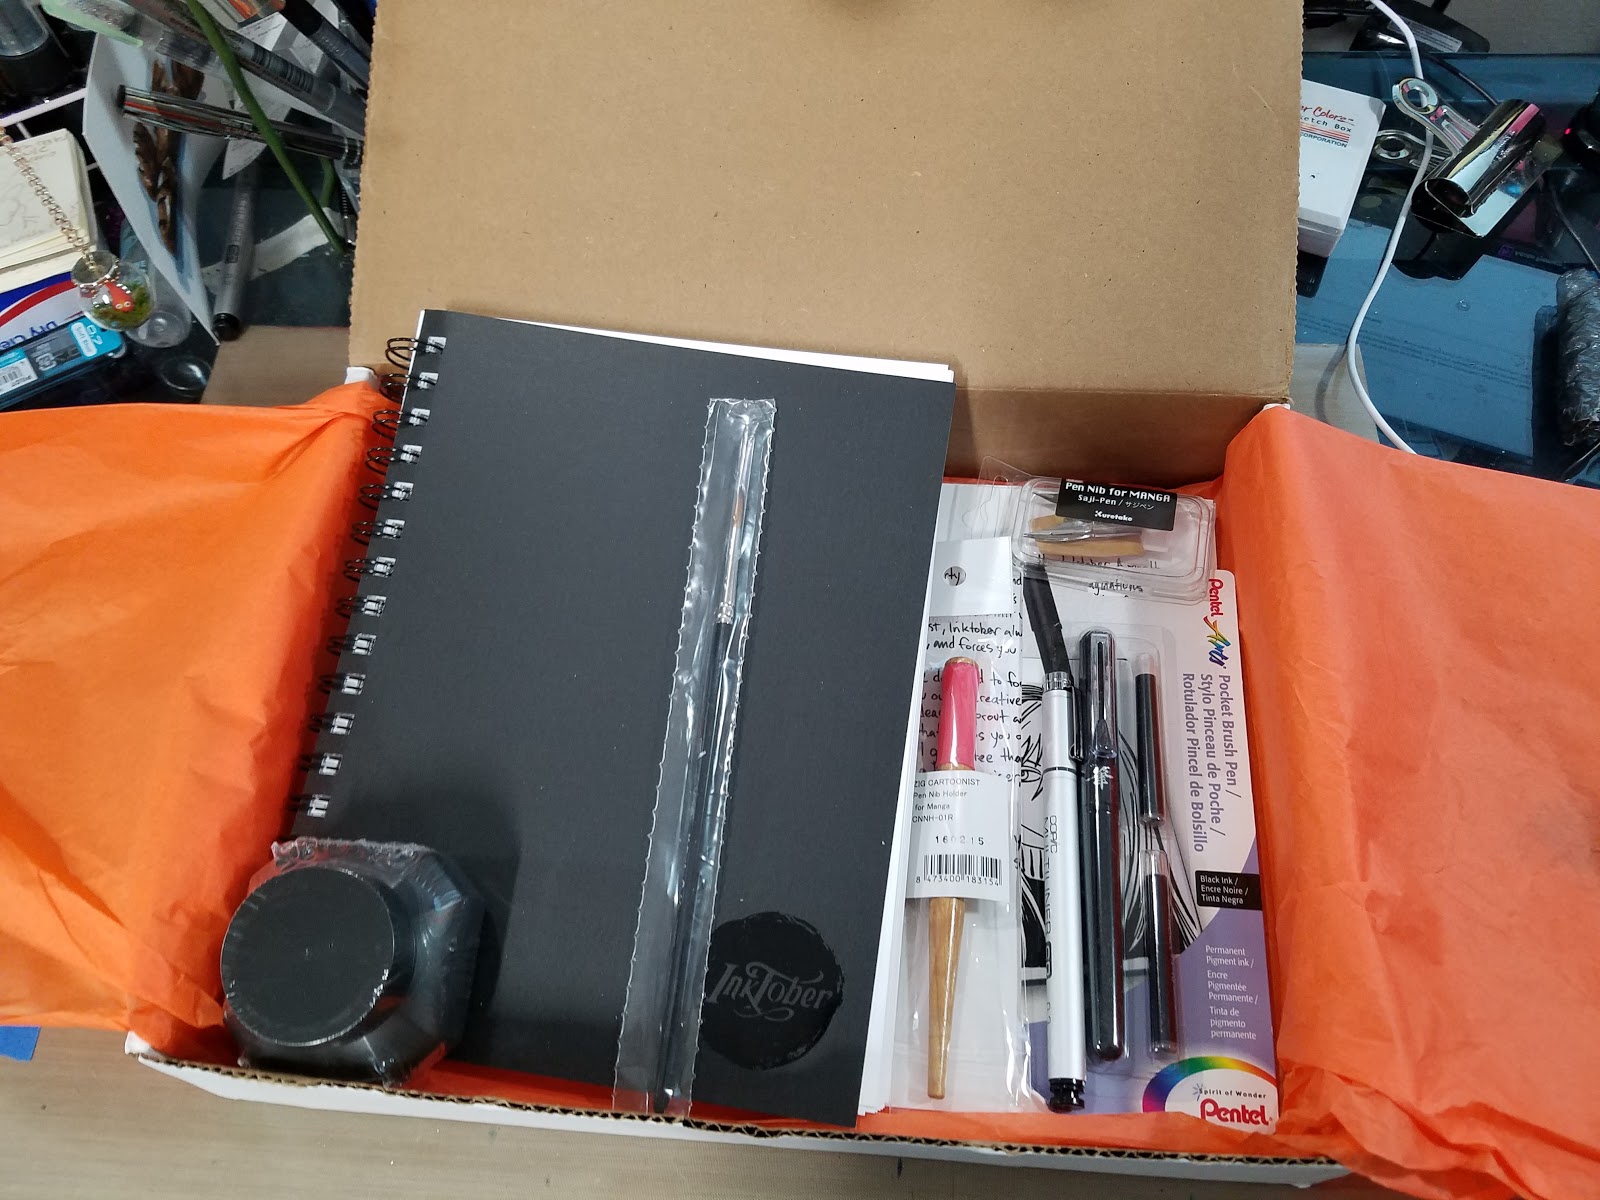
Inside the Box
Denik Notebook
On the Denik site, their larger Sketchbooks are $14.95: http://denik.com/sketchbooks/
Smaller hardcovers with an elastic band and bookmark are $18
http://denik.com/fabric-classics/
Otherwhise, there's nothing really comparable on the site.
Kuretake Saji-Pen for Manga (x3 nibs)
$7.99 on Amazon
$3.18 on Blick
$4.00 on Jetpens
Kuretake Nib Holder
$3.99 on Blick
$5.00 on Jetpens
Princeton Kolinsky Sable 7050R
$15.39 on Blick
$17.97 on WetPaint
$14.98 on Artist and Craftsman Supply
Copic Multiliner SP .3
$8.23 on DickBlick
$7.99 on Jerrys' Artarama
5.85 (euros) on CultPens
Pentel Arts Pocket Brush (with two refills)
$12.60 on Amazon
$19.99 on Pentel Site
$13.99 on DickBlick
$17.99 at Michaels
$12.60 at Walmart
Kuretake Sumi Ink 60
$8.50 on Jetpens
$10.77 on Amazon
$6.25 on Paper and Ink Arts
Totals:
MSRP: $95.38
Lowest Retail Value: $63.94
Plus a $25 How to Ink Class with Jake Parker
Cost of Box: $99

The Overview
I highly recommend you watch this overview, as I demonstrate how to prepare the materials inside, how many of these are used, and I show cheaper alternatives when applicable. If you are putting together a collection of inking supplies, this is a must watch.


Inktober Collection Tutorials And Demonstrations
These tutorials were not sponsored by ArtSnacks, and were created as bonus content for my Patrons. If you enjoyed these videos, found them helpful, or are using them to educate others, please consider visiting my Patreon for information on how you can join my community of art nerds, and help fund future content. Tutorials like these are not possible without outside support.
Nib Exposure- Inking Tutorial with ArtSnacks Inktober
Brush Inking Tips with the ArtSnacks Inktober Box
Faux InkWash-ArtSnacks Inktober Tutorial
Inking Your Character to Life with a Brush- Inktober Tutorial
Inking Your Character to Life with a Brush Part 2
Cartoony Inking with a Size 4 Brush
Nib Exposure- Inking Tutorial with ArtSnacks Inktober
Inking with a Manga Nib: Kuretake Saji Nib Timelapse
Copic Multiliner Demo Inking Tools
Inktober Saji Nib Timelapse-Naomi
Inktober Timelapse G Nib- Naomi
Size Matters! Brush Demonstration
Shots from Inktober Tutorials


As the month progresses, more inking and Inktober tutorials and demonstrations will be available on my YouTube channel, so please keep an eye out! Patrons get exclusive early access to all Inktober tutorial and demonstration videos, so if that sounds interesting, head on over and join the community!
The Verdict
I found this box massively underwhelming. Not because the items inside the box weren't good items- they are. They are good basic items that most inkers are already familiar with. They are good, basic items that add up to an underwhelming box given the amounts of hype ArtSnacks put into promoting this box, the lavish promises that were made, and the fact that there's still a $30 discrepancy between what I paid and what I received.
This box promised to have something for inkers of all abilities, but instead seemed to focus solidly on beginners, leaving the competent scratching their heads. There was so much room, budget wise, to really include some exciting goodies!
Potential Box Additions:
Variety of paper samples including cold press watercolor paper (for drybrush), Bristol, and mixed media papersWalnut inkColored inksCrowquillsA wider variety of nibs including fixed width like A, B, or C, mapping, or GInexpensive fountain pens like the PreppyFude pens like the Fudebiyori or the Pilot Mikase
If I had known the box would be so anemic, I would not have purchased it.
Resources and Outside Links
Difference Between G-Pen, Maru, Saji/Tama Nib Demo-Comic/Manga Fountain Pen Nib Tutorial
Copic Multiner SP vs. Sakura Pigma Micron
How to Change Nibs and Ink Cartridges on Copic Multiliner SP Pens
Pentel Brush Pen Review & How to Use Brush Pen
Review: Kuretake Zig Cartoonist Sumi Ink 60
Please consider donating to this blog or purchasing from Natto-shop (http://nattosoup.com/shop) if you want me to continue publishing quality content. All materials tested were purchased from my own pocket. Keep on Truckin' Nattosoup is not under any sponsorship.
You can find it here: http://www.artsnacks.co/inktober/
$99.00
Promises:
7 expertly curated, full-size, premium inky art supplies for the complete InkTober experienceAn exclusive, limited edition sketchbook designed specifically for the ArtSnacks Inktober CollectAn official InkTober Calendar for the "31 Days, 31 Drawings" Inktober ChallengeAn illustrated print by the InkTober creator, Jake Parker
The Hype
From about May until October, ArtSnacks regularly sent out emails hyping their upcoming Inktober collections. There were promises of exclusives and brand new products. Hype was also strong on Twitter and Instagram, and I must admit, I fell hard. I realize that as someone who reviews art supplies, I am hard to impress, so I really looked forward to some surprises in the Inktober Collection.
The Unboxing
ArtSnacks Inktober Collection Unboxing- Becca Hillburn


 If you watch the unboxing video, you'll hear some undisguised disappointment in my voice as I realize there isn't much new under the sun in this box. Although the Denik sketchbook is new to me, and exclusive to this ArtSnacks, I'm immediately disappointed by the paper inside- it's like a slick cardstock. And everything else is old hat- spoon nibs, sumi ink, Pentel Pocket Brush, Multiliner SP- there's just nothing inside to impress an experienced inker, let alone someone who reviews art supplies.
The Card Reads:
Inktober CollectionHere's what's on the menu for the ArtSnacks Inktober Collection:
Limited Edition
Custom Inktober+Denik Sketchbook
$18.00 retail value
#124 stark white pages ready to be inked. Artsnacks collaborated with notebook company, Denik to create a limited edition sketchbook that is unique to this Collection. This 7"x9" spiral sketchbook is the perfect place to keep your practice doodles or your finished pieces.
Kuretake Zig Cartoonist Sumi Ink
$8.50 retail
60 milliliters of intense liquid pigments. "Sumi" is the Japanese word for black ink painting, so naturally we put it in the ArtSnacks Inktober Collection. Allow 5-10 minutes for inked drawing to fully dry to a matte finish. This Sumi ink will not lift or smear when erasing post-inking. To avoid smudging and bleeding while adding color, use alcohol-based markers around your Sumi ink creation.
Kuretake Zig Cartoonist Pen Nibs
Set of 3, $3.99 retail
Three beautifully engineered Japanese metal nibs for your inking pleasure. Used for lettering or comic book drawing, these pen nibs produce a variety of lines. Try experimenting by adding pressure to the nib to create a thicker stroke. To clean, gently pull nib out of nib holder and use soap and water. WARNING: Pen nibs are sharp. Please be careful while handling your new pen nibs!
Kuretake Zig Cartoonist Nib Holder
$5.00 retail
The wooden wand for your new pen. We chose this model because of its modern style and comfortable design. Mount the blunt end of the pen nib into the nib holder ring. Make sure the pen nib is tight in place to avoid spilling or breakage. Watch this video on how to properly assemble your dip pen: http://artsn.ax/2aSdoDB
Princeton Kolinsky Sable Short Handle Brush
$29.95 retail
The Mercedes-Benze of paint brushes. No nylon, synthetics, or plastic here- just wood, metal, and Kolinsky sable hair. Prized for maintaining their fine shape and superior stroke control, the amount of pigments or liquids this brush can hold is staggering. Dip your brush into the Sumi ink to experience this first-hand!
Copic Multiliner SP
$9.95 retail
A futuristic pen with waterproof and refillable archival ink. Its aluminum body gives it a more sleek, industrial look- fitting, since it's designed to last a lifetime. Copic pens are great for quick drawing as well as more timely masterpieces.
Staff Favorites
Pentel Pocket Brush Pen
$19.99 retail
An inky pen for your on-the-go doodles. Thin and delicate or thick and bold: If there's a line you want, this pen will give it to you. It has a nylon brush tip, and offers a smooth and powerful line but can also give you fun expressive lines too. It's also a life-long favorite in Jake Parker's tool box.
ArtSnacks Exclusive Offer
How to Ink Class with Jake Parker, from the Society of Visual Storytelling
Individual Class $25.00 value
The Society of Visual Storytelling (svslearn.com) is an online catalog of art classes for mastering techniques and learning new skills. The "How to Ink Class" is taught by the InkTober founder, Jake Parker! Get access to this class for free through this link: redacted
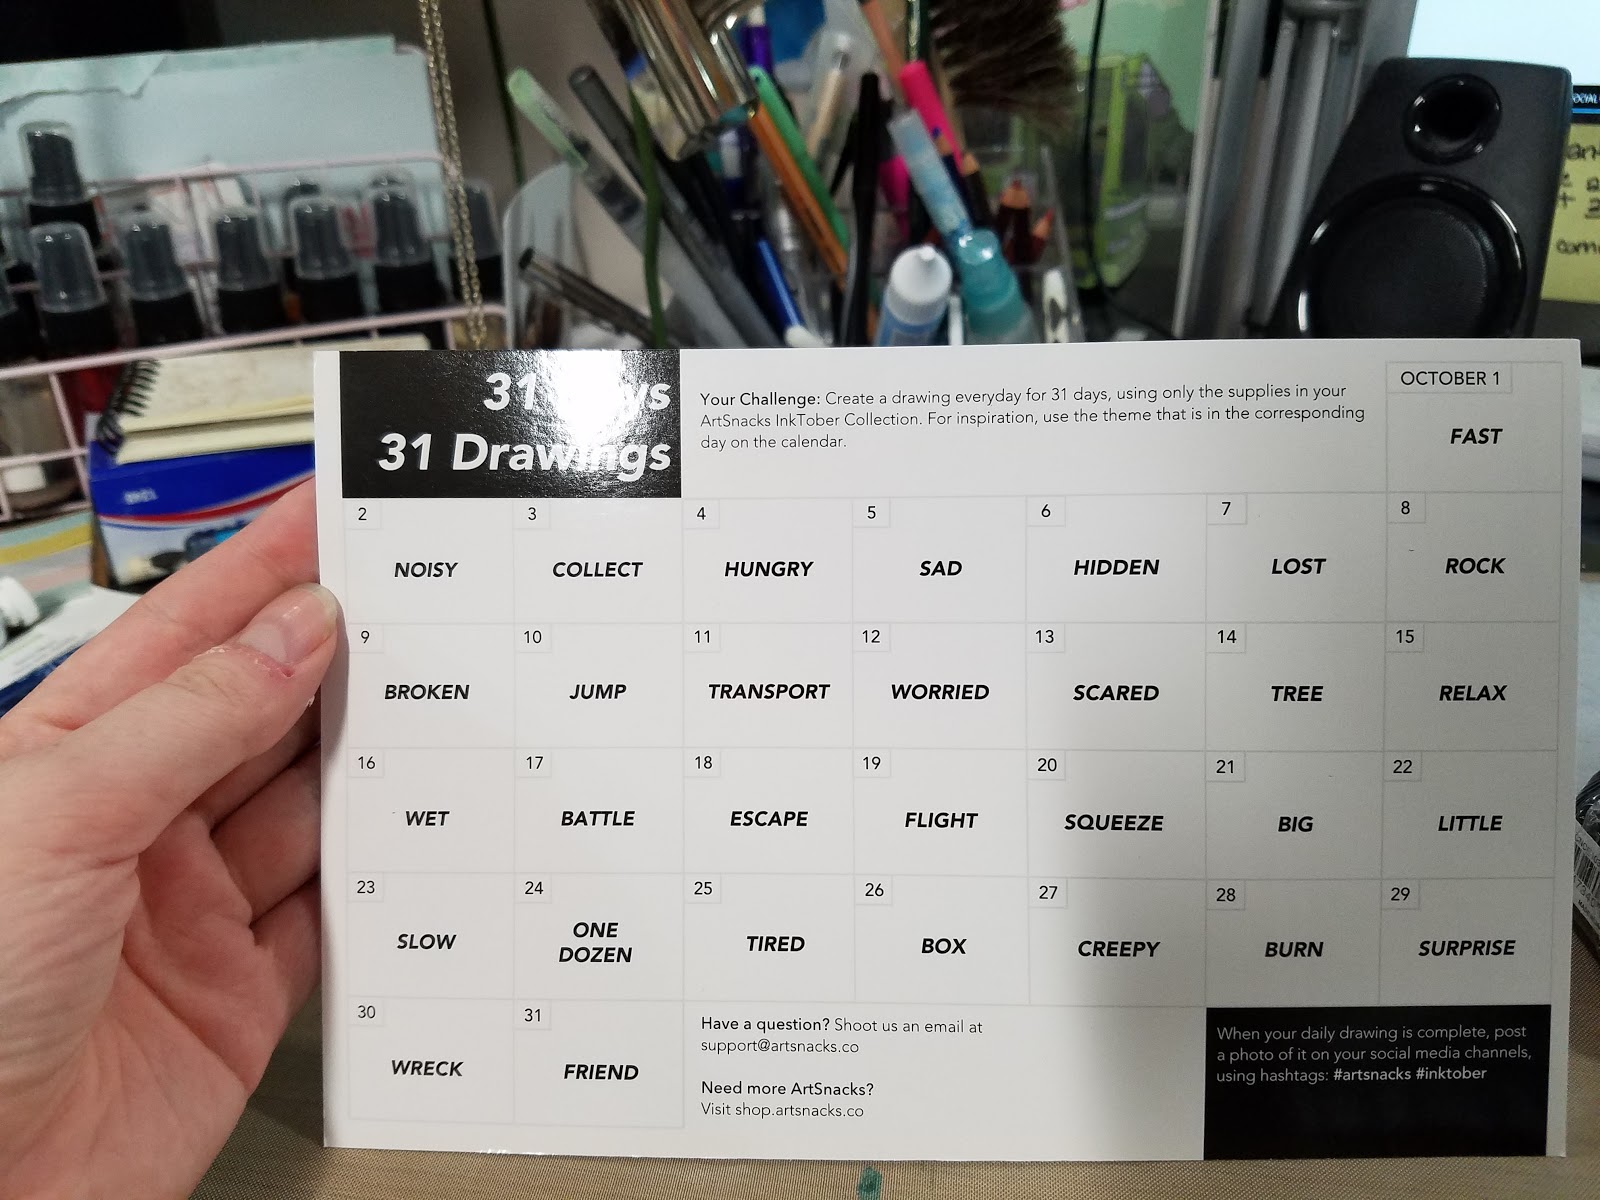
31 Days
31 Drawings
Your Challenge: Create a drawing everyday for 31 days, using only the supplies in your ArtSnacks Inktober Collection. For inspiration, use the theme that is in the corresponding day on the calendar.
When your daily drawing is complete, post a photo of it on your social media channels using hashtags: #artsnacks #inktober
Editors Note: You can use whatever inking supplies you wish for your Inktober, as well as whatever challenges or themes work for you. This is not the only way to officially do Inktober, although I do recommend using the #inktober hashtag.

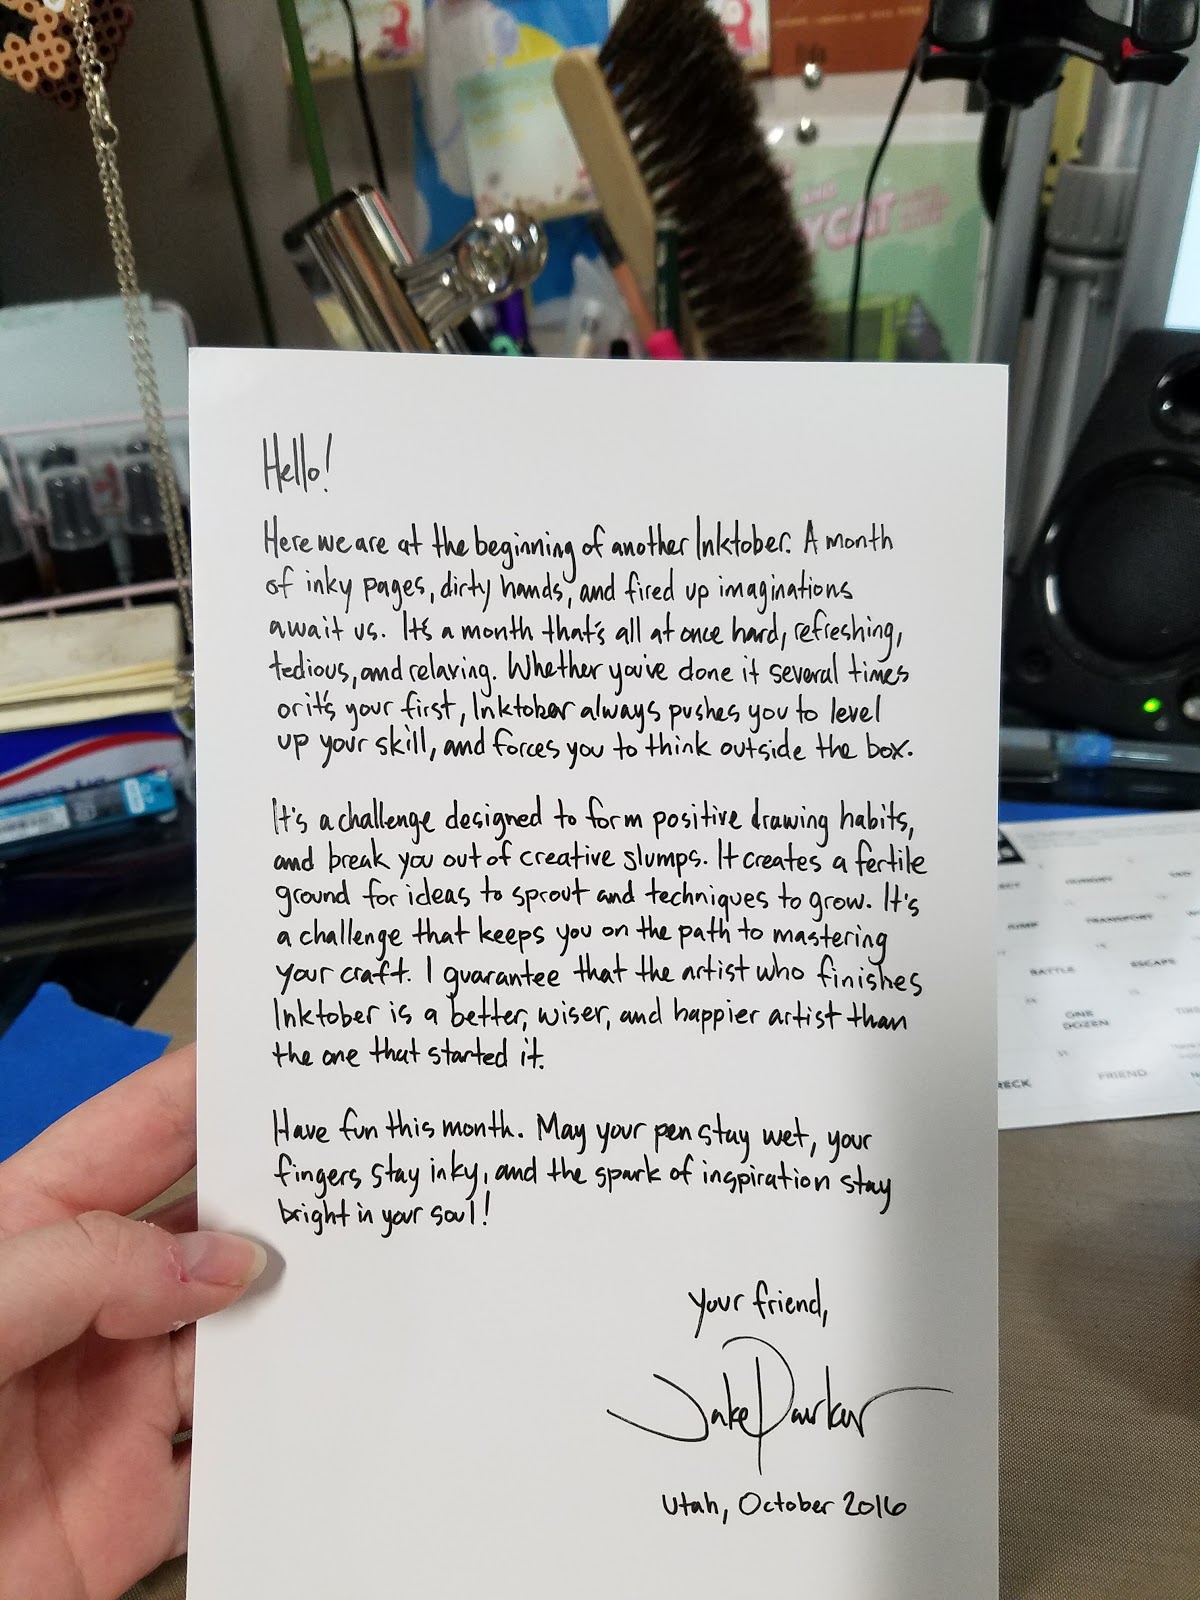
Hello!
Here we are at the beginning of another Inktober. A month of inky pages, dirty hands, and fired up imaginations await us. Its a month that's all at once hard, refreshing, tedious, and relaxing. Whether you've done it several times or it's your first, Inktober always pushes you to level up your skill, and forces you to think outside the box.
It's a challenge designed to form positive drawing habits, and break you out of creative slumps. It creates a fertile ground for ideas to sprout and techniques to grow. It's a challenge that keeps you ont the path to mastering your craft. I guarantee that the artist who finishes Inktober is a better, wiser, and happier artist than the one who started it.
Have fun this month. May your pen stay wet, your fingers stay inking, and the spark of imagination stay bright in your soul!
Your friend,
Jake Parker
Utah, October 2016
Editors Notes:
Even on the cards, the hype is strong.
Let me clarify a few things-
If you have the time, you should allow ink to dry for at least 1 hour and up to and beyond 24 hours for best results. This will prevent ghosting (lifting up of pigments). Sumi ink, even the Kuretake Sumi Ink 60, is not always waterproof or even water resistant, and you will get some smearing with this ink, regardless of how long you wait. Five to ten minutes is not long enough for ink to cure, especially on coated papers like the Denik paper included with this box.
The Kuretake Zig Cartoonist Pen nibs are Saji nibs, and are a type of spoon nib. Many companies make Spoon nibs, and you can check out some of my prior posts for more information. Spoon nibs have very delicate lines, and very little flex, so if you're interested in a flexible nib that handles like a brush, you should check out G nibs as well. Adding pressure to a spoon nib may result in the nib 'nipping' the paper, which happened frequently when using these Saji nibs on the Denik paper. And let's be clear- saji nibs are typically used for manga, which tends to lean towards the use of tone rather than lineweight to indicate shadow.
For demonstrations and more information on the materials included in this box, I strongly recommend you watch the Overview video included in the post below. Information that should have been included in this box (how to prepare your brush for first use, how to clean the oil off your nibs for first use) has been left out, and I try to cover that in the Overview to ensure that your first use is a smooth one.
And while Kolinksy Sable is considered the end all be all for brushes (for watercolor or inks), Princeton is not a company that has garnered much trust from me over the years. Typically Winsor and Newton series 7 was considered the Mercedes-Benz of brushes, but even they have had some issues with quality over the years. Whenever purchasing a natural hair brush, try to do so in person- look for brushes that come to a point either in package or after wetting the tip, and avoid brushes with stray hairs. Compared to other Kolinsky sable brushes from other brands in similar sizes, this Princeton brush doesn't hold a monumental amount of paint or pigments, and has a rather small 'belly' compared to other Kolinsky sable brushes.
The card neglects to mention that the Copic Multiliner SP (a .3 in this instance) is alcohol marker proof once fully dry, features both replacable ink cartridges AND nibs, and is hard to find open stock in most stores. You are more likely to find the disposable Copic Multiliner, or even the Sakura Micron, both of which are also waterproof, pigment ink, archival, and alcohol marker proof.
Inside the Box
Denik Notebook
On the Denik site, their larger Sketchbooks are $14.95: http://denik.com/sketchbooks/
Smaller hardcovers with an elastic band and bookmark are $18
http://denik.com/fabric-classics/
Otherwhise, there's nothing really comparable on the site.
Kuretake Saji-Pen for Manga (x3 nibs)
$7.99 on Amazon
$3.18 on Blick
$4.00 on Jetpens
Kuretake Nib Holder
$3.99 on Blick
$5.00 on Jetpens
Princeton Kolinsky Sable 7050R
$15.39 on Blick
$17.97 on WetPaint
$14.98 on Artist and Craftsman Supply
Copic Multiliner SP .3
$8.23 on DickBlick
$7.99 on Jerrys' Artarama
5.85 (euros) on CultPens
Pentel Arts Pocket Brush (with two refills)
$12.60 on Amazon
$19.99 on Pentel Site
$13.99 on DickBlick
$17.99 at Michaels
$12.60 at Walmart
Kuretake Sumi Ink 60
$8.50 on Jetpens
$10.77 on Amazon
$6.25 on Paper and Ink Arts
Totals:
MSRP: $95.38
Lowest Retail Value: $63.94
Plus a $25 How to Ink Class with Jake Parker
Cost of Box: $99
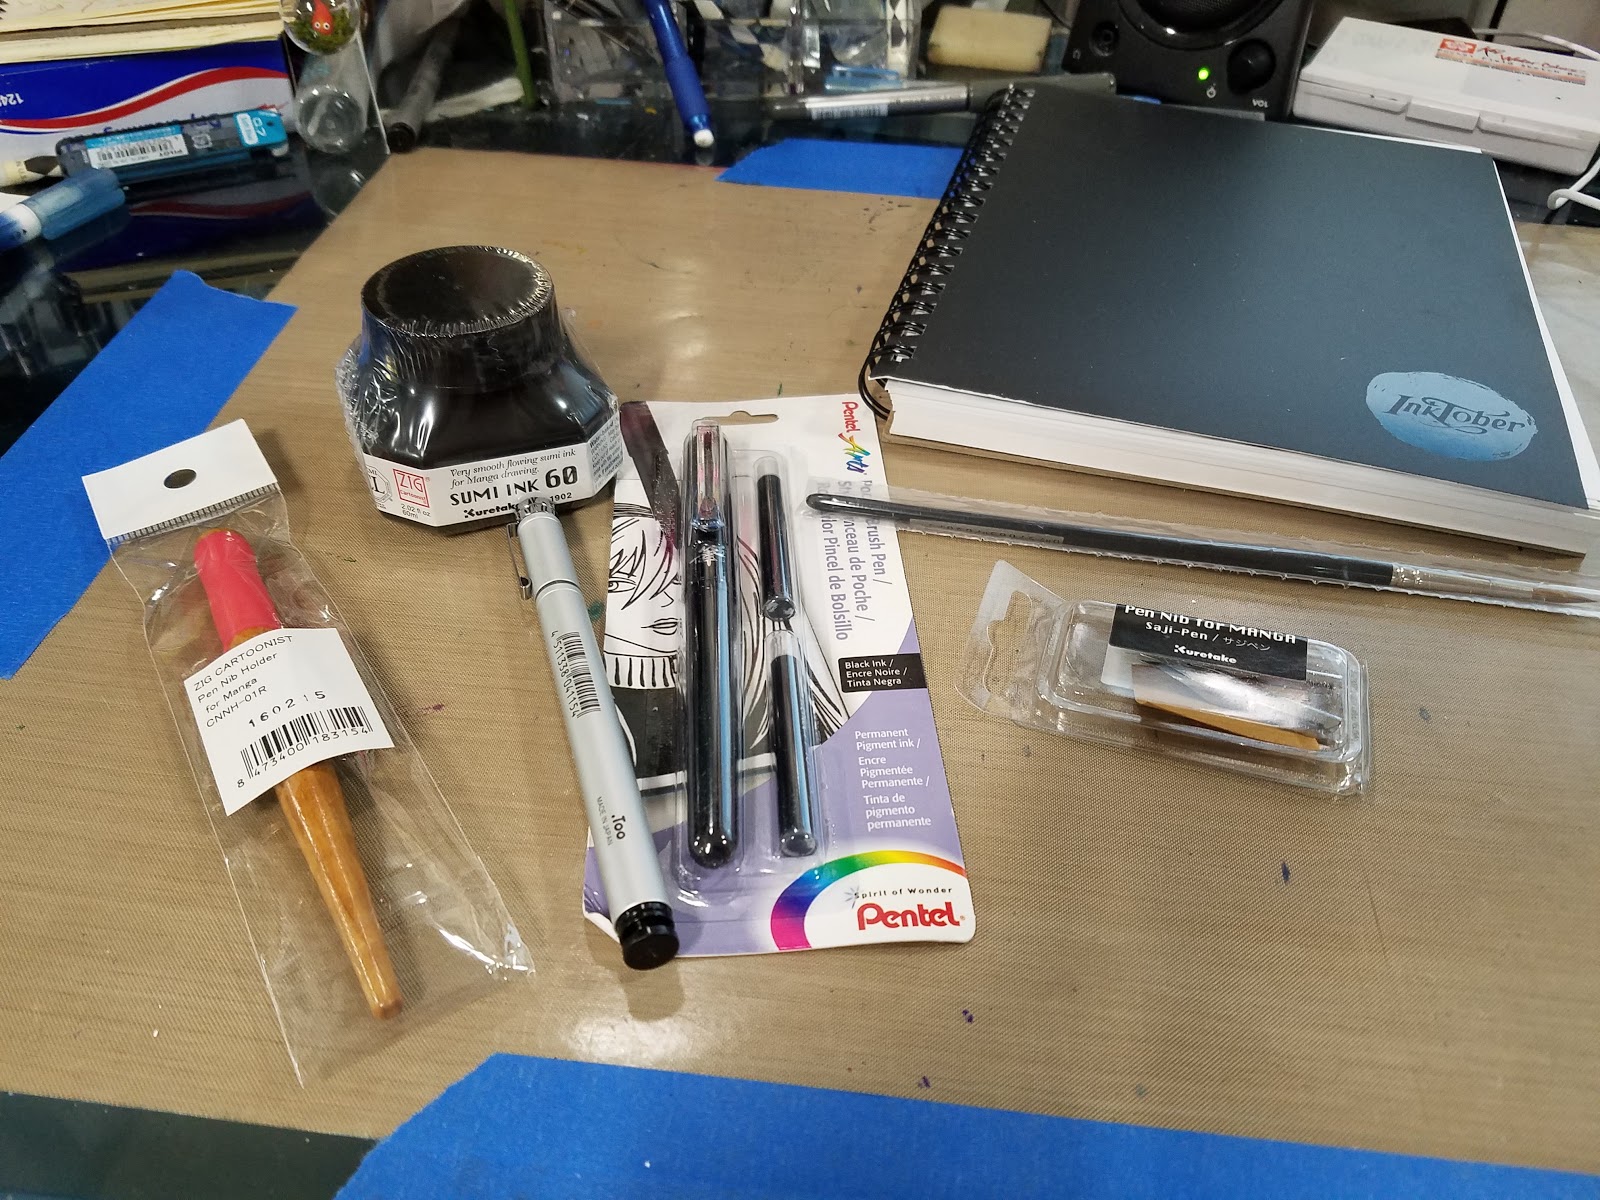
The Overview
I highly recommend you watch this overview, as I demonstrate how to prepare the materials inside, how many of these are used, and I show cheaper alternatives when applicable. If you are putting together a collection of inking supplies, this is a must watch.


Inktober Collection Tutorials And Demonstrations
These tutorials were not sponsored by ArtSnacks, and were created as bonus content for my Patrons. If you enjoyed these videos, found them helpful, or are using them to educate others, please consider visiting my Patreon for information on how you can join my community of art nerds, and help fund future content. Tutorials like these are not possible without outside support.
Nib Exposure- Inking Tutorial with ArtSnacks Inktober
Brush Inking Tips with the ArtSnacks Inktober Box
Faux InkWash-ArtSnacks Inktober Tutorial
Inking Your Character to Life with a Brush- Inktober Tutorial
Inking Your Character to Life with a Brush Part 2
Cartoony Inking with a Size 4 Brush
Nib Exposure- Inking Tutorial with ArtSnacks Inktober
Inking with a Manga Nib: Kuretake Saji Nib Timelapse
Copic Multiliner Demo Inking Tools
Inktober Saji Nib Timelapse-Naomi
Inktober Timelapse G Nib- Naomi
Size Matters! Brush Demonstration
Shots from Inktober Tutorials
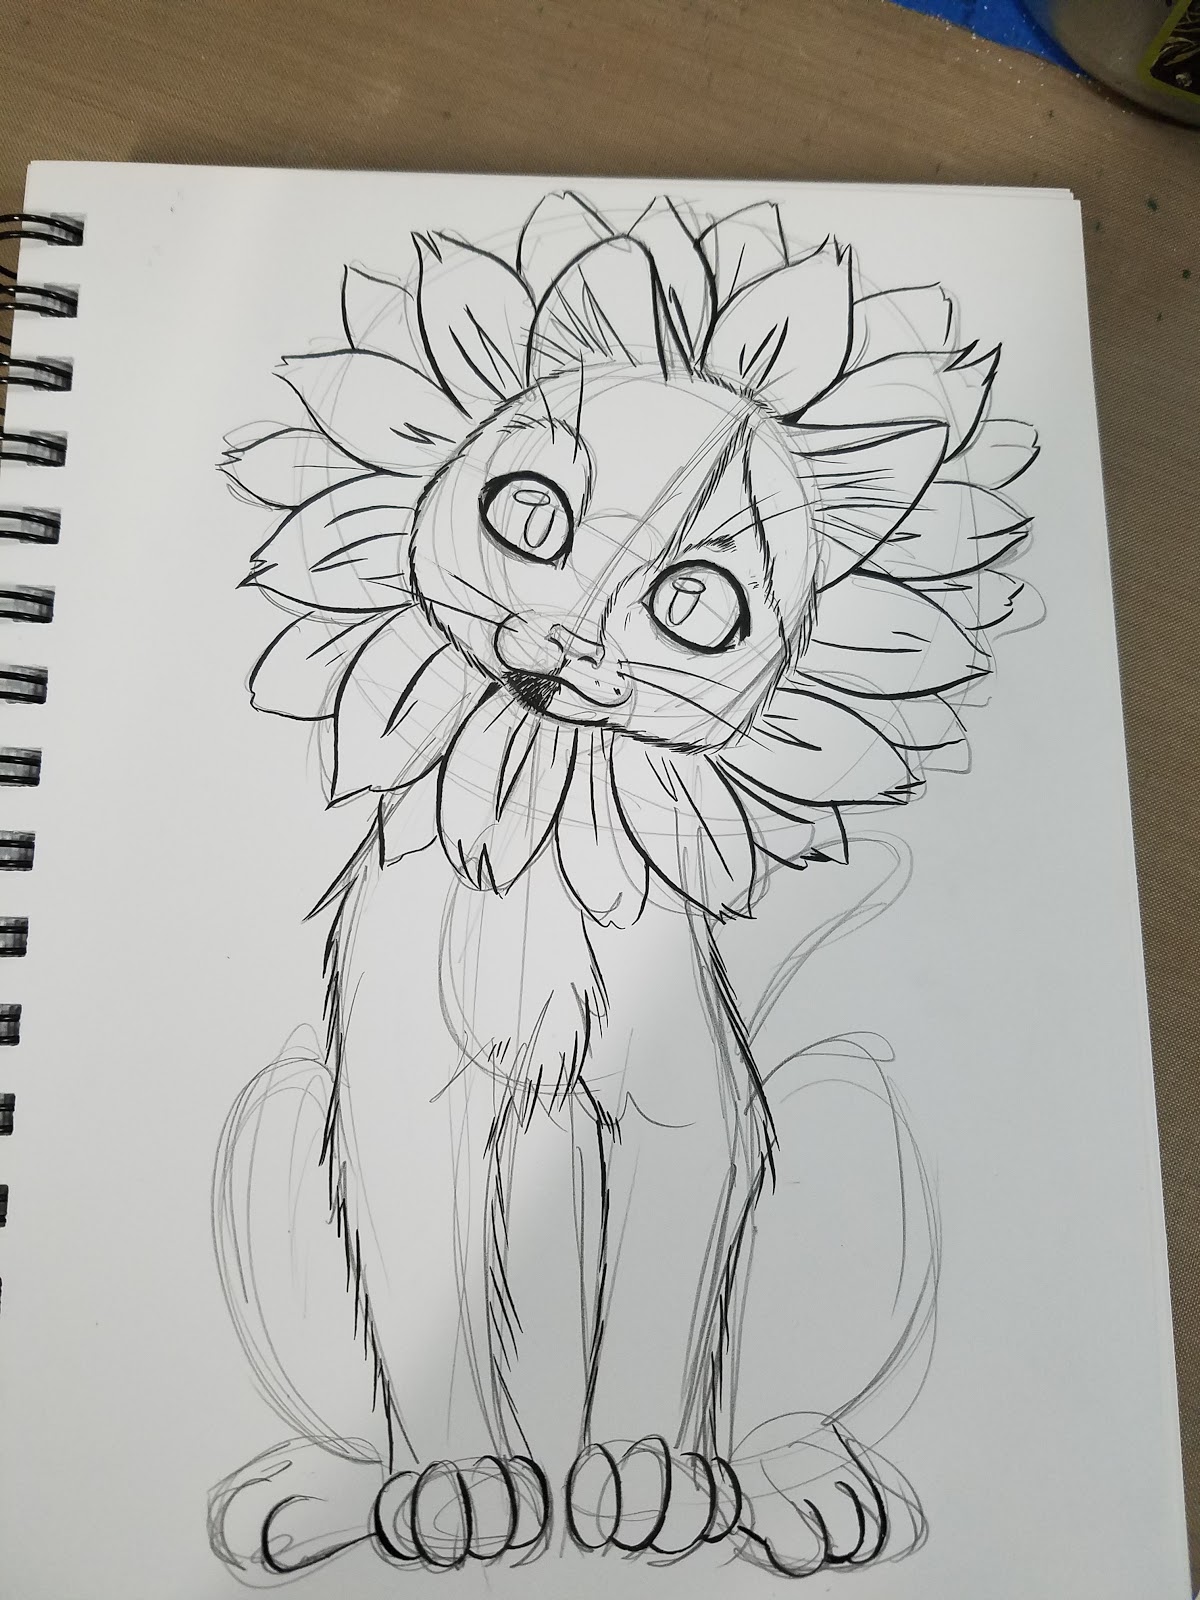


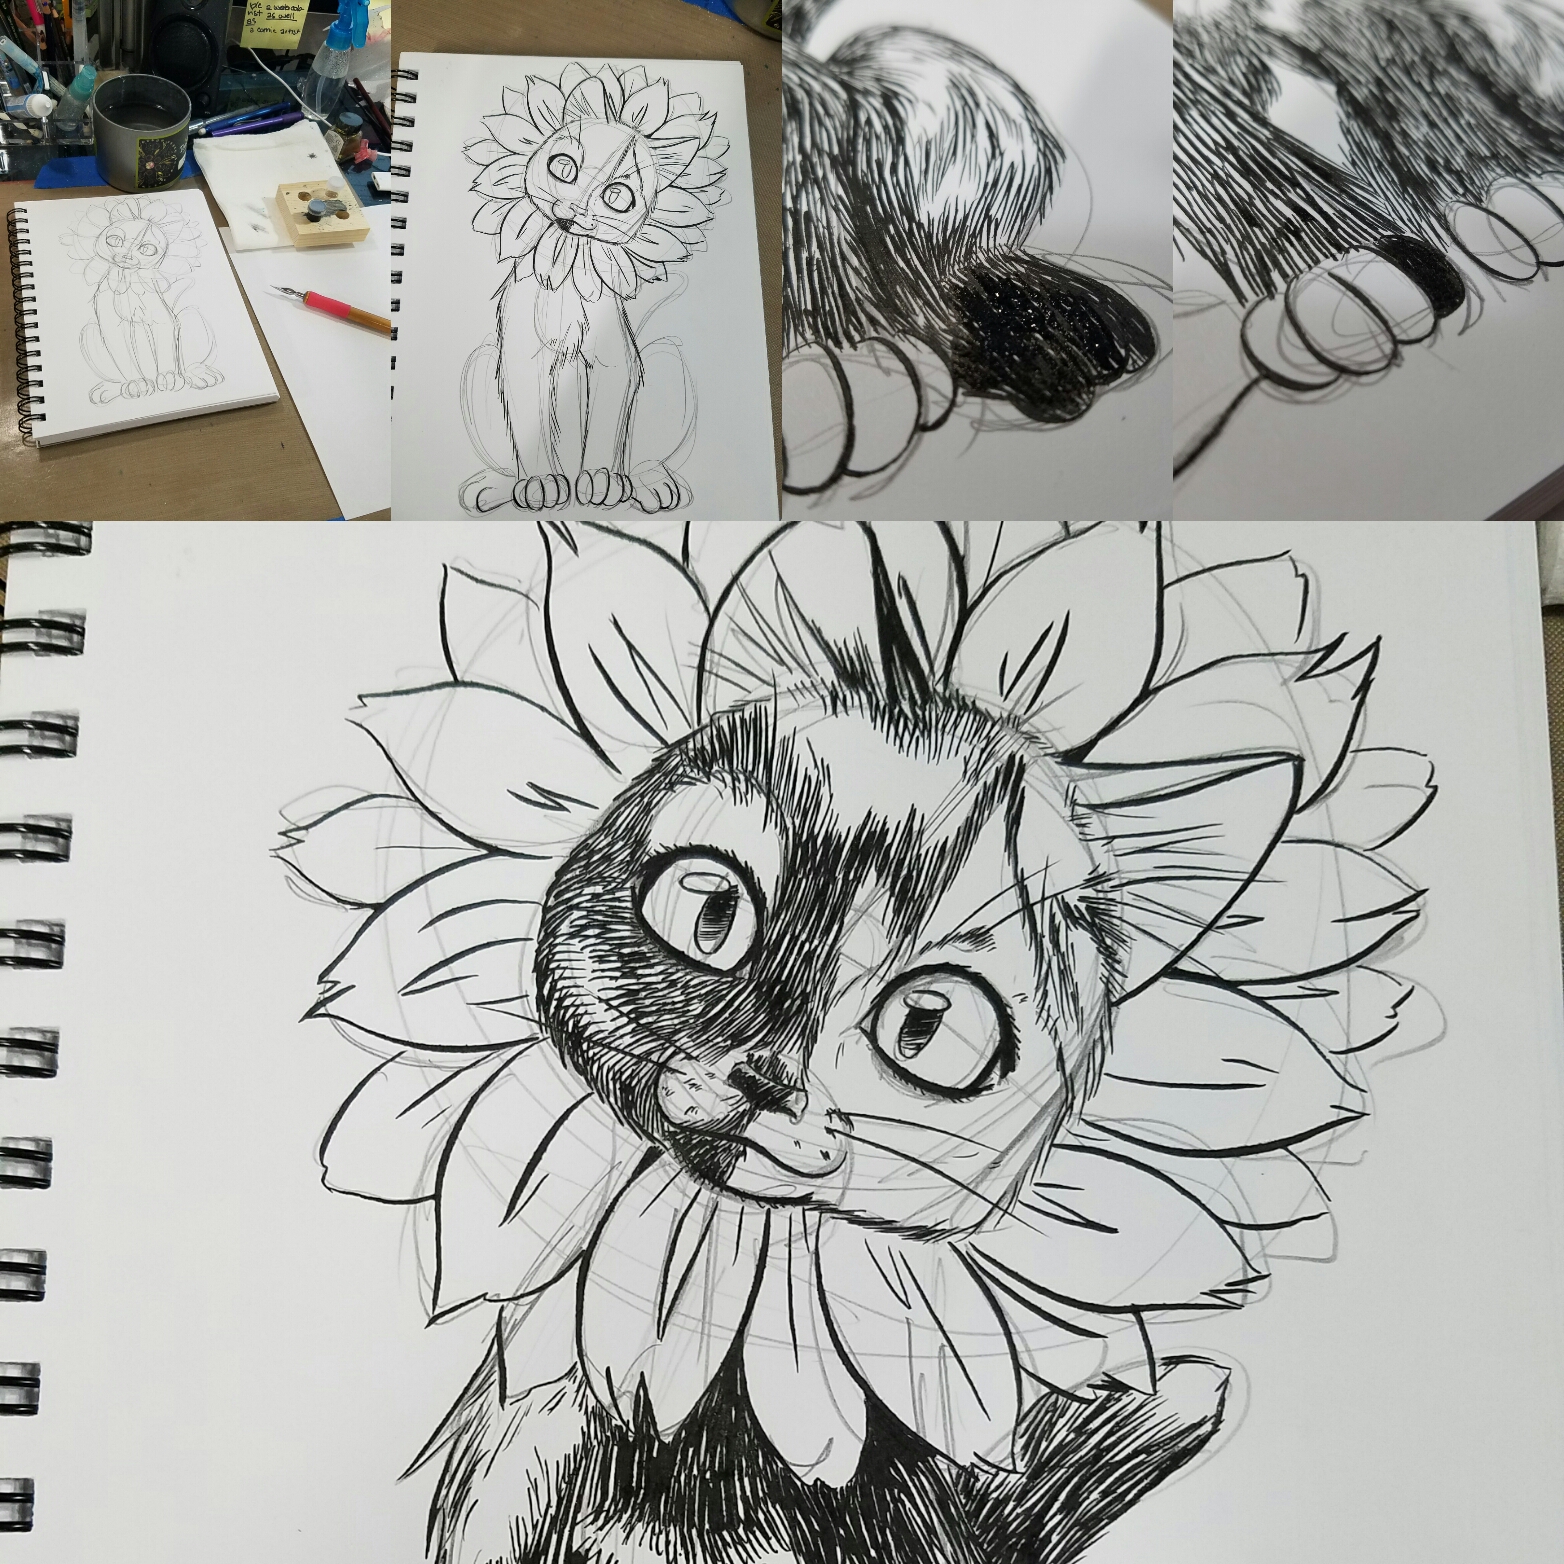
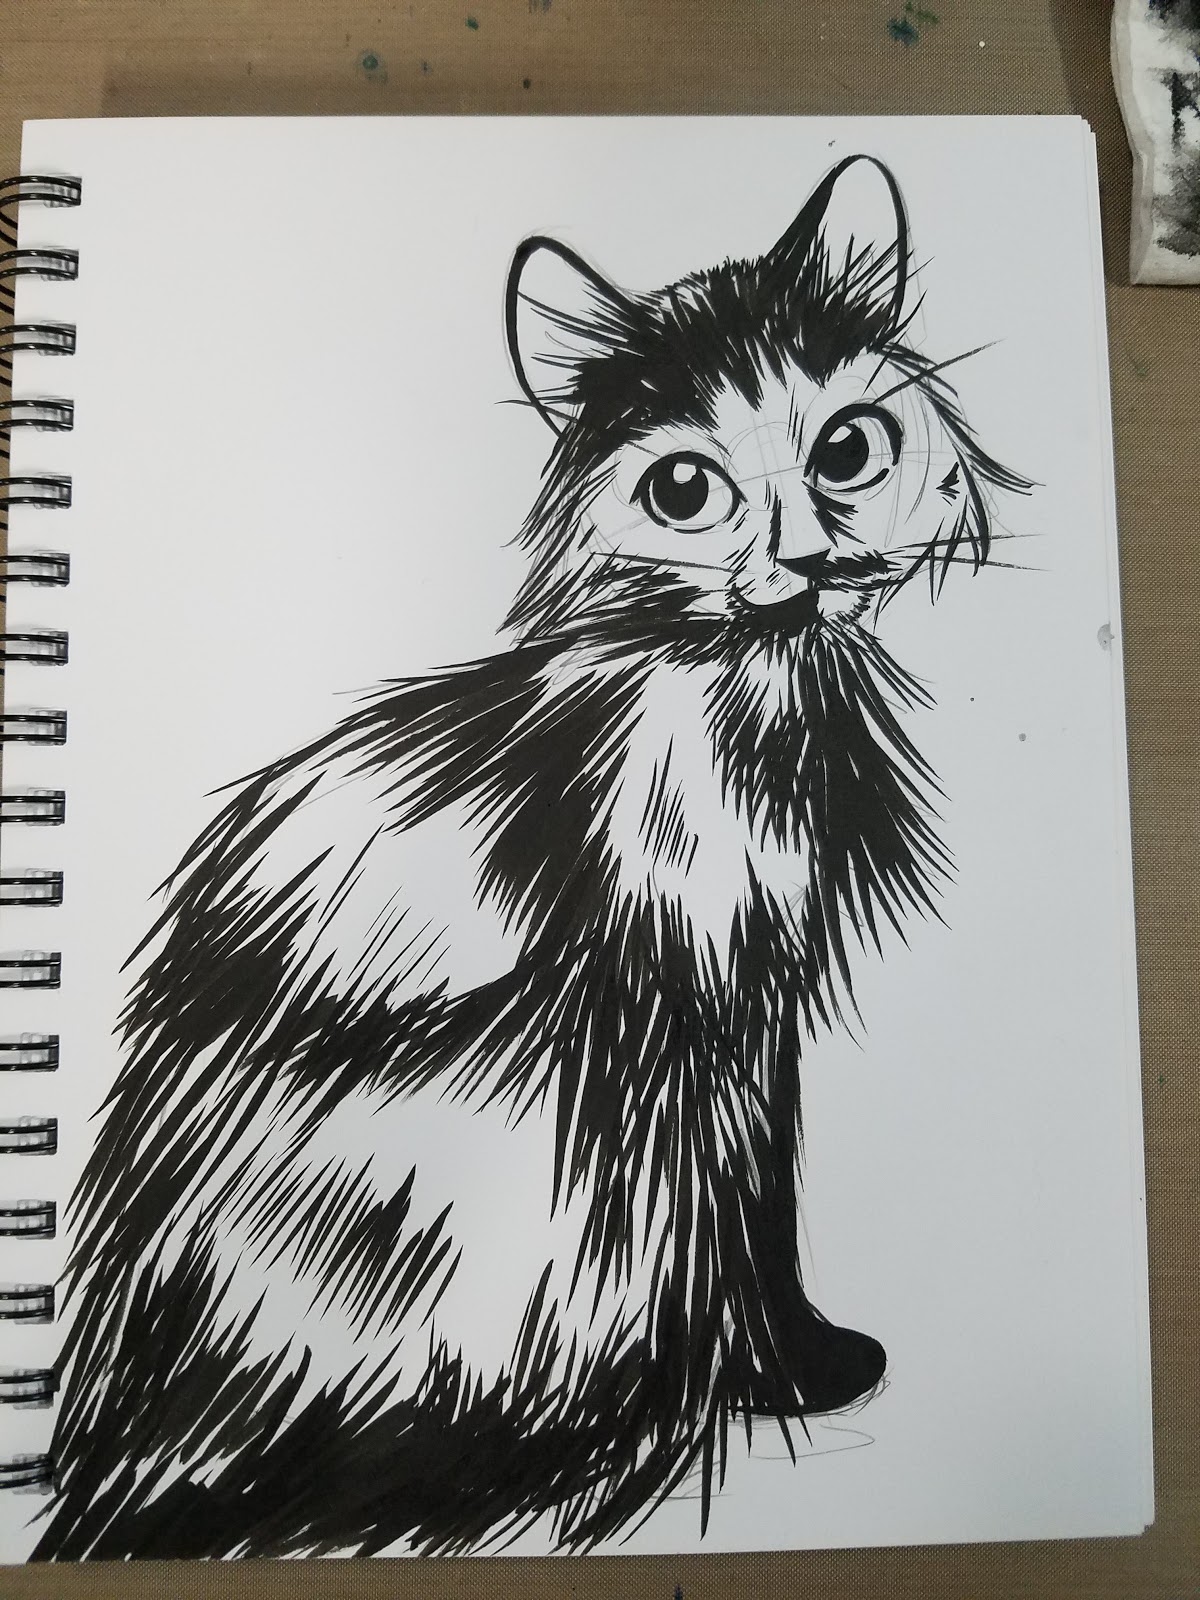
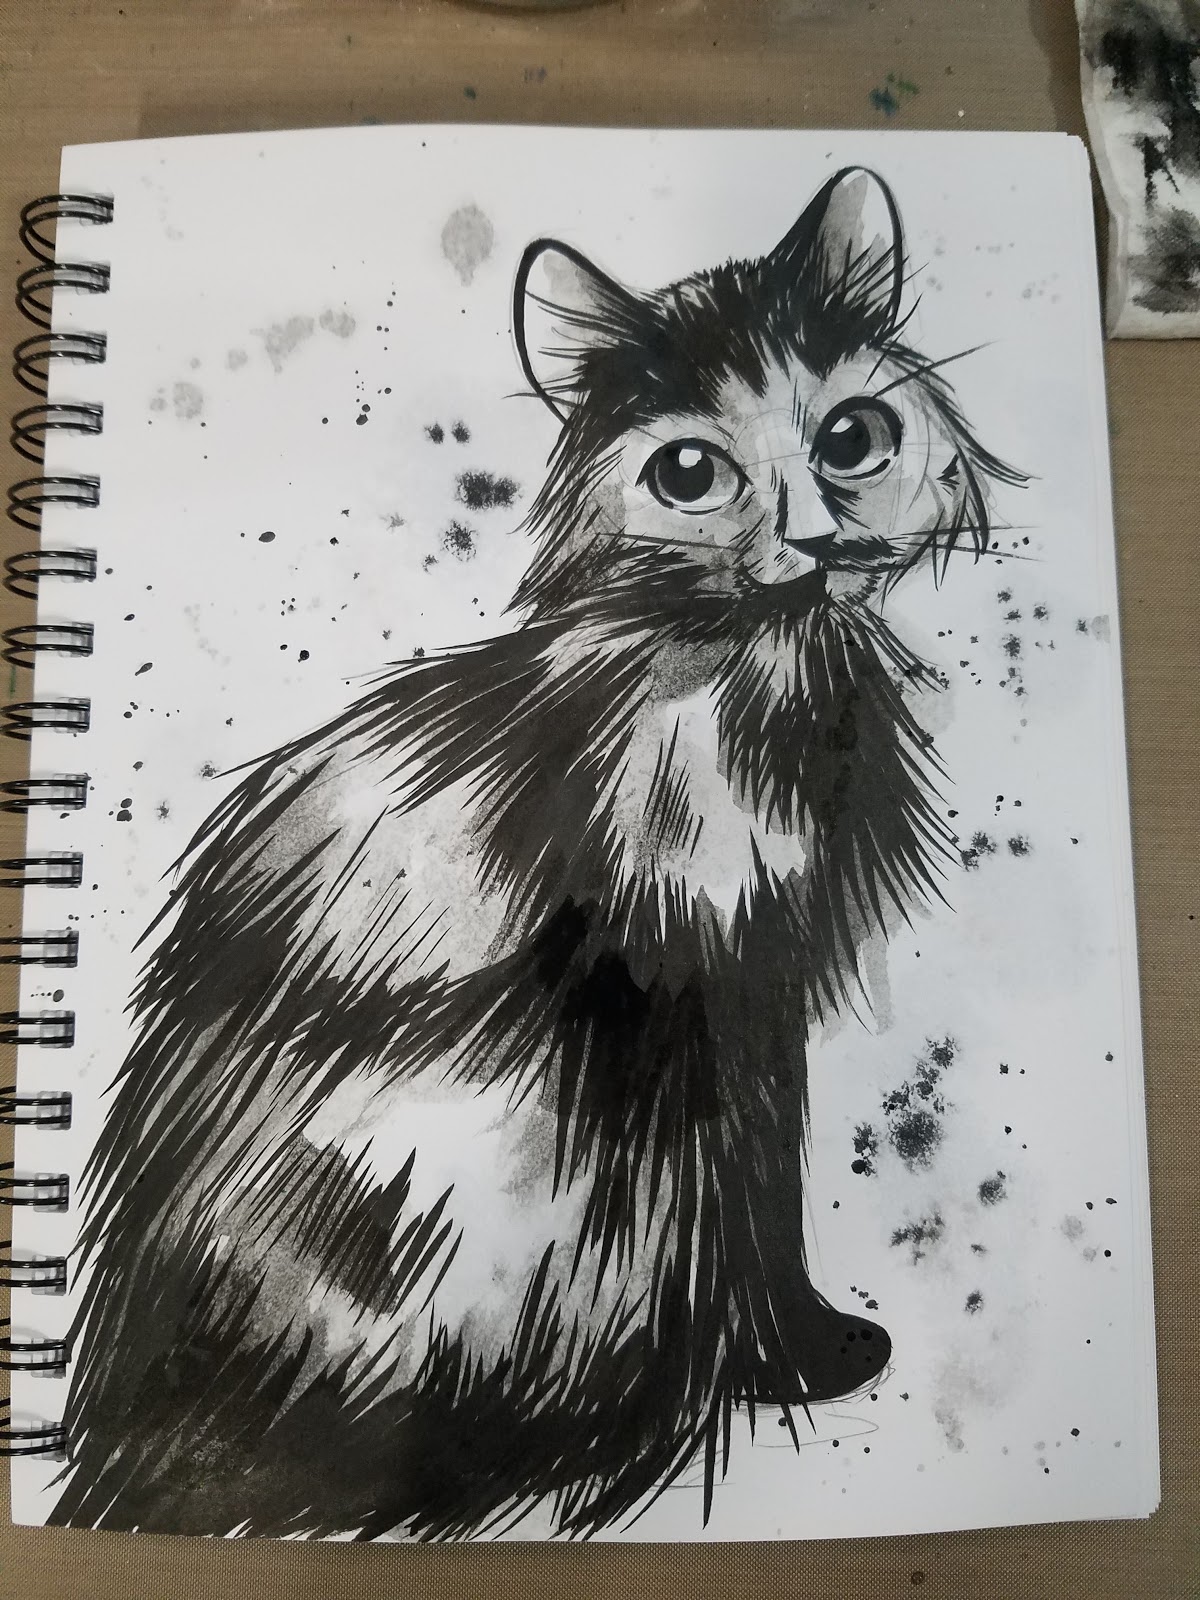


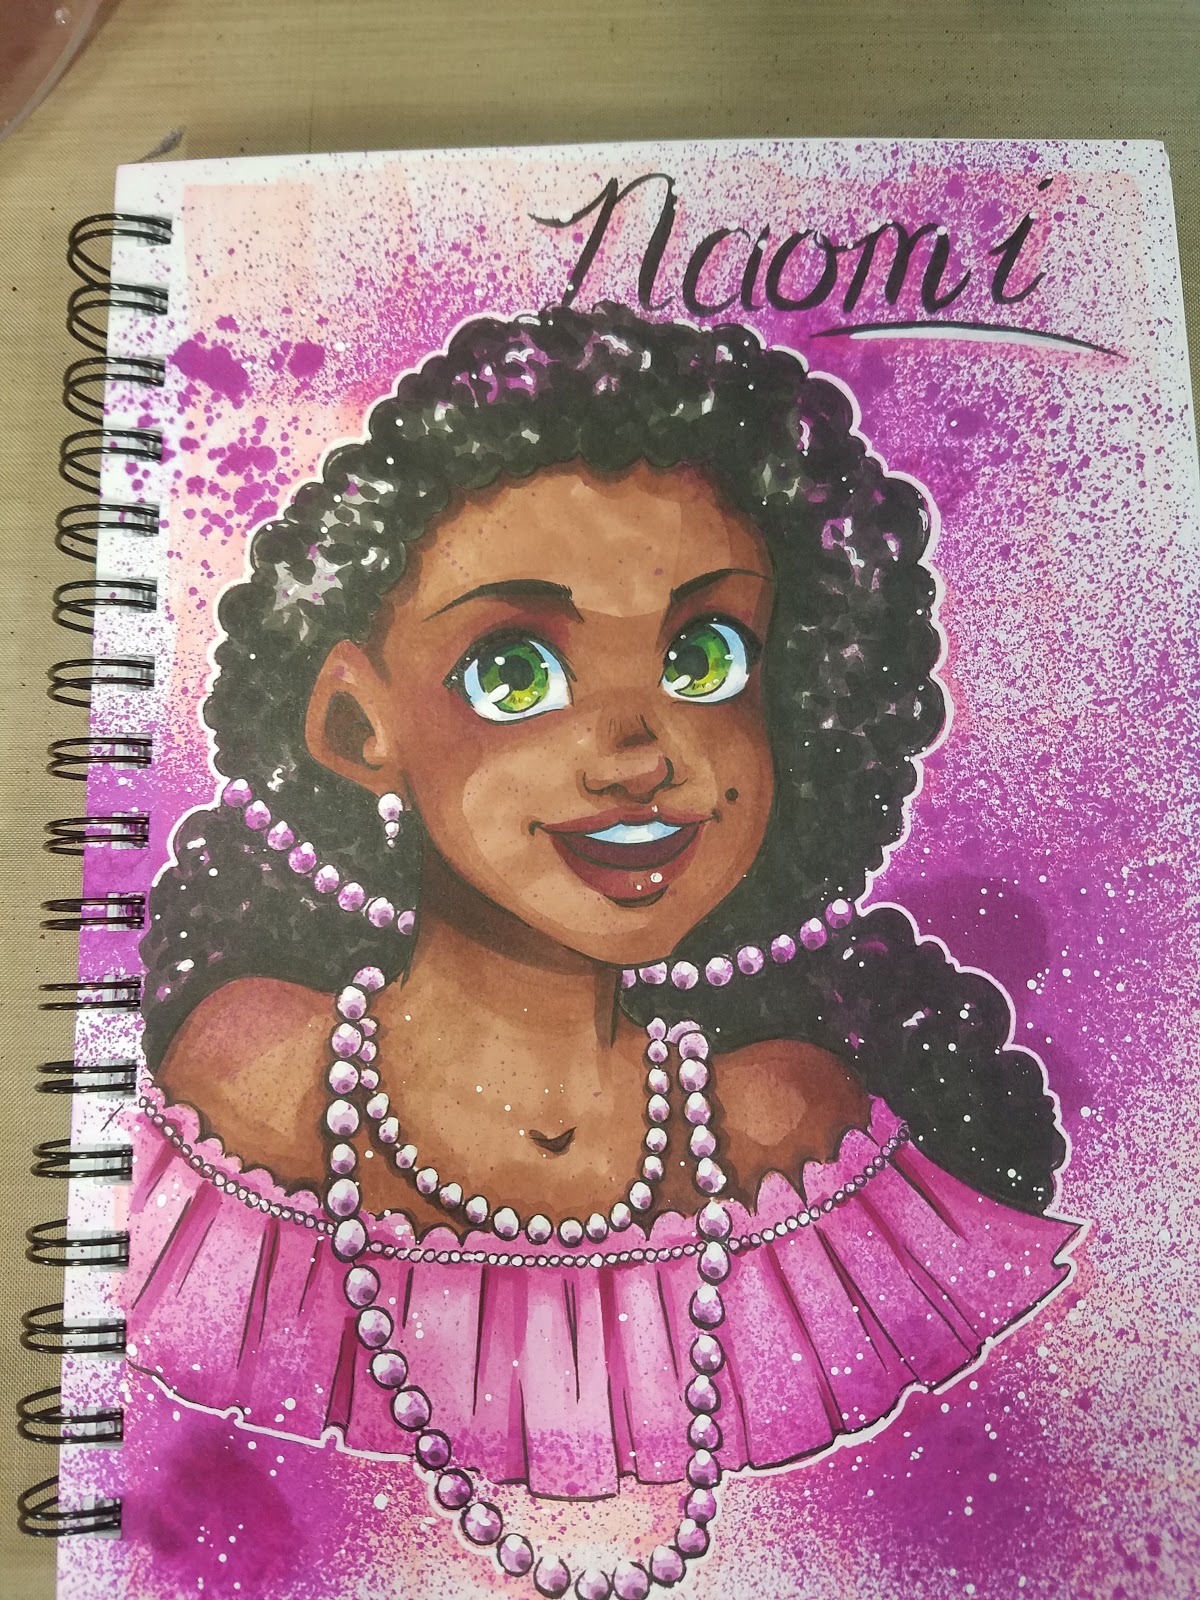
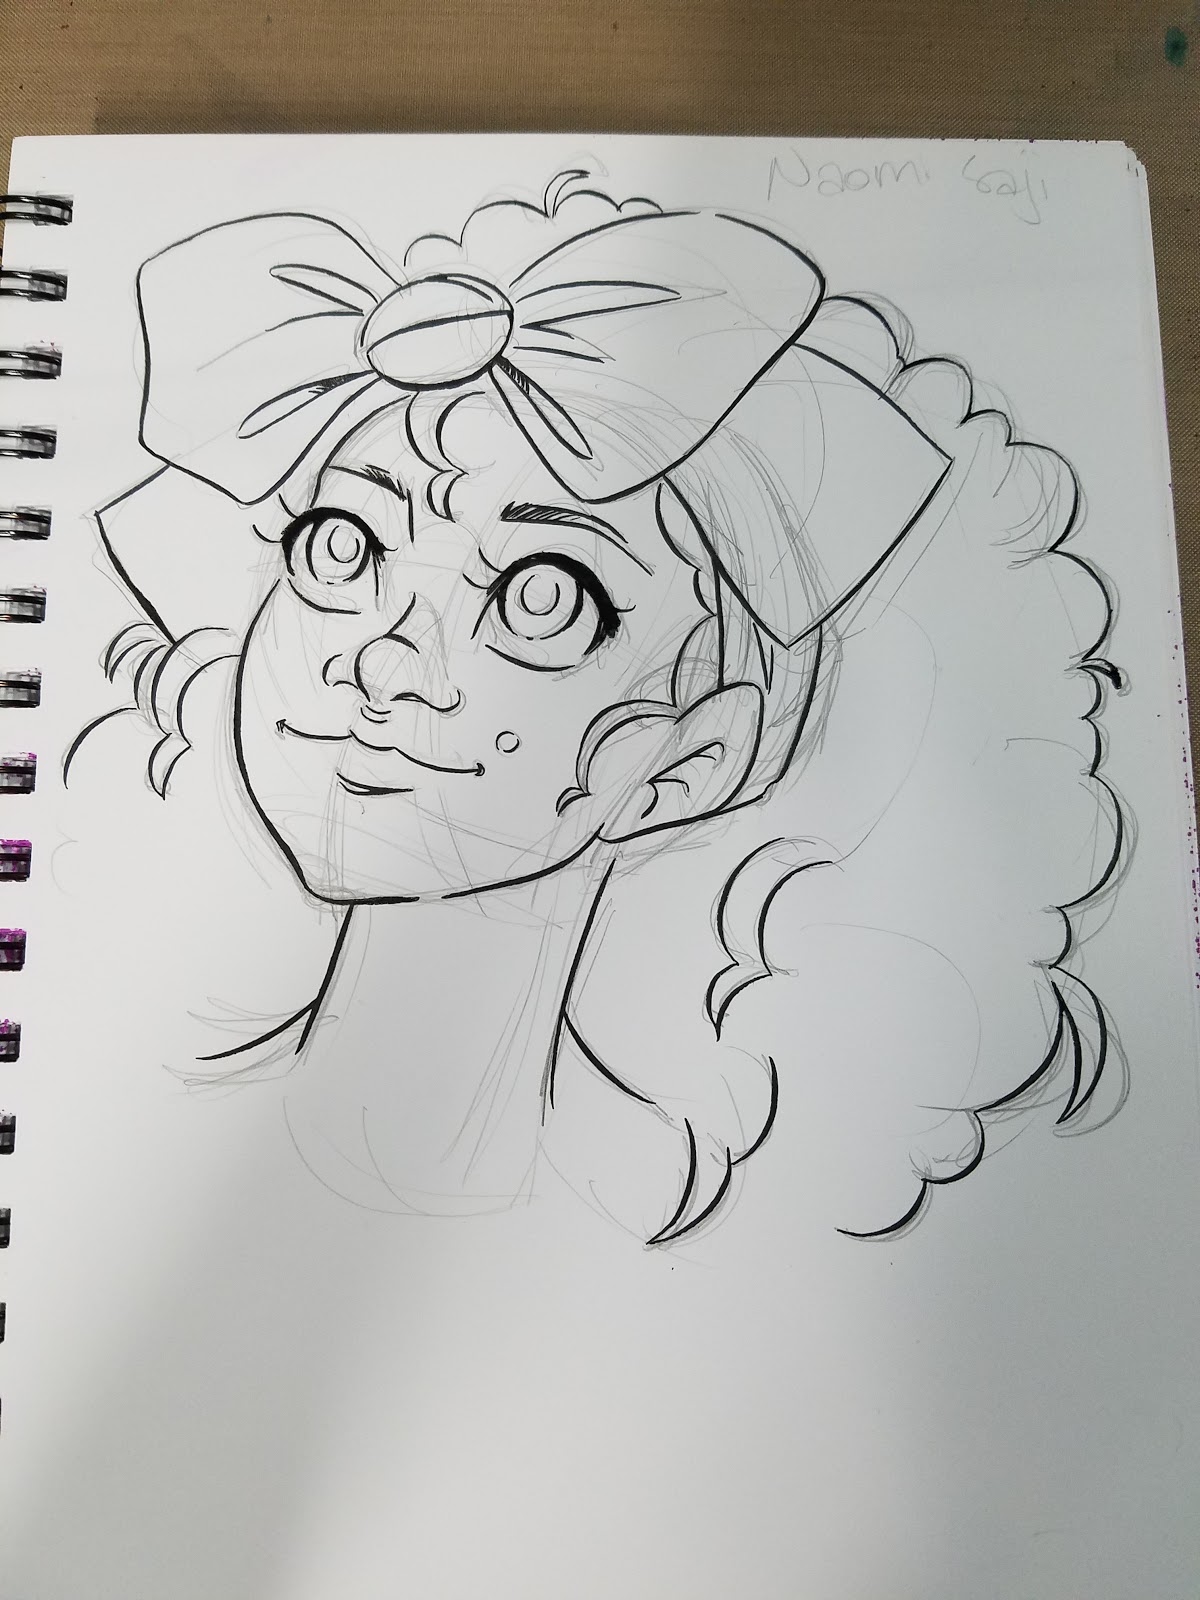
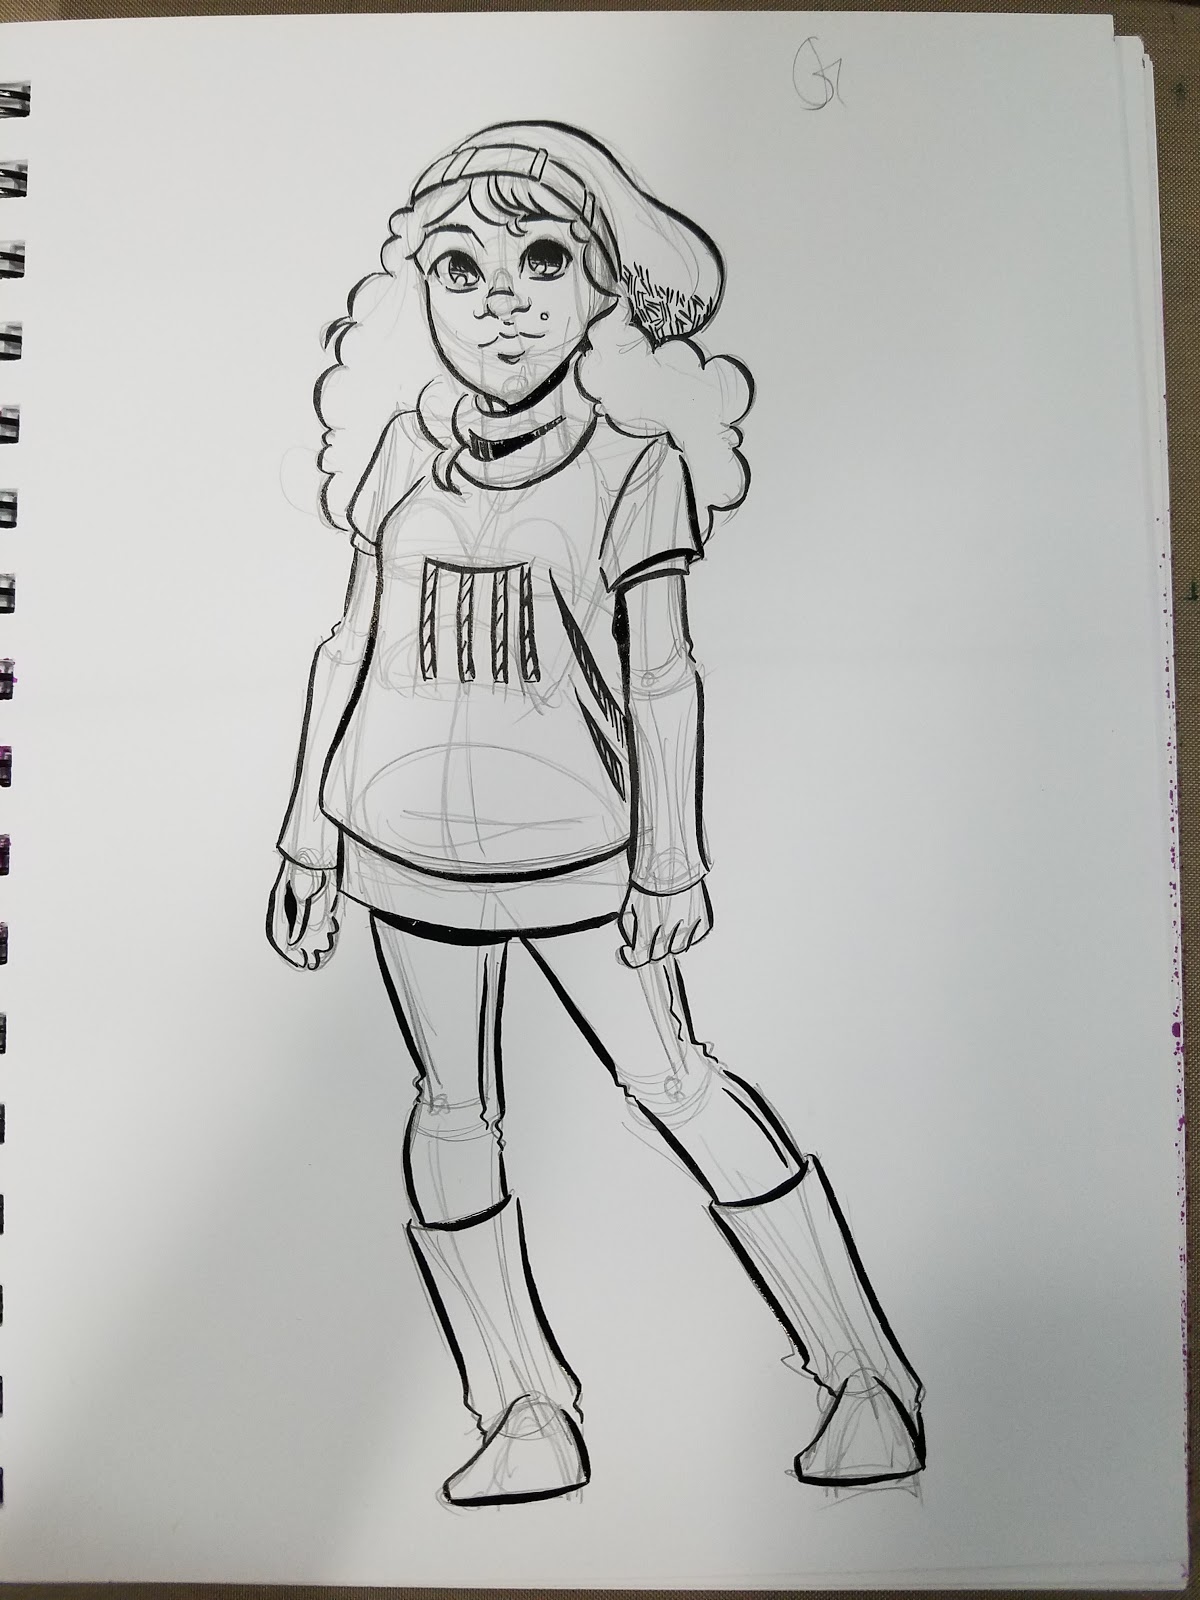
As the month progresses, more inking and Inktober tutorials and demonstrations will be available on my YouTube channel, so please keep an eye out! Patrons get exclusive early access to all Inktober tutorial and demonstration videos, so if that sounds interesting, head on over and join the community!
The Verdict
I found this box massively underwhelming. Not because the items inside the box weren't good items- they are. They are good basic items that most inkers are already familiar with. They are good, basic items that add up to an underwhelming box given the amounts of hype ArtSnacks put into promoting this box, the lavish promises that were made, and the fact that there's still a $30 discrepancy between what I paid and what I received.
This box promised to have something for inkers of all abilities, but instead seemed to focus solidly on beginners, leaving the competent scratching their heads. There was so much room, budget wise, to really include some exciting goodies!
Potential Box Additions:
Variety of paper samples including cold press watercolor paper (for drybrush), Bristol, and mixed media papersWalnut inkColored inksCrowquillsA wider variety of nibs including fixed width like A, B, or C, mapping, or GInexpensive fountain pens like the PreppyFude pens like the Fudebiyori or the Pilot Mikase
If I had known the box would be so anemic, I would not have purchased it.
Resources and Outside Links
Difference Between G-Pen, Maru, Saji/Tama Nib Demo-Comic/Manga Fountain Pen Nib Tutorial
Copic Multiner SP vs. Sakura Pigma Micron
How to Change Nibs and Ink Cartridges on Copic Multiliner SP Pens
Pentel Brush Pen Review & How to Use Brush Pen
Review: Kuretake Zig Cartoonist Sumi Ink 60
Please consider donating to this blog or purchasing from Natto-shop (http://nattosoup.com/shop) if you want me to continue publishing quality content. All materials tested were purchased from my own pocket. Keep on Truckin' Nattosoup is not under any sponsorship.
October 16, 2016
Guest Post: Haravanda on Eastern and Western Watercolors
Hello there! I’m known as Haravanda but you can also call me Hara for short! I create comics such as Peach Please! as well as collecting watercolor supplies for studies. Today I'm going to talk about how watercolor manufacturers from different parts of the world have a different choice of palette and characteristic.
This won’t be much of a walkthrough but more of a comparison post between different watercolor brands testing on some characters for my mini comic. Let’s get started! YarkaExhibit 1! For the first character, I figure since she’s a brawler girl who likes traditional dye color, I decided to go with Yarka St. Petersburg Professional (also known as White Night or St.Petersburg) which is a Russian branded manufacturer which alternates between artist and student grade due to their branding as “professional paint” while mostly selling pans instead of tubes. The binding is made with honey so the colors do melt a lot between travels but this was one of my go to color set whenever I want to do a more muted palette. With the exception of red hues, most are desaturated colors which weren't the result of the lack of pigment but more on the fact that many were more fugitive/mixed color. Price-wise, however, they are a bit more expensive than Cotman (due to import) but have a very decent set for those who want to start out with more dusted or classical palette.
 Hello old friend
I usually use a rounded 02 for painting, a flat brush for mixing and a bigger rounded brush for spreading water around a large surface since I tend to work pretty small. The Poo-Pourri bottle on the right side was repurposed into spraying water to keep the paint wet while painting and I also recycled my ice cream jars into water containers. For the paints, I mixed Quinacridone Lilac, Ultramarine and Payne’s Gray for the purples, different mixes of golden Deep and Claret for the red tints and plain Oxide of Chromium for the green. There is a clear difference that the more color got mixed, the more muted and dark the color became. Yarka’s main highlights were it’s red and blue hues which make sense considered that arts that depict sea and old, red bricks architecture are very popular amongst many Russian artists as well as the tendency to focus on a more realistic and nostalgic tone.
 Tada!Mijello Mission GoldFor the second character, I debated on getting a more vibrant orange and pink color. I figured it is a good time to give my Mijello Mission Gold mini set a chance to shine. Mijello comes from a South Korean manufacturer who takes pride in creating vivid paint pigments which are very well reflected in their selections. From the sample set of 24 I’ve received, with the primary Lemon Yellow, Viridian, Cerulean Blue, Permanent Red also comes with Bright Opera, Peacock Blue, and Red Brown. On the same token Mijello Mission Gold is judged to be more compatible with poster/print work rather than permanent work to hang on a wall due to their lower level of lightfastness. Mijello colors are generally sold in tubes and have a very creamy consistency right out of the tube that hardened with times. As an import, Mijello can be a price step if you’re used to Cotman, Van Gogh or Sakura Koi but their colors definitely worth every penny.
 Credit to my seller @hinoart.shop for her wonderful hand labeled mini boxset
 Rawr
Rawr
For this illustration, I shaded the darkest part of the girl’s skin with Prismacolor brown watercolor pencil as the base as well as part of the line work to add some warmth. I diluted the Yellow Orange and Sap Green for the character’s clothes and painted a light layer of Yellow Ochre with Rose Madder underneath for skin shade then adding some Red Brown to darken her complexion. The pink hair is a mix of Bright Opera and Rose Madder. Even with a lot of mixing, the colors did not become desaturated like Yarka and stayed very bright and warm. The way the paint behave also makes a lot of sense since the South Korean boom in art supplies comes with the development of industrial art such as posters, comic and product decor.Holbein Artist Watercolor Drum roll! Here’s tonight’s star: Holbein! Some of you might have stumbled against a rack of Holbein in an art store, some might have heard of it and some might want it. Holbein is a brand of art supplies and paint which originated in Osaka, Japan. Their brand of gouache and watercolor is known to be expensive on a student budget; their watercolor line is also divided between Holbein’s regular line and Irodori Antique, which has a color selection that is closer to the antique Japanese palette. What makes Holbein specials compares to other watercolor brands is their special range of bright, pastel colors such as Shell Pink, Bamboo Green or Lavender but they also have in my opinion an excellent range of blues. Since the paint typically comes in tubes and I’ve learned that panned set tends to be more expensive, I’ve squeezed some paint into pill boxes to keep around rather than just wasting them on the palette and risk accidental blending (again, prop to Hino for the tip).

I’ll have to confess that I am a sucker for marine theme clothing as well as my love for Holbein’s Marine Blue so this was a lot of fun to paint. Before anything, I went over the pencil lines with blue lead to make the linework blends in better with the paint. I leave the Marine Blue as is while mixing of Naples Yellow and Rose Madder for the girl’s skin tone. For the hair’s olive hue, I did a mix of Permanent Green No.2, Burnt Umber, and Yellow Lemon while adding some Yellow on the character’s tie and yo-yo. Out of the three set, I would vote for Holbein as the one with the easiest skin tone mix, which is I think is a reflection of the need born from manga art and daylight landscape’s popularity in Japan.
 From Left to Right: Holbein, Mission Gold, and Yarka
There are many other watercolor lines out there and one of the easier ways to see how each manufacturer differs from each other is to test them out by putting the swatches side by side which is an expensive and time-consuming process. That's why I’ve made my own palette chart for those of you who wants a clearer comparison so you won't have to. I also included some watercolor pencils because why not?Watercolor chart and country of origin (pardon my ink smears): Winsor and Newton Cotman: UK (student grade) - Derwent: UK - Rembrandt: Netherlands - Yarka: Russia - Mijello: S.Korea - Kusakabe: Japan
 Kuretake: Japan (student grade) - Marco Raffiné: China - Sennelier: France
 Holbein (test sheet 1-2): Japan
From what I can see, I think a lot of Western paint manufacture prefer to focus on strong primary color with pure pigment resulted with very deep red, yellow and ultramarine which also meant to be more permanent for fine art. Meanwhile, Eastern manufacturers prefer to create a wider variety of color with really bright selections but resulting with a more questionable level of paint permanence, which makes a lot of them perfect for prints and reproductions. Again this is just my own theory on said subject but who knows? Maybe there are Eastern paint makers who like to produce deep pigment paints and Western brands like Daniel Smith who create 90+ colors with different paint properties.
If you’re new to the whole watercolor scene or are familiar with the medium and trying to figure out where to go next, I hope this article helps. Also a big thank you to Becca for calling for submissions, I love talking about art and watercolor.
Sincerely,
Hara
You can find me here:Social:TwitterInstagramPortfolio:Website (Check out my comics!)Blog:Tumblr ( I occasionally write fountain pen reviews and pen 101 here)
Please consider donating to this blog or purchasing from Natto-shop (http://nattosoup.com/shop) if you want me to continue publishing quality content. All materials tested were purchased from my own pocket. Keep on Truckin' Nattosoup is not under any sponsorship.
This won’t be much of a walkthrough but more of a comparison post between different watercolor brands testing on some characters for my mini comic. Let’s get started!
 YarkaExhibit 1! For the first character, I figure since she’s a brawler girl who likes traditional dye color, I decided to go with Yarka St. Petersburg Professional (also known as White Night or St.Petersburg) which is a Russian branded manufacturer which alternates between artist and student grade due to their branding as “professional paint” while mostly selling pans instead of tubes. The binding is made with honey so the colors do melt a lot between travels but this was one of my go to color set whenever I want to do a more muted palette. With the exception of red hues, most are desaturated colors which weren't the result of the lack of pigment but more on the fact that many were more fugitive/mixed color. Price-wise, however, they are a bit more expensive than Cotman (due to import) but have a very decent set for those who want to start out with more dusted or classical palette.
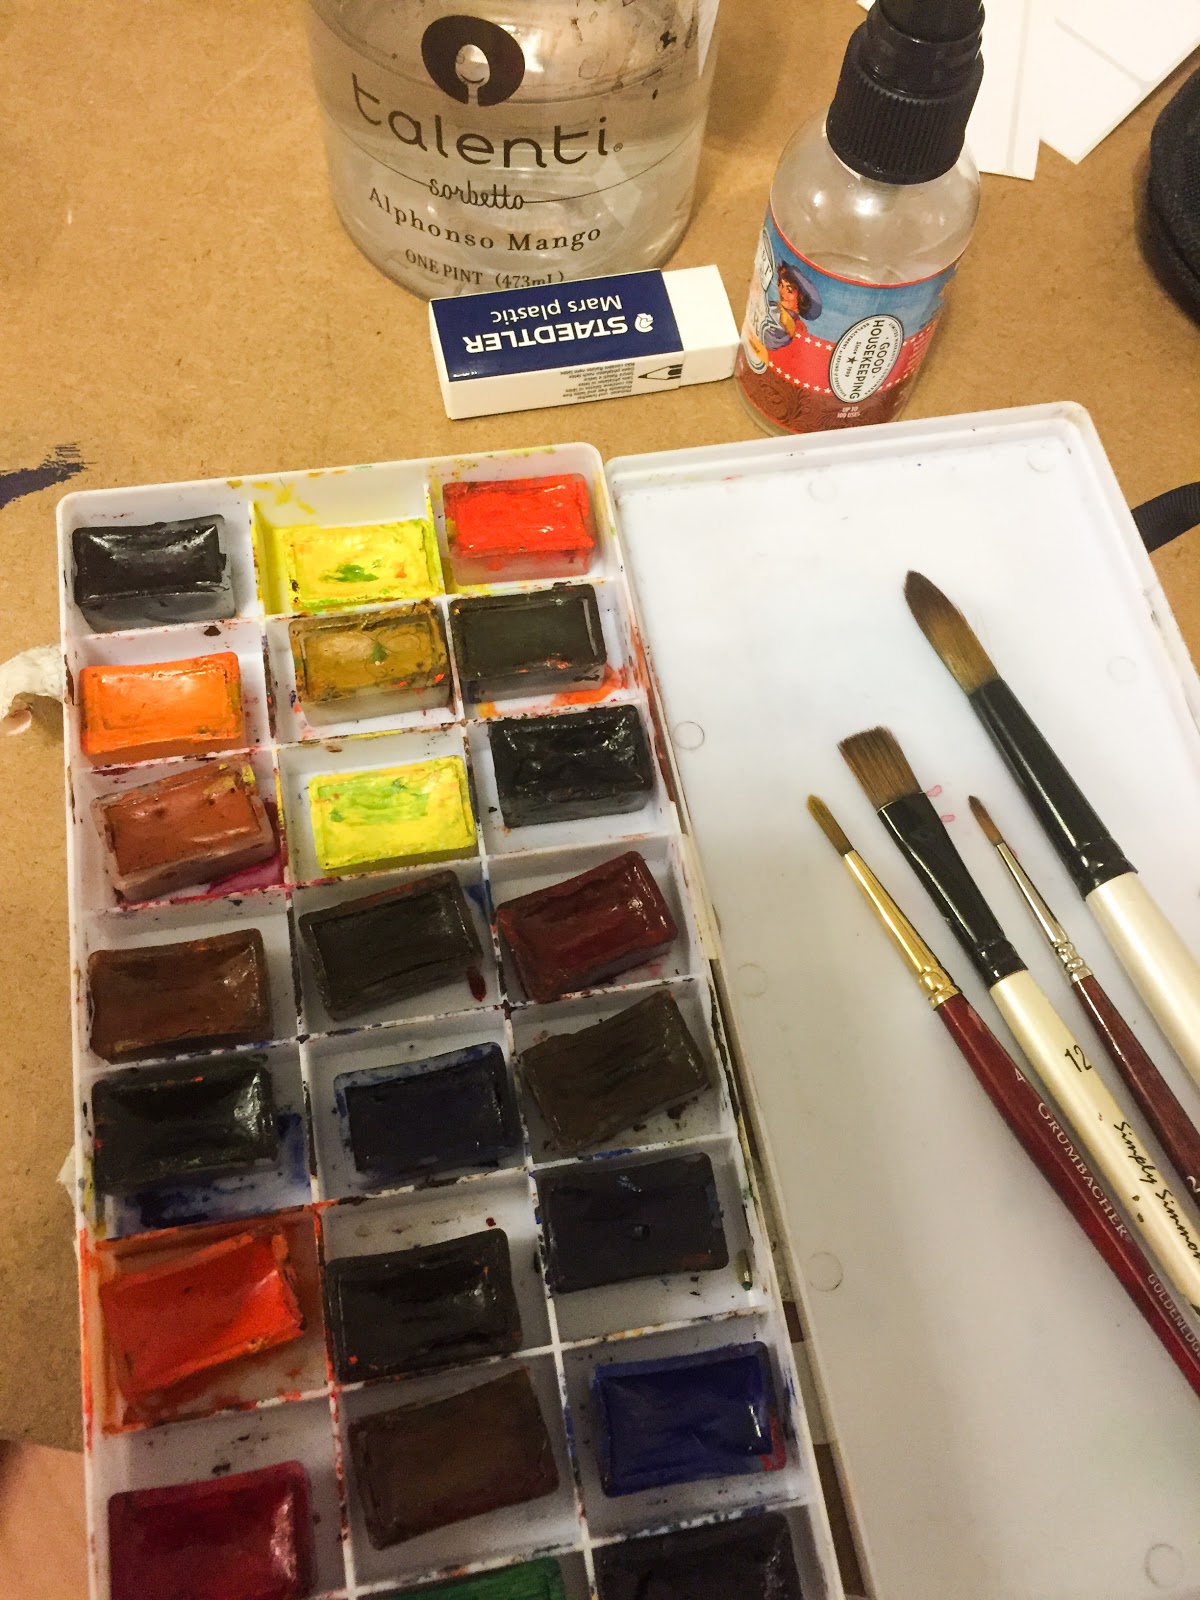 Hello old friend
I usually use a rounded 02 for painting, a flat brush for mixing and a bigger rounded brush for spreading water around a large surface since I tend to work pretty small. The Poo-Pourri bottle on the right side was repurposed into spraying water to keep the paint wet while painting and I also recycled my ice cream jars into water containers. For the paints, I mixed Quinacridone Lilac, Ultramarine and Payne’s Gray for the purples, different mixes of golden Deep and Claret for the red tints and plain Oxide of Chromium for the green. There is a clear difference that the more color got mixed, the more muted and dark the color became. Yarka’s main highlights were it’s red and blue hues which make sense considered that arts that depict sea and old, red bricks architecture are very popular amongst many Russian artists as well as the tendency to focus on a more realistic and nostalgic tone.
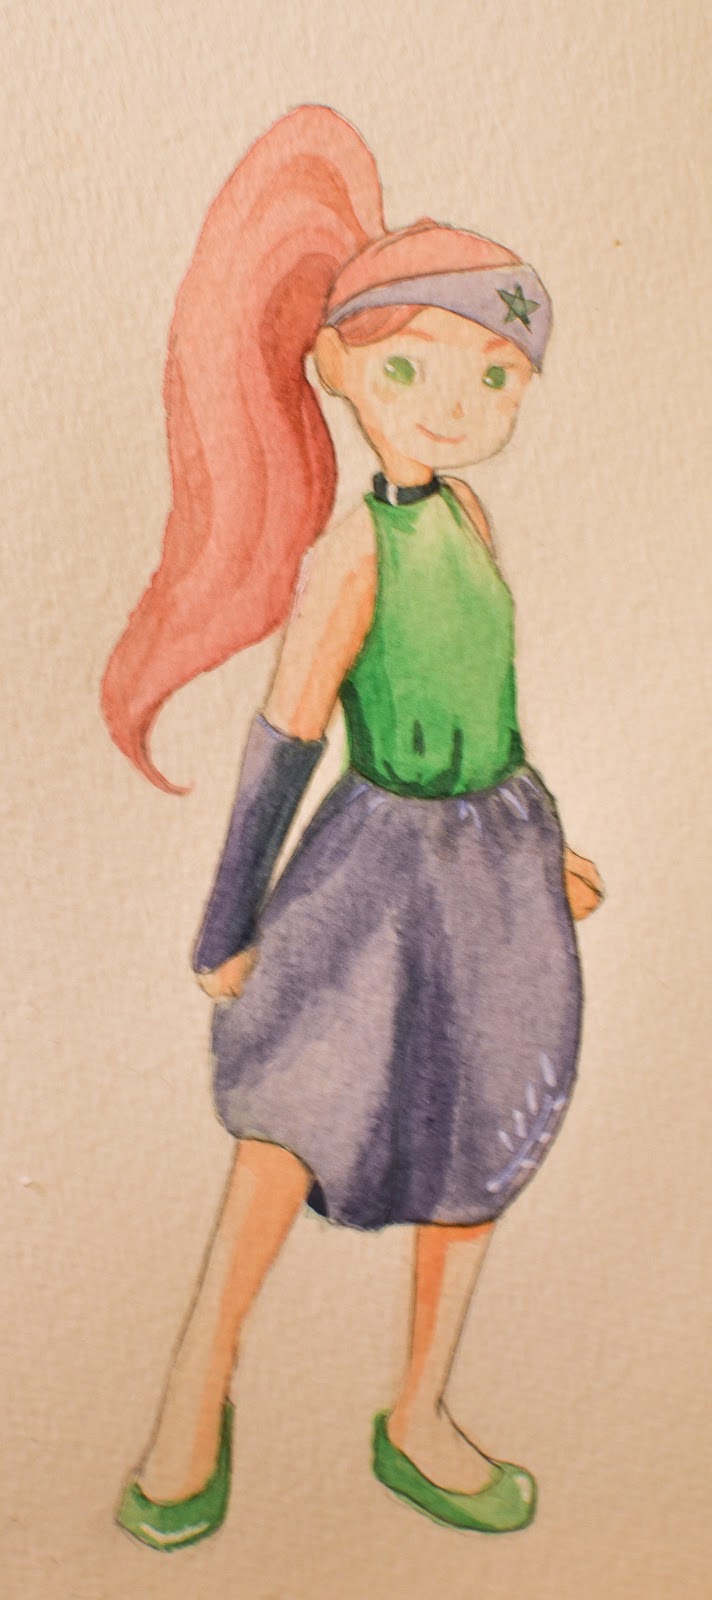 Tada!Mijello Mission GoldFor the second character, I debated on getting a more vibrant orange and pink color. I figured it is a good time to give my Mijello Mission Gold mini set a chance to shine. Mijello comes from a South Korean manufacturer who takes pride in creating vivid paint pigments which are very well reflected in their selections. From the sample set of 24 I’ve received, with the primary Lemon Yellow, Viridian, Cerulean Blue, Permanent Red also comes with Bright Opera, Peacock Blue, and Red Brown. On the same token Mijello Mission Gold is judged to be more compatible with poster/print work rather than permanent work to hang on a wall due to their lower level of lightfastness. Mijello colors are generally sold in tubes and have a very creamy consistency right out of the tube that hardened with times. As an import, Mijello can be a price step if you’re used to Cotman, Van Gogh or Sakura Koi but their colors definitely worth every penny.
  Credit to my seller @hinoart.shop for her wonderful hand labeled mini boxset
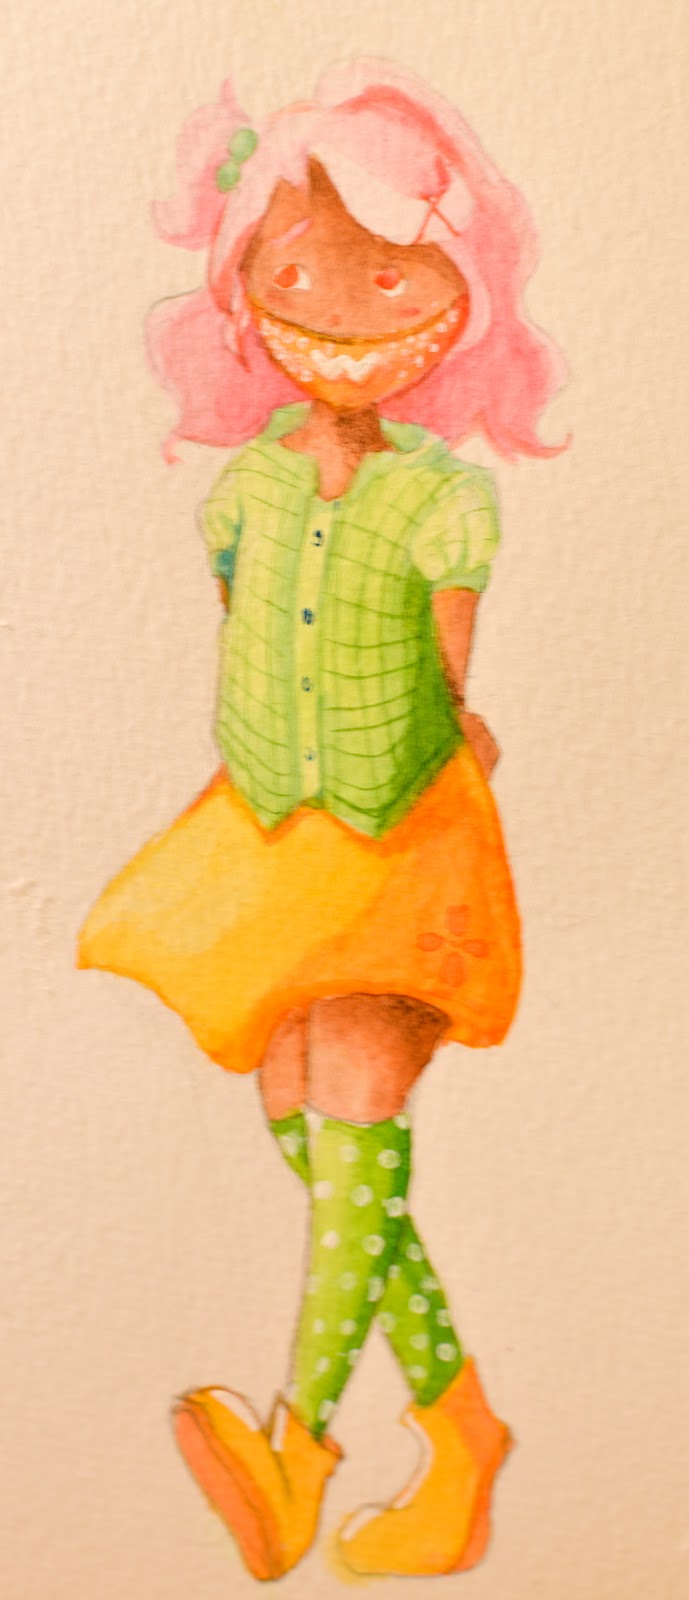 Rawr
RawrFor this illustration, I shaded the darkest part of the girl’s skin with Prismacolor brown watercolor pencil as the base as well as part of the line work to add some warmth. I diluted the Yellow Orange and Sap Green for the character’s clothes and painted a light layer of Yellow Ochre with Rose Madder underneath for skin shade then adding some Red Brown to darken her complexion. The pink hair is a mix of Bright Opera and Rose Madder. Even with a lot of mixing, the colors did not become desaturated like Yarka and stayed very bright and warm. The way the paint behave also makes a lot of sense since the South Korean boom in art supplies comes with the development of industrial art such as posters, comic and product decor.Holbein Artist Watercolor
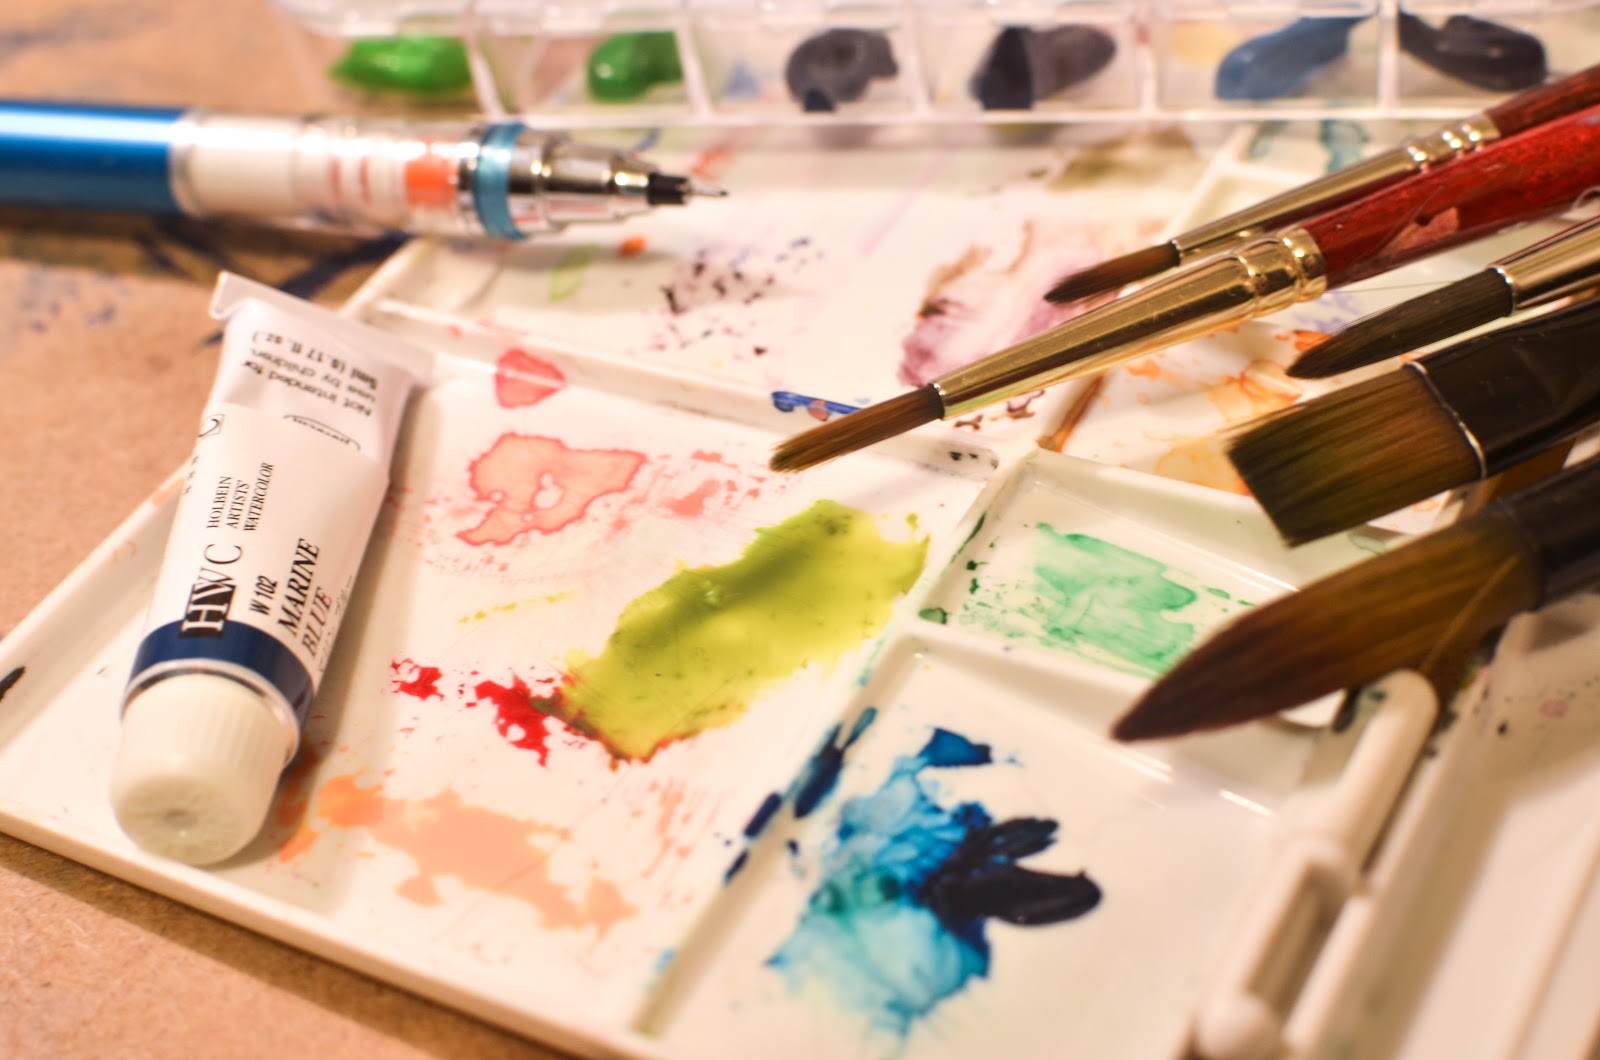 Drum roll! Here’s tonight’s star: Holbein! Some of you might have stumbled against a rack of Holbein in an art store, some might have heard of it and some might want it. Holbein is a brand of art supplies and paint which originated in Osaka, Japan. Their brand of gouache and watercolor is known to be expensive on a student budget; their watercolor line is also divided between Holbein’s regular line and Irodori Antique, which has a color selection that is closer to the antique Japanese palette. What makes Holbein specials compares to other watercolor brands is their special range of bright, pastel colors such as Shell Pink, Bamboo Green or Lavender but they also have in my opinion an excellent range of blues. Since the paint typically comes in tubes and I’ve learned that panned set tends to be more expensive, I’ve squeezed some paint into pill boxes to keep around rather than just wasting them on the palette and risk accidental blending (again, prop to Hino for the tip).
I’ll have to confess that I am a sucker for marine theme clothing as well as my love for Holbein’s Marine Blue so this was a lot of fun to paint. Before anything, I went over the pencil lines with blue lead to make the linework blends in better with the paint. I leave the Marine Blue as is while mixing of Naples Yellow and Rose Madder for the girl’s skin tone. For the hair’s olive hue, I did a mix of Permanent Green No.2, Burnt Umber, and Yellow Lemon while adding some Yellow on the character’s tie and yo-yo. Out of the three set, I would vote for Holbein as the one with the easiest skin tone mix, which is I think is a reflection of the need born from manga art and daylight landscape’s popularity in Japan.
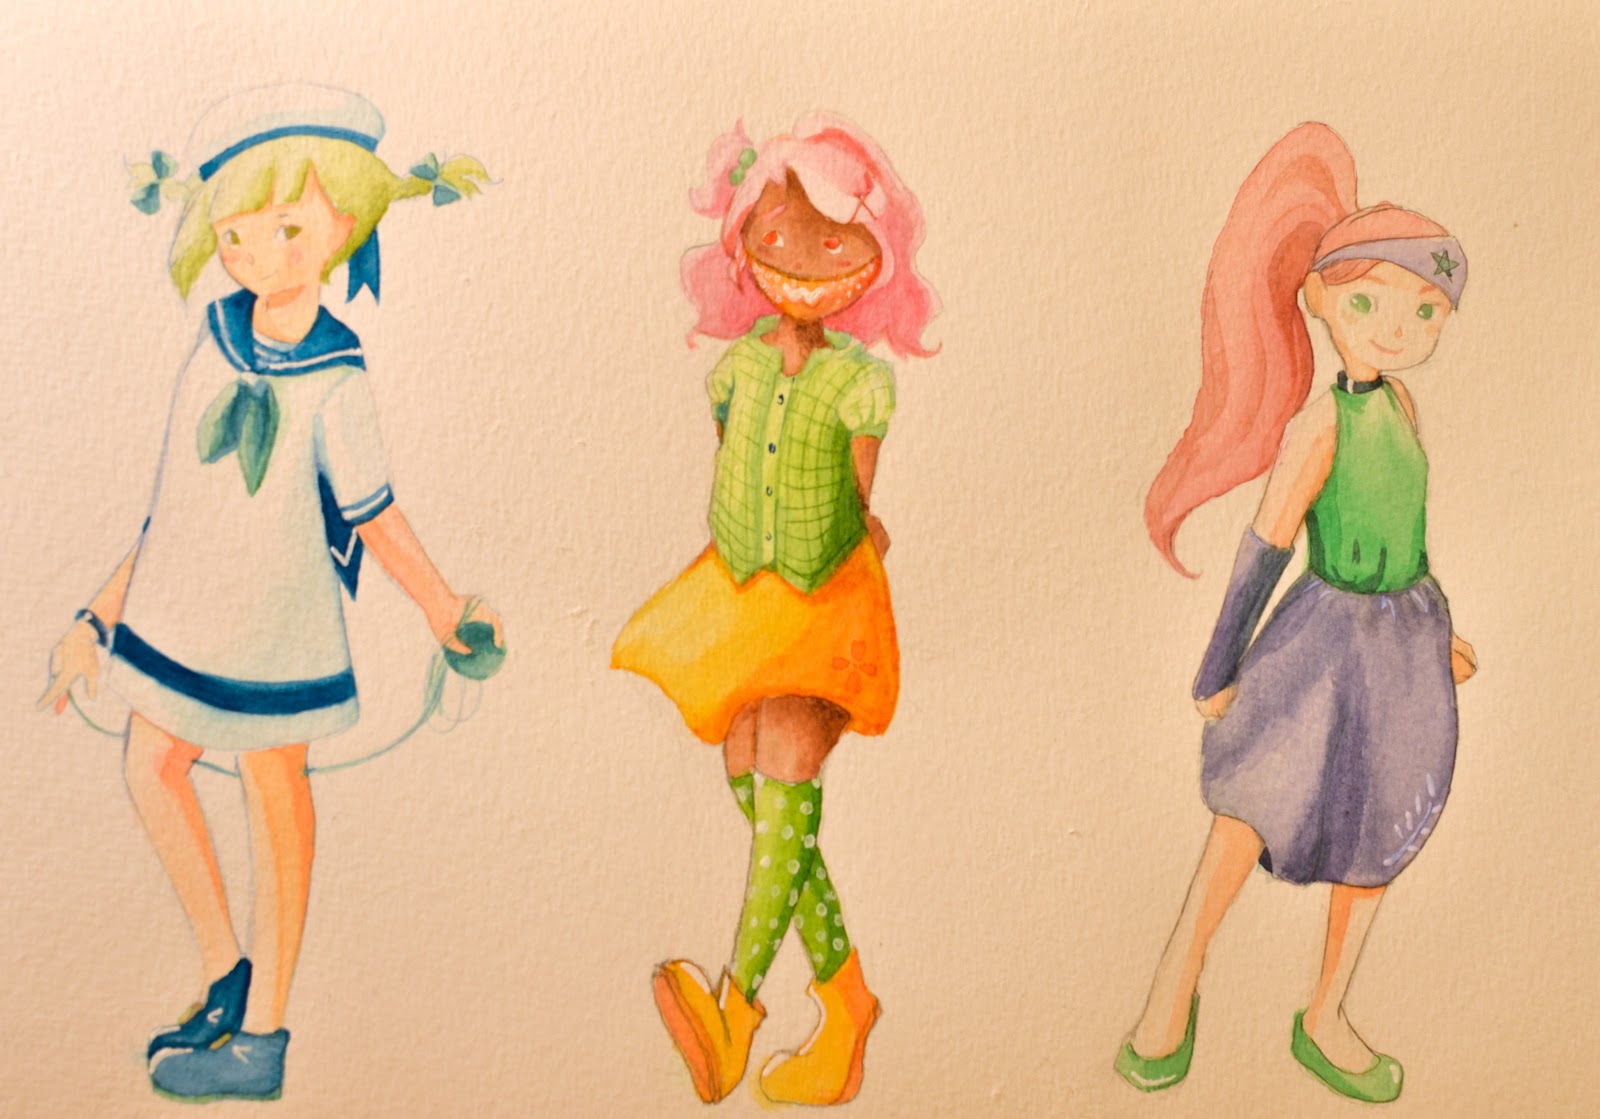 From Left to Right: Holbein, Mission Gold, and Yarka
There are many other watercolor lines out there and one of the easier ways to see how each manufacturer differs from each other is to test them out by putting the swatches side by side which is an expensive and time-consuming process. That's why I’ve made my own palette chart for those of you who wants a clearer comparison so you won't have to. I also included some watercolor pencils because why not?Watercolor chart and country of origin (pardon my ink smears):
 Winsor and Newton Cotman: UK (student grade) - Derwent: UK - Rembrandt: Netherlands - Yarka: Russia - Mijello: S.Korea - Kusakabe: Japan
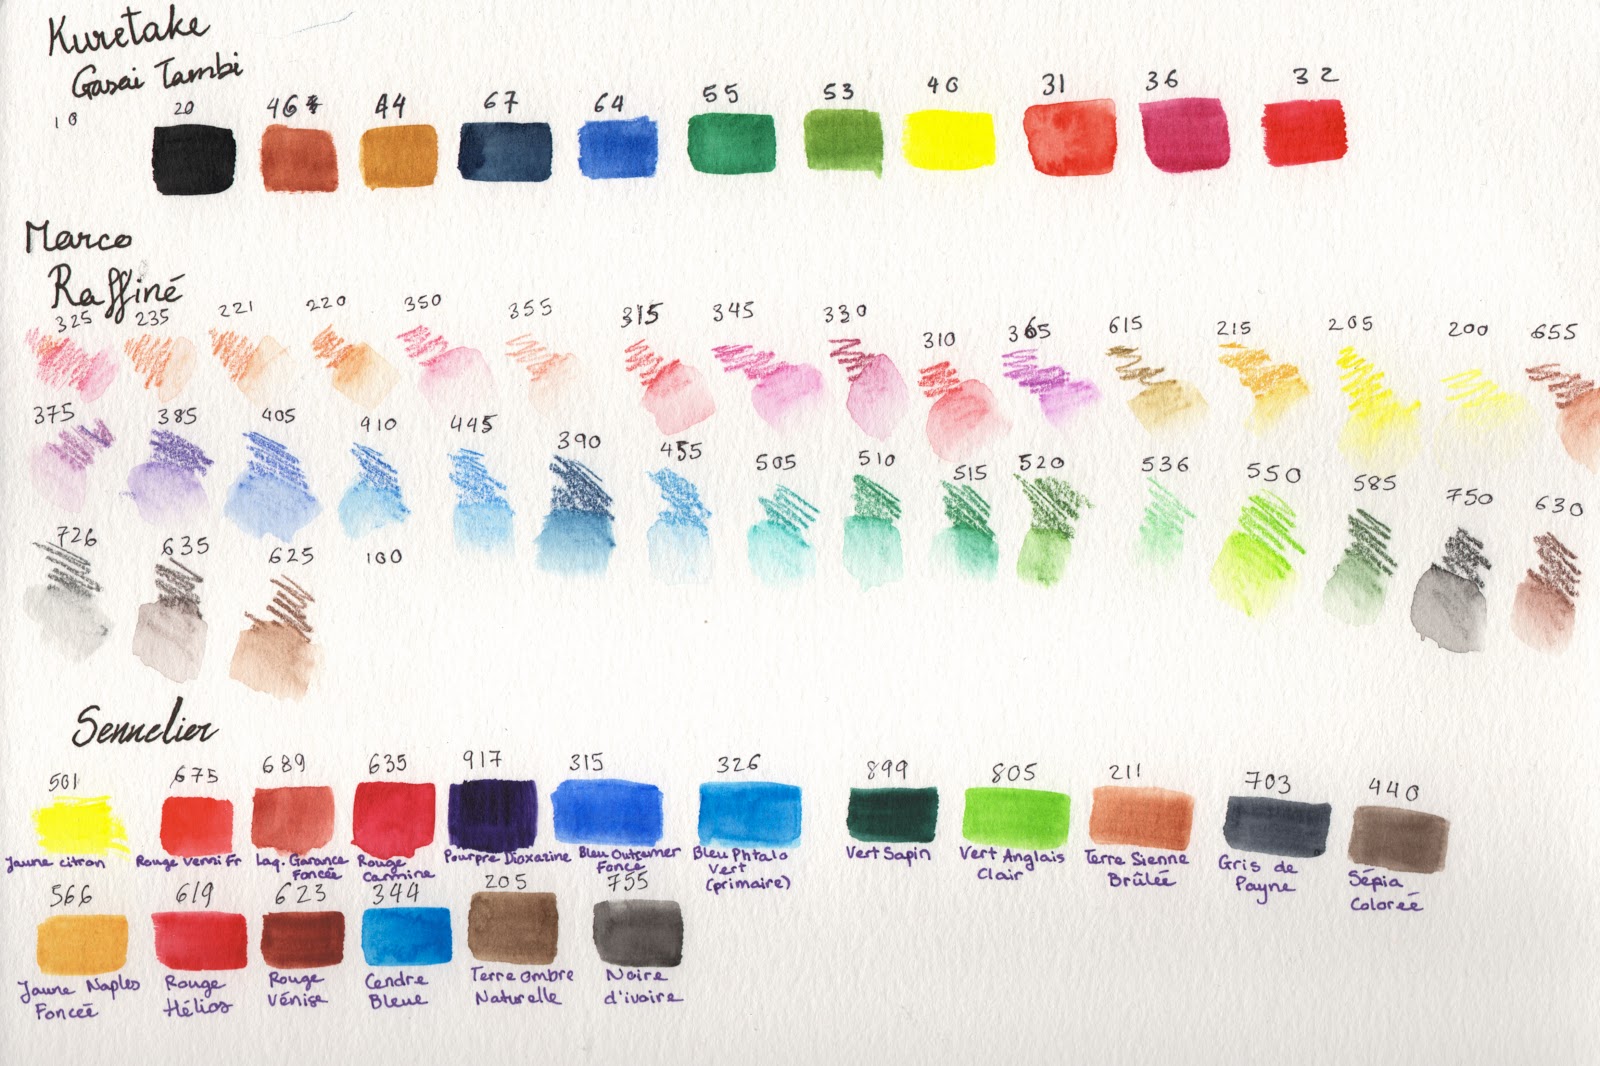 Kuretake: Japan (student grade) - Marco Raffiné: China - Sennelier: France
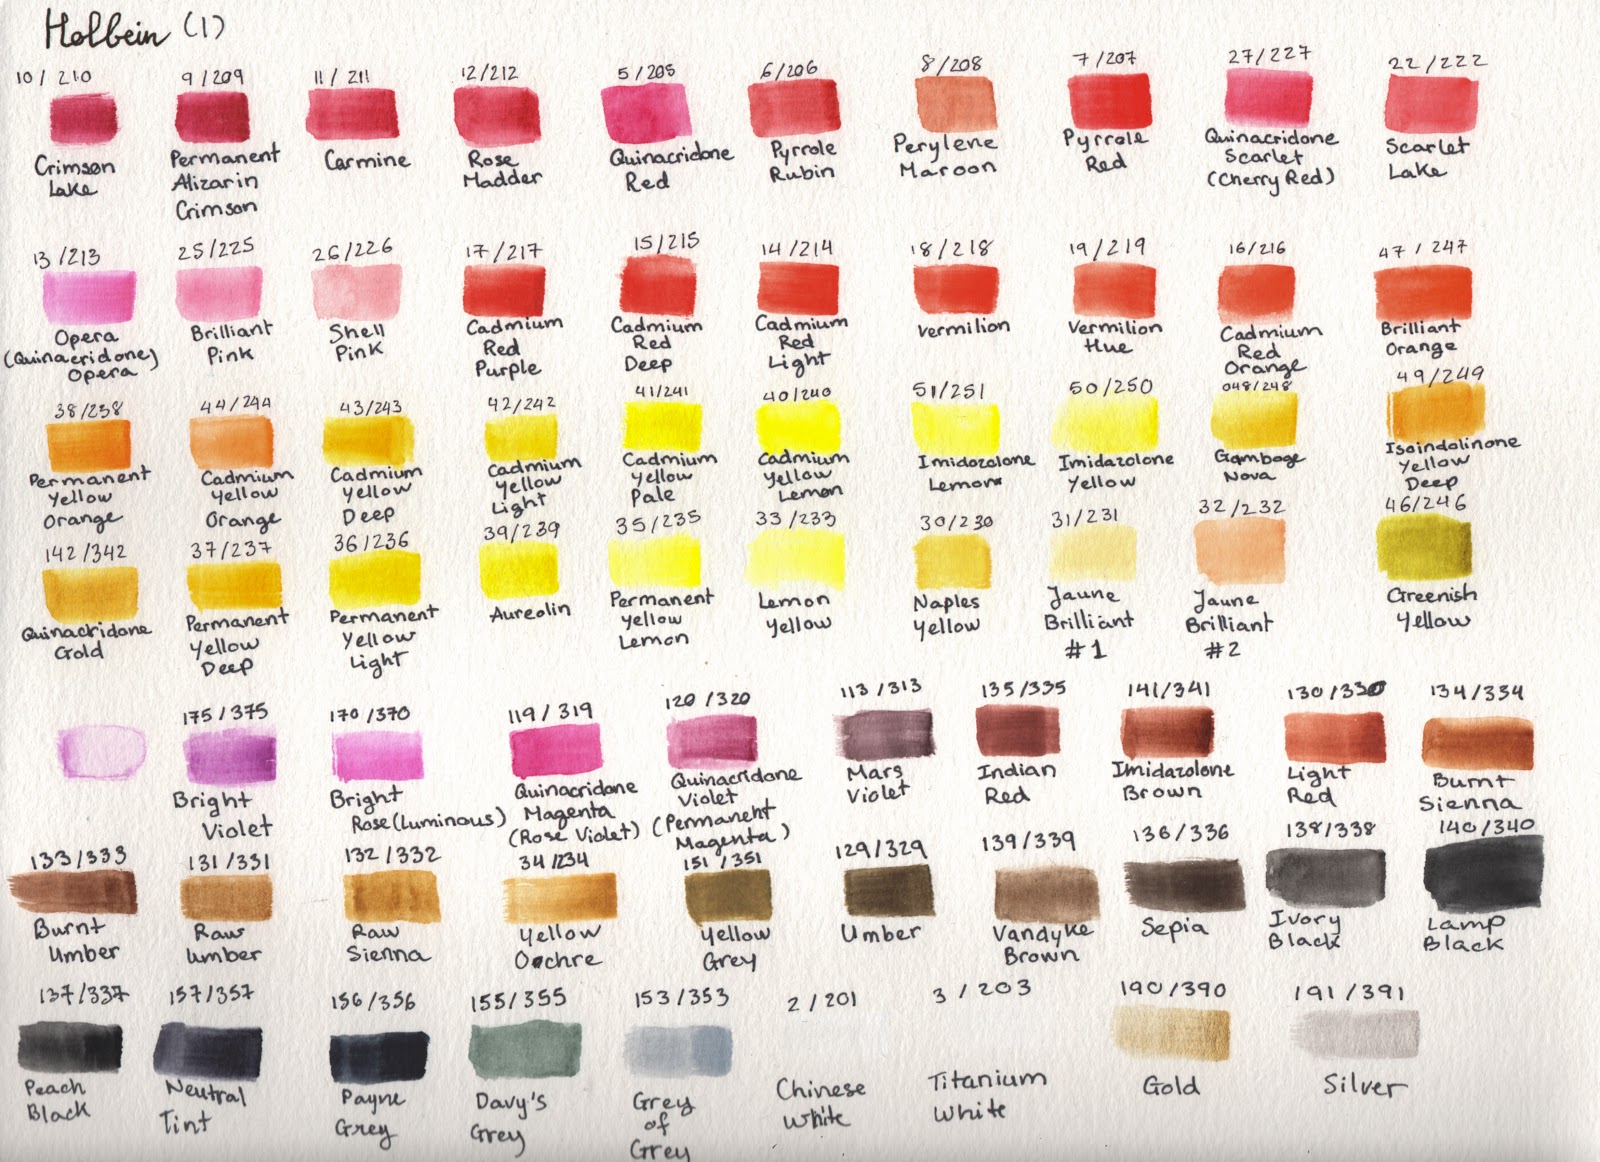 Holbein (test sheet 1-2): Japan
From what I can see, I think a lot of Western paint manufacture prefer to focus on strong primary color with pure pigment resulted with very deep red, yellow and ultramarine which also meant to be more permanent for fine art. Meanwhile, Eastern manufacturers prefer to create a wider variety of color with really bright selections but resulting with a more questionable level of paint permanence, which makes a lot of them perfect for prints and reproductions. Again this is just my own theory on said subject but who knows? Maybe there are Eastern paint makers who like to produce deep pigment paints and Western brands like Daniel Smith who create 90+ colors with different paint properties.
If you’re new to the whole watercolor scene or are familiar with the medium and trying to figure out where to go next, I hope this article helps. Also a big thank you to Becca for calling for submissions, I love talking about art and watercolor.
Sincerely,
Hara
You can find me here:Social:TwitterInstagramPortfolio:Website (Check out my comics!)Blog:Tumblr ( I occasionally write fountain pen reviews and pen 101 here)
Please consider donating to this blog or purchasing from Natto-shop (http://nattosoup.com/shop) if you want me to continue publishing quality content. All materials tested were purchased from my own pocket. Keep on Truckin' Nattosoup is not under any sponsorship.
October 12, 2016
Watercolor Basics: Akashiya Etegami Niso-Kyosen Paper Review and Introduction to Etegami
Akashiya Etegami Postcard Size Paper- Niso-Kyosen Paper-Pack of 10 Sheets
Purchased from Jetpens in 2015.
Etegami
Japanese picture messages
Postcard sized paintings of everyday objects often taken for granted. Intended as mail art. Western readers may find similarities with the ACEO and artist trading card movements, comic artists may see similarity to zines.
The paper: Akashiya Niso Kyosen etegami paper
A washi paper designed to bleed.

 Before I started on this post, I'd never worked with etegami paper or had made etegami postcards. I had been warned awhile back by a friend that it does NOT handle like regular watercolor paper, but while working on the Affordable Art Supply Series, I've had to paint on many surfaces that were not ideal for watercolor. I figured I had this under lockdown. So for those of you who ARE familiar with etegami, and etegami washi watercolor paper, please bear with me.
First Attempt: ArtSnacks September Challenge
My ArtSnacks box included an alcohol marker (Kurecolor) and a watercolor marker (Kuretake/Zig Clean Color Real Brush) in two non complimentary colors (dark pink and burnt umber), so I decided to supplement my anemic ArtSnack with some Radiant watercolors, as I have some tutorials coming up for those watercolors in the future. I also figured since I had to provide my own painting surface, I might as well give the Akashiya Etegami paper a try, as I hadn't used it before.
My Thoughts During the Field Test:
This paper has a weird, super soft, cottony texture, sorta like drawing on sheets. It seems to handle graphite and ink decently well so far, but the real test will come when I try to erase the graphite.

Does not like erasing.


Markers bleed out all over the place, and using a blender on them makes it so much worse.

Watercolor also bleeds out, difficult to control. This paper is probably not designed to handle multiple layers of watercolor, and feels a bit like painting on toilet paper. It handles the same way the Shinzen did after I wrecked its surface with masking fluid- could that be the cotton content?


Does not handle anything like traditional watercolor paper- it really is like painting on toilet paper or a tee shirt- colors bleed uncontrollably, first attempt is just generally a hot mess.
 I was so disappointed with my end result, that I decided to redo my ArtSnack demonstration.
 Top: Zig Clean Color Real Brush+ Radiant Watercolors on Fluid 100 watercolor paper. Bottom: Zig Clean Color Real Brush+Radiant Watercolors on Akashiya Etegami paper
As you can see, Akashiya Niso-Kyosen etegami paper absolutely does not handle anything like Western watercolor papers.
So it was at this point that, frustrated by having a paper defeat me, I decided to get smart and do my research. I should have done this from the start, but I didn't realize how differently etegami paper would handle from regular watercolor paper. After doing some research, I decided to try again with the etegami paper.
There are multiple types of etegami papers- hongasen, gasen, 3 layer gasen, niso-kyosen, suisai. I have no idea how the other papers handle, as I've never tested them. Niso-kyosen reminds me a bit of trying to do Western style watercolor on sumi paper.
I purchased the Niso-Kyosen paper from Jetpens about a year ago, and at the time, the site offered very little insight into how the paper should be handled, and no outside links. There were also no reviews. Now there's still very little insight- the most we get is "Paper has a blur degree of 5 and aborbs water beautifully. It is great paper for painting as well as calligraphy and black and white drawings..."Blur" refers to the blending capability of the paper, or its degree of absorbency that allows color to blur on the paper..." The two reviews posted aren't much help either-one says the paper is fantastic for ink painting, the other says it's great for inserts, and Jetpens categorizes this paper in their Watercolor Painting category, all of which contribute to confusion as to how etegami paper should be handled.
For more useful links and resources, please check my Outside Resources and Inspiration sections below.
Second Attempt: Traditional Etegami with Kuretake Tambi Gansai watercolors and Sumi brushes.
Sketched with pencil, did not ink before painting. Kept sketch loose and light, did not erase sketch, erasing seems to ruin paper surface.
My Thoughts While Painting

More water used, the more it bleeds- so delicate washes aren't really an option unless you plan well and have a little luck. Loose sketches were better- something gestural. Paper takes awhile to dry out, and bleeds a LOT until it's dry (the above mentioned blur?) Painting works best if you work thickly with the gansai watercolor- so think more like calligraphy than like Western watercolor. Loose washes and glazes will not work well on this paper.


I can't seem to find a brush that suits what I'm painting- the small Yasutomo sumi brush (0) can't lay down enough paint the larger Yasutomo (guessing a 4 or larger, it's unmarked) over saturates the page and bleeds all over. Even though I'm using the righ tools and the right paint, it STILL feels a bit like painting on toilet paper- the paper weirdly seems to reject the paint while bleeding all over the place. The only way I can tell if it's me, the paper, or ALL etegami papers is to try others, and I may have to find a place in my budget while in San Francisco to purchase other brands- or perhaps my local K and S international market may have some?

I opted to ink at the end of the experiment, using a Pilot small brushpen that looked similar to the brushpens used in the images linked in the Inspiration section.
Third Attempt: Freehand Painting a Gourd with a Waterbrush


I painted the gourd first, freehanding it with a light orange gansai watercolor. While that paint was still wet (etegami paper has a long open time), I added in darker oranges and greens, and the paint quickly diffused on the wet paper. This time, I left open some white space, trying to replicate etegami watercolors I'd seen online, and I filled in the background with a contrasting blue.

Going over already wet areas with a waterbrush causes the paper to pill and damages the paper's surface, no matter how gentle you are.

Paint quickly wet into wet to take advantage of the qualities that high blur papers like the Niso-Kyosen have to offer.

You don't need to tape this paper down- it will curl a little, but not much, and will dry flat.
Once the colors dry, they're very faded out on this paper, almost chalky and muddy, but you can paint another layer if you're careful, or add details. Make sure your brush is almost dry when applying the new paint.

The Verdict and More about Etegami
What started as a paper test turned into learning a whole new artform, and sharing what I learned with you guys. Is painting on traditional etegami washi paper a Watercolor Basic? Not at all. But watercolor postcards seem to be popular anywhere there are waterbased paints or pigments and paper to paint on, and many of you may be interested in sending original works of art in the mail to loved ones. You may find that this post on etegami sparks an interest in mail art, or creating affordable art for the masses, or just for creating quick little watercolors that don't have to be good to be precious.
Originally invented by a calligrapher, etegami may be best served by those who are familiar with sumi painting, or have a calligraphic approachto their watercolors. It seems that etegami papers like this Akashiya Niso Kyosen are designed to bleed, and may best serve those who are trained in economy of line- a skill I sorely lack at this time.
At its heart, etegami is intended for people to share hand made artwork with another person, and this is something I can definitely get behind, even if my own etegami lacks grace.
If you're interested in etegami, you do not have to use etegami specific paper- you can use what's available. 4X6" watercolor pads like Fluid are the right size for postcards and may handle watercolor in a way you're familiar and comfortable with.
Outside Resources:
Let's Talk Paper- Dosanko Debbie
Kuretake-Etegami
The Ikebana Shop- Etegami Workshop
Inspiration:
DosankoDebbie
Drawing Near
Etegamist- How To
The Etegamist
Etegami: Drawing with a little Message
a beginner's guide to etegami
Materials:
Papers:
Paper Sampler
Etegami Papers
Gansai Paints
Kuretake Etegami Starter Kit
Kuretake Gasen Etegami Paper
Kuretake Gansai Tambi 36 colors
Kuretake Gansai Tambi 12 Colors
Brushes:
Pentel Aquash Waterbrushes
Blick Sumi Brushes
Yasutomo Sumi Brushes
Please consider donating to this blog or purchasing from Natto-shop (http://nattosoup.com/shop) if you want me to continue publishing quality content. All materials tested were purchased from my own pocket. Keep on Truckin' Nattosoup is not under any sponsorship.
Purchased from Jetpens in 2015.
Etegami
Japanese picture messages
Postcard sized paintings of everyday objects often taken for granted. Intended as mail art. Western readers may find similarities with the ACEO and artist trading card movements, comic artists may see similarity to zines.
The paper: Akashiya Niso Kyosen etegami paper
A washi paper designed to bleed.
 Before I started on this post, I'd never worked with etegami paper or had made etegami postcards. I had been warned awhile back by a friend that it does NOT handle like regular watercolor paper, but while working on the Affordable Art Supply Series, I've had to paint on many surfaces that were not ideal for watercolor. I figured I had this under lockdown. So for those of you who ARE familiar with etegami, and etegami washi watercolor paper, please bear with me.
First Attempt: ArtSnacks September Challenge
My ArtSnacks box included an alcohol marker (Kurecolor) and a watercolor marker (Kuretake/Zig Clean Color Real Brush) in two non complimentary colors (dark pink and burnt umber), so I decided to supplement my anemic ArtSnack with some Radiant watercolors, as I have some tutorials coming up for those watercolors in the future. I also figured since I had to provide my own painting surface, I might as well give the Akashiya Etegami paper a try, as I hadn't used it before.
My Thoughts During the Field Test:
This paper has a weird, super soft, cottony texture, sorta like drawing on sheets. It seems to handle graphite and ink decently well so far, but the real test will come when I try to erase the graphite.

Does not like erasing.


Markers bleed out all over the place, and using a blender on them makes it so much worse.
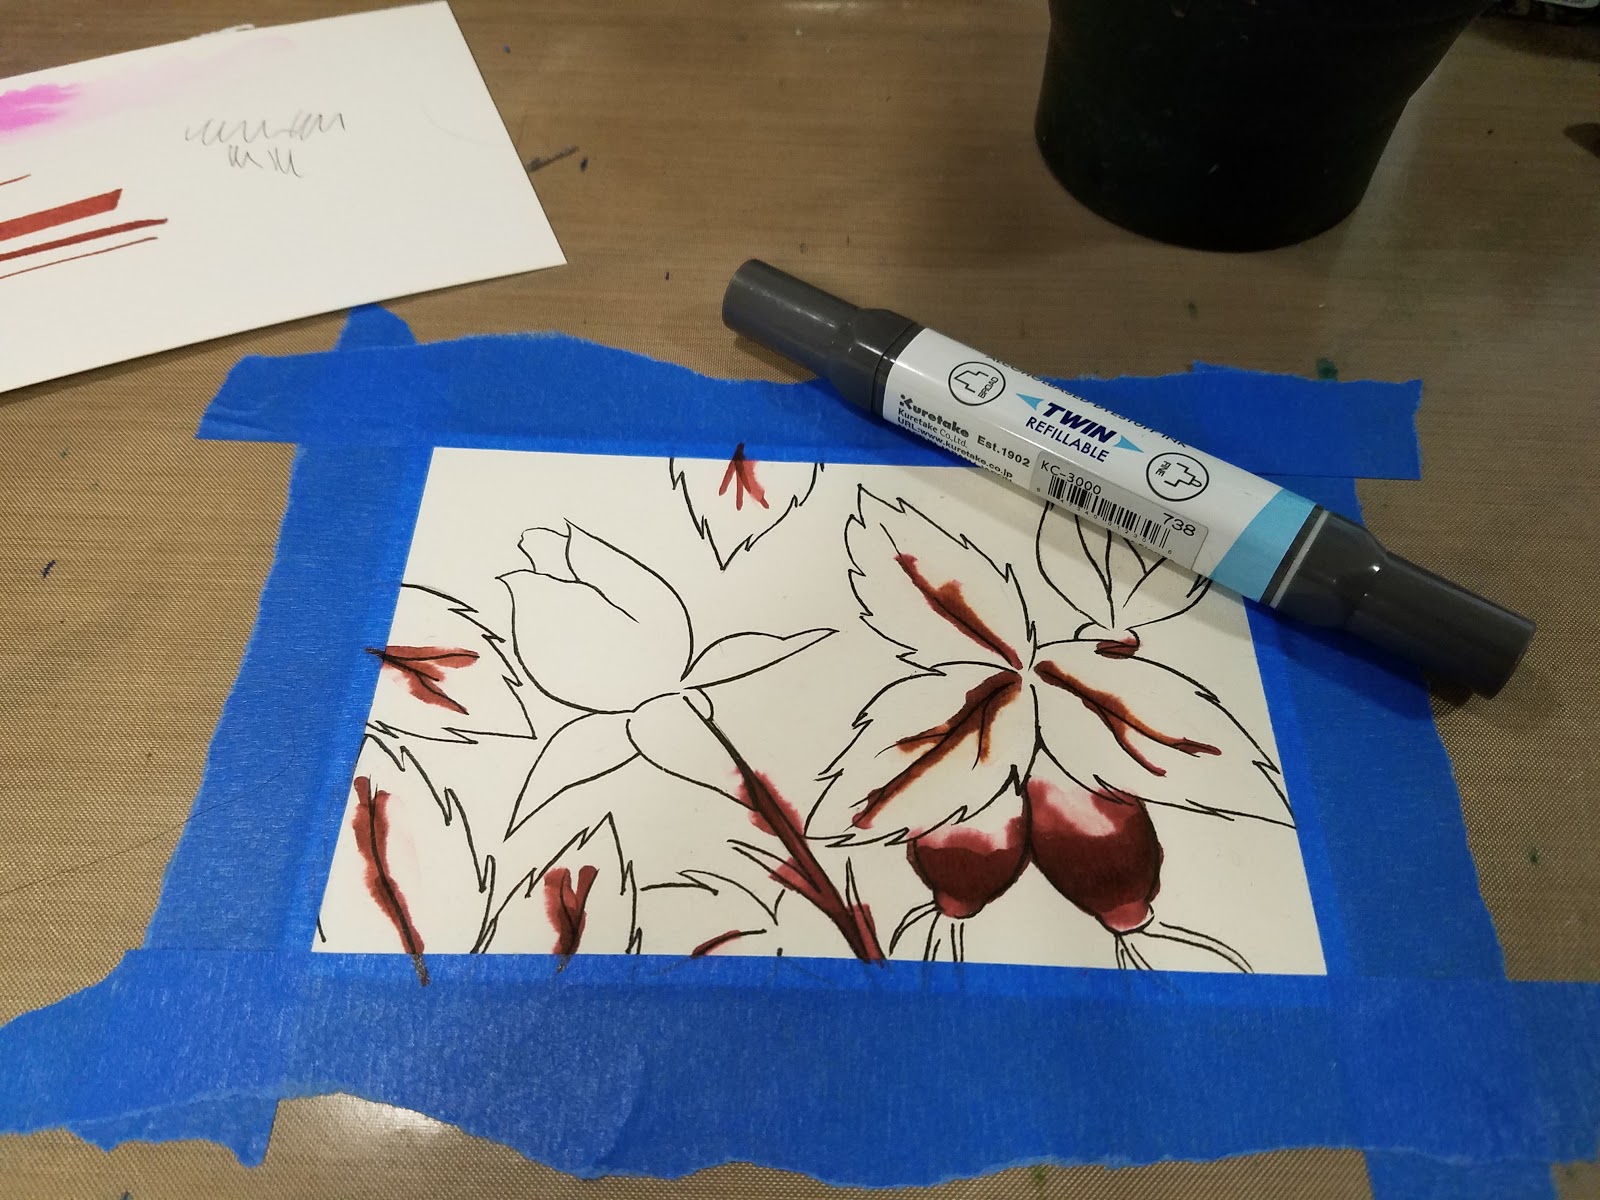
Watercolor also bleeds out, difficult to control. This paper is probably not designed to handle multiple layers of watercolor, and feels a bit like painting on toilet paper. It handles the same way the Shinzen did after I wrecked its surface with masking fluid- could that be the cotton content?


Does not handle anything like traditional watercolor paper- it really is like painting on toilet paper or a tee shirt- colors bleed uncontrollably, first attempt is just generally a hot mess.
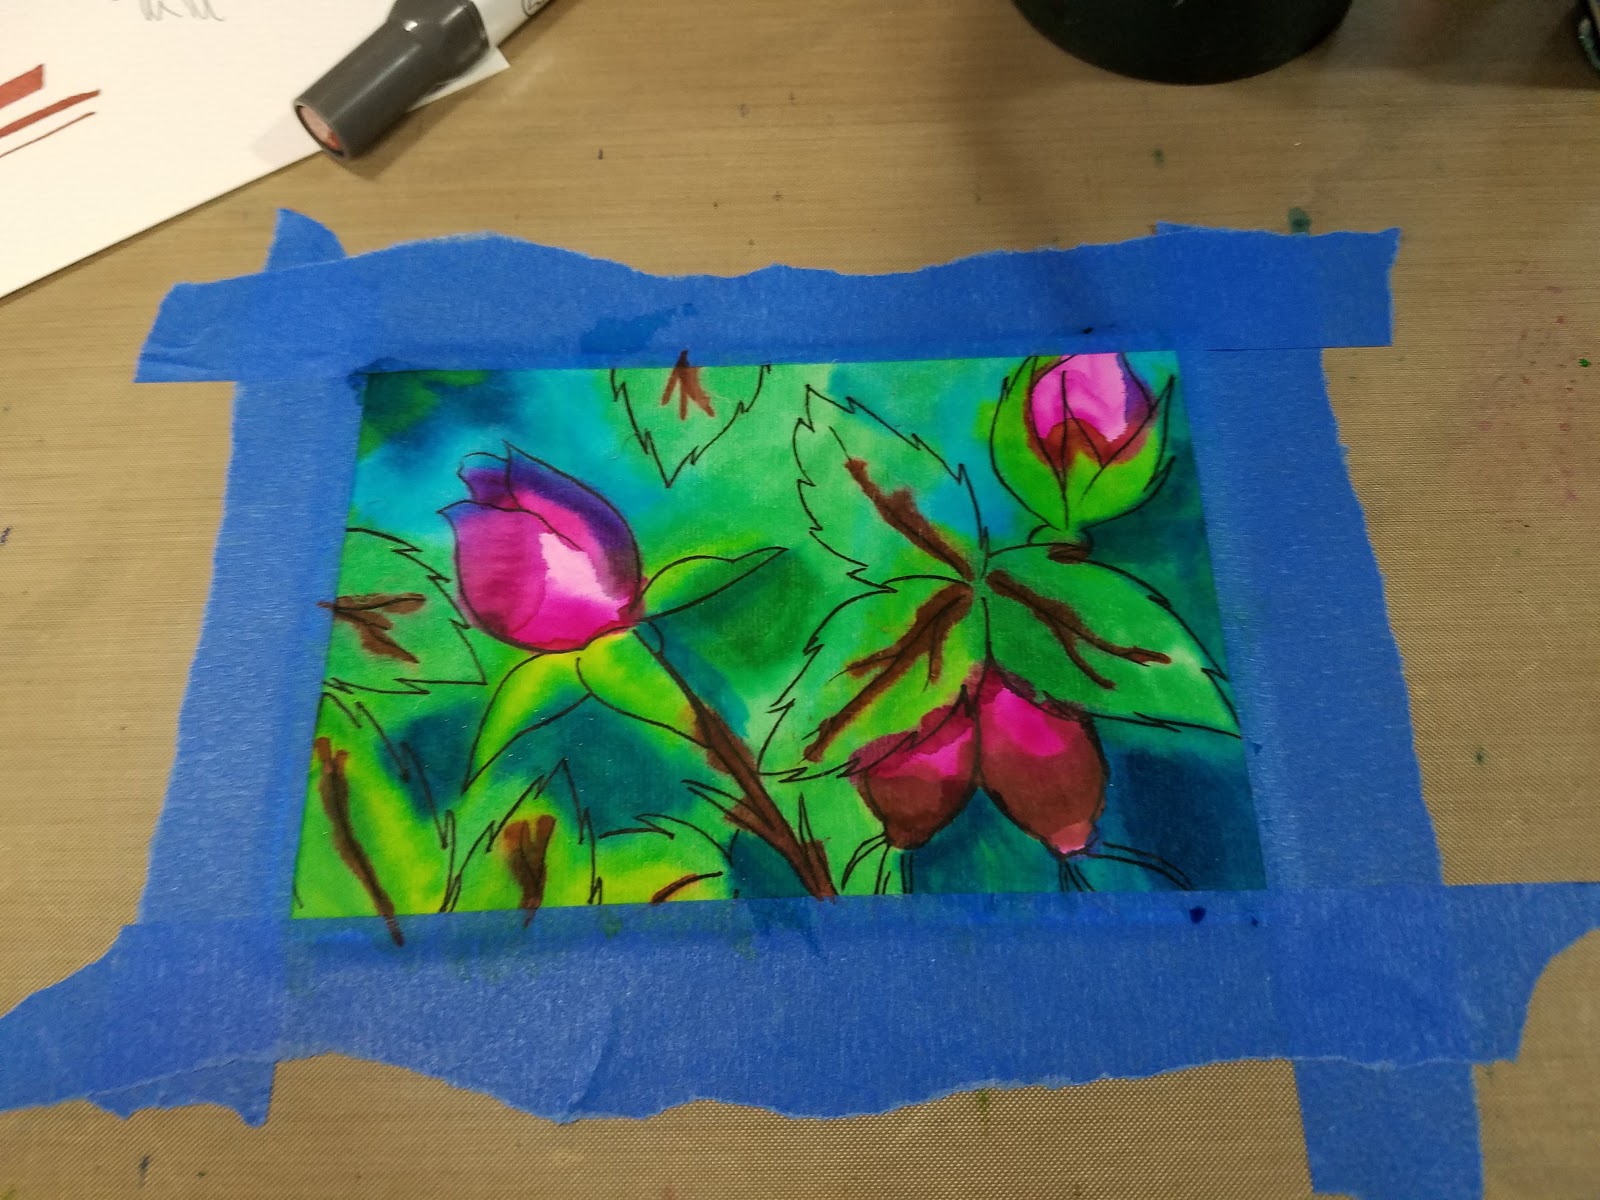 I was so disappointed with my end result, that I decided to redo my ArtSnack demonstration.
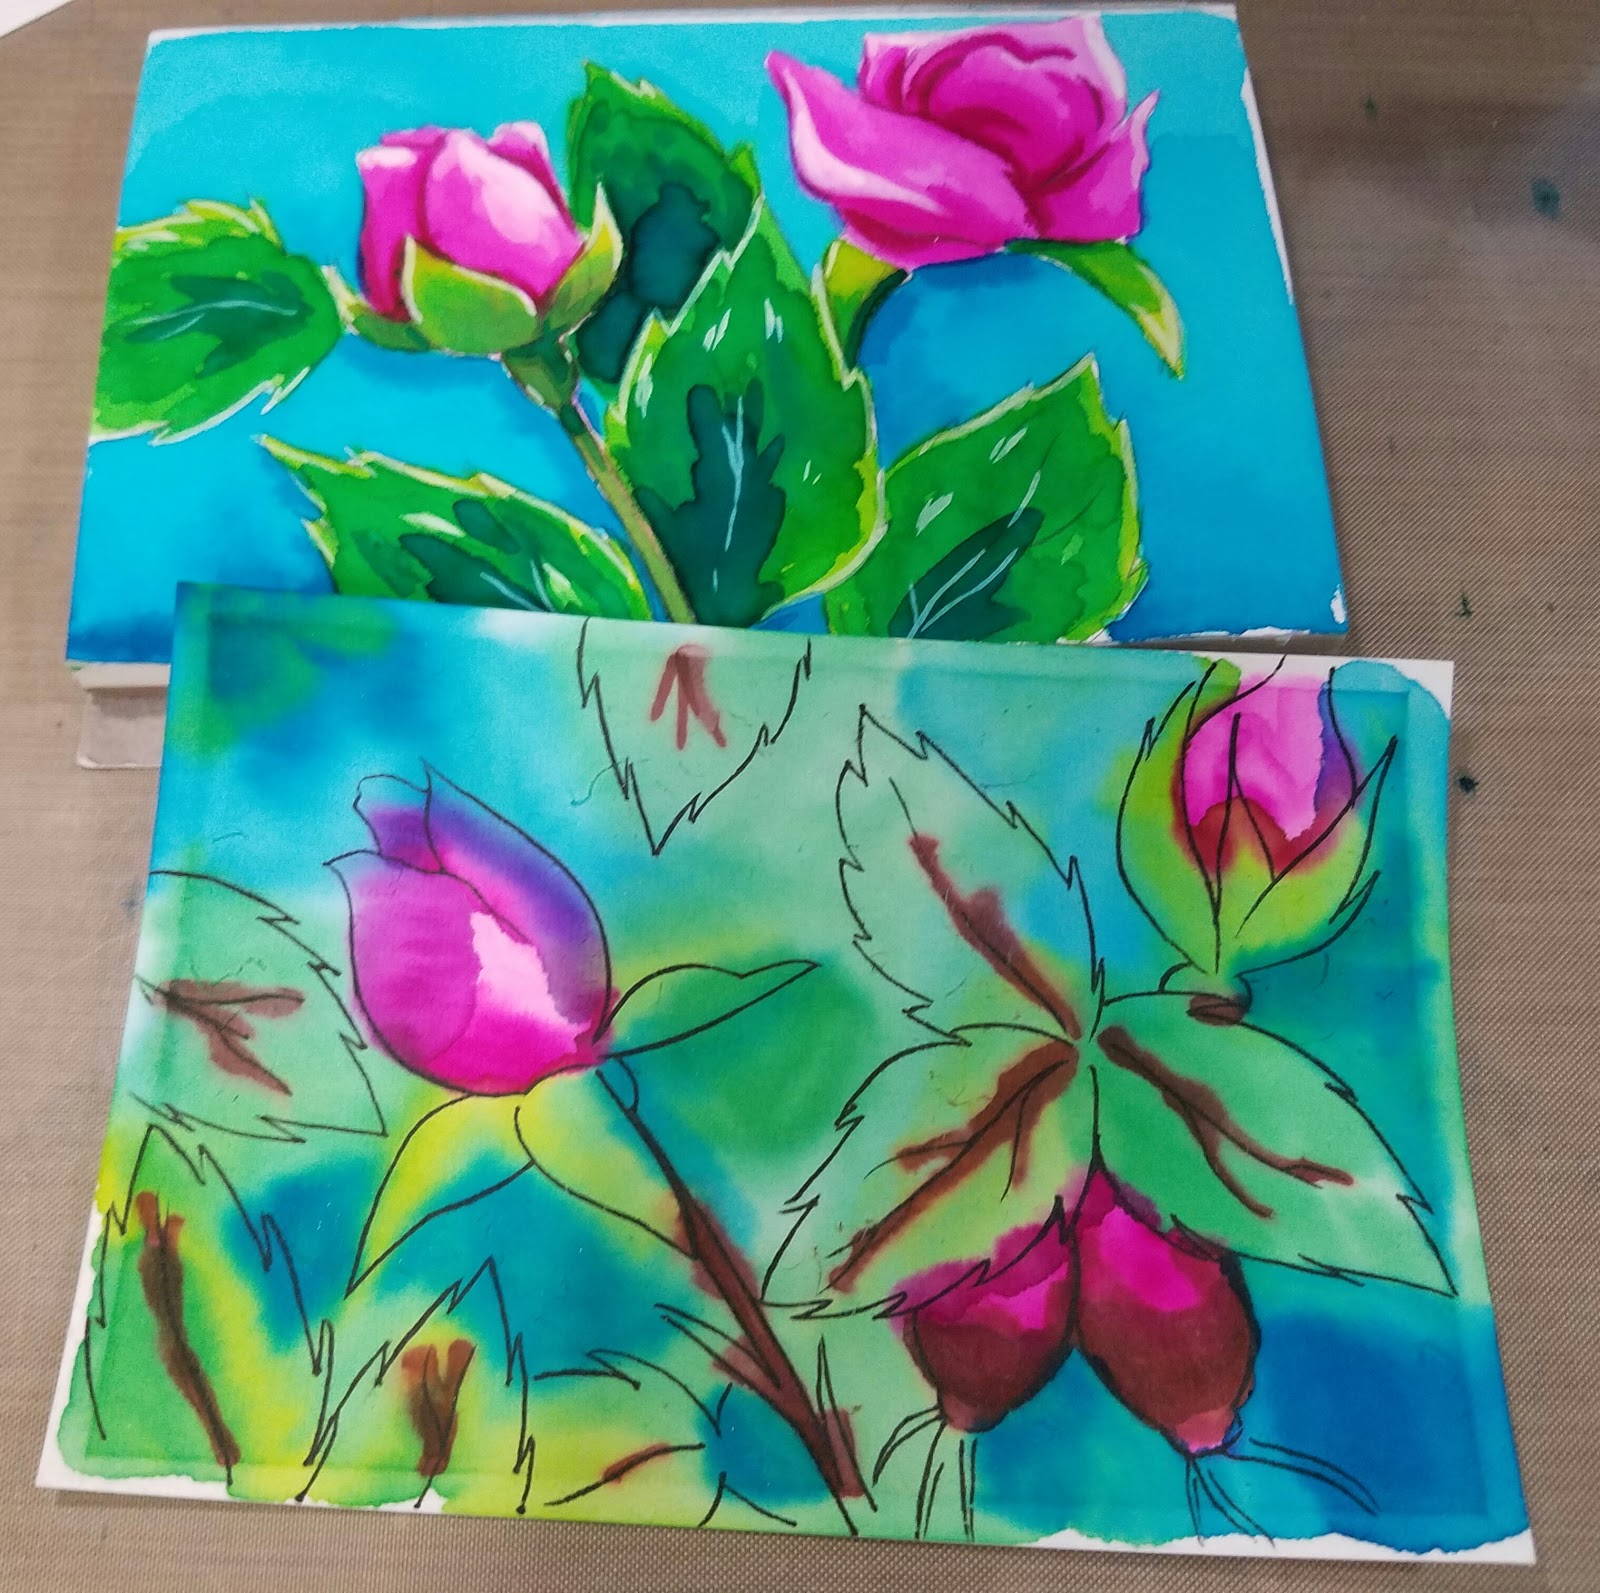 Top: Zig Clean Color Real Brush+ Radiant Watercolors on Fluid 100 watercolor paper. Bottom: Zig Clean Color Real Brush+Radiant Watercolors on Akashiya Etegami paper
As you can see, Akashiya Niso-Kyosen etegami paper absolutely does not handle anything like Western watercolor papers.
So it was at this point that, frustrated by having a paper defeat me, I decided to get smart and do my research. I should have done this from the start, but I didn't realize how differently etegami paper would handle from regular watercolor paper. After doing some research, I decided to try again with the etegami paper.
There are multiple types of etegami papers- hongasen, gasen, 3 layer gasen, niso-kyosen, suisai. I have no idea how the other papers handle, as I've never tested them. Niso-kyosen reminds me a bit of trying to do Western style watercolor on sumi paper.
I purchased the Niso-Kyosen paper from Jetpens about a year ago, and at the time, the site offered very little insight into how the paper should be handled, and no outside links. There were also no reviews. Now there's still very little insight- the most we get is "Paper has a blur degree of 5 and aborbs water beautifully. It is great paper for painting as well as calligraphy and black and white drawings..."Blur" refers to the blending capability of the paper, or its degree of absorbency that allows color to blur on the paper..." The two reviews posted aren't much help either-one says the paper is fantastic for ink painting, the other says it's great for inserts, and Jetpens categorizes this paper in their Watercolor Painting category, all of which contribute to confusion as to how etegami paper should be handled.
For more useful links and resources, please check my Outside Resources and Inspiration sections below.
Second Attempt: Traditional Etegami with Kuretake Tambi Gansai watercolors and Sumi brushes.
Sketched with pencil, did not ink before painting. Kept sketch loose and light, did not erase sketch, erasing seems to ruin paper surface.
My Thoughts While Painting
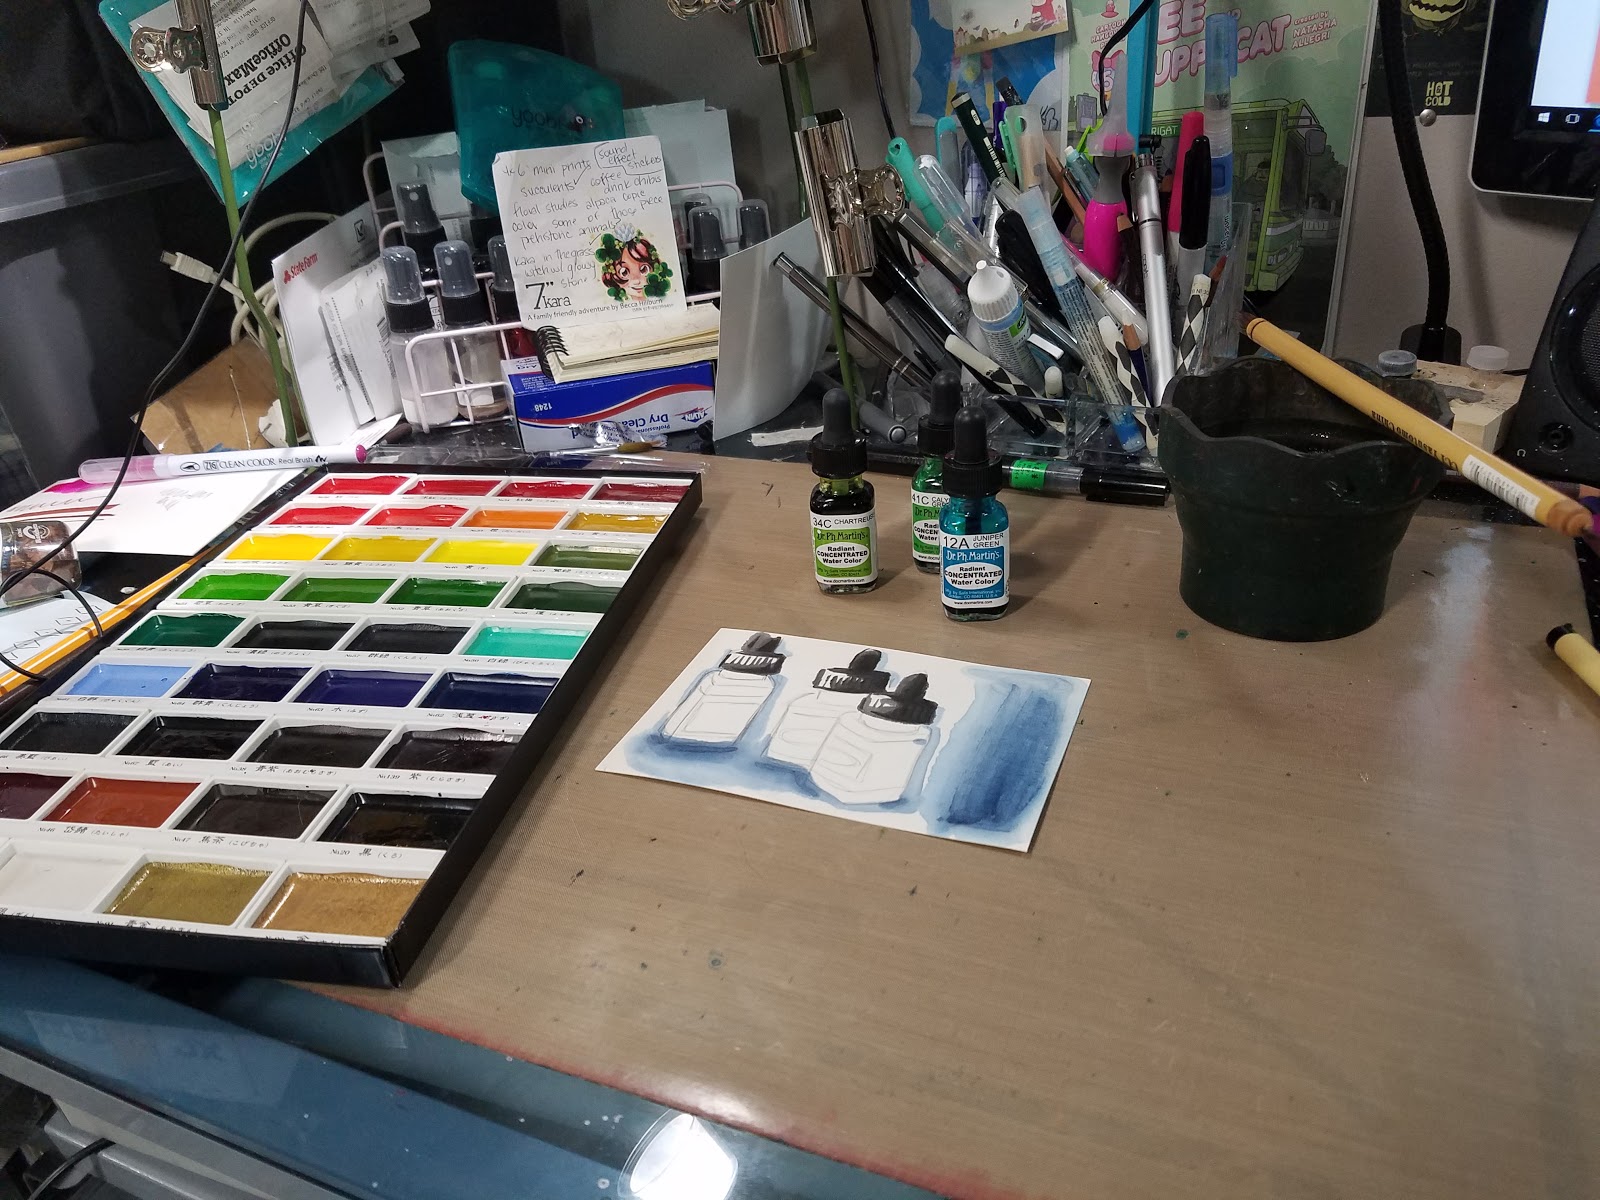
More water used, the more it bleeds- so delicate washes aren't really an option unless you plan well and have a little luck. Loose sketches were better- something gestural. Paper takes awhile to dry out, and bleeds a LOT until it's dry (the above mentioned blur?) Painting works best if you work thickly with the gansai watercolor- so think more like calligraphy than like Western watercolor. Loose washes and glazes will not work well on this paper.
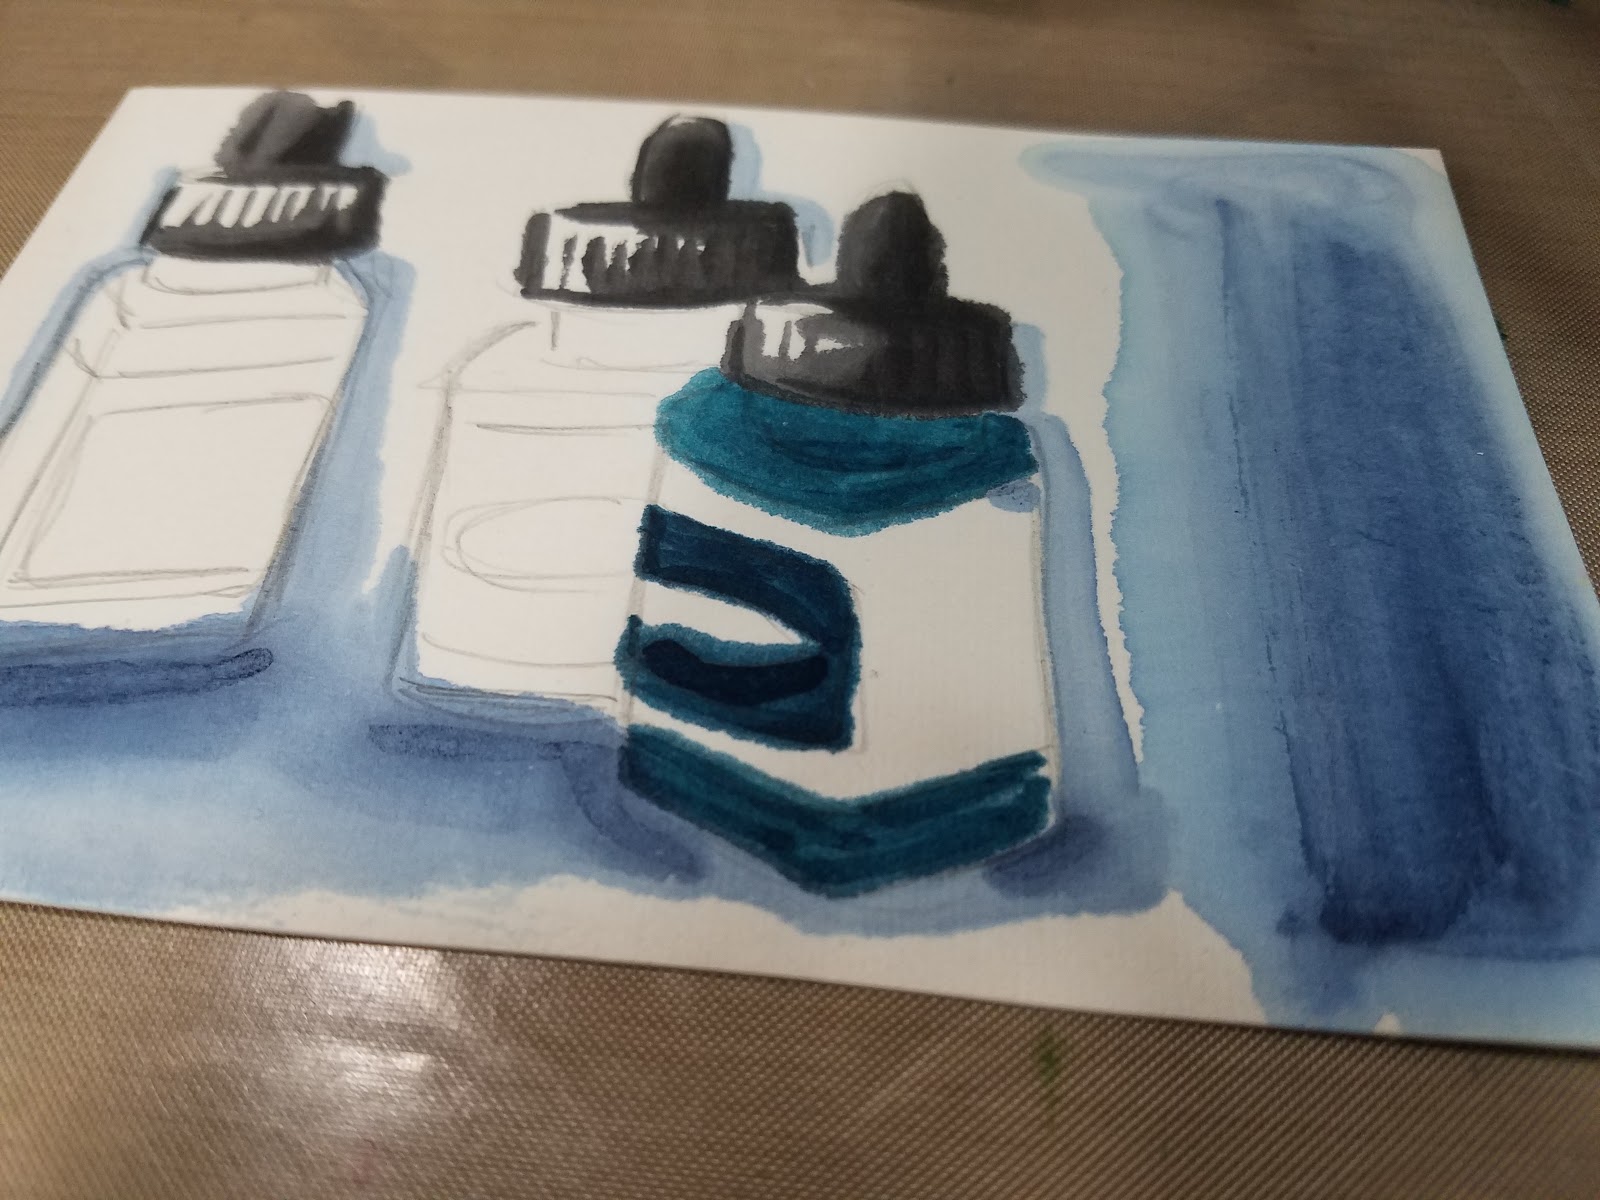
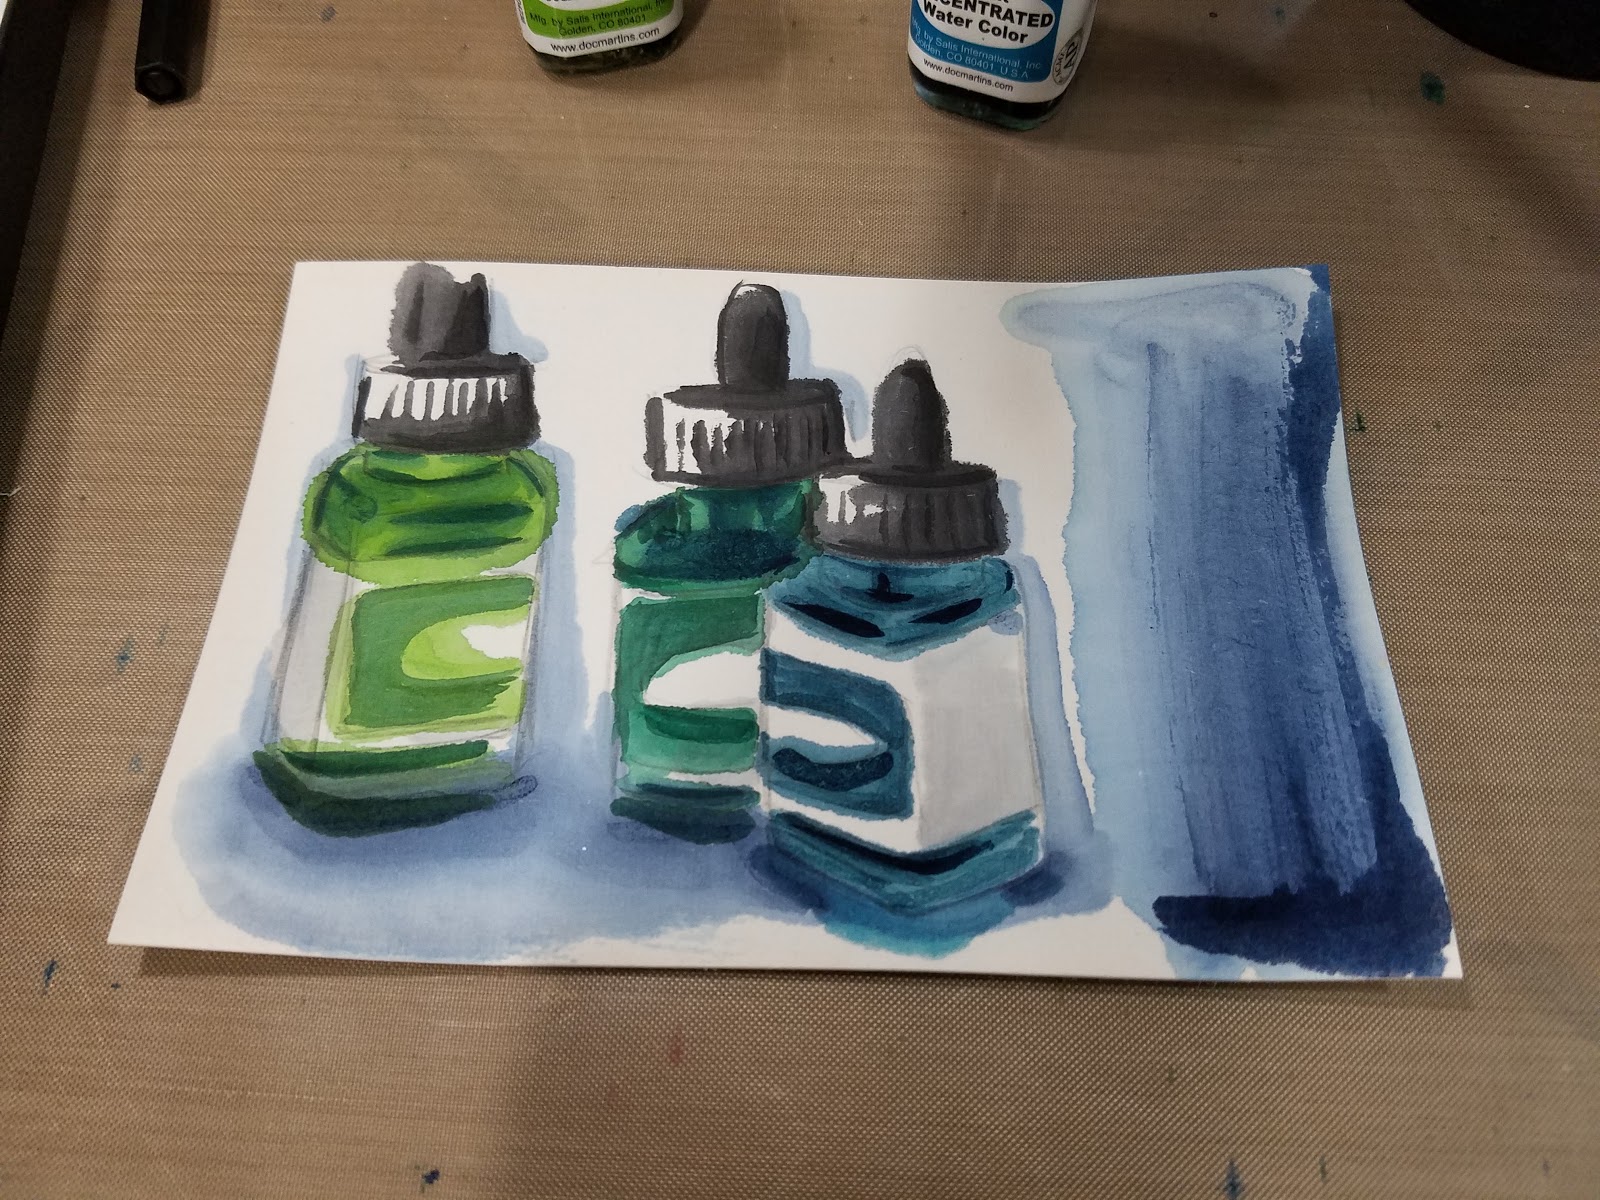
I can't seem to find a brush that suits what I'm painting- the small Yasutomo sumi brush (0) can't lay down enough paint the larger Yasutomo (guessing a 4 or larger, it's unmarked) over saturates the page and bleeds all over. Even though I'm using the righ tools and the right paint, it STILL feels a bit like painting on toilet paper- the paper weirdly seems to reject the paint while bleeding all over the place. The only way I can tell if it's me, the paper, or ALL etegami papers is to try others, and I may have to find a place in my budget while in San Francisco to purchase other brands- or perhaps my local K and S international market may have some?

I opted to ink at the end of the experiment, using a Pilot small brushpen that looked similar to the brushpens used in the images linked in the Inspiration section.
Third Attempt: Freehand Painting a Gourd with a Waterbrush
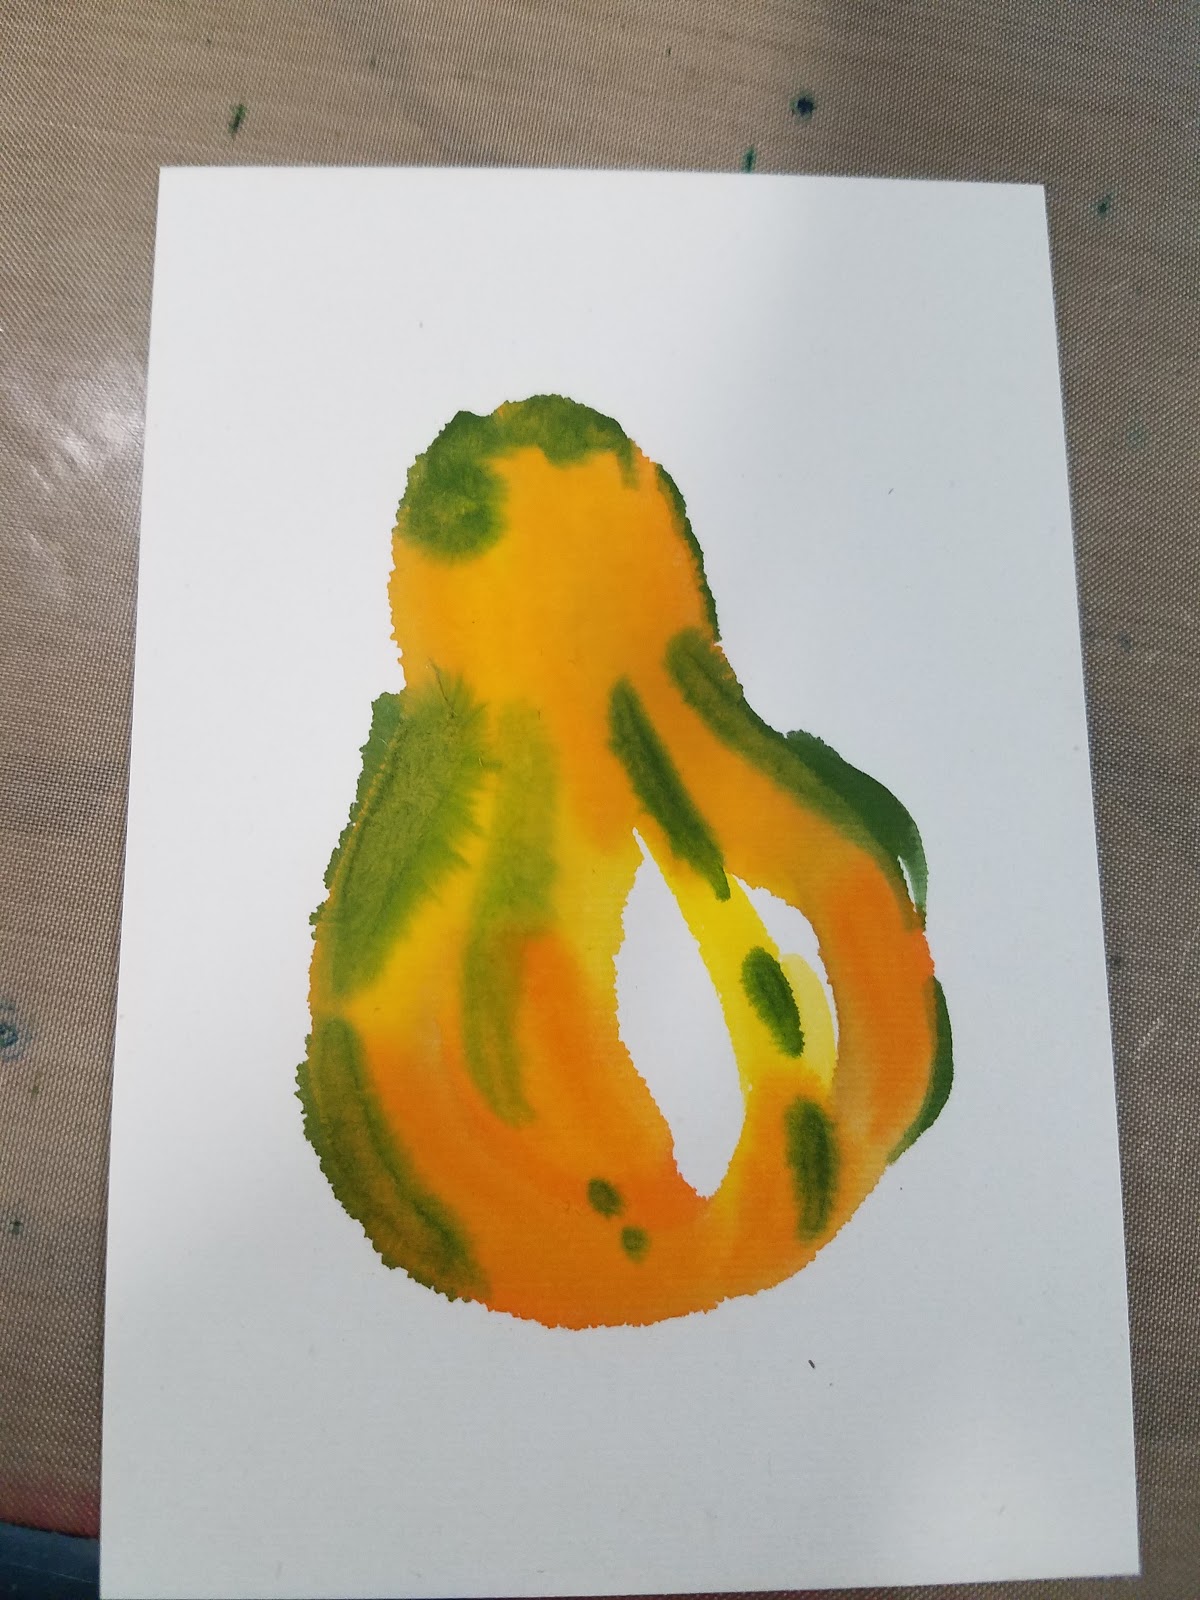

I painted the gourd first, freehanding it with a light orange gansai watercolor. While that paint was still wet (etegami paper has a long open time), I added in darker oranges and greens, and the paint quickly diffused on the wet paper. This time, I left open some white space, trying to replicate etegami watercolors I'd seen online, and I filled in the background with a contrasting blue.
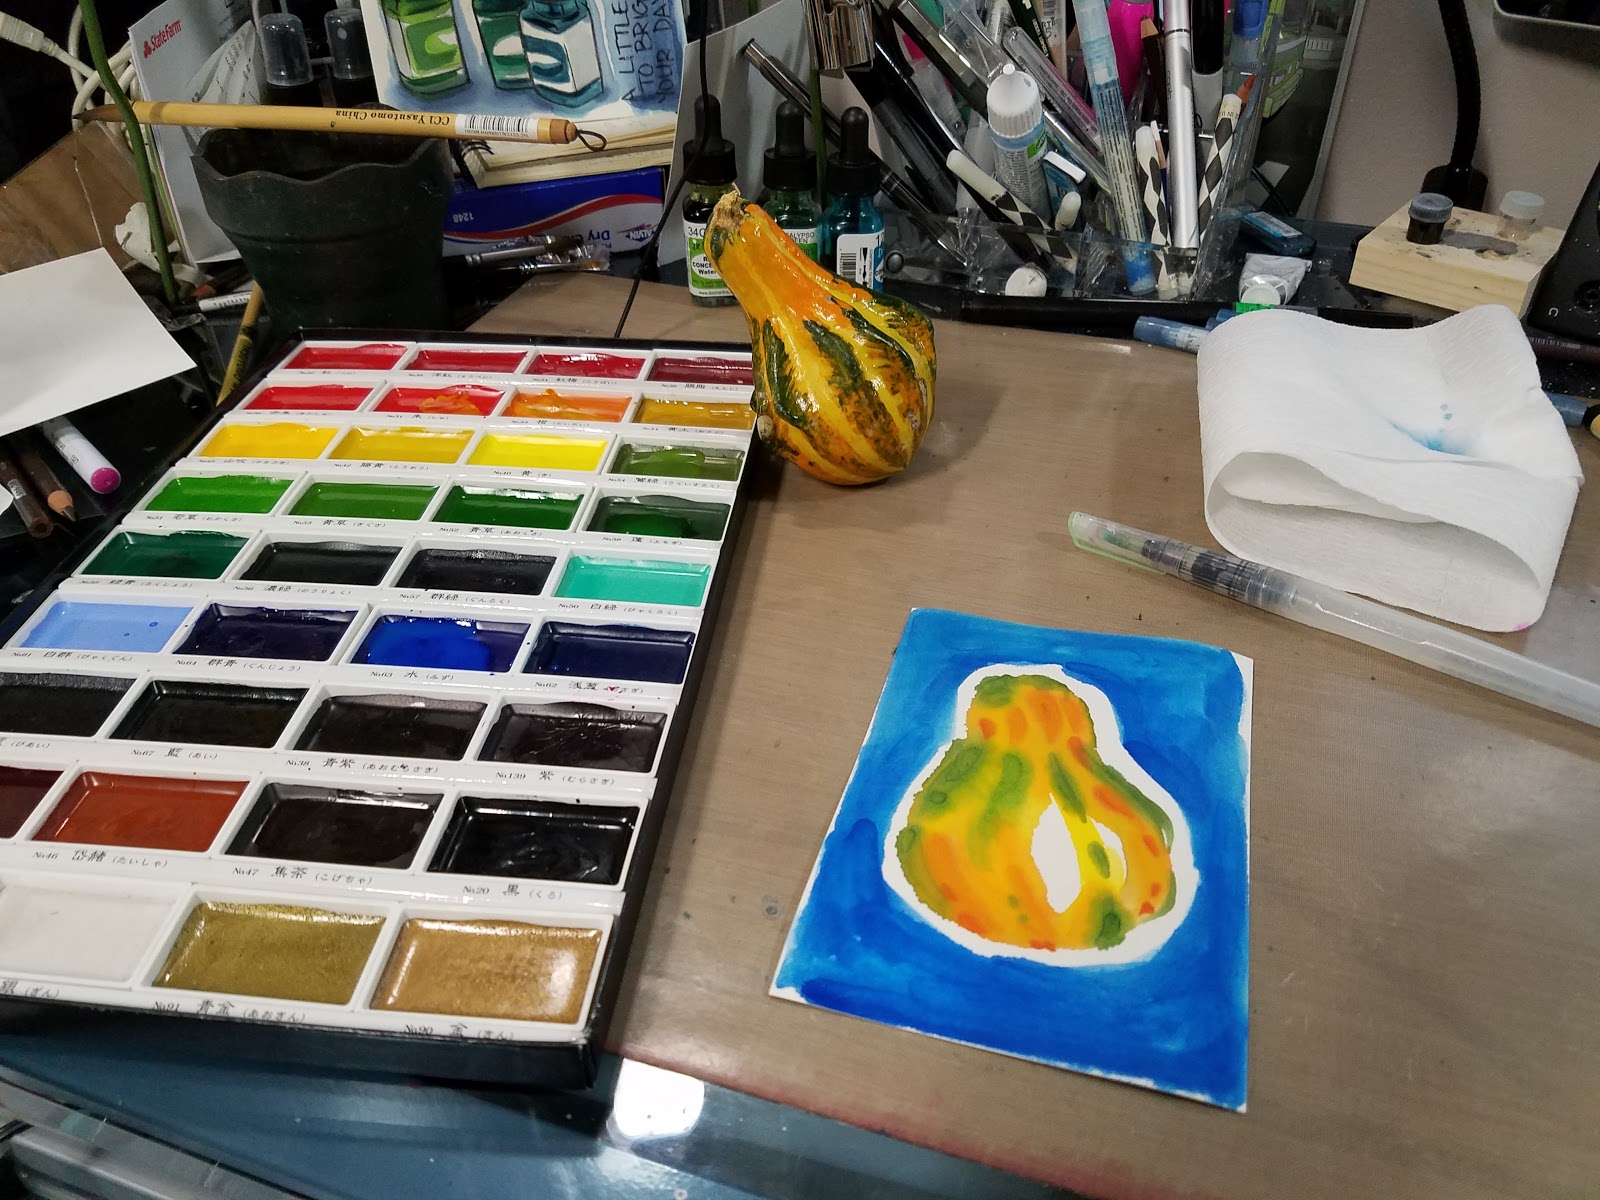
Going over already wet areas with a waterbrush causes the paper to pill and damages the paper's surface, no matter how gentle you are.
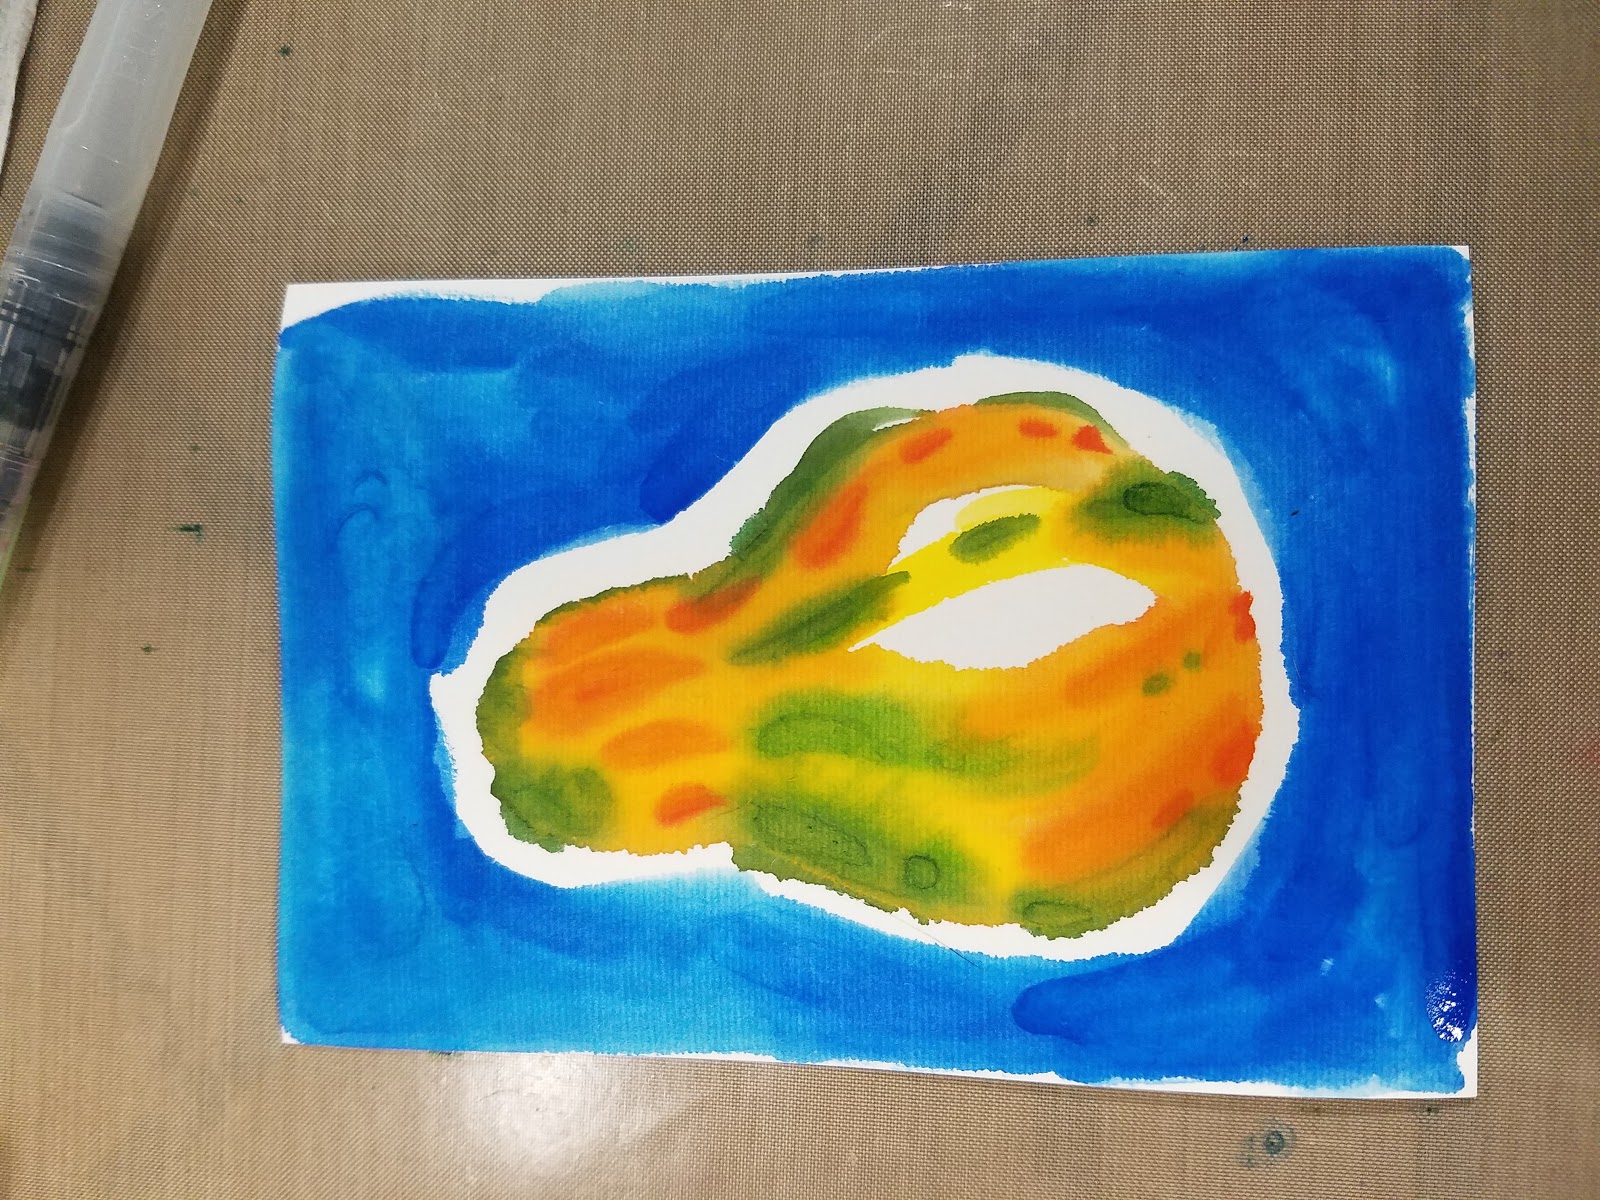
Paint quickly wet into wet to take advantage of the qualities that high blur papers like the Niso-Kyosen have to offer.

You don't need to tape this paper down- it will curl a little, but not much, and will dry flat.
Once the colors dry, they're very faded out on this paper, almost chalky and muddy, but you can paint another layer if you're careful, or add details. Make sure your brush is almost dry when applying the new paint.

The Verdict and More about Etegami
What started as a paper test turned into learning a whole new artform, and sharing what I learned with you guys. Is painting on traditional etegami washi paper a Watercolor Basic? Not at all. But watercolor postcards seem to be popular anywhere there are waterbased paints or pigments and paper to paint on, and many of you may be interested in sending original works of art in the mail to loved ones. You may find that this post on etegami sparks an interest in mail art, or creating affordable art for the masses, or just for creating quick little watercolors that don't have to be good to be precious.
Originally invented by a calligrapher, etegami may be best served by those who are familiar with sumi painting, or have a calligraphic approachto their watercolors. It seems that etegami papers like this Akashiya Niso Kyosen are designed to bleed, and may best serve those who are trained in economy of line- a skill I sorely lack at this time.
At its heart, etegami is intended for people to share hand made artwork with another person, and this is something I can definitely get behind, even if my own etegami lacks grace.
If you're interested in etegami, you do not have to use etegami specific paper- you can use what's available. 4X6" watercolor pads like Fluid are the right size for postcards and may handle watercolor in a way you're familiar and comfortable with.
Outside Resources:
Let's Talk Paper- Dosanko Debbie
Kuretake-Etegami
The Ikebana Shop- Etegami Workshop
Inspiration:
DosankoDebbie
Drawing Near
Etegamist- How To
The Etegamist
Etegami: Drawing with a little Message
a beginner's guide to etegami
Materials:
Papers:
Paper Sampler
Etegami Papers
Gansai Paints
Kuretake Etegami Starter Kit
Kuretake Gasen Etegami Paper
Kuretake Gansai Tambi 36 colors
Kuretake Gansai Tambi 12 Colors
Brushes:
Pentel Aquash Waterbrushes
Blick Sumi Brushes
Yasutomo Sumi Brushes
Please consider donating to this blog or purchasing from Natto-shop (http://nattosoup.com/shop) if you want me to continue publishing quality content. All materials tested were purchased from my own pocket. Keep on Truckin' Nattosoup is not under any sponsorship.
October 9, 2016
Inking Basics: Student Art Nib Set Review
Student Artist Set
calligraphy.co.uk

Included nibs:
Poster 6mm
Tape Nib
1mm2mm3mm4mm
Ornamental 4001mm3mm5mmCrown 41
School Nib 63 1/2
Mapping NibAnd a magnet that doesn't seem to work with these nibs?


I bought this set at DickBlick years ago, but never got around to testing the nibs inside. There are a fair number I'm unfamiliar with, including the Poster, the Tape Nibs, and the Ornamental.
Since these are new nibs, I'm going to use alcohol wipes to clean them all. I am also using the Kuretake Sumi Ink 60 included with my Inktober ArtSnacks, and I'm testing on the Denik notebook sent with ArtSnacks- not because either of these are favorites, but because they're handy and they need to be field tested anyway.


This is the first time I've ever used a Poster nib, but not the first time I've used nibs designed to deliver very broad strokes. This reminds me of the Brush nib I mentioned in the Nib Overview recently, as well as of larger (0, 1) A and C fixed width nibs. The Poster nib holds a lot of ink due to the folded nib.


Their included holder is kinda janky and didn't hold the nibs securely after three nibs, so I'm switching over to the Kuretake holder included in my ArtSnacks.
Preparing the nibs
Since these were unused nibs, I went ahead and cleaned each off with an alcohol wipe to remove the protective oil. I then dipped each nib into a Dinky Dip full of the Kuretake Sumi Ink 60, although with larger nibs, I would dip the nib directly into the bottle, as the Dinky Dip could not hold enough ink.

The Swatch Test
Poster Nib- Bold and large, similar to a Brush nib. Probably excellent for poster lettering and borders.
Tape- Features a diagonal nib. Probably also excellent for borders, although a little difficult to control.
Ornamental- Reminds me of the tip on B nibs, although not as well built. Come in larger sizes, a little difficult to keep width fixed, and not intended as a flexible nib.
Crown- Handles like a cheap spoon nib, no ability to carry ink.
School Nib- Reminded me of inexpensive G nibs.
Mapping nib- Held a surprising amount of ink and offered a surprising amount of flex. Fun to use. Had to use the included crowquill handle, which was fairly cheaply made.
The Poster, Tape, and Ornamental nibs are definitely geared towards lettering and borders. I found the Crown nib to be fairly cheap and incapable of holding enough ink to accomplish anything. The School nib, while still cheap, was at least able to draw a line. The Mapping nib was definitely cheaply produced, but could produce a decent line with no skips, and could deliver lineweight variation.
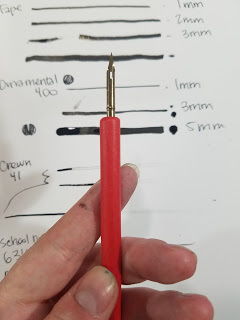
After use, each nib was swished in water and cleaned off again with an alcohol wipe.
The Verdict
Inexpensive sets like these aimed at artists can give you a quick rundown of a variety of nibs, and help you decide which may be worth further exploration. I personally enjoyed the Poster nib and the Mapping nib, and would be interested in trying more of those. I feel like the Tape nibs probably lend themselves to ornamental western Calligraphy, although I would be interested in hearing what someone who has experience in that field has to say about their favorite nibs.
Similar Sets
Speedball Oblique Pen Set
Speedball 6-Nib Calligraphy Lettering Set
Speedball Lettering and Drawing Round Pen Nibs
William Mitchell Calligraphy Dip Pen Nib Set
Speedball Arts Products Cartooning Set
Joseph Gillot Calligraphy Dip Pen Nib Set
Manuscript Pen Leonardt Copperplate and Shadow
Speedball Sketching Set
Speedball Calligraphy No-5 Artists Project Set
Joseph Gillot Ink Dip Pen 8 Nib Drawing Set
Please consider donating to this blog or purchasing from Natto-shop (http://nattosoup.com/shop) if you want me to continue publishing quality content. All materials tested were purchased from my own pocket. Keep on Truckin' Nattosoup is not under any sponsorship.
calligraphy.co.uk
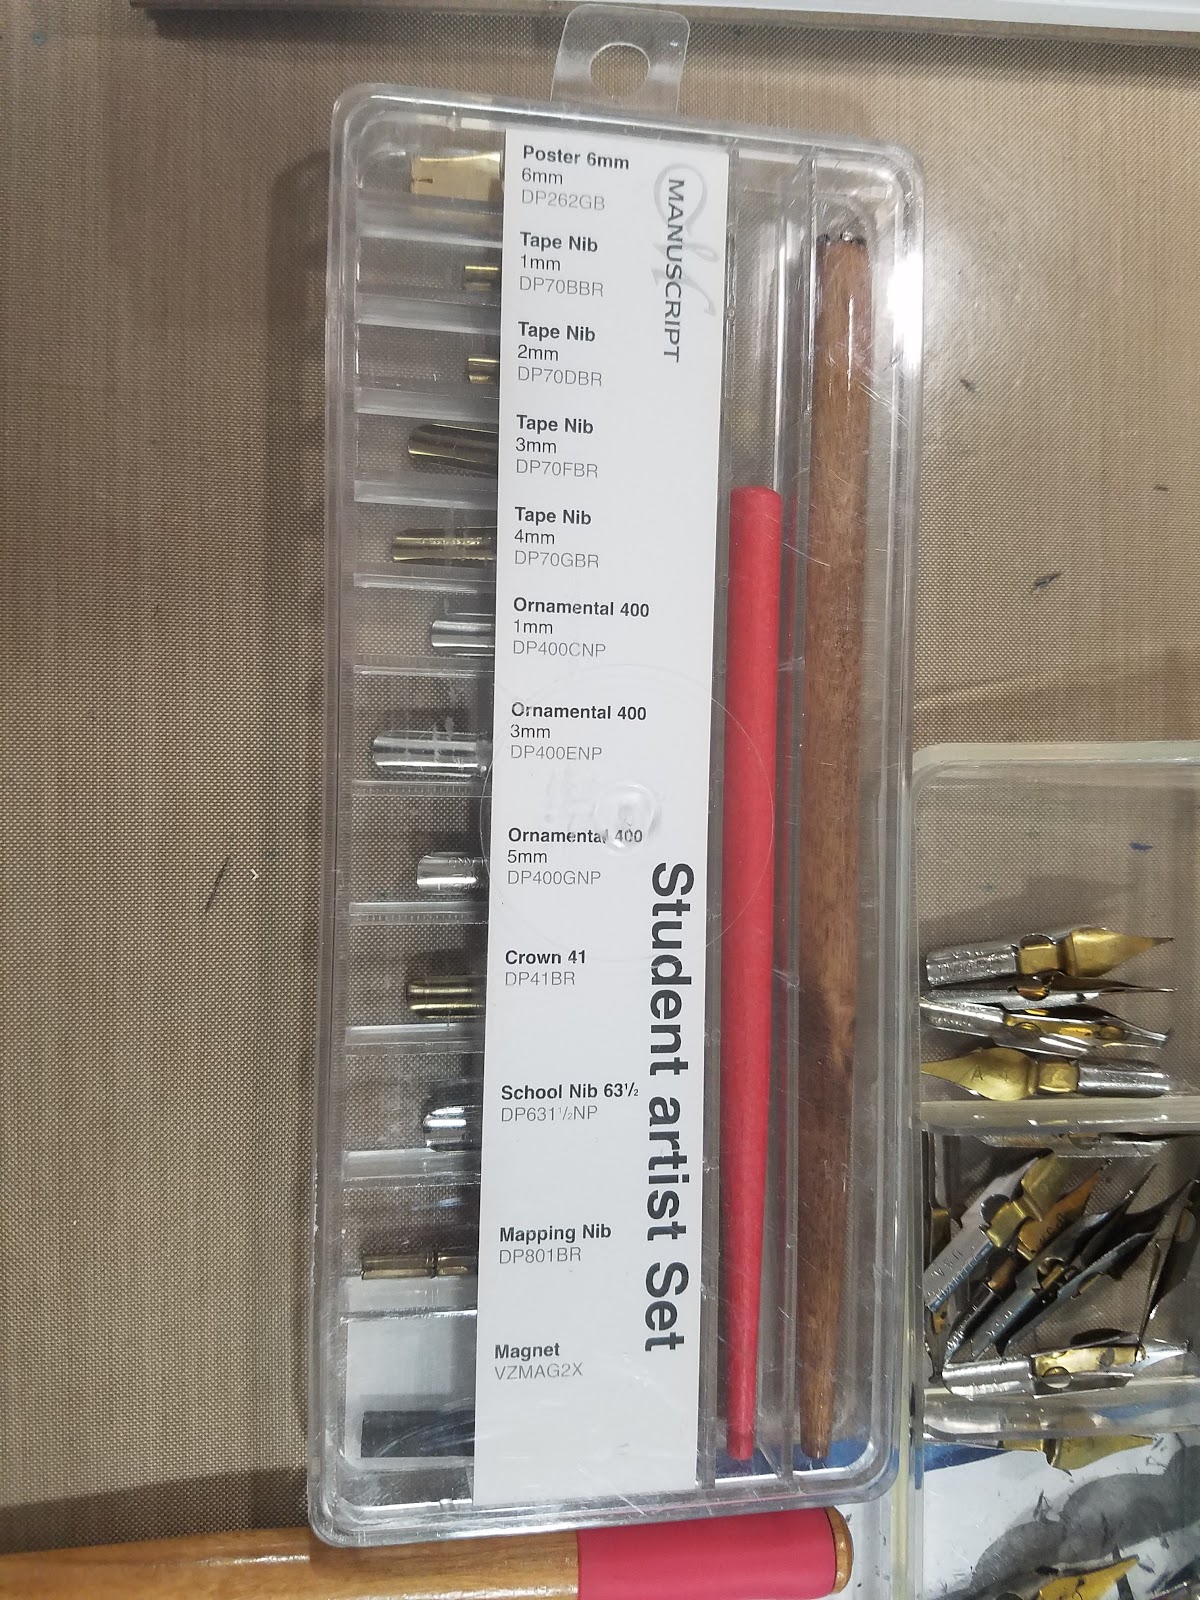
Included nibs:
Poster 6mm
Tape Nib
1mm2mm3mm4mm
Ornamental 4001mm3mm5mmCrown 41
School Nib 63 1/2
Mapping NibAnd a magnet that doesn't seem to work with these nibs?
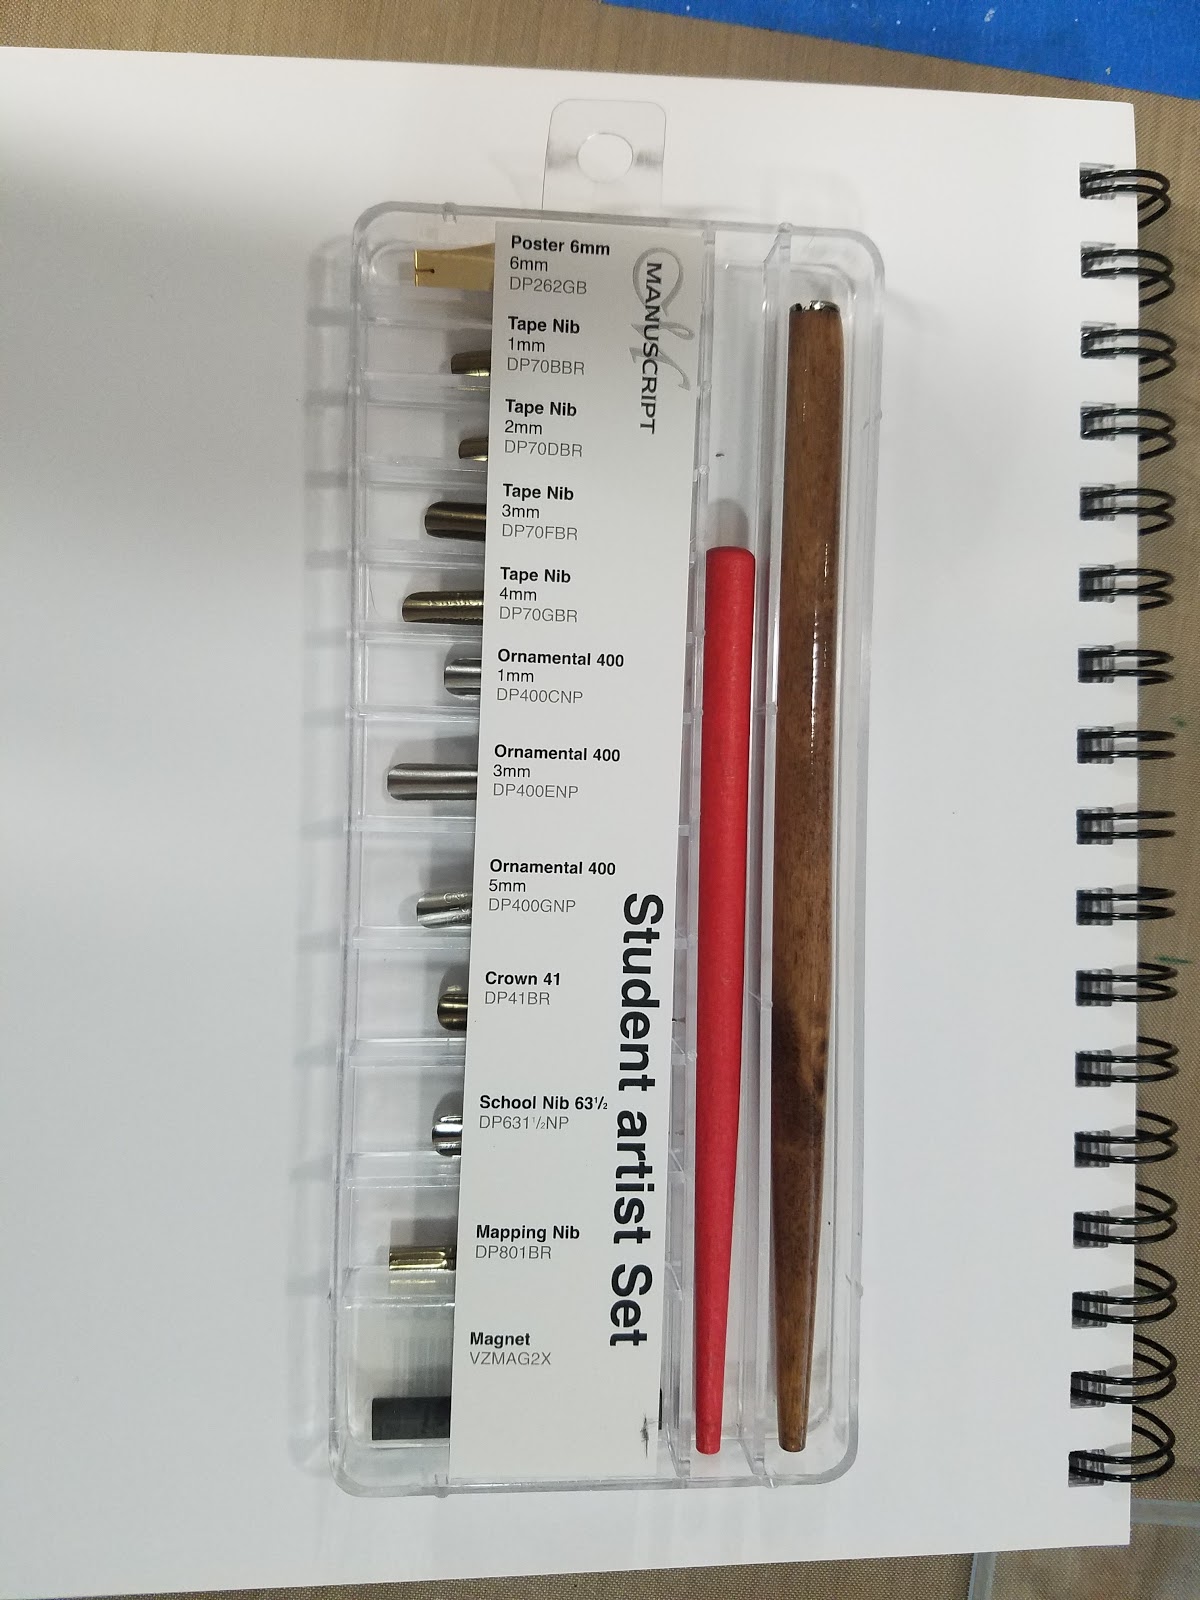
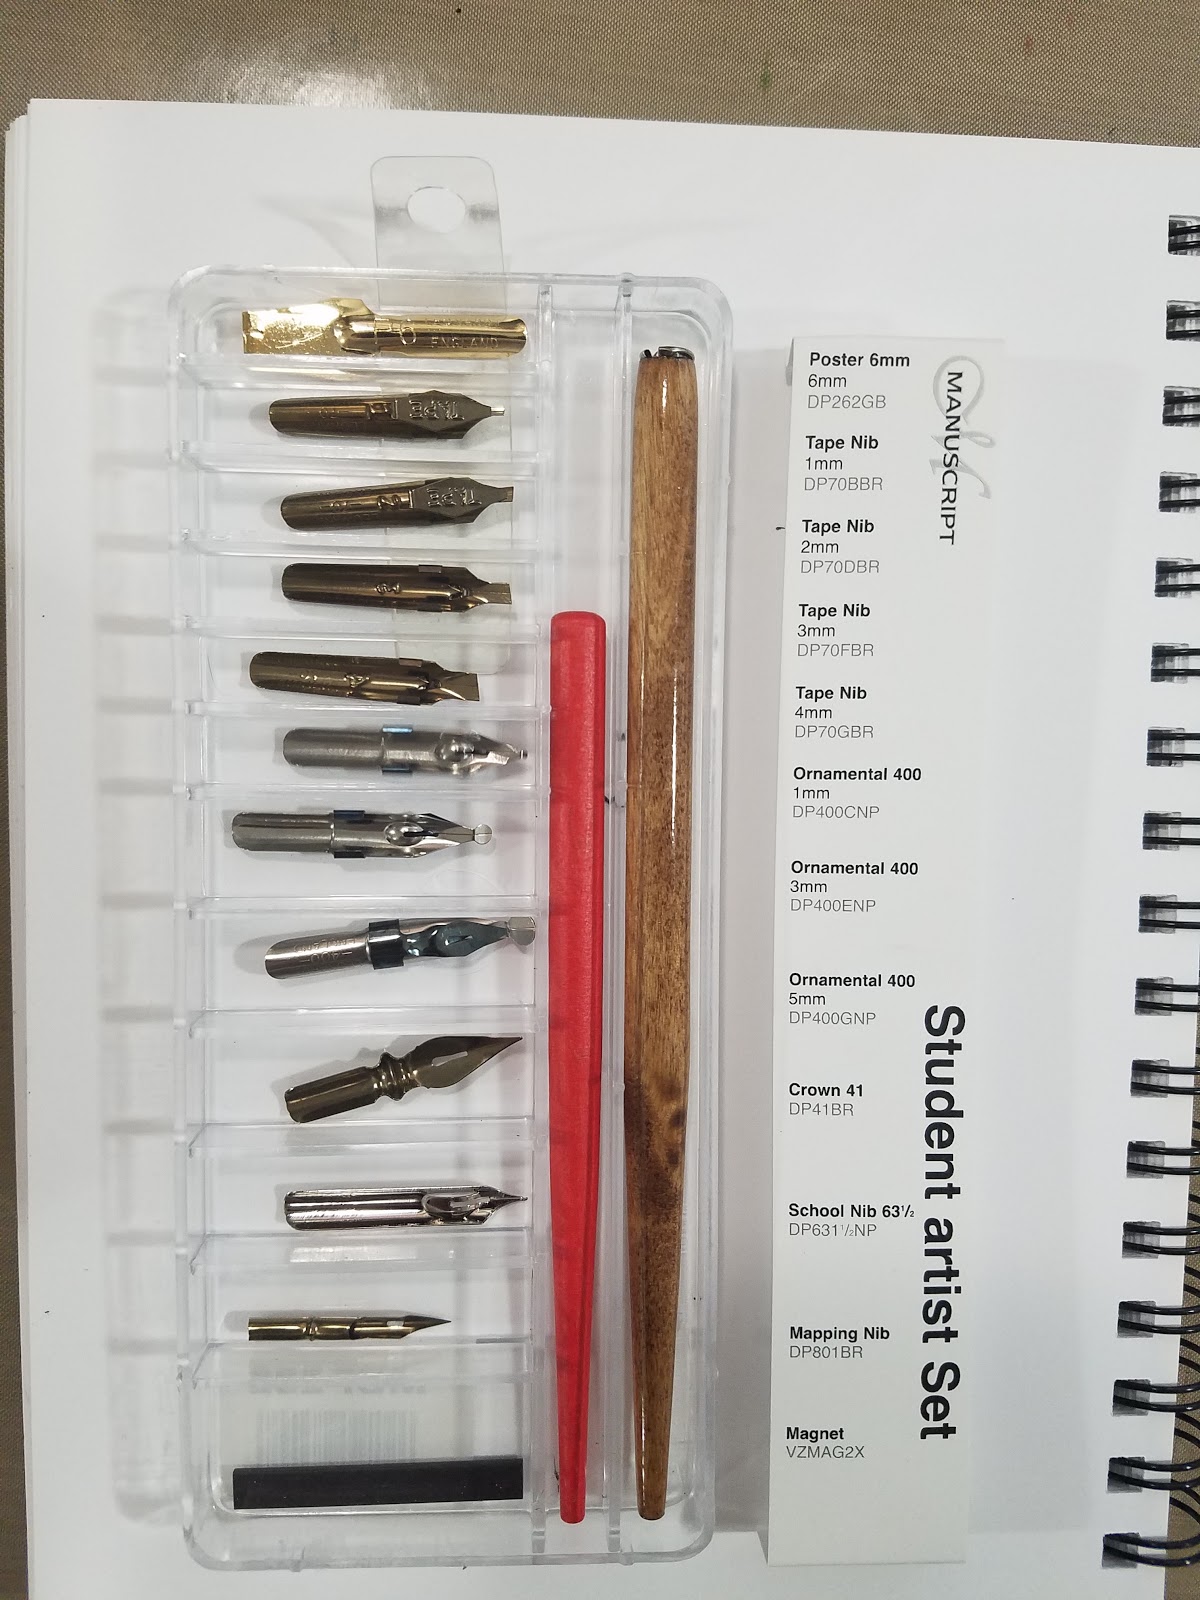
I bought this set at DickBlick years ago, but never got around to testing the nibs inside. There are a fair number I'm unfamiliar with, including the Poster, the Tape Nibs, and the Ornamental.
Since these are new nibs, I'm going to use alcohol wipes to clean them all. I am also using the Kuretake Sumi Ink 60 included with my Inktober ArtSnacks, and I'm testing on the Denik notebook sent with ArtSnacks- not because either of these are favorites, but because they're handy and they need to be field tested anyway.
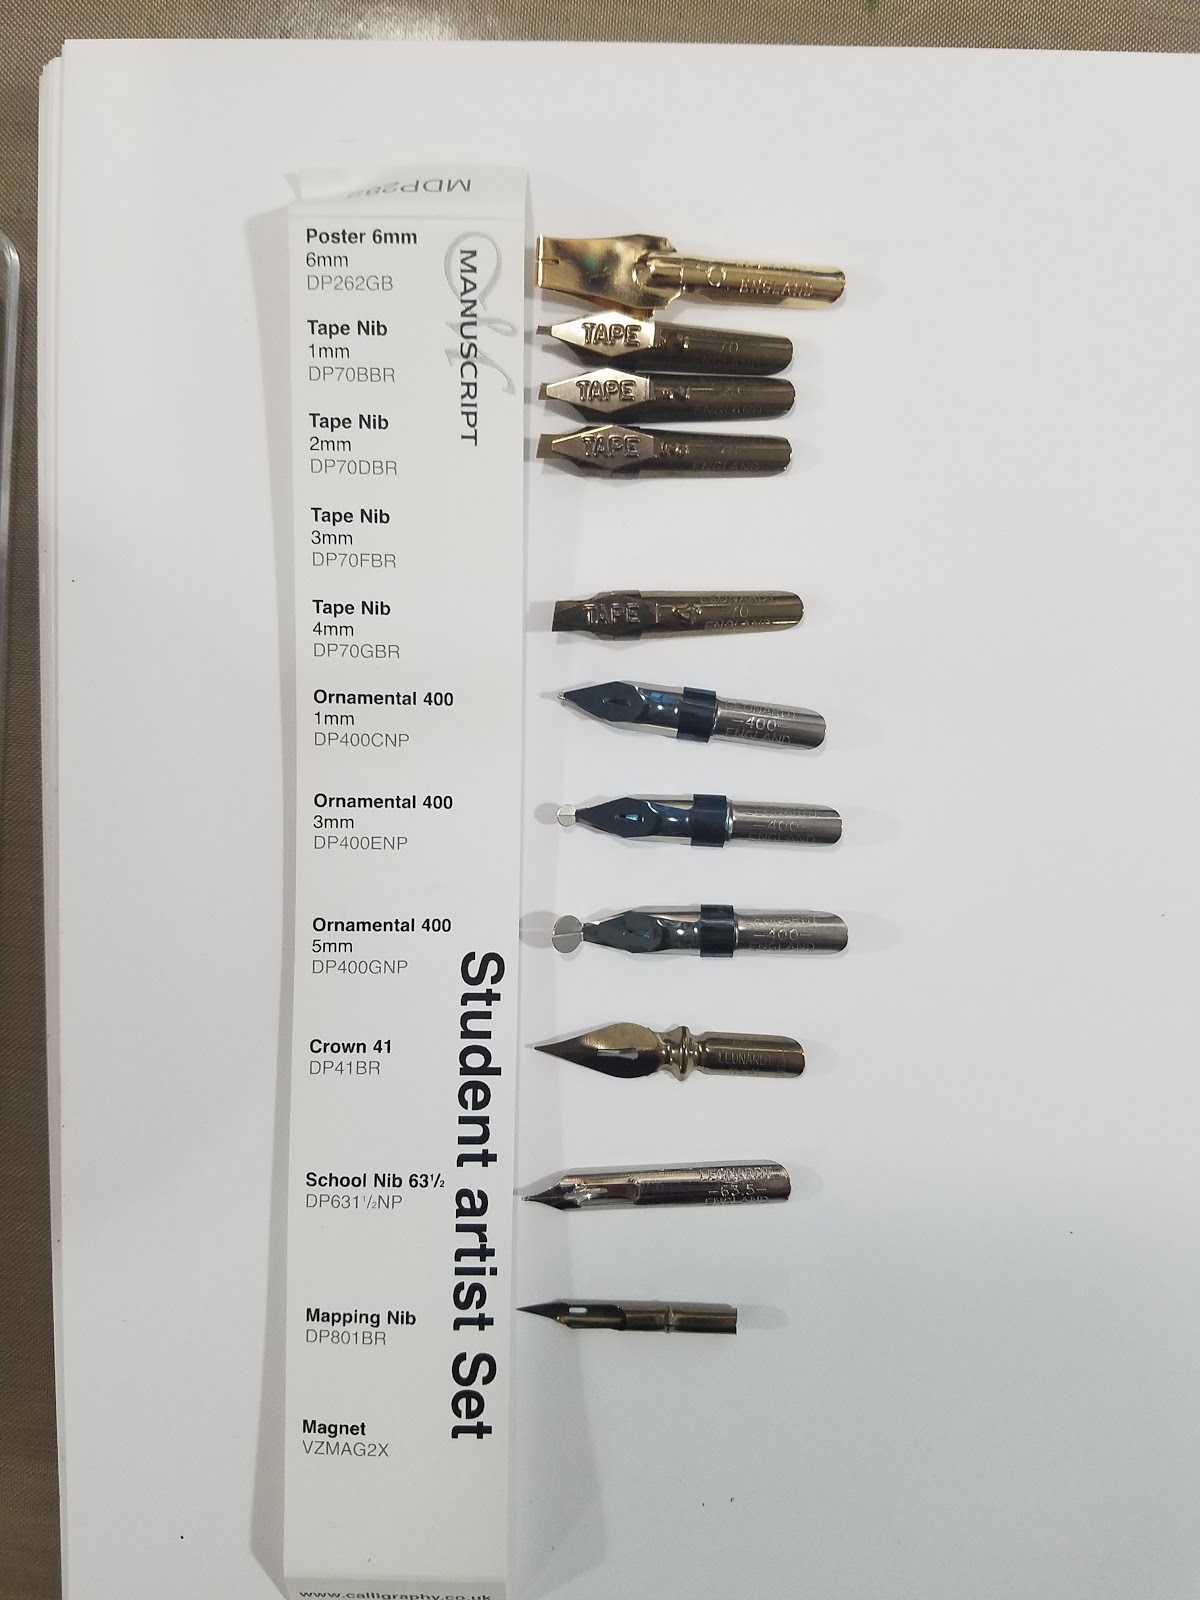
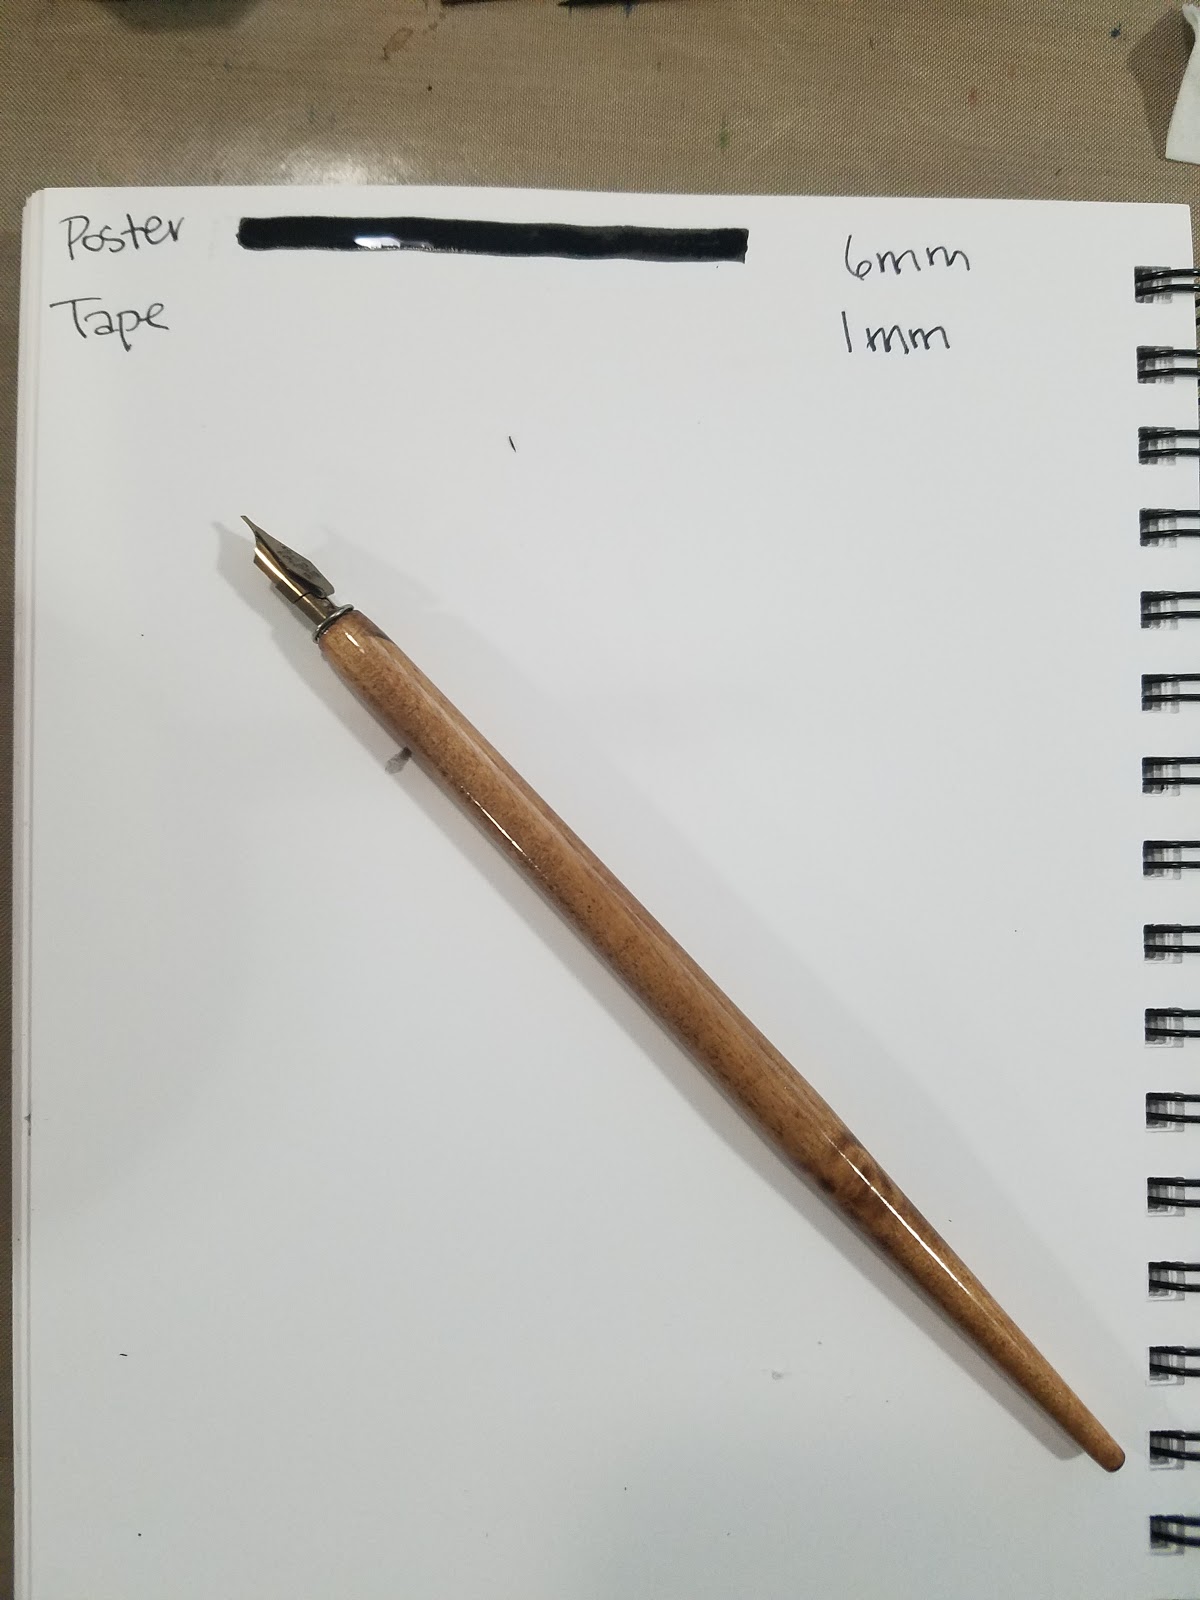
This is the first time I've ever used a Poster nib, but not the first time I've used nibs designed to deliver very broad strokes. This reminds me of the Brush nib I mentioned in the Nib Overview recently, as well as of larger (0, 1) A and C fixed width nibs. The Poster nib holds a lot of ink due to the folded nib.
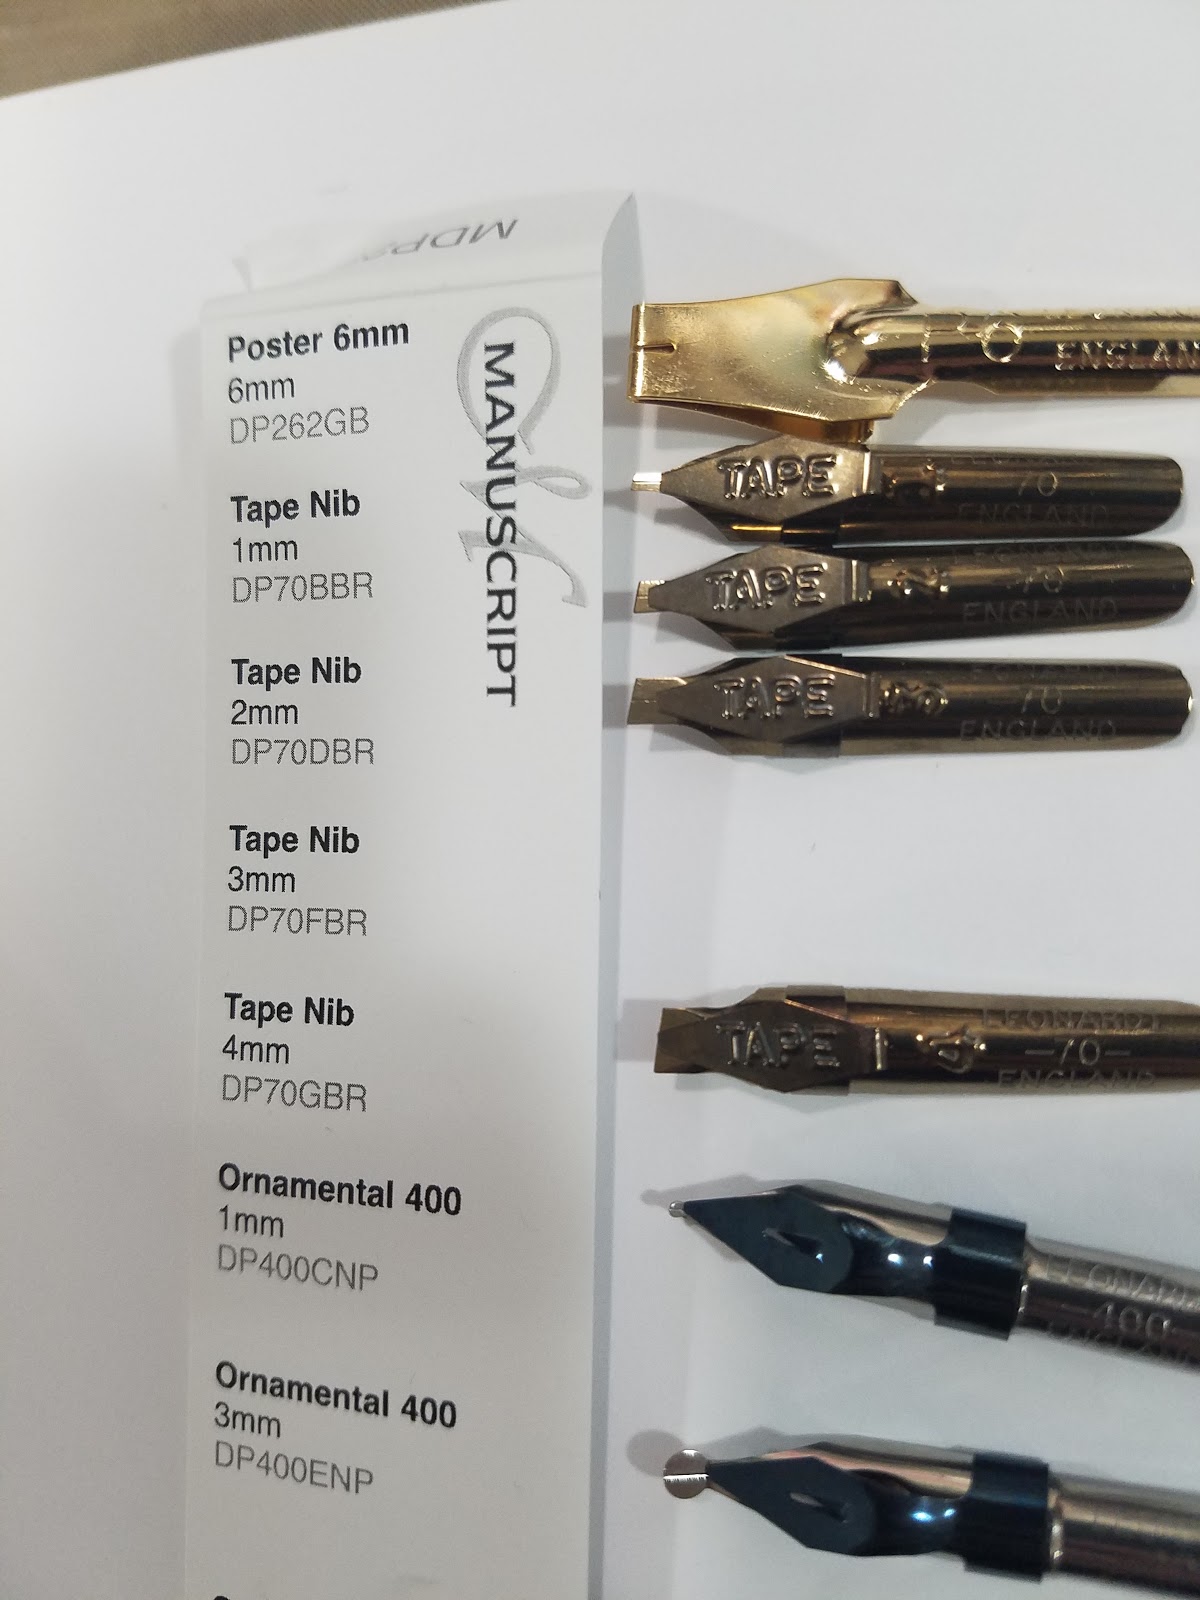
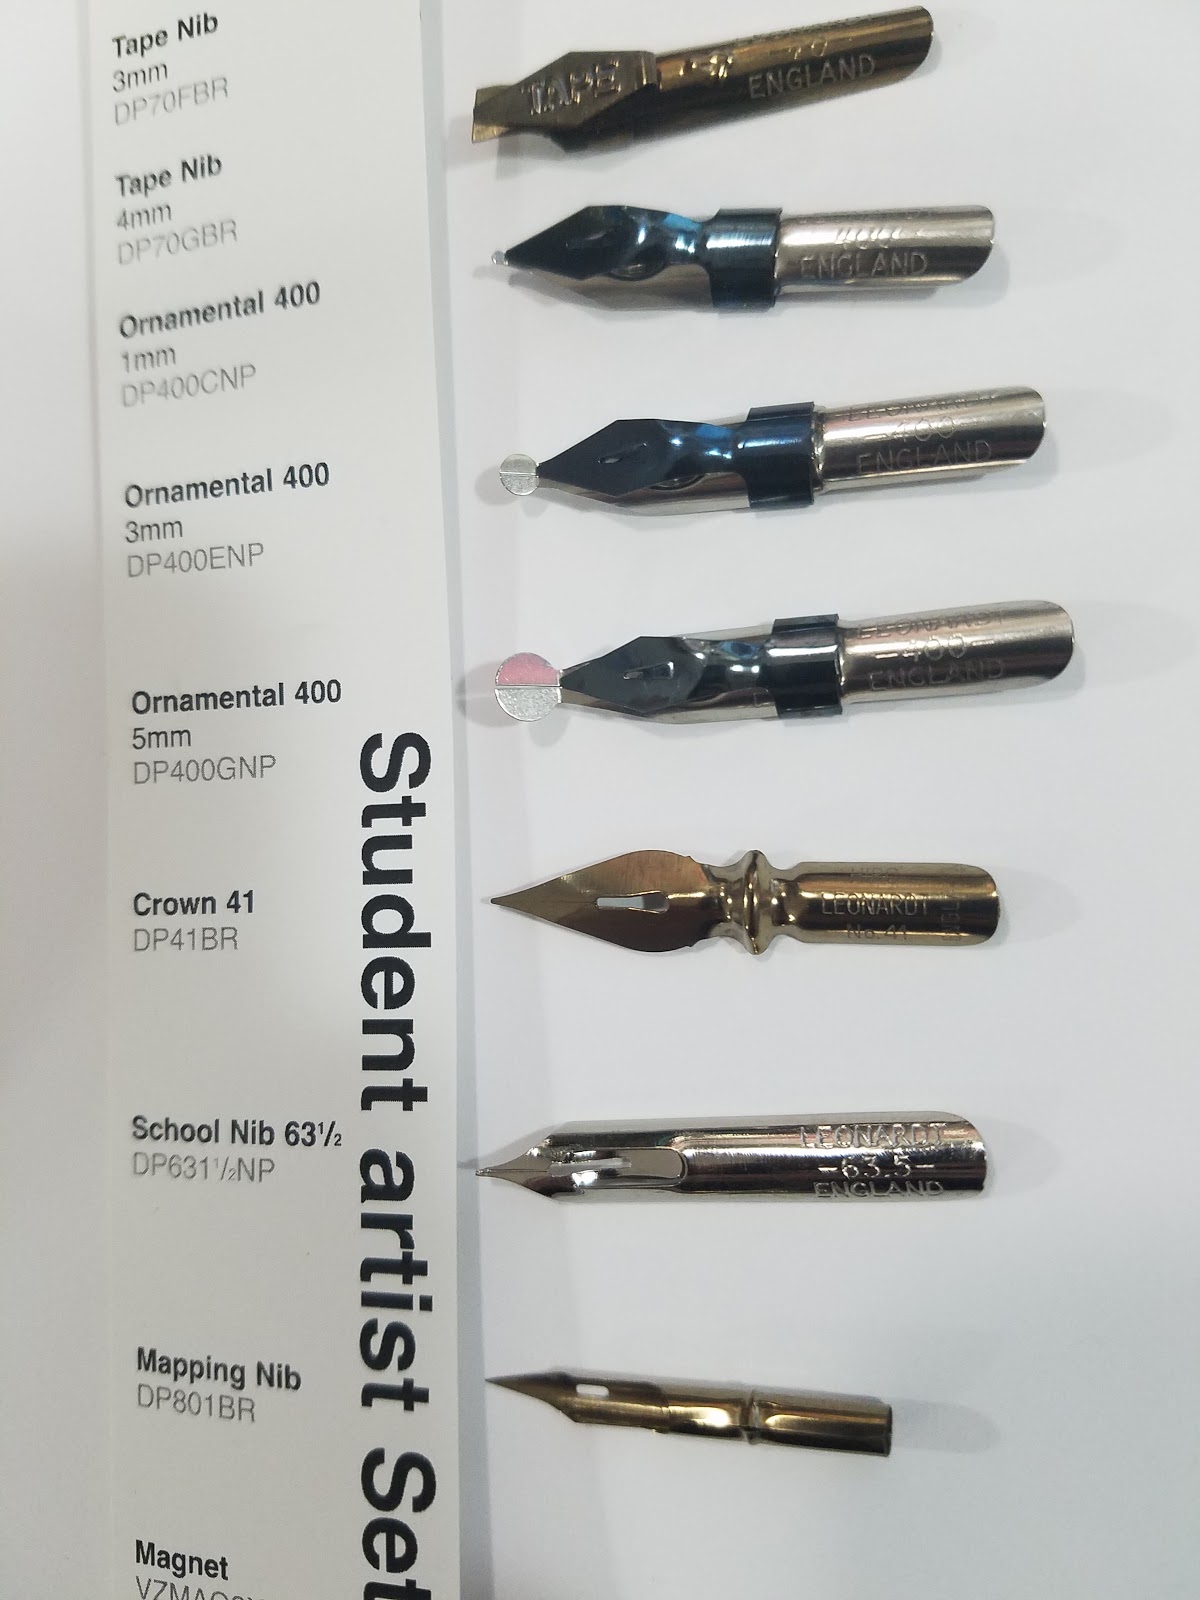

Their included holder is kinda janky and didn't hold the nibs securely after three nibs, so I'm switching over to the Kuretake holder included in my ArtSnacks.
Preparing the nibs
Since these were unused nibs, I went ahead and cleaned each off with an alcohol wipe to remove the protective oil. I then dipped each nib into a Dinky Dip full of the Kuretake Sumi Ink 60, although with larger nibs, I would dip the nib directly into the bottle, as the Dinky Dip could not hold enough ink.

The Swatch Test
Poster Nib- Bold and large, similar to a Brush nib. Probably excellent for poster lettering and borders.
Tape- Features a diagonal nib. Probably also excellent for borders, although a little difficult to control.
Ornamental- Reminds me of the tip on B nibs, although not as well built. Come in larger sizes, a little difficult to keep width fixed, and not intended as a flexible nib.
Crown- Handles like a cheap spoon nib, no ability to carry ink.
School Nib- Reminded me of inexpensive G nibs.
Mapping nib- Held a surprising amount of ink and offered a surprising amount of flex. Fun to use. Had to use the included crowquill handle, which was fairly cheaply made.
The Poster, Tape, and Ornamental nibs are definitely geared towards lettering and borders. I found the Crown nib to be fairly cheap and incapable of holding enough ink to accomplish anything. The School nib, while still cheap, was at least able to draw a line. The Mapping nib was definitely cheaply produced, but could produce a decent line with no skips, and could deliver lineweight variation.

After use, each nib was swished in water and cleaned off again with an alcohol wipe.
The Verdict
Inexpensive sets like these aimed at artists can give you a quick rundown of a variety of nibs, and help you decide which may be worth further exploration. I personally enjoyed the Poster nib and the Mapping nib, and would be interested in trying more of those. I feel like the Tape nibs probably lend themselves to ornamental western Calligraphy, although I would be interested in hearing what someone who has experience in that field has to say about their favorite nibs.
Similar Sets
Speedball Oblique Pen Set
Speedball 6-Nib Calligraphy Lettering Set
Speedball Lettering and Drawing Round Pen Nibs
William Mitchell Calligraphy Dip Pen Nib Set
Speedball Arts Products Cartooning Set
Joseph Gillot Calligraphy Dip Pen Nib Set
Manuscript Pen Leonardt Copperplate and Shadow
Speedball Sketching Set
Speedball Calligraphy No-5 Artists Project Set
Joseph Gillot Ink Dip Pen 8 Nib Drawing Set
Please consider donating to this blog or purchasing from Natto-shop (http://nattosoup.com/shop) if you want me to continue publishing quality content. All materials tested were purchased from my own pocket. Keep on Truckin' Nattosoup is not under any sponsorship.
October 6, 2016
Inking Basics: Inktober Inking Supply List
Purchasing from this list using the included links helps support my work on this blog and on the YouTube channel, as I am using Blick and Amazon affiliate links where applicable and fairly priced. These are products I am very familiar with, and many have been reviewed either here or on the YouTube channel. Recommendations are made with beginning inkers in mind.
In the Inktober Box
Pentel Pocket Brush:
$14.29 on DickBlick (plus shipping), $10.99 on Amazon Prime, free 2 day shipping
Copic Multiliner SP .3: $8.23 on DickBlick (plus shipping)
Kuretake Nib Holder: $10.39+$8.50 on Amazon
Kuretake Saji Nibs, 3 pack: $7.99+ free shipping on Amazon
Princeton Kolinsky Sable 4 round: $15.39 on DickBlick+ Shipping, $21.34 on Amazon with Prime shipping
Denik Inktober Exclusive SketchBook (not recommended)- Not available outside of the ArtSnacks Inktober Collection
My personal Recommendations
Strathmore Visual Journal Smooth Bristol:
9"x12" $9.67 on DickBlick
Strathmore Visual Journal Vellum Bristol:$9.67 on DickBlick
Sakura of American Pigma FB, MB, BB Brush Pens:$9.99 for all three on DickBlick
Kuretake Fudegokochi, set of 3: $10.55 on Amazon
Tachikawa G Nibs- Pack of 3 Nibs: $8.99 on Amazon with Prime
Crowquill Nib Holder: $1.29 on DickBlick
Crowquill Nibs, Set of 2, 100 and 104: $2.96 on DickBlick
Creative Mark Rhapsody 2 Round: $12.96 on Jerrys's Artarama
Copic Multiliner Set- Set of 9 nibs: $19.51 on DickBlick
OR Sakura Micron Set- Set of 8 Nibs: $16.43 on DickBlick
Tachikawa Nib Holder (like the Kuretake, but better rounded, comes with cap) $8.34 on Amazon, with free Prime 2 day shipping
Please consider donating to this blog or purchasing from Natto-shop (http://nattosoup.com/shop) if you want me to continue publishing quality content. All materials tested were purchased from my own pocket. Keep on Truckin' Nattosoup is not under any sponsorship.
October 3, 2016
Inexpensive Ways to Help Artists Whose Work You Enjoy
The Internet is a wonderland of ways to kill time without spending a dime. Webcomics, blogs, YouTube alone has a million ways you can learn or kill brain cells, depending on your whim. So much entertainment, a creator should be honored that you chose to spend YOUR time on THEM, right?
But what if you regularly consume someone's work- what if their YouTube has brightened your cloudy days, their webcomic has given you a reason to rush home on Thursday evenings? What if you drift off to dreamland with their ASMR in your ears, or taught yourself how to draw from their tutorials? What if you want to show your appreciation, but you really can't afford to commission them, donate, or join their Patreon?
There are loads of ways to help the creators whose work you consume without spending additional money, and this support can often mean the difference between a project continuing or getting canned.
When interviewing friends on Twitter about ways audience can help support their favorite creators, one of the saddest trends I noticed is that many creators have no idea ANYONE enjoys the project until they've been forced to go on hiatus or remove the project from the internet. This isn't just applicable to webcomics, bloggers, YouTubers- anyone who makes content is susceptible to working in an artificial vacuum. The number one favor you can do for ANY creator is to signal boost their work generously and regularly. Praise costs you nothing but time, and you never realize how influential your good word can be for others. The next biggest favor you can do is to talk to them like they're people.
Having spoken with comics editors over the years, many will admit they DO care about an artist's popularity. Popularity shows that someone's work is viable, it resonates, and it may work well as a commercial property. Even a small but vocal grassroots audience can help a lot, so please don't think your voice doesn't matter.
If you own a physical or digital copy of their comic:
Write a review on Goodreads (if they have one)If their book has an Amazon page, leave a review there as well!Check out their ComicVine to make sure it's up to dateConsider making a Wikipedia entry for them, if one does not already existTweet about how much you enjoyed reading their work- if they have a hashtag, use it!Share a friendly review to your Facebook, Twitter, Pinterest- anywhere you think people might see your review and possibly check out the comic. Positive word of mouth really helps a lot- don't assume a creator has a supportive audience, BE that supportive audience.Take a moment to shoot them an email about how much you enjoy their book- many print creators (especially indie comic artists) never hear feedback from the audience.Take a photo of the comic as a book, or photos of select favorite pages, post it to your Facebook, along with a quick review and a link to where others can find itTake a photo of the comic, post it to your Instagram, tag the artist, and include a quick review of why you liked the comic, and where people can find itCome visit them at cons and let them know how much you enjoy their work.BRING YOUR FRIENDS to visit the artists you admire at conventions, and explain WHY you enjoy their work.Create fanart and fanfiction for their comic- this is always appreciated and is a fantastic way to introduce new people to this work.Write in to comic news sites to promote the comic on the creator's behalf. Your glowing reviews often go much further than the creator's attempts at reaching comic press.Nominate their work for an award- Ignatz, Eisner- winning an award can do wonders for a creator's career (and their ego!)Write to their favorite conventions and request that they be invited as a guest.
If you enjoyed their webcomic:
Post to their comments on pages you particularly enjoy! Many artists feel like they are posting to the void when they share pages to a silent audience, so please speak up!Take a moment to share select pages to your Tumblr, Twitter, or Facebook, explaining why you like the comic and where others can find it. Seeing your work shared and enjoyed is a rewarding experience.Introduce your real world friends to the comicTurn off your adblocker or add their comic as an exception- many comic artists see revenue from ad sales, when you block their ads, you're cutting off a source of income for your favorite artists.Do NOT repost without proper credit- a link back to the original site and the comic's name. We see so many comic pages floating around unclaimed on Facebook, Instagram, and Tumblr- that's unfair to the creator. Citing "Credit to the Artist" does NOT count.Don't consume their comic from reposting sites- consume it directly from where the artist uploads it.Visit them at cons and let them know how much you enjoy their work.BRING YOUR FRIENDS to visit the artists you admire at conventions, and explain WHY you enjoy their work.Promote their work through fanart and fanfic is appreciated from any skill level, and is a great way to connect with a creator.Chat with them on social sites like Twitter about their comic- creators LOVE engagement, it lets them know the story meant something to the reader.Retweet their promotional posts! Signal boosting a creator can really help them build an audience.Write in to comic news sites to promote the comic on the creator's behalf. Your glowing reviews often go much further than the creator's attempts at reaching comic press.If a comic you love goes on haitus, it's alright to write the creator and let them know how much you enjoyed their work, and how you look forward to it returning, but please be patient and kind, and do not badger the artistMake sure to vote for your favorite comics regularly on comic voting sites like TopWebComicsWrite to their favorite conventions and request that they be invited as a guest
If you enjoy their YouTube:
Subscribe to their channel- those numbers count!Leave the video on until it's complete- watch time matters a lot when it comes to YouTube recommendations and rankingsLeave a Like or a comment! Even asking questions helps the creator out a lot, as it helps form community.Share your favorite videos to your Facebook, Twitter, or take a screencap and share it to your Instagram, with links to the channel. Make sure you tag the artist- you may end up with a new friend!Retweet their promotional posts on other social networks!Watch at least 30 seconds of the ad- otherwise the creator doesn't see a dime.
If you enjoy their blog/Tumblr:
Reblog it! Reblogging their work (while crediting them) helps other artists out a lot and it increases the value of your own blog.Share it to your social media, especially if you have friends and family who are interested in that topic.Use their affiliates links when you shop on Amazon. Even if you aren't purchasing the item linked, the writer sees a bounty fee from every sale made through that link. The best part? Amazon pays this fee, not you, so it's a great way to regularly help people you like by doing what you would do anyway.Credit them when you use their resources! If you're a teacher, consider writing to the creator of the resource to request business cards or promotional media. Retweet their promotional posts on other social networks!Turn off your ad blocker! Many of these sites get their ads served via Google AdSense, so you don't need to worry about getting a virus, and many of these creators only see ad money if you not only view the ad, but click on it. If you enjoy their content, doing even this little bit can go a long way!
If You Love Their Indie Game
If you love their prior work:
Spread the word about new releases. Word of mouth is hugely important to small developers who can't afford big advertising budgets.Signal boost game updatesBe patient! Indie games are developed by small teams sharing a lot of work.SUPPORT their prior efforts though Pay What You Want, Humble Bundles, Patreon, or just talking about how much you love their other games while you wait for the new one.
If you already own the game:Share a review of the game to your favorite social networks, including Reddit! Your positive word of mouth will encourage others to give it a shot.Request that your favorite LP'ers check the game out- maybe if they like it, they'll promote itFollow and engage the creators on their favorite social media platformsCheck to see if LPers who regularly review indie games, like RockLeeSmile, NorthernLion, or SplatterCat have already reviewed it- if not, consider shooting them a comment requesting that they do so. They may not be able to get to it, but channels like those are how many gamers find out about new indie games.Signal boost when the game goes on sale, and help promote the game as much as possibleIntroduce new people in your daily life to the game- invite your friends over to check it outDrop your nostalgia goggles and appreciate the game for what it is, not for what you remember games being.Retweet their updatesBe honest but kind and fair about bugs. A pre-Alpha or Alpha game is probably not going to resemble the finished game
General ways to help online creators
If they're having a contest- PARTICIPATE! Even if you don't want the prize or care about the prize, participation shows others that this is worthwhile. You can always shoot them a message forfeiting the prize.Participate in polls- this helps the creator out in a lot of ways. It shows that the audience is invested, helps them make important decisions, and allows them to involve their audience in the creation process.Respond to requests for feedback and opinionsShow up to Livestreams, other web-eventsIf they're lacking in something, volunteer! Many of us would love to have readers submit linklists to help with navigation.If you notice something is broken, let them know privately.If they've mentioned being an educator, interested in education, or the focus of their work involves education or outreach, request their presence at your local library/convention/school, and KEEP ASKING. Many creators are willing to present paid panels and workshops, and the added income is always welcome.Even if you can't afford to pay them for what they create, you can put them in front of others who can.If you have a webfollowing and a platform, write a review! Heck, even if you don't have a following, but it's relevant to your Twitter or Tumblr, a review can do a lot to help popularize a game.
Huge thanks to
@calientokami@NeilaK20@thenoirguy@lastres0rt@JayelleAnderson@terranacliff@megalashoon@SamhainNight@FerretParty@pixel_prism@sketchmazoid
@kibou
@Sskessa
for helping me out and suggesting lots of great ways for a webcomic audience to help out their favorite creators!
Oh hey! I happen to be a web creator in several of these categories! And you happen to be reading this post on one of those platforms!
My GoodReads
My Comic Vine
My Comic
My YouTube Channel
My Amazon Affiliates Link- Start here when shopping for products, and I'll see a small fee per item!
While you're here, why not test out some of the things we just talked about? I'm more than happy to be your guinea pig!
And of course, if you're willing to commit a little further, my Patreon is always an excellent way to show your financial support.
Please consider donating to this blog or purchasing from Natto-shop (http://nattosoup.com/shop) if you want me to continue publishing quality content. All materials tested were purchased from my own pocket. Keep on Truckin' Nattosoup is not under any sponsorship.

September 30, 2016
Handmade and Bound 2016
Tabling at Handmade and Bound Tomorrow

 Where: Watkins College of Art, Design, and Film
2298 Rosa L. Parks Blvd
Nashville, TN 37228
What time: 11:00AM-4:00PM
What is it: "Is a festival and marketplace celebrating independent publications and printed matter, featuring artists’ books, zines, and mini-comics. This is an event for publishers and artists (as well as zine distros) to come together to sell and/or trade their handmade and affordable publications and creations." (Source)
What I'll Have: Comics, Mini Comics (including three new minis for this year- Favorite Fictional Femmes, and two sketchbooks), Stickers, Mini Prints, Original Art for Sale, Charms, and More!
Other Vendors
Please consider donating to this blog or purchasing from Natto-shop (http://nattosoup.com/shop) if you want me to continue publishing quality content. All materials tested were purchased from my own pocket. Keep on Truckin' Nattosoup is not under any sponsorship.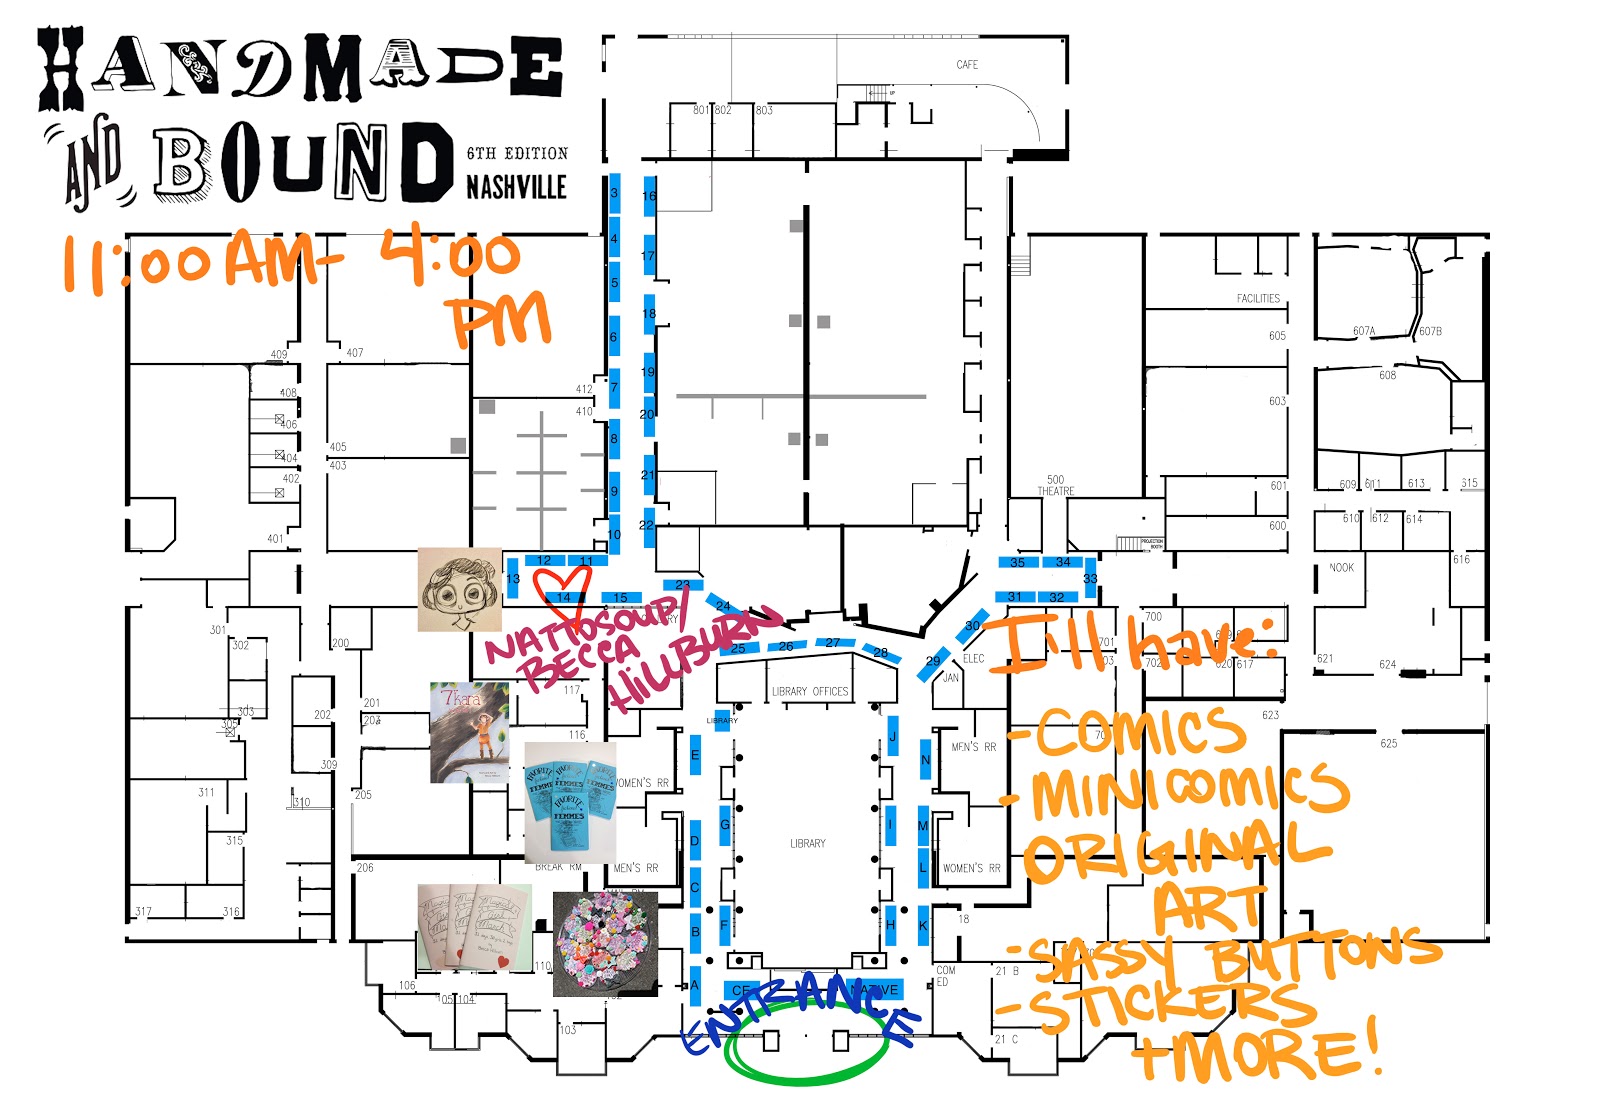


