Shawna Coronado's Blog, page 20
August 8, 2016
How To Plant a Butterfly Weed Video
Last season I wrote about the butterfly weed and how to plant it. Please go HERE FOR THE LINK and learn all kinds of 411 about this fantastic butterfly attracting plant. We are once again coming into perennial planting season and I wanted to emphasize the benefits of planting native plants if you have conditions like arthritis, rheumatoid arthritis, and degenerative osteoarthritis because native plants require less care in general. No fertilizer, no heavy watering once established, and no regular maintenance beyond clipping down in the spring — truly a benefit to a garden that requires less commitment and labor. Watch the video above on planting the butterfly weed and grow a low maintenance native plant for your garden this season (if you can’t see it, please click on the title of the post and it will take you to my website).
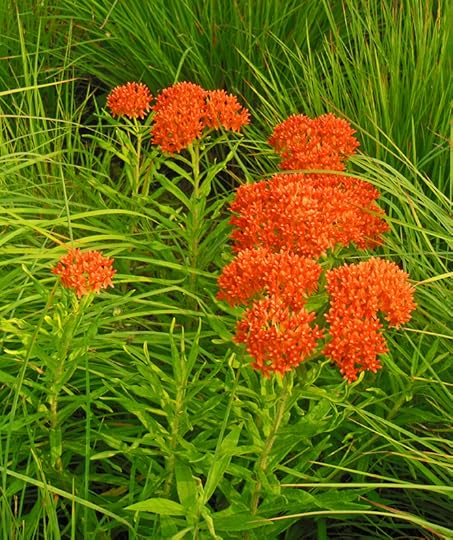
Special thanks to Jung Seed for sponsoring many of the videos and plants in this seasons test garden. If you would like to get your very own butterfly weed plants, Jung Seed has both yellow and orange butterfly weed varieties.

The post How To Plant a Butterfly Weed Video appeared first on Shawna Coronado.


August 5, 2016
How to Organically Fertilize Roses

Summer woes — I have noticed that a few of my roses are not looking as perky as I’d like. How to solve that? Add some organic fertilizer at the base of the plant, gently incorporate the organic fertilizer according to package directions (watch video to see how I fertilize roses at home – here’s a video LINK).
If you are searching for more complete information on roses and rose growing, I highly recommend the RoseChat Podcast. RoseChat is run by my good friends Chris VanCleave and Teresa Byington who are excellent garden bloggers and the ultimate rosarians. They give astoundingly good advice on everything rose.
Managing your roses can be a tremendously fun and beautiful aspect of gardening. My choice is to fertilize roses organically and to avoid heavy chemical usage. Incorporating too much fertilizer in your beds can produce lots of leaf and little flower, so be sure to follow package directions when adding any fertilizers into your garden.

Save
Save
Save
Save
The post How to Organically Fertilize Roses appeared first on Shawna Coronado.
July 27, 2016
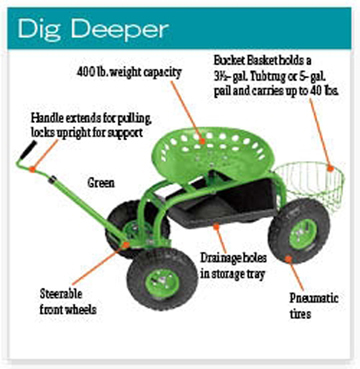
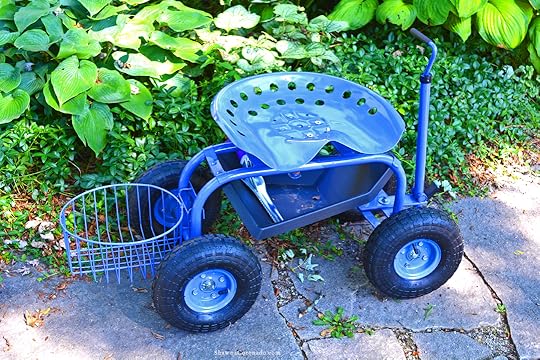
Garden Tractor Scoot Product Review
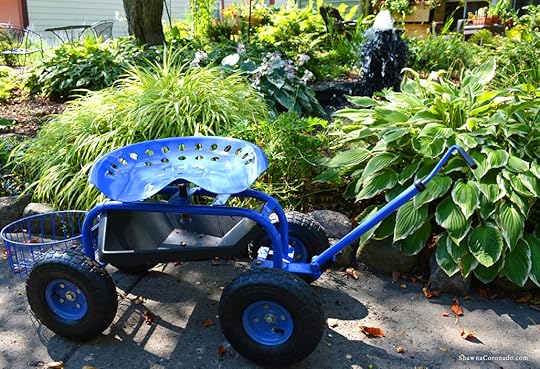
Today I bring you a garden tractor scoot product review on the Gardeners Supply Company’s Deluxe Tractor Scoot with Bucket Basket. Leaning over to weed on my knees in the garden has been causing my degenerative osteoarthritis to trigger in both my upper and lower back. I have tried all kinds of knee supports, knee pads, and more and they have all left me feeling a bit frustrated. I’ve been searching a solution for when I have long sessions of weeding and wanted to try the Deluxe Tractor Scoot to see if it might help. 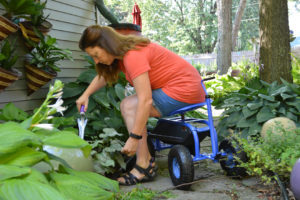
Tips to Relieve Strain
At all times while I am gardening I find that frequent breaks while working definitely help reduce pain by giving your body “a release” from a strenuous or repetitive activity. Even if you do not get out of your seat, lean back ever so often and allow your back and tummy muscles to stretch and rest a bit. If you are on your knees, change positions and try sitting on your bottom for a while. Move around to keep all your joints and your back more fluid.
Tractor Scoot
When I ordered the Gardeners Supply Company Deluxe Tractor Scoot with Bucket Basket, I was worried about how to assemble the product. It turns out that it was quite easy to put together and I store it out on my back patio with a drop cloth over it, but it could easily be stored in shed as well.
I really liked weeding along my sidewalk with the tractor scoot because I set it in place at one end of the sidewalk, then weeded all along the sidewalk edge without ever getting out of the scoot. I simply rolled along the edge while I weeded. If I have a narrow area to weed (see me middle right), the seat swivels, so I weed one side of the path and without getting up, just swivel around and weed the other.
Overall, the scoot is a fantastic solution for helping relieve my osteoarthritis pain while I am gardening. It is a challenge to steer from the sitting position, so is much easier to stand up and roll the tractor scoot if you come upon a corner or odd angle. The handle extends to a longer length then it shows in the below photo so you don’t have to bend and pull at the same time. I occasionally wheeled the scoot deep into a garden bed if I was sitting on ground cover material like ivy, but generally, it was easier to use while you were along the edge of the garden.
For this garden tractor scoot product review, I give the product several thumbs up and think it is a great tool to help someone with arthritis or other conditions where bending and reaching cause strain on your joints and back. You can find the Gardeners Supply Company Deluxe Tractor Scoot at Gardeners.com for $89.95 in red, green, or blue.
Save
Save
The post Garden Tractor Scoot Product Review appeared first on Shawna Coronado.
July 25, 2016
3 Tips to Prevent Blossom End Rot
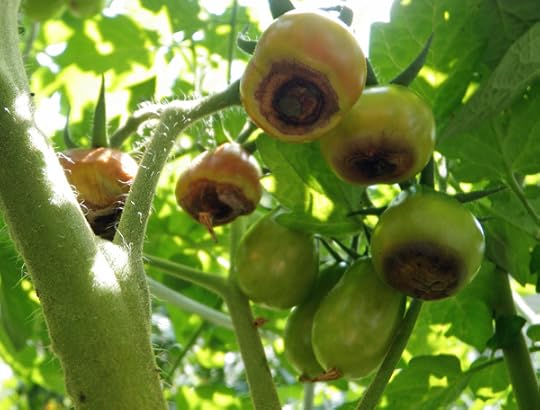
As soon as I recovered from the evil Japanese beetles, I look out and see my tomatoes with Blossom End Rot, which is created when the tomato plant does not absorb the level of calcium it needs. Unfortunately, there’s not much of a consistent cure for the blossom end rot once it establishes in a plant, although there are a few suggestions to help. Symptoms may occur at any stage in the development of the fruit, but mostly, are seen when the fruit is one-third to one-half full size. You will see a small, water-soaked spot which appears and enlarges, darkening rapidly as the fruits grow. These large, horrid-looking lesions soon dry out and become flattened, black, and leathery in appearance and texture.
1. Test Your Soil
Test your soil to see if it is deficient in calcium or other nutrients, then amend your soil at planting time with the appropriate organic nutrients so you can assist your tomatoes in absorption of the nutrients they need. Add organic fertilizer at planting time as well.
2. Plant in Warmth
Tomatoes planted early in cold soil are likely to develop blossom end rot on the first fruits, with the strength of the disease often subsiding on fruits later in the season. Chicagoland had a particularly cold spring and early summer, which produced chilly nights down in the 40’s all the way to June. My thoughts are my particular blossom end rot has been caused by early cold weather conditions. Planting tomatoes in warmer soil helps to prevent the problem.
3. Water Regularly
However, another concern is regular watering – it must be sufficient to maintain a steady growth rate for the plants. Poor watering techniques – with drought then drowning then drought then drowning will also prevent the tomato from absorbing calcium. Add bone meal to the soil so that calcium is available to the plant, then water regularly and at the base of the plant. Mulching the soil is helpful in maintaining a regular supply of water in times of moisture stress and drought. Use an organic fertilizer with added calcium. Do not spray the plants with chemicals – pull them out if the blossom end rot problem persists.
As you can see by the above tips, prevention of blossom end rot is more important than waiting until you have the problem and trying to fix it. Be sure to plan your garden well for next season incorporating prevention ideas for a healthier tomato.
The post 3 Tips to Prevent Blossom End Rot appeared first on Shawna Coronado.
July 21, 2016
Anti-inflammatory Breakfast Recipe

This month I have reintroduced rice for my anti-inflammatory elimination diet for my osteoarthritis condition. Rice opens up a whole new world because many of the products which are “gluten-free” are made from rice. That means I can occasionally have a piece of gluten-free bread and today was one of those mornings that I felt I needed a little excitement for breakfast. Eating rice every day seems to cause bloating, so I have limited to a piece of rice bread or a serving of rice a couple times a week. I prepared a simple toast made from Food for Life Rice Pecan Gluten-Free bread, then I piled on the fresh garden ingredients, an egg, and a little olive oil for a tremendously flavorful breakfast creation.
Basil Egg Anti-inflammatory Breakfast Recipe Print Prep time 5 mins Cook time 5 mins Total time 10 mins This delicious anti-inflammatory breakfast has no wheat, no dairy, and no heavy sugars - it combines fresh vegetables and herbs with eggs and gluten-free bread to deliver a satisfying and tasty meal. Author: Shawna Coronado at www.shawnacoronado.com Recipe type: Breakfast Serves: 1 serving Ingredients One piece gluten free bread, toasted (leave this ingredient out if you are going grain-free) One tomato, sliced One egg, hard-boiled and sliced Olive Oil Fresh basil to taste Salt & Pepper to taste Instructions Place toast on plate, drizzle with olive oil. Place sliced tomato, basil, and egg on top of the bread. Drizzle with more olive oil, then add salt and pepper to taste. Serve. 3.4.3177
Many people have approached me about the challenges of cooking an anti-inflammatory breakfast which has no grain, no dairy, and no sugar as ingredients when they are very used to eating cereal, donuts, and other sugary treats as a definitive breakfast choice. What I have discovered is that a high protein breakfast with vegetables and herbs mixed in gives me a LOT of flavor and also helps me last longer during the day because I have more long-term energy. (This anti-inflammatory breakfast is served on Fiestaware’s super cool square dinnerware in white – the serving set makes breakfast look yummy, dontcha think?)
Save
Save
The post Anti-inflammatory Breakfast Recipe appeared first on Shawna Coronado.
July 19, 2016
Staycations in Big Cities

This week the family and I kicked off the Chicago Staycation. My daughter came in from out of town and we wanted to save money by doing local things together. Touring Chicago activities and museums would make our experience extra special, but after comparing the full price of the museums we found out it would cost $207 to go to 5 museums. Too expensive, however if we signed up for the CityPASS [www.citypass.com] program, it allows you to save 53% and pay $98 for the same experience. A definite win.
We signed up and began our adventure with breakfast at Le Pain Quotidien on Michigan Avenue, then walked over to the South Boeing Gallery in Millennium Park and my kids posted for a photograph “Still Life with Tire Sculpture” (below). We stopped at the Cloud Gate sculpture, otherwise known as “The Bean”, then went on to the Lurie Garden (below).


Our first museum stop was the Art Institute where we pretended to be Ferris Bueller and wandered the museum halls connecting with art – it was beautiful (above). We had lunch at the museum, then walked along the Chicago streets and under the El to the Skydeck Chicago in Willis Tower to view the city from 103 floors up (top and below). Breathtaking.


Staying local is better for your wallet and better for the environment. We had a blast and can’t wait to hit the Museum of Science and Industry and The Field Museum next. There’s still time left to try your own staycation this summer – CityPASS offers passes in 12 North American destinations. My advice: pack a lunch and wear your most comfortable shoes because it’s gonna be an awesome few days of family fun.

Save
Save
Save
Save
Save
Save
Save
The post Staycations in Big Cities appeared first on Shawna Coronado.
July 18, 2016
Scientific Evidence on Juicing
Juice. I love it. When I was diagnosed with severe degenerative osteoarthritis I did some research on juicing. I have been working with my certified nutritionist to try to discover what health solutions are truly viable solutions to help me reduce pain and feel better every day. Is juicing worth the effort for my anti-inflammatory diet? Is juicing scientifically proven? What I have discovered is shocking.

There are many claims out there that suggest without the soluble fiber of the fruit or vegetable, the body is able to better absorb nutrients from the food. There is no scientific evidence to support this claim. Shockingly, some so-called experts claim that “juicing is the only way to stay healthy” and recommend staying away from solid foods, raw, or otherwise. This is not scientifically proven. Weight loss experts recommend drinking juice as a meal replacement stating you can achieve a caloric reduction without depriving your body of nutritional benefits. This is not only discouraged by doctors, but can be tremendously dangerous because while some vitamin benefits can be found within juices, the truth is there is not enough vitamins in juicing alone to support your physical health. Your digestive system needs to process a variety of whole fruits and vegetables along with proteins in order for you to stay healthy.
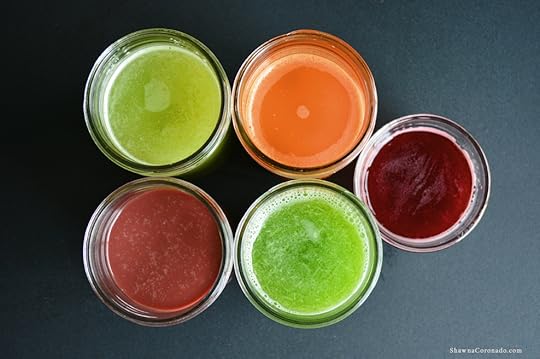
Bottom line — there is no scientific evidence to support juicing does all that the experts are claiming it does. This is backed up by Mayo Clinic, university studies, and more, my research suggests that the larger miraculous benefits of juicing simply are unfounded. Having said that, there was a study done in 2001 that proved polyphenols in juice form helped Alzheimer’s patients and may help delay the onset of the disease. Additionally, there are vitamins within juices, but processing vegetables and fruits can sometimes change the nutritional value of juice and juicing is processing the pulp and soluble fiber out of the food (see pulp photo bottom). Typically, I do not drink bottled fruit juices due to their high content of sugar. My anti-inflammatory diet is centered on low sugar, low carb, high protein, and high vegetable content. To keep my pain levels down, it helps to keep the high sugar content in check. Using vegetable juice, which is lower in sugar than fruits, as a smoothie base or flavor enhancer can be a positive contribution to an anti-inflammatory diet. It’s not a dietary miracle, but it can be a natural way to add some vitamins and flavor to enhance your taste experience.
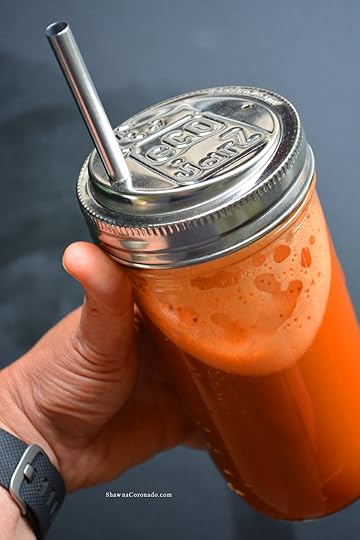
Earlier this season I wrote a post about stainless steel straws and how I am using EcoJarz at home more often and the containers are perfect for smoothies and juices. In order to test my tastebuds, I lined up my EcoJarz and started juicing. Juicers can be expensive – they typically range from $25 to $400 in cost – but I got my juicer for free from a dear friend. I juiced celery, cucumbers, carrots, beets, ginger, purple cabbage, and Swiss chard (top photo). It cost me just under $35 to buy all these vegetables from the grocery store. What I discovered is that dependent upon water content, it can take a fairly strong amount of veggies to make one cup of juice. For example, it takes 9-ish medium carrots for approximately 1 cup of juice. This means that if you are not growing your own vegetables, juicing can be an expensive venture.

After juicing all the vegetables I purchased and taste-tested, I discovered I love a combination of carrot and ginger the most. Carrots have a higher sugar content than celery, so I’m thinking the sweeter flavor had a better taste. I thought celery juice would be an excellent base for soups and gravies. While cucumber juice would be perfect for gazpacho or cold soup. All the juices would make an excellent smoothie base. What I missed in juicing all these vegetables is pulp.
Frankly, I’m a fiber girl – my body needs soluble fiber to keep it regular. I think I prefer raw whole vegetables or blending my fruits and vegetables into smoothies. All the pulp is difficult to clean out of the juicers, but is easily reused as compost. My thought on juicing after hours and hours of comparing scientific evidence and research is that it is a great flavor and vitamin enhancer, but not a miracle cure. Finding more ways to combine vegetables into your diet is a fantastic goal, and while juicing is not the sole solution for better health, it can add taste and vitamins to your diet.
Save
Save
Save
Save
Save
The post Scientific Evidence on Juicing appeared first on Shawna Coronado.
July 14, 2016
Farm to Table Broccoli
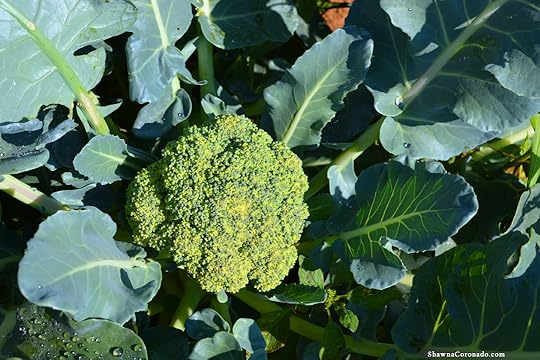
There’s an executive chef I met at Biltmore, Spencer Hilgeman, who has the gleam. You know what I mean, right? A magical gleam in his eye. That thing which is captivating the moment you meet him and you know that he is more than a chef because he loves what he does so much that it is his passion, but more importantly, his soul. This is the tale of how Chef Spencer took freshly harvested broccoli and transformed it into love.
The Farm
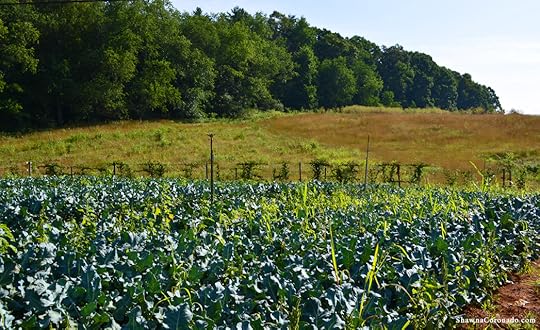
The story of Biltmore farm-to-table broccoli really starts at the farm. Back in April I visited Biltmore and met Eli Herman, Field-to-Table manager and all around good guy who believes in growing food on site. When I met him he was planting broccoli with his team; it was a spring day when the Blue Ridge mountains smelled a little bit like heaven and Eli walked me out and personally introduced me to that baby broccoli. When I returned to Biltmore on a sweltering hot day in June, the broccoli had ripened and they were harvesting it when I arrived. 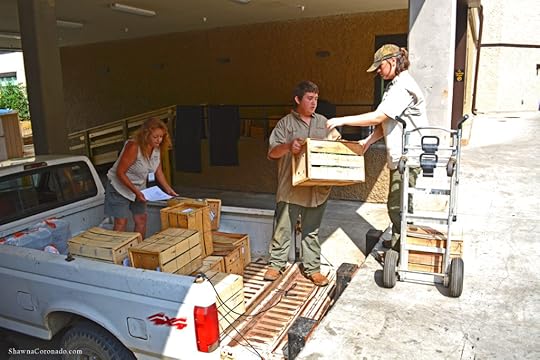
MY BROCCOLI.
My babies.
The field is nestled in the hills next to a row of berry vines and is filled with weeds (see above). I ask, “Why the weeds, Eli?” And Eli’s reply is the music to my ears, “We don’t care about weeds. If we ignore the weeds, we use less chemicals on the plants. Less chemicals means a healthier product for our guests.” I went with the farm-to-table team to deliver the broccoli to the restaurants (right) and saw the love the team has for growing, then connecting the food directly to the Biltmore kitchens.

The Kitchen
When we got to the kitchen the team asked if I’d like to meet Chef Spencer. I interrupted his day, unplanned, and he and I sat down for a chat about food and cooking and life after he toured me through his kitchens to meet the staff (see above). I was impressed with how much his team liked him as a boss and how clean the kitchen is. His cooking philosophy is centered on building creative food which tastes as good as it looks and is also healthy. Using fresh ingredients, particularly things grown directly on the estate, is part of his goal in creating the ultimate in deliciousness for every Biltmore guest.
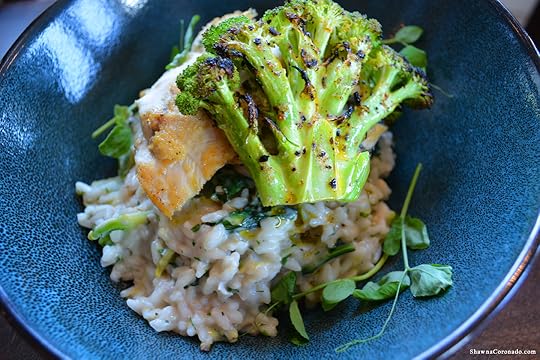
I explained my broccoli story to Chef Spencer – you know that it is MY broccoli and all – and that I’d like to see that broccoli through to the end. I asked if he could fix me an anti-inflammatory meal using the broccoli. What he came up with was beyond drool-worthy; Broccoli-Chicken Risotto with Chili Dust and Pea Shoots (below). I have recently reintroduced rice to my diet, so that worked. I cannot eat dairy due to my anti-inflammatory osteoarthritis dietary plan, so to help me out Chef Spencer went above and beyond and handmade almond milk to use as the “cream” for the risotto. Without a doubt he created pure love with his special kind of magic. My review of the dish is 5 thumbs up and a strong exclamation of, “TO! DIE! FOR!”
Why All the Passion
Seeing your broccoli from the beginning all the way through to the end is a great way to understand a question that Chef Spencer and Farmer Eli want you to ask –
“What does my food mean?”
When you go to the grocery store with no conscious understanding of connection between the land and the food you put in your mouth, you have no specific understanding of what food really means to your health. Examining this question of meaning makes the farm-to-table experience a purposeful journey that will make you feel better. Emotionally better. Physically better. We are all asking “what is the meaning of life” in this modern day of bitterly angry politicians, extreme hate crimes, and frustrated health systems.
Perhaps the better question to ask is “What is the meaning of my food?” When we can answer that question and begin to feed our brains healthy energy, then the bitterness, hate, and frustration will melt away. We will suffer less pain, make smarter decisions, and build a stronger world. This is not just about broccoli; Chef Spencer and Farmer Eli have discovered that healthy nutritious food is the answer in all aspects of life. They want to make a difference with food at Biltmore and see a better future because of our connections to the land.
Save
Save
Save
Save
Save
Save
Save
The post Farm to Table Broccoli appeared first on Shawna Coronado.
July 11, 2016
Living Wall Cone Container Garden How To
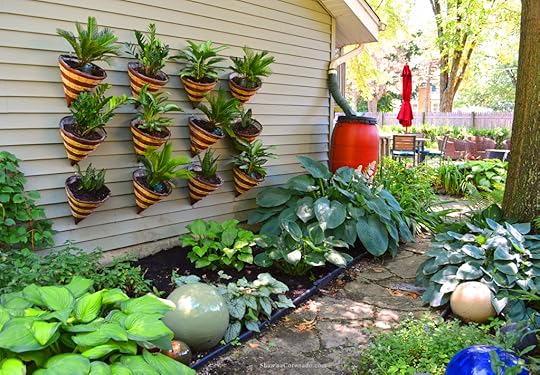
Looking for a new garden project, but have the mid-summer can’t-find-the-perfect-plant blues because the garden centers are cleared out? I have the living wall cone planter solution for you that will make your wall garden dreams come true. Best yet, we are planting the project up with organic fertilizer and a line of house plants that are drought tolerant and require minimum attention. Instructions below and in the above video (if you cannot see video please go to this LINK).
How To Plant a Living Wall Cone Container Garden
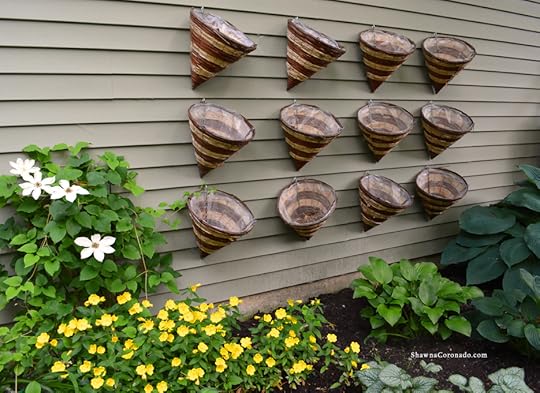
Get some cone shaped garden containers. Cut a hole in the plastic at the bottom of the cone for drainage. Leave the hanging wires on, but slip them inside the cones.
Measure and mark the wall, fence, or gate where you want to hang your cones.
Screw hooks into the wall where you want to hang your cones. If you are hanging on a sided wall, put a little sealant around the hooks to prevent any moisture from getting beneath your siding.
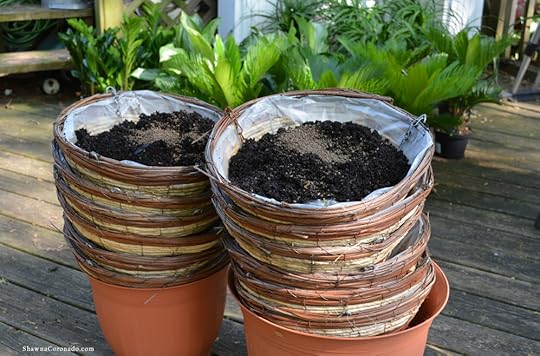
Balance the cones in a larger garden container for easy soil filling (see photos below).
Fill each cone with organic potting soil (my favorites have worm castings in the mix).
Add a half cup of organic fertilizer, I used Dave Thompson’s Organic Healthy Grow All-Purpose fertilizer (see below).
Plant sun appropriate plants in your cones. I used drought tolerant and low light loving Plants of Steel brand Ponytail Palm, ZZ Plant, Snake Plant, Chinese Evergreen, and Sago Palm (see below).
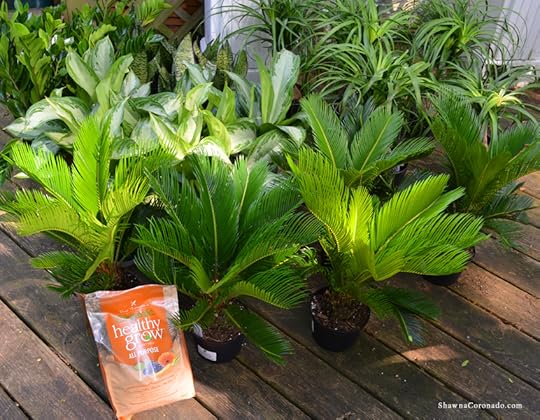
Plants of Steel are great as houseplants, but work great outdoors seasonally as well. They require minimal attention – low light, low humidity, and irregular watering work well for these plants. My recommendation is one cup of water per plant every two weeks or so. We have had some summer rain lately, so I have not had to water the plants at all since planting. Each plant is gorgeous and absolutely no fuss.
Dave Thompson’s Organic Healthy Grow All-Purpose organic fertilizer is super easy to use and has been excellent in my living wall container gardens and elevated beds this season. Following package directions, I used a half cup of organic fertilizer mixed in each planting cone (see below). I mixed it up and tossed the plant in – took me less than a minute to assemble each container. Dave Thompson’s Organic Healthy Grow is made from chicken manure and maintains a lot of beneficial microbial activity, is higher nitrogen and lower odor (does not smell like chicken poop), adds organic matter to the soil, adds calcium, and increases water retention for the container plants.
Building a living wall that is beautiful and requires very little maintenance is possible when you are using low light drought tolerant plants and natural fertilizers to keep the plants strong and healthy through the season. Grow a shade living wall from cone container garden planters and bring a little fun to your summer garden season.

Save
Save
The post Living Wall Cone Container Garden How To appeared first on Shawna Coronado.
July 5, 2016
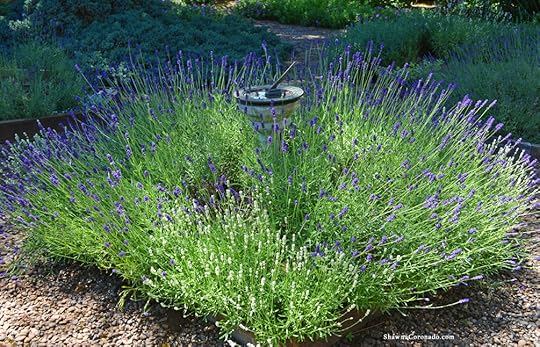
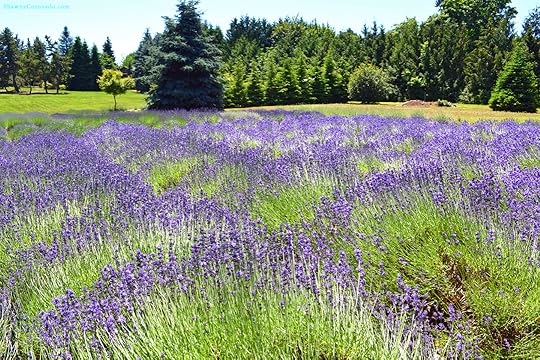
How to Grow Lavender
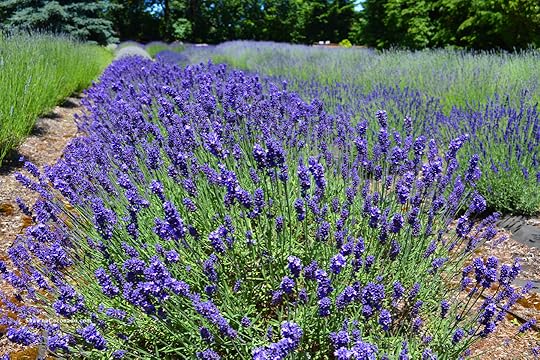
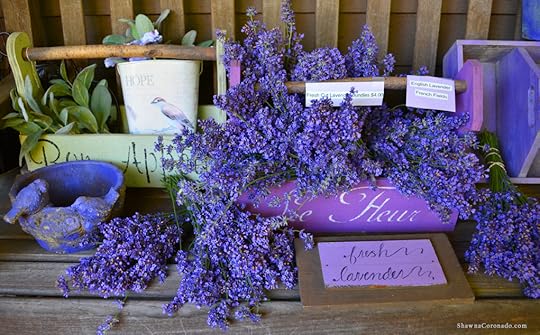
Oregon is known for it’s amazing lavender fields, so when traveling to Oregon’s Mount Hood Territory, I wanted to explore flowering fields and learn more about growing the plant. Chris Mulder from Barn Owl Nursery met me at her shop and gave me a delightful tour of her lavender fields (above) and store. She is filled with encyclopedic knowledge of everything lavender and her shop – situated next to her home – has everything from lavender sachets to lavender jelly to lavender tea (below). She sells other culinary herbs as well which partner well with lavender and gave me some great tips on growing herbs.
How to Grow Lavender
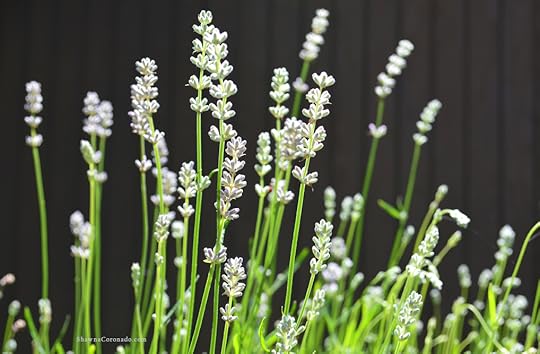
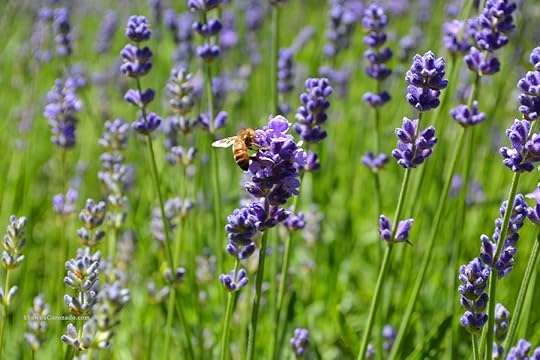
Lavender is a bee-attracting pollinator plant with silvery-green foliage and astounding flowers that bloom various shades of blue-purple, pink, and white (above) flowers which have a beautiful fragrant scent and does best in hot and sunny locations with a meager soil, much like the Mediterranean climate where the plant originates. Lavender is used fresh and works well in sugars, teas, and liquor distilments. Oil from the lavender flower has been used for perfumes and pomanders for more than 2,500 years.
Lavender plants prefer warm weather and average to poor soils that are loose, gravelly, sandy or loamy. Be sure soil composition is extremely well draining. Sow seeds indoors four weeks before last frost or sow seeds early in the season, covering lightly with 1/8″ of organic seed starting soil. When planting potted lavender, simply dig a hole, loosen the roots, place the plant in the hole and gently cover roots. Water regularly until established, but do not over water.
Mulch lavender plants well for winter protection. Do not fertilize heavily. Lavender that is over-fertilized can have flowers that are less fragrant and are more likely to suffer from legginess and fungal diseases. Help establish lavender by cutting off any flower buds that develop in the first season so the plant can focus on root growth. In the future, once flowers have bloomed, cut back to about 1/3 of the new growth. Wetness is the enemy of the lavender plant and will cause the leaves to yellow. Excessively wet seasons, watering too much, or planting in shaded and damp areas can lead the plant to disaster via fungal conditions and root rot. Prevention is the key; plant in open, airy, sun-filled locations in the proper soil. Plants sometimes become ragged looking and woody; simply remove and replace.
Oregon Lavender Adventures
Special thanks to Chris Mulder for allowing me to take the lovely lavender photos on this post at her nursery. If you would like to explore more about Oregon lavender, just go to the Oregon Lavender Association and check out Oregon Lavender Destinations and events going on right now. Go meet Chris at the Barn Owl Nursery in Oregon’s Mount Hood Territory to embrace a whole lot of lavender love.

The post How to Grow Lavender appeared first on Shawna Coronado.