Shawna Coronado's Blog, page 22
June 6, 2016
Are You Recycling Properly?
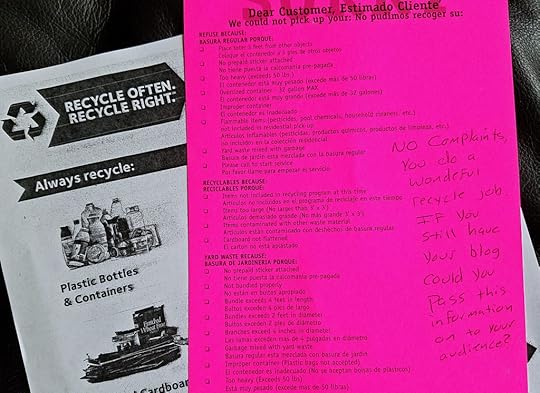
It’s time to help the earth by doing a quick reminder check on your local recycling regulations. When my suburban Chicago garbage man leaves me a note to help share more about recycling, I know there is a lot of confusion out there.
I got this note (above) a few weeks ago from my recycling man — I love my recycling and garbage men and they work super hard to do their job. I was surprised he knew about my blog, so in response to this kind request I am giving you some general recycling accepted in the list below based on the Waste Management Recycling Tip List for my city, Warrenville, IL. This is a regional list specific to the Chicagoland western suburbs, but the items on it are commonly accepted for most recycling pickup areas in the U.S. (there are exceptions to this list, please check locally to confirm your local rules and regulations).

Remember that not everything can be recycled and all items need to be cleaned or scraped because food items can contaminate a batch of recycling and it will be rejected at the processing plant. I think the biggest issue for me personally is glass. I tend to put all glass in the recycling containers, but not all glass can be recycled. The following glass items should not typically be placed into your recycling bin (again – check with your local recycling team):
Any glass contaminated with stones, dirt, and food waste
Ceramics, such as dishware, ovenware, and decorative items.
Heat-resistant glass, such as Pyrex.
Mixed colors of broken glass.
Mirror or window glass.
Metal or plastic caps and lids.
Crystal.
Light bulbs.
Cathode-ray tubes (CRTs) found in some televisions and computer monitors.
Special thanks go to my recycling man for reminding me that we all need a reminder to check the local trash and reycling regulations once in a while. He wants everyone to make a difference and so do I. Happy Recycling!
The post Are You Recycling Properly? appeared first on Shawna Coronado.


May 31, 2016
Drip Irrigation for Container Gardens or Elevated Garden Beds

 For 15 years I have been using sprinklers or hand watering because I have felt that installing a drip irrigation system will be complicated. Depending on the time of day non-drip styles of garden watering can be incredibly wasteful. According to the U.S. Environmental Protection Agency [EPA], more than 50% of used outdoors is completely wasted. The EPA says, “drip systems are generally more efficient than conventional sprinklers, because they deliver low volumes of water directly to plants’ roots, minimizing losses to wind, runoff, evaporation, or overspray Drip irrigation systems use 20 to 50 percent less water than conventional pop-up sprinkler systems and can save up to 30,000 gallons per year.”
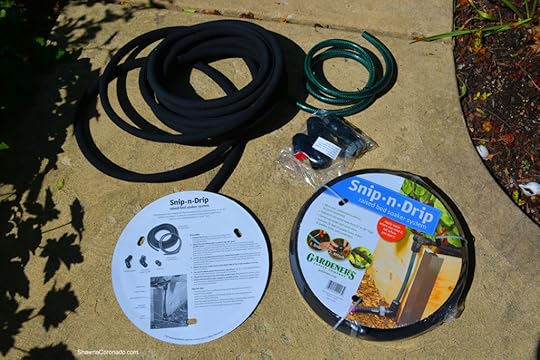
This is THEE SEASON for me to stop my ridiculous procrastinating and finally install a drip irrigation system for my elevated planters and raised beds. It saves water, obviously, but I also see it as an opportunity to reduce the amount of hoses I have to drag around the gardener. If you remember, hose dragging was causing my osteoarthritis some major aggravation. Less hose dragging means a happier back and less work in the garden. Gardener’s Supply Company sent out a Snip-n-Drip Raised Bed Soaker System and a Snip-n-Drip Raised Bed Soaker Hose Connector Kit so I can set all my raised beds and planters right for this season’s watering.
What I discovered is that installing a drip irrigation system takes A FEW MINUTES. No kidding. A few minutes. Why oh why have I been procrastinating for 15 years? It all comes in the package – all you have to do is lay out all the pieces, cut to the measurements of the elevated beds, raised gardens, or containers that you are irrigating, following the specific directions on the package. Then assemble the system much like a giant set of Tinker Toys — simply connect the hose to the connector, then connect the other side of the hose to the other side of the connector, and so forth and so on until you’ve created your drip irrigation masterpiece.
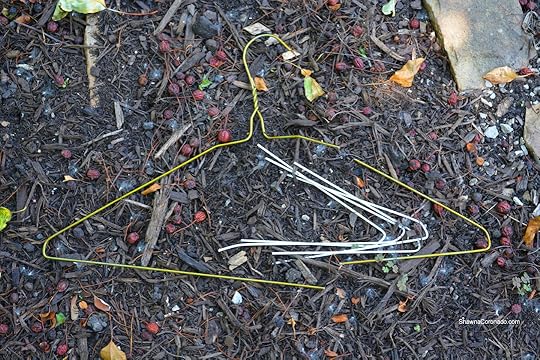
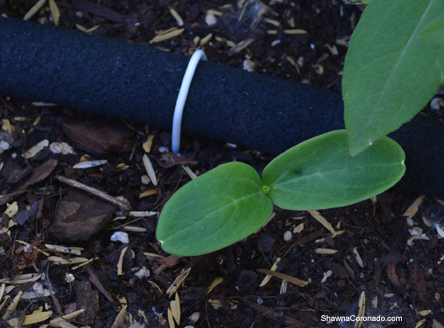 Tall beds like my new elevated beds were as easy to install as the lower-to-the-ground gardens. Once in a while the soaker hose would be tempted to curl up a bit. I solved that problem by clipping apart several old wire hangers I found in my closet and bending the hangers to form pins that would hold down the drip irrigation hoses.
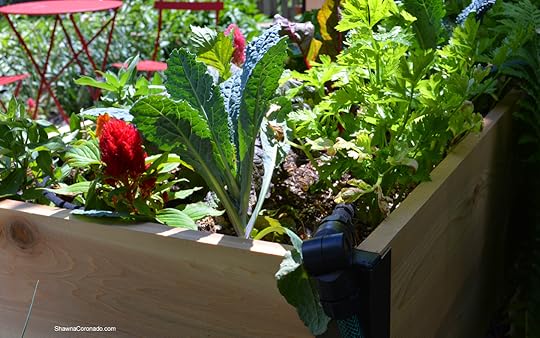
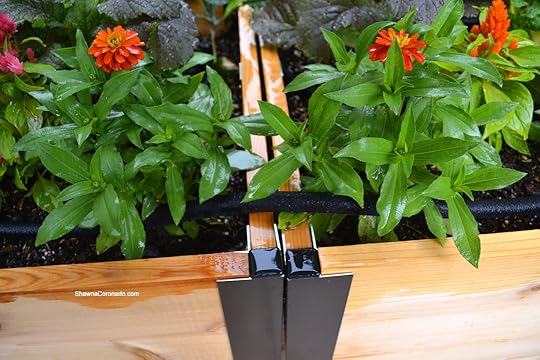
Because I have double elevated beds, there is one spot where the soaker hoses crossed over the connecting edge of the beds (see below), but once the plants fill in you will not see the hose. With a kit it was simple and fast to put together and definitely worth the effort as I will be saving water and saving my back both at the same time.


The post Drip Irrigation for Container Gardens or Elevated Garden Beds appeared first on Shawna Coronado.
May 29, 2016
No Mow Grass Update and Fish In The Garden

No mow grass update: At the beginning of May I told you all about my Eco-Lawn adventure where I am growing sustainable grass that only has to be mowed once or twice per season or not at all. Here’s the link to more about Eco-Lawn – LINK. This first year I have decided to keep the grass in prairie form – no mowing beyond trimming any grass seed heads off. So far it has been SUPER-EASY to maintain which really helps my arthritis as it means less effort in the garden. My 15 year old daughter is in love with the grass because it is extremely soft — she goes out back and lays in the grass and looks up at the trees on a warm day.
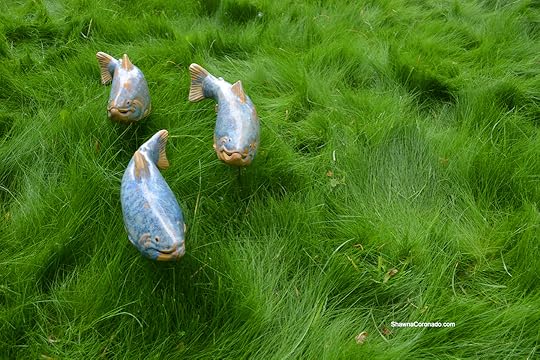
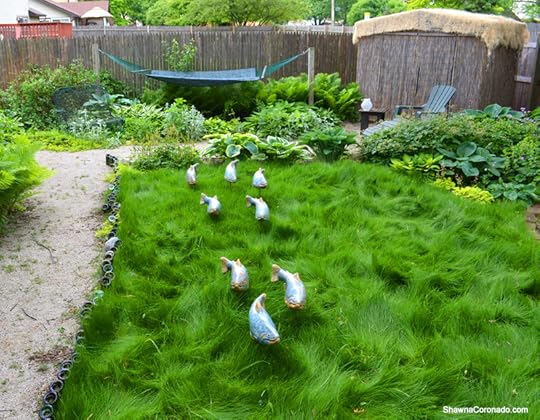
While next year I will cut the grass in a more formal design, I absolutely love the prairie look. My artist buddy Tyson Weiss sent out several Crystalline Trout from his astounding ceramic sculpture collection and now I have these amazing fishies as an art installation swimming across my prairie-lawn. I. Love. It.
In the top view you see the fish swimming towards the elevated garden past raised beds and my painted fence designed by artist Peter Thaddeus Kwiatkowski. Below you see the beautiful fish swimming away from my tiki hut shed and summer hammock garden. Having art in my garden does my heart good. Growing no mow grass for sustainability reasons has been wonderful – no lawn mower emissions, no arthritis-harming work, and all joy.
The post No Mow Grass Update and Fish In The Garden appeared first on Shawna Coronado.
May 27, 2016
Skin Cancer and National Don’t Fry Day

Wellness is about what you eat, but also how you protect your skin. Today is the National Council on Skin Cancer Prevention’s DON’T FRY DAY. This day, the Friday before Memorial Day, has been put aside by the organization to talk about the benefits of protecting your skin.
According to the council’s website, Most skin cancers are caused by overexposure to UV radiation. Individuals with lighter-toned skin are more susceptible to UV damage, although people of all races and ethnicities can be at risk for skin cancer. Those who have a family history of skin cancer, plenty of moles or freckles, or a history of severe sunburns early in life are at a higher risk of skin cancer as well. No single step can fully protect you and your family from overexposure to UV radiation, follow as many of the following tips as possible:
Do Not Burn or Tan
Seek Shade
Wear Sun-Protective Clothing
Generously Apply Sunscreen
Use Extra Caution Near Water, Snow, and Sand
Get Vitamin D Safely
Davey Trees has an excellent infographic (below) suggesting that trees are “nature’s sunscreen” and an excellent chemical-free way to protect your skin from overexposure to UV radiation. They give some tips on how to keep the trees on your property healthy and happy. Skin cancer numbers are growing in the world and every effort you can take to prevent over exposure to UV radiation is a step towards better health; hang out in the shade for Memorial Day and give your skin a break.

The post Skin Cancer and National Don’t Fry Day appeared first on Shawna Coronado.
May 24, 2016
How To Plant an Elevated Garden Bed
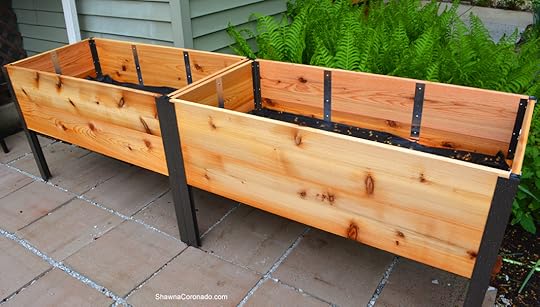
Surviving degenerative osteoarthritis or other physical conditions means that you can still have an amazing vegetable garden. One of my goals since being diagnosed with osteoarthritis has been to change the way that I garden so I can still stay active, but not hurt myself. Asking for help has been the chief change — trying to do it all on your own is simply unreasonable. This week, with help from my youngest daughter, we assembled and planted an elevated garden bed. My 2′ x 4′ Elevated Cedar Planter Boxes from Gardeners Supply Company looks great on my new front patio.
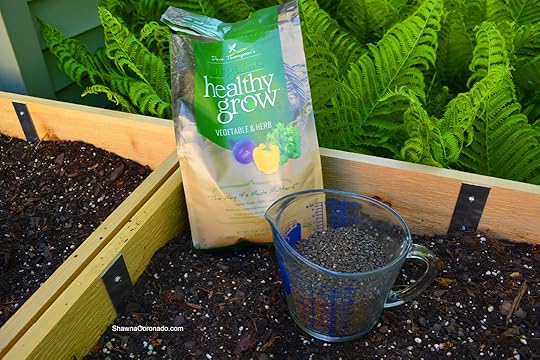
Last fall I had a dear friend help me remove all the plants that used to be in this space. This winter I hired a landscaper to lay patio bricks in the place of the garden with the goal of using the space for elevated gardening instead of the more traditional back-breaking gardens I had previously. Elevated gardens help people who cannot bend and lift as easily, but they are also super-attractive for every day gardeners who want to raise up the garden closer to eye level. Assembling two elevated beds took less than 15 minutes each. I filled them with Organic Mechanics Soil and Worm Castings, then mixed in a healthy dose of Dave Thompsen’s Organic Healthy Grow Fertilizer.


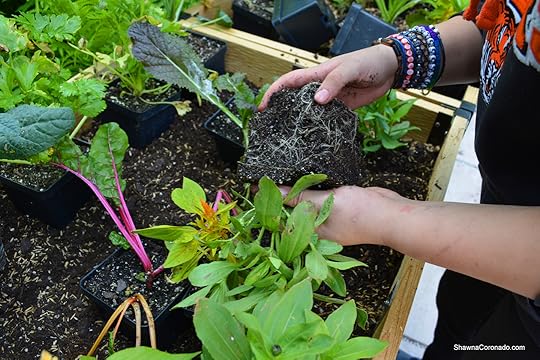
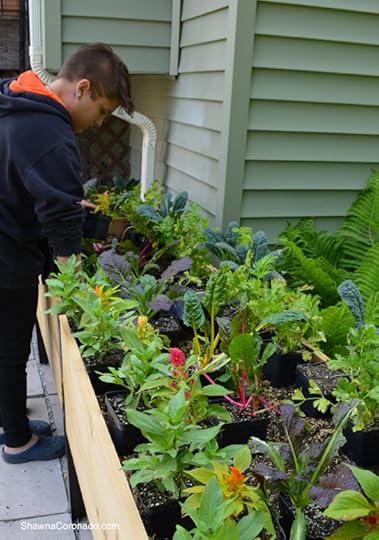
This season Jung Seed sent out a marvelous selection of vegetables and flowers for me to test. Before planting the elevated garden beds with my test plants, I arrange them in the order I want – I prefer to plant them closely together with an emphasis on the shorter flowering plants in the front and taller vegetable plants in the back. By the end of the season all the plants (see the list below) should be bursting out of the elevated bed.
Plants Used For This Garden
Black Magic Lacinato Kale
Bright Lights Swiss Chard
Deep Purple Mustard Greens
Golden Self Blanching Celery
Double Fire Zahara Zinnia
Ice Cream Mix Improved Celosia
Once the plants are all laid out, it is time to play in the dirt. My youngest daughter volunteered to help me plant – one of her favorite chores in the garden – and she said it was much easier planting in an elevated bed then digging holes in the ground and planting the more traditional way. She pulls the plants out of their cartons, loosens the roots, then gently buries the root ball in the soil. Asking for help, even from my own family, has always been such a challenge for me but I’ve noticed that my pain level after gardening has gone down significantly since I’ve started sharing projects versus doing them all by myself. Working with my daughter to assemble the elevated beds was also wonderful time spent together.
If you want a solution that is easier on your arthritis or back condition, elevated garden bed planting is certainly the gardening technique to try. Planting the beds for this season’s mixed ornamental edible plantings was super easy and I will keep you updated on the progress through the season. Happy Gardening my friends!


The post How To Plant an Elevated Garden Bed appeared first on Shawna Coronado.
May 23, 2016
Best Ajuga Groundcover is Chocolate Chip
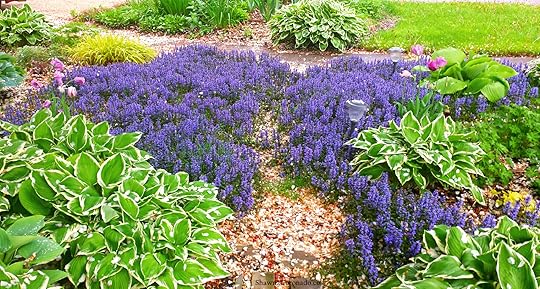
My absolute favorite groundcover ajuga for garden zones 4 to 9 is Ajuga reptans ‘Chocolate Chip’ or Chocolate Chip Bugleweed. Below is a video and an excerpt from my book, the Illinois Getting Started Garden Guide, featuring this plant. Ajuga is a very versatile and attractive groundcover that does well in most any sun situation, loves drought, withstands foot traffic, and flowers gorgeously in the springtime. This evergreen or semi-evergreen  perennial spreads rapidly by stolons and can be quite aggressive in lawns, so it helps to have a border or sidewalk to stop its creeping and keep it contained. On its own, the foliage stands only 2 to 3 inches above the ground, making this a great low grower that is a creative lawn substitute where traditional grass refuses to perform. Ajuga is an excellent plant to place on a hillside for erosion control due to its rhizomatous nature. Flowers bloom in spring and early summer and are absolutely stunning when ajuga is planted en masse.
Ajuga Growing Tips
Place ajuga in most any location about 10 inches apart and they will soon fill in. To help ajuga get a good start, amend soil with compost and make sure the soil is well draining. Although it likes moist conditions, it needs good drainage. Ajuga is a tough little plant and tolerates a variety of conditions; full sun to full shade, wet soil or dry, clay or sand.
Do not mulch ajuga as it will spread better on its own without mulch as a blockage to its growth. Fertilize once per month with a liquid organic fertilizer to see stronger plant performance. If plants get overly zealous simply shear back their growth with clippers or dig up and share with friends.
Plants may be mowed on a higher level setting in order to remove spent flower blooms and to tidy its appearance. If the groundcover is in a challenging garden position, simply shear back the dead flower spikes. Crown rot and other fungal conditions are a problem for ajuga. Control with an OMRI certified fungicide that contains the streptomyces lydicus bacteria. While ajuga is edible, it is primarily used as an herbal tea medicinal remedy and tastes bitter and somewhat dandelion-like in salads.
See the video below for a more detailed view of the Ajuga reptans ‘Chocolate Chip’ (if you are viewing this note via email and the video does not load, simply click the title and it will take you to my web page). Plant this tough little ajuga in a difficult spot and watch it explode with happiness.
The post Best Ajuga Groundcover is Chocolate Chip appeared first on Shawna Coronado.
May 16, 2016
Essential Oils and the Scientific Evidence of Scents

Aromatherapy is the use of fragrance to enhance health and promote feelings of well-being, but there is a limit to the power it has according to scientific studies. While scents are used in modern day times to relieve pain, reduce chemotherapy side effects, and promote restful sleep, the only thing that aromatherapy has been specifically scientifically proven to do is improve mood. Therefore, claims that applied oils can function as a miraculous physical healing tool are doubtful as they are scientifically unproven. Below is an excerpt from my book Grow a Living Wall where I discuss the research I discovered on the science of scent.
Scientific Proof [an excerpt from Grow a Living Wall]
“Using orange oil in dental clinics, a study from the University of Vienna shows that female patients showed less anxiety. Mie University School of Medicine discovered that smaller doses of antidepressant medications were needed after patients trialed a citrus fragrance treatment. Controlled trials have also suggested that different types of aromatherapy might be helpful for calming suffers of Alzheimer’s disease and dementia. One small study dosed a hospital ward with either water or lavender oil scent for several hours. A researcher who was unaware of the study’s design and wore a sensory block to prevent inhalation of odors was sent to rigorously examine the behavior of the residents who all had dementia. Results indicated that lavender oil aromatherapy decreased agitated behavior and encouraged calmness.”
“There can be a toxic effect to essential oils when they are not inhaled and are instead consumed orally in large quantities. Various oils can produce illness and even fatal effects, so essential oils should be both inhaled and consumed within suggested parameters due to safety concerns. Natural plants, however, do not have that restriction because they have not been distilled down to an essential oil are safe and beneficial for sniffing. With the knowledge that scents can be a mood enhancer – either calming or stimulating – having scented plants in a living wall garden is a powerful way to build a healthier mood.”
Testing the Theory
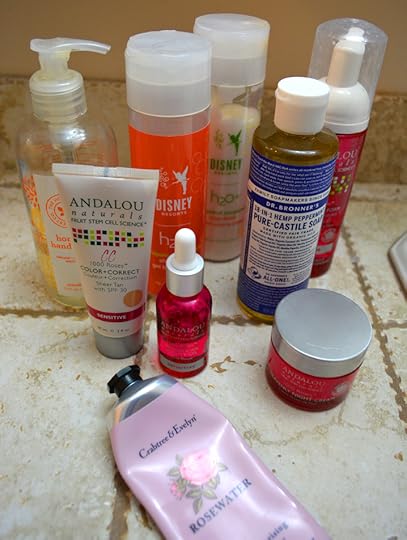
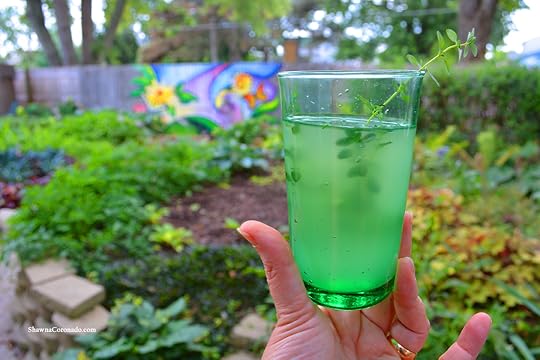
While scented plants have been marvelous for scent in my garden, I am dramatically allergic to certain chemically created as well as essential oil scents as they can make me physically ill and can trigger asthma attacks and more. There are only three scents I can comfortably tolerate – mint, rose, and grapefruit/citrus. Additionally, some scented items trigger a skin reaction, so I can only use lightly scented products that are more natural based. Clothes soaps, for example, are so strongly scented that I cannot use them and have to go “unscented”. For the last three months I have been testing out the theory of scent improving mood by using my tolerated scents in soaps, lotions, and beauty products.
As I predicted, there have been no miraculous changes in my wellness related to adding more scent to my beauty regimen and I do not see myself as a purveyor of essential oils in the future. HOWEVER, and this is a big however, I do look forward to using the products because they smell so good. When I apply the scented items I get this interesting level of relaxation and enjoyment from the experience. I have tried several dozen products over the last several months and selected the one’s that have I have truly enjoyed and listed them below.
PRODUCTS I LIKED FOR SCENT –
Disney Resorts H20+ Bergamot Bath Collection — Love the shower gel and body lotion. Makes me feel like I’m in citrus heaven. Sometimes I wash twice in the shower just to get the double grapefruit effect. No kidding.
Dr. Bronner’s Peppermint Pure-Castile Soap – This one is fantastic in the shower or as a foot wash. Love the brisk mint feel to the soap. Best yet, castile soap can be diluted and used as a clothing wash, vegetable rinse, or house cleaner. Pretty amazing stuff.
Crabtree & Evelyn Rosewater Hand Therapy Lotion – One of my favorites – I keep the lotion by my computer and use it 3 or 4 times a day.
The Honest Co. Hand Soap in Mandarin – Wonderful scent and all natural; I have now replaced all the hand soaps in the house with this scent.
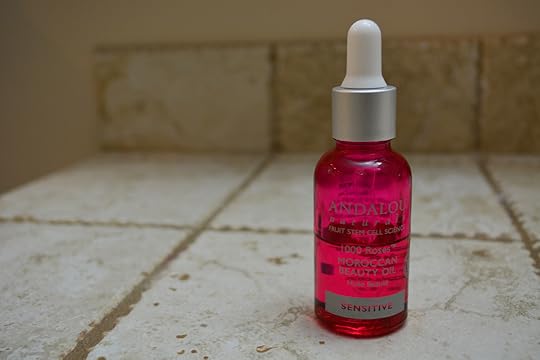
Andalou Naturals Sensitive 1000 Roses – Special thanks to the Andalou Sensitive products company for sending out products to test. I tried many of their products, but only include my most preferred below. My ABSOLUTE favorite was the Andalou Naturals Sensitive 1000 Roses Moroccan Beauty Oil – after I put the Crabtree & Evelyn Rosewater hand lotion on, I apply the oil to my horrid nail cuticles and I feel as if the cuticles have been looking a lot better lately thanks to the oil application. Plus the smell is delicious and gets me energized.
Andalou Naturals Sensitive 1000 Roses Moroccan Beauty Oil – The Best! I use it for my cuticles, but also for my hair. This has become my favorite product out of all those listed here.
Andalou Naturals Sensitive 1000 Roses Cleansing Foam – Excellent cleanser with a dreamy rose scent. I leave this in the shower and use it while my conditioner is in my hair doing it’s thing.
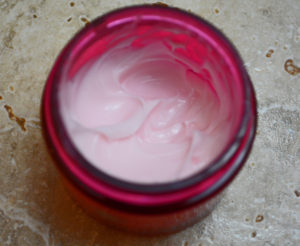
Andalou Naturals Sensitive 1000 Roses Heavenly Night Cream – Really a fine night cream, but more suited to summer as it is too lightweight for my skin during a Chicago winter. I used it for daytime, then used my regular heavier cream for night.
Andalou Naturals Sensitive 1000 Roses CC Cream in Sheer Tan – This smells only gently of rose, but felt great on the skin. If you are sensitive to SPF, this might be a concern as the CC Cream contains an SPF protection. I have a hard time wearing any foundation; this is the first foundation or CC Cream that I have been able to use in the last 3 years. Wonderfully moist and soft on the skin.
And so – the experiment was an interesting one. I tried dozens of products and found that not all scents make me feel good or energized or in a better mood. It’s selective and individual and therefore, not very scientific. While scents and essential oils aren’t miracle healers, they can lift my mood and make me feel better – give it a try with beauty products and see if it will do the same for you. Of course, trying aromatherapy with herbs and plants in the garden is a must do for your garden this season.
The post Essential Oils and the Scientific Evidence of Scents appeared first on Shawna Coronado.
May 6, 2016
Paleo Anti-inflammatory Chicken and Apple Sausage Recipe

Want a yummy tasting Paleo, Whole30, and anti-inflammatory compliant dish? Try this Anti-inflammatory Chicken and Apple Sausage recipe which truly checks off all the right vegetables and proteins for a delightful dish that satisfies and can function as breakfast, lunch, or dinner for your family. I was recently asked by Aidells® to create some unique tips for using their sausage, and this is a dish I make regularly in my anti-inflammatory kitchen.
 If you remember, I was diagnosed with Severe Degenerative Osteoarthritis of the Spine last season and I have switched to a no-dairy, no-soy, no-grain, no-sugar diet. Very similar to a Paleo or Whole30 Diet, this way of eating has reduced my pain by nearly 75% and in conjunction with walking one hour a day, has totally changed my health and outlook on life.
Beyond eating with the above dietary restrictions, I have also been searching for low-chemical meat products. Aidells® Chicken & Apple Sausage has no nitrites, MSG, or added hormones. I purchased the sausage at Meijer’s and you can too with the mPerks $1/1 coupon for “Aidell’s Dinner Links and Meatballs” running from 5/1 to 5/28 – here’s a LINK to the mPerk Coupon. Keeping our food as clean as possible is important and the bottom line is that eating well makes a difference – plus it tastes delicious.


This recipe is great because it is super simple and only has four primary ingredients, so it is really quick to prepare. I prepare the dish often just for me because I love the flavor of the sausage and butternut squash flavor. So delicious! I typically eat one portion, then freeze the remaining three portions. Three quick minutes in the microwave will reheat this frozen Anti-inflammatory Chicken and Apple Sausage recipe for a fast breakfast on-the-go.
Paleo Anti-inflammatory Chicken and Apple Sausage Recipe Print Prep time 10 mins Cook time 10 mins Total time 20 mins Delicious Anti-inflammatory Chicken and Apple Sausage recipe with only four primary ingredients. Can be frozen and reheated in individual portions. Author: Shawna Coronado at www.shawnacoronado.com Ingredients One package Aidells® Chicken and Apple Sausage, sliced in rounds 4 cups cubed butternut squash (substitute sweet potatoes if preferred) 1 large onion cubed Coconut OIl S & P to taste Instructions Microwave butternut squash with a little water in a bowl for five minutes or until fork tender. Heat coconut oil in a frying pain. Saute onions and sausage until onion begins to caramelize and sausage browns. Add butternut squash. Stir. Salt and pepper to taste. Serve. 3.4.3177 


According to the FTC rules, I need to let you know that Aidells® asked me to blog about this anti-inflammatory chicken and apple sausage recipe and this is a sponsored conversation written by me on behalf of Tyson. The opinions and text are all mine.

The post Paleo Anti-inflammatory Chicken and Apple Sausage Recipe appeared first on Shawna Coronado.
May 5, 2016
Cinco de Mayo Paloma Cocktail
Happy Cinco de Mayo! Want a fun and super-easy Mexican cocktail to celebrate tonight? Try the pre-made tequila-included cocktail created by Charles Joly, the famous bartender extraordinaire. His line of drinks is fantastic and the Crafthouse Paloma Cocktail is a step above the other mixes out there. Personalize the flavor with muddled basil or lemon thyme added to the cocktail and your guests will be blown away by all the fresh flavors.
According to Charles, “Little is known about the historical origin of the Paloma, the most popular tequila-based cocktail in Mexico. Some conjecture that it is named after La Paloma (‘The Dove’), the popular folk song composed in the early 1860s.” I first had the Paloma when I met Charles when he custom made the cocktail for me at a convention – it is a truly delicious combination of tequila, grapefruit, and lime. Rim your glass with salt if you like for a little extra umph and know that all the ingredients including the alcohol are already in the bottle and ready to pour. If you’d like to know where to stop this evening to pick up the Crafthouse liquor-already-added cocktails, go to this link – WHERE TO GET YOUR CRAFTHOUSE.
How to Muddle Herbs for a Cocktail
Muddling herbs is easy-peasy –
Get a large handful of your favorite herbs
Place the herbs in your favorite cocktail shaker
Use a muddling stick or find something with a flat bottom that fits inside the shaker
Push the herbs down hard, then twist the muddling stick – repeat 6 or 8 times
Pour cocktail ingredients and ice on top of herbs, cover, and shake
Strain into a glass
Serve with a bit of the herb resting in the glass to add a “scent hint” to the cocktail.
Above is a video that shows how to muddle up a Crafthouse Paloma Cocktail (if you get this post via email and can’t see the video, just link through the title and it will take you to the web page with full viewing capabilities). Happy Cinco de Mayo!
The post Cinco de Mayo Paloma Cocktail appeared first on Shawna Coronado.
May 2, 2016
Arthritis Chronic Pain and Mowing the Lawn Grass
Having arthritis or another chronic pain problem can be difficult when you try to mow your lawn. It hurts. This year I have been struggling with severe degenerative osteoarthritis of the spine and conducted an experiment to change my back yard “Gardens as Art” vegetable garden (photo below) into something more easily managed for my condition. Last season the artistic biointensive growing design was truly creative, but it still required planting, weeding, watering, and harvesting. Miriam Goldberger from Wildflower Farm contacted me and suggested I conduct an experiment using Eco-Lawn Grass Seed – she said that a low maintenance grass is far less problem for my chronic pain.
Tips for Tending the Lawn with Arthritis Pain
Stretch before doing the mowing. Best stretches focus on the area where your arthritis truly bothers you – consult a doctor or physical therapist for specific exercises built just for your body.
Take breaks often and pace yourself. Trying to do too much can over-strain joints and staying in one position can lock vertebra and joints in position. Taking breaks helps keep your body fluid and moving.
Use proper tools and assists when mowing. For example, wrap a self-propelled mower’s push handle with a velcro strap so that the mower is easier to push without squeezing your hands tight on the handle. If trimming the grass on a riding lawnmower, wrap the steering wheel in thick material so as not to stress your hand grip.
Mow at dawn and dusk. Heat often triggers arthritis symptoms. Working at cooler times in the day can make a difference with your pain levels.

Grass is a candidate for low maintenance IF you don’t water or fertilize or mow and Eco-Lawn makes that possible. Eco-Lawn is definitely a special grass seed and worth an experiment in the test gardens as it is drought-tolerant, slow-growing, perpetually green, and only needs to be mowed once per year or not at all. Miriam suggested that after the seeds germinated and became established I would not have to water. I wanted to find out for myself if I can have a mow-free grass in the back garden to reduce the amount of work I have to do.
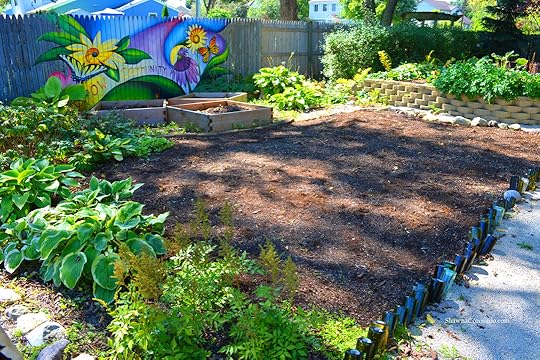
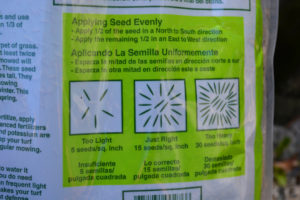 At the end of vegetable season last fall I cleared the herbs and vegetables out, weeded, sifted through the soil, leveled it out, then sprinkled the soil with water so that it was lightly moist (see above). Then I randomly threw grass seed every which way onto the moist soil following the directions on the Eco-Lawn bag to get approximately 15 seeds per square inch (see right). Sometimes it was 30, but mostly I’m guesstimating that it was 15 and all was right with the grass seed gods.
Gently sprinkling the area with water every morning for 9 days eventually produced germination (see below). Once the thin strands of grass pushed up I could see where I might need to fill in more seed. Then I repeated the seeding process for the areas that seemed bare.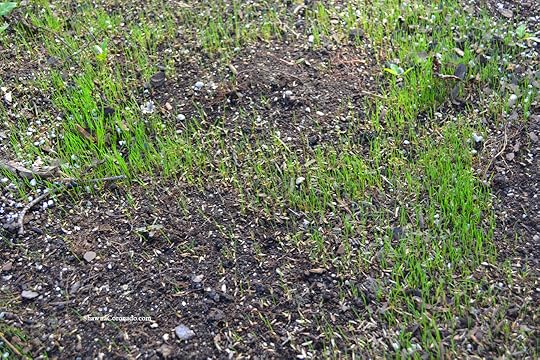
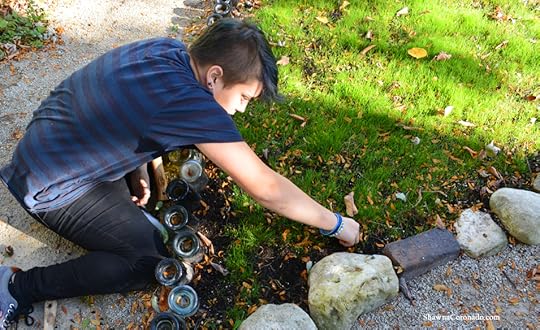
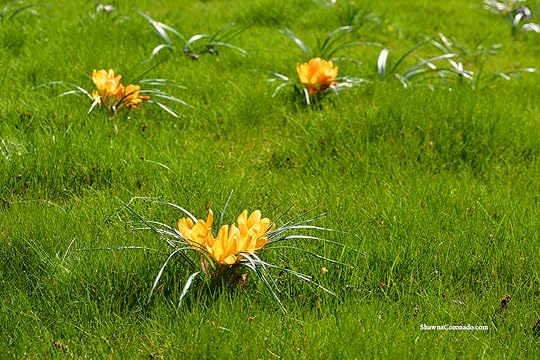
Once fall progressed a bit, I had my daughter help me by weeding again, then she tucked some Giant Mixed Crocus bulbs from Jung Seed in with the new grass using my favorite hori-hori knife (above). It was easy to do by cutting the knife down through the soil and dropping in the bulbs several inches down. Below you see an image of the Eco-Lawn in January after repeated snows and the grass is remarkably green. Average low temperatures in the Chicagoland northern tundra where I live in January is -11°C/12°F and you can see the flattened parsley on the right which finally fell from the cold in late December.

Where to get Eco-Lawn Seed – www.eco-lawn.com
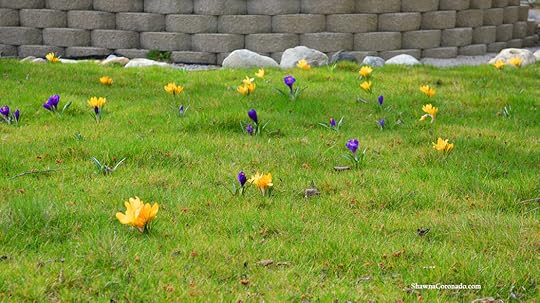
Arthritis chronic pain can truly be debilitating. However, it can be helped with a very low-maintenance lawn. With summer rapidly approaching, my goal is to see how the Eco-Lawn grass survives without water, fertilizer, or any special manipulation. This first year I plan on not mowing it at all in order to let the grass grow to it’s full height. I have an art installation I want to place on top of the garden which I am super-excited about sharing with my readers. Remember to follow the tips at the top of this post on keeping your chronic pain lower when maintaining the lawn and tune-in soon for more results of the low-mow Eco-Lawn experiment.


The post Arthritis Chronic Pain and Mowing the Lawn Grass appeared first on Shawna Coronado.