
Ruth Soukup's Blog, page 77
July 20, 2015
What Every Mom Needs to Know about Paying for College


If your kids are still young, college can sometimes feel a million miles away —a distant dream far off in the future that you’ll face when it gets a little closer. Maybe you and your spouse are still working to pay off your own student loans. Maybe you’ve taken a proactive approach and socked away a little fund to help offset the costs, but at the cost of your own savings. Or maybe you’re still working to build up an emergency fund, and the thought of paying for college seems downright laughable.
Of course, if your once-small kids have now grown into teenagers, college might not seem quite so far away, and you may be wishing you had started planning a little sooner.
The reality is that paying for college requires you to be proactive–both in planning for how you are going to pay for it, as well as teaching your children smart money management skills so that they are ready to take responsibility when the time comes. (After all, you don’t want them to turn into this entitled 22-year old who blew her college fund on clothes and a trip to Europe, then wondered why her parents would give her more money!)
Whatever you current situation, there is no time like the present to start making good decisions & preparing for the future–or the present. In any case, here are a few things every mom (and dad) should know about paying for college.

Look in the Mirror
When it comes to college savings, the first key is to take a hard look at your current financial state. Most financial advisors, including Dave Ramsey, recommend that you never put college savings ahead of your own retirement savings. The hard truth is that your kids can’t always come first.
Consider it like an oxygen mask on an airplane—secure your own before assisting other passengers. Having your own finances in order, your debt paid off, and a comfortable savings and retirement plan in place will help ease the burden down the road on both you and your children.

Keeping Education Costs Down
If your child is close to starting college and you haven’t already established a college fund, you may need to reframe the way you (and your child) look at education in order to keep your costs as low as possible. In today’s society, college educations are valuable and important, of course, but there are plenty of non-traditional options, and not every child needs to plan for Ivy League costs. Private liberal arts colleges can be vastly more expensive than state schools or community colleges, but they don’t always ensure employment after graduation. Your student can do their undergrad work at a local college, earn a technical certification, or even join the military to offset costs.
If they decide to go into nursing, teaching, or another professional field where certification and licensure is necessary, consider this—all RNs take the same board certification exams, whether they attend that expensive private college or their local junior or state school.
These students have many options when deciding how to structure their education plan, including getting a head start through programs like Running Start, in which motivated kids can graduate from high school with a 2-year associates degree already in hand. Don’t be afraid to get creative and encourage your child to pursue non-traditional alternatives to a 4-year degree.
Moreover, depending on your financial situation, make sure your student understands he or she may need to have a job (gasp!) while they go to school. Believe it or not, it won’t be the worst thing in the world. Studies have shown students who hold down a 10 to 25 hour per week job while going to school have better grades and test scores. Many colleges offer on-campus jobs to offset tuition costs, which can build your child’s sense of community and responsibility. Even with an off-campus job, they’ll learn time management and planning skills at a vital time in their life.
Students can also look into Job Corps, Peace Corps and other education and training programs where students can work to earn their education while having hands-on and real world experience.
Your child should also consider all their options when they’re ready to get serious about planning their post-high-school experience. Be sure to weigh in costs of meal plans, off-campus housing and public transportation. Encourage your kids to make frugal and wise choices, like purchasing used books and sharing room and board.

Establish a Strong Foundation
Before your child even understands the concept of college, you should be laying the groundwork to help build a strong financial foundation. Even the youngest children can understand the concept of savings, delayed gratification and wise choices.
Consider helping your child start a college fund on their own. While a lemonade stand won’t fund a Harvard education alone, it can help your kids become more involved in the process and learn the importance of the financial considerations required to set effective financial goals. (Check out this post on teaching your kids about money management.)
Help your child understand the concept of credit and loans. As they approach college-age, go over the costs of a college education. Work backwards, starting with their post-college loan payments (think $300+ per month on a $25,000 per year salary) and help them to also understand that interest can add up and there’s no such thing as “free money.” You can also utilize You Need a Budget.)
One of the statements we hear from young adults time and time again? They wish they had understood the consequences of overspending, under-saving and loans BEFORE they embarked on a debt spiral. Helping kids see that they will eventually have to face up to their debts can really keep them in the right frame of mind as they plan and separate their wants from their needs.
Also help your child establish “big picture” thinking when it comes to grades, homework and dedication to their academics. Scholarships and grants are a huge and underutilized source of funding for many students and can greatly offset the cost. There are tons of great, typically free student aid search sites. Encourage your child to do their own research into potential scholarships and grants.
Students in high school can pursue Advanced Placement (“AP”) classes, some which offer college credit at discounted tuition rates. Students who are dedicated now and driven throughout their grade school and high school careers can pursue their dreams much faster and at a savings.

ESAs, 529s and other Savings Plan Options
If you’re financially solvent and you have your own portfolio squared away, then it might be time to consider putting around 15% of your income away towards your child’s college fund. There are many options and savings methods out there, so be sure to do your homework. Working with an experienced financial planner or advisor to help navigate these options can be helpful.
There are a few rules of thumb to follow when you decide to invest. First of all, do your research and understand the options available. Second, and probably most important, be sure your money is working for you. Simply “tucking” money away in a low-interest savings account is almost pointless, and it’s certainly not your wisest option long term. Consider what will bring you the greatest interest, what works for the amount of time you have (invest conservatively if college is just a few years away), and which options make you feel most comfortable.
An Educational Savings Account (ESA) offers higher returns on your investment than traditional bonds or the poorly performing “insurance whole-life plans.” An ESA is basically like an IRA for your education and you can invest up to $2,000 per year, per child, tax-free. ESAs can often be transferred between family members and rolled over into your other investment plans in the event that it’s no longer needed.
Similar to a 401(k), a 529 is a like an investment vehicle for your child’s college education. Named for the line of IRS Tax Code, it’s geared towards those who have more than $2,000 per year to invest and it can work either as a prepaid plan or a savings plan (much like a 401(k), where you’re invested in mutual funds). Offering a much better interest rate than a traditional savings plan, you contribute a set amount each month, and receive a tax break or allowance for your investment.
The interesting thing about 529s is that they’re offered state-by-state, but your child does not need to attend a college within the state of their 529. For example, someone living in Florida could invest in a Maryland plan and send their child to college in Indiana. Nearly every state offers a 529 plan and some are more flexible than others. You can explore the options more thoroughly by visiting savingforcollege.com.
You can also invest your money in a more traditional manner: with an IRA or mutual funds. Whatever you choose to do, again, be sure to do your research beforehand and see the returns each offers.

Stay Realistic
Don’t panic. Many wonderful, amazing, learned scholars have worked their way through school, attended state schools or gone the less-traditional route. It’s no longer uncommon to see someone in grad school in their fifties or sixties or to see people change career plans down the road of life. (Trust me, I know–I majored in Political Science and dropped out of law school!) Our paths are not set in stone.
Teach your children to be wise with their money and to separate their needs from their wants. Teach the value of education and help your kids enjoy school by keeping a positive mindset about their classes and finding the areas that fit their natural aptitudes. Build a strong foundation through whatever education option you prefer—private school, home school, public or charter school options.
Share your love of learning and your financial peace with your family and you will surely pass those traits on to your kids, no matter what their future holds.

Pin It
The post What Every Mom Needs to Know about Paying for College appeared first on Living Well Spending Less®.


July 17, 2015
How to Use Facebook to Save Money


This is a guest post from Kalyn of Creative Savings
According to a recent study by Bloomberg news, the average Facebook user spends about 40 minutes per day browsing their newsfeed, updating their status, and interacting with friends. That’s pretty much nothing compared to the hours watching television, but it’s still quite a bit of time to waste away on the world wide web!
I totally get it though.
With access to all the social media apps on our smartphones, it’s almost too easy to “check in” right when you wake up, while you’re waiting in line at the grocery store, or {ahem} sitting at a red light.
But instead of feeling guilty for what some might consider a general waste of time, I propose a different idea. Why not use Facebook to our advantage? Meaning, if you’re spending so much time on Facebook anyway, you might as well turn it into something useful……like saving money.
Borrow, Instead of Buy
Is there a book you want to read, or a tool you need for your next DIY project? Maybe there’s a kitchen appliance that would make your monthly freezer cooking session that much easier. Instead of buying those items, see if you can borrow them from your Facebook friends!
If your friends are anything like mine, they love to help, and those local to you can lend a hand whenever you’re in need. And even if they no one has what you’re looking for, I’m sure they can point you in the right direction.
I’ve asked for all sorts of advice on brand names and what to buy when items around our home bite the dust. Plus, it’s always super helpful to know what works and what doesn’t so you don’t waste your hard-earned cash.
Create Interest Lists
Out of my 222 Facebook friends, and who knows how many LIKED pages, there’s a lot of clutter in my news feed, and it’s practically impossible to see every new update. This is where Interests Lists can come in really handy, and not too many people know about them!
Interest Lists allow you to organize all your pages in separate “lists”, so you can segment your news feed at any time based on which list you want to view. If you’re not exactly sure how to create interest lists and add pages to them, this post on Sprout Social features an easy-to-follow tutorial to get you started.
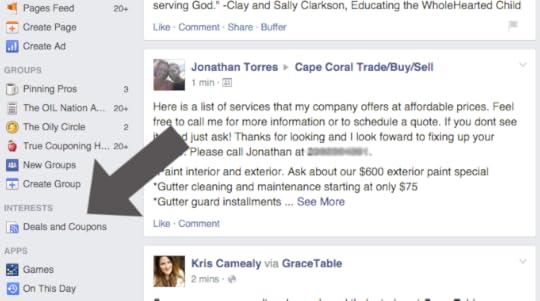
Here’s an example: Let’s say you follow quite a few coupon bloggers. Find each of their pages, and add them to a list titled, Deals and Coupons. Then anytime you want to check a sale or find coupon match-ups, click to view only that list. It will bring up all the latest posts by the pages you added and nothing else.
More Interest List ideas:
Local Deal Bloggers {For the latest coupons and deals in your area}
Frugal Lifestyle Bloggers {For general money saving tips}
Favorite Companies and Businesses {For sale notifications and coupons — you could unsubscribe via email and just follow them via an interest list if you wanted to clear out your inbox!}
Friends that have a business or blog {For support and latest updates}
Healthy Food or Recipe Blogs {For those dinner time dilemmas}
It might take a little bit of time up front to get everything organized, especially if you like a lot of pages, but once everything’s in place, I think you’ll find Facebook that much more enjoyable and easier to use to your advantage.
Check Pages for Coupons
Facebook pages used to incentivize you with a coupon for liking their page, but since Facebook doesn’t allow them to do that anymore, most have done away with any sort of discount.
However, there are still a few pages that offer coupons “just because”, and you can usually find these offers listed as a tab right under the header photo. Be sure to check the MORE dropdown tab as well for promotions that might not be so obvious!

Here are a handful of pages that currently offer coupons:
Silk
Rite Aid
Angel Soft
Uncle Ben’s
Seattle’s Best Coffee
Bottom Line — if you put any brand-worthy items on your grocery list, don’t forget to stop by their Facebook page to check for any current coupons or promotions before you head out to the store.
Join a Group
There are Facebook groups for just about anything, and while they can get distracting if you’re subscribed to every single notification, they’re still a really fun way to connect with others who are interested in the same topic as you, especially when you’re looking to save a little extra money.
Hyper Local Deal Groups: Many groups just focus on deals and specials specific to their area, and joining can be a great way to try a new restaurant or get notified of a special discount for a local family-friendly activity. Type “your city or closest metro area” + “deals” into the Facebook search bar to see what pops up.
Local Buy/Sell Groups: Other groups were specifically created for members to buy and sell from each other — almost like the Craigslist of Facebook. The really nice thing about them is you can instantly ask questions about each item instead of emailing a random address. Plus, you’ll get notified of garage sales happening in your area with a few pictures of what’s available. This saves a lot of time and effort from driving around wondering if you’ll find any hidden gems!
Couponing/Frugal Living Groups: If you’re looking for moral support, couponing advice, a different perspective, or accountability to reach your financial goals, there’s a group for you! True Couponing has quickly become my all-time favorite coupon group, and I always pop in before grocery shopping to find the best deals. I also have my own group called the CSB Inner Circle, which is all about budget-friendly living. I’d love to have you stop by!
Save Money Saving Articles to Read Later
Did you know that you can save links on Facebook? All you have to do is hit the drop down button on the upper right hand side of each post, and there is usually an option to save that post. Every post you save automatically shows up in your SAVED section under the Favorites column, and stays there until you archive or delete it.

Why is this helpful? Because sometimes you’re on the go and don’t have time to sit and read every article you come across. So whenever I find a post I’m really interested in reading, I’ll click save, then pull it up when I’m sitting in a waiting room or have a few extra minutes at home to check it out.
I use this trick whenever I want to save a particularly helpful post, especially if it relates to saving money, or if I want to investigate an online promotion a little further.
See, Facebook isn’t all that bad! The key is to make this social media network work for you, rather than the other way around. These five tips should help point you in the right direction!
Kalyn Brooke is a full-time writer and blogger at CreativeSavingsBlog.com, where she gives a fresh perspective on frugal
living, and the kick-in-the-pants you need to create a budget from scratch. She lives in beautiful Southwest Florida with her news-photographer husband and one terribly destructive rabbit. She loves making to-do-lists, reading good books, eating chocolate peanut butter ice cream, and pursuing big big dreams… all carefully planned out, of course.

Pin It
The post How to Use Facebook to Save Money appeared first on Living Well Spending Less®.
July 15, 2015
Easy Crockpot Lettuce Wraps


My husband and I are both big fans of P.F. Changs–especially their yummy lettuce wraps! Luckily for our wallet, the closest one is about 45 minutes away!
I thought it would be fun to see if we could recreate one of our favorite treats at home, but to be perfectly honest, I was a little nervous about how these crockpot chicken lettuce wraps would turn out, but they were a HUGE hit. Chicken in the crockpot can get very dry, especially when it is cut into smaller pieces. I used boneless skinless thigh meat rather than breast meat because it has a lot more fat, which helped keep the meat nice and moist. I also made a vegetarian version with protein crumbles for me. The whole family gave it a 10, and my dad and stepmom, who happened to be in town, couldn’t get enough!
To make it as part of a freezer cooking day, just split the chicken & sauce into multiple bags, then throw it right into the freezer! Making it ahead of time is not necessary, though, as it is equally delicious just marinated in the fridge for 30 minutes.

Here is what you need:
3-4 pounds skinless, boneless chicken thighs or 1 package vegetarian crumbles
3-4 tablespoons butter (optional)
1/4 cup chopped parsley
3/4 cup olive oil
1/3 cup soy sauce
1/3 cup rice vinegar
2 tablespoons brown sugar
1 tablespoon freeze dried or fresh grated ginger
2 tablespoons sesame oil
4 cloves garlic, minced
1 can water chestnuts, chopped
3 carrots, shredded
1/2 cup green onions, chopped
2 tablespoons sesame seeds
1 head iceberg lettuce (cooking day only)
Sauce
4 tablespoons hoisin sauce
6 tablespoons soy sauce
2 teaspoons sesame oil
1 teaspoon red pepper flakes
1 teaspoon rice vinegar

Step 1: Chop green onions, and parsley;set aside. Chop water chestnuts and set aside.

Step 2: Shred carrots ;set aside. Mince garlic and set aside.

Step 3: Cut chicken into strips; set aside. If using vegetarian crumbles, brown in 3-4 tablespoons of butter and set aside.

Step 4: Mix together olive oil, soy sauce, rice vinegar, brown sugar, ginger, sesame oil, garlic, water chestnuts, carrots, green onions, and sesame seeds.

Step 5: Divide chicken into 2 gallon size freezer bags ( be sure to label bags first.) Divide soy mixture over top chicken.

Step 6: Make sauce ( be sure to label bags first.) Mixing together- hoisin sauce, soy sauce, sesame oil, red pepper flakes and rice vinegar. Freeze.

Step 7: Thaw if frozen; cook in crockpot on low for 3-5 hours or high for 2-3 hours; until chicken is cooked. (Note-don’t worry if your chicken isn’t all the way thawed. It can also cook from frozen, it might just take a little longer.)

Step 8: Serve in washed & dried lettuce leaves with sauce.

Print This!
Recipe: Easy Crockpot Lettuce Wraps
Summary: This super easy crockpot meal is full of flavor and comes together so fast!It is sure to be a new family favorite.
Ingredients
3-4 lbs skinless, boneless chicken thighs or 1 package vegetarian crumbles
3-4 tablespoons butter (optional)
1/4 cup chopped parsley
3/4 cup olive oil
1/3 cup soy sauce
1/3 cup rice vinegar
2 tablespoons brown sugar
1 tablespoon freeze dried or fresh grated ginger
2 tablespoons sesame oil
4 cloves garlic, minced
1 can water chestnuts, chopped
3 carrots, shredded
1/2 cup green onions, chopped
2 tablespoons sesame seeds
1 head iceberg lettuce (cooking day only)
Sauce
4 tablespoons hoisin sauce
6 tablespoons soy sauce
2 teaspoons sesame oil
1 teaspoon red pepper flakes
1 teaspoon rice vinegar
Instructions
Chop green onions, and parsley;set aside. Chop water chestnuts and set aside.
Shred carrots;set aside. Mince garlic and set aside.
Cut chicken into strips; set aside. If using vegetarian crumbles, brown in 3-4 tablespoons of butter and set aside.
Mix together olive oil, soy sauce, rice vinegar, brown sugar, ginger, sesame oil, garlic, water chestnuts, carrots, green onions, and sesame seeds.
Divide chicken into 2 gallon size freezer bags ( be sure to label bags first.) Divide soy mixture over top chicken.
Make sauce ( be sure to label bags first.) Mixing together- hoisin sauce, soy sauce, sesame oil, red pepper flakes and rice vinegar. Freeze..
Thaw if frozen; cook in crockpot on low for 3-5 hours or high for 2-3 hours; until chicken is cooked. (Note-don’t worry if your chicken isn’t all the way thawed. It can also cook from frozen, it might just take a little longer.)
Serve in washed & dried lettuce leaves with sauce.
Preparation time: 7-10 minutes
Cooking time: 4-6 hours on low or 2-3 hours on high
Number of servings (yield): 8

Pin It
The post Easy Crockpot Lettuce Wraps appeared first on Living Well Spending Less®.
July 13, 2015
How to Deep Clean Your Garage


Oh, the garage.
I don’t know how it works in your home, but in ours, the garage is the collector of all things that we don’t quite know what to do with–boxes of stuff meant for Goodwill. Holiday decorations that haven’t made it back into storage. Half-completed projects. Stacks of scrap wood. Bowling balls and tennis rackets and roller blades. Tools and recycling and bikes and gardening supplies, and, inexplicably, an entire bucket full of car washing supplies, even though we haven’t washed our car in at least four years. (That’s what thunderstorms are for, right?)

It’s the one space in the house that we can shut the door to and just forget about, and so, often times, we do. But the mess is always there, lurking in the background, haunting us. And as much as we want to pretend it doesn’t exist, a messy garage can be a huge source of stress.

Ours certainly has!
In fact, after 11 years of struggling with it, fighting over it, hiding it, complaining about it, and pretending it didn’t exist, we finally decided we just couldn’t take it anymore. Enough was enough! We enlisted the help of Closet Maid, who took it upon themselves to document the whole process as part of their new web series called States of Organization. It was a pretty fun–albeit exhausting–process!
And you know what? Getting it clean really wasn’t as bad as we feared it would be, and it didn’t take nearly as long as we thought it would! Organizing and deep cleaning your garage might seem overwhelming, but if you attack it with a plan, you can probably do the majority of the job in just a day or two.
Here’s how to get it done:

Step 1: Remove Everything & Prepare your Supplies
Pick a day when weather is on your side and pull everything out of your garage and into your driveway or yard. It can seem productive to tackle a corner at a time, but honestly? Just getting everything out will help you assess what you have, take note of the grime level, and stay motivated to keep too many things from returning to their old spots.
Gather a ready supply of towels, a bucket, a broom and cleaning spray. You may also want to keep a measuring tape handy and some big, strong garbage bags or bins for sorting items.
Start by wiping down or hosing off anything dirty or dusty.

Step 2: Sort, Eliminate, Donate or Sell
Once everything is out of the garage, it’s time to start sorting everything into piles: keep, donate/sell and eliminate. Purge once, then go back through the keep pile and purge again.
Ask yourself if the item is something you’ll use again or something you’ve used in the last year—be realistic and honest. Holding onto those rollerblades because you think your kids might want to use them or that tennis racket that needs to be re-strung? These are the types of things that create clutter. There are many sports stores that will buy back equipment or sell it on consignment. You may even make a nice little profit that can be put towards something the whole family will like.
When it comes to tools, consider what you use frequently and what can be borrowed or rented. This is a difficult one, because many of us (and many husbands) fancy ourselves to be “Bob the Builder” or “Rosie the Riveter” and tend to hoard tools. If your husband is indeed a handyman, and especially if it’s a hobby, then by all means, let him keep a tool bench/workstation area, but keep it organized and useful.
Broken items or items rusted or past their prime can be tossed immediately. Give yourself permission to let go and stop keeping things in hopes that one day you’ll get around to repairing them.
If you’re a gardener, keep one, rust-free version of each tool you frequently use. Toss seeds over a year old (most will not grow past that time and pests LOVE them), and be sure all pots and planting items (including tomato cages, hoses and gardening decorations) are clean and free of dirt and moisture before stored.
Car repair items and cleaning supplies should be assessed for usefulness and potency. Some car fluids do expire, so keeping them might create a fire hazard. Always get rid of any oil rags and don’t allow them to pile up, as they’re combustible. Chemicals, paint and other items that have outlived their usefulness should be disposed of using the proper channels. Contact your local recycling and waste management or municipality to find out how to safely dispose of chemicals in your area.

Step 3: Find Storage Solutions that Work for You
Depending on what you have in your garage and what you need to store, you may be facing some interesting storage dilemmas. It seems that nearly EVERYTHING in the garage is oddly shaped—it’s either very, very large and bulky (such as weed trimmers, chainsaws or sports equipment) or very, very small and easy to lose (like nails, screws, bits or gardening markers).
While working with Closet Maid, we were introduced to their heavy duty garage storage system, which is awesome! The wire shelves allow for air flow (important in Florida!), they are easy to install, and the shelves are adjustable so you can reconfigure them any way you want.
For tools, we have found that a collection of bins works well; many other organization experts recommend using a pegboard over a workbench. Small, clearly marked jars work well for sorting various odds and ends that go along with your tools. Larger items like saws and electrical tools can be stored in shelving. Toolboxes should be kept off the floor and away from moisture.
Baseball bats, rackets, balls and bulky sports items store well in ball bins, large totes or even repurposed trash cans. If you sort carefully to pare down to just the necessary items, you can arrange everything clearly on a shallow shelf. (Deep shelves tend to create a magical abyss where things just disappear.)
Get bikes, kayaks and other large items off the floor so they’re protected from damage. Hang them up on ceiling hooks tightly fastened to support beams in the garage. Hanging large items such as ladders, shovels, rakes and other tools will also keep the ground free of clutter and provide each item with a safe place to rest. (We all want to prevent things from falling on kids or cars!)
Think about the storage options you’ll need and assess what you have on hand. Assemble all storage containers and hooks and get them ready to house your remaining, now-clean garage equipment.

Step 4: Seal Cracks and Repair Hazards
Garages bear the brunt of the harshest weather. Often they’re not heated or cooled and temperature fluctuations and moisture tend to cause mildew, cracking leaks and other issues. Since most of us don’t spend ample amounts of time in the garage, many of these issues can go unnoticed until they’re difficult to repair.
With everything out of the garage, really survey any areas that might need to be fixed or touched up. Seal any cracks with spray-in foam or sealant and consider spraying on a protective coat of LeakSeal or other flexible coating.
This is also the time to check out the wires around your garage and make sure nothing looks chewed on or presents a fire hazard. Look at anything that might be exposed and call a professional if needed.
Clean the gutters around your garage and be sure to look for signs of water damage. This is also a good time to check lighting, locks and seals around your windows. You want to ensure not only weather protection, but protection from intruders.

Step 5: Dust, Wash, Clean and Paint
Put that broom to use! Put on a mask. (Garages can house mouse droppings, bugs, chemicals, and all sorts of things you don’t want to breathe in.) Thoroughly clean out all of the corners, wash down the walls, and make sure everything is dust free. This will prevent all of that dirt from tracking into your house later.
Not all of us are ready to put in epoxy floor coating in the garage, but if you’re able, it’s an investment that will really help make things feel more “finished.” If you have oil spills on the floor, kitty litter works wonders for soaking it up and keeping the floor looking its best. Consider putting down an inexpensive garage floor protector or even a piece of indoor/outdoor carpeting or rug to protect from future damage.
A simple coat of latex paint in white will keep things fresh and help prevent mildew as well. Caulk around the windows and caulk any cracked or leaking seals. You don’t have to sew curtains or put up wall decals, but if you feel inclined to add a simple decorative touch, it may help you feel more of that “extension of your home” mentality and keep things clean in the future.

Step 6: Re-assemble and Re-commit
Now that you have a beautiful, clean and fresh garage, put the necessities back in place and organize your areas—tools, sporting goods, car repair, storage (in a few clearly marked bins) and gardening.
If you store your trash and recycling in your garage, be sure you keep things in bags, tightly sealed and closed to prevent odor and varmints. Keep a mat or paper under the can in case of spills. Hose out your trashcan monthly and sprinkle with baking soda to help prevent smells from wafting throughout the garage (or into your house).
As you return your items to the garage, keep purging and eliminating. Really aim for a garage where things are easily accessible and organized. Again, consider if you’re truly using each item or simply storing it. (If it’s the latter, time to get rid of it!)
With a clean garage, you’ll find you may even start to enjoy doing things outdoors more often. You may revisit hobbies or feel more inspired to garden or work on projects. Deep cleaning your garage can be surprisingly inspiring and motivating! You may even be so excited that you want to make a video of parking your car in it for the first time in 11 years!
In the end, while the task may seem daunting, the rewards are well worth the effort. Not only will you save money and keep your house cleaner, you’ll also protect your investment in your car, bikes and other items because they’re stored in a clean, dry environment, and finally be able to work on new projects that you never had the space for before.
So what are you waiting for?

P.S. Thank you ClosetMaid!
Pin It
The post How to Deep Clean Your Garage appeared first on Living Well Spending Less®.
July 10, 2015
12 Things NOT to Do to Save Time, Money & Sanity


Here at Living Well Spending Less we talk a lot about the things you can do to save time and money, and hopefully your sanity. And while these tips can be helpful, I think sometimes we can end up with such a long list of things we are supposed to be doing that we become overwhelmed and stressed out.
The older I get and the longer I write this blog, the more I am learning recognize the brutal truth that I can’t do everything. More and more, I am beginning to value the importance of simplifying, learning to say no, and of giving myself grace and permission to do less. In fact, I just finished writing a book about this very topic, called Unstuffed: Decluttering Your Home, Mind & Soul.
As I was pondering this topic, I realized there are quite a few things that I don’t really do anymore that have gone a long way in saving me time, money and sanity. They are things that, quite frankly, I don’t even really miss.

Cut or Color My Hair
When my husband and I met and got married, I was a blonde, but not a natural one. And let me just tell you—keeping that color looking good was practically a full time job. I’d get my roots touched up every four to six weeks, which not only took several hours each time, but cost a pretty penny too. After my oldest daughter was born, I went back to brunette, but still insisted on getting highlights and layers and frequent style changes, many of which weren’t all that flattering.
Finally, about five years ago, I decided to just let the chips fall where they may. I stopped fighting with my hair, embraced by natural color, and also realized that my fine-but-thick stick straight hair looks best when I don’t do anything at all.

Shop ’til I Drop
If you read my first book, Living Well Spending Less: 12 Secrets of the Good Life, you already know that too much shopping has been a very real struggle in my life. In fact, the fights between my husband and I about my shopping habits were what inspired me to start writing this blog in the first place! I used to make it to Target at least once a week (and usually even more), and the weekend wasn’t complete without at least one trip to the mall. I shopped for the sake of shopping, as a way to pass the time.
I’m happy to report that I don’t do that anymore. In fact, most of the time I avoid both Target and the mall like the plague, not because I don’t enjoy it, but because I know I’ll end up with a whole bunch of stuff I don’t need. Instead, if there is something I really need, I will generally order it on Amazon through Amazon Prime, or for gifts, I usually visit a small local shop close to my office called Pomegranate & Fig. I have also found that using Stitch Fix has, for the most part, eliminated my desire to shop for clothes. Even though I usually only keep one item, knowing that box is coming each month keeps temptation at bay! (Plus it is super easy and convenient!)

Cook Elaborate Meals
I don’t spend a lot of time in the kitchen. In fact, I purposely spend as little time as possible cooking meals! The truth is, we are not a family of foodies. Yes, we want our food to taste good, but neither my husband or I have any need for multiple courses or fancy fixings. Plain, easy, and tasty is just perfect.
My husband and I generally try to stick with easy freezer meals (our 10 Meals in an Hour plans have been a game changer!) or quick & simple recipes with five ingredients or less.

Drive a Car
After totaling a car in a big accident a few years ago we decided to see if we could get by with just one vehicle. As it turns out, it really wasn’t that hard. Yes, it does require a little coordination or juggling every now and then, and there have been a handful of times one of us has had to ask for a ride from a friend, but for the most part, it has been a non-issue.
In our small town, everything is close by, and while I do now work out of an office rather than at home, my office downtown is only about a mile from our house, and our tourist-friendly town has an extensive network of very lovely bike paths A few months ago, for my birthday, my husband surprised me with an adult tricycle that I can now ride to and from work, and that short ride has quickly become the best part of my day!

Get Sick
Hopefully I won’t jinx myself by writing about this, but finally getting healthy has been a huge accomplishment for me this year, and quite honestly, after several years of being sick almost continuously, I want to shout it from the rooftops!
So what made the difference? I attribute it to a couple of things. First, I started becoming much more intentional about getting enough sleep. I am an early riser, but I was burning the candle at both ends by staying up late too. Not anymore. Second, I started using essential oils every day, both to help with sleep and to boost my immune system. I also began taking a supplement from Young Living called Ningxa Red. I have (knock on wood) not been sick one single time since last September when I started using it!

Go Crazy for Holidays
I’ll be the first to admit that in the not-so-distant past, I have gone more than a little overboard for the holidays. When I first became a mom, I wanted every holiday to be picture perfect and magical, beautifully decorated and full of special traditions. And inevitably something would go awry, or I’d spend all my time running around, and end up feeling stressed out and let down.
These days, while I am still a fan of family traditions, I have let up a lot on the “magical” and “picture perfect” requirements. Instead, I am good with a little imperfection, and with fewer decorations, fewer expectations, fewer presents, a scaled-back menu, and a lot more time to just relax.

Go to the Gym
There’s nothing wrong with the gym. In fact, when we were living in Seattle and my husband was working long hours as a Boeing engineer, the gym was my refuge. They had an awesome daycare and I could spend the whole morning working out, then taking a nice, long, relaxing shower without any interruptions. I loved it! During that season of life, with just one child, a healthy income, and lots of time to fill, there was no reason not to spend 3 hours at the gym each day.
Sometimes I miss those days!
These days, with two kids, a demanding full-time job, and an endless list of things to do, going to the gym just isn’t an option anymore. Instead, I have learned to squeeze in exercise when I can. In addition to riding my bike to work, I will often go for a very quick run first thing in the morning. It is usually just 15 minutes, but it is enough to get my blood pumping. For strength training, I use dumbbells or a kettle ball that I found for $8 at TJ Maxx. Cheaper than the gym, and a lot faster too!

Throw Big Birthday Parties
If you’ve read this blog for a while, you know that I am no stranger to big, elaborate, over-the-top birthday parties for my kids! In fact, at this CAKE party, which I threw for my daughter Annie’s 3rd birthday, one of my friends remarked, “It looks like Pinterest exploded all over your house.” I don’t think it was a compliment.
Even so, as my kids have gotten older and I’ve learned to relax a little bit, I’ve realized that they don’t really care that much about having a big birthday party (particularly because we don’t allow gifts!) The truth is, all that that effort I was putting in was mostly for me, not for them. These days we usually give them a choice between going on a little trip somewhere or having a few friends over for a small get-together. It is so much easier!
When we do throw a party these days, it is usually something pulled together quickly, using mostly the supplies we already have on hand, like this last-minute Peacock Party we planned in just two days. Sometimes perfection is overrated!
Shower Daily
I have to admit that I hesitated to include this one! It’s true—I don’t take a shower or wash my hair every day. I just don’t think it is necessary, especially on the days that I don’t do much physical labor or activity. Obviously your own situation may vary, but to me those 30-45 minutes are often better spent getting some work done. (And this DIY Dry Shampoo is the perfect way to keep roots from getting greasy in between washings!)

Fill Our Weekends With Activities
As much as I like to be busy, my husband hates to feel like he is running around all the time. At some point I realized that for both of us to be happy, we would need to carve out a lot of downtime and blank space on our calendar. We made an effort to consciously begin cutting out and cutting down on the number of activities we committed to, especially on the weekends, and instead try to use that time to just re-charge, without having the need to go here or do that.
I can’t even tell you what a difference it has made in our lives! Our girls are now at the age where, left to their own devices, they can pretty much entertain themselves for an entire day, losing themselves in imaginary games, playing with Legos, or running around outside. This leaves Chuck and I free to read, work on projects, play card games, or even take a nap if we feel so inclined. And then, by the time Monday rolls around, we are ready to go once again!

Use Coupons
If you’ve read this blog for a while, you know that I used to be an avid couponer. I wrote this Beginner’s Guide to Coupons, and when my kids were small, we would even make videos of our couponing adventures. For that season of my life, coupons were a good fit, and I was able to save my family a lot of money, getting our monthly grocery bill down to just $50 per week.
These days, money is not quite as tight, but time is definitely at a premium. While we still want to save money, we also don’t have time to spend hours and hours each week clipping coupons. Instead, we have learned to keep our grocery budget in check by vigilantly shopping the sales, meal planning, and freezer cooking.

Watch TV
Years ago, shortly before we met, and before the advent of flat screens, my husband bought a gigantic 70” rear projection TV for what was then his house—the same house we live in now. I hated that thing from day one, and after we got married, I told him that we would have to figure out something to do with it, because I did not want to live in a house where the main focal point was the TV. It took us a while to finally get rid of it, but thankfully we have not had a TV in our living room since. Hopefully we never will!
We do have a TV in our bedroom, and while I do enjoy “vegging out” every now and then with a show or movie on Netflix, it is more of a special treat than a daily habit.
* * *
While these are 12 things I have been willing to let go of in my own life in the interest of sanity, that doesn’t mean that you should automatically cut them out too. That said, I do hope that this list may inspire you to look at what things you do want to limit in your own life, or possibly even cut out completely. After all, at the end of the day, we all have the same 24 hours. By saying no to a few things that aren’t that important to us, we open up the space to say yes to the things that matter more.

* * *
What things don’t YOU do to save time, money & sanity in your own life?
Pin It
The post 12 Things NOT to Do to Save Time, Money & Sanity appeared first on Living Well Spending Less®.
July 8, 2015
Grilled Peaches with Mascarpone & Honey

 This is a guest post from Christin of Blue Crab Martini
Summer is in full swing and that means it’s also peach picking season! Every summer our family spends a day in the local orchard picking as many peaches as we can carry. Although these sweet and juicy treats are quite tasty on their own, we often find ourselves with more peaches than the four of us can possibly eat. Fortunately, we’ve come up with some creative recipes over the years to make sure no peach goes to waste. This recipe for Grilled Peaches with Mascarpone and Honey was a home run and quickly became one of our family’s favorite summertime desserts.
Grilling peaches is a great way to enhance their naturally sweet flavor because the heat from the grill gives the outer edges a nice touch of caramelization. If you’ve never grilled fruit before, or have been hesitant to give it a try, you’re in for a real treat! It’s a fast and easy way to add a new level of flavor to your dishes. The sweetness of the peaches combined with rich and fluffy whipped Mascarpone and salty pistachios makes for a truly delicious and decadent bite.
Although this recipe for Grilled Peaches with Mascarpone and Honey may sound like a fancy dessert, it’s actually quite simple and inexpensive to prepare. Five everyday ingredients and about 20 minutes are all you need to make this impressive dessert. Just gather fresh peaches, Mascarpone, cream, honey, and pistachios and you’re all set! Enjoy!

Here is what you need:
6 ripe peaches (any variety will work), sliced in half, pits removed
8 oz Mascarpone
½ cup heavy cream
½ cup honey
½ cup roasted and salted pistachios, finely chopped

Step 1: Fire up your grill (or heat up your grill pan if you’re cooking indoors, in which case you may want to lightly grease your pan first). Place the peach halves sliced side down onto the grill. Let the peaches cook until they are tender and have a light coating of caramelization, about 8-10 minutes depending on your grill. Then remove from the grill and place on a cooling rack, sliced side up.

Step 2: While the peaches are grilling, begin making the whipped Mascarpone topping. To do this, add the Mascarpone, heavy cream, and ¼ cup of the honey to a stand mixer fitted with a whisk attachment. Whisk on high speed for 3-4 minutes, or until the Mascarpone has a nice light and fluffy texture. Feel free to taste test to see if any additional honey is needed to meet your taste preferences.

Step 3: While the peaches are still warm (but not steaming hot), add a dollop of the whipped Mascarpone to the top of each peach half.

Step 4: Sprinkle the chopped pistachios over the Mascarpone topped peaches.

Step 5: Drizzle the remaining honey over the peaches. Enjoy!
Print This!
Recipe: Grilled Peaches with Mascarpone & Honey
Summary: This simple summer dessert is made extra special by searing in that sweet flavor on the grill.
Ingredients
6 ripe peaches (any variety will work), sliced in half, pits removed
8 oz Mascarpone
½ cup heavy cream
½ cup honey
½ cup roasted and salted pistachios, finely chopped
Instructions
Fire up your grill (or heat up your grill pan if you’re cooking indoors, in which case you may want to lightly grease your pan first). Place the peach halves sliced side down onto the grill. Let the peaches cook until they are tender and have a light coating of caramelization, about 8-10 minutes depending on your grill. Then remove from the grill and place on a cooling rack, sliced side up.
While the peaches are grilling, begin making the whipped Mascarpone topping. To do this, add the Mascarpone, heavy cream, and ¼ cup of the honey to a stand mixer fitted with a whisk attachment. Whisk on high speed for 3-4 minutes, or until the Mascarpone has a nice light and fluffy texture. Feel free to taste test to see if any additional honey is needed to meet your taste preferences.
While the peaches are still warm (but not steaming hot), add a dollop of the whipped Mascarpone to the top of each peach half.
Sprinkle the chopped pistachios over the Mascarpone topped peaches.
Drizzle the remaining honey over the peaches. Enjoy!
Preparation time: 5-7 minutes
Cooking time: 8-10 minute(s)
Number of servings (yield): 12
Christin Wade is the creator and writer behind the food blog
Blue Crab Martini, where she shares family friendly and (mostly) healthy recipes. She lives in Annapolis, Maryland with her husband, two young boys ages 6 and 3, and Cole, the family pooch. When she’s not baking, blogging, or being a mom you can find her on her paddleboard exploring the Chesapeake Bay.

Pin It
The post Grilled Peaches with Mascarpone & Honey appeared first on Living Well Spending Less®.
July 6, 2015
How to Clean & Organize Your Makeup Drawer


This is a guest post from Tasha of DesignerTrapped.com
Aren’t bathroom drawers the worst?
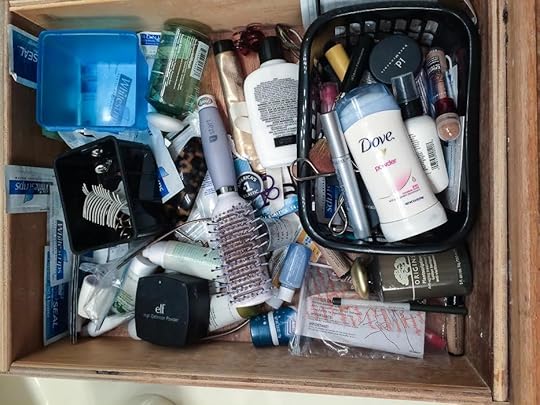
To be perfectly honest, I have a few drawers that I need to tackle, but the worst one in my home was a drawer in my bathroom where I keep my everyday cosmetics and personal care items. It made getting ready in the morning more stressful and frustrating than it needed to be. Worst of all, I often forgot what items I already had because things got buried, so I would purchase something I didn’t even need, which was a big waste of money. This is what my drawer looked like when I got started. Yikes.
Luckily I came up with the easiest solution EVER for organizing my bathroom drawer, which is what I am going to share with you today! It requires a trip to Target, (or a quick purchase on Amazon–thank you Amazon Prime!), and 10 minutes of your time. After you do this, you will wish you had done it long ago and will start hunting down other drawers in your home that need to be organized.
Tips for Getting Started
Before you begin, familiarize yourself with when things, such as makeup, should be tossed! Makeup can hang on to loads of bacteria, so it’s important to know how long to keep it. I was genuinely surprised to learn that mascara should only be used for 3 to 4 months because once it dries out or gets clumpy, it becomes a breeding ground for bacteria. GROSS! You’ll be surprised by how much clutter you can clear just by following these simple guidelines:
Generally speaking, eye makeup {including mascara, eyeliner and eyeshadows} should be tossed after 3 to 4 months. The reason for this is that your eyes have sensitive mucous membranes around them that can become irritated if you are using products that are full of bacteria. Worst case scenario is that you get an eye infection as a result, which is no good!
Foundations and liquid concealers should be tossed 6-12 months after opening. Stick concealers, on the other hand, can be kept for up to 2 years before needing replacement.
Powder based products, such as powders, bronzers and blush, can generally be kept for up to 2 years! will usually last really easily up to 2 years. As noted above, powder based eyeshadows are the exception to this rule and should be discarded after only 3 to 4 months.
Lip gloss should be tossed after 6 months, but you can hang on to lipstick for up to a year.
I’ve included a helpful “cheat sheet” infographic to guide you as you go through your makeup and decide what to keep and what to toss.

Other questions to ask yourself as you purge your drawer are:
When is the last time I used this? If you can’t remember, throw it out or give it away! Get rid of the clutter. If you can’t recall when you last used it, chances are you won’t be using it any time soon.
What is the expiration date? Be sure to toss any prescription and over-the-counter medications should be tossed after their expiration date.
What in the world is this???? Not every product has a printed expiration date, so let your common sense control when necessary. Eliminate products that look or smell different than when you purchased them.
Do I really need 3 of these? If you find that you have several duplicates of something, eliminate them! You don’t necessarily have to throw them away if you will eventually use them, but store them somewhere else to prevent them from cluttering the drawer used to store your daily items.
Would I purchase this if I went into a store right now? Again, if the answer is “no,” toss it or give it away! You want to eliminate products that don’t reflect your current style or taste so that you have plenty of room for those that do!
Okay, now that you know how to judge whether something should be kept or tossed, get to work!
Here is what you need:
An expandable kitchen utensil drawer organizer
{I purchased mine at Target for $12.00}
A trash bag

Step 1: Completely empty the offending drawer. Liberally throw away trash and other items that are outdated and/or that you no longer need.

Step 2: Place your kitchen utensil organizer in your drawer and expand it until it fits snugly.
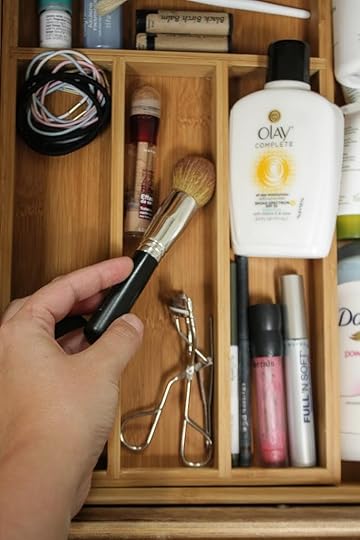
Step 3: Have fun organizing! I tried to place like items with like items and tidied up my zillion teeth whitening strips by wrapping a hair elastic around them. Super simple.
A bit of an improvement, wouldn’t you agree?
That’s it! For around $20 and 10 minutes of my time, I completely organized my most problematic drawer. Now that I can see all of the items I have, I won’t purchase duplicates and waste money. WIN! What are you waiting for? Go organize a junk drawer!

Tasha Agruso blogs at Designer Trapped in a Lawyer’s Body,
where you can find tons of thrifty DIY renovations and simple craft and home decor projects, like her popular painted vinyl floors and dotted, washable Sharpie mugs. She will inspire you to create a beautiful and happy home on a budget. She lives in Greensboro, North Carolina with her firefighter husband and 4-year-old twin girls. They are a typical, busy family and are proof that you can beautify your home one simple project at a time without breaking the bank.

Pin It
The post How to Clean & Organize Your Makeup Drawer appeared first on Living Well Spending Less®.
July 3, 2015
10 Smart Ways to Multitask


If you are anything like me, you probably multitask without a second thought. In fact, it is probably a rare occurrence that you find yourself focused on a singular task.
Like, ever.
To be perfectly honest, I have a hard time remembering the last time I managed to focus all of my attention on just one thing. There is always so much to do, and I want to do it all, all at once. This is not necessarily a bad thing, but not always a good thing either.
While multitasking does often seem like a necessity, and as much as I tell myself I’m being efficient, psychologists (and my husband) tell us that too much multitasking isn’t healthy. In fact, it may be burning us out and causing undue stress. Plus, it can actually make us less productive and less efficient, because multitasking actually increases the likelihood of critical mistakes and errors.
So what’s a busy girl (or guy) to do? Is there a way to get things done and yes, even multitask sometimes, without losing our sanity? After all, there are only 24 hours in a day–sometimes doubling up on tasks is just a reality of life!
Over the years, despite my propensity for biting off more than I can chew sometimes, I have discovered a few tricks for working smarter, not harder and getting things done as efficiently as possible. These 10 smart ways to multitask might just help you too!

1. Make a List…for Everything
Don’t think of your to-do list as just another extra step or a waste of time—they’re absolutely critical. Trust me, writing a list streamlines your activities, helping you group tasks together and be more efficient. Plus, you have too much to remember anyway! Give your brain a break and write a quick list.
Take, for example, a simple grocery store list. While it may seem silly to write down the three items you need to buy, how many of us have returned home and said, “Shoot! I forgot the ______!” And how often did you forget the most important item? Or maybe you returned with two items, but forgot the other one…?
The average person can only remember four items at once (seriously), so trying to remember more than that is just asking for a forgetful moment. Taking 30 seconds to write a short list before jumping into a task can ensure you hit all your critical objectives (even if those objectives are simply milk, bread and eggs).

2. Keep a Detailed Calendar
Writing down ALL your family’s activities in your calendar can really help with time management. Some people prefer an electronic calendar, while some prefer paper—the important thing is to find a calendar solution you’ll actually use. Simply scheduling a 1:00-1:30pm lunch break can help you plan, prioritize and determine what additional tasks you can complete during that time.
Don’t forget to give yourself some wiggle room. Things come up. Life happens. You can’t plan in that flat tire or a burnt dinner, BUT you can plan in a little extra time to deal with life’s little surprises. Bookend each scheduled task with fifteen- to thirty-minute catch-up periods, to avoid stress overload.
I like to keep a list of “whenever” quick-tasks (calls I need to make, correspondence, etc.), so when I do have a little extra wiggle room, I can tackle a few quick items so they don’t end up indefinitely on the back burner.
Bonus tip: Plan a Freezer cooking day to take care of all your meals for the entire week.

3. Get More Done with SMART Goals
Every Monday morning, write down a few big goals you’d like to (or need to) achieve that week. Make each of your goals SMART. That’s Specific, Measurable, Attainable, Realistic and Timely. “Be more organized” is not a SMART goal. Instead, try something like this: “To get this family more organized, create a DIY Command Center and hang it up in the kitchen by Friday.” This goal is now super specific, so you’ll know when you’ve achieved success!
Be sure to schedule in the steps required to achieve each goal. For example, if your ultimate goal is to lose two pounds this week, write out your exercise plan on your calendar, plan out all meals, schedule a time to weigh in, and add a fifteen-minute spot each day to record items in your food diary.

4. Be Smart About Your Smartphone
Our families benefit when we are fully present and in the moment. Checking your phone, reading or doing other distracting activities can be hurtful and rude, and can ultimately damage our relationships.
Unless you’re waiting on a critical (read: emergency) message, turn off the alert on your smartphone for texts and emails. Try to limit your email checking to once an hour or less, and set aside a specific time twice a day to return messages.
While Facebook, Twitter, Instagram and Pinterest are super fun and great for networking, crafting and sharing, sometimes social media can eat up time and distract us from real life. While online connections are important, try to limit your social media time to a set period once or twice a day. Remember that responding to someone’s Facebook status does not strengthen your personal connection to him or her in the same way as true interaction.
Why not just try removing social media alerts from your phone for a week or two? You might just marvel at your efficiency, presence of mind and freedom from distractions/

5. Stick to Multitasking-Friendly Activities
There are times when multitasking is most efficient. For example, try ironing while you catch up on phone calls, or practice your balance by standing on one foot while you brush your teeth, or cook dinner while doing the laundry.
You don’t always need to be fully engaged in every activity. Watching television is a perfect example. Catching up on a craft project, photo sorting or organizing a dresser drawer can be a great use of time while you’re watching a favorite show.

6. Don’t Overextend Yourself
It’s far better to take on one or two items and do them completely, thoroughly and well with your full concentration, than it is to try to do five things at once and fail at all of them. If you’ve planned ahead and mapped out your day on the calendar, and you can see a convenient moment to throw in a load of laundry or whip up a batch of brownies—go for it, then continue about your work.
However, if you have a batch of brownies in the oven and a load of laundry in, you’re late for two carpool pickups, but you need to make a phone call first, the television is on, and you’re trying to finish a church festival flyer—well, that’s when brownies get burned, washers flood (or clothes get forgotten and get that mildew stink), phone calls and pickups get mixed up, and typos happen.
Instead, schedule two tasks that can be done simultaneously but still deliberately and without requiring full concentration. Consult your to-do list, and schedule each item on your calendar. Taking a few minutes to make those critical planning steps can really help later on.

7. Set a Timer
If you still find yourself distracted or feeling frazzled, try setting a timer. It may sound counter-intuitive to add the pressure of time to an already stressful activity, but by setting aside a measurable and specific time frame, you can allow yourself to fully engage and block out distractions with the promise that there will be a time to visit them later.
Give yourself an allotment of time to really focus on a task, whether it’s writing, work, paying bills or something else, and focus fully on the given task at hand. When you get the urge to open up an internet browser and Google something, or to switch to a different task, add it to your to-do list and go back to concentrating on the task at hand, knowing you will address it when the timer dings.

8. Get Past Procrastination
Tasks we put off again and again often give us more stress than necessary. If you focus for just 20 minutes right at the start of the day, you can make a lot of headway on even the most undesirable task. I like to tell myself that anyone can do something for just 20 minutes.
After you’ve made it through, move on. Give yourself the reward of putting away the difficult task and scheduling another place for it on your schedule. After one or two tackles, you might find that it’s not so bad. Often the procrastination of a task takes more time than the actual completion. Don’t let yourself get bogged down by ruminating on how much you despise the task at hand and don’t want to do it. Whether it’s plumbing, or cleaning the garage, or taxes—tackle it in small chunks and get it over with.
Oftentimes, we procrastinate on back-burner tasks until they absolutely HAVE to be done. At that point, we’re time-crunched, tired and facing late nights of misery. By addressing these no-fun items first and using the 20-minute approach, you can avoid the three hours of last-minute, forced multitasking frazzle.

9. Focus on the Most Urgent Items
Each day you should approach what you must get done, what you should get done and what you’d like to get done and then prioritize accordingly. Narrow the “multi” down to your most important tasks, and give them your all. When you approach your list and your calendar, schedule in the items that really must be done (including that difficult one). Then move the rest to tomorrow.
Oftentimes, when multi-tasking in a disorganized fashion, we get into this frantic mode where we try to shove in extra tasks just to have them done in the name of efficiency. While this can mean that a lot gets done, sometimes the most important items don’t get the right amount of attention.
So, while we should not procrastinate, we also need to prioritize. Sometimes it’s okay to say no or to take store-bought treats to school instead of homemade. When you’re making dinner for a sick friend, pick up something she can re-heat later, rather than trying to get a hot meal out during the five o’clock rush.
10. Relax…Seriously!
I’ll be the first to admit that it is really hard to relax when it seems like there is so much to do, but occasionally, we need to stop, reflect, and nurture ourselves a little. As women, and particularly as moms, we often put ourselves last and try frantically to get everything done for everyone else. Not only does this cheat us out of happiness and enjoyment, but it cheats our husbands and children out of having a relaxed, happy and fun mom and spouse.
Allow yourself to disconnect from your phone, your computer, and all the to-do lists, and find time for those things that nurture you and bring you peace and happiness. Relax and do it without guilt. If exercise is very important to you and it helps you feel good every day, then get it on your calendar and keep your appointment to yourself. Maybe you’re a baker and you love decorating cookies every week, or maybe you’re a reader and you love to get lost in a good book. You need “you time” so you can be your best self every day for your family.
* * *
Multitasking done right can be an incredible way to get more done in less time. By approaching your to-do list in an organized and deliberate way, you’ll find that you can multitask and get things done efficiently and accurately, yet still have time for the important things. The key is prioritizing and organization. Just be sure to make yourself a priority as well—it will help you put your most efficient self forward.

Pin It
The post 10 Smart Ways to Multitask appeared first on Living Well Spending Less®.
July 1, 2015
Easy White Bean Chili

During the dog days of summer I’m all about no-fuss recipes that practically prepare themselves. This delicious white bean chili whips up in minutes with just a few basic ingredients, is crockpot friendly, and makes enough to feed a crowd. It also freezes beautifully which makes it the perfect recipe to include as part of a freezer cooking day, or simply divide it into bags to eat some now and save some for later!
I made it vegetarian friendly (and much lower in calories) by using vegetarian crumbles instead of beef but if your family prefers ground beef, it is delicious either way! I like serving it with some jalapeno corn bread, sour cream and cheddar cheese.

Here is what you need:
1 package vegetarian protein crumbles
1 sweet onion
3 15oz cans white beans
2 15oz can fire roasted tomatoes
1 10oz bag frozen corn
2 4oz cans diced green chilies
1 16oz jar salsa verde
2 packages dry chili mix
1 1/2 cups vegetable stock
3-4 tablespoons butter
sour cream & shredded cheddar cheese (optional-for cooking day only)

Step 1: Chop onion , set aside.

Step 2: Melt butter in large saucepan. Brown the vegetarian protein crumbles in the butter; add onions if desired. Set aside (or place onions in raw)

Step 3: Rinse and drain white beans.

Step 4: Combine meat, onions, beans, corn, tomatoes, diced chilies, salsa verde, and chili mix. Add stock if needed for extra moisture.

Step 5: Divide mixture into two gallon-size freezer bags (be sure to label bags first!) Freeze until needed.

Step 6: Cook in slowcooker for 3-4 hours on low.

Step 7: Serve with sour cream, cheddar cheese and jalapeno corn bread.
Print This!
Recipe: Easy White Bean Chili
Summary: This vegetarian friendly chili is hearty enough for meat lovers too!
Ingredients
1 package vegetarian protein crumbles
1 sweet onion
3 15oz cans white beans
2 15oz can fire roasted tomatoes
1 10oz bag frozen corn
2 4oz cans diced green chilies
1 16oz jar salsa verde
2 packages dry chili mix
1 1/2 cups vegetable stock
3-4 tablespoons butter
sour cream(optional-for cooking day only)
shredded cheddar cheese (optional-for cooking day only)
Instructions
Chop onion , set aside.
Melt butter in large saucepan. Brown the vegetarian protein crumbles in the butter; add onions if desired. Set aside (or place onions in raw)
Rinse and drain white beans.
Combine meat, onions, beans, corn, tomatoes, diced chilies, salsa verde, and chili mix. Add stock if needed for extra moisture.
Divide mixture into two gallon-size freezer bags (be sure to label bags first!) Freeze until needed.
Cook in slowcooker for 3-4 hours on low.
Serve with sour cream, cheddar cheese and jalapeno corn bread.
Preparation time: 7-10 minutes
Cooking time: 3-4 hours on low in slowcooker.
Number of servings (yield): 16

The post Easy White Bean Chili appeared first on Living Well Spending Less®.
June 29, 2015
12 Smart Ways to Save on Air Travel


Travel season is upon us, and if you are anything like me, you’ve got the bug and you are ready to hit the road…..or the skies! Of course vacationing with the whole family can be a challenge, especially when it comes to air travel. While one ticket might seem affordable, that same price multiplied by four or more gets very expensive, very quickly.
My husband and I recently booked flights for our family to Australia, where I will be speaking at a conference later this summer. It will be by far the biggest trip we’ve ever taken. Even though a portion of our travel is being covered by the conference, I have to admit that I took a mighty big gulp when I pressed that “purchase” button! International airfare for four is no joke!
Luckily for us, these days I fly pretty frequently for work, which means I’ve accrued lots of SkyMiles and frequent flier status on Delta. I’ve also learned that there are a number of ways for savvy travelers to save on the cost of air travel. From saving on tickets to keeping your extraneous expenses to a minimum, here are 12 smart ways to save on your trip:

1. Shop smart online
Shop discount airfare sites. Expedia, Orbitz and Priceline are online travel agencies, meaning they have access to deals and create discount packages to lure travelers. Kayak plugs your preferred dates into its search engine that looks at airline sites and agency sites to show you the price and options available. CarryOn uses crowd-sourcing to save members on airfare and hotels using group rates. CarryOn will also send you price alerts (as will Expedia).
Once you’ve found the best deal, get cash back on your purchase and save even more by shopping through a cash back site such as Ebates or Inbox Dollars. Ebates, for instance will give you up to 4% cash back on all purchases made through Expedia, plus you can also accrue Expedia rewards points AND get air miles on the airline you are traveling with–a great way to triple dip!
2. Cash in those credit card airline points and miles
I know, I know. Credit cards are dangerous and we should all use cash only, ever.
As a big a fan as my husband and I are of Dave Ramsey’s principles (we have made it to Baby Step #7–woot!), I am not afraid to say that we do use credit cards. That said, we are also extremely diligent about paying off our balances each month. This is key! If you can be just as diligent, then consider earning airline points through smart use of a credit card.
As a small business owner, I have found this particularly useful. There are a LOT of necessary expenses that come with running a business, everything from ordering supplies to paying for services and subscriptions. Per my accountant’s recommendation, I use my Delta SkyMiles credit card for every expense I possibly can, therefore earning as many SkyMiles as possible, which we can then use to pay for travel. This helps a lot!
These days many, many credit card companies offer mileage and points for every dollar that you spend. Not only that, but the dates are much less restrictive, and you don’t have to be a trained travel agent to figure out how to cash them in and use them for your travel. Many mileage points are transferable, so you and your spouse can use them interchangeably. Not only that, but they’re often accompanied by free baggage check-in and ticket insurance, preferred check-in status and even seat upgrades. (We’ll talk about some of the other benefits later on.)

3. Become a frequent flier with one airline
If you fly a lot, your loyalty to one airline can really pay off–more than you would save by always trying to get the very lowest fare. Frequent flier status is much more achievable these days, especially if you are smart about which credit card you use, as the right card can help you achieve preferred status much quicker. As a preferred frequent flier, you have access to discounts, special deals, better service, free upgrades and other great perks.
Here in Southwest Florida, where I live, the closest major airline hub is Atlanta. Thus, I chose Delta as my preferred airline of choice. Nearly every time I fly, I fly with Delta, and whenever I purchase airline tickets, I use my Delta card to get double miles. But that card is not just any card–for my business, I use a Delta Reserve card, which, in addition to regular air miles, awards bonus MQM’s (MQM’s are the special travel miles you have to accrue to attain frequent flier status.)
Those bonus MQMs help me earn higher status much faster than I normally would. The higher your status (Silver vs. Gold vs. Platinum vs. Diamond on Delta), the better your perks. And let me tell you….the only thing better than flying first class is being able to fly first class on a coach-priced ticket! (It’s living well & spending less at it’s best!)
Even if you don’t qualify for “preferred” status, you can still sign up with airlines that you frequent or that have a hub in your home state. For example, Frontier and Southwest offer great deals to the western US and Jet Blue has unbeatable prices if you live in New York; Delta has a hub in Atlanta, so you can find direct flights for a good price. Sign up for these alerts and you’ll get offers and sales right in your inbox.

4. Check with the airline directly
In the same vein of signing up for price alerts through your preferred airline, also check the airline’s site directly before you book through any other vender or agency. Sometimes airlines offer the best deals right on their website and you’ll find prices and time selection narrowed down. Not only that, but the airline sites are sometimes easier to work with, more simple and offer easier options if you have to change or cancel a trip.
5. Travel smart with insurance
Emergencies happen. Even if you think there’s absolutely no way you will cancel a trip, we all know sickness and other issues can come up out of nowhere. Before you pay the $50-$100 fee to insure your tickets through the airline, contact your credit card company. Even if you didn’t purchase the tickets using points or miles, some credit card companies will insure your purchase and save you the penalty and cancellation fees. See if your credit card provider offers trip protection before you buy tickets.

6. Be flexible and prepared
If you’re not picky about travel times or even dates, you can score the best deals of all. Obviously we can’t all spontaneously pack up and fly off to Cancun every time there’s an airline special, but having your passport ready and a few travel ideas in mind helps that weekend anniversary trip away seem more doable.
This flexibility can also pay off once you are at the airport. Airlines will frequently overbook flights and then ask for volunteers to be bumped. The less eager people are to change their plans, the bigger the incentives that get offered. If you’re not in a hurry to make it to your destination, you can score free tickets, upgrades, and sometimes even cash rewards.
7. Book one leg at a time
If you’re traveling alone or if you have really easy-going kids and you’re comfortable with flexible traveling, consider booking your trip one leg at a time. You may find a cheaper flight to Denver on one airline and make a connection to California on another. You may return home on a completely different airline or have an out-of-the-way layover, but you can save a ton of money in the long run. Before you hit “purchase” on the tickets, do the math, check nearby airports and get creative with deals.
This can be especially helpful when you are flying through lesser known, budget airlines such as Allegiant, Jet Blue, or Spirit.

8. Take a longer flight or schedule a longer layover
If you insist on always taking a direct flight (which yes, I know with kids can be a must), you’ll probably pay more. If you can work from the airport or don’t mind a little time in between flights or even taking a longer flight, you may save on your tickets.
An eight-hour layover can seem ridiculous to some people but many airports offer quiet workspaces, cafes, restaurants and reading material that can make your layover environment a decent place to spend some time. I’ve heard of more than one business executive that hold meetings right at the airport café and saves money on taxi fare, train travel and ground transportation (not to mention the time they save not having to travel to client offices). If you’re traveling alone or if you have a job that’s mobile, you might not mind a longer layover now and again.
The added benefit of longer flights and extra legs is that you can accrue more frequent flyer miles for the same trip and achieve status even faster.
9. Travel on holidays and less popular days
The day before Thanksgiving, Christmas, Memorial and Labor Day weekends are real travel nightmares. Expect long lines, delays, expensive tickets and other hassles if you travel on these days. Booking your flight instead on the holiday itself can make the experience less expensive and save you money. Tickets are frequently priced a little lower on holidays.
It’s also cheaper to fly on days that are less popular (Tuesday, Wednesday and Saturday). The most expensive days to travel are Fridays and Sundays.
10. Book your flight on a Tuesday, 54 days ahead
Airlines launch sales on Mondays or early Tuesdays. As each airline lists their updated sales and prices, other airlines scramble to meet them to get your business. This exchange is usually completed by Tuesday afternoon. Obviously there are some airlines that offer other sales at hot times like before holidays and on special days (if business is slow, etc), so it’s not a hard and fast rule.
According to a study by CheapAir, 54 days before travel is the optimal time to book. (Seriously, they did a study of 4 million trips!) Obviously, that’s not going to be the same for every trip, but booking 8 weeks in advance is a good guide.

11. Avoid additional fees
If you can pack smart and bring only one carry-on bag per traveler, you’ll save on the customary $50/bag charge that nearly every airline has nowadays. Additionally, some airline credit cards will also give you one free bag per flight.
Avoid other fees for things such as seat upgrades, on-board Wi-Fi, movies, entertainment and snacks by planning smart and simple. Download your entertainment before your trip and watch from your laptop or access from your tablet. Come prepared with as many small comforts as you can. (Pack a neck pillow, bring a wrap or scarf to stay warm, and book an aisle seat for more legroom.) If you travel simply and smartly, you can forgo many of the little fees that quickly add up over the course of your journey.

12. Don’t pay for food
Jerry Seinfeld had a stand up bit about airports and food prices and how they seem to subscribe to a market price that none of us would ever consider in the “real world.” It is so true. Airline food is notoriously expensive, stale and unhealthy. Even soda, bottled water and fresh fruit can be pricey and less than ideal.
Bring an empty bottle through security and fill up when you get to your gate or waiting area. Dry snacks are easy to bring on and packing a few granola bars and other items can help save you from making an impulse purchase at a time of desperation. Even on the flight, the most you’ll get for free is a half-can of soda and miniature pretzels. Keep yourself and your kids happy with a few little treats so you can avoid splurging on the $10 worse-than-lean-cuisine-meal offered on the flight.
Another option, if you fly frequently, is to consider a club or lounge access membership. Some credit cards, such as the Delta Reserve, United Plus, or American Express Platinum, include membership to the Delta Sky Club or equivalent. The annual fee for these cards can be pricey–anywhere from $350-450 a year–but the benefits (beyond the bonus MQMs, which I mentioned above) can make it worth the fee. I estimate that having access to “free” food, beverages, and WiFi in the Sky Club probably saves me at least $30-50 on food and drinks per trip, which adds up to well over $1,000 a year for the amount I travel. It also gives me access to clean bathrooms and a quiet place to work, which makes traveling so often a lot more bearable! The Delta Reserve card also gives me one free companion ticket per year, & that perk alone pays for the fee.
* * *
Whatever your destination and whenever you decide to travel, planning ahead and doing your research can really help you save, plus, when you save on travel, you’ll have more money to spend when you get there! If you decide flying is out of your price range and you simply want to get away, consider a road trip to save money and promote family bonding. Don’t shy away from the staycation either. And, if you do decide to brave air travel with kids, some careful planning and smart strategies can help ease the stress on yourself (and other passengers).
Happy flying!

Pin It
The post 12 Smart Ways to Save on Air Travel appeared first on Living Well Spending Less®.


