
Ruth Soukup's Blog, page 76
August 12, 2015
Easy Taco Cups

This is a guest post from Gina of Kleinworth & Co.
I don’t know about you but it seems the one thing I really dread is planning for & making dinner. It seems just as soon as the day gets started, I blink my eyes & it’s already time to think about the evening meal. I have recently started meal planning with some other blogger friends of mine & it has certainly helped in that prep process. However, sometimes I have leftovers from those great meals & I want to create something out of the box with them. It’s never quite the same when you just reheat & repeat. One fun recipe idea for those leftovers is taco cups.
These are so simple to make & the kids just devour them like they haven’t eaten in days. Something about changing up the packaging makes it taste better & enhances the leftover experience. The best part is that these require as little as 4-5 ingredients but you can always add more if you desire. I chose to keep it simple here & I’ll let you decide what other toppings & add-ins you might like to include later.

Here is what you need:
2 cups shredded chicken (from rotisserie or other leftovers)
1/1/2 cups shredded cheese
1 cup diced tomatoes
⅓ cup sour cream
2-3 large flour tortillas

Step 1: Preheat oven to 350 degrees. Start by taking something like a jar lid as your template & cutting around it to make your mini tortilla rounds. I was able to get 5 minis out of one large tortilla.

Step 2: Place in the bottom of your muffin tins.

Step 3: Add in your chicken & top with cheese. Bake for 10-12 minutes to crisp the tortilla, reheat those chilled leftovers & melt the cheese.

Step 4: Top with tomatoes.

Step 5: Then add sour cream. Enjoy!

Print This!
Recipe: Easy Taco Cups
Summary: This super simple recipe uses leftovers and can be made in minutes. Perfect for a light dinner or after school snack.
Ingredients
2 cups shredded chicken (from rotisserie or other leftovers)
1/1/2 cups shredded cheese
1 cup diced tomatoes
⅓ cup sour cream
2-3 large flour tortillas
Instructions
Preheat oven to 350 degrees. Start by taking something like a jar lid as your template & cutting around it to make your mini tortilla rounds. I was able to get 5 minis out of one large tortilla.
Place in the bottom of your muffin tins.
Add in your chicken & top with cheese. Bake for 10-12 minutes to crisp the tortilla, reheat those chilled leftovers & melt the cheese.
Top with tomatoes.
Then add sour cream. Enjoy!
Preparation time: 5-7 minutes
Cooking time: 10-12 minute(s)
Number of servings (yield): 10-15
Gina, author of Kleinworth & Co, is a busy homeschooling
mom to 3 great kids ages 11-17. She likes to find new ways to make life simple & streamlined on a budget. She loves to share easy DIY projects, fun crafts with the kids & a whole lot of recipes, with a few photography tips sprinkled in occasionally too.

Pin It
The post Easy Taco Cups appeared first on Living Well Spending Less®.


August 10, 2015
How to Save on Dry Cleaning


There’s nothing quite like getting a crisp, freshly laundered outfit back from the dry-cleaners. It’s almost like getting new clothing: everything is pressed, clean and looks brand new.
Being a fairly casual family, we don’t do a lot of dry cleaning in my house, but there are always those rare or special items—especially dresses, suits and coats—that require special care and cleaning (at least according to the label.) In fact, it seems like the default label for almost every shirt I buy these days is “dry-clean only.” Sheesh.
Unfortunately, there are many costs to traditional dry cleaning. Not only is it expensive, but it’s also pretty bad for the environment, even when using “green” dry-cleaners. The dry cleaning process usually involves using toxic solvents to remove and spot-treat stains. Yikes! Not only is this chemical carcinogenic and dangerous for the people that work in dry cleaning, but it’s not that great for those of us who are wearing the toxic clothes either. Doesn’t really seem worth it, does it?
Fortunately, there are a few ways to avoid dry cleaning almost entirely, and to save during those times when it really can’t be avoided. Next time, why not try some of these ideas?

Check Before you Buy
Always, always read labels before you buy. Most labels will outline care instructions so you won’t be surprised. (Who wants to get home only to find your four-year-old’s winter coat is dry clean only?) Avoid high maintenance fabrics, especially for kids and for items that you’ll wear frequently.
But what if you forget or absolutely fall in love with something that says “dry clean only”?
The reality is that leather, velvet and suede are just about the only things that really must be cleaned by a professional. Even silks and wool can be carefully spot-treated and washed, but the label will almost always recommend dry cleaning. So first read the labels and consider the requested care, then look for fabrics that are quality and can withstand home treatment. Knits, polyesters, denim and even cotton can be completely taken care of at home using careful techniques.

Use Care when You Wash
Dry-clean recommended fabrics do require additional attention. To refresh fabrics, try steaming. Hang your clothes in the shower, or even better, use a hand-steamer . Steaming can lend a really professional look to your clothes. Simply steam and the wrinkles will come right out, especially knits, polyester and loose weaves.
If you’d prefer not to invest in a steamer, try lightly misting clothes with a spray bottle or a fabric refresher like Febreze. Fill the bottle with water and a few drops of essential oil or try filling the bottle with two cups of water and a half a cup of vodka or rubbing alcohol. The liquid will evaporate, killing bacteria and germs that cause nasty odors (like B.O.). Just be sure to test it on the inside of a sleeve or hem first to be sure it won’t damage the fabric.
You can also toss clothes in your dryer on the low setting along with a damp washcloth and a dryer sheet. This will add a nice freshness to your clothing and get out the wrinkled look, leaving your clothes smelling fresh and clean.
Another key to fresh clothing is to make sure your washer is very clean. Try an at-home washer-cleaning kit like Affresh or run your washer through an empty cycle every so often. Change laundry right away when it’s finished and put it on a rack, hang it or get it right in the dryer. Not only will this prevent wrinkles, but it will also prevent clothes from getting that horrible sour, mildew smell. It can happen very quickly, so be aware!
Rayon, cotton, linen and wool can all be hand-washed and dried flat. Use a very mild or specialty soap to wash each piece, and use it sparingly. Carefully and gently hand wash and then reshape and flatten to dry. Fabric fibers can stretch and break down when wet, so use the utmost caution as you straighten each item to ensure they don’t become short and wide (a common complaint with hand-washed sweaters).
Try an At-Home Dry Cleaner
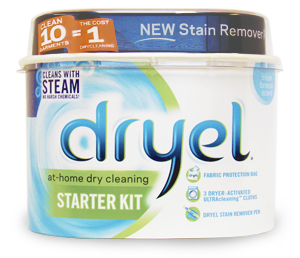
There are a few products on the market that allow you to at-home dry clean (such as Dryel). These products are simple to use and involve spot-treating, then misting with a spray. After clothing is misted, it’s placed in the dryer on a low setting. Dryel comes in a version that’s safe for black clothing (it won’t leave that white residue) and it’s available at most retailers, like Target, Walmart or Walgreens.
Similarly to at-home kits, you can also use a clothing brush, especially on suits or wool fabrics. It may sound old-fashioned, but fabric brushes are surprisingly effective at removing dust and dirt from clothing, especially those items that have been stored over summer months, like coats.
To use a brush on your clothing, look for a natural bristle brush (synthetic brushes can be hard on fabrics). Lay the item on a hard surface, like a table, and brush upwards in long strokes, against the grain of the fabric. Then, brush the fabric downward in similar strokes to restore the finish or “nap” of the fabric. You can use a dampened brush on fabrics that are especially dusty to really restore their luster.
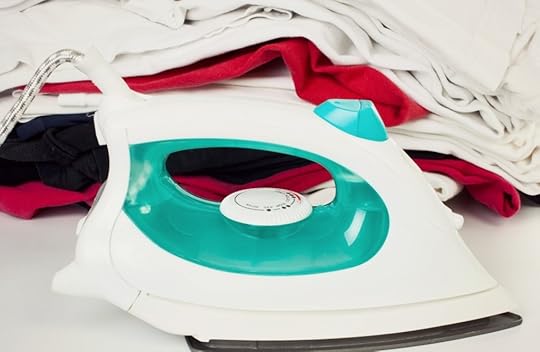
Don’t Avoid Your Iron!
Ironing is a chore that we often avoid, but it’s one of the single best things you can do to make clothing look clean, new and refreshed. It takes just a few minutes, and items such as skirts or jackets can be worn several times after just one ironing.
Use an ironing board or, in a pinch, a towel on a bed or hard surface will suffice. Start with the main body of the garment and then touch up the collar, lapel, hem, sleeves or cuffs, as needed. Always iron on the lowest setting for the fabric to avoid scorching or burning, and use distilled water in your iron to avoid mineral buildup.
Starch is not necessary, but it really does make a dress shirt look professionally done. A simple spray starch can crisp up the shirt and help it hold its wrinkle-free look. Try to tackle ironing once a week and you’ll find that it doesn’t become such a chore. You can usually do a week’s worth of shirts while watching a single television program or the news. You’ll be amazed at the results!

Care for Clothes Properly
Another way to maintain the look and cleanliness of your clothes is to take proper care to hang them up, remove pilling, properly treat stains and repairs, and to always use nice hangers. Adding just a few minutes to your laundry routine can really add dollars to your budget by extending the life of your clothing.
Trim threads and use a pill/lint remover to clean up sweaters, especially under the arms where they tend to get “nubby.” Place tissue inside drawers and carefully fold clothing to keep it wrinkle-free and looking great.
Always put your clothes away just as soon as you remove them from the dryer. Hang each piece on a nice hanger that don’t stretch or damage clothing. (Don’t use hangers that leave telltale marks on the shoulders of shirts.) “Huggable hangers” or fabric-covered hangers are best. For best results, never ever use wire hangers.
Look for Discounts
While caring for your clothes at home will always be cheaper than professional dry cleaning, there will be times that you simply can’t avoid the expense. Even so, taking your clothing to the professionals doesn’t have to mean taking yourself to the cleaners! (You knew that pun was going to show up eventually, didn’t you?) Keep an eye out for discounts on local dry cleaning services to use when you need them. ValPaks and local clipper magazines that come in the mail are a great place to look, as are the back of grocery receipts (many stores have coupons on the back of their receipts), or even online on sites like Groupon and Living Social often feature deals on local dry cleaning services as well.
* * *
With a little careful care and extra effort, as well as a willingness to keep a keen eye out for deals, you can really save a bundle on your dry cleaning and prolong the life of your wardrobe. Your clothing is an investment and you should try to make it last. Proper care and maintenance can offer a big payoff for just a little bit of work!

Pin It
The post How to Save on Dry Cleaning appeared first on Living Well Spending Less®.
August 7, 2015
5 Questions to Ask Before a Major Purchase


This is a guest post from Sarah Koontz of Grounded & Surrounded
Time and again on our journey towards living well while spending less we will have to make decisions about how to spend our hard-earned money. Some decisions are small, like whether or not we can afford to buy in bulk to stock our pantry when prices dip at the grocery store. Other decisions are larger and have the power to erase years of savings and financial gains, and we want to make sure they are worth the price we will pay for them.
After years of paying off debt and building up our savings account, my husband and I were presented with a unique opportunity to build our dream home in the country. As we evaluated the numbers and considered the opportunity, we realized that there was so much more to assess than just the financial impact of the decision. We needed to consider how the ripple effects of this decision would impact our life down the road. We recognized that it would put a financial strain on us for a short period of time, but came to the conclusion that the long-term benefits were well worth the risk.
As we walked through the process of building our own home, we learned so much about trusting the Lord with our financial well-being. As most building projects do, ours ended up costing far more than we expected and we nearly drained our savings account in order to avoid a larger mortgage at the end. But we are proud of every financial decision we made along the way because we thoroughly evaluated every purchase before we signed on the dotted line.

What is the P-R-I-C-E?
Throughout our home building project we learned to ask ourselves five questions before every big financial decision. These simple questions became a financial lifeline for us in stressful times and protected us from making decisions we would later regret.
When we are considering making a big purchase, we always ask, “What is the P-R-I-C-E?”
P-urpose
R-isk
I-ntrinsic Value
C-ommitment
E-motional Investment
By taking the time to evaluate all five aspects of a purchase before we make our final decision, we are easily able to spot red flags and deal breakers.

For example, our new home is located on 13 acres and the view is spectacular! I knew from the beginning exactly what patio set I wanted for the deck. As we were wrapping up the project, we had to decide whether or not the patio set was a wise purchase. When we took the time to ask ourselves, “What is the P-R-I-C-E?”, the right decision became quite obvious.
P- What is the Purpose?
Every item we buy should have a very specific purpose. It is important to take the time to decide if the purpose of the item meets a need or a want in our life. This is always the first question we ask ourselves because we treat needs and wants very differently on a financial level. The patio set was definitely a want, not a need.
R- What is the Risk?
Once we have established the purpose (need/want), then it is time to assess the risk. Generally, we only take financial risks for things we need. Using credit always adds risk to the unknowns of our future. Because the patio set was a want, using credit was not an option for us.
I- What is the Intrinsic Value?
The biggest financial decisions are often made because of the intangible value they add to our life. We strive to make financial decisions that strengthen relationships and improve the quality of our life. The intrinsic value of owning a patio set is that it would provide a place for us to sit and enjoy the view with our friends and family.
C- What is the Commitment?
The biggest purchases are often a commitment. Buying a house is a commitment to a mortgage payment. Buying a vehicle is a commitment to maintenance and fuel. It is crucial that we take the time to fully assess the long-term financial commitment of each purchase we make. The commitment level for a patio set is quite low, as it requires little upkeep and there would be no re-occurring costs.
E- What is the Emotional Investment?
All financial decisions affect us on an emotional level. When we over-extend ourselves financially, our emotional health suffers. Taking the time to evaluate the emotional investment before we commit to a purchase is the best way to protect ourselves from unnecessary stress. At the point in time we were discussing purchasing a new patio set, we were exhausted from our building project. Adding another large expense at this point in time would have increased our stress level for sure!

Our Decision…
Even though it was tempting to go out and buy that brand new patio set for our family, the risk and emotional investment were more than we could take on at the time. Maybe someday we will be able to afford that beautiful patio set, but for now we are grateful for what we do have. We have peace of mind that only comes from prayerfully considering the purpose, risk, intrinsic value, commitment and emotional investment before we make each significant financial decision.
It is important for us to make the best decisions we can with the information we have at the time, but that’s not to say we won’t still make mistakes. That is why I like to think of it as a financial journey; we simply do our best to make wise decisions and keep moving forward towards our goals. It is my hope that these simple yet powerful questions will help you navigate the next big financial decision your life as much as they have helped me.
Sarah Koontz is a stay-at-home wife & mother of 2 beautiful little girls.
She is passionate about writing, and loves encouraging other moms to “ENJOY the HERE and NOW” through her #ETHANproject Challenges. She has a blog with her best friend Sammi at Grounded & Surrounded where they write about all things Healthy! Heart, Home, & Habits. You can find Sarah on Facebook , Twitter, Instagram and Pinterest.

The post 5 Questions to Ask Before a Major Purchase appeared first on Living Well Spending Less®.
August 5, 2015
Easy Sorbet Pie

Whether it’s an invitation to a weekend barbecue, or simply wanting to make an everyday dinner a little more special, everyone needs a go-to dessert that can be thrown together quickly, with almost no effort at all, especially during the lazy last days of summer!
Luckily for all of us, this ridiculously easy sorbet pie is so simple to make that it can hardly even be called a recipe. But that’s what we are all about here at Living Well Spending Less–delicious easy recipes that make your life easier!
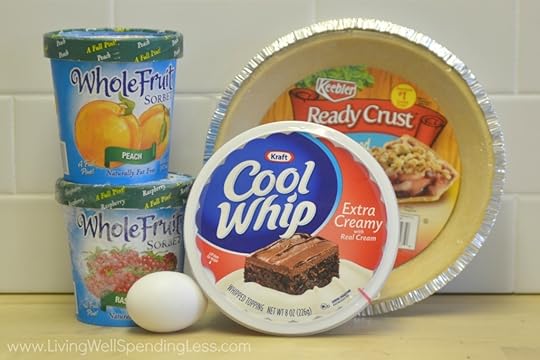
Here is what you need:
1 9 inch shortbread pie crust
1 pint peach sorbet (or your favorite flavor)
1 pint raspberry sorbet (or your favorite flavor)
1 container whipped topping
1 egg, beaten

Step 1: Brush bottom and sides of crust with egg yolk. Place on baking sheet. Bake at 375 for 5 minutes. Allow pie crust to cool on baking rack.

Step 2: Allow sorbet to thaw a bit and then scoop into pie crust. Then top with second flavor of sorbet.

Step 3: Smooth sorbet with spoon; cover and place in freezer for at least 2 hours.

Step 4: Top pie with whipped topping and place back in freezer for at least 4 hours or overnight.

Step 5: Slice and serve.
Print This!
Recipe: Easy Sorbet Pie
Summary: This super easy dessert comes together with little effort and can be made with any flavors you wish!
Ingredients
1 9 inch shortbread pie crust
1 pint peach sorbet (or your favorite flavor)
1 pint raspberry sorbet (or your favorite flavor)
1 egg
1 container whipped topping
Instructions
Preheat oven to 375. Brush bottom and sides of crust with egg yolk. Place on baking sheet. Bake at 375 for 5 minutes. Allow pie crust to cool on baking rack.
Allow sorbet to thaw a bit and then scoop into pie crust. Then top with second flavor of sorbet.
Smooth sorbet with spoon; cover and place in freezer for at least 2 hours.
Top pie with whipped topping and place back in freezer for at least 4 hours or overnight.
Slice and serve.
Preparation time: 5-7 minutes
Cooling time: 2-4 hours or overnight
Number of servings (yield): 8-10

The post Easy Sorbet Pie appeared first on Living Well Spending Less®.
August 3, 2015
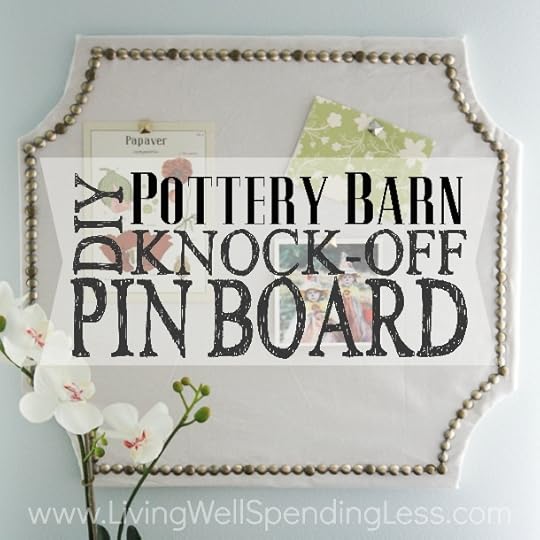
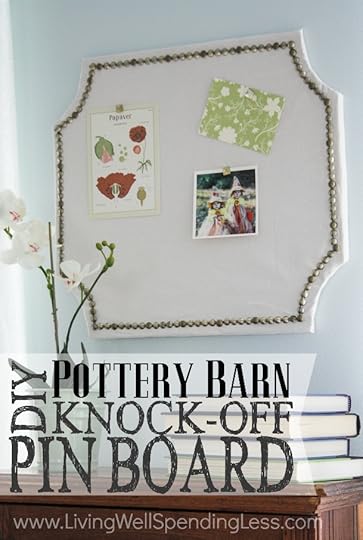
DIY Pottery Barn Knock-Off Pin Board
This is a guest post from Tasha of DesignerTrapped.com
Pottery Barn has gorgeous stuff, right? But, the price tags generally tend to put Pottery Barn’s drool-worthy merchandise out of my reach. Can anyone else relate?
The good news is that you can browse Pottery Barn and other designer stores for inspiration and then make less expensive, DIY versions of what you love yourself.
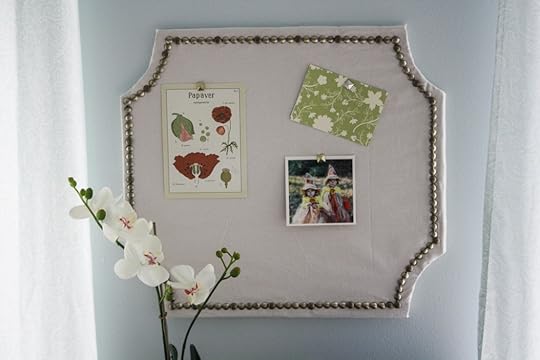
Case in point: I recently fell in love with this gorgeous nailhead pin board, which Pottery Barn sells for $159.

I knew I could make it for less myself, so I got to work. Read on to learn how to make your very own for around $25!
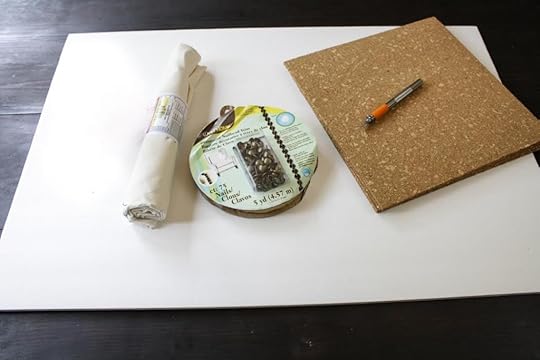
Here is what you need:
A piece of fabric remnant large enough to cover your board–mine cost $3.00
A piece of foam core board–I purchased mine at The Dollar Store for $1.00
3 cork tiles–my 4 pack cost $8.00
Nailhead trim–mine cost $11.00 at Joann’s with a coupon
Mod Podge (any finish)
An office stapler
Scissors
Craft knife
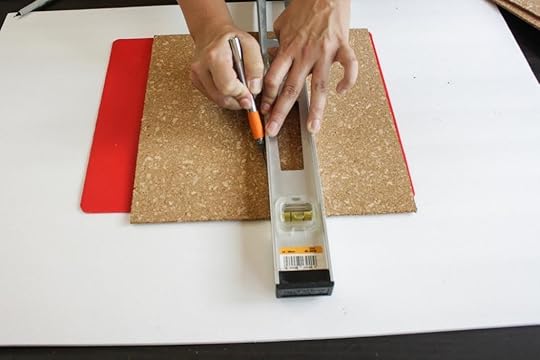
Step 1: Cut one of the cork tiles in half.

Step 2: Mod Podge your cork tiles onto your foam core board. Be sure to apply Mod Podge to both the board and the back of the tiles to ensure good adhesion. Allow the Mod Podge a couple of hours to dry.
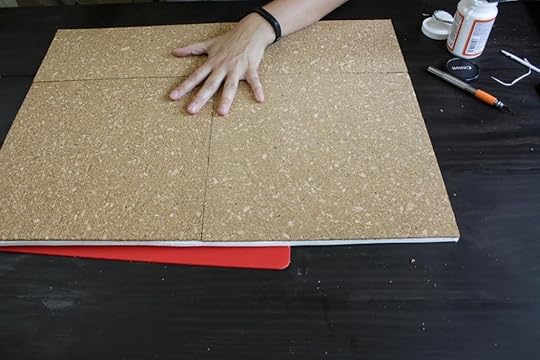
Step 3: Once your Mod Podge is dry, trim off the excess foam core board with your craft/exacto knife.
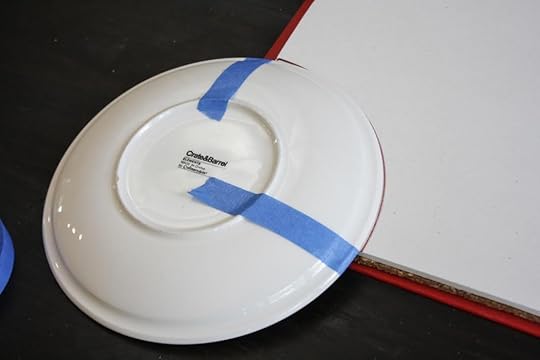
Step 4: Now you are ready to create the curved corners. I used a salad plate as a template for my curves. Be sure to line up whatever round object you use the same way on every corner. I used painter’s tape to ensure mine lined up correctly every time.
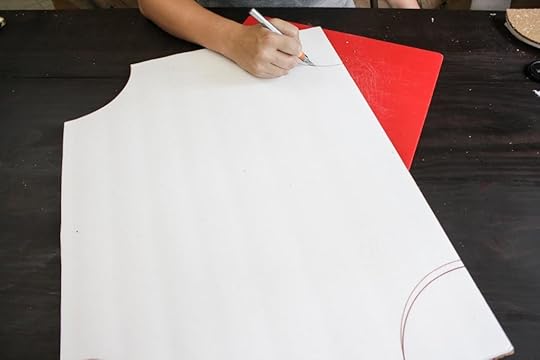
Step 5: Use your craft knife to cut out the curved areas. I recommend flipping your board over to cut from the foam core side.
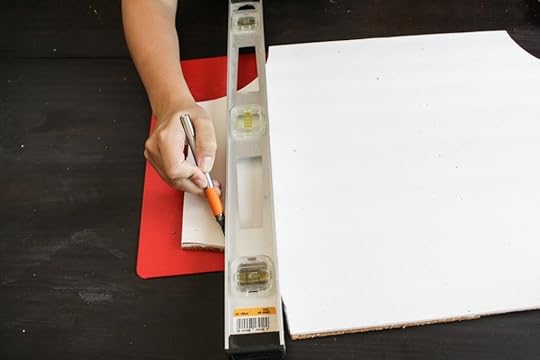
Step 6: I realized after I cut my curves out that my shape was not as square as I wanted it to be, so I trimmed two of the sides off a bit more. This is totally optional. If you are happy with your shape already, you can skip this step. If you do, yours will just look a bit more rectangular than mine.
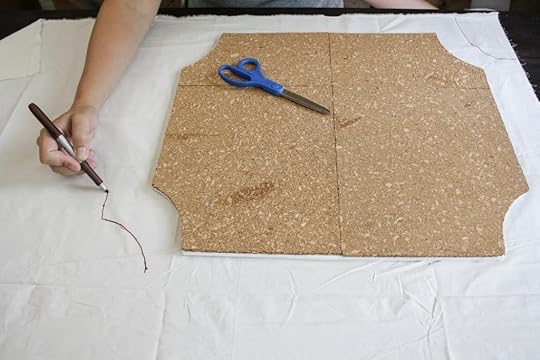
Step 7: Once you are happy with your shape, you are ready to cover the board with your fabric. Trace the shape of your board on your fabric, making it about 2 inches larger than the board itself. Then cut your fabric out.
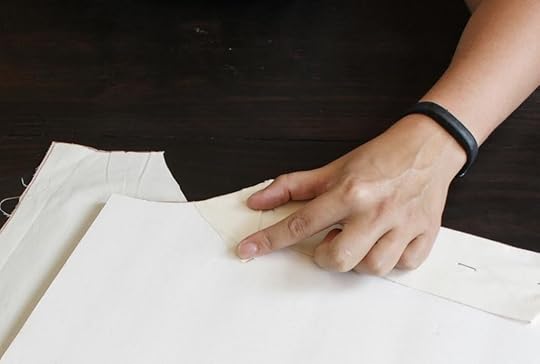
Step 8: Place the board cork side down on top of your fabric. Use a regular office stapler to secure the fabric to your board. To work your way around corners, cut the fabric in the middle of the curved area first so that you can pull the fabric to fit closely around the curve.
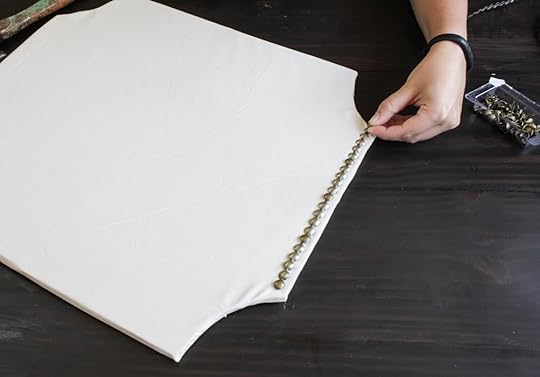
Step 9: Once your fabric is secure, you are ready to attach your nailhead trim. I used strips of nailhead, as opposed to individual nails, to make this step move quickly. To attach the strips to the board, you insert a nail into the holes that appear on the strip every so often. There is a slight color difference between the nails and the trim strip, at least for the brand I used (Dritz Home). You may be able to avoid this with a different brand.
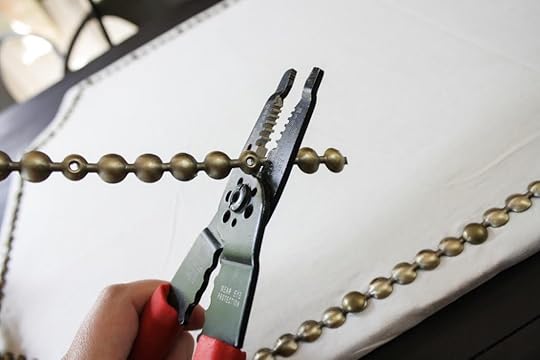
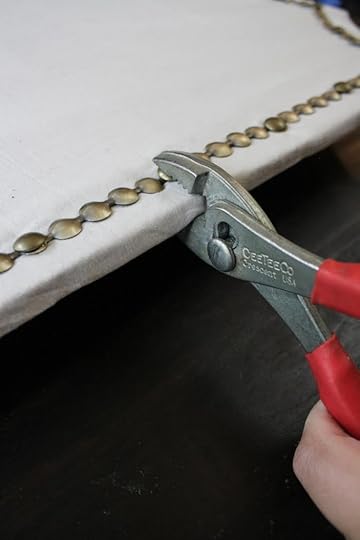
Step 10: I used wire cutters to easily cut the strips so that I could secure each strip with a nail in the corners–this ensures that they are firmly attached. The nails insert easily through the cork board and foam core, but the nails are long enough that they poke through the other side, so I used a pair of pliers to squeeze the nails a bit so that they no longer poked through the back of the board.
Use picture hanging command strips to hang your pin board wherever you like!
And that’s it! It took me about an hour and $25 in materials to make this gorgeous pin board–that’s a savings of $134 from the Pottery Barn version Talk about living well and spending less!
Tasha Agruso blogs at Designer Trapped in a Lawyer’s Body,
where you can find tons of thrifty DIY renovations and simple craft and home decor projects, like her popular painted vinyl floors and dotted, washable Sharpie mugs. She will inspire you to create a beautiful and happy home on a budget. She lives in Greensboro, North Carolina with her firefighter husband and 4-year-old twin girls. They are a typical, busy family and are proof that you can beautify your home one simple project at a time without breaking the bank.
Pin It
The post DIY Pottery Barn Knock-Off Pin Board appeared first on Living Well Spending Less®.
July 31, 2015
3 Back-to-School Budget Lessons Every Kid Needs to Learn

Today I am happy to welcome back my friend Cherie Lowe from the Queen of Free, who has graciously joined us here at LWSL as a regular monthly contributor. Cherie is the author of the amazing book, Slaying the Debt Dragon, which she wrote after paying off more than $127,000 in debt! I am so excited to have her bringing her wealth of knowledge & experience on this subject to LWSL–please join me in making her feel right at home!
* * *

This is a Guest Post from Cherie at Queen of Free
I have so many dreams for my two daughters. I pray they find passions in life to set their hearts ablaze. I long for them to see the wonders of the world and adventure to far off lands. I hope for a solid education, filled with great works of literature and challenging academic rigor to expand their knowledge base. I wish for both to learn how to love from the center of who they are, spreading joy and compassion with words and actions. And while it might not seem as whimsical or world changing on the surface, I aspire for my girls to have a solid understanding of money – to live on less than they make, be content with what they’ve been given, and realize that finances can be a blessing, not a curse.
During our journey of paying off $127K in debt, it was important for us to share with our daughters, Anna and Zoe, where we were at financially. We wanted to them to know not just why we were changing our lifestyle but how they could be an active part of our journey. Passing on lessons about managing money is one of the most important callings of parenthood. As our children transfer their dependence upon us to independence upon their faith and skill set, they mature into the people they’re meant to be.
On paper, all of the above sounds so noble and like a high aim. But what does that really look like in day-to-day life, in between soccer practice and piano lessons? How early do you begin teaching your kids about money? What’s over their head? How much is too much? Do you sit down and deliver a weekly lecture? Or do you just toss them into the deep end of managing their own resources and hope for the best?
My passion to equip parents to effectively pass on a healthy financial heritage to their children spilled on to the pages of Slaying the Debt Dragon: How One Family Conquered Their Money Monster and Found an Inspired Happily Ever After. More than anything, I wanted to share the many lessons we had learned while paying off debt, from how to throw your kid a birthday party and celebrate Christmas to the tricky territory of feeling guilty when you can’t afford to purchase from fundraisers. Key among our strategies to instill money wisdom in our girls is the back to school season.
With an onslaught of supplies to purchase, books to buy, and a wardrobe upgrade to ensure no dress codes are broken, a new academic year can be a stress on anyone’s budget. However, it also provides one of the best opportunities for you to begin shaping your child’s view of personal finance. Here are three life lessons you can teach through helping your child budget at back to school time.

Needs Are Not the Same as Wants
The very best gift you could give your child is unconditional love. Instruction in what constitutes a need vs. a want comes in right behind that. Most of us recognize that it’s easy to exaggerate what we want, creating a false sense of need. Since most schools provide a list of exact supplies, it’s easy to compare and contrast in the aisles what we need and what we want.
Don’t get me wrong, it’s ok to have wants. It’s ok to save for special purchases or long-term goals. But during the back to school shopping season, you can help your child begin process what it truly means to need something. One of the very best ways to introduce this idea is by taking an inventory of what you already have before you head to your favorite superstore to purchase items for the next year.
Take an afternoon to evaluate both clothing items and reusable school supplies. Make a record of what you already have and list what might need replaced. Talk about what is a need. Underwear in the right size with no holes? Need. New Hello Kitty lunch box when the one from last year is perfectly fine? Want.
Don’t forget that many items like scissors, rulers, backpacks, pencil boxes, and more will not need replaced every year. Thinking ahead before you hit the aisles will keep you from overspending and help your child realize what’s truly necessary and what’s just nice.

You Have to Make Choices in Life
Resources are limited. Unless you are sitting on a sizeable inheritance, you will need to make choices about what you can and can’t afford. And even if you can afford something, purchasing it might not be a wise choice. Clutter can multiple and leave us drowning in a sea of too many possessions. Whether you have a teen who desires every pair of cute jeans on the rack or a elementary student who insists on folders with each Avenger, you can help shape your child’s attitude toward money by helping them make judicious choices.
For most kids, it’s a good idea to present 2-4 options and help them narrow which items they will choose. Obviously, you’ll want to be sure that the required items are covered (see above comments on needs versus wants). But when it comes to deciding between clothing items or lunch boxes or notebooks covered in their favorite characters, begin to help your child refine what they love.
Even if you can afford all of the folders and all of the jeans, have your child choose one or two items and leave the others behind. You’ll begin to ingrain in them the ability to make choices and love what they purchase instead of fueling the insatiable desire to have it all.

Budgets Make the World Go Round
Ever fantasize what you would do if you found $100 on the ground? It’s easy to spend the money of others. However, when that money is yours, decisions become more difficult to make. If your child is in upper elementary school through college, it may be time to help them hold the purse strings when it comes to back to school shopping.
Determine a budget from prior year’s expenses and then allow your child to guide their own spending and if at all possible hold the physical cash in the store to pay for their items. You might even allow them to keep any leftover funds if they come in under budget.
This simple practice helps your son or daughter develop a sense of how much possessions cost and shifts the responsibility of managing money to them. If it’s his or her first experience budgeting, you must guide the process. Use the school’s list paired with your own personal inventory to create a list. Help them check off the list by choosing items wisely. Pull out a calculator or a phone to keep a running tally of your total expenses.
More than likely your child will be faced with the choice to buy one pair of name brand jeans or two pair of store brand. Or she may have to debate purchasing a plain lunch box instead of one with a character. A budget becomes the place where the rubber meets the road when you teach choice making and the difference between a want and a need.
You’ll never regret talking to your child too much about money. Just like you and me, our kids will make financial blunders. But it’s far better to help them pick up the pieces and make mistakes in their early years, guiding the decision making process and learning together than it is to come to the aid of young adults without a clue.
Back to school is one of your best opportunities to begin instilling personal finance wisdom into your child. Begin teaching them this fall and you might find out (like I do every year), that you learn a thing or two, too.

Cherie Lowe is an author, speaker and hope bringer.
Her book Slaying the Debt Dragon details her family’s quest to eliminate over $127K in debt in just under four years. As her alter ego the Queen of Free, Cherie provides offbeat money saving tips and debt slaying inspiration on a daily basis.
Pin It
The post 3 Back-to-School Budget Lessons Every Kid Needs to Learn appeared first on Living Well Spending Less®.
July 29, 2015
3 Ingredient Chocolate Chip Ice Cream


This is a guest post from Gina of Kleinworth & Co.
I, like most people, like easy recipes, especially in the summer when I want something delicious but still quick. I don’t want to turn that oven on & I don’t want to spend more than a few minutes on preparation. I’m always looking for recipes with just a few steps & even fewer ingredients too keep on hand. Which is why I always seem to come back to this simple & easy homemade chocolate chip ice cream. With just 3 ingredients you can’t go wrong.
I can tell you that this homemade ice cream is so simple to make! No ice cream maker needed, no churning required & it’s basically foolproof, you MUST give it a try! In fact, it’s so easy I often let my kids whip it up on their own so they can get creative with whatever mix-ins they are wanting at the time. It’s rich, creamy, cool & delicious, everything you want on a hot summer day.
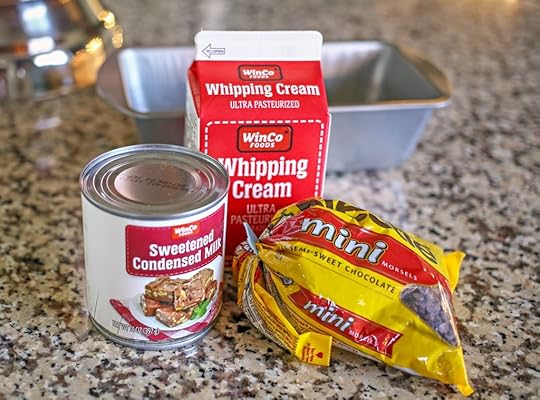
Here is what you need:
2 cups heavy whipping cream
1 14oz can sweetened condensed milk
1/4 cup mini chocolate chips
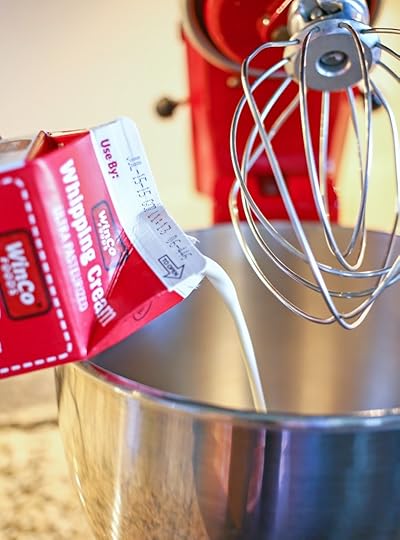
Step 1: Add whipping cream to your mixer bowl with the whip attachment.
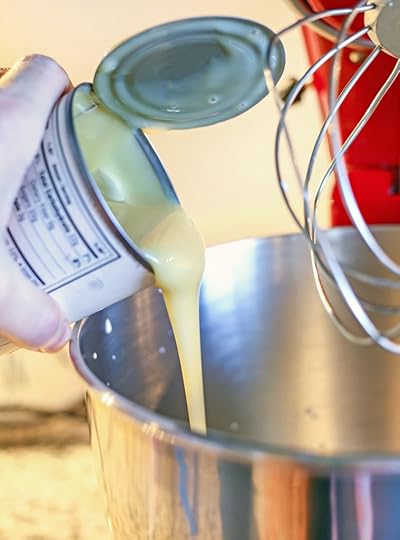
Step 2: Add sweetened condensed milk.
Step 3:Whip on the highest setting you can set your mixer at without it spattering outside your bowl for 4-6 minutes or until lighter & creamy looking. It won’t whip to peaks but just look thick & smooth.
Step 4: Transfer to freezer safe container.
Step 5: Slowly sprinkle in your chocolate chips & run a knife through the dish to distribute some of them through the ice cream without allowing them all to sink to the bottom.

Step 6: Cover & freeze for at least 8-10 hours, or overnight. I haven’t found a store bought ice cream with a flavor like this one. It’s heavenly & amazing what 3 simple ingredients can become!
Note:You can substitute some coarsely grated chocolate for the mini chocolate chips if desired. The key is to keep the chocolate small though so that it melts in your mouth with the ice cream. You want to avoid it becoming something you have to chew. Larger pieces of chocolate (like a regular size chocolate chip) tend to get quite hard & uncomfortable when frozen.
Print This!
Recipe: 3 Ingredient Chocolate Chip Ice Cream
Summary: This no churn ice cream comes together so easily and will surely satisfy your sweet tooth!
Ingredients
2 cups heavy whipping cream
1 14oz can sweetened condensed milk
1/4 cup mini chocolate chips
You can substitute some coarsely grated chocolate for the mini chocolate chips if desired. The key is to keep the chocolate small though so that it melts in your mouth with the ice cream. You want to avoid it becoming something you have to chew. Larger pieces of chocolate (like a regular size chocolate chip) tend to get quite hard & uncomfortable when frozen.
Instructions
Add whipping cream to your mixer bowl with the whip attachment.
Add sweetened condensed milk.
Whip on the highest setting you can set your mixer at without it spattering outside your bowl for 4-6 minutes or until lighter & creamy looking. It won’t whip to peaks but just look thick & smooth.
Transfer to freezer safe container.
Slowly sprinkle in your chocolate chips & run a knife through the dish to distribute some of them through the ice cream without allowing them all to sink to the bottom.
Cover & freeze for at least 8-10 hours, or overnight. I haven’t found a store bought ice cream with a flavor like this one. It’s heavenly & amazing what 3 simple ingredients can become!
Preparation time: 5-7 minutes
Cooling time: 8-10 hours or overnight
Number of servings (yield): 16
Gina, author of Kleinworth & Co, is a busy homeschooling

Pin It
The post 3 Ingredient Chocolate Chip Ice Cream appeared first on Living Well Spending Less®.
July 27, 2015
How to Actually Get Things Done


This is a guest post from Elaine of SuperRadChristianWriterChick.com
Do you ever wake up in the morning with an endless stream of to-do’s racing around in your head, only to crawl back in bed at night with none of them done? One of the characters of my favorite Jane Austen novel, Mansfield Park, says it perfectly:
“Life seems but a quick succession of busy nothings.”
So true, right? As women, we tend to spin spin spin like little spiders creating a web of illusion. While it might seems like we are meeting our real goals, we never actually achieve them.

How can we stay on task? How can we avoid letting the urgent overtake our long-term goals?
I believe that every woman can get their goals accomplished by making a simple 10-goal list everyday.
Unlike many people (including Ruth!), I simply don’t do mornings. I linger in bed and stay in my PJs throughout most of our homeschooling days, but I have managed to (among other things):
write and launch two books in less than three years
actively blog
have meaningful daily interactions with friends, children, and spouse
remain loyal to my spiritual side
exercise three times a week
homeschool my three oldest children
have two babies almost consecutively
keep a clean house
accomplish most of my long-term goals
This is not me bragging, but to show you that despite all the things that pull on my time (and they do!), I am able to stay focused on my long-term goals because of a simple little system I developed.
The downloadable chart has not only allowed me to achieve my work-related dreams of writing, but also my dreams of being a present mother, an active servant in my community and taking care of my prenatal and post-natal body. It’s not a chart that will help you merely work more effectively, but one that will help you LIVE more effectively.
I’m going to explain the chart and how I use it section by section.
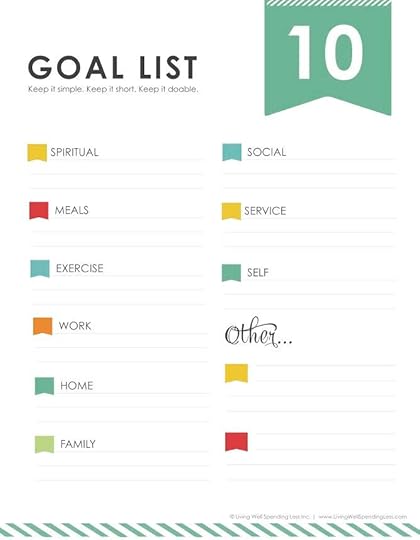
Get your printable goal list here.
Overview
This chart has 10 sections. While that might seem like a lot, they fill up quickly and you might find yourself wishing there were more spaces, but I promise that 10 goals is enough. There are so many other momentary necessities that will arise (insert: “Mom, the baby broke your favorite coffee cup!”) that you will see that 10 is sufficient. Besides, our society constantly pressures us to perform. Once you’ve completed these 10 goals you can sit back and say, “Well done, good and faithful woman/wife/mommy!”
Life changes day to day, so I usually pull out my list right before I go to bed to prepare for the next day. I mark off everything I accomplished for that day and transfer anything I didn’t accomplish to the next day so no goal gets forgotten.

Long-term vs Short-term
This chart is able to be used for long-term and short-term goals. Long-term goals are be more general, whereas short-term goals are more action specific. It’s a good exercise to assess what you want to accomplish throughout the year, then break each goal into tasks.
For example, one of my goals is to facilitate a intimate relationship with my children, so I would write this down as a long-term goal. The short-term daily goal is something we call “Mommy/Daughter” time: it is 15-minutes of uninterrupted time with one child per night right before bed.
Spiritual
Ruth often talks about waking up early before her children and having her coffee while reading her Bible. Like I stated before, I am not a morning person (partly because my husband works as a videographer that entails late nights). I complete my spiritual time when I have settled down after the morning chaos.
In this section of the chart, I might write which book of the Bible I want to focus on, a specific prayer request I have, or list a certain book I want to read for my quiet time.

Meals
I can’t tell you how many times my children pounce upon me claiming starvation. When I’m cornered in the kitchen with tiny voices yelling that they need food, I often go into crisis mode. By mentally preparing what I plan to cook for breakfast, lunch and dinner for the children, I can avoid a spontaneous lunch of Cheese Nips and pickles. I usually write out what I’m eating if it will be different from the rest of my family.
This also helps if you are trying to lose weight and since I have been pregnant six times I usually am! Have you ever heard the phrase, “If you fail to plan, you plan to fail”? Well, it’s especially true for weight loss!

Exercise
Who else puts on yoga pants in the morning in hopes that they will spur you on to hop on that elliptical you bought five years ago with your tax-refund money? Me, too. Exercise doesn’t happen by osmosis, you have to set your intentions toward it.
Even if I’m not going to workout, I like to write down ‘day off’ in the space for exercise so I’m know that I’m actively making a choice to take time off to rest and recover.
Work
If you are like me, you probably could fill up a 10-goal list of just things that you need to do at work–even if you work at home or don’t have a job. This section is provided for something that is outside of your normal work duties you specifically want to accomplish that day. Maybe it’s that extra something-something that will help you get noticed when you are reviewed for a promotion or something that cannot be put off without repercussions.

Home
There is always work to be done around the house (or apartment):the sink needs fixing,clothes need folding, groceries need to be bought. It’s a wonder that we can ever get to those cute DIY projects we love, much less organize the pantry and donate canned goods to the library’s food drive!
This is a section to put that ONE thing you want to tackle today.
Family
All of life would be meaningless if we didn’t pay attention to the people we love most. We dream of playing board games with our children when they are little, but our hectic schedules cause us to often forget to play that game of Chutes and Ladders or Balderdash. This space is for remembering to do those special things with our family.
It also might a visual reminder to call your dad on his birthday!

Social
A woman without a social life (even if you are an introvert) is a woman that doesn’t grow intellectually, spiritually or emotionally. We were intended for fellowship. Iron sharpens iron, so does a woman sharpen her friend! If you are a stay-at-home mom this can be especially troublesome. If you are only surrounded by toddlers all day, you might find yourself going a little stir-crazy. By purposing to do something social (either alone or with your family) you can ward off that pitfall.
Service
Mother Teresa is hailed as a modern-day hero. Why? Because she served people. Giving up a portion of your time doesn’t just benefit the person your serving, but it benefits everyone. If your children watch you serve they will be more likely to become servants themselves. It benefits those serving alongside you who need the extra set of hands. Lastly, it benefits you! Everyone needs a helping hand. And just as you sow a seed and it produces fruit, when you help it will come back to bless you.
I want to note that sometimes there is a time to back off serving. Serving others should bless you just as much as it blesses others and it is better done with a willing heart. I recently heard a sermon that gave a great acronym: H.A.T. You always want to put on the right H.A.T. when serving.
Serve where you have the:
Heart
Ability
Time

Self
This area is often the MOST neglected — my problem with wearing PJs all day not excluded. We do a million little things for other people, but often forget the one doing them! I like to remember that little something extra I can do (usually alone) for myself that will make me feel a little more human. It might be painting my nails, reading a book or drinking a glass of wine while watching Mr. Selfridge!
Whatever it is, make sure you write it down and spend a little TLC on you!
Other
In this section, you can write whatever doesn’t fit under another category. This is a catch-all section. It might be that you have two ‘work’ related things you want to write down or just something you want to remember.

Remember
My best advice to people who easily get overwhelmed by all the things they wish to accomplish is a common question and answer: How do you eat an elephant? One bite at a time.
Keep your goals simple, short and doable. By the end of the year, you won’t believe what you are able to accomplish one bite at a time!
Good luck!
Elaine is an author, blogger and speaker.
She’s written three books: Thriving the First Days of Becoming Mommy, How to Start a Christ-Centered Blog and has recently released her first novel, Without Regret. She writes on her blog at SuperRadChristianWriterChick.com. Elaine lives in the suburbs of Austin, Texas with her husband Noah and her six children.

The post How to Actually Get Things Done appeared first on Living Well Spending Less®.
July 24, 2015
7 Secrets to Finding the Life You Were Created to Live

Today I am happy to welcome back my friend Tammy Strait from Grace Uncommon. Tammy is the author of the inspirational book, Pretty: Breaking Free From The Illusions of a Superficial Life. I am so honored to have her share her heart & life experiences on this subject with us–please join me in making her feel right at home!
* * *

I was sitting on a bail of hay on my brother’s farm in northern Michigan. The air was heavy with fog and my thick skin was wearing thin. Truth is, my heart was worn right through. He was feeding the horses while I sat in a heap crying. My young marriage to my high school sweetheart and my rebound relationship with the “love of my life” had both ended. All in the matter of a few disappointing years. What am I going to do? I choked out through tears. I’d flown fast, from the small life to the high life, and this time I crashed hard.
He was quiet. And then he said, you don’t know how to be alone. He was short on words that day, but what he said was true. I’d never been alone. My whole life, my identity was wrapped up in who I was with, and what other’s said about me. I didn’t know who I was.
From the time I was twelve, I went from relationship to relationship trying to find my identity in others. I learned I was pretty good at being anybody! The truly sad part of that statement is I thought that was a good thing. Who I really was? I realized I didn’t have the first idea, and I set out to find it. While I’ll always be a work in progress, here are the 7 secrets I’ve discovered so far.

Stop pretending
You’re not doing anyone any favors pretending to be someone you’re not. The greatest gift you will ever give any relationship is yourself. Sometimes we need to get away from what feels normal in order to find what is real. Take some time to be alone. Travel, journal, sit in the silence of your own mind. Amazing discoveries happen when you embrace solitude and encounter yourself.

Do the work
We are only as strong as our greatest weakness, and we’ve all got them. The question is whether we admit them, talk about them, grow through them, and let them change us…or allow them to limit our strength. I’m not willing to let my fear keep me small. This journey is about being bold. As you walk through life you’re going to encounter your weaknesses. You’re going to encounter things you thought you left behind. Deal with them now so you can use them to build your strength.
Be intentional
Boldness demands that we live our lives with intention or we risk missing the point. How intentional are you with your life? I’m a creature of habit. I do the same things over and over and if I don’t make sure those habits are healthy, I’m likely to find myself night after night eating a bowl of vanilla ice cream with crushed candy canes and chocolate Hershey bar! Or sucked into social media, mindless television or the myriad other ways I can numb out of my real life. What we focus on becomes our destiny, both in thought and action.

Embrace your story
Your story is unique and no matter how hard it has been, there’s a gift. Every one of us has a redemption story. We just need to find it. The truth is we can never leave our past behind. It is always going to be with us, threatening to hold us back. But when we make peace with it, accept it for what it was and not what we wanted it to be, then we get to rewrite our story. We get to design how far it will propel us forward to the life we were created to live.
Design your life
You hold the power to design your life. The greatest war we face in this life is the battlefield of our mind. Sometimes what we know in our heads has a hard time making it to our hearts – we just don’t feel it! We mistakenly believe that if we don’t feel it’s true, then it can’t possibly be true. These are the parts of the journey where we just have to do it anyway. The first steps will most definitely be scary! They’re supposed to be. You’re doing something new and brave and hopefully different than you’ve done in the past.

Be patient
This is not a race. There’s no destination and you will never find a perfect map. Sometimes you’ll find yourself running to get somewhere only to find that it was the wrong way. It’s okay. Because despite all the ways I have fought to prove myself capable, sometimes my greatest lessons came in the quiet moments inside the cavernous walls of impossible where God whispered to the still places of my heart: Wait. Great things will come. Sometimes you just have to wait.

Have fun
This is hard for me. I’m wired to equate value with production and too often believe that I can’t play until all my work is done. When the house is clean and the laundry is put away and everything else is done – THEN we can have fun. You can imagine this doesn’t leave much room for fun. I recently heard Mark Batterson say: “Don’t write a sermon. Get a life!” It hit me hard because the times I most deeply struggle for words, are the times I’m just trying too hard. Play is not a reward for success, but is essential to success.
When you think about your life and the story you have lived, ask yourself: Is this the story I want to tell? You don’t get to change your past but you do have the power to write your future. And while there’s no map or destination, you already hold everything you need to begin.
It’s been a long journey figuring out who I am and the truth is, I’m still on it. Honestly I don’t know if I would’ve taken this road if I’d been given another option because it was hard. But looking back, I know we were made to do hard things. There’s an anonymous quote I love that says: “Nobody said that it’d be easy, they only promised it would be worth it.” This path is exactly like that. And one of the biggest problems with a path like this is it’s never straight or without pothole or dead-end. It’s not without wrong turns or u-turns or stops in the road. All I know, is it’s ours. And it’s good.

As with all journeys it’s good to have a friend to travel with. I share my story and the lessons I learned along the way in my new book, Pretty: Breaking Free From The Illusions of a Superficial Life, which is now available in print! Order your copy now and get my study guide free as my gift to you!
Tammy is an encourager, contemplator and deeply soulful spirit. She writes
candidly on her blog: Grace Uncommon about the common struggles that bond us together as women, and how we can boldly design unhindered lives. She just released her first book, Pretty: Breaking Free From The Illusions of a Superficial Life.

Pin It
The post 7 Secrets to Finding the Life You Were Created to Live appeared first on Living Well Spending Less®.
July 22, 2015
10 Freezer Meals in One Hour: Part 7


Here at Living Well Spending Less we are 100% committed to bringing you easy recipes that taste great and don’t take a lot of time, effort, or expensive ingredients to throw together. As a busy mom, I also want meals that can be made and frozen ahead of time to save time on hectic weeknights, especially as part of a Sunday Prep plan. My goal is to spend less time in the kitchen, not more, but I still want to be able to provide tasty meals that my family loves (and avoid eating out when we can!)
Over the past year and a half we have shared six different 10 Meals in One Hour plans, which have each included 5 great freezer recipes that can be prepared together in about sixty minutes. (You can find the previous plans here: Part 1 , Part 2, Part 3 , Part 4 , Part 5 and Part 6) They have been a huge hit, not only with our own families, but with many of your families as well, and we’ve absolutely loved hearing how much you all are enjoying these tasty recipes!
Today I am super excited to share with you a new series of “fresh flavor” recipes.
As usual, in order to make the cut, each recipe must meet ALL of the following criteria:
Deemed delicious by both my kids and husband
No pre-cooking required (aside from browning veggie crumbles)
Freezer friendly
Easy to cook
Uses budget-friendly ingredients and pantry staples
In this one post you will find everything you need to prep 10 awesome freezer meals in about an hour of hands-on time (not including grocery shopping.) Just think, in just one quick weekend session you could have almost two weeks worth of absolutely delicious, family-friendly meals all ready to go!
Before you begin, you will need to gather your tools & supplies and also make sure that you have all your groceries on hand. I find it is easiest to go grocery shopping the day before I do my cooking. To save time unloading, only put away the items that need to be refrigerated. Finally, make sure your kitchen counters are cleared of clutter and sanitized and empty your dishwasher and sink of any dishes. (Check out this post for more tips on freezer cooking like a pro!)

Here are the five recipes we will be making:
Simple Summer Chicken Sandwiches
Spice Rubbed Steak Salad
Easy Chicken Satay
Easy Crockpot Lettuce Wraps
Easy White Bean Chili
Here are the supplies you will need:
10 gallon size zipper freezer bags
labels or permanent marker
large mixing bowl
cutting board
sharp knife
garlic press
can opener
dry measuring cups
liquid measuring cups
dry measuring spoons
liquid measuring spoons

Here are the ingredients you will need:
Produce
1 sweet onions
2 bunches green onions
2 lemons
2 packages chopped romaine lettuce (optional; only needed for cooking day, not for prep)
1 bunch fresh basil
1 bunch fresh parsley
16-20 cloves garlic
Ginger(freeze dried or fresh)
2 containers cherry or grape tomatoes ( optional; only needed for cooking day, not for prep)
1 package Arugula (optional; only needed for cooking day, not for prep)
2 heads iceberg lettuce (optional; only needed for cooking day, not for prep)
3 carrots
Pantry Staples
Olive oil
Worcestershire sauce
Ketchup (optional; only needed for cooking day, not for prep)
Mayonnaise (optional; only needed for cooking day, not for prep)
Rice (optional; only needed for cooking day, not for prep)
Black pepper
Salt
McCormick Grill Mates Montreal steak seasoning
Pre-packaged chili powder
Brown sugar
Ground cumin
Garlic powder
onion powder
Chili powder
Soy sauce
Sesame oil
Hoisin sauce
Sesame seeds
Red Pepper Flakes (optional)
Rice wine vinegar
Canned/Dry Goods
1 13.5oz can coconut milk
3 15oz. cans white beans
2 4oz. cans diced green chilies
1 16oz. jar salsa verde
1 8oz. jar/can water chestnuts
1 5oz. package croutons
1 32oz. carton vegetable stock
2 16oz. jar creamy peanutbutter
Bread
Kaiser rolls (cooking day only)
Dairy
1 container blue cheese dressing (optional,cooking day only)
1 9oz. blue cheese crumbles (optional,cooking day only)
1 stick butter
Meat
9-12 pounds boneless, skinless chicken thighs or breasts
2 3-4 pounds skirt steak
2 packages Vegetarian crumbles
Frozen
1 10oz. bag corn niblets
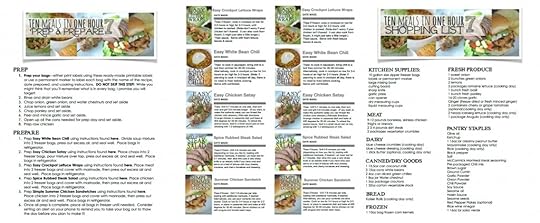
Be sure to print the following pages before getting started:
Printable labels (designed to work with Avery 8163 shipping labels)
Printable Shopping List
Printable Prep & Prepare Instructions
Be sure to also print the following recipes:
Simple Summer Chicken Sandwich
Spice Rubbed Steak Salad
Easy Chicken Satay
Easy Crockpot Lettuce Wraps
Easy White Bean Chili
PREP
Prep your bags—either print labels using these ready-made printable labels or use a permanent marker to label each bag with the name of the recipe, date prepared, and cooking instructions. DO NOT SKIP THIS STEP! While you might think that you’ll remember what is in every bag, I promise you will forget!
Rinse and drain white beans
Chop onion and set aside
Chop green onion and set aside
Dice water chestnuts if necessary
Juice lemons and set aside.
Chop parsley and set aside.
Peel and mince garlic and set aside
Open up all the cans needed for prep day and set aside.
Prep raw chicken
PREPARE
Prep Easy White Bean Chili using instructions found here . Divide chili into 2 freezer bags, press out excess air, and seal well. Place bags in refrigerator.
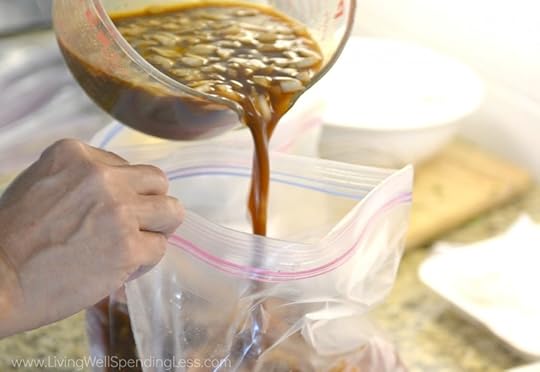
Prep Easy Chicken Satay using instructions found here . Place chicken into 2 freezer bags, press out excess air, and seal well. Place bags in refrigerator.
Prep Easy Crockpot Lettuce Wraps using instructions found here . Place chicken or crumbles into 2 freezer bags and cover with marinade, then press out excess air and seal well. Place bags in refrigerator.
Prep Spice Rubbed Steak Salad using instructions found here . Place meat into 2 freezer bags, then press out excess air and seal well. Place bags in refrigerator.
Prep Simple Summer Chicken Sandwich using instructions found Here . Place chicken into 2 freezer bags and cover with marinade, then press out excess air and seal well. Place bags in refrigerator.
Once all prep is complete, place all bags in freezer until needed. After you’ve made your meal plan for the coming week, consider setting an alert on your phone to remind you to take your bag out to thaw the day before you plan to make it.
* * *

Have you tried making 10 meals in an hour yet? What tricks or tips can you share?
Pin It
The post 10 Freezer Meals in One Hour: Part 7 appeared first on Living Well Spending Less®.


