
Laura Strutt's Blog, page 20
September 30, 2014
Quick Catch Up: Hello October!
Good Morning October! I’m all about the Autumn vibes right now and and I’m living in a perpetual state of desire for a PSL. I know. I just ned to put on a plaid shirt, a piece of knitwear, my dark framed glasses and, with a PSL in hand, I;ll be a complete walking stereotype. I’m fine with that!
September was a beautiful, busy, happy month – packed with wedding anniversary celebrations (I know, we made two years already, how did that even happen?!), we’ve made inroads with renovations projects, I;ve completed a huge work project and am starting a new journey with lots of exciting projects on the horizon.
This month I headed to the first ever Handmade Fair at Hampton Court and had a total blast? Did you make it to the show – be sure to share your stories, or blog posts to the event in the comments – I’d love to hear about your experiences too!
This show mark the start of a busy time for me, hitting the road for the exciting show season ahead!
So, here are my 2014 Diary Dates…
9 – 12 October The Knitting & Stitching Show Alexandra Palace, London
30 October – 2 November The Knitting & Stitching Show RDS, Dublin
20 – 23 November The Knitting & Stitching Show HIC, Harrogate
There has also been a fair bit of fun happening here on Made Peachy too! So, heres a round up of some of the things that have been my favourites here at Peachy HQ this month!

 Crafts: Quick-Make Bunting With Sizzix
 Style: DIY Autumn Cinnamon, Honey & Olive Oil Hair Mask
 Skills: How To Machine Piece Hexagon Patchwork[image error]Eats: Red Velvet Whoopie Pies
My other loves on the internet right now are…
My Browser Besties:
Lady Sew And Sew
CICO Books
Lulamae
Love Patchwork & Quilting
My Blog Crushes:
The Dainty Squid
A Beautiful Mess
Little Squish
She & Life
While I’ve been working at warp speed this month, sadly there has been little leisure time to curl up with a book (more’s the pity) but I have managed to add three new titles to my Reading Challenge in My Months Reads:
 36: Flowertown - S G Redling
My love for post-apocalyptic novels is growing and this was a great read. This was a chance find in the Kindle store, I have never read this author or even heard of this title, so this was a real treat to find a real gem of this genre. Truly enjoyable read!
 37: Secret Lives – Diane Chamberlaine
As a huge fan of Diane Chamberlain it was great to find one of her older works. This book contains everything you would expect from a Diane Chamberlain novel – carefully constructed storyline, blistering issues, and a personable collection of characters. A wonderful book that was a real page turner!
 38: Midlife Crisis at 30- Lia Macko & Kerry Rubin
This book was not what I expected – which might explain what it took me so long to get through it, returning to it again and again over the coming months. I believe there is value in this book, perhaps it is worthy of a re-read, there are certainly relevant elements worth exploring, but it seems to me that this exploration needs to be driven by the readers rather than guided by the authors through the text.
If you’re looking for ideas for boos to add to your Must Read List be sure to check out my January Reads, February Reads, March Reads, April Reads, May Reads, June Reads, July Reads, August Reads! If you’re on GoodReads sure to swing over and say Hi!
October you will be a month of travelling and meeting new people. You will be a month of making and creating and, most importantly you will be a month of delicious PSLs!
What plans do you have for October?
The post Quick Catch Up: Hello October! appeared first on Made Peachy.


Knitting & Stitching Show Ticket Winners!
Happy Tuesday y’all!
Today is the day that we announce the winners of the Made Peachy Knitting and Stitching Show Free Tickets Giveaway! Thank you all so much for getting behind this giveaway – I was stoked at all the entries…I wont lie to you, it has taken me an age to collect them all from Facebook, Instagram, Twitter and also the comments, get them all added to a hat and draw out the winners! But as least writing out all the names was good calligraphy practice (if you ignore the smudges!)
So, without any further ado here are the lucky three readers…
Congratulations…
 CarolineGsbM
Lyn Blackburn
Two Wednesdays (Jane)
Please email over your postal address so that I can get your pairs of entry tickets out to you!
 Thanks so much for entering – I’m sorry that y’all couldn’t win, it’s a great show and there is still time to get your tickets online!
The Knitting and Stitching Show takes place at Alexandra Palace:
Wednesday 8 Oct – 10am – 5.30pm
Thursday 9 Oct – 10am – 7pm
Friday 10 and Saturday 11 Oct – 10am – 5.30pm
Sunday 12 Oct – 10am – 5pm
Tickets prices – Adult: £16 on the door (£13.00 in advance); Children £7 on the door (£6 in advance)
If you do come along, be sure to swing in past the Vilene Stand TGR3 where I’ll be sharing some makes (if I get a wiggle on and finish them!), inspiration and helping with your stitching questions – so, come along and say hi!
The post Knitting & Stitching Show Ticket Winners! appeared first on Made Peachy.
September 28, 2014
The Week That Was: New Additions & New Challenges
The last week has been all about the new. A huge Top Secret project is drawing to a close and these times always feel strange to me. After months of being completely immersed in one large project to find that you suddenly have free time, well, not so much free time – there is always something out there to fill it…usually all those things that have, despite your best intentions, fallen by the wayside. But, none the less there is free head space.
 This is a great time for catching up with your thoughts, getting things back in order and being able to re-set new goals and challenges. However, this free head space time seems to have been and gone in an instant. During the last few days, I have gone from being The Girl Who Has Finished up a Huge Project to The Girl Who (if she can make the stars align) Will Be Starting on Two Huge New Projects. The free space in my mind is now taken over with dashing to London for meetings, dissecting contracts, plotting out reasonable working schedules, assessing all commitments and trying, trying, trying to make a dream a reality. What can I say, it’s Monday and already the thinky part of my brain is rapidly racing towards the weekend and some chill out time. I know, its only Monday.
I usually like to celebrate lovely calm feeling of finishing up a huge project, however, we have been throwing ourselves headlong into sorely neglected DIY tasks, with the aim of getting through more of our home renovations. There is little glamour in the hard graft of scraping 100 year old paint from the exterior of your home, but there has to be something said about the amazing feeling of achievement…even if there is still a long hard slog ahead of me. I have learnt that most renovation projects are not a quick finish, most often I find myself returning to the same task day after day, and trying to keep up my enthusiasm when the progress is so achingly slow. In a bid to remind myself that these efforts will all pay off soon and as a little treat for reaching the end of a huge project I treated myself (and out little home) to a couple of lovely statement accents from White Faux Taxidermy – and boy, am I ever glad that I did!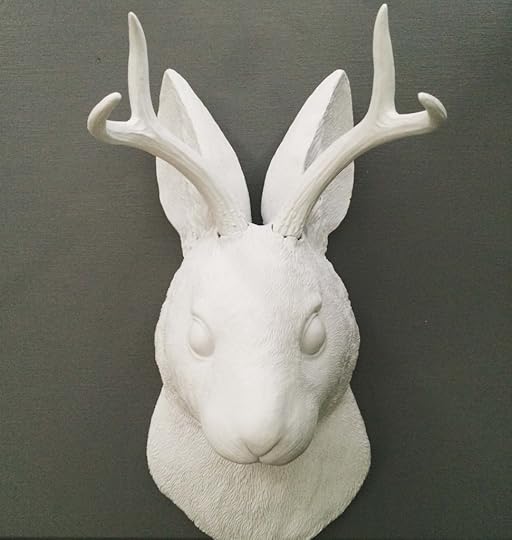 These beauties are just about the most perfect decor elements that I have set my eyes on. I mean, what home is complete without its very own Jackalope mounted on the wall for all to see?
 And, don’t even get me started on these resin Antlers – I have been coveting these for what feels like an eternity! Also, you may like to know that these statement pieces are created by a duo of animal lovers and no creature is harmed in the production of these amazing home accents. I am in love!
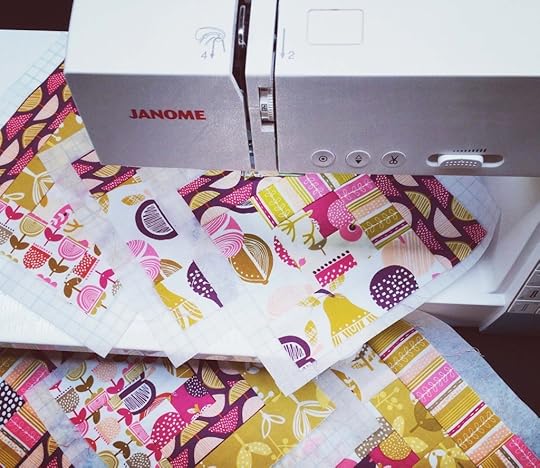 Aside from busting out more DIY, this coming week looks to be filled with keeping on top of commissions, projects and getting the workload in check – I’m looking forward to finishing up some colourful quilts that have been languishing in the Must Finish Someday Soon Pile ready to ship on out to Alexandra Palace for the Knitting and Stitching show – speaking of which, you know there is still time to enter the giveaway that I’m running to get your hands on one of three pairs of FREE Tickets to this years event, right?
 I’m also hoping to squeeze in as many snuggles with this little critter as possible, during these chillier nights of autumn Waffle has a new found love for curling up under a quilt – an activity I for one wont be discouraging anytime soon!
So, tell me, what does your week have in store?
The post The Week That Was: New Additions & New Challenges appeared first on Made Peachy.
September 26, 2014
Knitting & Stitching Show – Ticket Giveaway Alexandra Palace
You guys! The Knitting & Stitching Show is right around the corner and this year is promises to be better than ever!
 This year the event will run for five days and over 35,000 visitors are expected to come along to learn new skills, discover talented textile artists, meet fellow creative folks and shop for lots of lovely supplies.
No matter what aspects of textiles you are interested in there is sure to be something there to take your fancy…
 Stitch-by-Stitch is an interactive feature, which brings together some of the UK’s leading experts demonstrating and sharing their skills. From knitting, crochet and beadwork through to embroidery, sewing and weaving, Stitch-by-Stitch offers sessions for school children and complete beginners through to demonstrations for the more experienced textile enthusiast.
The Skill Exchange – the perfect chance for visitors to share their own skills with others in an informal social gathering at the show. Whether an expert quilter, braider or even loom band maker, visitors can pop into The Skill Exchange and spend some time teaching or learning from their fellow visitors – perfect for all those who love to knit and natter or stitch and bitch.
The Great British PicKnit – visitors are invited to join the UK Hand Knitting Association, as they inspire newcomers to knitting and crochet, shining a light on passing on skills. There will be one-to-one free tuition on how to knit or crochet – from those keen to learn the basics or more advanced techniques for those looking to experiment. Yarn and needles are all provided.
The Learning Curve – For those looking to enjoy a hands-on experience, the Learning Curve, in association with Groves, offers a comprehensive selection of workshops covering a broad range of knitting, stitching and craft subjects. Whilst a brand new programme of lectures gives visitors the chance to gain a more in-depth knowledge from some of the leading lights of the knitting and stitching world. This year’s speakers include Sandy Black, Debbie Bliss, Jan Beaney and Jean Littlejohn. Be sure to check out the full workshops and lectures listings!
 The show will also include a an exceptional collection of Textile Art and also Live Fashion Shows.
Yup, you guessed it, this is an event not to be missed. So, have I ever got a treat for you…
 I have three pairs of tickets – worth £32 per set – c/o The Knitting & Stitching Show to giveaway to three lucky Made Peachy Readers!
So, how do you enter?
Easy! There are a number of ways you can enter this giveaway – and the best part is each one will be counted as 1 entry…so, do all three and you will be entered three times my friend!
1 Please leave a comment below sharing why you’d love to win a pair of tickets to The Knitting & Stitching Show
2 Share this post on Twitter, tagging @madepeachy and using the hashtag #KSTicketsMadePeachy
3 Give the MadePeachy Facebook page a like, share the giveaway post and leave a comment on why you’d love to win!
Want a bonus entry? Then head over to the MadePeachy Instagram , follow and give the #KSTicketsMadePeachy post a like & comment!
The giveaway is for a pair of entry tickets only– y’all will have to get yourselves to the venue and home again – you will need a UK postal address for the tickets to be sent to you in time to attend the event! The winners will be picked at random and announced on the 30 September - Good Luck!
The Knitting and Stitching Show takes place at Alexandra Palace:
Wednesday 8 Oct – 10am – 5.30pm
Thursday 9 Oct – 10am – 7pm
Friday 10 and Saturday 11 Oct – 10am – 5.30pm
Sunday 12 Oct – 10am – 5pm
Tickets prices – Adult: £16 on the door (£13.00 in advance); Children £7 on the door (£6 in advance)
I’ll be on the Vilene Stand TGR3 for the whole show – sharing some makes, inspiration and helping with your stitching questions – so, come along and say hi!
The post Knitting & Stitching Show – Ticket Giveaway Alexandra Palace appeared first on Made Peachy.
September 25, 2014
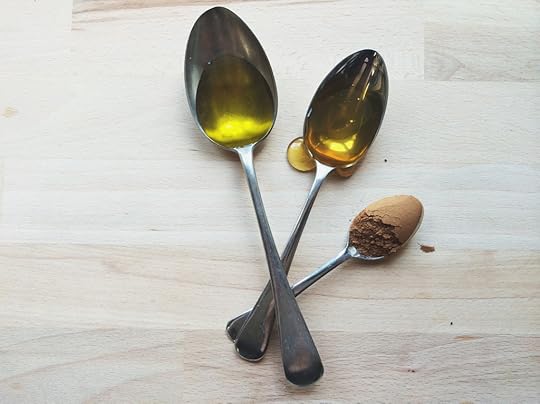
DIY Autumn Cinnamon, Honey & Olive Oil Hair Mask
The temperature has dropped, and while its not quite cold enough to be wearing a woolly hat something needs to be done to keep those tresses tamed as the weather changes.
This week has been a busy one here at Peachy HQ and, I don’t mind telling you, I’m feeling rather ravaged and in much need of a little pampering. When it comes to hair and facial treats the first stop for me is usually raiding the kitchen cupboards, I mean there are so many goodies that work wonders on hair and skin, are all natural, budget-friendy and oh so easy to make.
So, how about a DIY Autumn Hair Mask?
This treatment takes minutes to make and only uses three simple ingredients and will be leave you feeling pamperd with glossy soft locks – what’s not to love about that?
Grab your supplies..
Tablespoon Extra Virgin Olive Oil
Tablespoon of honey
Two teaspoons of cinnamon
This will make enough mask for mid length hair – if you super long mermaid locks, double up on the quantities to make enough to cover all your tresses.
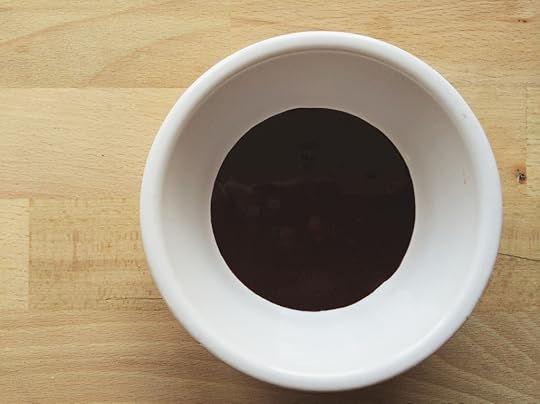
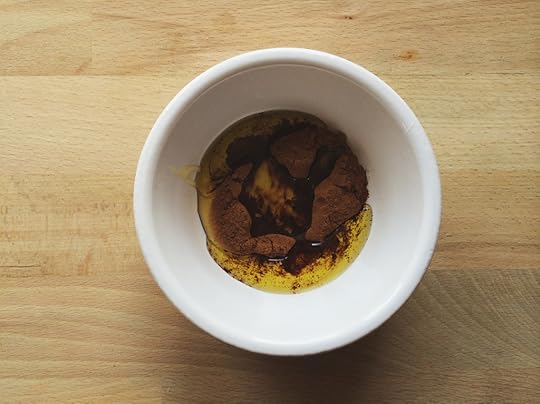 Mix the ingredients into a small bowl or ramekin, blending them all together to make a deep dark brown mix.
Warm the treatment – either for a couple of second in the microwave (be careful not to get the oil too hot as this will burn your scalp and damage your hair!) or place in a bowl of hot water and allow to gently warm.
 To apply, brush out your hair, and dipping your finger tips in the mask begin massaging into the hair starting at the temples and forehead, and working over the whole scalp. Keep re-dipping your fingers into the mask and massaging over the scalp, once the scalp is covered, begin smoothing through the heights of your hair. Twist your hair up and wrap in a shower cap (or clear wrap for a super sect look!) I like to leave this on for a few hours – but working from home makes this super manageable for me!
The mask has a lovely warming feeling – and smells great too! Cinnamon, honey and olive oil are all renowned for their benefits to healthy glowing hair and skin – some even believe that they promote hair growth, add a glossy sheen and can create natural gleaming highlights – I intend to keep up this mini hair pamper routine throughout the autumn, so I shall keep you posted!
To remove the mask after the treatment, rinse with warm (not too hot) water and gently massage the hair and scalp to remove fully. You might think that the oil would be hard to remove, and will leave your hair feeling yucky, I find that it rinses away really easily, and leaves my hear clean, glossy and super soft…with out a hint of autumn frizz in sight. I have also found that co-washing (hair washing with only conditioner) is a great way to finish up this treatment. So, Autumn hair, don’t care!
Do you have a favourite DIY hair or sink treatment? Do leave a comment and share them – I’d love to try them out!
The post DIY Autumn Cinnamon, Honey & Olive Oil Hair Mask appeared first on Made Peachy.
September 24, 2014
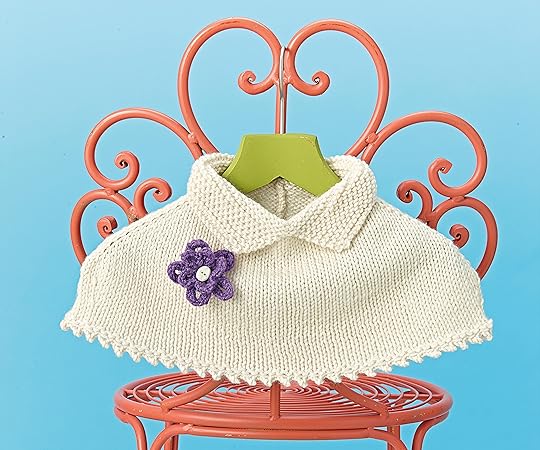
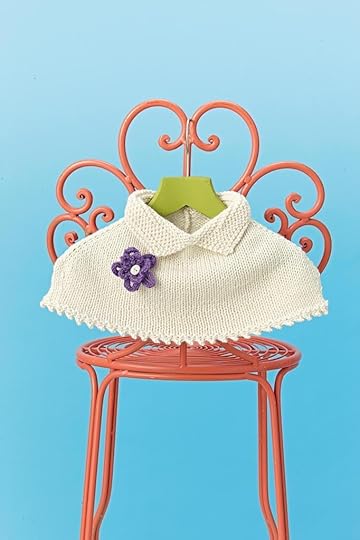
Knit Your Own Mini Capelet
Autumn is the perfect time for sweet mini knits and what could be more perfect than this Cream Capelet?
For old-fashioned charm with a bang-up-to-date twist, this charming girl’s capelet will keep out the chill and complement all manner of outfits. It is knitted in one piece and features a lovely scalloped edge which involves nothing more than a bit of fancy binding (casting) off. I love the perpetual appeal of simple cream—but if you want something a little bolder, go wild with bright shades!
Yarn
Debbie Bliss Cashmerino Aran (55% wool, 33% acrylic, 12% cashmere) worsted (Aran) yarn
3 x 1¾oz (50g) balls (98yd/90m) in shade 101 Ecru (A) Sirdar Country Style DK (40% nylon, 30% wool, 30% acrylic) light worsted (DK) yarn
1 x 1¾oz (50g) balls (141yd/155m) in shade 471 Pansy (B)
Needles and equipment
US 8 (5mm) knitting needles
US 6 (4mm) knitting needles
Yarn sewing needle
One small oval or round white button
Gauge (tension)
16 sts and 26 rows in stockinette (stocking) stitch to a 4-in (10-cm) square on US 8 (5mm) needles in A.
Measurements
The capelet is 7in (18cm) long from the neck to the lower edge and 13¾in (35cm) wide at the lower edge. It should fit an average-size girl of 4-6 years.
This project uses standard Knitting Abbreviations.
 For the capelet
Using US 8 (5mm) needles, cast on 60 sts in A.
Beg with a knit row, work 2 rows in st st.
Row 3: K14, m1, k2, m1, k28, m1, k2, m1, k to end. (64 sts)
Row 4 and every WS row: Purl.
Row 5: K15, m1, k2, m1, k30, m1, k2, m1, k to end. (68 sts)
Row 7: K16, m1, k2, m1, k32, m1, k2, m1, k to end. (72 sts)
Row 9: K17, m1, k2, m1, k34, m1, k2, m1, k to end. (76 sts)
Row 11: K18, m1, k2, m1, k36, m1, k2, m1, k to end. (80 sts)
Row 13: K19, m1, k2, m1, k38, m1, k2, m1, k to end. (84 sts)
Row 15: K20, m1, k2, m1, k40, m1, k2, m1, k to end. (88 sts)
Row 17: K21, m1, k2, m1, k42, m1, k2, m1, k to end. (92 sts)
Row 19: K22, m1, k2, m1, k44, m1, k2, m1, k to end. (96 sts)
Row 21: K23, m1, k2, m1, k46, m1, k2, m1, k to end. (100 sts)
Row 23: K24, m1, k2, m1, k48, m1, k2, m1, k to end. (104 sts)
Row 25: K25, m1, k2, m1, k50, m1, k2, m1, k to end. (108 sts)
Row 27: K26, m1, k2, m1, k52, m1, k2, m1, k to end. (112 sts)
Row 29: K27, m1, k2, m1, k54, m1, k2, m1, k to end. (116 sts)
Row 31: K28, m1, k2, m1, k56, m1, k2, m1, k to end. (120 sts)
Row 32: Purl.
Beg with a knit row, work 2 rows in st st.
Row 35: K27, k2tog, k2, ssk, k54, k2tog, k2, ssk, k to end. (116 sts)
Beg with a purl row, work 3 rows in st st.
Row 39: K26, k2tog, k2, ssk, k52, k2tog, k2, ssk, k to end. (112 sts)
Beg with a purl row, work 4 rows in st st.
Bind (cast) off to create a scalloped edge: bind (cast) off 1 st, *slip st rem from binding (casting) off onto left-hand needle, cast on 2 sts, bind (cast) off 4 sts, rep from * till there are 2 sts rem on needle. Bind (cast) off rem 2 sts.
First side of collar
With WS facing, pick up and k 30 sts from side of neck edge to center of capelet.
Knit 13 rows.
Bind (cast) off.
Second side of collar
With WS facing, pick up and k 30 sts from center of neck edge to side of capelet.
Knit 13 rows.
Bind (cast) off.
Lower flower petals
Using US 6 (4mm) needles, cast on 15 sts in B.
Next row: K3, turn and work on these 3 sts only.
* Beg with a purl row, work 11 rows in st st.
Next row: Bind (cast) off 2 sts (1 st rem on needle).
Next row: Knit into next st on left-hand needle, then bind (cast) off 1 st and k2.* (3 sts)
Rep from * to * 3 times more.
Beg with a purl row, work 11 rows in st st.
Next row: Bind (cast) off 2 sts (1 st rem on needle).
Next row: Pick up and k into cast-on edge on the left-hand side of the base of the petal. (2 sts)
Bind (cast) off rem sts, break yarn and fasten off.
Upper flower petals
Using US 6 (4mm) needles, cast on 10 sts in B.
Next row: K2, turn and work on these 2 sts only.
**Beg with a purl row, work 7 rows in st st.
Next row: Bind (cast) off 1 st (1 st rem on needle).
Next row: K into next st on left-hand needle, then cast off 1 st and k1.** (2 sts)
Rep from ** to ** 3 times more.
Beg with a purl row, work 7 rows in st st.
Next row: Bind (cast) off 1 st (1 st rem on needle).
Next row: Pick up and k into cast-on edge on the left-hand side of the base of the petal. (2 sts)
Bind (cast) off rem sts, break yarn and fasten off.
 To make up
Join back seam, including collar, using mattress stitch (see page 124).
Join the two rows of petals into circles. Place the smaller circle of petals on the larger one and stitch together. Stitch the button in place and the center.
Weave in all loose ends.
♥ – ♥ – ♥
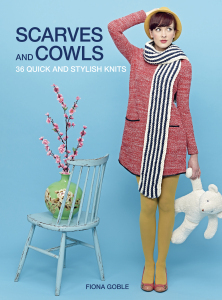
This stunning caplet is just one of the delightful knits features in Scarves and Cowls by Fiona Goble, photography © Terry Benson, published by CICO Books rrp £12.99
The post Knit Your Own Mini Capelet appeared first on Made Peachy.
September 23, 2014
Pinterest: What The Did With…Candles
It will come as no surprise that this Bookstore Scented Candle, £9.45 from FrostBeard Studio is on my wish list!
I have totally gotten into the Autumn vibe over here. I am almost wishing that the temperature drops more so that we can light the fire, curl up under quilts and drink hot chocolates! Yes, that is kinda wishing the seasons away, and there was promise of an Indian Summer – although you’ll forgive me if I don’t hold my breath!
As the nights are gradually drawing in, candles are a huge part of our Autumn decor. Ok – so I love them at most times of the year – that’s true, but we sure do burn through them (ahem!) when summer starts to fade away! Candle making is a lot of fun, so here are some fresh ideas for you to try with this round-up of DIY Candle Inspiration from Pinterest!
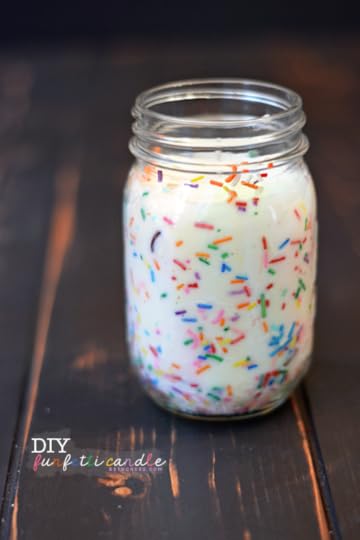 1 DIY Funfetti Candle ⇒ Beth Cakes
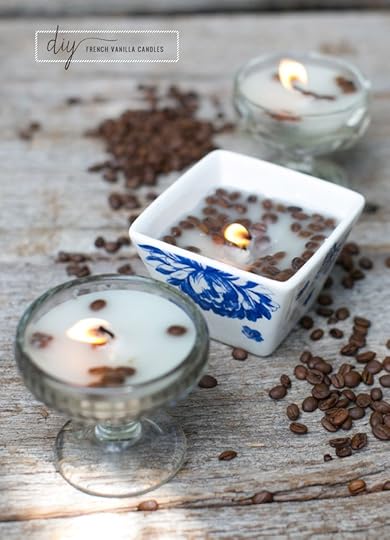 2 French Vanilla & Coffee Candle ⇒ Hello Natural
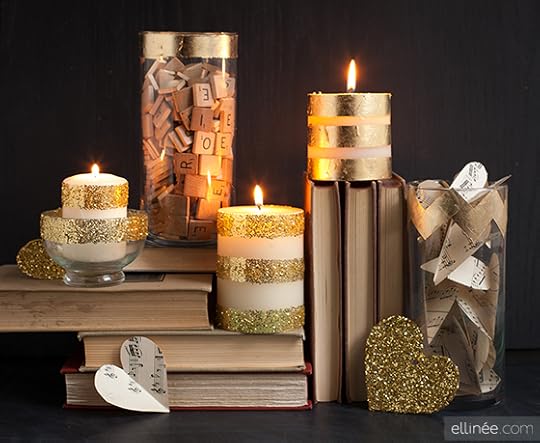 3 Glitter Foil Candles ⇒ Ellinee
 4 Spooky Effect Candles ⇒ A Little Bit Wonderful
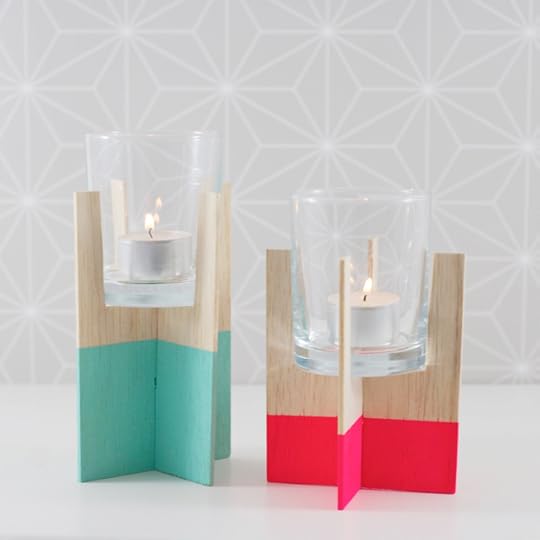 5 Neon & Wood Tea Light Holders ⇒ Johanna Rundel
 6 Concrete Candle Holders ⇒ Evanyaru
Psst! For those of you (like me) that aren’t multi-lingual, you might wanna hit up Google Translate for a couple of those!
Scented candles are my jam – literally! I’m currently blessing out to the wouth-watering fragrance of this Red Velvet Yankee Candle, a little wedding anniversary treat to remind us our our delicious wedding cake! What’s your favourite scented candle for the season?
Do you love Pinterest too? See what other seasonal treats I’m pinning right now!
The post Pinterest: What The Did With…Candles appeared first on Made Peachy.
September 22, 2014
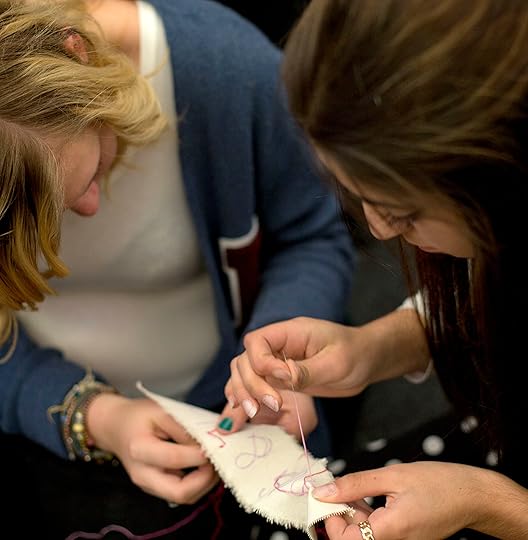
How to Machine Piece Hexagon Patchwork
Hexies have my heart. Always have and always will. I love that they can be traditional, contemporary, technical or fun all at the same time, for however you want to use them in your makes.
Hand piecing, EPP style, is my usual go to when it comes to Hexagon patchwork – it is the portability factor that really make it for me, stowing them away in a bag to tote along with you so you can whizz up a couple here and there as the mood hits.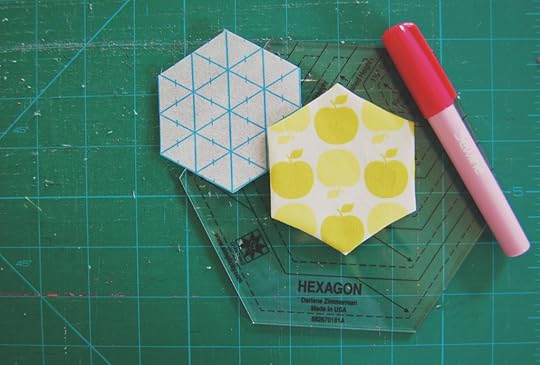 But, I know for some of y’all hand piecing is a huge turn off. Firstly I will say to you, have you checked out my tutorial for hassle free hand piecing hexies? And, secondly I will say to you, how about giving machine piecing a shot?
Yup, you can actually machine stitch all those little hexagons together, and it is not as tricky as you might think…let me show you How To Machine Piece Hexagon Patchwork.
 Get your supplies…
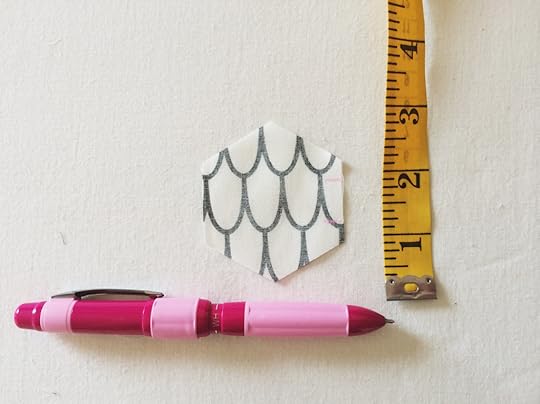
You’re going to need your pre cut hexagon fabrics in your chosen size
Sewing machine (duh!)
Chalk pencil
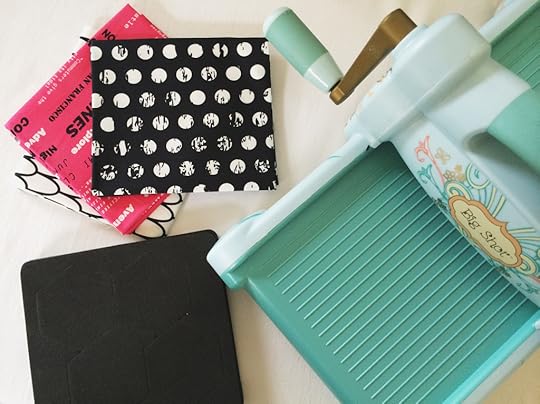
Tape measure or ruler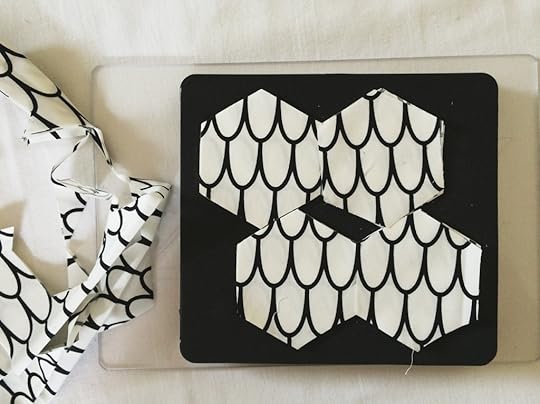 Also…if you’re looking at machine piecing hexies to hurry the process along, you might want to check out the Sizzix Big Shot and the Hexagon Dies – cutting multiple shapes is super quick and easy and will really cut your cutting time!
 Begin by laying out your hexagon pieces into rows of your desired pattern and design. You will be working with one new piece at a time to create rows of hexagons to piece together. Take the first pair of hexagons to be joined and place right sides together. Using the chalk pencil and ruler mark out the seam allowance. The marks need to be positioned 1/4 of an inch in from the raw edge and they need to be centred 1/4 of an inch from both the top and bottom sections of the seam. You may find that after piecing a few of these little hexes together that you are able to eyeball the correct seam amount, seam allowance a placement – but, just to be sure, it’s wise to add these markers in!
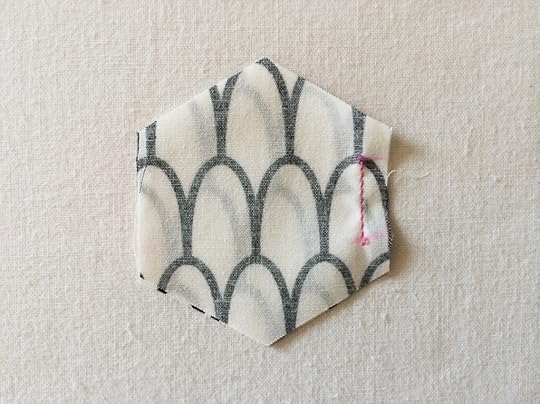 With a straight machine stitch, work the joining seam along the marked section, the seam will be 1/4 of an inch from the raw edges and there will be 1/4 of an inch unstitched at both the top and bottom of the shape to allow join in the other pieces later.
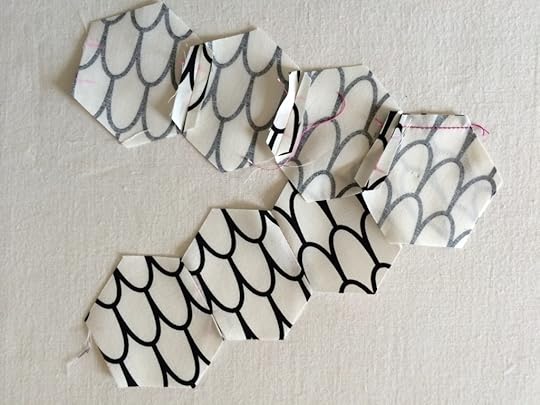
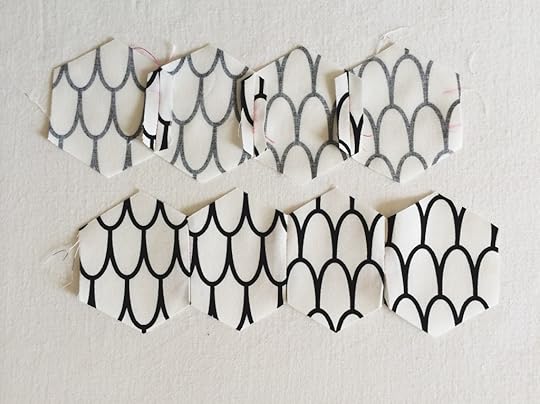 Continue working along the row to join in all the pieces in exactly the same manner, being careful to keep to the same 1/4 inch seam allowance and leaving the top and bottom 1/4 inch of the pieces unstitched. Once the first row has been jointed you can go ahead and join the remaining rows in exactly the same manner. Once joined press the seams open on the back of the work to neaten and help with the construction of the next stage.
Now, you will have a series of lovely hexie strips all ready to be joined together into your wonderful quilt project. The process of joining them is not as tricky as you might think. The strips are joined with a series of ver small seams working along the aligning short lengths of the two strips. With the two strips to be joined you can see the order in with you will be working the seams – I’ve numbered them and marked with arrows for the direction of the stitching!
 Using the image above you will be able to identify the seams that you will ned to stitch – and it might be helpful to keep this to hand as you work for an easy reference to keep you on the right track! Begin by aligning the first seams to be joined – shown by arrow 1 – with the right sides together – you can work a straight machine stitch across the two pieces to join them. As this is the start of the row, the stitching can begin right at the start of the shape and should continue to 1/4 from the end of the seam. You might like to mark this out with a chalk pencil and ruler – I found that the I was able to use the pressed seams as a guide for where to stop the stitching.
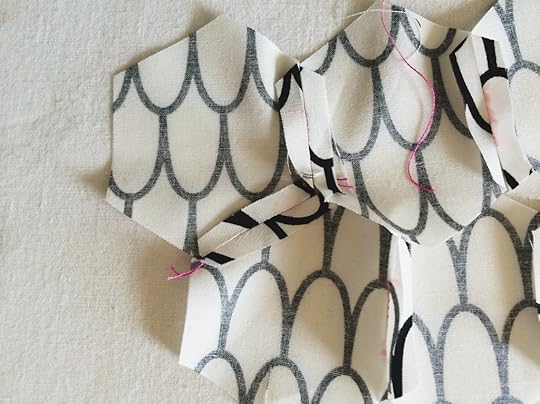 Press the seam open to prepare for the joining the second seam.
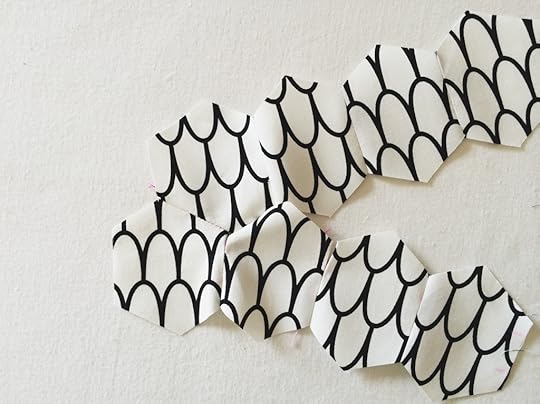 With the right sides uppermost, locate the second seam to be joined – shown by arrow 2 – you will find that the unstitches sections of the rows and the completed joined sections will need to be folded around in order to line up the seams. yes, this will feel a bit weird, and it will look a bit messy while you prepare to stitch, but, if each seam is aligned neatly the seams will all fit together perfectly!
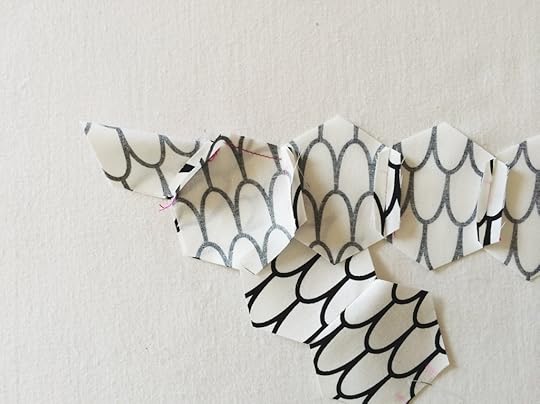 Place the sections right sides tougher and join with a straight machine stitch. Work with a neat 1/4 seam allowance and use the pressing mark (or add in chalk markers) to ensure that there is 1/4 inch left unstitched at the start and end of the seam.
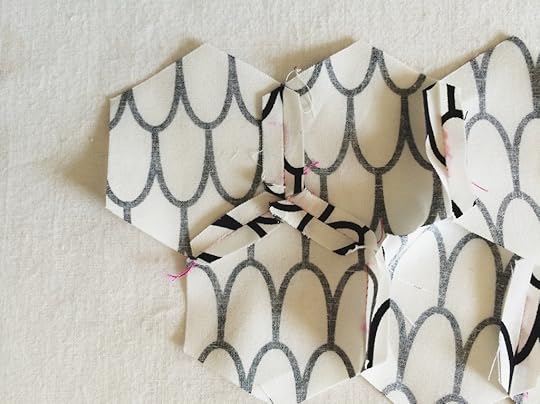 Once the seam is stitched, press neatly open to prepare for stitching the third seam.
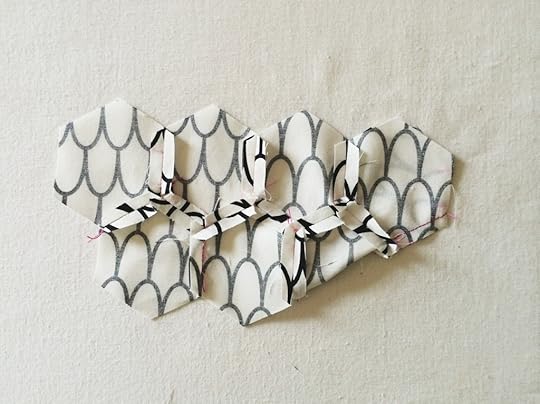 I think that you got where this is going, right? Repeat the process of folding the sections out of the way allowing you to align the next seam in the sequence (check back to the arrows to be sure!) and join with a 1/4 inch seam leaving 1/4 inch unstitched at the start and end of each seam. The more seams you work through in the sequence the more the folding of the stitched sections will start to feel like origami, but taking each one in turn and you’ll get to the end in no time!
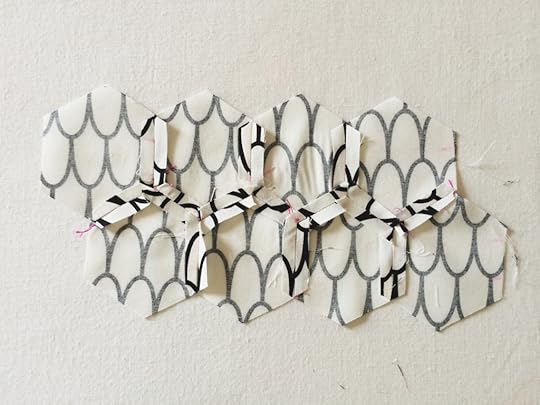 Press open the seams in preparation for adding any further rows, which – you’ve guessed it – are worked in exactly the same manner – following the arrowed sequence to work the small joining seams across the row!
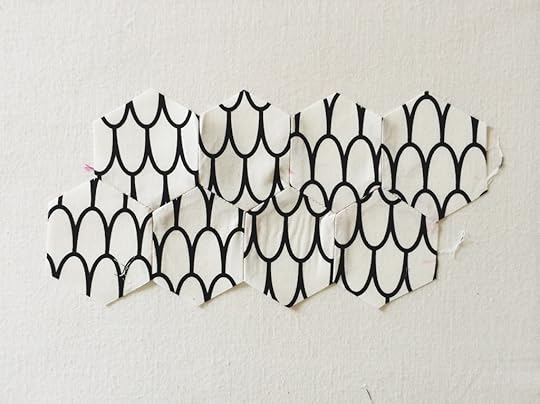 Tah Dah! Little rows of lovely hexagons joined with machine piecing! This was a lot of fun – I’m all for learning new ways to work awesome hexies into my makes – how do you join your hexagons, are you a hand stitching fan or a machine piecing convert?
The post How to Machine Piece Hexagon Patchwork appeared first on Made Peachy.
September 21, 2014
Handmade Fair – a happy times round-up!
This weekend I was fortunate enough to be part of the glorious collective of craft makers, sellers, tutors, authors, designers and enthusiasts that made up the merry band of the exhibitors at the very first Handmade Fair at Hampton Court Palace. And, let me tell you what an amazing weekend I had! As part of my work I get to travel around quite a bit, I am able to get involved in lots of different shows and events all over the UK and Ireland, which is a great highlight of my working calendar. Because I love these events so very much I always come home buzzing with ideas, declaring that this was the very best event I have ever been to. I come back with a sketchbook full to bursting with new ideas, a pack of new creative friends and, more often than not, a bundle of new and beautiful crafting supplies. I also come home exhausted, with a squeak for a voice and feet that are calling out for the cosiest slipper known to mankind. This event is no exception!
When something new launches there is always a huge amount of anticipation (and I guess pressure if you’re part of the team of folks that are actually making these things happen) there is excitement and there is also a little bit of mystery. The Handmade Fair certainly brought a whole new wave of excitement, with phenomenal ticket sales, impressive selection of creative celebrities and a workshop and education timetables that were simply not to be missed. During the weekend itself we enjoyed glorious sunshine (although I know I’m not alone in having to drive through torrential rain to get there!) and the collections of bunting-draped marquees in the grounds of Hampton Court Palace felt like an enchanted festival. Vintage pantry complete with elegant cake stands packed with tasty treats, Lush Cosmetics mini fresh floral fascinator workshops, picnic benches sporting fresh flowers in jam jars, an alcoholic Ice Tea vendor…it really did feel as though all my favourite things were plucked right from the inside of my head and laid out for everyone to enjoy!
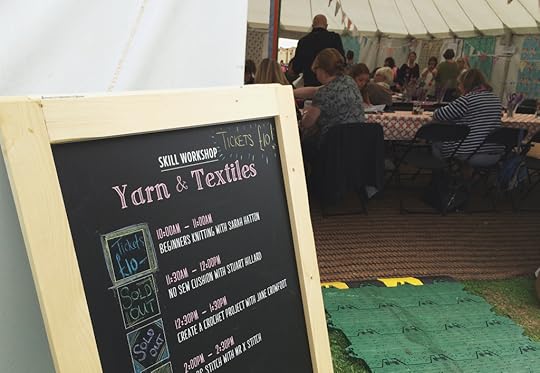 Although, I wasn’t free to attend any of the workshops (this is the downside for me having to work!) I did get to sneak past the tents and it was awesome to see such a mix of folks trying out something new, mastering a skill or having a giggle with their friends! And even though I didn’t get to take part (sob!) it was pretty cool to get a glimpse of a few of my idols – like Kaffe Fassett, Brandon Mably, Annie Sloan, Paul A Young, Tilly Walnes, Stuart Hilliard – in action!
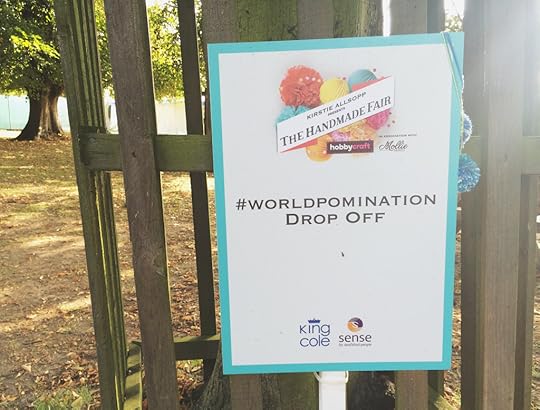 The World Pomination Attempt was a real sight to behold – I’m proud to say that I dropped of my little contributions to the collection…I will confess that I did have to use my pom pom maker…well, I didn’t want to let the side down with a shabby example of yarn craft now would I?!
 Scattered around the market tents were a collection of the most glorious food trucks I have ever seen – and for me, I know it is a good day when I get my hands on some freshly made Churros, complete with cinnamon-sugar dusting and rich melted chocolate dipping sauce.
 Churros selfie next to the World Pomination Attempt = my day was made!
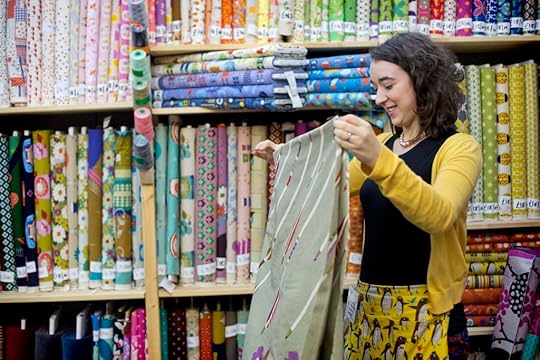
During the event I was demonstrating the joys of the Sizzix Big Shot as an essential for any stitcher and crafter’s workroom for efficient cutting and preparation stages for your projects – it’s a pretty rad feeling to be able to (in a matter of just a few seconds – because that it literally all the time it takes to use the Big Shot!) show stitchers and crafters how picking out the right tools for the job can help them to make their creative projects a reality. As you most probably already know, I’m a huge fan of the Big Shot for working with patchwork and quilting projects, to get the previously time-consuming and labour intensive preparations of fabrics completed with the highest level of accuracy, allowing me to spend my time on the design, placement, piecing, construction and finishing of my makes – if you didn’t get the chance to come along and see my demonstrations be sure to check out this super easy bunting project – made using the Sizzix Big Shot!
What an amazing weekend – sadly I was both pretty busy on the stand and suffering from that tragic First World Problem of rubbish internet access during the event – so I wasn’t able to share any pic or tweets during the event, so hopefully this catch up will make up for that! Here’s looking forward to next years event and fingers are firmly crossed that I get to take part in that one too!
Did you head over to the Handmade Fair? What was your favourite part of the event?
The post Handmade Fair – a happy times round-up! appeared first on Made Peachy.
September 20, 2014
Style Sunday: The Knitted Cowl
September will always the the month of the seasonal cross-over knitwear and the ultimate hand knit to see you through those “is it chilly? Wait there’s the sun – is it staying?” days, is the knitted cowl.
A cosy cowl can be draped around your neck to beak the chills or doubled up for added warmth – I love them so much. If I have an autumn knitwear goal it would be to have one in each and every colour. I adore the textures of this chunky Liquorish Wrap Knit Scarf, £34, ASOS – and it reminded me of a cozy Cowl I made last summer – check out this Style Sunday Moodboard for making your own Cozy Cowl!
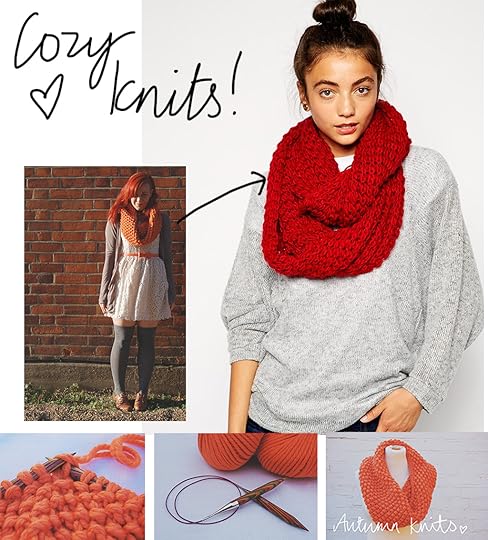 The Pattern
This is a free pattern (designed by yours truly!) and you can find it in the Made Peachy Archive here!
 The Yarns
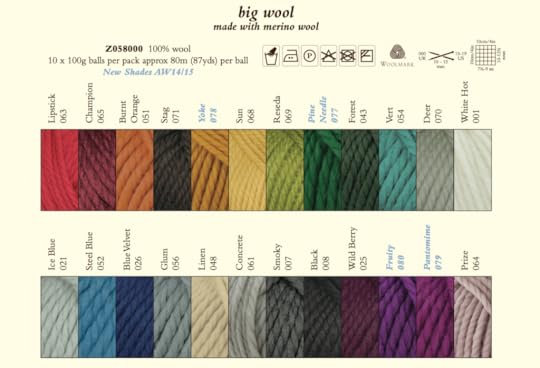
This cozy knitted yarn was made up in the delicious Burnt Orange shade of Rowan Big Wool - there are a 24 amazing shades to choose from with four new shades for AW/14!
I will most definitely be digging this cowl out from the back of the wardrobe – and may even be tempted to knit up another one, in a fun new shade. What colour cowl will you make?
The post Style Sunday: The Knitted Cowl appeared first on Made Peachy.


