Michael Hyatt's Blog, page 192
July 20, 2012
Convene CEO Summit 2013 [Event]

I am looking forward to speaking at this conference, along with Ken Blanchard, Dr. John Townsend, Dr. Henry Cloud, and Regi Campbell.
Date:
April 26, 2013
Time:
TBD
Event:
Convene CEO Summit 2013
Topic:
Platform: Get Noticed in a Noisy World
Venue:
The Westin Stonebriar
Location:
Frisco, TX
Public:
Public
Registration:
Click here to register.
More Info:
Click here for more information.


5 Ways to Foster Great Communication with Your Team


This is a guest post by Chris LoCurto. He is a Vice President at Dave Ramsey’s, host of the EntreLeadership Podcast, and highly sought after business and leadership speaker. You can read his blog and follow him on Twitter. If you want to guest post on this blog, check out the guidelines here.
There is no doubt about it: Great companies foster high levels of communication. When team members understand what is expected of them and what’s going on in the company, you win.

Keep the communication from happening and you will find that fear soon sets in, which is quickly followed by gossip.
Why? Because when team members don’t have a clue what’s going on, they begin to panic—wondering if their jobs are in jeopardy or if the company is falling apart.
How can you keep it from happening? It’s simple … communicate!
And by communicate, I mean more than just asking how their day is going or what they did last weekend. It has to be intentional.
Here are five ways to start communicating better with your team.
Key Results Areas (KRAs). It is vitally important for each team member to know what they are supposed to do each day. While job descriptions are great, we use KRAs to show specific tasks and responsibilities that are required. They define in detail what winning looks like in each position.
Meetings. While meetings can sometimes have a bad rap, they are still one of the best ways to communicate with your team. You just have to make sure that you prepare for them ahead of time, set an agenda, stick to the agenda, and that the meetings are static.
In other words, if you don’t have a set time every week, the crisis of the day will move it around and keep you from communicating.
Storytelling – People respond well to stories. It’s just how we’re wired. You need to become a great storyteller of how your company came to be and the victories it’s had along the way. This will inspire team members and give them hope in the midst of their battles.
Weekly Reports. Everyone on the team needs to be turning in a weekly report of what they have accomplished toward their KRA. This is for both the writer and the reader. It allows both to see what the team member has done to win in the position.
The report also gives the team member the opportunity to add a high and a low of the week. You’ll be amazed at what they put down.
BUT … and it’s a big but, you must respond to the report. If they have a great high, go celebrate. If there’s a bad low, go lead. If you don’t, it’s just become paperwork.
Annual Checkup. I don’t believe in annual reviews. Why? Because you should be spending enough time with your team that you already know how they are doing. Therefore, an annual checkup is a great way to go over the year and discuss how well they’ve done.
Rarely should this meeting include what they need to work on, unless they’re still really working on it. Reprimands should be done immediately when something is wrong. Don’t wait to discuss it in a checkup.
These are just a few things you can do to add to your current communication process. When done well, your team will feel more secure about their positions and, in turn, be considerably more productive.
Question: How have you seen a lack of communication hurt an organization? You can leave a comment by clicking here.


July 17, 2012
The 7 Benefits of Keeping a Daily Journal
Though I typically write several thousand words a week, I have never been a consistent journaler. I’ve tried. I have friends who swear by it. It’s just never worked for me.

Photo courtesy of ©iStockphoto.com/neomistyle
Until recently.
My wife Gail and I have been on an extended vacation for the past two weeks. We have been tucked away in the mountains of East Tennessee on the edge of a beautiful lake.
When we arrived, Gail challenged me to keep a journal. I rolled my eyes but reluctantly agreed to give it another try, evidently forgetting a previous post I had written on the difference between trying and doing.
So far, I have written daily for twelve days in a row. I’ve surprised both of us.
Here’s how journaling has worked for me in this setting.
Gail and I get up at about 5:30 a.m. (Yes, even on our vacation. We can’t help ourselves.)
We read the Bible on our own while drinking a cup of coffee. I’m currently reading through The One Year Bible (Tyndale).
When we finish, we grab our journals and walk down to the dock. It’s only about twenty yards away.
Then we sit quietly for fifteen minutes. No talking, no writing. No doing. Instead, we silently take it all in, give thanks, and pray. We take time just to be.
Finally, we crack open our journals and start writing. This is completely unstructured. We don’t edit. We don’t judge. We just get it out. We write for twenty to thirty minutes.
I might write about what I read in my Bible, a dream I had last night, an experience I had yesterday, or what I hope to accomplish today. Sometimes I will write on one topic; sometimes on four or five.
The main thing is I am writing for myself rather than an audience. I have found this tremendously liberating and deeply satisfying. Amazingly, I am effortlessly writing five hundred to a thousand words a day.
If I had to sum it up, I would say journaling has afforded me seven benefits. It has enabled me to:
Process previous events. What happens to me is not as important as the meaning I assign to what happens to me. Journaling helps me sort through my experience and be intentional about my interpretation.
Clarify my thinking. Writing in general helps me disentangle my thoughts. Journaling takes it to a new level. Because I am not performing in front of a “live audience,” so to speak, I can really wrestle through the issues.
Understand the context. Life is often happening so quickly I usually have little time to stop and reflect on where I am in the Bigger Story. Journaling helps me to discern the difference between the forest and the trees.
Notice my feelings. I understand feelings aren’t everything, but they also aren’t nothing. The older I get, the more I try to pay attention to them. They are often an early indicator of something brewing.
Connect with my heart. I’m not sure I can really explain this one, but journaling has helped me monitor the condition of my heart. Solomon said “above all else” we are to guard it (see Proverbs 4:23). It’s hard to do that when you lose touch with it.
Record significant lessons. I’m a better student when I am taking notes. Writing things down leads to even deeper understanding and, I hope, wisdom. I want to write down what I learn, so I don’t have to re-learn it later.
Ask important questions. A journal is a not merely a repository for the lessons I am learning but also the questions I’m asking. If there’s one thing I have discovered, it’s the quality of my questions determine the quality of my answers.
Will I stick with this after my vacation? Time will tell. I sure hope so. So far, it has been one of best personal development exercises I have done in a long, long time.
By the way, I started out writing in my Ecosystems journal. However, I am not the best at writing lots of text by hand. The legibility of my writing deteriorates quickly.
On day three of my journaling experience, I stumbled upon a software program called Day One (not an affiliate link). This is a beautiful minimalist writing tool that reminds me a lot of ByWord, the program I use to do most of my professional writing.
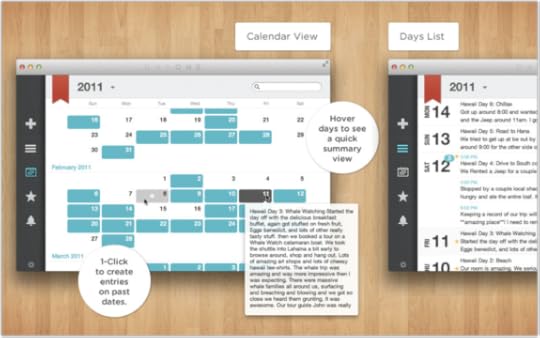
Day One sports:
A simple, uncluttered writing area.
iCloud and DropBox sync to iPad and iPhone.
Password protection (though not encryption yet).
A calendar view, allowing you to jump quickly to a specific day.
MultiMarkdown support, which is a formatting language I have grown dependent on. I use it in ByWord.
A fast, intuitive search engine that allows me to retrieve my notes instantly.
Best of all, it is only $4.99. I only wish the Apple app store allowed for trial versions of software, so you could experience the beauty of this program before you buy it.
Regardless, the tool is unimportant. The main thing is for it to become invisible, so you can focus on writing and reflecting.
Question: Do you journal? If so, what has been the primary benefit to you? You can leave a comment by clicking here.


July 16, 2012
How Not to Make a Presentation [Video]

If you can’t see this video in your RSS reader or email, then click here.
This short video pretty much sums up what not to do when you make a presentation. Unfortunately, about 90 percent of the presentations I have witnessed in corporate America make these exact mistakes.
This video stars my friends, Tripp Crosby and Tyler Stanton. It was created as a promo video for Tim Elmore’s visual book on communications.
It might be worth watching this with your team and asking how you can avoid these mistakes and make your presentations more compelling.


How to Launch a Self-Hosted WordPress Blog in 20 Minutes or Less [Screencast]
The easiest way to build a platform in today’s world is to start a blog. While you can do this with free hosted options like WordPress.com, TypePad.com, and Blogger.com, you will get the most control by using self-hosted WordPress. This is what most serious bloggers use. It is what I use here at MichaelHyatt.com.
If you can’t see this video in your RSS reader or email, then click here.
However, this is where many people get stuck. They assume that the process of setting up a hosting service and installing WordPress is complicated and time-consuming. It’s not.
(By the way, if you are not sure about the difference between hosted and self-hosted WordPress, check out this helpful infographic.)
In the video above, I show you how to setup your blog in twenty minutes or less. As a bonus, I explain to you how to write and publish your first blog post. If you don’t need this information yourself, perhaps you know someone who does. Please pass along the link to this post.
The good news is that you won’t need any technical expertise to setup your blog. I will keep the tutorial simple and walk you through the process, once step at a time.
If you prefer to read about the process rather than watch a video, you can do that too. I have written down all the steps here. This will also save you the trouble of taking notes as you watch the video.
Please understand: you can get everything you need just by watching the video above. The written material below is optional.
You can launch your blog by following these seven steps:
Gather your resources. To set up a self-hosted WordPress blog, you will need:
A domain name
A credit card
20 minutes (give or take)
It’s easier if you haven’t already registered your domain. It’s also cheaper. I will show you how to get one for free, using the service I recommend in Step #2.
However, if you have already registered your domain, no sweat. You will simply need to add an additional step. I will explain the process at the end of this post.
Set up a hosting account. This is where your blog will “live.” This is a server in the cloud (i.e., a remote computer), where you will rent space to install the WordPress software and manage your blog. It’s far easier than it sounds. Stay with me.
There are a hundreds of hosting services available—perhaps thousands. However, based on my experience and research, I recommend BlueHost. I believe it is the best option for most people for the following seven reasons:
Reason #1: Support. BlueHost has great 24–7 support via phone, e-mail, or chat. I have personally used it a few times and found the support staff to be courteous, professional, and helpful.
Reason #2: Reliability. BlueHost is super reliable. It boasts an uptime average of 99.9%. That’s about as good as it gets.
Reason #3: Ease of Use. BlueHost is super easy-to-use (as you can witness in the above video). In fact, shockingly so. They have worked hard to make it simple for non-geeks.
Reason #4: WordPress. Interestingly, WordPress itself only officially recommends three hosting services. BlueHost is number one. It hosts over 850,000 WordPress blogs.
Reason #5: No Limits. BlueHost offers unlimited disk space, unlimited bandwidth, unlimited domains (i.e., you can host multiple blogs or sites on one account), and unlimited e-mail accounts.
Reason #6: Affordability. BlueHost is inexpensive—about $4.95 to $6.95 a month, depending on which plan you select. The longer you are willing to commit, the cheaper it is.
Reason #7: Values. In its Terms of Service (see Section 10.03, BlueHost prohibits pornography, nudity, and other adult content. It strictly enforces this standard and deletes sites that violate it. Personally, I don’t want my blog sitting on the same server as some pornographer. If you feel the same way, you may be surprised to know that almost all of the most popular hosting services allow pornography on their servers.
Note: I am a BlueHost affiliate, which means the company pays me a commission every time someone signs up via one of my links. But this didn’t influence my recommendation, because all hosting services have similar programs. I recommend BlueHost because I honestly believe they offer the best hosting available.
Note: you will get an additional $1.00 per month discount off these rates if you signup through my affiliate link.
You should also know that I do not use BlueHost for MichaelHyatt.com. My site is too big and complicated. It requires a dedicated server with a mirrored backup. However, I have my other sites on BlueHost, as do several of my family members and friends. BlueHost specializes in shared servers and it is the right choice for 95% of bloggers.
By the way, BlueHost offers a thirty-day, money back guarantee, which is written into their Terms of Service. I have personally tested this and got my money back within a few hours. So there’s really no risk on your part.
Okay, so if you are still with me, go to the BlueHost home page. Click on the Sign Up Now button.
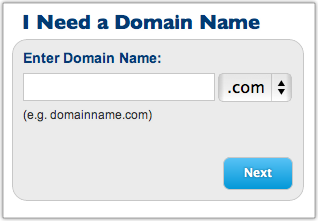
Now you need to decide whether you need a domain name or you already have a domain name. I’m going to assume that you haven’t previously registered a domain, using some other domain registration service (e.g., GoDaddy.com). If you have, I will explain what to do at the end of this post.
Now enter your domain name in the left-most box, choose the appropriate extension (com, net, biz, whatever) and click on the Next button.
Fill in your account information and then scroll down to select your package. As you can see, the prices range from $4.95 to $6.95 per month. It all depends on the length of your commitment.
Note: you will get an additional $1.00 per month discount off these rates if you signup through my affiliate link.
Keep in mind, you will be required to pay the annual rate in advance. That’s how BlueHost is able to offer these super low prices. Here’s the math:
12 months at $6.95 per month is $83.40 per year and $83.40 up front.
24 months at $5.95 per month is $71.40 per year and $142.80 up front.
36 months at $4.95 per month is $59.40 per year and $178.20 up front.
I would not sign up for any of the other services listed on this screen, but that’s up to you. The only one I might consider is “Domain WhoIs Privacy,” especially if your home address and your billing address are the same.
Now enter your billing information. Confirm that you have read and agree with BlueHost’s Terms of Service, and then click on the Next button. The system will now verify your credit card information.
BlueHost will next ask you to “Select the Upgrades that Best Suit Your Needs.” I would skip all of these. Click the Complete button at the bottom of the page.
Now you need to choose a password for your account. Click on the Create your password link:
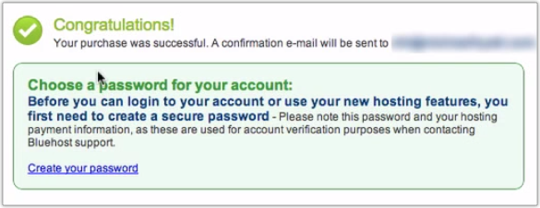
Enter a password and an optional PIN number. (Make sure you write these down somewhere.) Click the Submit button. Then you will be asked to login to your domain. Use the password you just selected and click on Login.
Now BlueHost will take you through “Getting Started.” It will ask you a few questions. This is really just a customer survey. Answer the questions and then click on Submit.
Step 3: Install WordPress. Don’t be intimidated by this step—it’s amazingly simple. The process used to be complicated, and you had to be a semi-geek to pull it off. But BlueHost now makes it super-simple. Trust me, anyone can do this.
You should be looking at your C-Panel (i.e., “Control Panel.”) If you aren’t, click on the button that takes you there. Then close the welcome message by clicking on the link that says, No thanks, I’m fine.
Scroll down the page to ”Site Builders.” Click on the WordPress logo and wait for the new page to load. At the bottom of that page, click on the Install button. (If you get lost, watch the video.)
The WordPress installation screen has four steps:
Step 1: Installation Preferences. By default, BlueHost will select the most current, stable version. That’s what you want, so leave it as is. In the field where it says, “Where would you like WordPress installed?” just leave it blank. This is really for more advanced users who want a custom installation.
Step 2: Advanced Options. Give your site a new name. Then give yourself a username and password. I would make it something other than “Admin.” Make sure you have selected “Automatically create a new database.”
Step 3: Select Plugins and Themes. I would uncheck all of these. You can reselect them later if you need to.
Step 4: Read the Legal Information. Check the box that says you have read the terms and conditions of BlueHost’s licensing agreement.
Now click on the Complete button. BlueHost will tell you it is installing WordPress. (You should see a progress meter.) When it is done, you will get a screen with your Blog URL, Login URL, username, and password. BlueHost will also e-mail this information to you, but I like to have a backup. I would write it down or take a screenshot.
You’re making great progress! Now things will speed up considerably.
Step 4: Load your new blog. Simply click on the blog URL address. Your new blog should load in a new browser tab.
As you can see, there’s nothing very fancy here. WordPress uses a very generic theme by default. But that’s the beauty of WordPress. There are thousands of themes available. I use StandardTheme. Regardless, you can customize your blog to your heart’s content.
Step 5: Log into WordPress. While you’re still on your blog’s home page, scroll down to the Login link in the lower right-hand side of the sidebar. Click on the link.
You should now be looking at your WordPress login page.
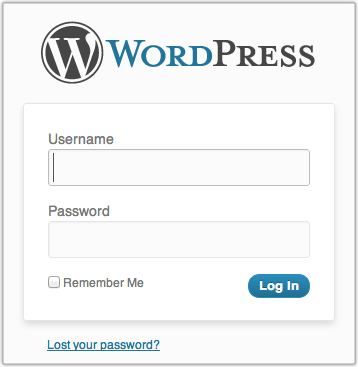
Now enter your username and password. (Remember, you wrote these down in Step 3.) You will soon see a welcome screen. For now, click Dismiss.
You are now looking at the WordPress “Dashboard.” Sometimes, bloggers refer to this as the WordPress back-end. The front-end is what your readers see—your normal blog site. The back-end is what you see—how you control what appears on the front-end.
Step 6: Write your first post. Click on the Posts | Add New option in the left-hand side menu. You should now see the New Post screen.
Enter the title of your post, perhaps something like, “Welcome to My Blog.” (I know, clever, right?)
Now write your first post in the field directly below the title. Perhaps you could explain why you are starting your blog, the topics you plan to write about, and how often you intend to post.
Now click the Publish button. This literally publishes your post for the world to see. You can click on the Preview Changes button to see it.
Congratulations! You have just published your first post on your very own self-hosted WordPress blog.
Step 7: Bookmark your blog. You’ll want to come back to your blog on a regular basis, so it’s a good idea to bookmark the two main pages: the front-end and the WordPress back-end.
In case, you have already closed the page to the back-end, you can re-open it by going to: http://[the name of your blog]/wp-admin.
If you have followed my instructions, you now have your very own self-hosted WordPress blog. Pretty exciting, huh?
If you know someone else who could benefit from this information, please pass along the link to this post. If you would like to embed the screencast in your own blog, please feel free to do so. You can find the video on both Vimeo and YouTube.
Optional: What if you have already registered your domain name on another service? No big deal. The first thing you will need to do is to point your domain name to the BlueHost servers. This will vary depending on where you registered it. BlueHost describes the process .
For example, at GoDaddy, where I have some domains registered, you log in, then go to Domains | Domain Management screen:
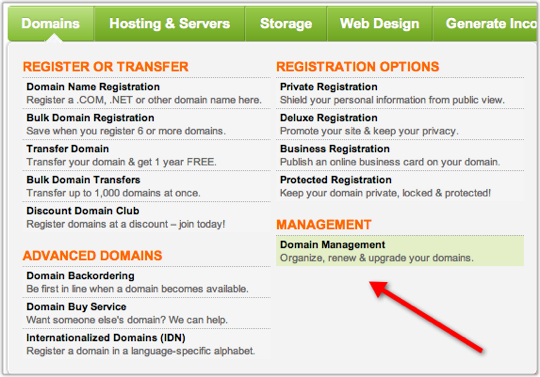
Now click on the domain name you want to point to BlueHost. You should now be looking at the “Domain Details” page. Scroll down to the bottom, left-hand side of the page. You should see a section called “Nameservers”:
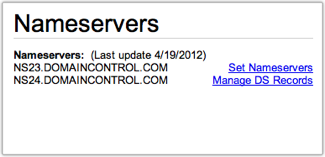
Click on Set Nameservers. A new screen should pop-up.
Enter ns1.bluehost.com in the field for Nameserver 1.
Enter ns2.bluehost.com in the field for Nameserver 2.
Click OK. That’s it. Now log out. It typically takes 24–48 hours for these changes to take effect. You might get lucky, and it will start working in an hour or two.
Please note: BlueHost or your Registrar (the company from whom you bought your domain) may change their procedures from time to time. If you have any problems, please check with them. I do not provide technical support for this process.
Once you have done this, you can begin the process of setting up your WordPress blog. In Step #2, after you click Sign Up Now, you will need to enter your domain name in the right-most box that says, “I Have a Domain Name.”

Now click the next button. Everything else should be the same. If you get stuck, you may need to wait for the change in your Nameservers to take effect before proceeding. Be patient.
Question: What questions do you have about the process of setting up your blog? You can leave a comment by clicking here.


July 14, 2012
What Are You Doing to Protect Your Marriage?
I am currently on vacation. During this time, I am completely offline. I am getting some rest, feeding my soul, and enjoying time with my family. While I am away, I thought I’d share with you my top posts of all time. Whether you have read this particular post or not, I think you will find the content relevant and useful. I am excited to share it with you again!
The lead story in the news a little more than a year ago was Arnold Schwarzenegger’s infidelity. Apparently, he has fathered at least one child out-of-wedlock. There are likely more.

Photo courtesy of ©iStockphoto.com/dsteller
To be honest, this whole thing made me angry, especially when I consider the impact this had on his wife and children. He is also one more negative example for our own children and grandchildren.
After hearing about this story, my wife Gail asked, “How does someone like Schwarzenegger engage in this behavior?” Great question. Off the top of my head, I offered this:
He had numerous opportunities.
He evidently thinks he is special—and entitled.
He is using his blood supply to power an organ other than his brain at the moment-of-temptation. (Yes, I really did say that.)
However, I don’t intend for this post to be a rant against Gov. Schwarzenegger. I am not his judge. He will give an account of his choices—as I will mine.
But I want to go on the record and say this: Adultery is not normal. It certainly isn’t inevitable. It is not the way God created us. We were made for monogamy and fidelity.
When we are loyal, we reflect the faithfulness of our Creator. When we are disloyal, we reflect the betrayal of both Satan and Adam. It is no wonder that the Bible often speaks of sin as “spiritual adultery.” Betrayal is the original sin.
However, we live in a fallen world—one that is increasingly indifferent to sexual sin. If we want to live and lead with intention, we can’t be naive. We must recognize the temptation adultery poses and protect ourselves accordingly. Nothing will destroy our influence and legacy faster than an affair.
If we are going to avoid becoming casualties, we must have a strategy. Here are three actions I take in order to protect my marriage:
I invest in my relationship with Gail. It is amazing to me that so many men are willing to invest such enormous spiritual, emotional, and financial resources in relationships other than the one they have. This doesn’t make economic sense. If you want your marriage to grow and flourish, you must invest in it. This means investing time—dreaming, laughing, listening, and crying together.
I set specific boundaries. This may sound old-fashioned, perhaps even legalistic. So be it. I think our world could use a little old-fashioned common sense. Therefore:
I will not go out to eat alone with someone of the opposite sex.
I will not travel alone with someone of the opposite sex.
I will not flirt with someone of the opposite sex.
I will speak often and lovingly of my wife. (This is the best adultery repellant known to man.)
I consider what is at stake. What story do I want my grandchildren to tell? This puts it all in perspective for me. Do I want them to be proud of my life’s story or embarrassed? Do I want to be remembered as a person who loves his wife and is faithful to her? Or do I want to be the one who squandered his legacy in a moment of indiscretion?
It is time for real leaders to lead—not only in their professional lives but in their personal ones as well. If we can’t lead ourselves, we are not qualified to lead others. Character matters. We must take responsibility for our own actions. Our grandchildren are counting on it.
Question: What are you doing to protect your marriage? You can leave a comment by clicking here.


July 13, 2012
10 Proven Practices for More Productive Leadership
This is a guest post by J.D. Meier. He is the author of Getting Results the Agile Way and blogs on personal effectiveness and leadership at Sources of Insight. If you want to guest post on this blog, check out the guidelines here.
Leadership is a verb, and productive leadership is an art. The art part is when you use your experience and judgment to apply proven practices to the situation you are in to produce effective results.

Photo courtesy of ©iStockphoto.com/Hiob
While you can always wing it, or luck into success, you can use patterns and practices to find the shortcuts and make your success more repeatable.
As a Principal Program Manager at Microsoft I’ve lead distributed teams around the world for more than ten years. I like to think of the Program Manager role as a technical Entrepreneur with an interesting blend of customer, business, and technical perspective.
As a Program Manager, my job is to take on big challenges, build a team of smart people, and drive projects from cradle to grave. That includes everything from creating the Vision and Scope to leading the project through the initiating, planning, controlling, and closing phases.
It also means creating work breakdown structures, project plans, resource plans, risk plans, project schedules, managing budgets, dealing with and responding to changes, reporting status, and managing stakeholder expectations. One of my favorite metaphors is that the Program Manager is “the oil and the glue.”
It’s one of the toughest jobs, you’ll ever love.
I’d like to share with you ten proven practices for more productive leadership. I’ve learned these from leading teams and shipping stuff in some of the most competitive, fast-paced, and toughest arenas:
Know what problem you are trying to solve. This sounds simple and it sounds obvious, but you’d be surprised how many people can run around, working on something, but have actually lost sight of the problem they set out to solve.
If you keep the problem front and center, you exponentially increase your effectiveness. It helps you prioritize. It helps you focus. It helps you bring in the right help. It helps you ask the right questions.
If you lack clarity in the problem you are solving, then you are most likely wasting a lot of time and effort. It’s tough to hit a target when you don’t know what it is. On the flip side, you can save a lot of time and energy when you know exactly what the problem is that you are trying to solve.
Get smart people on a cadence. It’s a lot easier to build your execution muscle if you decide on a simple cadence. For example, on my teams, I like to focus on shipping weekly.
I use a pattern I call, Monday Vision, Daily Outcomes, Friday Reflection. On Mondays, as a team, we identify three wins for the week. Each day, we identify three wins for the day.
On Fridays, we reflect on our results by asking, “What are three things going well?” and “What are three things to improve?” The goal is to take what we learn and carry the good forward. So every week we are getting better and better.
This very simple cadence creates an efficient and effective learning loop. As individuals, and as a team, we very quickly surface the bottlenecks and opportunities to improve our results.
Set boundaries and buffers. The best solution for burnout is to avoid it in the first place. This is knowledge work, and as one of my mentors puts it, “Brains work best when they are rested and relaxed.” The way to set the boundary is to first decide the maximum number of hours you expect to work for the week.
For example, one of my best managers forced me to set a limit of forty hours. This meant I had to ruthlessly prioritize and focus throughout the week to flow the most value. I could no longer throw hours at the problem. Instead, I had to get clear on the priorities, choose the best things to work on, and spend my time more wisely.
At the same time, I had to make sure I was creating space and allowing for things to go wrong. I’ve never seen a project where everything goes exactly as planned, and nothing changes. With that in mind, it’s better to embrace the reality and design for it, and create space so you can deal with unexpected surprises.
One of my colleagues enforces his forty hour work week boundary with “dinner on the table at 5:30.” It’s a rule he lives by and it’s served him well both for his family and at work. At work, he is known for working on the most valuable things and setting a great example of focus and priorities.
Lead with your why. The key to great results is passion plus purpose. Start asking yourself, “Why do you do what you do?” Find the meaning and make the connection between the work you choose to bite off, and how it lights up your life.
If you live for adventure, then make every project an epic adventure. If you love to learn, then by-golly make every expedition a chance to learn a new skill, conquer a new challenge, and add a new tool to your toolbox.
Share your “why” with others. It’s contagious. The most unproductive teams I know have no purpose. They have no juice. They have no joy. They do work, and every bit of work is a chore. Ironically, it’s not the nature of the work, but our mental models that make work meaningful.
Give your best where you have your best to give. One question I get asked often is, what’s the biggest game changer I’ve ever seen when it comes to execution excellence. I have to say, it’s always the same thing. Have people on the team spend more time in their strengths.
That includes you. If you want more out of you, then do more of what you love. Do more of what you are great at. Do more of what you can uniquely do.
The most ineffective teams I ever see are when people are all “out of position.” People are constantly working on things they aren’t good at or things that they hate. It kills their energy. In knowledge work, this is the “kiss of death.”
Focus on outcomes, not activities. I can’t stress this enough. When you focus on outcomes, you find the critical paths and the short-cuts. When you focus on activities, you throw time at things, but don’t necessarily achieve meaningful results.
As soon as you start asking yourself, “What’s the goal?” or “What’s the outcome?” you will quickly find yourself getting clarity on the problem. It will refocus your effort and energy in a more meaningful way. You can shave away needless activities once you identify what you want to accomplish.
Pick a theme or focus for the month. A lot can happen throughout the month. One way to see the forest for the trees and rise above the noise is to set a theme or focus for the month.
Every day, you can do a little something towards the theme. Personally, I use “30-Day Improvement Sprints,” but the ideas is to simply pick a theme for the month.
For example, you might pick a theme of “simplicity” and for the entire month, you will be focused on simplifying everything you do. Simplicity is one of my favorite themes, and I like to find ways to simplify products and processes. Finding ways to simplify your process is actually one of the secrets to innovation and staying in the game.
When you find ways to innovate in your process, you can do things better, faster, and cheaper. And that’s how you keep from getting priced out of the market or losing your job to somebody else who is better, faster, cheaper.
Ask better questions. I heard a colleague remark the other day that too many people still operate under an old leadership model. The leadership model of the 70s was command-and-control. That made sense for industrial type work or in the military. It doesn’t work well when it comes to knowledge work.
The people in the trenches are the closest to the problems and they are also closest to the solutions. In today’s world, the key to effective leaders is asking the right questions. Inquiry is your friend.
One of my mentors uses a small set of questions to guide investments:
Who’s the customer?
What’s the problem?
What’s the competition doing?
What does success look like?
It’s simple but highly effective. One of my favorite questions to ask is, “What are you optimizing for?”
Get their finger prints on it. If you go it alone, then it’s an uphill battle. It can feel like pushing rocks uphill!
The best way to get folks on board is to get their fingerprints on it. This means co-creating the vision with them. This means being inclusive on key decisions. This means having people participate in the process so they feel empowered and want to play the game.
If you build products for customers, the short-cut to success is to have customer participate up front and throughout the process. They’ll tell you what they want if you ask them. You don’t have to throw it over the wall and hope for the best.
The sooner you get folks involved and the sooner they get bought in, the sooner they have a sense of ownership. Also, the sooner you will have a tribe of raving fans that will help you move the ball forward and champion the cause.
Focus on “good enough for now.” This is how you get over “analysis-paralysis” and perfectionism. What’s the simplest solution for the problem at hand? What’s the minimum you could do to make it work, and then make it right?
If you get in the habit of thinking in terms of version, then you can enjoy the benefits of incremental progress. The power of incremental progress is that you finish what you start. You actually get to deliver something of value and get feedback on it.
You can then use the feedback to tune it and improve it. You can then play around with your release cycles to find the best rhythm for results.
For this to work well, you have to have a culture of continuous improvement, so that you actually get a chance to revisit things that need to be improved. This is a much faster path than trying to get everything figured out and get everything right up front.
The reality is you don’t know what will surprise you, and you are better off putting something out there so that you can see how it holds up under actual usage. You will gain clarity and insight if you look for it, and you will ultimately learn the lessons that help you improve next time.
These are all powerful practices when you apply them. As it’s been said, the trick isn’t knowing what to do, it’s doing what you know.
I will share with you one more practice that helps you turn your insight into action. This is a practice from the software world.
Create a personal checklist of the practices that you want to do more of. Add this as a reminder in your calendar and have it pop up daily or weekly, depending on how often you need the reminder. You can then continue to adjust your personal checklist as you go along, so that it serves you and it helps bring out your best.
Question: What leadership practices have you found that make you and your team more productive? You can leave a comment by clicking here.


July 12, 2012
Advice to First-Time Authors
I am currently on vacation. During this time, I am completely offline. I am getting some rest, feeding my soul, and enjoying time with my family. While I am away, I thought I’d share with you my top posts of all time. Whether you have read this particular post or not, I think you will find the content relevant and useful. I am excited to share it with you again!
As the former Chairman and CEO of Thomas Nelson, I receive a lot of email from would-be authors who are trying to get published. Because I make my email address public, it’s pretty easy to get to me.

Photo courtesy of ©iStockphoto.com/dougallg
However, by the time I hear from people, they are usually frustrated. They can’t get anyone in the book publishing world to respond, and they are convinced that they have a killer-idea. “If only someone would just read my manuscript,” they plead.
The problem is that most publishers will not review unsolicited proposals or manuscripts. When I worked at Thomas Nelson, I personally received hundreds of proposals each year; my staff received thousands. Publishers simply don’t have the resources to review these. It’s like looking for a needle in a haystack.
So as an author, what do you do? Here’s what I recommend:
Educate yourself. If you want to publish with a general market publisher, read 2012 Writer’s Market by Robert Lee Brewer. If you want to write for the Christian Market, read The Christian Writers’ Market Guide 2012 by Jerry Jenkins. Both books include writer’s guidelines and submission procedures for publishing houses. These books will give you a good overview of the literary marketplace.
Follow publishing blogs. You can get some incredibly helpful advice and straight-talk from people who work in the industry. I recommend you start with these four:
Rachelle Gardner
Jane Friedman
Chip MacGregor
Yates & Yates
There are other blogs, but I have found these to be the most useful.
Write a killer book proposal. If you want to write (or have written) a book, I recommend you read one of my e-Books, Writing a Winning Non-Fiction Book Proposal or Writing a Winning Fiction Book Proposal. These eBooks will tell you exactly what publishers want in a proposal. They are used by numerous literary agents and publishers alike.
Have someone review your proposal. If you have a friend who teaches English or is a professional editor, ask them to review your proposal. You might even barter something with them. In addition, the Editorial Services section of 2012 Writer’s Market, lists over 500 entries, many of which provide some kind of critique service.
Find a literary agent to represent you. This is usually the only way to get in the door with a publishing company. Most publishers do not accept unsolicited proposals or manuscripts. Instead, publishers let the literary agents do the filtering. If you want a list of general market agents, you can buy 2012 Guide to Literary Agents. I have also compiled a list of agents who represent Christian authors. This is the only list of Christian agents I have been able to find. (This list does not constitute an endorsement, nor do I recommend specific agents.)
Consider self-publishing. It’s not right for everyone, but it no longer has the stigma it once had. It can be a legitimate—and strategically smart—decision for some authors. It all depends on your goals, your circumstances, and your resources. I wrote a post about this when Thomas Nelson launched WestBow Press, its self-publishing division.
Finally, don’t lose heart. This is probably the most important thing I can say to you. Yes, you will be rejected. I had over 29 publishers reject my first book proposal. However, it went on to be a New York Times bestseller. I know scores of authors with similar stories.
Like many things in life, nothing worthwhile comes easily. But if you have a great idea and are persistent, you will eventually succeed.
Question: What advice do you have for first-time authors? You can leave a comment by clicking here.


July 11, 2012
How to Organize Evernote for Maximum Efficiency
I am currently on vacation. During this time, I am completely offline. I am getting some rest, feeding my soul, and enjoying time with my family. While I am away, I thought I’d share with you my top posts of all time. Whether you have read this particular post or not, I think you will find the content relevant and useful. I am excited to share it with you again!
I have been using Evernote for months. However, I have not really taken time to explore the depth of this incredible program until just recently. I have mainly just used it for a place to store meeting notes and an occasional web clipping.

Photo courtesy of ©iStockphoto.com/STEVECOLEccs
However, thanks to Brett Kelly’s very helpful e-book, Evernote Essentials, the Evernote user forum, and a little experimentation, I have begun to see the incredible power of this digital repository. So much so, then I am committed to going paperless in my new office setup.
It all begins by establishing a solid organizational structure. Evernote doesn’t require one, but, based on my personal experience you won’t realize the full power of this tool without one. You need to give some thought to how you want to structure your notebooks, “stacks,” and tags.
First, let’s define some terms:
Notebooks: These are collections of individual notes. Theoretically, you could just have one notebook and dump everything into it. But most people will want to establish different notebooks for different “areas of focus.”
Stacks: These are collections of notebooks. For example, you could have a stack called “Work” that has separate notebooks for each client, project, or area of responsibility.
Tags: These are attributes that you can apply to any individual note. You can then view all notes with a specific tag, regardless of which notebook it resides in. This provides for the ultimate in filing flexibility, though it can be confusing at times. (I still get confused about whether something should be a notebook or a tag.)
I tend to think of stacks and notebooks as a vertical (or hierarchical) way of organizing, and tags as a horizontal (or lateral) way of organizing. To use the metaphor of a filing cabinet, think of stacks as individual drawers, notebooks as the files within the drawers, and tags as a way of identifying common attributes regardless of what folder or drawer the note is in.
For example, you might “tag” a piece of paper within a folder by printing invoices on yellow paper. With Evernote, it’s much more simple, because each note can have multiple tags. So, for example, I have some notes in my Receipts notebook that are tagged “tax deductible” and others that are tagged “reimbursable.”
Perhaps my current structure—which is still a work in process—will serve as an example. Here are my stacks and notebooks. Bear with me. The list is a little long.
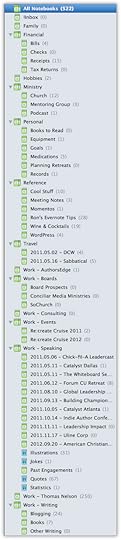
I created this list by first asking myself, “What are my primary areas of focus?” The highest level stacks or notebooks are that list. Note that “!Inbox” is my default notebook. This is where I put random items until I know exactly where I should file them. (The exclamation point ensures that this notebook is first in the sorted list.)
Note that I had to divide Work into several stacks, all with the prefix “Work.” This is simply because Evernote doesn’t currently allow the nesting of stacks. (Note to Evernote developers: please consider this as a feature request.)
Here are my current tags:
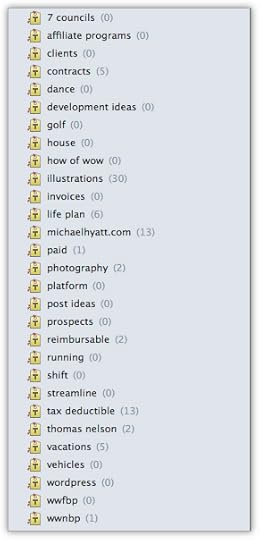
It is tempting to tag every note with a several tags. However, I broke myself of that habit once I realized that Evernote indexes every word in every note. So if you have a great quote on “purpose,” for example, you don’t need to tag the note with “purpose,” so long as the word appears in the note. This only adds more clutter. The key is to remember that less is more.
Once you get your basic structure, the fun really begins. (Okay, maybe this is a stretch.) I hope to post soon on how I get stuff into Evernote. This is where the versatility of the tool really shines.
I have written several posts about Evernote. Here is a handy reference:
How to Organize Evernote for Maximum Efficiency
How to Use Evernote If You Are a Speaker or Writer
How to Use Evernote with a Traditional Paper Notebook
How to Use Evernote with an iPad to Take Meeting Notes
How to Email Your Documents Directly to Evernote
How to Scan Documents Directly into Evernote
How to Get Your Stuff into Evernote
Is Your Data Safe in Evernote?
How to Use Evernote as a Blogger
How to Find Your Stuff in Evernote
7 Evernote Resources You May Not Know About
How to Get Your Kindle Highlights into Evernote
Questions: How do you organize Evernote? Where do you see that I could improve my organization? You can leave a comment by clicking here.


July 10, 2012
5 Rules for More Effective Presentations
I am currently on vacation. During this time, I am completely offline. I am getting some rest, feeding my soul, and enjoying time with my family. While I am away, I thought I’d share with you my top posts of all time. Whether you have read this particular post or not, I think you will find the content relevant and useful. I am excited to share it with you again!
Presentation software can be a wonderful tool if used correctly. It can also be a dangerous distraction that interferes with communication rather than facilitating it. The line between the two is thin.

Photo courtesy of ©iStockphoto.com/mbbirdy
Over the course of my career, I have sat through hundreds of presentations. Most of them were done with PowerPoint. Most of them are done poorly.
I often think the presenter would be more compelling if he would ditch the presentation software and just speak. Because of this, I even thought of outlawing presentation software when I was the CEO of Thomas Nelson.
But alas, It has become a staple of corporate life. It is the ubiquitous prop that attends every presentation.
So if we can’t outlaw presentation software, at least we can improve how we use it. Here are my five rules for making more effective presentations.
Don’t give your presentation software center stage. This is the biggest mistake I see speakers make. They forget that PowerPoint or Keynote are tools designed to augment their presentation not be their presentation.
Never forget: You are the presenter. Your message should be the focus. Not your slides. Not your props. And not your handouts. You are in the lead role, and you need to retain that role.
No amount of “razzle dazzle” or slide effects can overcome a weak presentation. If you don’t do your job, slides won’t save you. It only makes a bad presentation worse.
Create a logical flow to your presentation. Better yet, tell a story. (See Cliff Atkinson’s Beyond Bullet Points. The absolute last thing you want to do is turn your presentation into a random assortment of bulleted lists, which is what often happens, especially when PowerPoint is involved. There must be a flow.
Start with a good outlining or mind mapping program. I personally use OmniOutliner. Decide if your talk is going to be a persuasive speech or an enabling one. (It should be one or the other.) We teach you how to do this at The SCORRE Conference. This is something I use every day.
Make your presentation readable. Memorize this sentence: “If people can’t read my slides from the back of the room, my type is too small.” Now repeat it over and over again while you create your slides. If people are squinting during your presentation, trying to make out what’s on the slide, you’ve lost your audience.
In my experience you must use at least 30-point type. Obviously, it depends on the size of the room, the size of the screen, etc. This is precisely why you can’t afford to leave this to chance. You must test your slides and make certain they are readable.
In Really Bad PowerPoint (PDF file), Seth Godin also sets forth five PowerPoint rules. In the first one he says, “No more than six words on a slide. EVER.” This may be too extreme, but you get the idea. The more words you use, the less readable they become.
I have made some really effective presentations with no more than a word or two per slide. It can be done. Steve Jobs was a master at this. So is Tom Peters.
Here are some other things to remember regarding text:
Avoid paragraphs or long blocks of text. If you really, really must use a paragraph, then whittle it down to the bare essentials. Use an excerpt—a couple of sentences. Emphasize the important words. Put the text block by itself on a single slide.
Use appropriate fonts. I recommend a sans serif font for titles (e.g., Arial, Verdana, Helvetica, or—my personal favorite—Myriad Pro, etc.) and a serif font for bullets or body text (e.g., Times New Roman, Garamond, Goudy, Palatino, etc.). Most books are typeset this way because it make them more readable. The serifs help you recognize the characters (and thus the words) faster. It makes the text more readable. It’s also customary to use san serif fonts for chart labels.
Avoid detailed reports. If you need to include a report in your presentation, hand it out. Don’t force people to try to read a ledger printout on a slide. (Financial people take note!) If you must show a report, use it as a picture and then use a “call out” to emphasize the part of the report you want people to focus on. Better yet, just fill up a whole slide with the one number you want people to take away from the presentation.
Avoid “title capitalization” unless (duh!) it’s a title. Sentence capitalization is much easier to read. For example, “Sales are up 100% in the southeast region” is easier than “Sales Are Up 100% In The Southeast Region.” This is especially true when you have numerous bullet points.
Remember, less is more. Fancy slide transitions and fly-ins get old quickly. I strongly recommend that you keep things simple. A basic dissolve from one slide to another is usually sufficient.
Also, have all your bullets appear at once rather than one at a time. Avoid sound effects—they serve no other purpose than annoying the audience and distracting them from your presentation.
Finally, cut down the number of slides. You don’t need a transcript of your speech with every point and sub-point. Yawn! People are only going to remember the major points any way.
Distribute a handout. I have changed my mind on this over the years. I do not think that you should distribute a handout before you begin speaking.
If you do so, people will start reading ahead instead of listening to you. It’s just one more distraction to keep them from focusing on your message. It also eliminates any surprises or drama you have built into your presentation.
Instead, I tell people that I will distribute a handout of the slides when I am finished with my presentation. (Or now, I often create a special page on my blog, with the slides embedded into it using SlideShare.net.) That way, they can take notes during my session, knowing that they don’t have to write everything down. This allows them to stay engaged without becoming distracted.
Finally, I would encourage you to hone your PowerPoint or Keynote skills like you would any other essential business skill. The more you work at it, the better you will get. And the better you get the more compelling your presentations will become.
Question: What rules would you add? You can leave a comment by clicking here.