
Andrew Skurka's Blog, page 28
June 1, 2019
New look, same field-proven content
The website that most readers are familiar with launched in late-2011, shortly before the release of the first edition of The Ultimate Hiker’s Gear Guide. It was designed by Bracia, which like my company is mostly a one-man operation, and was a technological leap in my web presence. Its aesthetic was vastly superior to the preceding website, and the WordPress framework allowed me to more easily publish content, respond to reader comments, and take book orders.
 Pre-2011 website
When we launched, it was hard to imagine that in the next seven years I would write over 700 blog posts, create guides for six routes and trails, and guide more than 80 trips with 500 clients.
But the website was well designed and flexible, and it was able to grow with me. A few tweaks were necessary — like making it “responsive” to mobile traffic, and hosting it with KornDev as traffic increased — but it was essentially the same site until yesterday.
 Homepage, 2012 to 2019
This latest redesign was again done by Bracia, and I’m again thrilled with the end product. It has a cleaner and more modern look, but should still feel familiar. Its mega-menu is awesomely functional, especially on mobile. And its back-end is more up to date and supported. We also fixed a few things that were bothering me about the old site (e.g. multi-post series like campsite selection are now listed in descending order, and images and charts are no longer limited to 640 pixels in width).
 Just launched!
As I toured it last night, I found a few items that need fixing. If you see anything that’s amiss, leave a comment and I’ll get it addressed.
The post New look, same field-proven content appeared first on Andrew Skurka.


May 28, 2019
Quickstart Guide: Hayduke Trail
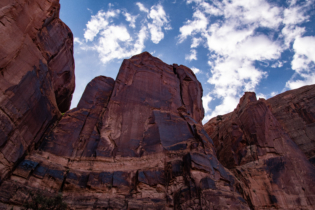
For years I have wanted to explore the American Southwest, with its iconic walls, rock formations, and mesas. But as a college student I’ve always struggled to get out there, due to the summertime heat and aridity.
This year, however, record snowpack in the Four Corners kept the region wet later in the season. So I marked my calendar for a section-hike of the Hayduke Trail.

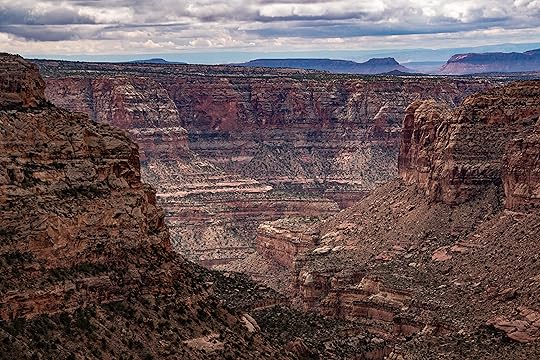
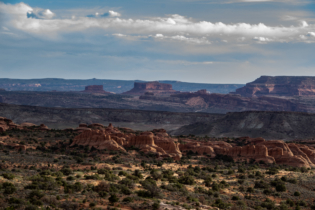
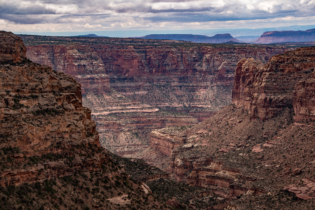
Looking over Arches National Park.
What is the Hayduke Trail?
The Hayduke Trail is not a trail. Rather, it’s an 800-mile network of standalone trails, dirt roads, and off-trail segments that form a semi-cohesive route. It was pioneered in the late-1990’s by Joe Mitchell and Mike Coronella, who spent hundreds of days exploring the region.
The name “Hayduke” pays homage to the main character in The Monkey Wrench Gang by Edward Abbey, a fictional story that takes place in this region.
In the original guidebook, the Hayduke Trail is broken into fourteen sections, the start and finish of which is relatively accessible.
What Will I See?
As the founders explain it, the Hayduke Trail is, “not intended to be the most direct route, but rather, to showcase the stunning beauty of the southwestern United States.” I would concur. The route starts and finishes in a National Park and passes through two more along the way, in addition to three National Monuments.


Recommended Direction and Spring Challenges
The Hayduke is traditionally hiked westbound, starting in Arches National Park and finishing in Zion National Park, since the western half of the route receives more and later snowfall than the eastern half.
Sections of the route that are most likely to be snowbound in the spring include:
Mt. Ellen (Section 5)
Bryce Canyon National Park (Section 9)
Kaibab Plateau (Section 10 and parts of Section 11, as well as Section 13)
Zion National Park (Section 14)
1. Scheduling
The HDT is about 800 miles long. Strong hikers can complete it in 40 to 50 days by averaging 16 to 20 miles per day, including rest days and excluding delays for travel or weather. The sweet spot for section-hikes is 1 to 2 weeks, which is enough time to find your rhythm, connect with the trail, and have a resupply or two.
Unless you are a hardened thru-hiker with a track record, I would allow for one zero-day per week. The Hayduke passes through rough country, and the sun is intense — both take their toll.
Build some cushion for travel delays if you must hitch, bus, or shuttle to/from a regional airport. It’s stressful to be racing against the clock.
Pacing
The Hayduke rewards fast hikers with frequent water sources, which are generally spread out. If you can cover large distances quickly, you can avoid caching water beforehand and you can reduce water loads between sources.
Miles on the Hayduke are of two varieties: fast and slow. Fast miles are on dirt roads, flat mesas, and sandy canyon bottoms. Slow miles involve tricky climbs out of and descents into canyons, brushy bushwhacks, dicey slickrock scrambles, and cryptic off-trail navigation.

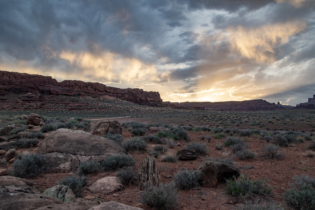
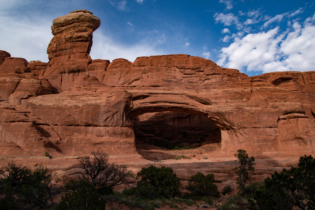
Straddling the gap in Arches National Park. This was a relatively easy wash to maneuver through. There were others that weren’t so easy. photo taken by Sam Chaneles
Andrew’s advice to me was to estimate your “Hayduke” mileage as 75% of your normal “trail” mileage. I think that’s a pretty good estimate. On the Hayduke I averaged around 23 miles per day in 12-14 hours, with around 1500-2500′ of elevation gain per day. My normal “trail” mileage would be closer to 30 miles with 3,000-4,000′ per day, so there is a clear downtick for the Hayduke.

Andrew’s estimate of daily hiking distances, adjusted for the Hayduke. This is pretty accurate. No need for me to reinvent the wheel. courtesy Andrew Skurka
When to go
To keep the Hayduke safe and fun, you must time your hike to balance temperatures and water availability.
In the winter, there is ample water but freezing cold conditions.
In the summer, it’s dry and wickedly hot.
The sweet spot is March through May: there is still enough water, but temperatures are manageable.
I hiked in May 2019. High temperatures were in the 80’s, but with low humidity I found it pleasant. At night the temperatures dropped into the 40’s or 50’s, depending on the elevation.
Conditions
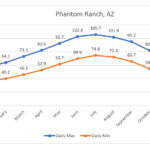
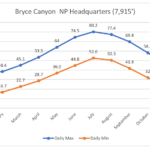
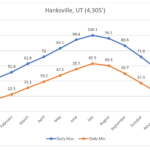
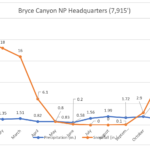
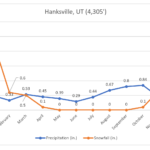
Below I’ve included normal monthly temperature and precipitation data for three locations:
Phantom Ranch, AZ, as an example of the hottest parts of the Hayduke;
Bryce Canyon, UT, as an example of the coldest parts of the Hayduke;
Hanksville, UT, as a location in between.
Temperature data:
Preciptation data:

For snowpack, contact backcountry rangers and local outfitters with pointed questions. Also consult NOAA’s Interactive Snow Information Map.

Higher elevations of the Hayduke can be snowbound well into March. Notice Mt. Ellen as the blue dot in the center of the screen capture.
For water, use Andrew’s Hayduke Trail Bundle, which includes a water sheet. Later in the season and/or after dry winters, you may need to cache water. As a precaution, always be skeptical of water availability.
Getting there
For both thru- and section-hikers, reaching the Hayduke Trail can be challenging. The route begins in a remote part of Arches National Park, and it travels through some of the least inhabited and developed regions of the country.
1. Dig Through Your Contacts. . . Find Those Friends
For my section-hike of the Hayduke, I relied heavily on friends who lived or were travelling in the area to meet me at remote trailheads and provide me with my resupply. This was a nice luxury to have. I would mail my resupply package to them and specify the meet-up location with a shared Google Maps pin. We would meet up at the pin, exchange the resupply, and keep on going.
2. Rome2Rio
For many of my past trips I’ve relied heavily on Rome2Rio as a search engine for getting to and from remote trailheads (see my blog post). Enter your origin and destination, and Rome2Rio will show you options of how to get there using planes, trains, and automobiles.

A display from Rome2Rio of how to get from A to B.
For much of the Hayduke, Rome2Rio will not get you much, simply telling you that driving by yourself or private shuttle are the only options.
Private Transportation
Unfortunately, public transportation throughout the desert southwest is not well established. It’s remote, open country.
Private shuttle services are available for hire, particularly near towns like Moab, St. George, the Grand Canyon, etc. They are expensive, but allow you a great amount of flexibility. Some private shuttle services include:
Moab Taxi
Groome Transportation
St. George Shuttle
FlixBus
Salt Lake Express
Permits
Backcountry or wilderness permits are required by some land agencies. Each system is different.
Permits are issued in person at the Arches National Park Visitor Center up to 7 days beforehand.
“You can make a reservation no more than four months, and no less than two days, before the permit start date. For very popular sites, you may have to make a reservation at midnight mountain time, exactly four months before the start date. ” – courtesy Canyonlands NP website
“All backcountry users are required to have a free permit. Hayduke Trail hikers, please email the park for information related to permits for the section of the trail within Capitol Reef National Park.” – courtesy Capitol Reef NP website
“A Backcountry Permit is required for all overnight stays in the backcountry. Permits may be purchased at the Visitor Center from 9 a.m. to 12:30 p.m. and 1:30 p.m. to 6 p.m.”- courtesy Bryce Canyon NP website
The Grand Canyon recieves heavy backcountry traffic. Thankfully, the Hayduke is usually in remote areas, so the permits are not in-demand like the main corridors. Still, apply early.

Application windows for Grand Canyon National Park.
Overnight stays in the backcountry require a permit, which can be reserved up to 3 months ahead of time. Walk-up permits are available up to one day ahead of time.
Glen Canyon National Recreation Area
“A backcountry permit is required for overnight stays in the Escalante District of Glen Canyon National Recreation Area.”
As mentioned, applying early only helps your chances of securing the necessary permits. Often times your permits can be modified if your trip dates change. Many national park rangers understand what “hiking the Hayduke” entails, and will allow for a greater level of flexibility when applying for permits. That said, do not count on their generosity.
Resupply
Southern Utah and northern Arizona are lightly inhabited, and there are few outposts of civilization. The Hayduke passes through only a few towns, and it only occasionally crosses paved roads. Your best bet will be friends in the area (if you have any) and locals, as well as a few self-supply opportunities:
Moab, UT (section 1)
Section 1 passes directly through Moab, UT, where there are grocery stores, a US post office, and many other supplies and services. This is an easy resupply, but very early into the trip.
Hite, UT and Hanksville, UT (section 4)
Section 4 takes you past Hite, UT, where there is a general store with some basic provisions for hikers, such as trail mix, granola bars, etc. You will NOT have cell service in Hite.
The end of Section 4 is along Utah State Route 95, a short hitchhike from Hanksville, UT, which has a grocery store, post office, a few restaurants, and other services.
Henrieville, UT and Cannonville, UT (section 7)
The end of Section 7 gets you close to the small towns of Henrieville, UT and Cannonville, UT. Both have a US post office, a few motels and lodges. Not much else.
Jacob Lake, AZ (section 10)
Section 10 intersects plenty of dirt roads, US Hwy 89A, as well as the town of Jacob Lake, AZ. There is a Chevron gas station and the Jacob Lake Inn in Jacob Lake.
Keep in mind that the road to the North Rim from Jacob Lake does not open until May 15 most years, so check for closures. This may not impact your ability to hike, but may affect the availability of resources in the area and the ease of hitchhiking.
Grand Canyon, AZ (section 12 & 13)
The South Rim of the Grand Canyon has a full grocery store and plenty of lodging and campgrounds, but you need to hike up and out for them. There is a basic mess hall at Phantom Ranch just as you pass over the Colorado River; meals and food are very expensive here though. You could probably mail your package to Phantom Ranch, but would likely pay a pretty penny to do so, as all supplies are carried down by mule to Phantom Ranch.
Basic snacks and beverages are available for purchase on the North Rim in the North Rim village; keep in mind that the North Rim Village does not normally open until May 15. The Grand Canyon Lodge receives packages and has a full store, as well as laundry, but does not open until May 15 most years.
Colorado City, AZ and Zion NP (section 14)
Section 14 will take you near Colorado City, AZ, where there are a few restaurants, lodging options, and places to purchase groceries and supplies. Section 14 ends in the heart of Zion National Park, where there are free park shuttles to visitors centers and other services.
Gear Considerations
Gear for the Hayduke will vary greatly depending on what time of year you decide to attempt the route. Earlier in the season, you will be dealing with cold; later, the heat. So packing will vary. A few year-round conditions that should be accounted for are:
Sand

My gear laid out in the sand at the end of a day. As much as I may have tried to shake out the powder-like sand, it still found ways of sticking to my clothes and equipment.
Your clothes, shelter, and sleeping bag will likely get sandy — the entire region is made of the stuff. Often times you can just shake it out or off, but keep it in mind. Especially consider sand when choosing your footwear; consider that highly breathable shoes with porous membranes will quickly fill with loose, powder-like sand.
Consider Wind

A lazy pitch resulting in a wind tunnel.
Much of the Hayduke is set on vast desert plateaus, which can mean high winds, especially during the stormier months of February and March. Keep wind in mind when choosing your shelter. If you opt for a conventional tent, consider that you may be pitching your tent in loose sand. If you opt for a tarp of some kind, consider how you will pitch the tarp in loose sand, and consider your tarp geometry.
Water Weight
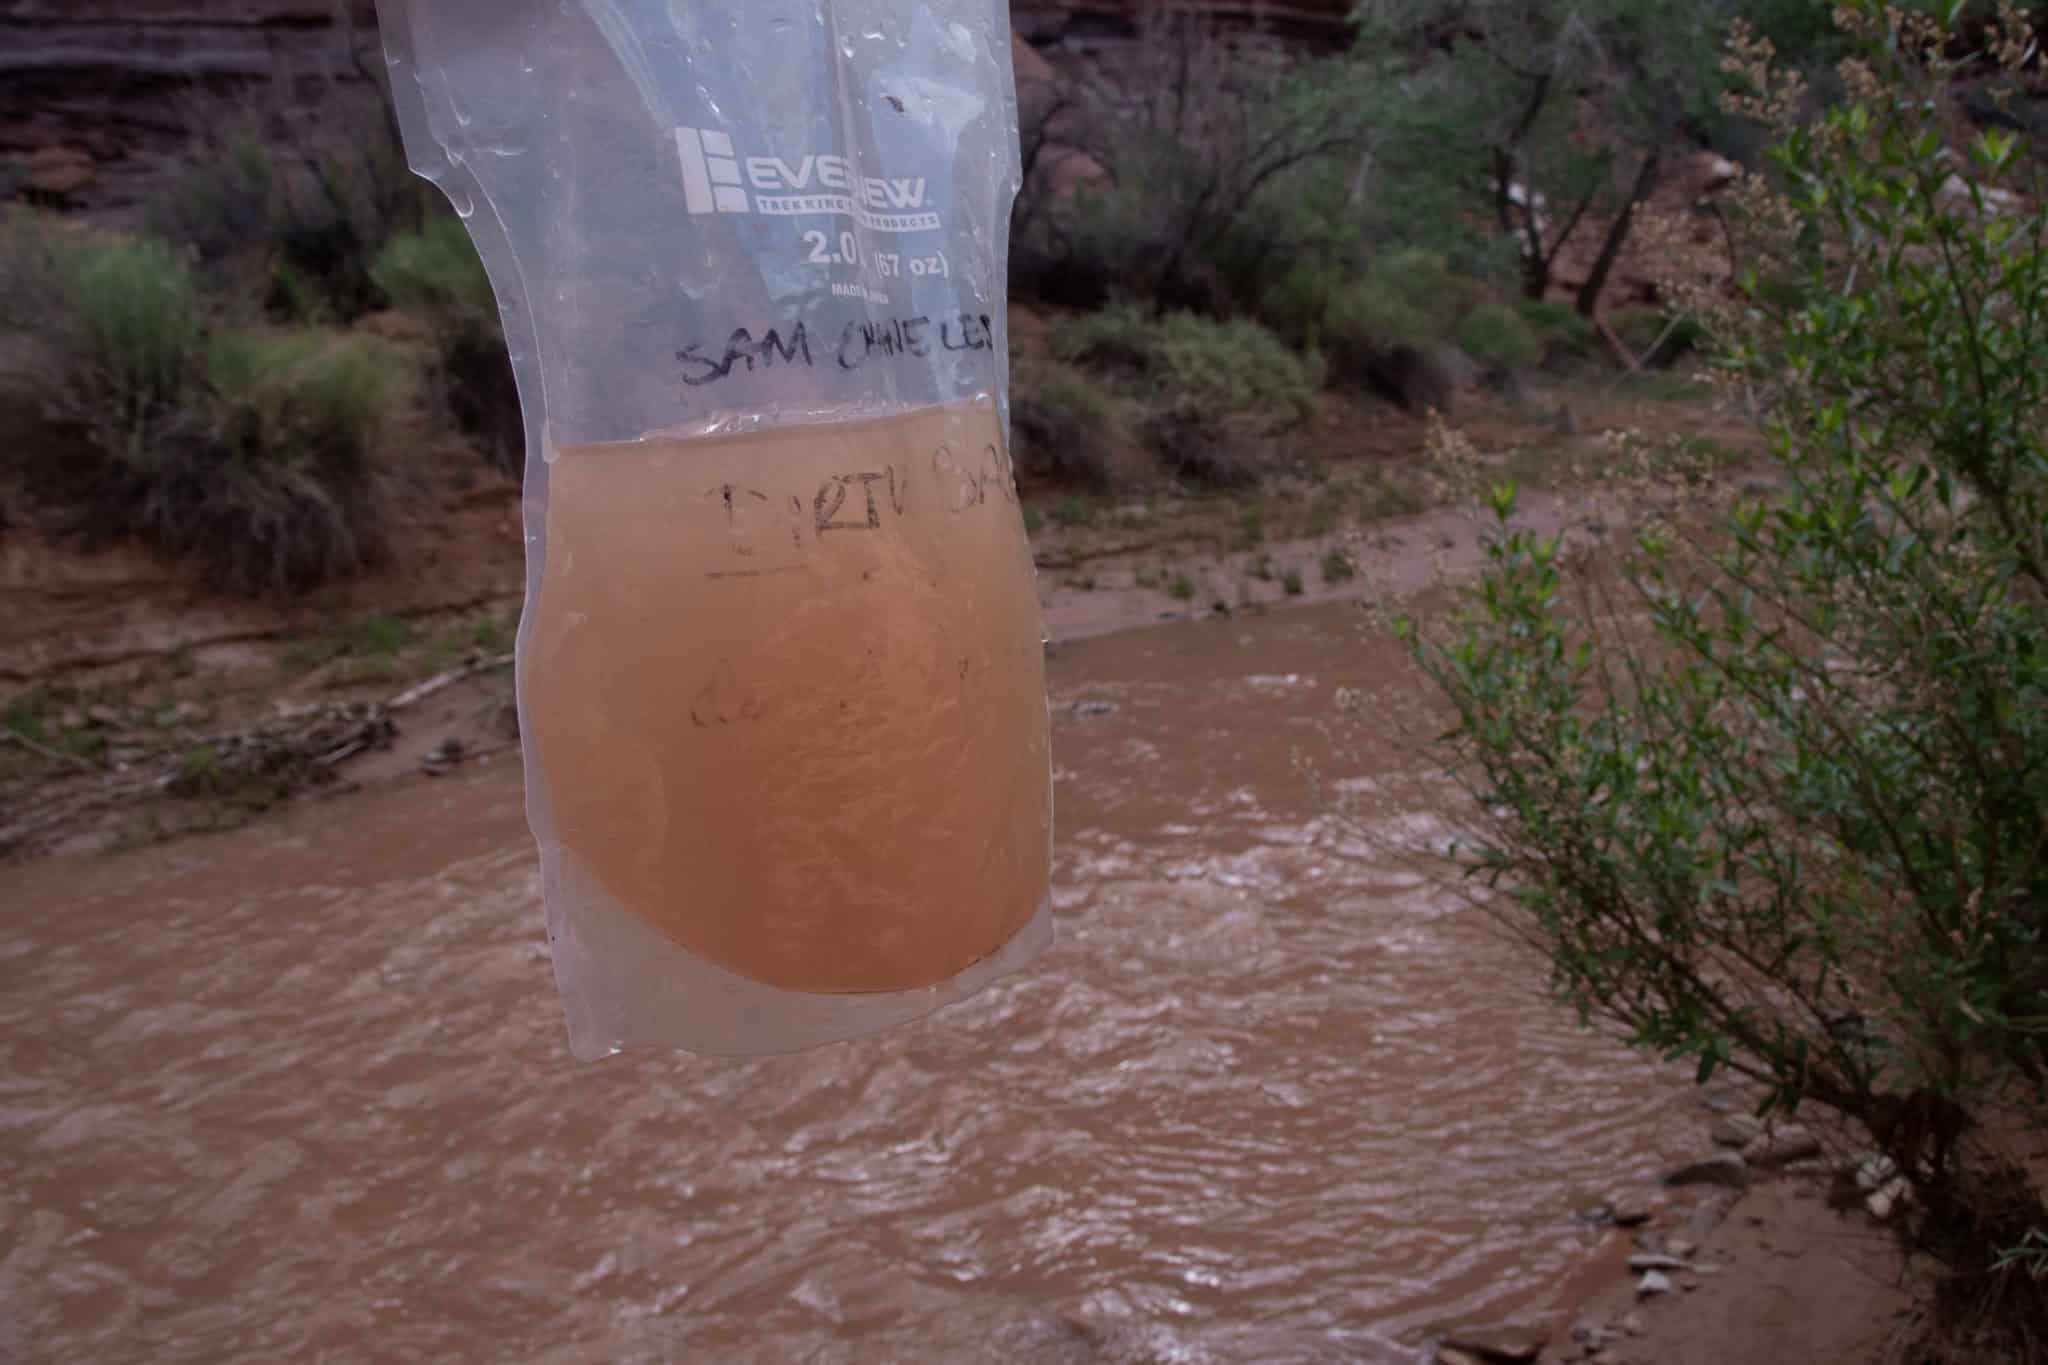
YUM! Some sandy water, pre-Sawyer filter. Definitely bring a plunger to backflush your Sawyer, if you plan to use one.
Water will be sparse, which will mean that you will often be carrying most of your weight in water. I often carried around 3-4 L, or around 6-7 lbs of water.
Challenges and requisite skills
Review your map and compass skills
Much of the Hayduke is overland, off-trail travel. You will need to be comfortable following landmarks, such as canyon washes and rivers, as opposed to trail blazes.
Get comfortable with scrambling
When travelling through canyons you will need to scramble up and down pour-offs, many of which are Class 3, some of which can verge on Class 4.
Understand you will likely be alone
It’s unlikely you will see many people on the HDT, especially during the more remote sections outside of frequently trafficked areas like national parks. Unlike the AT, which sees thousands of hikers every year, the HDT might see one hundred per year, and that’s probably an overestimate.
Get ready for bushwhacking, river crossings, and lots of mud
The Hayduke can be rough; there will be sections where you will have to cross rivers and streams, push through dense brush, and slosh through thick mud that verges on quicksand.

Sloshing through Courthouse Wash in Arches NP
More Information
Guidebooks
The Hayduke Trail: A Guide to the Backcountry Hiking Trail on the Colorado Plateau by Joe Mitchell and Mike Coronella
Facebook Groups
There is a dedicated group for the Hayduke Trail, as well as more general groups such as Hiking Utah and Hiking Arizona, which can be useful for general questions about transportation, logistics, conditions, etc.
Threads like r/WildernessBackpacking and r/Ultralight have occasional posts from HDT hikers, and can also be a good resource for asking questions to seasoned hikers.
Blogs from former HDT hikers
Andrew Skurka
Walking with Wired
Carrot Quinn
The Trek
Elanwalks
Little Package
Joe’s Diner
Katherine Cook
More resources are also available on the Hayduke Trail website under Resources.
Questions about the Hayduke Trail? Leave a comment.
The post Quickstart Guide: Hayduke Trail appeared first on Andrew Skurka.
May 26, 2019
Crampons & ice axe: Recommendations for the High Sierra


A boot track across a steep snowfield during the ascent to Muir Pass, late-June 2006.
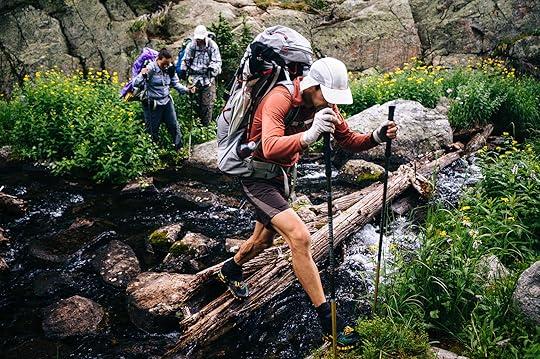
In July I’m running six trips in Yosemite National Park, split between two guide teams: two intro-level 3-day courses, and four more advanced 5- and 7-day trips. We will be hiking sections of the John Muir Trail, Pacific Crest Trail, Sierra High Route, and Yosemite High Route, in addition to other trails and off-trail routes.
Because of the exceptional 2018-19 snowfall and a stormy spring, we expect to encounter more lingering snowpack than normal (as well as higher runoff, more prolific mosquitoes, and more intense sun exposure). This post is designed primarily to guide my clients in the purchase of crampons and an ice axe. But I’ve included a broader discussion to make it applicable to other backpackers, too.
Recommended reading
I’ve written elsewhere about early-season conditions and the 2018-19 snowpack:
1. For my Outside blog, in late-March I wrote a piece, “What Epic Snowpack Means for Summer 2019 in the West.” It details the snowpack, predicts likely conditions, and runs through critical gear and skills.
2. When PCT and JMT hikers were losing their $hit in 2017 after a similarly wet winter, I posted a six-part tutorial on backpacking in early-season conditions. I have not updated it since, but it remains just as relevant today.
3. For JMT/PCT hikers specifically, read the three-part interview with Sam Chaneles, who thru-hiked the JMT in June 2017. It will give you an idea for the likely experience.

Sam on the JMT in June 2017
Considerations
Do you need crampons and an ice axe? And what specific models should you buy?
Well, it depends. I know that’s that the answer you wanted, but it’s a nuanced topic.
Below I’ve discussed four considerations to inform your decision. My general advice would be to purchase now what you are most likely to need, and to exchange or return the items later if your needs change. This approach has two benefits:
Take advantage of start-of-summer sales, usually 20-ish percent off a full-price item.
Move onto other aspects of your trip planning.
In determining whether you need crampons and an axe, and which products to purchase, consider:
1. Current conditions
We know that the High Sierra got whacked this winter. But what do conditions look like right now? Nowadays, the most current information and images will be shared online by hikers after they exit or while they resupply.
Start your search with the JMT and PCT (e.g. #JohnMuirTrail, r/PacificCrestTrail, and John Muir Trail Group), which transect the High Sierra and which receive heavy backcountry use. Then narrow your search for more specific results (e.g. #RaeLakesLoop), or start following specific hikers to observe trends.
View this post on Instagram
A post shared by Joshua Seligsohn • “Superman” (@jseligso) on May 24, 2019 at 4:10pm PDT
2. Time of day
Throughout the spring and summer, the snowpack is in a general state of melt. The seasonal trendline is interrupted most nights, however, when radiant heat loss and colder ambient air temperatures cause the snow to firm up or crust over. This can make even low-angle snow problematic for early-risers and dawn-to-dusk hikers. A few hours after sunrise, such sections will be unremarkable.
3. Individual comfort and skills
If you have prior relevant experience (e.g. early-season backpacking, mountaineering, climbing) or if you’re fit and athletic, you may need less equipment than others. For example, on steep but soft snow, you may feel comfortable with just an axe, whereas another hiker would want an axe and crampons.
4. Route
What challenges should you expect? For example:
How often will you hike on snow (which is a function of elevation)?
What steep pitches along your route are unavoidable? Pour over those maps!
Might you encounter a cornice on the leeward sides of some passes or ridges?
Will a boot track or glissade track have formed by hikers ahead of you?
Prior experience — with map-reading, early-season conditions, and the High Sierra generally — is really helpful is accurately predicting the likely conditions.
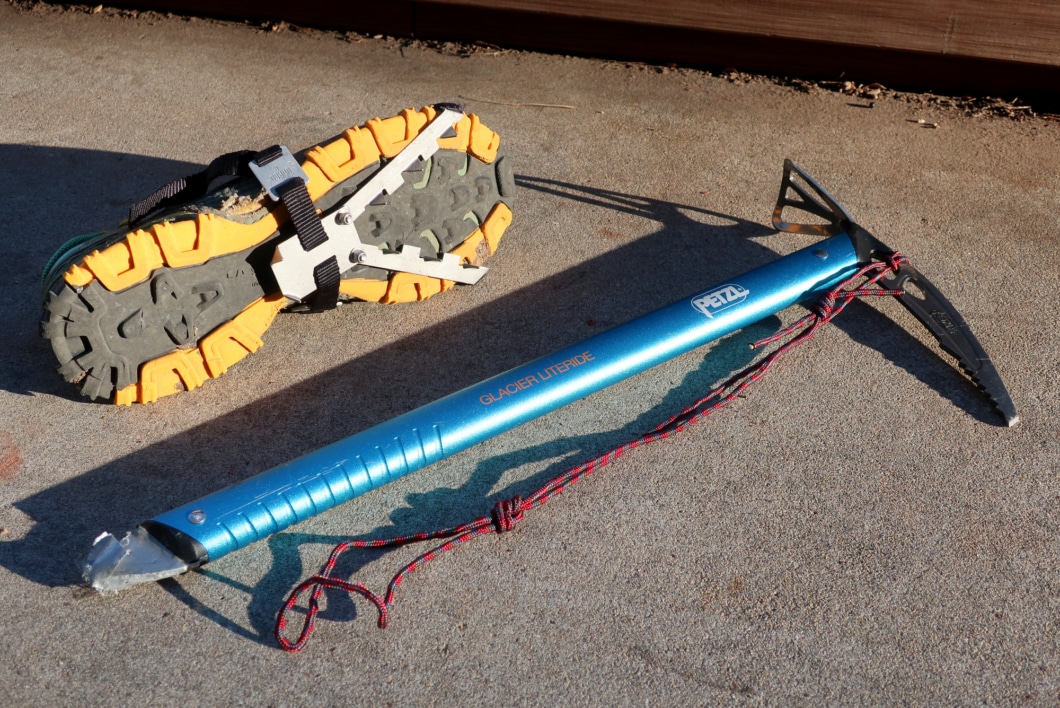
For a thru-hike of a high route in July 2017 after a snowy winter, I carried an ice axe for steep slopes and Pocket Cleats as just-in-case insurance.
Ice axes
An axe is used to:
Self-arrest a fall,
Self-belay up or down a snowfield,
Control a glissade; and,
Cut steps or cut through a small cornice.
On most backpacking routes, axes are needed only occasionally, usually to gain or descend a pass, or to contour across a steep snowfield or avalanche chute below a pass.
I recognize that it’s difficult to justify a ~$100 expense and 12 ounces of extra pack weight for an item that you infrequently need. But it can be a vital safety tool.
Recommendations
I’m requiring that every client in my 5- and 7-day trips have an axe, since we’ll be hiking over several steep off-trail passes like Don’t Be A Smart, Stanton, and Matterhorn. Generally, I’d recommend an axe for backpackers who will:
1. Travel on or across steep slopes in June and July without the aid of a boot track. This would include low-traffic trails and off-trail routes. By August, most snowfields will have melted, and most cornices will have lost volume and steepness.
2. Follow a major trail (e.g. JMT/PCT, High Sierra Trail) in June and some of July. As summer backcountry traffic increases, a boot track will form on the trade routes, helping to take the edge off steep slopes and chutes that are holding snow. The consequences of a fall could still be very bad, but the risk of falling will be lower.
Specific ice axes
Shopping for an ice axe is fairly simple: options are limited, and the styling and technologies are mostly the same. Select a/an:
Entry-level axe if you want to save money and are willing to carry the weight;
Performance axe if you will use it often and/or need a longer length;
Ultralight axe if you are willing to accept at least one tradeoff (e.g. price, short shaft, performance).
Personally, I own an ultralight axe. It’s been sufficient for the occasional instances when I want it, and I don’t curse its weight during the miles in between.
Sizing
Stay upright, holding the pick and keeping your arm by your side. Conventional wisdom says that the spike should fall between your ankle and mid-calf. For early-season backpacking I think mid-calf is better, because you probably will use it only on steep slopes. Mountaineers use their axe like a cane, and thus prefer a longer shaft.
Leash
I installed a wrist leash on my axe, believing that the risk of losing it on a steep slope is greater than the leash’s fussiness and its entanglement risk.

The relationship between traction and weight is inverse: the heavier the device, the better the purchase (with a rate of diminishing returns). Left to right: Pocket Cleats, Micro Spikes, and the original aluminum-spiked Kahtoola KTS crampon.
Crampons
On slick and steep snowfields, boot rubber alone will probably not cut it. And on low-angle and slushy slopes, hours of slip-and-slide can be tedious and energy-sapping. The solution is to increase your purchase with crampons or shoe chains.
Recommendations
I told my groups to skip the crampons. By mid-July more ground will be melted out than still snow-covered, and the snow will be soft enough to kick steps. Generally, I’d recommend:
1. Hiking crampons in June, and for aggressive routes in July.
2. Shoe chains for high-traffic trails in July to maintain traction in the boot track, which can get packed out and sometimes slick.

Typical boot track on a high-traffic pass.
Specific products
Traction devices fall into three categories:
1. Just-in-case crampons are better than nothing, and weigh very little. If there’s a low chance of needing traction or if there’s just one token problem spot, this is a good option.
2. Shoe chains are good for packed-out trails and boot tracks. They are lightweight, relatively inexpensive, easy to put on and take off, and bite well into firm surfaces.
3. Hiking crampons are best for icy/crusty snow and deep snow, and steep slopes. For backpackers, they are the most robust option.
Questions about axes or crampons, or your need for them? Leave a comment.
The opinions expressed in this post are my own. I do not publish sponsored content or native advertising, and I do not accept payments in exchange for reviews. I have no financial affiliations with or interests in any brands or products.
This website is supported by affiliate marketing, whereby in exchange for referral traffic I receive a small commission from select vendors like REI or Amazon, at no cost to the reader. This post contains affiliate links.
The post Crampons & ice axe: Recommendations for the High Sierra appeared first on Andrew Skurka.
May 21, 2019
Long-term review: Osprey Aether/Ariel Pro 70 || Tough mid-weight load-hauler

The Osprey Aether Pro weighs less than 4 pounds but has the weight and load-carrying capacity of a pack that normally weighs 5 to 7 pounds. It’s become my go-to for guiding, big game hunting, and spousal trips.
Recently I had to look through photos of the Great Western Loop from 2007. My, my, I had such a small and light pack. But the trend has been moving in the wrong direction ever since, and for about a year I’ve been using a pack that has more volume and weighs more than anything I’ve used since 2002, when I started the Appalachian Trail as a noob with a Mountainsmith Frostfire 4500.
I have now used the Osprey Aether Pro 70 for about 50 days, including on most of my guided trips for the past year, a spousal trip to Utah’s Cedar Mesa, an elk hunting trip in the Colorado Rockies in November, and weighted training hikes in Boulder’s foothills.
For women, Osprey offers the Ariel Pro 65, which has identical features and materials, but a women-specific fit and five liters less capacity. Nearly all of my comments about the Aether are applicable to the Ariel as well.
Long-term review: Osprey Aether Pro 70 and Ariel Pro 65
The Osprey Aether/Ariel Pro will appeal most to backpackers who:
Must carry large or heavy loads that exceed the volume or load-carrying capacity of modern lightweight packs; but,
Want this performance from a pack that weighs 3 to 4 pounds, rather than the normal 5 to 7 pounds.
When I’m leading clients, hauling out elk quarters, or carrying most/all of the food and gear on a group trip, the Aether Pro has become my go-to. I think Osprey also imagined it being used for alpine/mountaineering expeditions and for adventurous long-distance hikes (e.g. thru-hiking the Brooks Range).
My sole criticism of the Aether/Ariel Pro is its external storage. Instead of the removable compartments located in the “wedge” between the hipbelt and main compartment, I’d rather have conventional side pockets and hipbelt pockets, plus a shoulder strap pocket. But I’ve overlooked this shortcoming because of its performance otherwise.

Spousal trip in Utah’s Cedar Mesa, when I carried just about everything for the two of us (plus a lot more, it seemed).
Key specs
Volume: 70 liters (4272 cubic inches) in size Medium
Strong and durable fabrics throughout
Stiff aluminum peripheral frame and a single aluminum center stay
Mesh-covered aerated foam back panel
Heat-moldable foam hipbelt
Two front compression/attachment straps
Attachment points for trekking poles, two ice tools, hydration reservoir, and sleeping pad
$375 MSRP
More information (men’s, women’s)
The spec weight of the Aether Pro (in size Medium) is 3.94 pounds (3 lbs 15 oz, 1.79 kg). My pack is over-spec by 2.9 oz; it weighs 4 lbs 1.9 oz (1.87 kg). Its weight can be further reduced by removing features:
Floating top lid (5.1 oz)
Two side compression straps (0.5 oz each, or 1.0 oz total)
Zippered side pocket (2.7 oz)
Cinch-able side pocket (2.6 oz)
The total weight of these removable items is 11.4 oz, which would reduce the spec pack weight to 3 lbs 3.6 oz, but at the cost of some functionality.
Comparisons
To help you decide if the Aether/Ariel Pro is right for you, comparing it to other packs is probably useful.
Aether Pro vs Aether AG
The Aether/Ariel Pro was new for spring 2018, and Osprey kindly sent me it and two other packs that it had updated or launched that season, the Exos and Levity. The Pro is essentially a stripped down version of the Aether AG (“Anti-Gravity”).
Compared to the AG, the Pro:
Uses more premium fabrics;
Has a simpler harness system that’s lighter and probably carries better, but less ventilated;
Is 1.3 pounds lighter, with an opportunity to shed extra weight by removing features; and,
Costs $65 more, $375 vs $310 for the 70-liter versions.
The only thing I wish the Pro had is the AG’s external pockets.
Aether Pro vs “sweet spot” packs
My pack recommendation for most backpackers is a 2.5-pound framed pack that is nicely featured, made of durable materials, and costs $200-$300 such as the Osprey Exos, Sierra Designs Flex Capacitor, and ULA Circuit.
Such models are ideal for standard thru-hikes and high routes, and for backcountry trips up to 7 or 10 days. If your plans are more exceptional and require a pack with more volume or greater load carrying capabilities, plus some additional durability, the Aether/Ariel is worth a look.
Aether Pro vs. Deuter, Gregory, and Mystery Ranch
Other packs match (and may exceed) the volume and load-carrying capacity of the Aether Pro, including the Gregory Denali 75, Deuter Aircontact 65 + 10, and Mystery Ranch Glacier. But none of them rival its sub-4 pound weight. In size Medium, the Denali weighs 6 lbs 3 oz; the Aircontact, 5 lbs 6 oz; the Glacier, 5 lbs 10 oz.
Aether Pro vs Seek Outside Divide and Unaweep
The most direct comparisons to the Osprey Aether/Ariel Pro may come from the backpack hunting industry, which is presented with similar volume/load demands. I’m specifically thinking of the Divide 4500 and Unaweep 4800 from Seek Outside. Both packs weigh in the low- to mid-3 pounds and approach $400.

This pack display from a guided trip in Rocky Mountain National Park puts the Osprey Aether Pro in perfect context. On left, I’m carrying it. But clients have the Flex Capacitor, MTC Jam and Osprey Levity. Note: All our packs are near empty in this photo, since we did a day-hike from a base camp on Day 2 to help acclimatize. Credit: Andrew Manalo.
Suspension + harness
The standout feature of the Aether/Ariel is its suspension. Simply put, this pack is designed to haul weight. It’s light-years better than the Exos, and even in a different league than the Flex Capacitor, which is considered to carry weight better than most (all?) sub-3 pound packs.
The peripheral frame made of 7075 tubular aluminum is extremely stiff, so it efficiently transfers weight. As I’ve come to expect of Osprey, the harness system is masterfully fitted, and the weight is distributed well across the hipbelt, shoulder straps, and back pancel, which have generous but firm cushioning.
On overnight trips I regularly have carried loads in the low-40’s, and on recent training hikes I’ve carried exactly 50 pounds (courtesy of two 12″ x 12″ concrete stepping stones wrapped in old towels, plus some other gear for filler). I will never say that carrying 50 pounds is comfortable, but some packs do it more gracefully than others, and the Aether/Ariel is among them.

On a recent training hike in Boulder’s foothills, wearing the Black Diamond Rhythm Tee and carrying the Osprey Aether Pro 70 pack, loaded with 50 pounds.
To achieve this load-carrying performance in a sub-4 pound pack, Osprey gave the Aether Pro a more conventional back panel, abandoning the ventilated trampoline that you’ll find on the Exos and Aether AG. The mesh-covered aerated foam (branded as AirScape) provides relatively little ventilation in reality, so you should expect perspiration to buildup on warm days and during hard efforts.

The aerated back panel does little to reduce perspiration build-up in warmer conditions and during hard efforts, as evidenced by the sweat line. But a more ventilated back panel would add weight and expense, and compromise the load stability.
Fabrics
The Aether Pro is spec’d with four types of fabrics:
Main body: 210d nylon x 200d UHMWPE
Bottom: 200d UHMWPE
Accent: 315hd oxford
Trim: not specified, but appears to be a 200d-ish nylon
UHMWPE stands for ultra-high-molecular-weight polyethylene, and is the source material for Dyneema and Spectra fibers. Presumably as a cost-savings measure, Osprey chose non-branded UHMWPE fabrics. Sierra Designs made the same decision with the Flex Capacitor, and internally we referred referred to the fabric as “Chineema.” Osprey has branded the body fabric as NanoFly.
The bottom fabric is a pure UHMWPE.
While writing this review I inspected my pack for wear, and found no abrasions or tears. The Aether/Ariel seems like it’s built for a lifetime of use. If this proves not the case, it’s covered under Osprey’s All Mighty Guarantee.

The four fabrics: 210×200 gridstop body, 200d Chineema bottom, 315d Oxford accent, and an unspecified 200d-ish trim.
Storage
The main compartment is tall and narrow, even before the extension collar is utilized. I believe this shape leads to better load stability, but it’s disappointing that a full-sized bear canister (e.g. BV500) cannot be stored horizontally in the Aether. Shelters and hammocks without intentionally short pole sets will have to be placed vertically, too.
External storage
The floating top lid is nicely sized, and is convenient storage for items that you occasionally need during the day, such as toiletries, snacks, extra water storage, and even a windshirt or minimalist rain jacket. If you don’t need its volume or wish to pare 5 oz from the Aether, it can be easily removed.
The hipbelt/side pockets are underwhelming, and I consider them to be the Aether’s most notable imperfection. I believe it’s essential to have quick access to oft-needed items like water, a camera or phone, maps, skin treatments (e.g. lip balm, sunscreen, insect repellent), a headnet, water purification and other items. The design of hipbelt pockets and side pockets is vitally important — they must be accessible, secure, and generous.
To their credit, the hipbelt/side pockets are easily accessible, and one can be zippered shut. But their total volume is marginally acceptable, and the cinch-able pocket is deep enough only for a 1-liter Nalgene. Using a 1-liter Smartwater bottle (which weighs 2.4 oz less) is impractical — it immediately slips out if you lean forward, like to pick up a trekking pole or step under a downed tree.
I appreciate that Osprey tried something different here, but personally I would have preferred the Aether AG design, which includes two permanent side pockets and two permanent hipbelt pockets.

Only a 1-liter Nalgene can be used with the cinch-able side pocket. A 1-liter Smartwater bottle slips out easily.
Compression and utility
The Aether/Ariel Pro has two sets of compression straps:
Two horizontal straps across the front, and
One Z-style removable strap on each side
In addition to stabilizing the load, these straps are useful for securing trekking poles, an umbrella, ice tools, and long tent poles. I have not tried, but I’m certain that snowshoes would fit perfectly on the front. Skis could be attached, too, but I’d want to protect the pack fabric from the metal edges first.
The side compression straps photograph well, but the webbing does not slide easily through the rectangular sliders. O-rings would have been a better choice.

External attachments and utility is mostly excellent. I would only recommend that the hardware on the removeable side straps be changed to an O-ring, to improve glide.
Questions about the Aether/Ariel Pro 70, or have an experience with it? Leave a comment.
The opinions expressed in this post are my own. I do not publish sponsored content or native advertising, and I do not accept payments in exchange for reviews. I have no financial affiliations with or interests in any brands or products.
This website is supported by affiliate marketing, whereby in exchange for referral traffic I receive a small commission from select vendors like REI or Amazon, at no cost to the reader. This post contains affiliate links.
The post Long-term review: Osprey Aether/Ariel Pro 70 || Tough mid-weight load-hauler appeared first on Andrew Skurka.
May 19, 2019
Standout gear for cold-and-wet conditions in the Appalachians


Cold-and-wet conditions atop Spruce Mountain in West Virginia
Last week my guiding season kicked off in the beautiful — but soggy and unseasonably cold — mountains of West Virginia, with four 3-day/2-night learning-intensive Backpacking Fundamentals courses, split between two guide teams.
Based on the conditions assessment that we performed during the Planning Curriculum, we expected rain and cool temperatures. But I was hoping for better weather than what we got: five consecutive days of precipitation (with unhelpful sunshine on the last morning), and temps in the 30’s and 40’s for the second trip.
Despite the adverse conditions, these trips went spectacularly. What are some of the things that made the biggest difference?
1. Group tarps
At each campsite we created large protected spaces using oversized tarps. The other lead guide, Alan Dixon, keenly observed that the tarps had the same magnetic pull as a campfire — they allowed clients to eat, relax, and converse as a group, instead of being stuck in individual shelters.
I carried two flat tarps for my 10-person groups: Mountain Laurel Designs SuperTarp made of Dyneema Composite Fabric ($380, 12 oz), and a Warbonnet Mamajamba made of silicone-impregnated nylon ($115, 12 oz). On six tie-outs I put 10-foot guylines, sufficient for long spans and high sides; where possible, I anchored the tarps to tree trunks, sturdy branches, and exposed roots using my recommended guyline system, rather than stakes.

Having dinner together under group tarps
2. Campfires
In some locations and during some seasons, campfires are rightfully poo-poo’d. But fire restrictions in the Seneca Creek National Recreation Area are relatively lax, since there’s ample combustible fuel and normally low wildfire risk.
We had campfires each night during the colder second session to warm up, dry out, and boost morale. It was also an opportunity to conduct a masterclass in fire-starting. It’s disappointingly ironic that fires are needed most in the same conditions when they’re most difficult to start — when it’s cold, wet, and windy.
On the first night I successfully used my standard method, using a Bic lighter and mylar food wrapper. But on the second night we needed more help, since it’d rained most of the day and since we camped at 4,200 feet atop Spruce Mountain, which had been in the clouds for days. Coghlan’s Fire Sticks ($5, 2 oz) proved key, giving us a long-burning flame that dried out and eventually ignited our kindling.

This campsite had been in the clouds for several days, and everything was soaked. Starting a fire required skill, patience, and a few tricks.
3. Shell jacket + umbrella
When it became apparent that we’d see rain, I was excited that I’d be able to test the Gore H5 Shakedry Jacket ($400, 8 oz). But I also wisely packed a My Trail Company Chrome Umbrella ($40, 8 oz), which I’ve been wanting to thoroughly test as well.
In cool-and-wet conditions at least, I found the combination of these products to be stellar; they are not mutually exclusive. The umbrella kept me mostly dry — it shielded me from a lot of rain, including most of the the heaviest downpours. But the jacket was also essential — it protected my arms from driving rain, which translated into warmer hands; and I relied on it exclusively when the umbrella became impractcal, like on overgrown trails, during brushy bushwhacks, in high winds, and when the muddy trail demanded two trekking poles.

In a downpour, would you rather be relying on just a rain shell, or a rain shell plus an umbrella?
4. Showa Mitts
The Showa 282 Gloves are among the best $20 purchases that I’ve ever made, a sentiment now shared by many of the clients and other guides. My hands used to struggle badly in cold-and-wet conditions, but they’ve done much better since discovering the 282. On this trip, the gloves were ideal for hiking during the day, collecting firewood in camp, and packing cold wet tarps into stuff sacks in the morning.
The 282 feature a waterproof/breathable polyurethane shell and an acrylic liner. The shell is very tough and mildly textured (for enhanced grip). The acrylic liner is cheap and should be removed completely after it starts to delaminate. I now pair the 282 shells with Outdoor Research PL 400 Sensor Gloves, which is a more versatile system anyway. If your hands are small enough, you might be able to simply buy the liner-less Showa 281 version — but size way up, since they’re not designed with the expectation that you’ll wear liners with them.

Matt stayed relatively warm and dry by using the Showa gloves and Packa poncho/jacket/pack cover.
5. Bread bags
On the first day of each trip, my shoes were dry for about a mile — until reaching an unbridged creek, an unavoidable bog, or tall rain-soaked grass. For the rest of the trip, my shoes were at least damp, and often soaked. So-called waterproof shoes would not have helped. Water would have entered from the top, or just overwhelm the waterproof-breathable fabric. Our better bet was managing the effects and aftermath of wet feet.
In camp, this meant having dedicated camp footwear, so that we could avoid avoid wearing cold wet shoes for several hours before bed. Some clients brought lightweight slide sandals, but most of us packed bread bags. After arriving in camp, we removed our wet shoes and hiking socks, and briefly let our feet dry. Then, we’d put on our dry sleeping socks and bread bags, then slide our feet back into our wet shoes. This system is remarkably effective and comfortable, in addition to being free and lightweight (about 1 oz).

To keep our feet warm in camp, we wore bread bags between our dry sleeping socks and our wet shoes.
6. Fantastic groups
Okay, this is where I will get mushy.
Even with all of the right gear (and the oversight of a world-class guide roster), these trips still could have been a bust, or at least a wash. Understandably, it’s difficult to get excited about spending three days outside in inclement weather and whiteout conditions.
But our groups rocked it. For the entirety, they were positive, cheery, and engaged. They were undeterred by the cold and rain; they were generous with each other and worked as a team; and they asked questions and undertook the voluntary challenges that will make them better backpackers.
Since 2011 I have guided over 80 groups. Most have been great, but not all groups would have handled themselves as well. I hope to see many of these alumni again — they are all-stars.

Still smiling after hiking four miles out on the notoriously muddy and wet Lumberjack Trail.
The opinions expressed in this post are my own. I do not publish sponsored content or native advertising, and I do not accept payments in exchange for reviews. I have no financial affiliations with or interests in any brands or products.
This website is supported by affiliate marketing, whereby in exchange for referral traffic I receive a small commission from select vendors like REI or Amazon, at no cost to the reader. This post contains affiliate links.
The post Standout gear for cold-and-wet conditions in the Appalachians appeared first on Andrew Skurka.
May 8, 2019
Backpacking gear list: West Virginia & Appalachians in May


Seneca Creek
My guiding season starts this Friday in West Virginia, where Alan Dixon, Joseph “Stringbean” McConaughy, Ron Bell, Matthew Bright, and I will be leading two consecutive intro-level 3-day trips (May 10-12 and 13-15).
Seneca Creek National Recreation Area encompasses Spruce Knob, the state’s high point, and is not far from other popular backcountry areas like Dolly Sods and the Cranberry Wilderness. If you have hiked elsewhere in the southern Appalachian or Allegheny Mountains, it will feel familiar: lush hardwood forests at lower elevations, thick guard spruce at the highest, and occasional open meadows.
Expected conditions
Gear selection should be driven primarily by:
Your trip objective; and
The environmental and route conditions.
For planning purposes, we assumed normal springtime conditions for this location. When an accurate short-term forecast becomes available, we will tweak our kits.
Temperatures. For the month of May, a nearby weather station at Canaan Valley reports average high and low temperatures of 68 F and 42 F. Our location is a little bit higher (3,000 to 4,800 feet), and therefore cooler.
Precipitation. The same weather station reports 6.1 inches of rain in May, and Spruce Knob should receive a little bit more.
Daylight. We’ll have ample daylight, since we’re just 6 weeks away from the longest day of the year.
Footing. The dirt trails can become muddy.
Vegetation. At the lower elevations, we’ll be shaded by a thick hardwood canopy. At high elevations, we’ll find guard spruce. The understory is not prohibitively dense.
Navigational aids. Trails will be primitively signed, at least in the higher use corridors. Visibility will be very limited, besides for the occasional meadow.
Sun exposure. Between the tree canopy and likely rainfall, sun exposure is a low concern.
Water availability. Topographic maps depict regular and perennial streams and springs, except atop ridgelines.
Problematic wildlife. We found no reports of bear/human food conflicts. Rodents may be an issue at high-use campsites.
Biting insects. It’s peak tick season, which is a serious matter. Mosquitoes will be out but manageable.
Remoteness. A road is never more than a few miles away, but this is a lightly inhabited area — we will not have cell service, and we’re several hours from the nearest medical facilities.
Natural hazards. In heavy rains, Seneca Creek can swell.
Backpacking gear list: West Virginia in May
The applicability of this gear list goes well beyond 3-day trips in Seneca Creek. It could be replicated successfully for any springtime trip in the southern Appalachians (e.g. Appalachian Trail, Smokies, Blue Ridge, Shenandoah, etc.), possibly with small tweaks to comply with local regulations or conditions.
Summary
Here’s a big picture look:
The weight and cumulative cost are both on the high side:
These should be physically easy trips for me, and intentionally I’m packing luxuries like sleeping clothes, a bridge hammock, and a decent camera. I wouldn’t be surprised if my pack weighs more when I leave the trailhead — if it’s rainy, I’m going to bring an 8-oz umbrella and 1.5-lb group tarp; and for role-modeling purposes I may keep my food in an Ursack.
Keep in mind that I get a lot of gear for free. If I had to pay for everything, I’d shop the sales and I’d seek out more economical substitutes.
Full list
To make this list more viewing-friendly, open it in new window.
If you like the look and organization of my gear list, consider using my 3-season gear list template.
Questions about my selections? Leave a comment.
The opinions expressed in this post are my own. I do not publish sponsored content or native advertising, and I do not accept payments in exchange for reviews. I have no financial affiliations with or interests in any brands or products.
This website is supported by affiliate marketing, whereby in exchange for referral traffic I receive a small commission from select vendors like REI or Amazon, at no cost to the reader. This post contains affiliate links.
The post Backpacking gear list: West Virginia & Appalachians in May appeared first on Andrew Skurka.
April 28, 2019
In my pack: Six items for rain & ticks in West Virginia
Next month I am guiding two 3-day overnight backpacking trips in West Virginia, which has all the beauty of the Appalachian Mountains but a fraction of the backcountry traffic versus the range’s more eastern destinations like Shenandoah National Park. I’m being joined by Alan Dixon, Joe McConaughy (“Stringbean”), Ron Bell, and Matt Bright.
This week I will start packing up. Here are six critical and interesting items that are going with me:
Brute Super Tuff Compactor Bags
A NOAA weather station near the trailhead reports an average of 6.1 inches of rain in May. Over the course of six days, I’m almost certain that it’ll rain, and it could rain the entire time. To keep my gear dry, I will line my pack with two 20-gallon Brute Super Tuff Compactor Bags, which are made of 2-mil plastic and last about a month before developing holes (which can be covered with duct tape for a time).
In one bag I will keep gear and supplies that I don’t need during the day, like my sleeping bag, pad, stove, insulated clothing, sleeping clothes, and food for later in the trip. I will keep oft-needed items in the other bag. If any of my gear is wet (e.g. shelter, rain gear), I will keep it in an outside pocket, or inside the main compartment but on the outside of the Brute liners. For a partial demonstration, watch the video below.
Versus a pack cover, these 2.4-oz compactor bags are more effective in keeping my gear dry. Versus waterproof dry bags, they’re much less expensive to buy and to replace. The only downside is their “fresh scent” smell, which I’ve found will go away if the bag is aired out for a few days beforehand.
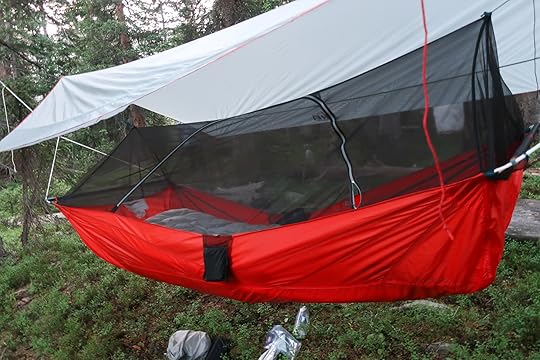
REI Quarter Dome Air Hammock
Most backpackers still sleep in tents, but for the eastern woodlands (and for some high-use areas in the West) I’m completely sold on the virtues of hammock, which:
Are phenomenally comfortable;
Liberate me from shelters and established campsites that are often crowded, hard-packed, wet, sloping, rocky and rooty, and rodent-infested; and,
Provide a spacious and well ventilated area to hang out when it’s raining.
Backpacking hammock systems are a niche category that is dominated by cottage brands like Warbonnet Outdoors, Hammock Gear, and Dutchware Gear. Since I’ve loaned my Warbonnet demo kits to my clients, I will be using a more budget-friendly model, the REI Quarter Dome Air Hammock.
I’m not disappointed. I used it last summer for two weeks in Rocky Mountain National Park, and found it to be user-friendly and very comfortable. It’s a great option for casual users and those with limited funds — for $200, you get the hammock with suspension, and a tarp with guylines. To complete the kit and avoid CBS (aka “cold butt syndrome”), I’ll add a new Therm-a-Rest UberLight; more ideally, I’d have the $100 underquilt accessory.
My only criticism of the Quarter Dome Air is its weight, 3 lbs 8 oz. Bridge style hammocks are generally heavy, and to keep it at $200 the Quarter Dome Air was not made of lighter (and more expensive) fabrics.

The Quarter Dome Air retails for just $200, and includes a tarp and well designed bridge-style hammock.
Sawyer Picaridin Insect Repellent Lotion
With temperatures in the 40’s through 60’s, I’m expecting some mosquitoes. But I’m more concerned about ticks — May is prime time for them, and the mid-Atlantic is the epicenter for Lyme disease according to the CDC.
The most effective method to repel ticks is full-coverage clothing (i.e. long-sleeve shirt and pants, with pants tucked into socks) treated with permethrin, which may be branded as Insect Shield, BugsAway, Insect Blocker, or similar. That will be my outfit in late-June for more trips in the Brooks Range, but I’m struggling to imagine that outfit in the steamy East.
So I plan to risk it some, wearing a more customary hiking outfit consisting of shorts and a t-shirt. But I plan to regularly apply Sawyer Picaridin Insect Repellent Lotion to my arms and legs, and around (but not directly on) sensitive areas where ticks are most likely to burrow like my armpits and crotch.

Gore H5 Gore-Tex Shakedry Hooded Jacket
Did I mention it will probably rain? When it does, I’m excited to test the new Gore H5 Gore-Tex Shakedry Hooded Jacket.
Unlike a conventional waterproof/breathable fabric, where the membrane is in a 2.5- or 3-layer “sandwich,” protected on both sides with face fabrics and/or coatings, with Shakedry it’s on the outside. This should prevent “wetting out,” when the face fabric becomes saturated with water and hinders breathability. Conceptually, it’s similar to Outdry Extreme from Columbia; I don’t yet know how the fabrics compare in their performance.
Shakedry Technology has been out for several years, originally released with The North Face HyperAir Jacket. But the original fabric was not sufficiently durable for use with a backpack, at least according to Gore’s guidelines. The H5 is made with a heavier fabric that should better withstand abrasion. It’s still very light, however — my size Large (which fits more like a Medium in most other brands) weighs just 8.2 oz (233 g). It’s a minimalist and well executed design, featuring a hood adjustment, two front pockets, elasticized wrist cuffs, and surprisingly a waist drawcord with waist gaiter.

Sleeping clothes
In extended rain and high humidity, even a $400 shell will probably fail to keep me dry. In this case, my backup is a dedicated sleeping layer that stays buried deep in my pack until I reach camp.
If forecasted low temperatures are in the 40’s as they normally are at this time of year, I will bring a long-sleeve polyester top and some lightweight running tights. The 8-oz weight penalty will be entirely justified by the enhanced night of sleeping comfort. These items have no performance threshold — I’ll take a top and bottom that I already own, even if it fits poorly, has holes in it, or is last decade’s hot color.

Osprey Aether Pro 70
As the guide, my pack is always the heaviest and largest in the group. I carry the first aid kit and satellite messenger, and usually a disproportionate share of the group food. Plus, I like having some extra capacity if a client needs to be relieved of some weight. (Most clients will start these intro-level 3-day trips with only about 20 pounds of gear, food, and water. But if someone is struggling with altitude, fitness, or a travel bug, every less pound helps.)
Since last year, I’ve been using the Osprey Aether Pro 70 as my “guide pack.” I started using it after I loaned out all of my Flex Capacitors, but liked it so much that I also used it on a two-night trip with Amanda and an elk hunting trip in the Colorado Rockies in November. I wouldn’t recommend the Aether Pro for normal backpacking trips, but it’s ideal for larger and heavier loads.
At about 4 pounds, the Aether Pro is about 1.5 pounds heavier than “sweet spot” backpacks like the Hanchor Marl, Osprey Exos, and Sierra Designs Flex Capacitor. But it offers more volume, more durability, and much more load capacity than lighter packs. This spring in the Aether Pro I’ve been carrying 50 pounds up Boulder’s foothills peaks, and I’m not at its maximum comfort weight.

Disclosure. I have no financial interests in any brands or products. However, for referral traffic I receive a small commission from select vendors. This affiliate marketing program d oes not cost readers a penny more, but it does support my efforts to create excellent content for this website. This post contains affiliate links.
The post In my pack: Six items for rain & ticks in West Virginia appeared first on Andrew Skurka.
April 24, 2019
Long-term review: Black Diamond Rhythm Tee with NuYarn, innovative nylon/merino blend

On a recent training hike in Boulder’s foothills, wearing the Black Diamond Rhythm Tee (and carrying an Osprey pack with two 12×12 concrete pavers, among other things).
At the end of a Black Diamond media lunch at Outdoor Retailer last November, I was given a t-shirt that we’d been quickly briefed about but that seemed like vastly inferior product seeding relative to the new powder skis and airbag packs that’d really wow’d us.
I’m notoriously particular about my athletic clothing, and I expected this Black Diamond Rhythm Tee would be dropped off at my local Goodwill before Christmas. Each year I receive mountains of new clothing, but I own only about a dozen go-to tops and bottoms — like an airy Smartwool long-sleeve from 2008, a wispy Salomon windshirt from 2013, and versatile Road Runner Sports short tights from 2014 — that fit and perform exactly how I want.
Long-term review: Black Diamond Rhythm Tee
To my surprise, the Black Diamond Rhythm Tee worked its way into my system. I’ve run in it over fifty times, including multiple long runs in the 2- to 2.5-hour range; and this spring I’ve been wearing it on training hikes with a 50-lb pack in the foothills in advance of a busy summer guiding schedule.
The Rhythm Tee is a simple pocket-less crew neck short-sleeve shirt. At $75 MSRP, it shares the uppermost price bracket with t-shirts from Smartwool, Arc’Teryx, and Salomon S/Lab.
I’ve found it ideal for road and trail runs in cooler temperatures (upper-40’s through 60’s, at which point I switch to a singlet or go shirtless), and for hikes and backpacking trips in summertime conditions with low sun exposure (or with regular applications of sunscreen). The Rhythm Tee has general outdoor applicability (e.g. climbing and cycling), but I haven’t used it in other capacities.

Key specs
New for spring 2019
Pocket-less short-sleeve crew neck
95 g/m2 fabric weight
Exactly 100 grams in size Medium
Made of NuYarn, 57% nylon and 43% merino
A men’s and women’s version
Available in Black and Nickel
$75 MSRP
Fabric
The Rhythm Tee is most unique for its fabric, NuYarn, a product of The Woolmark Company.
NuYarn is made by wrapping merino fibers around a nylon core, and contains 57 percent nylon and 43 percent merino. I’d describe it as soft, airy, slightly textured, and lofty for its weight. After testing merino fibers between 17 and 19.1 microns, BD says it settled on 18.5 for the Rhythm Tee, because this fiber weight seemed to have the best balance of comfort and durability.
The Rhythm Tee is made of 95 g/m2 NuYarn, which is about one-third lighter than standard “lightweight” merino fabrics at 150 g/m2. It’s actually not much heavier than a pure synthetic — my size Medium weighs exactly 100 grams (3.5 oz), versus 90 grams (3.1 oz) for my favorite polyester running t-shirt made of Columbia’s Omni Freeze Zero (from 2017, if you’re wondering).
I’ve long thought that synthetic/merino blends could offer the best of both worlds, and NuYarn seems to validate this. The Rhythm Tee rivals the weight, moisture management, and durability of a pure synthetic knit top like Patagonia Capilene. But it also has the odor-resistance and temperature regulation of a pure merino shirt like the discontinued Ibex Hooded Indie, making it suitable for long trips and wetter climates. I’ve yet to find any downsides.
NuYarn sounds similar to the “core spun technology” that’s now widely used by classic merino brands like Smartwool and Icebreaker. I’m unable to compare field performance; on paper, the two most notable differences are the fabric weight and the fiber ratio — core spun is heavier (150 g/m2 seems to be the lightest) and predominately merino (80+ percent). NuYarn should feel lighter and cooler, and it should dry faster, but it’s odor-resistance and temperature regulation may not be as wool-like.

Illustration of NuYarn, courtesy of Black Diamond
Fit
The Rhythm Tee has an athletic silhouette that, thankfully, fits me perfectly. I appreciate the extra inch-ish in torso length, too, especially while wearing a pack.
For context, with most tops I prefer Slim Fit in size Medium; I can fit a Relaxed size Small, but the sleeves and length are usually too short.
If you have a more muscular or thicker build, do not be deterred. NuYarn is absurdly stretchy — about one-third stretchier than normal merino, per data from the supplier — so it’s more forgiving of different body types than more static fabrics.
Durability
My initial concern about the Rhythm Tee was its stretch. With extensive use, I feared it — and, by extension, its fit — would be lost, as happens with elasticized fabrics. But the Rhythm Tee fits the same now as when it was new, because the stretch is inherent to the fabric knit. I should note that I rarely wash it as recommended — after a run or hike, I usually bring my clothing into the shower, where I hand-agitate it in a bucket with mild water and detergent.
The sole durability issue I have found is abrasion-related pilling of the NuYarn. So far it’s superficial. In my case, the pilling is most notable on the chest and shoulders, underneath my pack straps.
In-house Martindale abrasion testing suggests that the 95 g/m2 NuYarn fabric is more durable than standard 150 g/m2 wool, which has endured many normal thru-hikes. I’m not yet sure that I’d recommend it for extensive bushwhacking though. Hearing from harder-wearing readers would be insightful.

Where the fabric has been abraded by pack straps, there is noticeable pilling. So far it seems only superficial.
Future products
Black Diamond will expand it use of NuYarn in its growing SolutionWool collection. In fall 2019 expect a 150 g/m2 baselayer long-sleeve crew shirt, tights, and three-quarter tights (as well as some mid-layers and an insulated parka). And in fall 2020 BD is considering a long-sleeve crew and long-sleeve hoody.
These final products have me more interested. A 95 g/m2 long-sleeve would be ideal for running in cooler weather. And a 95 g/m2 long-sleeve hoody would be perfect for backpacking in the sun-blessed Mountain West. I’d give BD bonus points if it treats the fabric with permethrin so that I can wear it in the High Sierra during peak mosquito season.
Sustainability
Black Diamond is often associated with innovative engineering, not necessarily sustainability. But it seems to understand that consumer expectations of climbing hardware are different than merino wool, so it’s doing more on this front with SolutionWool.
In particular, NuYarn will be made only from responsibly sourced, certified non-mulesed merino. And it’s working with Australian Merino Exports Pty Ltd to ensure that the wool is app-based traceable from farm to garment.
Questions about the Black Diamond Rhythm Tee, or have an experience with it? Leave a comment.
Buy now: Black Diamond Rhythm Tee
Disclosure. I have no financial interests in any brands or products. However, for referral traffic I receive a small commission from select vendors. This affiliate marketing program d oes not cost readers a penny more, but it does support my efforts to create excellent content for this website. This post contains affiliate links.
The post Long-term review: Black Diamond Rhythm Tee with NuYarn, innovative nylon/merino blend appeared first on Andrew Skurka.
April 17, 2019
Long-term review: Saxx Kinetic Boxer Briefs || Pricey perfection


The Saxx Kinetic Boxer Briefs, which have become my go-to underwear for hiking and backpacking.
After my first trip last spring, I cut out the boxer brief liner of my favorite hiking shorts, which were designed for running and which I’d scored at Marshalls for $15(!) a few years earlier. The elasticized liner had lost its rebound, resulting in an imperfect fit and insufficient support.
The shell was still in good shape, however, so I thought I would try pairing it with performance underwear before I shopped for a full replacement. This gave me an opportunity to thoroughly test the Saxx Kinetic Boxer Brief, which I’d purchased from Massdrop a few months earlier.
Long-term review: Saxx Kinetic Boxer Briefs
Last summer I hiked in the Saxx Kinetic Boxer Briefs for about 50 days, including two-week blocks in both the Rockies and High Sierra. At $37 MSRP, I probably should “save” them for important days and outings, but I reach for them whenever they’re clean, so casual everyday use has at least doubled my time in them.
For hiking and backpacking, I have found the Kinetic to be just about perfect, and I have no suggestions for improvement (besides working on the steep price tag):
The fabrics are breathable and dry quickly.
They fit me very well, comfortably snug all around; the legs do not ride up.
The Ballpark Pouch provides support and organization, without being constrictive. And,
After extensive wear, they show few signs of use.
Kinetic collection
Saxx divides its underwear into seven collections. The Kinetic is the most suitable for athletic endeavors, due to its moisture management and semi-compression fit. A distant second is the Quest, which remind me of the ExOfficio Give-n-Go Sport Mesh — they’re better for travel than for serious hiking or running.
The Kinetic is available as a boxer brief (5-inch inseam) and in a long leg version (8-inch inseam). Saxx has also integrated the boxer brief into athletic shorts, such as the Saxx 2N1 Kinetic Run 5-inch, which may also make for good hiking shorts.
Support
Saxx launched its brand with the BallPark Pouch, a hammock-like cup that keeps the male anatomy nicely organized and supported. It reminds me of wheels on suitcases — other brands had built dimension into their patterns, but it should not have taken until 2006 for someone to develop underwear that keeps the penis and balls separated from the legs.
The BallPark Pouch is not hype. I wish all my underwear had it.

This photo may make everyone uncomfortable, but it’s the only way to really show the BallPark Pouch. The penis and balls go in the pouch, separating them from the legs.
Fabrics
The Kinetic is made of a four-way stretch mesh nylon/spandex blend (90/10). The BallPark Pouch is double-layered, for modesty and additional support.
This fabric dries quickly and is highly breathable. Heat and moisture will collect during high exertion, but it performs at least as well as any other underwear I own.
Despite the nylon having an anti-odor treatment, the Kinetic will get ripe, as underwear does. When backpacking, I wash and wear-dry them every day or every other day. Saxx also makes odor-resistant merino underwear, the Blacksheep, which I’ve owned for three years. But I’d recommend them for casual use only — they do not breathe or dry as well, and with only 5% spandex they don’t fit snugly enough for prolonged athletic activity.
The Kinetic waistband is quite wide, at 1.75 inches (4.5 cm). This helps them to stay put and to distribute pressure. Saxx also describes it as “anti-roll,” but I can’t attest to that.
Fit & sizing
The Kinetic fit me like a glove, like they were tailored for me. They’re snug all around, without ever pulling or being constrictive. The legs do not ride up.
YMMV. Other brands may use fit models that more closely resemble your build.
Pay attention to the sizing chart. It feels odd to be considered a XS/S with a 30-inch waist (or 29 when I’m at my fighting weight).
Durability
After 100+ uses, my Kinetics are still in excellent shape. The spandex in the main fabric, waistband, and BallPark Pouch have lost some rebound, but not yet enough to affect fit or performance. The seams are entirely intact.
I’ve noticed some odd “spotting” in the mesh, where the fabric is thinning. I don’t know the explanation, but I suspect that it’s either a quality issue, or that it was exposed to stove fuel or chlorine water purification, or was abraded against something like Velcro.

Spotting in the nylon/spandex, which I can’t explain. I’m unsure if it’s a quality issue, or if I managed to spill something on them.
Budget option: Jockey Sport Cooling Mesh
If you are on a stricter budget and/or balk at $37 underwear, as a more economical option I’d recommend the Jockey Sport Cooling Mesh Performance Trunk, which retail for $18.
I’ve worn these for years, and would consider them a reasonable runner-up. The fabrics, fit, and durability is as good as the Kinetic. For all-day use they’re not as comfortable, however — they support well, but without the BallPark Pouch the anatomy does not stay reliably in place.
Buy now: Saxx Kinetic Boxer Briefs
Disclosure. This website is supported by affiliate marketing, whereby for referral traffic I receive a small commission from select vendors, at no cost to the reader. This post contains affiliate links. I have no other financial interests in any brands or products.
The post Long-term review: Saxx Kinetic Boxer Briefs || Pricey perfection appeared first on Andrew Skurka.
April 14, 2019
Book review: Thirst, by Anish || Honest & accurate depiction of PCT FKT


“Better her than me,” I said multiple times during Thirst: 2600 miles to home, by Heather Anderson (“Anish”) about her record-setting thru-hike of the Pacific Crest Trail in 2013, which she completed in 60+ days at an astounding pace of over 43 miles per day.
This glorified diary is an honest and accurate depiction of the endeavor. Understandably, Heather is often sleep-deprived, hungry, and overwhelmed (and as a function of those things, emotionally raw). Necessarily, she’s obsessed with the details of her locomotion: hours moving, pack weight, remaining calories, water supply, foot health, headlamp brightness, etc. And, rightfully, she has a laser-like focus on her trip and her goal; the occasional deviations from the main story provide insight about who and why, but the landscapes through which she walks receive only cursory attention.
Criticism of Thirst will be aimed primarily at Heather’s style. It’s a convincing Exhibit A that demonstrates the difficulty of smelling the roses when you’re slaying miles like it’s your job.
But as a book, I think that Thirst properly depicts the experience. Let’s be honest: FKT’s of this duration are inward journeys, and their predominate themes — like setting goals, believing in oneself, overcoming odds, and pushing through adversity — share more in common with the bios of Olympians and survivors than the writings of Muir and Thoreau, or even Caroline van Hamert.

Thirst reads quickly and is well written, although it’s diary structure limits introspection and forces dedication of pages to uneventful and non-pivotal days. (As a supplement, consider The Pursuit of Endurance, by Jennifer Phar Davis.) It’s personal, with open discussions of Heather’s failed marriage, unfulfilling attempt at conventional life, and her struggles as an overweight child. Finally, it’s a unique book — Heather’s experiences put her in rare company.
Book specs
Mountaineers Press
Released February 2019
$25
208 pages
For a signed copy, purchase directly from Heather.
Disclosure. This website is supported by affiliate marketing, whereby for referral traffic I receive a small commission from select vendors, at no cost to the reader. This post contains affiliate links. I have no other financial interests in any brands or products.
The post Book review: Thirst, by Anish || Honest & accurate depiction of PCT FKT appeared first on Andrew Skurka.


