
Andrew Skurka's Blog, page 27
July 8, 2019
Gear List: Yosemite High Route + PCT/JMT in July
For several years my High Sierra guided trips have been in Sequoia-Kings Canyon National Park in September, when conditions are predictably comfortable (mild days, crisp nights, little precipitation, and no bugs or wildfire smoke) and when there is less backcountry traffic. But for a change in scenery, this year I scheduled them in Yosemite in early-summer, July 12-26.
The 3-day Fundamentals courses will play outside of Tuolumne Meadows, while the 5- and 7-day Adventure trips will undertake sections of the Yosemite High Route. All the itineraries utilize the John Muir Trail and Pacific Crest Trail, which are thoroughfares in this area.
For these trails and routes at this time of year, what clothing and equipment do I use and recommend? Here is my gear list:
 The Lyell Fork of the Tuolumne River in early-summer, as seen from near Donohue Pass on the John Muir and Pacific Crest Trails.
Environmental & route conditions
My gear reflects the likely conditions, and I make tweaks to it throughout the season. If you compare this gear list to my Yosemite High Route gear list for late-summer, you will notice major differences in my clothing, for example.
Temperatures & precipitation. Recently the NCEI website has not been fully operational, so I can’t link to exact historical weather data. At a later date, try Hetch Hetchy, Ellery Lake, and Gem Lake for relevant sources. Based on personal experience, I’m expecting daytime highs in the 60’s/70’s and nighttime lows in the 30’s. July is a dry month, with less than an inch of precipitation, usually during predictable and short-lived afternoon thunderstorms.
Daylight. Since we’re just three to five weeks beyond the summer solstice, the days will be long and the nights will be short. On July 12 in the nearby town of Bridgeport, civil twilight starts at 5:13 AM and ends at 8:52 PM, amounting to 15.5 hours of usable light; on July 26, there is still over 15 hours of daylight. In reality, we’ll have a little bit less due to the mountainous topography and occasional cloud cover. The full moon is July 16.
Footing. After a normal winter, the snowpack has mostly melted off by the solstice. The trails are on mineral sand (and not yet dusty) or granite slabs, and sometimes have extensive rock work. Off-trail travel is blissful: open forest, firm tundra and meadows (possibly water-logged), granite slabs, and sometimes talus. After an exceptionally wet winter like 2018-19, we’re expecting June-like conditions, with standing water, snow-covered passes, and perhaps lingering snowpack in high, shady, and leeward areas.
Vegetation. The subalpine forest consists of open lodgepole pine and hemlock, and transitions to alpine at about 10,000 feet. Knee-high willow may be found in wet alpine areas; usually, it’s easily penetrable.
Navigational aids. The trails are not blazed, but they are easy to follow; all junctions are marked. Clear skies, open views, and distinct topography are the norm in Yosemite, so terrain association is easy.
Sun exposure. We expect intense sunlight. The sun is high in the sky; we’re at high altitudes (8,000+ feet); clear skies are common; and lingering snowpack will reflect the sun from below, too.
Water availability. All mapped creeks and lakes will have ample high quality water. Many unmapped seasonal sources will probably be wet, too.
Problematic wildlife. Black bears are notoriously skilled food thieves. Per NPS regulations, all backcountry campers must carry a portable bear-resistant hard-sided canister.
Biting insects. Mosquito pressure will be heavy in the mornings and evenings, and lighter or non-existent during the day. In addition to proper clothing and shelter, this factor can be mitigated by deliberate campsite selection and by selecting routes that are relatively dry and breezy.
Remoteness. The Yosemite high country is vast, and it’s easy to get 20 to 30 miles away from the closest trailhead. In these remote pockets, traffic is light, especially when off-trail. Cell service is rare and unreliable.
Hazards. The spring runoff normally peaks in late-May and early-June, but will still be high in July after wet winters. Many creek crossings in the Yosemite backcountry are not bridged. Monsoon storms pose another hazard, specifically in the form of lightning, short-lived but torrential precipitation, and rapid decrease in ambient temperature.
 Harriet Lake alpenglow
Gear List: Yosemite High Route, Pacific Crest + John Muir Trails in July
Conditions along the Yosemite High Route and the PCT/JMT are mostly identical, so my gear list is mostly the same, too. On the Yosemite High Route, I might be more conservative with a marginal forecast, because the route is generally higher and more exposed.
Summary
When I was on the Yosemite High Route last August, my based weight was 14.7 pounds, or 2.6 pounds less. The difference is explained by one addition (ice axe, +14 oz) and several swaps (ULA Catalyst +10 oz, BV500 +8 oz, SD High Route +8 oz) since I’m in a guide capacity this time around.
The total cost is still completely inflated. Shop the holiday sales (usually 20 percent off a full-price item) and clearance; find less expensive substitutes; and eliminate pricey and extraneous items.
Full list
To make this list more viewing-friendly, open it in new window.
If you like the look and organization of my gear list, consider using my 3-season gear list template.
Questions about my selections, or what you should bring? Leave a comment.
Disclosure. I strive to offer field-tested information, insights, and advice, and I have a long-term incentive to be a trustworthy source. I do not publish sponsored content or native advertising, and I do not accept payments in exchange for reviews. I have no financial affiliations with or interests in any brands or products.
This website is supported by affiliate marketing, whereby in exchange for referral traffic I receive a small commission from select vendors like REI or Amazon, at no cost to the reader. This post contains affiliate links.
The post Gear List: Yosemite High Route + PCT/JMT in July appeared first on Andrew Skurka.


July 5, 2019
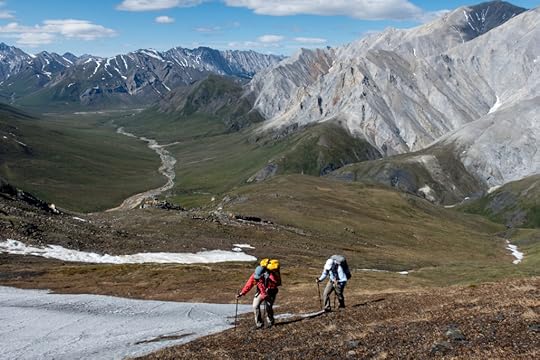
Quickstart guide: Gates of the Arctic National Park
Even within Alaska, the Brooks Range — which extends 700 miles across the state, from the Canadian border to the Chuckchi Sea — is considered to be the ultimate wilderness. It’s crossed by just one gravel road, has just one tiny Native village within its mountainous core, and has no man-made hiking trails.
Gates of the Arctic National Park encompasses the central Brooks Range, arguably its most aesthetic and diverse section. It was established in 1980, as part of the monumental Alaska National Interest Lands Conservation Act (ANILCA). At 7.5 million acres, it’s the second largest National Park and is 3.5 times larger than Yellowstone.
 Below Talus Top Pass, looking east towards the Arrigetch Peaks. Xanadu is the impressive block in the upper right.
Why go here?
The primary appeal of Gates of the Arctic is its wilderness character, which is virtually unchanged since people of European descent first began to explore the area in the 1880’s.
Inside the park boundaries, there are no roads or dams, and the only “trails” are those made by wildlife, including grizzly bears, wolves, Dall sheep, moose, and most importantly the Western Arctic Caribou Herd, which stands at about 225,000 animals and which migrates through the park twice each year.
For a backcountry enthusiast, Gates offers spectacular backpacking and rafting opportunities.
 Grizzly tracks on a gravel bar
 Probably not a golden retriever
Where is it?
Gates of the Arctic encompasses the central Brooks Range in northern Alaska, and is entirely north of the Arctic Circle.
Fairbanks is the closest city with full services and a large airport. It’s a seven-hour drive north from Fairbanks to the town of Coldfoot, located just outside the park’s southeastern boundary.
What is the Brooks Range?
The Brooks Range extends 700 miles across northern Alaska and divides the state’s Arctic and Interior regions. It’s the northernmost extension of the Rocky Mountains, and is composed mostly of sedimentary layers like limestone and shale.
Only one gravel road, the Dalton Highway (aka Haul Road), crosses the Brooks Range. And only one 350-person Native village, Anaktuvuk Pass, is located within it; about a dozen similarly sized communities are on its outskirts, mostly to the south.
The National Park Service and US Fish & Wildlife manage most of the range, as Gates of the Arctic National Park in the central Brooks, and as the Arctic National Wildlife Refuge in the eastern third.
How do I get there?
It’s difficult and expensive to reach Gates of the Arctic. As a result, you will not encounter crowds in gateway towns, and you are unlikely to see other parties in the backcountry.
1. By vehicle
The park’s eastern boundary can be accessed from the Dalton Highway, a well maintained gravel road that primarily services the oilfields in Prudhoe Bay but that is also open to private vehicles. From Fairbanks, it’s an eight-hour drive to the first practical access point near the Chandalar Shelf.
2. By passenger plane
Wright Air Service offers regularly scheduled flights to Anaktuvuk Pass ($190 one-way). From town, hike east or west on mostly good tundra, or float south on the John River (Class III) after a 5- to 10-mile portage.
3. By bush plane
To access most of the park, it’s necessary to use a bush plane, departing from:
FairbanksColdfoot, or,Bettles.
Fairbanks has an international airport and is serviced by major carriers like United, Delta, American, and Alaska Airlines.
Coldfoot is on the Dalton Highway, seven hours north of Fairbanks. Wright Air offers daily Fairbanks-Coldfoot flights ($230 one-way).
Bettles is not on the road system. It can only be reached via Wright Air ($170 one-way).
For a list of authorized air taxi services, consult this list from NPS. In Coldfoot, try Coyote Air; in Bettles, Brooks Range Aviation.
 Weyahok Creek, a tributary of the upper Alatna, as seen from a bush plane
When should I go?
The park is open year-round, but some seasons are more conducive to backcountry travel than others.
Winter (November through March): Brutally cold, stormy, very limited daylight, and few open services.Spring (April and May): Cool temperatures, increasingly long days, lingering rotten snowpack.Late-spring (June): Mild temperatures, 24 hours of daylight, manageable bug pressure, some lingering snow at the highest elevations, generally stable weather.Early-summer (July through mid-August): Heavy bug pressure, the wettest months of the year.Late-summer (mid-August through September): Comfortable days and crisp nights, no bugs, and fall foliage; but still stormy, and competition for bush planes with hunters.Fall (October): Rapidly decreasing daylight, cold temperatures, not yet winter.
 My camp in late-August near Nushralutak Creek.
What backpacking routes do I recommend?
I’m wary of discussing specific routes in the park. There are many stellar options, and currently backcountry traffic is nicely dispersed.
The best travel in Gates will be found:
Above 2,000 feet in the southern watersheds, e.g. North Fork, John, Alatna, Kobuk;On dry, well drained slopes;Adjacent to large and small rivers, on current and mature gravel bars; and,Along wildlife trails, particularly those made by caribou.
When planning a route, your goal should be to maximize the distance of good travel and to minimize the bad.
 Arrigetch Creek, as seen from the summit of Ariel Peak
What should I pack?
Full treatment of this question would warrant a standalone post. In lieu of that, start with my Brooks Range gear list for June, which can be tweaked for other seasons.
Do I need a permit? And other regulations
A wilderness permit is not required in Gates of the Arctic, but NPS asks that at a Visitors Center or Ranger Station you:
Leave an itinerary, for the sake of your safety and for visitor statistics;Complete a backcountry orientation.
Food must be stored overnight in an IGBC-approved canister or sack, per NPS regulations. I recommend using an Ursack Major or Major XL, which are much lighter and packable than hard-sided canisters. Refer to my buyers guide for more information.
Should I just hire a guide?
Even for competent backcountry travelers, Gates of the Arctic can be overwhelming. The logistics are complicated; the number of route options is infinite; the terrain is unlike anything in the lower 48; and multiple hazards must be managed (e.g. bears, river crossings, remoteness).
With a well developed skill set and extensive planning, private parties can successfully undertake trips in Gates of the Arctic National Park. But for those short on experience or time, a guided trip may have a better outcome.
 Approaching a pass out of the Kugrak River, a tributary of the Noatak
Where can I get more information?
The National Park Service website has basic information and is marginally helpful.
For a large-scale planning map, I recommend the National Geographic Trails Illustrated #257.
Elsewhere online you will find a handful of trip reports, but none provide plug-and-play itineraries (probably intentionally). Ironically, one of the best sources for route information is Robert Marshall, who documented his exploration of this area in Alaska Wilderness. The text was written in the 1930’s, but it’s still relevant today.
Disclosure. I strive to offer field-tested information, insights, and advice, and I have a long-term incentive to be a trustworthy source. I do not publish sponsored content or native advertising, and I do not accept payments in exchange for reviews. I have no financial affiliations with or interests in any brands or products.
This website is supported by affiliate marketing, whereby in exchange for referral traffic I receive a small commission from select vendors like REI or Amazon, at no cost to the reader. This post contains affiliate links.
The post Quickstart guide: Gates of the Arctic National Park appeared first on Andrew Skurka.
July 3, 2019
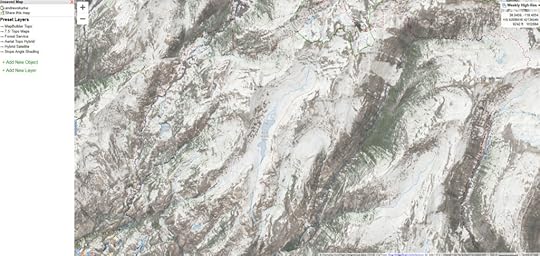
New snowpack tool: Satellite imagery for CalTopo + GaiaGPS
The peak backpacking season is almost here, and many backpackers with planned trips in the Mountain West are asking the same question: “What is the current state of the snowpack?” This is especially the case in areas that had wet winters and springs, notably the High Sierra, Colorado, and Wyoming.
Historically, I’ve relied on SNOTEL sensor data, the National Snow Analyses, and recent trip/route information (via social posts, online trip reports, and rangers). But CalTopo just added a new imagery layer that is perhaps more useful than any of these.
Its new Sentinel high-res satellite data will be updated weekly, and paints a very clear picture of the current snowpack. For example, below is the snowpack on July 1 around Rock Island Lake, which is one of my favorite spots in northern Yosemite and which I’m hoping to visit during my guided trips there later this month. It’s still thoroughly snowbound, but Slide Canyon is melted out, and the snowline will continue to climb.
For users of GaiaGPS, another platform that I’d highly recommend for field use, it sounds like you can download this satellite data for offline use.
This is a great resource, and I hope that backpackers utilize its potential.
The post New snowpack tool: Satellite imagery for CalTopo + GaiaGPS appeared first on Andrew Skurka.
June 13, 2019
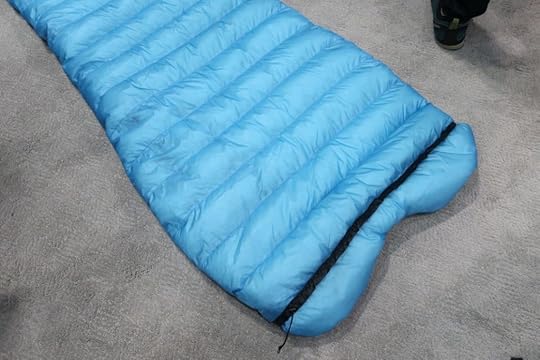
Long-term review: Western Mountaineering AstraLite || Very warm & light

In a one-week period in April I fielded three inquiries about the Western Mountaineering AstraLite, which was released in spring 2018 and which I’ve used for about 30 nights while scouting the Yosemite High Route in August, guiding trips in Sequoia-Kings in September, and enduring cold-and-wet conditions in West Virginia in May. I will use it again in July in the High Sierra, but intentionally I’m not taking it to Alaska this month.
I can’t recall another quilt that garnered such interest, and I attribute that entirely to the manufacturer. Western Mountaineering has been making premium down sleeping bags and insulated clothing since the early-1970’s in San Jose, Calif. And it’s still owned by Gary Schaezlein, who co-founded the brand with Jeff Jones.
Long-term review: Western Mountaineering AstraLite
The AstraLite is the first sleeping quilt from Western Mountaineering. It weighs a sweet 16 ounces (454 grams) and is appropriately rated to 26 degrees (-3 C), making it perhaps the warmest-per-weight quilt on the market. It’d be ideal for:
Mountain West: May through mid-October; and,Desert Southwest: Spring, fall, and most of the winter.
I would not recommend it for humid or rainy climates. If you backpack primarily east of the one-hundredth meridian or west of the Cascades, look elsewhere.
As a top quilt, the AstraLite performs wonderfully in a hammock or in a ground system (if you are a calm sleeper, utilize its pad attachment system, and/or use it inside of a bivy sack).
The AstraLite is a premium-grade product: made in the USA, 850-fill humane European goose down, 4.5 inches of loft, 7d and 10d shell and liner fabrics, and an insulated neck yoke — plus top-notch craftsmanship and customer service.
But you’ll pay for it. At $420 MSRP, the AstraLite is universally more expensive than the best offerings from younger direct-to-consumer brands like Enlightened Equipment, Nunatak, Katabatic, and ZPacks.
AstraLite vs NanoLite
The AstraLite was launched simultaneously with the Western Mountaineering NanoLite, which is lighter (11 oz) but less warm (38 degrees). If I were to review the NanoLite specifically, my comments would be mostly the same.
The AstraLite and NanoLite are identical in every way besides loft (which is a function of their respective fill weights and baffle heights). They share the same down quality, shell and liner fabrics, baffle construction, pad attachment system, dimensions, and neck yoke.
If I backpacked primarily in the warmer desert Southwest, I’d probably get more use out of a NanoLite, because it’s comfort range overlaps more with with the prime backpacking months. But in the Mountain West, it’d be suitable only for the warmest summer nights, or for warm sleepers.
 The NanoLite is lighter (and less warm) than the AstraLite. In the Mountain West, it’d be a summertime-only product. It’d get more use in the warmer Southwest.
Warmth
In the summer my sleeping comfort is about 10 colder than the average backpacker. I get scarily thin and I usually cowboy camp, making me more vulnerable to radiant heat loss and nighttime katabatic winds. To push a sleeping bag or quilt to its advertised or EN-tested comfort temperature rating, I expect to sleep in most of my clothing (hiking shirt, shorts and underwear, trekking pants, fleece mid-layer, and hooded down jacket).
Nighttime temperatures in Yosemite in August were in the low- to mid-30’s; in Sequoia-Kings in September, mid- to high-20’s; and in West Virginia in May, low-40’s and wet. I was comfortable on all trips, and concluded that the AstraLite’s 26-degree rating was fair and appropriate.
To remain comfortable on the September trips, when the lows were regularly at the AstraLite’s comfort limit, I swapped the Big Agnes Insulated AXL (my review) for a warmer Therm-a-Rest NeoAir XLite, and I more often used the AstraLite’s draft closure system.
I see little sense in a quilt that is rated for temperatures colder than the high-20’s. Beyond this threshold, high-loft head insulation is absolutely mandatory, and at that point you might as well use a traditionally mummy bag, which is simpler and less vulnerable to drafts.
Sizing
The AstraLite and NanoLite are both available in two lengths:
5’8″ version for sleepers less than 6’0″ tall; and,6’4″ version for sleepers between 6’0″ and 6’6″.
With quilts, it can be difficult to make sense of the width spec, which Western lists as, “up to 68 inches.” More helpfully, the AstraLite and NanoLite are based on Western’s Ultralite mummy bag, which has a slimer profile of 59, 51, and 39 inches at the shoulder, hip, and foot, respectively.
Insulated draft yolk
The chief downside of sleeping quilts is their draftiness. Active sleepers have an especially tough time, constantly revealing their non-insulated backsides, or breaking the seal between the quilt edges and the pad. But even calm sleepers like me lose heat around the shoulders and neck.
The AstraLite reduces drafts with a comfortable neck yolk. To employ, snap the two top corners together and tighten the cinch cord that runs through the quilt’s top hemline.
The yolk makes a significant difference in nighttime comfort, especially when temperatures are approaching the quilt’s comfort limit. But it still does not rival the cocoon sensation of a mummy bag or the warmth of the hideaway hood on the (notably heavier) Sierra Designs Nitro Quilt.
 The neck yoke reduces drafts by cinching gently around the neck.
Pad attachment system
The AstraLite has three 3/8-inch elasticized grosgrain webbing loops on its underside, through which a sleeping pad can be inserted. This creates a seal between the edges of the quilt and the sleeping pad, making the quilt function more as a true top bag.
The loops are simple and effective, but they are a little fussy. I found it best to slide a partially inflated pad through the loops, adjust as necessary, and then fully inflate the pad.
I removed the uppermost loop, which is a few inches below the top hemline. When this loop is engaged, it feels as if you’re attached to a backboard, which defeats a primary selling point of quilts: their free-form nature.
 On the back of the AstraLite, there are three 3/8-inch elastcized grosgrain webbing loops. (I removed one.) A sleeping pad can be inserted into them, to create a tighter seal between the quilt and pad.
 Side view of the pad attachment system when engaged.
Moisture resistance
Based on its performance in the High Sierra last year, I was inclined to give the AstraLite a hearty thumbs-up. It offers a lot of warmth for just 16 ounces. But after using it for two 3-day cold-and-wet trips in West Virginia, my endorsement is now qualified.
I don’t know the exact cause, but the AstraLite (and presumably the NanoLite, too) floundered in consistently wet conditions. My quilt never came into direct contact with moisture (e.g. splatter, a dunking), but it was wetter than other bags: clients observed it during a mid-day “Andrew Skurka.
June 9, 2019
PSA | Hazardous High Sierra creeks: List, map & alternates
Every spring, creeks in the High Sierra rage with snowmelt. For one to two months, they are a grave danger, especially after wet winters like 2018-19. Backpackers can still hike, camp, and explore safely, but they should be aware of and respect this hazard.
Swift and deep creek crossings will be found throughout the range, including but not limited to (the):
Yosemite National Park,Sequoia-Kings Canyon National Park,John Muir Trail,Pacific Crest Trail,High Sierra Trail, Rae Lakes Loop,Yosemite High Route, and,Kings Canyon High Basin Route.
On this page you will find a list and map of known creek hazards. It’s designed to keep backcountry users safer, by highlighting problem spots and identifying wiser alternates.
 A swollen Tuolumne River as it plummets from Tuolumne Meadows into the Grand Canyon of the Tuolumne
Please contribute
This resource needs your help. While I have hiked extensively in the High Sierra, I cannot speak confidently about every creek crossing.
Please share your experience(s) to help make this a more accurate and thorough resource, ultimately helping to keep hikers safer. For instructions, refer to the end of this post.
About peak run-off
Before we get to the list and map of creek hazards, I’d like to share some context and complementary information.
Contributing factors
Creek crossings in the High Sierra warrant your attention. The hazard is caused by a unique set of circumstances:
Significant wintertime snowfall,Arrival of hot and sunny weather in late-spring,Steep gradients,Few bridges,Recreational use miles downstream of headwaters, and,Non-porous granite substrate.
Timing
Water levels normally peak in late-May and June. But after wet winters and cool springs, they can be delayed until or remain elevated into July.
On a typical warm and sunny day, the creeks rise and fall considerably. They are highest in the early-evening, swollen with an entire day of melt; and lowest in the morning, after a night of near-freezing temperatures.
Gear & skills
Already I have written an in-depth tutorial about gear and skills for creek crossings. In short:
It’s helpful to use trekking poles and to cross in your hiking shoes. But it’s even more important to:
Plan crossings in the morning, when flows are relatively low;Identify and use safer crossing points;Cross larger creeks where they are braided, or take on their tributaries independently further upstream;Find snow bridges, and log bridges and jams; and,Cross with other hikers, as matter of safety and sometimes stability.
Data: Current levels
For current stream flows, refer to the gauges linked below. Even if they are not on your route, they will give you a sense for real-time conditions.
Kern River (at Kernville), which drains the southernmost High Sierra;Kaweah River (at Three Rivers), which originates upstream of Lodgepole Campground and Kaweah Pass (on the High Sierra Trail);Kings River (at Road’s End), which is downstream of Forester Pass, Rae Lakes, and Muir Pass;Merced River (at Happy Isles), which captures melt in the southern half of Yosemite;Tuolumne River (at Tuolumne Meadows), downstream of Lyell Canyon and Donohue Pass;
Warning
The list and map of creek hazards are increasingly comprehensive and accurate. But they are not perfect: some hazardous creeks are NOT included, and some information may be incorrect or out of date.
I am providing these sources as a matter of public safety, but ultimately you are responsible for your decisions and safety.
List of creek hazards
To make this list most useful to the most number of backpackers — who overwhelming start and finish at the same trail head, who stay within one land management jurisdiction, and who follow unbranded routes — I have decided to organize this list by agency and then by alphabetical order.
But in recognition of the popularity of trade routes like the Pacific Crest and John Muir Trails, and as an additional resource for my Yosemite High Route Guide and Kings Canyon High Basin Route Guide, I have included dedicated columns for these trails and routes to allow for quick filtering of applicable crossings.
Map of creek hazards
To open this map in a new window, click here.
The default layer is the USGS 7.5-minute map series. But I recommend using the more updated FSTopo 2016 layer for trips in or through National Forests.
How to use these resources in the field
The list and map will be regularly improved, specifically:
June 10-15, andJuly 2-10.
List
For a PDF of the list that you can print or download to your smartphone, click here.
To create your own copy of the spreadsheet that you can tailor to your itinerary and then either print or download, either:
Sign into your Google account, click here, and then select File > Make a copy; or,Download it as an Excel file.
Note: After creating your own copy of this file, additional updates to my master spreadsheet will not automatically download to yours.
Map
To bring this map (or its data) into the field:
To start, click here, which will open the map in a new window;Under Export, select Download GPX file.
This downloaded GPX file can be:
Opened on your smartphone, with an app like GaiaGPS;Loaded onto a handheld GPS unit;Uploaded to an online mapping platform (I highly recommend Caltopo), where you can edit and print it.
As with the list, your GPX copy will not update with changes that are made to my master map.
Contribute to this resource
If you would like to share information about specific creek crossings, leave a comment below. Please include:
Creek name;Jurisdiction (e.g. Yosemite NP, Sequoia-Kings Canyon NP, Inyo NF);A description of the crossing, including its watershed size, swiftness, and underlying bed surface; and,Potential safe alternates, including GPS points if they’re available.
If you are a High Sierra expert and would like to make significant contributions to this project, contact me with your credentials (and your proficiency with Google Sheets and CalTopo) and I will give you edit permissions to the source files. I could use some help with this, thanks.
Is the information accurate? Have an experience to share? Curious about an unlisted creek? Leave a comment.
The post PSA | Hazardous High Sierra creeks: List, map & alternates appeared first on Andrew Skurka.
June 7, 2019
Gear List: Gates of the Arctic National Park, Brooks Range, Alaska in early-summer
 Reflective pool in upper Arrigetch Creek
In the second half of June I’m running four 7-day guided trips in Gates of the Arctic National Park, split between two guide teams. Gates encompass the western half of the famed Brooks Range, which spans 1,000 miles across Alaska and which arguably offers the greatest wilderness trekking in North America. The terrain and conditions in the range’s eastern half, which is managed as the Arctic National Wildlife Refuge, are very comparable.
What’s in my pack for these trips?
Objectives + conditions
There is a right way to backpack: prepare yourself with the gear, supplies, and skills that are appropriate for your trip objectives and the conditions.
If your trip to the Brooks Range adheres to a different backpacking style, or if you are visiting during another season, deviations from my gear list are warranted and recommended.
Objectives
These are hiking-oriented trips. We enjoy camp, but see it mostly as an opportunity to recharge for more hiking. A typical day runs from 8 AM to 5 PM, with breaks for lunch and instructional tutorials, and when we simply want to take it all in. (With 24 hours of daylight, we may adjust our schedules to take advantage of good weather windows.)
If our clients were cut loose on a rolling section of the Appalachian Trail, their mileage would range from 15-20 or 20-25 miles per day (“High” and “Very High” on my intensity scale). On the John Muir Trail, it’d be more like 15 and 20 miles per day.
Conditions
As part of the Planning Curriculum, we researched the likely environmental and route conditions. We consulted government data, backcountry rangers, bush pilots, and trip reports and guide books.
Temperatures and precipitation. Monthly climate normals are available from two nearby NOAA weather stations. During the second half of June at:
Chandalar Shelf (3,250 feet near the Continental Divide), average high temperatures are in the high-50’s, and average low temperatures are in the low-40’s. Average monthly rainfall is 1.8 inches.Wiseman (1,200 feet along the Koyukuk River), average high temperatures are around 70 degrees, and average low temperatures are in the low-40’s. Average monthly rainfall is 1.9 inches.
Daylight. In the town of Bettles, our launch point into the park, the sun sets for just two hours in late-June; there is 24 hours of daylight. Along our route further north, the sun will not set. Bring a sleep mask, not a headlamp.
Footing. Not a single mile of man-made hiking trail exists in the Brooks Range. These trips are 100 percent off-trail. The travel can be joyous, like across firm alpine tundra or on open gravel bars; but it an also suck, with ankle-twisting tussocks, energy-sapping “sponga,” and water-logged muskeg.
Vegetation. The lower elevations on the south side of the range, including near a likely drop-off/pick-up point at Circle Lake along the Alatna River, are covered in spruce. The forest transitions to a “brush zone” before alpine tundra takes over. On the north side of the range, there are no trees. The hardiest plant is willow, which can be found at high elevations in wet areas like creek bottoms.
Navigational aids. The park has no trails or signage, so we will be navigating entirely with map, compass, altimeter watches, and GPS. The topography is distinct, but the huge landscape and 1:62,500 maps with 100-foot contour lines will take some getting used to. The weather is generally stable, but storms can obscure visibility.
Sun exposure. The sun will never go below the horizon, but it’s never particularly strong — it’s low in the sky, and we’re at low elevations. However, the cumulative solar exposure can add up, especially for those who are fair-skinned.
Water availability. There is no shortage of high quality water, due to melting snowpack, recent rainfall, and groundwater aquifers.
Problematic wildlife. The park is inhabited by grizzly and black bears, as well as wolverines and wolves. Attacks are rare, especially in groups of four or more. With such light recreational traffic, rodents have not become fearless around humans.
Biting insects. The peak mosquito season is in July, coinciding with summer’s greenery and warm temperatures. Normally early-June is reliably bug-free; in late-June, pockets of bugs should be expected. But this year, we are prepared for an early hatch due to a scarily warm and dry winter throughout Alaska.
Remoteness. There are no towns, roads, or hiking trails nearby. We must get dropped off and picked up by bush planes, and can communicate with the outside world only with satellite phones and messengers. It’s unlikely that we will see other people.
Natural hazards. Without packrafts, major rivers cannot be crossed safely. And after heavy rains, tributary streams rise quickly due to the relative dearth of top soil, almost akin to the Four Corners region.
 An upper branch of Kogoluktuk, as seen from near the Noatak-Koyuk divide.
Gear List: Gates of the Arctic National Park, Brooks Range, Alaska in early-summer
This gear list is specifically applicable to the Brooks Range in early-summer, roughly late-June to mid-August, when temperatures are relatively mild and bug pressure is expected. It would also be a good template for other seasons in the Brooks Range, and for similar Arctic environments like northern Canada, Iceland, Scandinavia, and northern Russia.
Summary
My pack weight is virtually unchanged from my last trip in the Brooks in 2010, when I traversed the range with a 15-pound base weight (sometimes plus seven pounds of packrafting gear).
The total cost is completely inflated. Shop the holiday sales (usually 20 percent off a full-price item), and find similar items on clearance that are even more steeply discounted.
Line-item
To make this list more viewing-friendly, open it in new window.
If you like the look and organization of my gear list, consider using my 3-season gear list template.
Questions about my selections, or what you should bring? Leave a comment.
Disclosure. I strive to offer field-tested information, insights, and advice, and I have a long-term incentive to be a trustworthy source. I do not publish sponsored content or native advertising, and I do not accept payments in exchange for reviews. I have no financial affiliations with or interests in any brands or products.
This website is supported by affiliate marketing, whereby in exchange for referral traffic I receive a small commission from select vendors like REI or Amazon, at no cost to the reader. This post contains affiliate links.
The post Gear List: Gates of the Arctic National Park, Brooks Range, Alaska in early-summer appeared first on Andrew Skurka.
June 6, 2019
Drop 4.4 oz from the ULA Catalyst in 5 minutes
 In five minutes, 4.4 ounces of extraneous items can be easily removed from the Catalyst and other ULA packs.
For 5- and 7-day guided trips this summer in the Brooks Range and Yosemite National Park, I plan to carry (and review afterwards) the ULA Catalyst. Its key specs:
48 oz (3 lbs 0 oz, 1360 grams)4,600 cubic inches (75L)Twin aluminum staysDurable fabrics throughoutGenerous hipbelt pockets and front stash pocketMade in USA$280More information
ULA appropriately describes the Catalyst as “the tried and true workhorse of [our] pack line.” Most of its features trickle down to the smaller 41-oz Circuit, which honestly is a better pick for most 3-season trips — I need more volume and load support when I’m guiding than when I’m on a private trip.
Strip it down
Many backpacks include extraneous features and materials, leaving open the opportunity to shed weight by taking scissors to it. This is not the most effective weight-savings tactic, but it’s usually worth a Snickers bar.
I wish that products arrived exactly as I want them, but I understand the manufacturer’s rationale for including these extra items: if its products lack features or functionality that a large number of prospective customers want or expect, it sales will be hindered.
With the Catalyst (and with ULA’s other packs like the Circuit, Ohm, and CDT), the weight-savings potential is greater than with most other packs. I easily removed 4.4 ounces (125 grams), which amounts to a 9 percent weight reduction.
The process is easy, too. It took me just five minutes. And everything is reversible — by reattaching webbing clips and/or cord locks, the functionality could be fully restored.
A word of caution: to remove the cord cinches, you will need to use a knife to gently pry them open. So that you don’t stab yourself, I recommend holding the cinches with pliers, not your fingers.
 Total weight savings is 4.4 ounces, or 9 percent of the pack’s spec weight.
Save 4.4 ounces in 5 minutes
I removed six features that cumulatively weighed 4.4 ounces (125 grams), listed below. Interestingly, the weight-savings were greater when I first did this seven years ago — in 2012 I managed to remove only 3.8 ounces.
Hydration sleeve,Internal accessory pocket,Bungee cord over the front stash pocket,Two bottle holsters on the shoulder straps,Two handloops, and,Two ice axe attachments.
The hydration sleeve (1.0 oz) is useless to me since I use water bottles, not a reservoir-and-tube system.
The internal accessory pocket (0.6 oz) could fit small items like toiletries, a headlamp, and Aquamira. But I prefer to keep oft-needed items in the hipbelt and side pockets. And I like to keep other small odds-and-ends in a free-floating stuff sack, which is more portable and won’t get caught up with items being shoved into or removed from my pack.
Water bottle holsters (0.7 oz) are attached to each shoulder strap, and best fit 20-oz squeeze bottles like those used by cyclists and ultra runners. But I normally use a 1-liter smartwater bottle, and I like to keep it in my left side pocket, where it’s out of the way but still easily reachable.
Handloops (0.8 oz) dangle from the shoulder straps, too. If you don’t use trekking poles, they are a nice place to hang your hands to avoid the pooling of blood. But I always use trekking poles, so I will never miss the handloops.
A bungee cord (0.5 oz) is threaded over the front stash pocket, and could be used to secure items to the pack’s exterior, like a rain jacket or a mid-layer fleece. But the mesh pocket serves the same function and is more secure; and the bungee is snag-prone when hiking off-trail through brush.
The ice axe loop attachments (0.4 oz) are convenient for carrying an axe, but relatively few hikers ever have to. Prior to my trips in Yosemite, which had an epic 2018-19 winter, this is the one feature that I will reinstall.
Questions about the ULA Catalyst? Leave a comment.
This post was originally published on July 24, 2012.
Disclosure. I strive to offer field-tested information, insights, and advice, and I have a long-term incentive to be a trustworthy source. I do not publish sponsored content or native advertising, and I do not accept payments in exchange for reviews. I have no financial affiliations with or interests in any brands or products.
This website is supported by affiliate marketing, whereby in exchange for referral traffic I receive a small commission from select vendors like REI or Amazon, at no cost to the reader. This post contains affiliate links.
The post Drop 4.4 oz from the ULA Catalyst in 5 minutes appeared first on Andrew Skurka.
June 3, 2019
The Trail Show: Episode 82 is live
Last month I hosted The Trail Show crew for a multi-hour recording of Episode 82, which is now live. They’re a great group and it was a fun evening.
 Disco and Princess of Darkness
 Salty, Triple O, D-Low, and Junaid
The post The Trail Show: Episode 82 is live appeared first on Andrew Skurka.
Why are thru-hikers already in the High Sierra?
Last week an alumni, Rod, sent me photos of Pacific Crest Trail thru-hikers in the High Sierra, climbing over Forester Pass. The photos were taken May 26, but he didn’t know the party.
(If it’s you, or if you know who it is, leave a comment so we can all kneel before you.)
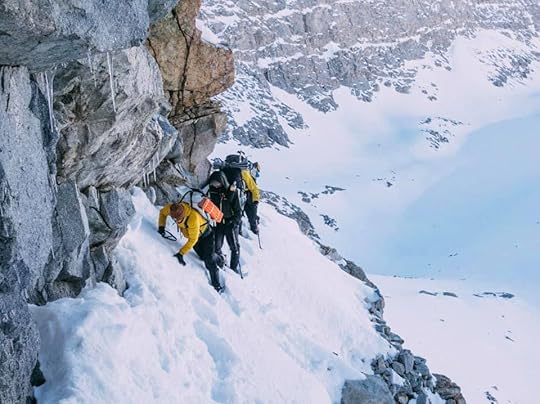 Below Forester Pass on its south side, the PCT/JMT was blasted into a rock wall. On May 26, snow was still partially filling in the cut.
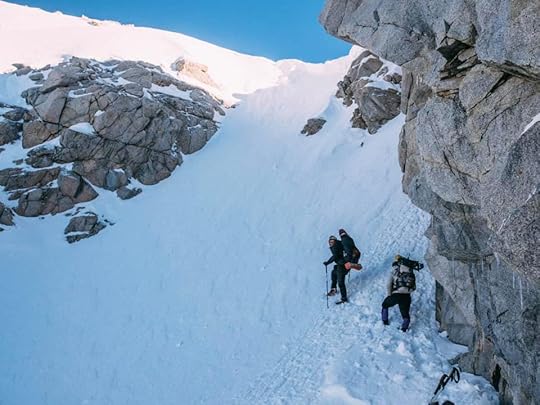 The chute just below Forester Pass on May 26. The trail — which cuts across the slope and switchbacks to the pass — is buried in snow.
 Forester Pass, the highest point on the PCT and JMT, on May 26, 2019.
Based on the absence of tracks on the trail, Rod speculated that this was the first party through the High Sierra this year. But I know of at least one party who was ahead of them, and I only had to look for a few minutes.
Joshua Seligsohn posted photos of Forester two days earlier, on May 24, while resupplying in Bishop, sixty miles further north and 10 miles off the trail. That puts him and his party on Forester Pass around May 20 or 21.
View this post on InstagramA post shared by Joshua Seligsohn • “Superman” (@jseligso) on May 24, 2019 at 4:10pm PDT
Meanwhile, an alumni, Paul, is currently on the PCT in northern California, which he skipped to after reaching Kennedy Meadows (at the southern end of the High Sierra) on May 8. The situation appears no different up there.
He started the Pacific Crest Trail on March 24, which seemed too early by four to six weeks. He’s a really strong hiker, and I figured he’d get through southern California long before the High Sierra was in-season.
View this post on InstagramA post shared by Paul Freeman walks the PCT (@freemanwalks) on May 26, 2019 at 8:23am PDT
My experience
I last hiked a long section of the Pacific Crest Trail in 2007, as part of the Great Western Loop. It had been a dry winter, and I left Kennedy Meadows on May 13.
The chart below illustrates the differences in snowpack in 2006-07 versus 2018-19, which was an epic winter. The High Sierra received more snow by January 1, 2019, than it had received the entire 2006-07 winter — and then it proceeded to dump snow for another four months!
 The California snowpack, 2007 v 2019
Even so, I was weeks ahead of the next hiker, and “the herd” was probably a month back still. Seeing trains of thru-hikers in the High Sierra in late-May 2007 was unfathomable.
What’s going on?
Are these photos one-offs, or do they indicate a trend? I don’t follow the PCT scene closely, but I’m guessing that it’s a little bit of both.
Why are thru-hikers pushing through the High Sierra already? Heck, it’s still ski season up there!
1. Popularity
Per the Pacific Crest Trail Association, 101 thru-hikers completed the trail in 2007. In 2018, there were 1,163! That’s an 11.5-fold increase in successful thru-hikes. I can’t find the data, but the growth in the number of hikers who start a PCT thru-hike is probably about the same.
On the ground, this increase means that for every one hiker in 2007, there are 11.5 today. Relative to “the herd” behind them, these early hikers may be exceptional, but their gross numbers are much larger.
2. Permitting
To reduce impact along the trail, the Pacific Crest Trail Association implemented a lottery system for northbound thru-hikers and capped the number of starters to 50 hikers per day.
For the sake of the trail, it’s a good policy. But it causes hikers to pick their starting date based on permit availability, not based on the High Sierra snowpack. And when the lottery opens in November, not even the world’s best meteorologist can accurately predict what the snowpack will look like in six months. After what has happened this season, I hope that future thru-hikers build more flexibility into their plans.
Good luck!
I wish the best for PCT hikers who are entering early.
Be conservative and stay safe, and don’t be afraid to exit early if the conditions are too much. Completing a long-distance trail is often a matter of willpower. But especially this year, Mother Nature may defy those who try to impose their will on her.
The post Why are thru-hikers already in the High Sierra? appeared first on Andrew Skurka.
Wilderness medicine training: When have I actually applied it?
This past weekend I took my biannual wilderness first responder (WFR) and CPR re-certification courses. Between refreshes on the patient assessment system, prerequisites for a FSA, and rescue breaths, I thought about the instances over the past eight years when I’ve had to apply my training.
As a new WFR in 2011, I remember being intimidated by the number of medical scenarios for which I’d been “trained” (with 80 hours of classroom-only instruction). For those who feel similarly, or for those who are interested in the operations of an organization like mine, I thought I would share my experiences from guiding 85 trips with 625 clients.
For the sake of patient confidentiality, I have changed the client names.
Context
The medical situations I have encountered are partly a function of my:
Role,Clientele,Trip length, andLocations.
I guide backpacking trips. My clients tend to be 30- to 60-years-old and in above-average fitness, and skew male by a 2:1 margin. My trips are 3 to 7 days long, and I run them mostly in the Mountain West, and sometimes in Alaska and the eastern woodlands.
If you will be leading, say, month-long canoe trips in the Boundary Waters with at-risk teens, your experiences will probably be different.
 I offer 3- to 7-day backpacking trips, mostly in the Mountain West.
Trends
I don’t keep a detailed record of every blister, sprain, and evacuation. Anecdotally, at least, I think our safely record has steadily improved, which I attribute mostly to:
More stringent vetting of clients, to ensure that we have like-abled groups and that every client is reasonably qualified for their trip;More experience around clients, enabling us to recognize telltale warning signs and to know the limits of our clients better than they do; and,Greater familiarity with the terrain, conditions, hazards, and common itineraries of our go-to locations.
What do these factors have in common? They’re all preventative. Unforgivably, in my opinion, the NOLS WFR curriculum omits any discussion about ways in which medical situations can be avoided — it’s entirely reactive.
Evacuations
I’ve had four medical evacuations, the last being in 2014.
Ethan strained his knee while crossing a wet rocky moraine in Alaska. We self-evacuated by packrafting down the Little Delta River.
Jennifer experienced an intestinal blockage, which had happened to her six months earlier, too. We slowly walked her out to a nearby trailhead, and her partner drove them to a nearby hospital.
Paul suffered a deep cut on his heel when a nearby boulder shifted, wedging his foot. I think I could see his Achilles tendon. He heroically self-evacuated, which involved a 25-mile hike with 5,000 vertical feet of gain, and then drove himself to the hospital.
Finally, Vic (real name, with permission) severely strained his lateral collateral ligament (LCL) when he stumbled on a washed-out trail and hyper-extended his knee. A helicopter evacuation was necessary due to his shock-inducing pain and our location in the upper Kern River, where we were separated from the nearest trailhead by 20 miles and a 13,000-foot pass.
 Vic badly strained his LCL during a stumble on a washed-out trail, and is my only client who has needed a helicopter evac.
Run of the mill
The prospect of another evacuation (or worse) makes me anxious, sometimes to the degree that I think about closing my program. Thankfully, they’re the exception, and most of our medical issues are easily manageable.
Feet
The worst blisters I’ve seen belong to Guy. He developed hot spots on the first afternoon, but we didn’t address them until camp, where I unveiled deep quarter-sized blisters on both forefeet. Never again. Guy was remarkably tough, and still managed to finish a 7-day John Muir Trail thru-hike.
Maceration is common on wet trips. Most clients are familiar with my recommended treatment, and guides are good about forcing clients to stay on top of it.
 Guy developed bad forefoot blisters on Day 1. We should have stopped to address them earlier, but instead waited until camp.
Aches, pains, and overuse
Few of our clients arrive already trail-hardened. Most are professionals, have families, and are involved in their community. Their training time is limited, and thus mostly restricted to short-but-intense exercise (e.g. running, HIT workouts, yoga). They’re unaccustomed to spending long days on their feet and carrying an overnight kit.
To prevent and address ensuing aches and overuse injuries, we recommend a personal supply of ibuprofen, and we moderate their effort early on so that they don’t fall apart after the turnaround. Sometimes I also ask every client to specify their biggest physical complaint and to assign a pain rating (out of 10), which gets better results than simply asking, “How does everyone feel?”
I recall only one client, Tanner, who developed debilitating tendentious along his IT band. This happened before I learned to reign in groups for the first few days — when they’re fresh they want to charge hard, and not everyone is good about checking their egos at the door.
Hydration & nutrition
I have no notable stories about dehydration. My best prevention tactic is periodically asking clients when they last peed. When seven clients report peeing at lunch or even more recently, and one client reports last peeing at the trailhead, it’s clear who needs to drink more.
Nutrition seems best managed by watching for changes in a client’s personality or performance. A lack of calories could explain why, say, a normally pleasant client seems slightly agitated, or why a front-of-the-pack client gets dropped on a climb.
Two clients have tried to follow strict keto diets, and both Sam and Sawyer bonked hard after a few days. It seemed as if their bodies lacked the necessary fuel for full functionality, so they were shadows of themselves. The solution was having them trade their jerky and pork rinds for the chocolate and Fritos that other clients had.
Insects
Heavy mosquito pressure has been a non-issue because we:
Researched the conditions beforehand and knew what to expect;Wore headnets and full-coverage permethrin-treated clothing;Hiked and camped where the bugs were less bad, like atop ridges and on open gravel bars.
Five years ago Bob, Samantha, and Adam all contracted Lyme disease after a May trip in the Blue Ridge Mountains, and thankfully were quickly treated. On our more recent West Virginia trips, we alerted clients to the risk, recommended precautions (e.g. repellents and permethrin-treated clothing), and tried to steer clear of tick-infested areas like meadows. I can’t say if these measures made a difference — it was unseasonably cold and wet, and we didn’t find a single tick.
 Alan warms himself over our campfire in Alaska. We’d intentionally camped on the open gravel braids, where the wind kept the mosquitoes at bay.
Strains, sprains, and cuts
Rhett hyper-extended his knee slightly on Stanton Pass, which we pushed over before dinner on Day 2. To further illustrate our erred judgement, an hour later Bill scraped his shin on sharp talus, cutting through most of the skin. We should have just saved the pass for the next morning, when we would not have been tired.
On an off-trail descent Matt badly sprained his ankle, which we taped for extra support. Interestingly, the incident occurred after the most difficult section. I regret not stopping the group after that part and forcing them to refocus.
 Thirty-six hours after Matt sprained his ankle on an off-trail descent, it had become very bruised. With supportive tape and caution, he finished the trip.
Altitude
At our Mountain West locations, the trailheads are at 7,000 to 8,500 feet, and all the trails climb higher. I learned quickly that clients would need to acclimate more cautiously, especially if they lived at sea level. In two out of my three trips in 2011, clients developed acute mountain sickness:
Ben from Missouri threw up his dinner on the first night, David from Oklahoma was nauseous for most of the second day, and Kayree from Ohio was a walking zombie after we hit 10,000 feet.
The number of altitude-related issues has declined, because most clients now arrive at least two days early, giving them full days to acclimate and work through the initial symptoms (e.g. headache, fatigue, restless sleep). But they still happen — last year, Rick from Seattle responded badly and had to be walked out, despite acclimating properly.
Giardia and GI distress
The guides carry a group supply of Aquamira drops, which in my program has achieved excellent results. Only five clients have developed giardiasis, always after returning home and always after admittedly drinking unpurified water, intentionally or accidentally.
Katie and Elizabeth developed flu-like symptoms (e.g. muscle aches, weakness, diarrhea, fatigue), presumably contracted from another client or from another traveler. The solution was over-the-counter medications and rest, and a day-hike for everyone else.
I do not publish sponsored content or native advertising, and I do not accept payments in exchange for reviews. I have no financial affiliations with or interests in any brands or products. This website is supported by affiliate marketing, whereby in exchange for referral traffic I receive a small commission from select vendors like REI or Amazon, at no cost to the reader. This post contains affiliate links.
The post Wilderness medicine training: When have I actually applied it? appeared first on Andrew Skurka.


