
Andrew Skurka's Blog, page 24
November 6, 2019
Very long-term review: Samsung Chromebook || 90 percent of computing needs for $200-ish
Five years ago I bought the second-generation Samsung Chromebook 2 for business travel. Versus my primary machine — at the time, a conventional Windows laptop — the Chromebook was:
Half the size and weight,Quieter and cooler,Faster at startup (8 seconds!), andLess expensive to replace if it was damaged or stolen.
It proved to be a fantastic purchase.
In fact, I’ve since bought two third-generation Samsung Chromebook 3’s — one last year for Amanda for $195, and a renewed model last week for $138 after water was sadly spilled on my Chromebook 2, frying the right-half of the keyboard. Otherwise, it was still running perfectly.
 The Chromebook 2 and 3 are mostly identical.
Long-term review: Samsung Chromebook
For someone like Amanda, who has a normal 9-5 job, the Samsung Chromebook 3 ($220) is probably the only computer they need at home. It’s ideal for email, basic documents and spreadsheets, social media, and web browsing (including videos). It’d be ideal for my retired parents and school-age nieces and nephews, too.
For someone like me, who runs a small business and works from home, the Chromebook is an inexpensive and travel-friendly supplement to a Windows or Apple desktop or laptop computer. While it addresses 90 percent of my needs, it can’t run vital programs like Quickbooks or Lightroom, due to incompatible software or inadequate computing power, or both. Moreover, it’s an inefficient workstation relative to a dedicated setup: its performance is sluggish; its screen is small; and it’s missing a numerical keypad.
 For me, the Chromebook is a supplement to my desktop computer, where the bulk of my work gets done.
On average, I use my Chromebook for an hour or two each day, mostly while working on the couch, at the dining table, or from the local library or coffee shop. It also goes with me to meetings, and I take it for both business and personal travel.
 Working on the couch with BFF Oden
At just 2.5 pounds and 0.7 inches thin, it’s extremely lap-friendly and portable. (Last summer I actually carried it into the backcountry so that I could work on a guidebook at night.) It sips on the battery, getting up to 11 hours of life. It doesn’t overheat or have a fan like my old Windows laptop. And the HDMI, Bluetooth, and headphone jack give me enough connectivity options to make a slideshow presentation.
The Chromebook presents an excellent value. The base model Chromebook 3 retails for $220, though it’s now available for much less (about $150) since Samsung released the next-generation Chromebook 4 last month.
Product specs
2 lbs 8.8 oz (1.16 kg) + 5.7 oz (161 g) for the charger0.7 inches thick11.6-inch screen (1366 x 768 pixels)Processor: 1.6 GHz Intel CeleronRAM: 4 GB DDR3 RAMHard drive: 16 GB to 64 GB Flash Memory Solid StateUp to 11 hours battery life
 2 lbs 8.8 oz for the Chromebook 3
 5.7 oz for its charger
Limitations
For a $200-ish device, the Samsung Chromebook is simply awesome. But it’s still true that you get what you pay for.
A Chromebook is optimized for the Google ecosystem, and most operations need to be doable in the Chrome browser. If you aren’t willing to give your data to Google or to adopt its platforms (e.g. Gmail, Drive/Docs), maybe it’s not the device for you.
The Samsung Chromebook also doesn’t look, feel, or perform like a premium product.
It’s made mostly of plastic, and is boring black.The 11.6-inch screen is acceptable, but has less brightness and resolution than modern smartphone screens. It’s slow while running multiple browser tabs or loading memory-heavy pages like an involved CalTopo map or lengthy document. And,The built-in camera is very lackluster, especially in low light.
Some might disagree, but I like the keyboard and trackpad. In fact, 1.5 years ago when I bought an accessory keyboard for my desktop computer, I looked for one with a similar feel.
Higher performance Chromebooks are available. The flagship Google Pixelbook, for example, has a nicer construction, laptop/tablet conversion, touchscreen, and more computing power, RAM, and hard drive storage.
 The Chromebook 2 had a rubberized finish, whereas the Chromebook 3 is a slicker textured plastic. I prefer the former.
Chromebook 3 versus Chromebook 4
The Samsung Chromebook 4 was released in early-October 2019, and currently is available only from Samsung and Best Buy. Read the press release.
Changes appear to be evolutionary. The fourth-generation devices are similarly sized and priced, but come with a sleeker aesthetic, military-grade construction, and some improved hardware.
At $230 retail, the base Chromebook 4 is a great buy. And now at about $150, the base Chromebook 3 is even more attractive. Personally, I went for the latter, knowing that it’s perfectly sufficient for how I use it.
Leave a comment!
What questions do you have about the Samsung Chromebook?If you own one, please share your experience with it.
Buy now: Samsung Chromebook 3
Disclosure. I strive to offer field-tested and trustworthy information, insights, and advice. I have no financial affiliations with or interests in any brands or products, and I do not publish sponsored content
This website is supported by affiliate marketing, whereby for referral traffic I receive a small commission from select vendors like Amazon or REI, at no cost to the reader.
The post Very long-term review: Samsung Chromebook || 90 percent of computing needs for $200-ish appeared first on Andrew Skurka.


November 3, 2019
Beginner backpackers: Start here || Advice, info, tips & resources
This is a one-stop resource to help you learn to backpack, or backpack better. It:
Establishes a philosophical context; Advises on gear, supplies, skills, fitness, and locations; and,Links to useful resources and additional reading.
For such a comprehensive primer, it’s length is very manageable. It’s intentionally succinct — it’s high signal, low noise. I wish that I had found something like it eighteen years ago when I began to backpack. It would have saved me a lot of time, money, and heartache. It’s designed primarily for:
First-time and beginner backpackers, perhaps with some day-hiking or car-camping experience;Longtime backpackers who need to update their approach.
It may be of some value to veteran or intermediate backpackers as well, if you are looking to expand or round out your know-how.
In a nutshell: How to backpack
I cannot put it more simply:
A backpacker needs the gear, supplies, and skills that are appropriate for their objective and the conditions.
This statement has five distinct elements — each one is underlined — and the remainder of this page will address them, plus a few other topics.
Read more:
Actually, there is a “right way” to backpack
Objectives
There are two extreme styles of backpacking:
1. Hike all day, and camp only long enough to recharge for another full day of hiking. This is the endurance athlete’s approach to backpacking, and is best represented by thru-hikers who cover 25, 30, even 35 miles per day for months on end.
2. Hike a little bit (maybe), and spend more time on non-active pastimes like fishing, photography, and campfires. This approach is ideal for those primarily seeking rest and relaxation.
Most backpackers aim for a happy-medium of these two approaches, and vary their intentions based on their location, trip duration, and companions.
 The ratio of time you plan to spend hiking or camping has a profound impact on the gear, supplies, and skills that you need. The hikers (left) are traveling light, so they’ll be comfortable on the trail. The campers (right) compromised their hiking experience so that they’d be more comfortable in camp.
For example, when I completed the 6,875-mile Great Western Loop in 7 months (33 miles per day pace), I carried lightweight gear and calorically dense food, and hiked efficiently by always taking care of my feet and avoiding navigational mistakes.
In contrast, when my wife and I hiked the 28-mile Aspen Four Pass Loop for our anniversary weekend, I carried a full-sized tent, her Kindle, and a powerful stove for coffee and a hot wash cloth at night. We moved well, but had more free-time for long breaks and swimming, and could hunker down in our shelter to avoid afternoon thunderstorms.
Takeaway: Whatever your intended mix of activities, you will need corresponding gear, supplies, and skills. If you pursue a backpacking objective with the wrong approach, disaster can ensue.
Read more:
What inspires you to backpack? The hiking, the camping, or both?
 On my first real backpacking trip, a thru-hike of the Appalachian Trail, I did not understand how my objective should shape my other choices. Notice the size of my pack, lower-left — it made the experience much more difficult than it needed to be.
Do not confuse the hike-all-day style with “ultralight backpacking,” which seems to:
Mistakenly define backpackers by the weight of their packs, not by why they go;Worship gear above all else, even though it’s not the primary factor in one’s success; and,Assume that lighter is always better, which is patently false.
Read more:
Is the “lightweight backpacking” label dead?Stupid Light: Why light is not necessarily right, and why lighter is not necessarily better
Conditions
After determining your trip objectives, you should research the conditions that you will likely encounter. They are a function of the location, time of year, and route.
The goal of this homework is to be properly prepared for your outing, and not over- or mis-prepared.
 As conditions change, so too should your gear, supplies, and skills. For example, In the Olympics (left), bring good rain gear and know how to stay comfortable when it’s cool and wet. In Big Bend (right), add extra water capacity, and know how to protect your skin from the intense sun.
The most important conditions include:
Climate, e.g. temperatures, precipitation, humidityDaylightGround cover, e.g. leaf-covered forest, granite slabs, snowVegetationSun exposureWater availabilityNavigational aids, e.g. blazes and signage, visibility, distinct topographyInsects and wildlifeNatural hazards like river fords and lightning
Read more:
Be prepared? Yes, absolutely. But against what?
Resource:
Sample: Environmental & Route Condition Assessment
Gear
If you’ve made it this far, you deserve some shopatherapy. Let’s buy some gear!
Well, maybe not quite yet. As a frugal person my recommendation is to first identify what you actually need for your objectives and the conditions. You wallet will thank you — impulsive and piecemeal purchases get expensive, because they’re often misguided.
Buy once, cry once!
To help select your gear, I recommend my book, The Ultimate Hiker’s Gear Guide.
This may seem like a shameless plug, but I’m so confident that it’s a good recommendation that I’ll make a deal: If you don’t feel that it was worth several times its price, I’ll buy it back from you.
The Gear Guide tackles all the major product categories: clothing, footwear, shelters, sleeping bags and pads, stoves, water storage and purification, plus a few more. In each chapter, I discuss and pros and cons of the available options, and state specifically what I use. While some of this content is scattered around the internet, including on my website, you’ll spend hours tracking it down and you’ll lose a holistic approach to gear.
Other good reads:
Trail Tested, by Justin Licther; and,Ultralight Backpackin’ Tips, by Mike Clelland
As you settle on specific items, drop them into a gear list to keep organized, estimate your pack weight, and budget for future purchases. For your convenience, I have created a comprehensive gear list template and checklist, and have shared some of my gear lists that can serve as guides for your own.
Read more and resources:
A gear list: Its importance & functionsBackpacking Gear List Template & ChecklistMy backpacking gear lists
 Camp above Spiller Canyon, Yosemite
Finally, before handing over your credit card, especially for big purchases, you may want to read online reviews. Beware of the source: too many “reviews” are simply a regurgitation of sell sheets, and are not based on comprehensive personal experience with the product. Also, be skeptical of sites that are never critical and that pitch every item as the “best” and a “must-have.”
Examples of trustworthy gear reviews:
Alan DixonAndrew SkurkaCam HonanDerek HansenHendrik MorkelMichael LanzaPaul MagnantiPhilip Werner
Supplies
As a thru-hiker, my supply list included food, water, stove fuel, sunscreen, topographic maps, toilet paper, and even socks — basically, everything that I would “consume” during my trip and need replenished.
Now, my trips are usually less than 10 days, and I carry everything from start to finish. So for simplicity, I account for non-food supplies in the same aforementioned gear list. Food is the only supply that is treated separately.
Footwear and food solicit more divergent opinions than any other categories. What works great for one backpacker will be a complete failure for another. My recommendation: Experiment until you find solutions that are right for you.
Read more:
Amounts & types of food to carryMy Breakfast & Dinner RecipesBackpacking Food: Recipes, Rations, Stoves & Storage (e-book)One Pan Wonders, by Dicentra Black
 Perfect at-home consistency, with cheese and Fritos
Skills
The difference between a beginner backpacker and an expert is not their gear or their supplies, which can be bought easily with a credit card.
Instead, it’s what they carry between their ears. An expert backpacker has skills.
Examples of backpacking skills:
Using map & compass,Finding 5-star campsites,Planning a trip,Pooping in the outdoors, andRemaining comfortable in the rain.
Skills cannot be mastered by reading or watching videos, although that helps. Better yet, take an in-person class such as Backpacking Fundamentals, a 3-day course that I offer in multiple US locations. The best, though, is to get out there — there is no better teacher than experience.
Fitness
Let’s quickly review what you have learned so far:
Determine your trip objectives;Assess the environmental and route conditions;Select your gear and supplies, and develop your skills.
This process would get you a long way, but there is one more notable variable in your ability to successfully undertake a trip: your fitness.
I generally consider fitness to be a skill. It can’t be bought — it must be acquired through hard work and dedication. But it’s different than other other skills in at least one regard, so it deserves special treatment.
Our fitness is naturally governed by our DNA, which is why not everyone can be an Olympian. Some itineraries will always be out of reach despite your gear, supplies, and other skills. In contrast, nearly everyone can learn to operate a compass.
Locations
In most parts of the country, there are backpacking opportunities within easy driving distance. Quality varies, of course.
While local options may not be as inspiring as California’s High Sierra or the Colorado Rockies, they’re actually more important. You can reach them quickly and for minimal expense, and they are a useful training ground for a larger stage. Plus, it’s fun to really know where you live.
The US has an extensive network of long-distance hiking trails. You have probably heard of some, like the Appalachian Trail, but there are dozens more.
Unfortunately, long-distance trails make for challenging logistics — a point-to-point itinerary requires a car shuttle or hitchhike, which eats up hiking time. Instead, I prefer to find a girthier area of public land where I can do a loop.
Resources:
Online trip reportsGuidebooksDeLorme GazetteersNational Geographic Trails Illustrated mapsGaiaGPSCalTopo
 Hynach Lakes, Colorado Rockies
Next steps
It’s time for you to get out there.
But if it’s dark, cold, or dreary, maybe you should wait another day or month. In the meantime, peruse my favorite backpacking blogs, websites, and forums for more information.
Disclosure. I strive to offer field-tested and trustworthy information, insights, and advice. I have no financial affiliations with or interests in any brands or products, and I do not publish sponsored content
This website is supported by affiliate marketing, whereby for referral traffic I receive a small commission from select vendors like Amazon or REI, at no cost to the reader.
The post Beginner backpackers: Start here || Advice, info, tips & resources appeared first on Andrew Skurka.
October 30, 2019
I’m hiring: Backpacking guide(s) for 2020 season
For the 2020 guiding season I plan to hire at least one additional backpacking guide, and possibly two or three.
Interested in joining our team? Read on.
Position description
The work will be short-term and seasonal. It should be considered a supplement to steadier full-time work, an additional contract in a larger freelance portfolio, or a fun and rewarding retirement project.
With the current size of the program, each season most of the guides are assigned one trip block in one location that is between 6 and 15 days. Some of the more experienced, capable, and available guides can be assigned to two or three blocks.
I am not yet certain for which 2020 trip locations I am hiring. This decision will be influenced by the availability and geographic location of the individual guides, and the final trip locations. Currently, I believe my needs are:
Southern Utah in April (possibly)West Virginia in May (likely)Brooks Range in June (possibly)Yosemite in July and/or September (likely)Rocky Mountains in August and/or September (likely)
Necessary qualifications
When I hire new guides, I see it as an opportunity to solidify the strengths and to offset the shortcomings of our existing guide roster. The organization specializes in learning-intensive and adventure-rich courses and trips, and our guides all have backgrounds in long-distance trails and high routes. I am looking for candidates that match this profile, while perhaps also bringing new perspectives and life experiences.
In reviewing applications, I will look for evidence that you have:
1. Extensive backpacking experience. Have you slept on the ground (or between trees) for hundreds of nights and in a variety of seasons and ecosystems? Do you have a practical understanding of backpacking gear, and have you developed a robust backcountry skill set?
2. Interpersonal skills. Do you enjoy working with people? Can you effectively communicate your thoughts? Are you comfortable managing groups and group dynamics?
3. Physical fitness. On average per day, at a minimum can you hike 15 miles (at sea level) or climb 3,250 vertical feet (at altitude), and occasionally hike 20 miles or climb 4,250 feet? Are you comfortable hiking off-trail, on uneven and loose surfaces, through talus and scree, and at elevations often up to 12,000 feet?
4. Community credibility. Have you been recognized by media outlets for your accomplishments? Have you written a book or developed route guides? Does your website and/or social media profiles have notable followings? Do you work with outdoor brands as an athlete or ambassador? Have trail associations, hiking clubs, retail stores, or community organizations asked you to speak for their group?
5. Teaching experience. Have you guided, taught, instructed, or mentored others, including students, adults, colleagues, teammates, and classmates? Do you have any professional credentials (e.g. degrees, wilderness medicine training, workshop or course certificates)?
6. Relate-ability. Nearly all of our clients are adults; most are working professionals or recently retired; and many have children and spouses. What experiences do you have in relating to this audience?
Compensation
Guides work as independent contractors, and are compensated for their preparation, travel, days in the field, certifications, and travel expenses.
Application instructions
To apply, complete this form. You will be asked to:
Enter basic biographical information and your location preferences;Upload a letter of interest as a PDF or document file (e.g. docx, txt).
Note: To upload a file in Google Forms, you must be logged into your Google account, if you are not already.
In your letter of interest, address the hiring qualifications — all or at least most of them, depending on your background. Keep it to less than 750 words, which should be sufficient to share your most noteworthy qualifications and to earn an interview.
Application deadline: on or before Sunday, November 17. However, I will review applications periodically and may schedule some interviews before this deadline.
Questions?
If you have general questions about this position, leave a comment below. I will answer it there, to avoid multiple private answers to the same questions.
If you have a question that pertains specifically to your application, please contact me directly.
The post I’m hiring: Backpacking guide(s) for 2020 season appeared first on Andrew Skurka.
October 29, 2019
Preview: Sierra Designs Flex Capacitors 25-40L, 40-60L and 60-75L
The original Sierra Designs Flex Capacitor backpack has performed and sold well since it was released three years ago. So Sierra Designs recently expanded the Flex Capacitor series with two new editions, while also updating the original.
I was involved with the design and launch of the original Flex Capacitor. But I haven’t been affiliated with the brand for nearly two years, and did not help with the development of these new and updated models. Last spring I visited the local Boulder office to get an early preview.
Preview: Flex Capacitor 25-40L, 40-60L, and 60-75L
The three-pack lineup now consists of:
New: Flex Capacitor 25-40L ($180, 2 lbs 7 oz/1.1 kg), best for thru-hiking and overnights/long weekends;Updated: Flex Capacitor 40-60L ($200, 2 lbs 9 oz/1.16 kg), still the sweetspot of the line, and best for 5- to 10-day trips, bear canisters, and colder/stormier conditions; and,New: Flex Capacitor 60-75L ($220, 2 lbs 10 oz/1.19 kg), best for winter backpacking and the family pack mule.
All three models are now available. It’s difficult to launch a summer product in October, but at least they’ll be available for holiday shoppers and thru-hikers this winter.
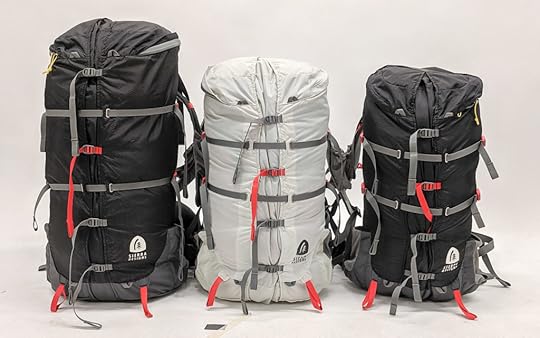 The new Flex Capacitor lineup consists of a new 60-75L (left), the original 40-60L (center), and 25-40L (right).
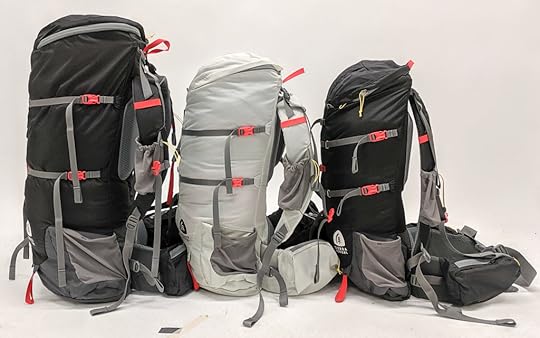 The basic aesthetic and core feature set of the original Flex was extended to the new models.
Sizing
The new Flex Capacitors will be available in just one or two sizes, with each size accommodating a 3-inch range of torsos. (To measure your torso, watch this video.) The limited sizing will compromise sales, but may have been necessary if sales forecasts did not exceed factory minimums. If the packs catch on, Sierra Designs can add sizes later.
25-40L: S/M (16″ to 19″)40-60L: S/M (16″ to 19″) and M/L (18″ to 21″)60-75L: M/L (18″ to 21″)
Each model is available in two hipbelt sizes:
S/M (29″ to 32″)M/L (32″ to 35″)
What’s the same, what’s new?
The basic aesthetic and core feature set of the original Flex Capacitor was extended to the new models, and is largely unchanged. Expect:
Gusseted front panel that can be collapsed or expanded to uniformly adjust the pack volume;Durable all-nylon construction;Multiple and functional exterior pockets;Two horizontal compression straps; and,Robust suspension system with a comfort capacity much greater than the average 2.5-pound backpack.
The updates to the Flex Capacitor are mostly small or behind the scenes:
Two color options: Birch, an off-white, and Peat, a dark gray;A second shoulder strap pocket was added, bringing the total number of exterior pockets to seven. The internal hydration sleeve is double-duty: it can be used as an exterior mesh “shove it” pocket, the lack of which was a common complaint (among non-owners, at least).The pack bottom fabric is the same 420d nylon oxford, but the body fabric was switched to a silicone-coated 100d nylon-polyester rip-stop with better tear-resistance.The anchor stitching for the volume adjustment straps was improved, to prevent tear-outs.The hipbelt was redesigned for simpler manufacturing, but its performance should be about the same.
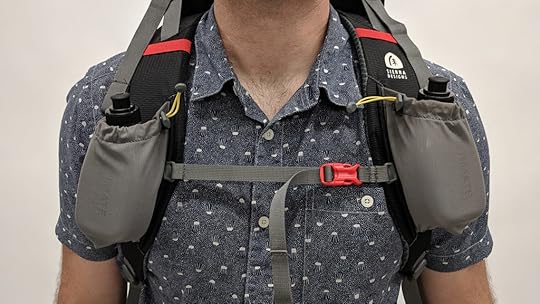 The chief complaint of the shoulder pocket on the original Flex was that there was only one. So a second has been added.
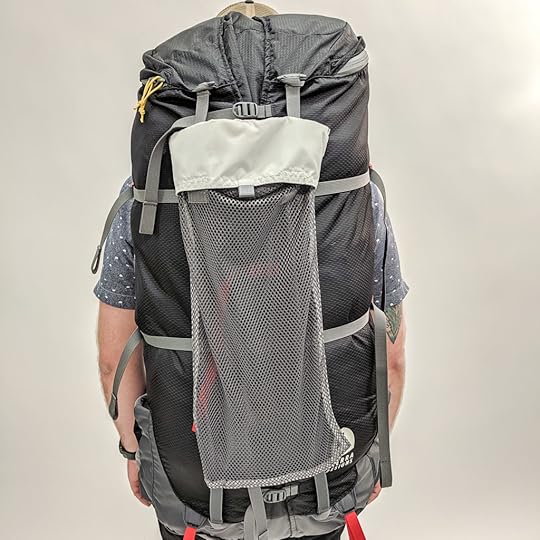 The internal hydration sleeve now doubles as an external mesh pocket. The functionality looks questionable, but it could be useful sometimes.
I was disappointed that the harness was not more fundamentally designed, so that it more consistently wraps around the body. Currently, there’s a “wedge” between the hipbelt and lumbar pad. The problem is not exclusive to the Flex Capacitor — my ULA Catalyst shares the same flaw. This redesign would have required more time and testing.
Note that the 25-40L and 40-60L use the same 8-mm aluminum Y-shaped stay, while the 60-75L version was spec’d with a stronger 9-mm version. Given the higher expected loads for this model, that seems appropriate, but I wonder if a tougher pack body fabric should have been used, too (e.g. 200d instead of 100d).
 The Flex 60-75L uses a slightly thicker aluminum stay than the 25-40L and 40-60L.
Leave a comment
What questions do you have about the Flex Capacitors?What do you think of the updates and the new models?
Disclosure. I strive to offer field-tested and trustworthy information, insights, and advice. I have no financial affiliations with or interests in any brands or products, and I do not publish sponsored content
This website is supported by affiliate marketing, whereby in exchange for referral traffic I receive a small commission from select vendors, at no cost to the reader. This post contains affiliate links.
The post Preview: Sierra Designs Flex Capacitors 25-40L, 40-60L and 60-75L appeared first on Andrew Skurka.
October 28, 2019
Hunt report: Successful but not elegant
For two seasons Noel, Steve, and I had hunted GMU 12, a productive — and popular — unit in northwestern Colorado. We had some success, tagging a young bull in 2017 and having an almost successful timber sneak last year, but had made several realizations about the location:
To reliably find elk, we had to hike 4 to 5 miles and climb 1,500 vertical feet on muddy horse-trodden trails, and that far out we still competed with hunters on horseback;
We lost a full day to the drive (10 hours total), which usually represented a significant share of our available time off; and,
Enthusiasm for scouting the area beforehand was low, due to the drive time and its lackluster backcountry aesthetic.
So as the draw deadline approached in April, we put in for a different unit that we thought, at least on the whole, would be better.
 Spoiler alert: unexpectedly, our hunt ended this way.
Pros and cons: GMU 29
GMU 29 is our backyard. It encompasses roughly the southern half of Boulder County, stretching from I-25 to the Continental Divide. It can be a difficult unit to hunt, as I’ve previously explained:
The big game population is small — it and adjacent GMU 38 are home to only 1,200 elk.
Harvest numbers are low, with just 71 total elk taken last year.
The limited public land is concentrated in the western one-fifth of the unit, with an additional patchwork of smaller holdings in the foothills.
But we decided to go for it anyway. The easy logistics were very appealing. We were successful here before, back in 2015. And I’d found many honey-holes while trail running and backpacking in the summer months, where they’d still be during a normal Second Season.
View this post on Instagram
A post shared by Andrew Skurka (@andrewskurka) on Aug 9, 2018 at 1:55pm PDT
I wouldn’t expect elk to stay put between August and October, but it was encouraging to see so many animals in the area.
Noel and I successfully drew cow tags. Steve put in for a bull, but had to settle for an over-the-counter tag that wasn’t valid for GMU 29. So it would be just Noel and me.
The worst case scenario
As a non-landowner, perhaps the biggest risk of hunting GMU 29 is heavy early-season snowfall. If their food sources get buried, the elk must drop eastward, out of the high elevation public lands and into the lower elevation patchwork of public and private. There, the elk can find food and safe zones; meanwhile, we find No Trespassing signs and limited access points to public land.
Early-season snowfall is a low but legitimate risk, and this year it happened during Second Season. Noel went up to 11,000 feet on opening day, October 19, and was chased out on Sunday by blizzard conditions, reporting a foot of fresh snow, 3-foot drifts, and 30 mph winds.
 The Indian Peaks are gorgeous, but after heavy early-season snowfall it can’t be practically hunted and most of the elk move downhill.
Due to responsibilities at home, I couldn’t go up until Thursday. It had snowed again on Wednesday night, and the scene became increasingly laughable as we approached Hessie Trailhead at 9,000 feet. When we stepped out of the truck, we landed in 15 inches of snow!
Noel and I had discussed the merits of bringing skis or snowshoes, and had decided that, “If we need them, the elk aren’t there.” But to shoot one you first need to find one. And to find one, it can be sometimes helpful to determine where they are not.
So we slugged up the road to Buckingham Trailhead, four miles and 1,000 vertical feet uphill. We crisscrossed a handful of mid-storm tracks, all going downhill, which confirmed our suspicions. At Buckingham, the snow depth was consistently two feet.
 On Eldora Road, the snow was consistently 1.5 feet deep, and a few inches deeper outside the tracks from the last vehicle.
Plan E
Weeks ago, Noel and I had settled on a hunt plan:
Plan A: Out of Buckingham Trailhead
Plan B: Way above Hessie Trailhead
Plan C: Above Caribou
Plan D: Jenny Creek via East Portal
Due to the snow, these four areas were entirely out of commission. The deep snow made it impractical for us to hunt, and the elk probably were no longer up there anyway.
So we were onto Plan E.
Deflated, we returned to Nederland to have a late lunch and to re-study our maps of the lands between the Peak to Peak Highway and the Front Range metro area. We decided we would work our way west to east, finishing near Gross Reservoir. Noel likened our prospects to finding a unicorn.
Getting soft
That afternoon we hunted the outer edges of West Magnolia, a mile outside of Nederland, but saw nothing to change our moods. We crossed a few deer tracks, but they were vastly outnumbered by those of humans, dogs, and vehicles.
It was already 29 degrees when we returned to the truck at 5:30 pm, and it was not lost on us that my house — with a cuddle-loving old cat for me and a guestroom for Noel — was just 45 minutes away. Tonight, we could be home before we’d have pitched camp here; and tomorrow, we could be at the trailhead before we’d broken down our camp.
So we jumped into the truck, bound for Boulder. I was disappointed that I wouldn’t get to test some new gear — including a Seek Outside Siplex shelter and a Sea to Summit Ether Light pad — but my own bed sounded better.
From 0 to 100
On our way out to the Peak to Peak Highway, I spotted three does grazing in the woods, just off the road. We didn’t have deer tags, but it gave us an idea. Rather than take the most efficient route back to Boulder, via Boulder Canyon, we opted to take Magnolia Road, which in places cuts through US Forest Service lands — maybe we’d see something.
Sure enough, as we rounded a corner, a half-dozen cows and calves ran across the road just in front of us. Noel pulled over a little bit beyond, and I turned on GaiaGPS to determine our location and the surrounding land ownership. Fortuitously, it was public.
I grabbed my rifle out of the back, chambered a round, and hiked briskly into the woods, hoping that I could get within range while maintaining my cover and while there was still light. When a shot corridor finally opened up, I took a knee, waited for the next cow to enter my sights, and fired. Noel was 20 yards behind me, and had tucked behind a tree when he saw me get into position.
It felt like a good shot — I was steady and within 100 yards, and she was broadside and slightly quartering-away. But it was difficult to distinguish her: she didn’t have an obvious reaction to the shot, and keeping eyes on her in the timber with other elk nearby was like a shell game. I thought I saw her go back towards the way they had came, but I wasn’t entirely sure. So I took note of the shooting lane and her approximate location when I’d shot, knowing this information would be helpful to have later.
Pack out
We quietly hiked back to the truck, where we tested our patience by waiting an hour. It took us a few minutes to find the blood trail when we returned to the site, but after that she was easy to track in the snow. We found her a few minutes away; she had not suffered for long.
 Shot placement was towards the top back of the vital area, but thankfully within it.
Noel and I field-dressed her in about an hour, and packed her out in just half that, with five light round-trips between us (rear quarter x 2, front quarter x 2, and backstraps + tenderloins + rib meat + personal gear). Compared to our 2015 hunt, when the pack-out was 12 miles with 3,300 vertical feet of gain, this one was a breeze.
As we drove back to Boulder, we were still in disbelief. It was not the elegant backcountry hunt that we had envisioned or wanted, but we were thankful that it’d still worked out and that our freezers are stocked for the winter.
 I processed the meat at home. On its own, the rear quarter weighed 43 pounds bone-in. Noel reported 59 lbs of edible meat after processing, and I have about the same.
The post Hunt report: Successful but not elegant appeared first on Andrew Skurka.
Hunt report: Successful, but not an elegant backpack hunt
For two seasons Noel, Steve, and I had hunted GMU 12, a productive — and popular — unit in northwestern Colorado. We had some success, tagging a young bull in 2017 and having an almost successful timber sneak last year, but had made several realizations about the location:
To reliably find elk, we had to hike 4 to 5 miles and climb 1,500 vertical feet on muddy horse-trodden trails, and that far out we still competed with hunters on horseback;We lost a full day to the drive (10 hours total), which usually represented a significant share of our available time off; and,Enthusiasm for scouting the area beforehand was low, due to the drive time and its lackluster backcountry aesthetic.
So as the draw deadline approached in April, we put in for a different unit that we thought, at least on the whole, would be better.
Spoiler alert: unexpectedly, our hunt ended this way.Pros and cons: GMU 29
GMU 29 is our backyard. It encompasses roughly the southern half of Boulder County, stretching from I-25 to the Continental Divide. It can be a difficult unit to hunt, as I’ve previously explained:
The big game population is small — it and adjacent GMU 38 are home to only 1,200 elk. Harvest numbers are low, with just 71 total elk taken last year. The limited public land is concentrated in the western one-fifth of the unit, with an additional patchwork of smaller holdings in the foothills.
But we decided to go for it anyway. The easy logistics were very appealing. We were successful here before, back in 2015. And I’d found many honey-holes while trail running and backpacking in the summer months, where they’d still be during a normal Second Season.
View this post on InstagramA post shared by Andrew Skurka (@andrewskurka) on Aug 9, 2018 at 1:55pm PDT
I wouldn’t expect elk to stay put between August and October, but it was encouraging to see so many animals in the area.
Noel and I successfully drew cow tags. Steve put in for a bull, but had to settle for an over-the-counter tag that wasn’t valid for GMU 29. So it would be just Noel and me.
The worst case scenario
As a non-landowner, perhaps the biggest risk of hunting GMU 29 is heavy early-season snowfall. If their food sources get buried, the elk must drop eastward, out of the high elevation public lands and into the lower elevation patchwork of public and private. There, the elk can find food and safe zones; meanwhile, we find No Trespassing signs and limited access points to public land.
Early-season snowfall is a low but legitimate risk, and this year it happened during Second Season. Noel went up to 11,000 feet on opening day, October 19, and was chased out on Sunday by blizzard conditions, reporting a foot of fresh snow, 3-foot drifts, and 30 mph winds.
The Indian Peaks are gorgeous, but after heavy early-season snowfall it can’t be practically hunted and most of the elk move downhill.Due to responsibilities at home, I couldn’t go up until Thursday. It had snowed again on Wednesday night, and the scene became increasingly laughable as we approached Hessie Trailhead at 9,000 feet. When we stepped out of the truck, we landed in 15 inches of snow!
Noel and I had discussed the merits of bringing skis or snowshoes, and had decided that, “If we need them, the elk aren’t there.” But to shoot one you first need to find one. And to find one, it can be sometimes helpful to determine where they are not.
So we slugged up the road to Buckingham Trailhead, four miles and 1,000 vertical feet uphill. We crisscrossed a handful of mid-storm tracks, all going downhill, which confirmed our suspicions. At Buckingham, the snow depth was consistently two feet.
On Eldora Road, the snow was consistently 1.5 feet deep, and a few inches deeper outside the tracks from the last vehicle.Plan E
Weeks ago, Noel and I had settled on a hunt plan:
Plan A: Out of Buckingham TrailheadPlan B: Way above Hessie TrailheadPlan C: Above CaribouPlan D: Jenny Creek via East Portal
Due to the snow, these four areas were entirely out of commission. The deep snow made it impractical for us to hunt, and the elk probably were no longer up there anyway.
So we were onto Plan E.
Deflated, we returned to Nederland to have a late lunch and to re-study our maps of the lands between the Peak to Peak Highway and the Front Range metro area. We decided we would work our way west to east, finishing near Gross Reservoir. Noel likened our prospects to finding a unicorn.
Getting soft
That afternoon we hunted the outer edges of West Magnolia, a mile outside of Nederland, but saw nothing to change our moods. We crossed a few deer tracks, but they were vastly outnumbered by those of humans, dogs, and vehicles.
It was already 29 degrees when we returned to the truck at 5:30 pm, and it was not lost on us that my house — with a cuddle-loving old cat for me and a guestroom for Noel — was just 45 minutes away. Tonight, we could be home before we’d have pitched camp here; and tomorrow, we could be at the trailhead before we’d broken down our camp.
So we jumped into the truck, bound for Boulder. I was disappointed that I wouldn’t get to test some new gear — including a Seek Outside Siplex shelter and a Sea to Summit Ether Light pad — but my own bed sounded better.
From 0 to 100
On our way out to the Peak to Peak Highway, I spotted three does grazing in the woods, just off the road. We didn’t have deer tags, but it gave us an idea. Rather than take the most efficient route back to Boulder, via Boulder Canyon, we opted to take Magnolia Road, which in places cuts through US Forest Service lands — maybe we’d see something.
Sure enough, as we rounded a corner, a half-dozen cows and calves ran across the road just in front of us. Noel pulled over a little bit beyond, and I turned on GaiaGPS to determine our location and the surrounding land ownership. Fortuitously, it was public.
I grabbed my rifle out of the back, chambered a round, and hiked briskly into the woods, hoping that I could get within range while maintaining my cover and while there was still light. When a shot corridor finally opened up, I took a knee, waited for the next cow to enter my sights, and fired. Noel was 20 yards behind me, and had tucked behind a tree when he saw me get into position.
It felt like a good shot — I was steady and within 100 yards, and she was broadside and slightly quartering-away. But it was difficult to distinguish her: she didn’t have an obvious reaction to the shot, and keeping eyes on her in the timber with other elk nearby was like a shell game. I thought I saw her go back towards the way they had came, but I wasn’t entirely sure. So I took note of the shooting lane and her approximate location when I’d shot, knowing this information would be helpful to have later.
Pack out
We quietly hiked back to the truck, where we tested our patience by waiting an hour. It took us a few minutes to find the blood trail when we returned to the site, but after that she was easy to track in the snow. We found her a few minutes away; she had not suffered for long.
Shot placement was towards the top back of the vital area, but thankfully within it.Noel and I field-dressed her in about an hour, and packed her out in just half that, with five light round-trips between us (rear quarter x 2, front quarter x 2, and backstraps + tenderloins + rib meat + personal gear). Compared to our 2015 hunt, when the pack-out was 12 miles with 3,300 vertical feet of gain, this one was a breeze.
As we drove back to Boulder, we were still in disbelief. It was not the elegant backcountry hunt that we had envisioned or wanted, but we were thankful that it’d still worked out and that our freezers are stocked for the winter.
I processed the meat at home. On its own, the rear quarter weighed 43 pounds bone-in. Noel reported 59 lbs of edible meat after processing, and I have about the same.The post Hunt report: Successful, but not an elegant backpack hunt appeared first on Andrew Skurka.
October 23, 2019
8 adventurous running & hiking loops in Rocky Mountain and Indian Peaks
For the first time since 2013, this year I didn’t race and I won’t log at least 3,000 miles. Nagging injuries, lack of race entry luck, and a growing guiding program all played a role, as did an absence of desire — whatever I’d been running towards in my mid-30’s, I felt like I’d reached it.
Somewhat ironically, however, this year had a disproportionate share of favorite and memorable trail runs — out of my all-time Top 10-ish, this year scored five, which on this page I’ll highlight (and recommend three more). Since I wasn’t on a strict training plan or beat up from the last race, I was free to run where, when, and how far I pleased, and to do it at whatever pace felt right.
The commonality: Pfiffner Traverse
Due to their proximity and quality, I focused my efforts on Rocky Mountain National Park and the Indian Peaks Wilderness, both in the Colorado Front Range. From Boulder, the east-side trailheads are about an hour away; the west side trailheads are 2.5 hours, but conveniently my work put me in Grand Lake for a few September days.
Intentionally, these five loops included sections of the Pfiffner Traverse, which is a 76-mile high route that parallels the geographic Continental Divide between Milner Pass (on Trail Ridge Road in Rocky) and Berthoud Pass (on US-40 near the boundary of the James Peak Wilderness). The route is 40 percent off-trail, gains or loses 750 vertical feet per mile, and approaches Class 3 in difficulty. Four of the eight loops on this page are recommended section-hikes.
By including sections of the Pfiffner, I was able to edit my Pfiffner Traverse Guide, gather data for a potential FKT attempt, and elevate the difficulty of each outing, making them true adventure runs. But most importantly, the Pfiffner helped to create loops in a range that otherwise has very few.
1. Across Onahu
17.2 miles (3.5 miles off-trail) with 5,000 feet of gain+ 6.8 miles on Trail Ridge Road without shuttleStrava (with Tonahutu TH finish)
The heart of this run is between Timber Lake and Haynach Lakes, which are separated by two 11,800-foot passes that provide access to and out of upper Onahu Creek. Onahu is a gem: it’s one of just two trail-less valleys on the west side of the park, features a rarely visited alpine lake, and serves as a quiet refuge for elk and moose.
Several options exist for reaching and returning from Timber Lake and Haynach Lakes. A shuttle or hitch is necessary for all of them.
The shortest variation of this run starts at Timber Lake Trailhead and finishes at Green Mountain Trailhead, which are separated by seven miles along Trail Ridge Road. Alternatively, start at Milner Pass (which is about the same distance but has less climbing) and finish at North Inlet Trailhead (+2.4 miles). The net vertical uphill/downhill difference between running northbound and southbound is generally negligible, unless you start at Milner Pass.
 Timber Lake, as seen from Timber Lake Pass, looking north
2. Continental Divide Trail Loop
25.8 miles (no off-trail) with 4,400 feet of gainStrava
The west side of Rocky Mountain National Park has just one all-trail loop, this one. Because of that, it’s already popular with backpackers and trail runners, and is actually the only route on this page with an established FKT (4 hrs 2 min), at least currently.
Start at the North Inlet/Tonahutu Creek Trailhead, and pick a direction. I prefer clockwise, so that the flat and boring 5.5-mile section along Big Meadows is at the start. If you have access to a shuttle or are willing to hitch, you can shortcut the route by 2.4 miles by starting or ending at Green Mountain Trailhead. Climb steadily to Ptarmigan Point (elev. 12,200+) and then descend into North Inlet and back to the trailhead.
 A herd of cow elk at Sprague Pass, just off the Continental Divide Trail
3. North & East Inlets
21.3 miles (3.3 miles off-trail) with 6,100 feet of gain+ 1.4 miles without shuttle between North Inlet TH and East Inlet THStrava
The North Inlet and adjacent East Inlet both drain into Grand Lake, the largest natural lake in Colorado. Hiking trails go far up both valleys, but strangely do not connect. Fortuitously, however, they are separated by just 3.3 miles of off-trail travel, most of it Sound of Music quality.
I strongly recommend running this loop clockwise, entering the park from North Inlet Trailhead and exiting at East Inlet Trailhead, so that you have gravity on your side for the tough pitch above Spirit Lake. The trailheads are separated by 1.4 road miles, which can be used as a warm-up or skipped with a shuttle or hitch.
Run up North Inlet, and take a right/south turn towards Lake Nokoni and Lake Nanita. When this trail terminates at the latter lake, follow the Pfiffner Traverse to Spirit Lake, where you will intersect an unmaintained use trail. Turn right/west and follow this track to the mapped end of the East Inlet Trail, which will take you back to the trailhead.
 Wildflowers and Ptarmigan Mountain
4. Triple Bypass
23.3 miles (3.1 miles off-trail) with 7,500 feet of gainStrava
The Pawnee-Buchanan Loop (aka Double Bypass Loop) is a popular 28-mile long run for Front Range trail runners. It gains 8,000 vertical feet and crosses two 12,000-foot passes on the Continental Divide.
Triple Bypass is an adventurous play on this Colorado classic. Whereas the original loop drops to the 8,800-foot junction of the Buchanan Pass Trail and Cascade Creek Trail above Monarch Lake, the Pfiffner Traverse is used to “shortcut” up Thunderbolt Creek, adding three off-trail miles and a third high point, Paiute Pass.
This loop can be run in either direction, starting and ending at Brainard Lake. But by doing it counterclockwise, you can follow the guidebook description through this complicated valley and over this Class 3 pass.
 Thunderbolt Creek, as seen from the Ooh La La Extra Credit route, north of Buchanan Creek. Paiute Pass is at the head of the valley and is still snow-covered.
5. Boulder Watershed
33.6 miles (4.7 miles off-trail) with 11,200 feet of gain+ 4.3 miles on gravel road without shuttleStrava
The Northeast Gully is the easiest non-trail exit from the iconic Lone Eagle Cirque. But it’s the most difficult feature on the Pfiffner Traverse: it’s filled with snow through midsummer, covered in loose rock and dirt in late-summer, and always steep. Before this fall’s first snowstorm, I wanted to get on this section of the Pfiffner (again), which connects Crater Lake with Coyote Park in upper Arapaho Creek.
Loops out of Monarch Lake would have been shorter (see below), but I figured that encircling the City of Boulder Watershed wouldn’t take me much longer after accounting for drive times. Plus, an end-of-season big hurrah was appealing. YMMV.
Start or finish at Rainbow Lakes Trailhead, and ideally hitch or shuttle the five miles of gravel between it and the Sourdough Trailhead, just off the Peak to Peak Highway. The loop can be done in both directions, with a slight advantage for clockwise (so that you can more easily follow the guidebook out of the Lone Eagle Cirque).
From Sourdough Trailhead, run/hike:
Over Niwot Ridge to Brainard Lake, Over Pawnee Pass to Cascade Creek Trail, Over Northeast Gully to upper Arapaho Creek, Over Arapaho Pass to the Fourth of July Mine, and Over the east ridge of Arapaho Peak, past the Arapaho Glacier, back to Rainbow Lakes.
 The Lost Tribe Lakes basin, as seen from its western edge at the top of the elk trail.
6. Monarch Lake Loops
Min: 16.miles (3.1 miles off-trail) with 4,800 feet of gainMax: 32.3 miles (10.4 miles off-trail) with 11,600 of gain
Monarch Lake is the western gateway to the Indian Peaks Wilderness, and sits at the confluence of four major creeks that flow off the Continental Divide: Hell Canyon, Buchanan Creek, Cascade Creek, and Arapaho Creek.
The Pfiffner Traverse connects these drainages, using Cooper Peak Pass, Paiute Pass, and the Northeast Gully. This area has at least seven loop opportunities — each includes one pass, two adjacent passes, or all three passes. Select the itinerary that best suits your fitness, interests, and off-trail skills.
 A carpet of avalanche lilies in upper Hell Canyon
7. Middle Boulder Creek
25.1 miles (4.3 miles off-trail) with 7,400 feet of gainStrava
From Boulder, Hessie Trailhead provides the quickest access into the Indian Peaks. Its popularity is proportional to its convenience, however, so the county operates a free shuttle bus on weekends to relieve parking pressure. By taking the N bus from downtown Boulder, this loop can be done using only public transit.
Go counterclockwise, so that you pass through the lowest and most heavily trafficked sections first, and reserve the wildest bit for the third quarter. The highlight is between Arapaho Pass and Rollins Pass, when this loop overlaps with the Pfiffner and mostly stays atop the Continental Divide
 Looking north over Arapaho Pass and Lake Dorothy towards Apache Peak, Lost Tribe Lakes, and the west ridge of Lone Eagle Cirque
8. James Peak Skyline
17.6 miles (5.2 miles off-trail) with 6,550 feet of gain
If I’d had one more week of cooperative weather, this would’ve been the one. Years ago I completed it as an overnight backpacking trip, and was surprised that it’s not a classic, especially given its accessibility from Denver.
Start at St. Marys Glacier Trailhead ($5 parking fee) and run clockwise, so that you finish with the best stuff. The exception: if there is a chance of thunderstorms and if you’re getting a late start, go counterclockwise so that you can get off the Divide earlier in the day.
From the parking area, cut through Alice and join the Continental Divide Trail (CDT) where it crosses the 4WD road to Loch Lomond. Follow it to Mt. Flora, the first of five 13’ers on this route.
Run/hike north atop the geographic Continental Divide, usually off-trail but sometimes with the help of a use trail, to James Peak, the final high point. Descend south on the CDT until it crosses the James Peak Wilderness Area boundary. There, travel eastward off-trail until funneling into the St. Marys Glacier. Return to your car on overused tourist trails.
 James Peak, one of five 13’ers on the route. Immediately to the north it gets easier for a while, with pleasant ridge-walking atop the Divide, overlooking deep cirques to the east.
Leave a comment!
Have questions about any of these loops?If you’ve done one, what was your experience?
The post 8 adventurous running & hiking loops in Rocky Mountain and Indian Peaks appeared first on Andrew Skurka.
October 21, 2019
Review: Gore Wear H5 Gore-Tex Shakedry Jacket || The holy grail?
Nearly four years ago we first heard about Shakedry, a new “permanently beading” waterproof/breathable membrane technology from Gore-Tex that eliminated the need for a DWR-treated face fabric and that purportedly wouldn’t wet-out. If true, that’d be a big deal, because it would solve one source of failure of modern rain shells.
The North Face was first-to-market, launching its HyperAir Jacket ($250, 6 oz, discontinued) in a miraculously fast 12 weeks.
In December 2015 I speculated that we were on the cusp of a category revolution. Earlier that year Columbia had released a heavier but technologically similar fabric, OutDry Extreme. And I thought it was only a matter of time until Gore-affiliated brands embraced Shakedry and until Asian mills reverse-engineered Shakedry and OutDry Extreme, leading to additional distribution and innovation.
But that didn’t happen. Today, it’s shockingly difficult to find Shakedry products — shell pants are simply nonexistent, and shell jackets are available from just three brands:
Arc’teryx has the Norvan SL Hoodie ($300, 4.2 oz), plus a lightly insulated version of it; and,Gore Wear, a Gore-owned apparel company that focuses mostly on bike and run and that seems to have more traction in Europe than the US.Rapha, the ritzy bike brand recently launched a few Shakedry shells.
To make matters worse, the Noran SL is made of fabric that is too delicate for a heavy backpack or for bushwhacking, and most of the jackets from Gore Wear and Rapha are hood-less.
The single exception — in the entire world, as far as I know — is the Gore Wear H5 Gore-Tex Shakedry Hooded Jacket ($380, 8 oz), which is made of a heavier Shakedry variant. One was sent to me by a Gore Wear media rep this spring for testing.
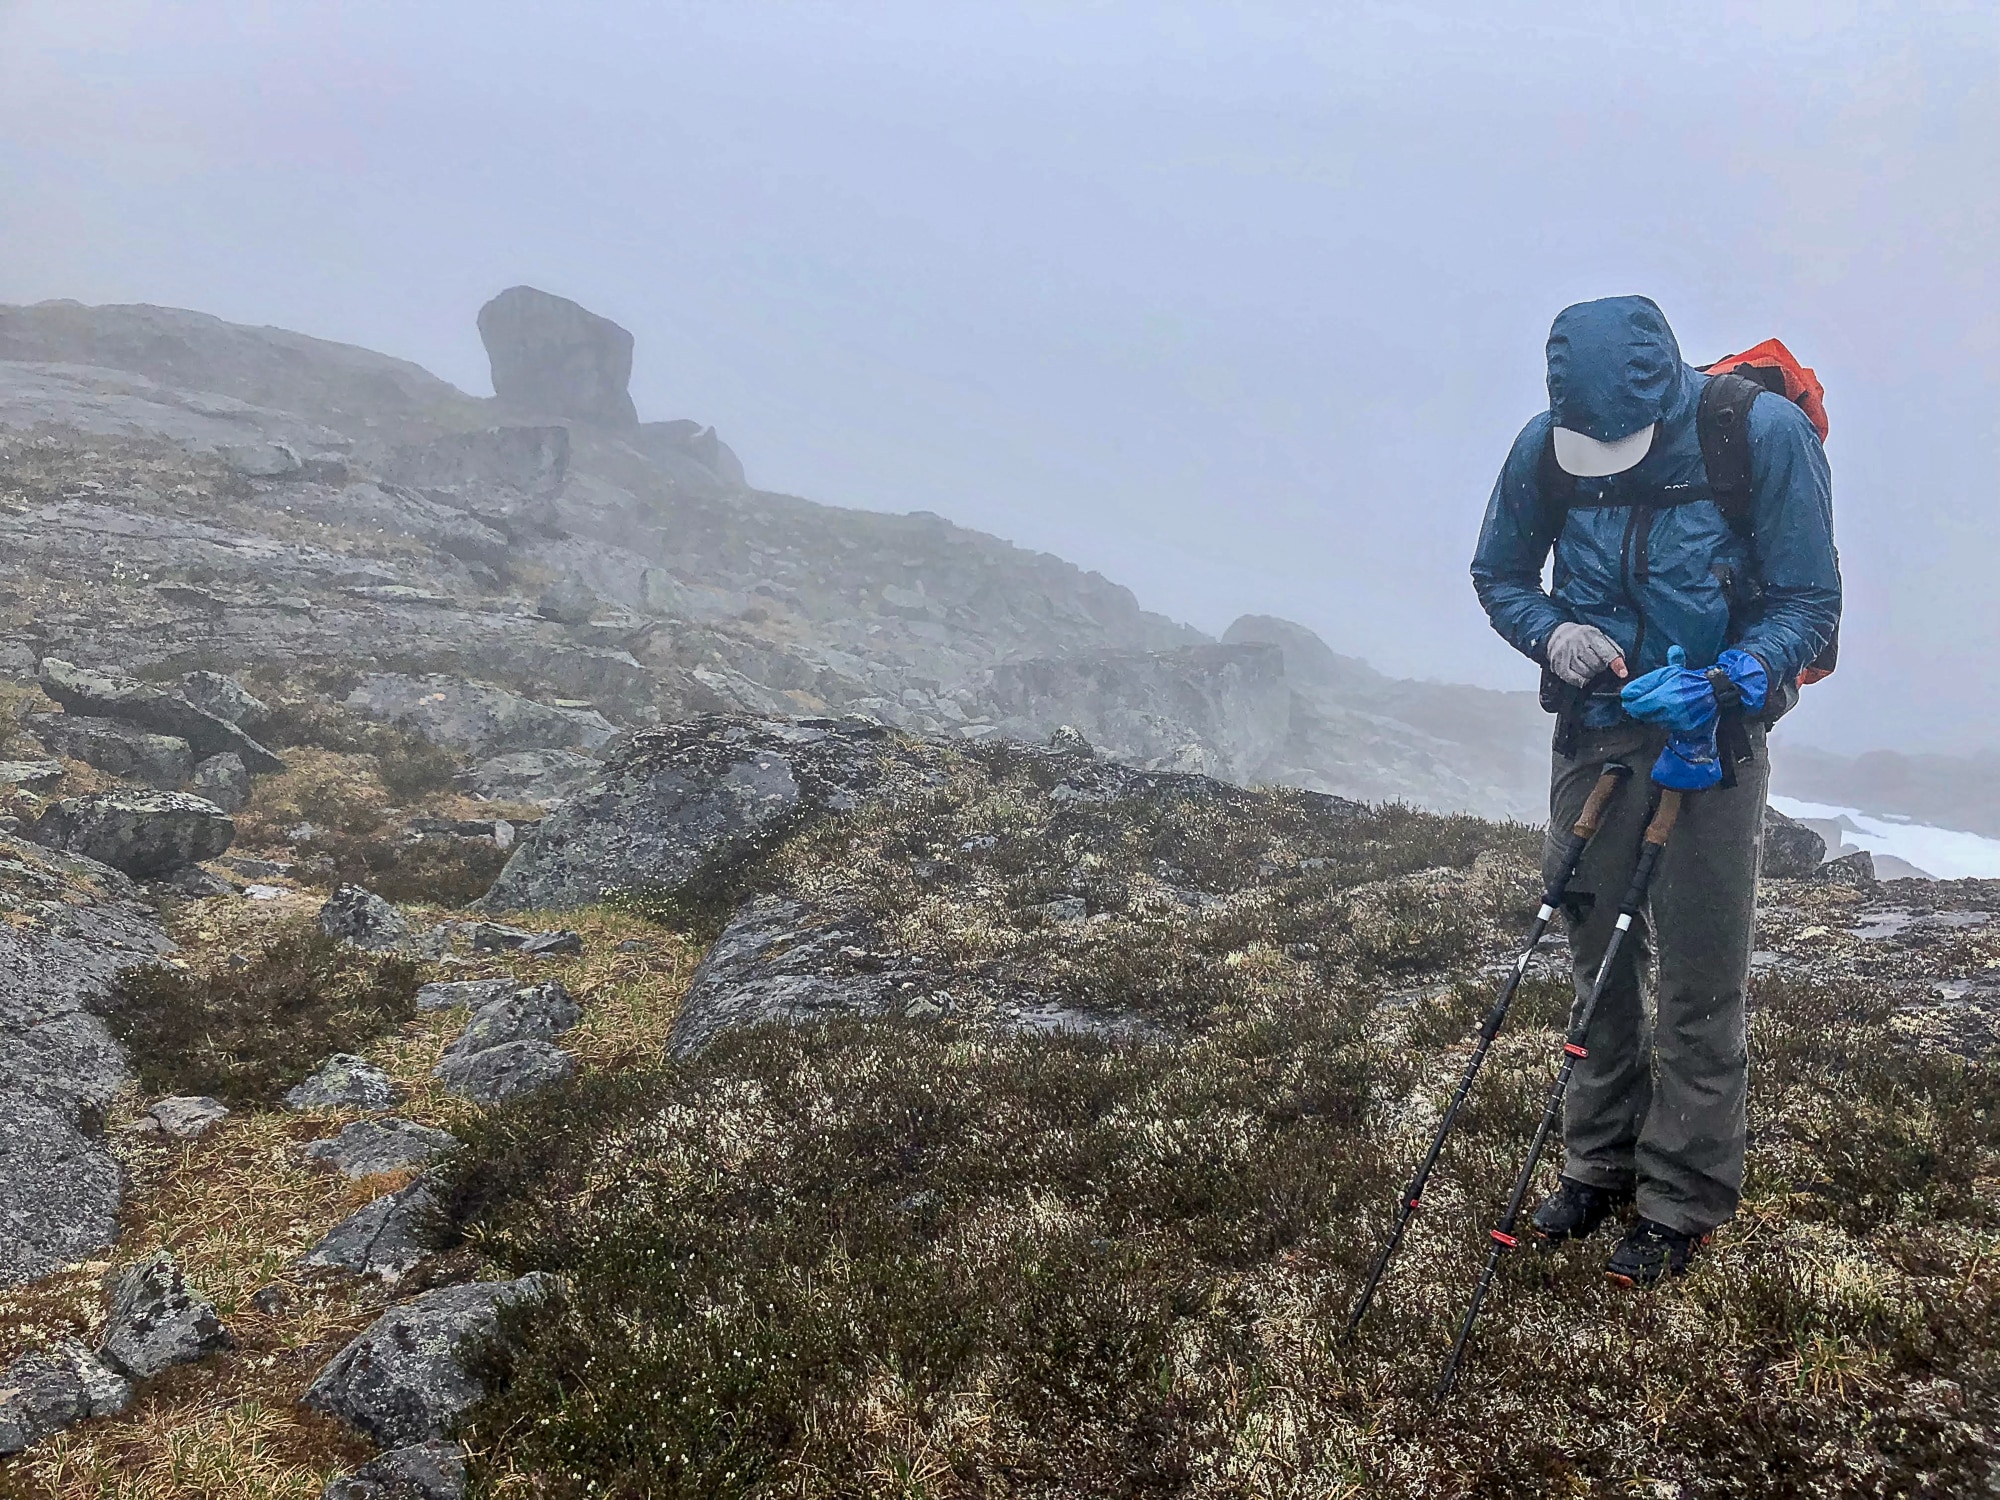 Navigating by GPS over a 4,000-foot alpine pass during whiteout conditions in Alaska’s Brooks Range, being kept dry by the H5 Shakedry. Photo: Chip Wood
Review: Gore Wear H5 Gore-Tex Shakedry Jacket
Is the Gore Wear H5 Gore-Tex Shakedry Hooded Jacket a game-changer?
I’m cautiously optimistic that it does represent a step-up in waterproof/breathable performance. But take note that this is not a “long-term review” — by design or luck, I had good weather on most of my 2019 trips.
This year I took it into the field for about forty-five days. But it was tested only during five days of persistent rain in West Virginia, one soggy day in Alaska’s Brooks Range, and one afternoon of torrential rains in Yosemite. Later this week while elk hunting in Colorado, it will probably also see some light snow and ferocious winds. I’ve noticed no change in performance from when it was new, which is more than you can say about most WP/B jackets after being touched with oily hands and shoved into a pack for 6 weeks.
 Torrential afternoon showers in Yosemite
The H5 Shakedry is best suited for hiking and backpacking in the Mountain West, where it does not rain often or for long (usually), and where rain is often accompanied by cooler temperatures.
While its breathability is very good for a waterproof-breathable garment, direct venting features like torso/pit zips and mesh-backed front pockets would be appreciated in warmer and more humid climates like the Appalachians and Alaska. To use Gore Wear’s nomenclature, this would be a H7 Shakedry Jacket.
But there is no H7 Shakedry (yet or ever?), and I’d still pick the H5 Shakedry in such conditions if my other option was made of a traditional WP/B laminate — the benefits of a permanently beading surface outweigh the H5 Shakedry’s minimalist design. Although, in really wet conditions, I’d consider supplementing it with a lightweight umbrella, which proved to be a powerful combination in West Virginia.
 More recently, my H5 is weighing 8.2 oz (232 grams) for size Large, which is really a US size Medium.
The H5 Shakedry could serve double-duty for running and biking — it weighs only 8 oz, packs down small, and has an athletic cut. But if hiking is not your primary activity, you might want to look at other Shakedry shells that are lighter, softer, and more activity-specific.
The H5 Shakedry is not to be confused with other H5 products from Gore Wear, specifically the:
H5 Gore-Tex Active, which is made of a more traditional 2.5-layer laminate;H5 Gore-Tex Shakedry Insulated, which has a Polartec Alpha lining; or the,H5 Gore Windstopper Jacket, which is not waterproof.
Key product specs
Gore-Tex Active fabric with Shakedry technologyTwo-way front zipperTwo large zippered front pockets, both of which serve as a stuff sackHat-compatible hood has drawcord adjustment and stiffened brimPartially elasticized wrist cuffs8.2 oz (232 g) in size Large (confirmed)$380 MSRPMore information
Fit and sizing
If you don’t read this section, you’ll get the wrong size, guaranteed. The H5 Shakedry has a “Form Fit,” which Gore Wear describes as:
Not skin tight, but also not excessively baggy, Form Fit garments provide a sporting silhouette without being body hugging. If you normally fall halfway between two sizes we recommend taking the larger one.
Based on my experience, Gore Wear is being too conservative with its sizing recommendation, especially for the US market. Mine is simpler: Buy one size up.
Normally I’m a slim fit Medium. Small tops fit me in the chest and shoulders, but the sleeves are too short. Standard size Mediums are oversized in the body.
My H5 Shakedry is a Large, and it’s the right size for me. It has an athletic cut, and a mid-layer fits nicely underneath. I can add a lightweight puffy jacket, too, but it’s at the expense of some loft and agility.
 In wet-and-cold West Virginia with co-guide Matt Bright, who is wearing a Packa, BTW. My H5 Shakedry is a size Large, which is a full size larger than I normally wear. A mid-layer fits nicely underneath, and if I’m really desperate I can squeze a puffy in there, too, but it’s pretty tight and restrictive. Photo: Ben Black.
Shakedry fabric
The most unique feature of the H5 Shakedry is its fabric: Gore-Tex Active with Shakedry technology. Unlike other waterproof/breathable fabrics (including standard Active), the PTFE/Teflon membrane is on the outside. It’s not sandwiched inside a laminate or protected by a DWR-treated face fabric.
The original Active with Shakedry — as used in aforementioned HyperAir and Norvant — is insufficiently durable for backpacking, per Gore’s usage guidelines. The H5 Shakedry uses a new heavier Shakedry variant that can better withstand abrasion from heavy packs and brush. Mine seemed unfazed by a 40-pound guide pack or by bushwhacking through alder and willow.
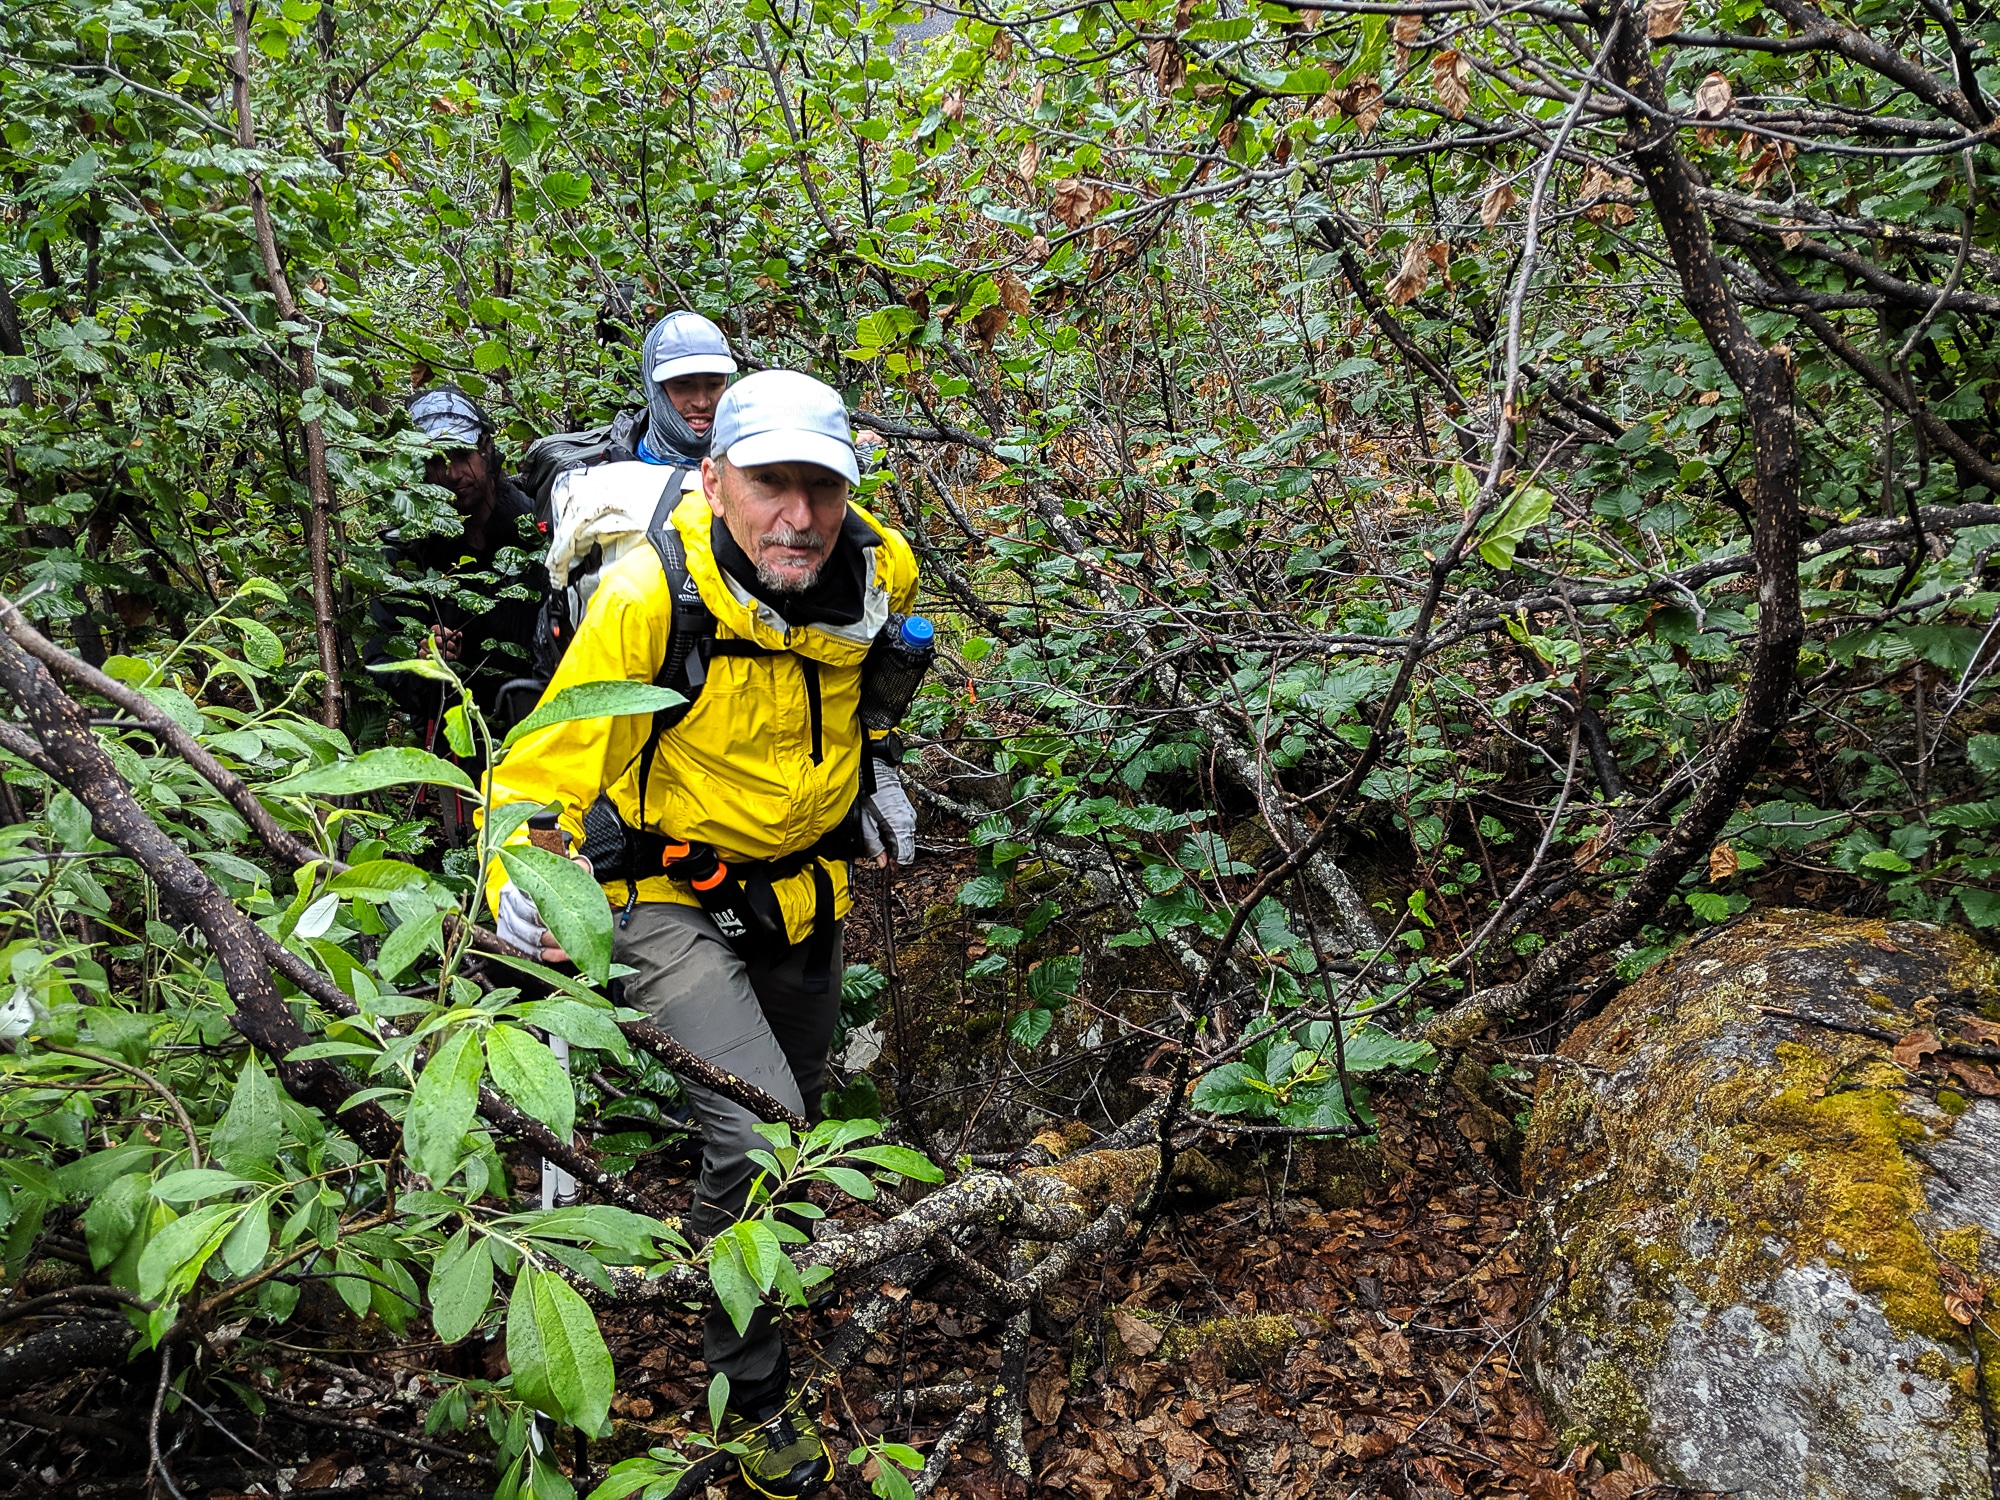 Dave Eitemiller busts through an alder thicket on the south side of the Brooks Range. The H5 Shakedry proved resistant to such bushwhacking.
Gore claims that Active with Shakedry will not wet out. So far this has been my experience, and I’ve enjoyed the benefits. The jacket:
Dries quickly even without shaking it, because water evaporates or falls off it;Does not gain weight during storms;Remains more comfortable in cold temperatures, because my body heat is no longer being sucked away by a saturated face fabric; and,Is less likely to wet through, because the relative humidity outside the jacket stays less than the humidity inside.
Many rain jackets work well when new-ish, and I can’t yet attest to the H5 Shakedry’s long-term performance. But I’m encouraged by the experience of Garret Workman, who used the TNF HyperAir Jacket on a 100-day thru-hike of the Appalachian Trail (his review) and who reported recently that it’s still performing well after three years (his update).
 The exterior is smooth and glossy. The interior has a micro-mesh layer for next-to-skin comfort. The seams are taped on the inside.
Per Gore, Active with Shakedry is “one of the most breathable GORE-TEX laminates available.” You’d be right to read that with a gain of salt — Gore has been the King of Hype for decades, and has made many such hyperbolic statements before. I’ve not seen any quantitative specs from MVTR testing.
Intuitively, Gore might be right, however: Its fabrics are constantly improving, and the Shakedry technology eliminates an entire layer from the laminate. Anecdotally, it’s difficult for me to say: testing temperatures were cool; the trips were all guided, so my output was sub-max; and I run cooler than average, so I’m usually the last to complain about lackluster breathability.
Features
The Shakedry fabric sets the H5 apart. The remainder of the jacket is well designed, but more ordinary.
The water-resistant two-way front zipper can be opened from the bottom, in order to vent the torso and to sit down without stressing the fabric or the zipper.
The front pockets are convenient, and mostly useful even while wearing a backpack with a hipbelt. But they’re not a “venting option” as suggested by the product specs. The backer fabric is, at best, water-resistant, and it could be WP/B — it’s difficult to tell. To vent in any meaningful way, the liner fabric would have to be mesh.
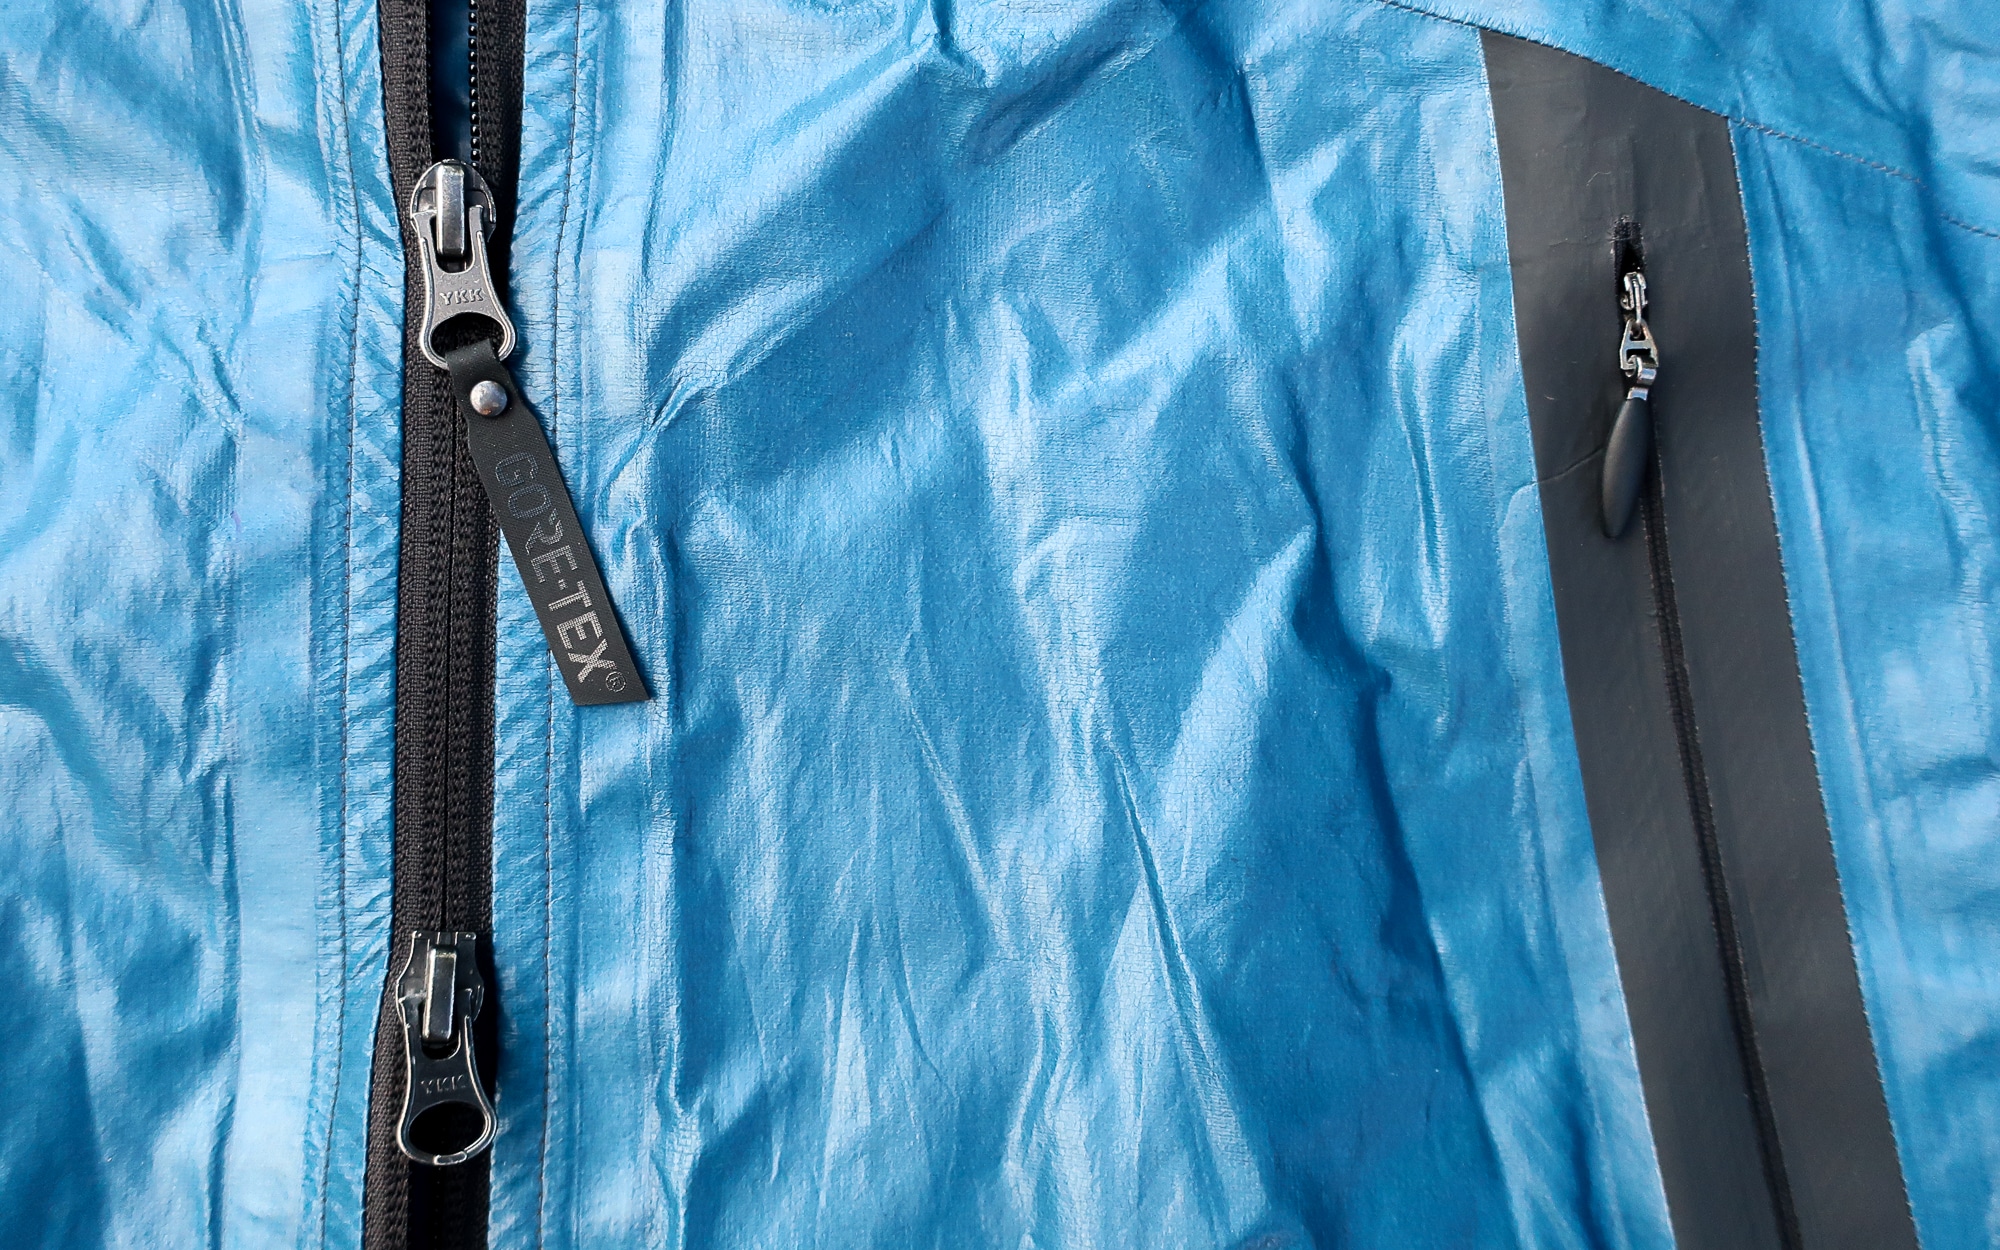 A close-up of the 2-way front zipper and the front pocket zipper.
The hat-compatible hood fits well, has a semi-stiff double-layer brim, and has one drawcord adjustment to help keep it out of your eyes. Still, though, every hood I’ve ever used performs better when paired with a ballcap or visor.
 The simple but well designed hood. Not my best photo — I think I may have a bat in the cave.
The waist drawcord and draft collar improves fit and comfort when running and day-hiking without a pack. But a hipbelt will do the same thing.
The partially elasticized wrist cuffs are consistent with the H5 Shakedry’s minimalist design, but they’re my chief complaint about the jacket. Looser cuffs with hook-and-loop adjustment flaps would be better: they’d offer more airflow, could be more easily shingled with rain mitts, and wouldn’t hinder access to a wrist watch.
 I’d prefer looser wrist cuffs with hook-and-loop adjustment flaps. The H5 Shakedry cuffs fit so tightly that I can’t even pull them over my watch.
Leave a comment!
What questions do you have about the H5 or about Shakedry?Do you have an experience with the H5 or with another shell made of Shakedry? Please share.
Disclosure. I strive to offer field-tested and trustworthy information, insights, and advice. I have no financial affiliations with or interests in any brands or products, and I do not publish sponsored content
This website is supported by affiliate marketing, whereby in exchange for referral traffic I receive a small commission from select vendors, at no cost to the reader. This post contains affiliate links.
Buy now & support this review: Gore H5 Shakedry Jacket
The post Review: Gore Wear H5 Gore-Tex Shakedry Jacket || The holy grail? appeared first on Andrew Skurka.
October 19, 2019
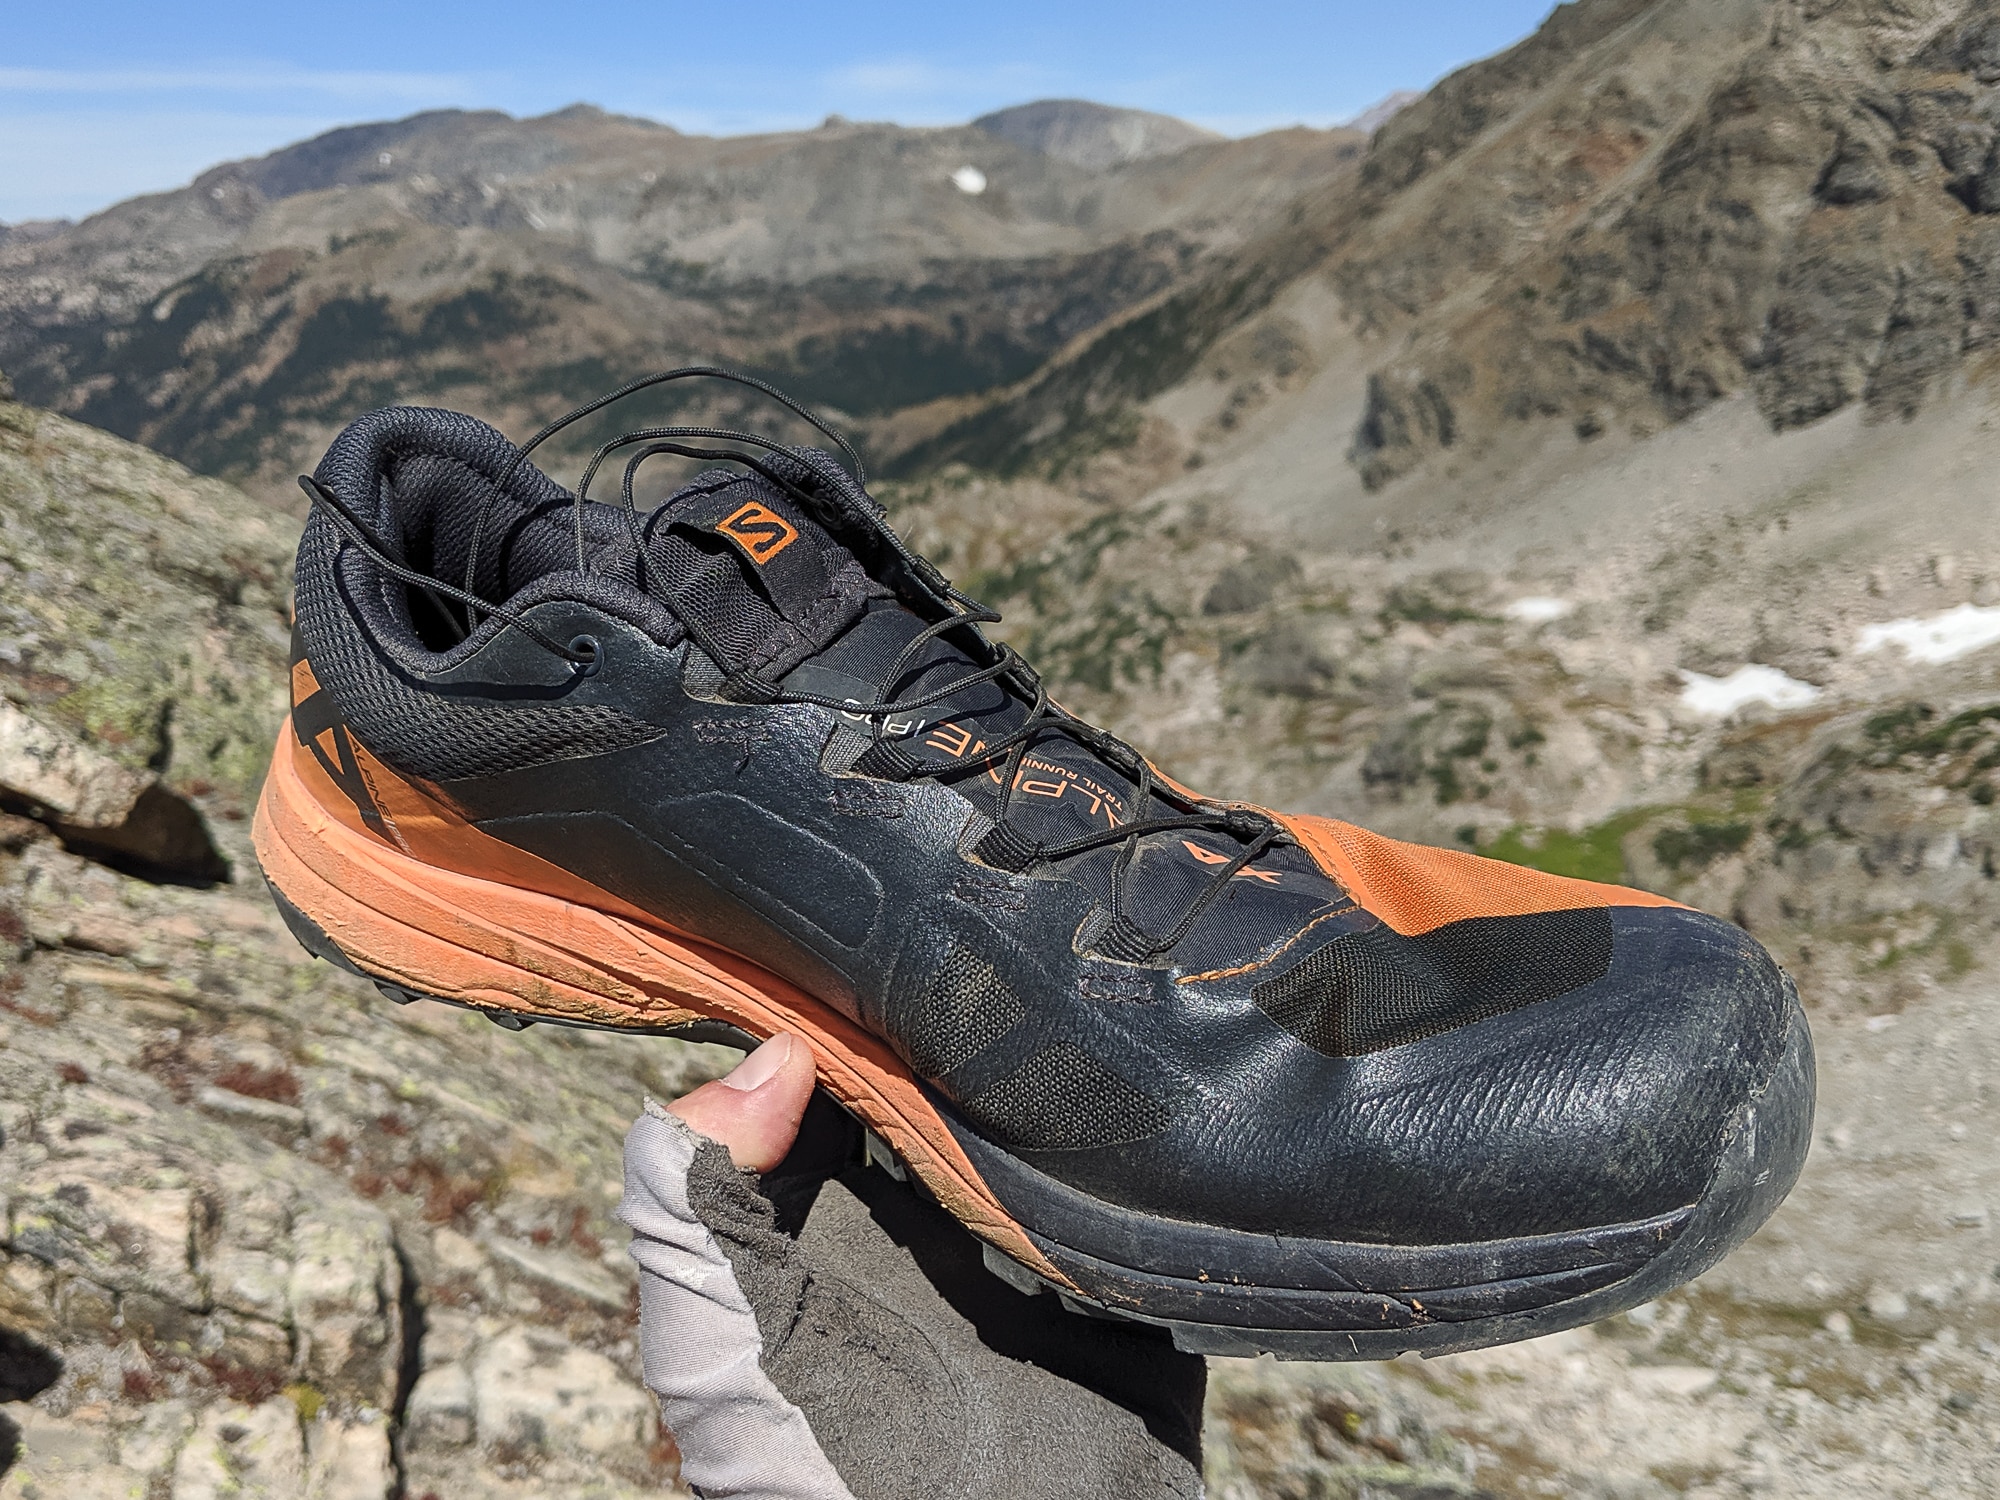
Review: Salomon X Alpine Pro || For high mountain runs + high routes
For years I’ve been an enthusiastic user of Salomon trail running shoes, with my all-time favorites coming from the Sense family — the Sense Pro, Sense Pro 2, and SLAB Sense Ultra.
But Salomon has never broadly or successfully extended the winning features of its trail running shoes — notably, the glove-like fit, reliable outsole grip, and best-in-class upper durability — to backpacking, or even to crossover categories like high routes and non-technical scrambles. Its best entry might be the XA Elevate, which has been discontinued for 2020.
When I saw the Salomon X Alpine Pro at Outdoor Retailer last November (my preview), I was hopeful that it would help fill this void. Salomon sent me a pair in August so that I could size them up.
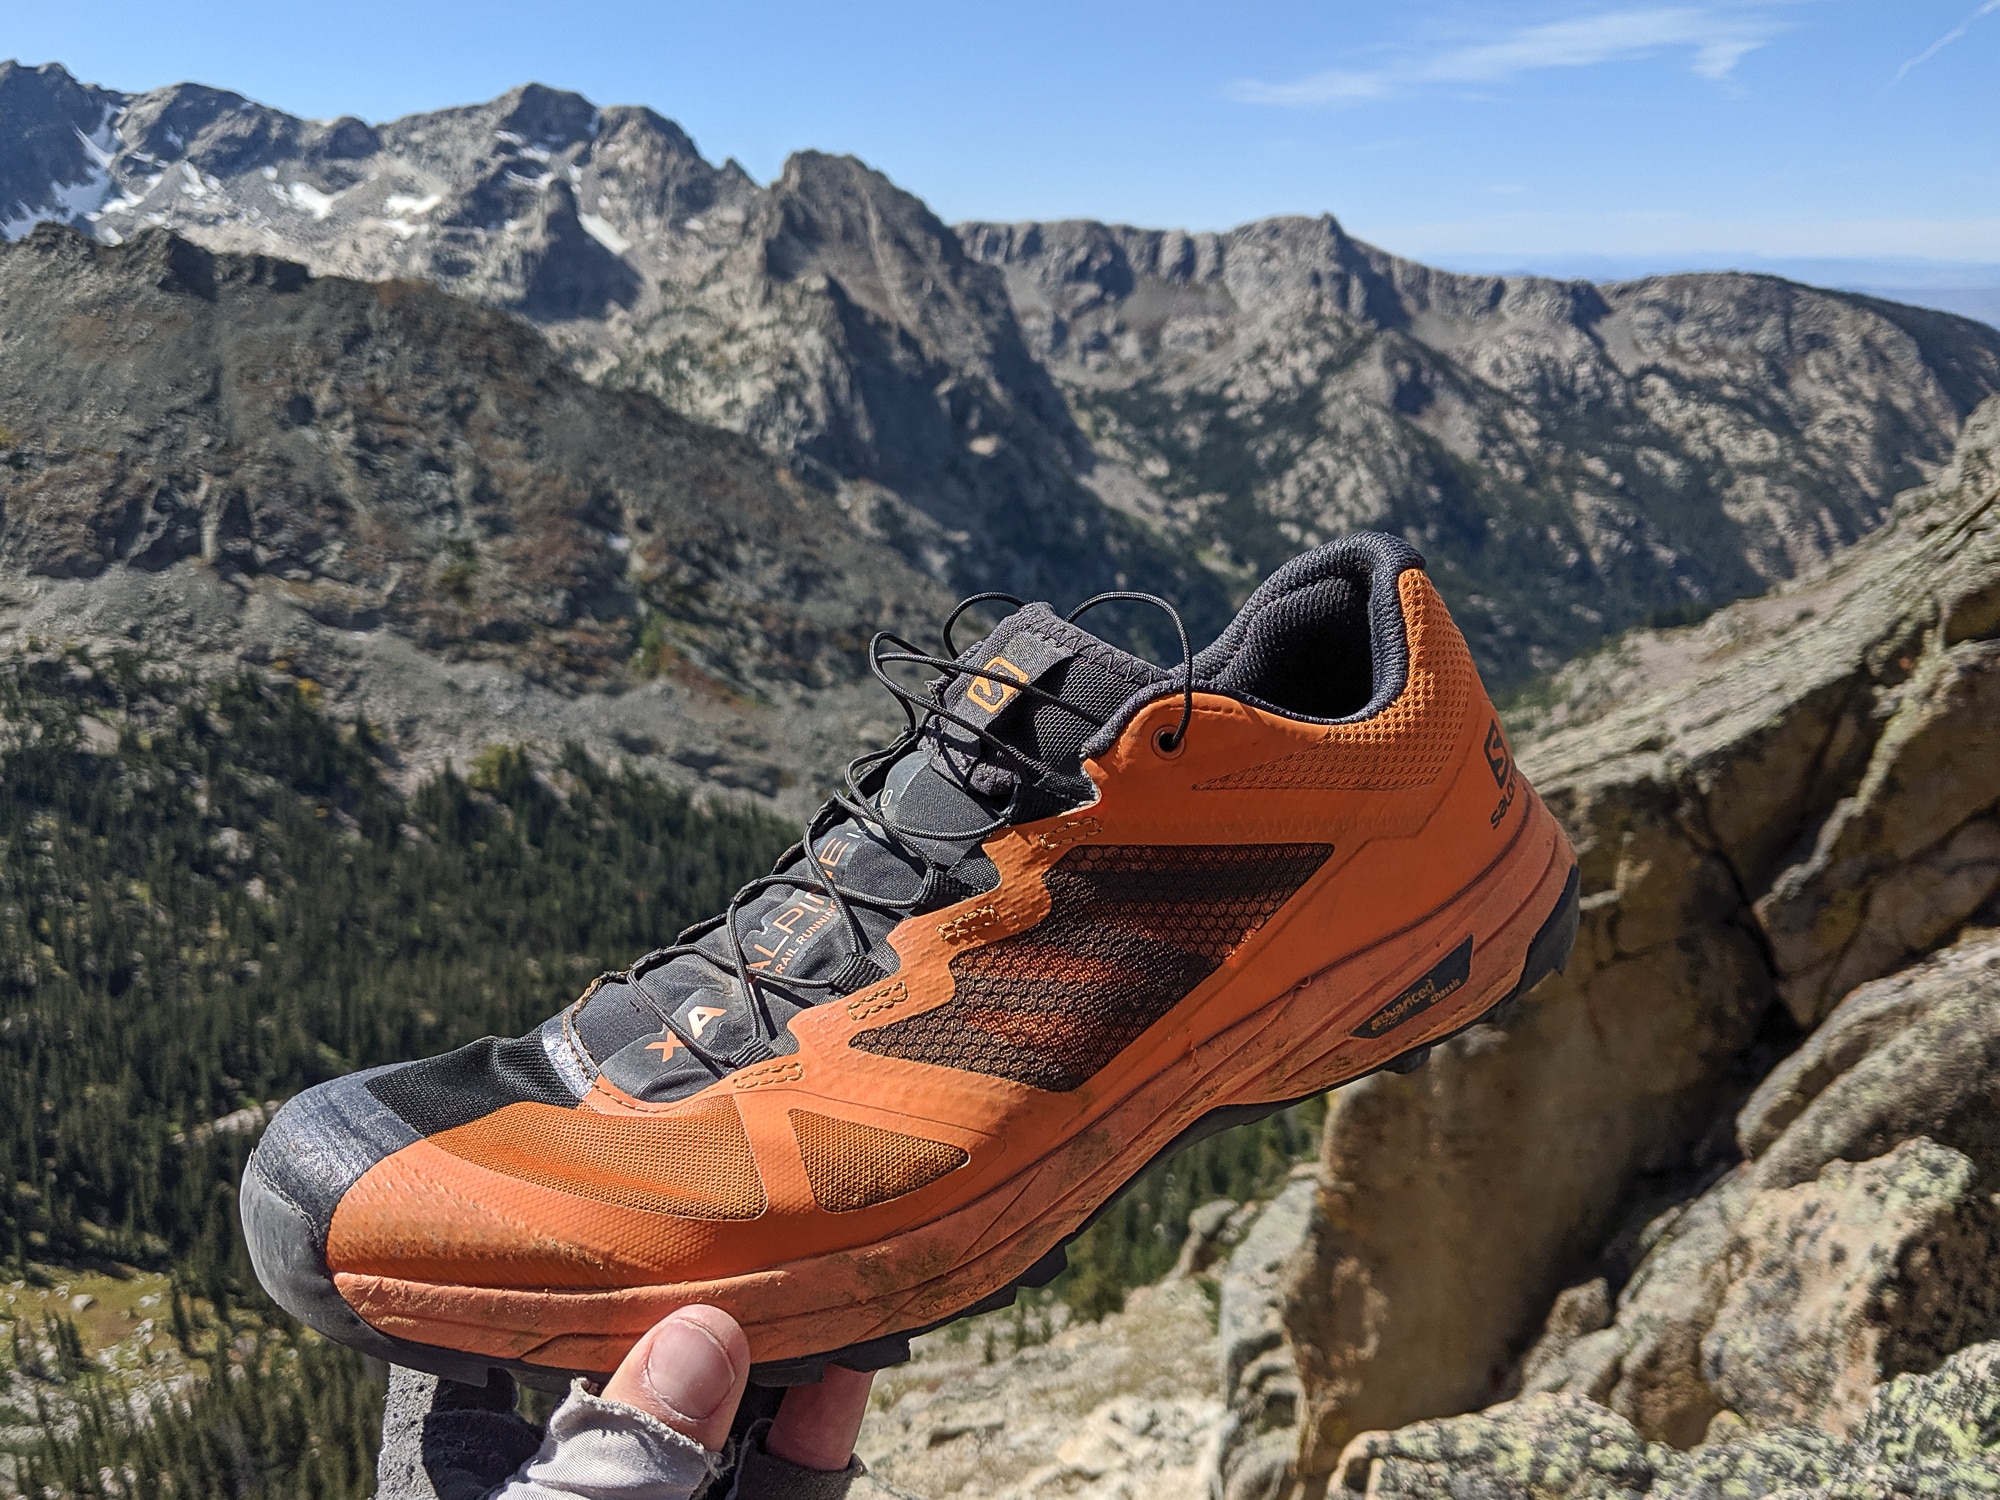 The new Salomon X Alpine Pro is best suited for high mountain running that entails long days, rocky and loose footing, prolonged ascents and descents, and a healthy share of hiking.
Review: Salomon X Alpine Pro
A media rep described the Salomon X Alpine Pro ($160, 10.9 oz) to me as “the perfect 14’ers shoe.” In it, she said, you could comfortably and confidently run the lower sections and the descent, hike the steeper and upper pitches, and rock-hop around the summit. Based on my experience, I think this is a very fair description.
The X Alpine Pro is best suited for high mountain running. To me, that means long days, rocky and loose footing, prolonged ascents and descents, and a healthy share of hiking. I’d consider it for the toughest-of-tough ultras, too, like Hardrock and Tor des Geants.
Personally, I found the X Alpine Pro ideal for four recent adventure runs in Rocky Mountain National Park and the Indian Peaks Wilderness, all ranging from 20 to 35 miles with 4,000 to 11,000 vertical feet of gain and with off-trail terrain up to Class 3. These 5- to 11-hour efforts would have pushed the limits of my aforementioned favorites, but the X Alpine Pro owned it.
As a backpacking and high route shoe, the X Alpine Pro is definitely worth consideration. Versus my go-to, the La Sportiva Bushido II (my long-term review), it’s more cushioned, less stiff, and more roomy, so it performs relatively better on-trail than off-trail, and it will fit more feet.
 The aesthetics have room for improvement, reminding me of a cross between bowling and Halloween.
Key product specs
Breathable upper with extra thick TPU reinforcementQuick LacesEndofit elasticized mid-foot yoke24 mm and 18mm stack heights in heel and forefoot6 mm dropContagrip TA outsole with a wide “climbing zone” lug under the toes310 g/10.9 oz (men’s 9), 270 g/9.5 oz (women’s 7)337 g/11.9 oz (men’s 11.5 confirmed)$160 MSRPMore information
Fit
The X Alpine Pro has a masterful fit, as we’ve come to expect of Salomon. It:
Securely locks down the heel, partly with the help of a sculpted foam collar;Hugs the mid-foot with an elasticized yoke (“Endofit”) and wide cushioned tongue; and,Gives the forefoot “just enough” volume to avoid constriction but to still maintain control.
 The heel is securely locked down with the help of a sculpted foam collar in the heel counter.
 The elasticized mid-foot yoke, Endofit, hugs the mid-foot and prevents it from sliding forward or backwards.
Versus other Salomon models I have worn, the fit most closely resembles the original SLAB Sense Ultra, which at the time was Salomon’s best-selling SLAB trail shoe ever. In particular, it shares that roomy and rounded toebox, and has a Sense Pro-like heel and midfoot.
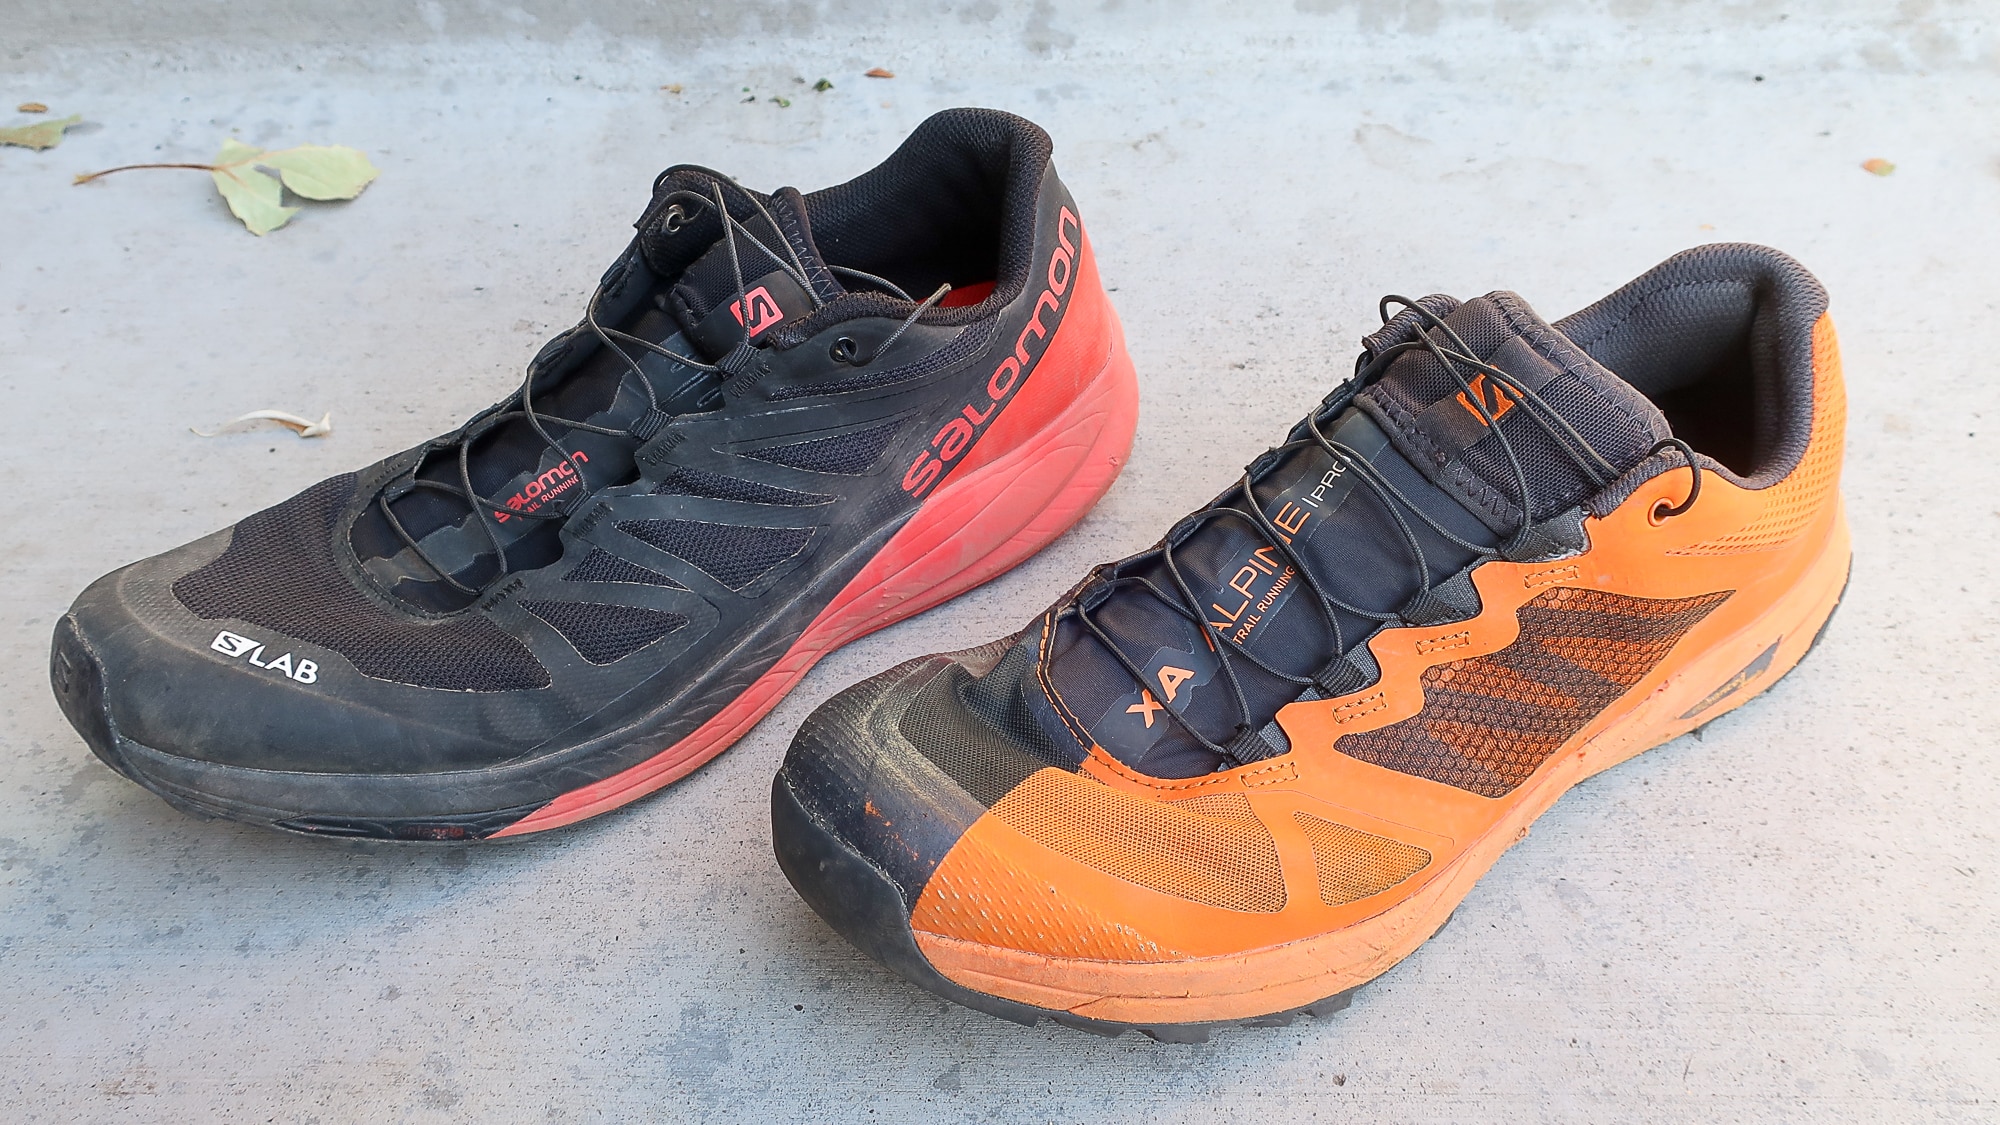 The X Alpine Pro fits most similarly to the original SLAB Sense Ultra. Both share a generous rounded toebox, and secure fit in the heel and midfoot.
Ride
The X Alpine Pro is not as nimble as a pure trail running shoe, but I found it surprisingly capable. In the midfoot and forefoot, it’s actually more flexible than the Sense Pro 2 or SLAB Ultra, which I think is largely explained by the absence of a film-on-mesh rock plate (“ProFeel Film”).
Not including a rock plate seems like an odd decision for an “alpine” shoe. I wonder if, when combined with the 18-mm stack height and large outsole lugs, the shoe was excessively stiff or insensitive. Probably so, if Salomon’s goal was to design an “alpine running” shoe. Probably not, if their goal had been to create an off-trail specialist.
It’s worth noting that the chief complaint among trail runners of the Bushido, which I think is better for high routes (assuming it fits), is that it’s too stiff. If all day they were hiking across slopes, through talus, and up super steep grades, they might feel differently.
Upper
The upper uses Salomon’s classic and time-tested mesh-and-TPU construction. But it’s been rugged-ized, with thicker TPU coatings, heavier-duty mesh, and a beefy toe bumper. Its breathability is satisfactory, but not amazing; only fine dust gets through, and it’s resistant to some splashing.
After about 100 miles on generally rocky trails, and a few miles through talus and scree, my uppers are entirely in-tact. I don’t think the uppers will be the first failure point of the X Alpine Pro.
I did not submerge the X Alpine Pro, but I think dry times will be slow-ish, due to the cushioned heel counter and tongue, and the medicore breathability.

Grip
The outsole consists of large 5-mm lugs and is made of Contagrip TA, a trusted proprietary rubber that’s proven grippy but durable.
Unique in the outsole is the single wide “climbing zone” lug across the toes. This approach shoe-like feature sticks well to clean rock, but compared to a more conventional pattern of smaller lugs I thought it’s performance was inferior on loose sand, mud, and wet grass.
 The outsole is made of Salomon’s proprietary Contagrip TA rubber, and consists of large 5-mm lugs.
Leave a comment!
What questions do you have about the X Alpine Pro?If you have worn them, what’s been your experience?Are you debating between the X Alpine Pro and another model? Give us more context and we’ll try to help inform your decision.12
Disclosure. I strive to offer field-tested and trustworthy information, insights, and advice. I have no financial affiliations with or interests in any brands or products, and I do not publish sponsored content
This website is supported by affiliate marketing, whereby in exchange for referral traffic I receive a small commission from select vendors, at no cost to the reader. This post contains affiliate links.
Buy now & support this review: Salomon X Alpine Pro
The post Review: Salomon X Alpine Pro || For high mountain runs + high routes appeared first on Andrew Skurka.
October 17, 2019
Quickstart Guide: Iceland’s Laugavegur & Fimmvörðuháls
Editor’s note. In 2008 I completed the classic Laugavegur and Fimmvörðuháls treks as a warm-up to a longer east-to-west traverse of Iceland. I posted how-to information afterwards, but it’s relevancy is diminished by my fast-and-light style and by subsequent changes in regulations and conditions. So I asked Katherine Kane, who has been on several of my guided trips and who did these routes in 2018 in more typical fashion, to share logistical and planning advice.

About the treks
The Laugavegur trek is 34.5 miles (55.5 km) long, and connects Landmannalaugar and Þórsmörk (Thorsmork). It’s very do-able for reasonably fit hikers — the distance and elevation change is modest. Expect snowfields, unbridged river crossings, short steep bits, geothermal activity, and expansive views.
The Fimmvörðuháls is an 18-mile (29-km) extension from Þórsmörk to Skogar, and requires more fitness and nerve. It’s also the best part, and highly recommended if you have time, sufficient fortitude, and cooperative weather. You will encounter: a 3,000+ ft. ascent, a narrow section called the Kattahryggur (cat’s spine), a cluster of sketchy parts called the Heljarkambur, and lots of mossy waterfalls. The pass between the volcanic snowcaps has large snowfields, high winds, and an amazing view out over the Atlantic Ocean. Remember the Eyjafjallajökull eruption that stopped global air traffic in 2010? That’s where you’ll be.

When to go
Weather is the single most important consideration when attempting the Laugavegur and Fimmvörðuháls. July and August are by far the safest bets, but there’s still a high chance you’ll experience some heavy rain and strong winds.
Prepare yourself emotionally for missing spectacular views. Prepare yourself safety-wise for wet, windy, low-visibility weather. Track the advisories on SafeTravel.is. The hut wardens serve as weather forecasters — check with them if there’s any question of safety.
Due to extreme weather conditions, the trail will occasionally be “closed.”
 The mountains around Landmannalaugar
Give me shelter: Huts vs. camping
At-large camping is not permitted. Trekkers must stay in staffed huts or camp outside nearby in designated areas.
Each option has pros and cons. By staying in the huts, you can carry a lighter pack and you’re guaranteed protection from the weather. But the huts lack privacy, and you’re often sleeping side-by-side, sardine-style next to some random Norwegian guy.
Camping is more flexible, and you can adjust your itinerary around the weather or your progress. Most camping areas have a large enclosed group tent with a picnic table for cooking and dining. Several hut areas have hot showers that campers and hut guests can buy tickets to use.
Ferðafélag Íslands (FI) has huts throughout the length of both treks. Make hut reservations in advance — they start confirming dates in January for the upcoming summer, and you can submit your reservation requests starting late-fall.
In Þórsmörk and on the Fimmvörðuháls, there are two other hut operators, Útivist and Volcano Huts. But reserving a complete itinerary with FI is the simplest plan.
Wait until you receive an itinerary confirmation before you book your flights to Iceland, in case they need to give you a slightly different start date.
Sometimes the huts have enough availability for change of plans while you’re on the trail. If you’re moving fast, wardens can try to bump your itinerary ahead — they’re networked and can radio each other. Likewise, campers may able to snag open bunks in the huts. But don’t count on these possibilities — I witnessed failed attempts at both. Odds are better for solo hikers.

Daily Mileage
Hut reservations commit you to an itinerary, so you must decide if you will hike hut-to-hut (7.5 to 10 miles between huts) or if you will skip some huts and hike further.
The case for short days:
Extra time for the side trips, specifically the sweeping summit views and collapsed snow cave at Hrafntinnusker and the Markarfljotsjljufur canyon at Emstrur.Extra time to deal with high wind or whiteout conditions.First dibs on your preferred bunk spot.Time to relax, have a shower, write in a journal, study your maps, or socialize with hikers from around the world.
Skipping Hrafntinnusker, which will mean a 15-mile day, is a perfectly reasonable choice if you’re fit, have limited vacation time, or want to move quickly. If you’re really fit, you could do both treks in three days, camping in Þórsmörk and Álftavatn/Hvanngil. And if you’re an ultra-runner, there is an organized marathon.
 The collapsed snow cave, a side trip from Hrafntinnusker
Direction: Southbound vs. Northbound
Most hikers travel southbound. Going with convention will make it easier to follow the Cicerone guidebook, a useful resource for more specific route details.
On the other hand, if your priority is going over the Fimmvörðuháls on a clear day, then camping and going northbound could be a good strategy for catching a clear weather window if you have time to be flexible and are willing to wait it out in Skogar.
Transportation
Use the bus system for this end-to-end trip. The “hiker package” type bus tickets are only sort of flexible — most of them still have you reserve dates online — you can’t really just “hop on” whenever, despite what the ads might imply on first glance.
It’s also possible to reserve each bus trip a la carte, which costs more but buys you more options for the return bus departure times. The buses out of Reykjavik fill up, so be sure to nail down your reservation to get to the trailhead.
Changing return bus reservations seemed easy enough for hikers who were deciding whether or not to extend their trip over the Fimmvörðuháls. Most FI huts get a cell signal, so you can do that online from Þórsmörk.
The relevant bus operators are: Trex, Sterna, and Reykjavik Excursions.
If for some reason you wanted to drive, be aware that all the trailheads (except for Skogar) are on “F-roads” that require an F-road rated high-clearance, 4WD vehicle that can ford rivers. Overland driving is taken very seriously in Iceland.
Food: Theory vs. Practice
The Icelandic customs regulations say:
Travelers may import duty-free up to 3 kg of food …. Meat products may be imported if they have been boiled or canned. Smoking, salting or drying without boiling is unsatisfactory.
What about the meat in freeze-dried meals? In theory it’s ambiguous, but in practice officials at Keflavik Airport seemed unconcerned about food. You don’t need to fill out a declaration form (i.e. no ethical or legal dilemma about being scrupulously accurate on a written document). While everyone else waltzed through the wide “nothing to declare” hallway, I veered off the side to the “declare” area, where the agent gave me a funny look and waved me through.
Here are some suggestions for food to purchase there:
Wasa at the Bonus chain grocery store — no need to fly over the Atlantic with this Scandinavian staple;Roast goose breast (for the first night), local sheep’s milk cheese, moss crispbread, and other fancy foodstuffs at Ostabudin in Reykjavik; and,A hot buffet dinner at Volcano Hut’s LavaGrill Restaurant & Bar — a one-mile walk from FI’s Langidalur hut in Þórsmörk.
Each hut has a give/take free food shelf. I supplemented my first-night meal with noodles, left behind my extra candy on the last, and noticed lots of abandoned bottles of vinegar. The hut wardens sold: freeze dried meals, candy bars, tampons, soda, and battery packs.
 Moss, yum
Hut-By-Hut Facility and Trail Information
Landmannalaugar
Most visitors were not Laugavegur hikers. It’s busy and crowded. You have to get a wristband to access the restroom to prove you paid the hut or campground fee.
Despite the initial shock that the unsightly parking area and cramped campground had been cropped out of all the photos I’d seen, if I were planning this again I might add a second night in Landmannalaugar to fully explore the colorful mountains in this area.
Regarding the hot spring: there’s a vague, worrisome sign about “swimmer’s itch” on the way to the hot spring. I risked a soak without any health consequences. It was pleasant, but not a must-do experience.
This hut had narrow (about 20”) sardine-style bunks.
Hraftinnusker
Camping is discouraged, but allowed, around this dramatic, up-there hut because of the strong winds. There was running water, but no showers. The toilets are not flush toilets, and over the course of the afternoon, evening, and night they smelled worse and worse. (There were also some geothermal sulfur fumes in the air, and it was hard to tell what smell was what.)
Downstairs they gave the tour group and older hikers the normal bunks. Upstairs we slept on mattresses about 30” wide, side-by-side on the floor.
For the side trip from Hraftinnusker, go at least as far as the big cairn at the top of the mountain for the phenomenal view. Finding the collapsed snow cave was more difficult. GPS and microspikes might be useful for this part.
 Hraftinnusker hut warden living the life
Álftavatn
The snowfields I crossed departing Hraftinnusker were flat and the route was well marked, but it could have been tricky in whiteout conditions. There were monuments to dead hikers on this stretch. The takeaway: Don’t try this in February.
At Álftavatn I was in a side hut (not the big main one) and it had conventional bunks with mattresses that seemed standard twin-width.
There’s a tiny restaurant that sells beer and starch-heavy servings of stew that left me hungry for more protein. (Thanks for sharing your leftovers that night, guided-tour-group cook!)
Alternative: the Hvanngil hut is about 2.5 miles further along. It’s supposed to be less windy for campers there. There’s a river to cross in between.
Botnar/Emstrur
The landscape was dramatic: black, stark, and windswept. There’s a note in the guidebook about making sure not to miss a turn off—but there were makers in both directions! Luckily I happened to stop for a snack and noticed other hikers went the other way.
Emstrur has three small, similar huts. They were very, um, “cozy.” In each, the kitchen isn’t separate from the bunk room. By this point in the trip there was a familiar cohort of hikers on the same itinerary, and we had a fun night of camaraderie.
There were ten 40” mattresss for 20 of us. Do the math: You might be snuggled up close with that random Norweigan guy!
 There’s a trail to Markarfljotsjljufur canyon just before you get to Botnar/Emstrur
Langidalur, Þórsmörk
This day is all about the Þröngá (Thronga) river crossing. My experience was more towards the you’re-going-to-have-to-get-your-feet-wet end of the spectrum than the you-might-drown end, but that will vary. There are likely to be plenty of other hikers at the crossing, so buddy up if need be. The hut was pleasant and comparatively spacious, the only noteworthy difference was an option of 4-person alcoves.
Baldvinsskáli, Fimmvörðuháls
At one point up over the pass there was a choice between two different sets of markers to follow—and they were the same color. I checked GPS tracks and saw they eventually reconnected. I heard later that I had made the better, more scenic choice by staying east. (The main commercially available map wasn’t very helpful.)
Many hikers stopped in the Baldvinsskáli A-frame to warm up and then continued on. There was no running water, just a big pot of melted snow.
Upstairs the mattresses were packed tight. Camping is not permitted, but the warden seemed to have a policy of letting any hiker stay, reservation or not. There was a stack of mattress downstairs in the kitchen/dining room for latecomers to spread on the floor.
When you get down to Skogar there’s a big waterfall, a campground, a restaurant, several places to stay, buses, and throngs of tourists.
 Upstairs in Baldvinsskáli
Gear Notes
The main thing that matters is rain gear. Definitely bring the rain pants. And nothing too flappy (e.g. no rainskirt or poncho).
Campers
Bring a shelter that handles wet and wind really well. If you use an alcohol stove, you can buy “Rauðspritt” at outdoor gear stores and hardware stores in Reykjavik.
Hut Guests
You must bring dedicated indoor shoes. I like these. (Note: you have to go outside to get to the toilets, so you’re supposed to change your shoes every time you have to go, which is a drag.)You need to bring your own sleeping bag. Quilt sleepers with DIY chops might rig up a flat piece of fabric secured with adjustable elastic so that you have a bottom-sheet layer. The huts are well stocked with pots, plates, and everything you need for cooking and eating. Save weight here.
Nice-to-Haves
TravelSafe.is recommended renting a handheld GPS unit. Had there been whiteout conditions, I would have been grateful for this rugged, glove-friendly device.Thin neoprene socks allowed me to take my time in the cold water while crossing the Þröngá. I was very happy I brought these gloves.
 Showa 282 waterproof gloves
About the author
Katherine Kane, a long-time Skurka client, started backpacking in 2002 on the East Coast with heavy equipment. She relocated to the Pacific Northwest, had children, and restarted backpacking in 2013 on a Fundamentals trip. She’s planned and completed several more backpacking trips since, with her children and solo. In her professional life she writes about financial technology.
Disclosure. I strive to offer field-tested and trustworthy information, insights, and advice. I have no financial affiliations with or interests in any brands or products, and I do not publish sponsored content
This website is supported by affiliate marketing, whereby in exchange for referral traffic I receive a small commission from select vendors, at no cost to the reader. This post contains affiliate links.
The post Quickstart Guide: Iceland’s Laugavegur & Fimmvörðuháls appeared first on Andrew Skurka.


