
Andrew Skurka's Blog, page 20
February 2, 2020
Help wanted: Guided trip manager
To help me run my guided trip program last year, I hired David, who proved to be exceptional. Unfortunately, he’ll soon be stepping away after being offered a can’t-turn-it-down promotion at Flagstaff House that has much greater career potential than I could give him.
So I’m looking to replace David, and to perhaps delegate other responsibilities as well.
Overview
This position has two components:
Local, in Boulder, Colo.; and,Online
It can be performed by one person who takes on both roles, or by two people who take on one role each. A single hire for both roles is probably preferred, but I’ll base this decision on the applicant pool.
On their own, the roles are part-time and accommodating of other full-time work (or less). Combined, the roles are about half- or three-fourths time. It could be kept at that, with or without other freelancing work; or, depending on interests and skill set, we could bring it up to full-time by adding other responsibilities and initiatives.
The workload tends to be inconsistent, but predictably so. For the local position, I need the most help before and between trips; it slows and then halts in September, after the final trips of the year start and then return, respectively. For the online role, the biggest glut is now through May, when the Planning Curriculum is being conducted.
Role 1: Local
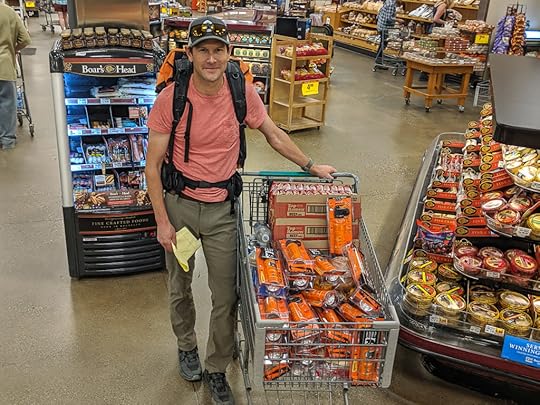
In 2020 we are operating 29 trips with up to 244 clients, which will entail an exceptional amount of manual work, including but not limited to:
Purchasing and preparing food;Assembling first aid, foot care, and repair kits;Gathering loaner/demo gear and putting it away upon return; and,Printing forms, maps, menus, rosters, and other field documents.
Of the items listed, food is the single most time-consuming task. It’d be equivalent to preparing breakfasts and dinners for a 1,292-day solo expedition. David hired and managed additional workers to expedite the process, but you’re welcome to do it all to maximize your hours.
This role requires:
Dependability,Attention to detail, andA good attitude.
Role 2: Online
The Planning Curriculum is an 8-part program to prepare clients for their trip with us. Most modules have already been developed, but the materials need to be updated for 2020 and shared with clients on a specific schedule. Most modules will generate some client questions, which must be answered; ditto for general client questions.
Reviewing client gear lists is the most important and time-consuming task for this position. If you are qualified and have the time, you can do all of them; if not, you will have to manage a team of shakedowners who can do it properly and efficiently.
This role requires:
Dependability;Attention to detail;Excellent customer service;Good writing skills;Comfort with Google products including Gmail, Drive, and ideally Classroom; and,Personal backpacking experience and familiarity with modern backpacking gear and skills, the more the better.
In addition to managing the Curriculum, you will also field customer service inquiries from my online store. Usually, you just need to reset download permissions.
 Running successful trips requires getting thousands of little details right.
Compensation and commitment
Wages will be commensurate with the responsibilities of the position and the qualifications of the applicant(s). I would consider the local position to be entry-level; the online position, above that. But both are critical, and I want to have reliable help.
I will only consider applicants who can commit for the entire 2020 season, through September.
How to apply
To apply for either role, complete this application.
In the form, will be asked to upload a cover letter and/or resume (in PDF format only). Use this opportunity to explain your interest in and qualifications for the positions.
I am accepting applications now for this position, and will review them as they come in. I’m looking to hire immediately so please submit when you’re ready.
Questions?
If it’s a general question, leave a comment below. If it’s a personal question, contact me.
Andrew Skurka Adventures LLC is an equal opportunity employer.
The post Help wanted: Guided trip manager appeared first on Andrew Skurka.


January 27, 2020
Must be doing something right
When I offered guided trips for the first time under my own company in 2011, it was a trial balloon of sorts — Will anyone even sign up?
Thankfully, a few did — eighteen, to be exact.
But that made me curious — What could this become? So for the next three seasons, I tried to find its upper limit by satisfying all demand with additional supply — if the scheduled trips sold out, I put more trips on the schedule.
It was clear to me by 2014, when I ran 18 trips with 153 clients, that I was onto something. But I was also fried — I’d organized and guided every trip, and had spent 76 days in the field, not including travel. Alas, a passion had turned into work.
 Autumn in Alaska’s Hayes Range, an ambitious location for a new guiding program and relatively inexperienced guides
I downsized the program in 2015 and ran no trips the following year, focusing instead on rewriting the Gear Guide, publishing more web content and high route guides, and running competitively again while I was still young and fast.
But I missed guiding and it seemed foolish to walk away from something with obvious potential, so I revived it in 2017, but with the express goal that I wouldn’t let it burn me out again.
The keys to this plan were expanding the guide team and running concurrent sessions, whereby a pair of exorbitantly competent guides — like Alan Dixon and Jessica Winters, or Brian Robinson and Christy Rosander — take out one group while I take out another at the same time. But the concept was unproven — Would anyone sign up for a trip that I wasn’t guiding, and could the quality be maintained?
Thankfully, again, the answers were affirmative.
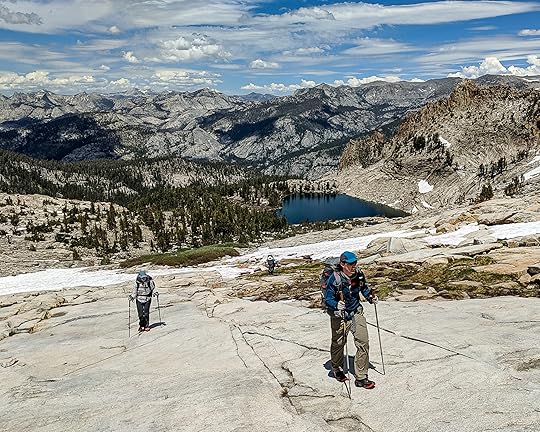 Traversing the Clark Range on the Yosemite High Route
Since 2018 I’ve again been pondering the potential of this program. It’s already a healthy lifestyle business, but all signs are that it could be much more than that.
The interest in our 2020 trips has been flattering, even a bit bonkers. It’s not even February yet, and I’ve received nearly 300 applications, have sold out 22 of 29 trips, and only have 10 available spots out of 244. These number change a little bit each day (view the schedule for details), but are still record-setting in every way for us.
So what exactly are we doing right? Above everything else, I think it’s because we prioritize backcountry education and because we send our clients into the field with backpacking experts. When I started this program I didn’t identify this combination as being our unique niche, but that’s what it’s become. In short, we stand alone in teaching backpacking skills at this high level.
Of course, having a good idea is not enough. But I don’t think we could be where we are because I’m good with spreadsheets or because we encourage clients to smother their dinner with Fritos.
My big task last week was reading through applications and assembling rosters. With that now behind me, we’ll soon be transitioning to the Planning Curriculum, an 8-part online course to help clients prepare for their trip that includes modules on researching conditions, selecting gear, planning food, making maps, and training. If this sound interesting to you, apply now for one of the remaining spots.
The post Must be doing something right appeared first on Andrew Skurka.
January 17, 2020
Review: Black Diamond Sprint 225 Headlamp || Upgraded Iota
On most backpacking trips last year, I carried the Black Diamond Iota Headlamp (my review). Its 150 lumens were plenty for 3-season conditions; it weighed only 1.9 ounces (56 grams) and packed away small; and I loved that it was rechargeable, so that I could keep AAA batteries out of the waste stream and so that I could recharge it mid-trip using the same portable battery that I use for my phone and inReach.
For spring 2020, the Iota has been updated and renamed — it has become the Black Diamond Sprint 225 ($45, 1.9 oz). An early production version was sent to me last fall for review.
 The Sprint 225 (left) will replace the Iota (right). The two share a similar price point, weight/size, and feature set.
Review: Black Diamond Sprint 225
The Black Diamond Sprint 225 Headlamp is technically new for spring 2020, but essentially it’s a brighter and updated version of the three-year-old Iota, which will be dropped from BD’s line. I’m uncertain if Black Diamond felt that the improvements warranted a rebrand or if “Sprint” speaks better to the intended end-use.
The key specs of the Sprint:
1.9-oz (56 grams)One TriplePower LED bulb with a non-adjustable oval flood beamUp to 225 lumens of light output (on “full power” using PowerTap)Rechargeable lithium batteryIPX4 waterproofness rating (“splashing from any direction”)$45 MSRPMore information
 Under spec
This winter, I’ve found the Sprint 225 ideal for night-running on Boulder’s bike trails, streets, and some very easy trails. Last fall, I carried it as a just-in-case light on long and adventurous trail running loops in the Indians Peaks and Rocky Mountain National Park. And this year I plan to carry it on most of my backpacking trips, which start in April and finish in September.
My only complaint about the Sprint 225 for backpacking is that it lacks a red-light. This night vision-saving feature is wonderful on group trips, and in camp it’s often the only light that I use. Because of this omission, the Sprint seems more optimized for moving (i.e. trail running and long day-hikes) than camping.
The Sprint 225 is not to be confused with the Black Diamond Sprinter 275 ($75, 3.7 oz), which is also new for spring 2020. That model is slightly brighter, powered by three AAA batteries (single-use or rechargeable), and has a second head strap.
 Without a red light, the Sprint is optimized more for moving (e.g. hiking and running at night) than for camping and group use.
Light output
The Sprint 225 uses one TriplePower LED bulb and throws a non-adjustable oval-shaped flood beam that is wonderfully smooth, with no distracting rings. It has three settings: full power, dimmer, and strobe.
Black Diamond reports that the Sprint 225 can maintain its max 225-lumen output for 1.5 hours; its minimum output, for 20 hours. I’m uncertain how BD tests its lights, but this seems roughly accurate — I learned the hard way that the Sprint 225 has enough power for one 60- to 90-minute night run, but needs to be recharged before a second one.
 The Sprint is recharged with a mini-USB cord.
The competition
How does the Sprint 225 compare?
Black Diamond Sprint 225 vs Black Diamond Iota
Let’s start by comparing the Sprint to its predecessor. Both fill a similar niche in their price ($45 and $40, respectively) and size/weight; they have the same operating configuration; and they share many features, like the 3-LED battery meter and PowerTap.
The Sprint is 50 percent brighter (225 lumens vs 150), and it has a few small improvements. For example, the Sprint remembers its last brightness setting when it’s turned back on, whereas the Iota has an adjustable default. BD also reports that the Sprint’s lens is more efficient.
Black Diamond Sprint 225 vs Petzl Bindi
The Sprint 225 is brighter and less expensive than the Petzl Bindi, which has only 200 lumens and retails for $60. However, the Bindi has a red light. Moreover, it’s likely that Petzl will soon release an updated brighter Bindi.
Black Diamond Sprint 225 vs Nightcore NU25
The Sprint 225 weighs the same as the Nightcore NU25 but costs $10 more. The NU25 puts out 360 lumens and has a red light. If Nightcore could just work on their 1990’s era PC-like aesthetics, maybe they’d be onto something.
Questions or comments about the Sprint 225? Leave a comment.
Disclosure. I strive to offer field-tested and trustworthy information, insights, and advice. I have no financial affiliations with or interests in any brands or products, and I do not publish sponsored content
This website is supported by affiliate marketing, whereby for referral traffic I receive a small commission from select vendors like Amazon or REI, at no cost to the reader.
Buy now: Black Diamond Sprint 225
The post Review: Black Diamond Sprint 225 Headlamp || Upgraded Iota appeared first on Andrew Skurka.
January 13, 2020
Review: SAXX Kinetic HD Boxer Briefs || For higher output activities than original
When I learned that SAXX had redesigned its Kinetic Boxer Briefs (my long-term review), I was frankly nervous. Over the past two backpacking seasons I’d worn them for over 100 days in Alaska, the High Sierra, Colorado Rockies, and Appalachians, and I’d yet to identify a flaw. So a redesign struck me as risky, with little to gain but a lot to lose.
Review: SAXX Kinetic HD
The redesigned second-generation Kinetic, renamed the Kinetic HD, will be available from all retailers starting February 1, 2020. Inventory of the original Kinetic will be closed out. I was sent production samples by SAXX for review.
The HD will be available in two lengths:
Kinetic HD Boxer Briefs ($38), with 5-inch inseam; and,Kinetic HD Long Leg ($40), with 8-inch inseam.
Differences between the original Kinetic and Kinetic HD are noticeable, both when comparing them visually and when wearing them. In short, the HD has a new paneling design and a more stabilizing hold. They are better for high-output activity, but they’re less comfortable for low-output use and everyday wear.
Construction
The Kinetic HD panels were entirely redesigned. The color-blocking — which SAXX felt was “old-fashioned looking” — has been eliminated, and the new panels follow more natural lines.
These changes are largely aesthetic. Like the original, the HD contours the body nicely and has a generally snug fit (“semi-compression,” in SAXX parlance). I have noticed only one difference: the HD are marginally tighter around the thigh, which was possibly done to reduce ride-up.
 The original SAXX Kinetic
 The Kinetic HD, released in January 2020
Fabrics
The main mesh fabric is unchanged: a 88/12 nylon-spandex 4-way stretch micro mesh, with a double-layer over the jewels to reduce fabric sheer and increase support. I’ve found that this fabric has good air permeability, wicks moisture well, and dries quickly.
The waist band is still a wide 1-3/4 inches, but it’s less thick and boardy. This band will still retain more moisture and dry more slowly than the mesh fabric, but it’s an improvement on both fronts.
Ballpark Pouch
The defining feature of all SAXX underwear is the BallPark Pouch, a hammock-like cup with mesh side panels that keeps the anatomical parts nicely organized.
The Kinetic HD uses a new BallPark Pouch design. Compared to the BallPark Pouch in the original Kinetic:
The side panels are crossed at the lower attachment point instead of spaced apart;The top attachment points were moved downward; andMore shape was added to the front of the pouch.
 The original BallPark Pouch on the SAXX Kinetic
 The new BallPark Pouch design on the Kinetic HD. Notice that the side panels have been crossed at the bottom and that the top attachment point has been moved down.
Overall, these changes cause the Kinetic HD to have a more stabilizing hold. So the HD is better for high-output activities like running, but less comfortable for lower-output activities like hiking or everyday wear. By crossing the side panels at the bottom attachment point, the scrotum feels slightly lifted, and is kept further away from the thighs; and by moving down the upper attachment point, it creates less area for the genitalia to float around.
Personally, I thought the original Kinetic was ideal for hiking, but a little light on support for running. The Kinetic HD is just the opposite: they’ve been comfortable on runs up to 12 miles, but intentionally I no longer wear them for, say, Nordic skiing or office work.
Extension of the new BallPark Pouch
The new BallPark Pouch design will be used in two other products:
Kinetic HyperDrive ($50), a new compression boxer brief; and,Kinetic 2N1 Shorts series, which have an integrated Kinetic boxer brief, starting in spring 2021.
Other styles will retain the original iteration of the BallPark Pouch. For hiking and backpacking, I’d now recommend the SAXX Quest, not the Kinetic HD.
Questions about the Kinetic HD or have an experience with them? Leave a comment.
Disclosure. I strive to offer field-tested and trustworthy information, insights, and advice. I have no financial affiliations with or interests in any brands or products, and I do not publish sponsored content
This website is supported by affiliate marketing, whereby for referral traffic I receive a small commission from select vendors like Amazon or REI, at no cost to the reader.
Buy now: SAXX Kinetic HD Boxer Briefs
The post Review: SAXX Kinetic HD Boxer Briefs || For higher output activities than original appeared first on Andrew Skurka.
January 10, 2020
Open Application closes Sunday January 12, and it’s kind of your last chance
Open Application for 2020 guided trips started on December 15. It closed December 30 for the West Virginia and Utah locations, and it will be losing this Sunday, January 12, for Alaska, California, and the Rocky Mountains.
If you’re interested in a 2020 trip, apply now for your best chance to get on your First Choice outing.
During Open Application, I consider all applications mostly equally. I give some priority to alumni and previously waitlisted applicants, but I don’t process applications in the order that they arrive. This removes the pressure of time and the element of luck, and it results in more like-abled and like-minded groups.
Once Open Application is closed, it’s first-come-first-served for remaining spots.

I’ve already finished processing applications for Utah and West Virginia. Of those 76 combined spots, I currently have six openings still. For the most current number, view the schedule.
Based on the number of applications received so far for the other locations, I expect most sessions to be completely or mostly full, specifically:
Alaska Expedition: Mostly or completely full;California Fundamentals: Mostly full;California Adventure 5-day: Completely full;California: Adventure 7-day: Completely or mostly full;Rockies Adventure 5- and 7-day: Mostly full.
If you’re unable to commit now, check back with us later in the season, since spots occasionally open up due to cancellations.
The post Open Application closes Sunday January 12, and it’s kind of your last chance appeared first on Andrew Skurka.
January 9, 2020
Slideshow: Great Western Loop || 6,875 miles around the American West
In April 2007 I began my second mega long-distance hike, the Great Western Loop. Unlike the first one, during which I walked east to west across North America, this was predominately a wilderness experience: I linked five existing long-distance trails and a DIY route across the desert Southwest to create a 6,875-mile circumnavigation of the American West.
My slideshow about the journey, recorded in 2008, has been available on my website for many years. But recently Clif R converted it into a video file that I uploaded to YouTube in two parts.
First is the adventure narrative:
And then a related Q&A/FAQ section, which is outdated but still interesting:
Physically, the Great Western Loop was my most impressive thru-hike: I averaged 33 miles per day for 208 days, and took only seven zero days (five for a funeral). It was taxing on my 26 year-old body, but I struggle as a very fit 38-year-old to imagine repeating it, especially if I’d have to sleep on a foam pad again.
The loop has been repeated only once, by Jeff Garmire in 2018. I suspect the need for speed deters interested thru-hikers. It’s 4,550 miles from Kennedy Meadows on the Pacific Crest Trail to Chama, New Mexico, on the Continental Divide Trail, and the backpacking season is only 4.5-ish months long, necessitating a pace of about 33 miles per day. Interestingly, Jeff also completed the loop in 208 days.
As I’ve aged and matured, I’ve become much more thankful for the Great Western Loop’s qualitative experience. It afforded me a first-hand perspective of the West’s wilderness, ecology and geology, and its modern use by man. Since first moving here in 2003, I’ve never considered living and playing anywhere else.
The post Slideshow: Great Western Loop || 6,875 miles around the American West appeared first on Andrew Skurka.
January 7, 2020
Preview: Showa 282-02 || Winter-ized + black
After reviewing the Showa 281 and 282 gloves two years ago (281 review, 282 review), I contacted Showa urging them to develop a more outdoor recreation-specific version. In particular, I wanted to see a rain mitt (not glove) in a subtler color and with a wrist cinch.
I got no response and dropped it. Their loss.
So I was surprised last month to receive an email from Showa, saying, “We really appreciate your comments about our gloves and we have a new style that accommodates some of the items you mentioned in your blog. If you could reach out to me with your address and glove size I’ll send you a sample to try.”
Preview: Showa 282-02 Gloves
The new Showa 282-02 ($20, 4.1 oz in size Large) is not an improved rain mitt so much as a winterized version of the 282. It will be available in August 2020 from LFS Marine & Outdoor.
The chief differences between the 282 and 282-02 are:
Draft collar with elasticized cinch, andBlack color.
 The new Showa 282-02 is a winterized version of the 282.
If you own or have read about the 282, the 282-02 will otherwise sound familiar:
It’s made of the same waterproof/breathable polyurethane, branded as Tem-Res. This rubbery material has proven to be exceptionally waterproof and durable, and I’ve used the 282’s in ways that I never would use shell mitts made of conventional WP/B fabrics like the REI Minimalist Mitts, such as breaking pointy spruce branches for firewood and cleaning leaves out of my gutters.
The 282-02 has the same acrylic liner as the 282. When new, it effectively traps hand warmth and protects from conductive heat loss. But with use it will delaminate, and at that time I recommend cutting it out and substituting it with a separate liner glove. This two-piece system has the added advantage of being easier to dry.
The fit of the 282-02 is also the same as the 282. Refer to my 282 review for a fit guide. As a general comment, they fit small — like Montbell, it’s Japanese sizing, not American.

Optimal applications
The 282-02 can certainly be used as a rain glove. It will perform similarly to the 282, but be marginally warmer because of the seal-able collar. The collar is not waterproof, however, so the 282-02 cuff is still a potential entry point for moisture.
The 282-02 is primarily designed as a winter recreation glove. It will particularly excel with wet frozen precipitation — like sleet, slush, and heavy snow — that would overwhelm most other waterproof handwear. It might be the ultimate glove for snowball fights.
I’m wary of offering an ideal temperature range, because this will vary by person and activity. My hands are generally cold, and the 282/282-02 reaches their comfort threshold when running in the low-10’s and downhill skiing in the upper 20’s.
Questions about or reactions to the 282-02? Leave a comment.
Disclosure. I strive to offer field-tested and trustworthy information, insights, and advice. I have no financial affiliations with or interests in any brands or products, and I do not publish sponsored content
This website is supported by affiliate marketing, whereby for referral traffic I receive a small commission from select vendors like Amazon or REI, at no cost to the reader.
The post Preview: Showa 282-02 || Winter-ized + black appeared first on Andrew Skurka.
January 2, 2020
Quickstart Guide: Walk Across Southern Utah (WASU)
On a fateful Sunday I found a reference to Jamal Green’s website, Across Utah!, and to his videos about his trek. Caution: Time sink! After studying this project for a year, I decided it would be my first post-retirement hike. So that I was ready to do the hike in the spring, conveniently it locked in an end-of-year retirement for me — this trip was the perfect excuse to make it happen!
Walk Across Southern Utah takes you from the western border of Colorado to the eastern border of Nevada, starting with the La Sal Mountains finishing with the Pine Mountains. Its crosses four National Parks (Canyonlands, Capitol Reef, Bryce, and Zion), Grand Staircase-Escalante National Monument, several mountain ranges, and the Colorado River. The total distance is 700 to 750 miles.
It has been hiked in the reverse direction, notably by Paul “No Breadcrumbs” Magnanti. Apart from Jamal Green’s videos, I’m only aware of one other report, from Amy Lauterbach & James Yurichenko, who hiked in a westerly direction.
 In the fins above Moab
Quickstart guide: Walk Across Southern Utah
The aforementioned trip reports are more philosophical than practical. I appreciated the vivid impressions of what they experienced and their general musings, but they lacked details that I would have liked to have had before I left. So here I will provide some succinct and actionable information, as a succinct supplement to more details on my own blog, Thomas Hikes.
WASU vs Hayduke Trail
The more established and popular route across this region is the Hayduke Trail, and a first obvious question is, Why do the WASU route instead of the Hayduke?
After having read several Hayduke Trail trip reports by people who have hiked many more miles than me, I was frankly intimidated by several aspects of the route, particularly the sections in the Grand Canyon. Being an old guy I typically hike solo. One of the consequences of hiking solo — if that is your preference or your only choice — is that you have no second opinion, nobody who will take the lead for a stretch so that you can recover mentally, nobody who will push back when you are about to screw up. At the time I did not feel ready to complete solo the Hayduke. Period.
Getting to the start
I took a page from Amy & Jim’s playbook and started the hike in Gateway, Colorado on Highway 141. The hike starts outside of “town” by walking John Brown Canyon. This has the advantage that you can tell whoever picks you up where exactly you want to go on Highway 141 and you can hold up a printed sign with your destination, as I always do. I’ve been told that this had a positive on the driver’s decision to stop.
I took the train from Oakland to Grand Junction (24 hours!). I next did my caching and after a night in a motel in Grand Junction I took a cab to the Junction of US 50 and CO 141S (~$25) and hitchhiked to Gateway. Worked like a charm.
Getting back from the finish
After reaching the Nevada border, hitchhike to Cedar City, Utah, from where you can take a one-hour flight to Salt Lake City or to Las Vegas ( ~ $100 one way).
The highlights
You will probably meet (few) people along the way. But they will really restore your faith in humanity. Incredibly kind and generous. I had several people go way out of their way to offer help when I needed it or when they thought I needed it.
In terms of geology and vistas, the most remarkable stretches include the fins above Moab (Moab to Behind the Rocks), the Needles, the Doll House, Pete’s Mesa and Ernie’s country (all in Canyonlands), Happy Canyon slot canyon, Capitol Reef and Upper Muley Twist canyon, Boulder Creek/Escalante River, Hackberry Canyon and the Stone Donkey/Hogeye canyon system, North Fork Virgin River, Zion.
While the wildflowers were not as abundant as the Rockies in July, in 2019 they nonetheless far exceeded my expectations. I just loved hiking through this gray/beige/brown/red country and all of a sudden encountering an Indian paint brush or a cactus with their bright red flowers.
 A quiet place just outside Zion NP. An alternative to “The Narrows” without the crowds.
Section-hiking
If you have friends or family visiting the area, you could plan section hikes and be picked up at a convenient location. If you had to rely on hitchhiking to get out of the backcountry, you would likely have to be very flexible with your travel arrangements.
Requisite backcountry skill & experience
You should have your gear dialed in, you should be comfortable with orienteering (compass/map work/GPS), you should have your water management down pat, you should be comfortable in the backcountry and know how to keep your cool when things go awry, and you should be comfortable to be without human contact for extended periods of time if you do this solo.
This should not be your first long-distance hike and not your first hike with significant off-trail travel, especially when you are solo. If you are tired of “hiking by the numbers” on the Cadillac trails, maybe this is for you.
For me, it was the first hike with significant off-trail sections since serving in the Army forty years ago, and I had taken significant recourse since then. In preparation for this adventure, I took a 5-day Adventure trip with Andrew in Rocky Mountain National Park, and at its conclusion was confident that I was “ready.”
 Entering the fins above Moab, Henry Mountains in the background
Managing risk
You will be walking through some fairly isolated country, bailing out is going to be neither easy nor fast. Traffic on the few roads you will be crossing is very light, often less than 10 cars per hour. You then apply your personal experience of how many cars will pass you by until you get a ride and you can estimate how long you’re going to be standing there.
Know your limits and have a clear understanding of the risks you are willing to take and which ones do not compute in your risk/reward calculation, regardless of how many others have gone up or down that specific spot that you are contemplating. I got really frightened in one spot in the entire route, and I talked myself through it, but that really went right up to the limit of what I am/was willing to risk.
I think that an emergency beacon of some kind and a support crew that monitors your progress on a daily basis are absolutely necessary. Your support should have a detailed hiking plan and agreed upon procedures for what to do when your location information does not come in in the evening.
Resupply
I am somewhat particular in what I wish to eat on a trip like this, especially in terms of salt and sugar content. It is unlikely that your typical country store will be able to cater to preferences like mine. Moab is fine; Escalante, Canonville, and Tropic are less satisfactory.
I therefore drove along the route beforehand to cache some food, fuel and water in spots that were respectably distant from the next resupply point, notably Needles Outpost, Poison Spring Rd/Highway 95, Capitol Reef, and Carmel Junction.
This reduced the amount of food I had to carry and I had more capacity for carrying water while maintaining a reasonable total pack weight. I would do the same if I were to do this hike again. It took a total of two-and-a-half days to place the caches which to me seemed a small price to pay in terms of time and money.
West of Bryce, there is a higher density of small towns with post offices. So I mailed parcels to myself via General Delivery (or had my support crew do this for me) at these locations.
This also requires meticulous planning because of funky opening hours of some of the PO’s and the maximum hold times of USPS. Next time I will send a message from the trail to the crew on when to send the next set of parcels rather than estimating my hiking time ahead of time.
 Severe weather while ascending the Henrys
Seasonal considerations
I hiked from mid-April to end of May in a westerly direction, as did Amy and James. Paul hiked in an easterly direction from mid-October to mid-November. Paul and Amy & James completed the hikes in about 35 days.
My total time was longer, but my net time for this route was about the same time. I encountered some problems with the availability of permits to cross Canyonlands NP and Zion NP that had me spin my heels for a few days, which added to the total time.
It may be possible to start a little bit earlier in years with average or sub-average snowfall. But unless you are keen/willing/able to carry snow travel gear across the LaSal and the Henry Mountains, we’re talking only a few weeks at most.
In spring 2019 the La Sal’s had 300 percent of their normal snowfall. I was lucky to make it across the lowest — and my least preferred — of three potential routes I had scoped out across that range. The Henry Moutnains had not thawed out at the peaks, but the road I was using was snow-free except for the new snow that was falling while I was crossing.
After speaking to locals along the route, I think you could also start somewhat later and finish, say, mid-June, meaning a start in late April/early May.
 For obvious reasons, this was my least preferred route over the La Sal Mountains. But it was hard enough after an epic winter.
Crossing the Colorado
I crossed the Colorado on a packraft that I had stashed at Needles Outpost while caching supplies. On my blog I’ll discuss this method more in-depth.
The alternative is to catch a ride across the river from Tex’ Riverways’ jet boat shuttle. This boat comes down to Spanish Bottom to pick up groups who have floated the Green and Colorado rivers on canoes or inflatables and returns them to Moab.
I have no idea whether the shuttle across the river is a courtesy or whether they charge a fee (I suspect the latter). They know days ahead when they will be going down to Spanish Bottom, so you should be able to plan accordingly in consultation with their Moab office (435) 259-5101). No connectivity down by the river!
On days when no paddlers are to be picked up, there will be no jet boat and hence no ride across the river. You need to be down by the river by 9:30 AM. That’s when the boat is about to arrive. By 10:45 AM they are heading upstream and there won’t be another boat for the day.
Do not even dream of crossing the river by swimming or floating on your inflatable mattress! The water is very cold, there is a lot of debris floating on the river that you can get entangled in, there are rakes (tree branches reaching down into the water on the Western shore) that push you under, and getting out of the water is very difficult (the banks are made of mud/sand that crumbles into the water if you were to attempt to pull yourself up).
 The packraft that I used to cross the Colorado River
Maps
I did all my map work in Gaia GPS using USGS, USFS and Nat Geo (for NPs) base maps. Jamal as well as Amy & James have Google maps on their respective websites showing their route to get you started.
Water
In Spring 2019 water was abundant, by Utah standards, but you had to still work for it, specifically finding promising spots for collection. Since you are also likely going to consume a lot of water (on days when the wind was blowing and no cloud was to be seen in the sky I used a minimum of 4L during the day alone), this is something that you need to consider for your purification strategy.
You will likely have to expand considerably the range of water sources you think are acceptable. There are four major sources of crude water: potholes under dryfalls and on rocky flats (best), cow water (“Château Bœuf”), road run-off (“Château 2CV”) and creek/river water (second best).
 Beggars can’t be choosers
Permits
Backcountry permits are required for several spots.
Canyonlands NP
You need permits for the Needles district and the Orange Cliffs section at a minimum. There are about 10 backcountry permits available per night for hikers in each of the two or three zones you are crossing. The passage through the Maze is optional, but if you are passing by there, it would be foolish to not take that side trip.
So you want to get this set up well ahead of time (up to 4 months to the day) and make sure that you are on time to pick up your permits. I was somewhat impatient with the low quota of permits (“What are they thinking?”). After having hiked through and having seen the water situation in the backcountry up close and personal I now understand why the quota is what it is.
Capitol Reef
A permit is required for staying overnight inside the park. In this park the permits are not scarce as in Canyonlands NP. However, it is easy to camp on the eastern border just outside of the park, cross it during the day, even if you take the scenic route, and get out the other side the same day.
Park headquarters is pretty far away from the trails you will be walking, therefore last minute adjustments are not easy. It is difficult to predict accurately when exactly you will be crossing.
I avoided this permit issue and would encourage you to do the same. An alternative is to request a permit with a larger time window around the day you expect to be in the park. I understand that they have stepped up their enforcement activities because, I was told, Hayduke hikers were flouting the rules.
 A cathedral along the way. Happy Canyon slot canyon.
BLM permits
The town of Escalante has an Interagency Office where I got my permit for the hike beyond town. This is uncomplicated in comparison to the National Parks permits, as the camping is “at large.” The “permit” is really mostly for use statistics I suspect and for SAR purposes if you get lost.
For the stretch between Canonville and Zion I obtained a permit at the Canonville BLM office (Note: they have some funky operating hours at Canonville due to lack of staff).
Bryce
I had been to Bryce several times before, so I had no need to hike inside the park.
Zion
This is complicated. One obtains backcountry permits from the main office inside the park.
I shudder to think what it would take to get a contiguous permit for the East and West rim. Normally one would hike the East rim, descend down to the park road and climb up the other side to the West rim. While the East rim has some “at large” camping zones, the west rim does not.
As of summer 2019, part of the East Rim Trail is closed due to a major rock slide (and they mean the “closed” part, because they threaten some serious monetary consequences if you get caught ignoring the closure). I suspect that closure is going to last a good while since the slide was major and there is concern about the stability of the rock face still standing.
I spun my heels for a couple of days on the East rim before I could secure a permit for the West Rim hike with camping for two nights. Zion is the only place that I ran into a ranger who checked my permit.
Camping in the campground inside the park is sold out weeks ahead and there is no set-aside for through hikers nor do they make available sites for which an issued permit is not being used. I had good luck with throwing myself on the mercy of people who had a campsite. There is one private campground right outside the park in Springdale ($$$) and one not too far from the East gate ($$$).
Have questions about my Walk Across Southern Utah? Leave a comment.
The post Quickstart Guide: Walk Across Southern Utah (WASU) appeared first on Andrew Skurka.
December 27, 2019
Will I encounter snow? New snow survey tool
In early-December an alumnus, Rud Platt, shared with me a project that he’d been working on, snowEvaluator. Its chief function is creating snow coverage maps, i.e. where there is snow, or where there was snow on specific dates in the past.
If you’ve ever been uncertain about whether you’ll encounter snow on an upcoming backpacking or camping trip, this tool will provide a fairly definitive yes or no. At least for this purpose, it’s a better predictor than other resources I’ve mentioned in the past, such as SNOTEL and the National Snow Analyses.
snowEvaluator is more robust than just a static map of current conditions. Features include a:
Calendar view, so that you can easily look up historical snow coverage (by 1-week increments); and,Snow Index (screenshot below), which plots snow coverage over time and reveals exactly when an area become covered (or uncovered) by snow.

snowEvaluator creates the maps using high-resolution Sentinel satellite data, which is also used by CalTopo and GaiaGPS, as I discussed here. For comparison, below are screenshots of snowEvaluator and then CalTopo, depicting Yosemite in June 2019.
 snowEvaluator
 CalTopo
SnowEvaluator has several advantages over CalTopo:
Its false color image better distinguishes snow from clouds. Snow is represented in an unmistakable red color.It automatically displays the least cloudy images, if multiple images were taken of the same area in a given week. This is especially helpful at high latitudes where there is a lot of overlap between neighboring image paths. It’s free forever, whereas CalTopo and Gaia may make it part of their premium subscriptions.
I wouldn’t expect an abandonment of CalTopo, however. In that platform, the snow coverage data can be helpfully overlaid atop topographic layers like USGS and USFS quads. And, in general, it’s a much more robust trip planning system.
Questions about snowEvaluator? Leave a comment.
The post Will I encounter snow? New snow survey tool appeared first on Andrew Skurka.
December 24, 2019
PSA’s: Apply by Dec 28 for UT + WV; by Jan 11 for AK + CA
Seasons greetings. I hope you are having a great week.
Three quick announcements related to my 2020 guided trips:
1. Apply by December 28 for Utah and West Virginia
Open Application started December 15 for all locations, and it will close for Utah and West Virginia on December 28 (or, more specifically, when I sit down at my desk at around 8 AM MST on December 29).
Apply during Open Application for your best chance of getting on your First Choice trip. All applications received during this period are considered equally, with some priority given to alumni and previously waitlisted applicants. After it’s closed, I treat applications on a first-come-first-served basis for any remaining spots.
2. Apply by January 11 for Alaska, California, and Rocky Mountains
Because the Alaska and California trips are later in the year, and because it will take me a few weeks to process the Utah and West Virginia applications, I set the Open Application deadline for these locations a few weeks later. It’s January 11 (or, more specifically, when I sit down at my desk around 8 AM on January 12).
Apply now for a 2020 trip!

3. What trips will be “sold out” by the end of Open Application?
Each year I’m surprised that in January I can sell out trips that aren’t until July or even September. But it happens, and it will happen again in 2020.
To help set the expectations of applicants, and to give prospective applicants an informed level of urgency, I’ll share some predictions.
Utah. By the end of Open Application, the 5-day Adventure trips in Grand Staircase-Escalante will be mostly sold out. I’d expect a few spots available after Open Application, and probably a few more will open in January or February due to cancellations.
West Virginia. There will be sufficient demand to run two Fundamentals courses and two Adventure trips. There probably will be available space on all of the sessions after Open Application. If last year is any guide, these sessions will slowly fill up in late-winter/early-spring.
Alaska. All four sessions in Alaska will be sold out. A few spots may open due to cancellations.
California. We have a lot of capacity in Yosemite in 2020 — we’re proposing to run up to six trips in July and another six trips in September. Out of the twelve sessions, a few will probably sell out during Open Application. The remainder will have some space.
Rocky Mountains. Many question marks remain about this location still. I’d like to stay away from Rocky Mountain National Park for a year, but I’m struggling to find another venue that checks my two boxes: world-class terrain and available outfitter-guide permits. I may bail on this location entirely and collapse these applicants into more certain locations, which will put some additional pressure on them.
Questions about the 2020 trips? Leave a comment.
The post PSA’s: Apply by Dec 28 for UT + WV; by Jan 11 for AK + CA appeared first on Andrew Skurka.


