
Andrew Skurka's Blog, page 16
June 18, 2020
Exclusive: Inside story on Stringbean’s new Long Trail FKT
Earlier this week Joe McConaughy (“Stringbean”) set a new unsupported FKT on 270-mile Long Trail, finishing it just under five days.
Last night I sat down with Joe for a live interview on Zoom about his experience. We were joined by his wife Katie for additional perspective and by standout alumnus Hunter Hall for fielding Q&A from the audience.
The interview runs for about an hour, and I think it maintained a steady energy and entertainment value throughout. Enjoy.
The post Exclusive: Inside story on Stringbean’s new Long Trail FKT appeared first on Andrew Skurka.


June 16, 2020
New Long Trail FKT: Story time with Stringbean
Yesterday Joe McConaughy (“Stringbean”) set a new unsupported FKT for Vermont’s Long Trail in 4 days, 23 hours and 54 minutes, which equates to about 54 miles per day across constant roots, rocks, and muck.
Join us tomorrow (Wednesday, June 17) at 8 PM EDT for “Story time with Stringbean,” during which we’ll rehash the highs and lows of his remarkable athletic achievement. Joe will be caught up on sleep by then, but everything will still be fresh in his mind.
Registration for this event is required, and spots are limited. Register here.
For a sense of Joe’s adventure, check out his IG feed.
What questions do you have for Joe? Leave a comment and we’ll be sure to get to it (assuming it’s a good one).
The post New Long Trail FKT: Story time with Stringbean appeared first on Andrew Skurka.
June 5, 2020
Learn from & adventure with us in Yosemite in July
Yosemite National Park began its phased reopening today. For the time being, only holders of wilderness and Half Dome permits are being allowed entry; visitation by the broader public sounds like it may start later next week.
This official news green-lights our guided trips in the park scheduled for July and September. Honestly, it’s a huge relief — the virus-related shutdowns upended my business this spring, forcing postponements of nine trips and outright cancellation of four.
Trip types
In Yosemite we are offering two different types of trips:
The three-day Backpacking Fundamentals course is designed for beginner backpackers who wish to accelerate up the learning curve and avoid years of trial-and-error and thousands of dollars in regrettable purchases.
The five- and seven-day Adventures are most well suited for intermediate backpackers (and some ambitious beginners) who want to learn next-level skills and to undertake a more challenging trip than they would on their own. Specifically, we will be following sections of the Yosemite High Route.
Trip dates & availability
Before the virus struck, nearly all of the 2020 trips were full. In late-February, I think I had just three openings out of 240 total spots. But despite thoughtful Covid mitigation protocols, we’ve lost clients due to travel concerns and financial uncertainties. As of 1pm on Friday, June 5, our availability currently is:
July 10-12 — Fundamentals, A and B: 3 spotsJuly 13-19 — Adventure 7-day, A and B (both “High” intensity): 4 spotsJuly 20-24 — Adventure 5-day, B session (“High”): 1 spot
Interested?
Contact me if you have questions about the program or trips, or your suitability for these available sessions. Or, apply now.
 Traversing the Clark Range on the Yosemite High Route
The post Learn from & adventure with us in Yosemite in July appeared first on Andrew Skurka.
June 4, 2020
George Floyd
When I sat down on Monday morning to map out blog and social content for the week, everything seemed unimportant. I know that hundreds of thousands of Americans were protesting the unnecessary death of another black man and systemic racism more broadly this weekend, but let me tell you about how much I love the new Salomon Sense Pro 4. How tone-deaf.
So instead I opted to lay low, but not check out — the week has been an opportunity to watch, listen, and learn; to reflect on my own white upper middle-class privilege; and to consider if and how I could be part of a solution that would be more material than simply condemning racism or blacking out my Instagram feed but that would also be achievable for a company with one full-time employee that’s been upended by a global pandemic.
From very early on, my parents, teachers, and coaches led me to believe that I could do anything that I wanted. And I generally proved them right: I attended and ran at one of nation’s premier universities, Duke; I walked across North America and around the American West; I started a guiding business that hinges on the trust of complete strangers; and I bought a house in Boulder, Colo., that’s an 18-minute run from the famed Flatirons.
In a truly perfect Union, similar focus and hard work by a person of any race, gender, sexuality, or socioeconomic background would generate the same results. But obviously that’s not where we’re at, in neither outcomes nor opportunities.
On my Sea-to-Sea Route hike in rural North Dakota in spring 2005, a local policeman pulled up behind me because, “We received a report of a man with a backpack walking down the road.” When he told me that and asked for my ID, I thought he was joking. He wasn’t; but he was respectful and unassuming, and I was quickly on my way since I had a good story and no warrants for my arrest. Never did I think that I might end up like George Floyd or even Boulder’s own Zayd Atkinson, and never did it remind me of stern warnings from my parents about how to behave around the police.
To date, I’ve embraced few causes for the greater good, even those that are very close to home like the protection of public lands. They’re either not my fight or it’s not my time, my thinking has (selfishly) been.
So probably like many people and many small businesses, I’m at the beginning of the process, don’t necessarily know my eventual destination, and am intimidated by not knowing what I don’t know. To start I plan to borrow Amanda’s copy of Me and White Supremacy; longer-term I’m compelled to further diversity the guide roster (which has greatly benefited from female representation but which is still all-white) and to create a scholarship fund (which I’ve wanted to do but so far failed to implement).
I’m open to other suggestions. What do you think are appropriate and sustainable measures for an organization like mine to be part of the solution? And who and what would you recommend reading, watching, listening to, following, and donating to?
The post George Floyd appeared first on Andrew Skurka.
May 21, 2020
Tips for handling harassment on the trail
While hiking alone on a trail, has a man ever slowed down a little when walking past you, and perhaps even brushed your shoulders ever so slightly, giving you that uneasy feeling and prompting you to look over your shoulder the rest of the way? Or how about a man on the trail who asks you one too many questions, including, “Are you alone?”
Yeah, me too.
Once while hiking alone in the foothills of the Wasatch mountains with my dog, a man trailed behind me for long enough that I became uncomfortable. I slowed my pace hoping he would pass, but he didn’t. I stepped off the trail and looked directly at him and said, “I’d like you to pass me please.” He said, “Okay, but I have enjoyed the view from behind.” I said nothing.
As soon as he passed me I pulled out my phone ready to dial 911 if necessary and headed straight back to my car. As women, our fears of other people, especially men, while recreating in the outdoors are not unwarranted.

By the Numbers
Studies support my anecdotal experiences: women are statistically more likely than men to experience verbal harassment, catcalling, unwanted touching, and unwanted following.
Numerous reports in recent years provide staggering numbers on the amount of sexual harassment in the outdoor community:
A 2016 investigative report by the Department of the Interior showed that women in the rafting industry have been the victims of sexual misconduct for years;
In a 2016 poll, Runner’s World found that 84 percent of women surveyed have been harassed while running;
A 2017 report by Outside Magazine found that 53 percent of women have been sexually harassed while recreating; of that percentage, 93 percent were catcalled, 56 percent were followed by someone, 18 percent were flashed, and 4 percent were attacked.
A 2018 special report by The American Alpine Club found that 47 percent of the 5,000 women surveyed repoted at least one incidence of sexual harassment or sexual assult behavior while engaged in a climbing activity.
I could go on because the studies and numbers are endless, but you get the point: harassment is alive and well in the outdoors. So, the question stands, how do we as women protect ourselves?

How to Stay Safe
As humans, a healthy dose of skepticism of strangers is important when you’re alone in the outdoors. It’s true that solo female activities could draw unwanted attention to yourself just for being a badass outdoorsy chick, but that shouldn’t stop you from adventuring your heart out. Here are some practical tips on how to stay safe when recreating in the outdoors alone:
1. Don’t disclose that you’re alone.
If someone starts conversing with you that makes you feel uncomfortable casually drop a hint that you’re with someone, say something like “Well, I should go catch up to my partner now.”
2. Don’t give details.
It’s also important not to give too many details to strangers about where you’re headed or what your plans are. Keep things vague and conversation short.
3. Get off the trail.
If someone is trailing behind you and it’s making you uncomfortable or nervous pull off to the side of the trail and let them pass. Pretend you’re stopping to take pictures or to get a drink of water.
4. Sleep near a group.
If you’re solo camping and nervous about being alone try pitching your tent among other campers. More people around means less chances of a creeper trying anything suspicious.

Attitude is Everything
I’ve been told that I’m intimidating more times than I can count. In social settings this isn’t always a positive thing, but when alone in the outdoors I think this works in my favor — assertive and self-sufficient women turn the creeps away. Even if being assertive and strong willed doesn’t come naturally to you, there are ways that you can fake it in times of necessity.
1. Don’t be nice to people who make you uncomfortable.
This may seem strange but oftentimes being passive can be interpreted as permission. For example, you smile and nervously chuckle when someone makes an awkward comment. We might think that our demeanor is conveying how uncomfortable we are, but they might be thinking, “She’s laughing. She must be interested!”
2. Work on saying “no” and using your resting bitch face.
Being polite to a pushy dude on the trail could be seen as an invitation to tag along with you. That resting bitch face sends a “touch or or else” warning look to the creeps. If someone makes you uncomfortable and you don’t want to be around them, be stern and tell them to leave.
3. Be opinionated, independent, and wear whatever you want.
We’ve all heard the horrific assumptions that women that wear short, tight, and revealing clothes are asking to be assaulted and harassed. Just because our shoulders are showing or you have leggings on is not an invitation for the creeps. If someone makes an unwanted comment about your clothing, tell them to eff off and then be on your way.
Take precautions
Whenever we venture outside, proper preparedness is always necessary and will work in your favor if you encounter unwanted or dangerous attention. You should always have your cell phone easily accessible, and don’t hike with headphones on if you’re feeling uneasy. To be extra cautious consider carrying pepper spray — just be sure that you know how to use it.
Lastly, the most important tools that a woman, or anyone for that matter, has is her brain and her gut — listen to them!
Leave a comment
Have you had uncomfortable experiences on the trail?What have you found to be (not) effective in preventing or stopping harassment on the trail?
The post Tips for handling harassment on the trail appeared first on Andrew Skurka.
May 19, 2020
8 very adventurous loop runs & hikes in the Colorado Rockies
For the first time since 2013, this year I didn’t race and I won’t log at least 3,000 miles. Nagging injuries, lack of race entry luck, and a growing guiding program all played a role, as did an absence of desire — whatever I’d been running towards in my mid-30’s, I felt like I’d reached it.
Somewhat ironically, however, this year had a disproportionate share of favorite and memorable trail runs — out of my all-time Top 10-ish, this year scored five, which on this page I’ll highlight (and recommend three more). Since I wasn’t on a strict training plan or beat up from the last race, I was free to run where, when, and how far I pleased, and to do it at whatever pace felt right.
The commonality: Pfiffner Traverse
Due to their proximity and quality, I focused my efforts on Rocky Mountain National Park and the Indian Peaks Wilderness, both in the Colorado Front Range. From Boulder, the east-side trailheads are about an hour away; the west side trailheads are 2.5 hours, but conveniently my work put me in Grand Lake for a few September days.
Intentionally, these five loops included sections of the Pfiffner Traverse, which is a 76-mile high route that parallels the geographic Continental Divide between Milner Pass (on Trail Ridge Road in Rocky) and Berthoud Pass (on US-40 near the boundary of the James Peak Wilderness). The route is 40 percent off-trail, gains or loses 750 vertical feet per mile, and approaches Class 3 in difficulty. Four of the eight loops on this page are recommended section-hikes.
By including sections of the Pfiffner, I was able to edit my Pfiffner Traverse Guide, gather data for a potential FKT attempt, and elevate the difficulty of each outing, making them true adventure runs. But most importantly, the Pfiffner helped to create loops in a range that otherwise has very few.
1. Across Onahu
17.2 miles (3.5 miles off-trail) with 5,000 feet of gain+6.8 miles on Trail Ridge Road if you don’t shuttleStrava (with Tonahutu TH finish)
The heart of this run is between Timber Lake and Haynach Lakes, which are separated by two 11,800-foot passes that provide access to and out of upper Onahu Creek. Onahu is a gem: it’s one of just two trail-less valleys on the west side of the park, features a rarely visited alpine lake, and serves as a quiet refuge for elk and moose.
Several options exist for reaching and returning from Timber Lake and Haynach Lakes. A shuttle or hitch is necessary for all of them.
The shortest variation of this run starts at Timber Lake Trailhead and finishes at Green Mountain Trailhead, which are separated by seven miles along Trail Ridge Road. Alternatively, start at Milner Pass (which is about the same distance but has less climbing) and/or finish at North Inlet Trailhead (+2.4 miles). The net vertical uphill/downhill difference between running northbound and southbound is generally negligible, unless you start at Milner Pass.
 Timber Lake, as seen from Timber Lake Pass, looking north
2. Continental Divide Trail Loop
25.8 miles (no off-trail) with 4,400 feet of gainStrava
The west side of Rocky Mountain National Park has just one all-trail loop — this one. Because of that, it’s already popular with backpackers and trail runners, and is actually the only route on this page with an established FKT (4 hrs 2 min), at least currently.
Start at the North Inlet/Tonahutu Creek Trailhead, and pick a direction. I prefer clockwise, so that the flat and boring 5.5-mile section along Big Meadows is at the start. If you have access to a shuttle or are willing to hitch, you can shortcut the route by 2.4 miles by starting or ending at Green Mountain Trailhead. Climb steadily to Ptarmigan Point (elev. 12,200+) and then descend into North Inlet and back to the trailhead.
 A herd of cow elk at Sprague Pass, just off the Continental Divide Trail
3. North & East Inlets
21.3 miles (3.3 miles off-trail) with 6,100 feet of gain+1.4 miles without shuttle between North Inlet TH and East Inlet THStrava
The North Inlet and adjacent East Inlet both drain into Grand Lake, the largest natural lake in Colorado. Hiking trails go far up both valleys, but strangely do not connect. Fortuitously, however, they are separated by just 3.3 miles of off-trail travel, most of it Sound of Music quality.
I strongly recommend running this loop clockwise, entering the park from North Inlet Trailhead and exiting at East Inlet Trailhead, so that you have gravity on your side for the light bushwhacking between Beak Pass and Spirit Lake.
The trailheads are separated by 1.4 road miles, which can be used as a warm-up or skipped with a shuttle or hitch.
Run up North Inlet, and take a right/south turn towards Lake Nokoni and Lake Nanita. When this trail terminates at the latter lake, follow the Pfiffner Traverse to Spirit Lake, where you will intersect an unmaintained use trail. Turn right/west and follow this track to the mapped end of the East Inlet Trail, which will take you back to the trailhead.
 Wildflowers and Ptarmigan Mountain
4. Triple Bypass
23.3 miles (3.1 miles off-trail) with 7,500 feet of gainStrava
The popularity of the 28-mile Pawnee-Buchanan Loop (aka Double Bypass Loop) is nearly on par with the famed Aspen Four Pass Loop. It gains 8,000 vertical feet and crosses two 12,000-foot passes on the Continental Divide, making it a fantastic long run or weekend backpack trip.
Triple Bypass is an adventurous play on this Colorado classic. Whereas the original loop drops to the 8,800-foot junction of the Buchanan Pass Trail and Cascade Creek Trail above Monarch Lake, the Pfiffner Traverse is used to “shortcut” up Thunderbolt Creek, adding three off-trail miles and a third high point, Paiute Pass.
This loop can be run in either direction, starting and ending at Brainard Lake. But by doing it counterclockwise, you can follow the guidebook description through this complicated valley and over this Class 3 pass.
 Thunderbolt Creek, as seen from the Ooh La La Extra Credit route, north of Buchanan Creek. Paiute Pass is at the head of the valley and is still snow-covered.
5. Boulder Watershed
33.6 miles (4.7 miles off-trail) with 11,200 feet of gain+4.3 miles on gravel road without shuttleStrava
The Northeast Gully is the easiest non-trail exit from the iconic Lone Eagle Cirque. But it’s the most difficult feature on the Pfiffner Traverse: it’s filled with snow through midsummer, covered in loose rock and dirt in late-summer, and always steep. Before this fall’s first snowstorm, I wanted to get on this section of the Pfiffner (again), which connects Crater Lake with Coyote Park in upper Arapaho Creek.
Loops out of Monarch Lake would have been shorter (refer to the next recommended loop), but I figured that encircling the City of Boulder Watershed wouldn’t take me much longer after accounting for drive times. Plus, an end-of-season big hurrah was appealing. YMMV.
Start or finish at Rainbow Lakes Trailhead, and ideally hitch or shuttle the five miles of gravel between it and the Sourdough Trailhead, just off the Peak to Peak Highway. The loop can be done in both directions, with a slight advantage for counterclockwise (so that you can more easily follow the guidebook out of the Lone Eagle Cirque).
From Sourdough Trailhead, run/hike:
Over Niwot Ridge to Brainard Lake, Over Pawnee Pass to Cascade Creek Trail, Over Northeast Gully to upper Arapaho Creek, Over Arapaho Pass to the Fourth of July Mine, and Over the east ridge of Arapaho Peak, past the Arapaho Glacier, back to Rainbow Lakes.
 The Lost Tribe Lakes basin, as seen from its western edge at the top of the elk trail.
6. Monarch Lake Loops
Min: 16.0 miles (3.1 miles off-trail) with 4,800 feet of gainMax: 32.3 miles (10.4 miles off-trail) with 11,600 of gain
Monarch Lake is the western gateway to the Indian Peaks Wilderness, and sits at the confluence of four major creeks that flow off the Continental Divide: Hell Canyon, Buchanan Creek, Cascade Creek, and Arapaho Creek.
The Pfiffner Traverse connects these drainages, using Cooper Peak Pass, Paiute Pass, and the Northeast Gully. This area has at least seven loop opportunities — each includes one pass, two adjacent passes, or all three passes. Select the itinerary that best suits your fitness, interests, and off-trail skills.
 A carpet of avalanche lilies in upper Hell Canyon
7. Middle Boulder Creek
25.1 miles (4.3 miles off-trail) with 7,400 feet of gainStrava
From Boulder, Hessie Trailhead provides the quickest access into the Indian Peaks. Its popularity is proportional to its convenience, however, so the county operates a free shuttle bus on weekends to relieve parking pressure. By taking the N bus from downtown Boulder, this loop can be completed without a personal vehicle.
Go counterclockwise, so that you pass through the lowest and most heavily trafficked sections first, and reserve the wildest bit for the third quarter. The highlight is between Arapaho Pass and Rollins Pass, when this loop overlaps with the Pfiffner and mostly stays atop the Continental Divide
 Looking north over Arapaho Pass and Lake Dorothy towards Apache Peak, Lost Tribe Lakes, and the west ridge of Lone Eagle Cirque
8. James Peak Skyline
17.6 miles (5.2 miles off-trail) with 6,550 feet of gain
If I’d had one more week of cooperative weather, this would’ve been the one. Years ago I completed it as an overnight backpacking trip, and was surprised that it’s not a classic, especially given its accessibility from Denver.
Start at St. Marys Glacier Trailhead ($5/day parking fee) and run clockwise, so that you finish with the best stuff. The exception: if there is a chance of thunderstorms and if you’re getting a late start, go counterclockwise so that you can get off the Divide earlier in the day.
From the parking area, cut through Alice and join the Continental Divide Trail (CDT) where it crosses the 4WD road to Loch Lomond. Follow it to Mt. Flora, the first of five 13’ers on this route.
Run/hike north atop the geographic Continental Divide, usually off-trail but sometimes with the help of a use trail, to James Peak, the final high point. Descend south on the CDT until it crosses the James Peak Wilderness Area boundary. There, travel eastward off-trail until funneling into the St. Marys Glacier. Return to your car on overused tourist trails.
 James Peak, one of five 13’ers on the route. Immediately to the north it gets easier for a while, with pleasant ridge-walking atop the Divide, overlooking deep cirques to the east.
Leave a comment!
Have questions about any of these loops?If you’ve done one, what was your experience?
The post 8 very adventurous loop runs & hikes in the Colorado Rockies appeared first on Andrew Skurka.
May 18, 2020
Review: ZOLEO Satellite Communicator || Seamless messaging
The satellite messaging market only has two players: SPOT and Garmin, with the latter getting most of the market share. For a product that’s now so ubiquitous and high-dollar (largely because of the subscription revenue), I’d like to see more brands competing and innovating in this space.
Here’s a new one that’s worth consideration: the ZOLEO Satellite Communicator ($200, 5.3 oz), which debuted in January. It’s well priced, constructed, and engineered; and it offers a significantly improved messaging experience for both the owner and their contacts.
Review: ZOLEO Satellite Communicator
When the Garmin inReach Mini ($300, 3.5 oz) was released two years ago, it seemed like the holy grail: reliable two-way messaging, location-based weather forecasting, and functional GPS navigation in a palm-sized package. Sweet!
The ZOLEO Satellite Communicator is forty percent heavier and lacks any navigation features (which is fine — just use Gaia GPS), but outperforms the inReach in its core function: messaging.
The ZOLEO platform — comprised of the device and the app — offers seamless messaging across all connection methods. From the ZOLEO app, texts and emails can be sent using:
Cellular service, using a normal carrier like AT&T;WiFi, like at home or a coffee shop; and,Satellite, using the ZOLEO Satellite Communicator.
In comparison, an inReach owner uses at least two messaging apps (personally, Google Voice and Garmin Earthmate), often resulting in disjointed conversations and missed messages, especially for those who bounce regularly between the frontcountry and backcountry like thru-hikers, avid weekend warriors, international travelers, and residents of very rural areas.
Like the inReach devices, ZOLEO relies on the Iridium network, which offers true global coverage. While testing the ZOLEO, messages cleared the device within minutes.
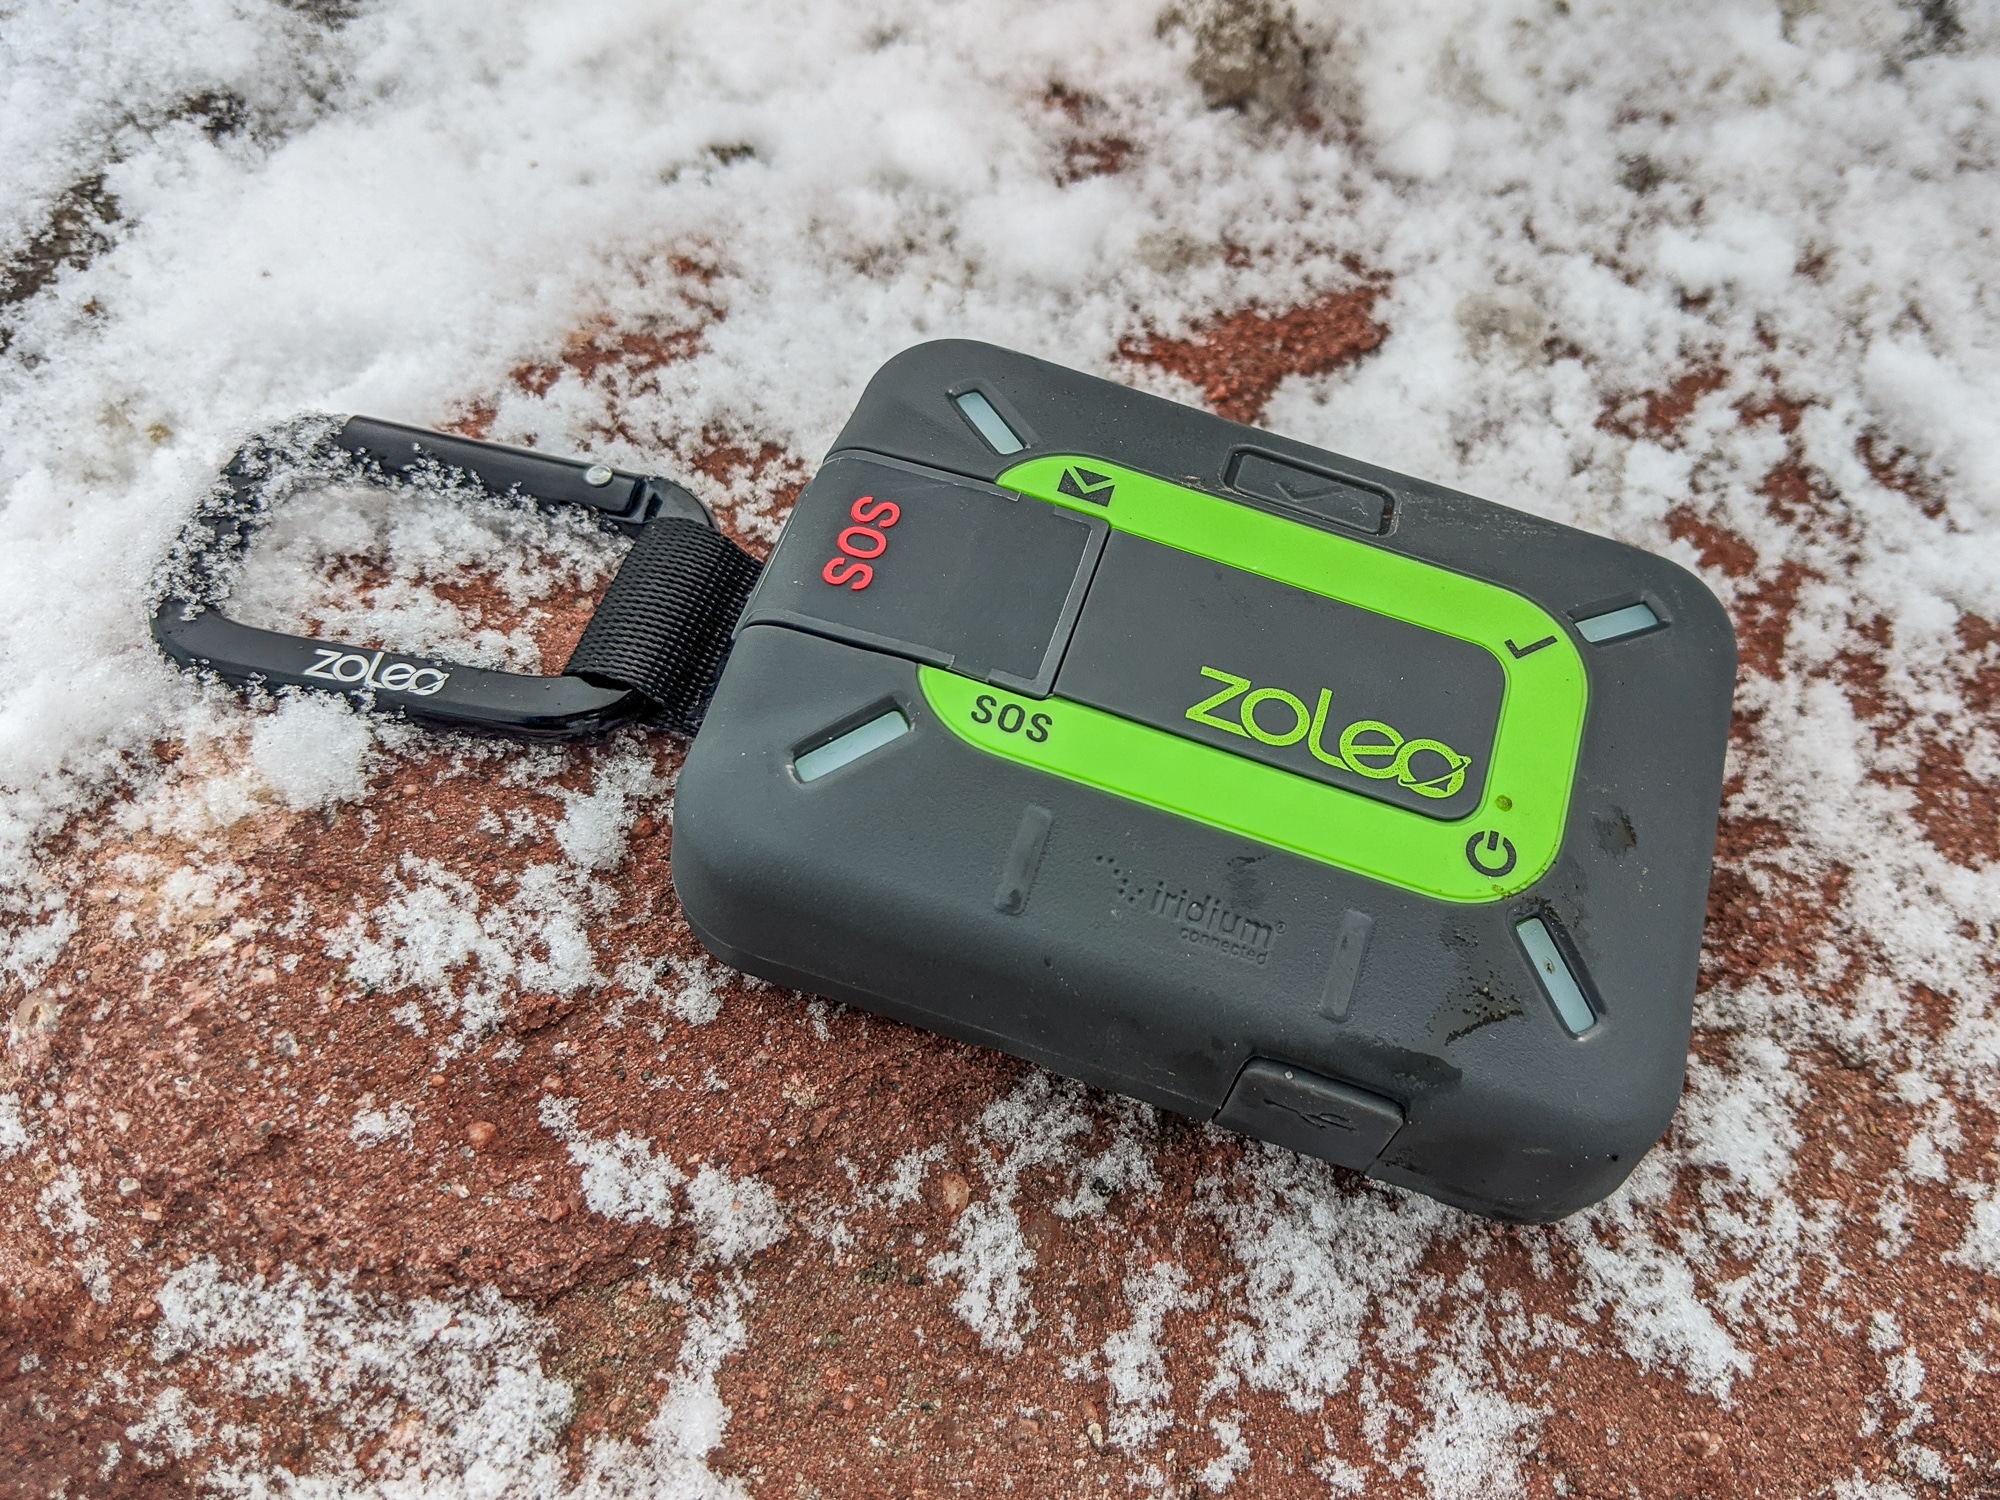 The ZOLEO Satellite Communicator debuted in January. It’s a 5.5-ounce two-way satellite messenger that — when paired with the ZOLEO app — offers a more seamless messaging experience than other satellite messengers.
Key product specs
Two-way satellite messagingGlobal coverage with the Iridium satellite network5.2 oz (150 g), with +0.3 oz for optional carabiner$200 MSRPMonthly service required ($20-$50 per month; or $4/month hold)
Device activation
Before taking ZOLEO into the field:
Register the device,Select a service plan,Download the ZOLEO app, andSync the device with your smartphone.
The ZOLEO website is well designed, in terms of both its aesthetics and intuitiveness, and I successfully sent my first message about thirty minutes after unboxing the device.
How to send messages
Messages can be sent directly with the ZOLEO unit, or using the ZOLEO smartphone app (which connects to the unit via Bluetooth).
From the device, two messages can be sent:
SOS, andCheck-in/Okay.
Notably, the unit does allow for location tracking, like on a 5- or 10-minute basis.
From the ZOLEO app, three types of messages can be sent:
SOS,Check-in/Okay, andCustom texts and emails.
SMS is capped at 160 characters; email, at 200. However, when the recipient also uses the ZOLEO app (which is free even without purchase), the cap is increased to 950 characters, or the equivalent of about six text messages.
How to receive messages
Each ZOLEO owner is given a dedicated phone number and email address. For example, the number for my demo unit was 804-616-35XX, and my email was andrewskurka@zoleo.com.
I could give this information to my contacts, who could then send me messages through any device or platform — phone, desktop computer, inReach, or another ZOLEO.
This configuration is much simpler than the relatively complicated directions for sending messages to an inReach unit.
Seamless messaging
The ZOLEO app can be used to send texts and emails with a cellular, Wifi, or satellite connection, and is therefore equally functional in the frontcountry and backcountry. This prevents: having to “move” conversations to a different app, and missing messages that were sent to the wrong platform.
As an example, here is a seamless conversation I had with Dave, sent over both Wifi and satellite:
 A quick conversation with friend Dave. The first three messages were sent using the Communicator; and the forth was over Wifi. I received his last message on Wifi, too.
The hardware
The 5.2-oz devices shares similar dimensions as a Canon ELPH camera (3.58 x 2.6 x 1.06 in), and lacks an awkwardly protruding antenna. It’s powered with a lithium-ion battery, and will last 200+ hours while checking for messages every 12 minutes. Operating temperature range is -4°F to 131°F.
The exterior is made of a rubberized plastic, and seems to offer a good balance of weight, durability, and grip. It’s shock-resistant, and dust- and water-resistant (IP68, MIL-STD 810G).
The unit does not have a screen. To convey activity, it instead relies on cheery beeps and four LED lights, which can blink or stay solid in green, amber, blue, and red. The beeps and lights are mostly intuitive, but until you have them memorized, pack the Quick Start Guide (or use the app).
The SOS button is well guarded by a hinged door. An accidental depressing of the SOS button is unlikely, though I’d be comforted if its snap closure required more force to open.

ZOLEO versus the competition
ZOLEO enters a market with just two other brands: SPOT and Garmin. SPOT offers the SPOT X (my review), which I wouldn’t recommend. Garmin’s inReach service is available in four devices, with my favorite being the inReach Mini (my preview) because it’s the lightest and least expensive option while still having all the functionality as the other units (assuming it’s paired to a smartphone).
How does the ZOLEO stack up against the Garmin inReach Mini?
Messaging: ZOLEO wins
The messaging reliability seems about the same between my inReach and the ZOLEO. Since they both use the Iridium network, this is what you’d expect.
Otherwise, the ZOLEO messaging experience is better in every way. For owners, the messaging is centralized (in the ZOLEO app), rather than being split between conventional messaging apps (when using cell service or Wifi) and the Garmin Earthmate app (when using the inReach). So conversations can be continuous, and no incoming messages are missed because they were sent to the app not use in use.
As an added perk, if your contacts send and recieve messages from you through the ZOLEO app (which is free), messages can contain up to 950 characters.
Extra functionality: inReach wins, maybe
The inReach devices offers GPS navigation, through the device itself (sometimes limited) and also in the Earthmate app. The ZOLEO completely omits this functionality. I think that’s fine, since I use Gaia GPS anyway.
ZOLEO also omits location tracking, whereas with Garmin it can be set to a specific frequently like every 10 minutes. As a hiker, I don’t particularly see the value in this service (as opposed to, say, a pilot or sea kayaker), but I know that some backpackers do use it.
Both devices have location-specific weather forecasting. Here is the screenshot from the ZOLEO app:

The device: inReach Mini wins
The inReach Mini has two advantages over ZOLEO. First, it’s 33 percent lighter, at just 3.5 ounces (versus 5.3 for ZOLEO).
Second, and more importantly, the Mini has a small screen that:
More clearly displays its status and any received messages; and,Can be used to send messages, using its painfully slow virtual keyboard.
This latter use is probably rare, since the Mini will most often be tethered to a smartphone, but it’s a nice option to have “just in case.”
The single advantage of the ZOLEO is its $200 price, which is $100 less than the Mini. I tend not to put too much stock in the retail price of these units, however, since its lifetime cost is largely determined by the monthly service fees.
 For size comparison: the DeLorme inReach Explorer (left), ZOLEO (center), and SPOT Gen3 (right).
Service plans: Toss up
Garmin currently offers three plans:
Safety: $144 per year, or $15 per month plus $25 annual fee;Recreation: $300 pear year, or $35 per month plus $25 annual fee;Expedition: $600 per year, or $65 per month plus $25 annual fee.
The Safety plan includes unlimited preset messages but only 10 custom messages ($0.50 per overage); tracking, location requests, weather forecasts are available but are charged a la carte. With the Expedition Plan, everything is essentially unlimited. Recreation is in between.
ZOLEO also has three plans:
Basic: $240 per year, or $20 per month;In Touch: $420 per year, or $35 per month;Unlimited: $600 per year, or $50 per month;Month-to-month plans are charged a $4 per month hold fee, which is similar to Garmin’s $25 annual fee for its Freedom plans.
The Basic plan includes 25 messages total, including both standard check-in/Okay and custom. For anything beyond “just in case” use, the In Touch plan is more realistic — it includes 250 messages, or eight times more than Garmin’s mid-tier Recreation plan. Unlimited is the final option, and fairly named.
Leave a comment
What are your first impressions of ZOLEO?What questions do you have about it?How do you think it compares to existing satellite communicators like the inReach devices and SPOT X?
Disclosure. I strive to offer field-tested and trustworthy information, insights, and advice. I have no financial affiliations with or interests in any brands or products, and I do not publish sponsored content
This website is supported by affiliate marketing, whereby for referral traffic I receive a small commission from select vendors like Amazon or REI, at no cost to the reader.
The post Review: ZOLEO Satellite Communicator || Seamless messaging appeared first on Andrew Skurka.
Review: Zoleo Satellite Communicator || Seamless messaging
The satellite messaging market only has two players: SPOT and Garmin, with the latter getting most of the market share. For a product that’s now so ubiquitous and high-dollar (largely because of the subscription revenue), I’d like to see more brands competing and innovating in this space.
Here’s a new one that’s worth consideration: the Zoleo Satellite Communicator ($200, 5.3 oz), which debuted in January. It’s well priced, constructed, and engineered; and it offers a significantly improved messaging experience for both the owner and their contacts.
Review: Zoleo Satellite Communicator
When the Garmin inReach Mini ($300, 3.5 oz) was released two years ago, it seemed like the holy grail: reliable two-way messaging, location-based weather forecasting, and functional GPS navigation in a palm-sized package. Sweet!
The Zoleo Satellite Communicator is forty percent heavier and lacks any navigation features (which is fine — just use Gaia GPS), but outperforms the inReach in its core function: messaging.
The Zoleo platform — comprised of the device and the app — offers seamless messaging across all connection methods. From the Zoleo app, texts and emails can be sent using:
Cellular service, using a normal carrier like AT&T;WiFi, like at home or a coffee shop; and,Satellite, using the Zoleo Satellite Communicator.
In comparison, an inReach owner uses at least two messaging apps (personally, Google Voice and Garmin Earthmate), often resulting in disjointed conversations and missed messages, especially for those who bounce regularly between the frontcountry and backcountry like thru-hikers, avid weekend warriors, international travelers, and residents of very rural areas.
Like the inReach devices, Zoleo relies on the Iridium network, which offers true global coverage. While testing the Zoleo, messages cleared the device within minutes.
The Zoleo Satellite Communicator debuted in January. It’s a 5.5-ounce two-way satellite messenger that — when paired with the Zoleo app — offers a more seamless messaging experience than other satellite messengers.Key product specs
Two-way satellite messagingGlobal coverage with the Iridium satellite network5.2 oz (150 g), with +0.3 oz for optional carabiner$200 MSRPMonthly service required ($20-$50 per month; or $4/month hold)
Device activation
Before taking Zoleo into the field:
Register the device,Select a service plan,Download the Zoleo app, andSync the device with your smartphone.
The Zoleo website is well designed, in terms of both its aesthetics and intuitiveness, and I successfully sent my first message about thirty minutes after unboxing the device.
How to send messages
Messages can be sent directly with the Zoleo unit, or using the Zoleo smartphone app (which connects to the unit via Bluetooth).
From the device, two messages can be sent:
SOS, andCheck-in/Okay.
Notably, the unit does allow for location tracking, like on a 5- or 10-minute basis.
From the Zoleo app, three types of messages can be sent:
SOS,Check-in/Okay, andCustom texts and emails.
SMS is capped at 160 characters; email, at 200. However, when the recipient also uses the Zoleo app (which is free even without purchase), the cap is increased to 950 characters, or the equivalent of about six text messages.
How to receive messages
Each Zoleo owner is given a dedicated phone number and email address. For example, the number for my demo unit was 804-616-35XX, and my email was andrewskurka@zoleo.com.
I could give this information to my contacts, who could then send me messages through any device or platform — phone, desktop computer, inReach, or another Zoleo.
This configuration is much simpler than the relatively complicated directions for sending messages to an inReach unit.
Seamless messaging
The Zoleo app can be used to send texts and emails with a cellular, Wifi, or satellite connection, and is therefore equally functional in the frontcountry and backcountry. This prevents: having to “move” conversations to a different app, and missing messages that were sent to the wrong platform.
As an example, here is a seamless conversation I had with Dave, sent over both Wifi and satellite:
A quick conversation with friend Dave. The first three messages were sent using the Communicator; and the forth was over Wifi. I received his last message on Wifi, too.The hardware
The 5.2-oz devices shares similar dimensions as a Canon ELPH camera (3.58 x 2.6 x 1.06 in), and lacks an awkwardly protruding antenna. It’s powered with a lithium-ion battery, and will last 200+ hours while checking for messages every 12 minutes. Operating temperature range is -4°F to 131°F.
The exterior is made of a rubberized plastic, and seems to offer a good balance of weight, durability, and grip. It’s shock-resistant, and dust- and water-resistant (IP68, MIL-STD 810G).
The unit does not have a screen. To convey activity, it instead relies on cheery beeps and four LED lights, which can blink or stay solid in green, amber, blue, and red. The beeps and lights are mostly intuitive, but until you have them memorized, pack the Quick Start Guide (or use the app).
The SOS button is well guarded by a hinged door. An accidental depressing of the SOS button is unlikely, though I’d be comforted if its snap closure required more force to open.
Zoleo versus the competition
Zoleo enters a market with just two other brands: SPOT and Garmin. SPOT offers the SPOT X (my review), which I wouldn’t recommend. Garmin’s inReach service is available in four devices, with my favorite being the inReach Mini (my preview) because it’s the lightest and least expensive option while still having all the functionality as the other units (assuming it’s paired to a smartphone).
How does the Zoleo stack up against the Garmin inReach Mini?
Messaging: Zoleo wins
The messaging reliability seems about the same between my inReach and the Zoleo. Since they both use the Iridium network, this is what you’d expect.
Otherwise, the Zoleo messaging experience is better in every way. For owners, the messaging is centralized (in the Zoleo app), rather than being split between conventional messaging apps (when using cell service or Wifi) and the Garmin Earthmate app (when using the inReach). So conversations can be continuous, and no incoming messages are missed because they were sent to the app not use in use.
As an added perk, if your contacts send and recieve messages from you through the Zoleo app (which is free), messages can contain up to 950 characters.
Extra functionality: inReach wins, maybe
The inReach devices offers GPS navigation, through the device itself (sometimes limited) and also in the Earthmate app. The Zoleo completely omits this functionality. I think that’s fine, since I use Gaia GPS anyway.
Zoleo also omits location tracking, whereas with Garmin it can be set to a specific frequently like every 10 minutes. As a hiker, I don’t particularly see the value in this service (as opposed to, say, a pilot or sea kayaker), but I know that some backpackers do use it.
Both devices have location-specific weather forecasting. Here is the screenshot from the Zoleo app:
The device: inReach Mini wins
The inReach Mini has two advantages over Zoleo. First, it’s 33 percent lighter, at just 3.5 ounces (versus 5.3 for Zoleo).
Second, and more importantly, the Mini has a small screen that:
More clearly displays its status and any received messages; and,Can be used to send messages, using its painfully slow virtual keyboard.
This latter use is probably rare, since the Mini will most often be tethered to a smartphone, but it’s a nice option to have “just in case.”
The single advantage of the Zoleo is its $200 price, which is $100 less than the Mini. I tend not to put too much stock in the retail price of these units, however, since its lifetime cost is largely determined by the monthly service fees.
For size comparison: the DeLorme inReach Explorer (left), Zoleo (center), and SPOT Gen3 (right).Service plans: Toss up
Garmin currently offers three plans:
Safety: $144 per year, or $15 per month plus $25 annual fee;Recreation: $300 pear year, or $35 per month plus $25 annual fee;Expedition: $600 per year, or $65 per month plus $25 annual fee.
The Safety plan includes unlimited preset messages but only 10 custom messages ($0.50 per overage); tracking, location requests, weather forecasts are available but are charged a la carte. With the Expedition Plan, everything is essentially unlimited. Recreation is in between.
Zoleo also has three plans:
Basic: $240 per year, or $20 per month;In Touch: $420 per year, or $35 per month;Unlimited: $600 per year, or $50 per month;Month-to-month plans are charged a $4 per month fee ($36 per year), which is similar to Garmin’s $25 annual fee.
The Basic plan includes 25 messages total, including both standard check-in/Okay and custom. For anything beyond “just in case” use, the In Touch plan is more realistic — it includes 250 messages, or eight times more than Garmin’s mid-tier Recreation plan. Unlimited is the final option, and fairly named.
Leave a comment
What are your first impressions of Zoleo?What questions do you have about it?How do you think it compares to existing satellite communicators like the inReach devices and SPOT X?
Disclosure. I strive to offer field-tested and trustworthy information, insights, and advice. I have no financial affiliations with or interests in any brands or products, and I do not publish sponsored content
This website is supported by affiliate marketing, whereby for referral traffic I receive a small commission from select vendors like Amazon or REI, at no cost to the reader.
The post Review: Zoleo Satellite Communicator || Seamless messaging appeared first on Andrew Skurka.
May 13, 2020
Women-specific gear: What’s the difference, and do you need it?
On my first backpacking trip, I used a rented backpack, a massively unwieldy sleeping bag, and a sleeping pad better suited for a guest room. My pack must have weighed over 50 pounds.
In the years that followed, I have gained hands-on knowledge with almost every gear category, and I have bought and replaced a lot of gear. Trust me — you should see my garage.
A large number of outdoor gear categories are truly one-size-fits-all. Tents, stoves and cookware, food storage solutions, and navigation equipment are among the many gender-neutral product categories. The right choice is a straightforward selection by weight, function, and personal preference.
Things become more complicated with gender-specific products, however. I’ve found that some women-specific items are fantastic, but I’ve abandoned others for unisex or men’s styles. The “women-specific” label is no guarantee that these items were made with my specific needs in mind.
Let me help you navigate the intimidating topic of women’s specific outdoor gear.

Women-Specific Gear
The outdoor industry has thankfully moved past the simple accommodations of “shrink it and pink it.” Progress has been made towards true women-specific designs, and the assumption that women are just tiny men has been discarded.
Modern women-specific designs are commonly created for:
Shorter heightsLighter weightsSmaller shouldersWider hipsNarrower feet
Is this you? Fantastic! Women-specific gear may be exactly what you’re looking for.
But women come in all shapes, heights, and sizes. The gear that works for my curvy 5’2″ frame may be all wrong for a frequent 6’3″ hiking companion. It’s important to select the gear that fits you, your body, and your needs.
Tops – Jackets & Shirts
Many women-specific jackets and shirts are built to accommodate our unique shape. This may include varying amounts of consideration for chest sizes, narrower shoulders, and shorter torso lengths. It is important to research each manufacturer to determine the ‘typical’ body shape for which they are designing.
I rely on a collection of both men’s and women’s styles. I count on men’s styles for more generous cuts meant to fit over multiple layers, longer hem coverage, and longer sleeve lengths. I choose women-specific cuts for low-profile base and mid-layers. These are commonly mixed-and-matched in my closet to create the right stackable system for specific adventure needs.
Footwear
Selecting the right shoes starts with a solid understanding of the anatomy of your unique foot shape. The right category depends on which attributes fit you best.
Women-Specific
Lower Overall VolumeHigher ArchesNarrower Heels
Men’s / Unisex
Wider FeetLarger Sizes Specific Technical Requirements
Do not despair if you find yourself limited to a men’s or unisex shoe model. This may be unavoidable if you are searching for highly technical or specialized footwear. I have put in countless miles in men’s boots with SuperFeet insoles and/or thicker socks to fill the extra volume that my narrower feet and heels do not need.

Backpacks
There are several key differences in the design of women-specific backpacks. These most commonly include:
Narrower Flared Shoulder StrapsShorter Torso LengthsExaggerated Lumbar SupportDownward Canted Hip Belts
If you are built like me this could be a dream come true. But this could be bad news if you are taller, have narrower hips, or a less exaggerated lumbar curve.
Most women-specific backpacks also top out at 70 or 80-liters in capacity. So it’s common for women to be forced to select a unisex backpack for larger expedition-style adventures. If this is you, seek out manufacturers that offer a women-specific interchangeable hipbelt option.
Sleeping Bags
Women-specific sleeping bags are created with a colder sleeper in mind. It is assumed that women need additional insulation for a warm and comfortable night of sleep.
Some common differences of women-specific sleeping bags include:
Flared Hip AreaIncreased Overall InsulationAdditional Insulation in the Footbox
The downside? All of this additional insulation results in a heavier or bulkier sleeping bag in your backpack.
Do you need that extra insulation built into your sleeping bag? That’s hard to say — some women sleep colder than others. Personally, I carry a lighter unisex bag and supplement its warmth with down booties and an insulated jacket.
Sleeping Pads
Many outdoor brands are now offering women-specific sleeping pads. These commonly include additional insulation — measured as R-Value — designed with the needs of a colder sleeper in mind.
Depending on the manufacturer, this additional insulation may also result in a shorter, narrower, heavier, or more expensive sleeping pad — and sometimes all four! It’s important to carefully read the technical specifications on sleeping pad models before making your selection.
I recommend prioritizing your R-Value insulation needs as your top sleeping pad selection criteria. For women, this is typically a minimum R-Value of 3.0 in the summer and an R-Value of 4.5 in the winter. Then assess how long, wide, or thick you want your sleeping pad to be for a comfortable night’s sleep. I personally rely exclusively on unisex sleeping pads.
Trekking Poles
Women-specific trekking poles are also commonly different from unisex models in the following attributes:
Shorter LengthsSmaller Grips
You may be interested in a women’s specific model trekking pole if you are petite or have smaller hands. I recommend trying before you buy to make sure the grips feel comfortable for your unique hand shape.
 Photo: Teresa Hagerty
My System
My typical backcountry system mixes-and-matches women-specific, men’s, and unisex outdoor gear. This breaks down as follows:
Three-Season Adventures
Tops: Women-Specific Base LayersJackets: Women-Specific Mid-Layers, Insulation, and Shell JacketsBoots: Women-Specific Low Top HikerBackpack: Women-Specific 53 Liter BackpackSleeping Bag: Unisex 20 Degree QuiltSleeping Pad: Unisex R-Value 3.2 Sleeping Pad
Winter Season Adventures
Tops: Women-Specific Base LayersJackets: Women-Specific Mid-Layers / Shell Jackets & Men’s ParkaBoots: Men’s / Unisex Insulated BootBackpack: Women-Specific 60 Liter BackpackSleeping Bag: Unisex 0 Degree QuiltSleeping Pad: Unisex R-Value 4.5 Sleeping Pad
The right gear for you is ultimately the gear that works, fits, and makes you feel like the empowered outdoor adventurer you are. Select your gear with care, focus on fit and function as your first priorities, and your gear will take care of you on all of your future adventurers
The post Women-specific gear: What’s the difference, and do you need it? appeared first on Andrew Skurka.
Encouraging sign: Rocky Mountain to reopen May 27
Rocky Mountain National Park announced yesterday that they will begin a phased reopening starting on May 27. The press release is here.
Most relevant to this readership, backcountry camping will be permitted right away, and will continue through the fall as normal.
Even though Rocky is a National Park, the release points out that under Colorado’s current “Safer at Home” policy, travel more than ten miles from your home and/or into the mountain towns is discouraged. The opening of the park seems inconsistent with this safer-at-home order, which makes me wonder: Do NPS officials foolishly believe that non-locals won’t visit the park, or does the reopening align with the expected expiry of the 10-mile recommendation (which seems untenable for much longer since our high country will open up next month or summer recreation)?
Rocky is the third most visited unit (with 4.5 million visitors, behind only the Smokes and Grand Canyon); it’s one-tenth the size of Yellowstone; and two small towns on its east and west sides serve as its main access points. I’m uncertain how NPS solved for social distancing requirements and addressed concerns about medical care in rural areas, but I’m going to assume that officials in DC and in both Larimer and Grand counties signed off on it.
It’s an especially encouraging sign that Rocky has scheduled a reopen date, and I hope that other parks will soon follow. The park experience needs to be different in 2020 to accommodate the risk of Covid-19, but parks do not need to remain closed.
The post Encouraging sign: Rocky Mountain to reopen May 27 appeared first on Andrew Skurka.


