Andrew Skurka's Blog, page 21
December 23, 2019
Guide team 2020 || Profile: Alan Dixon
Alan is 59 years-old and lives in Washington, DC, with his wife and adventuring partner, Alison. He has two children and two grandchildren. Four years ago he retired as an environmental engineer, and now focuses mostly on Adventure Alan, one of the oldest and most respected sources for ultralight backpacking.
Since joining Andrew’s program in 2012, Alan has guided twenty-six trips (including fifteen as the Lead) in Alaska, California, Utah, and the Appalachians.
The post Guide team 2020 || Profile: Alan Dixon appeared first on Andrew Skurka.
December 22, 2019
Breakfast Recipe: Fruit and Cream Porridge
The term “porridge” may not sound particularly appetizing, but we think this breakfast is pretty decent. It’s slightly nutty and not too sweet, and another great template that can be adjusted to your personal preferences.
The most unique element of this recipe is the streusel topping, which bumps up its craveability factor.

Meal Statistics:
Meal Weight: 4.5 ouncesCalories per ounce: 118Total Calories: 531
Ingredients
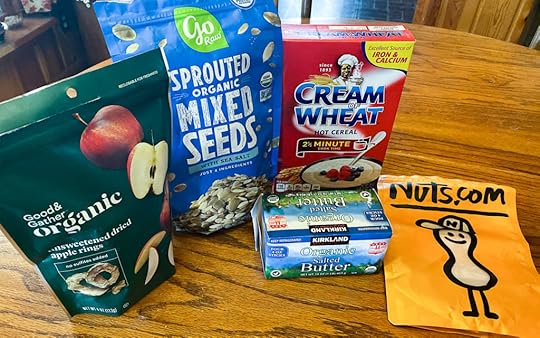
Most everything you need for this meal can be found at a standard super market or grocery store.
The exception is the streusel crumbs. If you can’t easily find them online, you can make your own using an online recipe. Or, crumble a cookie atop the meal to achieve a similar flavor and texture.
If you’re gluten free, substitute cream of rice for the cream of wheat, and either use a gluten-free cookie make the streusel with gluten free flour.
To make the meal fully vegan, use a vegan cookie for the streusel and replace the butter with coconut oil.
The dried apples and seeds can be substituted for any number of variations. For clients, we use pumpkin seeds and dried apples. Some other recommendations include
Almond slicesDried strawberriesCrumbled walnutsRaisins


Home Preparation
For solo trips, you can combine everything except the streusel crumbs into one small snack bag. Keep the streusel separate to help keep it crunchy. On hot trips, double bag the mixture to prevent the butter from leaking into your pack, or keep the butter in a sealable food storage container.
For multi-day trips, I bring a larger portion of butter for multiple meals. I keep it in a small Tupperware container, believing that the extra packaging is worth the reliabity.
For groups, you have several prep options. We bag separately the apple slices, streusel, and butter, and divide these ingredients in the field. Everything else is bagged together, in either individual or group sizes. If you substitute the apples for raisins or another dried fruit that mixes well, you can store them with the cream of wheat and seeds.
Cooking instructions
Bring 10 ounces of water to a boil. Add in all the contents except the streusel. Cover and let re-hydrate.After five minutes, remove the lid. Add in the streusel now.
As with most of these recipes, you can make clean-up easier by using more water. For this recipe, you can use up to 12 ounces.
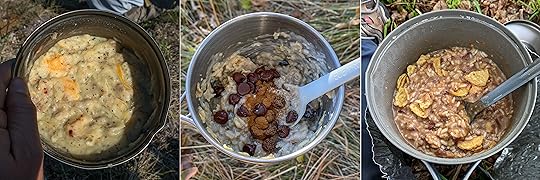
 The finished product
Have questions or an experience with this meal? Leave a comment.
Disclosure. I strive to offer field-tested and trustworthy information, insights, and advice. I have no financial affiliations with or interests in any brands or products, and I do not publish sponsored content
This website is supported by affiliate marketing, whereby for referral traffic I receive a small commission from select vendors like Amazon or REI, at no cost to the reader.
The post Breakfast Recipe: Fruit and Cream Porridge appeared first on Andrew Skurka.
December 21, 2019
Guide team 2020 || Profile: Brian Robinson
Brian has been backpacking since the 1970’s and helped to popularize ultralight gear and techniques. In 2001 he became the first person to complete the Calendar Triple Crown, which entails thru-hiking the Appalachian, Pacific Crest and Continental Divide Trails (7,400 miles total), all in the same year. This feat earned him the trail name “Flyin’ Brian” and induction into the California Outdoors Hall of Fame. It also caught the attention of Andrew, at the time still a college student, who would take my far, fast and light style to the next level.
The post Guide team 2020 || Profile: Brian Robinson appeared first on Andrew Skurka.
December 20, 2019
Guide team 2020 || Profile: Christy Rosander
As an elementary school teacher for 20 years, I took advantage of my breaks to hike extensively with family and friends, or on my own.
My most notable trips include:
Long-distance trails like the Pacific Crest, Great Divide, John Muir (4x), Theodore Solomons, and Tahoe Rim Trails;Off-trail adventures like the Yosemite High Route, Sierra High Route (2x), Lowest to Highest, The Great Outdoor Challenge, Wind River High Route, and Southern Sierra High Route, plus some DIY itineraries in the Grand Canyon, southern Utah, and Death Valley;Big peaks like Rainier, Shasta, Russell, Whitney (via the Mountaineers Route, 4x) Sahale, Banner, and Ritter.
The post Guide team 2020 || Profile: Christy Rosander appeared first on Andrew Skurka.
December 19, 2019
Slideshow || Coming of age: Hiking 7,775 miles across North America
Fifteen years ago now, in August 2004, I embarked on the first of my three mega long-distance hikes. From Cape Gaspe, Quebec, I followed a network of existing long-distance hiking trails — including the International Appalachian Trail, Appalachian Trail, Long Trail, North Country Trail, Continental Divide Trail, and Pacific Northwest Trail — for eleven months and about 7,775 miles, until finishing my journey at Cape Alava on Washington’s Olympic Peninsula.
My website had documented this journey well, but much of the content got lost when I migrated to a WordPress platform in 2011. My journal (what today we’d call a blog) is still live, but the Sea-to-Sea Route homepage is hollow and I’ve never bothered to restore the content — I typically find myself more interested by what’s ahead, not behind.
The missing documentation is unfortunate, since it was one of the most formative experiences of my life. I was 23 years-old, and not before and not since that journey have I seen so much of the country, both its places and people. The Great Western Loop was more noteworthy as a wilderness experience and athletic accomplishment, and the Alaska-Yukon Expedition still makes my jaw drop for its boldness and demonstration of backcountry competence, but the Sea-to-Sea Route was more quintessentially American than either of them.
In early-December I was contacted by Clif R., who may repeat the route and who converted my slideshow about the experience into a video file. I recorded the presentation as a PowerPoint in May 2006, when that seemed like a reasonable format — YouTube had been founded only fifteen months prior.
This has been a very long-winded way to say: My Sea-to-Sea Route slideshow is now on YouTube. Pull up a chair and get some popcorn, since it runs about an hour. Enjoy.
The post Slideshow || Coming of age: Hiking 7,775 miles across North America appeared first on Andrew Skurka.
December 18, 2019
Guide team 2020 || Profile: Joe “Stringbean” McConaughy
Joe set Fastest Known Times on the 2,600-mile Pacific Crest Trail (52 days, supported in 2014) and the 2,160-mile Appalachian Trail (45 days, self-supported in 2017). He lives in Boston with his wife, Katie, and is an elite ultra runner.
The post Guide team 2020 || Profile: Joe “Stringbean” McConaughy appeared first on Andrew Skurka.
December 17, 2019
Guide team 2020 || Profile: Matt Bright
Matt is our resident interpretive ranger, and in 2020 will be guiding with us in West Virginia. He has a PhD in environmental science and works in Washington DC on federal climate change policy.
His backpacking adventures include thru-hikes of the Long Trail, Sierra High Route, West Highland Way, and Cotswold Way; loops on the Wind River High Route and Pfiffner Traverse; and numerous other trips on both coasts and all points in between. To keep fit while living in the city, he’s become a runner, and right now he’s training for the #bostonmarathon in April.
The post Guide team 2020 || Profile: Matt Bright appeared first on Andrew Skurka.
December 16, 2019
7 critical skills you could learn with us in 2020
On Sunday I began accepting applications for my 2020 trips. This will be our ninth year in operation, and the program has evolved since I started guiding under my own company in 2011. By the end of that first season, I’d made three realizations:
The clients generally lacked the requisite backcountry skills for interesting routes, but wanted them;I was genuinely interested in teaching these skills, as a personal passion and as a value-add for the program; and,No other organization was using modern gear and techniques (sorry, NOLS), or hiring all-stars from the ultralight and long-distance communities, which had already redefined backpacking and have continued to do so.
So for 2012, I reformulated the program, and offered both intro-level Backpacking Fundamentals courses and longer learning-oriented Adventure trips. And I started working with backpackers who had extraordinary first-hand experience, notably Alan Dixon, Brian Robinson, and Mike Clelland.
It took us a few seasons to build out the curriculum, and each year I make small adjustments based on client feedback or technological changes. For example, last year I added GPS smartphone navigation as a dedicated tutorial.
 Just another unworldly canyon in Grand Staircase-Escalante.
In 2020, what are the top seven skills that you could learn with us?
1. Gear selection
What should you pack so that you’re appropriately prepared but not carrying more than you need? Your group will first be tasked with researching the conditions we will likely encounter. Then we’ll provide you a gear list template, which you must complete and which we will review afterwards.
2. Food planning
How much and what types of food should you prepare each day? We have some trail-tested recommendations, and we’ll treat you with stellar breakfast and dinner recipes that will forever cure you of Ramen noodles, instant oatmeal packets, or expensive freeze-dried meals.

3. Map making
Based on client feedback, we’re developing a more robust map-making module in this year’s Planning Curriculum. All clients will receive a free 6-month subscription to CalTopo plus some instruction, and you’ll be asked to create topographic maps for our trip.
4. On- and off-trail navigation
Can you proficiently read a map, dead reckon, operate a compass, use a smartphone GPS app, or find the path of least resistance when there is no trail? Navigation is usually the biggest focus when in the field, and we find that clients “get it” best when we challenge them with off-trail travel.
5. Early-season conditions
In Alaska in June and in Yosemite in July, we will encounter early-season conditions, including lingering snow, swift snowmelt-fed creeks, and occasionally prolific mosquitoes. All of these factors can be managed safely with proper gear and good decision-making.
 Buddying up across a swift thigh-deep creek in the Brooks Range
6. Water management
The Colorado Plateau is one the most unique and wildest landscapes in the country. But water is in chronic short supply, and good water management is essential to recreating safely here. We’ll teach you how to ration your water, plan your camps, purify nasty sources, and track down this liquid gold.
7. Campsite selection
If you are deliberate about your camps, you can sleep better at night by finding sites that are relatively warm, dry, and soft; and where insects, critters, and bears are less likely to bother you.
This list does not exhaust the subject matters that we teach. For a full list of topics, consult the Planning Curriculum and Field Curriculum.
Apply now for a 2020 trip!
Have questions about the 2020 program? Leave a comment, or contact me.
The post 7 critical skills you could learn with us in 2020 appeared first on Andrew Skurka.
December 14, 2019
Breakfast Recipe: Banana Chocolate Chip Oatmeal
This spin-off on the classic oatmeal breakfast is rich and decadent. Combined with our Coconut Chia version, we’ve taken oatmeal up a notch or two.
Meal Stats:
Recipe Weight: 4.5 ounces
Calories per Ounce: 136
Total Calories: 612
Ingredients
The chief benefit of this recipe is that the ingredients are widely available and easy to assemble. You can find everything in a standard supermarket, and probably even small-town grocery stores.
The recipe assumes that your banana chips are sweetened. If they’re not, it’s recommended that you add a sweetener like sugar or honey.
The meal is very fat- and calorie-heavy, due to the combination of whole milk powder, butter, chocolate, and walnuts. These will help balance the sugar content to give you a “slow burn” effect.
If you’re vegan, have a small appetite, or want a healthier version, consider these substitutions:
Use cacao nibs instead of chocolate chips;
Subsitute coconut milk powder for the whole milk powder;
Use dried blueberries or no-sugar-added dried cranberries; or,
Omit the butter and use coconut oil if you want to make it fully vegan.
While you can cold-soak this recipe, its full glory comes only when it’s cooked, because the chocolate chips melt into the oats.

At Home Preparation
For solo trips, combine all the ingredients in a sandwich bag, except for the chocolate chips and maybe the butter. To prevent the butter from leaking in hot conditions, double-bag it, or keep it in a secure food storage container (e.g. Tupperware). The chocolate chips are best added at the end.
For groups, combine the oats, banana chips, Craisins, and maybe the milk powder (depending on group allergies). This mix can be individually portioned, or divided in the field.
Keep the nuts separate, so you can accommodate allergies. Store the butter in a secure food storage container. Keep the chocolate chips separate, so they can be added at the end after the meal has cooked.

Field Preparation
Bring 10 ounces of water to a boil.
Add all the contents into the water.
Cover, and wait 5-10 minutes. Add cinnamon to taste.
A few minutes before eating, add the chocolate chips so that they melt into the oats some.
Using up to 12 ounces of water will help with cleanup, but the melted chocolate in the pot will inevitably need a little extra attention.
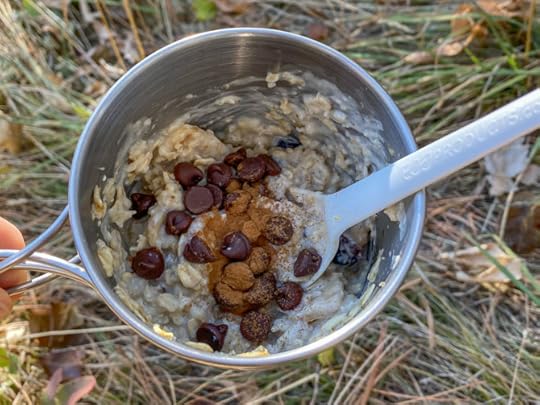
 Finished product
Have questions or an experience with this meal? Leave a comment.
Disclosure. I strive to offer field-tested and trustworthy information, insights, and advice. I have no financial affiliations with or interests in any brands or products, and I do not publish sponsored content
This website is supported by affiliate marketing, whereby for referral traffic I receive a small commission from select vendors like Amazon or REI, at no cost to the reader.
The post Breakfast Recipe: Banana Chocolate Chip Oatmeal appeared first on Andrew Skurka.
Breakfast Recipe: Banana Chocolate Oatmeal
This spin-off on the classic oatmeal breakfast is rich and decadent. Combined with our Coconut Chia version, we’ve taken oatmeal up a notch or two.
Meal Stats:
Recipe Weight: 4.5 ouncesCalories per Ounce: 136Total Calories: 612
Ingredients
The chief benefit of this recipe is that the ingredients are widely available and easy to assemble. You can find everything in a standard supermarket, and probably even small-town grocery stores.
The recipe assumes that your banana chips are sweetened. If they’re not, it’s recommended that you add a sweetener like sugar or honey.
The meal is very fat- and calorie-heavy, due to the combination of whole milk powder, butter, chocolate, and walnuts. These will help balance the sugar content to give you a “slow burn” effect.
If you’re vegan, have a small appetite, or want a healthier version, consider these substitutions:
Use cacao nibs instead of chocolate chips;Subsitute coconut milk powder for the whole milk powder;Use dried blueberries or no-sugar-added dried cranberries; or,Omit the butter and use coconut oil if you want to make it fully vegan.
While you can cold-soak this recipe, its full glory comes only when it’s cooked, because the chocolate chips melt into the oats.

At Home Preparation
For solo trips, combine all the ingredients in a sandwich bag, except for the chocolate chips and maybe the butter. To prevent the butter from leaking in hot conditions, double-bag it, or keep it in a secure food storage container (e.g. Tupperware). The chocolate chips are best added at the end.
For groups, combine the oats, banana chips, Craisins, and maybe the milk powder (depending on group allergies). This mix can be individually portioned, or divided in the field.
Keep the nuts separate, so you can accommodate allergies. Store the butter in a secure food storage container. Keep the chocolate chips separate, so they can be added at the end after the meal has cooked.

Field Preparation
Bring 10 ounces of water to a boil.Add all the contents into the water.Cover, and wait 5-10 minutes. Add cinnamon to taste.A few minutes before eating, add the chocolate chips so that they melt into the oats some.
Using up to 12 ounces of water will help with cleanup, but the melted chocolate in the pot will inevitably need a little extra attention.
 Finished product
Have questions or an experience with this meal? Leave a comment.
Disclosure. I strive to offer field-tested and trustworthy information, insights, and advice. I have no financial affiliations with or interests in any brands or products, and I do not publish sponsored content
This website is supported by affiliate marketing, whereby for referral traffic I receive a small commission from select vendors like Amazon or REI, at no cost to the reader.
The post Breakfast Recipe: Banana Chocolate Oatmeal appeared first on Andrew Skurka.


