
Andrew Skurka's Blog, page 25
October 16, 2019
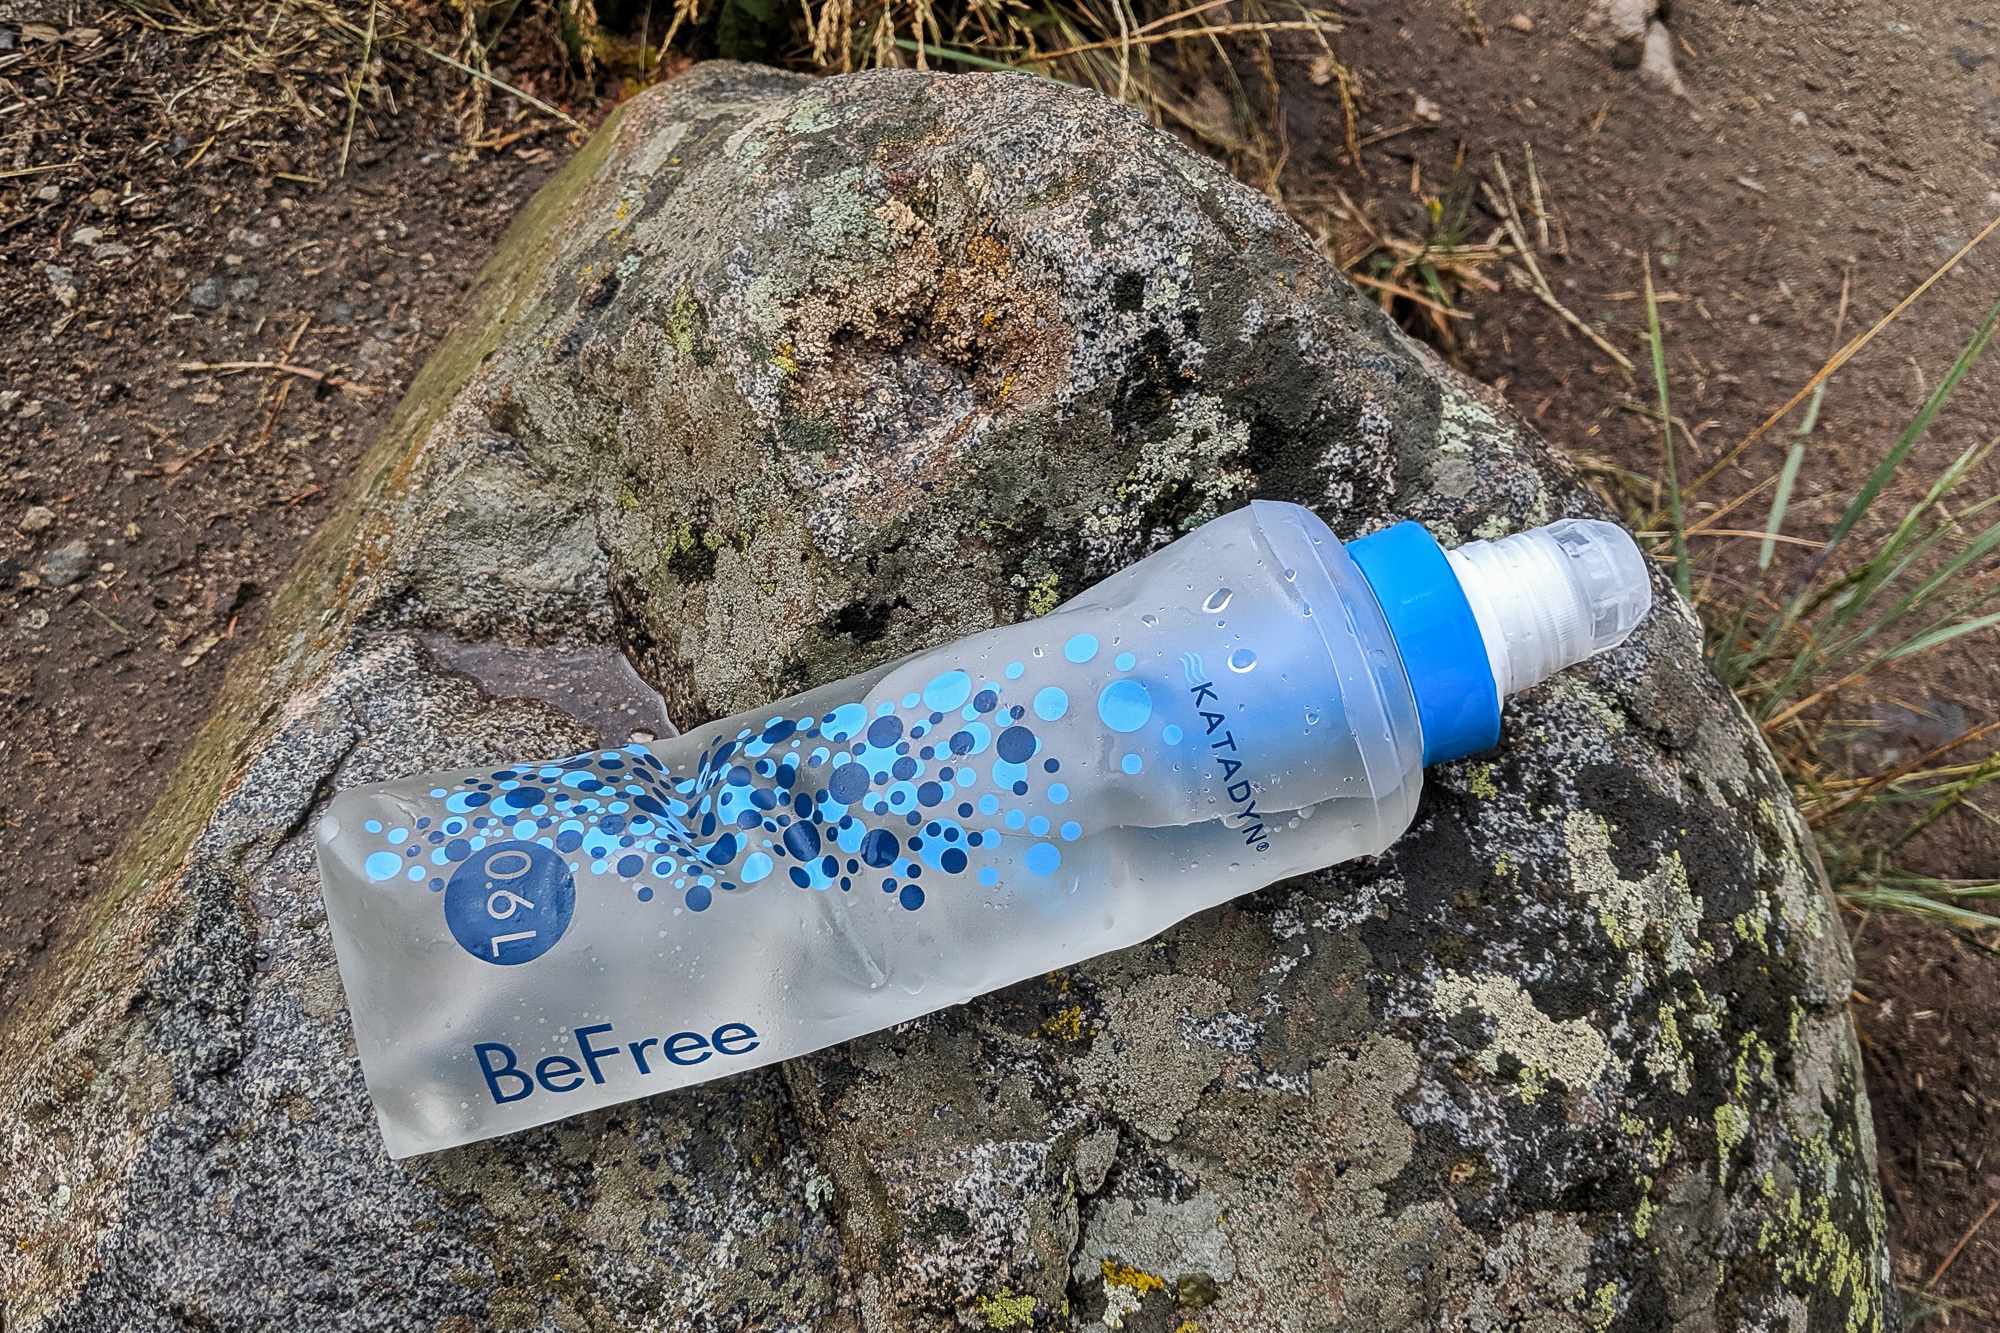
Clean water on-the-run || Review: Katadyn BeFree Collapsible Filter Bottle
Motivated by the impending arrival of winter, last month and earlier this month I undertook five of the most fun and most adventurous trail runs of my life.
Natural water sources were abundant during these 5- to 11-hour efforts, but I was skeptical of their quality. By late-summer in Rocky Mountain National Park and the Indian Peaks Wilderness, flow rates are low, and droppings from elk, moose, and deer (and sometimes humans) litter the tundra and forest floor.
To reduce my risk of waterborne cooties, I used the Katadyn BeFree Collapsible Water Filter Bottle 20-oz. It was sent to me last year by a media representative, but unfortunately I didn’t get out for any all-day mountain runs until recently.
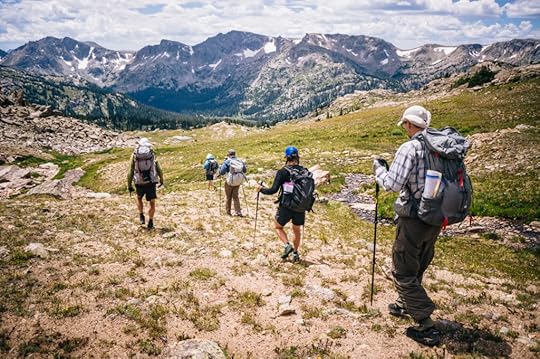
 The BeFree was ideal for several recent 5- to 11-hour outings in Rocky Mountain National Park and the Indian Peaks Wilderness (photo).
Review: Katadyn BeFree Collapsible Water Filter Bottle
The Katadyn BeFree Collapsible Water Filter Bottle provides potable water on-the-go, with the refill-to-drink process taking as little as 30 seconds. It’s available in two sizes:
BeFree 0.6-liter/20-oz ($40, 2.6 oz confirmed), andBeFree 1.0-liter/33.8-oz ($45, 3.0 oz estimated)
The smaller size, which has an actual capacity of 0.71 liters or 25 ounces, is ideal for long trail runs or fast day-hikes in areas with natural water sources, as well as for lightly supported trail races. While the BeFree has some room for improvement, I think it’s very well suited for this application and I’d heartily recommend it.
 The Katadyn BeFree Collapsible Water Filter Bottle 20 oz is ideally suited for long trail runs and fast day hikes in areas with natural water sources.
One unique feature of the BeFree is its form factor. The filter is inside the container, rather than protruding from the top like the Sawyer Squeeze ($35, 3 oz). When empty, it’s only marginally more bulky than the filter-less flasks popular among trail runners. When about three-fourths full (or less), the 0.6-liter/20-oz size fits in the front pocket of a running vest.
 When collapsed, the BeFree Bottle is only marginally more bulky than a filter-less flask like the UD Body Bottle.
The filter extracts protozoa and bacteria, which are more commonly found in backcountry water than viruses, which are too small to filter out. Out of the box, the BeFree has an astounding flow rate of about two liters per minute. There’s very little resistance in the system, and you may wonder if it’s actually doing anything.
The flow rate decreases with use, but can be quickly and easily cleaned in the field, without needing any accessories (e.g. back flush syringe). Some long-term users (read through the comments) have complained about permanently diminished performance, which is not something that I have yet seen but which I will keep tabs on.
Katadyn could better optimize the BeFree for trail running by:
Advertising correctly the BeFree’s true water capacity,Redesigning the cap, andOffering it in other bottle types and sizes.
Key product specs
Removes protozoa and bacteria, but not viruses2.7 oz for filter and 0.6-liter flask2 liters per minute flow rateField clean-able without accessories$40 MSRP for the 0.6-liter sizeMore information
Optimal uses
The BeFree is suitable for long runs in areas with natural water sources, so that you can refill along the way. I’d also consider it for lightly supported trail races, so that I could confidently top off between aid stations.
For runs shorter than one to two hours, when refilling is unnecessary, a standard filter-less bottle will suffice. For runs in areas without natural water sources, the BeFree will not help. And for runs in areas with extremely contaminated water sources, I’d insist on a two-step treatment process, filtering it first and then knocking it with chemicals like Aquamira drops ($15, less than 2 oz).
For backpacking, I’d prefer a different bottle type, and possibly a different treatment system, depending on the setting and group size. Personally, I normally carry:
A 1-liter disposable plastic bottle (e.g. smartwater), which is easier to refill and drink from than an amorphous flask;A 2.4-liter collapsible PlatyBottle, for long dry stretches and for camp use; and,Aquamira drops, which I’ve trusted for years and which will quickly treat large quantities of water (e.g. water for 10 people).
Room for improvement
I’m not aware of another product that better addresses the needs of trail runners than the BeFree, in terms of effectiveness, speed, and size/weight. But it could be more optimized for this purpose, with changes that are so obvious that I wonder if Katahdyn even sought the feedback of trail runners during the design process.
1. Advertise correctly its capacity.
The BeFree 0.6L (or 20 oz, for Imperial audiences) has a true capacity of 0.71 liters or 25 oz. That’s a 17 to 25 percent error!
 The true capacity of the 0.6L/20oz BeFree is 0.71L or 25 oz (1*16 + 9).
Yes, this small difference matters. When trail running, a 0.6-liter (20-oz) flask is borderline unmanageable. But a 0.7-liter (25-oz) flask is most definitely impractical — it will not sit nicely in the front pocket of any running vest, such as my Black Diamond Distance or Ultimate Direction AK Mountain Vest 3.0. Without proper support, it annoyingly bounces all over the place.
To make the 0.6-liter/20-oz work for trail running, I had two solutions:
Fill it no more than two-thirds to three-fourths full, orFill it entirely, but then drink one-fourth to one-third of the water before storing it away.
 The 0.6-liter BeFree (actual capacity 0.7 liters) does not fit well in the Black Diamond Distance Vest. For comparison, notice the 500-ml flask to the right.
 Nor does it fit well in the Ultimate Direction AK Mountain Vest 3.0. A true 500-ml flask fits much better.
2. Redesign the mouthpiece.
Currently, the free-flow spout is covered with a hinged cap. This cap requires two-hand operation: one hand must hold the flask while the other hand releases the cap. And it seems prone to snapping, which would ruin the filter — without the pressure of the cap, water would freely exit through the spout.
As an alternative to the current design, I’d recommend a more conventional push/pull cap or bite valve, both of which are time-tested and can be operated with just one hand (and a mouth).
 The hinged cap requires two-hand operation and seems vulnerable to snapping off.
3. Offer the BeFree in other bottle types and sizes.
As previously stated, a 0.7-liter flask is sub-optimal for trail running, because of its unwieldy size and its incompatibility with modern running vests. A true 0.5-liter flask would be much better.
I’d also like to see the BeFree added to a 20-oz soft-sided squeeze bottle. This type does not collapse like the flasks, but it’s rigidity is better for larger volumes. It’s also more easily refillable from non-flowing sources like lakes and small pools.
 The flask is easily filled in flowing water sources, but not in non-flowing sources like lakes and small pools.
Leave a comment!
Have questions about the BeFree Filter Bottle?Have an experience with it that you’d like to share?What other treatment methods have you tried for long trail runs?
Disclosure. I strive to offer field-tested and trustworthy information, insights, and advice. I have no financial affiliations with or interests in any brands or products, and I do not publish sponsored content
This website is supported by affiliate marketing, whereby in exchange for referral traffic I receive a small commission from select vendors, at no cost to the reader. This post contains affiliate links.
Buy now: Katadyn BeFree Collapsible Water Filter Bottle
The post Clean water on-the-run || Review: Katadyn BeFree Collapsible Filter Bottle appeared first on Andrew Skurka.


October 15, 2019
Current food storage regulations for Rocky Mountain National Park
For the 2019 season, Rocky Mountain National Park made a significant revision to its wilderness food storage regulations, giving backpackers a new option that is lighter and more user-friendly than the hard-sided canisters that have been required since 2014.
To date, the park has not consistently or widely communicated this policy change on its website or through its backcountry rangers, leading to public confusion.
My understanding of the new regulation is based on two telephone calls with the Wilderness Office and a face-to-face conversation with an on-duty ranger. I had a strong incentive for knowing and complying with the policy, since my company guided six trips (with 52 clients total) in the park this summer.
 Upper East Inlet, Rocky Mountain National Park. Credit: Andrew Manalo.
Official regulation
The official policy is correctly stated in the park’s Fall 2019 newspaper (page 11), which is distributed at entrance stations.
All food items and garbage must be secured inside an approved, commercially-made carry in/carry out bear-resistant food storage container that is either hard-sided or has a non-crushable insert in all areas of the park between April 1 and October 31.
But as I said earlier, the policy has not been consistently communicated. For example, the main Wilderness Camping page, which was last updated on October 3, still describes the old policy:
 The old policy is still described on the NPS website, as of October 3.
Interpreting the policy
Rocky Mountain National Park permits two types of food storage products:
Hard-sided canisters (e.g. BearVault BV500), andSpecific Ursack models in combination with the Aluminum Liner.
Hard-sided canisters
Unlike other National Parks, Rocky is not particular about canister models. It must merely be hard-sided, commercially made, and carry in/carry out (i.e. portable). The hard-sided canisters listed in my buyers guide all meet these standards.
From 2014 to 2018, hard-sided canisters were the only accepted food storage method in Rocky Mountain National Park.
 Option 1: Hard-sided canister, such as the BearVault BV450 (left) and BV500 (right)
Ursack + Aluminum Liner
The permitting of bear-resistant Ursacks (when used with the Aluminum Liner) was the big change in 2019. Three specific models are permitted:
Ursack Major ($80, 8 oz),Ursack Major XL ($100, 8.8 oz), andUrsack AllMitey ($125, 13 oz).
A fourth model, the Ursack Minor ($65, 5 oz), which is rodent-resistant but not bear-resistant, is not permitted.
On its own, the Ursack is not enough — it must be paired with the Aluminum Liner ($40, 10.8 oz). By making the Ursack more crush-resistant, theoretically the liner reduces the risk of viscous or crumbly calories exiting the Ursack and thus “rewarding” a bear.
The Park Service is serious about the liner. One ranger shared with me that he has packed out liner-less Ursacks that he found unattended, leaving them at the ranger station for retrieval by the hungry owners.
 Option 2: Ursack Major, Major XL (photo, left), or AllMitey with an Aluminum Liner (right)
Recommendations: Canister vs Ursack+Liner
An Ursack+Liner combination is lighter and more packable than hard-sided canisters of similar volume, but in most cases more expensive. For example:
Ursack Major + Liner = $120, 19 ozBearVault BV500 = $80, 41 oz
So an Ursack may be a worthwhile purchase if you:
Backpack often in Rocky Mountain National Park,Have planned an ambitious every-ounce-counts itinerary, Can afford the optimal gear for every trip, orBackpack in other areas where Ursacks are permitted, such as Glacier National Park or Gates of the Arctic National Park, or unregulated bear-inhabited areas where they are simply a good idea.
Otherwise, hard-sided canisters will probably be the better long-term value, since they are more universally accepted.
Policy change explanation
When I asked NPS why it revised its policy, I never received a definitive or confident answer. It did not sound related to NPS system guidance, internal testing or research, or even IGBC certification. The best I could tell, the chief ranger thought the Ursack+liner would be appropriate in Rocky, and was willing to at least try it.
Leave a comment!
What questions or thoughts do you have about the policy change?If you have backpacked in Rocky recently, what was your experience?
Disclosure. I strive to offer field-tested and trustworthy information, insights, and advice. I have no financial affiliations with or interests in any brands or products, and I do not publish sponsored content
This website is supported by affiliate marketing, whereby in exchange for referral traffic I receive a small commission from select vendors, at no cost to the reader. This post contains affiliate links.
The post Current food storage regulations for Rocky Mountain National Park appeared first on Andrew Skurka.
October 14, 2019
2020 guiding program: Tentative schedule
This weekend I received four inquiries about the 2020 guiding program. Normally I would not be prepared to discuss it until December, but I’m ahead of my usual schedule and can share a few things now.
Schedule
A tentative 2020 schedule has been posted. In coming weeks I’ll confirm some additional details, notably guide assignments and the Rocky Mountain location.
A “final” schedule will not be posted until after the open application period in early-January. Based on demand, I’ll commit to specific dates, trip types, and intensity levels at that time.
Open application period
I will accept applications starting no later than January 2, 2020, and may open the application period in December if it’s ready to go. The open application window will end on Sunday, January 12.
During the open application period, all applications will be considered equally. Starting January 13, applications will be considered on a first-come-first-serve basis, and only unfilled spots will be available.
Guides
I have not presented this tentative schedule with my guide team or discussed their availability. If the dates are not workable for certain key guides, I may modify the schedule, but I don’t think this is likely.
 Lunch spot in Arrigetch Creek, Alaska
Appalachians
In West Virginia we will run at least four trips, and we’ll run more if demand warrants them. The dates for the first two blocks are firm.
For the first time ever, we’re offering 5-day trips east of the Continental Divide. They’ll be a chance to explore the state’s best wilderness areas (e.g. Dolly Sods) and to master Appalachian conditions. The guide team will be very strong, with Alan Dixon, Joe McConaughy (“Stringbean”), yours truly, and one other TBA hammock specialist.
Brooks Range
The second half of June seems to be an excellent timing for the Brooks Range. The weather is generally stable; the snow has melted off; the mosquito season has barely started; and there is little competition for bush flights.
Last year all of the Alaska sessions were rated High and Very High. This year, I’d expect at least one Moderate session. All applicants must still have a strong resume, however.
Yosemite & Rocky Mountains
For certain, we’ll run trips in Yosemite in July. The bugs can be thick, but I still love this month: the high country is super green and still capped with some snow; wildflowers are everywhere; and we have the opportunity to teach early-season skills like snow travel and river crossings.
 Overlooking Roosevelt Lake, on the descent from Don’t Be A Smart Pass
The schedule in August and September will be shaped by both demand and commercial permits. To keep the guides (and alumni) excited, I’m hoping to take a break from Rocky Mountain National Park, and at least for 2020 check out another location in Colorado, Wyoming, or maybe Montana.
If my usage is restricted, I’ll probably run a few trips in the Rockies in August and then return to Yosemite in September. If I have more flexibility, I’ll run the full schedule in the Rockies in August or September, and only run a second set of trips in Yosemite if demand is high and I’m up for it.
Questions about 2020? Leave a comment.
The post 2020 guiding program: Tentative schedule appeared first on Andrew Skurka.
September 17, 2019
Tell me: Who’s your guiding dream team in 2020?
Tomorrow morning I drive up to Grand Lake, Colo., to greet the Adventure 2A and 2B groups as they exit from their respective 5-day outings. They’re our final set of trips this year, both in Rocky Mountain National Park and for the season.
For the first time since I launched trips under my own company in 2011, I sat out this block entirely. I helped send them off and was on-call throughout, but otherwise I was able to clean out the raised beds, sneak in a few adventure runs, and ponder the 2020 season.
View this post on InstagramA post shared by Hiker Midnight (@hiker_midnight) on Sep 15, 2019 at 12:19pm PDT
Mary and Jessica out with the 2A group.
State and concerns
Today I’m very pleased with the service that we offer, of which the guide team is the most important part.
Quantitative evidence supports my assessment. In the post-trip survey we send to every client, this year 113 out of 118 clients have given us a perfect 5/5 score when asked, “Overall, how satisfied are you with your experience?” The remaining five gave us a 4/5 rating.
Our scores have been high since 2014, when I started surveying clients. But we’re operating on another level now.
Without action, however, I’m concerned about our ability to maintain this quality long-term. My strongest and most experienced guides — notably, Alan Dixon, Brian Robinson, and Mike Clelland, as well as Buzz Burrell and Dave Eitemiller — are in their 60’s, or will be within a few years. For how many more years will they remain remarkably fit and healthy, or over-the-top enthusiastic about guiding?
I can assemble a younger team that’s equally good. But it takes a new guide several years in the rotation to learn the program and the craft. If I do it right, the transition from the current generation to the next generation can be seamless, and rewarding for all the guides involved.
Hiring criteria
New guides must strengthen our core expertise. Specifically, they should:
Be passionate about teaching backpacking and wilderness skills, andHave extensive experience with long-distance trails and high routes.
New guides should also help rectify or balance out some of our weaknesses, both major (e.g. our aforementioned demographics) and minor (e.g. our relative lack of hammock experience).
Finally, I’ll give bonus points to prospects who already have an audience. Mostly on my own, I have grown the program to its current level (this year: four locations, 20 trips, and 176 clients). I can grow it more, but I think I can grow it faster by finding partners.
Who are your dream guides?
I’m not taking applications. I’m just looking for names of strong candidates that I should consider. Leave a comment, telling me about backpackers that you know of, follow, have learned from, find entertaining, and admire, and that you think might make an excellent addition to our team.
Give me bloggers, vloggers, YouTube or Instagram sensations, writers, speakers, forum moderators, guides, community volunteers, SAR team leaders, up-and-coming thru-hikers, or obscure. The sole criteria is that you’d want to take a guided trip with them.
The post Tell me: Who’s your guiding dream team in 2020? appeared first on Andrew Skurka.
September 1, 2019
How to navigate || Part 5: Skills + knowledge checklist
Within a few days of starting my Appalachian Trail thru-hike in 2002, I learned dead-reckon navigation using my watch and the datasheet. With surprising accuracy, I could now monitor my hiking pace, pinpoint my location between known landmarks, and predict my arrival time at upcoming points of interest like water sources and shelters.
On an as-needed basis during later hikes, I learned additional navigation skills. For example:
On the Sierra High Route, my first off-trail experience, I learned how to really read a map;On the Hayduke Trail, I learned to use my compass to track my location in meandering canyon bottoms;On the Colorado Trail, I used my altimeter to rule out false summits on big climbs; and,While skiing along Alaska’s Arctic Coast, I used GPS to calculate the distance to landmarks ahead, like the shoreline.
It’s worth noting that my navigation skills took a leap forward when I began guiding. “Those that know, do. Those that understand, teach.”
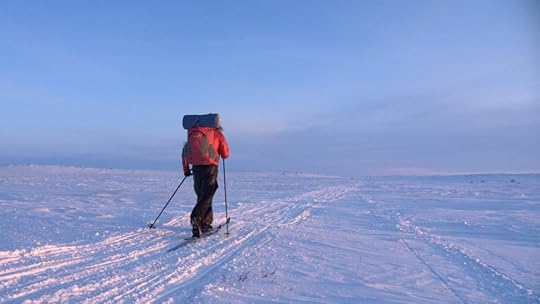 Alaska’s Arctic Coast gave me reason to learn to use GPS. In this featureless and frigid landscape, a GPS was faster and more reliable than map-reading and dead-reckoning.
So far in this tutorial on backcountry navigation, I’ve written about:
Part 1: IntroductionPart 2: Maps and resourcesPart 3: EquipmentPart 4: Navigator’s mindsetPart 5: Skill & knowledge checklist
To finish it off, I will offer a checklist of essential:
Definitions,Concepts, andSkills
It’s beyond the scope of this post to teach readers this knowledge and these skills, however. On a 5- or 7-day guided trip, we normally have enough opportunities to cover all of it, and it’s unreasonable to think it can be covered in 1,500 words.
Instead, it’s all on you: find videos, books, and classes that fill in the gaps of your knowledge and skill set, and most importantly practice. To get you started, I have linked and embedded a few of my own tutorials.
Maps
A topographic map (more info) is perhaps the most essential navigational aid. In many parts of the West, it can be used exclusively to get around.
Scale
Explain the map scale.How does the scale correspond to real distances. For example, one inch on a 1:24,000-scale map equals what distance in the field? What about 1:62,500 or 1:100,000?Measure the straight-line distance between two points.Measure the distance of a meandering trail.Measure distance using your finger, the scale-specific ruler on your compass, and your compass lanyard.Become familiar with the size of features on the map relative to their size in the field.
Pro challenge: Learn the relationship between different map scales and different contour lines (e.g. a 24,000 map with 40-foot contours, or a 63,360 map with 100-foot contours) so that the topographic size of new landscapes does not surprise you.
Contour lines
What is a contour line?What is the contour interval of your map?What is the difference between index contours and intermediate contours?Identify areas on the map that are: flat, moderate and steep.Identify high points, like summits, knobs, and hilltops.Identify low points, like lakes, creek bottoms, and dry gullies.Develop a general understanding of the landscape on your map, notably its major ridgelines and drainages, and its corridor trails. Calculate the vertical change between two points.Associate terrain on your map with the terrain in the field.
Pro challenge: Predict whether a pass or summit will “go” based on the steepness of the slopes below it. Also, account for where snow is likely to linger.
Shading
In areas shaded in green, what will you generally find?In areas without shading, what will you generally find?Explain the variants of blue: continuous line, intermittent line, solid blue, and blue stripes.On your particular map, what are the types of things that you will find in areas with green shading or no shading? For example: tree types, tundra, tussocks, bogs, slabs, talus, and sand.
Pro challenge: Predict the exact ground cover or vegetation you are likely to encounter at specific elevations, on specific slope aspects, and adjacent to specific types of land forms. Examples:
A moderate slope at 8,500 feet on the east side of Rocky Mountain National Park is shaded green. What type(s) of tree(s) will you likely find there?A streak of white cuts through a forest on a steep slope below a 6,000-foot peak in the Cascades. Why, and what will you find there?The base of a 1000-foot sheer wall in the High Sierra is unshaded. What will you probably find there?
 When you look at this 1:24,000 map, can you: Identify high and low points, measure the distance and vertical change between two points, and anticipate the ground cover (e.g. tundra, slabs, talus, dirt)?
Cartography
In a mapping platform like CalTopo:
Import a GPX file.Annotate the map with important route notes.Create a track, and measure its distance and vertical change.Enter this distance and vertical data into a spreadsheet to create a datasheet.Print a topographic map (or map set) at your preferred scale and on your paper size.
Watch
A basic, altimeter, or GPS watch (more info) is an essential tool for dead-reckoning, which is one of the most useful skills for on-trail hikers.
The fundamental formula is: DISTANCE = RATE * TIME
Calculate your average RATE using DISTANCE and TIME.Convert your RATE (e.g. MPH) into pace (e.g. 20 minutes per mile).By how much will your RATE be affected by variables like vertical change, altitude, and trail quality?Calculate the DISTANCE you have hiked using RATE and TIME.Calculate your ETA at an upcoming landmark by using your RATE and the DISTANCE.
Compass
Particularly in areas with limited visibility and subtle terrain, a backpacking compass (more info) is a lifeline, even in modern GPS-dominated times. In more favorable conditions, it can still be used to support your navigational story.
Explain declination.What is the declination of your current location?If you have an adjustable compass, adjust it for declination.Orient the map.Find a bearing in the field, and transpose it to the map.Find a bearing on the map, and transpose it to the field.Find a bearing in the field and transpose a bearing to the field, using both an adjustable compass or non-adjustable compass.Follow a bearing.
You might notice that triangulation does not make my list. To me, this seems like a useful technique only after I get lost, and frankly I find it easier to simply stay found. Plus, if you do get lost, you can locate yourself more quickly and more precisely with a GPS device.
Altimeter
An altimeter watch (more info) uses barometric pressure to calculate its elevation, and is an extremely useful tool in mountainous environments.
Calibrate your altimeter using a known reference point.Follow a contour, i.e. cover horizontal distance without losing or gaining elevation.Rule out false summits.Climb or descend to a specific elevation where an additional action must be taken, like leaving the trail.Pinpoint your location by cross-referencing your altitude against a nearby topographic feature, like a lake outlet or a creek confluence.
Pro challenge: Before a steep climb, predict your arrival time at the top using your normal rate of vertical speed (e.g. vertical feet per minute).
 Contouring at around 10,800 feet on the Sierra High Route between Evolution Basin and Snow Tongue Pass
GPS
When your map, watch, compass, and altimeter are not making sense, resort to the ace up your sleeve: a GPS device (more info).
Download maps for off-line use, so that your smartphone can function as a GPS (with maps) even without cell service.Set your GPS devices and map grids to a consistent datum.Upload tracks and waypoints to your device.Extend the battery life of your device by switching it to airplane and battery-saving mode (and, more importantly, by instead using non-consumptive tools like your paper map and compass).Pinpoint your location.Create a waypoint.Create a route to a waypoint.Create waypoints and record your tracks, and export it later as a GPX file that can be imported to a platform like CalTopo.
Pro challenge: For how long can you run your GPS device before it must be recharged?
Off-trail navigation
Find the overall path of least resistance from Point A to Point B by accounting for the individual effects of:
Horizontal distance,Vertical change,Vegetation,Ground cover,Game trails,Time sinks like canyons, cliffs and ledges, brush thickets, blowdowns, loose moraine slopes, and deep water.
The best line rarely “cuts against the grain” of the landscape. Instead, it goes directly with or against the fall lines, and works seams of weakness.
Simplify your route-finding by utilizing natural features:
Follow handrails, like a creek, ridgeline, or shoreline; and,Hike until running into a backstop, like a creek, trail, or ridge top.
Find relatively safe lines through areas with natural hazards like:
Creek fords,Snowfields,Avalanche zones.
Leave a comment
Do you have questions about the listed skills?What skills should be added to this list?How have you developed these skills? What resources what you recommend most?
The post How to navigate || Part 5: Skills + knowledge checklist appeared first on Andrew Skurka.
August 30, 2019
How to navigate || Part 4: Navigator’s Mindset & “staying found”
With just a credit card and reliable internet connection, an aspiring navigator can acquire the proper maps, resources, and equipment.
The final two steps to navigational proficiency require more intention, self-study, perhaps an evening or weekend course, and most importantly field practice. In other words, the process is more time-intensive, but also more fun.
These steps are:
Putting oneself in the Navigator’s Mindset, andDeveloping the skills to interpret and operate the maps, resources, and equipment.
This is the fourth installment of a multi-part series on backcountry navigation. If you landed here first, consider reading the remainder of the series afterwards, or start with the Introduction so that this post has more context.
Part 1: IntroductionPart 2: Maps and resourcesPart 3: EquipmentPart 4: MindsetPart 4: Skill checklist
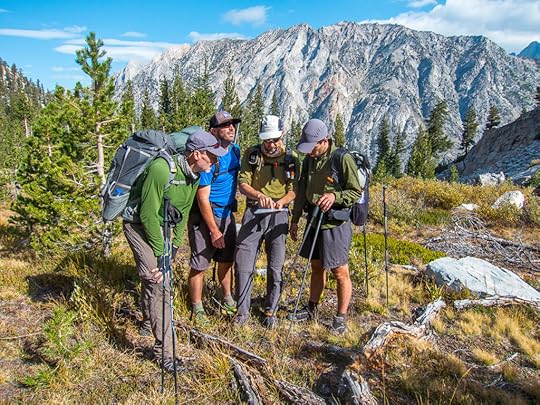
 From a high point above Tablelands, Brian Robinson discusses the proposed route with members of the group.
Tell me a story
When teaching clients how to navigate, we regularly ask them to tell us their “navigational story.” This device helps put them in the Navigator’s Mindset, specifically to be:
Attentive,Present, andAnticipating.
The story itself consists of three parts:
Where we’ve been (“attentive”),Where we are (“present”), and,Where we’re going (“anticipating”).
We ask clients to illustrate their story on the map, and to prove it with information they glean from their map, resources, and equipment. There must be alignment — if there are discrepancies between the story and these tools, clients must revisit their story line or double-check their instruments.
 Dave Eitemiller and crew get their bearings before committing to a big climb up Adventurer Col on the Kings Canyon High Basin Route.
Inconsistencies
It’d be reason to pause if:
The story is that we…
Reached a lake after climbing steeply west for an hour, but in fact we only climbed for 35 minutes and we were hiking east (“not attentive”);Have arrived (we think) at the ford of Return Creek on the Pacific Crest Trail, but our altimeters read 8,800 feet instead of 8,600 feet, and the creek is flowing southeast instead of southwest (“not present”); or,Expect to reach a junction after hiking downhill for 15 minutes, but the trail has been flat and we’ve been hiking for 10 minutes.
It’s sometimes okay to proceed when the story is not matching up entirely, but do so skeptically. If more information comes in that further questions the story, then maybe it’s time to stop and figure things out.
When a navigator is convinced that their story is correct even though it’s full of holes, it’s called “bending the map.” While you may not want to “waste” more time by getting the story straight right now, my experience is that it’s time well spent.
Case study: Yosemite High Route
To demonstrate the navigational story, I’ll use a case study from the Yosemite High Route, which is fresh in my mind since I was on it in July.
First, let’s look at the map. Suppose that we’re having this conversation at the gun sight in the middle of the map, and we’re essentially following the red dots from west to east.
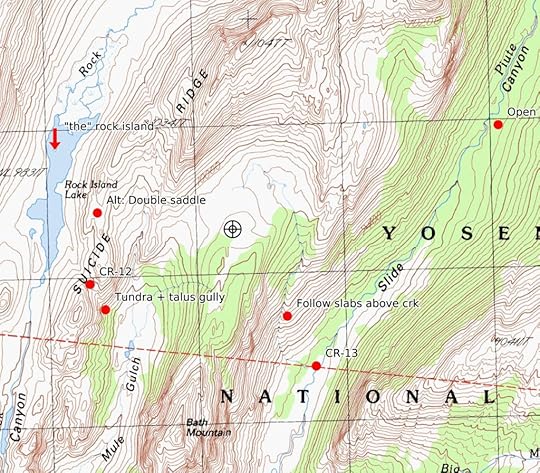
Where we have been. “We walked along the east shore of Rock Island Lake, crossed Suicide Ridge, descended a steep tundra/talus gully to the head of Crazy Mule Gulch, then climbed moderately in a northeast direction for about 300 vertical feet.”
Where we are. “We’re standing on the saddle between Crazy Mule Gulch and Slide Canyon, which I can prove with multiple pieces of evidence.”
The description of this saddle in the Yosemite High Route Guide is very similar to how I would describe it.The map depicts this saddle as being above treeline and broad. Both are true.From the base of the descent off Suicide Ridge, it took us 20 minutes to get here, which is about right for hiking 0.6 miles off-trail and uphill at altitude.Using my compass, I found a bearing of 195 degrees to a peak that topographically looks like Bath Mountain.My altimeter reads 9,920 feet. The maps says this saddle is at about 9,940, which is within the margin of error for my altimeter.Finally, my GPS says that I’m here.
What we’re anticipating. “From this saddle, the guidebook instructs us to drop southeast towards a low-volume creek, and then to use this creek as a handrail while descending 700 vertical feet on Class 2 slabs to the base of Slide Canyon.”
The right tool for the job
A navigational story is more convincing when it’s supported by multiple pieces of evidence. In the case study above, for example, I proved where we are by using every single item in my toolkit.
But the process need not be so thorough every time. One piece of supporting evidence is mandatory, and often sufficient. A second is good practice, especially when off-trail. When you’re less certain of your story, employ all of your tools until you become certain.
Leave a comment!
How have you learned to best “stay found?”When have you “bent the map” and got yourself in some trouble? How did you recover?
The post How to navigate || Part 4: Navigator’s Mindset & “staying found” appeared first on Andrew Skurka.
August 24, 2019
How to navigate || Part 3: Watch, compass, altimeter & GPS device
Using just a topographic map, I can competently navigate in areas like the High Sierra and Colorado Rockies, which generally have distinct landforms and open views. Even so, for added accuracy and unusual circumstances, I also carry select navigational tools, personally a GPS watch, magnetic compass, and smartphone with GPS app.
These instruments become more mandatory, not just merely optional or marginally helpful, in less favorable landscapes and conditions. Imagine, for example, hiking cross-country on a rolling ridgeline during a whiteout.
In Part 3 of this series on how to navigate, I discuss the pros, cons, and optimal applications for specific types of navigation equipment. Follow these links to the remainder of the series:
Part 1: Introduction + my standard kitPart 2: Maps and resourcesPart 3: EquipmentPart 4: Skills
 Alan Dixon and three clients contemplate the route ahead.
 A system of navigational equipment
Over the past 10 to 15 years, backpacking has become increasingly high-tech. Consider that when I walked across North America in 2004-05, my most notable gadget was my ABC watch (short for Altitude, Barometer, and Compass). In contrast, nowadays I usually have with me three GPS-enabled devices — a smartphone, watch, and two-way messenger — that duplicate the ABC functions and that also pinpoint my location, navigate to waypoints, and track my route, speed, distance, altitude, and vertical change.
Today, it’s no longer a challenge to get information. Instead, the challenge is to develop the lightest, least expensive, and most electrically efficient navigation system that still quickly delivers the information you need and want.
 My preferred system of navigation equipment consists of a GPS watch, magnetic compass, smartphone with GPS app (plus a charger on longer trips), and two pens.
Inputs
What information do you need from your system to inform your navigational decisions? I think the most basic system needs to:
Tell me the time;Find and transpose bearings, especially true north;If I’m in a mountainous area, display my altitude;Provide a way to mark my locations, jot down route notes, and draw bearings on my maps; and,Pinpoint my precise location on a map.
Additional GPS capabilities will enhance the value and functionality of your navigation system, but I don’t think they’re as essential.
Now, let’s discuss the options for providing all of this functionality.
Equipment overview
I write succinctly, or at least try to, but this post still reached 2,000 words. This chart helps to summarize and tease its information.
Time
When hiking on-trail, dead-reckoning is the single most useful navigational technique. Knowing the time is also useful for planning mid-day breaks and camps, and for communicating those plans with a group.
For these functions, a basic $15 watch will suffice. However, you may spend more for a comfortable band, big numbers, a positive display, back-lighting or glow-in-the-dark hands, and a scratch-resistant face. My everyday watch, the Bertucci A-2T, would be ideal, and you can wear it to the coffee shop, too.
The time can also be pulled from other devices, which I will discuss later on:
ABC watchGPS watch (my pick)SmartphoneHandheld GPSSatellite messenger
Overall, I strongly recommend “a” watch — whether that be a basic, ABC, or GPS watch — so that you can quickly reference the time. It’s less convenient to use a device that you probably carry in a pocket or attach to the outside of your pack, like a smartphone, handheld GPS, or satellite messenger.
Bearings
On any trip, including easy on-trail itineraries, I want the ability to orient my map. If this is the extent of your needs, buy an inexpensive baseplate compass like the Brunton TruArc 3 ($16, 1.1 oz).
If you can tolerate greater error or user-unfriendliness, you could also use a:
Keychain compass, which will be less precise, or orABC watch or GPS watch, which have hard-to-use digital compasses.
On trips with more extensive map-and-compass use — particularly those that are off-trail, in dense forests, or through indistinct topography — I carry and recommend the Suunto M-3G Global Pro Compass ($80, 1.6 oz). It’s not an inexpensive product, but it will last years and it has the right feature set — specifically, adjustable declination and a fast global magnetic needle, and it does not have a heavy bulky mirror. For my guiding program, I bought a fleet of these to loan out. Read my long-term review about the M-3G for more details.
The functions of a compass can be replicated with GPS devices, specifically a smartphone with GPS app, handheld GPS unit, and some satellite messengers. However, overall they are inferior. While they are excellent at finding a bearing on a map — they’re faster and more accurate than using map-and-compass — they are more difficult to use for everything else (e.g. finding a bearing in the field, and transposing bearings in the field and on a map) while also consuming battery power.
 Good, better, best. The Silva Starter (left) is sufficient for occasional and basic use. The Suunto M3-G (right) is best for extensive navigation. And the Suunto M3-D Leader (center, old version) is a more budget-friendly alternative than the M3-G but more advanced than the Starter.
Altitude
In a mountainous environment, elevation is a very useful data point. With it, I can:
Rule out false summits and passes;Double-check uncertain landmarks like an unmarked trail junction;Contour across a slope or around the head of a valley without losing or gaining elevation; and,Confirm my location on a map by cross-referencing my current altitude with nearby topographic features, like a creek confluence.
Altitude is less useful in flat landscapes like Nebraska or southern Utah, because it does not help tremendously in narrowing down your location. For example, if your watch reads 3,100 feet, you could be anywhere within a 1.5-square mile area on the Brigham Tea Bench above the Escalante.
When GPS technology was less ubiquitous, backpackers tracked their elevation with an ABC watch like the Suunto Core ($220, 2.2. oz). Nowadays, the better options are:
GPS watch (my pick)Smartphone with GPS appHandheld GPS unitSatellite messenger
In some circumstances I will check my elevation regularly, and therefore prefer to have it displayed on my wrist, like the time, not on a device that’s tucked away in a pocket.
Writing instrument
A writing instrument will not be given the same level of attention in this post as other navigation equipment, but that’s not to understate its importance. On my guided trips, it’s a required item.
Personally, I pack two pens, one as a backup. My favorite model is a retractable ballpoint that FirstBank gives away freely to its customers. I’ve also tried non-retractable/capped pens and gel ink pens, but found them less satisfactory.
I make extensive notes on my printed detailed maps, probably but not necessarily for the purpose of a future guidebook. Clients use them for drawing bearings on their maps, and for tracking their progress with quick remarks like, “Lunch spot,” “Scary ford,” and “Avalanche debris.” They can quickly reference these notes to re-find themselves on the map.
 Taking route notes in the Brooks Range
GPS technology
Even seven years ago, I was staunchly anti-GPS. But GPS technology has evolved, and so too has my thinking. GPS is now an essential part of my navigational system, and I think it should be an essential part of yours, too. Most critically, a GPS unit can:
Store a library of backup maps and imagery (as explained in Part 2); and,Pinpoint my precise location on a map.
A GPS device has additional functionality, but I consider these two functions to be the most crux.
Almost always I can “stay found” by correctly using my map, watch, and compass. But sometimes I want extra validation, and occasionally I need to know right now and can’t afford to fuss with old-school methods. In this sense, GPS is an ace in my sleeve.
The options
Backpackers have four general GPS options:
GPS watch (my pick)Smartphone with GPS app (also my pick)Handheld GPS unit,Satellite messenger (I carry one, but I don’t use it for GPS)
Their pros, cons and feature set vary:
GPS watches
A GPS watch will add a significant expense to your navigation system, so I think they’re only justifiable for endurance athletes who would already own one, or who would really benefit from one. In my case, I started using a GPS watch to better track my running, and realized later on that it was also a great backpacking watch.
The information displayed by a GPS watch can be viewed easily, and they excel at recording things, notably distance, vertical, and your track. Battery life is excellent, and they can be recharged quickly in town or with a small battery pack.
But the GPS functionality of these watches is otherwise limited — it’s like “GPS-lite.” They have small low-res screens, low quality maps (if any at all), and rudimentary buttons. For example, a GPS watch will display your lat/long coordinates, but you need to “play battleship” with a paper map to determine where you are.
I only recommend two GPS watches for backpacking, the:
Suunto 9 Baro (my long-term review) andSuunto Ambit3 Peak (my long-term review).
Most other Suunto models do not have adequate battery life or memory for multi-day backpacking trips, and none of the Garmin models do. The Suunto 9 Baro and Ambit3 Peak are head-and-shoulders better, with the Ambit3 lasting about 200 hours when set to 60-second GPS pings. At this setting, accuracy is okay, as discussed here.
 Select GPS sport watches like the Suunto Ambit3 Peak offer the features of an ABC watch plus much more, including tracking distance, pace, and vertical.
Smartphone with GPS app
A smartphone with a GPS app like GaiaGPS has the same recording capabilities as a GPS watch and is better for the remaining functions, specifically:
Pinpointing my location on a map,Creating waypoints and navigating to them.
If you don’t want to buy a GPS watch, a smartphone can be your sole GPS device. If you have a GPS watch, the smartphone is best used as a supplement. Personally, I use the watch to record data (e.g. distance, vertical, track), but I use the smartphone for everything else.
GaiaGPS may be the most widely used GPS app. There are others, like Backcountry TOPO, CalTopo, Avenza, and hunt-specific onX; but I’ve never felt compelled to experiment — Gaia checks my boxes for functionality and user-friendliness, and I appreciate that the founder Andrew gives my clients a free 6-month subscription so that we can teach GPS navigation on our trips. Gaia is free to download, but costs $20 to $40 per year to unlock its full functionality.
If you would like to advocate for or offer feedback about other GPS apps, leave a comment.
To maximize the battery life of a smartphone when using it as a GPS, switch it into airplane and battery-saving mode. On longer trips (5+ days) or any guided trip, I bring my Anker PowerCore II 10k to recharge my phone, as well as my GPS watch, satellite messenger, and now my Black Diamond Iota Headlamp (my review).
 A screenshot of the 7.5-minute layer, as seen in the GaiaGPS app
Handheld GPS unit
If you own a smartphone, the case for a dedicated handheld GPS unit like the Garmin eTrex 20x is lost on me. At best, its operation is less compromised if the screen is wet.
Otherwise, a smartphone has many advantages over a conventional handheld GPS unit:
No weight penalty, since I never leave my phone in my car at a trailhead;Little additional expense, since I already own the phone and just need software;A bright, large, and high-resolution touchscreen;Access to topographic map and imagery layers that are far superior to the primitive proprietary layers found on handhelds.
To me, handheld GPS units seem like technological dinosaurs. Am I missing something?
Satellite messenger
The final GPS option is a satellite messenger. Some devices like the Garmin inReach Explorer+ (long-term review) have the same functionality of a handheld GPS unit, in addition to their messaging capabilities. With less featured models like the Garmin inReach Mini (preview), essentially you must use the Earthmate smartphone app.
Since many backpackers already carry an inReach and pay for a monthly or annual subscription, using a satellite messenger does not add cost or weight, unlike a smartphone app or a handheld GPS, respectively.
However, the inReach devices share the same drawbacks as handheld GPS units (i.e. small low-res screens, clunky buttons, and inferior proprietary maps), and the Earthmate app is not as smooth as dedicated GPS apps like Gaia.
Personally, I think inReach technology is wonderful, but I think it should be decoupled from GPS navigation. Hence, I strongly recommend the inReach Mini over the other inReach models.
 The inReach Explorer+ (orange left) combines inReach messaging with the functionality of a handheld GPS unit. With the older SE (left) and Mini (orange right), you must use the Earthmate app.
Leave a comment!
What questions do you have about my navigation system, or the options in general?Share your navigation system, and the rationale for your choices.
Disclosure. I strive to offer field-tested and trustworthy information, insights, and advice. I have no financial affiliations with or interests in any brands or products, and I do not publish sponsored content
This website is supported by affiliate marketing, whereby in exchange for referral traffic I receive a small commission from select vendors, at no cost to the reader. This post contains affiliate links.
The post How to navigate || Part 3: Watch, compass, altimeter & GPS device appeared first on Andrew Skurka.
August 23, 2019
How to navigate || Part 2: Maps & resources
For my earliest hikes, I utilized whatever resources were conveniently available and that seemed sufficient. Before thru-hiking the Appalachian Trail in 2002, for example, I purchased the ATC Data Book and downloaded the ALDHA Thru-Hikers Companion. And to explore Colorado’s Front Range the following summer, I bought a few National Geographic Trails Illustrated maps that covered the area.
But when I started adventuring off script — starting with the Sierra High Route, culminating with the Alaska-Yukon Expedition, and continuing with high routes of my own — I had to create some or all of these materials from scratch. Through this process, I developed what I believe to be an optimal system of maps and resources, which is the subject of this post.
This article was originally published four years ago, but I’ve updated it and grouped it with a multi-part series about the Navigator’s Toolkit, which will help readers with learning how to navigate. Read the full series:
Part 1: Introduction + my standard kit
Part 2: Maps and resources
Part 3: Equipment
Part 4: Skills
 My three standard map types: custom detailed maps on 11 x 17 paper, a commercial overview map, and digital maps and layers on a smartphone.
Topographic maps
I normally pack three types of topographic maps:
A paper small-scale overview map,
Paper large-scale detailed maps, and
Digital maps (and sometimes additional imagery or data) on a smartphone.
Paper vs digital
The current generation of thru-hikers might consider me “old school” for my continued reliance on paper maps. But overall I think that they are functionally superior. They:
Offer a significantly larger viewing window: an 11 x 17 sheet has 187 square inches of topographic detail, or about 13 times more area than the screen on my Pixel 2 XL.
Can be written on, to make route notes and draw bearings;
Withstand impact, like when dropped or sat on;
Remain functional after being exposed to water, so long as a laser printer was used;
Do not require batteries or recharging;
Are more easily viewed by multiple people, like when discussing route choices.
I understand the appeal of digital maps, however. They don’t require a good printer or a trip to REI. A phone or handheld GPS is more pocket-table and less unwieldy. The mapping software can reliably pinpoint your location, and quickly calculate distance and vertical; and for a long trip, it’s also more cost-effective.
Printing tips
Elsewhere I have detailed my process and recommendations for exporting and printing custom maps. Read that now.
1. Paper overview maps
Overview maps normally have a scale of 1:50,000 to 1:100,000, meaning that one unit on the map (e.g. inch, centimeter, thumbnail) equals 50,000 or 100,000 units in the field. While planning a trip, I use these small-scale maps to:
Develop a general understanding of the landscape, including the main watersheds, the road system, and trail network;
Identify a general route, and potential alternates; and,
Work through logistics, like travel, permits, and resupply.
 Several examples of overview maps. Commercial recreation maps are best since they are updated regularly and include more than just topographic data. When unavailable, I custom print USGS 30- x 60-minute or 250k map series on 11×17 paper (upper right).
In the field, overview maps are useful for pinpointing distant landmarks, mid-trip planning discussions, and self-evacuations.
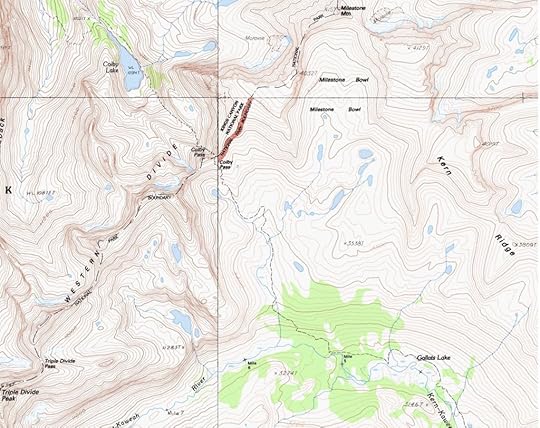
 From Colby Pass in Sequoia-Kings Canyon, we were intrigued by a prominent peak on the north horizon. Using our Trails Illustrated overview map, we concluded that it was Mount Goddard, 30 miles away and still inside the park!
On its own, an overview map can be adequate for on-trail navigating. However, I’d caution against this: it’s a missed learning opportunity.
By definition, the topographic detail on a small-scale map is compressed, making it difficult to associate features on the map with features in the field, particularly subtle ones. If your map-reading skills are only so-so, trying to improve them using small-scale maps will generate limited results.
Making matters worse, popular overview maps do not use a standard scale or contour interval, so your brain must relearn this relationship with every new map. For example, the overview map I used in July of Yosemite National Park is printed at 1:80,000 and has 50-foot contour lines. Whereas the map I will use next month in Rocky Mountain National Park is printed at 1:50,000 with 50-foot contour lines, making the topography appear 37 percent less steep.
Also, these popular maps almost always have shaded relief. The shading causes features to stand out more, but plays tricks with your eyes when not viewed from the south side of the map and looking north.
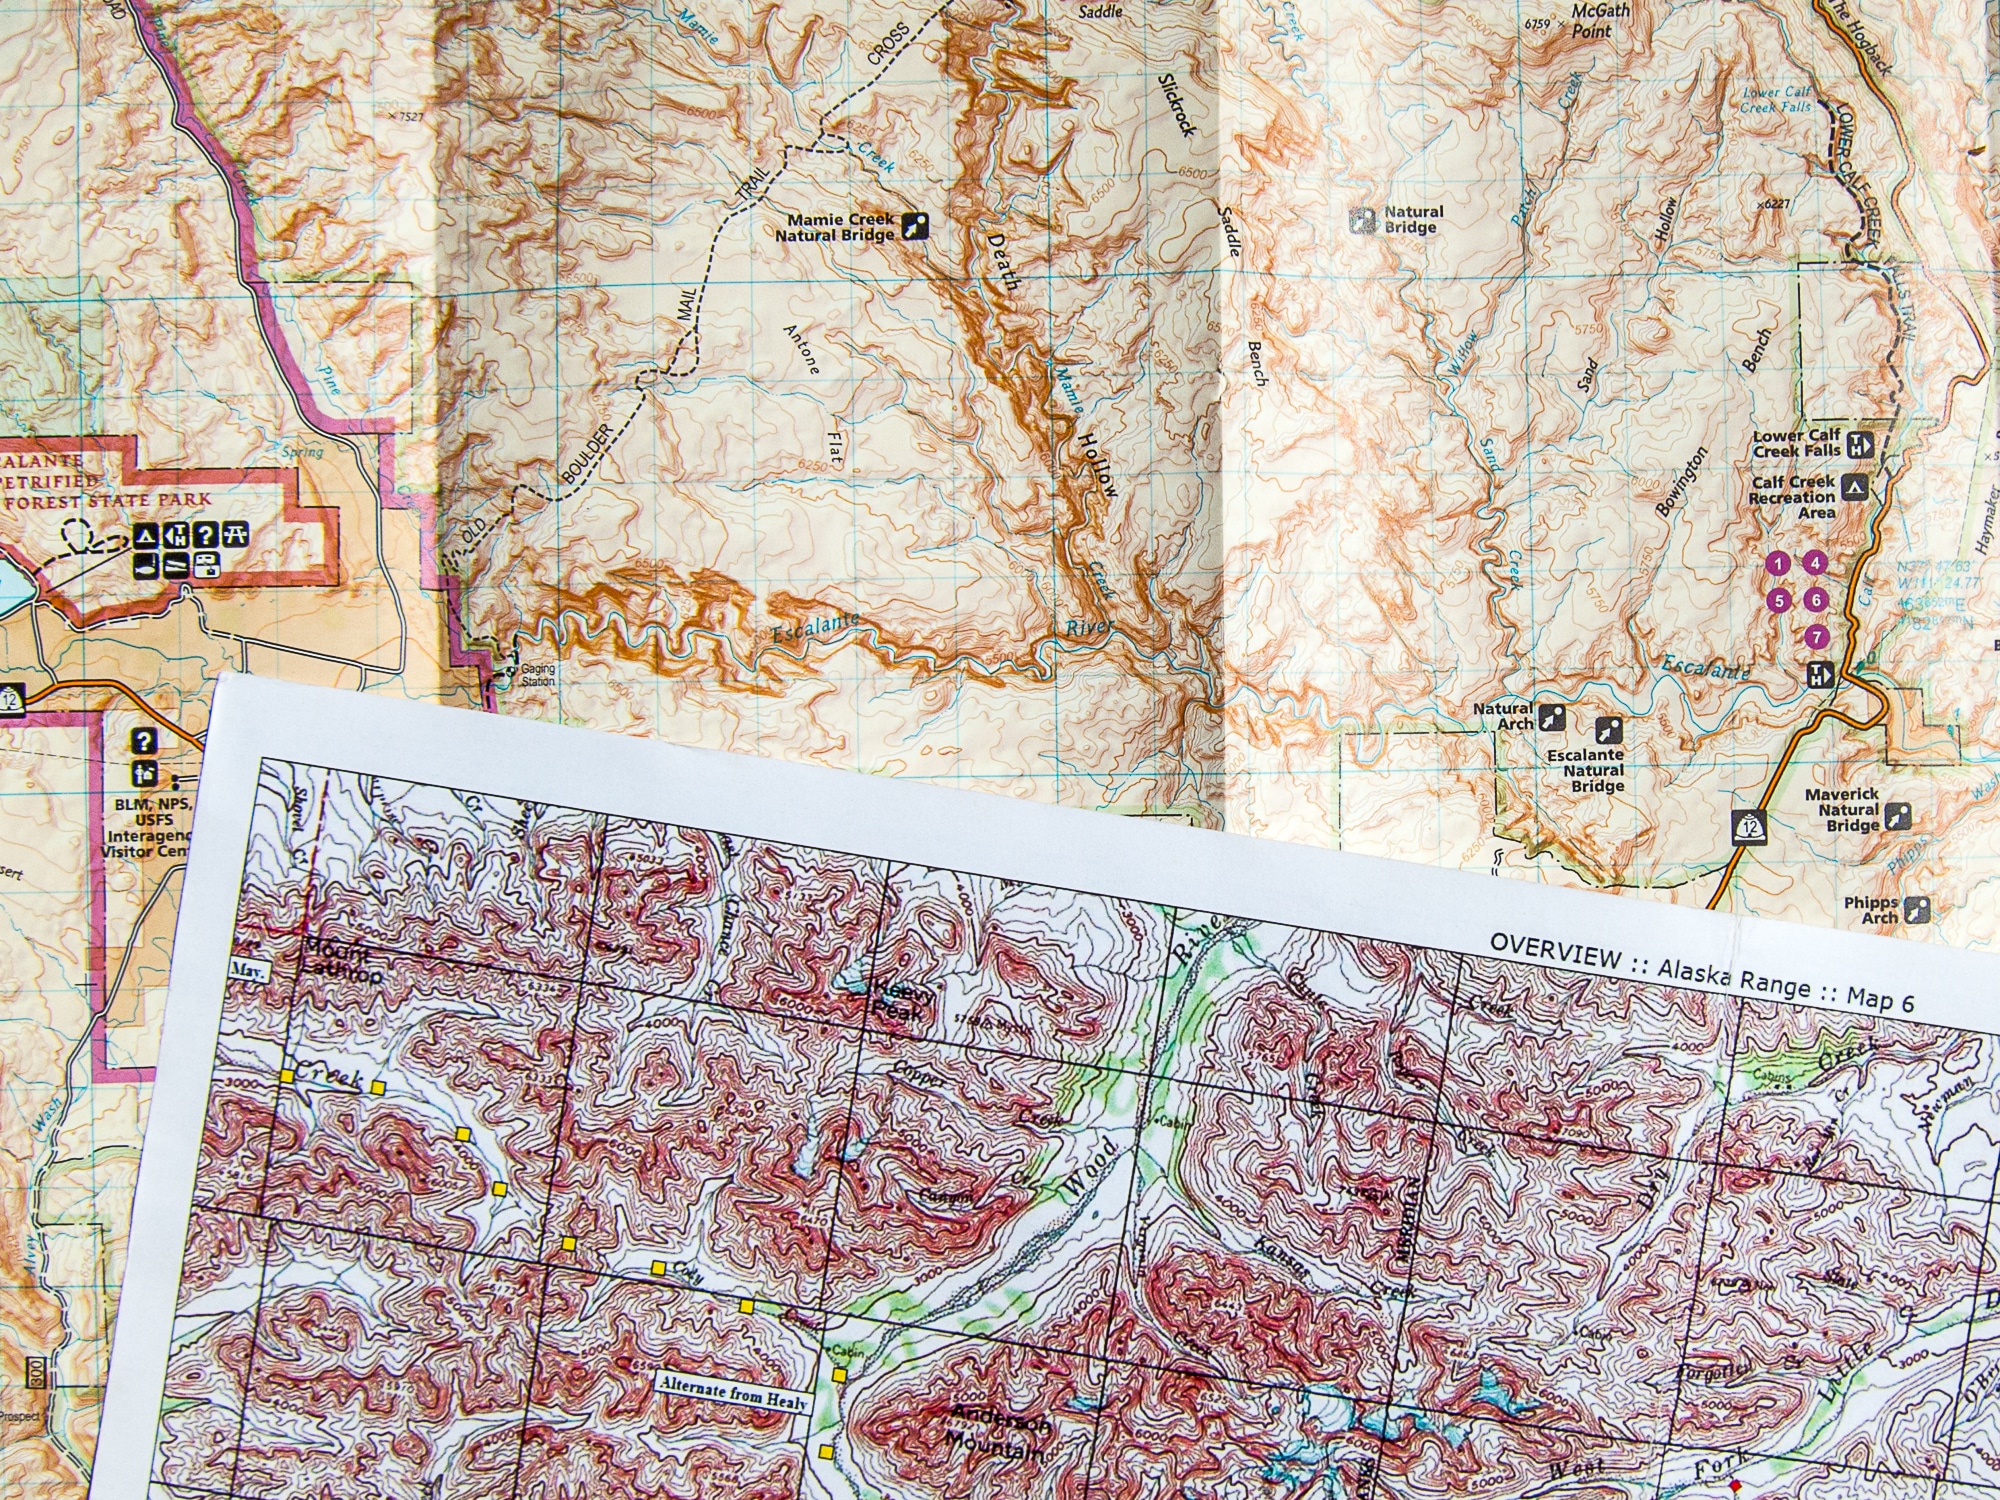 A closeup reveals how much topographic detail is compressed onto these maps. The upper map of Utah is at a scale of 1:75,000, or more than 1 mile per inch; the lower map is 1:250,000, or 4 miles per inch. These maps are most useful when planning a trip, and may be sufficient in the field only for on-trail itineraries.
 When a shaded relief map is viewed upside down, the shading can fool your eyes, making canyons look like ridgetops and mountains look like valleys. For field use, it’s better to use a map without shaded relif.
For an overview map, I prefer to use a commercial recreation map, such as from National Geographic Trails Illustrated, Tom Harrison, Green Trail Maps, or Beartooth Publishing, because they:
Are revised and updated regularly;
Conveniently include things like parking areas, backcountry campsite locations or zones, and services; and,
Encompass a specific area, like a National Park or Wilderness Area, where my entire trip will probably take place.
Individual recreation maps cost $10 to $15 and are available online and from local retailers. If you are Premium member of GaiaGPS ($30 per year), you can access the Trails Illustrated maps digitally (via the website or app); from the website, they can also be printed.
When recreation maps are not available, the next best option is to create your own. In CalTopo, another recommended platform, use the MapBuilder Topo layer. In GaiaGPS, the best layer is probably Gaia Topo, but it’s also worth looking at Mapbox Outdoors or Outdoors by Thunderforest,
A final option is purchase USGS 30- x 60-minute maps, which are at a scale of 1:100,000. Unfortunately, these maps are not updated regularly (many are 25+ years old) and they omit useful recreational details.
2. Paper detailed maps
To precisely plan my route at home and then to navigate in the field, I rely on more detailed maps. In the US, the gold standard for large-scale maps is the US Topo series, produced by the United States Geological Survey (USGS).
US Topo is modeled after the pre-digital 7.5-minute quadrangles. Each paper “quad” — of which there were about 55,000 — represented 7.5 minutes of latitude and 7.5 minutes of longitude. (In this instance, “minutes” are not in reference to time. The earth is divided into 360 degrees of longitude and 360 degrees of latitude. Within each degree, there are 60 minutes of lat and long, and within each minute there are 60 seconds.) This equated to about 8.5 miles of latitude (map height) and about 5.5 to 7.5 miles of longitude (map width), since the physical distance between lines of longitude decreases towards the poles.
 Left: An original USGS 7.5-minute quadrangle. Right: A custom map based on the same map series, digitally annotated and exported to a print-ready 11×17 PDF using CalTopo.
The 7.5-minute quads and US Topo have a scale of 1:24,000. One inch on these maps equals 0.3788 miles, since there are 63,360 inches in one mile.
The most common contour interval is 40 feet. But the USGS was not always consistent in its units or contour intervals. For example, some parts of the High Sierra have 20-meter contours, while 80-foot contours were used in the Tetons and Glacier National Park.
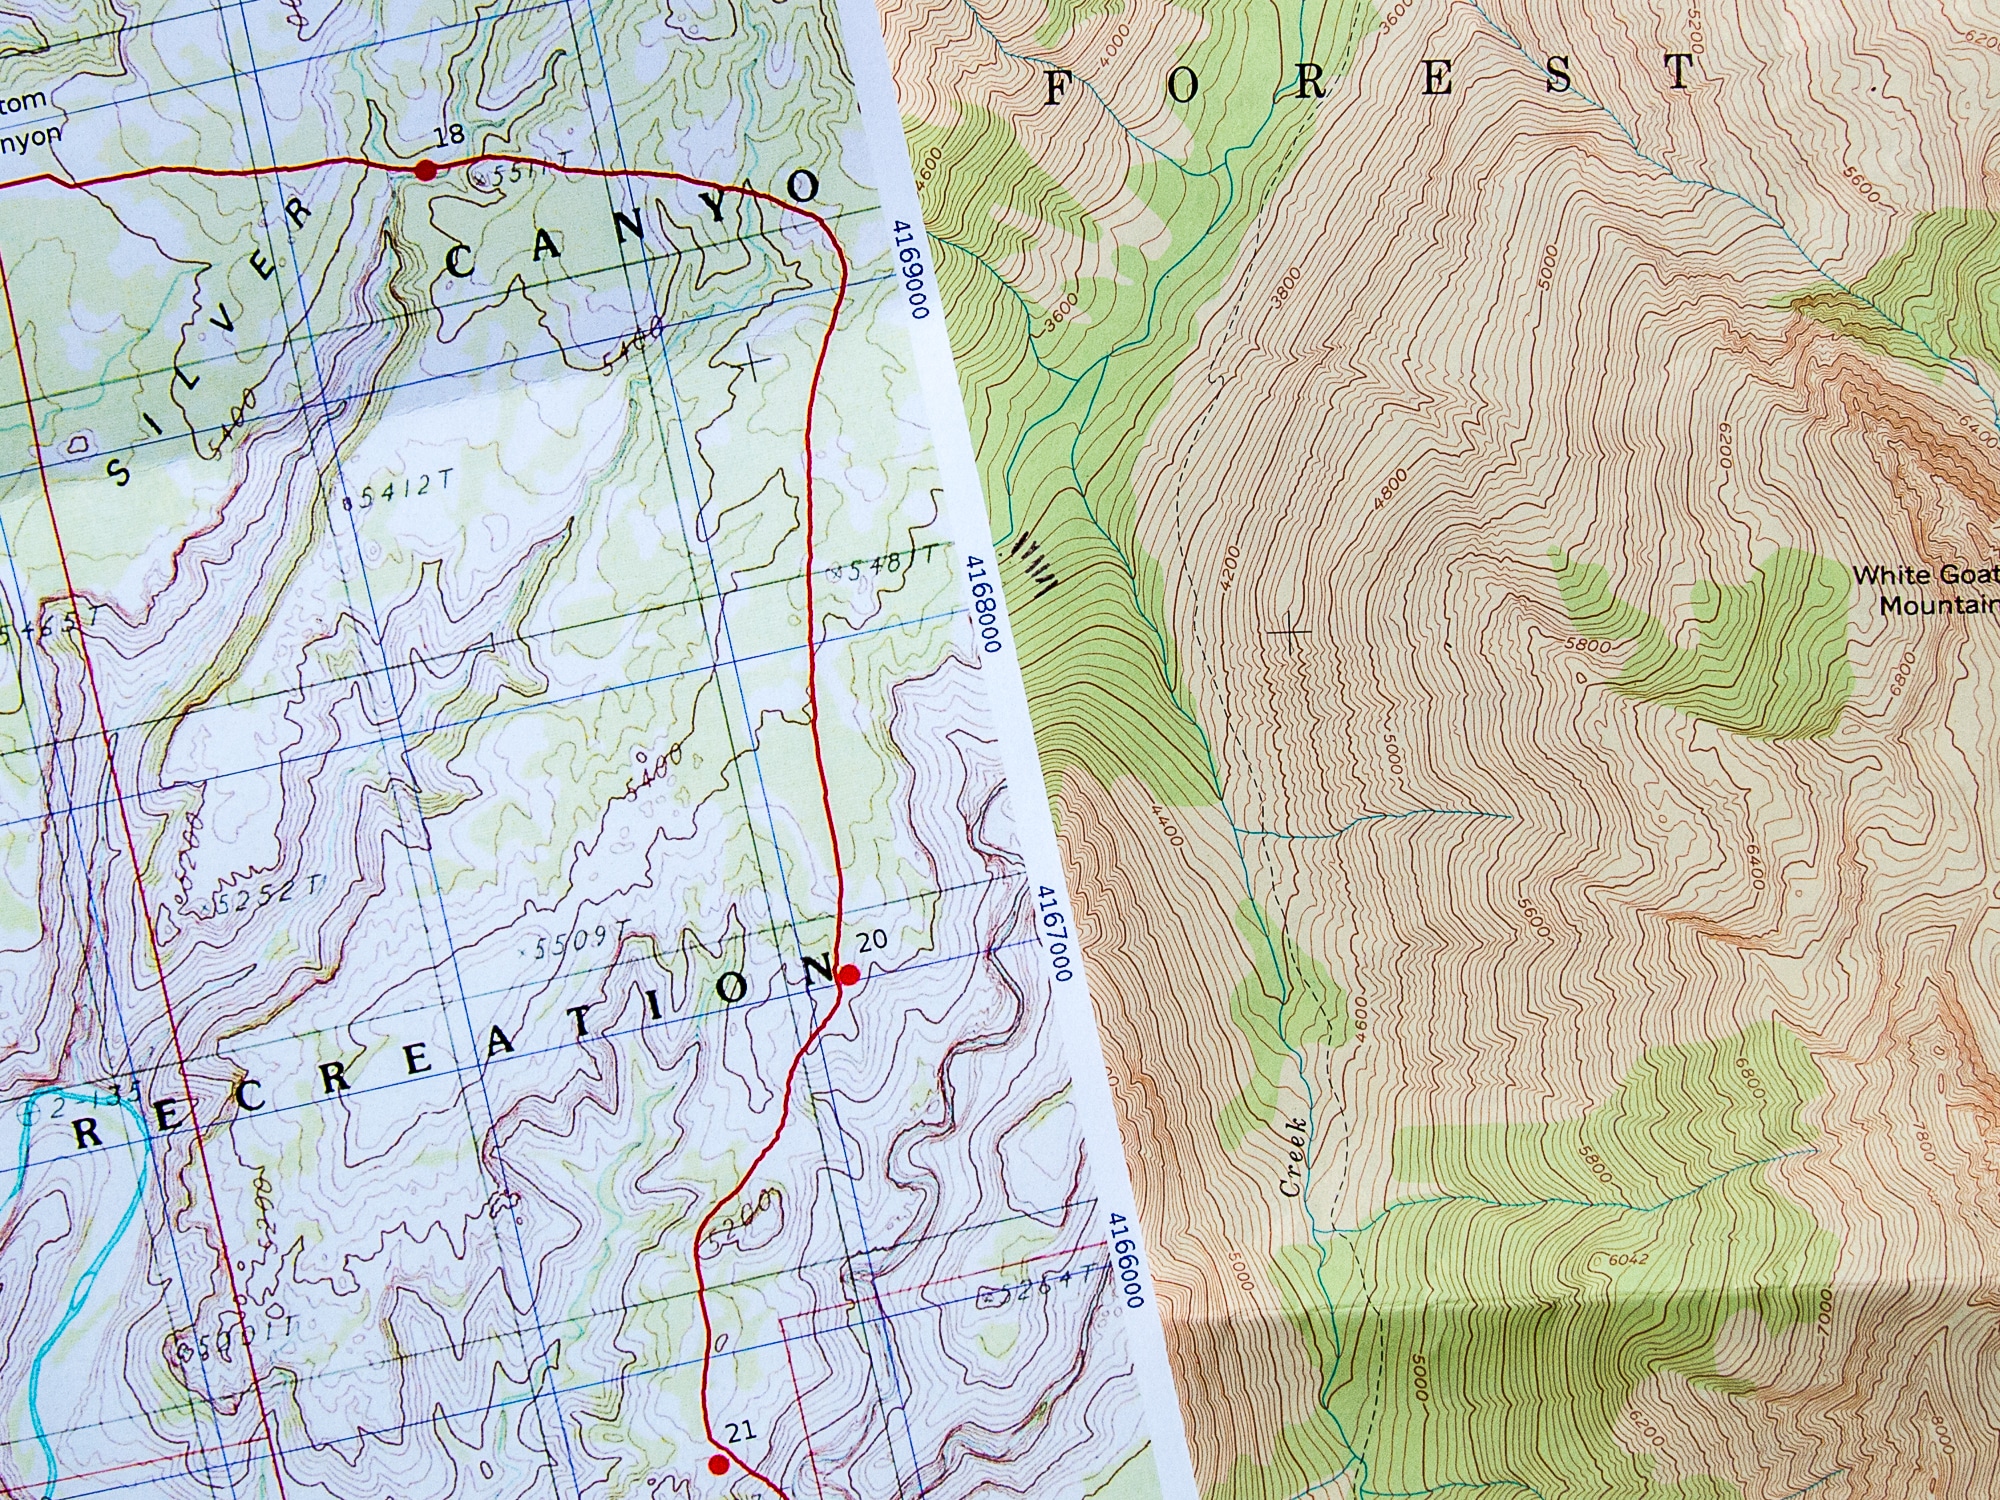 The natural scale of 7.5-min quads is 1:24,000, so topographic detail is much clearer. This series is the gold standard for topographic maps in the US, and ideal for precise navigating.
Today, scans of the 7.5-minute maps can be accessed digitally, like through CalTopo (my pick) and GaiaGPS. A related product that is better for Forest Service lands, FS Topo, is also available through these platforms. The 7.5-minute scans and FS Topo layers can be exported out of CalTopo and Gaia into print-ready PDF’s.
An 11 x 17 tabloid print-out does not rival the beauty or quality of an original quad, however. To be nostalgic, purchase them directly from the USGS, or look for a wooden bureau with coin slot-style drawers at your local outdoor retailer.
Special circumstance: Alaska
The maps generally available for Alaska are different than those in the lower 48.
Recreation maps are increasingly available for Alaska, particularly the National Parks. For areas where they are not available, make your own in CalTopo or Gaia, or track down the beautiful 1- x 2-minute series that are printed at a 1:250,000 scale with 250-foot contours.
The US Topo layer is increasingly available for Alaska, but I still prefer to use scans of the older 15-minute quads, which are printed at a scale of 1:63,360 and normally have 100-foot contour lines. A lot of topography hides in these maps, but the Alaskan landscape is so huge that the scale and contour interval is more becoming of it. The incredible detail of the standard 1:24k/40-foot series undermines its usefulness.
Read the comment from Roman Dial for additional perspective on maps in Alaska.
3. Digital maps
As a backup and a supplement to my paper maps, I also load digital maps onto a smartphone (my pick) or GPS unit, and sometimes other layers, too, like Landsat imagery and properly boundaries.
If I lose my paper maps or if I get way off route, digital maps become invaluable. Both instances happen. I’ve found other people’s maps, and I’ve had clients lose their maps. And on one of my first guided trips, we bailed out of the Alaska Range and ended up 100 miles away from our intended exit point, way off both our overview and detailed maps.
Digital maps have inherent value, not even accounting for the powerful software that accompanies them and that I will discuss more in Part 3 of this series.
 A screenshot of the 7.5-minute layer, as seen in the GaiaGPS app
Resources
In addition topographic maps, I also like to have two other items.
Route description
A route description is useful for providing general information about a route (or a section of it), interesting historical and scientific knowledge, personal anecdotes from the author, and in-depth explanations of tricky sections. I tend to get annoyed by wordy descriptions containing information that is obviously and more efficiently conveyed by a topographic map.
While preparing for routes for which no route description was publicly available, I have made my own. In these DIY guidebooks, I consolidate bits of information from email and phone conversations, online forums and trip reports, land manager websites, and my travel reservations. I have learned to copy the content verbatim, because it’s full meaning often can only be interpreted once in the field.
Datasheets
A datasheet is a list of key landmarks (e.g., intersections, passes, creek crossings, shelters), usually at least with the incremental and cumulative distance between them. In my high route guides, I also include vertical change because it’s more revealing than horizontal distance.
A datasheet it not useful for a spontaneous itinerary, because you’ll be off it after an intersection or two. But it’s extremely convenient for established trails and routes, like a long-distance trail. With a datasheet I can quickly:
Dead-reckon to future landmarks;
Identify realistic camping areas for the night or future nights; and,
Determine if I’m ahead or behind pace.
The information on a datasheet can be calculated manually, at home or in the field, for between two points or between many points. But digital measuring tools in CalTopo and GaiaGPS will yield more accurate data and make much quicker calculations.
Datasheets can be reconfigured into other quick-reference lists, such as of:
Water sources in an arid area;
Resupply points on a thru-hike;
Designated campsites.
 An example datasheet (left) and route description (right)
Storage
To keep my maps and resources clean, crisp, and dry, I keep them in a gallon-sized freezer bag. I carry two bags:
One bag is for materials that I’m using right now or will be using soon, like before the end of the day, and possibly before a long break when I would have the chance to resort things. I keep this bag free of clutter — the more that’s in it, the less accessible things are — and I store it in a secure but easily accessible location, like a dedicated side pocket on my backpack.
The other bag is for materials that are not presently in use, as well as other paperwork like my backcountry permit and sometimes some writing paper. I try to compartmentalize maps and resources that I have already used, so that I don’t waste time looking through them for my “next” map. I store this bag inside my pack, usually sandwiched between the pack liner and the pack body fabric.
Gallon-sized freezer bags are tough and inexpensive, and they fit perfectly my 11 x 17 maps after their half-inch margins have been removed and they’ve been folded in half. For trips longer than about 5 days, I will take a third bag so that I have a fresh and clear bag for the second half of the trip.

Leave a comment!
What types of maps do you carry?
Do you prefer paper or digital maps?
How does the length and difficulty of your trip affect your choices?
The post How to navigate || Part 2: Maps & resources appeared first on Andrew Skurka.
Navigator’s Toolkit || Part 2: Maps & resources
For my earliest hikes, I utilized whatever resources were conveniently available and that seemed sufficient. Before thru-hiking the Appalachian Trail in 2002, for example, I purchased the ATC Data Book and downloaded the ALDHA Thru-Hikers Companion. And to explore Colorado’s Front Range the following summer, I bought a few National Geographic Trails Illustrated maps that covered the area.
But when I started adventuring off script — starting with the Sierra High Route, culminating with the Alaska-Yukon Expedition, and continuing with high routes of my own — I had to create some or all of these materials from scratch. Through this process, I developed what I believe to be an optimal system of maps and resources, which is the subject of this post.
This article was originally published four years ago, but I’ve updated it and grouped it with a multi-part series about the Navigator’s Toolkit. Read the full series:
Part 1: Introduction + my standard kitPart 2: Maps and resources Part 3: EquipmentPart 4: Skills
My three standard map types: custom detailed maps on 11 x 17 paper, a commercial overview map, and digital maps and layers on a smartphone.Topographic maps
I normally pack three types of topographic maps:
A paper large-scale overview map,Paper small-scale detailed maps, andDigital maps (and sometimes additional imagery or data) on a smartphone.
Paper vs digital
The current generation of thru-hikers might consider me “old school” for my continued reliance on paper maps. But overall I think that they are functionally superior. They:
Offer a significantly larger viewing window: an 11 x 17 sheet has 187 square inches of topographic detail, or about 13 times more area than the screen on my Pixel 2 XL.Can be written on, to make route notes and draw bearings;Withstand impact, like when dropped or sat on;Remain functional after being exposed to water, so long as a laser printer was used;Do not require batteries or recharging;Are more easily viewed by multiple people, like when discussing route choices.
I understand the appeal of digital maps, however. They don’t require a good printer or a trip to REI. A phone or handheld GPS is more pocket-table and less unwieldy. The mapping software can reliably pinpoint your location, and quickly calculate distance and vertical; and for a long trip, it’s also more cost-effective.
Printing tips
Elsewhere I have detailed my process and recommendations for exporting and printing custom maps. Read that now.
1. Paper overview maps
Overview maps normally have a scale of 1:50,000 to 1:100,000, meaning that one unit on the map (e.g. inch, centimeter, thumbnail) equals 50,000 or 100,000 units in the field. While planning a trip, I use these large-scale maps to:
Develop a general understanding of the landscape, including the main watersheds, the road system, and trail network;Identify a general route, and potential alternates; and,Work through logistics, like travel and permits.
Several examples of overview maps. Commercial recreation maps are best since they are updated regularly and include more than just topographic data. When unavailable, I custom print USGS 30- x 60-minute or 250k map series on 11×17 paper (upper right).In the field, overview maps are useful for pinpointing distant landmarks, mid-trip planning discussions, and self-evacuations.
From Colby Pass in Sequoia-Kings Canyon, we were intrigued by a prominent peak on the north horizon. Using our Trails Illustrated overview map, we concluded that it was Mount Goddard, 30 miles away and still inside the park!On its own, an overview map can be adequate for on-trail navigating. However, I’d caution against this: it’s a missed learning opportunity.
By definition, the topographic detail on a large-scale map is compressed, making it difficult to associate features on the map with features in the field, particularly subtle ones. If your map-reading skills are only so-so, trying to improve them using large-scale maps will generate limited results.
Making matters worse, popular overview maps do not use a standard scale or contour interval, so your brain must relearn this relationship with every new map. For example, the overview map I used in July of Yosemite National Park is printed at 1:80,000 and has 50-foot contour lines. Whereas the map I will use next month in Rocky Mountain National Park is printed at 1:50,000 with 50-foot contour lines, making the topography appear 37 percent less steep.
Also, these popular maps almost always have shaded relief. The shading causes features to stand out more, but plays tricks with your eyes when not viewed from the south side of the map and looking north.
A closeup reveals how much topographic detail is compressed onto these maps. The upper map of Utah is at a scale of 1:75,000, or more than 1 mile per inch; the lower map is 1:250,000, or 4 miles per inch. These maps are most useful when planning a trip, and may be sufficient in the field only for on-trail itineraries.
When a shaded relief map is viewed upside down, the shading can fool your eyes, making canyons look like ridgetops and mountains look like valleys. For field use, it’s better to use a map without shaded relif.For an overview map, I prefer to use a commercial recreation map, such as from National Geographic Trails Illustrated, Tom Harrison, Green Trail Maps, or Beartooth Publishing, because they:
Are revised and updated regularly,Conveniently include things like parking areas, backcountry campsite locations or zones, and services; and,Encompass a specific area, like a National Park or Wilderness Area, where my entire trip will probably take place.
Individual recreation maps cost $10 to $15 and are available online and from local retailers. If you are Premium member of GaiaGPS ($30 per year), you can access the Trails Illustrated maps digitally (via the website or app); from the website, they can also be printed.
When recreation maps are not available, the next best option is to create your own. In CalTopo, another recommended platform, use the MapBuilder Topo layer. In GaiaGPS, try Gaia Topo.
A final option is purchase USGS 30- x 60-minute maps, which are at a scale of 1:100,000. Unfortunately, these maps are not updated regularly (many are 25+ years old) and they omit useful recreational details. In Alaska, use the 250,000-scale series, since the 30 x 60 is not available.
2. Paper detailed maps
To navigate off-trail, or even just to precisely follow my location when on-trail, it’s useful — and usually imperative — to have more detailed maps. In the US, the gold standard for small-scale maps is the US Topo series, produced by the United States Geological Survey (USGS).
US Topo is modeled after the pre-digital 7.5-minute quadrangles. Each paper “quad” — of which there were about 55,000 — represented 7.5 minutes of latitude and 7.5 minutes of longitude. (In this instance, “minutes” are not in reference to time. The earth is divided into 360 degrees of longitude and 360 degrees of latitude. Within each degree, there are 60 minutes of lat and long, and within each minute there are 60 seconds.) This equated to about 8.5 miles of latitude (map height) and about 5.5 to 7.5 miles of longitude (map width), since the physical distance between lines of longitude decreases towards the poles.
Left: An original USGS 7.5-minute quadrangle. Right: A custom map based on the same map series, digitally annotated and exported to a print-ready 11×17 PDF using CalTopo.The 7.5-minute quads and US Topo have a scale of 1:24,000. One inch on these maps equals 0.3788 miles, since there are 63,360 inches in one mile.
The most common contour interval is 40 feet. But the USGS was not always consistent in its units or contour intervals. For example, some parts of the High Sierra have 20-meter contours, while 80-foot contours were used in the Tetons and Glacier National Park.
In most of Alaska, 7.5-minute maps were never created. Instead, the most detailed maps available are 15-minute quads. They have 100-foot contour lines and are at a scale of 1:62,500, or about one inch to the mile.
The natural scale of 7.5-min quads is 1:24,000, so topographic detail is much clearer. This series is the gold standard for topographic maps in the US, and ideal for precise navigating.Today, scans of the 7.5-minute maps can be accessed digitally, like through CalTopo (my pick) and GaiaGPS. A related product that is better for Forest Service lands, FS Topo, is also available through these platforms. The 7.5-minute scans and FS Topo layers can be exported out of CalTopo and Gaia into print-ready PDF’s.
An 11 x 17 tabloid print-out does not rival the beauty or quality of an original quad, however. To be nostalgic, purchase them directly from the USGS, or look for a wooden bureau with coin slot-style drawers at your local outdoor retailer.
3. Digital maps
As a backup and a supplement to my paper maps, I also load digital maps onto a smartphone (my pick) or GPS unit, and sometimes other layers, too, like Landsat imagery and properly boundaries.
If I lose my paper maps or if I get way off route, digital maps become invaluable. Both instances happen. I’ve found other people’s maps, and I’ve had clients lose their maps. And on one of my first guided trips, we bailed out of the Alaska Range and ended up 100 miles away from our intended exit point, way off both our overview and detailed maps.
Digital maps have inherent value, not even accounting for the powerful software that accompanies them and that I will discuss more in Part 3 of this series.
A screenshot of the 7.5-minute layer, as seen in the GaiaGPS appResources
In addition topographic maps, I also like to have two other items.
Route description
A route description is useful for providing general information about a route (or a section of it), interesting historical and scientific knowledge, personal anecdotes from the author, and in-depth explanations of tricky sections. I tend to get annoyed by wordy descriptions containing information that is obviously and more efficiently conveyed by a topographic map.
While preparing for routes for which no route description was publicly available, I have made my own. In these DIY guidebooks, I consolidate bits of information from email and phone conversations, online forums and trip reports, land manager websites, and my travel reservations. I have learned to copy the content verbatim, because it’s full meaning often can only be interpreted once in the field.
Datasheets
A datasheet is a list of key landmarks (e.g., intersections, passes, creek crossings, shelters), usually at least with the incremental and cumulative distance between them. In my high route guides, I also include vertical change because it’s more revealing than horizontal distance.
A datasheet it not useful for a spontaneous itinerary, because you’ll be off it after an intersection or two. But it’s extremely convenient for established trails and routes, like a long-distance trail. With a datasheet I can quickly:
Dead-reckon to future landmarks;Identify realistic camping areas for the night or future nights; and,Determine if I’m ahead or behind pace.
The information on a datasheet can be calculated manually, at home or in the field, for between two points or between many points. But digital measuring tools in CalTopo and GaiaGPS will yield more accurate data and make much quicker calculations.
Datasheets can be reconfigured into other quick-reference lists, such as of:
Water sources in an arid area;Resupply points on a thru-hike;Designated campsites.
An example datasheet (left) and route description (right)Leave a comment!
What types of maps do you carry?Do you prefer paper or digital maps?How does the length and difficulty of your trip affect your choices?
The post Navigator’s Toolkit || Part 2: Maps & resources appeared first on Andrew Skurka.
August 22, 2019
How to navigate || Part 1: Navigator’s Toolkit + Navigation Mastery
Navigation is one of the most important backpacking skills, and certainly the most liberating. It allows you to drive your own adventure, rather than being a passenger.
As a new backpacker with only rudimentary know-how, I was confined to backcountry thruways like the Appalachian Trail and high-use areas like Rocky Mountain National Park, where I had the security of well worn footpaths, foolproof blazes, and accurate signage.
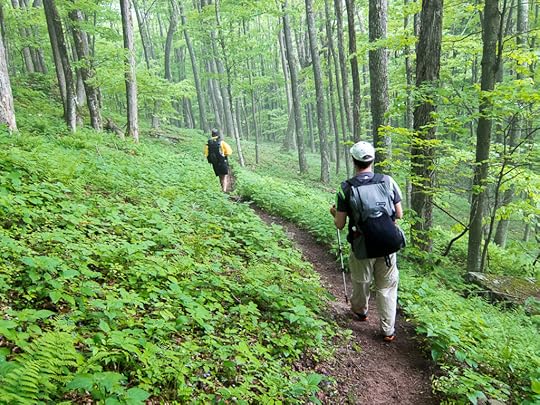 A pleasant footpath through the green tunnel of the Appalachians
As my navigational competence increased, so too did the adventurousness of my itineraries, best exemplified with high routes and the Alaska-Yukon Expedition. Now, I can essentially wander wherever I please, regardless of whether a trail crew, guidebook writer, cairn-building backpacker, or another person has gone before me.
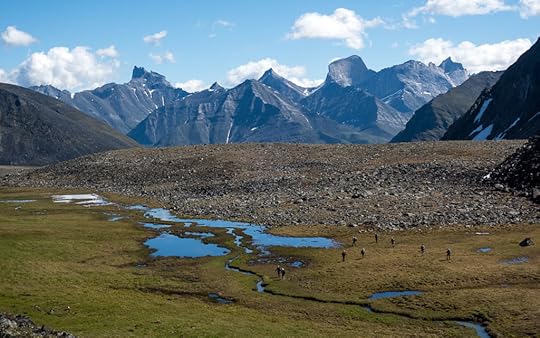 Adventuring in Gates of the Arctic National Park, which is 3.4 times bigger than Yellowstone and which doesn’t have a single mile of man-made trail.
Becoming proficient: The Navigator’s Toolkit
How can you learn to navigate? To become proficient, assemble the proper maps, resources, and equipment, and then develop the skills to interpret and operate them.
Collectively, I’ll call these items as the Navigator’s Toolkit, and in this multi-part series I’ll explain them in-depth.
Part 1: Introduction + my standard kit
Part 2: Maps and resources
Part 3: Equipment
Part 4: Skills
Taking it to the next level: Navigational Mastery
How do you move beyond proficiency, and become a true expert navigator It’s a simple matter of experience.
Of course, experience cannot be purchased, downloaded, or acquired by reading blog posts or taking a class. Instead, you must undertake trips that continually expand your navigational capabilities.
When it’s done well, navigation may seem like a mysterious art form. But, in fact, it’s just pattern recognition — i.e. the application of lessons learned from previous trips onto new scenarios.
Proficient navigators possess the Navigator’s Toolkit. But expert navigators also have a vast collection of past observations to inform their travels through new but similar landscapes.
For example, I can look at maps of areas to which I have never been in Colorado’s Front Range and California’s High Sierra, and predict where you’ll find elk and use trails, talus and tundra, lingering snowfields, safe water crossings, beetle-killed spruce and lodgepole pine, and great campsites. And in Alaska’s Brooks Range I can identify the best line (or, as is often the the case, the least bad) based on the colors and textures of the ground and vegetation.
In contrast, when a merely proficient navigator looks at these same maps or over this same landscape, they don’t have the experience to interpret what they’re seeing. Without past observations informing their options, they often take sub-optimal (and sometimes just bad) lines, as part of their learning process. The next time, they will do better.
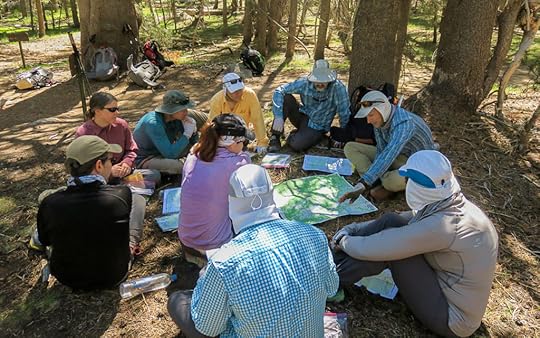 By taking a navigation course, watching navigation videos, and reading about navigation, you can more quickly become a proficient navigator. But the only way to become a pro is through practice.
Example toolkit
On a normal outing, what’s in my toolkit?
To start, there is the thing between my ears, my brain, which I use to read my maps and resources, and to work with my equipment.
I carry three types of maps:
Paper small-scale overview map, like from National Geographic Trails Illustrated or Tom Harrison;
Paper large-scale detailed maps, normally with the USGS 7.5-minute or FSTopo series as a base map, created in and exported from CalTopo; and,
Digital layers (always maps, and sometimes Landsat imagery) downloaded to my smartphone using GaiaGPS, as backups and/or complements to my printed maps.
For more involved trips, I hope to have several other resources. If I’m following an established trail or route, often they will be publicly or commercially available. For custom itineraries, I may create them myself.
Route description, especially for off-trail sections; and,
Databook, which lists key landmarks, mileage, vertical, and possibly water sources.
To protect and store my paper maps and resources, I bring two gallon-sized freezer bags:
For materials I need right now, stored in a side pocket; and,
For the rest of my materials, stored inside my backpack.
My standard equipment includes a:
Magnetic compass;
GPS watch, which records a breadcrumb track of my route and which gives me time, altitude, cumulative vertical gain and loss, and barometric pressure;
Smartphone with GaiaGPS, which converts my phone into an extremely functional GPS unit with maps;
Portable battery to recharge my smartphone and GPS watch, as well as my inReach; and,
Retractable ballpoint pen (plus a backup), so that I can make notes and draw bearings on my maps.
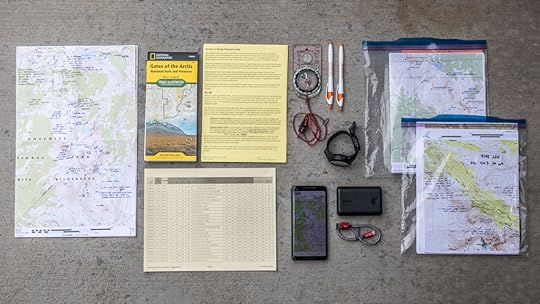 A complete navigator’s toolkit, less the skills to use these items.
Leave a comment
How did you learn to navigate?
What questions do you have about my toolkit?
How does your toolkit differ?
The post How to navigate || Part 1: Navigator’s Toolkit + Navigation Mastery appeared first on Andrew Skurka.


