
How to navigate || Part 4: Navigator’s Mindset & “staying found”
With just a credit card and reliable internet connection, an aspiring navigator can acquire the proper maps, resources, and equipment.
The final two steps to navigational proficiency require more intention, self-study, perhaps an evening or weekend course, and most importantly field practice. In other words, the process is more time-intensive, but also more fun.
These steps are:
Putting oneself in the Navigator’s Mindset, andDeveloping the skills to interpret and operate the maps, resources, and equipment.
This is the fourth installment of a multi-part series on backcountry navigation. If you landed here first, consider reading the remainder of the series afterwards, or start with the Introduction so that this post has more context.
Part 1: IntroductionPart 2: Maps and resourcesPart 3: EquipmentPart 4: MindsetPart 4: Skill checklist
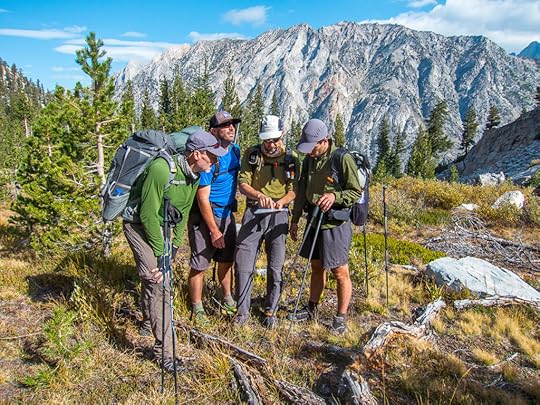
 From a high point above Tablelands, Brian Robinson discusses the proposed route with members of the group.
Tell me a story
When teaching clients how to navigate, we regularly ask them to tell us their “navigational story.” This device helps put them in the Navigator’s Mindset, specifically to be:
Attentive,Present, andAnticipating.
The story itself consists of three parts:
Where we’ve been (“attentive”),Where we are (“present”), and,Where we’re going (“anticipating”).
We ask clients to illustrate their story on the map, and to prove it with information they glean from their map, resources, and equipment. There must be alignment — if there are discrepancies between the story and these tools, clients must revisit their story line or double-check their instruments.
 Dave Eitemiller and crew get their bearings before committing to a big climb up Adventurer Col on the Kings Canyon High Basin Route.
Inconsistencies
It’d be reason to pause if:
The story is that we…
Reached a lake after climbing steeply west for an hour, but in fact we only climbed for 35 minutes and we were hiking east (“not attentive”);Have arrived (we think) at the ford of Return Creek on the Pacific Crest Trail, but our altimeters read 8,800 feet instead of 8,600 feet, and the creek is flowing southeast instead of southwest (“not present”); or,Expect to reach a junction after hiking downhill for 15 minutes, but the trail has been flat and we’ve been hiking for 10 minutes.
It’s sometimes okay to proceed when the story is not matching up entirely, but do so skeptically. If more information comes in that further questions the story, then maybe it’s time to stop and figure things out.
When a navigator is convinced that their story is correct even though it’s full of holes, it’s called “bending the map.” While you may not want to “waste” more time by getting the story straight right now, my experience is that it’s time well spent.
Case study: Yosemite High Route
To demonstrate the navigational story, I’ll use a case study from the Yosemite High Route, which is fresh in my mind since I was on it in July.
First, let’s look at the map. Suppose that we’re having this conversation at the gun sight in the middle of the map, and we’re essentially following the red dots from west to east.
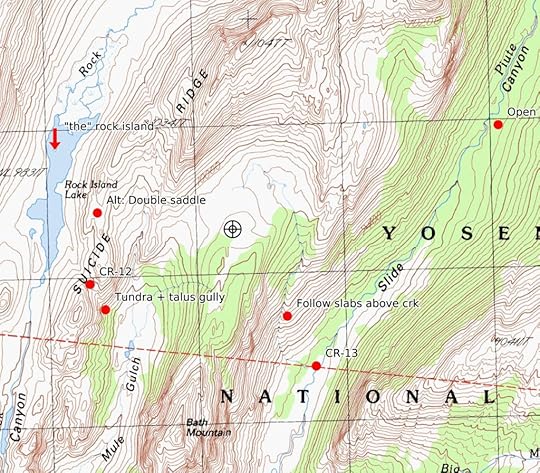
Where we have been. “We walked along the east shore of Rock Island Lake, crossed Suicide Ridge, descended a steep tundra/talus gully to the head of Crazy Mule Gulch, then climbed moderately in a northeast direction for about 300 vertical feet.”
Where we are. “We’re standing on the saddle between Crazy Mule Gulch and Slide Canyon, which I can prove with multiple pieces of evidence.”
The description of this saddle in the Yosemite High Route Guide is very similar to how I would describe it.The map depicts this saddle as being above treeline and broad. Both are true.From the base of the descent off Suicide Ridge, it took us 20 minutes to get here, which is about right for hiking 0.6 miles off-trail and uphill at altitude.Using my compass, I found a bearing of 195 degrees to a peak that topographically looks like Bath Mountain.My altimeter reads 9,920 feet. The maps says this saddle is at about 9,940, which is within the margin of error for my altimeter.Finally, my GPS says that I’m here.
What we’re anticipating. “From this saddle, the guidebook instructs us to drop southeast towards a low-volume creek, and then to use this creek as a handrail while descending 700 vertical feet on Class 2 slabs to the base of Slide Canyon.”
The right tool for the job
A navigational story is more convincing when it’s supported by multiple pieces of evidence. In the case study above, for example, I proved where we are by using every single item in my toolkit.
But the process need not be so thorough every time. One piece of supporting evidence is mandatory, and often sufficient. A second is good practice, especially when off-trail. When you’re less certain of your story, employ all of your tools until you become certain.
Leave a comment!
How have you learned to best “stay found?”When have you “bent the map” and got yourself in some trouble? How did you recover?
The post How to navigate || Part 4: Navigator’s Mindset & “staying found” appeared first on Andrew Skurka.


