
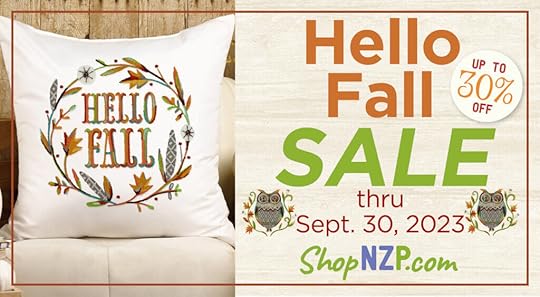
Nancy Zieman's Blog, page 32
September 23, 2023
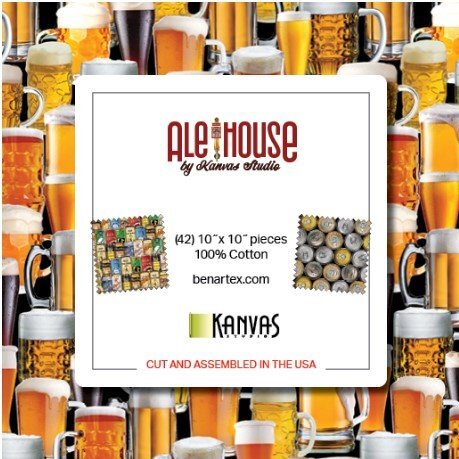
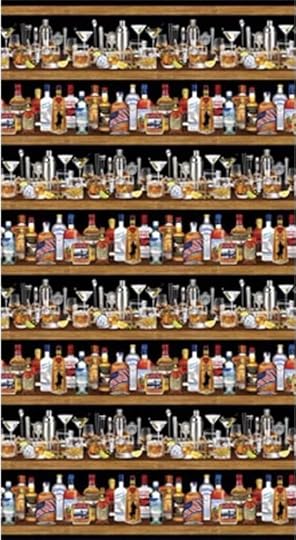
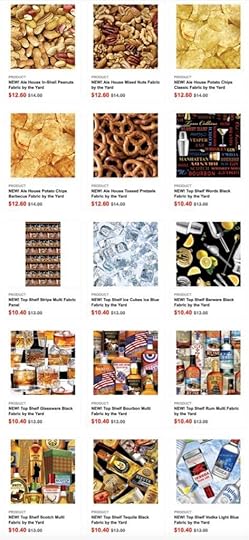
NEW! Ale House Fabrics by Kanvas Studio For Benartex Designer Fabrics at ShopNZP.com

We’re celebrating Oktoberfest with NEW! Ale House Fabrics by Kanvas Studio for Benartex. Explore the digital fabric swatches below. Plus SAVE 20% Off NEW! Ale House Fabrics during our Hello Fall Sale at ShopNZP.com!

Sew gifts with these high-quality designer fabric prints featuring various beer glasses, bottle caps, beer bottles, stacked cans, tabs, kegs, tappers, and pretzels & snacks! 100% Cotton Fabrics are great for quilting, home décor, aprons, coasters, table runners and napkins.

 NEW! Ale House Fat Quarter Pack


The Pop a Cold One Quilt Pattern is a fun project designed by Stephanie Sheridan that is being offered as a complimentary pattern for the Ale House fabric collection by Kanvas Studio of Benartex. It measures approx. 41’’ x 52’’. Download the Free! Pop a Cold One Pattern here:

Pop a Cold One FREE Quilt Pattern by Stephanie Sheridan featuring Ale House fabrics

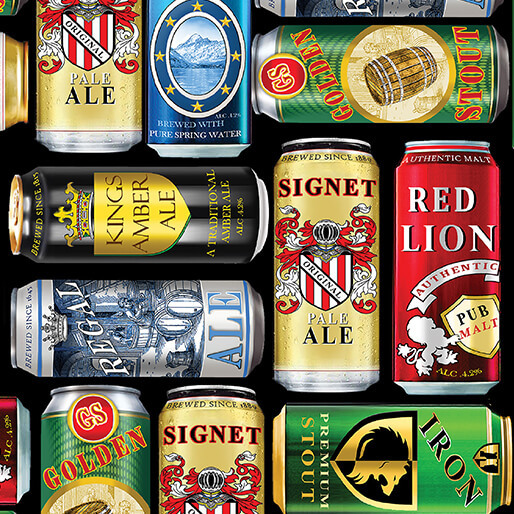
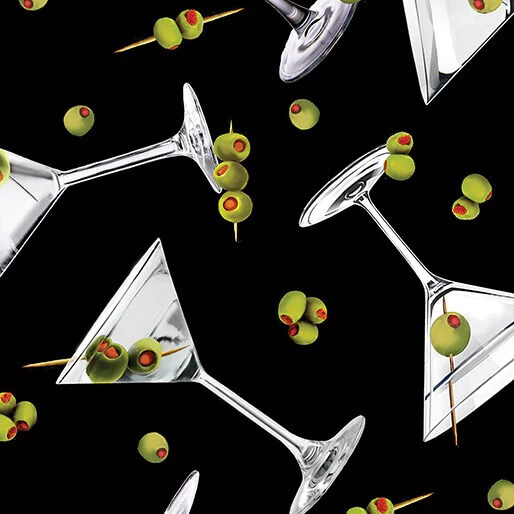
Top Shelf & Ale House Fabrics by Kanvas Studio for Benartex–It’s happy hour! These high-quality designer fabrics make great gifts for guys when sewn into aprons, bar décor, table runners, gift bags, coasters, quilts, pillows, home décor, apparel, and accessories.
Top Shelf Stripe Multi Fabric Panel
Top Shelf & Ale House Fabrics by Kanvas Studio for Benartex feature various favorite libation names and cocktails, including beer, bottle caps, bottled bourbon, scotch, vodka, rum, tequila, martini glasses and olives, ice cubes, barware and drinks — only the best for your favorite mixologist!
Top Shelf Words Black Fabric by the Yard


 Top Shelf Scotch Multi Fabric by the Yard


Happy Sewing!
Team Nancy Zieman
Nancy Zieman Productions. LLC.
[image error]
Stitch it! Sisters is a production of NZ Productions LLC. Content in this feed is © copyright 2023 by Nancy Zieman Productions, LLC and may not be republished without written permission. You’re welcome to forward the email to a friend or colleague but it’s not okay to add the RSS feed automatically as content on a blog or other website. The FTC requires us to tell you that Nancy Zieman Productions, LLC has provided products by other companies in the course of doing business. The FTC requires us to advise you to take this information into consideration when reading this posting.
Make sure you are subscribed to Nancy Zieman Productions, LLC enews mailing list so you won’t miss a thing. Sign up at nancyzieman.com/blog/enews. And join us on YouTube,Facebook,Instagram and Pinterest!


September 21, 2023
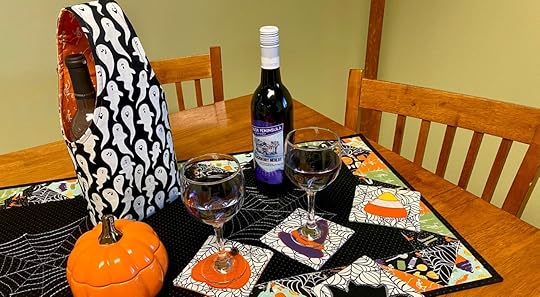
Team NZP’s Halloween Wine Tote Sewing Tutorial

Celebrate Halloween Sewing and sew our fun Wine Tote! In just a couple hours of sewing, you’ll have a fun and festive wine tote to add to your Halloween table decor. Plus SAVE 20% Halloween Fabrics, Panels, and Fat Quarter Packs in store at the Nancy Zieman Sewing Studio and online at ShopNZP.com.
Halloween Wine Tote Supplies McCall’s M6338 Picnic Party Pattern by Nancy Zieman 1/2 yd. Outer Wine Tote Fabric 1/2 yd. Inner Wine Tote Fabric 1 yd. Pellon Fusible ShirTailor InterfacingEze View Press Cloth & Fine Mist Spray Bottle Clover’s Heart Shaped Pins or Clover’s Wonder Pins Pattern Making Paper Pattern Shape Weights – Set of 8 Sewer’s Fix It Tape Team Nancy Zieman’s Clip ‘n Glide Bodkin by Clover Clover’s Stilletto/Awl Marking Pen Tailor’s Clapper June Tailor’s Starch Savvy Open Toe Presser Foot The Big Jig Schmetz Universal Sewing Machine Needle, Sz. 80 45 mm Rotary Cutter, Pinking Blade, Mat & Ruler Standard Sewing Thread Oliso Iron
 Halloween Wine Tote Sewing Tutorial!
Finished Size Approximately 4″ x 6″ x 14″
All seam allowance are 5/8″, unless otherwise stated.
Our Halloween Wine Tote, by The Nancy Zieman Productions Team, may be sewn in as little as two or three hours – and is made from just two Halloween Fat Quarters, or 1/2 yd. each of two different fabrics.
Make sure you are subscribed to the Team NZP E-news—so you won’t miss a thing. Sign up today! And join us on Facebook, Pinterest, and Instagram.
Prepare Fabrics


Prepare all fabrics by pressing and starching with June Tailor’s Starch Savvy. Press and starch, press and starch.
Cut Fabrics & Interfacing Cut two 10″ wide x 17″ tall rectangles from
Outer
Wine
Tote
Fabric.
Cut two 10″ wide x 17″ tall rectangles from
Inner Wine Tote Fabric.
Cut four 10″ wide x 17″ tall rectangles from
Pellon Fusible ShirTailor Interfacing.
Cut two 10″ wide x 17″ tall rectangles from
Outer
Wine
Tote
Fabric.
Cut two 10″ wide x 17″ tall rectangles from
Inner Wine Tote Fabric.
Cut four 10″ wide x 17″ tall rectangles from
Pellon Fusible ShirTailor Interfacing.
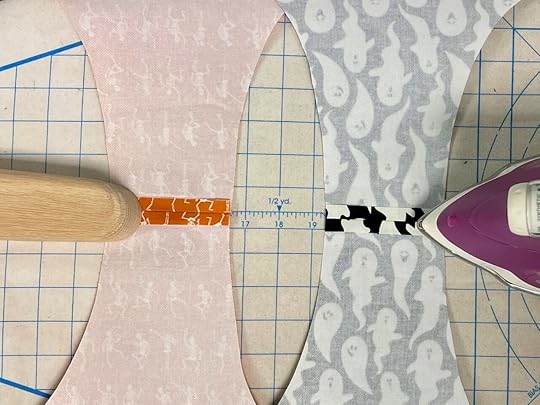
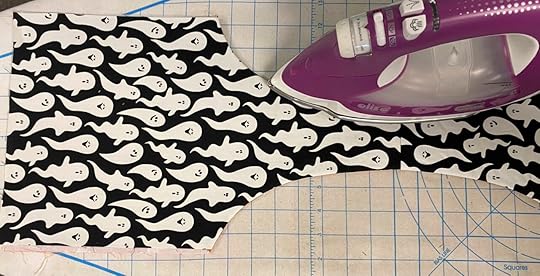
 Fuse ShirTailor Interfacing rectangles to wrong side of fabric rectangles, using
Eze View Press Cloth & Fine Mist Spray Bottle
– filled with water.
Fuse ShirTailor Interfacing rectangles to wrong side of fabric rectangles, using
Eze View Press Cloth & Fine Mist Spray Bottle
– filled with water.
 Cut out the Wine Tote Pattern Piece from the
McCall’s M6338 Picnic Party Pattern by Nancy Zieman
.
ll’s M6338 Picnic Party Pattern by Nancy Zieman
.
ll’s M6338 Picnic Party Pattern by Nancy Zieman
.Cut one 10″ wide x 17″ tall rectangle from
Pattern Making Paper
.
Cut out the Wine Tote Pattern Piece from the
McCall’s M6338 Picnic Party Pattern by Nancy Zieman
.
ll’s M6338 Picnic Party Pattern by Nancy Zieman
.
ll’s M6338 Picnic Party Pattern by Nancy Zieman
.Cut one 10″ wide x 17″ tall rectangle from
Pattern Making Paper
.

 Position
Wine Tote Pattern Piece
along fold of
Pattern Making Paper
– using
Pins
or
Shape Weights
to hold pattern in place.
Position
Wine Tote Pattern Piece
along fold of
Pattern Making Paper
– using
Pins
or
Shape Weights
to hold pattern in place.
 Cut away
Pattern Making Paper
, along curved edge.
Cut away
Pattern Making Paper
, along curved edge.
 Unfold pattern, and tape
Wine Tote Pattern Piece
to
Pattern Making Paper
– using
Sewer’s Fix It Tape.
Unfold pattern, and tape
Wine Tote Pattern Piece
to
Pattern Making Paper
– using
Sewer’s Fix It Tape.
 Position wine tote pattern onto fabric rectangles, using
Pins
or
Shape Weights
to hold pattern in place.
Position wine tote pattern onto fabric rectangles, using
Pins
or
Shape Weights
to hold pattern in place.
 Cut two wine tote lining pieces.Cut two wine tote outer pieces.
 Pin or Wonder Clip
lining fabrics, right sides together, at top narrow edge.
Pin or Wonder Clip
outer fabrics, right sides together, at top narrow edge.
Pin or Wonder Clip
lining fabrics, right sides together, at top narrow edge.
Pin or Wonder Clip
outer fabrics, right sides together, at top narrow edge.
 Attach an
Open Toe Presser Foot
to sewing machine, and insert a new
Schmetz Universal Sewing Machine Needle, Sz. 80
.Stitch seams, along top narrow edges.
Attach an
Open Toe Presser Foot
to sewing machine, and insert a new
Schmetz Universal Sewing Machine Needle, Sz. 80
.Stitch seams, along top narrow edges.
 Press seams open, using a
Tailor’s Clapper
– to flatten seams.
Press seams open, using a
Tailor’s Clapper
– to flatten seams.
 Pin or Wonder Clip outer wine tote section to lining fabric section, right sides together, along curved edges.
 Stitch outer wine tote section to lining fabric section – along curved edges.


Extend the life of the cutting mat, and cut on the “reverse side” of the mat – when rotary cutting with a pinking blade!
 Press seams open over a
Tailor’s Clapper
– to flatten seams.
Press seams open over a
Tailor’s Clapper
– to flatten seams.
 Attache
Clip ‘n Glide Bodkin
to lower corner of outer wine tote section, and turn right sides out.
Attache
Clip ‘n Glide Bodkin
to lower corner of outer wine tote section, and turn right sides out.
 Press.


Using an Open Toe Presser Foot makes it easy to stitch directly on the marked line!


Use The Big Jig – to keep presser foot level – when sewing multiple layers!


Our Halloween Wine Tote holds one or two standard wine bottles, and also makes a great gift bag – with a built-in handle!

Eze View Press Cloth & Fine Mist Spray Bottle Clover’s Heart Shaped Pins or Clover’s Wonder Pins Pattern Making Paper Pattern Shape Weights – Set of 8 Sewer’s Fix It Tape Team Nancy Zieman’s Clip ‘n Glide Bodkin by Clover Clover’s Stilletto/Awl Marking Pen Tailor’s Clapper June Tailor’s Starch Savvy Open Toe Presser Foot The Big Jig Schmetz Universal Sewing Machine Needle, Sz. 80 45 mm Rotary Cutter, Pinking Blade, Mat & Ruler Standard Sewing Thread Oliso Iron
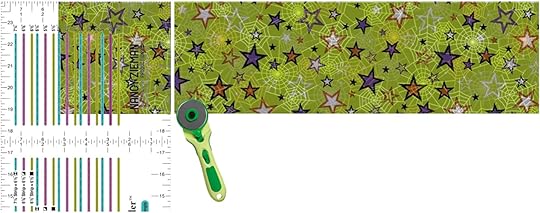
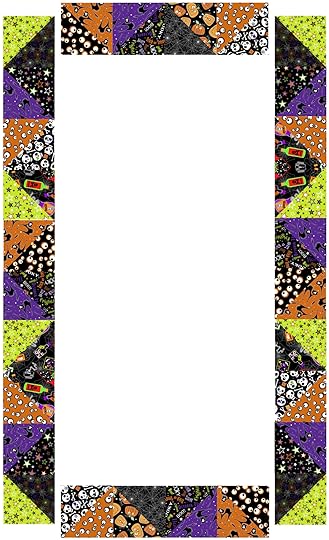
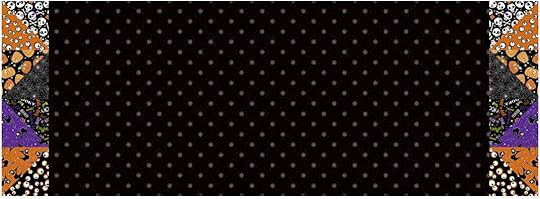
Sew our Coordinating Spooky Spiderweb Table Runner! with Team NZP’s FREE! Spiderweb Stitching Guide Printable PDF!

Sew a Set of our Coordinating Halloween Applique Coasters and download the FREE! Spooky Halloween Applique Printable !


Sew a Halloween Wine Tote!

Create a Spooky Spiderweb Table Runner our with FREE! Spiderweb Stitching Printable PDF!

Stitch a set of Reversible Appliquéd Coasters with our FREE! Halloween Appliqué Printable Patterns PDF!
Happy Sewing!
Team Nancy Zieman
Nancy Zieman Productions. LLC.
[image error]
Stitch it! Sisters is a production of NZ Productions LLC. Content in this feed is © copyright 2023 by Nancy Zieman Productions, LLC and may not be republished without written permission. You’re welcome to forward the email to a friend or colleague but it’s not okay to add the RSS feed automatically as content on a blog or other website. The FTC requires us to tell you that Nancy Zieman Productions, LLC has provided products by other companies in the course of doing business. The FTC requires us to advise you to take this information into consideration when reading this posting.
Make sure you are subscribed to Nancy Zieman Productions, LLC enews mailing list so you won’t miss a thing. Sign up at nancyzieman.com/blog/enews. And join us on YouTube,Facebook,Instagram and Pinterest!September 19, 2023
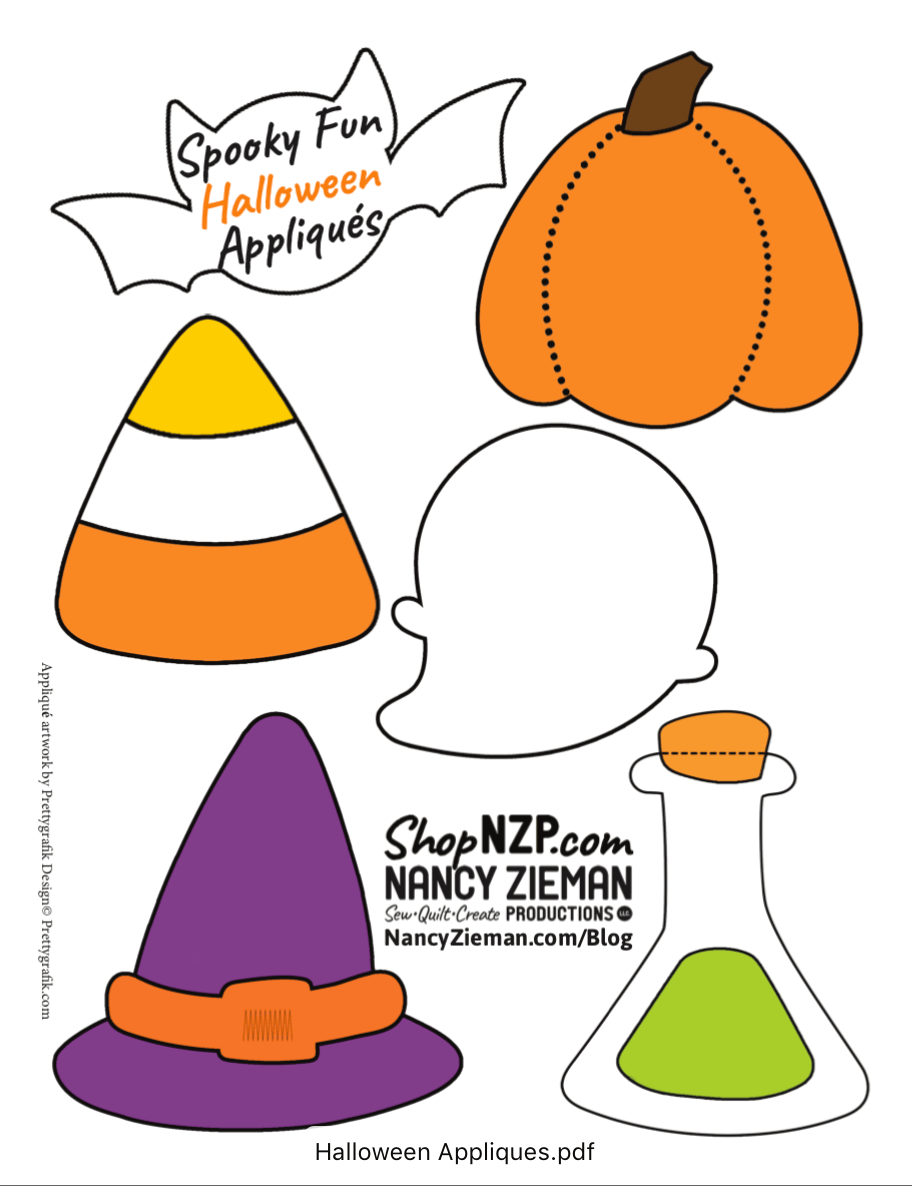
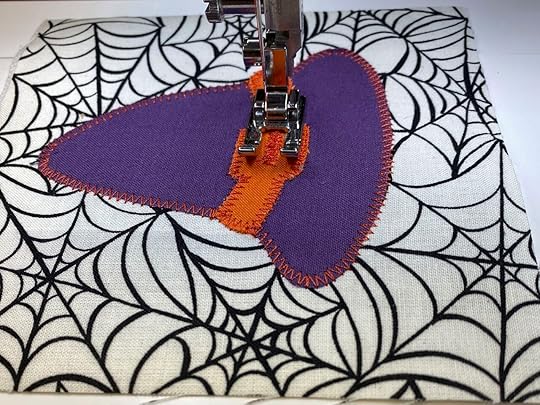
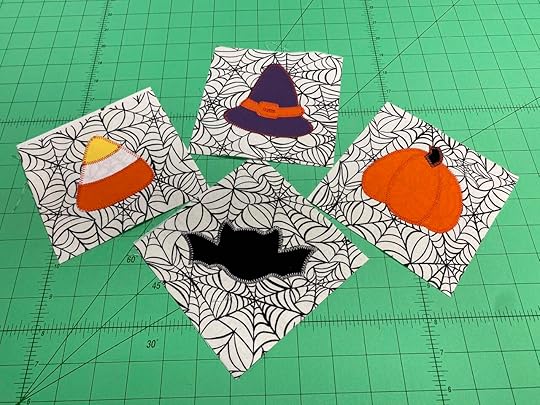
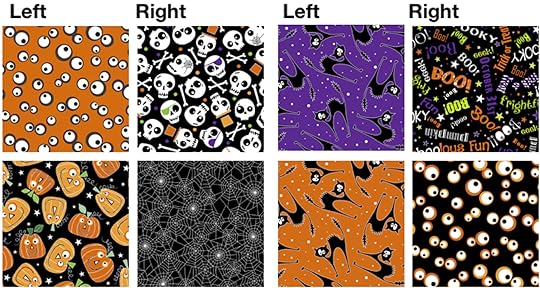
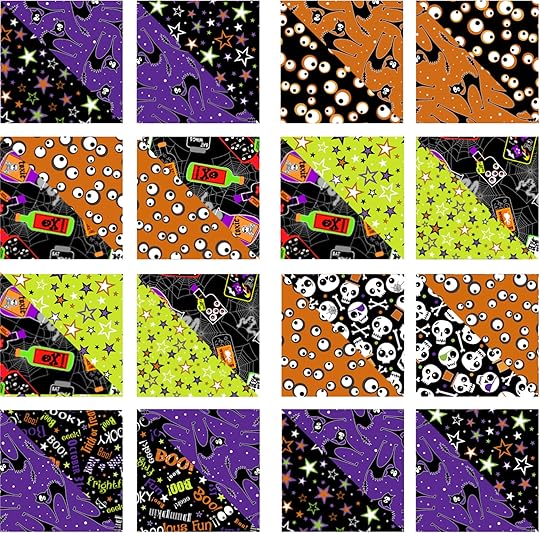
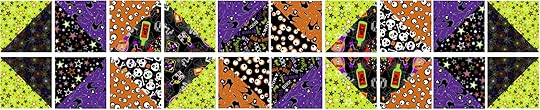
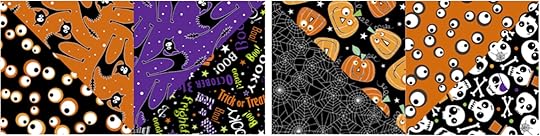
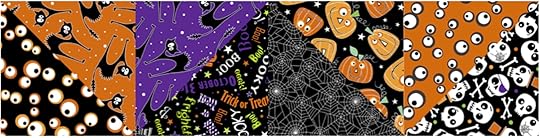
Halloween Applique Coaster Sewing Tutorial & FREE! Applique Printable

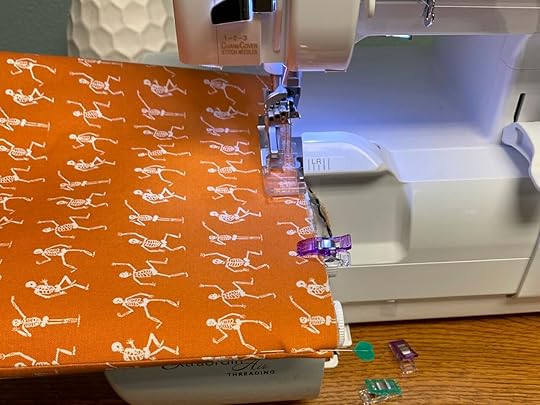
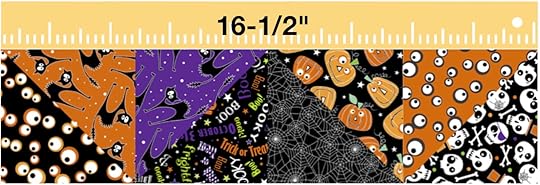
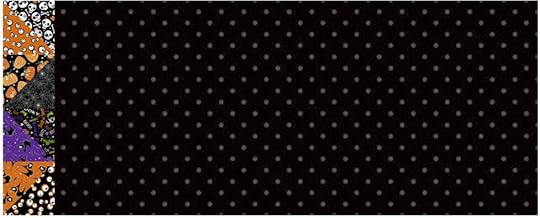
Celebrate Halloween Sewing and stitch a set of Reversible Palette Coasters with our Spooky-Fun Halloween Appliques! We stitched this easy sewing project with five fat quarters. Our reversible drink coasters, or mug rugs, feature an envelope back and a front flat surface — an ideal “palette” for showcasing seasonal appliques! The reverse side opens to wrap around the base of a stemmed-glass.


Five coordinating cotton quilting fabric Fat Quarters
Quilter’s Starch Savvy Pellon’s® ShirTailor Interfacing by the Yard Eze-View Pressing Cloth Non-Stick Teflon Pressing Sheet Wonder-Under Paper Backed Fusible Web Clover’s 5-1/8″ and 6-3/4″ Bordeaux Ultimate Scissors Open Toe Applique Presser Foot Clover’s Straight Tailor’s Awl/Stiletto Clover’s Point 2 Point Turner Clover’s Wonder Clips Clover’s Rotary Cutter and Mat, & Ruler Schmetz Chrome Embroidery Needles, Size 75/11 Optional: 1/4″ Quilting Presser Foot Standard Sewing Thread Oliso Iron
Preshrink fabrics by steaming and pressing, and steaming and pressing a second time, and then spray press and starch fabric with June Tailor’s Quilter’s Starch Savvy — press and starch, press and starch.


We selected four different Fat Quarters – for the back of our coasters.

Machine Appliqué
Download and print our FREE! Halloween Spooky Fun Applique Printable Patterns.


 After cutting out our applique shapes, we auditioned two background fabric. black spiderwebs on white won!


Position fusible appliqués to right side of palette coaster front fabrics.


Using a Non-Stick Teflon Pressing Sheet, press appliqués to palette coaster front fabric – using a dry iron.

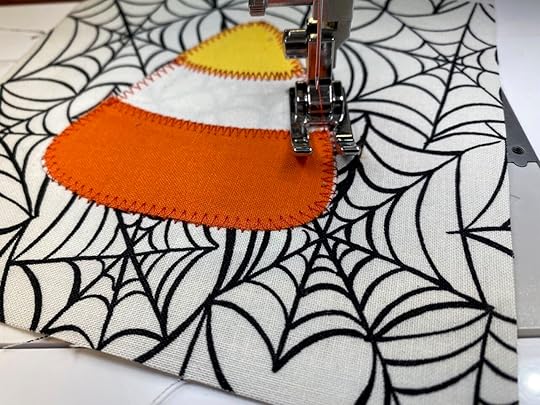
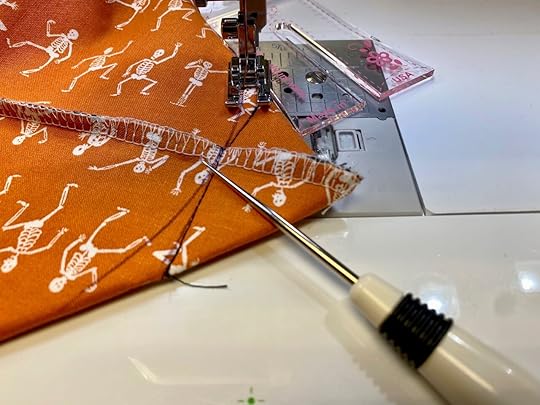
When stitching –or appliquéing– designs to fabric, stop with needle down on the outside of appliqué fabric when turning outside curves or corners; and stop with needle down on the inside of appliqué fabric when turning inside curves and corners! Always test stitches on a sample appliqué number– fused to a fabric scrap.

Stitch Reversible Palette Coaster Approximate finished size: 4-1/2″ x 4-1/2″Press two coordinating 5″ fabric squares in half, creating 2-1/2″ x 5″ folded fabric rectangles.
 Layer front appliqued square to one 5″ coordinating fabric square, with wrong sides together and appliqued square facing up. Position two 2-1/2″ x 5″ fold fabric rectangles over thread-embellished square – with folded edges meeting at middle, and raw edges aligning to outer edges.
 Wonder Clip edges.
 Optional: Insert a
1/4″ Quilting Presser Foot,
and use
Nancy Zieman’s Wrapped Corner Technique
to stitch and “wrap” coaster seams toward center – folding along previous stitching lines. Stitch seams twice, for durability! Find
Nancy Zieman’s Wrapped Corner Technique
in our
previous Blog Posting.
Optional: Insert a
1/4″ Quilting Presser Foot,
and use
Nancy Zieman’s Wrapped Corner Technique
to stitch and “wrap” coaster seams toward center – folding along previous stitching lines. Stitch seams twice, for durability! Find
Nancy Zieman’s Wrapped Corner Technique
in our
previous Blog Posting.
 Use Clover’s Straight Tailor’s Awl Stiletto to assist feeding fabric layers under presser foot..
 Turn Reversible Palette Coaster right side out, using
Point 2 Point Turner
to push out corners.Press.Repeat steps above and complete additional coasters.
Turn Reversible Palette Coaster right side out, using
Point 2 Point Turner
to push out corners.Press.Repeat steps above and complete additional coasters.
Our Reversible Palette Coasters are so fun to make, you’ll be stitching new coasters for every holiday! And, they make a great addition to a gift basket!
Halloween Palette Coasters Supply ListingTeam NZP’s FREE! Halloween Spooky Fun Applique Printable PatternsFive coordinating cotton quilting fabric Fat Quarters
Assorted fabric scraps – for appliques Quilter’s Starch Savvy Pellon’s® ShirTailor Interfacing by the Yard Eze-View Pressing Cloth Non-Stick Teflon Pressing Sheet Wonder-Under Paper Backed Fusible Web Clover’s 5-1/8″ and 6-3/4″ Bordeaux Ultimate Scissors Open Toe Applique Presser Foot Clover’s Straight Tailor’s Awl/Stiletto Clover’s Point 2 Point Turner Clover’s Wonder Clips Clover’s Rotary Cutter and Mat, & Ruler Schmetz Chrome Embroidery Needles, Size 75/11 Optional: 1/4″ Quilting Presser Foot Standard Sewing Thread Oliso Iron Related Sewing Tutorial Posts
Halloween Wine Tote Sewing Tutorial. In just a couple hours of sewing, you’ll have a fun and festive wine tote to add to your Halloween table decor.
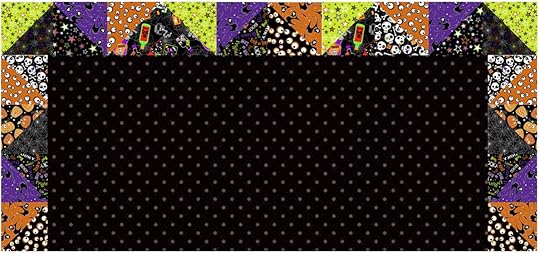
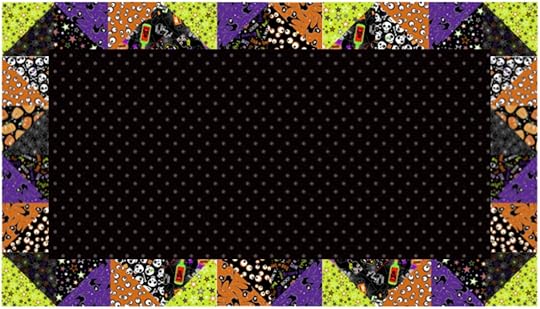
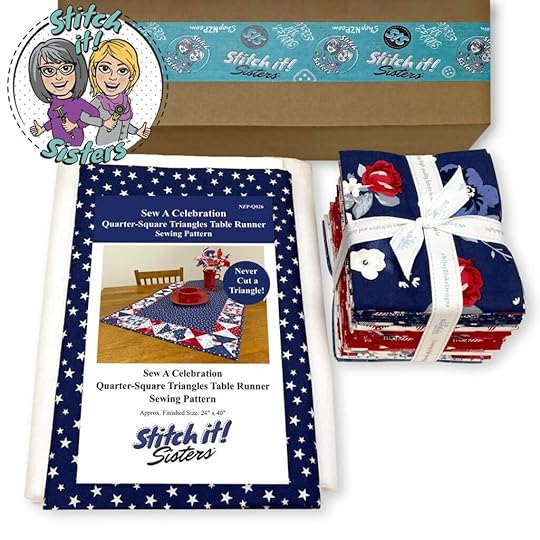
Sew A Celebration with our Halloween Half-Square Triangles Table Runner Sewing Tutorial! Easily cut, mark, and stitch half-square triangles without ever cutting a triangle! Plus FREE! Halloween Applique Printable!
Stitch a set of Reversible Appliquéd Coasters with our FREE! Halloween Appliqué Printable Patterns PDF!
Happy Sewing!
Team Nancy Zieman
Nancy Zieman Productions. LLC.
[image error]
Stitch it! Sisters is a production of NZ Productions LLC. Content in this feed is © copyright 2023 by Nancy Zieman Productions, LLC and may not be republished without written permission. You’re welcome to forward the email to a friend or colleague but it’s not okay to add the RSS feed automatically as content on a blog or other website. The FTC requires us to tell you that Nancy Zieman Productions, LLC has provided products by other companies in the course of doing business. The FTC requires us to advise you to take this information into consideration when reading this posting.
Make sure you are subscribed to Nancy Zieman Productions, LLC enews mailing list so you won’t miss a thing. Sign up at nancyzieman.com/blog/enews. And join us on YouTube,Facebook,Instagram and Pinterest!September 16, 2023
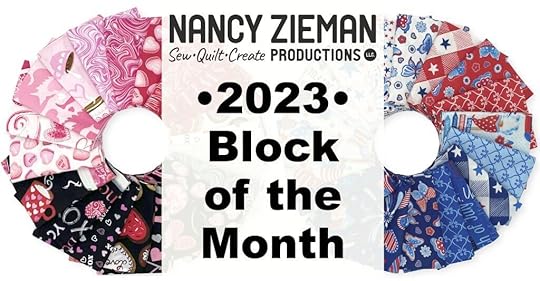
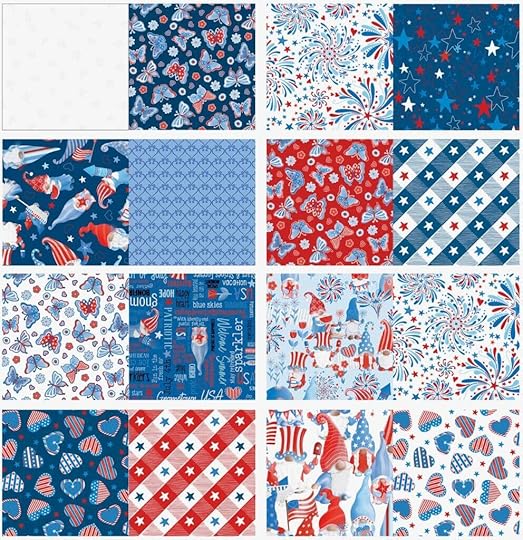
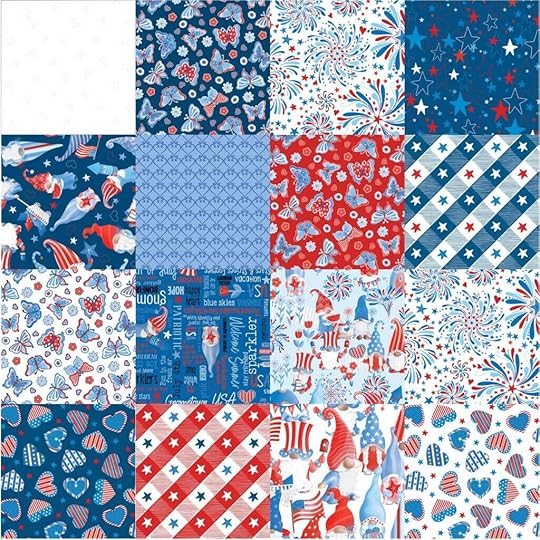
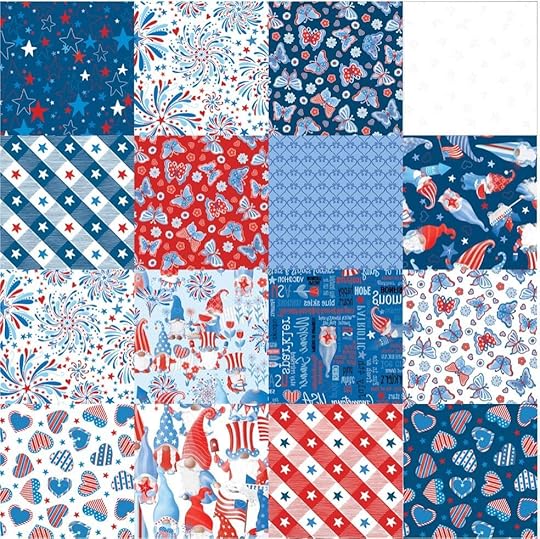
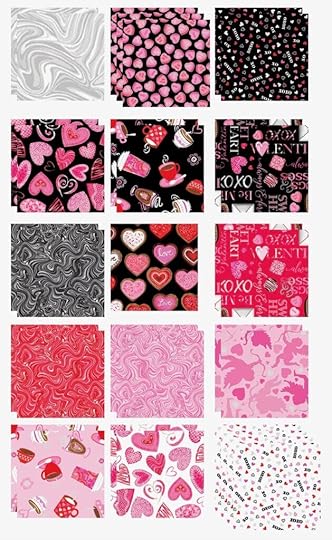
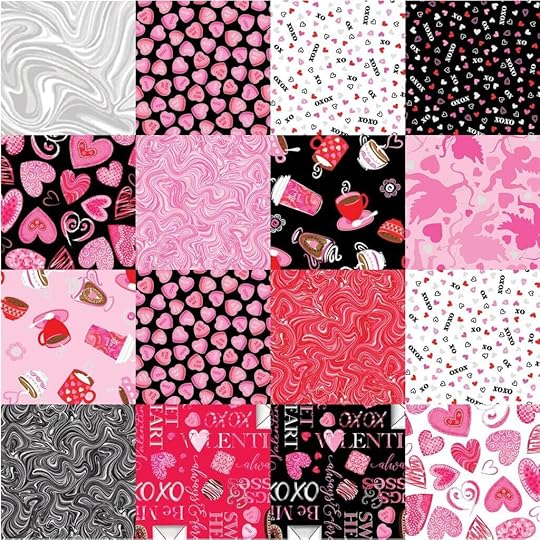
September 2023 NZP Block of the Month
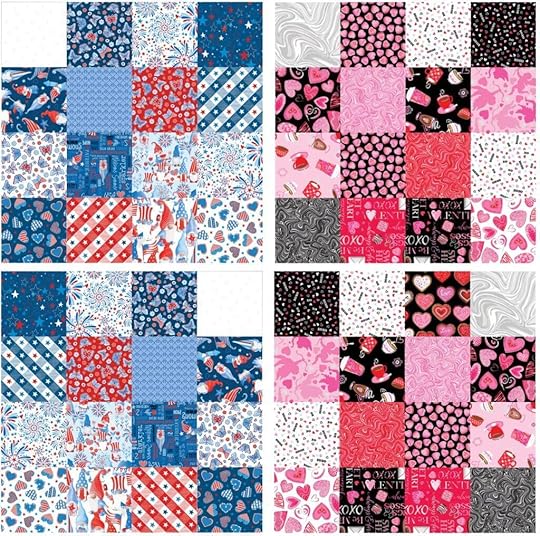
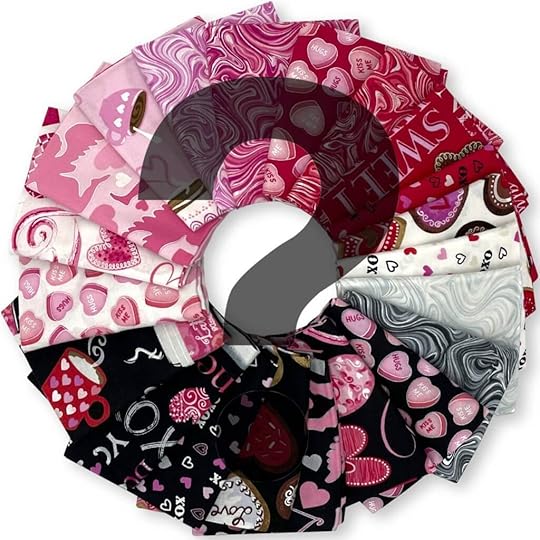
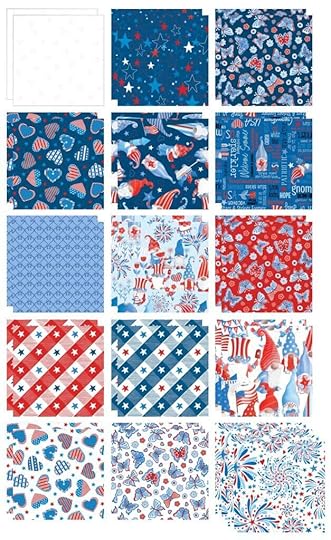
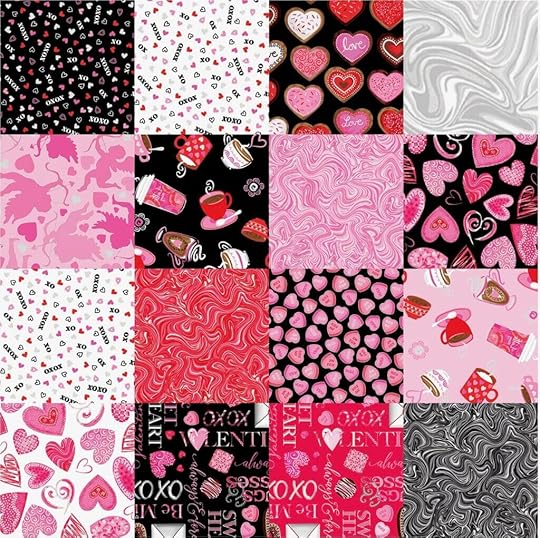
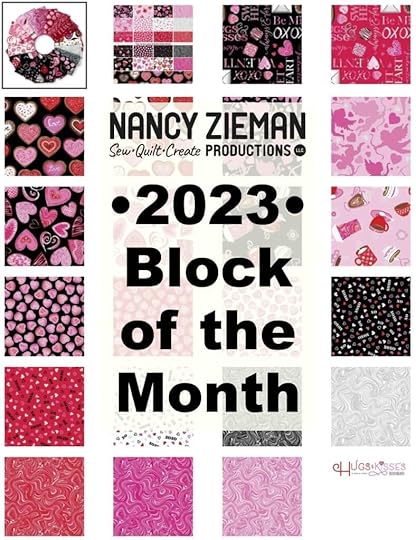
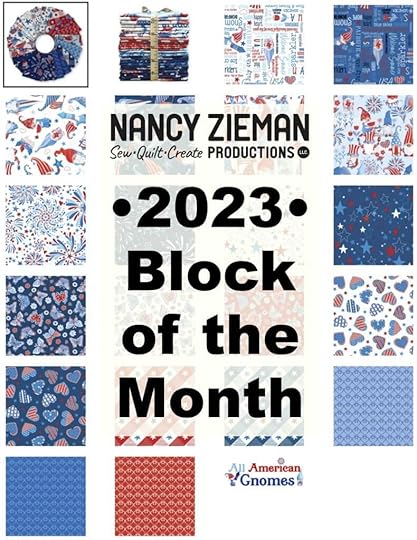
Our NEW! 2023 Nancy Zieman Productions Free! Block of the Month Mystery Quilt Series is a great way to finish a quilt in manageable monthly installments. One block at a time is an easy approach to creating a quilt. Plus our BoM23 is fat quarter friendly. Whether you’re a beginner quilter or seasoned quilter, our block of the month series is a great opportunity to get stitching in the new year. Team NZP is honored to continue Nancy Zieman’s Block of the Month program with our free monthly block sewing tutorials! We’ll be keeping the finished quilt design a mystery until later in December 2023! Hint: This year’s quilt is not a block sampler and will not have borders! This year, you may choose from two different Fat Quarter Bundle Colorways by our friends at Benartex: Choose Hugs & Kisses Fat Quarter Bundle includes twenty-one 18″ x 21″ fabric rectangles – Or, choose All American Gnomes Fat Quarter Bundle includes twenty 18″ x 21″ fabric rectangles.
Gather Your Fabrics and SuppliesAll blocks will feature fabrics from one Hugs & Kisses Fat Quarter Bundle or All American Gnomes Fat Quarter Bundle! Finished quilt measures approximately 72″ x 72″. For this quilt project, you will need:
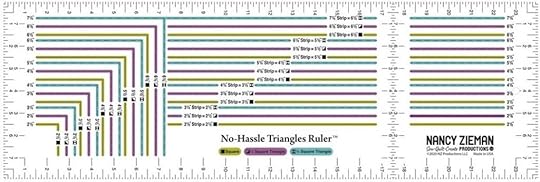
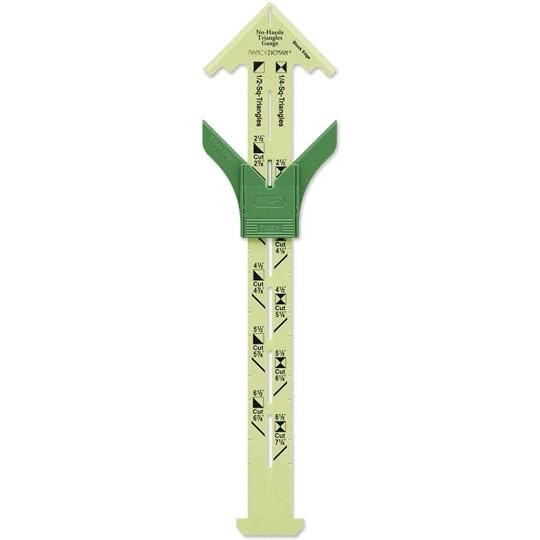
One Hugs & Kisses Fat Quarter Bundle or All American Gnomes Fat Quarter Bundle ! Our Exclusive No-Hassle Triangles Ruler by Team NZP No-Hassle Triangles Gauge by Nancy Zieman for Clover 3-1/2 yd. White Block Background Fabric (options listed below)1 yd. Binding Fabric (options listed below)4-1/2 yd. White Quilt Backing FabricBasic Supplies and Tools Listed Below
The Hugs & Kisses Fat Quarter Bundle or All American Gnomes Fat Quarter Bundle by Benartex offers two beautiful colorways to choose from! Each Fat Quarter Pack includes twenty 18″ x 21″ 100% cotton designer fabrics. Choosing just one collection may be the most difficult part of our BoM23!

Our NEW! 2023 Nancy Zieman Productions Free! Block of the Month Mystery Quilt Series will feature Hugs & Kisses Fat Quarter Bundle or All American Gnomes Fat Quarter Bundle! Here’s the inside scoop:
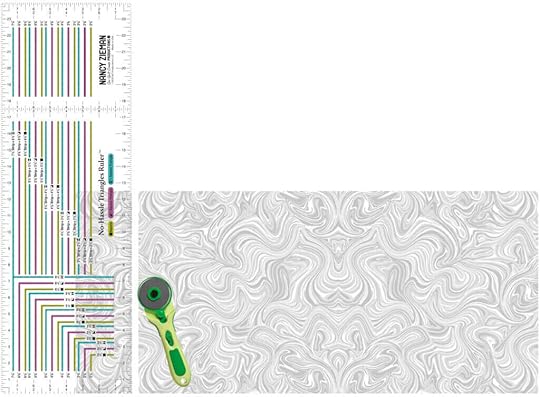
2023 NZP Mystery Block of the Month Series kicked off Saturday, January 21, 2023.As always, there’s no cost to join and no need to formally sign up.Block designs will be announced the Third Saturday each month.2023 NZP Block of the Month is fat quarter friendly.2023 NZP Block of the Month project lasts 12 months.Sharpen Your ToolsWell, not really, but do make certain that you have a sharp blade in your rotary cutter, and gather your No-Hassle Triangles Ruler, rotary cutting mat and pressing notions. The main tools for our 2023 Block of the Month are our Exclusive No-Hassle Triangles Ruler by Team NZP and the No-Hassle Triangles Gauge by Nancy Zieman for Clover. You may have already guessed the blocks will be made with a few triangles! Great News! Half-Square and Quarter-Square Triangles are easy to create with our Exclusive No-Hassle Triangles Ruler and No-Hassle Triangles Gauge!
Basic Supplies for NEW! 2023 Nancy Zieman Productions Free! Block of the Month Mystery Quilt Series!You’re the designer, choose between TWO Fat Qtr. Packs, then choose coordinating Block Background Fabric, and Binding Fabric by our friends at Benartex:
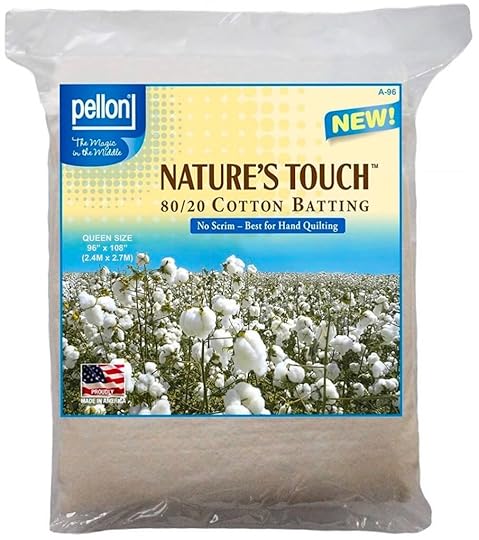
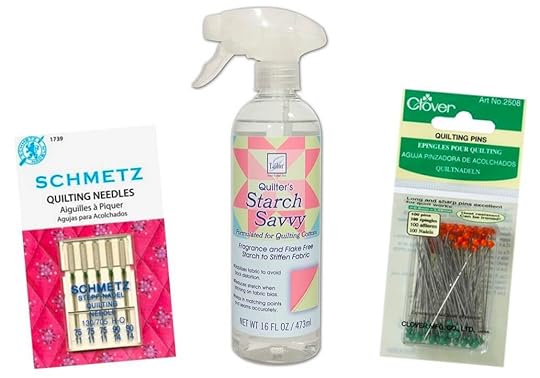
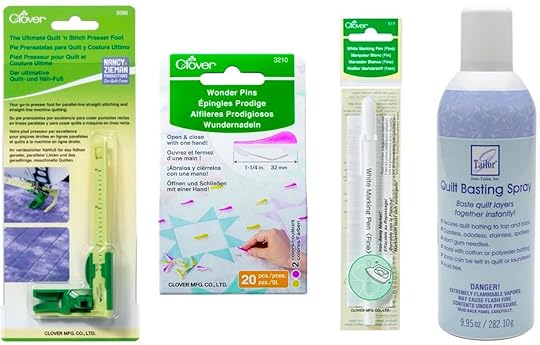
One Hugs & Kisses Fat Quarter Bundle or All American Gnomes Fat Quarter Bundle ! Exclusive No-Hassle Triangles Ruler by Team NZP No-Hassle Triangles Gauge by Nancy Zieman for Clover 3-1/2 yd. White Block Background Fabric, choose one: Hugs & Kisses Shimmery Marble White(for Hugs& Kisses colorway), White Stars Tone On Tone Fabric(for All American Gnomes colorway) or for either colorway: Day and Night Paisley White, or Day and Night Dot Waves White, or Day and Night Geo Bloom White Fabric by the Yard, or a coordinating white solid or white tone on tone fabric from your stash. 1 yd. Binding Fabric, “Hugs & Kisses” choose one: A Coordinating Hugs and Kisses Fabric by the yard, such as: Hugs & Kisses XOXO Hearts Black Fabric by the Yard or Hugs & Kisses XOXO Hearts Red Fabric by the Yard. Or 1 yd. Binding “All American Gnomes” Fabric: A Coordinating All American Gnomes Fabric by the yard, such as: Fireworks Celebration Blue Fabric by the Yard or Star Spangled Fabric Navy Blue by the yard.4-1/2 yd. White Backing Fabric Queen Size Pellon Nature’s Touch 80/20 Cotton Quilt Batting Size 75 Schmetz Quilting Needles Clover’s Quilting Pins June Tailor’s Starch Savvy Tailor’s Clapper Frixion Marking Pen 45 mm Rotary Cutter and Cutting Mat 1/4″ Quilting Presser Foot Optional: Clover’s Ultimate Quilt ‘N Stitch Presser Foot for quiltingOptional: Clover’s Fine White Marking Pen Optional: Quilt Basting Spray Optional: Clover’s NEW! Wonder Pins Silk Finish Cotton Quilting Thread for piecingIron

 Get Started Today!
Prepare for the NEW! 2023 Nancy Zieman Productions Free! Block of the Month Mystery Quilt Series by gathering and organizing your supplies. Organize your sewing space, and as soon as you have your fabrics, press & starch all Fat Quarters. Did you follow along with one or more of our previous NZP Block of the Month Series? If you finished part of all of the quilt blocks or the entire project, please share photos. We’d love to see and share them! Email your finished BoM quilt or quilt top photos to info@ziemanproductions.com. Find all the Supplies for NEW! 2023 Block of the Month Mystery Quilt Series at Nancy Zieman Productions at ShopNZP.com! You’re the designer, choose one colorway from the Fat Quarter Pack options above with coordinating Block Background Fabric, and Border and Binding Fabric by Benartex, above!
All blocks will feature fabrics from the Hugs & Kisses Fat Quarter Bundle or All American Gnomes Fat Quarter Bundle along with our Exclusive No-Hassle Triangles Ruler by Team NZP and Nancy’s No-Hassle Triangles Gauge by Clover. Follow along as we share step-by-step how to create the September Quilt Blocks.
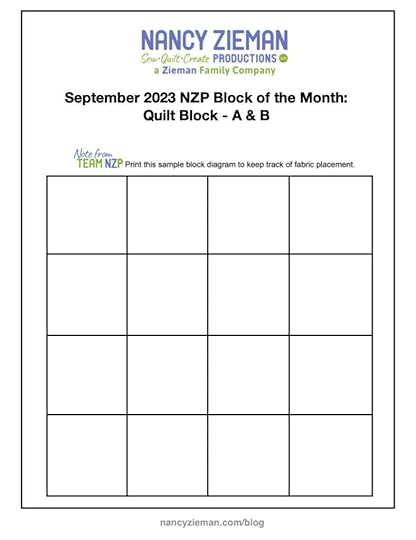
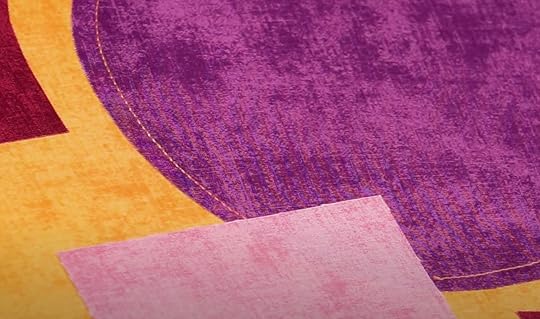
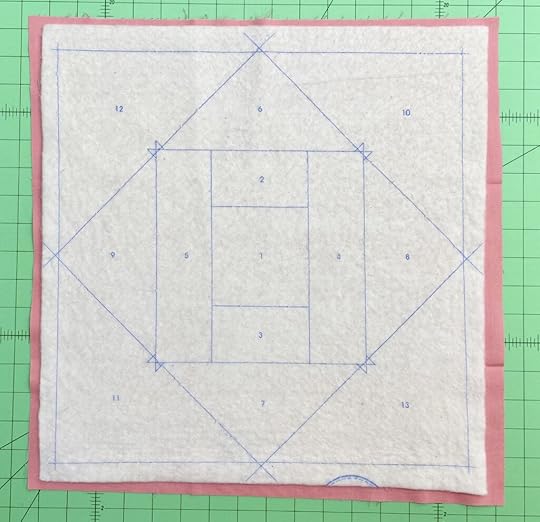
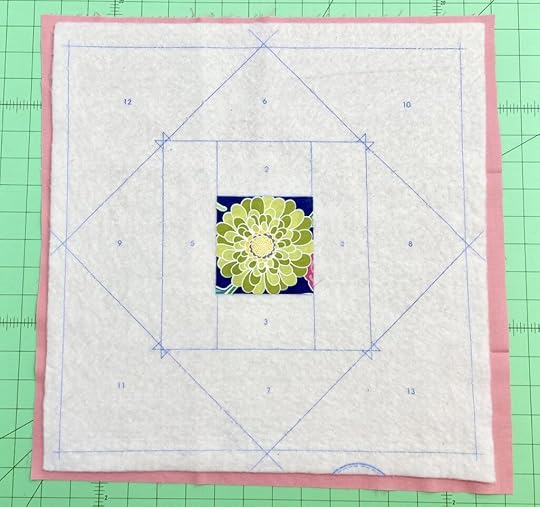
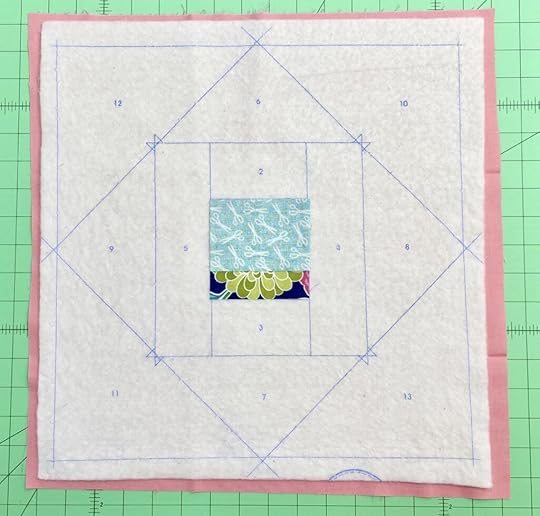
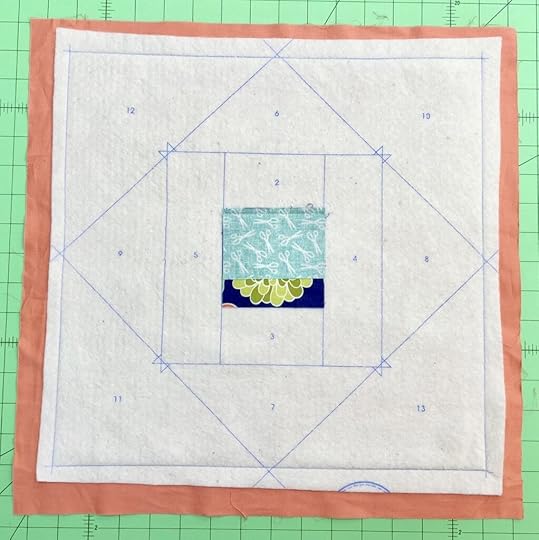
September Quilt BlocksKeep your fabric choices sorted using this handy Fabric Planner diagram. Download the planners, make notes, and/or pin cut block elements to the planner to remind you of the fabric placements. September 2023 NZP Block of the Month Planners
Prepare your fabrics! Pre-shrink fabrics by steaming and pressing. Then, stabilize fabrics for the sewing process by pressing and starching fabrics with Quilter’s Starch Savvy.
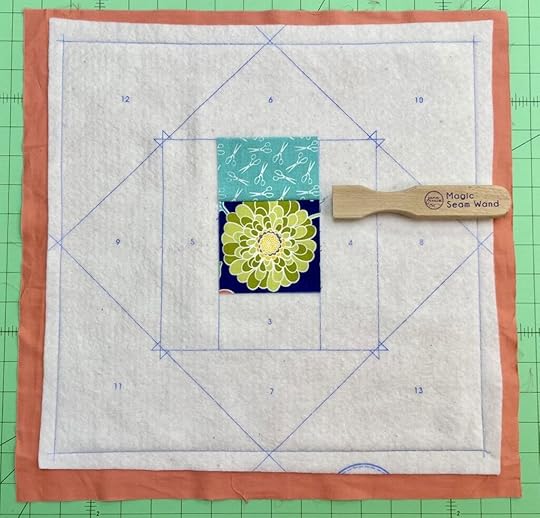
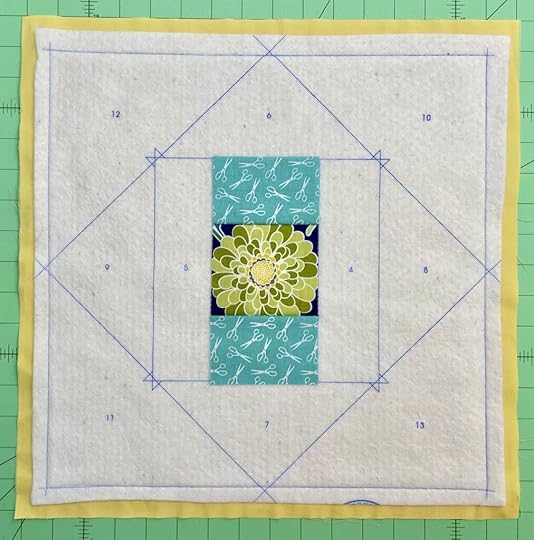
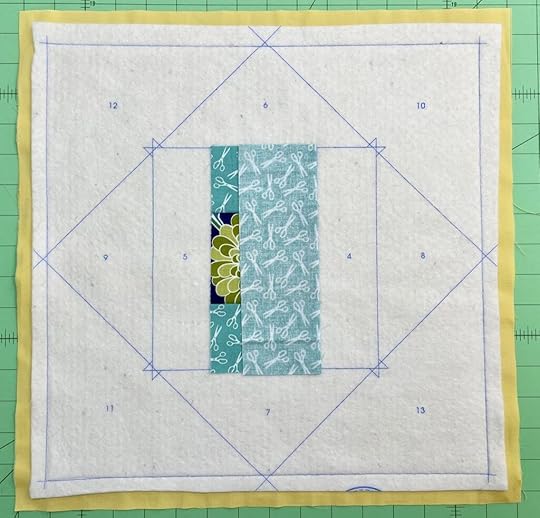
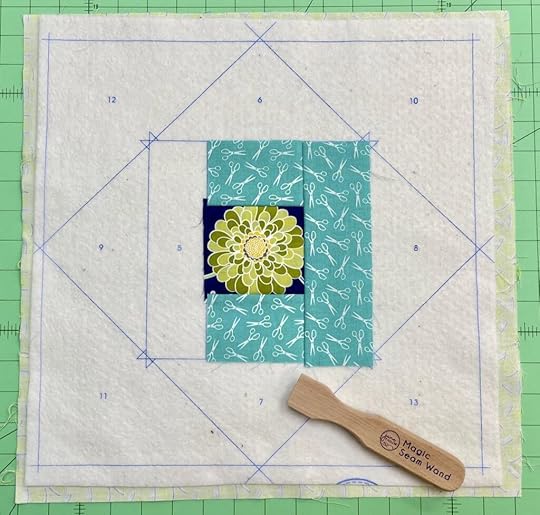
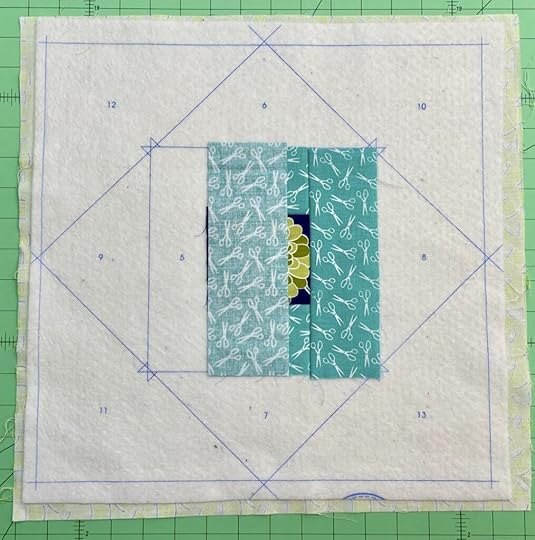
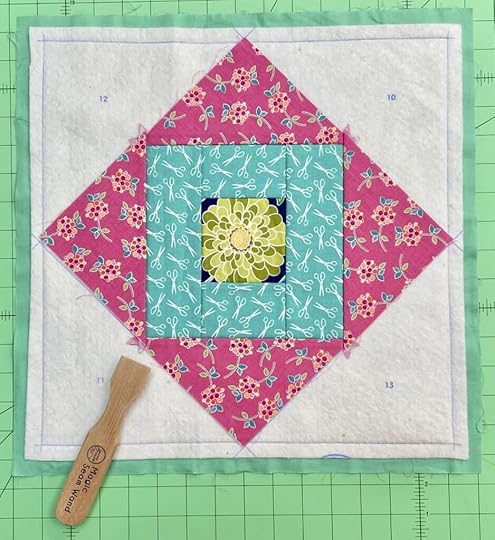
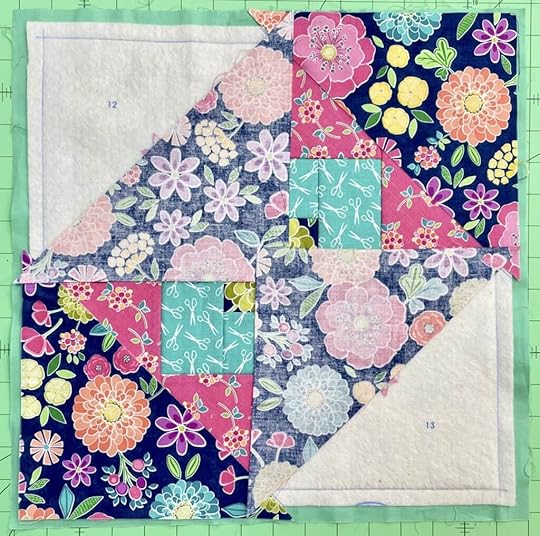
This block is 12-1/2″ square; 12″ finished square. Approx. Finished Quilt Size 72″ x 72″ This month we’re featuring Two block designs. Follow along as we demonstrate how to create the September Quilt Blocks.
This month we’re illustrating the All American Gnomes Colorway! See below for the Hugs & Kisses Colorway!
 Construct Blocks
All seam allowances are scant 1/4″ unless otherwise stated.
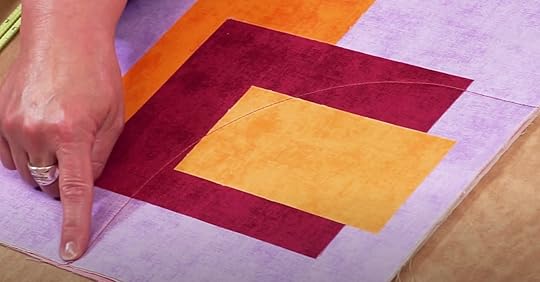
Layout squares as show below. Rotate blocks as needed.

 Place first column set to second column set right sides together.
Pin.
Stitch.Press seams flat, then press open or to one side – using a
Tailor’s Clapper
to set the seams.
Place first column set to second column set right sides together.
Pin.
Stitch.Press seams flat, then press open or to one side – using a
Tailor’s Clapper
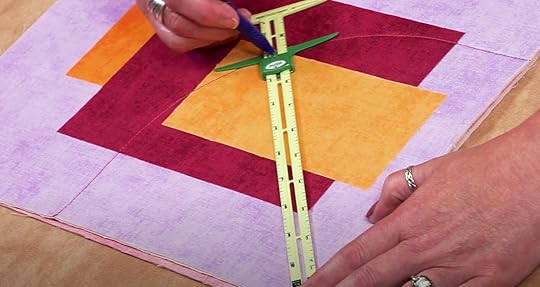
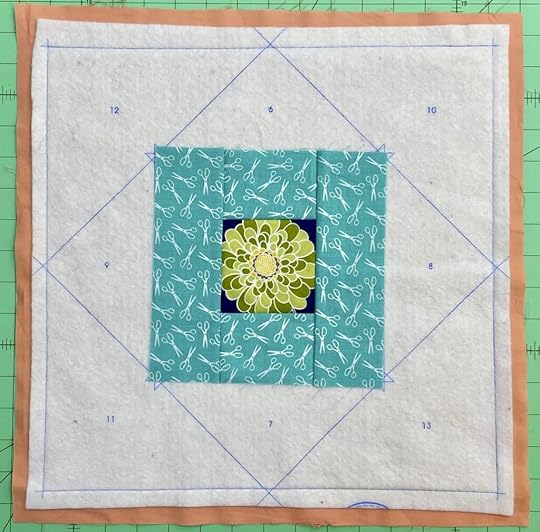
to set the seams.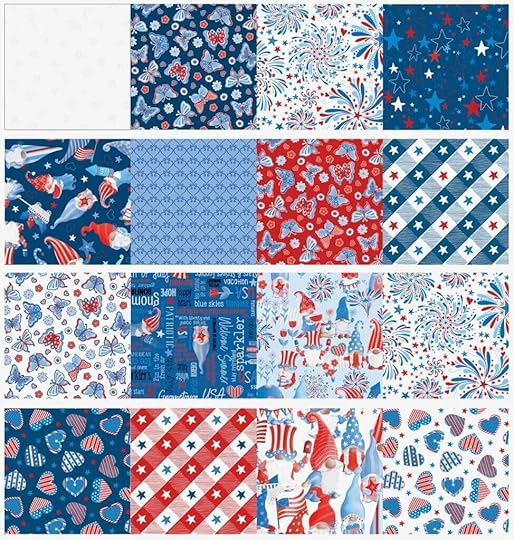 Join RowsPlace top row to second row right sides together.
Pin.
Stitch.Press seams flat, then press open or to one side – using a
Tailor’s Clapper
to set the seams.
Join RowsPlace top row to second row right sides together.
Pin.
Stitch.Press seams flat, then press open or to one side – using a
Tailor’s Clapper
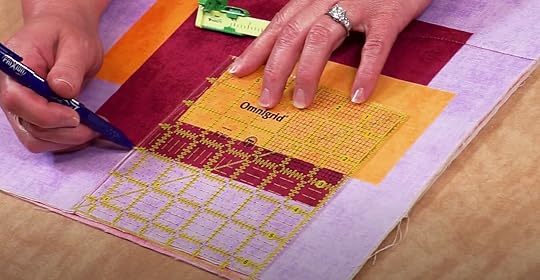
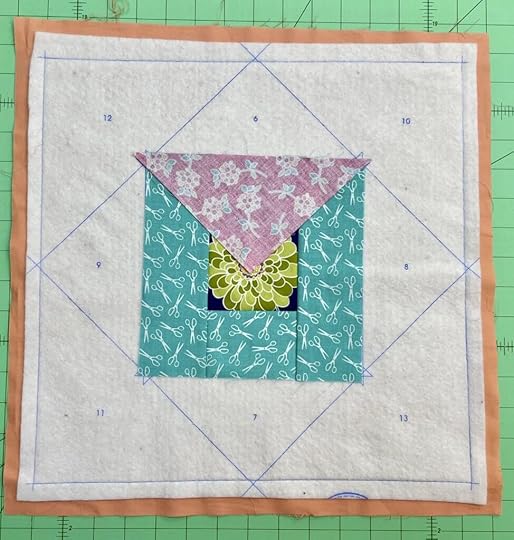
to set the seams.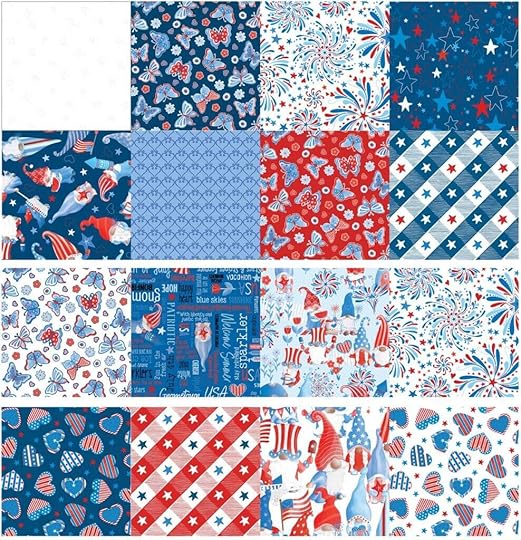 Place third row to second row right sides together.
Pin.
Stitch.Press seams flat, then press open or to one side – using a
Tailor’s Clapper
to set the seams.
Place third row to second row right sides together.
Pin.
Stitch.Press seams flat, then press open or to one side – using a
Tailor’s Clapper
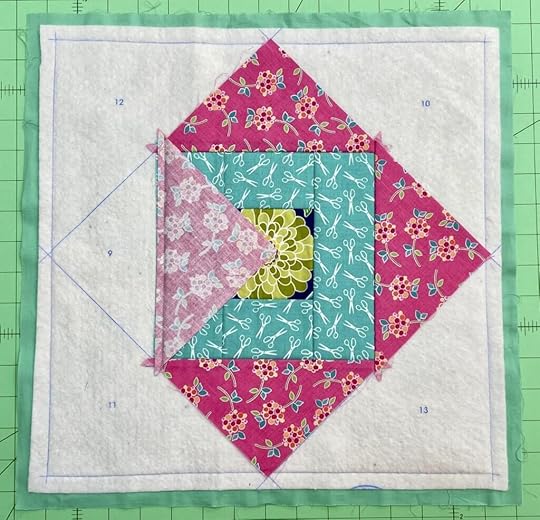
to set the seams.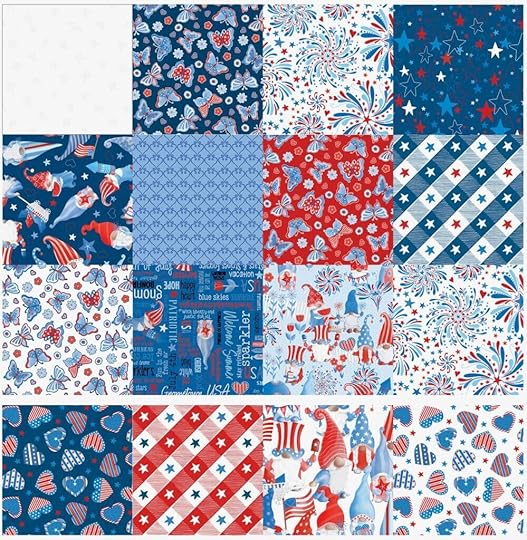 Place fourth row to third row right sides together.
Pin.
Stitch.Press seams flat, then press open or to one side – using a
Tailor’s Clapper
to set the seams.Block A
Place fourth row to third row right sides together.
Pin.
Stitch.Press seams flat, then press open or to one side – using a
Tailor’s Clapper
to set the seams.Block A
We’re over halfway through the 2023 BoM! Do you need more time to stitch your January through July Quilt Blocks? Fast-track this month’s August blocks by simply cutting four 12-1/2″ Blocks(and skip the seams). Then, use the extra time to catch up on your January through July Blocks!
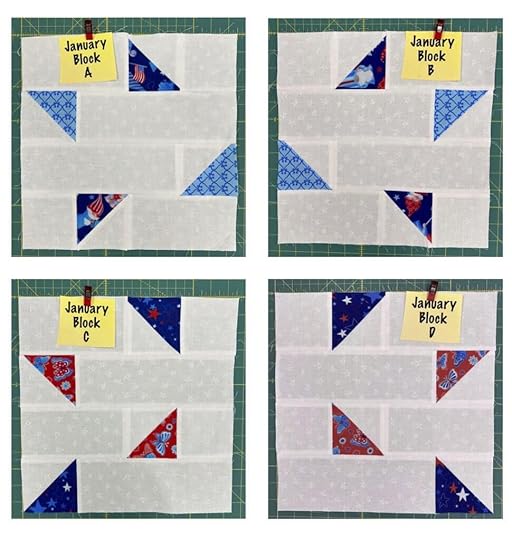
Be sure to label each block upon completion. This will help with assembly in December!
Find all the Supplies for NEW! 2023 Block of the Month Mystery Quilt Series at Nancy Zieman Productions at ShopNZP.com! You’re the designer, choose the pink/white/black colorway with the Hugs & Kisses Fat Quarter Pack or the red/white/blue colorway with the All American Gnomes Fat Quarter Pack plus coordinating Block Background Fabric, and Binding Fabric by Benartex, above!
Happy Stitching,
Team Nancy Zieman & The Stitch it! Sisters
Nancy Zieman Productions. LLC.

Stitch it! Sisters is a production of NZ Productions LLC. Content in this feed is © copyright 2023 by Nancy Zieman Productions, LLC and may not be republished without written permission. You’re welcome to forward the email to a friend or colleague but it’s not okay to add the RSS feed automatically as content on a blog or other website. The FTC requires us to tell you that Nancy Zieman Productions, LLC has provided products by other companies in the course of doing business. The FTC requires us to advise you to take this information into consideration when reading this posting.
September 14, 2023
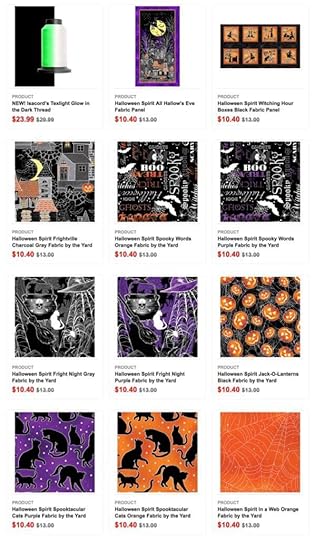
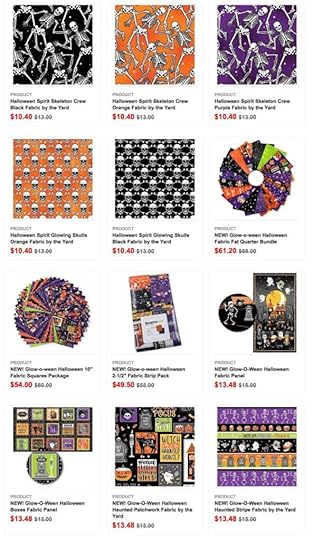
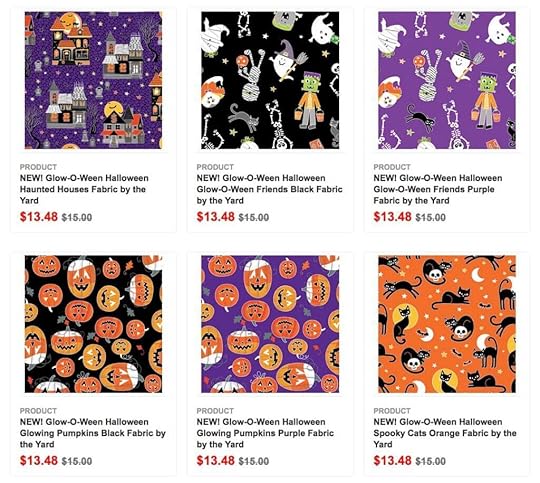
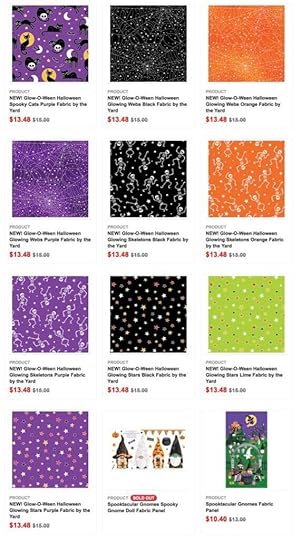
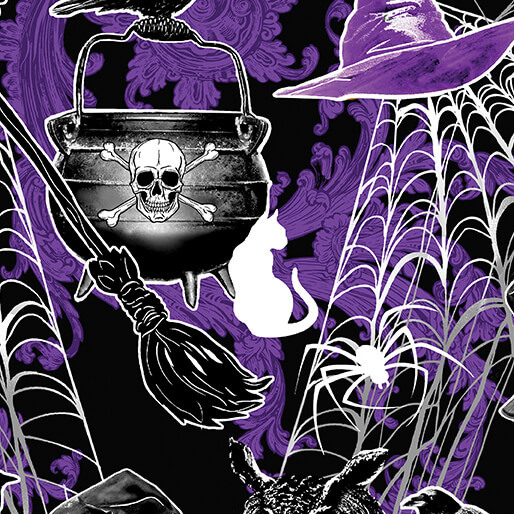
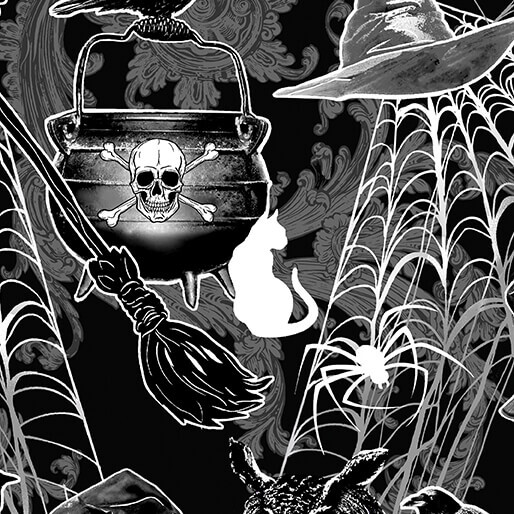
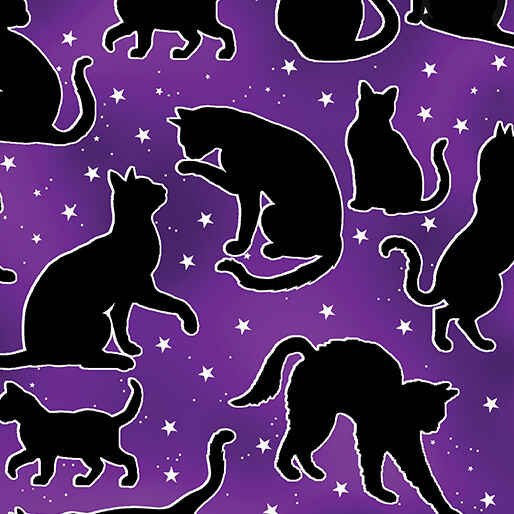
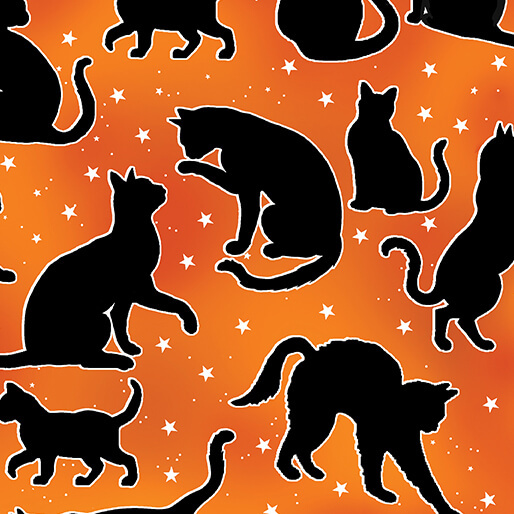
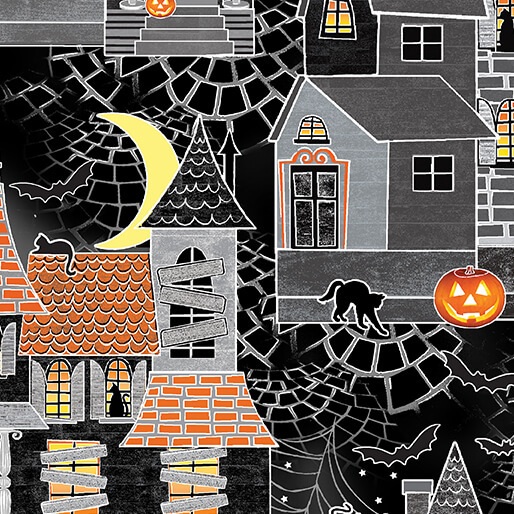
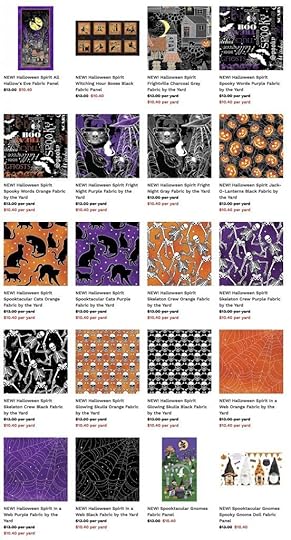
Halloween Spirit Fabrics Available at Nancy Zieman Productions at ShopNZP.com
 Halloween Spirit Fabrics by Kanvas Studios for Benartex
now 20% Off at Nancy Zieman Productions at ShopNZP.com
Halloween Spirit Fabrics by Kanvas Studios for Benartex
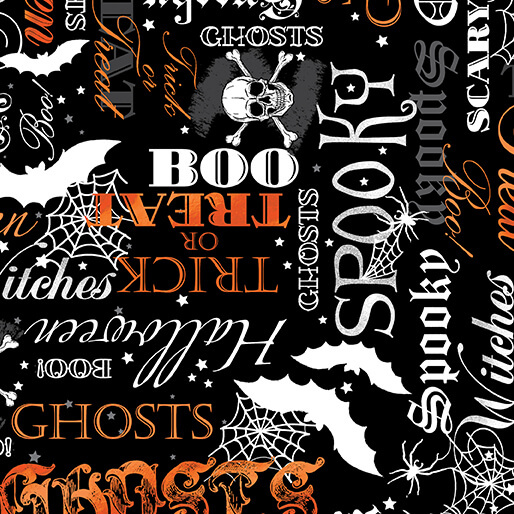
now 20% Off at Nancy Zieman Productions at ShopNZP.comSweet & spooky, the glow in the dark Halloween Spirit collection is sure to be a hit with revelers everywhere! Dancing skeletons, black cats and sassy witches come alive against bewitching backdrops. Check out the two panels – one a witchy block print, the other a spooktacular scene complete with creepy mansions and a full moon! Use the Halloween Spirit fabrics to start your own holiday traditions.

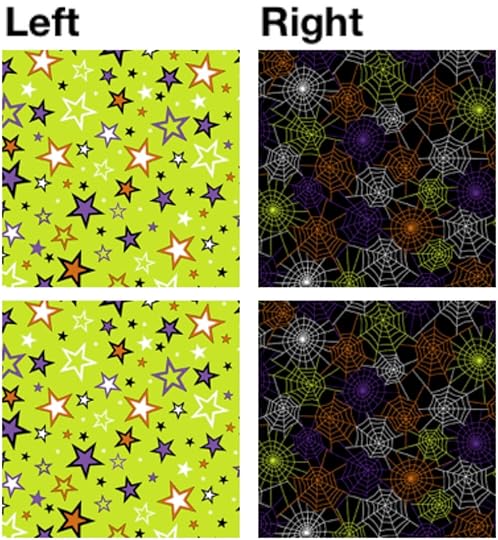
The Halloween Spirit Panels and Fabrics Fabrics by Kanvas Studios for Benartex are high-quality designer prints. Featuring iconic jack-o-lantern pumpkins, bats, trees, spiderwebs, cauldrons, cats, and more! The Halloween Spirit Panels and Fabrics by Kanvas Sudios for Benartex. These high-quality fabrics are 100% Cotton and ideal for quilting, home décor, trick or treat bags, and accessories! What will you stitch with this spooky new fabric collection?
Halloween Spirit All Hallow’s Eve Fabric Panel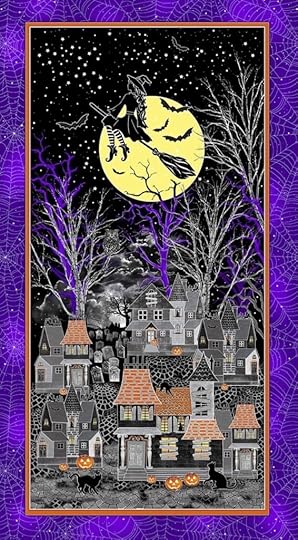 Halloween Spirit Witching Hour Boxes Black Fabric Panel


SAVE 20% Off Halloween Spirit Fabrics at ShopNZP.com
SAVE 20% Off Spooktacular Gnomes Fabrics at ShopNZP.com


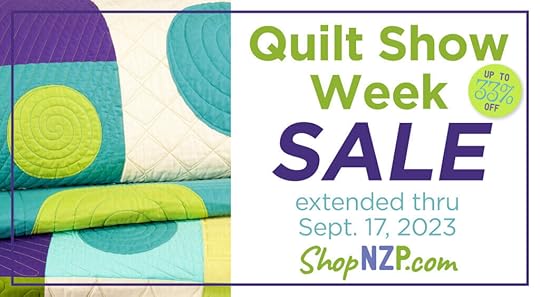
Quilt Show Week Sale EXTENDED! Save 10%-60% Off Select Fabrics, Sewing Tools, & Quilting Supplies, including 20% Off Halloween and Fall Fabrics in store at The Nancy Zieman Sewing Studio and online at ShopNZP.com.
Happy Sewing!
Team Nancy Zieman
Nancy Zieman Productions. LLC.
[image error]
Stitch it! Sisters is a production of NZ Productions LLC. Content in this feed is © copyright 2023 by Nancy Zieman Productions, LLC and may not be republished without written permission. You’re welcome to forward the email to a friend or colleague but it’s not okay to add the RSS feed automatically as content on a blog or other website. The FTC requires us to tell you that Nancy Zieman Productions, LLC has provided products by other companies in the course of doing business. The FTC requires us to advise you to take this information into consideration when reading this posting.
Make sure you are subscribed to Nancy Zieman Productions, LLC enews mailing list so you won’t miss a thing. Sign up at nancyzieman.com/blog/enews. And join us on YouTube,Facebook,Instagram and Pinterest!September 12, 2023
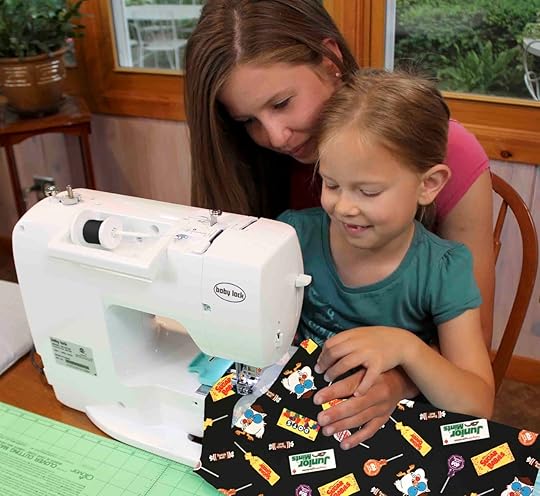
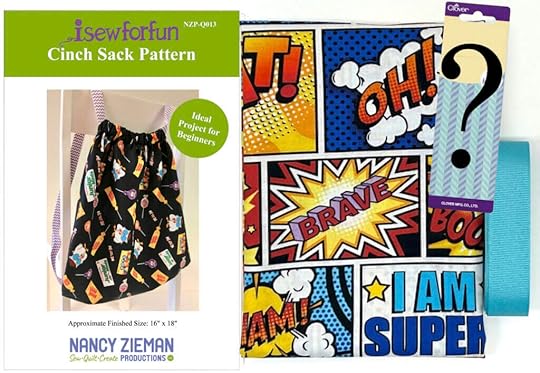
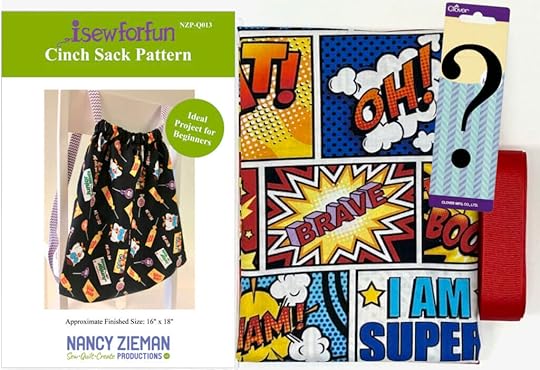
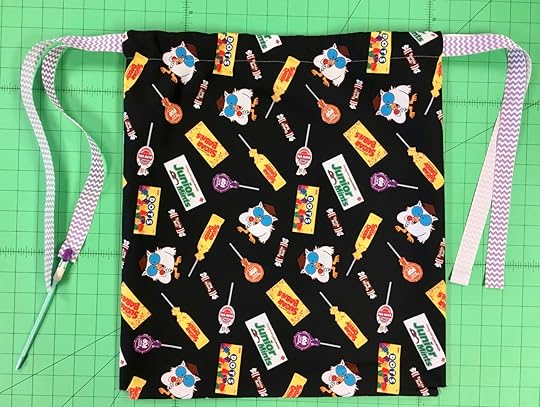
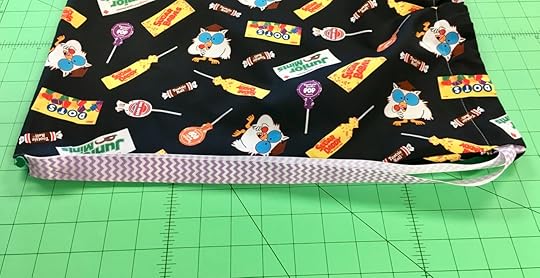
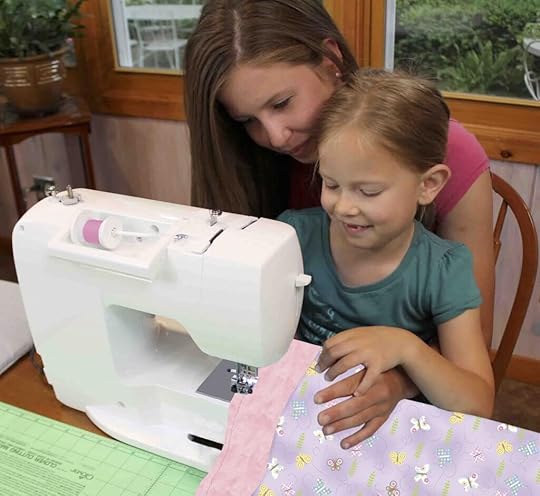
I Sew For Fun Kids’ Sewing Challenge FREE! Cinch Sack Sewing Tutorial and NEW! Comic Strip Challenge Kit
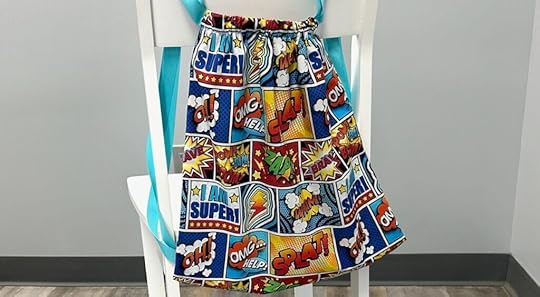
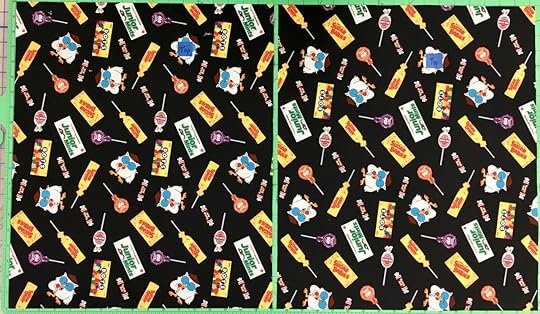
NEW! I Sew For Fun Kids’ Sewing Challenge 2023 sponsored by Nancy Zieman Productions, Clover Needlecraft, and Benartex Fabrics. Youth ages 15 and under are invited to share how they “sew for fun”— while making a Cinch Sack with My Hero Fabric by Benartex; along with a Clover sewing tool.
Youth age 15 and under may participate in the NEW! I Sew For Fun Kids’ Sewing Challenge 2023 by reading and understanding the contest guidelines listed below, sewing a cinch sack using one of the 2023 I Sew For Fun Kids’ Sewing Challenge Cinch Sack Project Packs purchased by an adult, and emailing two photos to info@ziemanproductions.com on or before September 23, 2023: One photo showing youth sewing/working on the challenge project using the Clover tool (included in the 2023 I Sew For Fun Kids’ Sewing Challenge Cinch Sack Project Pack, and a second photo of youth with completed project. Note: It’s okay if you prefer not to show youth’s face in photos. Be sure to include challenge participant’s first name, city, state, and age–when emailing photos to info@ziemanproductions.com.
To reserve a spot in the NEW! 2023 I Sew For Fun Kids’ Sewing Challenge, an adult parent or guardian must purchase the Official 2023 I Sew For Fun Kids’ Sewing Challenge Cinch Sack Project Pack. Purchase the Official 2023 I Sew For Fun Kids’ Sewing Challenge Cinch Sack Project Pack at ShopNZP.com, as soon as possible. Quantities are limited!
2023 I Sew For Fun Kids’ Sewing Challenge Cinch Sack Project Pack – My Hero Turquoise


Helpful Notions
 Using the right sewing tools assists with creating a successful sewing project! Above is a photo showing I Sew For Fun Tools by Nancy Zieman Productions for Clover. You may use any of the above I Sew For Fun sewing tools while sewing your cinch sack challenge project! Show us What You’re Making! We love to hear from you, so email your photos—anytime—to The NZP Team at info@ziemanproductions.com, and/or share your experiences and photos with us on Facebook or Instagram!
Gather your sewing supplies and prep your fabric for sewing. Included with the Official 2023 I Sew For Fun Kids’ Sewing Challenge Cinch Sack Project Pack is everything you’ll need to complete the I Sew For Fun Cinch Sack Project, you’ll supply the thread! When you receive your challenge project pack, open the package and prep your fabrics. The FREE! I Sew For Fun Cinch Sack Sewing Tutorial will be available September 12, 2023, right at the Nancy Zieman Productions Blog. If you’re ready to get started sooner than September 12, you’ll also find our Cinch Sack Sewing Tutorial shared in an earlier blog posting. Read all directions, before beginning.

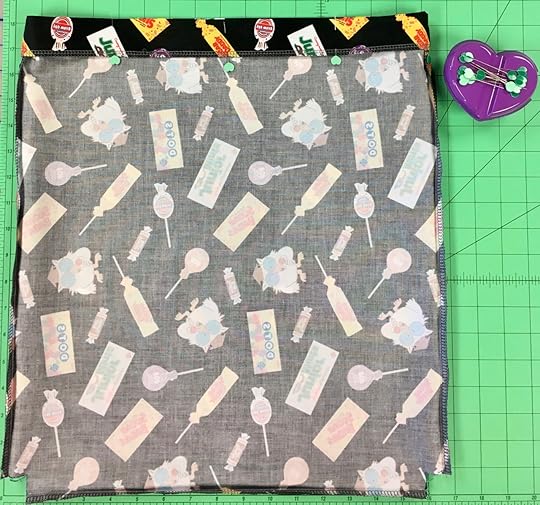
Before the sewing process, pressing and starching the fabric adds a bit of stiffness that helps make the cutting and sewing easier.
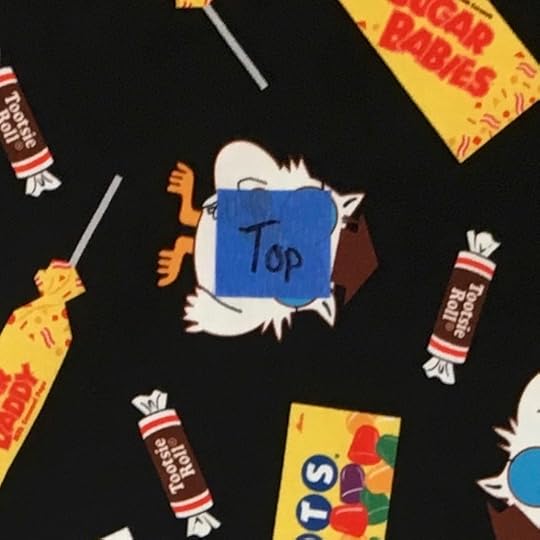
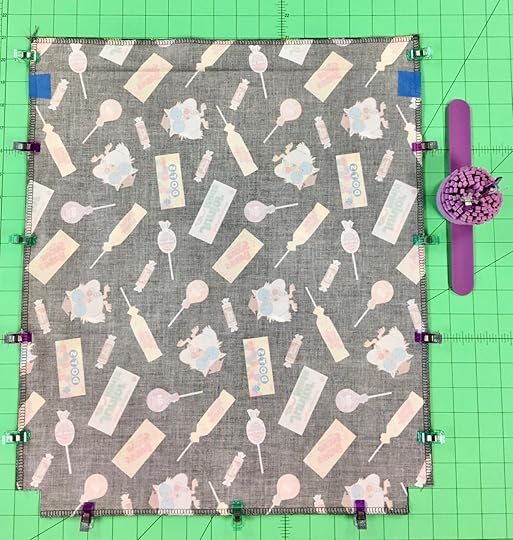
To easily identify the cinch sack top, during the sewing process, place a piece of painter’s tape—on both fabric rectangles—near the fabric wrong side, near the top 17″ wide edge.
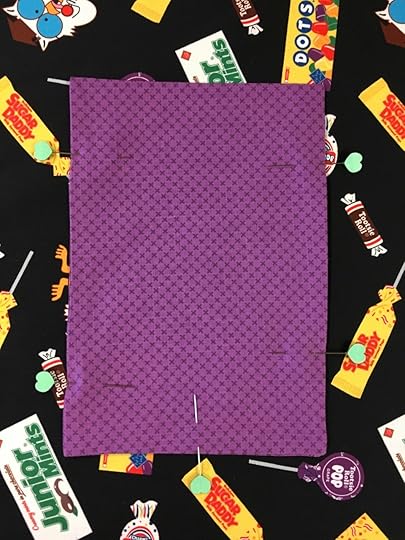
Sew a cinch sack with our super-easy step-by-step directions. This sewing project is ideal for beginners! Stitch this project in a weekend, then wear the cinch sack as a backpack – for carrying books or workout gear. The cinch sack also makes a great trick or treat bag! Approximate Finished Size: 16″ x 18″ – fits most youth and adults
Use the edge of the I Sew For Fun (ISFF) Sew Safe Presser Foot – for a quick and easy seam allowance reference.
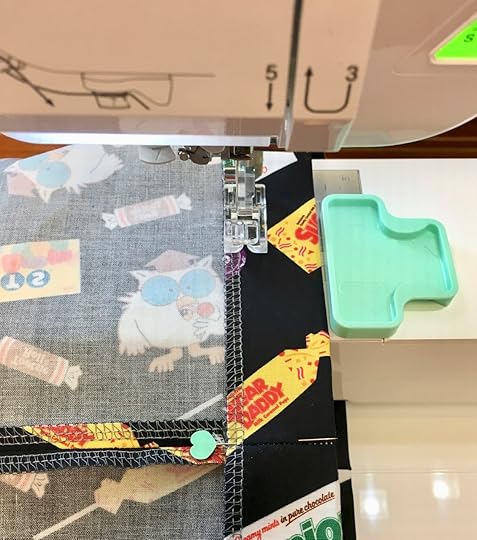
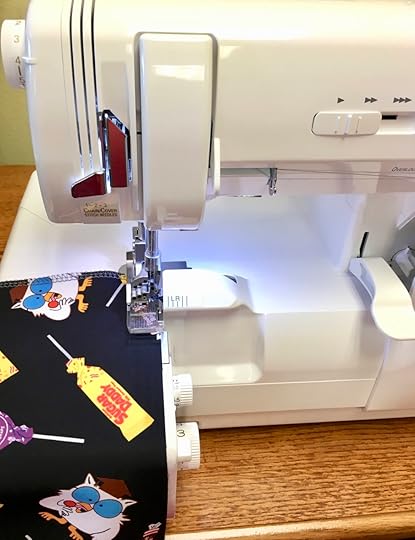 Finish Raw Edges
Clean finish cut edges with a zigzag stitch, or Serger machine stitching, around all four edges of both fabric rectangles.
Optional! Add a patch pocket to the front of your cinch sack.
Cut a contrasting 9″ x 16″ fabric rectangle for pocket.
Fold pocket rectangle right sides together, meeting short ends. Using the ISFF 5-in-1 Sliding Gauge, mark a 3″ seam opening along one long edge.
Stitch around three edges, leaving a 3″ opening for turning. Optional: Use Nancy Zieman’s Wrapped Corner Sewing Techniques to create quick and easy pointed corners.
Using the ISFF Point 2 Point Turner, turn pocket right side out. Press.

Center and pin patch pocket to cinch sack front, right sides up, with lower pocket edge approximately 4″ from lower edge of cinch sack front panel.
Stitch sides and lower edge of pocket, guiding pocket edge along edge of ISFF Sew Safe Presser Foot, and pivoting (with needle down) at corners. Backstitch to reinforce top edges of pocket.
Mark and Prep Cinch Sack

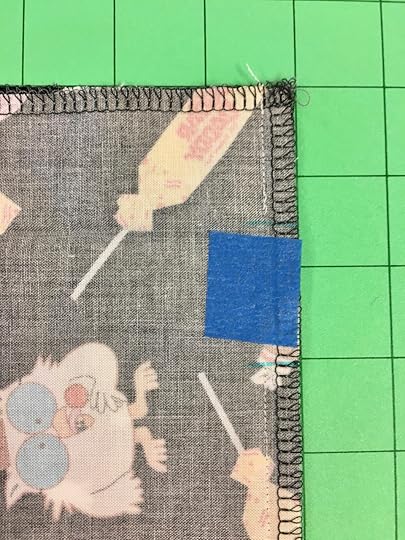
On the wrong side of upper right corner, using the ISFF 5-in-1 Sliding Gauge and ISFF Fabric Marking Pen, place a mark 1-1/4″ below top edge – at side seam. Place a second marking 1-1/4″ below the first marking. Repeat on all four front and back upper corers – this will later form the ribbon casing openings.

For reference later during the sewing process – place a piece of painter’s tape on the fabric wrong side, between each of the markings.
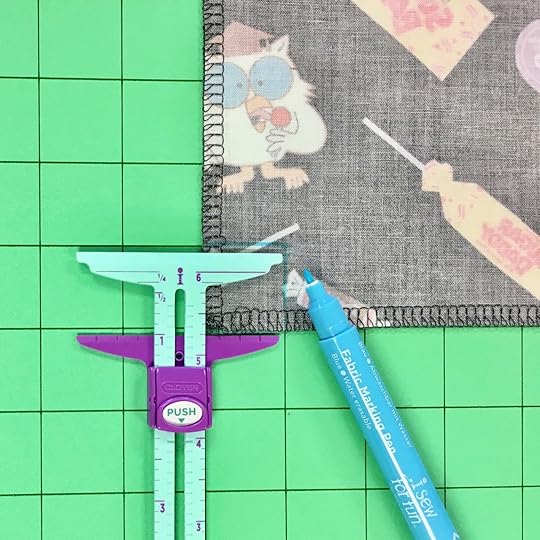
At lower left corner, using the ISFF 5-in-1 Sliding Gauge and ISFF Fabric Marking Pen, mark a 1″ square – to form a gusset.
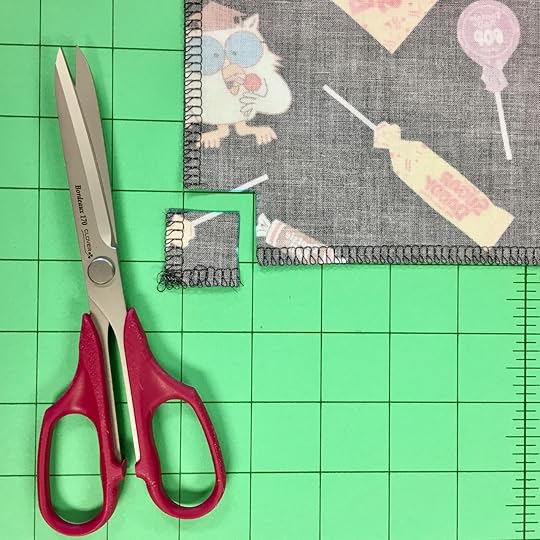
Using a scissors, cut out lower 1″ corner square along marked lines. Repeat above steps on all four front and back lower corners.
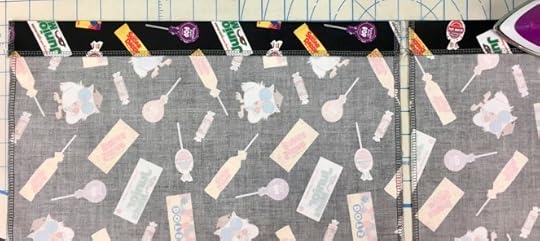
At top edges, fold 1-1/4″ to wrong side on front and back panels. Press, then open. This step later forms ribbon casings.
Place cinch sack front and back right sides together, aligning edges. Hold edges together temporarily with ISFF Wonder Clips.
Assemble Cinch SackStitch side seams and lower edge seam.
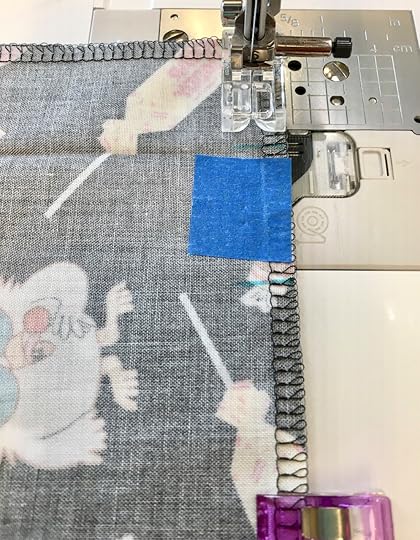
At upper right, stitch cinch sack side seam to first marking, backstitch and cut threads. Advance fabric under presser foot to second marking. Stitch remaining side seam, backstitching at the beginning and ending of seam. Repeat steps on remaining left side seam. Press seams open.
Placing a piece of painter’s tape on the fabric wrong side, between each of the markings, provides a visual marker for “no stitching zones”, and automatically forms the ribbon casing openings. It’s okay to remove the painter’s tape, after seams are stitched.
Stitch lower/bottom seam, backstitching at beginning and ending of seam.
Using the ISFF Roll ‘n Press, press seam open. The rolling action opens the seam—without the heat of an iron.
Fold over top edges at 1-1/4″ pressed line. Pin in place along clean finished edge.
Stitch along clean finished edge, about 1″ from folded edge. Backstitching at beginning and ending of seam – this forms the ribbon casing. Turn cinch sack right side out.
For evenly spaced seams, place the ISFF Seam Guide on your sewing machine – to the right of the fabric fold.
Add Ribbon Straps
Cut two 60″ lengths of ribbon.
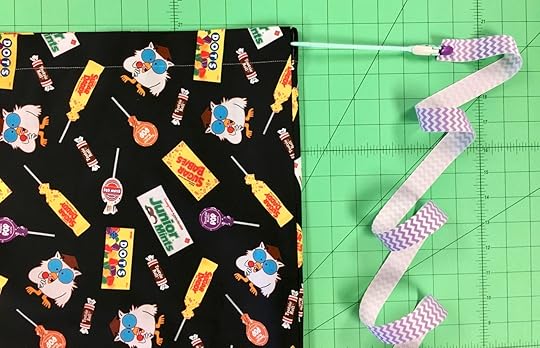
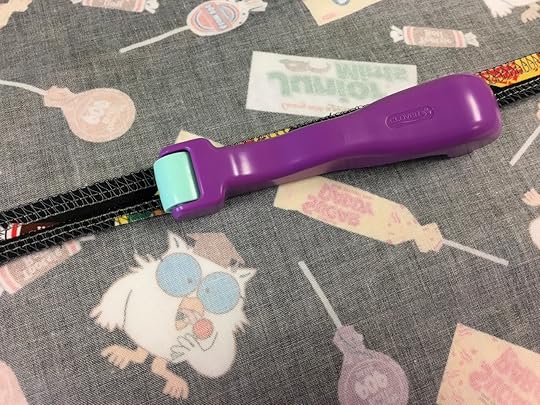
Using the ISFF Clip ‘n Glide Bodkin, thread ribbon through front casing beginning at right edge, then through back casing at left edge, and exit out the right edge. About 17″ of ribbon will extend out right edges of both front and back casings.
Using the ISFF Clip ‘n Glide Bodkin, thread ribbon through front casing beginning at left edge, then through back casing at right edge, and exit out the left edge. About 17″ of ribbon will extend out left edges of both front and back casings.
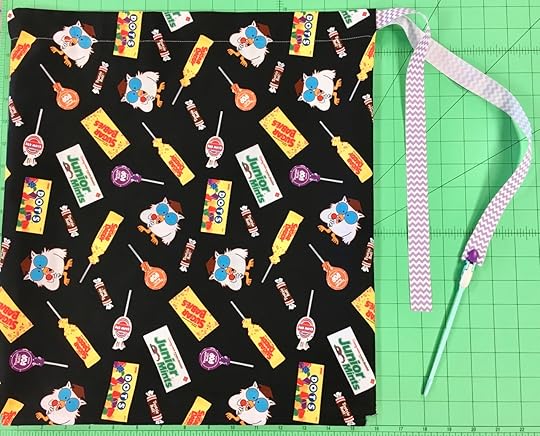
Center ribbon along outside right side seam, matching cut edges of ribbon to center of side gusset opening at lower right edge. Pin.
Reach into cinch sack, grasping pin head and ribbon layers, and turn cinch sack wrong side out.
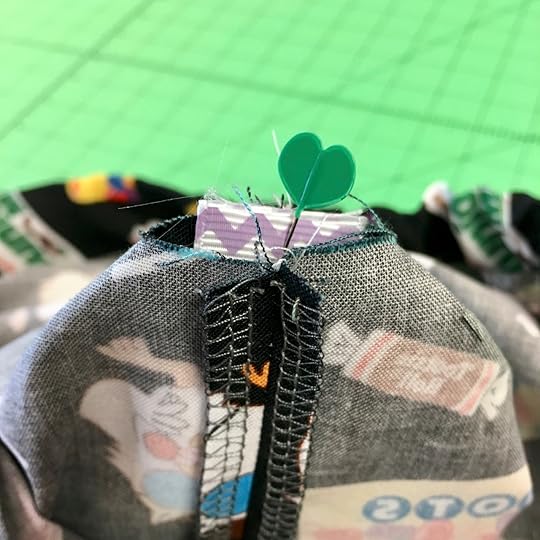
Align cut edges of gusset corner openings, stacking side seam on lower/bottom seam – centering ribbon layers between fabric layers. Realign pin as needed and re-pin.
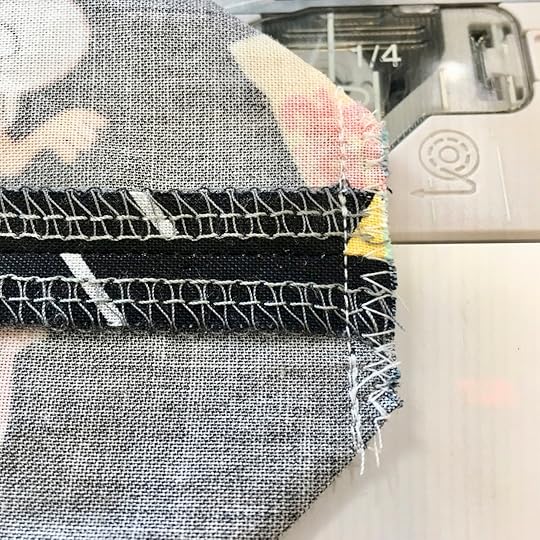
Stitch gusset seam through all fabric layers, securing ribbon ends within seam. Clean finish cut edges with a zigzag stitch or Serger stitching.
Repeat above steps to form gusset at lower left corner.

Turn cinch sack right side out. Enjoy!
2023 I Sew For Fun Kids’ Sewing Challenge Cinch Sack Project Pack– My Hero Turquoise
2023 I Sew For Fun Kids’ Sewing Challenge Cinch Sack Project Pack– My Hero Red
As soon as you receive your 2023 I Sew For Fun Kids’ Sewing Challenge Cinch Sack Project Pack you may start making your pillowcase! You’re the designer: You may choose to embellish your pillowcase with ribbons and/or lace, and/or add your name with fabric markers, and/or decorate your pillowcase as desired. Remember, you must use the office challenge fabrics included with the project pack and one Clover sewing tool—all included with the challenge kit!
Coming, September 12, right here at the NZP Blog: NEW! I Sew For Fun Kids’ Sewing Challenge Part Two: Step-by-Step Cinch Sack Sewing Tutorial!
Sign up for Nancy Zieman Productions E-news, then watch your inbox for updates from the NZP Team.
1. Challenge is open to all youth, ages 15 and under, residing in the continental US.
2. The challenge is limited to the first 30 persons whose parent or guardian purchases the Official 2023 I Sew For Fun Kids’ Sewing Challenge Cinch Sack Project Pack. Purchase project pack as soon as possible at ShopNZP.com to reserve challenge spot. Quantities are limited.
3. Today, September 12, here at the NZP Blog: NEW! I Sew For Fun Kids’ Sewing Challenge Part Two: Pillowcase Sewing Steps! Or go ahead and get started with our Cinch Sack Sewing Tutorial shared in an earlier blog posting.
4. Sew a pillowcase using the official Official 2023 I Sew For Fun Kids’ Sewing Challenge Cinch Sack Project Pack fabric, along with any sewing and/or serging techniques. Construction may be done by hand or by machine. Participants may use any type of embellishment, decorations, and may add designer touches. Work may be done exclusively by the participant, and/or with the assistance of an adult. One pillowcase per participant. Challenge participants, and/or an adult parent/guardian must email two photos to info@ziemanproductions.com on or before September 22, 2023: One photo showing youth using Clover’s Sewing Tool(s) while sewing and/or working on the project, and a second photo of youth with the completed pillowcase. Note: It’s okay if you prefer to not show youth’s face in photos. Be sure to include challenge participant’s first name, city, state, and age when photos to info@ziemanproductions.com.
Participants will be judged on workmanship, creativity, and overall appearance. Participants photos will be shared on sponsoring companies social and web sites to promote the love of sewing.
Prizes will be awarded to those making the top three pillow cases, along with additional prizes awarded randomly. Winners will be announced on the Nancy Zieman Productions Blog on September 28, 2023.
To reserve a spot in the NEW! 2023 I Sew For Fun Kids’ Sewing Challenge, an adult parent or guardian must purchase the Official 2023 I Sew For Fun Sewing Challenge Project Pack. Purchase challenge project pack, at ShopNZP.com, as soon as possible. Quantities are limited! Coming, September 12, here at the NZP Blog: NEW! I Sew For Fun Kids’ Sewing Challenge Part Two: Cinch Sack Sewing Steps!
Thank you to our generous sponsors!
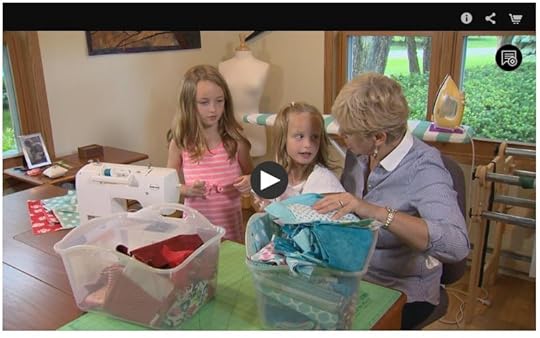
For Adults and Sewing Teachers: Tune in and watch Nancy Zieman and her granddaughters, along with friends, take a modern approach to sewing. Nancy shares her team sewing-for-fun experience along with many tips for a big partner, and numerous insights for involving a little sewing partner—all while making simple, easy to sew kid-friendly projects. Watch I Sew For Fun on Sewing With Nancy!
For a listing of all Clover Sewing Tools by Nancy Zieman Productions, visit ShopNZP.com.
Happy Sewing!
Team Nancy Zieman
Nancy Zieman Productions. LLC.
[image error]
Stitch it! Sisters is a production of NZ Productions LLC. Content in this feed is © copyright 2023 by Nancy Zieman Productions, LLC and may not be republished without written permission. You’re welcome to forward the email to a friend or colleague but it’s not okay to add the RSS feed automatically as content on a blog or other website. The FTC requires us to tell you that Nancy Zieman Productions, LLC has provided products by other companies in the course of doing business. The FTC requires us to advise you to take this information into consideration when reading this posting.
Make sure you are subscribed to Nancy Zieman Productions, LLC enews mailing list so you won’t miss a thing. Sign up at nancyzieman.com/blog/enews. And join us on YouTube,Facebook,Instagram and Pinterest!September 9, 2023
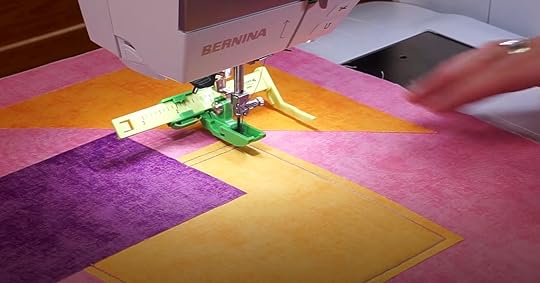
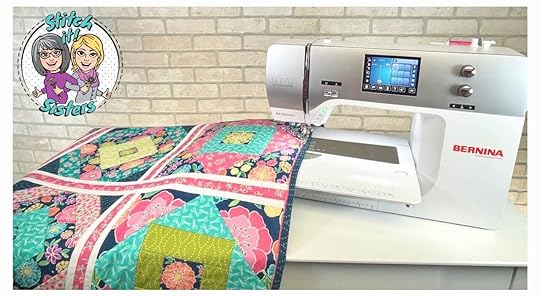
Ultimate Straight Line Machine Quilting on a Domestic Sewing Machine
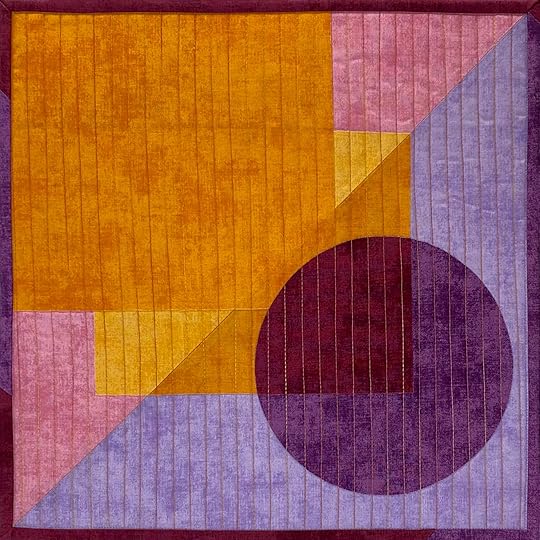
Watch Stitch it! Sisters Program 217 Ultimate Straight Line Machine Quilting!
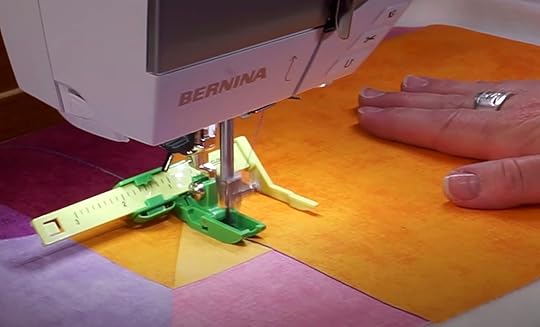
Watch the Stitch it! Sisters Ultimate Straight Line Machine Quilting Tutorial Video with hosts Deanna Springer and Dana Casey from Team NZP! In this video, Deanna shares how to master straight line machine quilting on a domestic sewing machine with The Ultimate Quilt ‘n Stitch Presser Foot from Clover!
The Ultimate Quilt ‘n Stitch Presser Foot by Clover has a built in stitch alignment ruler for guiding rows of parallel stitching. It’s ideal for parallel-line straight stitching, topstitching, and straight-line machine quilting!
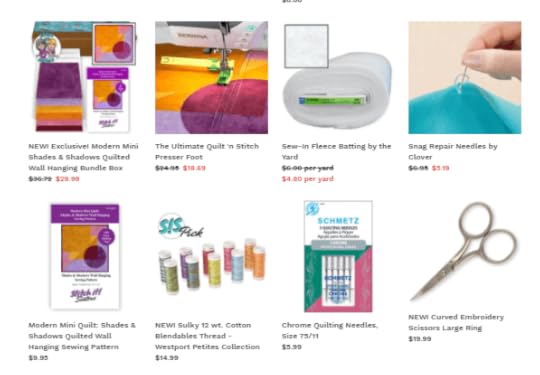
 Then, head over to ShopNZP.com and purchase our Exclusive Modern Mini Shades & Shadows Quilted Wall Hanging Bundle Box that includes six Cotton Shades Fat Quarters and White Confetti Cotton Backing Fabric from Riley Blake Designs; Pellon® Wonder-Under® Paper Backed Fusible Web and Fusible Fleece Batting; and our Exclusive Modern Mini Shades & Shadows Quilted Wall Hanging Pattern! Bundle Box includes everything you’ll need to make two 16″ x 16″ Modern Mini Shades & Shadows Quilted Wall Hangings! You’ll supply the thread.
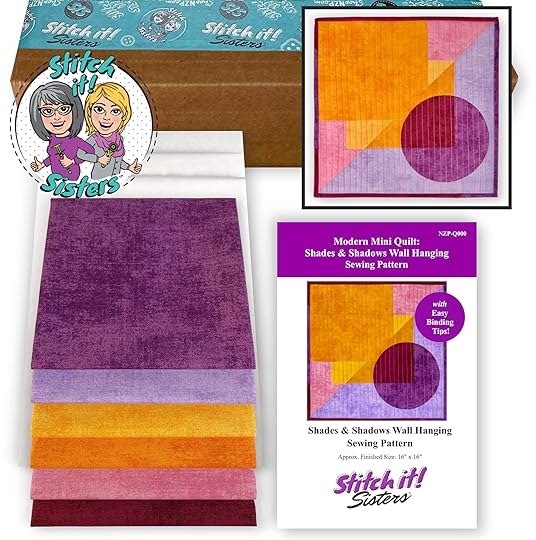
Modern Mini Shades & Shadows Supplies Listing
Exclusive Modern Mini Shades & Shadows Wall Hanging Bundle Box by Team NZP
Rotary Cutting Ruler, Rotary Cutter and Mat
12-1/2″ x 12-1/2″ Square Rotary Cutter Ruler
Clover’s Heart Shaped Straight Pins and/or Clover’s Heart Shaped Magnetic Pin Caddy
Clover’s I Sew For Fun Fabric Marking Pen
Clover’s Fine White Marking Pen
Clover’s 1-4″ Fusible Web Tape
Clover’s Straight Tailor’s Awl Stiletto
Clover’s Ultimate Quilt ‘n Stitch Presser Foot
Sulky 12 wt. Cotton Blendables Thread- Westport Petites Collection
Clover’s 7-3/4″ Bordeaux Shears
Clover’s 5-1/8″ Bordeaux Shears
June Tailor’s Eze-View Pressing Cloth
June Tailor’s Non-Stick Teflon Pressing Sheet
June Tailor’s Quilt Basting Spray
Schmetz Chrome Quilting Needles Size 90
Iron
Straight Line Machine Quilting from No Marked Lines:
Find a straight line on the quilt.Choose a Sulky 12 wt. thread for decorative stitching.Insert a new Schmetz Chrome Quilting Needle size 90.Set machine to a longer stitch length such as 3.0.Work from the center out and stitch one line using the edge of the presser foot for your stitching line, or set guide to desired measurement.Continue stitching up and down rotating quilt.
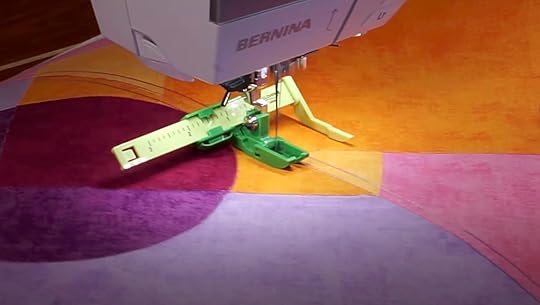
Straight Line Machine Quilting from One Marked Line:
Mark one line using a ruler and erasable fabric marking pen.Choose a Sulky 12 wt. thread for decorative stitching.Insert a new Schmetz Chrome Quilting Needle size 90.Set machine to a longer stitch length such as 3.0.Work from the center out and stitch one line using the edge of the presser foot for your stitching line, or set guide to desired measurement.Continue stitching up and down rotating quilt.

Echo Quilting from No Marked Lines:
Stitch around shape(s) with edge of presser foot, advancing foot one row inward using previously stitched line as a guide.Choose a Sulky 12 wt. thread for decorative stitching.Insert a new Schmetz Chrome Quilting Needle size 90.Set machine to a longer stitch length such as 3.0.Work from the outside in and stitch one line using the edge of the presser foot for your stitching line.Continue stitching rotating quilt.
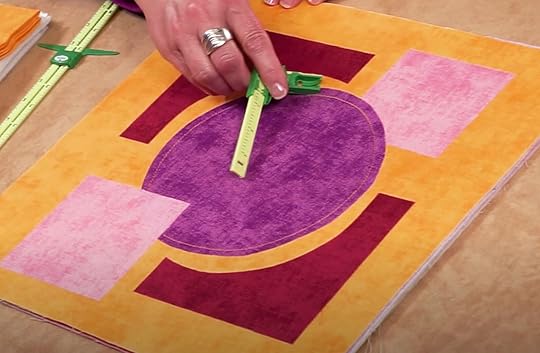
Curved Straight Line Machine Quilting:
Using Clover’s 5-in-1 Supersize Sliding Gauge, and erasable fabric marking pen, depress the button and mark an arch line.Using a ruler extend the curved line to the edge of the quilt.Stitch on line with edge of presser foot, advancing foot one row inward using previously stitched line as a guide.Choose a Sulky 12 wt. thread for decorative stitching.Insert a new Schmetz Chrome Quilting Needle size 90.Set machine to a longer stitch length such as 3.0.Work from the center out and stitch one line using the edge of the presser foot for your stitching line, or set guide to desired measurement.Work from the center out and stitch one line using the edge of the presser foot for your stitching line, or set guide to desired measurement.Continue stitching rotating quilt.
Custom Machine Quilting from No Marked Lines:
Place a piece of painters tape as a built in guide at desired measurement as a guide, when painters tape reaches edge of quilt, stop with needle down raise presser foot and pivot. Continue stitching as desired, working inward.Choose a Sulky 12 wt. thread for decorative stitching.Insert a new Schmetz Chrome Quilting Needle size 90.Set machine to a longer stitch length such as 3.0.Continue stitching rotating quilt.
Straight Line Machine Quilting enhances your quilting projects. It’s functional – melding all the layers together into one – and as we’ve shared today, it’s an easy technique to master with great results every time!
Modern Mini Shades & Shadows Supplies Listing
Exclusive Modern Mini Shades & Shadows Wall Hanging Bundle Box by Team NZP
Rotary Cutting Ruler, Rotary Cutter and Mat
12-1/2″ x 12-1/2″ Square Rotary Cutter Ruler
Clover’s Heart Shaped Straight Pins and/or Clover’s Heart Shaped Magnetic Pin Caddy
Clover’s I Sew For Fun Fabric Marking Pen
Clover’s Fine White Marking Pen
Clover’s 1-4″ Fusible Web Tape
Clover’s Straight Tailor’s Awl Stiletto
Clover’s Ultimate Quilt ‘n Stitch Presser Foot
Sulky 12 wt. Cotton Blendables Thread- Westport Petites Collection
Clover’s 7-3/4″ Bordeaux Shears
Clover’s 5-1/8″ Bordeaux Shears
June Tailor’s Eze-View Pressing Cloth
June Tailor’s Non-Stick Teflon Pressing Sheet
June Tailor’s Quilt Basting Spray
Schmetz Chrome Quilting Needles Size 90
Iron
Related Post: 2021 Modern Mini Shades & Shadows Quilted Wall Hanging Tutorial
Watch Stitch it! Sisters Program 217 Ultimate Straight Line Machine Quilting!
Tune in –right here at the Nancy Zieman Productions Blog– and watch the Stitch it! Sisters Ultimate Straight Line Machine Quilting Tutorial Video with hosts Deanna Springer and Dana Casey from Team NZP! In this video, Deanna and Dana shares different techniques for straight line machine quilting – from one marked line – with The Ultimate Quilt ‘n Stitch Presser Foot from Clover!
Then, head over to ShopNZP.com and purchase our Exclusive Modern Mini Shades & Shadows Quilted Wall Hanging Bundle Box that includes . Our Exclusive Exclusive Modern Mini Shades & Shadows Quilted Wall Hanging Bundle Box includes everything you’ll need to make two 16″ x 16″ Modern Mini Shades & Shadows Quilted Wall Hangings! You’ll supply the thread.
Happy Quilting!
Team Nancy Zieman
Nancy Zieman Productions. LLC.
[image error]
Stitch it! Sisters is a production of NZ Productions LLC. Content in this feed is © copyright 2023 by Nancy Zieman Productions, LLC and may not be republished without written permission. You’re welcome to forward the email to a friend or colleague but it’s not okay to add the RSS feed automatically as content on a blog or other website. The FTC requires us to tell you that Nancy Zieman Productions, LLC has provided products by other companies in the course of doing business. The FTC requires us to advise you to take this information into consideration when reading this posting.
Make sure you are subscribed to Nancy Zieman Productions, LLC enews mailing list so you won’t miss a thing. Sign up at nancyzieman.com/blog/enews. And join us on YouTube, Facebook, Instagram and Pinterest!September 7, 2023
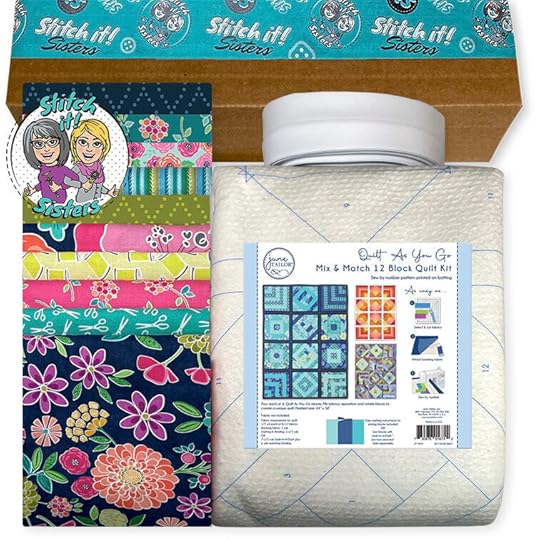
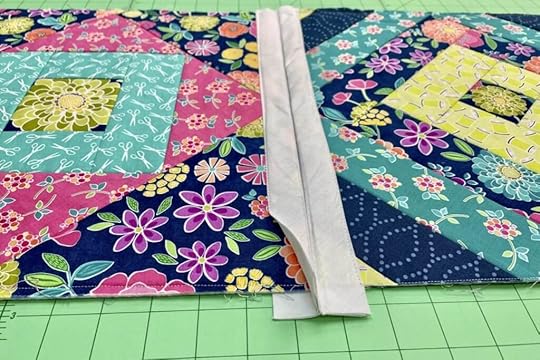
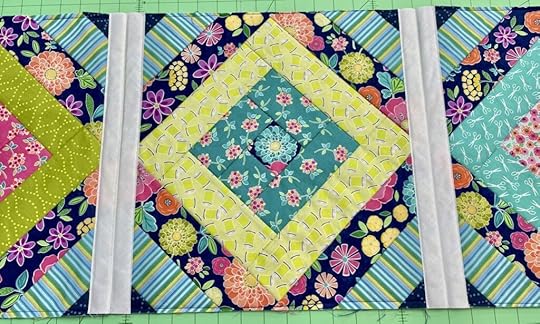
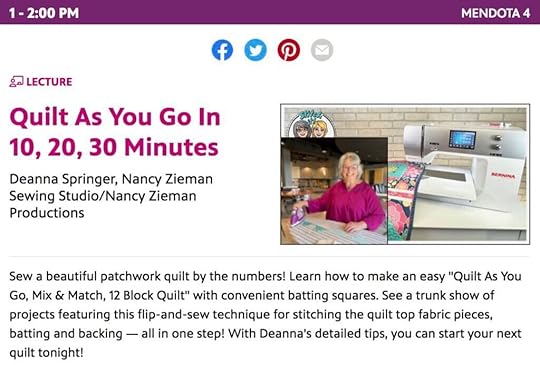
Quilt As You Go: Mix & Match 12 Block Quilt plus Quilt Show Week Sale at ShopNZP.com
Quilt As You Go: Mix & Match 12 Block Quilt Project – a great beginning quilting project! We’re sharing our sewing tips below. Plus SAVE 20% Off all June Tailor Quilt As You Go designs during our Quilt Show Week Sale at ShopNZP.com!
Subscribe to the Team NZP E-Newsletter for updates and more at nancyzieman.com/blog/newsletter.
Learn how to sew a beautiful patchwork quilt by the numbers! This fun Quilt As You Go Project features Jill’s “quilt-by-number” flip-and-sew techniques for stitching the top fabric pieces, batting and backing – all in one step! Then piece your quilt with Jill’s NEW! Sash-In-A-Dash!
 Then, head over to
ShopNZP.com and SAVE 25% OFF our Exclusive Quilt As You Go Mix & Match 12 Block Quilt Bundle Box that includes everything you’ll need to sew this project including 12 Block Mix and Match Quilt Printed Batting, Quilt Backing Fabric, Quilt Binding Fabric, NEW! Sash-In-A-Dash, and Sew Bloom Fabrics by Cherry Guidry of Contempo Studio for Benartex Fabrics. You’ll supply the thread. Available exclusively at ShopNZP.com!
Then, head over to
ShopNZP.com and SAVE 25% OFF our Exclusive Quilt As You Go Mix & Match 12 Block Quilt Bundle Box that includes everything you’ll need to sew this project including 12 Block Mix and Match Quilt Printed Batting, Quilt Backing Fabric, Quilt Binding Fabric, NEW! Sash-In-A-Dash, and Sew Bloom Fabrics by Cherry Guidry of Contempo Studio for Benartex Fabrics. You’ll supply the thread. Available exclusively at ShopNZP.com!
by the Stitch it! Sisters
Exclusive Quilt As You Go: Mix & Match 12 Block Quilt Bundle Box by the Stitch it! Sisters
June Tailor’s Quilter’s Starch Savvy
June Tailor’s Eze View Pressing Cloth
June Tailor’s Non-Stick Teflon Appliqué Pressing Sheet
June Tailor’s Shape Cut Plus Slotted Ruler
June Tailor’s Fabric Glue Stick
Schmetz Machine Quilting Needles Size 90
Clover’s 7-3/4″ Bordeaux Ultimate Shears
Clover’s Straight Tailors Awl Stiletto
Iron – such as Oliso Mini Project Iron with Solemate
Optional: Clover’s Ultimate Quilt ’n Stitch Presser Foot
Prepare your fabrics! Pre-shrink fabrics by steaming and pressing. Then, stabilize fabrics for the sewing process by pressing and starching fabrics with Quilter’s Starch Savvy.
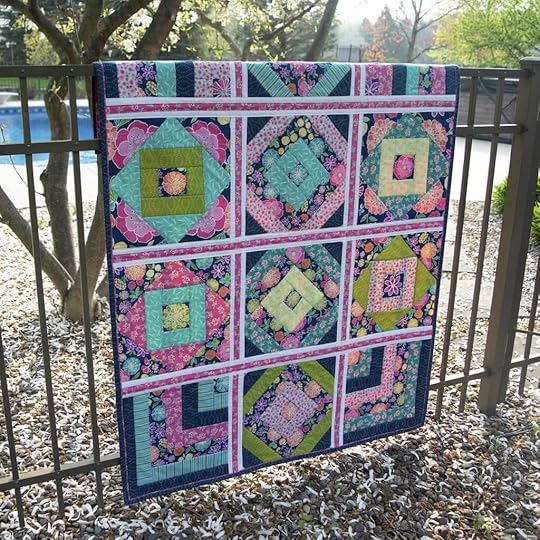
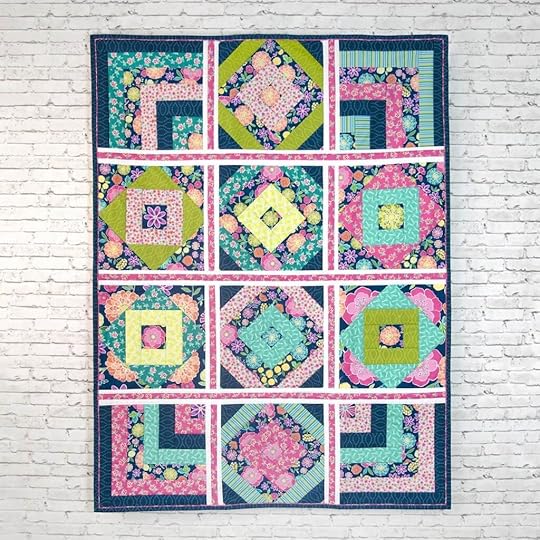
Quilt As You Go:
Mix & Match 12 Block Quilt has three different block designs; Courthouse Square Block, Cornerstone Block, and Cabin on Point Block. Today, we’re illustrating Courthouse Square!
Follow the fabric placement photo, along with the instructions included with our Exclusive Quilt As You Go: Mix & Match 12 Block Quilt Bundle Box by the Stitch it! Sisters. We’re using Sew Bloom Collection, by Cherry Guidry of Contempo Studio for Benartex!
We’ve arranged our layout as shown:
Assemble Quilt As You Go: Mix & Match 12 Block Quilt
 Place wrong side of backing fabric on (unprinted) side of batting. Make sure backing fabric completely covers printed area.Baste stitch around outside perimeter pattern line.

Use June Tailor’s Quilt Basting Spray to spray baste batting to backing fabric!

 Place piece one – 3-1/2″ x 3-1/2″ right side up.
Printed lines are for placement only and are not stitching lines!
 Stitch with a scant 1/4″ on long side of the rectangle as shown.
Assemble Quilt
Prepare quilt blocks by pressing and starching and trimming all blocks to 14-1/2″ x 14-1/2″ square.Layout block rows as shown below, or you’re the designer–you may choose your quilt block layout!
Attach Sash in a Dash
Cut eight, 15-1/2″ Sash-In-A-Dash strips for vertical sashing.Cut three 47″ Sash-In-A-Dash strips for horizontal sashing.
Optional: Using Clover’s 3/4″ Bias Tape Maker and create folded accent fabric strips for a coordinating sashing accent!
For piping and binding tips watch Stitch it! Sisters Quilt As You Go: Mix & Match 12 Block Quilt Video 308 with guest Jill Repp from June Tailor!
Stitch it! Sisters Quilt As You Go:
Mix & Match 12 Block Quilt
Tipsby the Stitch it! Sisters
Quilt As You Go: Mix & Match 12 Block Quilt SuppliesExclusive Quilt As You Go: Mix & Match 12 Block Quilt Bundle Box by the Stitch it! Sisters
June Tailor’s Quilter’s Starch Savvy
June Tailor’s Eze View Pressing Cloth
June Tailor’s Non-Stick Teflon Appliqué Pressing Sheet
June Tailor’s Shape Cut Plus Slotted Ruler
June Tailor’s Fabric Glue Stick
Schmetz Machine Quilting Needles Size 90
Clover’s 7-3/4″ Bordeaux Ultimate Shears
Clover’s Straight Tailors Awl Stiletto
Iron – such as Oliso Mini Project Iron with Solemate
Optional: Clover’s Ultimate Quilt ’n Stitch Presser Foot
Save up to 25% Off
Limited Edition S!S Bundle Boxes
at
ShopNZP.com
Save 2o% Off
June Tailor Quilt As You Go Products
&
Select Tools
at
ShopNZP.com
Sew Bloom Fabrics for Benartex by Cherry Guidry Available
at
ShopNZP.com

Starting Today! Join us for The Great Wisconsin Quilt Show, September 7-9, 2023, in Madison, Wisconsin. Plan an exciting getaway! View the Advanced Registration Guide at QuiltShow.com for lectures with the Stitch it! Sisters, view the listing of vendors–then visit us onsite to purchase class tickets, and stop by and see us at the NEW! Nancy Zieman Sewing Studio vendor booth at The Great Wisconsin Quilt Show! We look forward to seeing you in-person, next week at The Great Wisconsin Quilt Show!
Find Event Details at QuiltShow.com

Happy Sewing!
Team Nancy Zieman
Nancy Zieman Productions. LLC.
Stitch it! Sisters is a production of NZ Productions LLC. Content in this feed is © copyright 2023 by Nancy Zieman Productions, LLC and may not be republished without written permission. You’re welcome to forward the email to a friend or colleague but it’s not okay to add the RSS feed automatically as content on a blog or other website. The FTC requires us to tell you that Nancy Zieman Productions, LLC has provided products by other companies in the course of doing business. The FTC requires us to advise you to take this information into consideration when reading this posting.
Make sure you are subscribed to Nancy Zieman Productions, LLC enews mailing list so you won’t miss a thing. Sign up at nancyzieman.com/blog/enews. And join us on YouTube,Facebook,Instagram and Pinterest!September 5, 2023
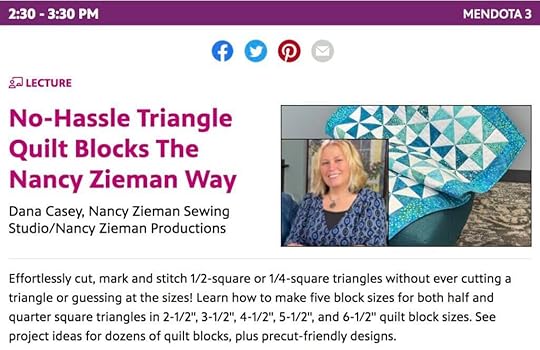
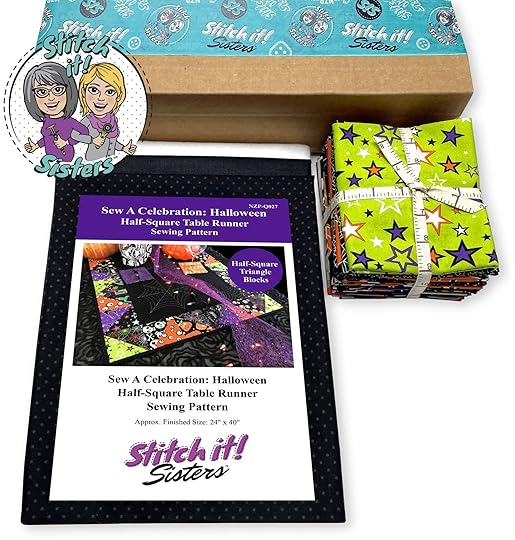
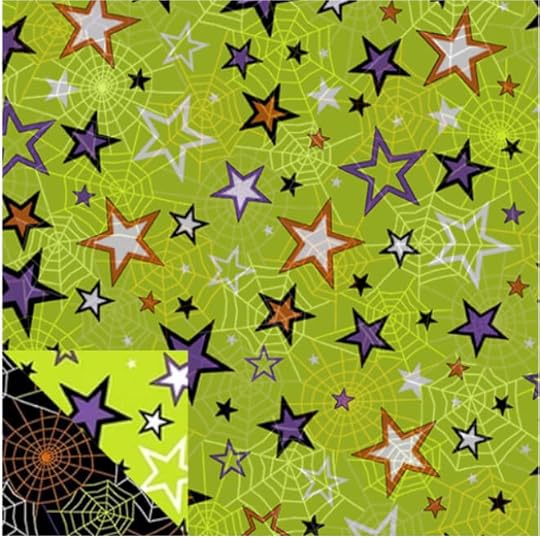
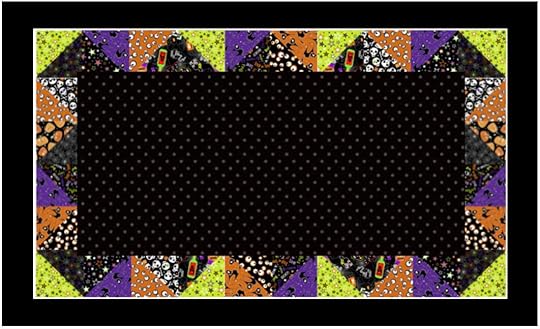
Sew A Celebration Halloween Half-Square Triangles Table Runner Sewing Tutorial
Sew A Celebration with our Halloween Half-Square Triangles Table Runner Sewing Tutorial! Easily cut, mark, and stitch half-square triangles without ever cutting a triangle! Plus FREE! Halloween Applique Printable, below!
Then, head over to ShopNZP.com and purchase our Halloween Half-Square Triangles Table Runner Bundle Box that includes the Halloween Party Fat Quarter Bundle by Benartex, 3/4 yd. top and binding fabric, 3/4 yd. backing fabric and Pellon® Fleece Batting, and exclusive Sew a Celebration Halloween Half-Square Triangles Table Runner Sewing Pattern by Team NZP – with step-by-step instructions and color photos/ illustrations. Includes everything you’ll need to make one Halloween Half-Square Triangles Table Runner! You’ll supply the thread.
by the Stitch it! Sisters
Halloween Half-Square Triangles Table Runner Sewing Tutorial SuppliesExclusive Halloween Half-Square Triangles Table Runner Bundle Box by the Stitch it! Sisters
No-Hassle Triangle Ruler by Team NZP
Clover’s No-Hassle Triangle Gauge by Nancy Zieman
Clover’s Heart Shape Pins and Heart-Shaped Magnetic Pin Caddy
Clover’s Fabric Marking Pen or Erasable Gel Pen
Clover’s Fine White Marking Pen
Clover’s Straight Tailor’s Awl/Stiletto
Clover’s Bordeaux Scissors
June Tailor’s Quilter’s Starch Savvy
June Tailor’s Quilt Basting Spray
Iron
Tailor’s Clapper
Cotton Quilting Thread
Schmetz Chrome Quilting Needles, Sz. 75
Schmetz Super Nonstick Needles, Sz. 90
Schmetz Metallic Needles, Sz. 80
Rotary Cutter, and Mat
1/4″ Patchwork Presser Foot
Open Toe Presser Foot
Edge Joining Presser Foot
Optional: Metallic Nylon Thread
Optional: Clover’s Wonder Pins
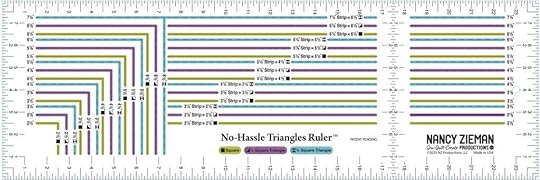
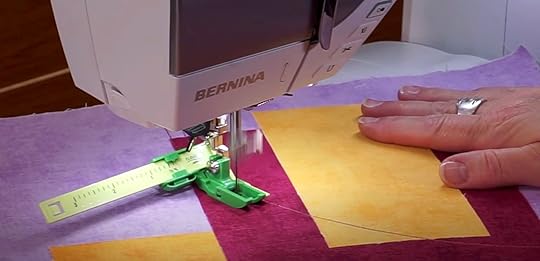
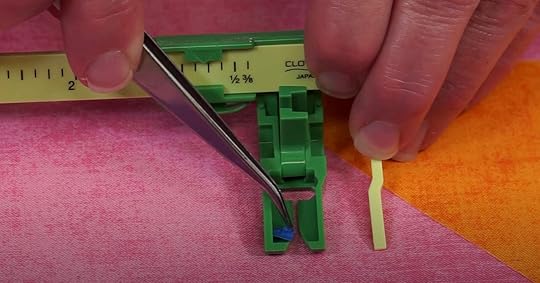
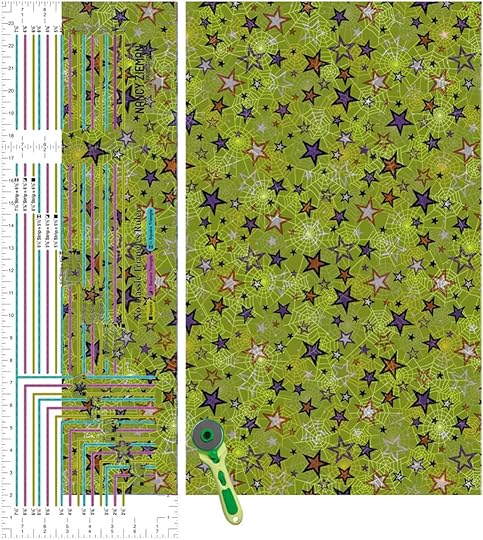
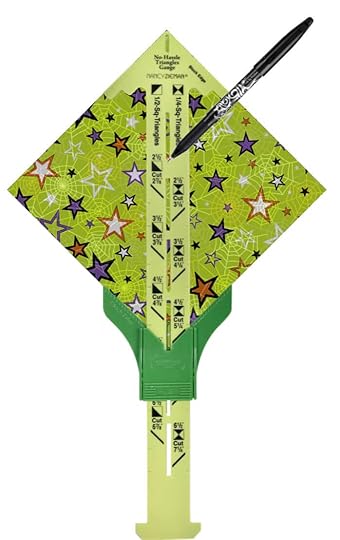
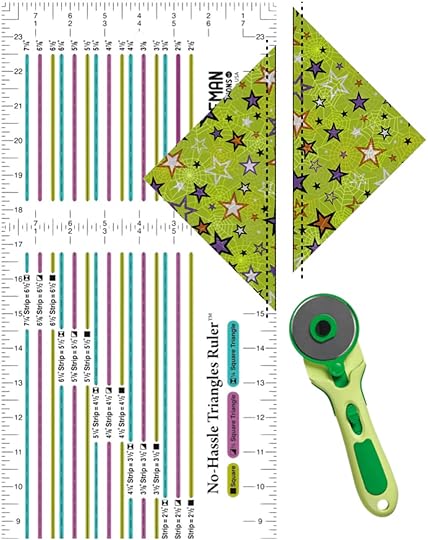
Easily make half-square triangle blocks using the No-Hassle Triangles Ruler. There’s no hassle and no need to cut a single triangle! The measurements are printed on the No-Hassle Triangles Ruler – designed by Team NZP.
Mark block sets using Clover’s No-Hassle Triangles Gauge and fabric marking pen. The left side of the gauge is designated to create 1/2-square triangle blocks. Depress button on sliding portion of the gauge and move to size of the desired 1/2-square triangle.
Prepare your fabrics! Pre-shrink fabrics by steaming and pressing. Then, stabilize fabrics for the sewing process by pressing and starching fabrics with Quilter’s Starch Savvy.
Halloween Half-Square Triangles Table RunnerLearn how to easily make our Sew A Celebration Half-Square Triangles Table Runner Sewing with our Exclusive No-Hassle Triangles Ruler and No-Hassle Triangles Gauge.
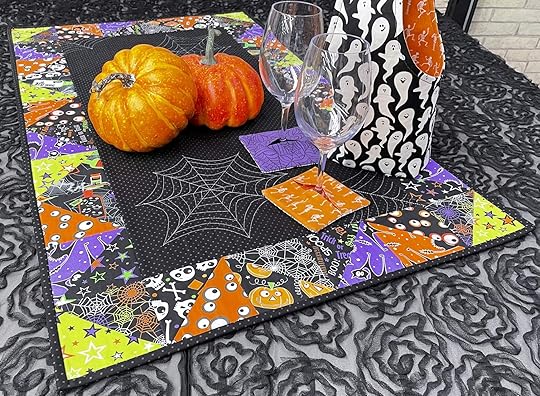
Our Halloween Half-Square Triangles Table Runner goes together in a couple evenings of sewing and features twenty-eight 4″ half-square triangle quilt blocks – all made with fat quarters!
Approximate finished size: 24″ W x 40″ L
Cut Fabrics and Supplies
Prior to cutting center front and backing fabric rectangles, first measure your completed Block Rows. If your Block Rows are different measurements – adjust your center rectangle measurements accordingly.
Cut one 16-1/2″ x 32-1/2″ rectangle from dark coordinating fabric for table runner center.

Pair light/medium fat quarters with dark fat quarters making assorted sets.
Place fat quarter sets right sides together. Press.
Subcutting strips into squares is also known as creating block sets. This table runner requires only 14 block sets!
Team NZP selected the following block set combinations:
Subcut four 4-7/8″ squares, for corner block sets, and layout in columns as show below.Pair left column square with right column square, to create corner block sets.
Pair each left column square with right column square, to create block sets.
Pair each left column square with right column square, to create block sets.
Create Half-Square Triangle (HSTs) Quilt Blocks for Outer Borders
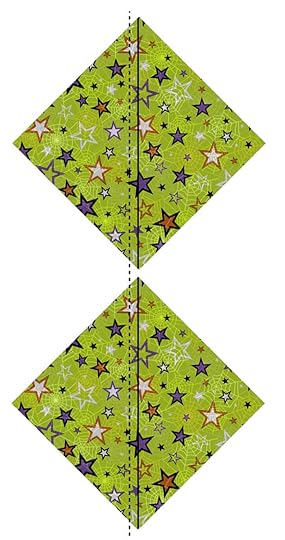
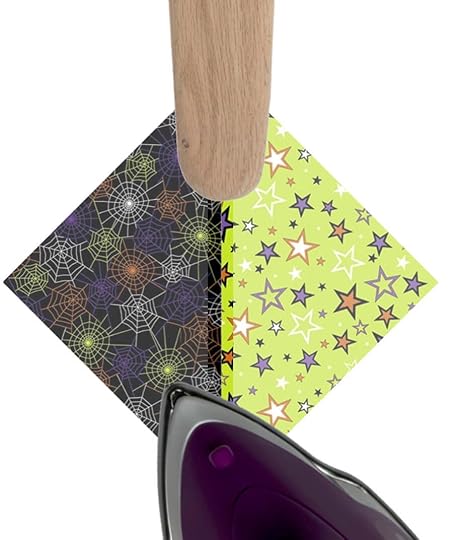
Align one light/medium 4-7/8″ square with one dark 4-7/8″ square, right sides together, as shown above.
Stitch Blocks
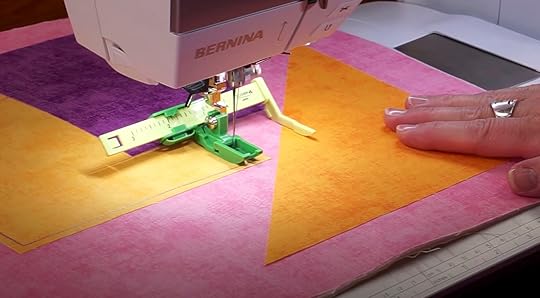
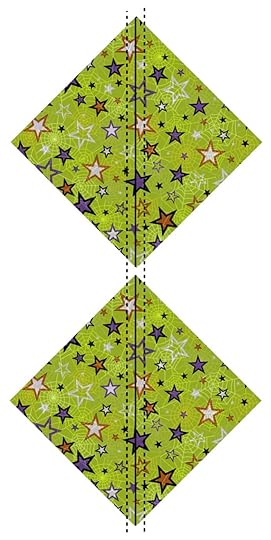
Attach 1/4″ Patchwork Presser Foot to machine.Insert new Schmetz Chrome Quilting Needle, Sz. 75 .Set machine for a straight stitch with a 2.0–2.5 mm stitch length.Align 1/4″ presser foot along one side of center marked line. Stitch. Do not cut the threads.
“Kiss” the next block set to the stitched block, and chain stitch from one block to the next block.
Use Clover’s Stilletto/Awl to assist with guiding blocks under presser foot.
Rotate blocks 180 degrees, and stitch along the second side of center marked lines.

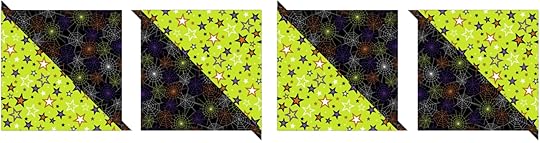
Repeat steps above and create twenty-eight half-square blocks:
Four Corner block sets.
Create Outer Border Block Rows
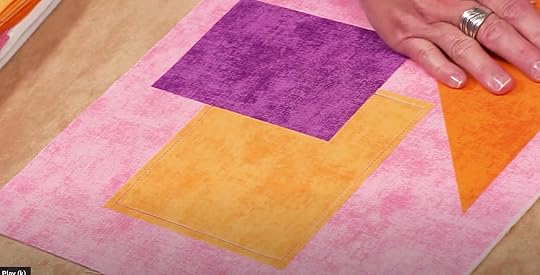
Create two “Ten Block” rows. Approximate finished size: 4-1/2″x 40-1/2″.Layout quarter-square triangle block rows as shown, rotating blocks as necessary. Note: Each “Ten Block” row begins and ends with a corner block.
Stitch Block Pairs


Create two “Four Block” rows. Approximate finished size: 4-1/2″ x 16-1/2″.Layout quarter-square triangle blocks as shown, rotating blocks as necessary.

Arrange completed “Four Block” and “Ten Block” outer border block rows as shown.
Assemble and Finish Table Runner
Prior to cutting center front and backing fabric rectangles, first measure your completed Block Rows. If your Block Rows are different measurements – adjust your center rectangle measurements accordingly.
Double check center rectangle width measurement by measuring the width of your “Four Block” rows.

Cut Backing and Batting
Cut fabric backing and quilt batting rectangles approximately 27″ W x 42″ L ea. (or larger).
Finish quilt, using your favorite binding technique. Find Nancy Zieman’s favorite binding method at the Nancy Zieman Productions Blog: http://www.nancyzieman.com/blog/quilting-2/how-to-bind-quilts/
Embellish your Table Runner with Star Quilting!
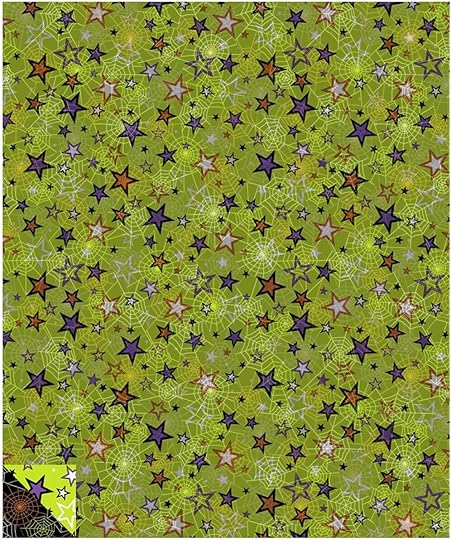
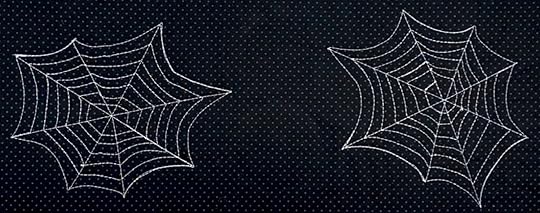
Download and print Team NZP’s FREE! Spiderweb Stitching Guide Printable PDF!

And/Or, embellish your table runner with appliques! Visit our September 26, 2020 NEW! Halloween Applique Coaster Sewing Tutorial and download our FREE! Spooky Halloween Applique Printable!
Optional: Trace Spiderweb Stitching Guide on to Templar Heat Resistant Template Material for repeated uses!
Trace and cut out Spiderweb Stitching Guide.Arrange Spiderweb Stitching Guide, as desired, on quilt top.Trace around edges of Spiderweb Stitching Guide with Clover’s Fine White Marking Pen .Thread sewing machine with Metallic Nylon Thread , insert a Schmetz Metallic Needle, Sz. 80 , and set machine for a 3.0 mm stitch length.Stitch on marked lines, using Open Toe Presser Foot .
Your Halloween Half-Square Triangle Table Runner is complete!
Exclusive Halloween Half-Square Triangles Table Runner Bundle Box by the Stitch it! Sisters
No-Hassle Triangle Ruler by Team NZP
Clover’s No-Hassle Triangle Gauge by Nancy Zieman
Clover’s Heart Shape Pins and Heart-Shaped Magnetic Pin Caddy
Clover’s Fabric Marking Pen or Erasable Gel Pen
Clover’s Fine White Marking Pen
Clover’s Straight Tailor’s Awl/Stiletto
Clover’s Bordeaux Scissors
June Tailor’s Quilter’s Starch Savvy
June Tailor’s Quilt Basting Spray
Iron
Tailor’s Clapper
Cotton Quilting Thread
Schmetz Chrome Quilting Needles, Sz. 75
Schmetz Super Nonstick Needles, Sz. 90
Schmetz Metallic Needles, Sz. 80
Rotary Cutter, and Mat
1/4″ Patchwork Presser Foot
Open Toe Presser Foot
Edge Joining Presser Foot
Optional: Metallic Nylon Thread
Optional: Clover’s Wonder Pins
Then, head over to ShopNZP.com and purchase our Halloween Half-Square Triangles Table Runner Bundle Box that includes the Halloween Party Fat Quarter Bundle, 3/4 yd. top and binding fabric, 3/4 yd. backing fabric and Pellon® Fleece Batting, and exclusive NEW! Sew a Celebration Halloween Half-Square Triangles Table Runner Sewing Pattern by Team NZP – with step-by-step instructions and color photos/ illustrations. Includes everything you’ll need to make one Halloween Half-Square Triangles Table Runner! You’ll supply the thread.
Halloween Wine Tote Sewing Tutorial

Watch Stitch it! Sisters Program 213, Patriotic Quarter-Square Triangles Table Runner Tutorial Video with hosts Deanna Springer and Dana Casey from Team NZP! Learn how to make our easy Patriotic Table Runner and Celebrate Summer Sewing!
Then, head over to ShopNZP.com and purchase our Patriotic Quarter-Square Triangles Table Runner Bundle Box that includes the Land of Liberty Fabric Fat Quarter Bundle by My Mind’s Eye For Riley Blake Deigns, 3/4 yd. top and binding fabric, 3/4 yd. backing fabric and Pellon® Fleece Batting, and exclusive NEW! Sew a Celebration Quarter-Square Triangles Table Runner Sewing Pattern by Team NZP – with step-by-step instructions and color photos/ illustrations. Includes everything you’ll need to make one Patriotic Quarter-Square Triangles Table Runner! You’ll supply the thread.
Join us for The Great Wisconsin Quilt Show, September 7-9, 2023, in Madison, Wisconsin. Plan an exciting getaway ! View the Advanced Registration Guide, register for lectures with the Stitch it! Sisters, view the listing of vendors–then visit us at our NEW! Nancy Zieman Sewing Studio vendor booth at quiltshow.com! We look forward to seeing you in-person, next week at The Great Wisconsin Quilt Show!
Find Event Details at QuiltShow.com
Happy Sewing!
Team Nancy Zieman
Nancy Zieman Productions. LLC.
Stitch it! Sisters is a production of NZ Productions LLC. Content in this feed is © copyright 2023 by Nancy Zieman Productions, LLC and may not be republished without written permission. You’re welcome to forward the email to a friend or colleague but it’s not okay to add the RSS feed automatically as content on a blog or other website. The FTC requires us to tell you that Nancy Zieman Productions, LLC has provided products by other companies in the course of doing business. The FTC requires us to advise you to take this information into consideration when reading this posting.
Make sure you are subscribed to Nancy Zieman Productions, LLC enews mailing list so you won’t miss a thing. Sign up at nancyzieman.com/blog/enews. And join us on YouTube,Facebook,Instagram and Pinterest!September 1, 2023
NEW! I Sew For Fun Kids Sewing Challenge 2023 Kick Off and Order Your Challenge Project Pack Today
NEW! I Sew For Fun Kids’ Sewing Challenge 2023 sponsored by Nancy Zieman Productions, Clover Needlecraft, and Benartex Fabrics. Youth ages 15 and under are invited to share how they “sew for fun”— while making a Cinch Sack with My Hero Fabric by Benartex; along with a Clover sewing tool.
Youth age 15 and under may participate in the NEW! I Sew For Fun Kids’ Sewing Challenge 2023 by reading and understanding the contest guidelines listed below, sewing a cinch sack using one of the 2023 I Sew For Fun Kids’ Sewing Challenge Cinch Sack Project Packs purchased by an adult, and emailing two photos to info@ziemanproductions.com on or before September 23, 2023: One photo showing youth sewing/working on the challenge project using the Clover tool (included in the 2023 I Sew For Fun Kids’ Sewing Challenge Cinch Sack Project Pack, and a second photo of youth with completed project. Note: It’s okay if you prefer not to show youth’s face in photos. Be sure to include challenge participant’s first name, city, state, and age–when emailing photos to info@ziemanproductions.com.
To reserve a spot in the NEW! 2023 I Sew For Fun Kids’ Sewing Challenge, an adult parent or guardian must purchase the Official 2023 I Sew For Fun Kids’ Sewing Challenge Cinch Sack Project Pack. Purchase the Official 2023 I Sew For Fun Kids’ Sewing Challenge Cinch Sack Project Pack at ShopNZP.com, as soon as possible. Quantities are limited!
2023 I Sew For Fun Kids’ Sewing Challenge Cinch Sack Project Pack – My Hero Turquoise
The FREE! I Sew For Fun Cinch Sack Sewing Tutorial , will be available September 12, 2023, right here at the Nancy Zieman Productions Blog.
Sewing Machine, sewing thread, and basic sewing tools.
Helpful Notions
Using the right sewing tools assists with creating a successful sewing project! Above is a photo showing I Sew For Fun Tools by Nancy Zieman Productions for Clover. You may use any of the above I Sew For Fun sewing tools while sewing your pillow case challenge project! Show us What You’re Making! We love to hear from you, so email your photos—anytime—to The NZP Team at info@ziemanproductions.com, and/or share your experiences and photos with us on Facebook or Instagram!
Gather your sewing supplies and prep your fabric for sewing. Included with the Official 2023 I Sew For Fun Kids’ Sewing Challenge Cinch Sack Project Pack is everything you’ll need to complete the I Sew For Fun Cinch Sack Project, you’ll supply the thread! When you receive your challenge project pack, open the package and prep your fabrics. The FREE! I Sew For Fun Cinch Sack Sewing Tutorial will be available September 12, 2023, right at the Nancy Zieman Productions Blog. If you’re ready to get started sooner than September 12, you’ll also find our Cinch Sack Sewing Tutorial shared in an earlier blog posting. Read all directions, before beginning.
Before the sewing process, pressing and starching the fabric adds a bit of stiffness that helps make the cutting and sewing easier.
The I Sew For Fun Cinch Sack may be sewn on a sewing machine, and/or sewing machine and serger!
2023 I Sew For Fun Kids’ Sewing Challenge Cinch Sack Project Pack– My Hero Turquoise
2023 I Sew For Fun Kids’ Sewing Challenge Cinch Sack Project Pack– My Hero Red
As soon as you receive your 2023 I Sew For Fun Kids’ Sewing Challenge Cinch Sack Project Pack you may start making your pillowcase! You’re the designer: You may choose to embellish your pillowcase with ribbons and/or lace, and/or add your name with fabric markers, and/or decorate your pillowcase as desired. Remember, you must use the office challenge fabrics included with the project pack and one Clover sewing tool—all included with the challenge kit!
Coming, September 12, right here at the NZP Blog: NEW! I Sew For Fun Kids’ Sewing Challenge Part Two: Step-by-Step Cinch Sack Sewing Tutorial!
Sign up for Nancy Zieman Productions E-news, then watch your inbox for updates from the NZP Team.
1. Challenge is open to all youth, ages 15 and under, residing in the continental US.
2. The challenge is limited to the first 30 persons whose parent or guardian purchases the Official 2023 I Sew For Fun Kids’ Sewing Challenge Cinch Sack Project Pack. Purchase project pack as soon as possible at ShopNZP.com to reserve challenge spot. Quantities are limited.
3. Coming, September 12, here at the NZP Blog: NEW! I Sew For Fun Kids’ Sewing Challenge Part Two: Pillowcase Sewing Steps! Or go ahead and get started with our Cinch Sack Sewing Tutorial shared in an earlier blog posting.
4. Sew a pillowcase using the official Official 2023 I Sew For Fun Kids’ Sewing Challenge Cinch Sack Project Pack fabric, along with any sewing and/or serging techniques. Construction may be done by hand or by machine. Participants may use any type of embellishment, decorations, and may add designer touches. Work may be done exclusively by the participant, and/or with the assistance of an adult. One pillowcase per participant. Challenge participants, and/or an adult parent/guardian must email two photos to info@ziemanproductions.com on or before September 22, 2023: One photo showing youth using Clover’s Sewing Tool(s) while sewing and/or working on the project, and a second photo of youth with the completed pillowcase. Note: It’s okay if you prefer to not show youth’s face in photos. Be sure to include challenge participant’s first name, city, state, and age when photos to info@ziemanproductions.com.
Participants will be judged on workmanship, creativity, and overall appearance. Participants photos will be shared on sponsoring companies social and web sites to promote the love of sewing.
Prizes will be awarded to those making the top three pillow cases, along with additional prizes awarded randomly. Winners will be announced on the Nancy Zieman Productions Blog on September 28, 2023.
To reserve a spot in the NEW! 2023 I Sew For Fun Kids’ Sewing Challenge, an adult parent or guardian must purchase the Official 2023 I Sew For Fun Sewing Challenge Project Pack. Purchase challenge project pack, at ShopNZP.com, as soon as possible. Quantities are limited! Coming, September 12, here at the NZP Blog: NEW! I Sew For Fun Kids’ Sewing Challenge Part Two: Cinch Sack Sewing Steps!
Thank you to our generous sponsors!
For Adults and Sewing Teachers: Tune in and watch Nancy Zieman and her granddaughters, along with friends, take a modern approach to sewing. Nancy shares her team sewing-for-fun experience along with many tips for a big partner, and numerous insights for involving a little sewing partner—all while making simple, easy to sew kid-friendly projects. Watch I Sew For Fun on Sewing With Nancy!
For a listing of all Clover Sewing Tools by Nancy Zieman Productions, visit ShopNZP.com.

We’re excited to give you a sneak peek at our newly enhanced shopping experience! Visit our NEW! ShopNZP.com website! and Save up to 25% Off during our End of Summer Sewing SALE. And please pardon our mess while we move over to the new website.
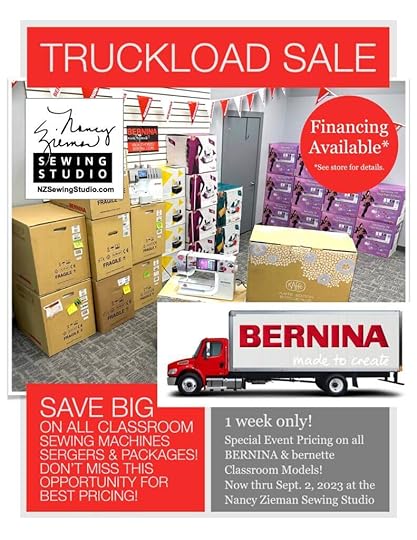 Stop in and shop our BERNINA Sewing Machine Truckload Sale *ONE WEEK ONLY* at The Nancy Zieman Sewing Studio–now Through September 2, 2023!Nancy Zieman Sewing StudioNew Fall Store Hours Coming Soon
Monday through Saturday 10 a.m. to 4 p.m.
Parking Behind Store
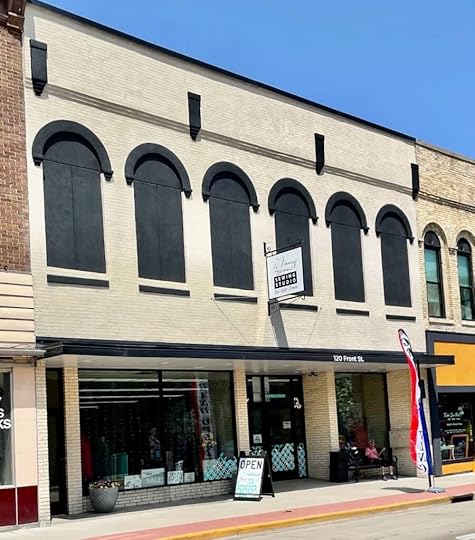
NANCY ZIEMAN SEWING STUDIO
120 FRONT STREET
BEAVER DAM, WI 53916
INFO[at]ZIEMANPRODUCTIONS[dot]COM
920-356-9546 phone
☀️ Shop our End of Summer Sewing SALE starting today! 🧵 Save up to 25% Off Select Sewing Tools, Fall Fabrics, S!S Sewing Patterns and More, now through September 2 ☀️ in store at The Nancy Zieman Sewing Studio and online a ShopNZP.com.

The Great Wisconsin Quilt Show.
Join the Stitch it! Sisters at The Great Wisconsin Quilt Show September 7 through 9, 2023 At the Exhibition Hall at The Alliant Energy Center in Madison, Wis.
Find Event Details at QuiltShow.com
Happy Sewing!
Team Nancy Zieman
Nancy Zieman Productions. LLC.
[image error]
Stitch it! Sisters is a production of NZ Productions LLC. Content in this feed is © copyright 2023 by Nancy Zieman Productions, LLC and may not be republished without written permission. You’re welcome to forward the email to a friend or colleague but it’s not okay to add the RSS feed automatically as content on a blog or other website. The FTC requires us to tell you that Nancy Zieman Productions, LLC has provided products by other companies in the course of doing business. The FTC requires us to advise you to take this information into consideration when reading this posting.
Make sure you are subscribed to Nancy Zieman Productions, LLC enews mailing list so you won’t miss a thing. Sign up at nancyzieman.com/blog/enews. And join us on YouTube,Facebook,Instagram and Pinterest!Nancy Zieman's Blog

- Nancy Zieman's profile
- 21 followers

