Carrie Vitt's Blog, page 30
April 3, 2018
Panna Cotta and Kombucha Jello Slice
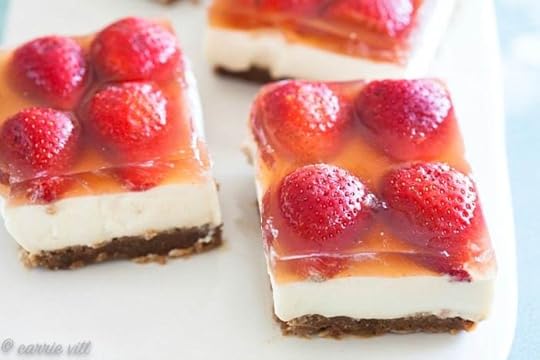
Honey-sweetened panna cotta is a favorite spring dessert, so I thought it would be fun to layer it with a cookie crust and strawberry kombucha jello!
To be honest, I was a bit crunched for time last week so I used Simple Mills grain-free pecan cookies for the crust. They are made with all wholesome ingredients and taste fabulous! You can change out the pecan cookie crust for a graham cracker crust if you prefer.
The middle layer is panna cotta and then I topped it all off with homemade kombucha jello. I chose strawberry, but you can change out the flavor of kombucha or the berries on top depending on your taste.
Here are some other springtime desserts you might enjoy:
Tres Leches Cake
Strawberry Sherbet
Angel Food Cake
Frozen Yogurt
Chocolate Berry Tart
Carrie Vitt
Panna Cotta and Strawberry Kombucha Slice (Grain-Free)
 Save Recipe
Print Recipe
My Recipes
My Lists
My Calendar
Ingredients
For the crust:30 Simple Mills pecan cookies (or a batch of homemade graham crackers )5 tablespoons unsalted butter (or 4 tablespoons coconut oil for dairy-free)For the panna cotta:4 cups coconut milk , divided1 tablespoon unflavored gelatin 1/4 cup raw honey 2 teaspoons vanilla extract For the kombucha jello:2 1/2 cups kombucha (I used Strawberry GTS)1 tablespoon unflavored gelatin 2 pints strawberries, hulled and cut in halfInstructions
Preheat the oven to 350ºF and adjust the rack to the middle position. Place the cookies and butter in a food processor and pulse until crumbled and moist. Press the cookie mixture into an 11x7” baking dish lined with parchment paper. Bake for 11 minutes. Cool and then put in the freezer for 30 minutes.Meanwhile, pour 1 cup coconut milk into a medium saucepan and sprinkle evenly with the gelatin. Let the milk sit for 5-10 minutes to allow the gelatin to soften. Heat the milk and gelatin over medium heat, stirring constantly, until gelatin is dissolved and milk begins to steam. Stir the remaining 3 cups coconut milk and honey into the warm milk and whisk until all the ingredients are dissolved. Remove the pan from the heat and stir in the vanilla. Let the mixture cool to room temperature. When cooled, pour all but 1/2 cup of the panna cotta mixture over the cold cookie crust. (Pour the remaining 1/2 cup panna cotta mixture into a small bowl and enjoy it by itself later) Put the baking dish into the refrigerator and chill for 2 hour until mostly set.Meanwhile, combine 1/2 cup kombucha and gelatin in a measuring cup and let sit for 5 minutes (this allows the gelatin to bloom). Heat over low while stirring constantly until the gelatin is dissolved, about 2 minutes. Slowly whisk in the remaining kombucha. Cool completely. When cooled, pour it over the chilled panna cotta and top with berries. Place in the refrigerator and let chill for at least 5 hours until set. Slice and serve cold.7.6.84588https://deliciouslyorganic.net/panna-cotta-and-kombucha-jello-slice-grain-free/Copyright 2016 Deliciously Organic
The post Panna Cotta and Kombucha Jello Slice appeared first on Deliciously Organic.


March 14, 2018
Is Iodine Safe for Hashimoto’s Disease?

Is it safe to take iodine if one has Hashimoto’s Disease? This is one of the top questions I receive, so today I want to break down this controversial topic.
Iodine is very important for the production of thyroid hormones. Without iodine and L-tyrosine we don’t have the raw materials to make thyroid hormones. Iodine also helps manage the metabolic rate in the body.
With Hashimoto’s, the immune system knows there’s something going on in the thyroid tissues that’s not normal and so the body is attacking the thyroid tissue. There are many different root causes for this such as: a viral infection, a bacterial infection, overabundance of stress, heavy metals in the body, etc.
In our practice, we’ve found that when a client has Hashimoto’s and is in a hypothyroid state, by slowly adding a small amount of an iodine supplement to the diet, such as Iodomere from Standard Process or sea vegetables, the client often feels better.
But, there are some who say they don’t feel well when taking iodine or eating iodine-rich foods. When we look at their labs we often see either high levels of T4, which indicates they are in a hyperthyroid state, or they have indications of a congested liver. In this situation, when you add iodine to the mix, the metabolic rate speeds up and the thyroid gland tries to push out various toxins. This can create die-off reactions and they will feel very sick because their body is being pushed harder than they can handle.
If hyperthyroidism has been ruled out, then here are some things to try alongside a nutrient-dense diet:
Do a castor oil pack over the liver for 3-4 weeks. Then, try adding a bit of kelp powder or sea vegetable powder to the diet and see how you feel. I also recommend keeping a close eye on your labs to see if things are headed in the right direction.
Along with the castor oil packs, we like to use specific Gemmotherapy remedies such as Rosmarinus or Juniperus that gently drain the liver. Prunus amagdylus will often be used to specifically support the thyroid gland.
When the castor oil packs and drainage remedies are used together, our clients feel better and they are usually able to then add iodine-rich foods back into the diet and are ready to take an iodine supplement if needed.
It’s good to keep in mind that we are all biochemically individual, so iodine won’t work for every single person but, in general, adverse effects from iodine are rare when it’s used appropriately.
Here’s a list of foods that are good sources of iodine:
Sea vegetables such as kelp, dulse, and wakame
Wild sea food such as shrimp, scallops, cod, salmon, sardines and tuna
Unprocessed, organic dairy such as raw milk, raw cream, cultured yogurt, etc.
Pastured/organic eggs
Celtic sea salt (not iodized salt because it is not a naturally occurring salt and is processed)
If you’ve been nervous to eat iodine-rich foods because you’ve heard they aren’t healthy, then I recommend giving something like sea vegetables a try and see how you do. If you’ve experienced negative symptoms in the past from iodine, then I recommend following the steps above and also talk to your holistic practitioner about this so they can help safely guide you through the process. If you’re looking for a practitioner to work with, give our office a call and we will be happy to help you.
The post Is Iodine Safe for Hashimoto’s Disease? appeared first on Deliciously Organic.
March 6, 2018
Greek Salad with Beef Kabobs
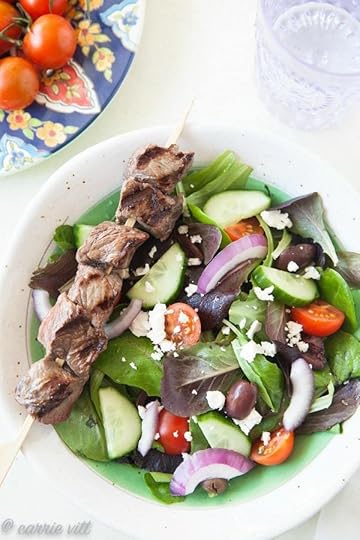
Greek Salad is an iconic favorite and is so easy to make at home. I’ve added sirloin kebobs that have been marinated in olive oil, red wine vinegar and garlic to add some extra protein to the dish.
Red onions can often have a very harsh flavor, but if you soak them in ice water for about 20 minutes before adding them to the salad it will take away the “bite.”
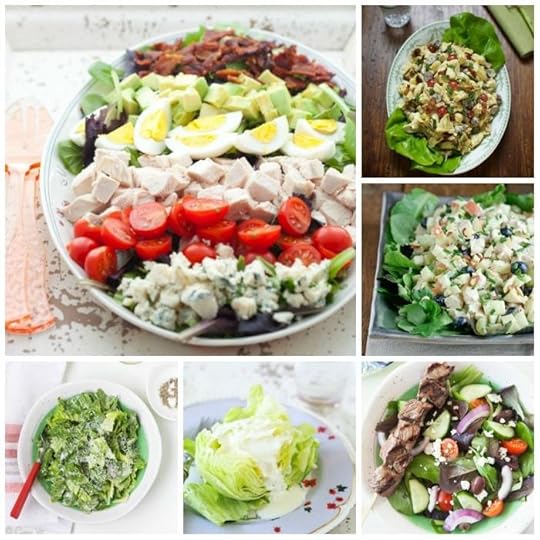
Here are some other salad recipes you might enjoy:
Avocado, Mango and Pickled Onion Salad
Wedge Salad with Yogurt Dressing
Classy Chicken Salad with Dates and Macadamia Nuts
Cobb Salad
Classic Caesar Salad
Chopped Waldorf Salad
Serves 4
Greek Salad with Beef Kabobs1 hr, 15 Prep Time
10 minCook Time
1 hr, 25 Total Time
Save RecipePrint Recipe
My Recipes
My Lists
My Calendar
Ingredients
For the kabobs:1 pound sirloin, cut into 1 1/2-inch cubes3 tablespoons extra-virgin olive oil 1 tablespoon red wine vinegar 1/2 teaspoon garlic powder For the salad:6 ounces baby romaine1/2 red onion, sliced thin1/2 cup Kalamata olives1/2 cup feta cheese, crumbled1/2 English cucumber, slices1 pint cherry tomatoes, cut in halfFor the dressing:1/4 cup extra virgin olive oil 2 tablespoons red wine vinegar 2 garlic cloves, crushed1/2 teaspoon Celtic sea salt Freshly ground black pepperInstructions
Place the sirloin in a flat dish. Whisk together the olive oil, red wine vinegar and garlic in a measuring cup. Pour the marinade over the steak and lift the steak up so the marinade covers the bottom side of the steak as well. Let sit for 1 hour at room temperature, or 2-3 hours in the fridge. Heat the grill to medium (or you can use an indoor grilling pan ). Thread the meat onto skewers and grill until medium-rare to medium, depending on your preference. Set aside.Place the romaine, red onion, Kalamata olives and feta cheese, cucumber and tomatoes in a salad bowl. Whisk the olive oil, red wine vinegar, garlic, and sea salt in a measuring cup. Pour the dressing over the salad. Serve the salad with the beef kabobs and season with just a bit of freshly ground black pepper.7.6.74585https://deliciouslyorganic.net/greek-salad-beef-kabobs/Copyright 2016 Deliciously Organic
The post Greek Salad with Beef Kabobs appeared first on Deliciously Organic.
February 23, 2018
8 Ways to Detox Your Liver Naturally and Gently
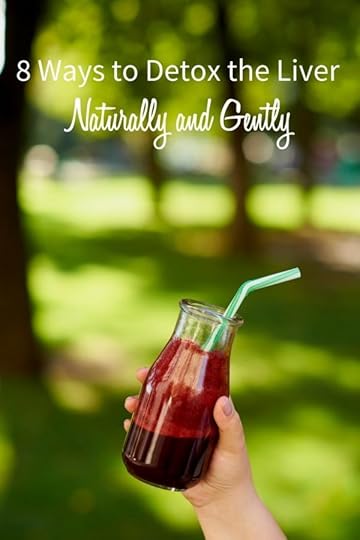 Detox is a way the body continually cleanses to heal and repair itself. I’ve talked before about why detox is necessary and why in today’s industrialized world, diet alone won’t suffice, so today let’s focus on how to specifically detox your liver naturally and gently.
First, here are some signs that you may have some liver congestion:
Grey circles under or around the eyes
Bloodshot eyes
PMS symptoms
Menopause symptoms
Blood sugar imbalance
Under conversion of T4 to T3
Liver disease
Itchy skin, hives, or other rashes
Waking up with night sweats
Hormone imbalance
Chemical sensitivity
Dark spots on the cheeks and/or around the eyes (commonly known as liver spots)
Nausea
Estrogen dominance
The liver is one of the primary detox organs in the body and is responsible for over 500 functions in the body. It’s also the master transformation site that filters toxins from the blood to neutralize and eliminate them. These toxins can include: synthetic chemicals, excess hormones, heavy metals, sugar, processed foods, etc.
When the liver sees a toxin, it creates bile and puts the toxin in the bile and then sends the bile to the gallbladder. When you eat fats, this sends a signal to the gallbladder to release the bile into the intestinal tract to then be expelled via the bowels.
This is why it’s imperative to eat healthy fats each day such as butter, ghee, tallow, duck fat, coconut oil, etc. so the liver can create the bile and then the gallbladder can be sent the signal to contract to release the bile into the intestines. Gallstones are often a result of a low-fat diet, so it’s very important to always include fats in your diet each day.
What about a juice cleanse?
A juice cleanse isn’t a good way to detox the liver because juices don’t contain any fats. If there are no fats, then the body can’t excrete the toxins via the bile. I understand that the idea of juice cleanse is nice because it can help you focus on making better food choices, but if you want to do a juice cleanse, then make sure to blend in some raw cream or raw egg yolks in the juices so the liver and gallbladder can actually excrete the toxins from the body.
Another very important thing to consider is that detox can only happen in the parasympathetic state. The parasympathetic state is the state in which the body can rest, digest, heal, repair and restore. So, it’s imperative to make sure you get enough sleep each night, set boundaries on your work hours each day and how often you’re on electronics, find ways to reduce your stress, exercise daily, etc.

Above all, remember that detox is a process, not an event. So it’s best to incrementally change some of your daily habits to enable your liver to function at its optimum capacity over time.
8 Ways to Detox Your Liver Naturally:
1. Keep your sugar intake at 20 grams or lower a day (this does not include carbohydrates from healthy sources such as vegetables, soaked grains, raw dairy, etc.). I realize this is probably the least favorite tip of all, but it’s important to understand that the liver is one of the three organs responsible for blood sugar balance. When you eat too much sugar, this makes it very difficult for the liver to do its job.
2. Find ways to reduce your stress and slow down your pace. Remember, detox is a parasympathetic process, so if you’re on the go all the time and under too much stress, this will make it very difficult for the liver and other detox organs to do their job.
“When the body is dominated by the sympathetic nervous system it diverts resources to the muscles (fight or flight) and away from organs (rest and digest). Stress affects our bodies in many different ways: our muscles tighten and energy is shunted away from our repair and renewal system—and this means that we will not be detoxifying optimally. For this reason, our bodies will store more toxins in fat cells when we are stressed because they do not have the energy required to convert and excrete them”. source
3. Do a castor oil pack over the liver 3-4 times a week. Castor oil packs are a gentle and effective way to decongest the liver and lymphatic system. (This is not recommended if you have an IUD, during menses, or when pregnant or breastfeeding.)
4. Let go of anger and practice forgiveness. Nothing overburdens the liver like unresolved anger. Talk to a counselor or therapist, someone you trust at your local church, or a friend that will help you walk through this process.
5. Eat healthy fats from animal sources each day to provide the body with plenty of vital nutrients to support the liver. Some of my favorite sources are: butter, ghee, tallow, duck fat, pastured eggs, and raw dairy.
6. Eat organ meats 1-2 times a week. This liver pate recipe is absolutely divine (and I don’t even like pate!). If the taste of organ meats is too much for you, then taking liver capsules from Vital Proteins or Radiant Life is a good option.
7. Drink a small glass of beet kvass first thing each morning. This tonic is fabulous for the liver and very easy to make. See recipe below.
8. Walk or do other gentle exercise such as pilates, yoga, etc. to lower cortisol and stress levels to reduce putting stress on the liver.
Makes 2 quarts
Beet Kvass5 minPrep Time
5 minTotal Time
Save RecipePrint Recipe
My Recipes
My Lists
My Calendar
Ingredients
3-4 small beets or 1 large beet, cut into 2-inch pieces1 tablespoon Celtic sea saltInstructions
Place the beets in a 2 quart glass or ceramic pitcher. Cover with water and stir in the sea salt. Cover with a clean cloth and place in a dark cool place for 3 days. After 3 days, remove the beets and store the kvass in the fridge. It will keep for about 2 weeks.7.6.74584https://deliciouslyorganic.net/8-ways-to-detox-your-liver-naturally-and-gently/Copyright 2016 Deliciously Organic
The post 8 Ways to Detox Your Liver Naturally and Gently appeared first on Deliciously Organic.
February 15, 2018
Lemon Ricotta Pancakes (Grain-Free)
 A stack of light, fluffy lemon ricotta pancakes is a wonderful way to start the day! I made these with Bob’s Red Mill Paleo flour and they came out beautifully. I found their flour blend last year and will grab it on occasion when I want to adapt a recipe, but am unsure of the exact quantities. I’ve used their flour blend for dozens of recipes and it truly is a 1:1 substitution for other flours!
I do realize the Paleo flour is a bit on the pricey side, so I don’t use it very often. But, if you only use grain-free flours every once in a while and you don’t want to purchase multiple flours, then this is a great option. I’m not affiliated with Bob’s Red Mill, but I do love to promote a good product when I find one!
You can also make this with a blend of almond and coconut flour and I’ve got those measurements for you listed below.
This recipe is super simple, can be whisked together in about 10 minutes and topped with lemon, berries, maple syrup, jam, jelly, or whatever you fancy!
Makes about 12-14 pancakes
Lemon Ricotta Pancakes (Grain-Free)10 minPrep Time
15 minCook Time
25 minTotal Time
Save RecipePrint Recipe
My Recipes
My Lists
My Calendar
Ingredients
4 eggs, separated1 cup Paleo flour (or 1 cup almond flour and 2 tablespoons coconut flour)1 1/2 teaspoons baking powder1 tablespoon coconut sugar or maple sugar3/4 teaspoon Celtic sea salt1 1/3 cup whole milk ricotta cheese1/2 cup whole milk (I used raw)1 tablespoon fresh lemon juice1 tablespoon fresh lemon zest2-3 tablespoons ghee, coconut oil or palm shortening for fryingLemon wedges, butter and maple syrup, for servingInstructions
Place the egg whites in the bowl of a standing mixer and whisk for 5 minutes on medium-high speed. Meanwhile, whisk together Paleo flour, baking powder, sugar and salt in a medium mixing bowl. In another bowl, whisk together the ricotta, milk, lemon juice, and lemon zest.Take about 1 cup of the whipped egg whites and whisk it into the ricotta mixture. Then, combine the ricotta mixture with the flour mixture. Add the remaining whipped egg whites and fold until combined.Heat a large skillet over medium heat for 1 minute, Melt 1-2 teaspoons of the ghee (or whichever oil you are using) in the pan and swirl the pan to coat. Spoon small portions of the pancake mixture into the pan and fry until bottom sides are golden brown. Using a spatula, flip each pancake and cook until second side is golden brown. Serve with lemon wedges, butter, and maple syrup.7.6.74582https://deliciouslyorganic.net/lemon-ricotta-pancakes-grain-free/Copyright 2016 Deliciously Organic
The post Lemon Ricotta Pancakes (Grain-Free) appeared first on Deliciously Organic.
February 5, 2018
Butter Chicken Recipe

Butter chicken is a comforting and nourishing meal that has become a family favorite these last few months. The chicken is marinated in yogurt, vindaloo spice blend, and lemon juice and then combined with caramelized onions, broth, tomatoes and cream to create a luxurious meal.
With a recipe like this, I’m pretty sure many of you will ask about adaptations, so let’s dive in:
If you need to avoid dairy, you can make this with a dairy-free yogurt, coconut oil and coconut milk (see specific measurements below).
If you need to avoid tomatoes, you can use 1 cup of this Nomato sauce. If you’re wondering why I use nightshades in my recipes and if you need to avoid them, read this article.
You can serve this with either riced cauliflower or properly prepared brown rice.
The Vindaloo spice blend is a must. I honestly don’t know how to make this dish without it. You can purchase it here, or make your own.
I like to put together the marinade in the morning and then finish the rest when it’s time to cook dinner. It also makes for great leftovers!
Serves 6
Butter Chicken Recipe20 minPrep Time
60 minCook Time
1 hr, 20 Total Time
Save RecipePrint Recipe
My Recipes
My Lists
My Calendar
Ingredients
For the marinade:1 cup plain, whole yogurt (or coconut or almond milk yogurt for a dairy-free option)1/4 cup Vindaloo spice blend Juice of 1 lemon4 chicken breasts cut into bite-size piecesFor the onions:1 stick unsalted butter (or 4 tablespoons ghee or coconut oil for a dairy-free option)2 yellow onions, thinly sliced1 cup crushed tomatoes1/2 cup chicken stock or broth2 teaspoons Celtic sea salt 1/2 cup raw cream or coconut milk Cilantro and chopped cashews for serving (optional)Instructions
Stir the yogurt, vindaloo spice blend, and lemon juice together in a medium bowl. Stir in the chicken and make sure the chicken is thoroughly coated with the marinade. Cover and place in the refrigerator to marinate for about 8-10 hours, or you can leave the mixture on the counter for 1 hour to marinate if you’re short on time.Melt the butter over low heat in a large sauté pan. Add the onions and cook on low heat for about 35-40 minutes, stirring occasionally until soft and caramelized. Stir in the chicken mixture (yogurt, spices and all) and increase the heat to medium. Stir in the tomatoes, stock and salt. Continue to cook, stirring frequently, until chicken is cooked through, about 15 minutes. Stir in the cream. Serve over riced cauliflower, or soaked brown rice, and top with chopped cilantro and cashews.7.6.74581https://deliciouslyorganic.net/butter-chicken-recipe/Copyright 2016 Deliciously Organic
The post Butter Chicken Recipe appeared first on Deliciously Organic.
February 2, 2018
Natural Red Velvet Cupcakes (Dye-Free, Grain-Free)

Natural red velvet cake without any food dyes and grain-free? Game on!
With Valentine’s Day coming up, I wanted to give you a healthier option to a holiday favorite.
This grain-free, dye-free red velvet cupcake recipe gets its red color from roasted beets, and you can’t actually taste the beets at all!
I played around with different sugars, and this recipe really does taste best with maple sugar, or organic cane sugar. I tried it with coconut sugar, and while the cake tasted nice, it did have a slight off-flavor that I wasn’t a huge fan of. I rarely use an organic cane sugar, but for a recipe like this that I only make once a year, I’m OK with making an exception.

Also, keeping the sugar as low as possible in desserts is an important factor to me. I found that keeping the sweetener at 3/4 cup was best so that the beet flavor didn’t shine through and instead you get that lovely traditional red velvet flavor.
Red velvet cake is served with cream cheese frosting, but if you need to avoid cream cheese, here and here are some great options for a dairy-free “cream cheese” frosting. And, to make the cupcakes a bit more festive, I sprinkled them with freeze-dried raspberries and inserted a beet chip in them.
Here are some more Valentine’s favorites you might enjoy:
3-Ingredient Chocolate Mousse
Grain-Free Chocolate Mug Cake
Grain-Free Chocolate Tiramisu
Grain-Free Molten Lava Cake
Makes 1 dozen cupcakes
Natural Red Velvet Cupcakes (Dye-Free, Grain-Free)20 minPrep Time
20 minCook Time
40 minTotal Time
Save RecipePrint Recipe
My Recipes
My Lists
My Calendar
Ingredients
For the cupcakes:1 cup roasted beets, chopped2 tablespoons vanilla extract1/2 cup buttermilk2 cups finely-ground almond flour 1/4 cup coconut flour 1/2 cup cocoa powder (non-alkalized)3/4 cup maple sugar or organic cane sugar (see note above in post)2 teaspoons baking powder (make sure it's gf!)3 large eggs, room temperature6 tablespoons unsalted butter, melted and cooledFor the frosting:3/4 pound mascarpone or cream cheese2 teaspoons vanilla extract1/4 cup raw honey1 cup heavy cream, whipped until soft peaks formDried raspberries, crushed (optional)Instructions
Preheat the oven to 350ºF and adjust the rack to the middle position. Place the roasted beets, vanilla and buttermilk in a food processor or blender and blend until smooth. Pour the beet mixture into a large mixing bowl. Add the almond flour, coconut flour, cocoa powder, maple sugar or cane sugar, baking powder, eggs and butter. Whisk until smooth, about 30 seconds. Divide evenly into a lined muffin tin. Bake for 20 minutes or until baked through. Cool completely.Whisk mascarpone or cream cheese, vanilla and honey in the bowl of a standing mixer until smooth. Using a spatula, fold in whipped cream. Frost cooled cupcakes with frosting and sprinkle with dried raspberries, if using. These are best served the day they are made.7.6.74580https://deliciouslyorganic.net/natural-red-velvet-cupcakes-grain-free/Copyright 2016 Deliciously Organic
The post Natural Red Velvet Cupcakes (Dye-Free, Grain-Free) appeared first on Deliciously Organic.
January 31, 2018
10 Holistic Tips for a Good Night’s Sleep
 Sleep is the time each night when the body repairs, heals and restores. If you’re not getting enough, it can put you at risk for all sorts of various health issues including: heart disease, high blood pressure, diabetes, thyroid issues, depression, adrenal fatigue, etc.
We’ve all heard the usual tips like, limit caffeine and alcohol, exercise regularly, etc., so today we’re going to avoid the common tips and look at some of the root causes as to why you aren’t sleeping well.
Here are my 10 Holistic Tips for a Good Night’s Sleep:
1. If you tend to get a second wind at the end of the day, or when you lie down you can’t sleep, eat a small snack such as a piece of raw cheese or spoonful of almond butter right before bed. A second wind, or not being able to go to sleep, is usually due to high cortisol levels, so if you eat something, this can help drive those cortisol levels back down.
2. If you wake up in the middle of the night and you can’t fall back asleep, again, eat a small snack such as a piece of raw cheese or spoonful of almond butter. Why are you waking up? This tends to happen when blood sugar levels get too low when you’re sleeping which triggers the adrenals to send out cortisol into the bloodstream. When you eat a small snack, this will help drive the cortisol levels back down so you can sleep. Click here to read more about adrenal health.
3. Before you go to bed, rub 1 drop of Cedarwood and 1 drop of Lavender on the bottoms of your feet and then diffuse the same oils in your bedroom. I’ve shared this blend with thousands of people and I can’t tell you how many people come back telling me how well they slept using these two essential oils!
4. Turn off your Wi-Fi and put your phone in another room, or at least put it in airplane mode to reduce electromagnetic fields (EMFs). Man-made electromagnetic radiation can cause sleep issues so it’s a good idea to take simple steps to reduce your exposure. You can put a timer on your Wi-Fi, so that it turns off when you’re sleeping. If you absolutely have to sleep with your phone in your room, make sure it’s on airplane mode.
5. Do you wake up in the middle of the night because you need to go to the restroom? This is a sign of blood sugar imbalance, so take steps to reduce your sugar intake. Make these buttermints to curb cravings and your sleep should become much more restful and void of any midnight bathroom trips.
6. Do you wake up sweating or nervous? This is usually rooted in adrenal fatigue, so read this article and see which steps you can start taking today to calm your adrenals.
7. Make sure you’re getting enough magnesium. Magnesium is calming for the central nervous system and helps us rest, but many of us are deficient. This deficiency is most often caused by too much stress or being in a fight-or-flight mode too often. When we are stressed, the first mineral the body burns through is magnesium, so this explains why so many of us need more of this important mineral! A super easy way to increase magnesium stores in the body is to take an Epsom salt bath for 20 minutes. Or, if you need supplements, I prefer Dr. Ron’s Mag Max.
8. Vitamin A plays an analogous role in setting our circadian rhythm. “When blue light from sunshine enters our eyes, Vitamin A translates it into a signal that tells our brain it is daytime. When this signal wanes, our brain knows that it is nighttime. This means that Vitamin A plays an essential role in helping us fall asleep on time, get high quality sleep, sleep long enough, wake up feeling rested, and stay alert and energetic throughout the day.” So, make sure you’re getting plenty of Vitamin A from animal foods such as eggs, grass-fed meats, organ meats, cultured dairy, etc.
9. Use essential oils such as Lavender, Frankincense, Wild Orange, etc. throughout the day to reduce your stress. Stress plays a big role in blood sugar balance and, as I mentioned in #2 and #6, blood sugar balance plays a role in how well we sleep each night. If you haven’t given essential oils a try, you really must. I was skeptical for so many years and then when I learned how to properly use them, they were a game changer! I’ve got a free online class on this topic that you can register for here.
10. Lastly, evaluate your bedroom conditions. Are you sleeping on a supportive mattress? If not, consider finding a new non-toxic and supportive mattress. Is the room dark? If not, consider blackout shades for your windows, or unplugging electronics in the room. Is the room too hot or too cold? A small fan or hot water bottle can make all the difference!
Have you found any tried-and-true tips for a good night’s sleep? Please share in the comments below!
The post 10 Holistic Tips for a Good Night’s Sleep appeared first on Deliciously Organic.
January 30, 2018
My Favorite Non-Toxic Mattress
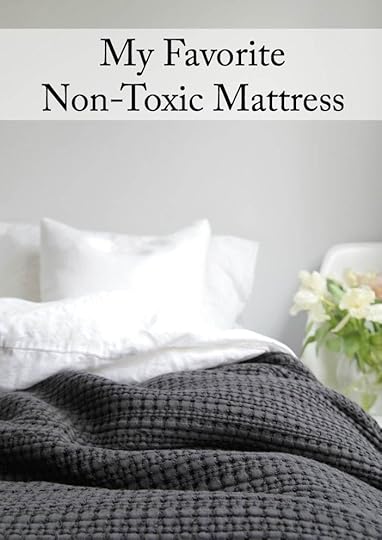
When it was time to replace our mattress last year I really wanted to get an organic mattress that would offer great back support, but as I was began reading and talking to my friends about organic mattresses, I realized that maybe it wasn’t the best option.
I learned that organic mattresses break down pretty quickly. If I was going to pay a premium, I wanted something that would last and was free of synthetic fire retardants, such as formaldehyde, which can cause thyroid problems. I tried different foam mattresses in the past and really didn’t sleep well on them, so I knew a foam mattress wasn’t an option.
While shopping around, I happened to be chatting with Sara Pope and she recommended I try the Intellibed. Sara really does her homework, and I turn to her website often to get the real story on health-related issues, so I gave Intellibed a call.
Before I purchase a product, I’m that annoying person who calls the company and asks all sorts of questions like: Does it off-gas? For how long? What materials is it made of? Why did you choose ______ material? Can you send me a sample so I can see if it smells or I have a reaction?
The rep at Intellibed was kind enough to answer my questions and here’s what I learned:
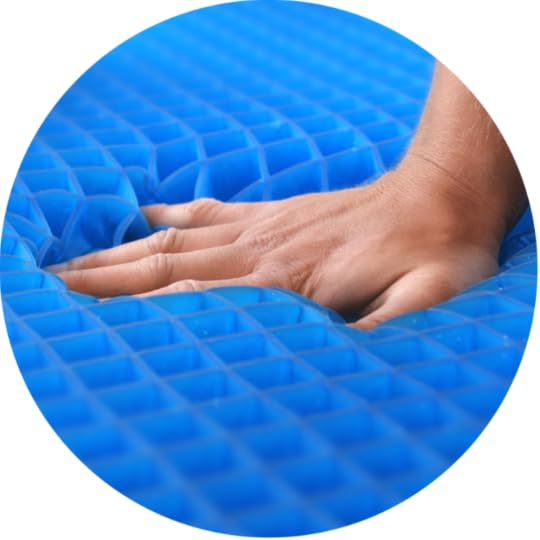
Intellibed mattresses aren’t sprayed with any synthetic chemicals. Most mattresses are sprayed with chemicals such as formaldehyde and fire-retardants which are damaging to the endocrine system and are carcinogenic. Instead of synthetic chemicals, Intellibed uses nontoxic silica thread, which is actually the ingredient in those little white packet inserts in supplement bottles.
The materials used in an Intellibed mattress are CertiPUR-US which means they are analyzed by an independent and accredited testing laboratory to be free of ozone depletes, PBDEs, TDCCP or TCEP flame retardants, heavy metals, formaldehyde, and phthalates and are low VOC (Volatile Organic Compound).
The off-gassing from an Intellibed mattress is very, very minimal! Their foams are low VOC and their patented Intelli-Gel is an inert, non off-gassing material. This medical-grade gel is also used in hospitals for bedridden patients and burn victims to reduce pressure and promote healing.

The Intellibed mattress supports the body in a way other mattresses cannot. Foam mattresses, such as Tempur-Pedic®, are made of layered foam. A supportive mattress needs to support your back and push on your hips to keep the body in alignment. A foam core mattress softens over time and loses its resiliency which reduces the ability for the foam to push on the hips. Intelli-Gel behaves differently than foam. The gel collapses under the heaviest parts to the body which relieves pressure on the body. And, if you can relieve pressure points, your body won’t need to move as much during the night to relieve that pressure.
The small amount of foam that wraps around the mattress gives the bed strength and is certified to be pure and toxin-free.
Given that a nontoxic mattress is quite an investment, I was happy to learn that Intellibed offers a 30-year warranty and they also have a 60-day guarantee. If you don’t like the mattress, you can return it and they will pay for the shipping.
Because there wasn’t an Intellibed store nearby, I first asked if they would send me a piece of the Intelli-Gel so I could make sure it didn’t smell and that I wouldn’t have any type of reaction to it. A few days later an Intelli-Gel sample arrived on my doorstep, free of charge! I actually sat on the Intelli-Gel while working at my desk for a few days to make sure I didn’t have any negative reactions to the material. I’m very sensitive to toxic materials so, for me, this test was enough to show me that I wouldn’t have any kind of skin reactions, migraines, etc. from sleeping on one of their mattresses.
While the bed isn’t organic, it’s a choice that I felt comfortable with because it fit my criteria for a nontoxic mattress that is supportive for the body and with almost zero off-gassing.
Before the mattress arrived, I told my husband I was still skeptical as to whether it would be comfortable. I was thinking we’d send it back after a week work two. To my surprise, the mattress is supportive yet soft, and truly the most comfortable mattress I’ve ever slept on.
We like the Intellibed so much that we just purchased an additional Intellibed mattress and plan to replace all of the mattresses in our home with Intellibed.
They also make Intelli-Gel pillows and a mattress topper. The topper is a great option if buying a new mattress isn’t in the budget right now, or if you want to add some extra non-toxic cushioning to your current mattress.
Because I’m a huge fan of their mattresses, I’ve become an affiliate so that I can offer you a discount. For 10% off any mattress, use my code DeliciouslyOrganic10.

Disclosure: This post is not sponsored by Intellibed. I am an affiliate for Intellibed. If you purchase a mattress and use my discount code I will receive a commission.
The post My Favorite Non-Toxic Mattress appeared first on Deliciously Organic.
January 17, 2018
Pizza Soup
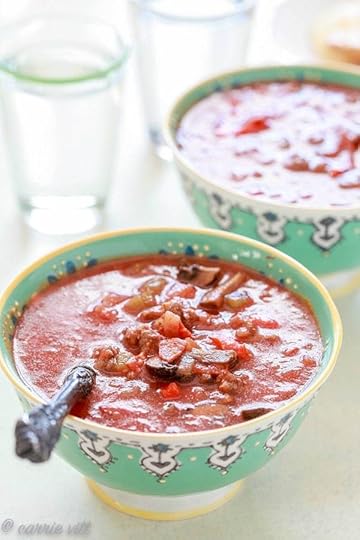 When you’ve got a craving for pizza, but want to keep things on the healthier side, pizza soup is the answer! I know it may sound a little odd, but when you put the vegetables, broth, tomatoes, pepperoni, ground beef and spices together, it really does have the same flavors as pizza!
You can serve the pizza soup alone, top with cheese, or serve with grain-free white dinner rolls if you’d like a bit of bread on the side. It’s a pretty simple recipe and I think it will become a new favorite addiction to your recipe collection.
Serves 8
Pizza Soup10 minPrep Time
50 minCook Time
1 hrTotal Time
Save RecipePrint Recipe
My Recipes
My Lists
My Calendar
Ingredients
3 tablespoons extra-virgin olive oil, divided1 onion, chopped1 bell pepper, chopped (red, yellow, orange or green will work)8 ounces cremini or white mushrooms, sliced3 ribs celery, chopped (celery isn’t normal on a pizza, but it does add some nice flavor, you can leave it out if you prefer)2 cloves garlic, chopped2 teaspoons Celtic sea salt1 tablespoon Italian Seasoning blend 1 pound ground beef6 ounces uncured pepperoni or sausage, sliced6 cups chicken stock 32 ounces crushed tomatoesFreshly ground black pepperInstructions
Place 2 tablespoons of olive oil in large pot over medium heat. Add the onion, bell pepper, mushrooms, celery (if using), and garlic. Stir to combine, reduce the heat to low and cover with a lid. Let the mixture cook over low heat for 30 minutes. Stir in the salt and Italian seasoning blend. Transfer the vegetable mixture to a bowl and set aside.Add the remaining 1 tablespoon of olive oil to the now empty pot. Add the ground beef and pepperoni. Cook until the ground beef is browned and break up the meat using the back of a spoon. Add the vegetable mixture, chicken stock and crushed tomatoes. Stir to combine and bring to a simmer. Serve with freshly ground black pepper.7.6.74579https://deliciouslyorganic.net/pizza-soup/Copyright 2016 Deliciously Organic
The post Pizza Soup appeared first on Deliciously Organic.