Carrie Vitt's Blog, page 33
June 29, 2017
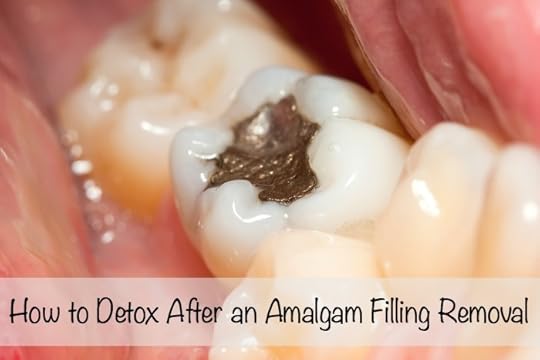
How to Detox After an Amalgam Filling Removal
Don’t be cavalier about removing an amalgam filling. I learned that lesson the hard way back in 2008! I went to a dentist who wasn’t trained to take the proper precautions and ended up very sick. It took me several years to recover.
Having a seemingly simple filling removal ruin my health made me very passionate about educating others regarding safe dentistry.
Most people don’t realize amalgam fillings are actually about 50% mercury. Since anything above 0 parts per billion (ppb) of mercury is toxic, it’s imperative to take proper precautions when removing these fillings. I’m not going to go into the details of off-gassing or why removing amalgams is important in this post, so if you’d like to read more on these topics, click here or here.
My husband, Pete, has quite a few amalgam fillings and this week he’s getting the first two removed. We wanted to have his fillings removed for many years, but for reasons related to his job in the Air Force, we decided to wait. Now that he can take the proper steps to detox, we can finally get them removed.
Since we’re walking through the process, I thought you might find it helpful to know the steps we’ve taken – especially if you’re going to get your mercury amalgam fillings out soon.
We had to do a lot of homework to figure everything out, so hopefully I’ve given you a head start on your research!

Before you get your mercury amalgams removed, here are some important things to consider:
Is the dentist properly trained to safely remove amalgam filings? I recommend the IAOMT website, IABDM website, DAMS website, or Consumers for Dental Choice website – all great places to search for a dentist in your area. The closest dentist may be a couple of hours away, but we think it’s worth the drive to see someone who’s properly trained. We personally go to Dr. Pfister at Biodentist Alabama in Dothan, AL. It’s a two hour drive each way, but worth it for us to know we’ll be healthy when we walk out the door.
When you find a dentist you think is a good fit, call their office and talk to them about the precautions they take during the removal. Keep in mind that just because a dentist says he’s “holistic” doesn’t necessarily mean he will align with your desires. It’s important to talk about the precautions they plan to take for your safety and the safety of the dental staff.
The precautions should include:
a. A rubber dam should isolate the tooth with a thin piece of latex, so the particles of the toxic metals being drilled out don’t mix with your saliva and become absorbed into the gums or swallowed.
b. Oxygen for the patient, to reduce inhalation of airborne particles.
c. The dentist should remove the filling in chunks, using the drill only as much as absolutely necessary.
d. Both low and high-speed drills to remove the last bits of amalgam from the tooth to minimize the risk of killing the tooth.
e. The dentist or assistant should spray on the tooth throughout the procedure to keep the tooth cool.
f. A vacuum to trap and remove toxic metal particles.
g. Masks for the dentist and assistant to protect them from mercury vapor. If the dental staff doesn’t wear masks to protect themselves, then you know you’re in the wrong place!
h. Glasses for the patient, dentist and assistant.
i. A well ventilated office with a vacuum hose to draw the mercury vapor and particles away from the patient and dental staff, with proper disposal.
Talk to the dentist or staff about the dental materials they will use to fill the tooth, create a crown, inlay, the kind of anesthetic, etc. Here’s a list of “clean” dental materials.
Ask about the price of the filling and see how much your insurance will cover. Often, insurance companies won’t cover the full cost because they think this is an unnecessary procedure. The procedure often isn’t cheap, but knowing what I know now, I would have gladly saved up and paid $1,000 to have my filling removed years ago. It would have been far cheaper than what I ended up spending to get my health and life back!
I know in our society, it’s not “normal” to walk into a doctor’s office with a list of questions and preferred methods of treatment, but don’t be afraid to speak up. Biologically trained and holistic dentists are used to this – they will welcome your questions. In fact, when I first called Dr. Pfister, he talked to me for half an hour about the exact methods he uses to practice safe dentistry. That’s the kind of doctor I want to work with!
How to Detox After the Mercury Amalgam Filling Removal
It’s imperative you do a dental detox after the filling removal even when you go to a dentist who’s properly trained because some vapors or particles can still enter the body despite the dentist’s best efforts. Using the right supplements and diet can help the body quickly eliminate these toxins so they don’t take residence in your tissues and cause problems.
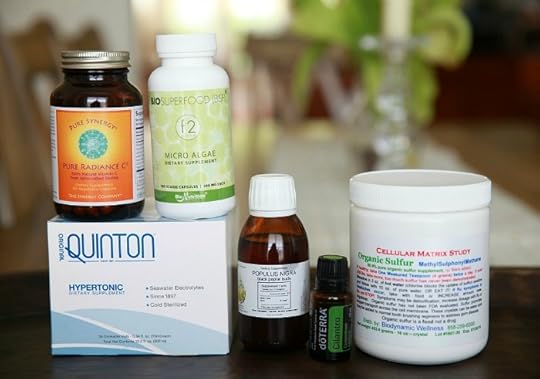
This is the dental detox protocol we use for our clients at Biodynamic Wellness and is the exact protocol Pete is using for the next six months.
Dental Detox Protocol: Before you get your fillings out, email or call our office – we can ship all these supplements to you (except for the cilantro oil*). The protocol takes place the day of and the six months following the removal of mercury amalgam fillings and other toxic metals.
Populus Nigra – This herbal extract made from the black poplar tree is very effective at removing toxic metals and chemicals from the body. Take a half-teaspoon twice daily on an empty stomach – in the morning and then in the mid afternoon.
Pure Radiance C – This non-GMO vitamin C is derived from organic and wild berries. It acts as a powerful antioxidant for the body during the detox. Take one capsule at breakfast and another at dinner for six months.
BioSuperfood f2 – This supplement contains spirulina and algae for immune system support. Take one pill at breakfast and another at lunch for the first five days. Thereafter, take one pill at breakfast for six months.
Quinton Hypertonic or Isotonic – These vials of deep sea water help replace minerals displaced by mercury fillings.
Organic Sulfur – Sulfur enhances mercury detox.
*Cilantro Oil – Cilantro helps remove heavy metals from the body. It’s imperative you only use a brand of essential oil you know for certain is completely pure. We trust and recommend doTERRA essential oils; I can help you to purchase the oils at retail or get you signed up to buy them for wholesale prices.
Foods to Eat During the Dental Detox:
The diet should be free of all processed foods, sugar, alcohol, and artificial sweeteners. We recommend our clients follow the Foundational Food Plan, available to you when you purchase the supplements from our office, which includes vegetables, pastured meats, eggs, raw dairy, fermented foods, properly prepared nuts, seeds, legumes and grains, plenty of water, and healthy fats (like butter, ghee, coconut oil, duck fat, lard, tallow, etc).
Other Detox Therapies:
Karack’s Oil Treatment – Hold a mouthful of unrefined sesame oil (from a dark bottle) in your mouth for 3-10 minutes, intermittently swishing it around, “chewing it,” and gargling. When you can’t hold it any longer (without serious drooling!), spit it out. Then gargle and rinse with salt and baking soda, and brush your teeth Do this treatment daily for 3-6 months after all amalgams have been removed. The change in oil color from golden to white as well as the change of texture from thick to thin you’ll notice upon spitting out the oil indicates the degree of lipophilic (fat-loving) toxic chemicals, metals, and microbes that have been absorbed into the oil from the oral mucosa, as well as throughout the entire body as the blood circulates through the oral mucosa. Environmentally sensitive individuals particularly like the chemical-clearing effects of Dr. Karack’s Ayurvedic sesame oil treatment.
Near Infrared Sauna – The sweating promotes elimination of toxic chemicals, radioactive particles and other toxins. It also increases the skin’s ability to eliminate poisons.
I hope you find this post helpful! If you have further questions, please leave them in the comments below.
Sources:
Biodynamic Wellness
Radical Medicine by Dr. Louisa Williams
5-Day Dental Detox by Dr. Louisa Williams
The post How to Detox After an Amalgam Filling Removal appeared first on Deliciously Organic.


June 22, 2017
Chicken Parmesan Meatballs (Grain-free)
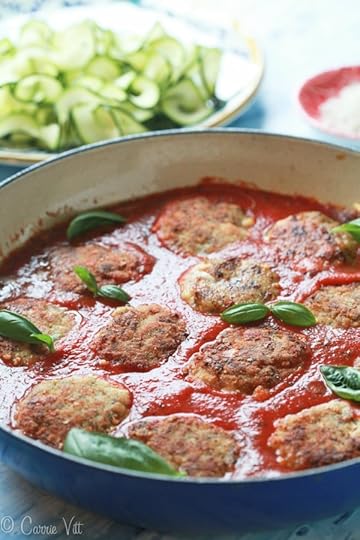
My family found a new favorite weeknight recipe! Chicken Parmesan meatballs have all the flavors of a classic Chicken Parmesan rolled into one bite.
I had my eye on this recipe for quite a while and then took some time to adapt it to be grain-free. I’m thrilled with the result!
There are a couple of different ways you can make this:
1. You can follow the recipe exactly.
2. If you have a dairy allergy, simply omit the parmesan and mozzarella balls.
3. If you have a nut allergy, then omit rolling the meatballs in the flour mixture.
4. And if you’d like to make things really simple skip the last step of dredging the meatballs in the flour, place them in the skillet with the marinara and increase the baking time to 20 minutes.
 I don’t recommend cooking with olive oil because it has a low smoking point and will begin to break down when used for cooking. So, I recommend using palm shortening or duck fat. They both have very little flavor so they won’t compete with the rest of the dish.
Even with just one pound of chicken, this dish will serve six people. You can serve it over spiralized zucchini or alongside a fresh salad.
Makes about 18-20 meatballs
Chicken Parmesan Meatballs (Grain-free) Save Recipe
Print Recipe
My Recipes
My Lists
My Calendar
Ingredients
For the meatballs:1 pound ground organic chicken1/2 cup shredded parmesan cheese1/2 cup crushed plantain chips 2 large eggs, beaten3/4 teaspoon Celtic sea salt 1/4 teaspoon freshly ground black pepper1 tablespoon Italian seasoning blend 1 tablespoon coconut flour1/2 cup almond flour For the flour coating:1 teaspoon coconut flour4 tablespoons or duck fat10 Bocconcini mozzarella balls, each cut in half1 recipe marinaraInstructions
Preheat oven to 350ºF and adjust the rack to the middle position. Combine the ground chicken, parmesan cheese, plantain chips, eggs, sea salt, black pepper, Italian seasoning, and 1 tablespoon coconut flour in a bowl until incorporated.Combine almond flour and 1 teaspoon coconut flour in a small bowl.Spoon about 2 tablespoons of meat mixture (I used an ice cream scoop so each meatball was the same size) and place in your hand. Flatten the meat mixture in your palm. Place 1/2 a bocconcini ball on the meat and carefully mold the meat around the cheese making sure you close any gaps. Roll the meatball in the flour mixture and set on a baking sheet or large plate. Repeat with remaining meat mixture and mozzarella balls.Heat the palm shortening or duck fat in a large skillet over medium heat for 1 minute. Add half of the meatballs to the pan and cook on each side until golden brown, about 3 minutes per side. Transfer the meat balls to a plate. Cook remaining meat balls.Pour the marinara into the now-empty skillet and place meatballs on top of sauce. Bake for 10 minutes until meatballs are cooked through. Serve.7.6.24561http://deliciouslyorganic.net/chicken-parmesan-meatballs-grain-free/Copyright 2016 Deliciously Organic
The post Chicken Parmesan Meatballs (Grain-free) appeared first on Deliciously Organic.
May 24, 2017
20 Steps to Heal From Adrenal Fatigue
 Did you know that about 90% of those struggling with thyroid disease also have some form of adrenal fatigue? When the adrenals become taxed, they tell the pituitary to slow down the thyroid. If you struggle with thyroid disease, it’s important you take steps to heal the adrenals so the rest of your endocrine system can return to homeostasis.
Here are some common symptoms of adrenal fatigue:
A tendency to be a night person
Having difficulty falling asleep
Waking up in the middle of the night with difficulty falling back asleep
You’re a slow starter in the morning
Feeling keyed up and having trouble calming down
Low blood pressure
Headaches after exercising
Clenching or grinding your teeth
Chronic low- or middle-back pain
Difficulty maintaining chiropractic adjustments
Craving salty foods
Perspiring easily
Chronic fatigue or getting drowsy often
Afternoon yawning
Afternoon headache
Anxiety
Seasonal or chronic allergies
Pain on the medial (inner) side of the knee or knees
Needing to wear sunglasses
Dizziness when you stand up
Difficulty losing weight
Gaining weight around the waistline
Getting upset or angry easily
Doesn’t that sound like “modern life?” No wonder people are having so many endocrine issues!

What do the adrenals do?
The adrenal glands are the body’s emergency system. When the body is under chronic stress, the adrenals will send out cortisol into the bloodstream. Over time, chronic cortisol output will weaken the endocrine system, liver, digestive system, and brain; it will also “slow down” your thyroid. So, if you are wanting to reduce your thyroid symptoms, start with healthy adrenal glands.
What do you eat?
While a lower carb diet is fabulous to reduce inflammation and many symptoms of thyroid disease, eating this way for too long can put stress on the adrenals and cause hormonal imbalance. So it’s important to get good, healthy carbs into your diet each day such as: potatoes (make sure to eat with plenty of butter), root vegetables, peas, properly prepared legumes or gluten-free grains (if you can tolerate them), apples, pears, berries, and beets.
I like Dr. Christianson’s idea of eating one golfball-size portion of carbs at breakfast, two golfball-size portions of carbs at lunch, and three golfball-size portions of carbs at dinner. Using this method, dinner should be the largest meal of the day. And most importantly, don’t stress about your food. Do the best you can, and let the rest go.

As you read the list below, remember: this is a marathon, not a sprint. Fully healing the adrenals may take up to 12 months. The good news is that even making just a few changes can help you feel better within weeks or even days.
Here are 20 Steps to Heal Adrenal Fatigue:
1. As soon as you wake up, drink a glass of water along with 1/4 teaspoon of Celtic sea salt. Then, throughout the day, have a pinch of sea salt with each glass of water and also use it to season your food. Daily total consumption of about 2 teaspoons of Celtic sea salt is a good place to start. The 80+ minerals in the salt will help nourish the adrenals and endocrine system.
2. Eat breakfast within one hour of waking. If you wait any longer than this, it can cause your blood sugar levels to decrease too much and your adrenals will start kicking out the cortisol.
3. Eat a small snack between breakfast and lunch: a boiled egg, 1 ounce raw cheese, a spoonful of nut butter, etc.
4. Have lunch about 4 hours after eating breakfast and include some protein, carbs and fat in your meal. I know this is a simple step, but skipping meals will put strain on your adrenals.
5. Only do low-impact exercise like walking, pilates, gentle yoga or stretching. High impact exercise puts strain on the adrenals, especially when the adrenals are already fatigued. If you’re having trouble losing weight, I know this can seem counter-productive, but I’ve seen clients lose weight by resting and following the steps I’m listing here.
6. Sit down to eat each meal and eat slowly. Don’t eat on-the-go, when you’re stressed, driving, etc. Here’s an entire article to help you understand the importance of eating in a slow and relaxed state.
7. Diffuse essential oils throughout the day to help you feel more relaxed. If you can’t diffuse the oils, put a drop or two on the bottoms of your feet twice a day to help lower stress levels. In fact, this study found that inhaling lavender essential oil can decrease cortisol levels. That’s good news for the adrenals! Do make sure you only use a completely pure essential oil so you aren’t adding any synthetic chemicals to your body — that could stress your system further. I personally use doTERRA essential oils for me and my family and have found them incredibly helpful. Some of my personal favorites are Lavender, Balance, Serenity, Ylang Ylang and Lemon.
8. Eat a snack in-between lunch and dinner: again, a boiled egg, 1 ounce raw cheese, a spoonful of nut butter, etc.
and make sure to sit down while you eat.
9. Eat dinner no later than 6 or 7pm and make sure to sit down while you eat. Dinner should be your largest meal of the day. This will help keep cortisol levels down at the end of the day.
10. Don’t eat any food after dinner except if you have trouble sleeping. If you’re having trouble going to sleep, eat a small snack (an ounce of raw cheese, a spoonful of nut butter, etc.) right before you go to bed. This will help bring cortisol levels down. If you wake up in the middle of the night, eat a small snack again and then get right back into bed.
11. Take an epsom salt bath a few times a week (or each evening, if you can). When you’re stressed, the first mineral your body burns through is magnesium (this is why so many people are magnesium deficient!). Soaking in a bath with 1 cup of epsom salts and a few drops of your favorite essential oil will help you relax and replenish your magnesium stores.
12. Go to bed by 9pm each night. Honestly, the best way to heal your adrenals is with sleep.
13. Take the right kind of B Vitamins – I recommend Cataplex B from Standard Process.
14. Try an Adrenal Tonic that contains adaptogenic herbs – Our office carries an adrenal tonic we mix in-house. It contains ashwaganda, licorice root and rhodiola. It’s immensely helpful for calming the body.
15. Drink plenty of filtered water each day. Drink 1/2 your weight in ounces is a good goal — a 160-pound person should drink about 80 ounces of water per day. Hydration is really important for the endocrine system. Without the right amount of water, the body can’t transport the necessary nutrients and hormones to the cells properly. So, please make sure you’re getting enough water.
16. Eat as many fresh organic vegetables as possible at all three meals with some healthy fats. There is no limit on vegetable intake.
17. Include protein at each meal – get these proteins from meat, poultry, wild seafood, eggs, etc.
18. If you have trouble with sweet cravings, then eat a butter mint every 30-60 minutes for the first two weeks to normalize your blood sugar. Here’s an easy recipe for butter mints.
19. Eliminate all caffeine. I know this is a hard one, but your adrenals will thank you! Here’s a post about how I kicked the coffee habit — with step-by-step instructions for you.
20. Take one day of rest each week. While it’s popular to “hustle”, that kind of daily mentality can lead to all sorts of health issues and will strain the adrenals. Take a day each week to rest. Turn off your phone, get outside, or just sleep all day if that’s what your body needs. It’s ok. God set the example by taking a day to rest, so I order my week that way, too!
If you’re curious to know exactly what your adrenals are up to, you can call our office at Biodynamic Wellness and order an adrenal test kit. It’s $120 and will give you insight into which stage of adrenal burnout you’re in. You can also schedule a consult with me and I’ll write up a personalized protocol to help you bounce back from adrenal fatigue. I’ve used many of these steps with my clients and have seen fantastic results!
The post 20 Steps to Heal From Adrenal Fatigue appeared first on Deliciously Organic.
May 23, 2017
How to Curb Sugar Cravings with Buttermints
 Do you struggle with sugar cravings? Do you get “hangry” if you don’t eat? Do you struggle with hormone imbalance? Adrenal fatigue? Thyroid disease?
If you answered “yes” to any of these questions, taking steps to balance your blood sugar levels can help you a lot! I know it sounds like a gimmick, but these buttermints can truly help reduce your cravings very quickly! The original recipe, minus the peppermint, was created by Dr. Natasha Campbell-McBride who’s a brilliant MD and an expert on gut health.
The combination of nutrient-dense grass-fed butter and raw honey satiates the body, helps balance blood sugar levels, reduces sugar cravings and actually supports weight loss because we feel “full” from a very small amount of calories.
I don’t recommend making these with stevia or another “sugar-free” sweetener, because the very small amount of honey satisfies your current sugar cravings. The amount of fat in these little mints slows the absorption of the sugar from the honey, so you don’t need to worry about blood sugar spikes.
How often do you eat them?
After you make the mints, store them in the freezer. Then eat 1-2 mints every 30-60 minutes during waking hours for two weeks, as needed to normalize blood sugar levels. After about 2 weeks, you’ll find that you don’t need the mints anymore and your sugar cravings will have decreased.
What about a Dairy-Free Option?
Unless you have a documented dairy allergy, eating some butter is healthy and can help reduce cravings and inflammation and also balance hormones. I know many people are saying that all dairy automatically causes inflammation, but this simply isn’t true. Grass-fed butter is a very heathy food and a great addition to our diets when we’re struggling with health issues.
If you do have an allergy to dairy, you can substitute with either 2 cups of dairy-free ghee, or 1 cup of coconut butter and 1 cup of Nutivia Palm/Coconut Shortening in place of the butter. If you use the coconut butter option, then make sure you’re getting some good animal fats elsewhere in your diet every day.
I used this recipe for many of my Nutritional Therapy clients – they’ve all told me the mints work like a charm to reduce sugar cravings! Give them a try and let me know how it goes.
Makes about 80 quarter-size mints
ButtermintsPlease make sure you use a pure peppermint essential oil so you’re not accidentally adding synthetic chemicals or other vegetable oils into this recipe. doTERRA publishes 3rd-party purity reports for this exact reason.
If you work and need to take these with you, then instead of piping them into small portions, put the mixture in a mason jar and have a small spoonful when needed (see directions above in post).
Save RecipePrint Recipe
My Recipes
My Lists
My Calendar
Ingredients
1 pound unsalted, grass-fed butter, room temperature1/4 cup raw honey 6 drops peppermint essential oilInstructions
Place all ingredients in a mixing bowl and whisk until completely combined and smooth. Add an additional drop or two of peppermint oil if desired.Using a piping bag, pipe small portions, about the size of a quarter, onto a baking sheet lined with parchment paper. If you don’t have a piping bag, you can also drop small portions of the butter mixture onto the pan using a spoon. Freeze.7.6.24560http://deliciouslyorganic.net/buttermints-curb-sugar-cravings/Copyright 2016 Deliciously Organic
The post How to Curb Sugar Cravings with Buttermints appeared first on Deliciously Organic.
May 4, 2017
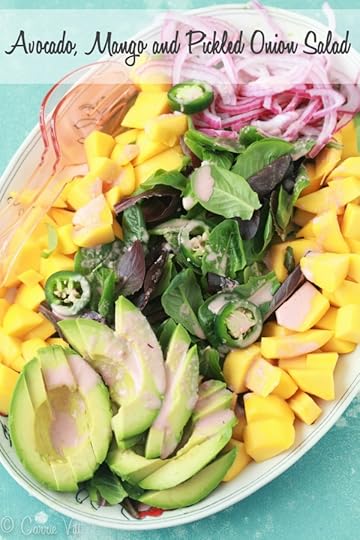
Avocado, Mango and Pickled Onion Salad with Jalapeño Vinaigrette
 If you’re looking for a healthy compliment for your meals, you need to try quick pickled onions! You can put them together in just a few minutes; after an hour, you can use them over salads, meats, vegetables and fruits. I enjoy adding them to my lunch bowls and love the little zing of flavor!
The pickled onions pair beautifully with this avocado and mango salad. You cut the mango and avocado into bite-sized pieces, layer them with baby romaine, drizzle with jalapeño vinaigrette and top it all off with the pickled onions. The vinaigrette isn’t spicy, so it’s safe enough for kids.

Cinco de Mayo come this Friday, so why not serve this delicious salad with some flautas and my no-sugar added margaritas and finish it off with Tres Leches Cake for a fun and healthy celebratory meal!
Serves 6-8
Avocado, Mango and Pickled Onion Salad with Jalapeño VinaigretteAdapted from Cuisine at Home
Save Recipe
Print Recipe
div#mpp-buttons { float:right; margin-top: 10px; }
.mpp-button { display:inline-block; }
My Recipes
My Lists
My Calendar
Ingredients
For the quick pickled onions:1/2 cup raw apple cider vinegar 1 cup filtered water1 teaspoon honey 1 teaspoon Celtic sea salt 1 red onion, thinly slicedFor the Vinaigrette:1/4 cup fresh lime juice1/4 cup extra-virgin olive oil 1/2 jalapeño, seeds removed1 tablespoon chopped red onion1 teaspoon Celtic sea salt For the Salad:8 cups baby romaine lettuce4 mangoes, cut into bite-size pieces (I prefer Champagne mangos)4 avocados, cut into slices1 recipe picked onions (see recipe above)Instructions
Whisk the apple cider vinegar, water, honey and sea salt together in a measuring cup. Place the onions in a medium bowl and pour the vinegar mixture over the top. Let it sit for 1 hour.Place the lime juice, olive oil, jalapeño, red onion and sea salt in a blender and blend until smooth. Taste and add more salt if you prefer.To Serve: Place the lettuce, mangos, avocados and pickled onions in a large salad bowl (or layer it on a large platter as pictured above). Pour the dressing over the top and toss until coated. Serve immediately.7.54559http://deliciouslyorganic.net/avocado-mango-pickled-onion-salad-jalapeno-vinaigrette/Copyright 2016 Deliciously Organic
The post Avocado, Mango and Pickled Onion Salad with Jalapeño Vinaigrette appeared first on Deliciously Organic.
April 24, 2017
Should Moms Be Able to Eat During Labor + Top Labor Snacks
 Ever since I met Genevieve Howland, aka Mama Natural, at a Weston A. Price conference, I knew we were kindred spirits. As fate would have it, she ended up moving close to where I live in Florida and we actually meet for lunch every week or so.
April 17, 2017
Tres Leches Cake (Grain-Free)

A slice of Tres Leches cake defines pure indulgence. Before going gluten-free, my favorite place to enjoy a piece of Tres Leches was a restaurant in Dallas called La Duni. I still visit La Duni for their incredible latin food, but I’m always a little disappointed I can’t have a bite of cake. So I decided to recreate the recipe at home using grain-free ingredients and different milks.
Tres Leches cake uses 3 different milks: whole milk, evaporated milk and condensed milk. You can choose to use dairy-free or raw milk, making your own condensed and evaporated milks, or you could choose to use these dairy-free organic condensed and evaporated milks that are done for you.
For the cake, you can use this coconut flour cake recipe or, if you want to cut some corners, use the Simple Mills Vanilla grain-free cake mix. I’ve been using Simple Mills mixes occasionally when I’m in a hurry as they each contain only real food ingredients.
The beauty of this cake is that you can make it ahead and store it in the fridge for 3 days before serving.
Keep in mind that this cake contains quite a bit of sugar, so it’s best to enjoy in strict moderation. I made it for Easter, enjoyed a slice with the family, and look forward to making it again next year!
Serves 9
Tres Leches Cake (Grain-Free)Inspired by Food Network.
Save Recipe
Print Recipe
div#mpp-buttons { float:right; margin-top: 10px; }
.mpp-button { display:inline-block; }
My Recipes
My Lists
My Calendar
Ingredients
1 recipe Coconut Flour Cake , or Simple Mills Vanilla Cake 3/4 cup heavy cream (or coconut cream for a dairy-free option)1 cup whole milk (or coconut milk for a dairy-free option)1 (7.5-ounce) can dairy-free sweetened condensed milk (or you can use my homemade recipe )1 (14-ounce) can dairy-free evaporated milk or you can use Jennie’s homemade recipe 1 tablespoon vanilla extractSeeds scraped from 1 vanilla bean2 pints fresh strawberries, slicedWhipped cream, for toppingInstructions
Preheat the oven to 350ºF and adjust the rack to the middle position. Pour the prepared cake batter into a buttered 8x8-inch pan. Bake for 30 minutes, or until the cake tester comes out clean. Set aside to cool for 30 minutes.Place the heavy cream, milk, condensed milk, evaporated milk, vanilla extract and vanilla seeds into a blender and blend until smooth.Using a bamboo skewer, poke holes all over the cooled cake and slowly pour the cream mixture over the cake, allowing it to be absorbed completely before continuing to pour more of the mixture over the cake. Continue this process until you have about 3/4 a cup of the milk mixture left. Cover the cake and refrigerate for at least 6 hours. Store the remaining milk mixture in the fridge.To serve, pour 2 tablespoons of the milk mixture on 9 dessert plates and then top with a piece of cake. Surround the cake with strawberries and place a dollop of whipped cream on top.7.3http://deliciouslyorganic.net/tres-leches-cake-grain-free/Copyright 2016 Deliciously Organic
The post Tres Leches Cake (Grain-Free) appeared first on Deliciously Organic.
April 5, 2017
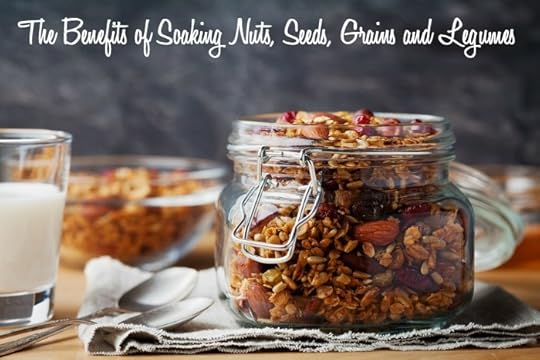
The Benefits of Soaking Nuts, Seeds, Grains and Legumes
Humans have eaten grains, legumes, nuts and seeds for thousands of years. Traditionally, people soaked these foods before cooking them to promote easier to digestion. Somewhere along the way, we forgot about this important step and now consume these foods without the proper preparation.
All grains, legumes, nuts and seeds contain anti-nutrients that require neutralization. Nuts and seeds contain enzyme inhibitors that block digestion – potentially causing negative effects on the health of the body. Grains and legumes contain phytic acid that robs the body of important minerals like magnesium, calcium, zinc, copper and iron.
Over time, when we consume these foods without properly preparing them, serious health issues like leaky gut, irritable bowel syndrome (IBS), and autoimmune problems can arise.
Here at Deliciously Organic, we often talk about avoiding grains; but after you’ve taken measures to heal your digestive system, you can usually add healthy, soaked grains back into your diet. This can be especially helpful for people dealing with adrenal issues.
Soaking these foods may sound intimidating, but it’s actually very easy! It basically involves putting the food in a bowl, covering it with water, adding a neutralizer, letting it sit at room temperature, and then draining.
It takes a little forethought, but your body will certainly thank you!
Soaking Grains:
If you need to avoid grains right now because you’re on a healing diet, just save this info for later.
Rice and Millet: Place 2 cups of grain into a large mixing bowl and cover with 2 cups of warm water. Stir in 2 tablespoons of fresh lemon juice or apple cider vinegar. Leave the bowl at room temperature for 7 hours. Drain, rinse, and then cook as usual.
Quinoa: Place 2 cups of quinoa into a large mixing bowl and cover with 6 cups of water. Stir in 1 tablespoon of fresh lemon juice or apple cider vinegar. Leave at room temperature for 24 hours. Drain, rinse, and then cook as usual.
All other grains: Place 2 cups of grain into a large mixing bowl and cover with 2 cups of warm water. Stir in 2 tablespoons of fresh lemon juice or apple cider vinegar. Leave the bowl at room temperature for 12-24 hours. Drain, rinse, and then cook as usual, or dry in a dehydrator.
Soaking Legumes:
For Kidney, Pinto, Navy, White, and Black Beans: Place 2 cups of beans into a large mixing bowl and cover with warm water. Stir in 2 pinches of baking soda. Leave at room temperature and soak for at least 18-24 hours total. Every 7 hours, drain the beans, cover with warm water again and stir in another 2 pinches of baking soda.
Drain, rinse, and cook in a large pot or slow cooker. Avoid using a pressure cooker as the extremely high temperature and pressure will denature the protein and can destroy other nutrients in the legumes.
Lentils: Place 2 cups of lentils into a large mixing bowl and cover with warm water. Stir in 2 tablespoons of lemon juice or apple cider vinegar. Leave at room temperature and soak for at least 7 hours.
Drain, rinse, and cook in a large pot or slow cooker. Avoid using a pressure cooker as the extremely high temperature and pressure will denature the protein and can destroy other nutrients in the legumes.
Garbanzo Beans: Place 2 cups of beans into a large mixing bowl and cover with warm water. Stir in 2 tablespoons of fresh lemon juice or apple cider vinegar. Leave at room temperature and soak for at least 24 hours.
Drain, rinse, and cook in a large pot or slow cooker. Avoid using a pressure cooker as the extremely high temperature and pressure will denature the protein and can destroy other nutrients in the legumes.
Soaking Nuts and Seeds:
All nuts: Place 4 cups of raw, shelled nuts into a large mixing bowl. Cover with water and stir in 1 tablespoon of Celtic sea salt. Soak (see chart below for specific soaking times). Drain and then place in a dehydrator, or spread the nuts on a large baking sheet lined with unbleached parchment paper and dehydrate them in a warm oven (under 150ºF) for 12 to 24 hours. I usually let the nuts dehydrate in my oven overnight.
Almonds: 7-8 hours
Brazil Nuts: 4-6 hours
Cashews: 3-6 hours
Flaxseeds: 7-8 hours
Hazelnuts: 7-8 hours
Macadamia Nuts: 6-7 hours
Pecans: 7 hours
Pine Nuts: 7 hours
Pistachios: 4 hours
Pumpkin Seeds: 7-8 hours
Sesame Seeds: 7-8 hours
Sunflower Seeds: 4 hours
Walnuts: 6 hours
The post The Benefits of Soaking Nuts, Seeds, Grains and Legumes appeared first on Deliciously Organic.
March 28, 2017
Paleo Chicken Flautas

I’ve made some homemade grain-free tortillas over the years, but they haven’t really hit the mark. So a few weeks ago, when I was grabbing a few things at Whole Foods, I was elated to see grain-free tortillas on the shelf! I purchased a bag with some skepticism, because I honestly didn’t think they’d taste anywhere near what I was hoping for. But I was pleasantly surprised; they not only tasted fabulous, they also handled just like a regular tortilla!
We all enjoyed making our old favorite – Chicken and Black Bean Quesadillas – for dinner one night. Next, I tried using these tortillas to make flautas. Man, were we one happy bunch!

I looked into the company that makes these tortillas, and they offer a few different options based on your dietary restrictions. I tried all three and they all cooked well on the skillet and tasted great. Keep in mind, the almond flour and coconut flour options contain a bit of xanthan gum, so if you’re currently trying to heal from digestive issues, I’d choose the cassava and chia tortillas.
You can serve these Paleo Chicken Flautas with sour cream, guacamole, avocado crema, or fermented salsa. Enjoy!
Makes 8 Flautas
Paleo Chicken Flautas Recipe Save Recipe
Print Recipe
div#mpp-buttons { float:right; margin-top: 10px; }
.mpp-button { display:inline-block; }
My Recipes
My Lists
My Calendar
Ingredients
1/2 pound ground pork sausage, casings removed1/2 pound ground chicken (you can substitute with ground turkey or beef if you prefer)1 teaspoon chili powder 1 teaspoon Celtic sea salt 1 cup cilantro, loosely packed8 grain-free tortillas 2 tablespoons melted lard or duck fat Celtic sea salt for sprinklingInstructions
Preheat the oven to 350ºF and adjust the rack to the middle position. Place the sausage and turkey in a large skillet and cook over medium heat until browned. Make a well in the center of the pan and add the chili powder and salt, and heat until fragrant. Then stir the spices into the rest of the meat. Place the meat mixture and cilantro in the bowl of a food processor and process, using 1-second pulses until the meat is finely ground.Place a tortilla on a clean surface and place 2-3 tablespoons of the meat mixture on the tortilla. Roll the tortilla and place on a baking sheet lined with parchment paper. Using a pastry brush, brush the rolled tortilla with a little melted lard and sprinkle with sea salt. Repeat with remaining tortillas. Bake for 15-20 minutes, until the edges of the tortillas are turning golden brown. Serve.6.8http://deliciouslyorganic.net/paleo-chicken-flautas-recipe/Copyright 2016 Deliciously Organic
The post Paleo Chicken Flautas appeared first on Deliciously Organic.
March 9, 2017
9 Ways Stress is Destroying Your Health and How to Break Free

The CDC has stated that by 2020, stress will be one of the most critical health issues for Americans. While stress is a part of life, if it’s excessive and we don’t take proper steps to handle it in a healthy way, we can experience devastating effects on our health.
First, I think it’s very important to understand what happens in the body when it encounters too much stress. The adrenal glands are the body’s “emergency” system. When the body is under chronic stress, the adrenals will send out cortisol into the bloodstream. Over time, this chronic cortisol output will weaken the endocrine system, liver, digestive system, the brain, slow down your thyroid, etc.
9 Ways Stress Can Destroy your Health:
1. Stress increases cortisol production in the adrenals which wreaks havoc on the entire endocrine system.
2. Stress elevates cortisol production which depresses the immune system. The adrenals are your “emergency” organs. When they fire, your body goes into “fight or flight mode”. The body has to make a decision – do I want to save my life right now or fight infection. The body will choose to “save your life.” This is often a root cause of autoimmune disease.
3. Chronic stress overworks the adrenal glands which can lead to low DHEA, low progesterone, abnormal estrogen/progesterone ratios, pituitary and thyroid imbalances.
4. Elevated cortisol decreases your liver’s ability to detox excess hormones out of the body which can lead to estrogen dominance, PMS and menopausal symptoms.
5. Stress elevates cortisol and decreases T3 production. This has a negative effect on thyroid health.
6. Elevated cortisol tells the body to stop using fat as energy which can lead to hypothyroidism and weight gain around the waist.
7. Elevated cortisol decrease the amount of stomach acid produced in the stomach. When this happens the body can’t use the nutrients in your food.
8. Elevated cortisol lowers white blood cell production making it harder for your immune system to fight.
9. Chronic stress increases insulin output and can cause insulin resistance or even type II diabetes.
We all encounter stress of some kind each and every day, but we each have the ability to deal with it in a healthy way.

Here are some of my favorite ways to deal with stress:
1. I love to use essential oils on a daily basis to help deal with stress. It’s by-far the easiest and quickest way to help me feel better! Why? Because your sense of smell is the only sense that’s directly connected to your emotional brain. So, when you smell an essential oil, it immediately makes you feel different. If you’d like to dive into exactly how to use oils for stress, check out my free online training that I teach with a fellow NTP.
2. Exercise, but not too much. Long walks, Pilates, yoga, swimming, or light weight lifting are all great ways to exercise without putting too much stress on the adrenals.
3. Spend time in a near-infrared sauna.
4. Disconnect from electronics. I turn off my phone each evening at 6pm. This allows me to be completely present with my family and also helps me to unwind.
5. Spend time with family and friends who encourage and build you up.
The post 9 Ways Stress is Destroying Your Health and How to Break Free appeared first on Deliciously Organic.