Carrie Vitt's Blog, page 36
September 12, 2016
Why Stomach Acid is Good for You and How to How to Increase It Naturally
 We’ve been told by the conventional medical world that too much stomach acid is the cause of reflux and heartburn. This simply isn’t correct. Stomach acid is incredibly beneficial to the body and an increase in stomach acid can actually reduce and many times cure issues like acid reflux or heartburn and improve common issues like irritable bowel syndrome (IBS), leaky gut, colitis, and other gastrointestinal problems.
Let me explain. . .
What Does Stomach Acid Do?
Stomach acid (also known as Hydrochloric acid or HCL) is a necessary part of the digestive process. The acid is our first line of defense against pathogens, bacteria, parasites, etc. It also helps us digest our food properly.
When the body is relaxed, HCL is released into the stomach and breaks down fats into fatty acids, carbohydrates into glucose, and proteins into amino acids. This breakdown is very important so the body can then use the nutrients in our food.
When the food in your stomach has been mixed with the correct amount of stomach acid, enzymes, and other digestive secretions, it will reach an acidity between 1.5-3.0 on the ph scale and then move into the small intestine to continue the digestive process.
8 Key Things that Happen When There Isn’t Enough Stomach Acid:
1. The fats, carbs and proteins cannot break down properly for the body to utilize them. The food can then sit, petrify, become rancid and/or ferment.
2. The body can’t absorb and utilize many minerals like zinc, iron, magnesium, and calcium.
3. Overgrowth of harmful bacteria can occur which can lead to ulcers and cancer.
4. Because the contents of the stomach aren’t acidic enough, the stomach doesn’t want to release the contents of the stomach into the small intestine (see below).
5. When the contents of the stomach reach the small intestine, the gallbladder isn’t signaled to release bile, the pancreas isn’t signaled to release pancreatic enzymes and sodium bicarbonate isn’t released to increase the ph of the digested food.
6. Because sodium bicarbonate isn’t released, the mixture of food can burn the mucosal lining which lead can lead to ulcers.
7. The proteins that weren’t broken down by proper stomach acid now irritate the villi and can lead to leaky gut. A leaky gut allows fats and proteins to pass through the gut directly into the bloodstream which overwhelms the immune system.
8. The undigested food heads to the large intestine and can degenerate and weaken the colon, disrupt the flora, and cause inflammation, IBS and colitis.
If We Need So Much Stomach Acid, Then What Causes Reflux and Heartburn?
When there isn’t enough stomach acid, the pyloric sphincter – the valve that releases the broken-down food into the small intestine – doesn’t want to open. This leads to food sitting in the stomach for much longer than intended. Eventually the food tends to come back up the other way. Ironically, because the food has been bathed in some stomach acid it burns when it comes back up the esophagus.
So, you’re probably asking, “then why do acid-blockers work, or at least take the burn away”? The acid blockers lower the acidity in the stomach, so when the food starts to come back up, it doesn’t burn. This doesn’t mean the problem is fixed. The acid-blocker is simply masking the symptoms of a bigger issue.
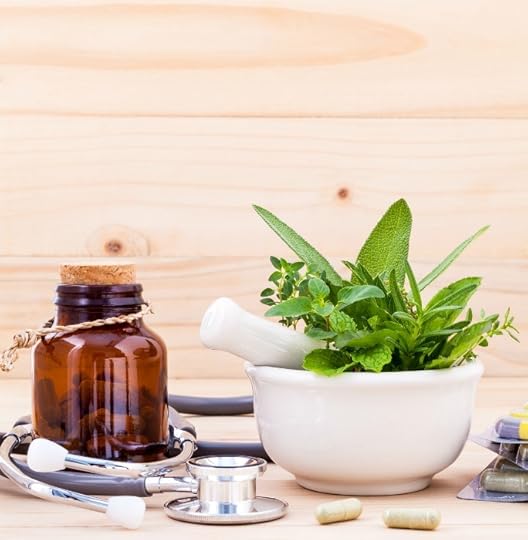
3 Ways to Reverse Low Stomach Acid:
Don’t eat when you’re stressed or on the go and eat slowly. This is the most important piece of the puzzle. When you eat slowly and aren’t stressed, your body will be in the parasympathetic state, which is the body’s “rest, digest and heal” function. The parasympathetic state allows your body to release the correct amount of stomach acid, enzymes, etc. to digest your food.
Take 1 tablespoon of apple cider vinegar with a little bit of water before each meal.
Consider taking HCL with Pepsin at each meal. Talk to your holistic practitioner or nutritionist about the proper dosage.
So remember, you need stomach acid! Eat slowly, in a relaxed state and consider some of the remedies I mentioned above – I think you’ll start seeing some great results.
The post Why Stomach Acid is Good for You and How to How to Increase It Naturally appeared first on Deliciously Organic.


September 6, 2016
Apple, Bacon and Sausage Breakfast Skillet
 This breakfast skillet recipe has become a favorite in our house. All we we do is fry up some bacon and sausage, add some chopped apple and finish off with a little sea salt and we’re done!
This dish is delicious served alone, or great as part of a large weekend breakfast. You need to give this one a try – I’m sure it’ll become a staple in your home, too!
Serves 4-6
Sausage, Bacon and Apple Breakfast Skillet Save Recipe
Print Recipe
div#mpp-buttons { float:right; margin-top: 10px; }
.mpp-button { display:inline-block; }
My Recipes
My Lists
My Calendar
Ingredients
8 slices bacon, cut into small pieces?8 ounces sausage links, cut into small coins4 apples, peeled, cored and cut into bite-size pieces1 tablespoon unsalted butter1/4 teaspoon Celtic sea saltInstructions
Cook the bacon over medium heat, stirring often, until it’s crispy. Add the sausage to the bacon and cook for 2-3 minutes, until the sausage is just turning golden brown on the edges. (At this point, if there's more than a tablespoon or two of fat in the bottom of the pan, drain the pan). Add the apples and cook for about 1 minute until the apples are hot. Add the butter and stir until melted. Sprinkle with sea salt and serve.6.6.12http://deliciouslyorganic.net/sausage-bacon-apple-breakfast-skillet/Copyright 2016 Deliciously Organic
The post Apple, Bacon and Sausage Breakfast Skillet appeared first on Deliciously Organic.
August 23, 2016
Homemade Chick-fil-a Nuggets Recipe (Grain-Free, Paleo)
 I’m a big fan of copycat recipes – after all, “Imitation is the sincerest form of flattery.” Chick-Fil-A nuggets are super popular, but sadly they contain MSG, white flour and some ingredients I can’t really pronounce. After hearing so many friends rave about them, my kids and I decided to come up with a copycat version we can eat!
The chicken is marinated in pickle juice and buttermilk, providing a tangy flavor and making the meat exceptionally juicy. The nuggets are then coated with a grain-free flour mixture featuring lots of spices. I chose tallow or lard (from good sources) as the frying fat because they withstand high heats without oxidizing.
I hope you enjoy them!
Homemade Chick-fil-a Nuggets Recipe (Grain-Free, Paleo)
Save Recipe
Print Recipe
div#mpp-buttons { float:right; margin-top: 10px; }
.mpp-button { display:inline-block; }
My Recipes
My Lists
My Calendar
Ingredients
For the marinade:2 pounds of chicken breasts, cut into bite-size pieces1/2 cup pickle juice (I used Bubbies)1/2 cup buttermilk (or use 1/2 cup coconut milk and 2 tablespoons lemon juice)For the breading:2 cups almond flour1/4 cup coconut flour1/2 cup arrowroot flour1 1/2 teaspoons gelatin1 tablespoon paprika1 tablespoon Celtic sea salt1 teaspoon garlic powder1/2 teaspoon freshly ground black pepperDash of cayenne5 eggsFor frying:4 cups tallow or lardInstructions
Place the chicken, pickle juice and buttermilk in a large bowl. Cover and marinate in the fridge overnight.Place the almond flour, coconut flour, arrowroot, gelatin, paprika, sea salt, garlic power, black pepper and cayenne in a large baking dish. Toss gently to combine. Crack the eggs into a pie plate and whisk in 2 tablespoons water. Dip a few pieces of the chicken first into the flour mixture, then the egg, then the flour again. Set the coated chicken on a large plate while you coat the remaining pieces.Place the tallow or lard in a large pot or Dutch oven and heat over medium-high heat to 350ºF on a candy thermometer (this will take about 10 minutes).Place a cooling rack on top of a baking sheet. Preheat the oven to 250ºF and adjust the rack to the middle position.When the tallow is at 350ºF, carefully place 8-10 chicken pieces in the hot oil. Fry for about 2 minutes, or until they’re golden brown on the bottom. Using a pair of tongs, flip the chicken pieces. Cook until the other side is golden brown, about 2 minutes. As you finish the chicken pieces, place them on the prepared baking sheet. Place the sheet into the oven to keep the chicken warm while you cook the remaining pieces. Serve hot.6.6.12http://deliciouslyorganic.net/homemade-chick-fil-a-nuggets-recipe/Copyright 2016 Deliciously Organic
The post Homemade Chick-fil-a Nuggets Recipe (Grain-Free, Paleo) appeared first on Deliciously Organic.
August 16, 2016
Essential Oils for Back-to-School
 This blog is 8 years old! I can hardly believe it! As I sat down to write my annual back-to-school post, I realized I’ve written several times about food, snacks, lunch gear, etc. This year I wanted to add a bit of a twist. Instead of talking food, let’s look at another way we can help keep our kids healthy and vibrant throughout the school year.
Essential oils are a great tool to use alongside a nutrient-dense diet, sleep, stress reduction, etc. to keep our bodies healthy, so I thought I’d share some of my favorite essential oils for back-to-school. Let’s dive in!
Here are my top 11 back-to-school oils and blends:
For daily immune support – Frankincense, OnGuard, Melaleuca, and Lemon is one of the best immune-supporting blends I know of. You can put 10 drops of each into a 10ml glass roller ball, top it off with fractionated coconut oil and then apply to the soles of the feet 2x a day.
If your kid isn’t feeling well – Add 10 drops of Oregano to the immune support blend mentioned above and apply to the feet 2x a day until they’re feeling 100%.
Respiratory support – if your kid gets the sniffles or a cough when they come in contact with environmental threats, a blend of: Frankincense, Breathe, Lemon, Peppermint and Lavender is one of the best ways I know to support the respiratory system. My daughter gets puffy-eyed and a sniffly nose when she’s around dogs, and this blend keeps her from these occasional symptoms!
The Happy Blend – Do your kids ever wake up grumpy or come home a bit frustrated? Try diffusing Balance, Serenity and Wild Orange into the air and watch the smiles come back.
The Homework Blend – My girls are both teenagers, and homework can be a challenge at the end of a long day! We diffuse Wild Orange and Peppermint at their desks to help them stay focused and alert.
Stress Relief – This one is for the kids and parents! Rub 1 drop each of Serenity and Lavender on your feet or neck and feel the stress start to melt away.
For the occasional upset stomach – Rub a drop of DigestZen on the stomach. I don’t go anywhere without this blend!
For first aid – Use a drop of Lavender and rub it directly on the occasional cut or scrape. Dilute with fractionated coconut oil if you prefer.
For a good night’s sleep – With all the hustle and bustle a new school year brings, it can be challenging to fall asleep sometimes! We love to diffuse Serenity and Vetiver in the room while sleeping. You can also rub a drop of each on the soles of your feet before bed.
For the occasional headache – Rub one drop of Peppermint on the area of concern.
For sore muscles – Rub a drop of Deep Blue right on the area of concern. This oil works like a dream!
If your kids are older, you can also send them with a travel pack of essential oils, so they always have what they need on hand. Below is a picture of the oils my daughters like to carry in their backpacks.
If you want more information about how to use essential oils, click here to download my “50 Practical Ways to Use Essential Oils” cheat sheet.
The post Essential Oils for Back-to-School appeared first on Deliciously Organic.
August 9, 2016
Prosciutto Wrapped Chicken Breast Recipe
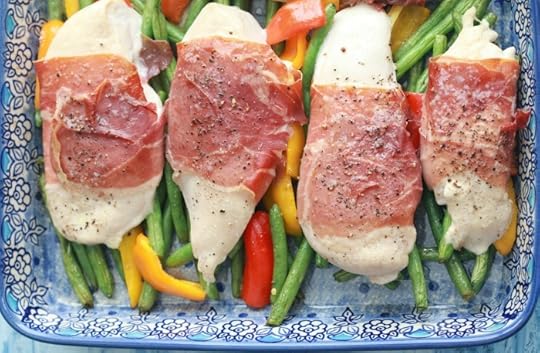 Sheet Pan dinners make their way onto our table a couple of times per week because of their simplicity and ease of preparation. Toss some vegetables in a healthy fat like ghee, lard, duck fat or tallow, add some meat, season generously with sea salt and black pepper, throw it in the oven and about 30-45 minutes later you have a nutrient-dense meal!
I like to use carrots, potatoes, squash, bell peppers, green beans, asparagus, broccoli or cauliflower. For the protein, I usually stick with something simple like a butterflied chicken, bone-in chicken breasts or pork chops. It’s imperative we use a healthy saturated fat that can withstand the heat without oxidizing. We also benefit from those fats helping our bodies assimilate Vitamin A, D, E and K for optimum health.
For this sheet pan dinner, I wrapped thin slices of prosciutto around chicken breasts and laid them on a bed of green beans and baby bell peppers tossed in duck fat. I seasoned everything with sea salt and pepper, baked for about 30 minutes and then we all enjoyed!
Here are some more sheet pan dinners you might enjoy:
Roast Chicken and Vegetables
Broiled Steak and Asparagus with Feta Cream Sauce
Lemon-Herb Sole on Crispy Potato Rafts
Apple and Cabbage Oven-Baked Chicken
Salmon with Bok Choy, Green Cabbage and Shiitake
Serves 4
Prosciutto Wrapped Chicken Breast Recipe10 minPrep Time
30 minCook Time
40 minTotal Time
Save RecipePrint Recipe
div#mpp-buttons { float:right; margin-top: 10px; }
.mpp-button { display:inline-block; }
My Recipes
My Lists
My Calendar
Ingredients
1 pound green beans, trimmed8-10 baby bell peppers, cut in half and seeded3 tablespoons duck fat, {ghee|http://amzn.to/2aSkd4Y], lard, or [tallow|http://amzn.to/2bchGX6, meltedCeltic sea salt and freshly ground black pepper4 chicken breasts4 slices prosciuttoInstructions
Preheat oven to 375 degrees F and adjust the rack to the middle position. Place the green beans and bell peppers in the bottom of a baking sheet or dish. Toss with 2 tablespoons of the duck fat and then season with sea salt and pepper. Wrap 1 piece of prosciutto around each chicken breast and lay them on top of the vegetables. Using a pastry brush, brush the remaining 1 tablespoon of duck fat on the wrapped chicken. Season the meat with sea salt and pepper. Bake for 30-35 minutes, until the chicken is cooked through. Serve.6.6.9http://deliciouslyorganic.net/prosciutto-wrapped-chicken-breast-recipe/Copyright 2016 Deliciously Organic
The post Prosciutto Wrapped Chicken Breast Recipe appeared first on Deliciously Organic.
July 28, 2016
How to Heal Your Gut After Antibiotics
Today’s post is written by my friend, Eva Aspegren. She’s an Integrative Nutrition Health Coach and is going to help us understand how antibiotics are impacting our health and importance of healing the gut after we consume antibiotics.
Today, antibiotics remain helpful – and occasionally essential – for treating bacterial infections and diseases, but they should be used with caution.
The overuse of antibiotics – in the form of unnecessary prescriptions to treat non-bacterial infections in humans and routine use in factory farming – has become quite alarming in the U.S. and worldwide over the past decade, negatively affecting public health.
Antibiotic-resistant superbugs have developed as one result of this situation – threatening the wellbeing of people and livestock.
Men, women and children are also struggling daily with health issues caused by weakened immune systems caused by overexposure to antibiotics – even if they are not personally taking them in the form of a prescription!
How is this possible?
Here are the two main ways antibiotics can cause immune issues:
1. Taking multiple doses of antibiotics over a short period of time. Even one dose of medically justified and necessary antibiotics can weaken your immune system, but exposure to several “rounds” of these medications, or repetitive use over a lifetime, can result in a sub-optimal immune system.
2. Consuming non-organic, non-grass-fed, non-pasture-raised supermarket meat and dairy products and eggs on a regular basis. Especially whole fat dairy and fatty cuts of meats (let’s clarify: the problem is NOT with whole fat products! Fats have a very important role in a healthy diet. The problem is that toxins, antibiotics and other drugs and heavy metals are stored in fatty cells, so if the animal is raised using antibiotics, the fat of the animal can pass them into our food and bodies).
What about prescription antibiotics? In some cases, the use of antibiotics is justified and necessary, no question about that. Unfortunately, according to David P. Calfee, MD, MS, chief hospital epidemiologist at New York-Presbyterian/Weill Cornell, “… the results of antibiotic overuse are alarming: Antibiotic-resistant “superbugs,” which have developed due to antibiotic overuse, infect about 2 million people in the U.S., resulting in nearly 23,000 deaths annually, according to the Centers for Disease Control and Prevention (CDC).” .
He also states that antibiotic misuse sometimes stems from a patient demanding the drug for a viral infection, other times healthcare providers are to blame for over prescription.

Exposure to antibiotics from our food supply
While we can control how much prescription medication we take or give our children, we have less control over the routine overuse of antibiotics in agriculture, thus making it more difficult to monitor our indirect ingestion of these drugs.
As a matter of fact, according to the FDA, “Of all antibiotics sold in the United States, approximately 80% are sold for use in animal agriculture; about 70% of these are “medically important” (i.e., from classes important to human medicine).” .
This means that even if we have never taken prescription antibiotics, our bodies may still be exposed to antibiotics through the foods we consume, mainly animal meat and dairy products!
Here are a few things we can do to limit our unnecessary exposure to antibiotics:
Get Educated – Learn more about antibiotic overuse on humans and animals.
Discuss the details of any diagnosis with our doctors – If possible, request testing be done to ensure an ailment is caused by bacterial infection before taking antibiotics. Don’t be afraid to get a second medical opinion.
Eat grass-fed, organic meat, dairy, or pastured egg products – this very important step will significantly reduce your exposure to antibiotics. If you can’t obtain grass-fed, organic animal products (Eat Wild is a good resource), purchasing lean cuts of meat will reduce your intake of any antibiotics stored in animal fat.

9 Ways to Heal Your Gut After Antibiotic Exposure
Eat a whole-food, nutrient-dense diet loaded with high amounts of colorful vegetables, and healthy fats, moderate amounts of protein, and low amounts of sugar. Eat organic produce (at least the “Dirty Dozen” items), and organic, grass-fed meats, dairy and eggs.
2. Hydrate – make sure you consume sufficient amounts of filtered water each day.
3. Get sufficient aerobic exercise – especially outdoor exercise.
4. Reduce stress through breathing and relaxation exercises – develop a daily practice of meditation or other relaxation techniques.
5. Following a whole-food, nutrient-dense diet will already help restore gut health, but there are other simple ways to support a healthy gut such as: consuming homemade/organic bone broth as part of your diet, take a kosher/organic gelatin or collagen hydrolysate supplement, eat fermented foods like sauerkraut, fermented vegetables, kombucha, and organic fermented dairy products like kefir and yogurt, take a high-quality probiotic daily.
10. Take a quality multivitamin daily.
11. Take a quality Omega 3 supplement daily.
12. Make sure your Vitamin D levels are sufficient – get enough exposure to sun and/or take a Vitamin D3 supplement.
13. Consider natural remedies and supplements for immune boosting. Examples include Echinacea, Elderberry/Sambucus, Vitamins C and D, or essential oils that boost immune function.
These tips certainly aren’t comprehensive, but they will give you a nice starting point to begin restoring your immune system to full function after exposure to antibiotics.
 Eva Aspegren is an an Integrative Nutrition Health Coach, mother of 2 amazing kids, and the founder of Crave2Live Health and Wellness. Eva is passionate about helping people learn how to implement healthy changes into their lifestyle, be it in their food, home, beauty or health and wellness, one step at a time.
The post How to Heal Your Gut After Antibiotics appeared first on Deliciously Organic.
July 13, 2016
The Best Egg Replacement for Baking
A healthy egg replacement that really works can be extremely elusive! Most that I found were either too gummy or they added an undesired flavor or texture. Many egg replacement recipes feature flaxseed, but I’m not a fan because of the very low smoking point for flaxseed. If you add the flax “egg” to a recipe and then put it into a hot oven, the oil will most likely oxidize, which isn’t a good thing.
Also, many who have gut issues and are allergic to eggs can have a hard time with seeds when they haven’t been soaked to reduce the phytic acid. After playing around with different recipes, I finally found a combination of gelatin and hot water that really works! It’s super important to use gelatin from grass-fed animals so you know exactly what you’re getting. I like Great Lakes or Vital Proteins. Good gelatin also provides the added benefit of helping heal the gut and support healthy skin, hair, nails and immune system.
I’ve found this egg replacement recipe works well if you need 1 or 2 eggs, but any more than that and the recipe can become a bit too gummy. I tested this “egg” with my Grain-Free Chocolate Chip Cookies and it worked perfectly: use 1 gelatin “egg” in place of the actual egg, and reduce the 3/4 teaspoon of gelatin called for in the recipe to 1/2 teaspoon.
I hope you find this recipe helpful for your egg-free baking!
Makes 1 gelatin egg
The Best Egg Replacement for Baking (Gelatin Egg)5 minPrep Time
5 minTotal Time
Save RecipePrint Recipe
div#mpp-buttons { float:right; margin-top: 10px; }
.mpp-button { display:inline-block; }
My Recipes
My Lists
My Calendar
Ingredients
1 1/4 teaspoons unflavored, grass-fed gelatin3 tablespoons hot waterInstructions
Place the gelatin and hot water in a small liquid measuring cup. Put the hand immersion blender into the measuring cup and blend the ingredients together until it turns white and frothy, about 30 seconds. Add immediately to your baking recipe when it calls for an egg.Notes
I only test the recipes on my site with the listed ingredients and measurements. If you would like to try a substitution, you are welcome to share what you used and how it turned out in the comments below. Thanks!
6.6.8http://deliciouslyorganic.net/best-egg-replacement-baking/Copyright 2016 Deliciously Organic
Photo credit: I was short on time this week so I used a photo from Big Stock Photo.
The post The Best Egg Replacement for Baking appeared first on Deliciously Organic.
June 21, 2016
Blueberry Streusel Muffin Recipe (Grain-Free)
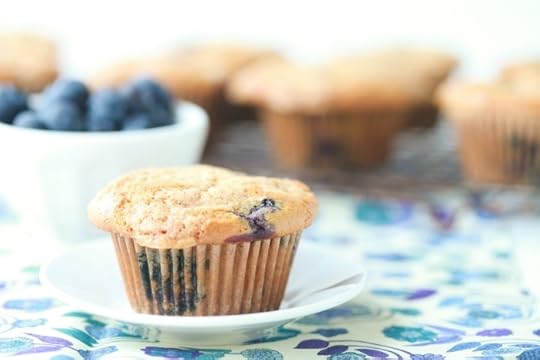
It’s been years since I’ve had a fluffy, blueberry streusel muffin – so last week I headed into the kitchen to change that situation. A whole bag of almond flour later, I came up with a lightly-sweet muffin bursting with fresh blueberries. I think you’re going to love it!
I chose fresh berries because frozen and thawed berries tend to turn the batter blue, and I wanted a nice “white” batter. The streusel topping adds a bit of crunch and a delightful touch of cinnamon, but you can omit it if necessary. If you’re looking for a blueberry muffin recipe that uses coconut flour, check out this recipe.
Makes 1 dozen muffins
Blueberry Streusel Muffin Recipe (Grain-Free)20 minPrep Time
25 minCook Time
45 minTotal Time
Save RecipePrint Recipe
div#mpp-buttons { float:right; margin-top: 10px; }
.mpp-button { display:inline-block; }
My Recipes
My Lists
My Calendar
Ingredients
For the Batter:1/2 cup whole milk1 tablespoon lemon juice2 cups almond flour (I prefer Honeyville)1/2 cup tapioca flour3 tablespoons coconut flour1 tablespoon baking powder1 teaspoon baking soda1/2 teaspoon Celtic sea salt1/2 cup maple sugar1/2 teaspoon almond extract2 large eggs, lightly beaten6 tablespoons unsalted butter, melted and cooledFor the Topping:1/4 cup maple sugar3 tablespoons unsalted butter, softened1/2 teaspoon ground cinnamon1 teaspoon coconut flourInstructions
Preheat the oven to 350 degrees F and adjust the rack to the middle position. Combine the milk and lemon juice in a small bowl and set aside for 5 minutes.Place the almond flour, tapioca flour, coconut flour, baking powder, baking soda, sea salt and maple sugar in the bowl of a food processor. Process for about eight 1-second pulses to combine. Pour the flour mixture into a large mixing bowl. Pour the milk mixture, almond extract, eggs and melted butter into the flour mixture and whisk until combined and no lumps remain.
Combine the maple sugar, unsalted butter, cinnamon and coconut flour in a small bowl until a thick paste. Using your hands, place little bits of the butter topping on top of each muffin. Using a large cookie scoop or tablespoon, evenly spoon the muffin batter into a muffin tin lined with baking cups. Bake for 23-25 minutes until just turning golden brown on the top. Cool for 10 minutes. Serve.
Notes
I only test the recipes on my site with the listed ingredients and measurements. If you would like to try a substitution, you are welcome to share what you used and how it turned out in the comments below. Thanks!
6.6.4http://deliciouslyorganic.net/blueberry-streusel-muffin-recipe-grain-free/Copyright 2016 Deliciously Organic
The post Blueberry Streusel Muffin Recipe (Grain-Free) appeared first on Deliciously Organic.
June 14, 2016
Strawberry Sherbet

Strawberry sherbet makes use of the beautiful berries in season right now! The easy recipe only requires 6 ingredients – you can blend it all in your food processor or blender and then freeze in an ice cream maker.
I know an ice cream maker can seem like an extravagance in the kitchen, but I have to say it may be the best $50 I ever spent for a food appliance. Store-bought ice creams, sherbets, sorbets, gelatos, etc. usually have processed ingredients, stabilizers, preservatives … the list goes on. But with an ice cream maker, you can make homemade ice creams full of wholesome ingredients and in the long-run you’ll save quite a bit of money. I’ve had a Cuisinart Ice Cream Maker for 18 years and it’s still running strong!
You can substitute any berries for the strawberries in this recipe, and if you have a dairy allergy, coconut milk makes for the perfect substitute.

Here are some more frozen treats the whole family will enjoy!
Frozen Yogurt
Chocolate Chip Cookie Dough Ice Cream
Apricot Ice Cream
Chocolate Peanut Butter Ice Cream
Firecracker Pops
Orange Creamsicle
Serves 4
Strawberry Sherbet Save RecipePrint Recipe
div#mpp-buttons { float:right; margin-top: 10px; }
.mpp-button { display:inline-block; }
My Recipes
My Lists
My Calendar
Ingredients
1 cup raw cream or coconut milk1/4 cup fresh lemon juice3 cups strawberries1/3 cup raw honey1 teaspoon vanilla extractPinch of Celtic sea saltInstructions
Place the cream and lemon juice in the bowl of a food processor and let sit for 10 minutes. Add remaining ingredients and process until smooth. (At this point I like to taste the sherbet, and add a bit more honey, salt or vanilla to suit my taste.) Pour the mixture into a large bowl and place over a bowl of ice for about 30 minutes, or chill in the fridge for 2 hours.Pour the mixture into an ice cream maker and freeze according to manufacturer’s instructions. 6.6.4http://deliciouslyorganic.net/strawberry-sherbet-2/
Copyright 2016 Deliciously Organic
The post Strawberry Sherbet appeared first on Deliciously Organic.
June 1, 2016
Wedge Salad with Garlic and Yogurt Dressing
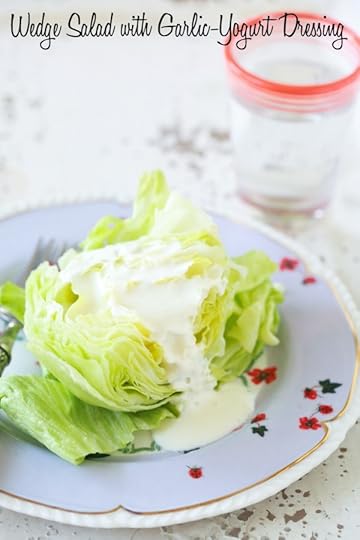
Wedge Salad with Garlic and Yogurt Dressing is one of my staple salad recipes for the family. It pairs really well with a cold wedge of iceberg lettuce, as well as grilled meats, veg and seafood. You can make a large batch of the dressing and store it in the fridge to use all week long.
Here are some other salad recipes you might enjoy:
Peach and Arugula Salad
Tomato Blueberry and Burrata Salad
Chicken Salad with Dates and Macadamia
Classic Caesar Salad Dressing
Makes about 1 cup
Wedge Salad with Garlic and Yogurt Dressing5 minPrep Time
5 minTotal Time
Save RecipePrint Recipe
div#mpp-buttons { float:right; margin-top: 10px; }
.mpp-button { display:inline-block; }
My Recipes
My Lists
My Calendar
Ingredients
1 cup whole, plain yogurt (use coconut or almond milk yogurt for dairy-free)1 clove garlic1 tablespoon red wine vinegar2-3 tablespoons olive oil3/4 teaspoon Celtic sea salt1 head iceberg lettuce, cut into wedgesInstructions
Place all ingredients in a large mason jar and blend with a hand-immersion blender until smooth. (You can also blend in a blender.) Pour dressing over iceberg wedge and serve. 6.6.4http://deliciouslyorganic.net/garlic-yogurt-dressing-wedge-salad/Copyright 2016 Deliciously Organic
The post Wedge Salad with Garlic and Yogurt Dressing appeared first on Deliciously Organic.