Carrie Vitt's Blog, page 35
December 6, 2016
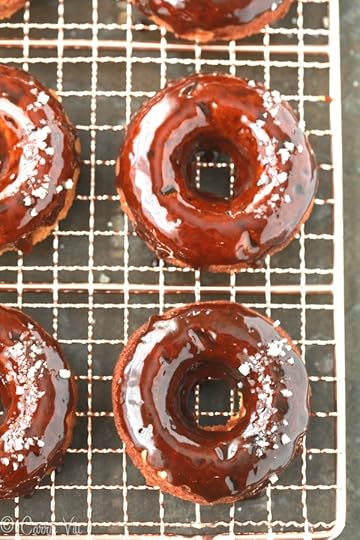
Cream of Vegetable Soup
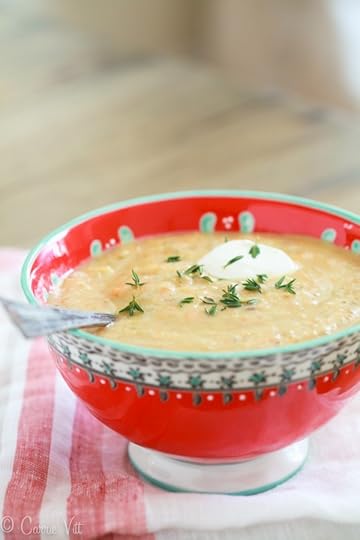
I picked up a copy of Nourishing Traditions 13 years ago when I was learning how to cook and bake with unprocessed ingredients. Cream of Vegetable Soup was one of the first recipes I tried and the entire family fell in love with this delightful soup. Abby even requested it for her birthday dinner when she turned three!
The soup offers a comforting mix of vegetables, healthy fats, herbs and sea salt that nourishes from the inside-out. It makes for great leftovers, in fact, my kids took this soup in an insulated thermos to school today! It also freezes well.
If you’re hosting a holiday party, you can even pour the soup into individual shot glasses and top with a small dollop of sour cream and a few thyme leaves. Place them on a tray and pass. Your guests will love it!
We like to serve it with a dollop of creme fraiche, a bit of raw cheddar and some fresh thyme leaves, but you can also serve it without the garnishes or with sour cream in place of the creme fraiche.
Serves 6-8
Cream of Vegetable SoupAdapted from
Nourishing Traditions
.
 Save Recipe
Print Recipe
div#mpp-buttons { float:right; margin-top: 10px; }
.mpp-button { display:inline-block; }
My Recipes
My Lists
My Calendar
Ingredients
4 tablespoons butter (or 3 tablespoons duck fat for a dairy-free option)2 yellow onions, chopped4 carrots, chopped4 large russet potatoes, chopped (or 1 large head cauliflower chopped for a lower carb option)10 cupschicken stock
3 sprigs of fresh thyme, tied together with a piece of twine4 zucchini, cut into 1-inch coins2 teaspoons
Celtic sea salt
1/2 cup raw heavy cream (or coconut milk for a dairy-free option)Creme fraiche, sour cream, raw shredded cheddar (optional)
Instructions
Melt the butter over low heat in adutch oven
. Add the onions and carrots, put the lid on the pot and let the vegetables sweat for 30 minutes. Add the potatoes and stock and increase heat to medium-high and boil. Reduce the heat to a low boil and cook until potatoes are fork tender. Add the thyme sprigs and zucchini and cook for an additional 8-10 minutes until the zucchini are tender. Using a hand-immersion blender, blend the soup until smooth. Stir in salt and cream. Taste the soup and add more sea salt if needed. Ladle the soup into bowls and serve with a dollop of sour cream or creme fraiche and raw cheddar (if using).6.6.15http://deliciouslyorganic.net/cream-vegetable-soup/
Copyright 2016 Deliciously Organic
The post Cream of Vegetable Soup appeared first on Deliciously Organic.


December 3, 2016
10 Holiday Essential Oil Diffuser Blends
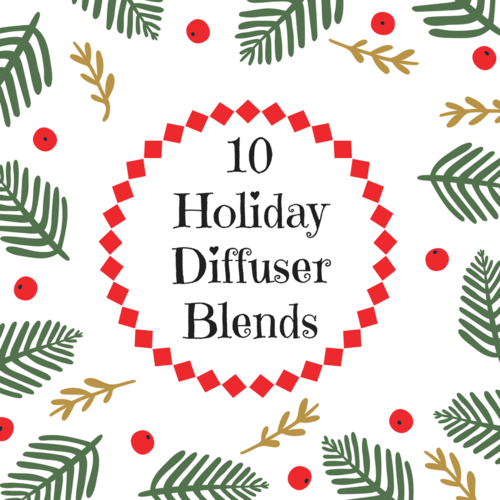 If you’re looking for an all-natural and non-toxic way to bring the wonderful smells of the holidays into your home, I’ve got you covered! Instead of synthetic fragrances from scented candles or air fresheners, our family uses a diffuser and therapeutic grade essential oils to make our home smell festive during the Christmas season.
Here are My Top 10 Favorite Holiday Essential Oil Diffuser Blends:
Candy Cane Forest – 4 drops of Holiday Joy, 2 drops of Wintergreen, and 2 drops of Peppermint
Holiday Cheer – 1 drop of Clove, 3 drops of Wild Orange, and 2 drops of Cinnamon
Gingerbread House – 3 drops of Ginger, 2 drops of Cinnamon, and 2 drops of Clove
Christmas Tree Farm – 3 drops of Douglas Fir, 2 drops of Cedarwood, and 1 drop of Juniper Berry
Christmas Cookies – 2 drops of Cedarwood, 3 drops of Wild Orange, 3 drops of Cassia, and 1 drop of Cinnamon
Holiday Treats – 2 drops of Peppermint, 1 drop of Wild Orange, 1 drop of Cassia, and 2 drops of Wintergreen
Wassail – 3 drops of Wild Orange, 2 drops of Juniper Berry, 1 drop of Clove, and 1 drop of Ginger
Gift of the Magi – 3 drops of Frankincense, 3 drops of Myrrh, and 2 drops of Wild Orange
Christmas Eve – 3 drops of Douglas Fir, 1 drop of Grapefruit, and 2 of drops Frankincense
Winter Spice – 3 drops of Bergamot, 1 drop of Ginger, 1 drop of Cassia, and 1 drop of White Fir
Happy Holidays!
The post 10 Holiday Essential Oil Diffuser Blends appeared first on Deliciously Organic.
December 1, 2016
Flourless Almond Butter and Chocolate Sandwich Cookies (Grain-Free)
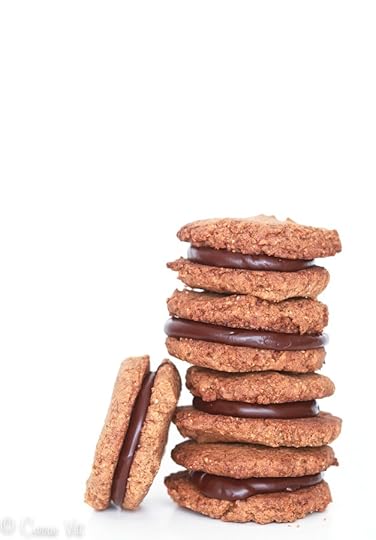
We’ve started the Christmas season! For most of us, that means getting into the kitchen and baking cookies. While sugar should be enjoyed in strict moderation, I do like to offer healthier alternatives to traditional favorites. It’s also fun to show up at a party, serve grain-free cookies, let your friends rave and only then reveal they’re grain-free. I kinda get a kick out of this.
November 22, 2016
Easy Gravy Recipe (Grain-Free, Paleo)
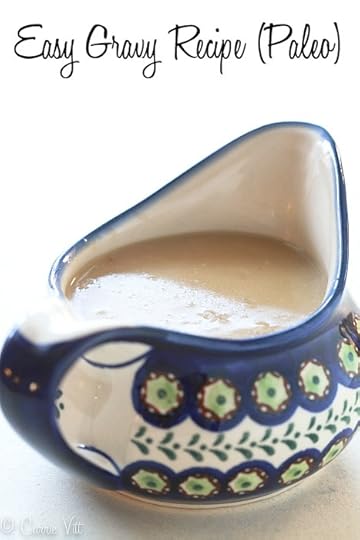
It pays to have an easy gravy recipe in your repertoire – and not just for Thanksgiving! This gravy recipe contains just six ingredients and provides a nice depth of flavor because of the caramelized onions and homemade chicken stock. You can serve it with turkey, chicken, mashed potatoes, or anything else you like to accompany with gravy.
Gravy sometimes causes unnecessary stress since it’s usually made last minute – when the turkey is ready and everyone is waiting to eat. To alleviate the stress, you can make this gravy a day or two ahead of time, store it in the fridge and then quickly reheat it on the stove before serving.
Makes about 3 cups
Easy Gravy Recipe (Grain-Free, Paleo)If you’d like to use turkey or chicken drippings in this recipe, substitute up to 1/2 cup of the stock for drippings.
Save RecipePrint Recipe
div#mpp-buttons { float:right; margin-top: 10px; }
.mpp-button { display:inline-block; }
My Recipes
My Lists
My Calendar
Ingredients
4 tablespoons unsalted butter (or 3 tablespoonsduck fat
for Paleo)2 yellow onions, thinly sliced3 tablespoons
arrowroot flour
3 cups
chicken stock
1 tablespoon
Celtic sea salt
1/4 teaspoon freshly ground black pepper
Instructions
Melt the butter over medium-low heat in a medium saucepan. Add the onions, turn to low and cook, stirring occasionally until the onions begin turning golden brown, about 30 minutes. Stir in the arrowroot flour. Whisk in the chicken stock, sea salt, and pepper. Heat over medium heat and whisk constantly until gravy just begins to thicken. Remove immediately from the heat. Using a hand immersion blender, blend gravy until smooth or pour into a blender and blend until smooth (you can skip this step if you prefer a chunkier texture). Add additional salt and pepper to taste. I like to store the gravy in a large mason jar if I make it a day or two ahead of time. Alternately, if you’d like to keep it hot before a meal, pour it into aninsulated water bottle
.Note: I only test the recipes on my site with the listed ingredients and measurements. If you would like to try a substitution, you are welcome to share what you used and how it turned out in the comments below. Thanks!6.6.15http://deliciouslyorganic.net/easy-gravy-recipe-grain-free-paleo/
Copyright 2016 Deliciously Organic
The post Easy Gravy Recipe (Grain-Free, Paleo) appeared first on Deliciously Organic.
November 17, 2016
Creamed Kale with Shallots
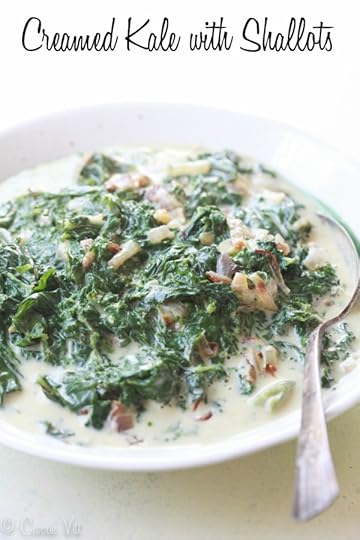
I’ve got another nutrient-dense Thanksgiving side dish for you! Easy-to-make Creamed Kale with Shallots provides a delicious complement and allows a dairy-free adaptation.
Last week I finished Nutritional Therapy School, so as we move along you’ll see more health-related articles, especially ones focused on thyroid health.
Many of you have asked me about the program, what I think, how much time it takes, etc. so I’m taking some time to give you my honest feedback.
I received my Nutritional Therapy Practitioner certification via The Nutritional Therapy Association. The school teaches the importance of properly prepared whole foods for nourishing the body and restoring health. They respect the bio-individuality of each person and teach how to tailor diets and whole food supplements (when needed) for each person based on their specific needs.
The course is broken down into 15 modules, takes 9 months to complete and covers in-depth topics like: digestion, detox, the immune system, the cardiovascular system, autoimmune disease, blood sugar balance, essential fatty acids, mineral balance, whole food supplementation, functional evaluation, the endocrine system, and much, much more.
I appreciated the scientific approach to nutrition and the tools they provided for looking at a client’s symptoms and producing a nutritional protocol focusing on root issues.
A nutritional therapist works alongside other health professionals to help a client reach their specific health goals. We do not prescribe medications or diagnose – we simply focus on using a traditional food approach to wellness.
The required reading is quite extensive, and I saved a lot of time by reading the books even before my class started. On average, most students spend about 20 hours a week completing the coursework, studying and practicing their functional evaluation skills. There are also three long weekends where students are required to travel for in-class lectures, hands-on functional training and exams. I enjoyed the classroom environment and was excited to make new like-minded friends.
Now, I can’t give an honest review without a few criticisms. One of the things I didn’t like was the length of the video and audio lectures – some were almost two hours. If they’d been broken into smaller lectures, it would have been more helpful for learning. I also think they should spend more time during one of the workshop weekends to help graduating students understand how to start a nutritional therapy business. Many of my classmates were bursting with business questions and didn’t feel those were well discussed.
Overall, I found the program very educational and I highly recommend the program if you’re interested in nutritional therapy!
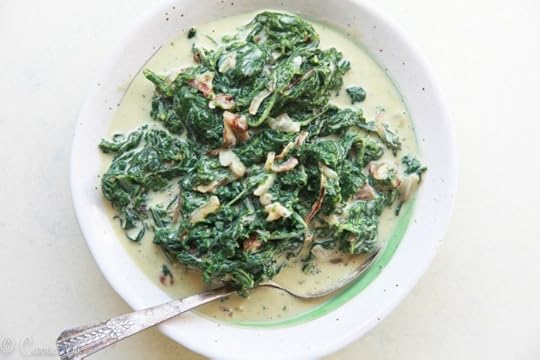
Now, back to the recipe . . . Boil the kale for 8 minutes before sautéing to reduce the goitrogens in the greens. This is an important step as goitrogens can inhibit the uptake of iodine in the thyroid, and the body depends on iodine to produce thyroid hormones. So, don’t skip this step.
The kale is then sautéed in an animal fat (this time I chose butter, but you could also use duck fat or lard) because animal fat contains fat-soluble vitamin activators. These are important because vitamins A, D, E and K in fruits and vegetables cannot be used by the body unless there is a fat-soluble vitamin activator present. This is why it’s very important to consume some type of animal fat each day. Otherwise, your body can’t utilize all of those good nutrients in your food!
This side dish adds a nice touch of green to the Thanksgiving table – I can say from personal experience, the leftovers are worth fighting for!
Serves 4-6
Creamed Kale with Shallots Save RecipePrint Recipe
div#mpp-buttons { float:right; margin-top: 10px; }
.mpp-button { display:inline-block; }
My Recipes
My Lists
My Calendar
Ingredients
1 1/2 pounds kale, fibrous stems removed, chopped3 tablespoons unsalted butter (orduck fat
or
pork lard
for a dairy-free option - see above)2 large shallots, sliced (about 1/2 cup)1 clove garlic, finely chopped1 tablespoon
arrowroot flour
1/2 cup whole milk (or 3/4 cup
coconut milk
for dairy-free)1/2 cup heavy cream (or 1/4 cup
coconut cream
for dairy-free)Pinch
saffron
(optional)1 teaspoon
Celtic sea salt
1/4 teaspoon freshly ground black pepper
Instructions
Bring a large pot of water to boil. Place kale in the boiling water and continue to boil for 8 minutes. Drain and squeeze excess moisture out of kale (this can be done a day or two ahead and time. Just store the kale in the fridge until ready to continue with the recipe).Melt the butter in a large sauté pan over medium heat. Add the shallots and cook, stirring frequently until just turning brown on the edges, about 10 minutes. Stir in the garlic and cook for about 30 seconds. Stir in the arrowroot flour and then the milk and cream. Continue to cook, stirring constantly, until the mixture begins to thicken, about 2-3 minutes. Add the crumbled saffron (if desired), and then stir in the kale until it’s coated with the creamy milk mixture. Continue cooking until the kale is heated through. Stir in the salt and pepper. If the mixture is too thick, you can thin it with a little milk. Taste and see if kale needs a bit more salt or pepper. Serve.6.6.15http://deliciouslyorganic.net/creamed-kale-with-shallots/Copyright 2016 Deliciously Organic
The post Creamed Kale with Shallots appeared first on Deliciously Organic.
November 8, 2016
Hazelnut Tart (Grain-Free)
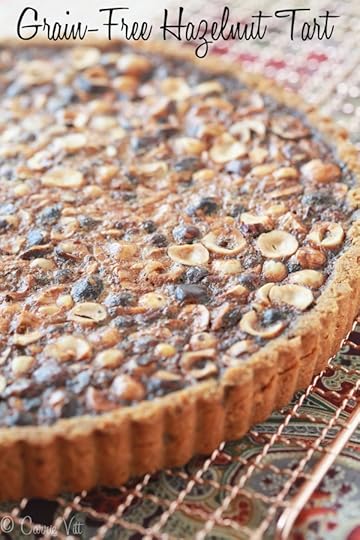 Thanksgiving arrives in just a few weeks! I’m striving to help make your big holiday meals both nutrient-dense and thoroughly enjoyed by friends and family. I’ve shared dozens of grain-free recipes over the past few years; today I’ve got a Hazelnut Tart recipe I think you’re going to love.
The crispy hazelnuts and honey-sweetened filling nestle into my basic grain-free pie crust and bake until they’re golden brown. The resulting sweet, nutty tart will remind you of pecan pie, but be different enough that you can serve it alongside your traditional favorites at Thanksgiving.
Here are some more Thanksgiving desserts you might enjoy:
Pumpkin Pie
Pecan Pie
Grain-Free Bread Pudding with Chantilly Cream
Pumpkin Cheesecake
Kombucha Jello
Serves 12
Hazelnut Tart (Grain-Free)Adapted from
Fine Cooking
Save RecipePrint Recipe
div#mpp-buttons { float:right; margin-top: 10px; }
.mpp-button { display:inline-block; }
My Recipes
My Lists
My Calendar
Ingredients
For the Crust:2 cupsalmond flour
4 tablespoons
coconut flour
1/2 teaspoon unflavored grass-fed gelatin1/4 teaspoon
Celtic sea salt
1 teaspoon
coconut sugar
8 tablespoons unsalted butter, cold, cut into tablespoonsFor the Filling:1 1/2 cups soaked and dehydrated hazelnuts (I use
this recipe
and omit the maple syrup), chopped12 tablespoons unsalted butter, melted and cooled3 large eggs3 large egg yolks1/2 cup coconut sugar1 cup
raw honey
1 teaspoon Celtic sea salt2 tablespoons heavy cream or coconut cream1 tablespoon coconut flour1 teaspoon vanilla extract
Instructions
Prepare the crust: Place the almond flour, 4 tablespoons coconut flour, gelatin, ¼ teaspoon sea salt and 1 teaspoon coconut sugar into the bowl of a food processor. Pulse 2-3 times to combine. Add the 8 tablespoons cold butter to the flour mixture and pulse for eight 1-second pulses. Then leave the processor on until the dough forms into a ball. (If the dough is crumbly, add 1-2 tablespoons of water.) Press the dough on the bottom and up the sides of a10-inch tart pan
. Place in the refrigerator to chill for 30 minutes.Preheat the oven to 350ºF and adjust the rack to the middle position. Cover the chilled crust with a piece of
parchment paper
. Pour
pie weights
or beans onto the parchment to weigh the paper down. Place the tart pan on a baking sheet and put into the oven. Bake the crust for 10 minutes, remove the pie weights and parchment and then bake for an additional 10-12 minutes, until the crust just begins turning golden brown.Prepare the filling: Pour the hazelnuts over the pre-baked pie crust and spread into an even layer. Whisk the eggs, yolks, ½ cup coconut sugar, honey, 1 teaspoon salt, cream, 1 tablespoon coconut flour and vanilla until combined. Pour the egg mixture over the hazelnuts. Bake the tart for 30-35 minutes, until the filling turns golden brown. Cool completely. Serve at room temperature.Note: I only test the recipes on my site with the listed ingredients and measurements. If you would like to try a substitution, you are welcome to share what you used and how it turned out in the comments below. Thanks!6.6.15http://deliciouslyorganic.net/hazelnut-tart-grain-free/
Copyright 2016 Deliciously Organic
The post Hazelnut Tart (Grain-Free) appeared first on Deliciously Organic.
October 25, 2016
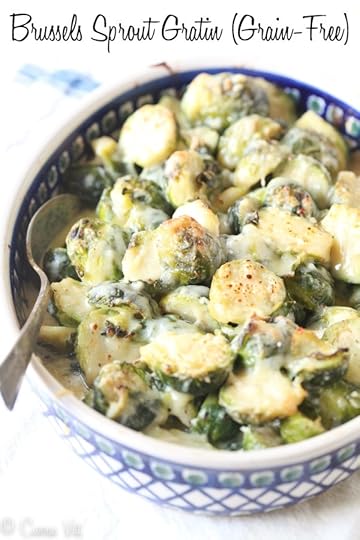
Brussels Sprout Gratin (Grain-Free)
I’m two weeks away from graduating from Nutritional Therapy School and I’m super excited for the approaching holidays! I know things have been a little quiet here, but I’ve needed the extra time to study over the last nine months. Once I graduate, I’ll be able to post more often. Thanks for hanging in there with me!
I know Brussels Sprout Gratin is more of a Thanksgiving dish, so maybe I’m getting ahead of myself, but it’s so good I decided share it with you now.
The Brussels sprouts are simmered in water which helps reduce the goitrogens (remember – this is a good thing to do if you battle thyroid issues). The sprouts are then combined with a creamy cheese sauce and baked in the oven. You can substitute any mild cheese you’d like. Breadcrumbs sprinkled on top would be a nice touch, too – if you can tolerate grains.
Serves 8
Brussels Sprout Gratin (Grain-Free) Save RecipePrint Recipe
div#mpp-buttons { float:right; margin-top: 10px; }
.mpp-button { display:inline-block; }
My Recipes
My Lists
My Calendar
Ingredients
3 pounds Brussels sprouts, trimmed and cut in half2 tablespoons unsalted butter3 cloves garlic, minced1 tablespoonarrowroot
1 1/2 cups whole milk1 teaspoon
Celtic sea salt
1/4 teaspoon freshly ground black pepper14 ounces gruyere cheese, grated and divided
Instructions
Preheat oven to 375ºF and adjust rack to the middle position. Place the Brussels sprouts in a pot, cover with water and bring to a boil over high heat. Then lower the heat to medium-low and simmer the sprouts for 8 minutes. Drain and then rinse with cold water. Lay a clean towel on the counter then pour the sprouts on the towel and gently press the sprouts to soak up any excess water.Place the butter and garlic in a large saucepan over medium heat. Cook until the butter melts and the garlic sizzles. Whisk in the arrowroot and then slowly whisk in the milk, salt and pepper. Continue to cook, whisking often until the mixture begins to thicken. Add 10 ounces of the grated cheese (that’s about 1 1/4 cups), and stir until the cheese is melted and the sauce is creamy. Stir in the Brussels sprouts and combine until all sprouts are coated with the sauce. Pour the mixture into an 11x7-inch baking dish. Sprinkle the remaining grated cheese on top. Bake for 25 minutes, or until the top is just beginning to turn golden brown. Cool for 10 minutes. Serve.6.6.16http://deliciouslyorganic.net/brussels-sprout-gratin-grain-free/Copyright 2016 Deliciously Organic
The post Brussels Sprout Gratin (Grain-Free) appeared first on Deliciously Organic.
October 11, 2016
Corn Dog Muffins (Grain-Free)

These little Corn Dog Muffins taste so much like a corndog you’ll be amazed! My kids loved them. I used my “cornbread” batter and inserted a two-inch piece of organic hotdog into each mini muffin before baking. So easy!
These little poppers are great for kids’ parties or game day, and would be super fun for a Halloween event.
You can dip them in ketchup (see my cookbook for a great homemade recipe) or classic yellow mustard or eat them alone. They also freeze well after baking – to reheat, place them in a 300ºF oven for about 15 minutes until thawed and warmed.
Makes about 36 mini muffins
Corn Dog Muffins (Grain-Free) Save RecipePrint Recipe
div#mpp-buttons { float:right; margin-top: 10px; }
.mpp-button { display:inline-block; }
My Recipes
My Lists
My Calendar
Ingredients
2 cupsalmond flour
3 tablespoons
coconut flour
3 teaspoons baking powder (make sure it's grain-free)1 teaspoon
Celtic sea salt
1/2 teaspoon baking soda2 teaspoons
coconut sugar
2 large eggs, lightly beaten8 tablespoons unsalted butter or 6 tablespoons
ghee
, melted and cooled slightly1 cup sour cream (or plain, whole coconut yogurt)1/2 yellow onion, minced8 organic hotdogs, cut into 2-inch pieces
Instructions
Preheat oven to 375°F and adjust rack to middle position of oven. Butter each cup in amini-muffin pan
. Whisk almond flour, coconut flour, baking powder, sea salt, baking soda and coconut sugar together in a large mixing bowl. In a separate bowl, whisk together the eggs, butter, and sour cream. Pour sour cream mixture and onions into flour mixture and gently fold all ingredients together. Spoon 1 tablespoon of batter into a muffin cup and then push a piece of hotdog into the center. Repeat with the remaining ingredients. Bake 16-18 minutes, until the muffins are turning golden brown on the edges. Cool for 10 minutes and then carefully transfer the muffins out of the pan and onto a cooling rack. Cool for an additional 10 minutes. Serve.6.6.16http://deliciouslyorganic.net/corn-dog-muffins-grain-free/
Copyright 2016 Deliciously Organic
The post Corn Dog Muffins (Grain-Free) appeared first on Deliciously Organic.
October 3, 2016
Pumpkin Spice Donuts with Salted Caramel (Grain-Free)
 I haven’t posted a dessert recipe in quite a while, so I thought it would be fun to celebrate the official start of fall by sharing Pumpkin Spice Donuts with Salted Caramel. These donuts start with a simple cake batter you can even mix in a blender or food processor to make things easier.
The caramel features just three ingredients – coconut sugar, coconut milk and vanilla. The two simmer on the stove for 20 to 25 minutes and become the most wonderful dairy-free caramel! Try using the caramel for apples, over sundaes, or drizzled over apple crisp for a little extra indulgence.
A little Celtic sea salt sprinkled on top of these pumpkin spice donuts produces a delightful salty-sweet combo. Happy Fall!
Makes 12 donuts
Pumpkin Spice Donuts with Salted Caramel (Grain-Free) Save RecipePrint Recipe
div#mpp-buttons { float:right; margin-top: 10px; }
.mpp-button { display:inline-block; }
My Recipes
My Lists
My Calendar
Ingredients
For the Donuts:1 cupcoconut flour
1/2 teaspoon
Celtic sea salt
1 teaspoon baking soda1 teaspoon
pumpkin pie spice blend
8 large eggs1/4 cup plain whole yogurt (or a coconut yogurt)1/4 cup
pureed pumpkin
6 tablespoons unsalted butter or coconut oil, melted1/2 cup
honey
or maple syrup1 tablespoon
vanilla extract
For the Caramel:2 cups
coconut sugar
1 can
coconut milk
1 teaspoon
vanilla extract
Celtic sea salt
for sprinkling
Instructions
Preheat oven to 350ºF and adjust rack to middle position. Place all of the donut ingredients in alarge bowl and whisk until smooth. Spoon the batter into a buttered donut baking pan. Bake for18-20 minutes until just turning golden brown on the edges. Cool completely.Place the coconut sugar and coconut milk in a medium saucepan and whisk until combined.Heat over medium-high until boiling and then turn down to medium-low and simmer for 20-25minutes until reduced and mixture has thickened. Cool for about 30 minutes.To glaze the donuts: Pick up a donut and dip the top half in the cooled caramel and then placeon a cooling rack. Repeat with remaining donuts. Sprinkle with Celtic sea salt. Serve.Notes
I only test the recipes on my site with the listed ingredients and measurements. If you would like to try a substitution, you are welcome to share what you used and how it turned out in the comments below. Thanks!
6.6.16http://deliciouslyorganic.net/pumpkin-spice-donuts-salted-caramel-grain-free/Copyright 2016 Deliciously Organic
The post Pumpkin Spice Donuts with Salted Caramel (Grain-Free) appeared first on Deliciously Organic.
September 21, 2016
Grain-Free Chilaquiles Recipe

A serving of grain-free Chilaquiles totally feels like cheating! It’s kinda like enjoying fancy nachos for breakfast – perfect for a lazy weekend morning.
Chilaquiles traditionally uses corn chips, so to keep this recipe grain-free I tested the recipe with both taro and plantain chips and the entire family loved it. This recipe is pretty versatile, so you can use whatever grain-free chip you prefer.
Serves 6
Grain-Free ChilaquilesYou can make this recipe with either a red or green enchilada sauce, so I gave options for both. If you need to avoid nightshades, then omit the sauce (and the recipe will still taste fantastic!). As I mentioned in the post, I tested this recipe with taro and plantain chips, but you can use whichever grain-free chip you prefer!
Save RecipePrint Recipe
div#mpp-buttons { float:right; margin-top: 10px; }
.mpp-button { display:inline-block; }
My Recipes
My Lists
My Calendar
Ingredients
1 tablespoon unsalted butter orghee
6 large eggs1/2 teaspoon
Celtic sea salt
1 recipe
tomatillo sauce
, or
red enchilada sauce
12 ounces
plantain chips
, homemade
Taro chips
,
Terra taro chips
or whatever grain-free chips you prefer2 cups shredded Monterey Jack cheese1/4 cup pickled jalapeños2 avocados, sliced1/4 cup
salsa
1/4 cup cilantro
Instructions
Preheat oven to 400ºF. Place butter or ghee in alarge oven-safe skillet
and melt over medium heat. Beat the eggs, pour them into the skillet and cook, stirring occasionally until scrambled. Season with sea salt. Spoon the eggs into a bowl and set aside. Place half of the chips in the the skillet, pour sauce over (if using) and toss until heated. Place the eggs and half of the cheese on top of the chip mixture. Add the remaining chips on top and then add the remaining cheese and jalapenos. Place in the oven and bake for about 10 minutes – until the cheese is melted. Place avocado slices, salsa and cilantro on top and serve.6.6.13http://deliciouslyorganic.net/grain-free-chilaquiles-recipe/
Copyright 2016 Deliciously Organic
The post Grain-Free Chilaquiles Recipe appeared first on Deliciously Organic.