
David Petersen's Blog, page 18
June 14, 2022
Snake Killer Process
 I've released a new Mouse Guard sketchbook titled "Alone Together" (https://mouseguard.bigcartel.com/product/alone-together-sketchbook) The majority of that material is inked commissions I did during last year's ONLINECON event. But to round out the sketchbook sometimes I need to generate some material of my own both to fill up pages and to add certain tone or subject for a thematic through line for the work in the book
To the left you can see one of those pieces finished and colored ready for a page in that sketchbook––and in this blogpost I'll break down the process to get there.

Layout:
I thought the sketchbook needed some action––and what better visual of that in a Mouse Guard book that a mouse vs a snake? So, I started with drawing a mouse lunging down with a spear on one sheet of copy paper, and then a snake writhing and coiled upside-down on another. I scanned those in and resized them, rotated them, and shifted them around until they lined up how I wanted and within a square border. I added in some quick digital color blocking, and the suggestion of a background. I then printed that out and drew in a better and tighter version of the background elements.

Inks:
With the above layout finished, I printed it out and taped it to the back of a sheet of Strathmore 300 series bristol. On my Huion Lightpad I was able to use the printout as a guide to ink from. I used Copic Multiliner SP pens. The 0.7 nib did most of the heavy lifting in this piece and I only used the 0.3 for some finer bits like the mouse's face. Inking in the scales was the most time consuming and stressful part––when that pattern goes awry it's easy for the human eye to catch the mistakes and see the flaws in the drawing.
 Color Flats:
With the finished inks scanned I could start on the coloring process. The original inked art was shipped off to the new owner and I worked on this piece for my sketchbook. The color flats stage is just coloring in the lines with flat colors, establishing what every major area's base color is––no rendering, no textures, no effects. Some of the colors I chose when I was blocking in the forms in the layout stage, others like the snake and the background were also informed by reference images of the real things in nature. I added a color hold (areas where I want the linework to be a color other than black) to the branches and leaves at the top in the furthest distance.

Final Colors:
Using Photoshops's Dodge and Burn tools (as well as a stock textured brush) I added all the shadows and highlights. In some places I shifted colors by selecting areas with a lasso tool and using color balance sliders to get them where I wanted them. I also added a little lighting effect to the sky leaving a slight corona around the snake's rattler.
This piece is one of the pieces included in the 2022 Mouse Guard sketchbook 'Alone Together' which is available in my online store: (https://mouseguard.bigcartel.com/product/alone-together-sketchbook)


June 7, 2022
The Lop-Eared Pandrilla
 Last Friday on my Twitch Stream, we did the eighteenth community draw-along event #DrawTheExtinct where I posted an image from an old block print I made with a few animal photo inspiration prompts and the idea to create an imaginary extinct animal. This was the last new #DrawTheExtinct draw along (though we will be doing some make up sessions before moving on to a new First Friday theme in August. I worked on my piece live on my Twitch stream while viewers worked at home and then on Monday we shared our finished pieces.
 Here is my finished Lop-eared Pandrilla. And below are my steps to create it as well as the community submissions.
 We started with the prompt of my original 2000's era linocut print titled 'Extinct' as well as a a Lop eared bunny, a Panda, and a Gorilla.
I told the viewers that they could use any combination of the inspiration prompts––they could make their version as cute and cuddly as a pocket pet stray kitten, as monstrous and deadly as a giant kaiju destroying cities, or anything in between. I also wanted this to be an excuse to get their pencils moving. I invited all skill levels, because I'm a firm believer that you shouldn't have to be good at something or pursuing mastery of it to just simply enjoy the act of it...and art is no exception.
 On the Friday stream I started by drawing with a mechanical pencil my Pandrilla.I focused on the Gorilla stance and mouth adding in panda coloring (and hind paws) and leaving the lop eared bunny as the ears and tail alone. Once I had my drawing pretty well done, I scanned it and did some resizing and morphing tweaks (including mirroring it horizontally so it's facing the alternate direction as last month's entry). While I had it in Photoshop I also slopped down some basic color to help me visualize what I was going for tonally in the final piece.
 After I was happy with my above design, I printed that piece out on copy paper and taped it to the back of a sheet of Strathmore 300 series bristol. Using a lightpad, I was able to see through the surface of the bristol as I inked the Lop Eared Pandrilla. I used Copic Multiliner 0.7 & 0.3 SP pens to ink the art. I worked on the outer contours first, then went back in to add all the darker texture and tone to the arms, legs, spots, ears, and paws. The timing of this month's work was perfect. I had my pencils done in an hour and then wrapped the inks 10 min before the end of the stream.
 I signed off and wished everyone at home well in their pieces over the weekend and after the stream ended and I got a bite to eat, I scanned the inks and flatted the colors. For these Draw The Extinct pieces I have a template with background and border already established, so it makes some of this color prep work all the easier.
 I went with the color scheme I'd roughed in when doing the pencil/layout stage. Though I did warm up the lighter tone and go darker with the dark spots.
I had a nice long chat with an old friend on the phone as I did the rendering. To get all the highlights, shading, and texture I used the dodge and burn tools with a stock photoshop texture brush. I also selected areas and used the color balance tool to tint them warmer or cooler. Below you can again see the final rendered colors with a border and type applied in this final version.

But, as this is a community event, I wanted to share all the other entries posted in the Discord. I awarded a prize and we voted together on a few more (prize winners marked with *) on Monday's Twitch stream and we all enjoyed seeing what each other had done.
 Capt.Nemo

AmyLeB
 CreatingRuth*
DePuggo*

EvilCartoonist

Nuvalo
 RedJarOJam*
Tyrie*
 Nate Pride*
This was the final #DrawTheExtinct species to draw--but we will be doing several more make-up sessions on the 10th and 17th of this month, for folks who only recently discovered the draw-along and want to go back and have some fun, for people who participated, but missed a few critters, or people who want to take another try and a piece they were less than happy with.
May 31, 2022
Ankur - 2nd of the Black Axe Wielders
 For a new 10 piece print set, I illustrated all of the past wielders of the Black Axe from Bardrick to Celanawe. I'd shown and listed the wielders in the Black Axe book--but they were only ever visualized as embroidery details on the Adana Tapestry––and I wanted to give them a more solid design existence. The set of ten 4.75" x 4.75" prints is available for sale in my online store and comes in a vellum envelope:https://mouseguard.bigcartel.com/product/wielders-of-the-black-axe-print-set
To the left you can see the finished art for the BAnkur, Second of the Black Axes print in the set. Below I'm going to go through the process to create the art.
 Layout:
I started with a pencil drawing of Ankur on copy paper, and unlike much of my work, I did this drawing all in one go--no extra sheets for the background drawing, just a quick digital color blocking pass after drawing.
On the Adana Tapestry, Ankur is shown with a scale mail pattern on his clothes--and instead of making regular metal armor, I decided to go with a pinecone seed look––something a rugged outdoors mouse sourced and assembled himself. The stitching on the helm and the eyepatch also suggest an worn existence. The other theme of this piece was to do a Winter scene.

Inks:
I printed out the above layout when I was happy with the arrangement and taped that printout to the back of a sheet of Strathmore 300 series bristol. On my Huion Lightpad I'm able to see through the bristol to the the printout to use it as a guide to ink from. I ink with Copic Multiliner SP pens, and I used the 0.7 & 0.3 nibs for this piece.
 Color Flats:
When the inks were done, I scanned the art and brought it back into Photoshop to start the coloring process. This is the step where I 'm basically just filling in each area with flat color. In this step I also establish the color holds, areas where I want the ink work to be a color other than black. In this piece that consists of The snow, the flame, and the number 2.
Most of the colors were either plucked from the Adana Tapestry or established in my rough layout

Final Colors:
The final colors were rendered by using the dodge and burn tools in Photoshop (and a textured brush) to add shadows, highlights, and textures. I select areas and play with the color balance to shift colors in some areas.
I added the falling snow snow and the torch glow effects on separate layers
The entire 10 piece print set is available in my online store: https://mouseguard.bigcartel.com/product/wielders-of-the-black-axe-print-set
May 24, 2022
Mouse Carpenter
 I've released a new Mouse Guard sketchbook titled "Alone Together" (https://mouseguard.bigcartel.com/product/alone-together-sketchbook) The majority of that material is inked commissions I did during last year's ONLINECON event. But to round out the sketchbook sometimes I need to generate some material of my own both to fill up pages and to add certain tone or subject for a thematic through line for the work in the book
To the left you can see one of those pieces finished and colored ready for a page in that sketchbook––and in this blogpost I'll break down the process to get there.
 Layout:
Already knowing the sketchbook's title 'Alone Together' was a reference to going through the pandemic, I wanted to show a few hobbies/crafts I'd done in that time. To medieval-mousify it, I looked at a few primitive woodworking claps/vices/mules, and then designed my own that would use the mouse's full sitting weight as the clamping pressure. The mouse and mule were drawn on separate sheets of copy paper and placed together in Photoshop. I printed that out within a square frame and then on a lightpad drew the background elements on another sheet. Once all digitally assembled I tinted the background a different color to help me see the forms (I also digitally drew in some forms for ropes loosely hung from the woodworker's structure.

Inks:
With the above layout finished, I printed it out and taped it to the back of a sheet of Strathmore 300 series bristol. On my Huion Lightpad I was able to use the printout as a guide to ink from. I used Copic Multiliner SP pens. I did all of the inking on this one with the 0.7 nib using some pressure variance to get the lineweights and details. I have a 0.3 nib I sometimes use on really fine bits (especially if a mouse's face is small in the image) but I didn't use it here. The trick for these inks were to differentiate the various piled elements and planes of the wood, tools, planks, etc, and that was mostly done with different densities of texture.
Color Flats:
 With the finished inks scanned I could start on the coloring process. The color flats stage is just coloring in the lines with flat colors, establishing what every major area's base color is––no rendering, no textures, no effects. Because in the end I knew the differences between so many of the forms would be subtle and low contrast, I started with crazy color selections. Green for planks of wood standing upright, purple for the mule clamp, royal blue for the stumps, bright yellow for the wood shavings...once everything was filled in, I could start easily swapping those colors for hues and values closer to what I wanted, dialing in those slight changes so you could see the objects as differently colored from one another.
 Final Colors:
Using Photoshops's Dodge and Burn tools (as well as a stock textured brush) I added all the shadows and highlights. In some places I shifted colors by selecting areas with a lasso tool and using color balance sliders to get them where I wanted them. I also added a bit of a lighting effect coming in from the background and making a slight corona on the rope, structure, and planks.
This piece is one of the pieces included in the 2022 Mouse Guard sketchbook 'Alone Together' which is available in my online store: (https://mouseguard.bigcartel.com/product/alone-together-sketchbook)
May 17, 2022
Recent Toned Commissions
I've finished all the toned paper commissions from ONLINECON 2022. In addition to opening up commissions for sale, I also gifted a piece to every guest who appeared on stream. I streamed drawing most these on my Twitch Stream.
 Orren, the 4th Black Axe
 A Degu homage to a photographer Grandfather
 A Veteran Guardmouse Minder
  Usagi Yojimbo
A Ghost Owl
 Pet Portrait of 'Chewy'
 Mouse with Owl armor
 Rand
Rand Lieam
Lieam A Mouse Graduate
 Catbus
 Remy of Ratatouille
 Master Splinter from TMNT
 'Skeptical George' as a Gnome
 French Bulldog in armor
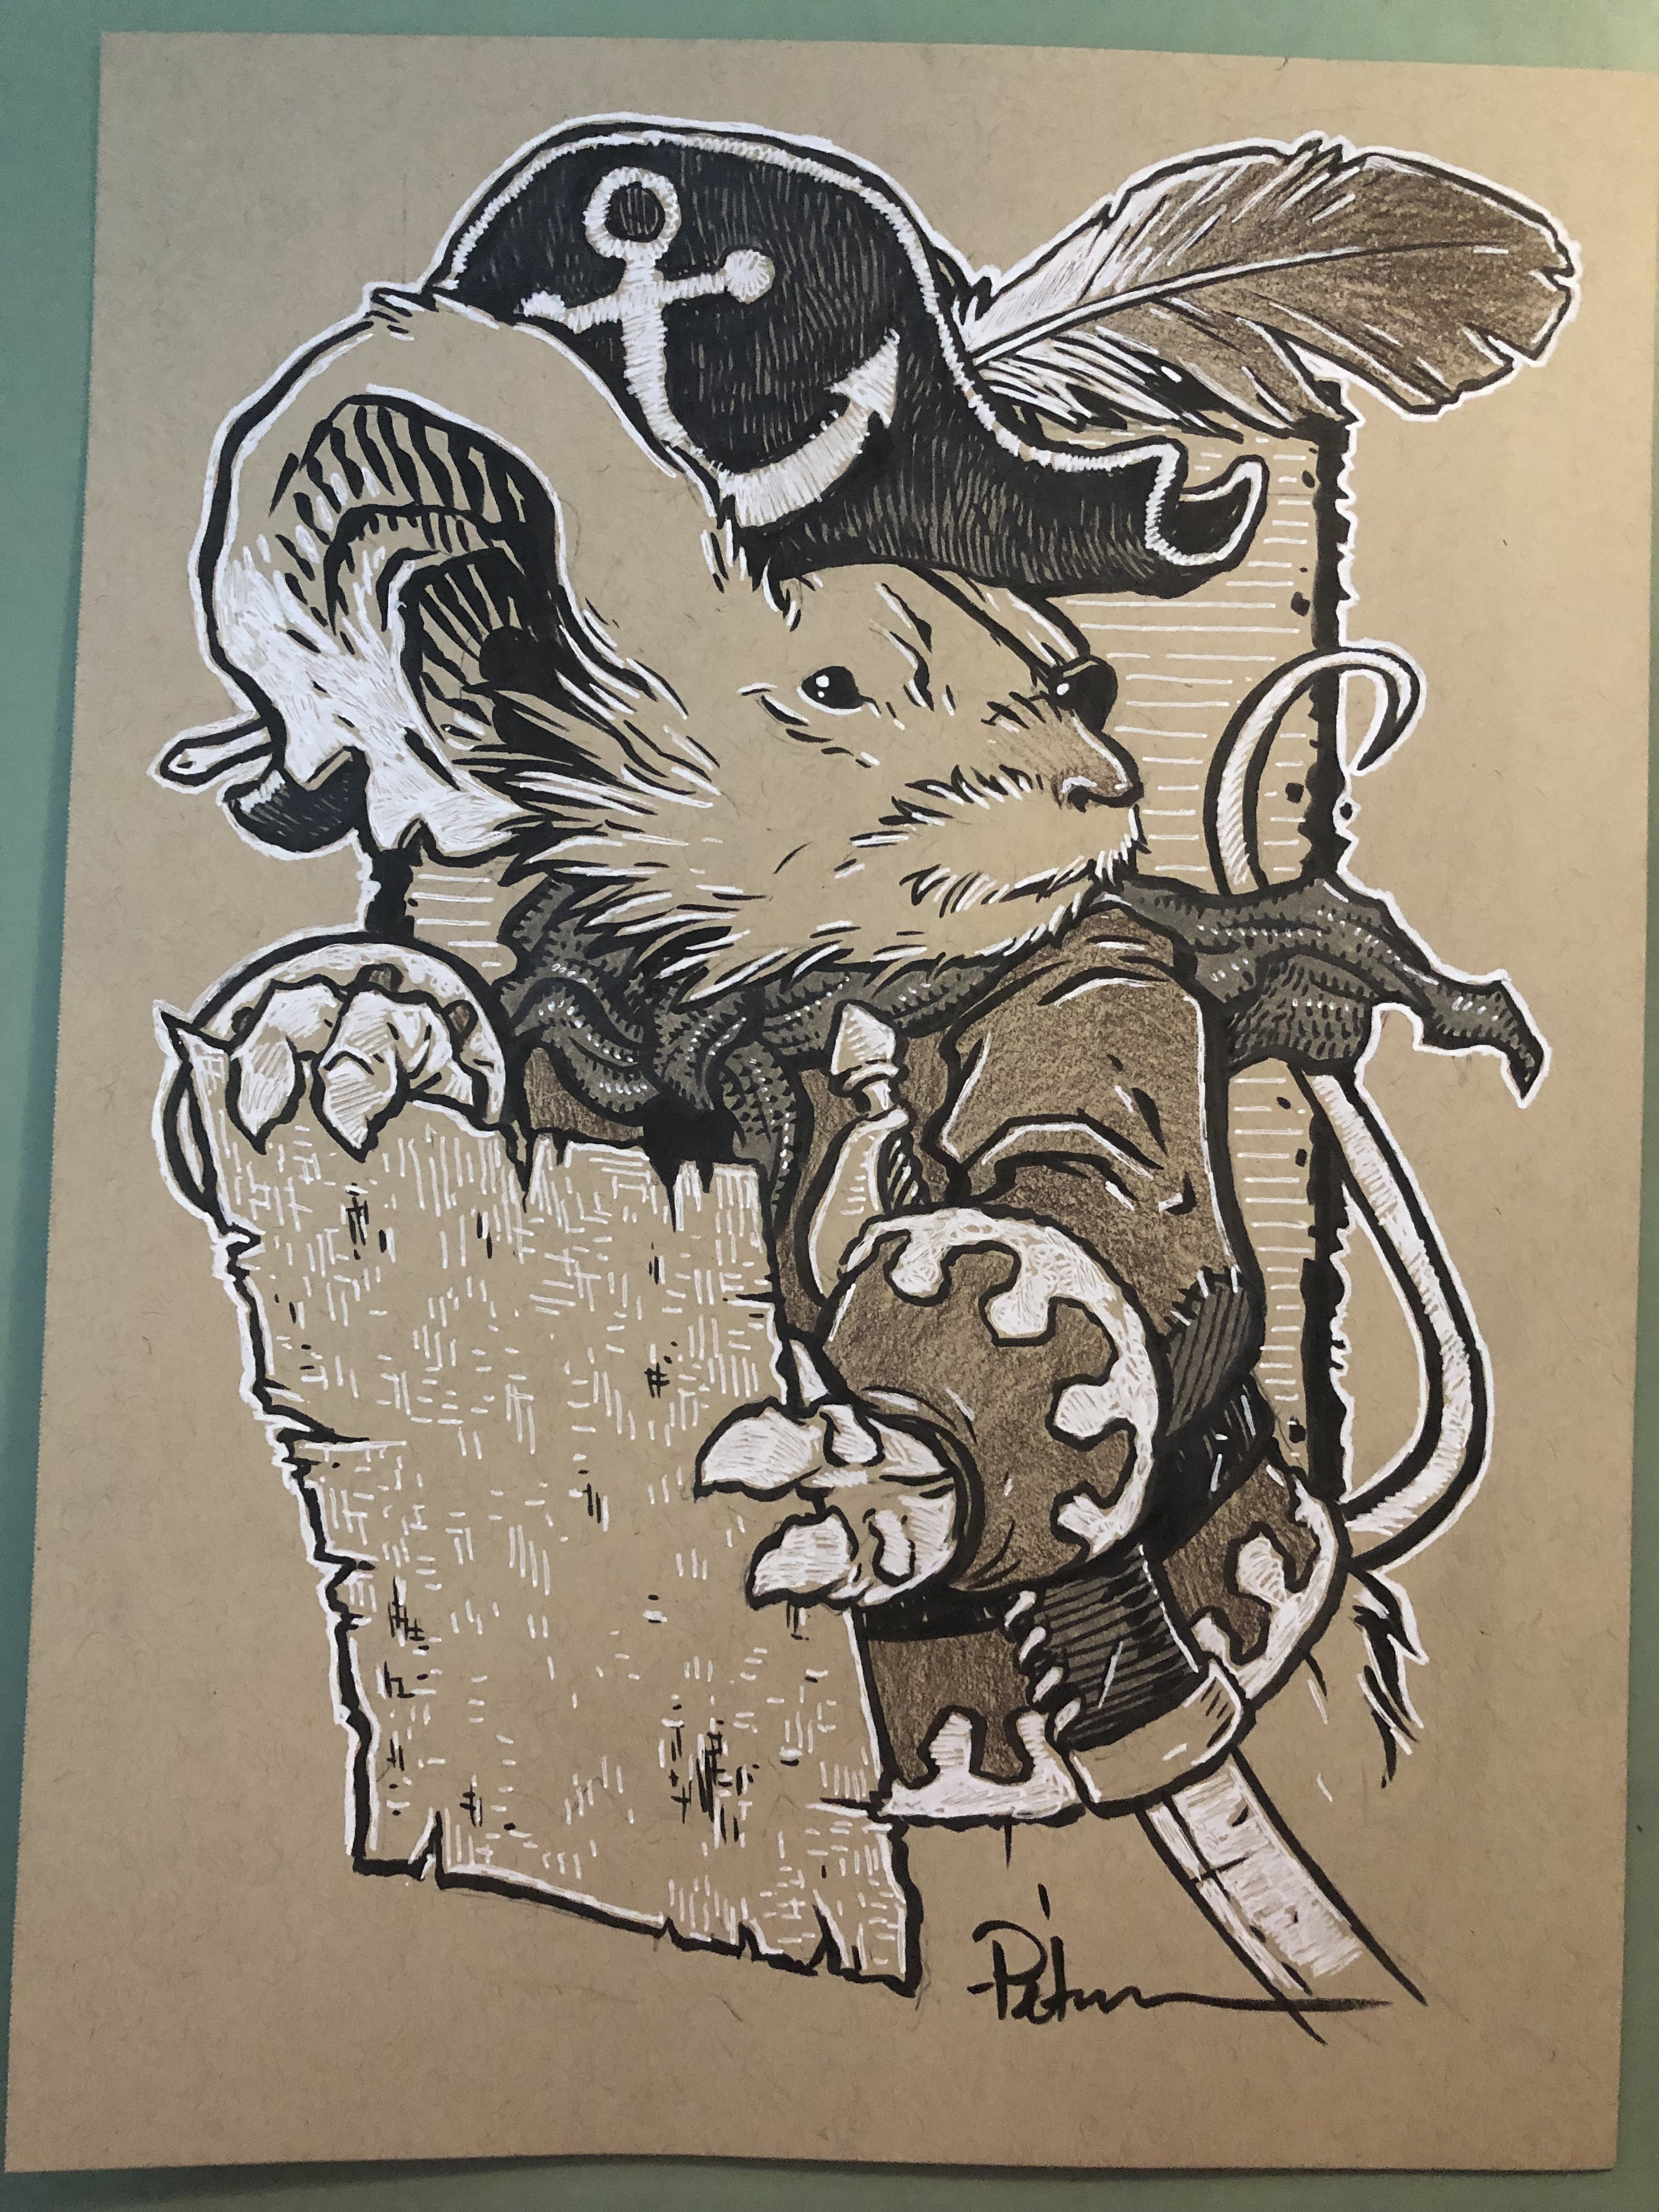 Pirate Mouse
 Librarian Mouse
 Usagi Yojimbo (homage to Albedo #2)
 Mouse Brain Surgeon
 Happy Usagi Yojimbo
 Ming the Merciless
 A Mouse named 'Rose'
 Mouse Samurai
 Mouse Microbiologist
 Bagpiper Mouse
 Frog Monk Warrior
 Mouse Librarian
 A Mouse loving reading
 Mr. Mole
Mandolin MouseFor Guest Eoin McCartan
 Mr. Bojangles from Kukuburi
For Guest Ramon Perez
 Gilbert LutherFor Guest Jeremy Bastian
 CelanaweFor Guest Javier Garcia Urena
 Warduke For Guest Dan Larson
 Mushroom CreatureFor Guest Iris Compiet
 The Wheel is not a CultFor Guest Will Smith
 ArchangelFor Guest Louise Simonson
 Thor from RagnarokFor Guest Walt Simonson
 Manu PuppetFor Guest Barnaby Dixon
 Lily Pad 7 recruitFor Guest Conor Nolan
 A Dragon MonkeyFor Guest Dave Stewart
 LEGO Mouse Guard MinifigFor Guest Guy Himber
 A Gwelf RabbitFor Guest Larry MacDougall
 A Belgian GnomeFor Guest Matt Smith
 A Cork (Corgi+Shark)
For Guest Meg's Mashables
 A BaryonyxFor Guest Danny Anduza
 Roka from Runners
For Guest Sean Wang
 Crow from Crow and WeaselFor Guest Tom Pohrt
 Basset Hound
For Guest Scott Kurtz
 Mouse CarpenterFor Guest Eric Petersen
May 10, 2022
The English Maned Castor

Last Friday on my Twitch Stream, we did the seventeenth community draw-along event #DrawTheExtinct where I posted an image from an old block print I made with a few animal photo inspiration prompts and the idea to create an imaginary extinct animal. I worked on my piece live on my Twitch stream while viewers worked at home and then on Monday we shared our finished pieces.
Here is my finished English Maned Castor. And below are my steps to create it as well as the community submissions.

We started with the prompt of my original 2000's era linocut print titled 'Extinct' as well as a Lion, Beaver, & English Sheepdog.
I told the viewers that they could use any combination of the inspiration prompts––they could make their version as cute and cuddly as a pocket pet stray kitten, as monstrous and deadly as a giant kaiju destroying cities, or anything in between. I also wanted this to be an excuse to get their pencils moving. I invited all skill levels, because I'm a firm believer that you shouldn't have to be good at something or pursuing mastery of it to just simply enjoy the act of it...and art is no exception.
 On the Friday stream I started by drawing with mechanical pencil on a sheet of copy paper to try and reimagine the beast. After a few quick false starts, I ended up working on this drawing with the muzzle of a lion, body of a beaver, and the shaggy hair of a English sheepdog. I wasn't sure if the sheepdog was coming through enough, so even at this stage, I was thinking about how color could help get the idea across.
 I scanned the pencil drawing and then did some photoshop trickery to get a pattern on the tail that was geometrically spaced similarly as a real beaver's tail to help me in the next step.
 After I was happy with my above design, I printed that piece out on copy paper and taped it to the back of a sheet of Strathmore 300 series bristol. Using a lightpad, I was able to see through the surface of the bristol as I inked the English Maned Castor. I used a Copic Multiliner 0.7 SP pen to ink the art. A lot of the work was in the hair textures and drape––but also in that beaver tail. I ended up laying a piece of paper over the piece and redrawing the texture for the tail before committing it to ink. I then taped that paper to the back of the piece to use as an inking guide. And with the inks finished, I had to end the stream and head over to my Sister's place for a birthday party.
 Once the stream ended and I got back from my sister's I started the flat colors. For these Draw The Extinct pieces I have a template with background and border already established, so it makes some of this color prep work all the easier.
 I went with the color scheme of the original lino block piece––but as I looked at it I realized I was right about my premonition in the pencils stage, that the sheepdog colors needed to be used to get the full three species blend communicate.
So, on Sunday (after a full Saturday of Mother's day celebrations at my Sister-in-Law's place, I went back to do the rendering. To get all the highlights, shading, and texture I used the dodge and burn tools with a stock photoshop texture brush. I also selected areas and used the color balance tool to tint them warmer or cooler. Below you can again see the final rendered colors with a border and type applied in this final version.

But, as this is a community event, I wanted to share all the other entries posted in the Discord. I awarded a prize and we voted together on a few more (prize winners marked with *) on Monday's Twitch stream and we all enjoyed seeing what each other had done. I hope we get even more participants next month (First Friday!)

Capt.Nemo*

Amy LeBaron
 Evil Cartoonist*
 DePuggo
 JustPottering22
 Nate Pride*
 RedJarOJam*
 Nuvalo*
 SevenDeadlyStreamers
Sydney (SevenDeadlyStreamers' daughter)
 Tyrie
Tyrie
May 3, 2022
Mice Gardening Radishes
 Last year I did an online event called OnlineCon where I opened up a list for inked commissions. It's not often that I offer fully inked commissions like this any more, but I was open to the idea of making fans happy in troubled times, supplement my income with conventions responsibly canceled, and to generate material for an upcoming Mouse Guard sketchbook.
To the left you can see one of those pieces finished and colored ready for a page in that sketchbook––and in this blogpost I'll break down the process to get there.

The person commissioning this piece asked for two mice gardening together. It was something that he and his wife found solace in during the pandemic. I sketched out each character separately on copy paper (as well as a cart carrying radishes). Those drawings were then scanned and assembled in Photoshop until I had a composition that I liked. To flesh out the setting a bit more I quickly digitally painted in some background foliage.

I inked the piece with a printout of the above layout taped to the back of a sheet of Strathmore 300 series bristol. On my Huion lightpad I can see through the bristol down to the pencils and use them as a guide while I ink. I used Copic Multiliner SP pens (the 0.7 & 0.3 nibs) to ink this as I streamed on Twitch, answering fans questions as I worked.
To help with the depth, I left a white gap between the inks of the figures and the background. This also helped when I was dealing with the color holds in the next step.

When the inks were finished, I started the color flatting (the first step of digital coloring where you establish all the color spaces with flat color). I also added all my color holds at this stage. Color holds are areas where I want the ink lines to be a color other than black, like the background and the dripping water.
I actually did three different holds for the various depths of the background...the closest and darkest version was for the mouse with the watering can, then a slightly lighter one for the cart & vegetation behind him, and the lightest for the furthest leaves and plants.
Below you can see the final colors all rendered withe the Dodge and Burn tools and ready for inclusion in the sketchbook I'll release this year.

April 26, 2022
Bardrick-1st of the Black Axe Wielders
 For a new 10 piece print set, I illustrated all of the past wielders of the Black Axe from Bardrick to Celanawe. I'd shown and listed the wielders in the Black Axe book--but they were only ever visualized as embroidery details on the Adana Tapestry––and I wanted to give them a more solid design existence. The set of ten 4.75" x 4.75" prints is available for sale in my online store and comes in a vellum envelope:
https://mouseguard.bigcartel.com/product/wielders-of-the-black-axe-print-set
To the left you can see the finished art for the Bardrick, First of the Black Axes print in the set. Below I'm going to go through the process to create the art.
 Layout:
I started with a pencil drawing of Bardrick himself on copy paper, and then added another sheet of paper on top of it on a light box for the snake skeleton environment. I scanned both sheets into Photoshop (tinted them to make viewing them easier) and added some basic color blocking as well as a quick medieval tent.
With Bardrick being the fist I wanted him to be battle worn, so he has a tattered cloak which is stitched together in places. The helmet is the one I'd shown in the illuminated illustrations from Fall. And since one of the Black Axe's first mythic deeds was to have 'slain the five serpents who surrounded all that was' I though the snake bones as well as a tent that I thought implied a arduous campaign against the serpents.
 Inks:
Inks:
I printed out the above layout when I was happy with the arrangement and taped that printout to the back of a sheet of Strathmore 300 series bristol. On my Huion Lightpad I'm able to see through the bristol to the the printout to use it as a guide to ink from. I ink with Copic Multiliner SP pens, and I used the 0.7 & 0.3 nibs for this piece.
I had to be careful with the density of the ground covering so that the snake skeleton could still be seen. I also made sure I left a little white gap between the background details and Bardrick--this helps me coloring in the next step, but also gives some visual separation in the planes of depth.
 Color Flats:
When the inks were done, I scanned the art and brought it back into Photoshop to start the coloring process. This is the step where I 'm basically just filling in each area with flat color. In this step I also establish the color holds, areas where I want the ink work to be a color other than black. In this piece that consists of all the tent lineart and the numeral '1'. That 1 is a runic numbering I stole from artist Jeremy Treece which is a large 1 with a smaller roman numerals coming off the right side--in this case, just another 1.

Final Colors:
The final colors were rendered by using the dodge and burn tools in Photoshop (and a textured brush) to add shadows, highlights, and textures. I select areas and play with the color balance to shift colors in some areas.
The entire 10 piece print set is available in my online store: https://mouseguard.bigcartel.com/product/wielders-of-the-black-axe-print-set
April 19, 2022
Mouse Guard Flower Spot Illo Process
 This year I've released a new Mouse Guard sketchbook (past sketchbooks are available in my online store: mouseguard.bigcartel.com) and many of the colored inked commissions I've been sharing on this blog will are collected there. But, I also wanted to generate some pieces of my own. And some of those pieces will need to be smaller illustrations for things like the inside front and back covers.
To the left you can see one of those pieces finished and colored that has a place in that sketchbook––and in this blogpost I'll break down the process to get there.

We have a flowering Rose of Sharon bush that lines our back yard, and in the summer it is in full bloom with bees stopping by each flower like it was visiting an old neighbor. The Rose of Sharon overhands our deck a bit, and I took a few photos with my phone thinking they'd make for good Mouse Guard illustration inspiration.
I drew the flower and bee in one go on copy paper, and then on another sheet overlyaying it on a light pad, I drew in the mouse gently holding the petals open and watching. When both were scanned I blocked in some color to help me see what each form was (as well as to add some more leaves I felt the composition needed.

I printed out the above layout on copy paper and taped it to the back of a sheet of Strathmore 300 series bristol. On my Huion lightpad I can see through the surface of the bristol down to the printout to use as a guide as I ink. I used Copic Multiliner SP pens (the 0.7 & 0.3 nibs).
Most of the focus was on getting the details and textures of the flower and leaves right. I added a stippled trail of pollen (almost like the fairy godmother's magic trails in Disney's Cinderella) that I planned to exploit with color in a later step.
 I started the coloring process for this piece by scanning in the inks and then laying in flat colors. The step is called 'flatting' for that reason––it's basically a professional task of coloring-in-the-lines and establishing what color area each thing in the piece is. I used variations of the colors from my layout combined with my real life reference in the backyard.
I also took this step to establish a few color holds (areas where I want the black linework to be a color other than black) on the lines that transition the tones in color on the flower, the bee's wings, and that trail of pollen magic.

Here are the final colors all rendered and textured. I do most of this work only using two tools in Photoshop: Dodge and Burn. These are tools that date back to when Photoshop was a photo retouching tool and emulate part of the development process to over and under expose areas––ie: make areas darker and lighter. So with a stock textured brush I add shadows and highlights.
This piece is in the new Mouse Guard sketchbook: Alone Together available now in my online store: mouseguard.bigcartel.com .
April 12, 2022
Usagi Yojimbo: Lone Goat & Kid #6

I was fortunate enough to be asked by IDW and Stan Sakai to do a run of covers on the new Usagi Yojimbo reprints of short story issues that will be collectively called 'Lone Goat and Kid'. I've done six in total, and for this blogpost I'll be sharing my process for the creation of the cover art for issue #6.
This issue is currently up for pre-order through Diamond with the code APR221602. Just ask your local comic shop to order it for you, or order it though an online retailer. The issue will be in shops Jun 22, 2022.
To the left you can see the finished cover, but below I'll go through the steps in creating it.
 Layout/Pencils:In this issue, We finally focus on the titular characters of the mini series: Yagi, the Lone Goat and his kid. Obviously, this is a play on Kazuo Koike & Goseki Kojima's Lone Wolf and Cub. This cover needed to be a rush job, there was a change at the distribution level that altered when solicitations are due, so I had about a week and a half to fit this cover's steps into my normal workload.
So, I went fairly straight forward with a reinterpretation of Stan's original cover back in 1990. For my version, I did shift the camera's view to a dutch angle to unsettle the vibe. The image you see to the right is several separate drawings all cobbled together in Photoshop, and then quickly colored to help me figure out the overall shapes and to easily convey to the editors and Stan what my vision was.
 Inks:When the layout was approved by the editor and Stan, I started the inks. First step was to print the layout file onto copy paper (over two sheets that had to be taped together at the seam) and tape that to the back of a sheet of Strathmore 300 bristol. On my Huion lightpad I was able to ink the cover art using the printout as my pencils lines. This way in the end the inked artwork is very crisp and clean with no need to erase pencils lines. I used Copic Multiliner SP pens to ink the art (the 0.7 and 0.3 nibs).
The tricky parts to ink on this cover were the background shapes of the tree silhouettes so that they didn't touch any linework in the foreground, and the drawings of Usagi––which I considered inking with a brush pen, but decided to just do my best to emulate that look with my technical pens.

Color Flats:
The inks were approved and I scanned them in to Photoshop to start the coloring process. This first part of coloring digitally is called 'flatting' and is a professional version of coloring inside the lines. Establishing what each area's color is and where it ends. This not only is a color base for the image, but also allows a quick flat color area to be able to quickly isolate to render or make adjustments on. Most of the color choices had been made in the layout stage, but I made many subtle color and value adjustments to get the base colors just right before rendering. In this step I also established color holds (areas where I want the lineart to be a color other than black) on the background trees, the goats' eyes, and the drawings of Usagi.
 Final Colors:
Here again is the finished art (this time sans-logo). To render all of the color I mostly used the Dodge and Burn tools (Photoshop tools based on real photography techniques for purposely over or under exposing film as it develops). Burn is do darken and Dodge is to lighten. I use a stock Photoshop textured brush as I add shadows and highlights with these tools so the work looks a little more organic and less digital.
Usagi Yojimbo: Lone Goat & Kid #6 is out in stores Jun 22, 2022..
David Petersen's Blog

- David Petersen's profile
- 339 followers

