
David Petersen's Blog, page 15
January 16, 2023
Mouse Guard Mugs by Hollowed Earth
 I reached out to Hollowed Earth Pottery to see if he'd be interested in manufacturing a Mouse Guard mug/tankard for me to sell to fans. Mutual friend Cory Godbey had introduced us to the husband and wife team of potters as well as their amazing work (which Julia and I use almost every day for our morning coffee).
 The initial run of what Hollowed Earth could get to us in time for Christmas sold out in a day, so I talked to them and ordered a 2nd batch as a pre-order (slated to be shipped later this month)––and there are only a handful of those still available to order in the online store.
Below are images and videos Mark of Hollowed Earth sent me as he worked on the first batch.


January 10, 2023
Ember Ferret Dragon

Here is my finished colored Ember Ferret Dragon. And below are my steps to create it as well as the community submissions.
 For #DiscoveringDragons, I post two or three prompt words for everyone to make into a dragon. It's a nice framework for artists of any skill level to focus some time on an 'assignment' to shake the rust off or get the pencil moving again––all while also being loose enough that there's plenty of room for individual expression and interpretation.
This month the prompt words were Ferret & Ember. I opened a few tabs of google image searches of those words as well as one for 'dragons' as well as another artist I was inspired by 'Nora Patwora'
 I started with a pencil drawing on copy paper of the ferret shape and I slowly started adding dragon features like the belly scale plates and the horns. To incorporate 'ember' into the piece, I decided that all the dragon-ish parts would have a texture like glowing embers on a log in a fire. I also applied that idea to the ferret mask markings.
The wings I actually drew on a separate sheet of copy paper because I'd taken a few stabs at loose shapes on the original paper and wasn't happy. In photoshop I was able to combine the two drawings into this piece to the left.

After I was happy with my above design, I printed that piece out on copy paper and taped it to the back of a sheet of Strathmore 300 series bristol. Using a lightpad, I was able to see through the surface of the bristol as I inked the dragon. I used Copic Multiliner 0.7 & 0.3 SP pens to ink the art. I worked on the fur contours first, then dove in to the texture of the glowing ember bits. As I inked I started adding more of the falling ash and embers falling from his floating form.
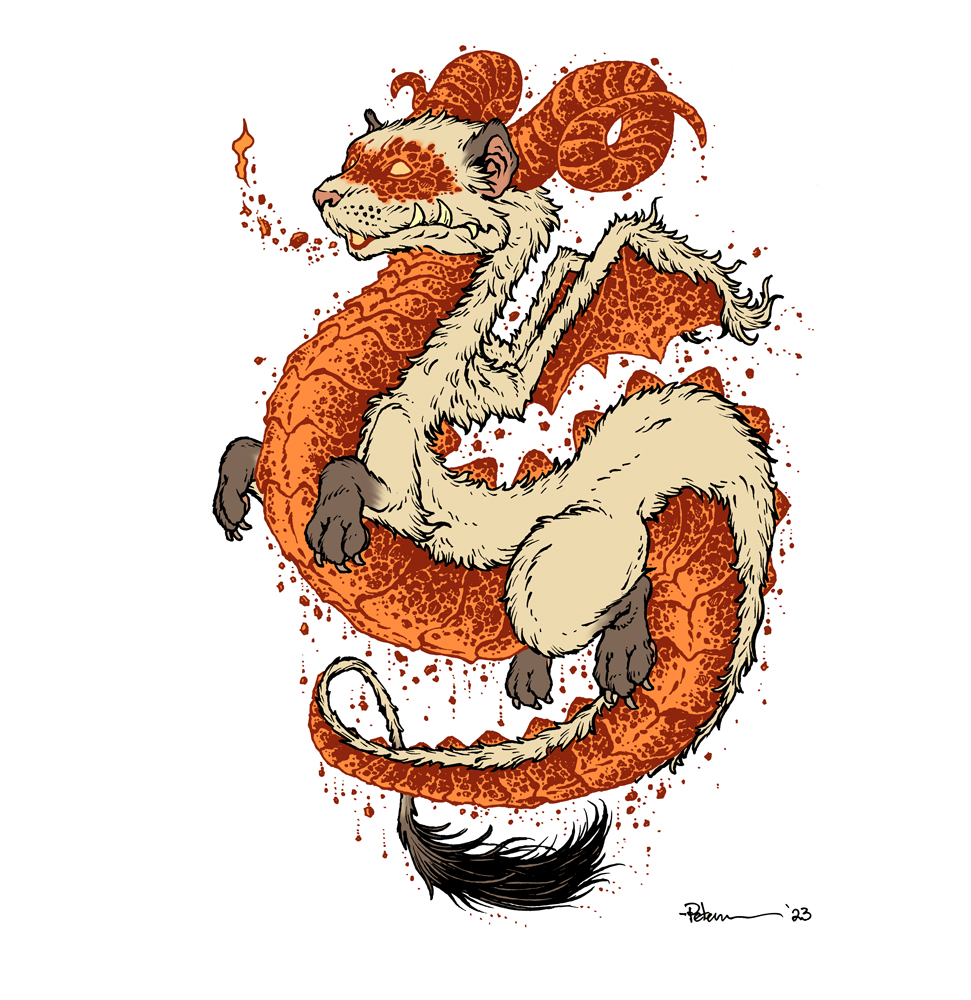 I was able to scan the piece and establish some color holds (areas where I want the ink to be a color other than black) before needing to sign off the stream for the night. I wished everyone luck with their pieces and told them we'd take a look at everyone's work on Monday.
After I had a break and some dinner, I got back into the coloring. That first step is to flat in the colors, basically professional coloring-in-the-lines.
For the final colors and all the highlights, shading, and texture I used the dodge and burn tools with a stock photoshop texture brush. I also selected areas and used the color balance tool to tint them warmer or cooler. Below you can again see the final rendered dragon.

But, as this is a community event, I wanted to share all the other entries posted in the Discord.
 Amy With A Side of Art
 Atimllam
 Capt.Nemo
 DePuggo
 Doombot2015
 Emily C.
 Evil Cartoonist
 Kelsey
 Matt Goodall
 Nate Pride
 Nuvalo
 Pendrake
 SciFi Taoist
 Sleepless Ninja
 Sydney
 Theresa Seanchai
 Towry Games
 Wicked Goblin King
January 3, 2023
Happy 2023 Guardmice!
 On New Year's Eve I decided to stream as I made a 2023 Mouse Guard image to post as we go into the new year.
 I've been recovering from COVID (exposed on Christmas Eve and symptomatic on the 26th) and this was the first time I'd picked up a pencil since before Christmas.
To the left you can see the finished artwork, and below I'll go through the steps to get there.
 Rough/Pencils:
I started with the idea of a mouse beating a drum (it came to me as I was watching an old episode of QI and they used an etching of musical parade goers as they talked about the feast of fools). I drew the mouse on a sheet of copy paper knowing my plan was to do some type of checked banner behind him with 2023 set in some font.
I scanned the drawing and worked on the digital design work (resizing, typography, the diamond pattern) when I realized I didn't like his right hand––so I copied the drumstick from the other hand and digitally drew a replacement hand for his right.
 Inks:
Inks:When I got the digital version of the layout the way I liked, I resized it to be about 8" square and printed it out on another sheet of copy paper. I taped that to the back of a sheet of Strathmore Bristol and inked the piece atop my Huion A3 Lightpad.
I used Copic Multiliner pens (the 0.7 nib mostly) to do the inking. It was fairly straight forward without too much texture other than on the cloak and filling in the '2023' numbers.

Color Flats:
I scanned the above inks and prepared them for coloring in Photoshop. First, adjusting levels and balances so that the black lines were crisp and the white areas were clean. Then, establishing color holds (areas where I want the ink lines to be a color other than black) on the banner & numbers. And lastly, drawing in flat colors to every area and establish the palette. It's a professional version of coloring inside the lines.

Final Colors:
The last part is rendering all those flat colors––adding shading, highlights, and textures.
Happy 2023 Guardmice! March to the beat of your own drum.
December 27, 2022
Discovering Dragons--A Community Draw Along
 First Friday of the month, starting January 6th:
DISCOVERING DRAGONSa community draw along event4-8pm easttwitch.tv/davidpetersen
Much like the #DrawTheExtinct project I did with my Twitch community for 18 months, we are switch gears to a new theme of #DiscoveringDragons
I'll provide some prompts and we'll each draw (or sculpt, or paint, or carve, or doodle) our own unique dragons combining those ideas. Work will be shared on my Discord, where we also vote to award little prizes.
Hope to see you there!
December 20, 2022
Recent Toned Commissions
I've finished all my recent toned paper commissions for the end of the year:

Dream
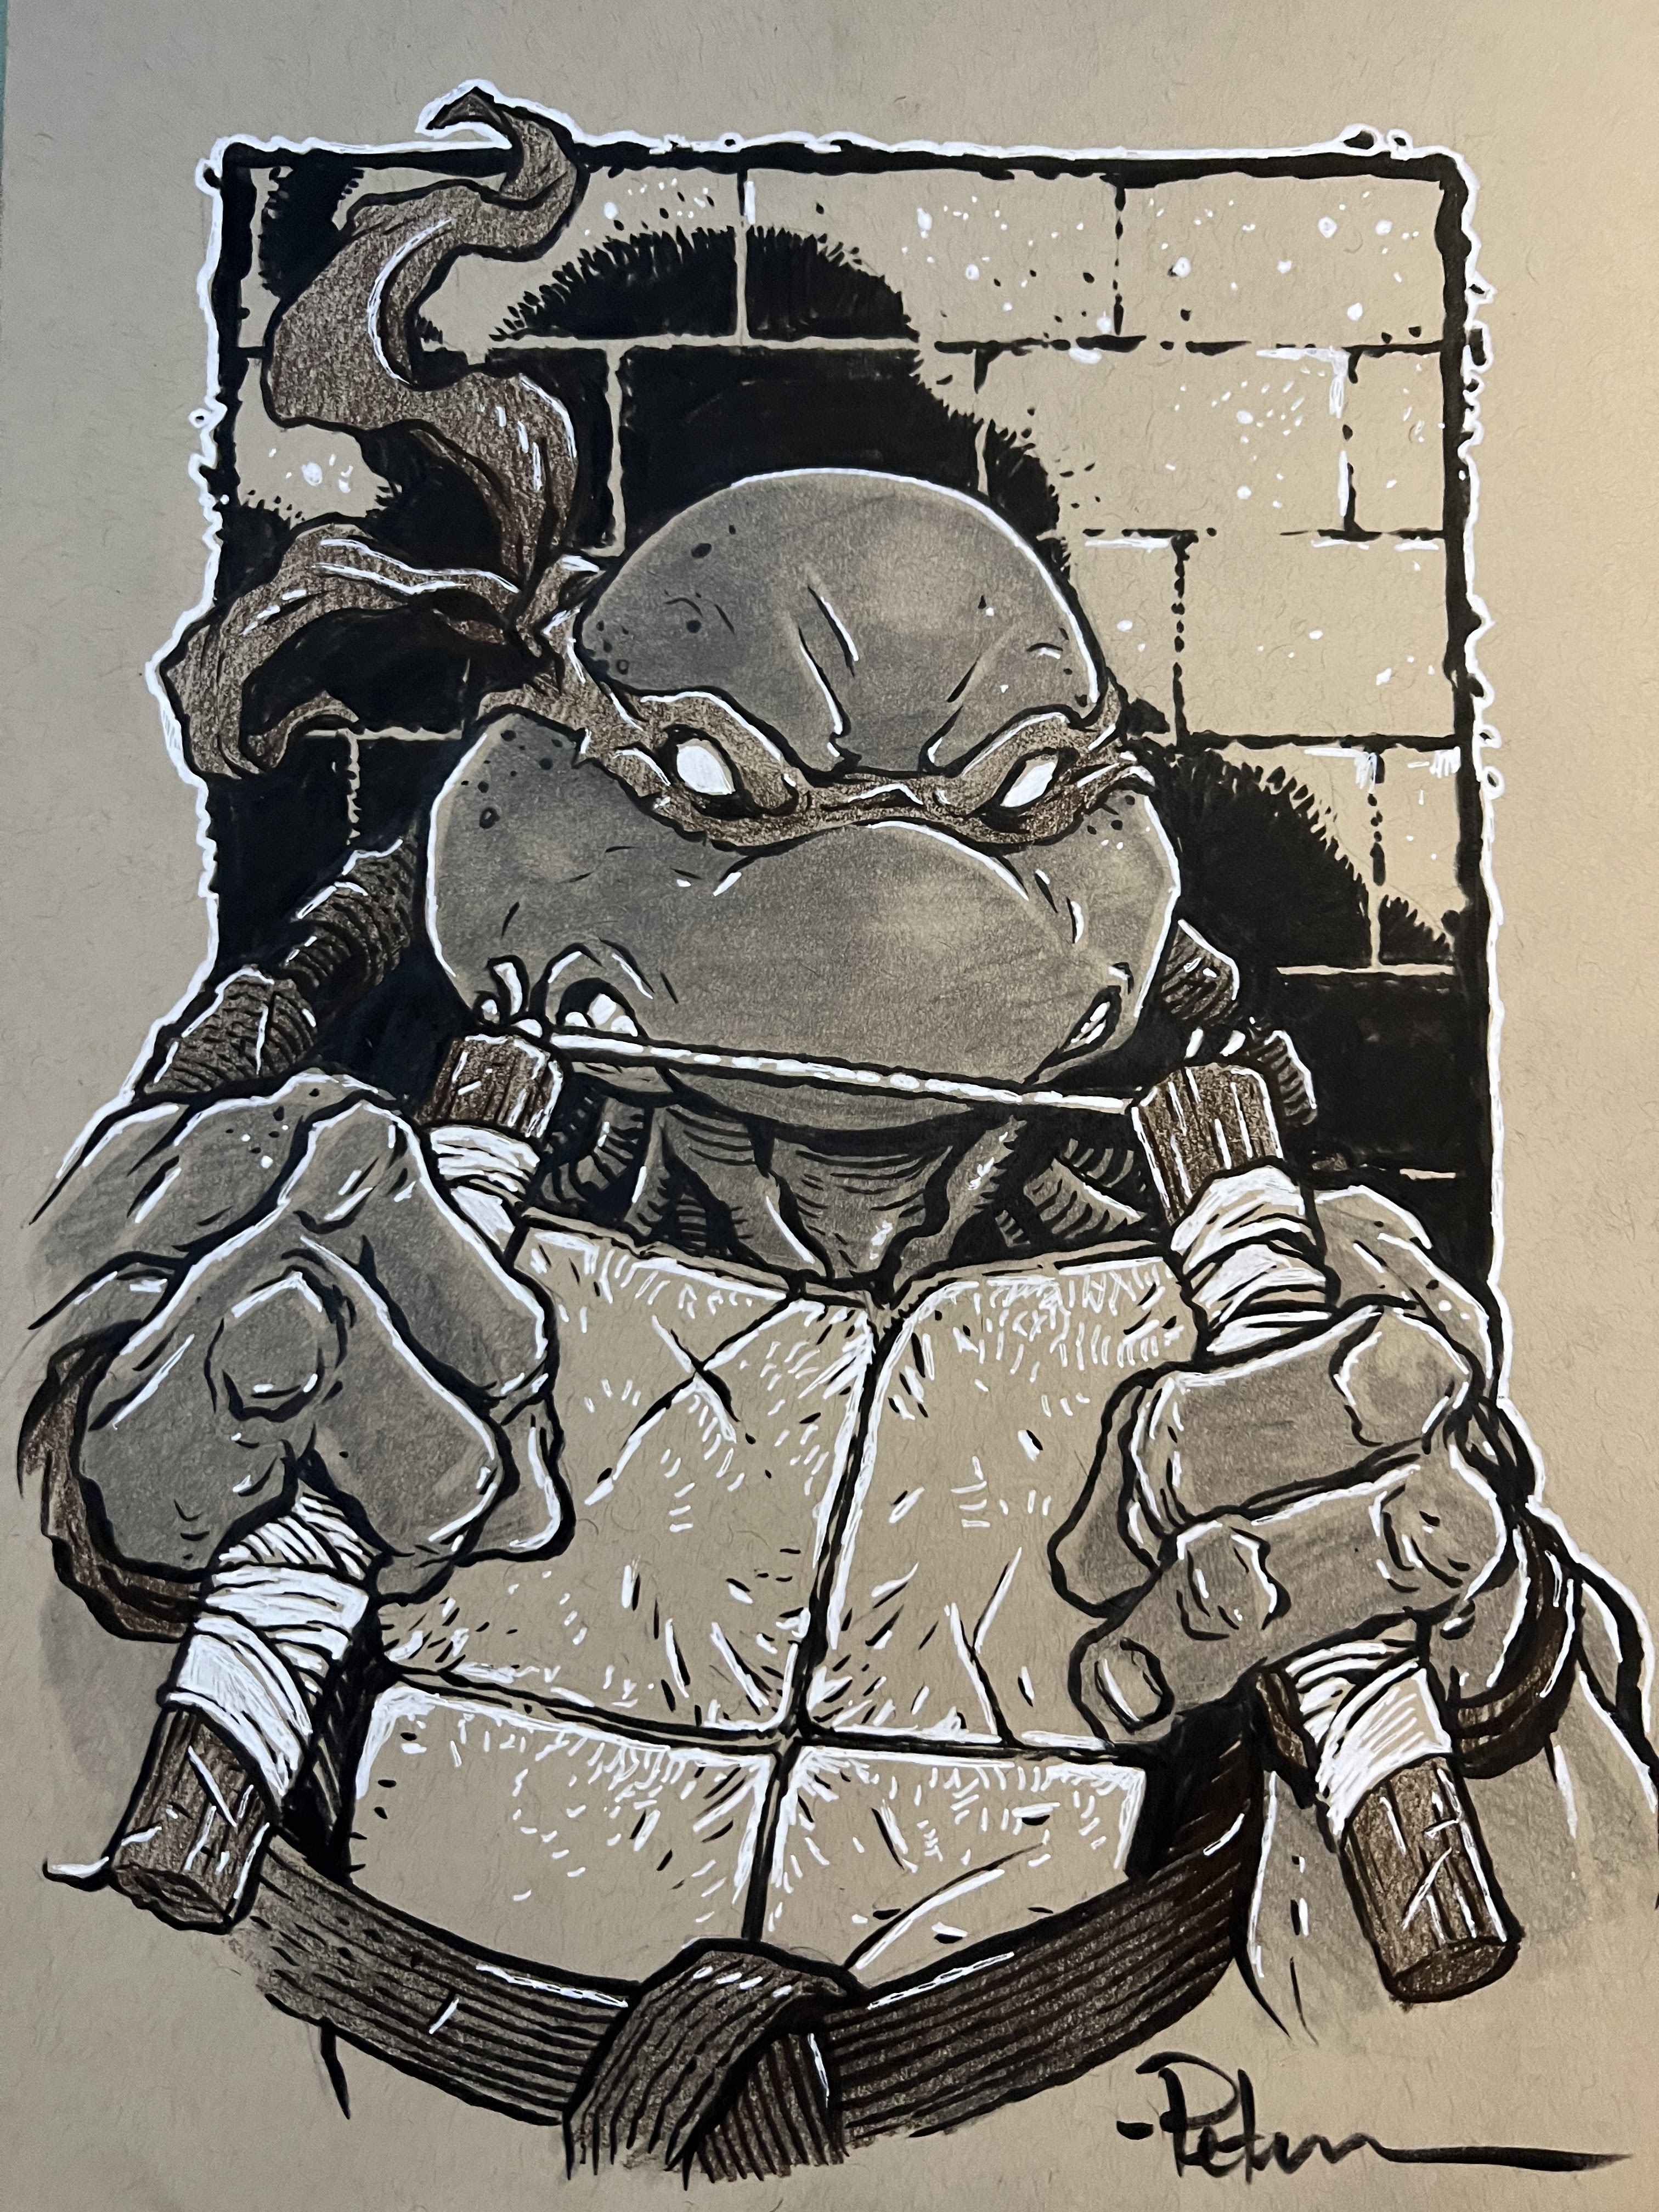
Michalangelo of the TMNT
 Sir Quimp from The Middle Age
 Ben Grimm: The Thing
 Goldie the Gargoyle
 Usagi Yojimbo
 Wonder Woman
 Leonardo of the TMNT
 A Lantern Mouse
 Usagi Yojimbo eating a rice ball
 A Mouse in snake themed armor
 A Mouse Botanist
 A Bookish Mouse
 Ragnier the Hunter
 Calvin & Hobbes
 Princess Mononoke
 A Mouse Thief
 Arzach
 Boris the Bear
 Grey Hulk: Mr. Fix-It
 A Guardmouse
 Deathwing: A Dragon
 A Wise old Degu
 A Princess Kitty
 The Rocketeer
 A Cat Adventurer
December 13, 2022
January Mouse Guard 2023(24!) Calendar Art

This year I'm releasing a Mouse Guard 2023 Calendar. I'll be taking copies with me to Baltimore and selling them through my Online Store (**SOLD OUT**). I created seven new pieces of artwork specifically for the calendar (even numbered months mainly). The new pieces were all drawn at 12" x 12" (the size of the Calendar itself)
To the left you can see the final art piece for that 13th month January 2024! I wanted to do something more geometric and stylized, some art the mice would have.
Below in this blogpost I'll walk through the steps to creating it.
 Reference:
I started by searching for 'Medieval Calendar' imagery (things with moon phases or intertwining circles)––when this odd 1974 plate came up. It's a collectable piece of porcelain with a medieval art style to the design. And, well––I really liked it, so I decided to interpret it and resize it in my own way for my own needs. It took a lot of resizing this photo's elements before I could even start swapping out elements. By enlarging the center and eliminating the month calendars I had room to widen the outer ring for a better illustration space.
 Layout:
I redesigned each shield to be an emblem of a mouse city (many of these were already established and hinted at in the extras pages of Winter & Black Axe) I used the month arches to hold the names of those settlements. The center became a mouse-sun and zodiac symbols became a twelve step moon phase.
The last part was to recreate that bayeux tapestry-like ring with mouse figures. I tried to stylize and simplify my version of that, which gave me freedom to use hares, birds, a frog, and a turtle as mounts without worrying about scale.
 Inks:
Inks:With the above layout all set, I printed out the image (onto two sheets of legal paper that had to be registered and taped back together). I inked this piece on my Huion lightpad. Using the lightpad I could see through the 12" x 12" Strathmore bristol to the printout below so I could use it as a pencil guide. I used Copic Multiliner SP pens.
The detail was so tight, that I did need to use my smaller 0.3 nib Multiliner rather than the 0.7 I normally use (though I certainly used the 7 on the larger circular borders). I was a trick to get the outer characters to look good and to not want to add texture. Oh! and I messed up and forgot to switch out 'Shorestone' above the shield with the black circles to 'Dawnrock' I know the layout above has it right, but that's because I had to fix it so I could ink a patch of the correct letters onto the back of this piece in the corner to scan and swap out.
 Flats:
When the inks were done I scanned them into Photoshop and started the coloring process. In this step I am filling in each area with a flat color (no rendering, no textures)–it's like a professional version of coloring-in-the-lines. It took me a while to decide on the color choices here. I didn't want the look of the 1974 reference plate. So I started with the known: the shield emblems. I then pulled from those as I filling in the other design elements around the piece, altering them sightly when needed.
At this stage I also established all the color holds (areas where I want the lineart to be a color other than black) Everything is a hold in this piece––the dark linework is a dark brown, then it was a matter of establishing from a design point-of-view what colors worked best for each other element

Final:
I rendered the piece using dodge and burn tools as well as a stock texture brush to add all the light, shadow, and texture. This piece is an oddity in that I was able to do very little rendering to just add a bit of scuff and focus texture so the piece didn't look so digital.
December 6, 2022
December Mouse Guard 2023 Calendar Art
 This year I'm releasing a Mouse Guard 2023 Calendar. I'll be taking copies with me to Baltimore and selling them through my Online Store (**SOLD OUT**). I created seven new pieces of artwork specifically for the calendar (even numbered months mainly). The new pieces were all drawn at 12" x 12" (the size of the Calendar itself)
To the left you can see the final art piece for December. I wanted to suggest a holiday, but without being overly blatant––so this mouse may just happen to wear red when delivering goods to mouse towns and villages in the snow.
Below in this blogpost I'll walk through the steps to creating it.
 Reference:
This stock photo is the sled reference I used for the piece. I'd actually already drawn the mouse with their lantern when I decided I needed to dig for reference. At first, I didn't find sled designs I liked that felt rustic enough while also having space for the load of goods piled up. I was prepared to look at medieval carts with the plan to replace wheels with rails when I found this perfect sled.
 Layout:
As I mentioned before, I started with the mouse in a fur lined coat holding a lantern. Then I used the above sled reference. I did bulk up most of the wooden pieces to make them a bit more fairy tale looking. I also added side walls (like on a kid's wagon). Then on a separate sheet I drew the bundle of goods. Some of those items are recognizable items (a pulley, a cauldron, sourdough bread, swords, bottles, a bolt of tartan fabric etc) but some are just boxes and odd shapes meant to imply important goods. I drew a pine bough (using a photo as reference) but when I had everything scanned and added some quick color blocking, I found that the area needed more density, and quickly painted in more shape.
 Inks:
Inks:With the above layout all set, I printed out the image (onto two sheets of legal paper that had to be registered and taped back together). I inked this piece on my Twitch stream on a Huion lightpad. Using the lightpad I could see through the 12" x 12" Strathmore bristol to the printout below so I could use it as a pencil guide. I used Copic Multiliner SP pens.
While the mouse and snowy ground were fairly straight forward, there was a lot to take into account in the sled's contents so they read as a mass, but also as separate objects--which also had to be different than the pine background.
 Flats:
When the inks were done I scanned them into Photoshop and started the coloring process. In this step I am filling in each area with a flat color (no rendering, no textures)–it's like a professional version of coloring-in-the-lines. The character and setting's colors were fairly established in the layout stage, but getting all the items in the sled to read took a long time of color selecting.
At this stage I also establish the color holds (areas where I want the lineart to be a color other than black) snow and the tartan pattern and the liquid & labels in/on the bottles.
 Final:
I rendered the piece using dodge and burn tools as well as a stock texture brush to add all the light, shadow, and texture. The lantern light really set the rendering for this piece, so I had to get the snow shadows and warm highlights established, then get the character lit in those same terms before I could start on the sled or goods. I added in a digital thumbprint trail for his pipe smoke, and digitally painted falling snow.
November 29, 2022
October Mouse Guard 2023 Calendar Art
 This year I'm releasing a Mouse Guard 2023 Calendar. I'll be taking copies with me to Baltimore and selling them through my Online Store. I created seven new pieces of artwork specifically for the calendar (even numbered months mainly). The new pieces were all drawn at 12" x 12" (the size of the Calendar itself)
To the left you can see the final art piece for October. I didn't want to do a spooky October piece, but I did think it should have a pumpkin in it, so I came up with a lantern-lit pumpkin-cider booth...inside a pumpkin
Below in this blogpost I'll walk through the steps to creating it.
 Reference:
This istock photo is one of many many many pumpkin photos I looked at for reference before starting the piece. This photo helped me more with the look of the ground cover and the pumpkin leaf greenery behind the pumpkin booth. So while I did look at this image, I didn't directly reference it (or any of the other dozens of wild growing pumpkins I found photos of), but looked at it for inspiration.
 Layout:
The first step was the pumpkin booth. I wanted there to be a bit of an up-angle for our view so that we could see the wall thickness of the pumpkin rather than it being obscured by the canopy. Once I had the pumpkin, bar, barrels, and leaves drawn I scanned them into Photoshop and figured out where in the frame it would fit. The placement I chose meant I had to draw more greenery on top as well as all the mouse characters on a separate sheet of copy paper (using a small prinout of what I already had on a lightpad). I added in the rope lines for the lanterns digitally and drew the lanterns themselves on the same sheet as the mice.

Inks:
With the above layout all set, I printed out the image (onto two sheets of legal paper that had to be registered and taped back together). I inked this piece on my Twitch stream on a Huion lightpad. Using the lightpad I could see through the 12" x 12" Strathmore bristol to the printout below so I could use it as a pencil guide. I used Copic Multiliner SP pens.
There was a lot of density of texture on the floor and in the background, so I tried to be simple with any tones I added to the barrels, mouse clothes, or pumpkin.
 Flats:
When the inks were done I scanned them into Photoshop and started the coloring process. In this step I am filling in each area with a flat color (no rendering, no textures)–it's like a professional version of coloring-in-the-lines. Many of the colors were obvious from nature for the scene, but it still took some time to dial in specific hues and tones for them. How light or dark, how saturated, how warm, how cool, etc. I fiddled with for a bit before starting the actual coloring
At this stage I also establish the color holds (areas where I want the lineart to be a color other than black) on the lanterns and cider.

Final:
I rendered the piece using dodge and burn tools as well as a stock texture brush to add all the light, shadow, and texture. There was a play of light in this piece (the light coming from inside the pumpkin as well as from the lanterns) that was a hard thing to render without also over-rendering and overworking the piece. I hope that I found the balance so that it just feels like a fun crisp air evening where there's plenty of warmth from the setting and company.
The Calendar is available in my online store: https://mouseguard.bigcartel.com/product/mouse-guard-2023-calendar
November 22, 2022
August Mouse Guard 2023 Calendar Art
 This year I'm releasing a Mouse Guard 2023 Calendar. I'll be taking copies with me to Baltimore and selling them through my Online Store. I created seven new pieces of artwork specifically for the calendar (even numbered months mainly). The new pieces were all drawn at 12" x 12" (the size of the Calendar itself)
To the left you can see the final art piece for August. Inspired by tomatoes growing in my back yard, I wanted something more pastoral and calm featuring plants and food.
Below in this blogpost I'll walk through the steps to creating it.
 Reference:
In our back yard Julia grows a few different types of tomatoes. These were growing in a raised bed and while Julia was away dog-siting for her sister for a week I was watering them this summer. Unfortunately, we only were able to enjoy a few of them before critters started taking nibbles out of each one that was even close to ripe.
Well, I was starting work on the calendar project when Julia was away, and I liked the shapes and colors, thinking every time I watered it that it would be a good backdrop for a piece. Here's a pic I grabbed on one of those watering sessions.
 Layout:
I started with re-drawing the photo using the reference. I needed to crop the image down and figure out how I was going to handle rendering the texture of the leaves. I then drew a farmer mouse with a wooden pitchfork(?) standing watch over his harvest. But the piece needed more, so I added a little band of musicians who I guess are celebrating the bounty. And then I still felt like it needed more, so I added three fur Karner Blue butterflies to help the scene. I do feel like this is an illustration that got away from me in terms of composition or focus, but then somehow worked itself out through no fault of my own.

Inks:
With the above layout all set, I printed out the image (onto two sheets of legal paper that had to be registered and taped back together). I inked this piece on my Twitch stream on a Huion lightpad. Using the lightpad I could see through the 12" x 12" Strathmore bristol to the printout below so I could use it as a pencil guide. I used Copic Multiliner SP pens.
I inked a lot of the mice with the 0.3 nib Multiliner rather than the 0.7 I do most everything else with. This piece is all about density of detail and texture distributed within some orbs of open space.
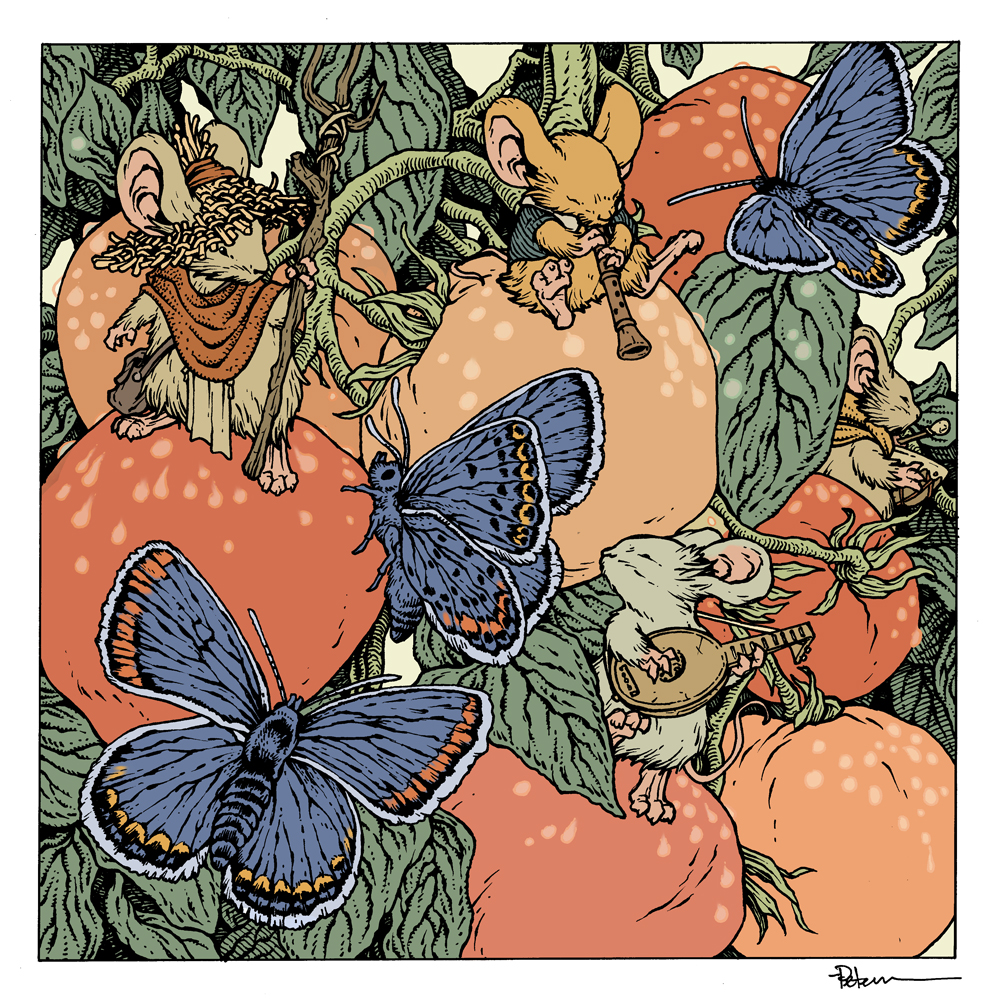 Flats:
When the inks were done I scanned them into Photoshop and started the coloring process. In this step I am filling in each area with a flat color (no rendering, no textures)–it's like a professional version of coloring-in-the-lines. TSome of the colors I was able to eye-dropper from the original reference photo. The butterflies were interpreted from photo references, and the mice were colored to not clash or blend in with the scene.
At this stage I also establish the color holds (areas where I want the lineart to be a color other than black) on the water droplets.
Final:
I rendered the piece using dodge and burn tools as well as a stock texture brush to add all the light, shadow, and texture. Getting the the tomatoes rendered was first priority since the amound of realism & volume in them would discate how far I had to push everything else. I had some fun using a freehand lasso tool (with a slight feather) and changed the color balance several times around the butterfly wings to give more color depth and a slight iridescence.
The Calendar is available in my online store: https://mouseguard.bigcartel.com/product/mouse-guard-2023-calendar
November 15, 2022
June Mouse Guard 2023 Calendar Art
 This year I'm releasing a Mouse Guard 2023 Calendar. I'll be taking copies with me to Baltimore and selling them through my Online Store. I created seven new pieces of artwork specifically for the calendar (even numbered months mainly). The new pieces were all drawn at 12" x 12" (the size of the Calendar itself)To the left you can see the final art piece for June. I wanted a moment of exhaustion and peace after the battle. I was also able to bring in a stained glass window I'd drawn before (used for the back cover of the sketchbook Dawn, Daye, Dusk)
Below in this blogpost I'll walk through the steps to creating it.
Layout:
 I started with the room (dropping in the stained glass window art I mentioned earlier). Unfortuneately somewhere in this, I lost the perspective of the floor, and it somewhat ruins the illustration, but I tried making it less distracting in the coloring stage. Next came the exausted mouse (wearing a cloak clasp with an anvil on it––this is meant to be somewhere in Ironwood) The snake was drawn separately referenced from a few photos of Michigan's Eastern Massasauga rattlesnake. Everything was reassembled in Photoshop where I tinted the pencil drawings different colors and added in some digitally drawn details (unfortunately I didn't see the perspective issues.)
 Inks:With the above layout all set, I printed out the image (onto two sheets of legal paper that had to be registered and taped back together). I inked this piece on my Twitch stream on a Huion lightpad. Using the lightpad I could see through the 12" x 12" Strathmore bristol to the printout below so I could use it as a pencil guide. I used Copic Multiliner SP pens.
Most of this was fairly straight forward except for the snake's scales and dark spots.. I then had to balance the level of line density in the background wooden planks and beams so they receded into the background and didn't distract from the snake.
 Flats:When the inks were done I scanned them into Photoshop and started the coloring process. In this step I am filling in each area with a flat color (no rendering, no textures)–it's like a professional version of coloring-in-the-lines. The colors for the window were already established from the original piece of artwork––the mouse, snake and background were variations on tones already in the window
At this stage I also establish the color holds (areas where I want the lineart to be a color other than black), here the glass, the mouse's cut, and the snake's eye
 Final:I rendered the piece using dodge and burn tools as well as a stock texture brush to add all the light, shadow, and texture. The light coming through the stained glass window (as well as the cast light spots on the characters did a lot of heavy lifting before I even started to render the scene and figures. As I mentioned earlier, I needed to draw your eye away from the perspective issues, so the tile floor is much darker and more muted than I'd originally envisioned.
The Calendar is available in my online store: https://mouseguard.bigcartel.com/product/mouse-guard-2023-calendar
David Petersen's Blog

- David Petersen's profile
- 339 followers

