
Ree Drummond's Blog, page 79
March 3, 2011
Deliciousness
I have cooking photos still to edit, so I thought I'd share a handful of utter deliciousness I've seen on some of my favorite food sites lately.
I die.
I swoon.
I crave.
 Dulce de Leche Cupcakes from Joy the Baker. Bless you, Joy. Bless you.
 Feta Sun-Dried Tomato Turkey Burger Sliders by Picky Palate. I love sliders, and I'm craving these at 9:50 a.m.
 Cheesecake wih Guava Swirl from The Noshery. Oh, Meseidy. Yum.
 BBQ Chicken Salad by Two Peas and Their Pod. Oh my goodness. Loaded salads are my life.
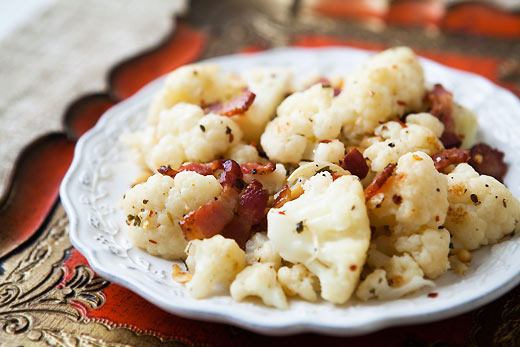 Cauliflower with Pine Nuts and Bacon. Oh my gracious. This looks divine.
 Chocolate Covered Cherry Oreo Cake by I Am Baker. It's gorgeous on the outside…even more so on the inside. Wow.
 Sautéed Bacon, Mushrooms, and Lentils by Leites Culinaria. And with that…I just died from bliss. Delicious!
I'll have my next recipe up as soon as I dig out from under my pile.
I estimate this will be in the year 2039.
See you then!
Love,
P-Dub


February 28, 2011
Chicken Fried Steak
 There's nothing special about this dish, except that it's a total miracle.
It's Chicken Fried Steak, is what it is. I made it for Marlboro Man last night because I like him, because he drove me all over Kingdom Come this weekend, because he stopped at a gas station each of the 4,322 times I asked him to because I kept drinking iced coffees (TMI?), and because I like him. And because I like him.
I think I'll keep him.
Make it for someone you like!
And plan on keeping.
To begin, you need an assembly line of ingredients:
 A plate of cube steak, which is tenderized round steak that's been extra tenderized.
You could also just use tenderized round steak.
You could also buy regular round steak and beat it to smithereens with a tenderizer.
 You need a dish with milk and eggs…
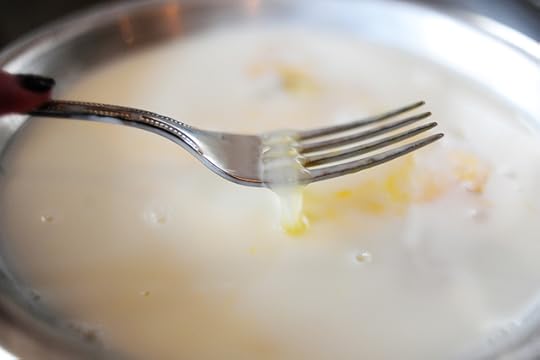 Beaten together with a fork.
 Next, you need a dish with flour. Sprinkle on some seasoned salt…
 And some black pepper. I like to add a little cayenne, too; you can add whatever spices you think might float your boat.
 For the assembly, dip the meat, one piece at a time, into the egg/milk mixture.
 Turn it over to coat.
 Remove it from the wet mixture, then place it into the flour mixture.
 Remove it from the flour mixture…
 Then place it into the wet mixture again, turning to coat.
 Finally, place it in the flour once again and turn to coat.
 After this, place the meat in a clean dish while you repeat the breading process with the rest of the meat.
 Heat some canola oil in a heavy skillet.
 Fry the meat, three pieces at a time…
(If little chunks of the breading fall off, don't weep. Happens to me all the time, man.)
 Until both sides are golden brown.
Remove the cooked meat to a paper towel-lined plate, then get ready to make the gravy.
 Now, that's a beautiful skillet of grease. Look at those bits of deliciousness.
What you need to do first is pour off all the grease into a heatproof bowl, then add 1/4 cup of grease back into the skillet. Heat it over medium-low heat, then sprinkle flour over the grease. (Sorry. Missed the photo.)
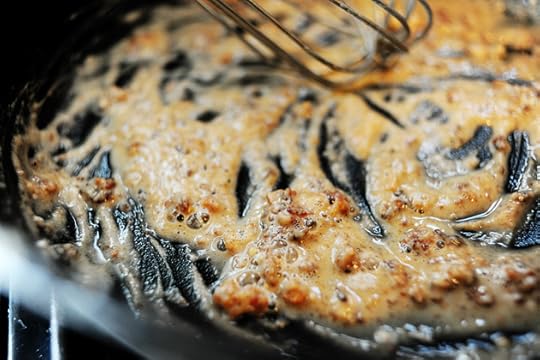 Whisk the flour into the oil…
 And cook it for a couple of minutes, until it turns a deep golden brown. If the roux looks more greasy than pasty, just sprinkle in a little more flour.
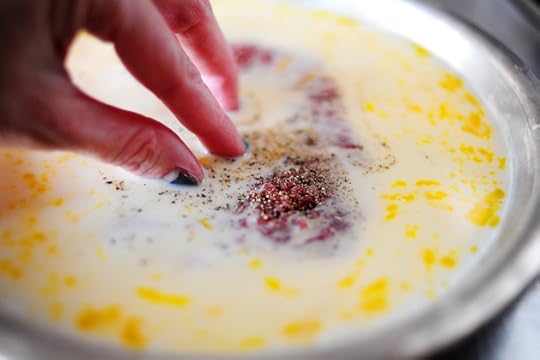
 Pour in a couple of cups of milk…
 And whisk until it's combined. You'll need to add plenty of salt and pepper to the gravy, tasting as you go. Undersalted gravy is a sacrilege.
And grody.
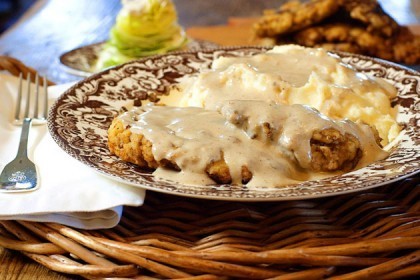
(Pardon me while I slip in this shot from my cookbook because I forgot to take a finished shot last night. Don't be like me.) Serve the meat alongside a big pile of mashed potatoes, then pour the gorgeous gravy over the whole thing.
It's one of life's real pleasures.
Here are the printables, both for Chicken Fried Steak and the mashed potatoes that belong alongside them:
Recipe: Chicken Fried Steak
Prep Time: 15 Minutes
|
Cook Time: 25 Minutes
|
Difficulty: Easy
|
Servings: 8
Print Recipe
3"x5" Cards
4"x6" Cards
Full Page
Ingredients
3 pounds Cube Steak (tenderized Round Steak That's Been Extra Tenderized)1-½ cup Whole Milk, Plus Up To 2 Cups For Gravy2 whole Large Eggs3 cups All-purpose Flour Seasoned Salt¼ teaspoons Cayenne LOTS Of Black Pepper. Lots. Canola Oil, For Frying Salt And Pepper, For Both Meat And Gravy Preparation Instructions
Begin with an assembly line of dishes for the meat: milk mixed with egg in one; flour mixed with spices in one; meat in one; then have one clean plate at the end to receive the breaded meat.
Work one piece of meat at a time. Season both sides with salt and pepper, then dip in the milk/egg mixture. Next, place the meat on the plate of seasoned flour. Turn to coat thoroughly. Place the meat back into the milk/egg mixture, turning to coat. Place back in the flour and turn to coat.
(So: wet mixture/dry mixture/wet mixture/dry mixture.) Place breaded meat on the clean plate, then repeat with remaining meat.
Heat oil in a large skillet over medium heat. Drop in a few sprinkles of flour to make sure it's sufficiently hot. Cook meat, three pieces at a time, until edges start to look golden brown; around 2 to 2 1/2 minutes each side.
Remove to a paper towel-lined plate and keep warm. Repeat until all meat is cooked.
GRAVY:
After all meat is fried, pour off the grease into a heatproof bowl. Without cleaning the pan, return it to the stove over medium-low heat. Add 1/4 cup grease back to the pan. Allow grease to heat up.
Sprinkle 1/3 cup flour evenly over the grease. Using a whisk, mix flour with grease, creating a golden-brown paste. Keep cooking until it reaches a deep golden brown color. If paste seems more oily than pasty, sprinkle in another tablespoon of flour and whisk.
Whisking constantly, pour in milk. Cook to thicken the gravy. Be prepared to add more milk if it becomes overly thick. Add salt and pepper and cook for 5 to 10 minutes, until gravy is smooth and thick. Be sure to taste to make sure gravy is sufficiently seasoned.
Serve meat next to a big side of mashed potatoes. Pour gravy over the whole shebang!
Recipe: Creamy Mashed Potatoes
Prep Time: 1 Hour
|
Cook Time: 30 Minutes
|
Difficulty: Easy
|
Servings: 10
Print Recipe
3"x5" Cards
4"x6" Cards
Full Page
Ingredients
5 pounds Russet Or Yukon Gold Potatoes¾ cups Butter1 package (8 Oz.) Cream Cheese, Softened½ cups (to 3/4 Cups) Half-and-Half½ teaspoons (to 1 Teaspoon) Lawry's Seasoned Salt½ teaspoons (to 1 Teaspoon) Black Pepper Preparation Instructions
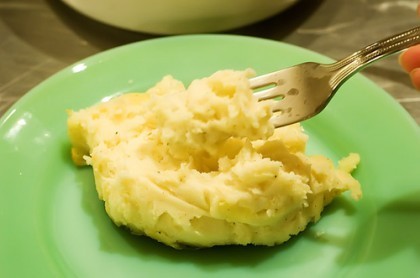
Peel and cut the potatoes into pieces that are generally the same size. Bring a large pot of water to a simmer and add the potatoes. Bring to a boil and cook for 30 to 35 minutes. When they're cooked through, the fork should easily slide into the potatoes with no resistance, and the potatoes should almost, but not totally, fall apart.
Drain the potatoes in a large colander. When the potatoes have finished draining, place them back into the dry pot and put the pot on the stove. Mash the potatoes over low heat, allowing all the steam to escape, before adding in all the other ingredients.
Turn off the stove and add 1 ½ sticks of butter, an 8-ounce package of cream cheese and about ½ cup of half-and-half. Mash, mash, mash! Next, add about ½ teaspoon of Lawry's Seasoning Salt and ½ a teaspoon of black pepper.
Stir well and place in a medium-sized baking dish. Throw a few pats of butter over the top of the potatoes and place them in a 350-degree oven and heat until butter is melted and potatoes are warmed through.
Note: When making this dish a day or two in advance, take it out of the fridge about 2 to 3 hours before serving time. Bake in a 350-degree oven for about 20 to 30 minutes or until warmed through.

February 24, 2011
Devil Dogs
 Raise your hand if you know what a Devil Dog is. Well, let me amend that: raise your hand if, to you, a Devil Dog is a chocolaty/cakey dessert with a whipped cream substance sandwiched between two pieces of chocolate cake.
*Raises Hand*
The other day when I tweeted that I was making Devil Dogs, it became clear to me that my Devil Dog perspective isn't necessarily the status quo. Some believed a Devil Dog to be what I believe a Devil Dog to be, but some believe a Devil Dog to be some kind of fancy hot dog concoction. Some still believed a Devil Dog to be a college mascot. Other had never heard the term "Devil Dog" at all.
So today, I shall stick up for my beliefs! Devil Dogs are in the same genre as Suzy-Q's, Ding Dongs (without the chocolate coating), or anything delight that combines chocolate cake with a light, whipped cream…or icing…or whatever that white stuff is in that genre of treats. I went the easy route and made my trust chocolate sheet cake, emphasizing the "heaping" in the "heaping tablespoons of cocoa." (Recipe at the end.)
 Then I let the cake cool completely in the pan.
Next up, I decided to make That's the Best Frosting I've Ever Had, a Tasty Kitchen recipe submitted by TK Member MissyDew several months ago. The frosting really is wonderful, despite its slightly unusual flour-and-milk beginning.
 I decided to take a walk on the wild side and use half-and-half instead.
 Sprinkle in some all-purpose flour…
 And whisk it together over low heat. Keep stirring for several minutes as it thickens.
 As MissyDew's instructions in the printable recipe below state, it should be as thick as brownie batter (much thicker than cake batter.) Then you let that mixture cool completely; put the pan over a big bowl of ice if you're in a hurry.
 While that bizarro mixture is cooling, beat some butter and sugar in a mixer…
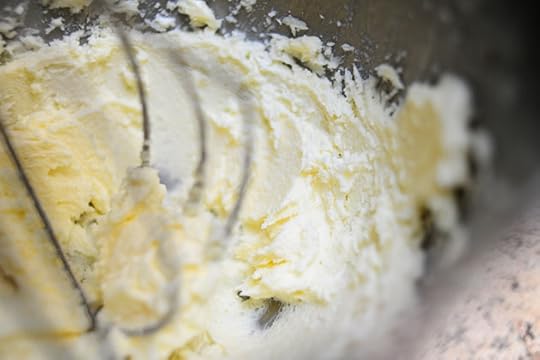 …Until very light and fluffy.
 Then you add the (completely cooled) flour/milk (or half-and-half if you're like me and like fat) concoction to the butter/sugar mixture…
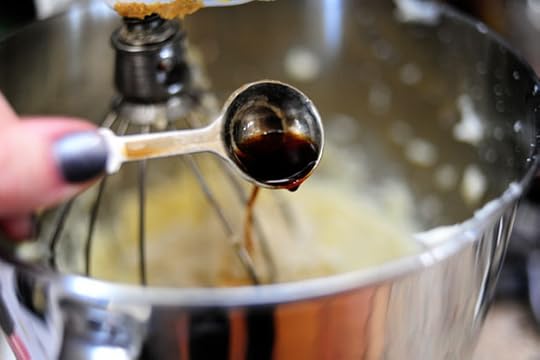 Add some vanilla…
(There's no excuse for my mixer. Sorry. I kinda use it a lot and I don't always wipe it down properly. Don't be like me.)
 And beat it to smithereens until it becomes a light, fluffy whipped icing.
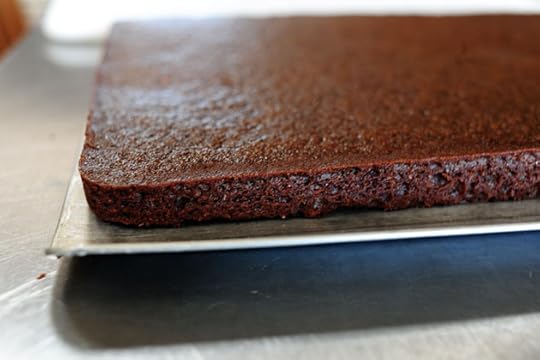 Turn the cake out of the pan.
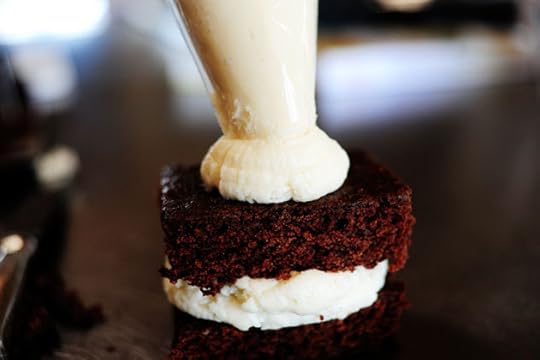
 Next, it's time to cut the cake into rectangles. I have a set of rectangular nesting cutters and they work great, but you can also just use a sharp knife.
 Start cutting, coming in just a bit from the edges…
 Continue, cutting the entire cake into rectangles.
 Then lay them on a pan and have them ready. I actually set this pan in the fridge to make sure there was no warmth to the cake at all. The frosting is so light and fluffy, the coolness will help keep it all together.
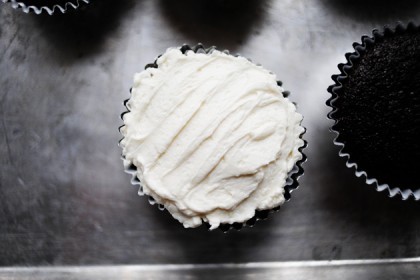
 Throw some frosting into an icing bag if you have one, then squeeze some onto a rectangle of cake, bottom side up.
 Then place another piece, top side up, on top, lightly pressing to distribute the frosting.
 Squirt a dollop on top…
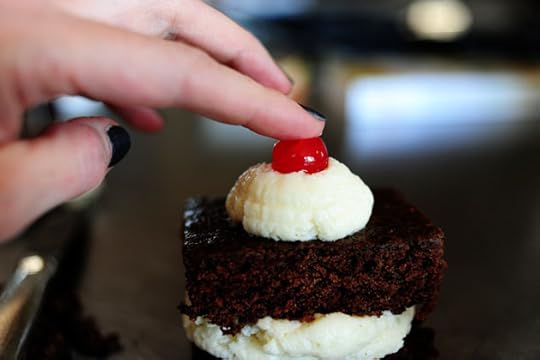 Then stick on a cherry.
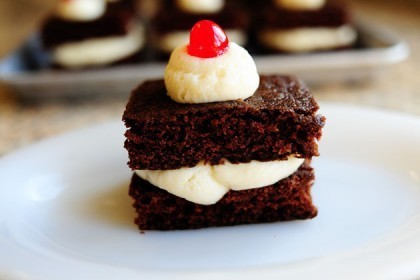
 Repeat until you have a big ol' platter of devil dogs…and I don't mean the loaded hot dog numbers. Chill them in the fridge until you're ready to serve; the frosting will become softer and softer and room temperature.
 Note that you can use any whipped-type frosting or filling you want: if you have a true recipe for the Hostess-type filling for Ding Dongs and Twinkies…or (forgive me) you can use Cool Whip.
As I said: forgive me.
Enjoy these!
Here are the three printables:
Devil Dogs:
Recipe: Devil Dogs
Prep Time: 45 Minutes
|
Cook Time: 20 Minutes
|
Difficulty: Easy
|
Servings: 12
Print Recipe
3"x5" Cards
4"x6" Cards
Full Page
Ingredients
1 whole Chocolate Sheet Cake (see "Best Chocolate Sheet Cake Ever" On Tasty Kitchen)1 whole Recipe For "That's The Best Frosting I've Ever Had" On Tasty Kitchen (or You Can Use Frozen Whipped Topping) Maraschino Cherries Preparation Instructions
Bake cake according to recipe directions, thoroughly greasing and flouring the pan. Allow cake to cool completely, then turn out onto a flat surface.
Make frosting recipe, substituting half-and-half for milk for extra thickness/richness.
Cut cooled cake into rectangles.
Place frosting into a frosting bag. Squeeze frosting onto one rectangle of cake. Press second rectangle on top. Squeeze a dollop of frosting on the top piece of cake. Place a cherry on top.
Chill until ready to serve!
Chocolate Sheet Cake Recipe. Spray the pan thoroughly with non-stick baking spray; you'll want to turn it out of the pan.
Recipe: The Best Chocolate Sheet Cake. Ever.
Prep Time: 20 Minutes
|
Cook Time: 20 Minutes
|
Difficulty: Easy
|
Servings: 24
Print Recipe
3"x5" Cards
4"x6" Cards
Full Page
Ingredients
FOR THE CAKE:2 cups Flour2 cups Sugar¼ teaspoons Salt4 Tablespoons (heaping) Cocoa2 sticks Butter1 cup Boiling Water½ cups Buttermilk2 whole Beaten Eggs1 teaspoon Baking Soda1 teaspoon Vanilla _____ FOR FROSTING:½ cups Finely Chopped Pecans1-¾ stick Butter4 Tablespoons (heaping) Cocoa6 Tablespoons Milk1 teaspoon Vanilla1 pound (minus 1/2 Cup) Powdered Sugar Preparation Instructions
In a mixing bowl, combine flour, sugar, and salt.
In a saucepan, melt butter. Add cocoa. Stir together.
Add boiling water, allow mixture to boil for 30 seconds, then turn off heat. Pour over flour mixture, and stir lightly to cool.
In a measuring cup, pour the buttermilk and add beaten eggs, baking soda, and vanilla. Stir buttermilk mixture into butter/chocolate mixture. Pour into sheet cake pan and bake at 350-degrees for 20 minutes.
While cake is baking, make the icing. Chop pecans finely. Melt butter in a saucepan. Add cocoa, stir to combine, then turn off heat. Add the milk, vanilla, and powdered sugar. Stir together. Add the pecans, stir together, and pour over warm cake.
Cut into squares, eat, and totally wig out over the fact that you've just made the best chocolate sheet cake. Ever.
Frosting Recipe (Sub half-and-half for the milk for extra richness; do milk for more lightness)
Recipe: That's the Best Frosting I've Ever Had
Prep Time: 15 Minutes
|
Cook Time: 10 Minutes
|
Difficulty: Easy
|
Servings: 12
Print Recipe
3"x5" Cards
4"x6" Cards
Full Page
Ingredients
5 Tablespoons Flour1 cup Milk1 teaspoon Vanilla1 cup Butter1 cup Granulated Sugar (not Powdered Sugar!) Preparation Instructions
Bake your favorite chocolate cake and let it cool.
In a small saucepan, whisk flour into milk and heat, stirring constantly, until it thickens. You want it to be very thick, thicker than cake mix, more like a brownie mix is. Remove from heat and let it cool to room temperature. (If I'm in a hurry, I place the saucepan over ice in the sink for about 10 minutes or so until the mixture cools.) It must be completely cool before you use it in the next step. Stir in vanilla.
While the mixture is cooling, cream the butter and sugar together until light and fluffy. You don't want any sugar graininess left. Then add the completely cooled milk/flour/vanilla mixture and beat the living daylights out of it. If it looks separated, you haven't beaten it enough! Beat it until it all combines and resembles whipped cream.
Grab a spoon and taste this wonderful goodness. If there is any left after your taste test, spread it on a cooled chocolate cake.
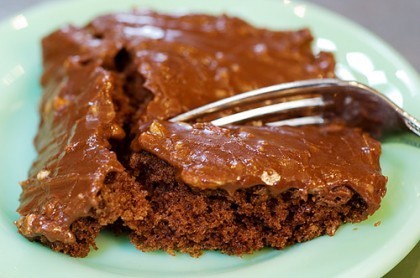
Cut yourself a piece and put it on a pretty plate. Grab a fork and prepare to experience the most divine pairing you can imagine. This frosting on chocolate cake is to die for. Sure, the recipe sounds strange — it has flour in it — but it's sublime. Try it, you'll see. You'll love it so much you won't go back.

February 22, 2011
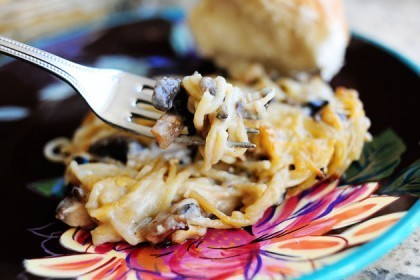
Creamy Chicken Spaghetti Casserole
 Make this today.
Sorry to be bossy. But this is important.
I whipped up this casserole yesterday and loved it. I had a chicken in the fridge, a couple of boxes of mushrooms, and the sheer will to eat a big ol' plate of comfort food. It resembles a tetrazzini more than anything, but is a little more on the simple/pared down side. No onions, no celery, no carrots. Just creamy, mushroomy loveliness.
I repeat: Make this today.
Sorry to be bossy. Again.
 Boil a whole cut up chicken for 30 to 40 minutes, until the meat is cooked all the way.
 Remove the chicken to a plate or bowl after it's done…
 Scoop out a couple of cups of broth from the pot and set it aside…
 Then keep the rest of the broth simmering in the pot.
 Next, slice up some mushrooms.
 Then crack open a can of black olives. Green if that's more your style.
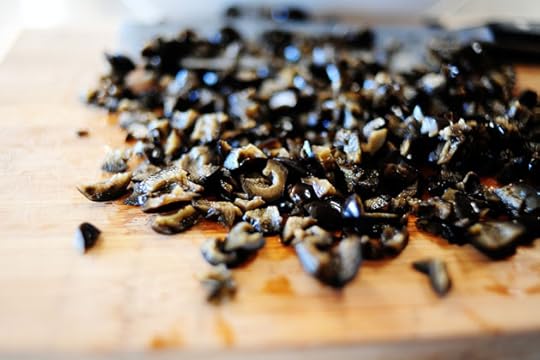 Chop them up pretty finely.
And I guess you could buy the already-chopped black olives. But that would be way too easy.
 Heat a couple of tablespoons of butter in a large (as large as you have or you'll regret it for the rest of your natural born life! Okay, that was an exaggeration) skillet, then throw in the sliced mushrooms.
 Pour in some wine, sprinkle in some salt and pepper…
 …And cook the mushrooms over medium-high heat for eight to ten minutes.
 Remove them from the pan and set them aside when the liquid has all cooked off.
 By now you can pull the chicken meat from the bone…
 Then give it a chop so the pieces are a little more fine. You'll need about two cups of meat, man.
 Next, crank up the heat on the broth and throw in some thin spaghetti, broken into pieces.
Let it bawl (boil) while you make the white sauce.
 Melt the rest of the butter in the skillet…
 Then sprinkle on some flour, whisking as you go. Cook this mixture for a minute or so.
 Pour in two cups of the broth.
 Whisk it to combine, then let the mixture bubble for a few seconds.
 Whisk in some more wine, which makes this dish utterly delicious.
 Then pour in some whole milk, whisking to combine.
 Use your freaky pink alien claw to add in some salt…
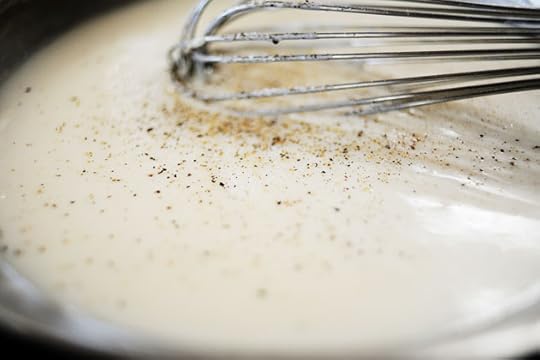 And some pepper…
 And the grated Parmesan cheese. Man, that is one freaky pink alien claw, isn't it?
It isn't mine. Just remember that, okay?
 Throw in the cooked mushrooms…
The cooked chicken…
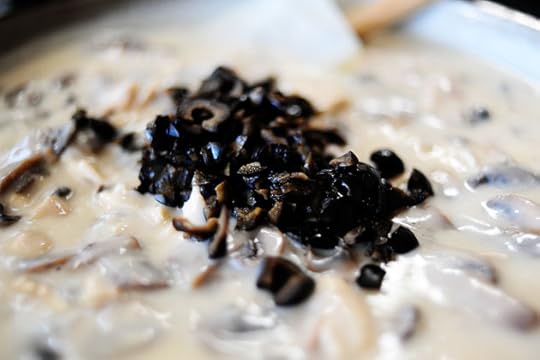 The chopped olives…
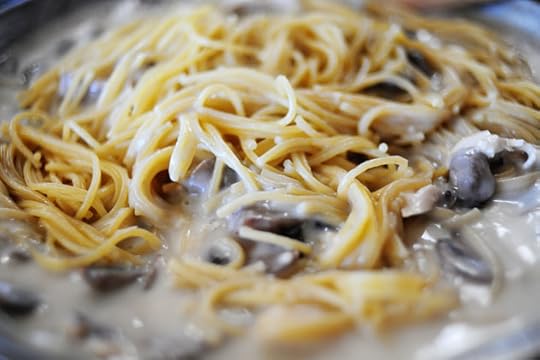 And the cooked spaghetti.
 Stir it all together, check the seasonings, and you're good to go!
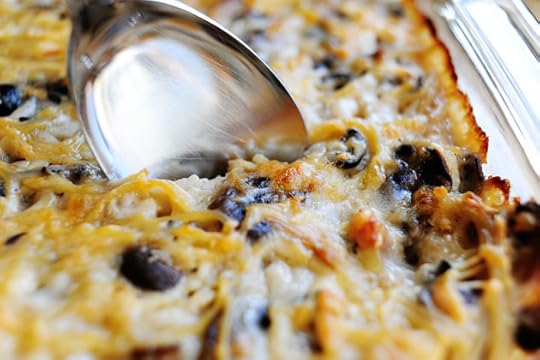
 Pour the mixture into a casserole dish, then sprinkle with a little more grated Parmesan.
Bake it at 350 for about 30 minutes or so, or until the top is golden brown and bubbly.
 Hello, my beautiful lover. I want you in my life immediately.
 Yum…
Yum…
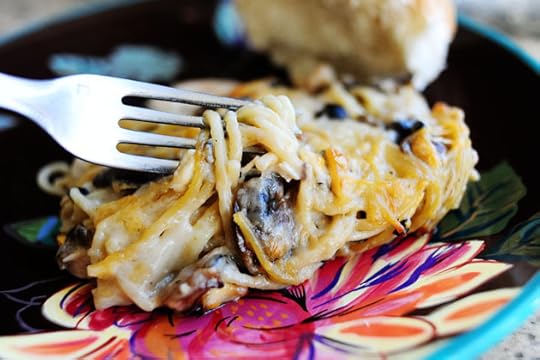 And yum.
 Heaven! Serve this with a green salad and some hot crusty bread and you too shall know the beauty.
Perfect for a weeknight dinner.
Enjoy!
Here's the handy dandy printable:
Recipe: Creamy Chicken Spaghetti Casserole
Prep Time: 45 Minutes
|
Cook Time: 30 Minutes
|
Difficulty: Easy
|
Servings: 8
Print Recipe
3"x5" Cards
4"x6" Cards
Full Page
Ingredients
1 whole Cut Up Fryer Chicken1 stick 1/2 Cup Butter16 ounces, weight White Mushrooms, Sliced¼ cups Dry White Wine Kosher Salt And Pepper¼ cups Flour2 cups Chicken Broth (reserved From Chicken Or Canned)1-½ cup Whole Milk¼ cups (additional) Dry White Wine1 cup Freshly Grated Parmesan Cheese1 cup Whole Black Olives, Chopped1 teaspoon Kosher Salt, Or To Taste Freshly Ground Black Pepper Extra Cheese, For Sprinkling1 pound Thin Spaghetti Preparation Instructions
Place chicken in a pot of water and boil on medium-low heat for 30 to 40 minutes. Remove chicken from pot and allow to cool slightly. Keep broth in pot.
Melt 2 tablespoons butter in a large skillet. Throw in mushrooms, add 1/4 cup white wine, and sprinkle with salt and pepper. Cook over medium heat for 8 to 10 minutes, or until liquid has totally evaporated. Remove mushrooms from skillet. Set aside.
Bring broth to a boil. Break spaghetti into thirds (shorter pieces). Add spaghetti pieces to boiling broth and cook. Drain when al dente. Remove meat from bones and shred until you have 2-plus cups of shredded chicken.
Return large skillet to medium-low heat. Add 6 tablespoons butter. Sprinkle flour over butter, whisking to combine. Cook for 1 or 2 minutes. Pour in 2 cups broth and whisk to combine. Pour in milk, additional 1/4 cup wine, salt and pepper to taste, then cook and bubble until thick. Turn off heat, add Parmesan cheese, and stir.
Add mushrooms, chicken, and chopped olives. Stir to combine and check seasonings. Add cooked spaghetti and stir.
Turn into a 9 x 13 casserole pan. Bake at 350 degrees or until golden brown and bubbly. Serve with salad and warm, crusty bread.

Special Edition Mixer Winners
 Here are the winners of the special edition orange floral mixers:
#179 Junglemom: "Tiramisu!"
#9653 Cas: "Sticky Toffee Pudding."
Congrats to the lucky winners! Contact prizes@thepioneerwoman.com to claim your lovely mixer.
Enjoy!

February 20, 2011
The Last Two to Tango
 I wish I had more to give away, but these…are…it. Last Monday's giveaway for the first two mixers was definitely the largest response to any giveaway here, and I hope it hasn't ruined all of us on plain/solid-colored mixers. 'Cause I've kind of been looking at my old white one and asking it what it's done for me lately.
"Mixed and beaten whatever you've asked me to," it replies.
Then I always feel bad.
Before I begin the giveaway, I wanted to let you know a few things:
1. As much as I'd like to, I won't be able to offer the mixers for sale. Because the design was a custom (and beautifully executed) paint job, it would result in a mixer that cost a pretty penny, which wouldn't be practical for "me" to manufacture. Not that a bright orange mixer with flowers all over it is practical, but still.
2. I think KitchenAid just wanted to do a small handful of these custom mixers.
3. I can't think of #3.
I would, however, like to share with you the name and link of the extremely talented designer/artist who's responsible for creating this beauty. She does custom mixers, so if you do decide you'd like to make your own color scheme/design some day, she'd be a great resource.
Un Amore Custom Designs
Nicole is very talented and definitely knows what she's doing.
And now…THE GIVEAWAY!
 Today I'm giving away the remaining two (of four) of these limited edition KitchenAid mixers.
 Here's another peek in case you missed it.
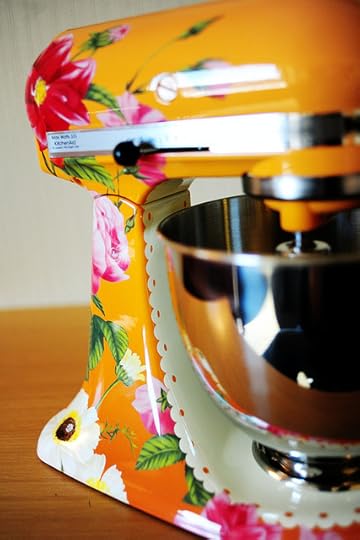


TO ENTER
To enter this extra special giveaway, just answer the following question in the Comments section of this post:
"What's your favorite sweet?"
Would you rather have brownies or apple pie? Vanilla ice cream or creme brulee? Just shout out your favorite dessert in the Comments section of this post and your automatically entered to win a mixer.
THE RULES
One entry per person, please.
No entries after midnight Monday.
Winners will be selected at random and announced Tuesday.
Good luck!
___________________________
Mixers definitely, absolutely, 100% provided by KitchenAid, with help from CHEFS Catalog.

Last Two to Tango
I wish I had more to give away, but these…are…it. Last Monday's giveaway for the first two mixers was definitely the largest response to any giveaway here, and I hope it hasn't ruined all of us on plain/solid-colored mixers. 'Cause I've kind of been looking at my old white one and asking it what it's done for me lately.
"Mixed and beaten whatever you've asked me to," it replies.
Then I always feel bad.
Before I begin the giveaway, I wanted to let you know a few things:
1. As of right now, I won't be able to offer the mixers for sale. Because the design was a custom (and beautifully executed) paint job, it would result in a mixer that cost a pretty penny, which wouldn't be practical for "me" to manufacture. Not that a bright orange mixer with flowers all over it is practical, but still.
2. I think KitchenAid just wanted to do a small handful of these custom mixers.
3. I can't think of #3.
I would, however, like to share with you the name and link of the extremely talented designer/artist who's responsible for creating this beauty. She does custom mixers, so if you do decide you'd like to make your own color scheme/design some day, she'd be a great resource.
Un Amore Custom Designs
Nicole is very talented and definitely knows what she's doing.
And now…THE GIVEAWAY!
Today I'm giving away the remaining two (of four) of these limited edition KitchenAid mixers.
Here's another peek in case you missed it.
TO ENTER
To enter this extra special giveaway, just answer the following question in the Comments section of this post:
"What's your favorite sweet?"
Would you rather have brownies or apple pie? Vanilla ice cream or creme brulee? Just shout out your favorite dessert in the Comments section of this post and your automatically entered to win a mixer.
THE RULES
One entry per person, please.
No entries after midnight Monday.
Winners will be selected at random and announced Tuesday.
Good luck!
___________________________
Mixers definitely, absolutely, 100% provided by KitchenAid, with help from CHEFS Catalog.
February 17, 2011
Spinach and Mushroom Quesadillas
 First of all, naming recipes cracks me up.
Spinach and Mushroom Quesadillas with Fontina and Goat Cheese.
Fontina and Goat Cheese Quesadillas with Spinach and Mushrooms.
Spinach and Fontina Quesadillas with Mushrooms and Goat Cheese.
Spinach and Mushrooms Quesadillas.
Quesadillas with Spinach, Mushrooms, Fontina, and Goat Cheese.
Quesadillas with a Bunch of Yummy Stuff Inside.
Okay. Just had to get that out.
Second: I could eat quesadillas every day of my life. I've carried on and on here about how much I love quesadillas, and I have a handful of varieties on PW Cooks. Here are a couple of my favorites:
Quesadillas de Camarones
Grilled Chicken and Pineapple Quesadillas
I love vegetarian varieties of quesadillas, too, so last night I whipped up a yummy batch packed with sauteed mushrooms and spinach. I added sherry to the veggies while they were cooking, which gave them a nice, rich flavor, and I used Fontina and goat cheese to switch things up a bit. You can use Monterey Jack in place of the Fontina, but do give the goat cheese a try if you have some available.
Goat cheese in quesadillas will make your skirt fly up.
Like, totally.
 Begin by slicing a bunch of mushrooms.
 Melt a couple of tablespoons of butter in a large skillet…
 Then throw in the sliced mushrooms. Sprinkle in a little salt and pepper.
 Stir them around for a minute or two, then pour in some sherry or wine.
Wine + Mushrooms = TrueLuv4Evr
 Cook the mushrooms over medium-high heat for several minutes, until the liquid is totally gone. At the end, you'll want to get as much color on them as possible.
Color = Flavor.
Amen.
 Remove the mushrooms to a plate.
 Next, return the skillet to the stovetop and reduce the heat to medium-low. Add one more tablespoon of butter and a little splash of sherry (or wine)…
 Then throw in a whole bag of baby spinach. Sprinkle with salt and pepper, then stir it around for no more than two minutes…
 And remove it from the pan just as soon as it's wilted.
Words can not express to you how much I love wilted spinach.
I want to grow old with it.
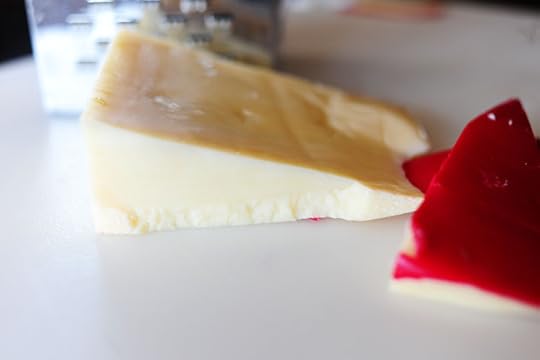 Cut the wax from the Fontina…
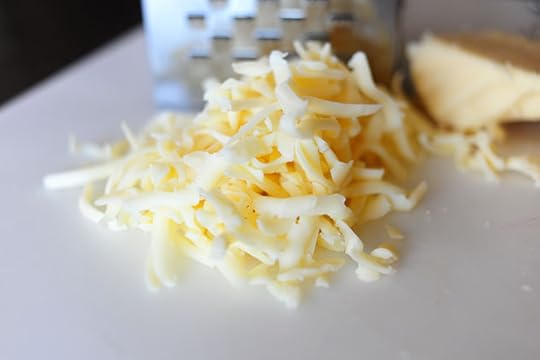 Then grate up a nice pile.
 Then open the package of goat cheese and have it ready.
 To assemble the quesadillas, smear a little butter on one side of a flour tortilla. Flip it over, then start with a layer of Fontina…
 Arrange spinach over the cheese…
 Then fill in the gaps with sauteed mushrooms.
 Dot goat cheese all over the top…
 Then add a little more Fontina for good measure.
 Heat a grill pan or skillet over medium heat. You want it hot enough to turn the tortillas golden brown and melt the cheese, but not so hot that it burns them.
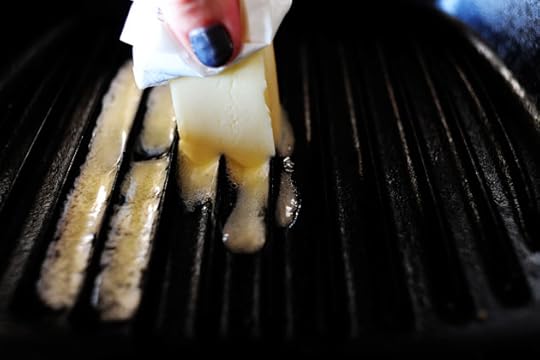 Melt some butter in the pan…
 Then place the tortilla in the pan.
 Smear the top of the tortilla with butter.
 Then grill/cook the quesadilla on both sides, until the cheese is melted and the tortillas are golden brown.
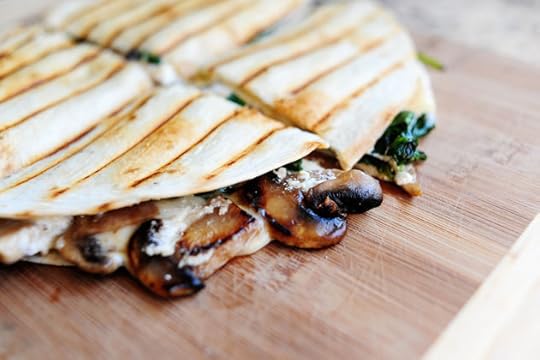
 Place the quesadillas on a cutting board and slice them into wedges with a pizza cutter.
 One word: Yum. This looks delicious.
That was four words. Forgive me.
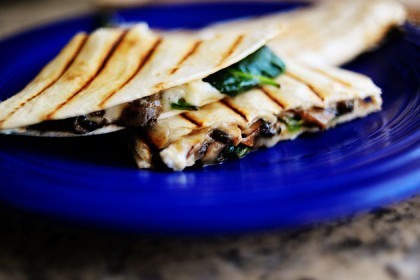
 One word: Gosh.
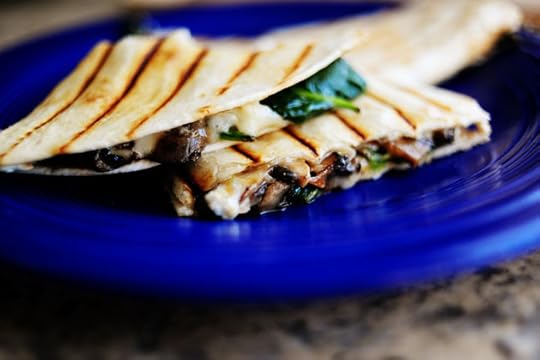 And one final word: Divine.
Make these for dinner tonight!
You'll love every single bite of them.
Love,
Pioneer Woman
Recipe: Spinach and Mushroom Quesadillas
Prep Time: 10 Minutes
|
Cook Time: 20 Minutes
|
Difficulty: Easy
|
Servings: 6
Print Recipe
3"x5" Cards
4"x6" Cards
Full Page
Ingredients
3 Tablespoons Butter16 ounces, weight White Mushrooms, Sliced⅓ cups Sherry Or Wine3 Tablespoons (additional) Sherry Or Wine Kosher Salt And Pepper To Taste1 bag Baby Spinach12 whole Flour Tortillas (Soft Taco Size)8 ounces, weight Fontina (or Monterey Jack) Cheese, Grated3 ounces, weight Goat Cheese (chevre) Extra Butter, For Tortillas Salsa, For Serving Preparation Instructions
Melt 2 tablespoons butter in large skillet and add sliced mushrooms. Sprinkle with salt and pepper, then saute over medium-high heat for 2 minutes, then pour in sherry. Add salt and pepper. Continue cooking for 6 to 8 minutes, or until all liquid is evaporated. Remove mushrooms from skillet and set aside.
Return skillet to stovetop and reduce heat to medium-low. Melt additional 1 tablespoons of butter and add a couple of tablespooons of sherry. Add spinach to skillet and stir gently as it wilts. Sprinkle with salt and pepper, then cook for 2 minutes, max. Remove from skillet.
To assemble the quesadillas, arrange grated Fontina, spinach, and mushrooms on top of one flour tortilla. Dot with goat cheese. Top with a little more Fontina, then top with second tortilla. Smear softened butter lightly on both sides of the quesadilla, then grill until golden brown and until cheese is totally melted. Repeat with remaining tortillas and filling.
Slice quesadillas into four wedges and serve immediately.

February 16, 2011
Frozen Cappuccino Cups
 I'm cooking some new recipes today (my kitchen is already a disaster. please send help. thank you.) and will have one up tomorrow, but in the meantime, here's a little treat from my mom's trusty church cookbook from the old country. They're quick and easy (and make-ahead) frozen ice cream cups that you can dress up or down according to your schedule…and appetite. Switch up the ice cream flavor if that makes you happy…or add in different nuts and candy bars as you see fit.
(I repeat this in my note below, but you'll want to use a sturdy cupcake liner so it'll peel off easily. If you meet with any resistance as you're peeling them off, just wait, take a breath, count to twenty-seven, then try again.)
I made these before I left on my trip a couple of weeks ago, and when I returned yesterday there was still one in the original Ziploc in which I stored them. I peeled off the liner, put it on a plate, then drizzled on some cold chocolate sauce out of the fridge. Then I sprinkled on some chopped pecans, settled in, and enjoyed every last bite.
It was a sweet homecoming!
 Crush up about 15 chocolate sandwich cookies, either in the food processor or in a Ziploc bag, using a rolling pin and all your aggressions.
 Drizzle in a little melted butter…
 Then pulse or mix it until just combined.
 Grab a heaping tablespoon of crumbs…
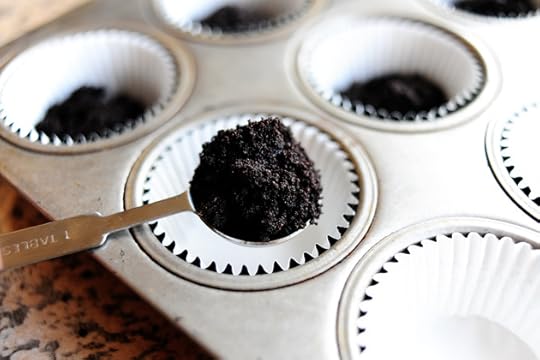 Then spoon them…
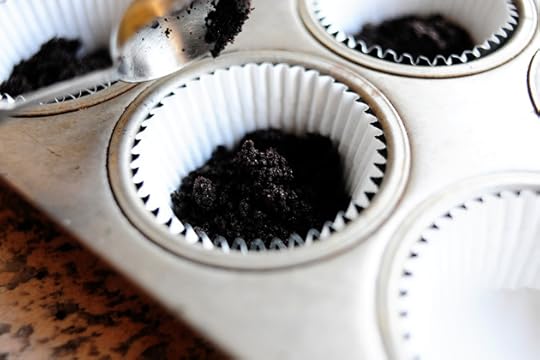 Into individual muffin cups.
 Use your spoon to *pat-pat-pat* pack the crumbs tightly into each cup. Set these aside for a minute.
 Next, chop up some semi-sweet chocolate.
 Throw some slightly softened coffee ice cream into a mixing bowl.
 Add the chocolate…
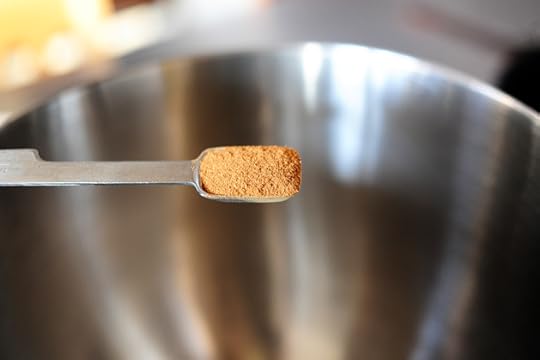 Then a little cinnamon…
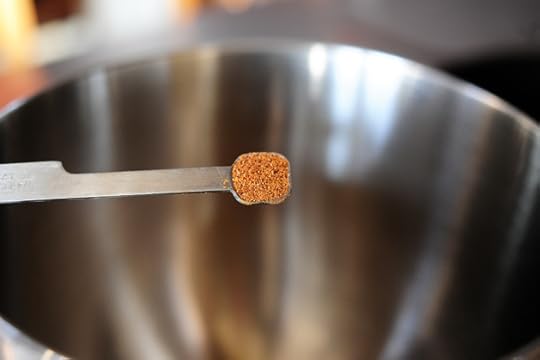 And a leetle bit of nutmeg.
The addition of these spices might seem a little unusual, but they really do add a nice, flavorful edge to the coffee ice cream and keep the dessert from tasting like you simply added chocolate to ice cream, then put it in individual chocolate cookie crusts.
Not that there's anything wrong with simply adding chocolate to ice cream then putting it individual chocolate cookie crusts. The spices just make it more delicious.
I'm not here to judge, man.
 Mix this all together, and please refrain from sticking your entire head in this bowl and slurping down every last drop of this.
I tried it once.
I was filled with self-loathing for over a month.
 Next up, spoon a good portion of the ice cream/chocolate mixture into each cup.
 Now, this is where life got in the way and I forgot to take photos of the future of these lovely little cappuccino cups. So I'll try to illustrate it.
Basically, you freeze them until they're totally firm.
Then…
(Use your imagination here…)


Some notes:
* After you freeze the cups in the muffin pans and they're nice and firm, you can remove them from the pan and store them in Ziplocs or any airtight container. Then just remove them as you need them.
* You can add the toppings (crumbs, nuts, hot fudge, etc.) before the first freezing if you want them to freeze on top of the cups. Just lightly press them into the top so they'll set a little easier.
* Alternately, you can just freeze the cups untopped, then top them when you're serving them.
* IMPORTANT: If you meet with some resistance when you peel off the paper liner, just wait a couple of minutes, then try again. Sometimes they just have to slightly soften before the liner easily peels off. (Or you can just eat them straight out of the liners.)
Have fun with these! And make dozens of them if you want. It's nice to have them in the freezer when you need something sweet and yummy.
Here's the handy printable:
Recipe: Cappuccino Cups
Prep Time: 15 Minutes
|
Cook Time:
|
Difficulty: Easy
|
Servings: 12
[image error]
Print Recipe
3"x5" Cards
4"x6" Cards
Full Page
Ingredients
15 whole Chocolate Sandwich Cookies2 Tablespoons Melted Butter2 ounces, weight Semi Sweet Chocolate, Chopped Into Chunks1 pint Coffee Ice Cream, Slightly Softened½ teaspoons Ground Cinnamon⅛ teaspoons Ground Nutmeg TOPPINGS: Extra Chocolate Cookie Crumps Finely Chopped Pecans Chocolate Sauce Sweetened Whipped Cream Chocolate Curls Preparation Instructions
Place twelve cupcake liners into muffin cups.
Crush cookies into crumbs. Add melted butter, then mix to combine. Press crumbs into twelve cupcake liners. Set aside.
Mix softened ice cream with chocolate chunks, cinnamon, and nutmeg. Spoon into cupcake liners. Freeze until firm, then remove from muffin pan (leaving on the cupcake liners) and place in a Ziploc or other airtight container.
To serve, peel off liners, place on a plate, and top with any or all of the toppings. You can also just serve them in the liners.
(Alternately, you can press nuts and/or crumbs into the top of the cups before freezing them.)

February 15, 2011
Lovely Mixer Winners
 The good news: I'll be giving away two more of these lovely mixers next week.
The bad news: I can only pick two winners this time! Here they are.
Winner #1: #40348 Alejandra – "Ramon. He liked me. I lived in a small town, so EVERYONE knew. I miss him."
Winner #2: #2470 Monica "Cody. The five year old boy next door who caught my attention when I was three."
Congrats, winners! Contact prizes@thepioneerwoman.com to claim your gorgeous mixers.
(Note: If winners don't claim their mixers within 48 hours, I'll select replacements and contact them.)
 Two more of these coming next week. Thanks so much for your positive response, everyone!

Ree Drummond's Blog

- Ree Drummond's profile
- 2032 followers

