
Ree Drummond's Blog, page 83
December 21, 2010
Fig-Prosciutto Pizza with Arugula
 I made a whole bunch of pizza dough last week, and after churning out my Leek and Potato pizza (and subsequently scarfing it down unabashedly), I stuck the rest of the dough in a plastic bag in the fridge and walked away for a few days.
This week, because I'm busy getting ready for Christmas, I decided I'm making pizza whenever I get struck with the urge. The only rule I'm imposing on myself is that I can't make the same pizza twice. I started with this scrumptious fig-and-prosciutto pizza on Sunday, some five days after making the original batch of dough. And when I took my first bite, I realized once again how delicious this pizza dough is when it's "aged" in the fridge for several days. I don't know what happens to the dough over time, but it takes on some kind of magical chewy/flavorful quality that's absolutely noticeable. One of my New Year's Resolutions in 2011—aside from never running out of gas and staying on top of my laundry pile and exercising every day and learning how to sing and play guitar—is keeping a steady batch of several-day-old pizza dough in the fridge.
I'm convinced it will make me a happier, more well-rounded individual.
Well-rounded, because I like a lot of cheese on my pizza.
But that's another story for another time.
 Here's what you need for the pizza crust.
This is simple stuff here, my darlings!
 To make the crust, sprinkle yeast over warm water and let it stand for a few minutes.
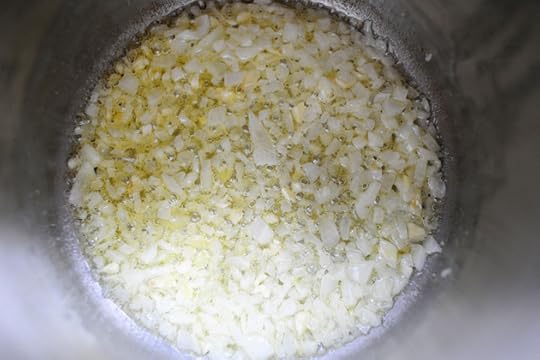
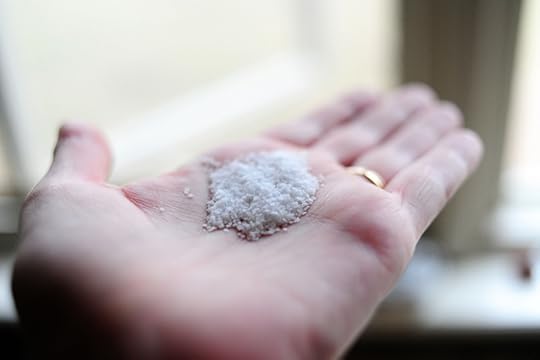
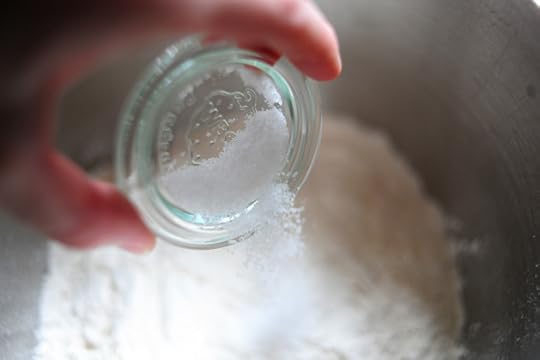 Next, add the salt to the flour.
 And stir it around in the mixer for a few seconds.
 Next, with the mixer on low, drizzle in the olive oil.
 Stir it together till the olive oil is worked into the flour.
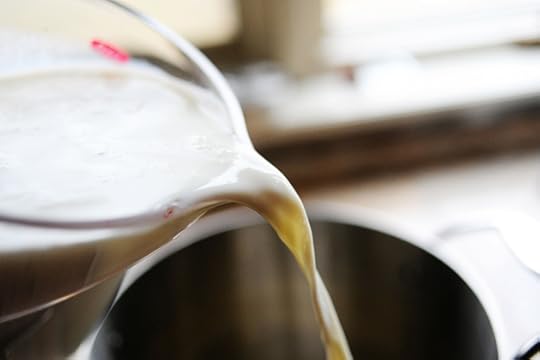
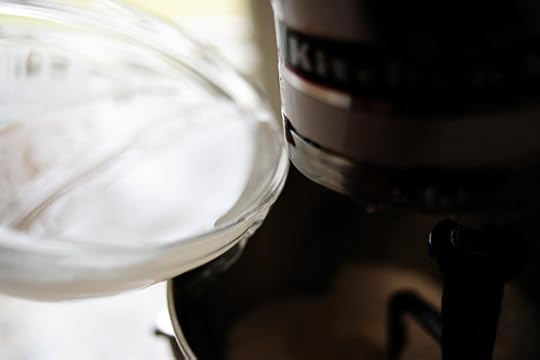 Next, pour in the warm water/yeast mixture.
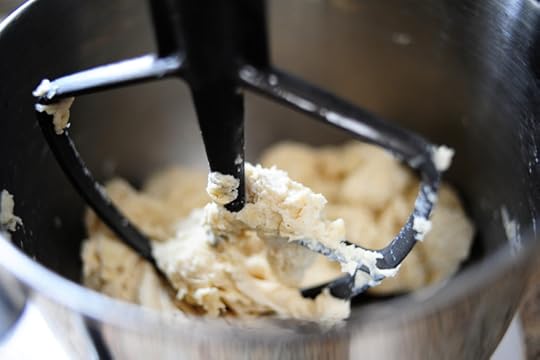 Mix it together until the dough all comes together in a sticky mass.
 Then just cover the bowl with plastic wrap and set it aside for 1 to 2 hours. Or, to really step up the flavor and texture, just park it in the fridge for a few days, sealed in a plastic bag.
 Yum. Aged to perfection.
 I want this pizza to be as thin as possible, so I just used a third of the dough recipe (I usually use half the recipe for one pizza.) Just roll it out as thin as you can.
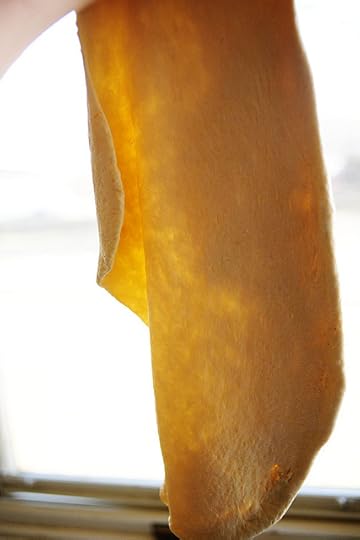 Or, if you're talented in this arena (and I'm not), shape it and stretch it with your hands.
 Place the dough on a large baking sheet. Drizzle it very lightly with olive oil, and sprinkle very lightly with salt.
 Grab some fig spread, which is pretty much like fig jam.
 I found this at the little grocery store in our small town! They've started carrying some gourmet cheese and specialty items, which means I'm probably the happiest woman in the world at this point.
 Scoop out a couple of large spoonfuls of the spread…
 Spread a nice layer of fig spread all over the crust.
Note: You could also just use regular pizza sauce here; just go a little easy on it so it doesn't overpower the toppings.
 Next, use your hands with the chipped and grody fingernails to lay slices of fresh mozzarella over the top.
 This mozzarella was pre-sliced and was a bit thicker than I would have sliced myself; the thinner the mozzarella slices, the better.
Now just stick the pizza in a very, very hot oven—on the lowest rack—for about 10 to 12 minutes.
While the pizza is cooking, get all the other ingredients ready–you'll want to throw it all on as soon as it comes out of the oven!
 You'll need some thinly sliced prosciutto. Separate the slices so they'll be all ready to go.
 And you'll need some delicious, peppery arugula.
Raise your hand if arugula makes you want to sing songs of praise.
*Raising hand*
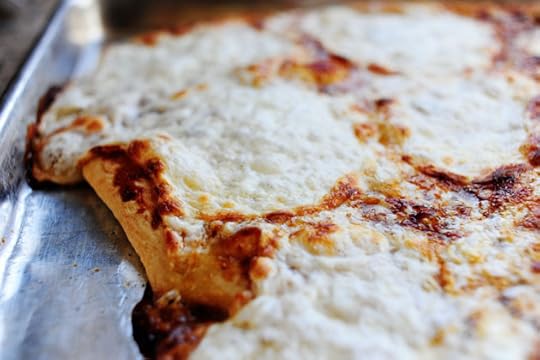 Pull the pizza out of the oven with the crust is golden and the cheese is bubbly. The fig spread will caramelize in areas and have some nice golden brown areas. Yum.
 Immediately lay/drape slices of prosciutto over the top of the hot pizza.
 Back when I shared this recipe for Caramelized Onion and Prosciutto Pizza, I got a great tip from a gal who said "Next time, wait till the pizza's done before you lay the prosciutto on top."
And she was right. The prosciutto is allowed to get nice and warm from the hot pizza, but it stays soft and delicious.
 Here you can see how yummy the fig spread is. Sweet, but a nice, distinctive flavor.
If I were a kitten, I'd be purring.
 Next, sprinkle the arugula all over the top.
 I just tear off the leaves (rather than chop it) and throw 'em right on. I actually didn't have much arugula, but I would have really piled it on if I'd had more. You can't use too much!
 Sprinkle on plenty of shaved Parmesan…
 Then cut it up…
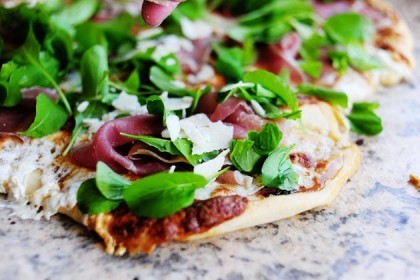
 And serve it immediately. You'll love it! Crispy crust, the sweetness of fig, the deliciousness of fresh mozzarella, the saltiness of prosciutto, the peppery crispness of arugula.
Goodbye. I'm going to have it for breakfast.
Enjoy!
Recipe: Fig-Prosciutto Pizza with Arugula
Prep Time: 1 Hour30 Minutes
|
Cook Time: 12 Minutes
|
Difficulty: Easy
|
Servings: 12
Print Recipe
3"x5" Cards
4"x6" Cards
Full Page
 [image error]
');
[image error]
');
Ingredients
Pizza Crust1 teaspoon Active Dry Yeast4 cups All-purpose Flour1 teaspoon Kosher Salt⅓ cups Olive Oil FOR THE PIZZA:2 Tablespoons Olive Oil4 Tablespoons Fig Spread Or Jam Kosher Salt To Taste12 ounces, weight Fresh Mozzarella, Sliced Thin6 ounces, weight Thinly Sliced Prosciutto*1 bunch Washed And Rinsed Arugula Freshly Ground Pepper, to taste½ cups Shaved Parmesan Preparation Instructions
NOTE: PIZZA INGREDIENTS IN THIS RECIPE ARE FOR 1/3 OF THE PIZZA DOUGH RECIPE. USE LEFTOVER DOUGH TO MAKE OTHER KINDS OF PIZZA!
Sprinkle yeast over 1 1/2 cups warm (not lukewarm) water.
In a mixer, combine flour and salt. With the mixer running on low speed (with paddle attachment), drizzle in olive oil until combined with flour. Next, pour in yeast/water mixture and mix until just combined.
Coat a separate mixing bowl with a light drizzle of olive oil, and form the dough into a ball. Toss to coat dough in olive oil, then cover the bowl tightly with plastic wrap and store in the fridge until you need it. ***It's best to make the dough at least 24 hours in advance, and 3 or 4 days is even better.
Preheat oven to 500 degrees.
Roll out 1/3 of the pizza dough as thinly as possible. Place on a large baking sheet.
Drizzle lightly with olive oil. Spread fig spread (or jam) all over the surface of the dough. Sprinkle lightly with salt.
Lay sliced of mozzarella all over the surface. Sprinkle lightly with salt and freshly ground pepper. Bake for 12 to 15 minutes, or until crust is golden and cheese is bubbly.
Remove from oven and immediately lay prosciutto over hot pizza. Just before serving, sprinkle on arugula and Parmesan shavings.
Cut into wedges or squares and serve immediately!


December 20, 2010
Filet au Poivre
 Goodness gracious.
I remember the first time I ate steak au poivre, the first time I tasted the gorgeous spice of rich, creamy peppercorn sauce atop a medium rare steak. Of course, I've forgotten all the pertinent details surrounding that moment: the date, the time, where I was, who I was with, and what I was wearing.
But at least I remember the peppercorn sauce.
And if you make this dish for one of your holiday dinners this week, you'll remember it, too.
Even if you won't remember any other details of your life.
 Begin with a couple of good steaks. These are beef fillets, which are slices of whole beef tenderloin. But you can do ribeyes, strips…any good quality steak.
 Grab some peppercorns. I love these tricolor beauties (you can find 'em in lots of supermarkets or specialty stores) but you can use plan black ones, too.
 Throw 'em into a Ziploc…
 Then use a rolling pin to crush 'em up a bit, then set 'em aside for a bit.
 Sprinkle both sides with kosher salt…
 And plenty of freshly ground black pepper.
 Next, heat a heavy (ovenproof) skillet over medium-high heat and drop in a couple of tablespoons of butter.
 When it's melted, throw in the steaks and brown them on both sides—just about 45 seconds per side. (If you can stomach it, you can crank up the heat to high. You want to get some nice, nice color on the steaks without cooking the middle.
After the steaks are brown, put the skillet into a very hot (500 degree) oven for a few minutes, just to finish the cooking process.
Then remove the pan from the oven and transfer the steaks to a clean plate.
Don't worry. It won't be long before we see them again.
Put the skillet back on the stovetop over low heat.
 Pardon me. Do you have any Grey Poupon?
 Good! Then add a couple of tablespoons to the pan and whisk it around a bit.
 Then grab some brandy from your bedside table.
 Pour in a little more than 1/4 cup.
Just kidding about the bedside table part.
 Whisk the Dijon and brandy together until combined, then let it bubble semi-violently for about 45 seconds or so…
 Then pour in some heavy cream…
 And the crushed peppercorns.
 Whisk it all together, allowing it to bubble for less than a minute.
 Look at this gorgeousness. And it smells so, so good.
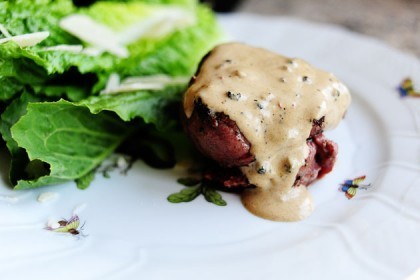
 Place one of the steaks on a plate…
 And drizzle on some of the peppercorn sauce.
It was at this point that I realized the iron skillet was a little heavy for my left hand. I thorta thplattered it.
Thorry.
 This is a much better method.
 Wow.
Wow.
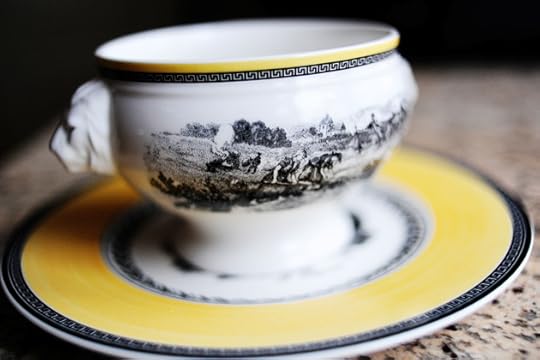
(China Check: Herend "Rothschild Bird.")
 Oh my gosh—you will love this. The sauce is so incredibly delicious—a slight tang of Dijon, the spice of the peppercorns, the richness of the cream. You'll want to lick up every last drop.
Make this for your sweetie on Christmas Eve…or double, triple, or quadruple it depending on your crowd size. Each recipe makes enough sauce for two, so it's easy to increase quantities accordingly. Just cook the sauce a little longer if you do.
Enjoy this!
Recipe: Filet au Poivre
Prep Time: 5 Minutes
|
Cook Time: 10 Minutes
|
Difficulty: Easy
|
Servings: 2
Print Recipe
3"x5" Cards
4"x6" Cards
Full Page
[image error]
');
Ingredients
2 whole Beef Fillets Or Other Good Steaks2 Tablespoons Butter Kosher Salt And Freshly Ground Pepper2 Tablespoons Dijon Mustard¼ cups Brandy2 Tablespoons (additional) Brandy½ cups Heavy Cream1 Tablespoon Good Peppercorns, Crushed Preparation Instructions
Preheat oven to 500 degrees. Sprinkle both sides of steak with salt and freshly ground black pepper.
Melt butter in a medium ovenproof skillet over medium-high heat. When skillet is hot, brown steaks on both sides, about 45 seconds per side. Place skillet into the hot oven for about 3 to 5 minutes. Remove pan from oven and remove steaks to a separate plate.
Return pan to stovetop over low heat. Add Dijon and brandy, then whisk together. Add heavy cream and crushed peppercorns, whisking to combine. Allow to bubble for about 45 seconds, then remove from heat.
Spoon sauce over steaks and serve.
Scrumptious!

December 17, 2010
Edible Photo Decal Cookies
 I talked about these briefly over a year ago, but haven't touched on them since. Have you seen them? Cookies decorated with edible photo (or art) decals?
When Bridget came to the Lodge for the holiday baking weekend, she brought along adorable cookies decorated with some of my photos of Charlie, horses, cows, insects…and my husband's bottom.
Don't believe me? Here's Bridget's post. The bottom cookie is at the top. (Hardee har har.)
Bridget's Photo Cookies
In a second, I'll give you specific information about how to print and apply these decals yourself. (Bridget also provides great info in her post.) But first, here are just a few glimpses into the process:
 First, you print out multiple photos on special edible paper. (The ink is edible, too.) Then you cut them out.
 I have a book of vintage holiday greeting card clip art, so I printed out a couple of different designs. What you see here is completely edible! (Not necessarily scrumptious on their own, mind you…but definitely good on a cookie.)
 To apply the decal, make a border of royal icing around the edge of the cookie.
 Rectangular cookies are great for photos, as you don't have to worry about cropping or altering the photo's shape; just match up the photo size to the size of the rectangle and you're good to go!
 Next, fill in the rectangle with flood icing.
 Use a toothpick to fill in the gaps so that it's evenly covered.
 Then peel the backing off of the edible paper…
 And gently set it right on top. The decal will naturally adhere to the royal icing; no need to apply much pressure at all.
 Lovely!
 After that, you can pipe a decorative edge around the decal to "frame" the image.
 So lovely! After that, all you need to do is allow the whole thing to harden and set, then place them in individual plastic bags (or just arrange on a serving platter). The great thing is, the icing and decal really do "seal" the freshness into the cookies. A couple of days can pass and the cookies are still soft underneath. Note, however, that Bridget's cookies are much thicker than these, which definitely helps the cookies remain soft and yummy.
Those are the broad strokes; here are the fine details!
1. Kopycake is the source I used to order both the edible printer ink and edible paper.
2. Order edible ink cartridges; they're available for several different printer models. You can swap them in and out of your existing printer (if you have one that's compatible) or, if you think you'll be using it for this purpose very much, you can just spring for a printer designated for this purpose.
3. Order edible paper. The backing size of the paper I ordered is 8.5 x 11, but the actual edible part is usually a smaller printable area than that.
4. Order (to make things easy) rectangular cookie cutters. I have this set and absolutely love it. Note: You could also measure and cut rectangles yourself! The cutters just make it easier.
5. Choose the photo (or photos) you want to use for your cookies, then resize the photos according to the size of cookie cutter you use. If the ratio size of the photo isn't compatible with the cookie cutter size, just crop the photo to match exactly.
6. Create a document with a "grid" of the photos you want to use. You'll have to experiment a little bit to make sure you're fitting as many photos on one sheet as you can without going past the edible paper area.
7. Insert edible cartridges into your printer.
8. Insert the edible paper.
9. Print out sheets of edible images.
10. Trim them with scissors.
11. Bake cookies, let cool.
12. Pipe a royal icing border around the edge of the cookie. Read this post for more information about royal icing/flood icing, as well as links to Bridget's recipes:
Decorated Christmas Cookies – Royal Icing and Flood Icing
13. Fill the cookie with a thin layer of flood icing (see above link for more information.)
14. Peel photo decal and lay gently on top of the flooded cookie.
15. Allow to set for a bit, then pipe decorate border of royal icing.
16. Allow cookies to set, uncovered, overnight.
17. Deliver to friends, make for a bridal or baby shower, a birthday celebration…the possibilities are endless!
Such a fun, creative adventure. Thanks again to Bridget for demonstrating.
Let me know if you give it a try, guys!
Love,
P-Dub

December 16, 2010
Lia's Dark Chocolate Truffles
 I've been wanting to show you Chef Lia's beautiful, artisan method for making the most perfect chocolate truffles imaginable…
But I've been too busy making Chicken and Dumplings.
And Spinach Soup.
And going to see West Side Story.
But today's the day!
Chef Lia visited our holiday baking day a couple of weeks ago. She demonstrated her brilliant Butter Toffee recipe (if you haven't tried it, you must!) first, then moved into these gorgeous chocolate truffles. You'll love them.
Note: There is mention of using "unmelted tempered chocolate" in this recipe. You can read in length about tempered chocolate on the web, but in my limited understanding: tempering chocolate is the process of melting chocolate and bringing it to a certain ideal temperature. Tempered chocolate that is then allowed to harden again is also called "tempered chocolate" and can be purchased in this form. This can seem a little confusing, but know that regular (widely available) chocolate could also be used in this recipe. Obviously, if you use high quality/tempered chocolate, you'll wind up with more professional results, but if you use regular chocolate, the truffles will still be delicious.
(If I'm explaining this incorrectly, please let me know. I ain't no chocolate scientist, and I have children biting my ankles as I write this.)
 Begin by bringing cream and corn syrup to a boil, then pour the mixture over chopped chocolate. Allow it to sit for about 60 seconds, then begin to whisk to combine.
 Keep whisking until all the chocolate is melted (put it over a hot water bath if it needs a little help). When it's melted, stir in softened butter.
 Next, stream in the booze! Use whatever kind you like—Grand Marnier, brandy, Kahlua, etc.
Set the mixture aside (either in the bowl or in a shallow pan) and let it rest until slightly firm.
 This is a little firm, but it's not quite firm enough to form into balls.
 This is good! Chef Lia "agitates" the chocolate at this point—breaks it up with a spatula.
You can see from this photo that it really would help to pour the ganache into a flatter pan; that way, the chocolate would harden more uniformly.
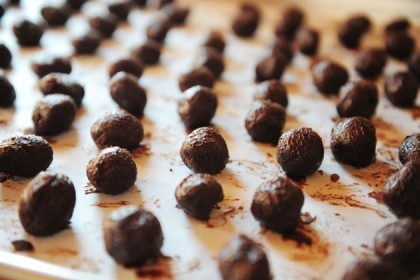
 Next, roll the firmed-up ganache into balls. I told Lia that what I love about her truffles is that they aren't perfectly round and smooth; they actually look like truffles! To me, this gives them a nice little artisan feel.
Let the truffles sit until they're firm enough to handle; probably a couple of hours at least.
 When you're ready to coat the truffles, temper some more chocolate; it should be warm enough to be melted and smooth, but not so warm that it'll disturb the firmed ganache.
Whew. I know this seems like a lot of complicated steps and considerations…but it's really not!
Now…let me show you how Lia coats the truffles.
You'll love it.
 While wearing plastic (non-latex) gloves, Lia sticks the palms of her hands onto the surface of the melted chocolate. Then she simple grabs a truffle and gently rolls it between her hands to lightly coat it.
So much quicker (and less unwieldy) than dunking straight into the chocolate.
 Place them on parchment and let them set.
 See what I mean about them looking like actual truffles? I love them. And if you look really closely, you can see that Lia sprinkled a tiny bit of gold dust on top of one. Very pretty.
 Everyone at the class had such a terrific time.
 Even Beautiful Bridget!
 After the truffle coating, Lia demonstrated how to make little parchment cones in order to pipe softened chocolate in intricate designs.
I didn't catch photos of the parchment cone-making. I was too busy licking chocolate off my camera. I'll try to whip out a tutorial here soon, but if you Google "parchment piping cones" you'll find lots of great tutorials.
 Lia says this is a great way to adorn cakes, cupcakes, cookies, etc. Gives it a nice, artsy feel and it's so, so easy!
 You can also pipe little lines on the truffles themselves.
 But you have to check this out.
You'll love it.
 Lia piped a left wing and a right wing (this is not a political statement) and let them harden.
And then…
And then…
 She stood them up on one of the truffles. How gorgeous a presentation is this?
This piping method opens up a whole world of possibilities. Pipe someone's initials, then stick them in the top of a slice of cheesecake. Pipe swirly, abstract designs and stick them in a scoop of ice cream.
I'll bet you could freeze a scoop of ice cream until very firm/hard, then pipe a lacy design all over the scoop. So much fun!
Thanks so much, Chef Lia, for sharing all your creativity.
Give these a whirl, guys!
Recipe: Lia's Dark Chocolate Truffles
Prep Time: 30 Minutes
|
Cook Time: 30 Minutes
|
Difficulty: Easy
|
Servings: 36
Print Recipe
3"x5" Cards
4"x6" Cards
Full Page
[image error]
');
Ingredients
7 ounces, fluid Heavy Cream2 ounces, fluid Corn Syrup15 ounces, weight Dark Chocolate, Unmelted, Tempered, Chopped½ ounces, weight Soft Butter1-½ ounce, fluid Liqueur: Brandy, Kahlua, Schnapps, Chambord, Grand Marnier2 pounds Dark Chocolate, Melted And Tempered, For Precoating And Dipping Preparation Instructions
Combine cream and corn syrup and bring to a boil.
Pour the hot cream over the chopped chocolate and let sit for about sixty seconds to allow the chocolate to melt.
Whisk together, checking to see if all the chocolate is melted. If needed, place briefly over a warm water bath, but do not exceed 94 degrees.
Stir in soft butter. Then stream in the liqueur and mix until homogeneous.
Pour ganache into a large shallow pan. Let it rest at room temperature until slightly firm. Agitate/stir around the ganache with a spatula to break it up a bit.
Scoop truffles onto parchment paper and let sit until firm enough to handle.
Roll into balls and precoat in tempered chocolate. Dip again once the first layer of chocolate is set.
If desired, roll in cocoa powder. Truffles should look beautifully imperfect!
(Note: photo depicts truffles before they are dipped.)

December 14, 2010
Chicken and Dumplings
 Chicken and dumplings. Mmmm. Let's just contemplate that for a moment.
I love Chicken and Dumplings. Love it. I love Chicken and Noodles, too, and Chicken Spaghetti, and basically any dish that begins with cooking a chicken in a pot and throwing in some kind of noodle or dumpling. Comfort food to the max. Like, totally.
Dumplings, when it comes to Chicken and Dumplings, can be a little difficult to get right; if you're not careful, you can wind up with gloopy flour balls that wind up in a paste on the roof of your mouth. But in all my trial and error, I've found that dumpling recipes that include cornmeal along with the flour completely solve that problem.
This is an adaptation of one of my favorite old Gourmet Magazine recipes for Chicken and Dumplings. I've tailored it in a few ways through the years, but kept my two favorite elements: the dumplings (because I think they really are perfect) and the addition of apple cider (you have to trust me on this.)
Don't be intimidated—while it takes a little time to cook, it's a beautifully simple dish.
With beautifully delicious results.
 You need a whole chicken. Whenever I need a whole chicken I almost always buy a cut-up fryer; all the hard work's already done! Sprinkle both sides of the chicken with salt and pepper…
 Then dredge each piece in flour.
 Shake off the excess.
 Melt some butter and olive oil in a pot…
 Then brown the chicken in two batches.
 Loveliness!
 When the chicken's nice and brown, remove it from the pot. It doesn't have to be done in the middle; it's going back into the pot in a minute.
 Next, slice up some carrots. Don't even peel 'em! Just wash 'em really thoroughly.
 Dice 'em up into small—but not tiny—pieces.
 Do the same with celery…
 And onions…
 Then throw it all into the same pot you used to cook the chicken.
One pot meals make my skirt fly up.
Speaking of which, my friend Pam has an entire cookbook of dinners that are made in one pot, dish, or baking pan. If you're into that sort of thing, here's the link:
Perfect One Dish Dinners by Pam Anderson
(Pam Anderson did not know I was going to slip a mention of my cookbook in here.)
(To be honest, I didn't know I was going to until approximately fifty seconds ago.)
(This is basically how I roll.)
 Cook the carrots, celery, and onions over medium heat for 3 to 4 minutes.
 Throw in some ground thyme and just a leetle bit of turmeric.
If you don't like turmeric, you can leave it out…but it's such a tiny amount, you'll hardly taste it. And it really does give the finished dish a lovely golden tinge and nice flavor.
 Stir in the herbs until they're combined…
 Then pour in some low (or no) sodium chicken broth.
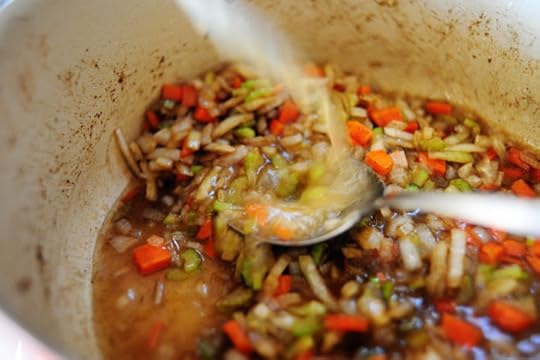 Stir as you're pouring it in.
 Next, put the browned chicken back in the pot.
And here's where I can tell you about the two different directions you can head with the chicken. It's nice and brown and pretty, so if you wanted a more impressive/elegant presentation, you could leave the chicken pieces whole and serve a piece with each serving. I tend to like chicken diced up and/or shredded for dishes like this, so I'll take the meat off the bone. But I wanted to show you the option here.
I would normally say that if you plan to take the meat off the bone for the finished dish, there's no need to dredge it in flour and go to great lengths to brown the chicken and make it pretty. But first of all, browning the chicken first injects some good chicken flavor into the dish right off the bat; and second of all, the small amount of flour used to dredge the chicken actually winds up giving the dish a little strength and substance later (without sprinkling in a whole lot of extra flour.)
Did that make sense?
No?
Good! Then today is a normal day.
 Oops! Forgot an ingredient. Apple cider! I see this in the occasional chicken and dumpling or chicken and noodle dish, and while it sounds totally bizarre, it really does add just a nice little oomph.
 Normally, you'd add the cider along with the chicken broth.
That's what most people would do.
But most people operate on a higher level of organization and clear thinking than I do.
 And that's it for awhile! Just cover the pot and simmer the chicken for a good 20 minutes or so. You want the chicken to finish cooking and the broth to achieve a nice, deep flavor.
 Next, it's time to make the dumplings! The best dumplings, in my opinion, have a mix of cornmeal and flour. Without the cornmeal, the dumplings can become gummy and overly glutenous and then your life can completely fall to pieces if you're not careful.
The pressure! The pressure!
 Sift together the dry ingredients, then pour in half-and-half.
 (Whole milk will work, too…but half-and-half seems to hold things together a little better.)
 Stir it together until just combined. It won't be overly wet, but if you feel like it needs a teeny bit more moisture, just splash in a tiny bit of half-and-half.
Now just set this aside for a minute.
 Now, back to the pot: remove the chicken to a plate. Continue simmering the broth.
 Use two forks to pick the meat from the bone.
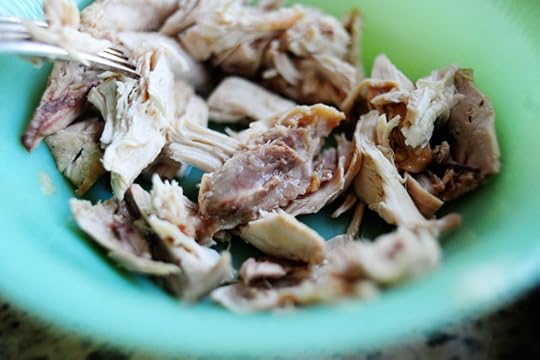 Then throw this into the pot.
 Yum!
Yum!
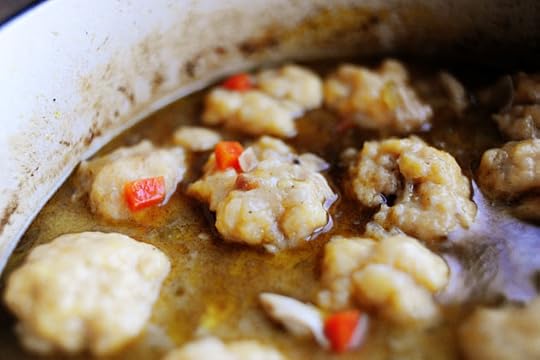
 Now, pour 1/2 to 3/4 cup of heavy cream into the pot. This will not result in an overly creamy base; it'll just give it a nice richness. Stir it around to combine…
 Then it's time to throw in the dumplings! I just use a tablespoon to roughly scoop out some dough, then drop it on in without shaping it or messing with it at all. You want the dumplings to be rough and rustic and interesting. You don't want ping pong balls.
After you drop in all the dumplings, just put the lid on the pot and let it simmer for another 15 minutes or so.
 Bingo!
 I can't tell you how heavenly this smells.
But I'll try: This smells so heavenly.
How was that?
 Uh…waiter? Call 911. I'm dying from bliss right here at my table.
 So here's what I think I should do: give it a nice, healthy taste.
I wouldn't want to serve my family an inferior product.
I'm considerate like that.
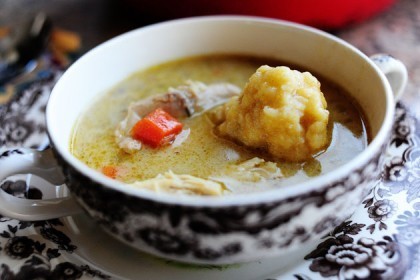
 Absolutely scrumptious. Here's what the dumplings look like on the inside, even after about fifteen minutes of simmering. The outside is soft and moist; the inside is a little grainy and textured.
 And the surrounding elements: perfect. Not overly brothy and thin; not overly creamy and thick. Lovely chicken flavor, lovely hints of thyme and turmeric.
Lovely, lovely, lovely. Who can argue with that?
Enjoy this, guys! It takes awhile to whip out, but it's really very easy to make. And it'll make anyone you serve it to say ooooh, aaaah, and I love you.
Recipe: Chicken and Dumplings
Prep Time: 15 Minutes
|
Cook Time: 30 Minutes
|
Difficulty: Easy
|
Servings: 8
Print Recipe
3"x5" Cards
4"x6" Cards
Full Page
[image error]
');
Ingredients
2 Tablespoons Butter2 Tablespoons Olive Oil½ cups All-purpose Flour1 whole Chicken, Cut Into Pieces (cut Up Fryer) Salt And Pepper½ cups Finely Diced Carrots½ cups Finely Diced Celery1 whole Medium Onion, Finely Diced½ teaspoons Ground Thyme¼ teaspoons Turmeric6 cups Low Sodium Chicken Broth½ cups Apple Cider½ cups Heavy Cream Dumplings:1-½ cup All-purpose Flour½ cups Yellow Cornmeal1 Tablespoon (heaping) Baking Powder1 teaspoon Kosher Salt1-½ cup Half-and-half2 Tablespoons Minced Fresh Parsley (optional) Salt As Needed Preparation Instructions
Sprinkle chicken pieces with salt and pepper, then dredge both sides in flour.
Melt butter in a pot over medium-high heat. In two batches, brown chicken on both sides and remove to a clean plate.
In the same pot, add diced onion, carrots, and celery. Stir and cook for 3 to 4 minutes over medium-low heat. Stir in ground thyme and turmeric, then pour in chicken broth and apple cider. Stir to combine, then add browned chicken. Cover pot and simmer for 20 minutes.
While chicken is simmering, make the dough for the dumplings: sift together all dry ingredients, then add half-and-half, stirring gently to combine. Set aside.
Remove chicken from pot and set aside on a plate. Use two forks to remove chicken from the bone. Shred, then add chicken to the pot. Pour heavy cream into the pot and stir to combine.
Drop tablespoons of dumpling dough into the simmering pot. Add minced parsley if using. Cover pot halfway and continue to simmer for 15 minutes. Check seasonings; add salt if needed. Allow to sit for 10 minutes before serving.
*Adapted from Gourmet Magazine

December 13, 2010
Easy Mulligatawny
 I can't hear the name "Mulligatawny" without thinking of Seinfeld.
I just can't.
Mulligatawny is a traditional curry soup of Indian origin. There are many, many variations on the theme and the ingredients can range from the ones you'll find in this recipe to coconut milk, legumes, rice, carrots, potatoes, lamb…the list goes on.
Use this simple recipe as the base, and turn it into your own.
And now, I would like to say one thing:
SOUP FOR YOU!
(Only Seinfeld fans will understand what I just said.)
 Sprinkle the diced chicken with salt and pepper, then cook the chicken in two tablespoons of butter until it's golden brown and sizzling.
 When the chicken's done, remove it to a separate plate.
 Add two more tablespoons of butter to the pot…
 Then throw in garlic and diced onions.
 Stir it around and cook until the onions are soft…
 Then sprinkle in some flour.
 Stir in the flour…
 Then add a good tablespoon of curry powder.
 Have I mentioned I'm mildly obsessed with curry?
I am.
It's becoming a problem.
A delicious, dark golden yellow problem.
 Stir the mixture in the pot and allow it to cook over medium-low heat for a good minute or so…
 Then pour in a bunch of low-sodium (unsalted is even better) chicken broth.
 Stir it around to combine, then cook it for about five minutes over medium heat.
 After that, add half-and-half…
 Stir it to combine, then cook for another five minutes
 It'll get thicker as it cooks. Yummy.
 Next up, dump in the chicken.
And by the way: you can add whatever cooked chicken you might have on hand—shredded, diced, etc. You don't have to cook it at the beginning if it's already cooked.
 Next up, peel a Granny Smith apple…
 Then dice it up finely.
 Do as many or as few as you'd like!
 Then use your freaky, large alien hand to dump them into the soup.
 I know this is a totally bizarre ingredient. But it's such a nice little touch.
 Add salt, pepper, and—another weird ingredient—a little white or brown sugar.
I love a little sugar in my curry.
I'm bizarre.
 Next, just cook the soup for another 5 to 10 minutes. Zat…eez EET.
 Turn off the heat and just let it sit for 5 to 10 minutes or so before serving.
 This is good, my friends. So quick! So flavorful!
So scrumptious.
 Mmmm. This is definitely one of those dip-crusty-bread-in-the-bowl soups.
 The flavor's divine. Curry, of course. Creaminess. A tiny bit of sweet. A mild crunch of apples.
Bada bing.
You can spice things up with a little cayenne, freshen things up with some chopped cilantro on top of each serving…and there are any number of authentic ingredients that would make this soup more authentically Indian. But this version's nice and simple.
And scrumptious.
Enjoy!
Here's the handy printable:
Recipe: Quick & Easy Mulligatawny
Prep Time: 5 Minutes
|
Cook Time: 15 Minutes
|
Difficulty: Easy
|
Servings: 8

Print Recipe
3"x5" Cards
4"x6" Cards
Full Page
[image error]
');
Ingredients
1 whole Boneless Skinless Chicken Breast, Cut Into Bite-Sized Pieces Salt And Black Pepper To Taste4 Tablespoons Butter1 whole Medium Onion3 cloves Garlic, Minced Finely¼ cups All-purpose Flour1 Tablespoon Curry Powder32 ounces, fluid Chicken Broth2 cups Half-and-half1 whole Granny Smith Apple, Peeled And Diced1 Tablespoon Sugar (white Or Brown) More Or Less To Taste2 teaspoons Salt, More To Taste Freshly Ground Black Pepper Cayenne Pepper (optional, For Spice) Preparation Instructions
Season diced chicken with salt and pepper. Heat 2 tablespoons butter over medium-high heat. Add chicken and cook, stirring occasionally, until golden. Remove chicken to a plate. Set aside.
In the same pot, add butter and reduce heat to medium. Add diced onion and garlic and stir to cook. Onions should be starting to brown.
Sprinkle flour over onions. Stir to combine, then stir in curry powder. Cook mixture over medium heat for one minute, stirring constantly.
Pour in chicken broth. Stir to combine, then cook for five minutes. Add half and half, salt, pepper, and sugar, then cook for another five minutes.
Add chicken and diced apple and cook for another 5 to 10 minutes. Turn off and allow to stand 5 or 10 minutes before serving. Taste for seasonings before serving.

December 9, 2010
Spinach Soup with Gruyere
 I'm a spinach freak. I absolutely love it. Always have always will.
In honored of spinach, I will now share with you a poem. I just wrote it fourteen seconds ago.
Spinach, by Ree Drummond
I love it sauteed, I love it creamed, I love it as a salad, I love it raw.
I love it in the morning and I love it in the night.
I love spinach.
Popeye.
Copyright 2010 – Do not copy this brilliant poem or use this brilliant poem without permission!
 Finely mince some garlic. Not a lot, as you don't want to overpower the yummy, creamalicious soup.
Creamalicious?
Sorry.
 Heat a little olive oil in a large skillet over medium to medium-low heat.
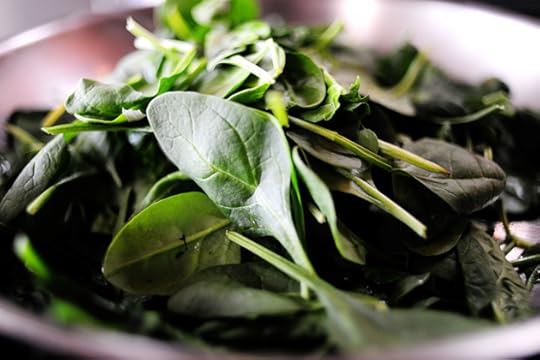 Throw in a bunch of spinach…
 And stir/toss it around for a couple of minutes…
 Until it wilts.
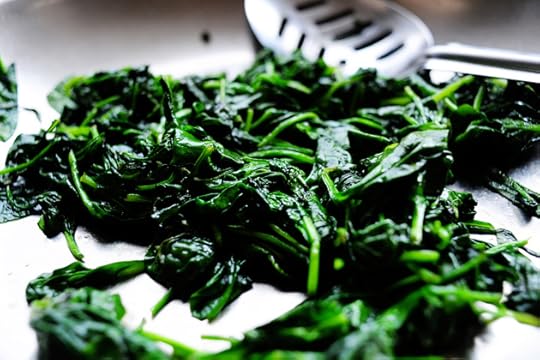
Wilted Spinach
I love wilted spinach.
Yum.
I understand if this poetry runs you off.
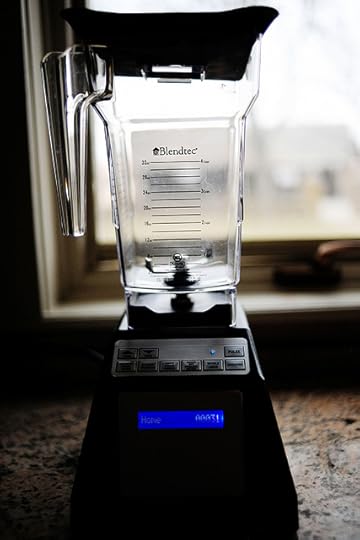 Then, grab a blender.
 Throw in the spinach.
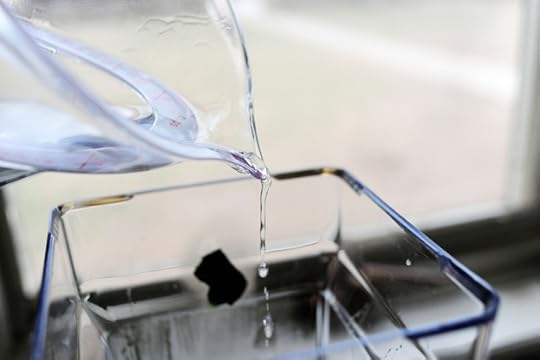 Pour in a little hot water…
 And pulse it up a few times.
 How gorgeous, lovely, delicious, and nutritious does this look?
Answer: Extremely gorgeous, lovely, delicious, and nutritious.
 Next up, cook some onions in a pot over medium heat.
 And when the onions are soft…
 Sprinkle in some all-purpose flour.
 Stir until the flour's all absorbed, then allow it to cook for a minute or two.
 Then pour in whole milk.
 Sure you could use skim milk. But if you do, you need to go ahead and add in some heavy cream.
I'm a smart alec. I know.
 Add in some kosher salt…
 And some cayenne pepper.
 Stir it around and cook it for about five minutes until it starts to get thick…
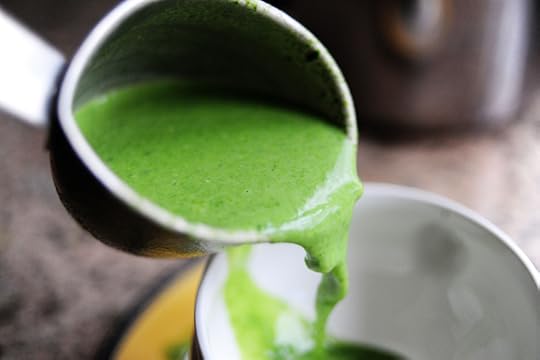
 Then pour in the pureed spinach.
 Stir it around, cooking it for another 3 to 4 minutes or so. Turn off the heat and allow the soup to sit for at least 10 or 15 minutes.
 Perfect! Just give it a taste and make sure all the seasonings are right. Add a little more if it needs it; don't undersalt it!
 To serve it up…
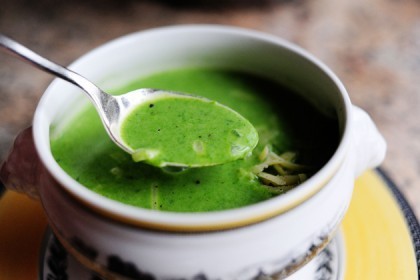
 Spoon it into a bowl…
 Oh, dear. If I were a kitten right now, I'd be purring.
 To top off all the deliciousness, sprinkle on some grated Gruyere.
Or Monterey Jack.
Or Swiss.
Or even something crazy like blue cheese.
 Sprinkle on a little black pepper, just to top it off.
 This is good, my loves. So, so good. Creamy, dream, diving.
Add a grilled shrimp or two to each bowl.
Or add a strip of roasted red pepper. Black bits welcome.
A little swirl of creme fraiche would be just about perfect, too.
Crumbled bacon. Yes, yes, yes, yes, yes.
(Can you tell I think about food a lot?)
Recipe: Spinach Soup with Gruyere
Prep Time: 5 Minutes
|
Cook Time: 25 Minutes
|
Difficulty: Easy
|
Servings: 8
Print Recipe
3"x5" Cards
4"x6" Cards
Full Page
[image error]
');
Ingredients
2 Tablespoons Olive Oil10 ounces, weight Spinach2 cloves Garlic, Finely Minced4 Tablespoons Butter½ whole Medium Onion¼ cups Flour5 cups Whole Milk2 teaspoons Kosher Salt½ teaspoons Cayenne Pepper (Optional) Freshly Ground Black Pepper4 ounces, weight Gruyere Cheese, Grated (other Cheeses Are Fine) Preparation Instructions
In a large skillet, heat olive over over medium heat. Add spinach and garlic and cook for 2 to 3 minutes, stirring constantly, or until wilted. Add spinach to a blender or food processor. Pour in 1/4 cup hot water and pulse until pureed. Set aside.
In a large soup pot, cook onion in butter over medium heat until onions begin to soften. Sprinkle flour over the top and stir to combine. Cook for about 2 minutes, then pour in milk, stirring occasionally. Add salt, pepper, and cayenne and stir to combine. Cook over medium heat for 5 minutes, stirring constantly. Pour in pureed spinach, then cook another 3 to 5 minutes until thickened.
Check seasonings, adding more salt, pepper, or cayenne as needed. Serve in a bowl. Add a little grated Gruyere.

December 7, 2010
Lia's Butter Toffee
Note: Starting tomorrow, for the rest of the week I will be posting only salty recipes. I've used all my sugar and my jeans no longer fit.
Amen.
In addition to enjoying the fabulous cookie demonstration, Holiday Baking Weekend attendees also enjoyed a great truffle and toffee-making class.
This is Chef Lia. She lives in the big city. I'd invited her and my other chef friend, Tiffany, to come to the Lodge for the day. They made a beautiful lunch of Seafood Salad for all the guests, then Lia (a pastry chef) spent a couple of hours teaching all of us about chocolate and candy, which she understands as well as a doctor understands his specialty of medicine.
It was so much fun to listen to her.
I'll cover the chocolate truffles in another post (good lands, were they incredible) but first I want to share Lia's delicious Butter Toffee. It's utterly perfect, so easy to make, and makes such a nice (and personal) Christmas gift when wrapped in individual bundles and tied with a bow.
Whip out your candy thermometers! (If you don't have one, you can find them at any large supermarket or specialty cooking store.)
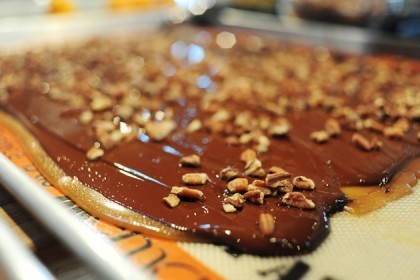
 Combine butter, sugar, water, and salt in a pan. (This is tripled, I think, so don't expect your pan to be this full!) Bring it to a boil, stirring constantly. Stick the candy thermometer (pictured here in the back of the pan) on the side of the pan (it'll come with a handy clip) so you can monitor the temperature.
 Cook the mixture over medium/moderate heat until it reaches 298 degrees on the candy thermometer. Remove it from the heat immediately and stir in vanilla extract.
Yum.
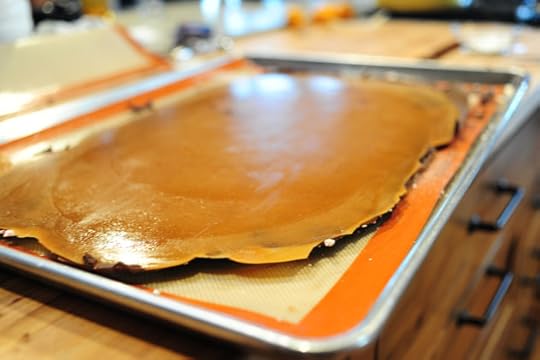
 Immediately pour it onto a silicone baking mat (or good parchment) distributing it evenly across the sheet.
 Burned sugar. Yum.
 Act quickly to spread the toffee thin before it starts to set. You can use a heatproof rubber spatula or (probably better) an offset metal spatula.
I noticed two things during this step:
1. Lia spread the toffee very thin. This wound up being really nice. Don't be afraid to spread it so thin that you see the baking mat in some spots!
2. Lia didn't seem concerned about the toffee looking uniform or perfect. Don't be afraid of the natural look.
 Next, just set the toffee aside and allow it to set completely. This probably could take as little as twenty to thirty minutes; more than that would be even better.
 When you're ready to proceed, melt some tempered chocolate (or just good quality chocolate; i.e. not regular chocolate chips) and stir until it's cool enough to dab right underneath your bottom lip and feel slightly cool to the touch.
Translation: the chocolate should be cooler than your body temperature, but still (obviously) warm enough to pour and spread.
Oh, and please don't burn your lip.
Please?
I care about your lip.
Thank you.
 Pour half the melted chocolate on top of the set toffee.
 Use a spatula to spread it evenly over the top…
 Then immediately sprinkle on whatever topping you'd like! Chopped nuts—either big chunks or finely chopped so that they're almost powdery—are classic and delicious.
 Or how 'bout crushed candy canes?
Just be sure to break it up so that a chunk won't break someone's tooth.
*CRUNCH*
 This was my favorite: light, lovely sea salt.
And just think of all the other possibilities.
 Now let this stage sit until the chocolate is firm, probably about 30 minutes or so. Then carefully flip the toffee over to the other side…
 Perfect!
 Then pour on the rest of the chocolate. This is the sea salt pan—you'll notice that this one broke apart a bit when it was flipped.
And that didn't matter one bit.
 Just spread the chocolate over the other side, and sprinkle on the toppings again. Let it set, then break it apart into pieces. Package them in bundles, take them to your friends, and know the joy and simple beauty of giving such a personal gift.
Here's Lia's recipe.
Enjoy, guys!
Oh, and by the way:
This toffee was so freaking good.
I just thought you'd want to know that.
The end.
Recipe: Lia's Butter Toffee
Prep Time: 10 Minutes
|
Cook Time: 30 Minutes
|
Difficulty: Intermediate
|
Servings: 18
Print Recipe
3"x5" Cards
4"x6" Cards
Full Page
[image error]
');
Ingredients
16 ounces, weight Butter, Melted16 ounces, weight Granulated Sugar3 ounces, fluid Water1 teaspoon Salt1 teaspoon Vanilla Extract16 ounces, weight Chopped Topping: Toasted Nuts, Candy Canes, Sea Salt, Etc.24 ounces, weight Tempered Dark Chocolate For Coating, Melted Preparation Instructions
*Necessary Equipment: Candy Thermometer*
Combine butter, sugar, water, and salt in a saucepan. Bring to a boil, stirring constantly.
Cook over moderate heat, stirring gently, until candy thermometer registers 298 degrees.
Remove from heat and stir in vanilla until well combined.
Pour the mixture onto a silicone baking mat or good parchment paper. Use a heatproof rubber spatula or offset spatula to spread quickly before the toffee sets. Spread thin.
Allow toffee to cool completely. Blot to remove excess oil from the surface. Coat surface with half of the melted chocolate and immediately sprinkle with topping.
When chocolate has totally set, carefully flip over (it's okay if it falls apart a bit) and coat other side with the rest of the chocolate. Sprinkle on topping.
Allow to set, then break into bite-size pieces.
Store in an airtight container.

December 6, 2010
Decorated Christmas Cookies
This weekend, four winners of the Holiday Baking Weekend Giveaway (and their guests) assembled at the Lodge for a weekend of rest, relaxation and…holiday baking! I decided to focus in on decorated sugar cookies, since learning those skills can open up a whole world of cookie fun around the holidays, but since I'm much better at haphazardly slopping savory ingredients into an iron skillet than I am at executing precise, meticulous cookie decorating techniques, I knew I'd want to bring in reinforcements.
One day a month or so ago, I went to Twitter and asked for the names of favorite cookie decorating foodbloggers. There was a handful of bloggers whose names were mentioned over and over.
I am Baker, for example. Her cookies are absolutely lovely. So are One Tough Cookie's. Amazing.
 One of the most enthusiastically recommended cookie experts was the lovely Bridget at Bake at 350. I'd met Bridget briefly before, but wasn't sure if she'd be game for taking a weekend out of her December and coming up to Oklahoma to teach a cookie decorating class.
But I did know I was willing to find out.
I emailed Bridget the same day…and she graciously accepted the invitation.
I jumped for joy.
And if that weren't enough, Bridget took care of rounding up all the necessary supplies to teach the class…and send everyone home with what they'd need to decorate cookies themselves.
 When the box arrived at my house, I just about died. The stuff was just lovely.
My homegirl Bakerella would have fainted.
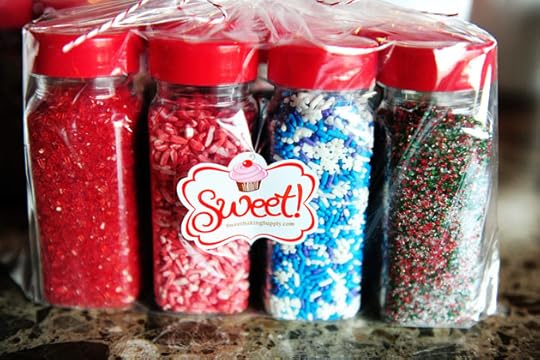 Sprinkles, sprinkles galore.
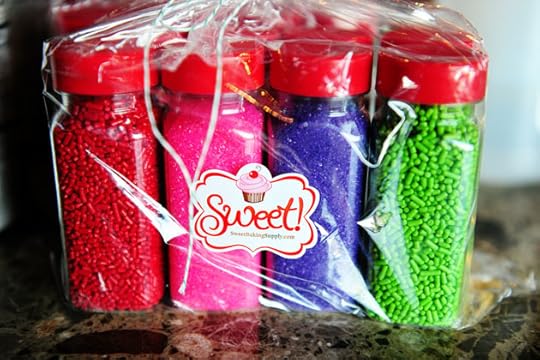 I adore the colors.
 Aside from all the sprinkles and glitters, there was all the gel coloring needed to make whatever color of icing anyone would ever want.
And glitter dust.
I loved the glitter dust.
 And squirt bottles galore. I'll show you why we needed them in a minute.
(Sweet Baking Supply is the source. Fabulous stuff!)
 So here's what happened: Bridget arrived.
We all ate lunch.
Then I ushered Bridget to the mixer and said something along the lines of "Take it away, Bridge!"
I like to show my guests a good time.
 I'd had a bunch of plain cookies made up for Bridget ahead of time (recipe link below) so she could focus primarily on the icing/decorating process during the class. Bridget uses two thicknesses of the same Royal Icing for her cookies (one thick, one thin); it begins with storebought meringue powder.
Benefits of meringue powder (as opposed to fresh egg whites):
1. You don't have to worry about the raw egg factor. I don't get concerned about raw eggs for myself, but if I'm going to serve others (or, in this case, give cookies to others) meringue powder is a better bet.
2. You'll get a more consistent result. With meringue powder, you're not having to battle the temperature of the eggs, etc. So you'll be able to get (generally) the same basic result each time you make the icing.
 To make the icing, you add the meringue powder to the bowl of an electric mixer fitted with the paddle attachment. Then you add water…
 And mix it a bit until combined.
 Next, add in sifted powdered sugar.
Here's where Bridget asked me for a sifter and I handed her this fine mesh strainer, which I use for a sifter.
She was very nice and didn't talk about how unwieldy and awkward it was.
I was very nice and sat there and ate undecorated cookies.
It's a problem I have.
That, and inadequate kitchen tools.
 After you add the powdered sugar, you add a little corn syrup, then turn on the mixer and let it go.
 You don't let it go for one minute. You don't let it go for two minutes.
You actually let the mixer go for a good five to ten minutes—more if needed. You want to let it beat until stiff peaks form.
 This, for instance, is not stiff enough. If you hold the paddle upside down and the icing moves or flops backward, it isn't stiff enough.
 Now, this. THIS is stiff enough. How gorgeous is this? The meringue powder makes it so glossy and nice.
This is the icing Bridget uses to outline and define the sections of a cookie.
 We had plenty of disposable pastry bags on hand, and lots of decorative tips.
 And lots of royal icing, colored various shades of holiday colors.
 To color the icing, Bridget uses Americolor gel. Other brands, Bridget warns, can make the icing taste a little funky.
Funky icing. Grody.
Americolor it is.
 Just add a little icing into a bowl and drop in some of the gel coloring.
 Then stir it around, adding more color to the icing to get it to the depth you want.
 Bridget colored some icing green, then spooned it into a bag. She recommends filling it less than halfway full, then attaching a twist tie here…
 And here (up toward the top) if you want to walk away from it and come back later.
 And away she goes!

 Done!
Done!
Well…about halfway done.
 Next up, now that the outline was completed, Bridget mixed up some flood icing.
Flood icing is used to fill in the outlined areas of a cookie. It moves a little more freely and easily and can be used to create some really wonderful effects (more in a minute).
 All you have to do to make the flood icing is plop some regular royal icing into a bowl and add water in teeny tiny increments, stirring well after each addition. This (above) is way, way too thick.
 The rule of thumb Bridget uses after mixing in each addition of water (and the additions are half a teaspoon at a time) is to raise up a ribbon of icing and drag it back and forth across the surface. If the ribbon sinks down into the rest of the icing within a count of "one thousand one, one thousand two," it's ready.
This (above) is still not ready.
 This is ready!
A note about thinning the royal icing to make flood icing: there are no shortcuts, and this can not be sped along. You literally should only add water 1/2 to 1 teaspoon at a time (adding less and less each time), stirring after each addition, until the icing reached the proper consistency. As I watched this portion of Bridget's demonstration, I commented that because I am impatient in the kitchen, I would be tempted to just slosh in a bunch of water and stir it around. And I would. But Bridget warned that doing so can really compromise the integrity of the flood icing.
Next up, the flood icing goes into a squirt bottle…
 And you just fill in the spaces.
 Use a toothpick to carefully move the royal icing around and evenly distribute it.
Note from Bridget: The icing should not be thin enough to ooze into place all by itself; if it's thin enough to do this, it either won't dry properly or will dry with unsightly pits.
Unsightly pits? Who the heck needs that pressure?
 It's coming together!
 Meanwhile we mixed some red flood icing on the sidelines (I was very, very careful not to slosh…but it was difficult) and Bridget squeezed it into the middle section.
 And then…this lovely mint green color!
This color was my favorite.
And you can see (above) the difference between the original, thick royal icing and the thinner flood icing. The thick stuff wouldn't be able to be poured.
 Now, here's what happens when you put flood icing on flood icing…
 It creates a flat color-on-color effect. (Bridget calls these "flat dots.") Very cute!
And I love the red/mint green combination.
That's the basic technique! Outline with the thick royal icing, fill in with the thinner flood icing. Drop flood icing onto flood icing to create pretty flat effects. The world is your oyster.
 Bridget was great to encourage everyone to try it.
 She made her way around the island, lending her help and instruction for anyone who needed it.
 My girls were there with a couple of their friends.
 They loved it!
 And the guests churned out some lovely cookies…
 Gorgeous!
 The flat flood-on-flood designs are my favorite. Just use a toothpick to make swirls.
 Bridget brought some finished cookies along.
 These peppermint candy cookies will make your skirt fly up…in a major way. Here's the tutorial on Bridget's site that shows you how to make them:
Peppermint Candy Cookies on Bake at 350
RECIPES
Here are the links to the recipes we used:
Vanilla Almond Sugar Cookies – These are the cookies Bridget uses, and they are exceptionally delicious. You don't have to chill the dough before rolling them out (a plus!) and they're really tasty. Note that she rolls the cookies pretty darn thick—I'd guess hers push half an inch thick—and in my opinion, this is what makes Bridget's cookies extra memorable. They're soft and chewy. Yum.
Royal Icing – This is the first stage (thick) royal icing you'd use to outline cookies (with a #3 tip) or do decorative edge techniques. For flooding, you'd follow the steps above, adding small amounts of water until a ribbon of the stuff disappears back into the icing within a count of one thousand one, one thousand two.
(Pssst. Bridget also taught us how to make these beauties, which involve edible ink and paper. Tutorial later this week.)
Thank you so much, dear Bridget! Your class was incredibly informative, lots of fun, and ultimately delicious.
Most importantly, everyone left the weekend wanting to get home and try the techniques in their own kitchens.
We were all definitely inspired.

December 3, 2010
Festive Fruitcake Cookies
 Before you recoil at the word "fruitcake" and run screaming from this website (and I realize it wouldn't be the first time you've probably run screaming from this website) please listen: You must try these cookies! They are completely divine.
That these are divine is a little bit of an accident, as I violently and recklessly tweaked an old church cookbook recipe until I really didn't have any more time to tweak.
And they wound up just lovely.
Sometimes the most delicious things in life are accidents.
 Begin by throwing some milk and baking soda into a bowl.
 Stir it around to combine.
 Next, add some brown sugar into a mixing bowl with a stick of butter.
 Beat them together until fluffy.
 Add two eggs, then beat until combined.
Then add the milk/baking soda mixture, too.
 Mix in the flour…
Then go grab the bottle of brandy from the bottom drawer of your bedside table.
You know that's where you keep it.
 With the mixer on low, pour in a big ol' cup of brandy.
Yes, I said a cup.
Yes, I said that I said a cup.
Yes, I…oh, never mind.
 Then add some vanilla, too, to take your mind off the fact that you just added a cup of booze to your cookie dough.
Scrape the sides, then mix again for another sec.
Incidentally, during all this mixing, just go easy. Just mix until each element is combined; don't beat the dough to smithereens.
 Next, pour in some finely chopped pecans.
I'm lazy and in love with my food processor.
 Alrighty. Next, we're going to add in bunch of this curious, brightly-colored fruit. This is the stuff usually only sold during the holiday season. The stuff folks use to make fruitcake.
The stuff that glows so beautifully in the dark.
 Give all the fruit a rough chop…
 Then sprinkle on some flour.
 Toss the fruit to totally coat it with flour…
 Then dump the fruit into the mixing bowl. Give it a really gently stir on low, just until all the fruit is incorporated.
The dough will be extremely wet!
It's the booze, man.
 I like to use a nice sized cookie scoop; this is probably about 2 level tablespoons of dough! And note: the cookies will stay pretty much in whatever shape you drop them on the cookie sheet. So keep that in mind if you roughly plop the dough onto the sheet; it'll bake in the same rough shape.
Bake, bake, bake…
 Done!
Done!
 They're nice and soft and cakey…and extremely yummy. No kidding.
But I'm about to make them yummier.
 In a separate bowl, mix some more brandy (yes, I said more brandy) with equal parts brown sugar and a little vanilla. Then drizzle about a teaspoon of the stuff over each of the cookies.

 Oh, dear. You can't know.
You can't know unless you try them.
 I can't stop eating them. They're seriously delicious. Soft, nice texture…but the flavor is just all there.
Enjoy these!
Recipe: Festive Fruitcake Cookies
Prep Time: 15 Minutes
|
Cook Time: 20 Minutes
|
Difficulty: Easy
|
Servings: 24
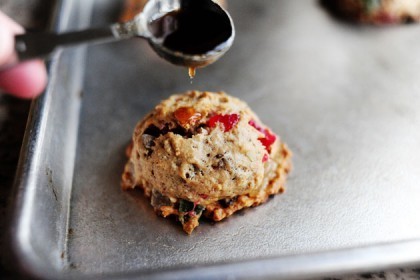
Print Recipe
3"x5" Cards
4"x6" Cards
Full Page
[image error]
');
Ingredients
Cookies:3 teaspoons Milk3 teaspoons Baking Soda1 stick (1/2 Cup) Regular (salted) Butter, Softened1-⅓ cup Packed Brown Sugar2 whole Eggs2-½ cups Flour1 cup Brandy1 Tablespoon Vanilla Extract¾ cups Finely Chopped Pecans8 ounces, weight Candied Pineapple, Roughly Chopped4 ounces, weight Candied Red Cherries, Roughly Chopped4 ounces, weight Candied Green Cherries, Roughly Chopped½ cups (additional) Flour GLAZE½ cups Brandy½ cups Packed Brown Sugar1 teaspoon Vanilla Extract Preparation Instructions
Preheat oven to 350 degrees.
Combine milk and baking soda and stir. Set aside.
Cream butter and brown sugar. Add eggs and mix lightly. Add 2 cups flour and mix until just combined. With mixer on low, pour in brandy until combined. Add nuts and combine.
Sprinkle 1/2 cup additional flour over the chopped fruit. Toss to coat. Add fruit and any excess flour to mixing bowl Mix until just combined. *Batter will be very wet*
Spray baking sheet with baking spray (or use baking mat.) Drop heaping tablespoons of batter, then bake for 20 minutes or until just golden brown. Do not overbrown!
Mix glaze ingredients in a bowl, then spoon 1 to 2 teaspoons of glaze over each warm cookie. Allow to cool. These cookies get better with age! (Well…within reason.)

Ree Drummond's Blog

- Ree Drummond's profile
- 2032 followers

