
Ree Drummond's Blog, page 80
February 14, 2011
Too Much American Chopper
I'm not sure if you've noticed, but I kinda like KitchenAid mixers.
Like, totally.
I've had my trusty white KitchenAid since the day Marlboro Man and I got married, and it's my best friend and companion in the kitchen. It's still going as strong as ever.
I've given away KitchenAid mixers on The Pioneer Woman Cooks for quite some time now, for one important reason: I love them. They're indispensable. They're powerhouses. They work. And all this time, I've chosen to provide the mixers myself (they have not been sponsored by KitchenAid) because I love my mixer and love to share them with others. And at the end of every mixer giveaway, I'm always clear to point out that the mixers are sponsored by Pioneer Woman. (That's me.) As part of that disclaimer, I usually throw in some kind of line about how KitchenAid has no idea who I am, yada yada yada. And as far as I was concerned, they didn't.
Recently, however, KitchenAid contacted me and told me that they wanted to thank me (and you) for supporting their mixers by creating a limited edition mixer for me to give away here. I immediately rubbed my hands together, then worked with a designer to create a beautiful, unique mixer. One that might appear in my dreams.
Here it is:
 This is what happens when I watch too much American Chopper.
 But oh…do I love this mixer.
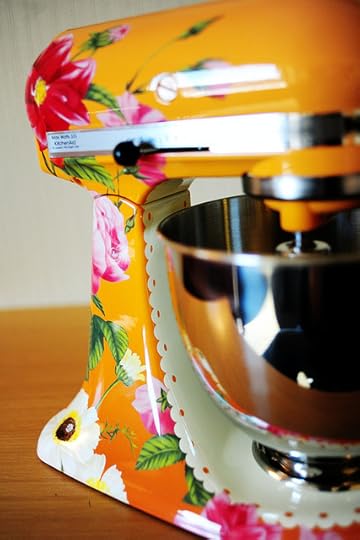 This is a custom paint job designed to mirror the cover of Black Heels.
 I decided not to put the cowboy and cowgirl on the mixer, though. I thought that might just be a tad over the top.
Ha.
 The orange is a custom color, too.
I'm sorta obsessed with orange, in case you didn't know.
 I repeat: This is what happens when I watch too much American Chopper.
 I loved this scalloped edge. Lovely!
 It's enough to make Paul Sr. and Paul Jr. sing praises of joy.
If you don't know who Paul Sr. and Jr. are…it's best if I don't explain it. I don't want you to get hooked, too.
Today, in honor of Valentine's Day, I'm giving away two (of four) of these limited edition KitchenAid mixers.
They're crazy. They're orange. They're covered with flowers. And if you'd like one, let me know!
TO ENTER
To enter this extra special giveaway, just answer the following question in the Comments section of this post:
"What was your first sweetheart's name?"
Whether it's Kevin, Kevina, Dilbert or Dilberta, just enter the first name of your first sweetheart and you're automatically entered to win one of these lovely mixers.
THE RULES
One entry per person, please.
No entries after midnight Monday.
Winners will be selected at random and announced Tuesday.
Good luck!
___________________________
Mixers definitely, absolutely, 100% provided by KitchenAid, with help from my friends at CHEFS Catalog. Thanks, KitchenAid, for this very fun giveaway!


Special Edition
I'm not sure if you've noticed, but I kinda like KitchenAid mixers.
Like, totally.
I've had my trusty white KitchenAid since the day Marlboro Man and I got married, and it's my best friend and companion in the kitchen. It's still going as strong as ever.
I've given away KitchenAid mixers on The Pioneer Woman Cooks for quite some time now, for one important reason: I love them. They're indispensable. They're powerhouses. They work. And all this time, I've chosen to provide the mixers myself (they have not been sponsored by KitchenAid) because I love my mixer and love to share them with others. And at the end of every mixer giveaway, I'm always clear to point out that the mixers are sponsored by Pioneer Woman. (That's me.) As part of that disclaimer, I usually throw in some kind of line about how KitchenAid has no idea who I am, yada yada yada. And as far as I was concerned, they didn't.
Recently, however, KitchenAid contacted me and told me that they wanted to thank me (and you) for supporting their mixers by creating a limited edition mixer for me to give away here. I immediately rubbed my hands together, then worked with a designer to create a beautiful, unique mixer. One that might appear in my dreams.
Here it is:
This is what happens when I watch too much American Chopper.
But oh…do I love this mixer.
This is a custom paint job designed to mirror the cover of Black Heels.
I decided not to put the cowboy and cowgirl on the mixer, though. I thought that might just be a tad over the top.
Ha.
The orange is a custom color, too.
I'm sorta obsessed with orange, in case you didn't know.
This is what happens when I watch too much American Chopper.
I loved this scalloped edge. Lovely!
It's enough to make Paul Sr. and Paul Jr. sing praises of joy.
If you don't know who Paul Sr. and Jr. are…it's best if I don't explain it. I don't want you to get hooked, too.
Today, in honor of Valentine's Day, I'm giving away two (of four) of these limited edition KitchenAid mixers.
They're crazy. They're orange. They're covered with flowers. And if you'd like one, let me know!
TO ENTER
To enter this extra special giveaway, just answer the following question in the Comments section of this post:
"What was your first sweetheart's name?"
Whether it's Kevin, Kevina, Dilbert or Dilberta, just enter the first name of your first sweetheart and you're automatically entered to win one of these lovely mixers.
THE RULES
One entry per person, please.
No entries after midnight Monday.
Winners will be selected at random and announced Tuesday.
Good luck!
___________________________
Mixers definitely, absolutely, 100% provided by KitchenAid. Thanks, KitchenAid, for this very fun giveaway!
February 12, 2011
Marlboro Man Approved
 In honor of Valentine's Day, I have created a new Marlboro Man Approved category on The Pioneer Woman Cooks. There, you can browse all the dishes that my beloved, a meat-and-potatoes-loving human, would eat every day of the week and twice on Sunday. This is a different collection from the straight-up Cowboy Food category on the site, and might be a nice place to browse for those of you who might be looking for the perfect Valentine's Day dinner for your love-muffin.
Here's the link:
Marlboro Man Approved Recipes on PWC

February 8, 2011
Chocolate Valentine Cookies
 My mom and I used to make these together every Valentine's Day, and the recipients ranged from cute little girlfriends in the more innocent early adolescent years, to (much to my mom's consternation) full-on polo shirt-and-Topsider-wearing boyfriends later in high school. They're sweet little chocolate heart cookies, personalized with stencils and sifted powder sugar, which couldn't be an easier decorating method.
I used to go nutso with the suckers, spelling out Valentine heart quotes such as "Be Mine" and "Love You" and "You're Cute"
My mom nixed "Kiss Me," unfortunately. What a buzzkill she was! I'd also spell out names, the date of that Valentine's Day, and would occasionally cut my own geometric stencils and make funky designs on the cookies for some interesting decoration. It really is a fun way to decorate.
You'll want to have tweezers to remove the stencils once the powdered sugar has been dusted on, and might also need a fine brush of some kind to erase mistakes. Other than that, you just need a heart cookie cutter and some alphabet stencils that fit the cutter. Easy and fun to make with kids.
And—sigh—so romantic.
 Begin by adding 2 sticks of unsalted butter to the bowl of an electric mixer. I'm almost exclusively a salted butter gal, but in this case, unsalted butter is necessary.
 Cream the butter until fluffy, then add in the brown sugar.
 Cream that mixture, then add in one egg…
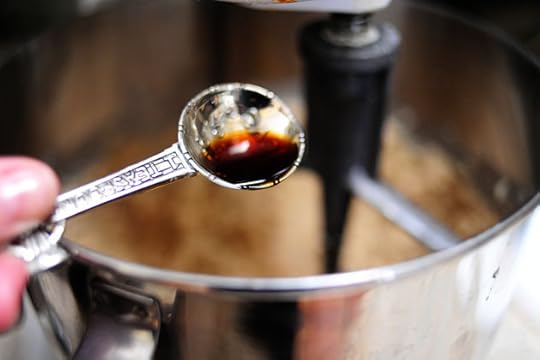 And some vanilla…
 And mix until totally combined.
 Into a separate bowl, mix add flour, salt, baking powder, cinnamon, and cocoa powder.
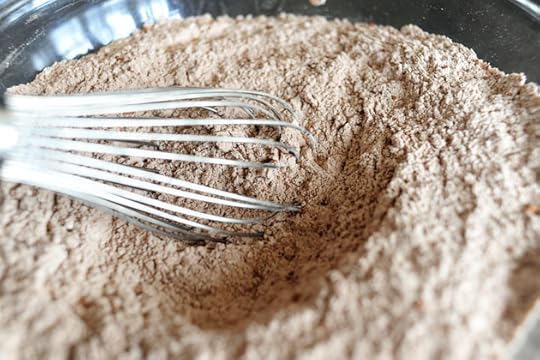 Whisk it together to combine.
 Then add it in two batches to the butter/sugar mixture in the mixing bowl, mixing well after each addition.
 Next—and this is important—do not eat all of this dough. If you do eat all of this dough, you will not have any cookies.
This has been a public service announcement.
 Stick the dough into a large Ziploc bag, then flatten it into a disc. This'll make it easier to roll out later.
Now just throw it into the fridge for a couple of hours.
 While the dough is chilling, find your heart cutter…or cutters! This was a heart cutter nesting set I picked up a few months ago.
 When you're ready to make the cookies, remove the dough from the fridge. Remove it from the plastic bag and set it on a lightly floured surface. You'll need to let it sit for maybe five to ten minute, just to soften enough to make it easy to roll out. If it cracks violently when you first start to roll it, wait a few more minutes.
 Before you cut the cookies…
 Make sure the stencils you're going to use will fit the size of the heart.
 Then roll out the dough on a lightly floured surface, cut them out, and place them on a piece of waxed paper or a baking mat. Don't roll the dough too thin; I prefer the cookies to be a little on the soft side, and if you roll them too thin, they'll be crisp and tragic.
Bake them for about 12 minutes or so, then let them cool completely.
 When you're ready to decorate, lay the stencil right on top of the cookie.
 Cut up pieces of scrap paper and lay them over any areas of the cookie that are exposed.
 Then lightly sift powdered sugar over the top. As you can see, I wasn't very "light" with my sifting because I evidently had some kind of muscle spasm.
Don't be like me.
 Use (clean) tweezers to carefully lift off the paper and stencil, being very careful not to drop powdered sugar as you remove them.
 There you go! As you can see, I could have gone a little lighter with the powdered sugar, as it looks like it's going to have an avalanche here in a second. But you get the idea.
 This one's a little better. Not so clumpy.
Finish up with all the letters you need, then arrange them on a pretty napkin on top of a tray.
 Oh, and you can also do inverse stencils for a different look (and for more powdered sugar per cookie.)
 Nice!
Nice!
 Make these for your sweetie on V-Day. Spell out his/her name, cute V-Day sayings, or decorate them in pretty patterns. Have fun with them!
 And if you have any leftover cookies…
 Chocolate icing…or, in my case, Nutella.
Amen.
Lots of Love,
Pioneer Woman
Here's the handy printable:
Recipe: Chocolate Valentine Cookies
Prep Time: 2 Hours
|
Cook Time: 12 Minutes
|
Difficulty: Intermediate
|
Servings: 16

Print Recipe
3"x5" Cards
4"x6" Cards
Full Page
Ingredients
2-¼ cups All-purpose Flour1 teaspoon Baking Powder¼ teaspoons Salt½ teaspoons Ground Cinnamon¼ cups Unsweetened Cocoa Powder1 cup Firmly Packed Brown Sugar1 whole Large Egg1-½ teaspoon Vanilla Extract Powdered Sugar, For Sifting Alphabet Stencils2 sticks (1 Cup) Unsalted Butter, Softened Preparation Instructions
Combine flour, baking powder, salt, cinnamon, and cocoa powder in a bowl. Whisk together and set aside.
In the bowl of an electric mixer, cream butter and brown sugar until fluffy. Add egg and vanilla and beat until combined. Add flour/cocoa mixture in two or three batches, mixing well after each addition.
Place dough into a large Ziploc bag and flatten slightly with your hand. Seal bag and refrigerate for two hours.
To make to cookies, preheat oven to 350 degrees. Remove dough from bag and place on a floured surface for 5 to 10 minutes. Roll out to 1/4-inch thickness and cut with a heart cutter. You'll need to consolidate and re-roll the dough as you go.
Place on a cookie sheet lined with parchment paper or a baking mat. Bake for 12 minutes, or until set (but not browning at all.) Remove from oven and allow to cool completely.
Place stencils on cooled cookies, spelling out things like "Love You" and "Be Mine". Lay on pieces of scrap paper on any areas of exposed cookie. Lightly sift powdered sugar over the stenciled cookies. Carefully remove paper and stencils with tweezers, being careful not to drop powdered sugar as you remove. Use a tiny brush to correct "errors."
Arrange on a platter or in a basket and deliver to your sweetie!
(Spread chocolate icing or Nutella on leftover cookies if desired. Yum!)
Makes 12 to 18 cookies, depending on size of heart cutter.

February 7, 2011
Pasta ai Quattro Formaggi
 I included this recipe in the Black Heels book because it's one of the first (disastrous) things I cooked for Marlboro Man when we were dating. It was my favorite pasta dish from my favorite restaurant in all of Los Angeles: Intermezzo in West Hollywood. Intermezzo was where my friends and I would go when we felt as though we'd earned a nice dinner out after studying for a whole hour or so…and it's where we'd have our parents take us to dinner when they'd come visit us at school.
Intermezzo was a dreamy, wonderful place with an outdoor covered patio peppered with trees and tiny white lights. But it was the pasta—not the atmosphere—that I'll remember the rest of my life. I dream about the pasta at Intermezzo regularly.
The dish I ordered with the most frequency was angel hair with four cheeses. It was delectable. So when I made it for my (cattle ranching, meat eating, non-pasta crazed) new boyfriend on one of those first dinners at his house in the country, I was certain it was going to be a hit. I won't go into detail here, but the dish was a complete flop. User error. Live and learn.
Through the years, I've improved my technique and still make Pasta ai Quattro Formaggi anytime I need a taste of the L.A. days…or whenever I need a good, rich carb dish next to a juicy fillet or rib-eye.
Make this for your sweetie on Valentine's Day. You can serve it alongside beef or seafood, or can just serve it with a lovely green salad if your beloved doesn't require some kind of animal protein with every meal.
It will light up your life.
 First, grate up four cheeses.
Get it?
 You can use any four cheeses you like, and I often switch things up according to what I have in my fridge. I used Parmigiano Reggiano, Pecorino Romano, Fontina, and goat cheese/chevre.
 The chevre gives it a delicious creaminess and tang, and the Parmesan and Romano give it a great Italian sharpness.
But any ol' cheese will do.
Except perhaps Cheez Whiz. We might want to save that for another time.
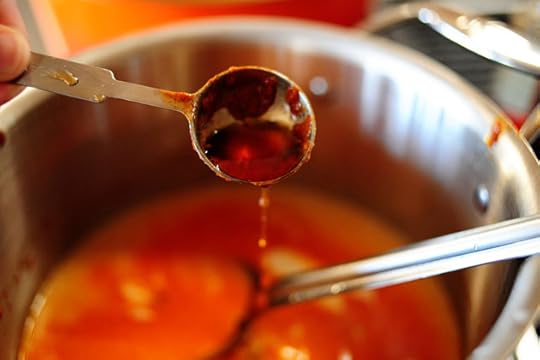
 Heat up some cream in a small saucepan.
This is actually—gasp—whole milk, which I'm only using for purposes of this demonstration. I was—gasp—out of cream yesterday, so I had to improvise. But please, please, please don't be like me; this dish needs the rich cream.
Promise me you'll use the cream. Promise?
 Next, boil the pasta. I like to use angel hair, but linguine or fettuccine work well, too. Fusili would also be divine.
 Very, very important: do not overcook the pasta. If you do, by the time you mix in the cheeses, the dish will resemble watery cheese grits. And you'll cry. Go for al dente, baby. You'll be glad you did.
 When the pasta's ready, drain it and throw it into a large serving bowl (or heck, right back into the pan) with a couple of tablespoons of butter. Before draining, reserve a good cup or two of the hot pasta water; you'll need it in a minute.
Helpful hint: Before you drain the pasta, use a heatproof measuring cup to take out a couple of cups of the hot pasta water. You'll need it in a minute!
 Pour in the hot (pretend it's) cream…
 And add the cheeses.


 Next, add some salt and plenty of freshly ground black pepper.
 Then stir, using a large spoon or tongs, very gently as the cheese melts.
 If needed, add in a little hot pasta water here and there to keep the pasta from being too clumpy or dry. The consistency should be smooth and creamy.
 Stop just short of the cheeses being totally melted. Give it a quick taste and add more salt and pepper if it need it. Don't undersalt!
 To serve, violently rub a peeled garlic clove in each serving bowl…
 And place a nice serving o' pasta in the bowl.
 Sprinkle on a little chopped parsley…
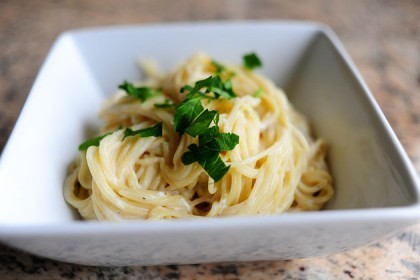
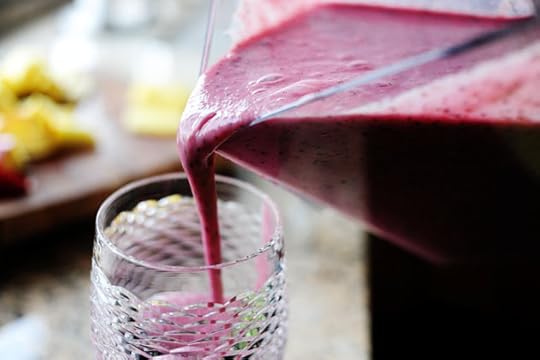
 And serve it immediately. Sublime.
Because of all the cheese, you won't want this to sit very long. It needs to be enjoyed right this very minute!
I'm not very good with waiting. This dish is right up my alley.
Enjoy, my friends!
Cute Valentine's recipe coming up next.
Here's the pasta printable:
Recipe: Pasta ai Quattro Formaggi
Prep Time: 10 Minutes
|
Cook Time: 10 Minutes
|
Difficulty: Easy
|
Servings: 8
Print Recipe
3"x5" Cards
4"x6" Cards
Full Page
Ingredients
1 pound Angel Hair Pasta½ cups Grated Fontina Cheese½ cups Grated Parmesan Cheese½ cups Grated Romano Cheese½ cups Goat Cheese (chevre)2 Tablespoons Butter, Softened1 cup Heavy Cream1 whole Garlic Clove, Peeled½ teaspoons Salt, More To Taste Freshly Ground Black Pepper Minced Fresh Parsley Preparation Instructions
Heat cream in a small saucepan on the stove over low heat.
Rub garlic clove all over the inside of a large serving bowl.
Cook pasta according to package directions in lightly salted water, leaning toward the al dente side. Do not overcook! Drain pasta, then return to the cooking pot. Pour in cream, add butter, and add cheeses and salt and pepper. Stir gently to combine, adding hot pasta water as needed for consistency. Don't overmix; if there are little clumps of cheese here and there, it's fine! Taste and add more salt if needed. Mixing stage should happen very quickly.
Turn pasta into large serving bowl. Sprinkle with parsley and serve immediately with a nice medium rare steak.
*Can use whatever four cheeses you'd like!

February 4, 2011
Smoothies for Breakfast
 Before we all load up on Super Bowl food, let's take a break and have…a smoothie.
My mom has years of experience as an oncology social worker, and is a big believer in mind-body medicine. She's also—wait for it—a very healthy eater, and she never walks through my house on the first day of her visit without carrying a bag of cruciferous vegetables and colorful fruits. During her last visit to the ranch a couple of weeks ago, she got my girls hooked on eating smoothies for breakfast. They're now addicted and make them regularly.
So much better than Cocoa Puffs!
I think.
Don't tell my mom I said that.
Here's one smoothie we made while she was here.
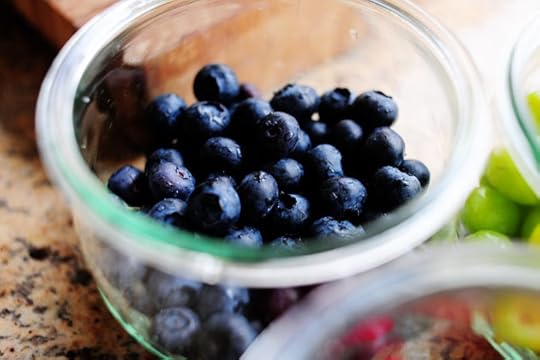 Delicious blueberries.
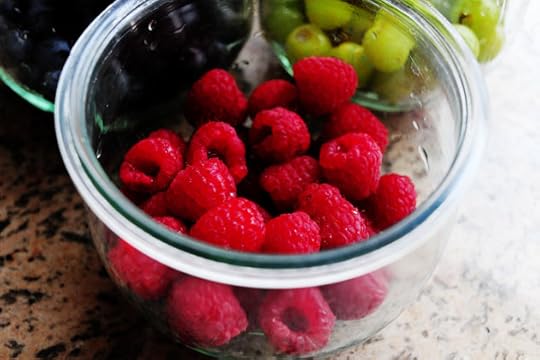 Scrumptious raspberries.
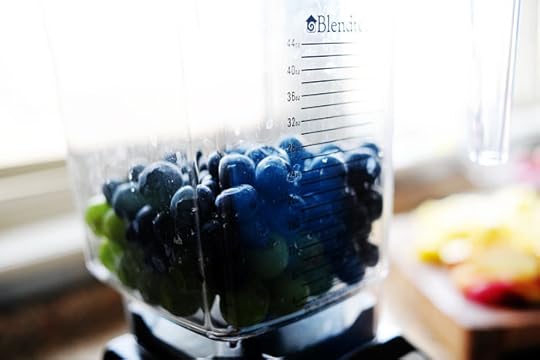
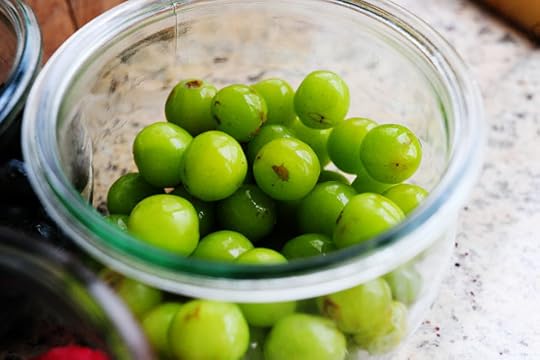 Sweet, succulent grapes.
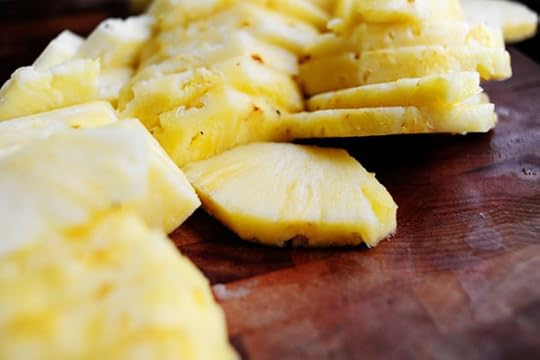 Fresh cut-up pineapple.
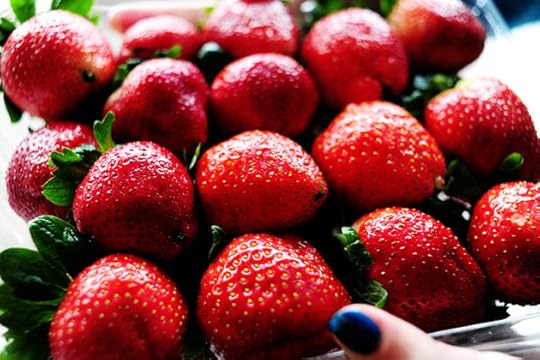 Gorgeous strawberries.
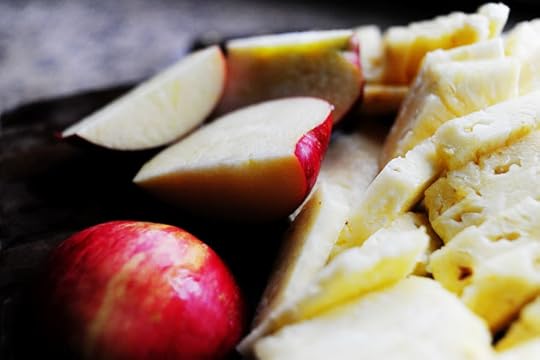 Cut up apple.
 And yes. A little banana. I still contend they're from the devil, but I will say that if less than half a banana is used, I really can't detect the flavor at all.
Use 3/4 of a banana and it's a whole different ballgame.
I cringe.
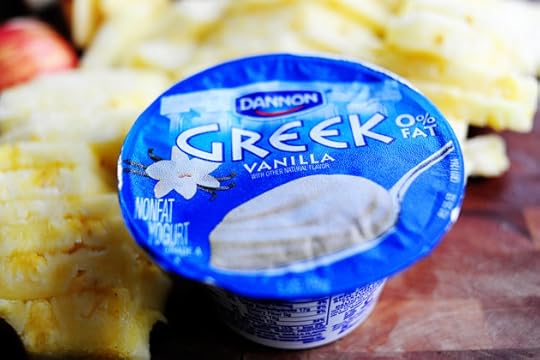 Yogurt. Any kind will do, but my mom likes the Greek stuff. I can't get Greek yogurt (yet) at our local grocery store, though, so I'd tend to use plain, unsweetened yogurt instead.
 This is totally optional, but if you're wanting to have the smoothie for breakfast, it just adds a little more nutritional heft to the picture. Or you can substitute protein powder or any kind of supplement powder you might have on hand.
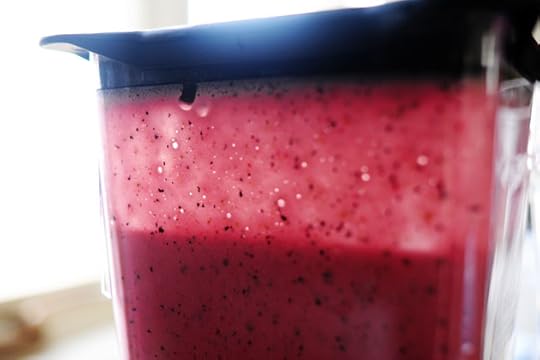
 Begin by layering fruit in the blender. Oh, and you'll notice that the fruit doesn't need to be perfect and flawless! Smoothies are a great way to use up bruised or banged up fruit.
 Layer…
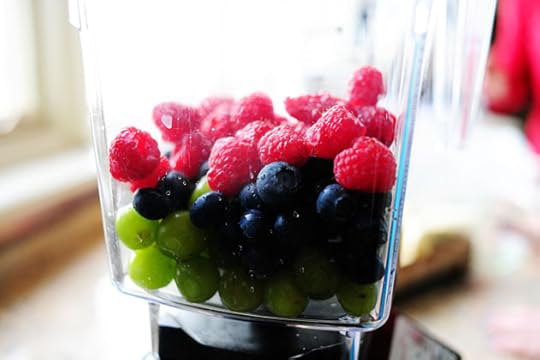 Layer…
 Layer. And leave the stems on the strawberries!
Why?
Because my mom said.
 After you get all the fruit layered in the blender (and I'm just going to pretend I don't see that banana)…
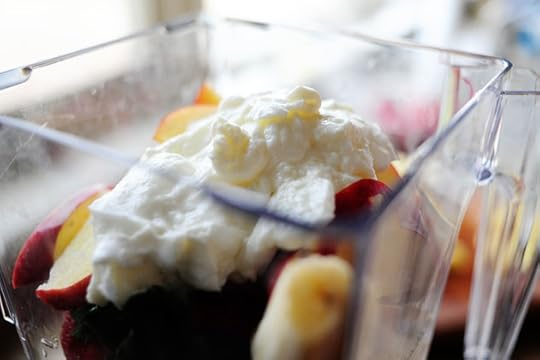 Add the yogurt…
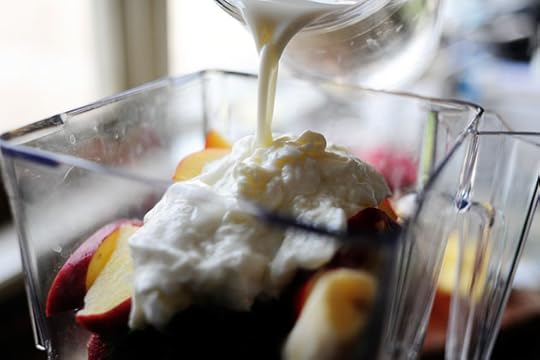 A little milk…
(Note: You can use fruit juice instead of milk at this stage, but I like the creaminess.)
 And the powder, if you're using any.
You can also add a little honey for some added sweetness if you have an overactive sweet tooth like some people around here.
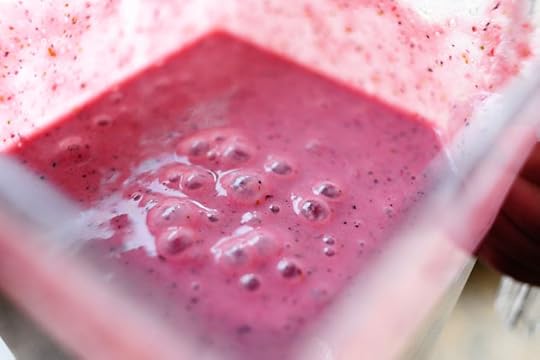
 Top off the whole thing with some ice. It'll give the smoothie more of a milkshake consistency and will ensure that it's ice cold.
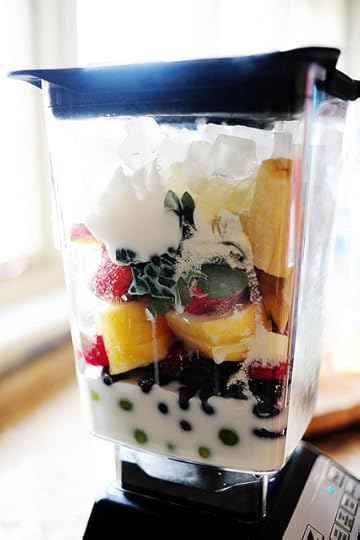 Throw on the lid…
Then HANG ON!
 Keep your hands and feet away from the blender.
 Yum…
Yum…
 Yum…
Yum…
 Yum.
Yum.
This good-sized blender, packed with ingredients, served a good four to six humans.
This is a straight-up fruit smoothie, and there's no limit to the combinations you can add: mangos, blackberries, peaches…the list goes on. But things can get really interesting when you add vegetables with the fruit. Anything from spinach to carrots add not just extra nutrition, but some very interesting color results. Have fun with it!
If you're a smoothie aficionado, feel free to list your favorite ingredients—or recipes—here in the comments.
Today, it's about smoothies.
(Tomorrow, we're back to wings and potato skins. Game day is almost here!)
Love,
Pioneer Woman

January 31, 2011
Beef Fajita Nachos
 Oh dear. These are good.
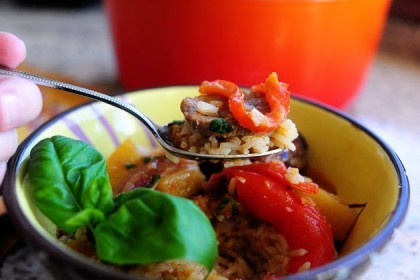
These are very, very good. Flank steak marinated in chipotle, lime, garlic, and cilantro is used not for fajitas, as one might expect flank steak marinated in chipotle, lime, garlic, and cilantro to be used for…but for fajita nachos, a nice, unexpected twist.
Make these for the Super Bowl! Serve them with plenty of guacamole, sour cream, and salsa.
You'll make lots and lots of friends. Promise.
 You need garlic…
 Olive oil…
 Limes…
 And chipotle peppers.
 Throw the olive oil and chipotle peppers (about four or so) into a food processor or a blender.
 Squeeze in some lime juice…
 And add some cilantro.
 Mix it all together until it's lovely and combined and colorful.
 Throw the flank steak into a large Ziploc…
 And pour in the marinade. Squish it around and make sure the meat's all coated, then refrigerate it for at least 24 hours. The flavor will be out of this world.
 This is more like 36 hours later, and boy oh boy, am I excited.
 Oh my.
 Oh my goodness gracioius. This is flank steak. See that beautiful grain? I'm in love, I'm in love, and I don't care who knows it!
 Remove the meat from the pan, set it on a cutting board, and cover with foil while you prepare the rest of the ingredients.
 Next, slice up some onions…
 And some green bell peppers…
 And throw them into a skillet. Cook them over high heat…
 Until they're soft with nice, flavorful black bits.
 Next, slice up about half of the flank steak. Look at that gorgeous, gorgeous piece of meat!
 Then cut the slices into smaller (bite-size) pieces.
Note: you can use the other half of the flank steak to make another batch of nachos, or you can just save it in the fridge and snack on it over the next few days.
Cold flank steak out of the fridge = Heaven.
 Next, throw the cooked veggies onto a cutting board and chop them into smaller pieces.
 Throw some sturdy tortilla chips onto a large ovenproof platter or cookie sheet.
 Sprinkle them generously with grated cheese. If I'd had any Monterey Jack, I would have used some of it, too.
 Pop it into a preheated oven just long enough to melt the cheese but not so long that the chips will brown.
 Sprinkle on a bunch of the chopped cooked veggies.
 Then sprinkle on a bunch of the chopped meat.
 Pop this into the oven for a minute or so, but watch it! We only want to warm up the ingredients; we definitely don't want the meat to cook any more. A minute or so in the oven should be fine.
 I took the liberty of whipping up some very quick guacamole…
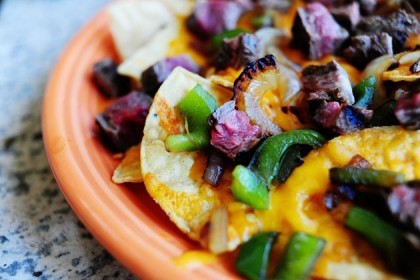
 And plopped it over the top.
I serve this like it is, but with plenty of sour cream and salsa on the side. The beef is so deliciously flavorful and the guacamole is a cool, creamy complement.
Make these for the Super Bowl this year! You'll absolutely love 'em.
Recipe: Beef Fajita Nachos
Prep Time: 24 Hours
|
Cook Time: 12 Minutes
|
Difficulty: Easy
|
Servings: 12
Print Recipe
3"x5" Cards
4"x6" Cards
Full Page
 [image error]
');
[image error]
');
Ingredients
Flank Steak1 whole Flank Steak⅓ cups Olive Oil2 whole Limes, Juiced4 whole Canned Chipotle Peppers, With A Little Sauce4 cloves Garlic, Peeled1 whole Handful Of Cilantro NACHOS2 whole Yellow Onion2 whole Bell Peppers, Cored And Sliced (can Use Different Colors) Olive Oil (for Frying) Sturdy Tortilla Chips8 ounces, weight Cheese, Grated (cheddar, Jack, Pepper Jack, Etc) Guacamole Salsa Sour Cream Preparation Instructions
To prepare the steak: Combine olive oil, lime juice, garlic, chipotle peppers, and cilantro in the bowl of a food processor or a blender. Blend until totally combined. Place flank steak into a large plastic bag or baking dish. Pour in marinade and make sure it adequately coats the meat. Seal bag or cover tightly and refrigerate for 24 hours at least.
When ready to make the nachos, preheat oven to 350 degrees. Heat an outdoor grill or an indoor grill pan (or you can use a skillet). Drizzle a little olive oil on the grill and grill the meat over very high heat, about 4 minutes per side. (Turn 45 degrees halfway through on both sides to get nifty grill marks.) Remove steak from grill and set aside to rest.
In a large skillet, heat a couple of tablespoons of olive oil over medium-high heat. Add onions and peppers and cook for 3 to 5 minutes, or until vegetables are somewhat soft and starting to get black bits. Remove from heat and set aside.
Slice half of the flank steak into strips against the grain, then chop slices into smaller bites. Place sauteed veggies on a cutting board and roughly chop to get them into smaller pieces.
Arrange tortilla chips on a large ovenproof platter (or cookie sheet.) Sprinkle plenty of cheese all over the top. Place platter in oven for 3 minutes or so, just long enough to melt the cheese (but not burn the chips.) Remove from oven, then generously sprinkle peppers, onions, and chopped steak all over the top. Return to oven for no more than another minute—just long enough to heat up the meat and peppers (but not cook the meat all the way through.)
Remove from oven and plop guacamole all over the top. Serve immediately with salsa and sour cream.
Use the rest of the meat for more nachos…or make real fajitas!

Red Thai Duck Curry
 I almost can't speak. It really was that delicious.
I think that due to the fact that I live on a cattle ranch in Oklahoma, I've developed this I-want-what-I-can't-have, rabid appetite for cuisine from the continent of Asia. I don't care if it's Indian, Thai, or Japanese, at any given moment of any day of the week, month, or year, I would drop everything I'm doing to sit down and feast on food from any of these nationalities.
My best friend Hyacinth's son Matthew went duck hunting this year and gifted me weeks ago with some of the most succulent, beautiful duck breasts I think I've ever seen. Once I interrogated him and made sure he hadn't left them in the back of his pickup for two weeks before giving them to me, I thanked him profusely and knew exactly what I was going to cook first: Thai Duck Curry. I'd had some at a Thai restaurant in Portland last spring, and I almost called Marlboro Man and told him he was going to have to move the children and cattle to the Pacific Northwest so I could be assured a steady stream of what was probably one of the ten best things I've ever eaten in my life.
I didn't call him, though. He would have said no, which would have just made me want it more.
No, I don't have issues. Why do you ask?
Anyway, here's how I made the duck curry. It likely isn't the most authentic or logical or sane or sound method…but it's good. Real, real good. (Note: since Thai cooking isn't my forte, I consulted a handful of online curry recipes and wound up adapting this one for my use.)
THE CURRY PASTE
The first thing I had to do was make some red Thai curry paste. The reason I had to make red Thai curry paste is that I thought I had red Thai curry paste but didn't actually have any red Thai curry paste. I think I did this subconsciously so that I would be forced to make my own dang red Thai curry paste because it's something I'd never done before. I found this simple recipe, then adapted it to fit what I had on hand, and what flavors I wanted to highlight.
* Note: Red Thai curry paste is not to be confused with red Thai chili paste, which is a totally different product.
* Also, if you already have red Thai curry paste on hand, you can skip this part of the recipe.
 Into the bowl of a food processor or blender, throw a fourth of a purple onion.
 Then grab some lemon grass. You can find it in the herb section of some large supermarket chains or specialty stores. That I happened to have some in my fridge was a total fluke; I bought it last week when I was in the big city, and I had no reason to buy it. I just thought it was neato.
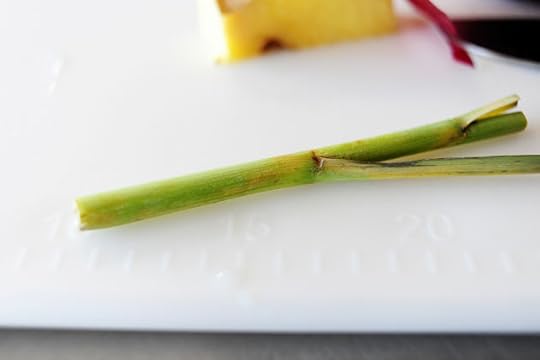 Grab a stalk…
 And chop it into pieces. Hold the pieces in your hand and give them a rinse under cold water to wash the dirt away.
 Throw those in with the onions.
 Add cayenne pepper…
 Peeled garlic…
 A chunk of ginger…
 Some ketchup…
 Ground cumin and ground coriander…
 Storebought fish sauce. You can get it anywhere.
 Beware: the stuff is salty. Between the fish sauce I'm adding to the curry paste and the curry dish themselves, there was zero need to add additional salt.
 Add some sugar…
 A good amount of regular chili powder…
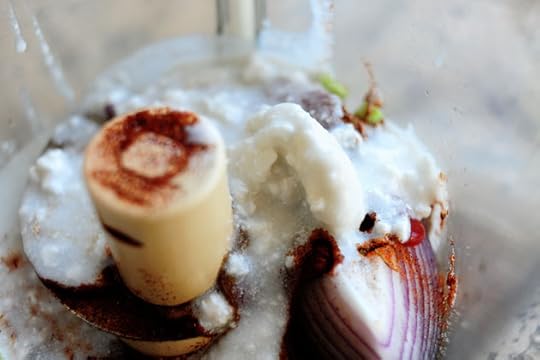 Some coconut milk from a can…
 The the juice of a lime.
 Such an interesting mix!
 Just process it until it totally combined. I think it's best to make this ahead of time if you can; I stuck it in the fridge overnight and the flavors were stronger and more "melded" the next day than they were right after I mixed it.
THAI DUCK CURRY
 Before you get started, get the veggies ready. You'll need some minced garlic, minced fresh ginger, sliced red onions, sliced bell pepper, chunks of pineapple, a handful of grape tomatoes, and a good amount of fresh basil.
 I bought these duck breasts and decided to keep the fat on.
Duck fat? Fugghetaboutit.
If duck fat is wrong, I don't ever, ever, ever want to be right.
 Rinse the breasts, then pat them dry with a paper towel.
 Fry them, fat side down, in a large skillet of olive oil. You can add a tiny bit of butter to facilitate browning, but since the temperature is high, you need to be careful not to burn it.
 Remove them from the skillet without browning the other side. Our purpose here is just to get the fat nice and brown and crispy; do not worry about cooking the duck at this point.
 Cut the breasts into pieces, then cover with foil and set aside.
 If the oil/butter isn't too burned, you can use the same skillet to continue making the curry. (I used a different pan with new oil. Long story.) Heat garlic over low heat and cook it for a couple of minutes, until it starts to soften.
 Add a good amount of the curry paste…
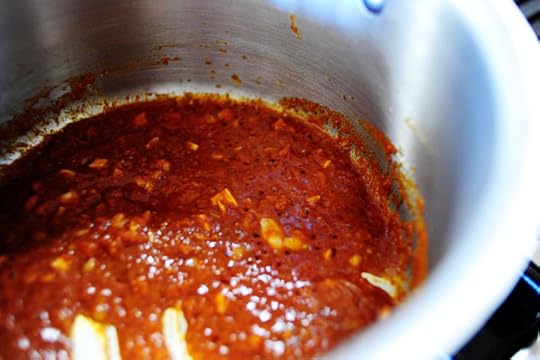 And cook the paste for several minutes. This is an essential step; the flavors of the curry paste really deepen and awaken while cooking.
 After a few minutes, add a can to a can-and-a-half of coconut milk.
 Coconut milk is usually separated and freaky looking in the can, but once you add it to the mix, it'll be just fine.
 Also add in some water…
 Some fish sauce…
 And a good amount of ginger.
The flavors!
 Then just let the mixture cook over medium-low heat for 10 to 15 minutes; it'll thicken slightly and become even more delicious than it already is.
 Meanwhile, in a French oven far, far away, heat a little olive oil and cook the onions and peppers over high heat. Cook them for a few minutes; we want them to get a little color on them without cooking them to the point of being flimsy.
 With the heat still on high, throw in the sliced duck.
 Stir it around and cook it for a few minutes.
* Note: Rather than cook the duck this way, you could also use leftover roast duck that you might have (or you can roast the duck breasts in the oven, then chop or shred it.) If you use precooked duck, just add it at this point and proceed immediately to the next step.
 Add the pineapple and cherry tomatoes to the mix. Stir them in and cook for about 3 to 4 minutes.
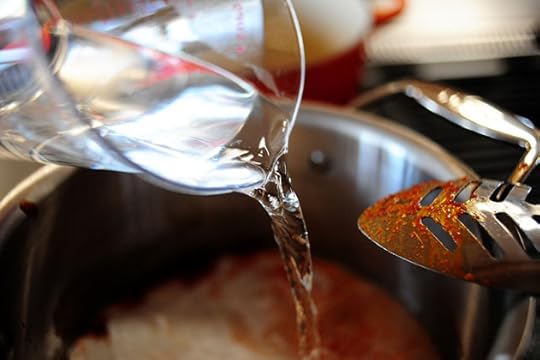
 Then pour in the curry sauce that's simmering in the other pan. Allow this to bubble and cook over medium heat for a good 5 to 10 minutes. If it seems too thick at that point, add in a little bit of hot water. If it's not thick enough, let it bubble and cook for a few more minutes. And taste the sauce! Make sure it's right. If it needs a little more heat, add in a little more cayenne or red chili paste. If it needs salt (it really shouldn't, but you never know), add a little salt or fish sauce.
When it's done, remove it from the heat and let it sit for 5 to 10 minutes before serving. I like to do this with things like stews and soups, as it allows everything to calm down and become perfect.
 Have some cooked rice ready.
 Then, at the very last minute, throw in a good amount of fresh chopped basil.
(In a separate post, I will write about the blood, sweat, and tears required to find this basil. Where has all the basil gone? Long time passing.)
You could also use cilantro as an alternative. A different flavor, but still utterly delicious.
 Yum. Note that for the printable recipe below, I decreased the amount of water in the recipe. I actually added more like 3 to 4 cups, and the sauce was a little thinner than I'd like.
(This is how I "test" recipes, by the way. I cook. I mess up. I adjust the printable accordingly. The end.)
 Spoon plenty of sauce over the top; you want the rice to be doused!
At least I want the rice to be doused. I probably shouldn't speak for everyone.
 Add a pretty sprig of basil…
 Me so happy.
 There's a lot going on here: flavorful duck with browned skin; delicious veggies, spicy curry sauce. Divine.
 Enjoy this, guys! It realize it's not exactly a quick and simple recipe, but a girl's got to live every now and then. If you do make it through and knock it out, I know you'll love it!
I'm including the printable recipe for the curry dish below. For the red Thai curry paste recipe, click here. (Sorry to put it on a different page, but something in the system prohibits putting two printable recipes in the same post.)
Red Thai Curry Paste Printable Recipe
New Super Bowl recipe next!
Love,
P-Dub
Recipe: Red Thai Duck Curry
Prep Time: 10 Minutes
|
Cook Time: 40 Minutes
|
Difficulty: Easy
|
Servings: 6
Print Recipe
3"x5" Cards
4"x6" Cards
Full Page
[image error]
');
Ingredients
3 whole Boneless Duck Breasts, Fat On If Desired2 Tablespoons Olive Oil3 cloves Garlic, Minced6 Tablespoons Thai Red Curry Paste (storebought Or Homemade)1-½ can (14 Ounce) Coconut Milk2 cups Hot Water4 Tablespoons Fish Sauce3 Tablespoons Minced Fresh Ginger2 Tablespoons Olive Oil (additional)½ whole Red Onion, Sliced1 whole Green Or Red Bell Pepper, Cored And Sliced1 cup Grape Tomatoes½ whole Pineapple, Cut Into Chunks (can Use Canned Pineapple) LOTS Of Fresh Basil, Chopped Jasmine Rice Cooked Preparation Instructions
Heat 1 tablespoon olive oil and 1 tablespoon butter in a large skillet over medium high heat. Place duck breasts fat side down and cook for several minutes, or until skin is crisp and golden brown. (Don't worry about cooking the duck at this point. You just want to give the skin some great color.) Remove from the skillet and cut into slices. Set aside.
Reduce heat to medium low. If oil isn't overly brown, go ahead and add the minced garlic to the pan. (If oil is to brown, pour it off and add some new oil.) Add red Thai curry paste to the pan and stir. Cook paste for several minutes to release the flavors. Pour in the coconut milk, hot water, fish sauce, and minced ginger. Stir and allow to cook over low heat for 10 to 15 minutes while you prepare the other ingredients.
In a separate pot (I use a dutch oven) heat oil over medium high heat. Add sliced onions and bell pepper and cook for several minutes. Make sure the pan is hot, then add sliced duck and stir. Cook for 3 to 4 minutes.
Add pineapple and cherry tomatoes. Stir and cook for 2 minutes.
Taste curry sauce, which should be slightly thickened by now. Add more spice if needed.
Pour curry sauce into the pot with the veggies and duck. Stir to combine and allow to bubble and simmer for a good 5 to 10 minutes. Add a little hot water if it seems too thick, or allow to bubble longer if it needs more thickening. Remove from heat and allow to sit for 5 minutes.
At the last minute, stir in lots of chopped basil. Serve immediately over jasmine rice. Spoon plenty of sauce into the bowl!

January 28, 2011
Countdown to the Super Bowl!
Just over a week until the Super Bowl! And you know what that means…
Time to get on the Stairmaster.
I've just created a new "Super Bowl" category on The Pioneer Woman Cooks, where I'm housing all the drippy, football fan-pleasing delights that are perfect for a Super Bowl party.
 Whether you're into sliders…

 Or good ol' Circa 1983 Mexican Layer Dip…
You're sure to find something that'll make your football fans happy.
Here's the full category for you to browse. Wanted you to be able to plan early!
Super Bowl Food on PW Cooks
 (Pssst…I even threw in some Hummus for those of you who might like to add a little non-guacamole flair to your evening.)
Lots of Love,
Pioneer Woman

January 25, 2011
Shrimpo de Gallo
 Yes, I made up the name for this recipe. Why do you ask?
I tried my best, okay? My choices were:
Shrimp Pico de Gallo
Shrimpy Pico de Gallo
Pico de Shrimpo
Shrimpo de Gallo
Shrimp Salsa
So I closed my eyes and picked one. Same thing I do when I'm trying to decide which shirt to wear, which piece of cake to eat, or which child to bathe.
(But that's another story for another time.)
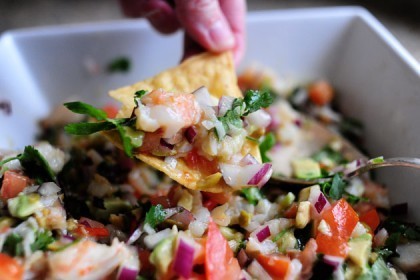
You'll love this light, fresh dip! Serve it with tortilla chips (blue ones would be lovely) or use it as a relish on grilled shrimp. It's reminiscent of pico de gallo, but has shrimp, olives, avocado…lots of delicious things going on.
 Start with some cooked shrimp. I bought this frozen and let it thaw for a little while.
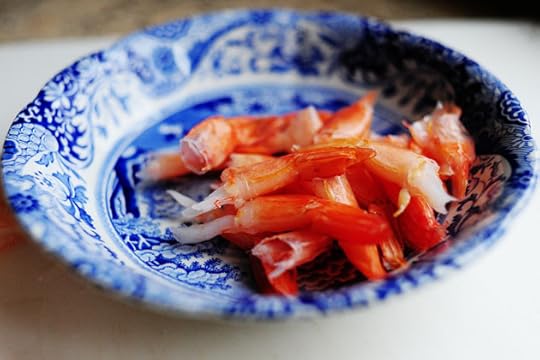 Pull off the tails…
 Then throw the shrimp on a cutting board.
 Cut them into small pieces.
 Keep cutting and chopping until the shrimp is in smaller pieces.
 Then throw the shrimp into a large bowl.
 Cut a red onion in half, then make vertical slits in one half.
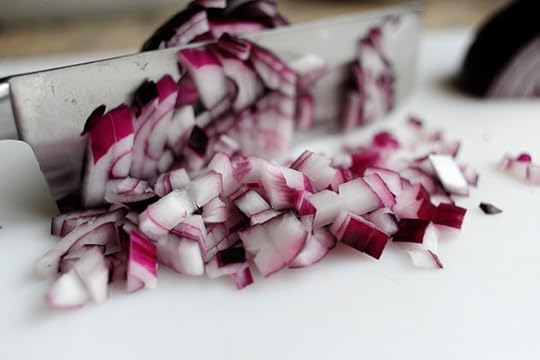 Chop it up, too…
 Then add it to the bowl with the shrimp.
 Next, grab some olives. Black ones would be great (and a little more Mexican-ish) but I like the salty punch of these.
 Chop 'em up, then throw it into the bowl.
 Next, cut a couple of tomatoes in half…
 Then chop 'em up and throw them in, too.
 Halve a couple of avocados…
 Remove the pits and scoop the good stuff out of the shell/skin.
 Then chop it up and resist the temptation to sprinkle salt all over it and eat it in eleven seconds.
Why is avocado so, so good?
I love it so much. I want to grow old with it.
So I will.
 Throw the avocados into the bowl.
 After that, slice a couple of jalapenos into long pieces.
 Then dice 'em up.
Note: Leave in the seeds if you like things really spicy; discard them if you can't HANDLE the spice.
 Next, pretend this is a lime. Then squeeze this lime—the lime! The one you see right there!—into the bowl.
What? It's a lime. That's what it is.
 Sprinkle in a little salt…
 Then stir to combine.
 Finally, chop up a good amount of cilantro…
 And stir it in.
At this point, give the shrimpo de gallo/pico de shrimpo a good taste; I like to taste it on tortilla chips so I can get an accurate gauge of the salt content. Add a little more of what you need.
 You can chill this for awhile, but keep in mind that that avocado will start to brown before too long. If you'd like to make it farther in advance, leave out the avocado; stir it in right before serving.
Serve this on Super Bowl Sunday! It'll be a nice balance to the cheesy, drippy potato skins and wings.
Enjoy this, my friends! It's delightful.
Love,
P-Dub
Recipe: Shrimpo de Gallo
Prep Time: 15 Minutes
|
Cook Time:
|
Difficulty: Easy
|
Servings: 12
Print Recipe
3"x5" Cards
4"x6" Cards
Full Page
[image error]
');
Ingredients
1 pound Cooked Shrimp (tails Removed), Chopped½ whole Red Onion, Diced Finely½ cups Green Or Black Olives, Chopped2 whole Tomatoes, Diced2 whole Fresh Jalapeno Peppers, Minced2 whole Avocados, Chopped2 whole Limes, Juiced Kosher Salt To Taste2 cups Cilantro, Chopped Preparation Instructions
Combine shrimp, red onion, olives, tomatoes, and jalapenos in a large bowl. Add lime juice to taste, then a dash of kosher salt. Add cilantro. Stir gently with a spoon, then taste on a tortilla chip so you'll have an accurate gauge of the salt content. Add more salt and/or lemon juice if needed.
Chill until serving. Note that the avocado will brown if too much time passes, so if you want to make this ahead of time, leave out the avocado until just before serving.
Serve with tortilla chips!

Ree Drummond's Blog

- Ree Drummond's profile
- 2032 followers

