
Ree Drummond's Blog, page 75
May 16, 2011
Pineapple Upside Down Biscuits + A Cooking Weekend in June!
UPDATE: I'm an airheaded dork! Contest time has NOT ended. Feel free to continue entering until midnight tonight. I need coffee.
Lots to cover today.
Typical Monday!
But I'll try to make it worth your while.
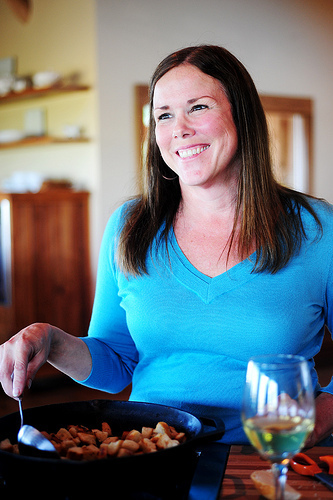 Some time ago, I had a visitor at the ranch. It was Pam Anderson (no, not that Pam Anderson), former editor of Cook's Illustrated and author of several fantastic cookbooks. I once said that I want to be Pam Anderson (no, not that Pam Anderson) when I grow up, and I meant it. Her cooking is elegant and accessible, her recipes straightforward and foolproof. Throw in the fact that Pam herself is personable, warm, and first introduced me to Spanx, and I'm happy to call her my best friend forever.
In all seriousness, Pam is a serious inspiration to me in so many ways. I'm so glad she exists in this world.
In a minute, I'll show you Pam's latest cookbook and a recipe of Pam's that I made last night.
But first…the fun part!
THE CONTEST
Today, to celebrate cooking…
To celebrate summer…
And to celebrate Pam Anderson…
I'm giving away a cooking weekend at the Lodge in June. Pam Anderson will be there to treat three winners (and their guests) to a fantastic series of cooking lessons, all fitting under the theme "Stop Entertaining!"
When Pam suggested the Stop Entertaining theme for the weekend of cooking lessons on the ranch, I thought it was perfect. For me, the term "entertaining" has always been a tricky one. Oh, I have people over: the family on Thanksgiving, friends for dinner here and there, and anyone who wants to come on the Fourth of July. But I don't decorate beyond sunflowers and flags in pitchers, I don't do linens beyond cloth napkins when (and if) they're clean. I learned a long time ago that stressing about flower arrangements and polished silver trays just wasn't the life for me. Neither are fussy, elaborate meals that take days and days to prepare for. Who has the time for such things? I don't even have time to tame my cowlick most days.
Pam's approach to entertaining is similar. Keep things simple, unfussy, and delicious…and let the fun and fellowship take center stage.
THE DETAILS
Three winners will be selected.
Each prize package will include:
* Two night stay at the Lodge on our crazy ranch in Oklahoma, June 24 -26, 2011
* Airfare (if applicable) for each winner and one guest of their choice
* Transportation from the airport to the ranch (and back!)
* Cooking classes taught by Pam Anderson
* Gift basket for winners and their guests
* Lots of relaxation, eating, and bucolic bliss
* No Spanx allowed
TO ENTER
To enter the giveaway for the cooking weekend on the ranch, make sure you're available June 24-26…then just leave a comment on this post saying something along the lines of "Enter me" or "Sure, why not" or "I'm game, man" or "Sign me up!"
Also, if you're so inclined, leave a quick description of your approach to entertaining.
Do you stress out for weeks before having people over?
Do you wig out over the food, pulling out all the stops?
Do you starch your tablecloth?
Or are you like me and you don't even own a tablecloth?
Just leave any ol' thing in the Comments section of this post and you're automatically entered to win the prize. Since this requires a weekend out of the summer, the number of entries won't get as high as regular mixer/cookware contests. So the chances of winning should be higher than usual!
THE RULES
One entry per person, please.
Entry period will end Tuesday at midnight Pacific Time.
Winners will be announced Wednesday.
If a winner is selected and is unable to attend, an alternate winner will be chosen.
Good luck!
NOTE: This is NOT the same contest as the Bush's Grillin' Beans Grilling Recipe Contest, which also involves a trip to the ranch as a prize! If you'd like to try for this weekend getaway as well, enter your best grilling recipe for that contest, here: Bush's Grillin' Beans/PW Recipe Contest. (Thank you to Bush's for sponsoring that contest!)
And now, back to our regularly scheduled Pam Anderson programming:
THE RECIPE
Now for the delicious part!
Pam has released several cookbooks, but her most recent one is this:
 It's Perfect One Dish Dinners, and I've highlighted it on this website before because I absolutely love it.
 It's a gorgeous, colorful cookbook.
 And the recipes are grouped as complete meals, with the appetizers, salads, main dishes, and desserts all appearing together.
 I whipped up these last night. They were utterly, without question, divine.
 The recipe calls for pineapple, but I didn't have a fresh one. So I just peeled some apples instead.
 You'll also need brown sugar…
 And unsalted butter.
 Throw the brown sugar and butter into a saucepan and melt them together.
 When it's all dissolved and runny, do not eat it with a spoon. It will burn your tongue, and you'll have to get more butter and more brown sugar and start all over. And your time is way too precious!
 Pour the mixture into a round cake pan. Tip the pan to allow the mixture to run and coat the surface.
 I actually waited a little too long and had to spread it with an offset spatula.
Don't be like me.
 Chop up the apples and measure a cup and a half…
 Then sprinkle them over the butter/brown sugar mixture.
 Next, mix together flour, baking powder, baking soda, sugar, and salt.
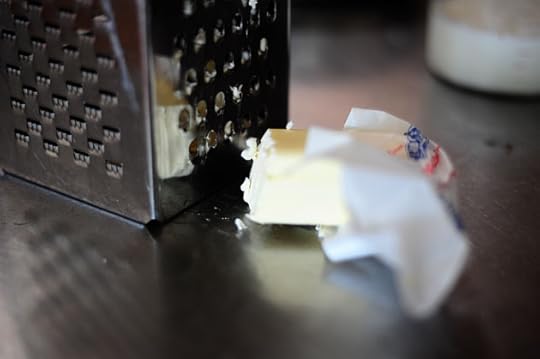 Grate some frozen butter…
 And measure some buttermilk. I didn't have buttermilk (of course) so I just did the milk/vinegar trick.
 Take the cold grated butter…
 And throw it into the flour mixture.
Next, work the butter into the flour (or the flour into the butter, depending on your political affiliation) with your fingertips until it's all combined.
I didn't take a photo of this stage because my hands were covered in flour and butter.
Or butter and flour. Depending on your astrological sign.
 Pour in the buttermilk…
 And stir it with a fork until totally combined. Pam says to splash in a little more buttermilk if the mixture's too dry, but mine didn't need it.
 Turn the dough out onto the work surface.
 Divide the dough into ten pieces…
 And slightly flatten each piece.
 Arrange the over the top of the apples/pineapple. This cake pan was a little smaller than the recipe called for, so I had a little dough left over. But if you use a 9 or 10-incher, it'll be fine.
 Bake it in a hot (450 degree) oven until the biscuits are golden brown, about 20 minutes.
 Stick a platter or cake pedestal on top, upside down…
 Then flip it over…
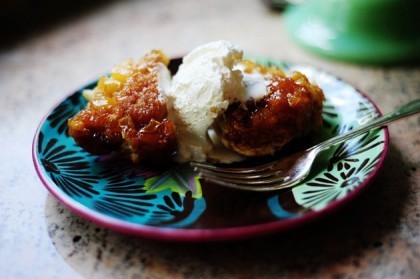
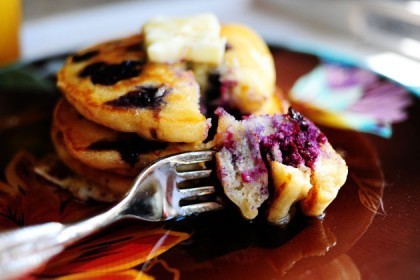
 And carefully remove the cake pan. Gorgeous!
 It's like a normal upside down cake, but the cake is separated into neat, easy-to-separate rounds.
 You can serve up one biscuit at a time…but I felt called to serve myself two.
 Ice cream would be great, but I whipped up some cream. Yum.
 Wait a minute or two to give the cream time to melt and drip and have meaning.
 Divine. This is an incredible recipe. I loved it.
If you want to make these pineapple upside-down biscuits, here's the handy dandy printable:
Recipe: Pam's Pineapple Upside Down Biscuits
Prep Time: 10 Minutes
|
Cook Time: 20 Minutes
|
Difficulty: Easy
|
Servings: 10
Print Recipe
3"x5" Cards
4"x6" Cards
Full Page
Ingredients
Pineapple¾ cups Packed Brown Sugar3 Tablespoons Unsalted Butter1-½ cup Chopped Fresh Pineapple (I Used Chopped Peeled Green Apples) Biscuits2 cups All-purpose Flour2 teaspoons Baking Powder¼ teaspoons Baking Soda1 teaspoon Sugar¾ teaspoons Salt¾ sticks (6 Tablespoons) Unsalted Butter, Frozen1 cup Buttermilk, Plus Extra If Necessary Preparation Instructions
*From "Perfect One Dish Dinners" by Pam Anderson.
Adjust oven rack to middle position and heat oven to 450 degrees.
Pineapple: Heat brown sugar and 3 tablespoons butter in a small saucepan over medium heat to a spreadable consistency. Pour into a 9-inch round cake pan, tilting to coat pan bottom; top with pineapple.
Biscuits: Mix flour, baking powder, baking soda, sugar, and salt with a fork in a medium bowl. Using a box grater, coarsely grate frozen butter into dry ingredients, mixing quickly with fingertips to evenly blend. Stir in buttermilk with a fork, adding extra droplets of buttermilk over any dry patches, if necessary and mix until dough just comes together.
Turn dough onto a floured surface. With your fingers, pinch dough into 10 rough rounds and arrange over pineapple. Bake until biscuits are golden brown and pineapple topping is bubbly, about 20 minutes. Invert onto a serving plate and serve immediately with vanilla ice cream or freshly whipped cream.
Posted by Ree on May 15 2011


Pineapple Upside Down Biscuts + A Cooking Weekend in June!
Lots to cover today.
Typical Monday!
But I'll try to make it worth your while.
Some time ago, I had a visitor at the ranch. It was Pam Anderson (no, not that Pam Anderson), former editor of Cook's Illustrated and author of several fantastic cookbooks. I once said that I want to be Pam Anderson (no, not that Pam Anderson) when I grow up, and I meant it. Her cooking is elegant and accessible, her recipes straightforward and foolproof. Throw in the fact that Pam herself is personable, warm, and first introduced me to Spanx, and I'm happy to call her my best friend forever.
In all seriousness, Pam is a serious inspiration to me in so many ways. I'm so glad she exists in this world.
In a minute, I'll show you Pam's latest cookbook and a recipe of Pam's that I made last night.
But first…the fun part!
THE CONTEST
Today, to celebrate cooking…
To celebrate summer…
And to celebrate Pam Anderson…
I'm giving away a cooking weekend at the Lodge in June. Pam Anderson will be there to treat three winners (and their guests) to a fantastic series of cooking lessons, all fitting under the theme "Stop Entertaining!"
When Pam suggested the Stop Entertaining theme for the weekend of cooking lessons on the ranch, I thought it was perfect. For me, the term "entertaining" has always been a tricky one. Oh, I have people over: the family on Thanksgiving, friends for dinner here and there, and anyone who wants to come on the Fourth of July. But I don't decorate beyond sunflowers and flags in pitchers, I don't do linens beyond cloth napkins when (and if) they're clean. I learned a long time ago that stressing about flower arrangements and polished silver trays just wasn't the life for me. Neither are fussy, elaborate meals that take days and days to prepare for. Who has the time for such things? I don't even have time to tame my cowlick most days.
Pam's approach to entertaining is similar. Keep things simple, unfussy, and delicious…and let the fun and fellowship take center stage.
THE DETAILS
Three winners will be selected.
Each prize package will include:
* Two night stay at the Lodge on our crazy ranch in Oklahoma, June 24 -26, 2011
* Airfare (if applicable) for each winner and one guest of their choice
* Transportation from the airport to the ranch (and back!)
* Cooking classes taught by Pam Anderson
* Gift basket for winners and their guests
* Lots of relaxation, eating, and bucolic bliss
* No Spanx allowed
TO ENTER
To enter the giveaway for the cooking weekend on the ranch, make sure you're available June 24-26…then just leave a comment on this post saying something along the lines of "Enter me" or "Sure, why not" or "I'm game, man" or "Sign me up!"
Also, if you're so inclined, leave a quick description of your approach to entertaining.
Do you stress out for weeks before having people over?
Do you wig out over the food, pulling out all the stops?
Do you starch your tablecloth?
Or are you like me and you don't even own a tablecloth?
Just leave any ol' thing in the Comments section of this post and you're automatically entered to win the prize. Since this requires a weekend out of the summer, the number of entries won't get as high as regular mixer/cookware contests. So the chances of winning should be higher than usual!
THE RULES
One entry per person, please.
Entry period will end Tuesday at midnight Pacific Time.
Winners will be announced Wednesday.
If a winner is selected and is unable to attend, an alternate winner will be chosen.
Good luck!
NOTE: This is NOT the same contest as the Bush's Grillin' Beans Grilling Recipe Contest, which also involves a trip to the ranch as a prize! If you'd like to try for this weekend getaway as well, enter your best grilling recipe for that contest, here: Bush's Grillin' Beans/PW Recipe Contest. (Thank you to Bush's for sponsoring that contest!)
And now, back to our regularly scheduled Pam Anderson programming:
THE RECIPE
Now for the delicious part!
Pam has released several cookbooks, but her most recent one is this:
It's Perfect One Dish Dinners, and I've highlighted it on this website before because I absolutely love it.
It's a gorgeous, colorful cookbook.
And the recipes are grouped as complete meals, with the appetizers, salads, main dishes, and desserts all appearing together.
I whipped up these last night. They were utterly, without question, divine.
The recipe calls for pineapple, but I didn't have a fresh one. So I just peeled some apples instead.
You'll also need brown sugar…
And unsalted butter.
Throw the brown sugar and butter into a saucepan and melt them together.
When it's all dissolved and runny, do not eat it with a spoon. It will burn your tongue, and you'll have to get more butter and more brown sugar and start all over. And your time is way too precious!
Pour the mixture into a round cake pan. Tip the pan to allow the mixture to run and coat the surface.
I actually waited a little too long and had to spread it with an offset spatula.
Don't be like me.
Chop up the apples and measure a cup and a half…
Then sprinkle them over the butter/brown sugar mixture.
Next, mix together flour, baking powder, baking soda, sugar, and salt.
Grate some frozen butter…
And measure some buttermilk. I didn't have buttermilk (of course) so I just did the milk/vinegar trick.
Take the cold grated butter…
And throw it into the flour mixture.
Next, work the butter into the flour (or the flour into the butter, depending on your political affiliation) with your fingertips until it's all combined.
I didn't take a photo of this stage because my hands were covered in flour and butter.
Or butter and flour. Depending on your astrological sign.
Pour in the buttermilk…
And stir it with a fork until totally combined. Pam says to splash in a little more buttermilk if the mixture's too dry, but mine didn't need it.
Turn the dough out onto the work surface.
Divide the dough into ten pieces…
And slightly flatten each piece.
Arrange the over the top of the apples/pineapple. This cake pan was a little smaller than the recipe called for, so I had a little dough left over. But if you use a 9 or 10-incher, it'll be fine.
Bake it in a hot (450 degree) oven until the biscuits are golden brown, about 20 minutes.
Stick a platter or cake pedestal on top, upside down…
Then flip it over…
And carefully remove the cake pan. Gorgeous!
It's like a normal upside down cake, but the cake is separated into neat, easy-to-separate rounds.
You can serve up one biscuit at a time…but I felt called to serve myself two.
Ice cream would be great, but I whipped up some cream. Yum.
Wait a minute or two to give the cream time to melt and drip and have meaning.
Divine. This is an incredible recipe. I loved it.
If you're free that weekend in June, scroll down and enter the contest!
If you'd like to enter a recipe in the other (Bush's grilling recipe) contest, click here.
If you want to make these pineapple upside-down biscuits, here's the handy dandy printable:
Recipe: Pam's Pineapple Upside Down Biscuits
Prep Time: 10 Minutes
|
Cook Time: 20 Minutes
|
Difficulty: Easy
|
Servings: 10
Print Recipe
3"x5" Cards
4"x6" Cards
Full Page
Ingredients
Pineapple¾ cups Packed Brown Sugar3 Tablespoons Unsalted Butter1-½ cup Chopped Fresh Pineapple (I Used Chopped Peeled Green Apples) Biscuits2 cups All-purpose Flour2 teaspoons Baking Powder¼ teaspoons Baking Soda1 teaspoon Sugar¾ teaspoons Salt¾ sticks (6 Tablespoons) Unsalted Butter, Frozen1 cup Buttermilk, Plus Extra If Necessary Preparation Instructions
*From "Perfect One Dish Dinners" by Pam Anderson.
Adjust oven rack to middle position and heat oven to 450 degrees.
Pineapple: Heat brown sugar and 3 tablespoons butter in a small saucepan over medium heat to a spreadable consistency. Pour into a 9-inch round cake pan, tilting to coat pan bottom; top with pineapple.
Biscuits: Mix flour, baking powder, baking soda, sugar, and salt with a fork in a medium bowl. Using a box grater, coarsely grate frozen butter into dry ingredients, mixing quickly with fingertips to evenly blend. Stir in buttermilk with a fork, adding extra droplets of buttermilk over any dry patches, if necessary and mix until dough just comes together.
Turn dough onto a floured surface. With your fingers, pinch dough into 10 rough rounds and arrange over pineapple. Bake until biscuits are golden brown and pineapple topping is bubbly, about 20 minutes. Invert onto a serving plate and serve immediately with vanilla ice cream or freshly whipped cream.
Posted by Ree on May 15 2011
May 12, 2011
Beef Noodle Salad Bowls
 At the salad supper I attended a couple of weeks ago–the one that gave birth to this chicken salad I made recently–four salads were served on a great big dinner plate. It was a lovely assortment of textures and flavors, and I left the party declaring that salads are my favorite thing to eat. The ingredient possibilities are endless, and they can be strictly vegetarian or packed with chicken, meat, or seafood. Today's salad is inspired by one of the other four delicious selections that night. It was a salad supper I'll not soon forget.
"I love salads!" I declared after scraping the last of the salads out of the serving bowl. "Salads are my life!"
"Viva salads!" I screamed as I was escorted off the premises. "Salads will triumph!"
"Salads are natural, salads are good!" I screamed as they shoved me into my car. "Not everybody does it, but everybody should!"
I don't think I'll be invited back next year.
 Here's what you need to make the dressing: Ponzu (this is a citrusy soy sauce that's delicious! But you can also use regular soy sauce.), olive oil, sesame oil, hot chili oil, rice wine vinegar, and olive oil.
 And brown sugar.
 And garlic!
I'm growing garlic this year. This didn't grow in my garden, though. This grew in The Wal Marts.
 Okay, start with a steak. This is a sirloin, which is great for grilling, and which is also great for situations like this, where we're going to grill it then eat it cold.
Cold, cooked beef from the fridge: One of the real treats of the world in which we live. I will almost cook a couple of steaks just to keep in the fridge so I can steal slices of cold beef.
 Sprinkle both sides with salt.
 Cook on a grill pan until medium rare. Don't overcook it! You want it to be tender and divine.
 Set it aside on a plate.
 Peel some garlic…
 And mince it up.
 Measure some ponzu or soy…
 Then add rice wine vinegar…
 Sesame oil and hot chili oil…
 A little olive oil…
 The garlic…
 And the brown sugar.
ADDED: I hardly ever have fresh ginger when I need it because I can't get it here in town. But 2 teaspoons of minced fresh ginger here would be divine.
 Stir it around to combine. Give it a taste and add more of what it needs. Sesame oil rocks my entire existence, so I usually wind up adding a little more of that…and then I add more hot chili oil, which makes the whole thing too spicy…and then I add more ponzu…and then I do the Macarena.
 Once it's cool enough, place the cooked steak into a Ziploc bag.
 Add three tablespoons of the dressing…
 Then seal and refrigerate until you need it. This is a great way to use up any leftover cooked steak or beef you have!
 Next, chop up some green onions.
 We were having a storm. Look how close I had to park to the window in order to get enough light to take my photos.
It was a glorious storm.
A blessed storm.
A soil-drenching storm.
My roof leaked.
 Next, boil up some noodles. I used thin spaghetti, but you can use more authentically Asian noodles if you'd like.
 Bawl 'em up and drain 'em…
 Then throw 'em into a bowl.
 Pour on the dressing…
 Then toss the noodles until they're all coated.
 Throw in the green onions…
 Toss them to combine…
 Then cover the bowl with plastic wrap and refrigerate for at least a couple of hours, or until cool.
This is the great thing about this salad–you can make all the elements ahead of time, then just slice and serve when you're ready.
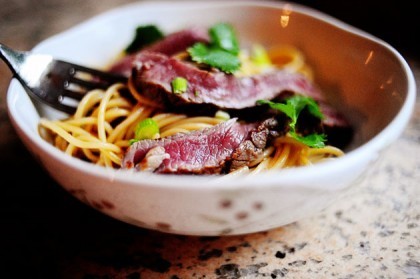
 When you're ready to serve it up, remove the steak from the plastic bag and slice it against the grain into thin strips.
 Throw some cilantro leaves into the noodles and toss them in.
 You can serve up the salad like this, with a mound of noodles and strips of beef laying off to the side…
 Or you can just toss it all into a bowl together. I like this way the best. Less fancy. Less fussy. Less contrived.
 Look at that beef. Divine. The sirloin is nice and lean and flavorful, and it absorbs the flavor of the dressing so nicely. And the noodle salad is dreamy and flavorful and light. A feast for the senses.
Serve it to guests, serve it to your sweetie…serve it to yourself! Leftovers keep in the fridge nicely, so you can munch on it for a couple of days.
Here's the handy dandy printable:
Recipe: Beef Noodle Salad Bowls
Prep Time: 10 Minutes
|
Cook Time: 10 Minutes
|
Difficulty: Easy
|
Servings: 4
Print Recipe
3"x5" Cards
4"x6" Cards
Full Page
Ingredients
1 whole Sirloin Steak, 3/4 To 1 Pound Kosher Salt To Taste¾ cups Ponzo Or Regular Soy Sauce3 Tablespoons Pure Sesame Oil2 Tablespoons Olive Oil2 Tablespoons Rice Wine Vinegar1 teaspoon Hot Chili Oil (less If You Can't Handle Heat!)2 cloves Garlic, Peeled And Minced Finely2 Tablespoons Packed Brown Sugar½ cups Sliced Green Onion8 ounces, weight Thin Noodles (I Used Thin Spaghetti) Cilantro Leaves Preparation Instructions
Season both sides of the sirloin with salt. Grill on an outdoor grill or indoor grill pan until medium rare. Remove from heat and set aside.
In a bowl, combine ponzu (or soy), sesame oil, olive oil, rice wine vinegar, hot chili oil, garlic, and brown sugar. Mix to combine, then taste and adjust flavors/seasonings to your taste.
When steak is cool enough, place in a large plastic storage bag. Add 3 tablespoons of dressing. Seal bag tightly and place in fridge until needed.
Cook pasta according to package directions. Drain and place in a bowl. Pour remaining dressing over the top and toss to combine. Finally, toss in green onions. Cover bowl with plastic wrap and refrigerate for at least a couple of hours or until cool. You can make the steak and noodles well in advance of when you want to serve.
To serve, remove steak from storage bag and slice against the grain into thin strips. Drizzle a little ponzu (or soy) over noodles just to give it a little flavor boost, throw in plenty of cilantro leaves, and toss to combine. Serve strips of beef over mound of noodles, or throw it all into a bowl together. Serve with chopsticks if you have them.
You'll love this!
Posted by Ree on May 12 2011

May 10, 2011
Web Deliciousness: Strawberries!
Strawberry season is upon us, and the uses for strawberries in delicious, dreamy recipes are limitless. Look no further for proof of this than the world wide web, where strawberry deliciousness abounds.
At the present time, I want all of the following:
 Dark Chocolate Strawberry Shortcakes with Amaretto Cream by Snappy Gourmet. Oh, the decadence!
 Red Velvet Strawberry Shortcake by I Am Baker. Click on the link to see it fully iced. A masterpiece.
 Strawberry Buttermilk Cake by Fork Spoon Knife. Mmm. I love this kind of cake. Simple and perfect.
 Strawberry Cupcakes by Elana's Pantry. Gluten-free goodness!
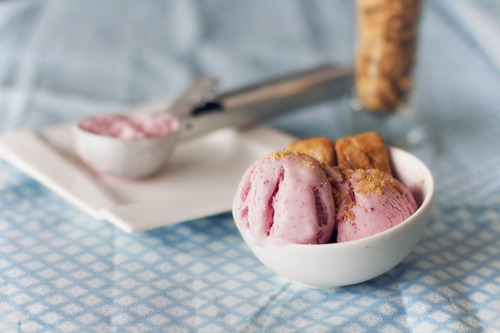 Strawberry Cheesecake Ice Cream by The Fresh Fridge. Oh, how good does this look? I want some now.
 Crispy Parmesan Cheese Rosemary Cups by Cookin' Canuck. Beautiful!
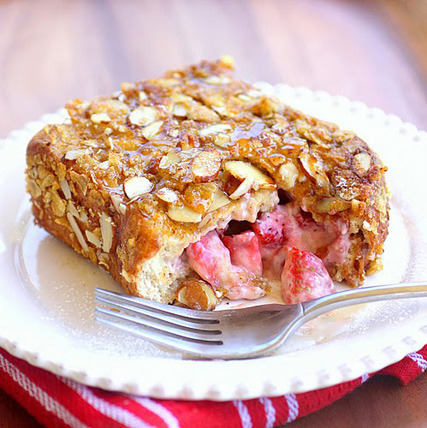 Strawberry Stuffed French Toast by The Girl Who Ate Everything. What a treat. My kids (and I) would love this.
 Strawberry Pound Cake with Basil Whipped Cream by Keep it Simple Foods. What a stunning flavor combo. Yum!
 Strawberry Cheesecake Parfaits by The Italian Dish Blog. I want to put on a bathing suit and dive into this head first. Delicious!
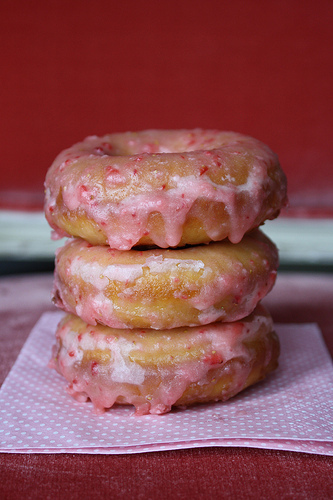 Strawberry Doughnuts by Heather Cristo Cooks. Just like our local doughnut shop. Love the look of these.
 Strawberries with Cannoli Cream by Baked Bree.
 White Chocolate Strawberry Chunk Ice Cream by Daydreamer Desserts. Mmmm. Gorgeous!
 Strawberry Kiss Cake by Cakewalker.
 Old Fashioned Eggless Chocolate Cake with Balsamic Strawberry Cream Filling by Passionate About Baking. This is the first time I've seen this food blog and the photos are just spectacular, not to mention the treats themselves. Wow.
Here's another one:
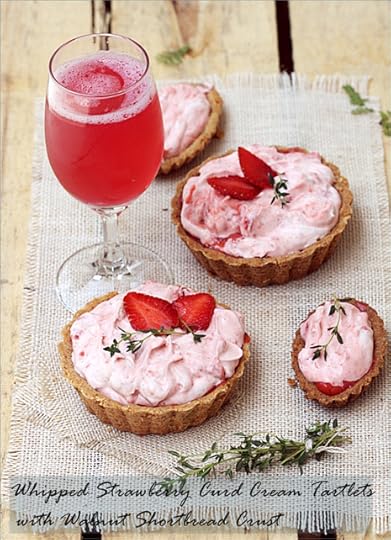 Whipped Strawberry Curd Cream Tartlets with Walnut Shortbread Crust. My, oh my. I don't know what to say.
 And finally: Strawberry Shortcake Popsicles by Bakers Royale. Simple, cool, and lovely.
Thank you to everyone above for such beautiful strawberry delights. You're all very talented and I want to come over and eat at your house.
Love,
Pioneer Woman

May 9, 2011
Risotto Primavera
 I love risotto.
And I love primavera dishes: pasta, pizza, lasagna.
Last night, because it was Mother's Day, because we'd had Sonic for brunch and I was burgered out, because it was the Amazing Race finale (say it ain't so, Zev and Justin!), and because I felt like it, I whipped up a quick risotto packed with whatever veggies I could find. In an ideal world, I would have thrown in some peas and basil. But my garden ain't there yet and I ain't got a grocery store down the street.
The world is an imperfect place.
But I don't let it thwart me. I decided early in my life that no matter what might come my way, I shall continue to make risotto…even in the midst of the chaos.
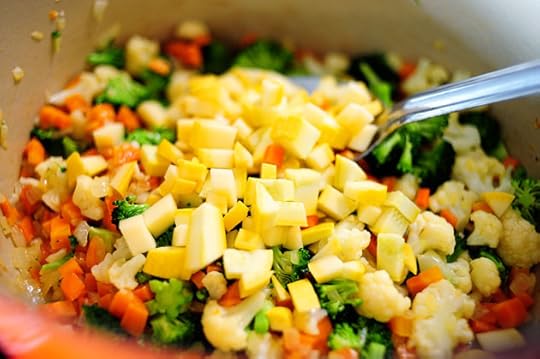
 I used carrots…
 Broccoli…
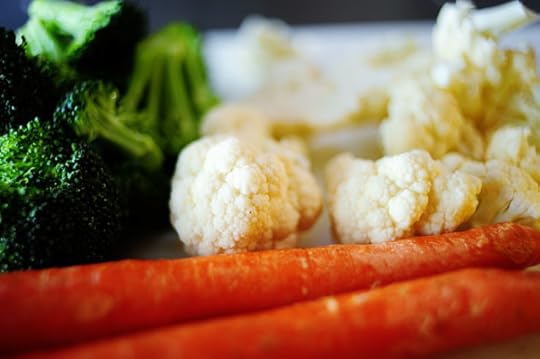 Cauliflower…
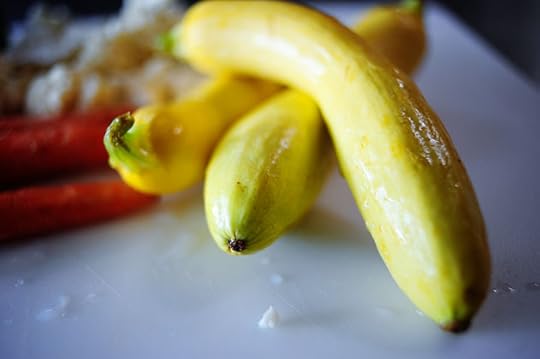 And yellow squash.
Pretend I had peas too, okay?
I thought I had peas.
I needed to have peas.
I wanted to have peas.
I didn't have peas.
Curse the peas.
 Begin by peeling the carrots. If you could avoid slipping and slicing off half your fingernail, you'll be one step closer to being nothing like me. Congrats!
 Cut the carrots into sticks, then cut the sticks into a dice.
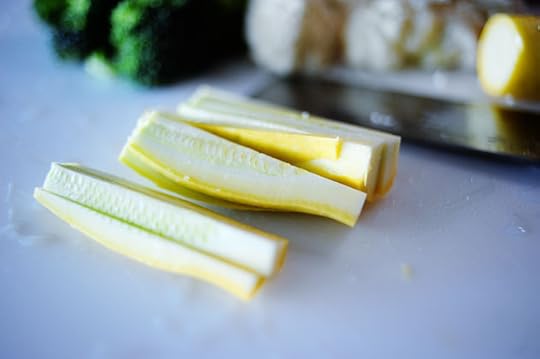 Cut the squash into sticks…
 And cut them into a dice.
 Cut the cauliflower into bits…
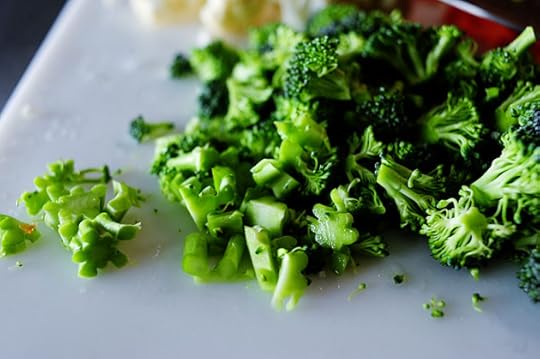 And the broccoli, too.
 Finally, dice an onion, the–and this is important–do the hokey pokey and turn yourself about.
Because you know what? That's what it's all about. Like, totally.
 Grab a dutch oven–preferably one that's not entirely clean from the last thing you just cooked. Heat them over medium-low heat.
 Throw in the diced onion and carrots.
 Stir and cook for about a minute, just enough to start the carrots cooking.
 Throw in the cauliflower…
 And stir it around to cook for about 30 seconds.
 Add the broccoli…
 And the squash…
 Then add salt, and stir it around. Cook it for just another thirty seconds or so. The whole point here is to barely cook the vegetables so they won't be totally falling apart and mushy when it's time to stir them into the rice.
 Remove the veggies to a separate plate and set them aside.
 Add another tablespoon each of olive oil and butter.
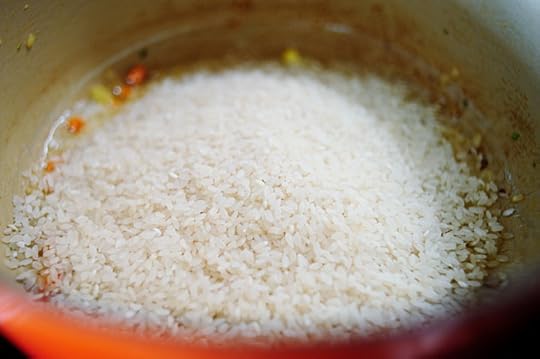 Then dump in the rice…
 And stir it around for about a minute. Arborio rice is the standard for risotto…
(But I didn't have any arborio at my house.)
(So I used Calrose rice, which is typically used to make sushi rice.)
(I have to improvise out here.)
(And it worked out perfectly fine.)
 Meanwhile, grab some low-sodium chicken broth. Low-sodium, because then you can dang control how dang much salt winds up in the dang finished dish.
 Throw it into a saucepan and bring it to a simmer.
This chicken broth, you'll notice, is much browner in color than other brands of chicken broth.
Do not be alarmed. If you want the risotto to be lighter in color, you can use a lighter color broth.
 Also, grab some wine as you tear your daughter away from American Idol and tell her the least she can do for you on Mother's Day evening is step away from J-Lo long enough to grate up some Parmesan.
Use those exact words, please.
Stir in the wine for about thirty seconds or so…
 Then use a heatproof vessel to retrieve about a cup of the simmering broth.
Crack up at the word "vessel." Then proceed to the next step.
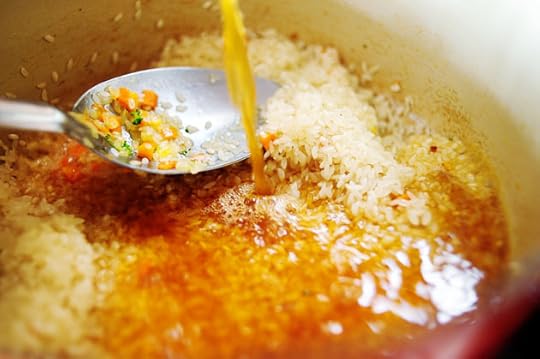 Pour in the broth.
 Add a good amount of salt. Since you're using low-sodium broth, it'll definitely need it.
 Stir gently and cook the risotto for a couple of minutes. It will slowly absorb the liquid as it cooks.
 As soon as the liquid is absorbed, pour in another cup of broth.
 Stir gently, then let it cook for a couple of minutes until the liquid is absorbed.
And this is the process of making risotto: warm liquid is added to the rice in increments, usually over a period of 30 to 45 minutes, until the rice is fully cooked. It takes patience, it takes time, and it takes rhythm and dancing.
Not really on those last two things.
 This is about thirty minutes in. At this point, splash in another half a cup of wine, just to finish it off with a great wine flavor. Allow the wine to fully absorb. Taste a bite of risotto and make sure it's cooked enough; it should definitely have a bite to it, but shouldn't be overly firm or–egads–crunchy.
If it is–egads–crunchy, just add another cup of wine and let it cook/absorb.
 Slice up some green onions…
 And throw those into the pan. *Note: This is where you'd also throw in the frozen (or fresh, if you have them) peas if you were an organized person and had them on hand.
 Stir and allow this to simmer for 30 seconds or so…
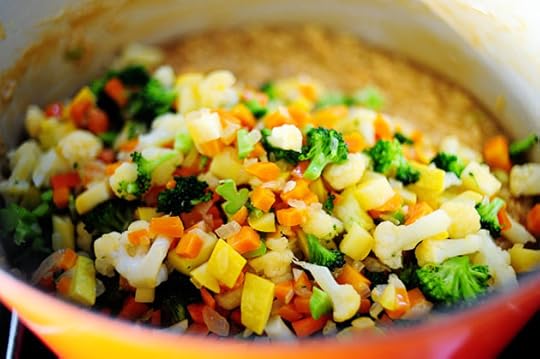 Then throw in the vegetables.
Then move over to the window because it's getting too dark in your kitchen and your photos are getting an overly yellow cast.
*Note: if you are not photographing your risotto, you can ignore the move-to-the-window step.
 Stir in the veggies…
 Then throw in some goat cheese…
 And some Parmesan. Stir gently to incorporate the cheese, adding a small splash of broth if it gets overly thick/sticky.
 China Check: Lenox "Chirp."
I love it very, very much. As much as a girl can love a plate.
 Serve up a helping. You'll notice the deeper color of the risotto; if I'd used a lighter broth, it would be lighter in color. And you can change up the vegetable combination: add diced red bell pepper, zucchini instead of yellow squash, red onion instead of yellow, mushrooms, and asparagus pieces.
 Add crumbled goat cheese to the top.
 Add a little sprig of something. If I had it in my garden, I would have added a chiffonade of basil. But my basil plants are but a twinkle in my eye at this point, and all I could find was dill.
By the way, when my basil plants finally explode, I'm going to cook with basil 24 hours a day for at least a month. I'm tired of being without it. Between the Big Basil Blight and my distance from any market that ever carries it, I'm going to exact my revenge here in about 41 days.
It won't be pretty.
I've got an ax to grind.
 Risotto Primavera. A triumph. Creamy, flavorful, good.
Try it soon!
Here's the handy printable:
Recipe: Risotto Primavera
Prep Time: 10 Minutes
|
Cook Time: 45 Minutes
|
Difficulty: Easy
|
Servings: 8

Print Recipe
3"x5" Cards
4"x6" Cards
Full Page
Ingredients
5 cans Low Sodium Chicken Broth2 Tablespoons Olive Oil2 Tablespoons Butter½ whole Large Yellow Onion Finely Diced3 whole Carrots, Peeled And Finely Diced½ cups Cauliflower Pieces½ cups Broccoli Pieces1 whole Yellow Squash, Finely Diced½ teaspoons Kosher Salt1 Tablespoon Olive Oil (additional)1 Tablespoon Butter (additional)1-½ cup Arborio Rice1-½ cup Dry White Wine1-½ teaspoon Kosher Salt (additional), More To Taste4 whole Green Onions, Thinly Sliced½ cups Frozen Peas4 ounces, weight Goat Cheese½ cups Grated Parmesan Cheese Fresh Dill, For Garnish Optional Vegetables To Substitute For Any Of The Above: Mushrooms, Red Bell Pepper, Zucchini, Asparagus Pieces Preparation Instructions
Pour chicken broth into a small saucepan. Heat to a simmer.
In a large Dutch oven, heat 2 tablespoons olive oil and 2 tablespoons butter. Add diced onions and diced carrots. Stir and cook for a minute or two. Add cauliflower and cook for a minute. Add broccoli and cook for 30 seconds. Add squash and cook for 30 seconds. Sprinkle in salt and stir. Remove from pan and put on a plate. Set aside.
Add 1 tablespoons olive oil and 1 tablespoon butter to the same pan. Heat over medium-low heat. Add rice and stir, cooking for 1 minute. Add half the wine and 1 1/2 teaspoons kosher salt. Stir and cook until liquid is absorbed. Over the next 30 to 45 minutes, add 1 cup of simmering broth at a time, stirring and cooking until each addition of broth has absorbed. Add other half of wine and cook until absorbed. Add green onions and peas, stirring to combine. Taste to make sure rice is the right texture; add another helping of broth if rice has too much bite to it. Check salt content and add more salt if necessary.
Once rice is cooked, remove from heat. Stir in goat cheese, Parmesan, and vegetables until all goat cheese is combined.
Serve on a plate with a sprig of dill.
Posted by Ree on May 8 2011

May 6, 2011
Lemon Blueberry Pancakes
 So here's what I did. One day I made Grilled Chicken Salad with Feta, Fresh Corn, and Blueberries. A few days later I made Knock You Naked Brownies.
That same day, I realized I had leftover blueberries from the salad, and extra evaporated milk from the brownies.
So I decided to make pancakes so I could use up both ingredients. And because I wanted pancakes. I threw in lemon for two reasons: one, the juice, when combined with the evaporated milk, results in a little bit of a buttermilk effect. Two, I love lemon with blueberries. Three, my name is not Myrtle.
Here's how I made them:
 Measure the evaporated milk…
 And squeeze in the juice of one whole lemon. If the lemon isn't a very juicy one, squeeze in the juice of two lemons.
 Stir this together and let it sit for a few minutes to thicken.
 In a separate bowl, combine cake flour…
 Salt. Best added with freaky pink alien claws.
Pancakes taste better that way.
 Baking powder…
(Don't be thrown off by the teaspoon here. I used 1 tablespoon + 1 teaspoon, but in the printable recipe below wound up just saying "1 heaping tablespoon.")
 Plenty of sugar! You need to offset the tartness of the lemon.
 Back to the evaporated milk/lemon juice mixture: crack in an egg…
 Add vanilla extract…
 Then zest the lemon…
 And throw it in.
 Add the wet mixture to the dry ingredients…
 Stirring it gently with a fork as you pour it in.


 Then throw in a bunch o' blueberries. I don't believe in spooning the batter into the skillet, then adding the blueberries to each individual pancake. It goes against my belief system.
And I'm lazy.
 And stir until just combined. Splash in a little more evaporated milk if it's overly thick. It needs to be slightly pourable; not just ploppable.
 Then melt some butter…
 And stir it into the batter. I should have added the butter before the blueberries, but I plum forgot.
Don't be like me.
 Heat a heavy griddle or skillet over medium-low heat and add butter to the pan. Drop batter into the pan with a 1/4 cup measure.
 Then cook 'em on both sides until golden brown.
 Stack 'em up to your heart's content, top with a big pat of softened butter, and drizzle on the warm syrup.
And then, this is important: repeat after me.
 I…
I…
 Love…
Love…
 Pancakes…
 So…
So…
Much.
Enjoy these over the weekend! Make 'em for your mama. Or, if you are one of those mama creatures…put in this order for Sunday morning.
Have a happy, happy weekend, everyone.
Lots of Love,
P-Dub
Recipe: Blueberry Lemon Pancakes
Prep Time: 10 Minutes
|
Cook Time: 10 Minutes
|
Difficulty: Easy
|
Servings: 4
Print Recipe
3"x5" Cards
4"x6" Cards
Full Page
Ingredients
1-½ cup Cake Flour1 Tablespoon (additional) Cake Flour¼ teaspoons Salt1 Tablespoon (heaping) Baking Powder3 Tablespoons Sugar1-½ cup Evaporated Milk (more If Needed)1 whole Lemon (more If Needed)1 whole Large Egg1-½ teaspoon Vanilla2 Tablespoons Butter, Melted Zest From 1 Lemon1 cup Heaping Blueberries Extra Butter Maple Or Pancake Syrup Preparation Instructions
Heat heavy skillet or grill over medium low heat.
In a medium bowl, mix flour, salt, baking powder, and sugar. Set aside.
In a separate bowl, mix evaporated milk, juice of 1 lemon (more if lemon isn't very juicy), and lemon zest. Allow to sit for five minutes, then add egg, vanilla, and melted butter. Mix to combine.
Pour wet mixture into dry ingredients. Stir gently to combine. Splash in more evaporated milk if mixture is overly thick. Stir in blueberries. Again, check to make sure mixture isn't overly thick.
Melt butter in heated skillet. Drop batter by 1/4 cup measures and fry pancakes on both sides until golden.
Serve with softened butter and warm syrup.
Posted by Ree on May 6 2011

May 5, 2011
Web Deliciousness: Cinco de Mayo
Happy Cinco de Mayo, everyone! If you're a lover of good Mexican food (who isn't a fan of Mexican food?) and love to jump in and celebrate this day with plenty of festive grub, you're about to see some of the most delicious Cinco de Mayo-friendly dishes on the internet.
Honestly. Brace yourself.
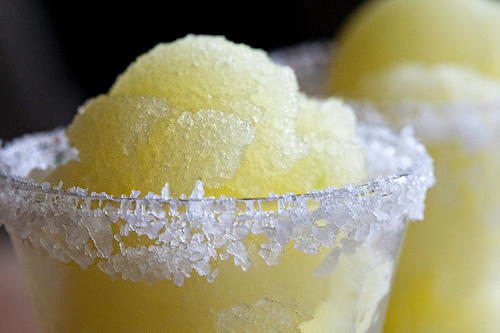
 Blood Orange Margarita by White on Rice Couple. How gorgeous are these? I want.
 Roasted Jalapeno Tomato Salsa Baked Goat Cheese by Chaos in the Kitchen. I love goat cheese, and I would dive into this with great enthusiasm.
 Crunchy Mexican Salad Nachos by Drizzle and Dip. This looks so refreshing and light. Love it!
 Holy Guacamole by Joylicious. I had some fantastic guacamole at a restaurant last night, and this looks even better. Chunky, simple, and divine.
 Restaurant Style Carne Asada Soft Tacos with Guacamole and Corn by Picky Palate. Jenny, you never disappoint. I love everything about these. The steak looks divine.
 Mexican Braised Beef Tacos by Kitchen Konfidence. Mmmm. Love the greens on top.
 Creamy Baked Chicken Taquitos by Pink Parsley. My family loves taquitos. Making these soon!
 Mexican Chicken and Rice Bake by Sugarcrafter. Oh, does this look good. Comfort food!
 Smoky Pork Tinga Tacos by Smells Like Home. Again: divine.
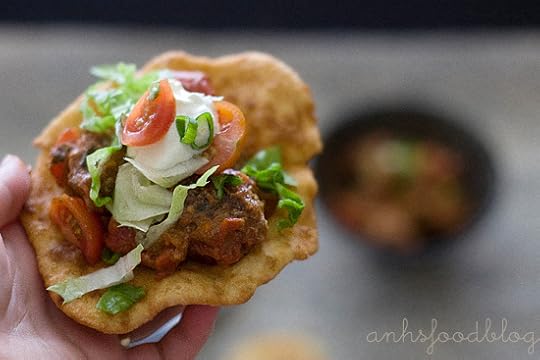 Fry Bread Taco with Mexican Spicy Meatballs by Anhs Food Blog. Fry bread tacos are big in my neck of the woods. These look fantastic!
 Beef Enchiladas with Chipotle-Pasilla Chili Gravy by Homesick Texan. Oh, Lisa. Oh, Lisa, Lisa, Lisa. Yum.
 Shredded Beef Tacos by Mangio da Sola. I love Memoria's recipes! These look delicious.
 Green Mango Margarita Sorbet by Ivory Hut. So refreshing after all this savory food. Yum.
 Mexican Wedding Cakes by Shared Sugar. I'll take seven, please. Okay, fine: eight.
 Sopapillas from Tara Cooks. These look yummy. Sopapillas make me feel good inside, and I love that these are coated in cinnamon sugar.
 Buñuelos (Mexican Fritters) by Muy Bueno Cookbook. These look so crisp and lovely.
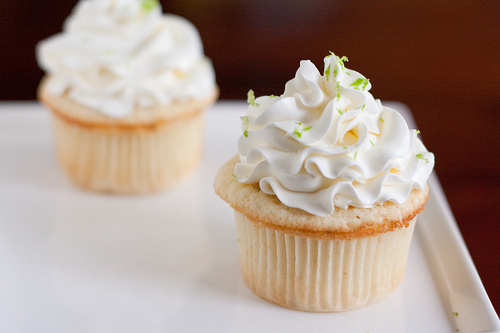 Margarita Cupcakes by Confections of a Foodie Bride. Oh, my. How scrumptious!
 Tres Leches by Delicious Shots. My favorite dessert, prepared oh so beautifully.
Have a wonderful, festive day, everyone!
Love,
P-Dub

May 4, 2011
Fer Yoo (Winners Announced)
 The (randomly selected) winners of the All-Clad cookware sets are:
#31921 Monica d: "My idea of a perfect meal? One that I don't have to clean up after." (Ha. Funny.)
#2870 Esther Sam: "My ideal meal would be a huge bowl of Phad See Yew. Its a Thai dish with wide noodles, broccoli and fried tofu. I will also have some crab puffs to start the dish off with and a thai iced tea. Mmmmmm."
Congrats, winners! Contact prizes@thepioneerwoman.com to claim your cookware sets.
Today…
Because I'm puffy…
Because I'm sweaty…
Because it's Wednesday…
And because I love ya…
 I'm giving away two (2) of these All-Clad stainless steel cookware sets.
Most of you are aware of my love for enameled cast iron pots. I use them every day and will love them the rest of my life.
However, when it comes to skillets, saucepans, saute pans, etc, I love cooking with stainless steel. And when it comes to stainless steel cookware, I don't think it gets any better than All-Clad.
*This is not a paid advertisement. All-Clad doesn't have any idea who the heck I am. I could disappear tomorrow and All-Clad would not bat an eyelash. I just like their pans. Amen.*
TO ENTER
To enter the giveaway, just answer the following questions in the Comments section of this post:
What is your idea of the perfect meal?
What would you choose to eat over everything else on earth? Just list your ideal meal and you're automatically entered to win.
THE RULES
One entry per person, please. Strictly enforced with a wooden spoon.
No entries after midnight Pacific Time Wednesday.
Winners will be selected at random and announced Thursday.
Note: Replies to comments are unable to be counted as entries. Please leave one comment (not a reply) as your entry.
Lots of Love,
P-Dub
____________________________
Giveaway sponsored by Pioneer Woman, with cooperation from CHEFS Catalog.

Fer Yoo
Today…
Because I'm puffy…
Because I'm sweaty…
Because it's Wednesday…
And because I love ya…
I'm giving away two (2) of these All-Clad stainless steel cookware sets.
Most of you are aware of my love for enameled cast iron pots. I use them every day and will love them the rest of my life.
However, when it comes to skillets, saucepans, saute pans, etc, I love cooking with stainless steel. And when it comes to stainless steel cookware, I don't think it gets any better than All-Clad.
*This is not a paid advertisement. All-Clad doesn't have any idea who the heck I am. I could disappear tomorrow and All-Clad would not bat an eyelash. I just like their pans. Amen.*
TO ENTER
To enter the giveaway, just answer the following questions in the Comments section of this post:
What is your idea of the perfect meal?
What would you choose to eat over everything else on earth? Just list your ideal meal and you're automatically entered to win.
THE RULES
One entry per person, please. Strictly enforced with a wooden spoon.
No entries after midnight Pacific Time Wednesday.
Winners will be selected at random and announced Thursday.
Note: Replies to comments are unable to be counted as entries. Please leave one comment (not a reply) as your entry.
Lots of Love,
P-Dub
____________________________
Giveaway sponsored by Pioneer Woman, with cooperation from CHEFS Catalog.
May 2, 2011
Knock You Naked Brownies
 Goodness.
Here's how it shakes out. Several weeks ago, I was gifted with a tin of brownies. To be specific: Killer Brownies from Dorothy Lane Market in Dayton, Ohio. There were four substantially-sized brownies in the tin, and each brownie was coated generously with a sifting of powdered sugar. But they weren't just any brownies: they were multilayered, with a gorgeous caramel oozing out of the center layer. And the flavor. To die for. I ate them over the period of several days, more despondent with each bite that I was one step closer to being without them. And I didn't ever want to be without them again.
They're one of the best things I've ever tasted.
While an official recipe for the Killer Brownies is not available, the classic layered brownie recipe known as "Knock You Naked Brownies" is rumored to be a pretty good match.
I decided to whip up a batch over the weekend and see if they measured up.
It was all in the name of research, of course.
 Start by dumping this into a large mixing bowl.
What's "this" you ask?
 It's German Chocolate cake mix.
Not Devil's Food.
Not Chocolate Fudge.
German Chocolate.
And if you're not a cake mix person, don't worry: because of the way the ingredients are combined, the end result just doesn't have a box mix flavor. Promise.
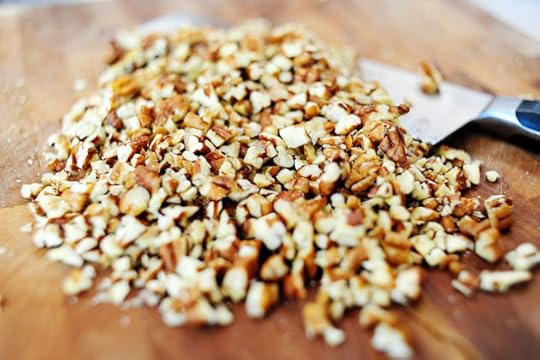 Finely chop up some pecans.
 You'll need about a cup of chopped nuts, which you'll remember is quite different from a cup of nuts, chopped.
 You'll also need some melted butter…
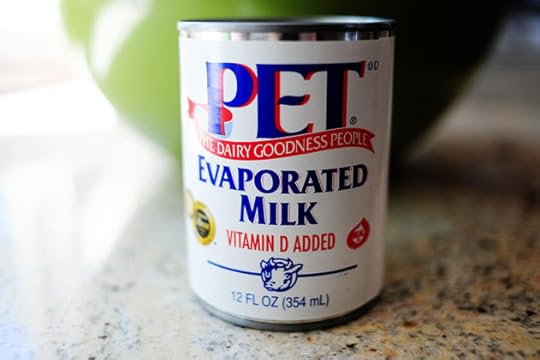 And some evaporated milk.
 Pour the evaporated milk over the cake mix.
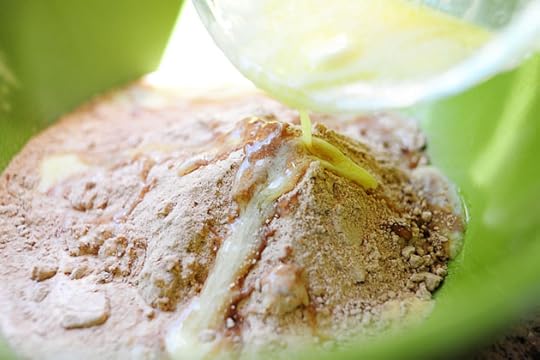 Then add the butter…
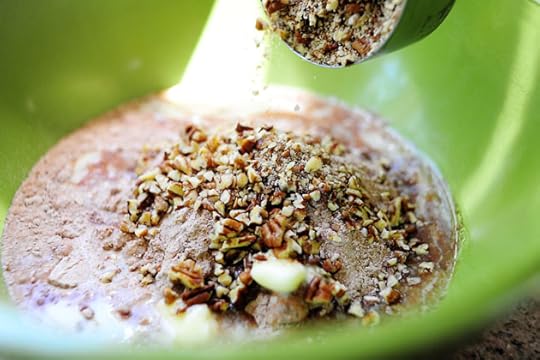 And the nuts.
 Stir together until totally combined. It'll be very, very thick–not at all like cake batter. More like a thick cookie dough.
 Spray a square (either 8 x 8 or 9 x 9) baking pan very generously with nonstick cooking spray.
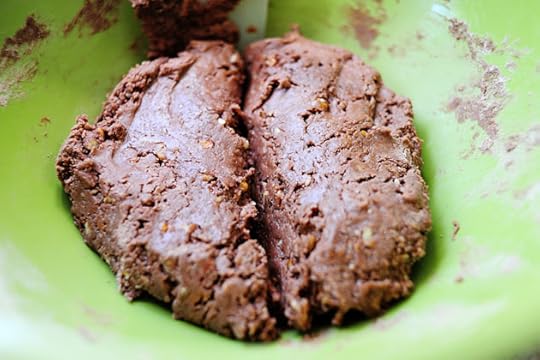 Divide the dough in half…
 And press half the dough into the bottom of the pan. Stick it in the oven for eight minutes.
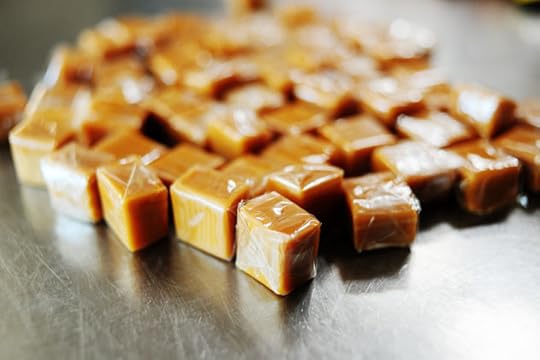 Caramels!
 Peel 'em. Put 'em in a bowl.
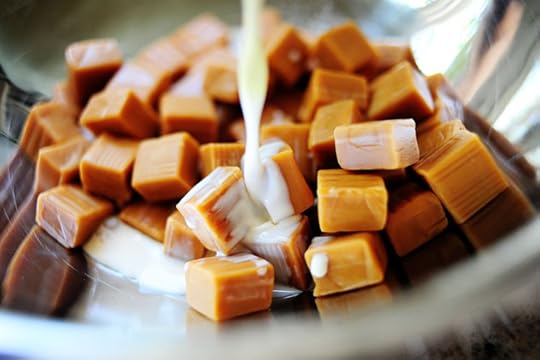 Pour in some evaporated milk.
 Heat it over the double boiler, stirring frequently, until the mixture is smooth and melted.
 Pull the pan out of the oven.
 And pour the caramel over the top.
 Now, this is optional: grab some chocolate chips. I say "optional" because I don't think the brownies I received as a gift and loved with all my heart and dreamed about for weeks and fainted after eating had the inclusion of chocolate in the caramel layer.
 In any event, I would ultimately determine that the amount the recipe calls for–one whole cup–was too much. I cut it down to 1/3 cup in the final printable recipe.
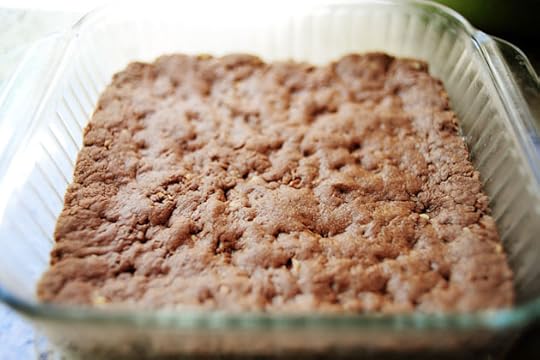
 Next, grab the other half of the cake mixture. The original recipe says to pour it over the top of the pan, but it's thick and anything but pourable. So I just roughly formed a large square with my hands.
(I think you could also spoon the mixture over the top, but I was afraid it would have too rough a texture.)
 Carefully place the square of dough on top…
 And bake it for 20 to 25 minutes, until the top layer appears "done."
 This looks like a seriously delicious mess, that's all I know. And I say "mess" in the most wonderful sense.
Now, this is important: you are not allowed to eat the brownies now.
I know. I'm cruel. But because of the gooeyness of the ingredients, the brownies must be cooled, then refrigerated for several hours in order to set the ingredients together. So whatever you do, DO NOT make this recipe if you're in the throes of a wicked chocolate craving. In fact, eat a piece of chocolate before you make the recipe. Only then will you have the strength to resist…and refrigerate.
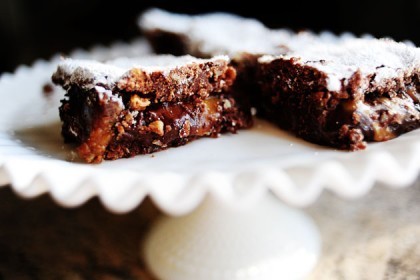
 After refrigerating, when you're ready to dig in, sprinkle the top very generously with powdered sugar.
And when I say generously, I mean really lay it on, sister. Brother, if you're male. The brownies I received as a gift had a decidedly thick layer of powdered sugar anchored to the top, and this is part of what made them special.
 You can divide the brownies however you'd like. I decided to make one large brownie for Marlboro Man, and one large brownie for me.
 Just kidding, but I did take the oversized route and divide the pan into just six large brownies.
But nine would be much more sensible.
But I've never really had much sense when it comes to dessert.
 Hello, my beautiful lover. Come away with me.
 Let's examine: first of all, you'll see what I mean about the excessive chocolate. Granted, I did use a square pan instead of the 9 x 13-incher the recipe calls for, so the gooeyness is more pronounced. But this is definitely more chocolate than the brownies need; you want the caramel to be the star. But that aside: look at the deliciousness. I only refrigerated for one hour since I was chasing daylight; ideally, I would have had more time to mitigate the ooze factor.
 The verdict is this: I was actually quite amazed at how close these tasted to the gifted brownies I received. Of course, nothing can quite measure up to the Dorothy Lane brownie experience–it was life-changing. But this recipe is right behind it. I'll make it again and again.
Incidentally, if you need a special food gift to send to a friend, family member, or business associate, I'd highly recommend a tin of Killer Brownies. They definitely make a statement.
Killer Brownies – Dorothy Lane Market
Here's the printable!
Recipe: Knock You Naked Brownies
Prep Time: 15 Minutes
|
Cook Time: 23 Minutes
|
Difficulty: Easy
|
Servings: 12
Print Recipe
3"x5" Cards
4"x6" Cards
Full Page
Ingredients
1 box (18.5 Ounce) German Chocolate Cake Mix (I Used Duncan Hines)1 cup Finely Chopped Pecans⅓ cups Evaporated Milk½ cups Evaporated Milk (additional)½ cups Butter, Melted60 whole Caramels, Unwrapped⅓ cups Semi-Sweet Chocolate Chips¼ cups Powdered Sugar Preparation Instructions
Preheat oven to 350 degrees.
In a large bowl, mix together cake mix, chopped pecans, 1/3 cup evaporated milk, and melted butter. Stir together until totally combined. Mixture will be very thick.
Press half the mixture into a well-greased 9 x 9 inch square baking pan. Bake for 8 to 10 minutes. Remove pan from oven and set aside.
In a double boiler (or a heatproof bowl set over a saucepan of boiling water) melt caramels with additional 1/2 cup evaporated milk. When melted and combined, pour over brownie base. Sprinkle chocolate chips as evenly as you can over the caramel.
Turn out remaining brownie dough on work surface. Use your hands to press it into a large square a little smaller than the pan. Use a spatula to remove it from the surface, then set it on top of the caramel and chocolate chips.
Bake for 20 to 25 minutes. Remove from pan and allow to cool to room temperature, then cover and refrigerate for several hours. When ready to serve, generously sift powdered sugar over the surface of the brownies. Cut into either nine or twelve helpings, and carefully remove from the pan.
*Adapted from the standard/classic "Knock You Naked Brownies" recipe. These brownies don't really knock you naked…but almost.
Posted by Ree on April 30 2011

Ree Drummond's Blog

- Ree Drummond's profile
- 2032 followers

