
Conor Jordan's Blog, page 5
July 26, 2021
Two-Level Nested Function in Excel
Two-Level Nested Function
Functions are formulas that perform calculations in a spreadsheet. Functions can be combined where one of the values can be a function itself. This means that there is a function within a function. Instead of having a number as part of a calculation, you can have another function. This can be used when more than one criteria needs to be met within a calculation. The IF function can be used in this way. For example:
=IF(OR(E2>40,F2<6),20,10)
In the table below, this is calculating IF the number of sales is below 40 OR the number of days absent is less than 6, the employee bonus will be €20. If not, the bonus will be €10.
Enter the following information: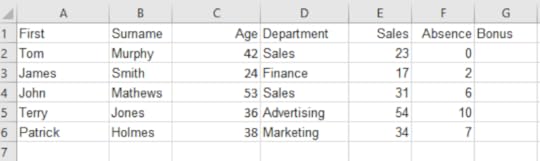
2. We want to award a €20 bonus for staff who had over 40 sales or less than 6 days’ absence, if not, award a €10 bonus
3. In cell G2, enter =IF(OR(E2>40,F2<6),20,10)
4. Use the fill handle to copy the formula
This function can be used in budgets, tables of data as well as performing financial calculations.
For more information about Advanced Excel features, click on the image below:


July 23, 2021
AutoFormat in Microsoft Word

AutoFormat
AutoFormat formats an entire document using a uniform style. This is useful if the user wants to apply a consistent style to the document depending on its purpose. It is an efficient way of applying a uniform style to a document.
Open a document you are working on Click on the Customize Quick Access Toolbar arrow and choose More Commands Under Choose Commands From select All Commands Scroll down until you find AutoFormat Click on the Add button and click OK Click on the AutoFormat button Click OK The document will be formatted according to the styles available Save the documentMarch 2, 2021
Advanced Find and Replace in Microsoft Word

Find and Replace
Advanced find and replace features allow users to search a document according to criteria including case e.g. uppercase, whole words and types of font. The find and replace function can be used to find many elements of a document including paragraph marks and formatted text.
Open the document you want to work on On the Home tab in the Editing group, click on Replace Click on More Click on the Match Case checkbox In the Find What text box type in the word you want to replace In the Replace With text box type the word you want to replace it with The search will only find a match that has the same lowercase lettering and will replace each instance of that word within the documentFinding Whole Words
Users can find whole words in a document and replace them with another whole word of their choice. This is useful if you want to find an exact match in a document. Rather than searching for text with the beginning of a word and coming up with several results, searching for whole words allows users to locate every instance of a word in a document and replace it with an alternative.
In the Find What text box, type in the word you want to replace In the Replace With text box, type in the word you want to replace it with Select the Find Whole Words Only checkbox Click on Replace All Only whole words matching the search will be replacedReplacing Types of Font
Users can search a document for certain types of font and replace it with another type of font. This is a fast way of changing fonts within a document and can save time when involved in repetitive tasks.
In the Find and Replace dialog box, click on Format then Font On the Font tab, choose Times New Roman Click OK In the Find What text box, type in the word you want to replace In the Replace With text box, type in the word you want to replace it with Click on Replace Only text that is in the Times New Roman font will be replaced Save the documentFinding Paragraph Marks
When you press the Enter key, paragraph marks appear if the Show/Hide feature is turned on. Users can find these marks and replace them with alternative marks such as indents.
In the Find and Replace dialog box, click on the Find tab Click on the Special button then Paragraph Mark Click on Find Next Microsoft Word will search for any paragraph marks in the textJanuary 28, 2021
Relationships in Access

Tables in a database can be related so that information is not duplicated. You could have a Customer Details table that contains the contact information for each customer. This could be related to an Orders table providing details of every order that was made. Rather than having to repeat the customer details for every order, you can create a One-To-Many relationship so that one record in the Customer Details table is related to many records in the Orders table. This is because some customers are likely to order more than one product from a company
Tables are related using Key Fields
The first table will likely have the Primary Key
The matching field in the other table will have the Foreign Key
Creating Relationships
Access allows you to link tables together so that records are maintained. For example, a primary table containing information about Customers may be linked to Products Ordered. This will establish a link between customer details and the products they have ordered.
Create a table called ‘Customer Details’ with the following field names: Customer Ref, First Name, Surname, Address, Telephone No. Fill in the details for each customer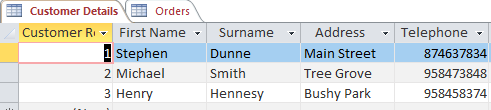
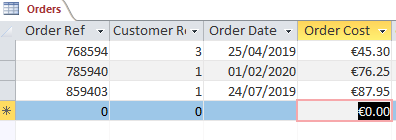
4. Create another table called Orders with the following field names:
5. Order Ref, Customer Ref, Order Date & Order Cost
6. Fill in the details for each order making sure some customers order more than one product
7. Save the database and leave it open
One-to-Many Relationships
A one-to-many relationship is when a primary table containing one field of data is linked to a table with all the details for that field. For example, a table containing Contact Details can be held in one table and can be related to a Company table where all of the details for that company are held only once.
Open the ‘Customer Details’ database On the Database Tools tab in the Relationships group, click on Relationships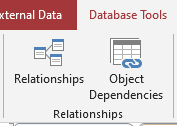
3. In the Show Table dialog box, select the Customer Details table and click on Add
4. Do the same for the Orders table
5. Click and drag the Customer Ref field in the Customer Details table to the Customer Ref field in the Orders table
6. In the Edit Relationships dialog box, click on the Create button
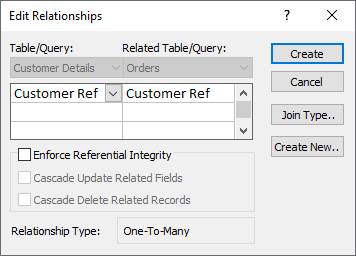
7. A One-To-Many relationship type is created
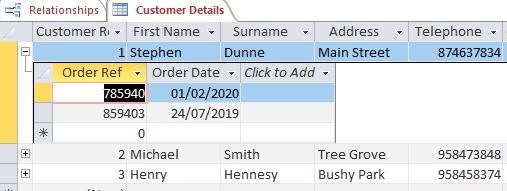
8. Return to the Customer Details table
9. Click on the Expand symbol to reveal the order details related to Stephen Dunne
10. This is called a Subdatasheet
11. Save the database
For more information about Microsoft Access visit www.digidiscover.com or click the link below:

Get Office 365 on Amazon: https://amzn.to/2YmgLKq
January 27, 2021
Creating Macros in Word
Macros can be used in Microsoft Word to automate certain tasks such as formatting a document. Macros are helpful when the user repeats a series of tasks many times. When the macro is created, all the user has to do is click on the macro for the series of tasks to run.
 Open a new document On the Developer tab in the Code group, click on Record Macro
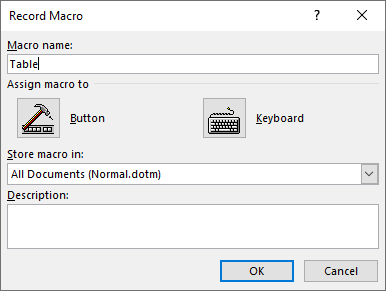
3. Name the Macro as “Table” and click OK
4. On the Insert tab in the Tables group, create a table with 4 columns and 3 rows
5. Format the table as Grid Table 4 – Accent 6
6. On the Table Tools Layout tab in the Data group, select Repeat Header Rows
7. On the Developer tab in the Code group, select Stop Recording
8. Save the document as “Macro”
Run a Macro
Open the “Macro” document On the Developer tab in the Code group select Macros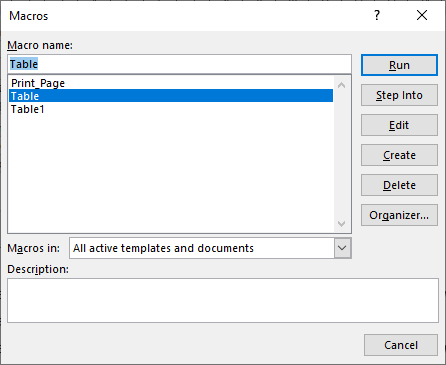
3. Select Table and click on Run
4. This will run the macro and create the formatted table
5. Save the document
Creating a Custom Button
Open the “Macro” document Right-click on an empty space on the ribbon Choose Customize the Ribbon In the Choose Commands From drop-down box choose Macros Click on the New Group button to create a new group Click on the Rename button Change the name of the group to Macro Click OK Select the Macro and click on the Add button Click on the Rename button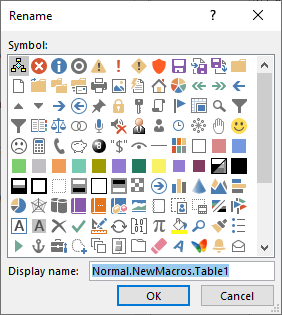
11. Choose a Smiley Face for the icon and change the Display Name to Table
12. Click OK
13. Click OK again
14. The Macro is now added to the Ribbon
15. Save the document
For more information about Advanced Word features, visit the Amazon link below:
Or visit www.digidiscover.com
January 26, 2021
Text Functions in Excel
To buy Microsoft Office 365 click here: https://amzn.to/3pkd9nT

Text functions allows users to extract pieces of text from selected cells, neaten the appearance of text in cells and bring together text from separate cells. The function Left extracts the left part of text within a cell depending on the number of characters the user specifies. The Right function extracts text in the left part of a cell depending on input. The Mid function extracts a set number of characters from the middle of a cell.
Enter information into a spreadsheet to create the following table: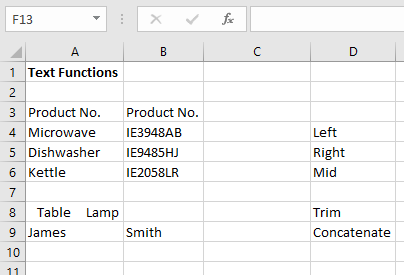
2. Select cell C4
3. On the Formulas tab in the Function 4. Library group, select Text
Select Left
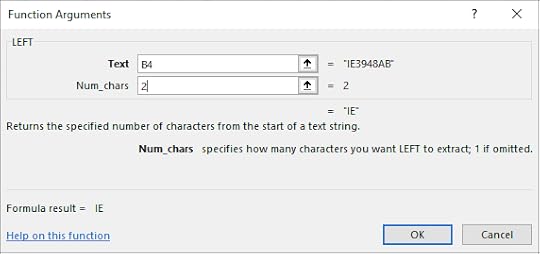
5. Select B4 for the Text textbox
6. For Num_chars type in 2
7. Click OK
8. This returns the first 2 letters of the Product Number
9. Select cell C5
10. On the Formulas tab in the Function Library group, select Text
11. Select Right
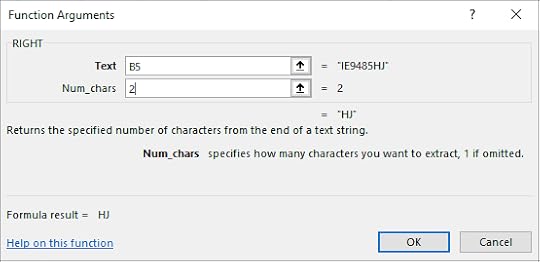
12. In the Text textbox select cell B5
13. For Num_chars type in 2
14. Click OK
15. This displays the last 2 letters of the Product Number
16. Select cell C6
17. On the Formulas tab in the Function Library group, select Text
18. Select Mid
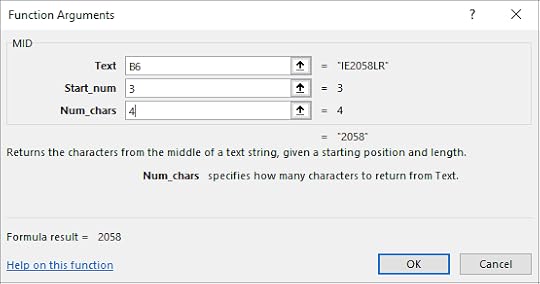
19. Select cell B6 for the Text textbox
20. Type in 3 for the Start_num
21. Type in 4 for the Num_chars
22. Click OK
23. This has displayed the 4 numbers in the middle that started at the 3rd number
Trim
The Trim function can remove the spaces between text within a cell. This makes the appearance of text in a cell much clearer and is useful for neatening a range of cells in a worksheet.
Select cell C8 On the Formulas tab in the Function Library group, select Text Select Trim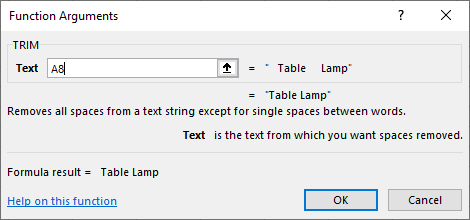
4. In the Trim text box, select cell A8
5. Click OK
6. This removes unnecessary spaces between words
Concatenate
This function takes a number of separate cells containing text and joins them together in another cell. This can be useful if a user has a list of contact details and wants the first name and surname of each contact to appear in a single cell.
Select cell C9 On the Formulas tab in the Function Library group, select Text Select Concatenate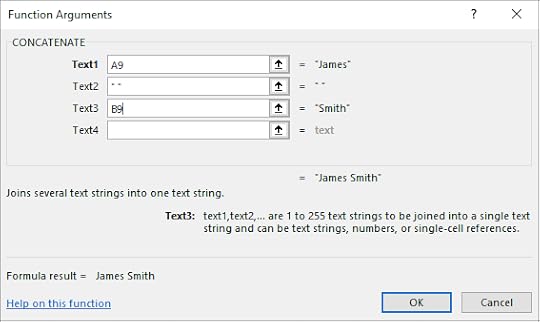
4. In the Text1 textbox, select A9
5. In the Text2 textbox, type in “ “
6. In the Text3 textbox, select B9
7. Click OK
For further information about Advanced Excel, visit the Amazon link below:
January 22, 2021
The IF Function in Excel

The IF Function in Excel can be used to calculate whether the cell contents of a selected cell meets certain criteria and then perform a calculation IF it meets the specified criteria.
The function includes a Logical Test to see whether the selected cell falls within specified criteria and then performs a calculation depending on whether it meets the criteria in the logical test.
=IF(Logical Test, Value if true, Value if false)
For example:
If the value of a cell is less than 6, add by 4, if not, add by 2
=IF(B1<6,B1+6,B1+2)
You can calculate interest on a savings account depending on its worth by entering in the following values:

In cell B4, we want to apply an interest of 2% if the amount saved is less than €40 and an interest rate of 4% if the amount saved is greater than €40
=IF(B3>40,B3*4%,B3*2%)
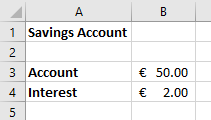
This function has calculated the interest as being €2 e.g. 4% of €50 because the selected cell B3 was greater than €40.
If the amount in cell B3 was less than €40, only 2% of the amount would be calculated and so the answer would have been €1.
For more information about Excel features, view the ICDL Excel book on Amazon:
January 21, 2021
Microsoft Word: A versatile, reliable desktop application

Office 365 comes with a range of useful desktop applications allowing you to create documents, spreadsheets, slideshows and databases.
To find out more about Office 365 visit: https://amzn.to/2KCrflG
The Microsoft Word application has many useful features providing you with a variety of tools to create, edit, format and publish documents.
Users can work with a range of documents and save them in different file formats. These documents can then be used with other desktop applications. You can try out many of the formatting tools to make your documents appealing and use them to enhance productivity.
Word allows you to create and edit word processing document that will be ready to share and distribute to others. You can apply different formats to documents to prepare them for distribution.
Users can insert tables, images and drawn objects into documents providing you with a host of useful features to edit and format these elements. Mail merge is another versatile feature within Word that allows users to prepare letters to be sent out to a customer base. Page settings can also be adjusted and spell checking can be carried out quickly and easily, allowing the user to prepare documents before finally printing them.
Advanced users of Microsoft Word are able to apply advanced text, paragraph, column and table formatting such as converting text to a table and vice versa. Referencing features including footnotes, endnotes, captions, table of contents, indexes and cross references can be used within documents.
Working with documents can be made more efficient with the use of automated features such as Macros. Linking and embedding can be used to integrate data within Microsoft Word. People can collaborate with other users by working with master documents and subdocuments as well as applying security features to documents. To keep sensitive documents secure, users can apply watermarks, sections as well as headers and footers to Word documents.
The Office 365 software provides a range of useful application to desktop users with Microsoft Word being a popular choice for creating and designing professional looking word documents.
To find out more about Office 365 and any of the associated applications visit: https://amzn.to/3o2JRc7
Slide Masters in PowerPoint
To purchase Microsoft Office 365 visit: https://amzn.to/3sJVGHJ

Slide Masters are used to create slides in a presentation that have the same formatting, objects and text appearing on each slide. This is a useful feature that allows you to create a uniform slideshow with a consistent appearance.
Insert a New Slide Master
Slide Masters contain formatting, objects and text that appear on each slide in a presentation
1. On the View tab in the Master Views group, Select Slide Master
2. This will create a new Slide Master that you can edit to give the presentation a consistent style
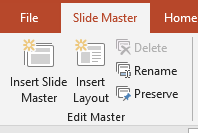
3. On the Slide Master tab in the Edit Master group, select Insert Layout
4. This will apply a custom layout to the master slide set
Edit Slide Master Layouts
Highlight the first Bulleted List Level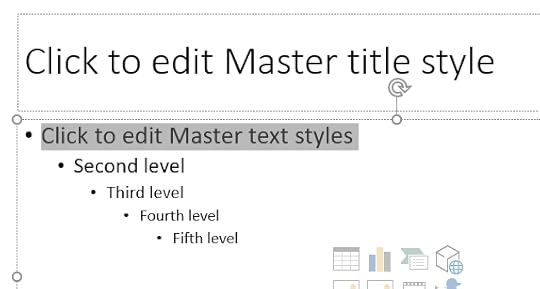
2. On the Home tab in the Paragraph group, select Bullets and choose Bullets and Numbering
3. Select a style of bullet to apply to the Bulleted List Level
4. On the Slide Master tab in the Background group select Background Styles and choose Format Background
5. Choose a Solid Fill to apply to the slideshow
6. You can also move and delete placeholders so that text and objects will appear in different positions
Custom Slide Master
On the Slide Master tab in the Edit Master group, select Insert Layout Select the inserted master slide and change the background colour to light blue On the View tab in the Presentation Views group, select Normal On the Home tab in the Slides group, select Layout and choose Custom LayoutFor more information about Advanced PowerPoint features, click the link below:
January 20, 2021
Logical Functions in Excel

Logical functions allow you to determine whether a value is true or false depending on the contents of the selected cells. Specified criteria are set in the calculation to find out whether certain conditions are met or not. Logical functions are useful calculations that can be made to find out if certain criteria are met among a range of selected cells.
And, Or & Not
1. Create the following worksheet:
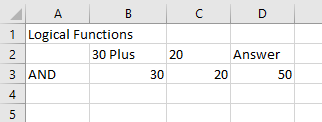
2. Select cell E3
3. On the Formulas tab in the Function Library select Logical
4. Select AND

5. Select cell D3
6. Click OK
7. The calculation is true so returns a value of True
Or Function
1. Enter in the following information:
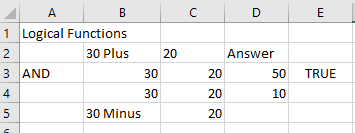
2. Select cell E4
3. On the Formulas tab in the Function Library select Logical
4. Select OR
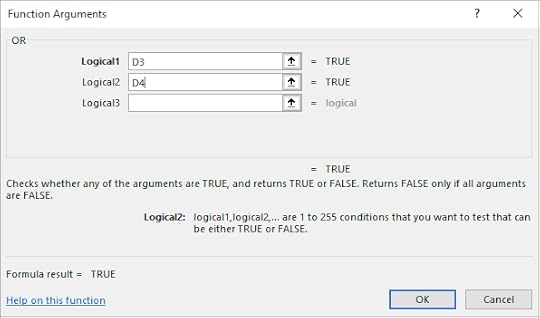
5. Select D3 for Logical1 and D4 for Logical2
6. Click OK
7. The value True appears because the calculations are correct
Not Function
1. Select cell E5
2. On the Formulas tab in the Function Library select Logical
3. Select Not
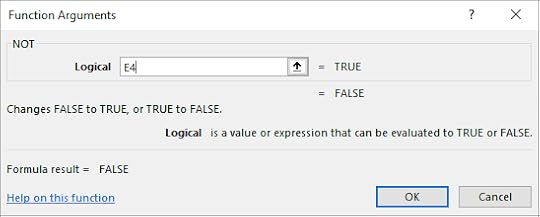
4. Select Cell E4
5. Click OK
6. A value of False was produced because the value True was not False
7. Save the workbook
For further information about Advanced Excel features click the link below:
Conor Jordan's Blog


