
Conor Jordan's Blog, page 3
October 12, 2021
Table Styles & Settings in Microsoft Word

Table Styles
A range of styles can be applied to tables using pre-set formats. Word offers many different table styles for users to apply to tables. Finding a style that will fit in well to your document can be achieved quickly with the range of styles available.
Open a New Document Create a table with 3 rows and 4 columns On the Table Tools Design tab, click on the More drop-down arrow on the Table Styles box
4. Choose Grid Table 4 – Accent 2
Merge & Split Cells/Table
Cells can be divided into 2 or more cells using the split function. Merge joins 2 or more cells together. A table can be split into 2 tables also.
With the document still open, highlight the first 2 adjacent cells in the second row On the Table Tools Layout tab in the Merge group, click on Merge
3. The cells have been merged into one cell
4. With the cell still selected, click on Split Cells in the Merge group
5. Choose Number of Columns 2
6. Click OK
7. The cells have been split into two
8. With the cursor in the second row, in the Merge group, click on Split Table
9. This splits the table into two
10. Save the document as “Table”
Cell Margins
The margins between cells in a table can be set using table options. The margins are set in centimetres and users can also apply spacing between cells. Another option is available to resize the cells to fit its contents.
Open the “Table” document On the Table Tools Layout tab in the Alignment group, select Cell Margins Change the cell margins to the following settings: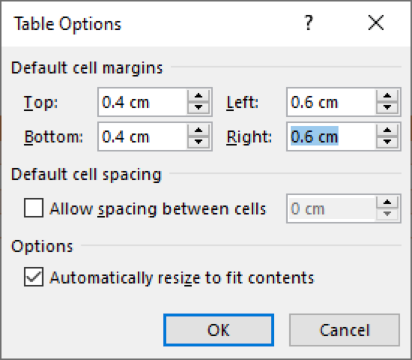
4. Click OK
5. Save the document as ‘Table 2’
To learn more advanced word processing features, click on the link below:


October 6, 2021
Linking & Embedding in Microsoft Word

Linking & Embedding
Links can be placed in a document tying them to other documents or files. When you make a change in a file, this is reflected in the document. Embedding an object means placing an object in a document without a link. When you make a change in the file, there is no change reflected in the document.
Open a new document On the Insert tab in the Illustrations group click on the Chart button and choose a Pie Chart On the Insert tab in the Text group, click on the Object button Select the Create From File tab and click on the Browse button Navigate to your documents folder and select a separate document Select the Link to File checkbox and click OK The linked text will appear in the document beneath the pie chart Save the document as “Linked” Open the separate document and make a change Save the document Re-open the “Linked” document Select Yes in the dialog box The changes will be updated in the linked document Save the documentDisplay as Icon
Open the “Linked” document On the Insert tab in the Text group, click on the Object button Select the Display as Icon checkbox Click OK The object will be displayed as an icon in the document Save the document as ‘Display as Icon’ Leave the document openTo learn more about Advanced Word Processing features, click on the image below:
October 5, 2021
Formatting Shapes in PowerPoint
Drawn shapes in PowerPoint can be formatted using a wide range of styles and colours. Objects can be rotated to suit the preferences of the user, they can be coloured using an array of different settings and they can be shaded in different styles. PowerPoint allows you to apply a range of formatting styles to objects.
Open a new blank presentation On the Home tab in the Slides group, select Layout Select Title Only Give the first slide a title of ‘Drawing’ On the Home tab in the Drawing group, select the Arrow Right Right-click on the shape and choose Format Shape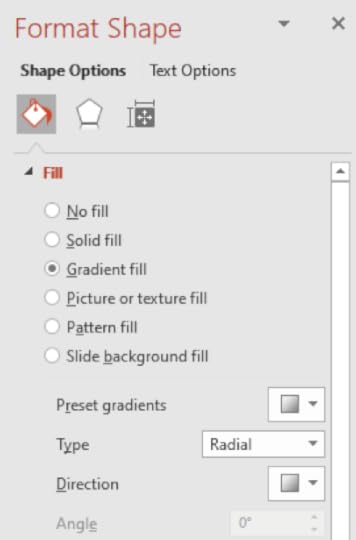
7. On the Format Shape pane select Gradient Fill
8. Choose a Preset Gradient of Top Spotlight Accent 1
9. Change the Type to Rectangular
10. This has applied a fill effect to the drawn object

11. Save the slideshow as ‘Drawing’ and leave it open
Shape Transparency
The level of transparency of an object can be adjusted to suit the style of a slide. Applying shape transparency to an object will allow other elements on a slide such as text, appear behind the shape. This is useful when you want to present a slideshow with shapes filled with text or other objects. It can also be used for drawing shapes around images.
With the ‘Drawing’ slideshow open, change the Shape Fill to White On the Format Shape pane increase the Transparency to 60% Position the shape behind the heading text
4. The text can now be seen within the shape
5. Save the presentation as “Shape”
3-D Effects
3 dimensional effects can be applied to shapes. The direction of 3D shapes can be adjusted to suit the style of a slide. For instance, a right-hand facing arrow can be rotated three dimensionally so that it appears to be facing out from the screen. This is useful when a presenter wants to get creative with a slideshow and include some new designs.
With the ‘Shape’ slideshow open, on the Drawing Tools – Format tab, in the Shape Styles group, select Shape Effects Select 3-D Rotation and under Parallel choose Off Axis 1 Right This has applied a 3-D effect to the shape making the arrow point in a different direction
4. Save the presentation with the same name and close it
To learn more about advanced presentation techniques, click the paperback image below:

October 1, 2021
Presentation Planning for PowerPoint

Considerations
PowerPoint is a versatile presentation graphics application that allows you to create stylish presentations. This application can allow you to create a range of appealing slideshows for a variety of different audiences and purposes. When creating a slideshow, there are some considerations to acknowledge. Preparation is key when delivering a presentation.
Consideration for the audience must be taken into account before creating a presentation. The content will be influenced by the age, educational level, occupation and cultural background of the audience. Ensure that the presentation is suitable for the people who will attend. For example, a presentation designed for teenagers would not be appropriate for a corporate audience.
The presentation must be suited to what the audience is expected to know and what they will be able to understand. This means providing a presentation that meets the needs of the audience and is suited to the expected knowledge of attendees. For example, a presentation for younger students would be inappropriate for university students as they may not be able to fully comprehend the content of the presentation.
Having adequate lighting for the room is important. Poor lighting can result in difficulties viewing slides and can present a communication barrier between you and the audience. Appropriate lighting is vital for an effective presentation, so ensure that the room is fit for purpose.
If the room size is large, you may need to use a microphone and a projector. This is so you can project your voice around the room and audience members can view the slideshow clearly. Without a microphone, attendees towards the back of the room may not be able to hear you clearly and can result in confusion and loss of interest. Without a projector, the content of the slideshow may not be presented clearly. This is why these considerations should be taken into account prior to setting up for a presentation.
Layout is important to consider as everyone in the audience needs to be able to see the presentation clearly. Consider the following questions before deciding on the layout of the room. Where will the slides be displayed? Will the speaker be standing front and centre before the audience or to the side? Where will the speaker position themselves in relation to the audience? These considerations need to be addressed before delivering a presentation to ensure that audience members can view each slide clearly and hear the important points in a presentation.

It is important to have suitable video equipment so that slides can be seen clearly by everyone in the audience. Inadequate video equipment can result in poorly displayed slides and may cause confusion for audience members. Ensure that the content of the presentation is legible in each slide and that images, charts, videos and text are clearly presented.
Having adequate audio equipment is also important to ensure that the audience will be able to hear the presentation clearly. Always check the suitability of the audio equipment before commencing the presentation. Otherwise members of the audience may not be able to hear the presentation clearly.
Slideshow accessories can be used to deliver a convincing presentation. Laser pointers can be used to emphasise important points on a slide. For example, whenever there is a statistic in a chart that needs to be highlighted, a laser pointer can be used to draw attention to this important point.
Remote clickers are another accessory that can be used to deliver a presentation. This device allows you to progress through each slide seamlessly without having to return to the computer when advancing slides. It can also allow you to return to the previous slide whenever an important point is missed.
Having appropriate computer display adapters can be helpful when delivering presentations in different rooms. Ensure you have the necessary adapters as connections needed to use a computer with a projector may vary depending on the equipment being used.
All these considerations should be taken into account before preparing for a presentation. Ensure that you allow plenty of time to prepare prior to each presentation. Review slideshow material thoroughly before delivering a presentation to ensure that you are able to give the audience a clear understanding of what you intend to say.
Design, Content and Layout

Before you create your presentation, it is important to consider the length of your slideshow. Too long and you run the risk of boring your audience. Too short and there may be not enough time to cover all the material. Plan how long you will spend delivering the presentation and what would be appropriate for the type of presentation being given.
Allow adequate time to display each slide so that the audience can understand and follow the information being presented. Going through slides too quickly may make the content in a presentation too difficult to comprehend. This could make it seem as if the presentation is rushed and audience members may not be able to comprehend the key points of the slideshow. Go too slowly and the audience could lose interest in what is being said. Spend time practicing a presentation to find the appropriate length required for each slide. This can be achieved by using a helpful timing feature in PowerPoint.
Ensure you have accompanying graphical objects included in the slideshow such as photographs, charts, tables or diagrams. This can help you to explain the content of the presentation clearly and display information in a format audience members can understand at a glance. Graphical objects can also provide colour and variety to your presentation making it appealing to audience members. This can help to reinforce learning and allow audience members to understand the presentation better.
Apply colour combinations in your presentations to make text appear clearer. Adequate contrast makes text stand out more making the presentation easier to read. Choose contrasting colours to make text stand out better. Avoid colour combinations that make it difficult for people to view the slideshow. Some audience members may be colour blind or may have visual impairments, so providing a clear colour set for each slide is important.
Avoid having too much colour and too many accompanying images in the presentation. This may distract from the important content contained within a slideshow. Maintain a balance between text and colour so that the content is understandable and is presented in an interesting manner. Increasing the size of fonts can also enable people with visual impairments to clearly read text in the presentation.
Alternative text can be included to describe what images or objects are in a slideshow. Alternative text allows the screen reader to describe what an image, object, diagram or graph is. This is a useful feature for people who may have visual impairments.
Keep the level of detail concise and to the point so that the audience will be able to comprehend the intended message of the presentation. Having cue cards will help you to stick to the main points of a slideshow and provide the audience with a clear understanding of the presentation. Prolonging the length of time spent on covering content in each slide can become wearisome for audience members, so it is important to be brief and to the point when delivering a presentation.
Consider providing handouts that cover the important points in each slide. This will help audience members follow a presentation and can make delivering important points easier. It can provide attendees with reference material they can then use to revise material following the presentation. This can help to reinforce material learned during the presentation.
Limit animations where possible so that audience members do not become distracted. Having a good balance between static objects and animated objects is important. Too many animations may distract from the main content, too few and the content may become less interesting.
It is also useful to include appropriate transitions so that the presentation continues seamlessly and does not distract audience members. With a clear understanding of advanced PowerPoint features and how to deliver content, good presentations are possible for anyone who is expected to give them.
To learn more about presentations and Advanced PowerPoint features, click the book cover image below:
September 22, 2021
Line & Page Breaks in Microsoft Word

Line Breaks
Line Breaks are used when you want text to appear on two lines but to be treated as if it were a single line. This technique is often used when creating headings.
1. Type the following text into a new document:
This is a Line Break
2. Format the text so that it has an Arial font and has a size of 14pt
3. Place the cursor just before the word “Line”
4. Hold down the Shift key and press Enter
5. The heading should appear like this:
This is a Line Break
6. Centre the text in the document
7. Click on the Show/Hide button on the Home tab to show the Line Break symbol
Leave the document open
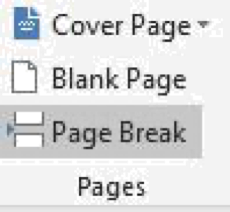
Page Breaks
Page Breaks are used to start a new page. There is a keyboard shortcut that can make entering text into a document easier when including page breaks. Page Breaks may be used when you want to start a new section, chapter or paragraph on a new page.
1. Type in the following paragraph:
Low energy, tiredness, lack of enthusiasm, time constraints and wavering interest are all common barriers to taking part in regular physical activity. With many people’s lives overrun with errands, chores, tasks mounting to the ceiling, fitting in time for exercise let alone having the energy to start can seem almost impossible.
2. On the Insert tab, in the Pages group select Page Break
3. On the new page, type in the following text:
For many, exercise can be seen as boring. Another mundane activity about as exciting as watching grass grow. The thought of doing any type of exercise beyond stretching to reach the remote can seem like work. However, there are many simple and effective ways to squeeze in some physical activity into your daily routine without having to lift weights in the gym or pound the treadmill for hours on end. You don’t have to be super fit to be healthy.
4. After the paragraph, use the keyboard shortcut Ctrl + Enter
5. This has inserted a page break into the document
6. Place the cursor after the Page Break and press the Backspace key to remove it
7. Save the document as "Line and Page Breaks" and close it
To learn more about Microsoft Word features, click on the image below:

September 17, 2021
Styles in Word Documents

Using Styles
Using styles allows you to apply a consistent format and style throughout a document. You can create your own styles in Word and apply it to your document by choosing a font for titles, headings and body text.
For example, when writing an essay, a style can be applied so that headings have a larger font size, subtitles have a different colour with italics, and paragraphs contain smaller text suitable for reading.
Open a document you have previously created containing headings and at least two paragraphs Highlight the main heading in your document Click on the Styles Dialog Box Launcher Click on the New Style button
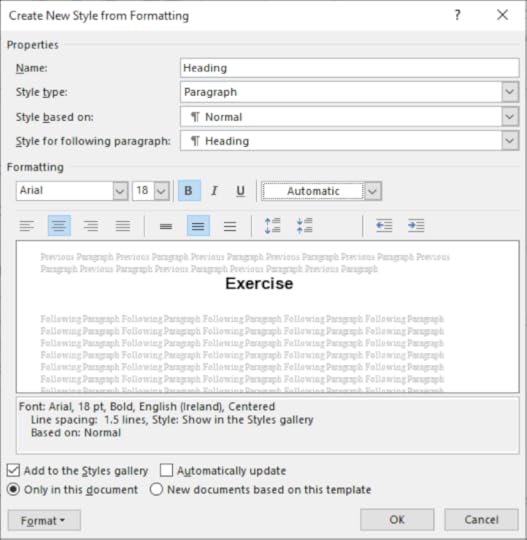
5. In the Name property type Heading
6. Format the text as Arial, 18pt, Bold and Centred
7. Click OK
8. Save the document and leave it open
Creating a Character Style
Character styles are types of fonts you apply to text in a document. This setting can be adjusted using the styles formatting dialog box.
Create a New Style Name it Character Choose Character for Style Type Change the format to Arial, Bold, 14pt Click OKMatching Styles
Matching styles allows you to highlight text and update the character font so this style of font can be applied to other parts of text in a document. This is an efficient way of applying a similar style to parts of the document containing similar content such as paragraphs.
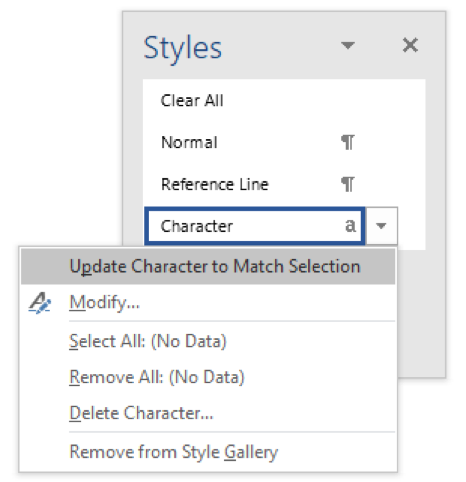 Highlight the second paragraph Click on the Styles Dialog Box Launcher Click on the arrow beside the Character Style Choose Update Character to Match Selection The character style has been applied to the second paragraph
Modifying Styles
Existing styles can be adjusted to your preferences. Changes can be made to the type of font and paragraph settings used for each of the defined styles. This feature is useful when you want to apply a consistent format to documents that are different to the original styles previously set.
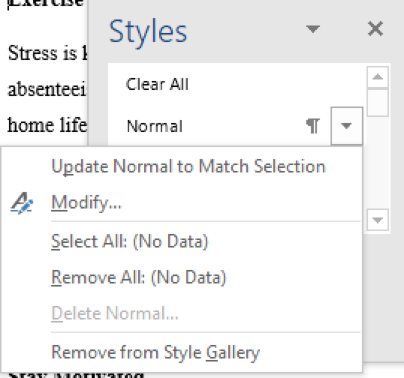 With the document still open, after the Normal style click on the drop-down arrow and choose Modify Format the Normal style to Times New Roman, 12pt, Justified Click on the Format button and choose Paragraph Choose a Special indentation of First Line Change the Line Spacing to Double Click OK Click OK again Highlight the heading and click on the Heading style to apply that style Highlight the paragraph and click on the Normal style to apply that style Save the document as “Styles” and close it
To learn more about advanced word processing, click on the image below:
September 16, 2021
Creating Forms in Microsoft Word
Creating a Form
Forms can be created in a document allowing other users to fill in their details. A range of different fields in a form can be used such as checkboxes, text fields and drop-down menus. Many elements of a form can provide other users with a means to enter personal details. This is useful as it allows the collection of data for the creator of the form. Settings can be applied to allow only the creator of the form to edit the structure of the form.
1. Open a new document
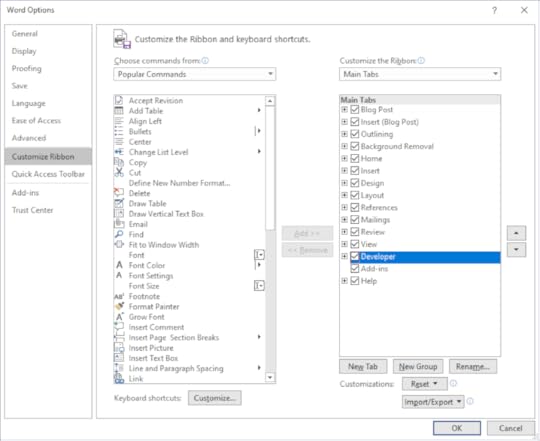
2. On the File tab select Options
3. Click Customize Ribbon
4. In the list of Main Tabs check Developer
5. Click OK
6. Create the following form:
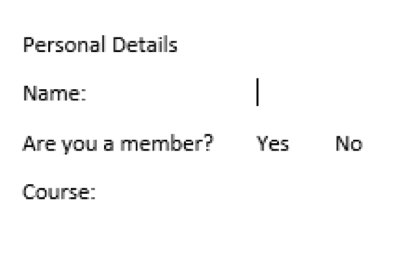
7. On the Developer tab in the Controls group click on Legacy Tools
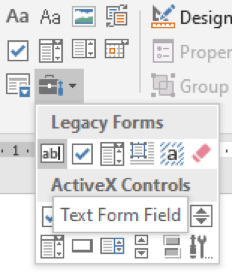
8. Choose Text Form Field for the name field
9. A text field is entered into the form
10. After the Yes and No insert a Check Box Form Field
11. After Course insert a Drop-Down Form Field
12. Right-click on the Drop-Down Form Field and choose Properties
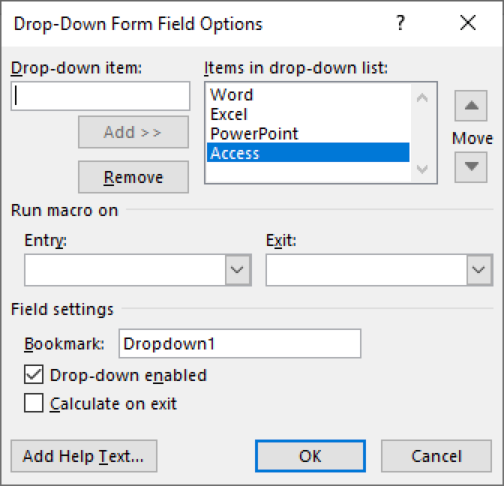
13. In the Drop-Down Item text box, type in “Word”
14. Click the Add button
15. Type in “Excel” “PowerPoint” and “Access” to include as Items in the drop-down list
16. Click OK
17. Save the document as “Form”
Protecting Forms
Forms can be protected so certain parts of the form cannot be changed e.g. the first name label. This is useful if users want other people to fill in forms without changing the form itself.
1. Open the “Form” document
2. On the Developer tab in the Protect group, click on Restrict Editing
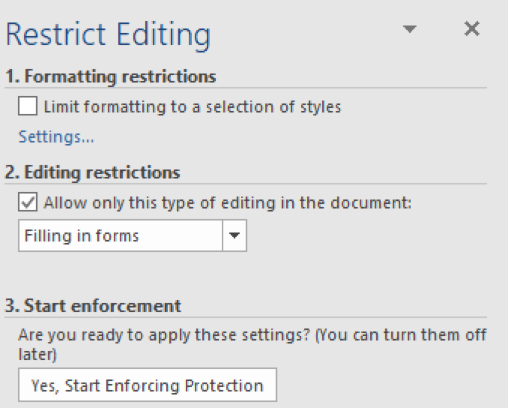
3. On the Restrict Editing pane select the Allow Only This Type of Editing in the Document checkbox
4. In the drop-down menu beneath, choose Filling in Forms
5. Click on the Yes, Start Enforcing Protection button
6. Fill in your details in the form
7. Save the document and try editing any of the text labels. Notice how you can only edit the form fields rather than the labels
To learn more Advanced Word features, click on the image below:
September 14, 2021
Mixed Referencing in Excel
Mixed Referencing
This calculation is used when you want to find out the value of a fixed cell and calculate it with a range of cells. This may be used when you have a percentage and want to calculate values in a list e.g. in a sales table. One part of the reference is fixed and the other part is not. The fill handle is then used to copy the formula along the list of cells. The formula remains at one cell and the other part continues wherever the formula is copied.
1. Create the following table:
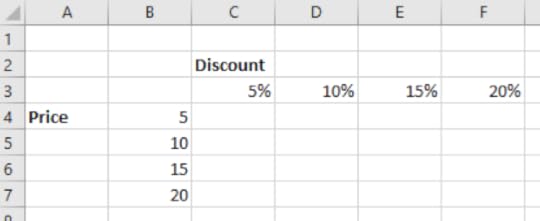
2. In this example, we want to find out the discount based on the price of an item. This will calculate the discount for the item if it is priced at €5, €10, €15 and €20. This calculation will also calculate the discount applied to each price at different percentages including 5%, 10%, 15% and 20%. For example, using mixed referencing, we can check what discount will be applied to the item if it is €15 and the discount is 10% in cell D6.
3. Include the dollar sign before the first cell reference and in the middle of the second cell reference: In cell C4 type in: =$B4*C$3
4. Use the fill handle to copy the formula horizontally then vertically
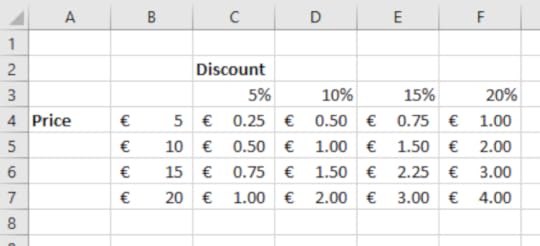
5. This has now calculated the discount based on the price of the item and the rate of discount applied. Mixed referencing can be applied to a range of different scenarios such as calculating loans based on varying percentages or savings based on variable rates of interest.
6. Save the workbook as “Mixed Referencing”
7. For more information about Relative Addressing and Absolute Addressing, click on the link below:
September 13, 2021
Mail Merge: Creating a Data Source

Creating a Data Source
When sending out letters to a large number of people, it is important to have contact details such as first name, address line 1 and telephone number. This is why creating an accurate data source is important. Ensure that fields are filled in correctly so that the letters will be addressed to the correct recipients.
1. Open a blank document
2. On the Mailings tab in the Start Mail Merge group select Step-by-Step Mail Merge Wizard
3. Move to Step 3: Select Recipients of the Step-by-Step Mail Merge Wizard
4. Select Type a New List under the Select Recipients List then click Create
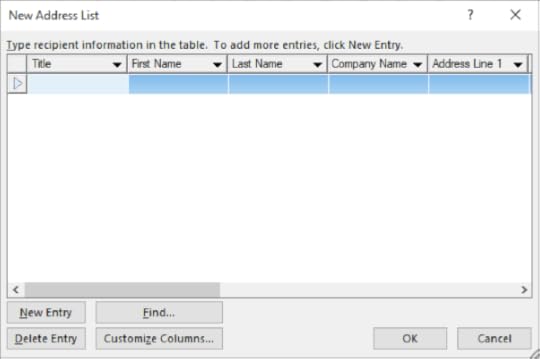
5. Click the Customize Columns button to enter in the field names that will be put into your letter: First Name, Last Name, Address Line 1, Address Line 2 and Town
6. Remove field names by selecting the Field Name and clicking on the Delete Button
7. Press the Rename button to change the name of City to Town and click OK until you are left with First Name, Last Name, Address Line 1, Address Line 2 and Town
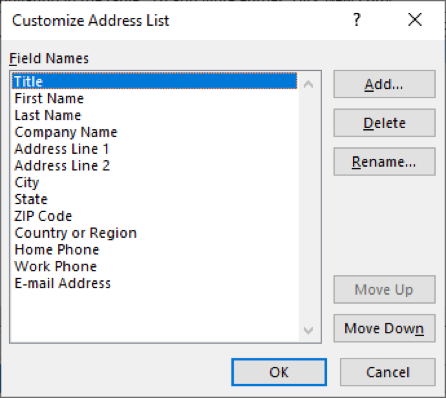
8. Click the Add button to add a new field
9. Type Title into the box and click OK
10. Use the Move Up button to place the new field at the start
11. Enter a list of contact details into your fields
12. Press the Tab key to go to the next field while you enter details
13. After each Row (Record) is complete, click on the New Entry button to start a new Record
14. Click OK when finished
15. When the Save Address List dialog box appears, save it as a Microsoft Office Address List file (*.mbd) named “Data Source”
16. Click OK
17. Save the document as “Mail Merge”
Learn more about advanced word processing here:
September 8, 2021
The Difference Between Relative & Absolute Addressing in Excel

Relative Addressing
When copying cells with formula answers Excel automatically calculates cells in different positions relative to the original formula e.g. A1+A2 copies to the right B1+B2 and C1+C2
1. Create the following worksheet:
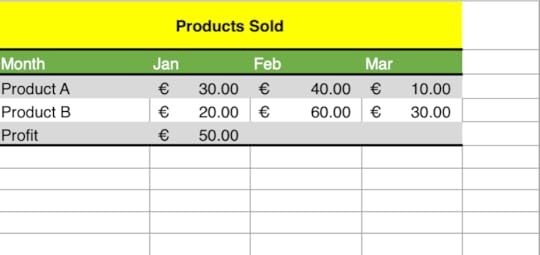
2. Notice there is a formula in cell B6
3. It is possible to copy the formula to the right so that the same calculation is performed relative to the product prices in February and March
4. Hover the mouse pointer over the bottom right-hand corner of the active B6 cell
5. Click and drag to the right until you reach cell D6
6. This will copy the formula across the table
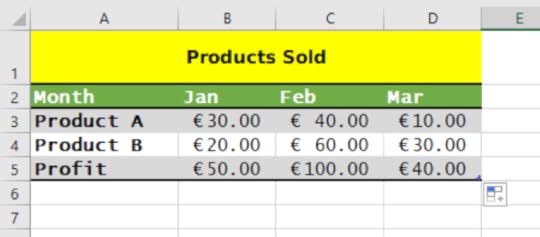
Absolute Addressing
Absolute Addressing keeps the cell reference the same when calculating formulas. It is used when you want to include a single cell in a formula and use this to calculate many cells in a range of data.
1. It is expressed using the dollar sign: $C$4
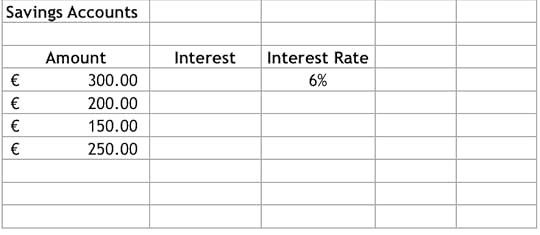
2. Create the following worksheet:
3. We want to calculate the interest on a savings account based on the amount saved
4. To do this, we need to multiply the interest rate in C4 by each of the amounts
5. Instead of typing out the formula for each amount, we can use absolute addressing
6. In cell B4 enter the following formula:
=A4*$C$4
7. Press the Enter key
8. The value should be €18
9. Hover the mouse pointer over the bottom right hand corner of the active cell
10. Click and drag down the formula to copy it to cells B4:B7
11. The resulting table should look like this:
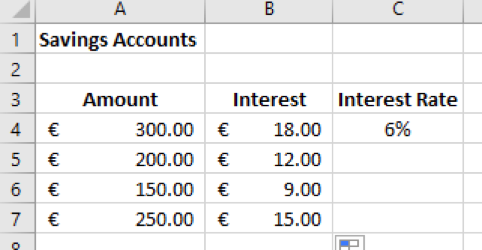
12. Save the worksheet as 'Savings Accounts'
For more ICDL Excel tips, click on the paperback cover below:

Conor Jordan's Blog


