
Emily Henderson's Blog, page 35
November 11, 2024
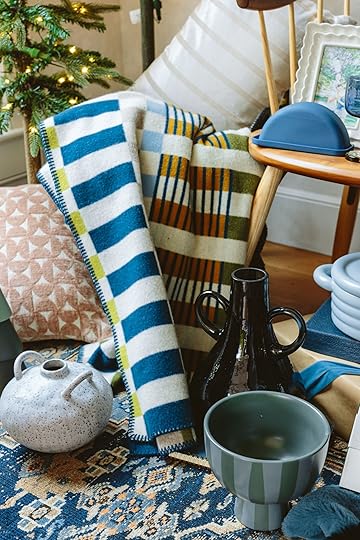
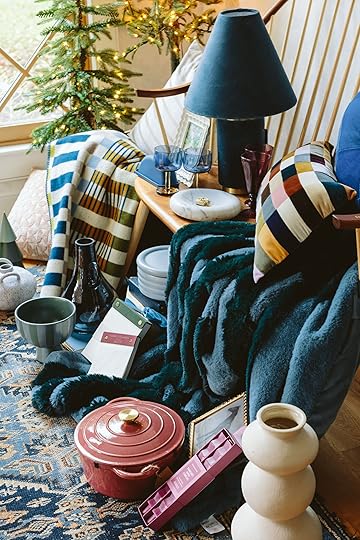
Need Christmas Decor Inspo?? Let’s Try 3 Cozy, Inviting Scandi-Inspired Styled Out Setups

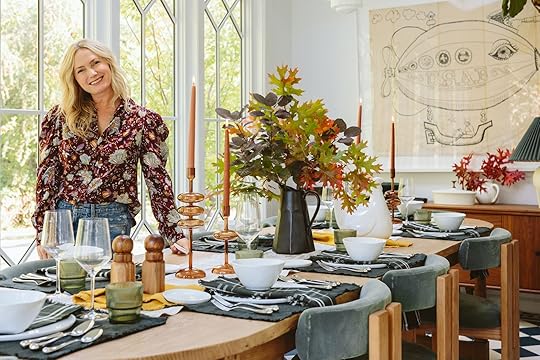
There are potentially some of you who have already started decorating for Christmas, which I’m sure is filling your home with some needed joy, but for likely the majority, we haven’t quite gotten to that point yet and may be in more of the planning stage. Either way, I think this post will be fun for anyone who loves Christmas decorations because boy are they CUTE. And in an effort to make everything easy, every single thing is from Wayfair. Somehow this one-stop-shop got even more one-stop-shop-y because baby, they’ve got good Christmas/holiday decor. For this post, I decided that I would take inspiration from the farmhouse last year and apply it into a few different setups. It was a cooler color palette than the classic red and green, but so happy, so warm, and of course, a little Scandi. Let’s get into it.
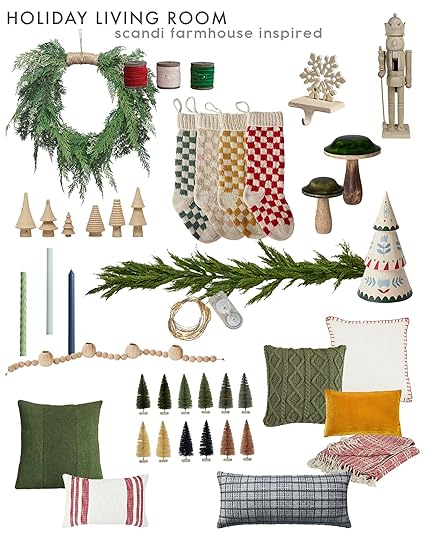
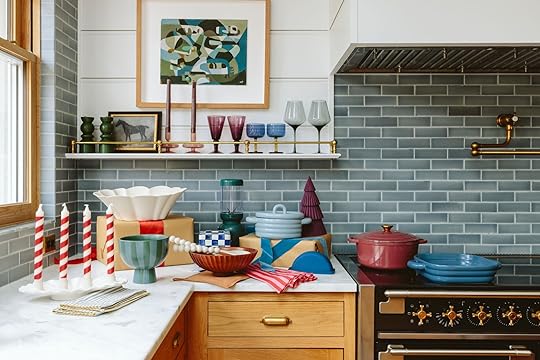
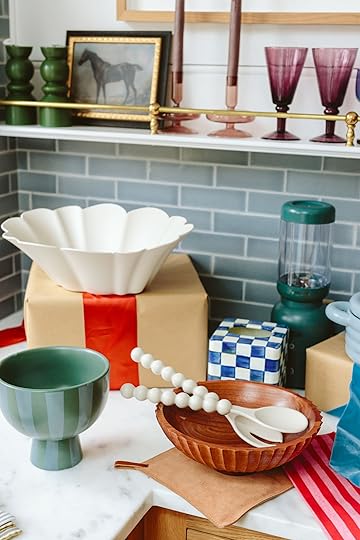
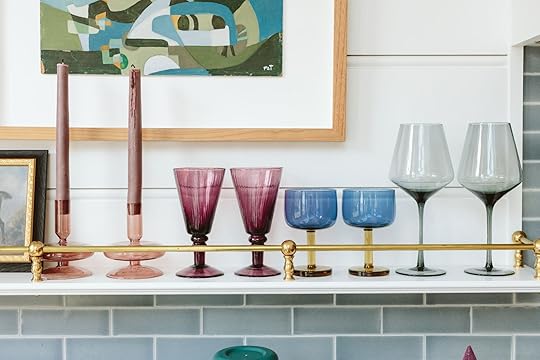
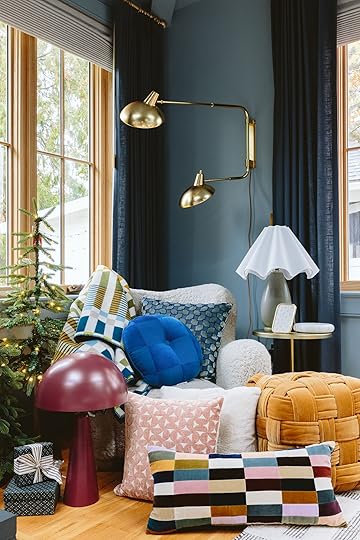
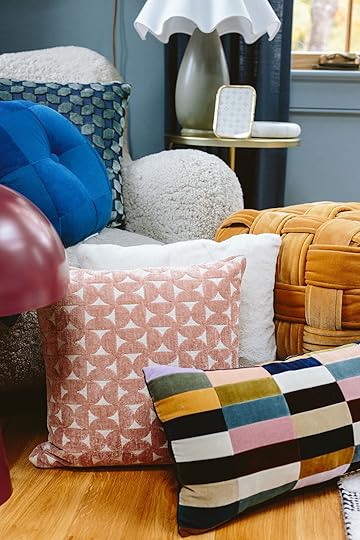
Wreath | Ribbons (set of 3) | Wooden Trees (set of 6) | Stockings | Snowflake Stocking Holder | Wood Nutcracker | Medium Mushroom | Large Mushroom | Taper Candle Set (set of 3) | Wood Garland Candle Holder | Faux Garland | Battery-Operated Fairy Lights (set of 3) | Painted Tree | Solid Green Pillow | Red and White Striped Lumbar Pillow | Bottle Brush Trees (set of 12) | Blue Plaid Lumbar Pillow | Green Knit Pillow | White and Red Stitch Pillow | Yellow Pillow | Red Plaid Blanket
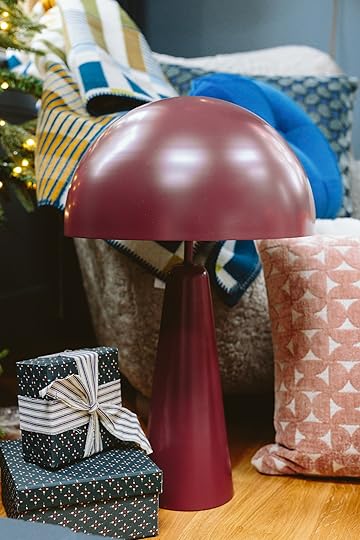
I think we should all infuse as much whimsy as possible this year for Christmas and this Scandi farmhouse-inspired living room really does the trick (she says to herself)! When I was putting this all together the first thing that I knew I had to include were the checkered knit stockings. They are $25 and sold separately if any of the colors don’t work for you. But I really do love them all together. However, I come from a family that has used the same embroidered stockings every year for as long as I can remember. Nothing could change that. So if you’re already covered in the stocking department, consider adding a cute knit check somewhere else in your Christmas decor. But if you need a stocking I vote these. From there, I played off the colors of the stockings and kept it tight! Both the wreath and garland are faux, which means they are great to use for years and years, but I think adding something to them will really make them extra special. For example, adding some pretty velvet ribbon to the top of the wreath or some battery-operated fairy lights to the garland would be perfect yet simple upgrades that would make a big impact. Then if you can’t tell I’m pretty obsessed with all kinds of tree figurines. I actually have a very similar set to the blonde wood trees I got years ago and they are some of my favorites. A fun modern twist to a classic figurine:) But I think mixing modern and classic is always the way to go which is why I picked that extremely cute (but neutral) nutcracker and snowflake stocking holder. But not only is it about mixing old and new but also textures and colors. Take that incredible painted tree and the bottle brush tree set. They bring in color and different materials which will make your decor feel more fun and layered. That’s also why I chose that super cute set of candles! All different but perfect together. Oh, and those mushrooms may be the sweetest things I’ve seen. Lastly, I made sure to pick cozy, not overly “Christmas-y” pillows within our color palette but in a bunch of different fabrics and patterns. Heck, you could probably use most of these year-round! So there you have it, a pretty wonderful Christmas Scandi-inspired living room (or any room) decor plan that will definitely make your home feel happy, pulled together, and ready for the big day:)

Pre-Lit Wreath | Red Bells (set of 3) | Faux Tree | Ceramic Planter (set of 3) | Ornaments (set of 24) | Door Mat | Wood Stump Side Table | Wooden Trees (set of 3)
Now let’s move on to a pretty simple front door set that’s still very festive and has that Scandi essence. Let’s start with the pre-lit wreath. I love how drapey it is, I LOVE that it comes with lights, and as a gal that keeps her wreath up year-round (I add ribbons for the holidays), I would happily have this one on my door too. To make it a little extra special, I would add at least one of those adorable red bells to the wreath. Now, I’m not the biggest doormat person but this simple (but cute) one would go right in my cart if my front door was outside (I live in an apartment building with lots of rugs so no need for me). Honestly, you could end it there. BUT, if you are feeling extra festive/have a larger front door area then consider a potted faux tree like this one and put it in a chic mid-century modern outdoor ceramic planter. I love how the planter has a little green in it to pull in the tree and wreath. But a Christmas tree isn’t 100% a Christmas tree unless it has some ornaments, right? These classic red and white plastic bulbs are perfect and help tie in the bells and red on the mat. Then on the other side of the door, I chose a really cute tree stump side table with some little wood tree figurines. Again, not necessary but festive and you could easily use that side table year-round.
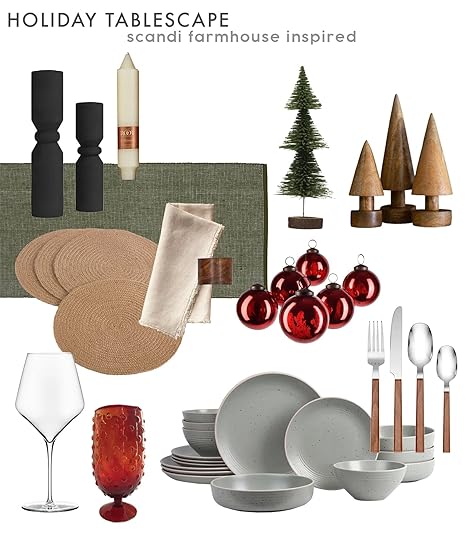
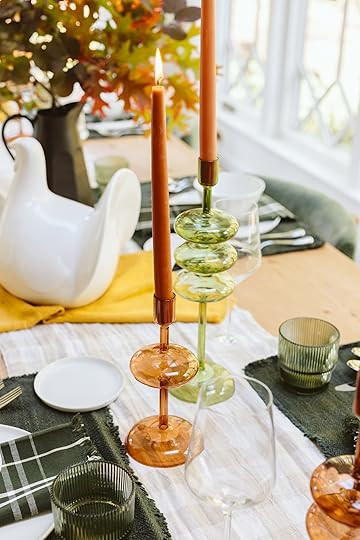
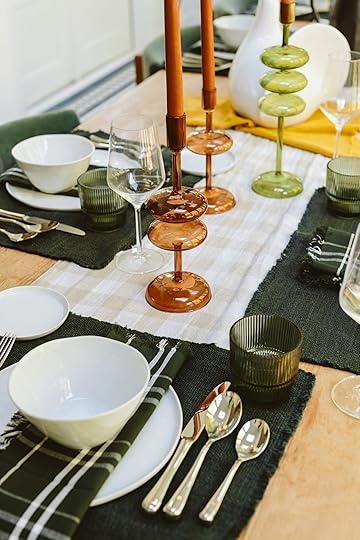
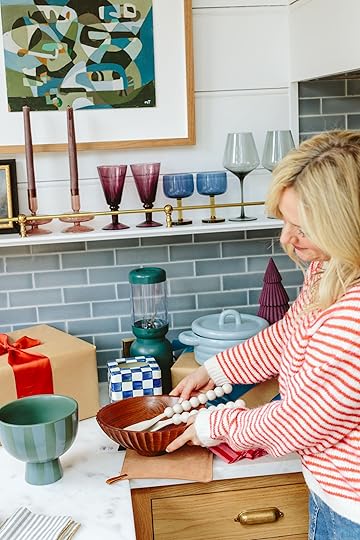
Candlestick Holder (set of 2) | Taper Candle (set of 4) | Large Bottlebrush Tree | Wood Trees (set of 3) | Table Runner | Placemat (set of 4) | Fringed Napkin (set of 4) | Wood Napkin Ring (set of 4) | Glass Ornament (set of 4) | Wine Glass (set of 4) | Red Drinking Glass (set of 4) | Stone Dinnerware (set of 16) | Flatware Set
Last but not least is a festive but casual tablescape. Aside from the trees and ornaments, this could easily be an everyday setup. I love the tone and style of that dinnerware. Organic in feeling but also refined. The same goes for the wood-handled flatware! Notice how there are wood/brown accents evenly dispersed around the table. The placemats are so universal and the round shape breaks them up from the cute green table runner. The wood trees are maybe my other favorite and I’m tempted to get them but I already have SO MANY TREES that I’m doing my best to resist. Ugh, but that green bottle brush one is kinda perfect too! Again, mixing materials and colors will make for a more interesting design. Then staying with the decor, these black candlestick holders and cute chubby candlesticks help modernize while also adding more fun shapes. Great for year-round too. But it’s not really the holidays/Christmas to me without some color so these awesome red drinking glasses. A great color, and exciting texture, and really adds an unexpected punch to the tablescape. Since this is a Christmas post, adding in some pretty ornaments for one more pop of color. Dinner is served!
Hope this was fun and maybe even helped to brighten your day. Wayfair truly has everything you need so if you want to make it easy breezy on yourself with decorating, check them out. Thank you, Wayfair for partnering with us on another fun post!
Love you, mean it.
Opening Image Credits: Photo by Kaitlin Green | From: The OFFICIAL First Farmhouse Christmas! (+ A Great Ribbon Hack And My Dream Color Palette)
The post Need Christmas Decor Inspo?? Let’s Try 3 Cozy, Inviting Scandi-Inspired Styled Out Setups appeared first on Emily Henderson.


November 10, 2024
The Link Up: Em’s New Favorite Tool That Helps With Kids’ Confidence, Gretchen’s Comfy PJs, And A Happy Announcement
It’s been a few days now that we found out who the next President of the United States is going to be and as we’ve expressed, we did not get the candidate we so deeply wanted. We’ve been experiencing a range of emotions but at the end of the day we have accepted the results and will continue to do what we can to unite and promote love and inclusivity. It bears repeating that the work doesn’t stop now but only continues. Ok, let’s talk about some links and an exciting announcement.
This week’s house tour is just happiness in design form. Colors, patterns, vintage, new, it has it all. Go check it up for a boost<3
From Emily: A new tool to help our kids build confidence that our whole family loves. Ok, this is going to sound weird but I’ve told almost everyone I know about this app since we started using it two weeks ago. It’s called Legends and it’s an interactive game/exercise that is promoting some really great confidence-building skills and making space for a lot of connection and conversation in our home. The kids look forward to doing it before bed (only 5 minutes) and so do we. We get to tell them really amazing things about them and they have to also say great things about themselves. You start by identifying the issues (negative self-talk, negative self-image, anxiety, depression – a ton more, but those are off the top of my head) and then each exercise gives a great example of someone great, who overcame some sort of adversity – even mentally (famous people like Muhammad Ali, Lizzo, and Taylor Swift). Then it walks you through identifying some of your core values, creates mantras, and you even name your inner critic. It’s all the positive skill-building that grownups tend to do (likely when we are struggling) so we think it’s pretty awesome that there is something really fun for kids to learn this early on. It’s not free (I think $6 a month, a 3-month program I THINK) but we can’t stop raving about it. It does NOT feel like homework because it’s super fun and interactive (not a video game, but just not boring). It’s not an app yet but we do it on our phone. Again, it’s called Legends and we give it a 10/10.
Ok, y’all. The EHD Portland crew is looking for some help (i.e. hiring). We need a local, full-time social media person with experience making reels and editing video – of course, a lot of other skills are GREAT, but really just an obsession with social media, real comfort and knowledge of the platform, and a love of design are the main “requirements”  We also are looking for a Portland graphic designer to re-brand and re-design our site (we have a web builder). The graphic designer does not HAVE to be local, but it’s always nice to work with people in our community. I’ll do more outreach in January, but wanted to throw it out there. If you want to apply to the social media position send through a design reel and anything else you want to like a resume to gretchen@emilyhendersondesign.com.
From Jess: I got to spend a couple of days with my dad earlier this week. It was extremely needed and we even got to vote together which felt really special despite the candidate we so desperately wanted not winning. After voting, we did a little father-daughter retail therapy at Everlane where I got a new pair of my favorite jeans (he got some great stuff too but I’ll let him tell you all about it in his upcoming gift guide:)). I’ve said it before and I’ll say it again, I am an Everlane jeans convert. The vintage mid-blue wash is my personal favorite and I feel like the sizing with these are true to size unless you want a looser fit. Hot tip: Go try on or buy a pair online to see what your size is then wait for Black Friday because last year the jeans were 50% off (an actual amazing discount) but the sales were final. Get ahead of it if you are interested. Sending all my love on this week that is really hard for so many of us.
From Gretchen: So let’s just be real. This has not been the best of weeks for many of us. Personally, I’m feeling defeated, disappointed and disconnected, searching for a way to feel a little lighter. A few of my friends bought festive pjs as a means to cope–so that’s what I’m doing. My cute pj pick? Hanna Anderson adult-sized jammies that I can only hope contain some sort of magic, enough to help me embody the spirit of Junie B. Jones during these trying times. Can’t speak to the fit yet, but banking on this new flannel nightshirt to provide me some sort of superficial comfort. If it arrives in time, I think I’ll wear it to the town hall meeting that Caitlin suggested! Also on my pj-wearing agenda is an hours long re-watch of Severance on Apple TV. Season two finally comes out in January. But if you’d rather pair your pj’s with something a little lighter, I highly recommend English Teacher on Hulu. It’s sweet, funny and progressive.
From Mallory: I popped into a coffee shop last weekend and saw a girl wearing the CUTEST workout set. I complimented her on it and her response was “It’s target!!” It truly looked like an Alo or Lululemon set so I was so surprised and then immediately went to Target and was once again thrilled about the price. The sports bra is only $20 and the leggings are $28 which is so much better than anything out on the market right now. The expensive athleisure brands are like $150 for leggings and $70 for the matching sports bra (which is WILD). All in all, this is an amazing set for less than $50 (and it comes in 3 cute colorways!)
From Arlyn: This past Wednesday, I was in deep grief and mourning over the state of this country. It took a few days, but I realized I needed to claw my way out of the dark place I was in mentally and find the light again, if only for my daughter and her future. I saw someone on the Pantsuit Nation group I’ve been a part of on Facebook since 2016 share the app Goods Unite Us, where you can see what retailers and brands support what politicians and PACs, so I can be sure that my dollar is aligning consciously with my values because sadly, our wallets seem to talk louder than almost anything else these days. I downloaded it to my phone and it’s been helpful to explore and understand what I might have been blind to previously. We have a voice, and I’ll continue to use mine in whatever way I can.
From Caitlin: Today feels like a great time to plug my favorite non-partisan organization, She Should Run! It’s a nonprofit group that helps women – from either side of the aisle – run for all types of political office, from the school board to the mayor’s office (and beyond). If nothing else, the last few years have proven that there is definitely space for you at the table – you are qualified enough, you are connected enough, you are (definitely) smart enough, and you would likely make an incredible addition to the political fabric of our country. If you’re interested in running (or if you’d just like to volunteer, like me!), please come check out this 30-minute town hall meeting next Wednesday, 11/13, at noon Eastern. You’ll learn how to get involved locally, how to channel your feelings into positive change, and how to encourage more women to get involved (my new dream? A presidential election with 2 women at the top of the ticket!). As Shania would say: let’s go girls.
See y’all tomorrow. xx
Opening Image Credits: Photo by Kailtin Green | From: A Quick And Casual “Thanksgiving To Christmas Tablescape” (With Only A Couple Swaps)
The post The Link Up: Em’s New Favorite Tool That Helps With Kids’ Confidence, Gretchen’s Comfy PJs, And A Happy Announcement appeared first on Emily Henderson.
The Link Up: Em’s New Favorite Tool That Helps With Kids’ Condifence, Gretchen’s Comfy PJs, And A Happy Announcement
It’s been a few days now that we found out who the next President of the United States is going to be and as we’ve expressed, we did not get the candidate we so deeply wanted. We’ve been experiencing a range of emotions but at the end of the day we have accepted the results and will continue to do what we can to unite and promote love and inclusivity. It bears repeating that the work doesn’t stop now but only continues. Ok, let’s talk about some links and an exciting announcement.
This week’s house tour is just happiness in design form. Colors, patterns, vintage, new, it has it all. Go check it up for a boost<3
From Emily: A new tool to help our kids build confidence that our whole family loves. Ok, this is going to sound weird but I’ve told almost everyone I know about this app since we started using it two weeks ago. It’s called Legends and it’s an interactive game/exercise that is promoting some really great confidence-building skills and making space for a lot of connection and conversation in our home. The kids look forward to doing it before bed (only 5 minutes) and so do we. We get to tell them really amazing things about them and they have to also say great things about themselves. You start by identifying the issues (negative self-talk, negative self-image, anxiety, depression – a ton more, but those are off the top of my head) and then each exercise gives a great example of someone great, who overcame some sort of adversity – even mentally (famous people like Muhammad Ali, Lizzo, and Taylor Swift). Then it walks you through identifying some of your core values, creates mantras, and you even name your inner critic. It’s all the positive skill-building that grownups tend to do (likely when we are struggling) so we think it’s pretty awesome that there is something really fun for kids to learn this early on. It’s not free (I think $6 a month, a 3-month program I THINK) but we can’t stop raving about it. It does NOT feel like homework because it’s super fun and interactive (not a video game, but just not boring). It’s not an app yet but we do it on our phone. Again, it’s called Legends and we give it a 10/10.
Ok, y’all. The EHD Portland crew is looking for some help (i.e. hiring). We need a local, full-time social media person with experience making reels and editing video – of course, a lot of other skills are GREAT, but really just an obsession with social media, real comfort and knowledge of the platform, and a love of design are the main “requirements” We also are looking for a Portland graphic designer to re-brand and re-design our site (we have a web builder). The graphic designer does not HAVE to be local, but it’s always nice to work with people in our community. I’ll do more outreach in January, but wanted to throw it out there. If you want to apply to the social media position send through a design reel and anything else you want to like a resume to gretchen@emilyhendersondesign.com.
From Jess: I got to spend a couple of days with my dad earlier this week. It was extremely needed and we even got to vote together which felt really special despite the candidate we so desperately wanted not winning. After voting, we did a little father-daughter retail therapy at Everlane where I got a new pair of my favorite jeans (he got some great stuff too but I’ll let him tell you all about it in his upcoming gift guide:)). I’ve said it before and I’ll say it again, I am an Everlane jeans convert. The vintage mid-blue wash is my personal favorite and I feel like the sizing with these are true to size unless you want a looser fit. Hot tip: Go try on or buy a pair online to see what your size is then wait for Black Friday because last year the jeans were 50% off (an actual amazing discount) but the sales were final. Get ahead of it if you are interested. Sending all my love on this week that is really hard for so many of us.
From Gretchen: So let’s just be real. This has not been the best of weeks for many of us. Personally, I’m feeling defeated, disappointed and disconnected, searching for a way to feel a little lighter. A few of my friends bought festive pjs as a means to cope–so that’s what I’m doing. My cute pj pick? Hanna Anderson adult-sized jammies that I can only hope contain some sort of magic, enough to help me embody the spirit of Junie B. Jones during these trying times. Can’t speak to the fit yet, but banking on this new flannel nightshirt to provide me some sort of superficial comfort. If it arrives in time, I think I’ll wear it to the town hall meeting that Caitlin suggested! Also on my pj-wearing agenda is an hours long re-watch of Severance on Apple TV. Season two finally comes out in January. But if you’d rather pair your pj’s with something a little lighter, I highly recommend English Teacher on Hulu. It’s sweet, funny and progressive.
From Mallory: I popped into a coffee shop last weekend and saw a girl wearing the CUTEST workout set. I complimented her on it and her response was “It’s target!!” It truly looked like an Alo or Lululemon set so I was so surprised and then immediately went to Target and was once again thrilled about the price. The sports bra is only $20 and the leggings are $28 which is so much better than anything out on the market right now. The expensive athleisure brands are like $150 for leggings and $70 for the matching sports bra (which is WILD). All in all, this is an amazing set for less than $50 (and it comes in 3 cute colorways!)
From Arlyn: This past Wednesday, I was in deep grief and mourning over the state of this country. It took a few days, but I realized I needed to claw my way out of the dark place I was in mentally and find the light again, if only for my daughter and her future. I saw someone on the Pantsuit Nation group I’ve been a part of on Facebook since 2016 share the app Goods Unite Us, where you can see what retailers and brands support what politicians and PACs, so I can be sure that my dollar is aligning consciously with my values because sadly, our wallets seem to talk louder than almost anything else these days. I downloaded it to my phone and it’s been helpful to explore and understand what I might have been blind to previously. We have a voice, and I’ll continue to use mine in whatever way I can.
From Caitlin: Today feels like a great time to plug my favorite non-partisan organization, She Should Run! It’s a nonprofit group that helps women – from either side of the aisle – run for all types of political office, from the school board to the mayor’s office (and beyond). If nothing else, the last few years have proven that there is definitely space for you at the table – you are qualified enough, you are connected enough, you are (definitely) smart enough, and you would likely make an incredible addition to the political fabric of our country. If you’re interested in running (or if you’d just like to volunteer, like me!), please come check out this 30-minute town hall meeting next Wednesday, 11/13, at noon Eastern. You’ll learn how to get involved locally, how to channel your feelings into positive change, and how to encourage more women to get involved (my new dream? A presidential election with 2 women at the top of the ticket!). As Shania would say: let’s go girls.
See y’all tomorrow. xx
Opening Image Credits: Photo by Kailtin Green | From: A Quick And Casual “Thanksgiving To Christmas Tablescape” (With Only A Couple Swaps)
The post The Link Up: Em’s New Favorite Tool That Helps With Kids’ Condifence, Gretchen’s Comfy PJs, And A Happy Announcement appeared first on Emily Henderson.
November 9, 2024
The Extremely Kid-Vetted Gift Guide – Ideas To Steal From My Own Kids:)

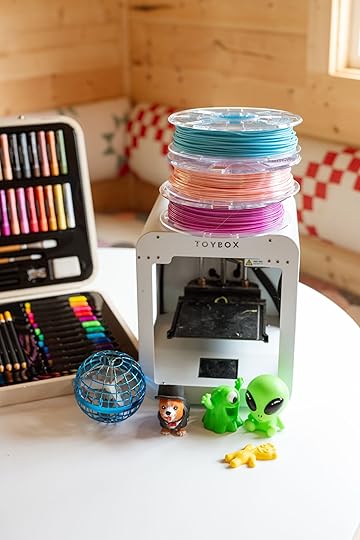
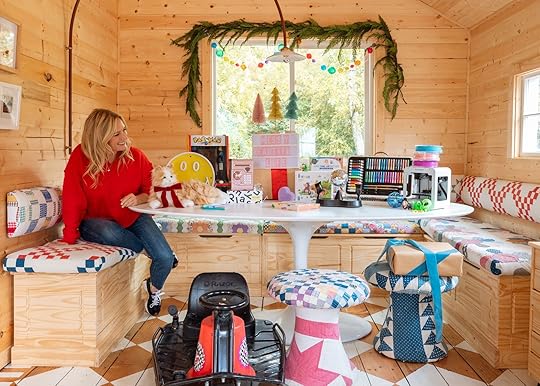
For this year’s installment of “gifts your kids will actually play with and not become land-fill items nor just look pretty and take up space on their shelves,” I had my kids, once again, tell me what their favorite gifts have been the last few years – and what they want this year. Of course last year I went rogue/desperate and paid them 25 cents per each gift rec – an odd parenting move for sure. This year I demoted them from the accidental paid kid influencer (I never paid them LOL – jokes on them!) and just kidnapped their favorite things while they were at school after a lengthy “sunday-sundae” information gathering session. Now, my kids are pretty “typical” in a lot of ways, while also being very specific (and opinionated). But they also have like 15 friends over a week and I see what their friends also gravitate towards, so I feel pretty confident about these recs. Don’t just skim this one – while I only shot what they have, I linked up a bunch of alternatives or other things they WANT this year, should you not think the specific thing is right for them. If nothing else it can spark the idea. Starting around 7 or 8 you really lean into their interests, with the normal Lego or stuffy landing less successfully. So listen to them, not me, or my kids. But these are solid ideas that mine LOVE.

I dragged everything into the art barn to shoot – kidnapping it all for the day. Yes, we have everything from their favorite lifelike Comfort Robo-Cat (??!!) to a Razor Go-Cart, art set, the only 3D printer they’ve ever loved, and a few video games that somehow seem like a healthy alternative to the more addictive kind.

Comfort Robo Cat – our kids were begging for a cat, I’m allergic and we were afraid our dogs would kill a kitten, so I found these comfort animals for senior citizens. And well, the rest is history. They got these two years ago and still love them. They purr, roll over, clean their paws and y’all, on a bad day I might pick one up and let it soothe me. They aren’t cheap, but cheaper than cleaning up the tears you’ll have when your kid won’t clean the litter box and you lose your mind having to be in charge of one more thing.
Charlie wants a vintage Game Boy (Urban Outfitters sells refurbished ones – the yellow one on the right) but those are really splurgy. We also got them those pocket Game Boys for their stockings (Tetris and Pacman). Yes, our kids are super into tech, tis the age, so trying to find non-addictive video games or YouTube-based toys is hard. Also, both our kids switched to Kindles for reading (less book clutter) and they love their iPads to make stop motion videos, music videos and use the Procreate and Canva apps. We got them for the birthdays on the last Target Circle sale so def wait til Black Friday for those, and while they are more expensive than tablets, they can do the above things on them which they love (and better for travel as they can download more shows to watch).
The ATM and the disco ball rotating light are two that have been popular in our house with both kids for years (we actually just rebought Elliot’s ATM after 4-5 years because it finally broke). Hot tip: plug in the disco ball for when they come down the stairs, it’s SO FUN (it comes with the right lights, and spins to reflect all over the walls and ceilings versus having to hang from the ceiling and rig up lights – don’t bother with those). Also, these plug-in disco ball lightbulbs are SUCH A HIT and for $12 for TWO, a great price.

Counter Pac-Man: This vintage-style arcade game was one of the big Santa gifts last year and our kids love playing it with friends. It was a fun one to leave out because it had big impact. Still a big hit, and a great video game alternative. Comes with so many different games. Looks like our exact one might be less available (or you’ll need to shop around).
Room Decor – Elliot loves her Cinema light box (we just lost the L on the way to the art barn and didn’t notice it – comes with a ton of letters) and Charlie picked out this yellow smiley face neon light for his room (they have gotten so much more affordable since 2 years ago, and soooo many more designs readily available – I love this one.) They don’t turn them on, it’s just more of a cool tween move to have these as decor.

Both kids are into art, with Elliot being far more of an enthusiast and willing to do it on her own. Last year, I got her a similar easel and art storage kit (not shown) which she LOVES, and then she recently got that art kit for her bday (which is super dialed in for being Target). The best air-dry clay they’ve ever used (and they’ve used a lot) is Hey Clay, which also comes with instructions on how to create a variety of creatures. They fly through them and takes up hours of creative time. She loves these fabric markers (with blank pouches or T-shirts), and these paint markers (from her favorite crafting influencer, WILD, but they are legit great markers). The art kit in the back she just got and LOVES – it makes her feel really grown up and like a serious artist.
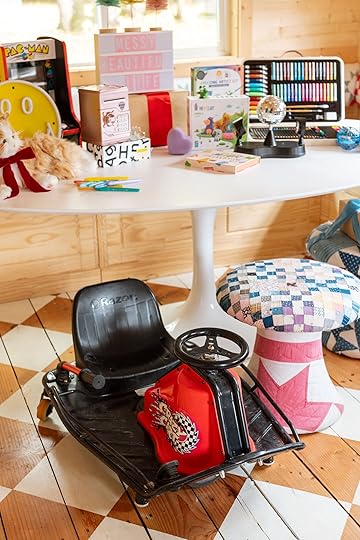
The Razor Go Cart was a HUGE hit last year (Charlie’s big present). Charlie is begging for a hoverboard this year (which Elliot broke her arm from in 2020), and he’s promised to gear up. He also wants Uggs Elliot wants an electric guitar and also wants slippers and a cozy robe. Other ideas – jewelry boxes (of all kinds) and diaries (with locks on them).

They got this 3D printer two or three years ago and it’s been a VERY huge hit. They can do it by themselves, but does require an iPad with software and wifi, etc. But once it’s set up the kids love doing it with their friends and make so many different creatures and gadgets. This toy has totally stuck (which is great because it has a lot of parts and was $$). I highly recommend it based on our kids (and their friends) frequent use and love of it but make sure someone is willing to figure out the setup and help them troubleshoot the first few gos. It’s not for everyone (it’s a bit techy for me, but every 8-12 year old seems to be obsessed with it and since it’s so expensive it’s a good “multiple kid” gift IMHO).


A couple of other fun callouts – We have bought MANY magic kits over the years – some fun, but all pretty janky. This small one from Justin Willman (the best magician/comedian out there) is really really good, clever, and SOLID. Plus, all the proceeds go to an Alzheimer’s fund (as his mom passed away from it). Both our kids love this kit and even bought it for some of their friends. That blue orb is a dumb toy that they both love a lot (you throw it up and it lights up and floats around, etc), and they can’t walk past this maze box without doing it (it’s for little kids so I can’t guarantee they’ll love it, but mine have played with it for 5+ years).
We obviously really really try to predict the big hits with varying degrees of success. We all know that what they LOVE on Christmas morning might not have any staying power, and yet we still want them to scream with joy. Squishmallows are in that category (so big and just sit there), and BTW Axolotls are the new unicorns. Brian wants to explore a BB gun, Elliot wants makeup and earrings, and oh, charms are very, very in. As are keychains, hair chalk, and Origami. We are still going to do a younger kid gift guide, too. Hopefully, this gets some ideas going if nothing else. xx
*Photos by Kaitlin Green
The post The Extremely Kid-Vetted Gift Guide – Ideas To Steal From My Own Kids:) appeared first on Emily Henderson.
November 8, 2024
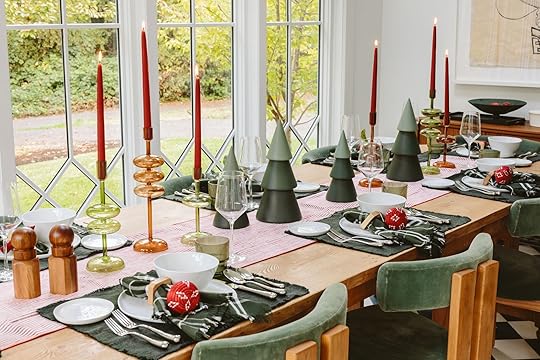
A Quick And Casual “Thanksgiving To Christmas Tablescape” (With Only A Couple Swaps)

I love tablescapes and I love styling, but I don’t love the pressure people likely feel to have different sets of everything for different occasions (perhaps exacerbated by people like me?). So for this shoot, I challenged myself to use mostly the same foundational pieces, only switching out a few elements, the more “holiday indicators” (like colors or icons). I partnered with Crate and Barrel on some social stories, but not this blog post, and decided to shoot it because I liked the challenge of making things easier while still looking festive and fun. I concepted this “Thanksgiving to Christmas” post with the pieces that I featured in the stories, but you could do this “move” with other basic pieces as well. The trick is only changing the “seasonal indicators” (especially if you are more casual like me).

Linens: Table Runner | Placemats | Plaid Napkins | Yellow Napkin
Dinnerware: Wine Glass | Ribbed Water Glass | Dinner Plate | App Plate | Bowl | Flatware
Decor: Pitcher | Ceramic Turkey | Glass Candlestick Holders | Candlesticks | Salt and Pepper Mills
As you can see, we have some fall motifs – the plaid runner, the amber candle holders (and candlesticks), one mustard napkin, some fall leaves and you know, THE HUGE CERAMIC TURKEY. But beyond that, it’s just white plates, with green napkins, glassware, and pretty silver flatware. All these things work year-round in my house (which leans green/blue modern farmhouse). Of course, you could add WAY more, but we were just shooting this quickly for a social campaign when I begged Kaitlin to throw her expert talented lens on it.

Linens: Table Runner | Placemats | Plaid Napkins | Yellow Napkin
Dinnerware: Wine Glass | Ribbed Water Glass | Dinner Plate | App Plate | Bowl | Flatware
Decor: Pitcher | Ceramic Turkey | Glass Candlestick Holders | Candlesticks | Salt and Pepper Mills
So much of entertaining comes down to vibe, and as you might suspect I lean hard into the “fun and casual” because I’m an Enneagram 7 and like to have fun (and not very into being a proper “host”). So regardless of the occasion, that is our tone. But the same principles could be applied if you lean a bit more traditional or luxurious – just with a different foundation and amped-up seasonal indicators.

Linens: Table Runner | Placemats | Plaid Napkins | Yellow Napkin
Dinnerware: Wine Glass | Ribbed Water Glass | Dinner Plate | App Plate | Bowl | Flatware
Decor: Pitcher | Ceramic Turkey | Glass Candlestick Holders | Candlesticks | Salt and Pepper Mills
I think it’s fun to think of some of these colors, patterns, and elements as “seasonal indicators”. Fall branches + mustard + a warm plaid + Turkey = Thanksgiving. Some scattered pine cones or wicker/wood elements for turkey day and you get the same “vibe”.
Linens: Table Runner | Placemats | Plaid Napkins | Yellow Napkin
Dinnerware: Wine Glass | Ribbed Water Glass | Dinner Plate | App Plate | Bowl | Flatware
Decor: Pitcher | Ceramic Turkey | Glass Candlestick Holders | Candlesticks | Salt and Pepper Mills
You want some color as to not look like a catering company, so I chose green as my foundation (appropriate for Oregon) but you could choose some other neutrals (like mauves, browns, ivories, blues) because when you have a burst of mustard and a big turkey there will be no confusion.
Ready For Christmas?
Linens: Table Runner | Placemats | Plaid Napkins
Dinnerware: Wine Glass | Ribbed Water Glass | Dinner Plate | App Plate | Bowl | Flatware
Decor: Wood Trees | Glass Candlestick Holders | Candlesticks | Salt and Pepper Mills | Napkin Rings | Ornaments
Now that I’m seeing them next to each other they don’t look THAT different, lol, but I suppose that’s because barely anything changed. And yet it does read as a casual, fun, Christmas day brunch.
Linens: Table Runner | Placemats | Plaid Napkins
Dinnerware: Wine Glass | Ribbed Water Glass | Dinner Plate | App Plate | Bowl | Flatware
Decor: Wood Trees | Glass Candlestick Holders | Candlesticks | Salt and Pepper Mills | Napkin Rings | Ornaments
Here’s what I did: I switched out the runner, added red candlesticks, a pop of red with the ornament, and those green trees. In person this felt appropriately “Christmas brunch” and you bet we put on Mariah Carey. This was our first holiday shoot (mid-October) and you know I was into it

Linens: Table Runner | Placemats | Plaid Napkins
Dinnerware: Wine Glass | Ribbed Water Glass | Dinner Plate | App Plate | Bowl | Flatware
Decor: Wood Trees | Glass Candlestick Holders | Candlesticks | Salt and Pepper Mills | Napkin Rings | Ornaments
I switched out the napkin into a ring mostly to show you a different idea, but you don’t need to do that. I think the pops of red (with the green foundation) are what indicate “HI I’M DOING CHRISTMAS NOW” to you and your guests.

Linens: Table Runner | Placemats | Plaid Napkins
Dinnerware: Wine Glass | Ribbed Water Glass | Dinner Plate | App Plate | Bowl | Flatware
Decor: Wood Trees | Glass Candlestick Holders | Candlesticks | Salt and Pepper Mills | Napkin Rings | Ornaments
I LOVE those trees (they match my dining chairs and my sofas perfectly so they are my new Christmas element this year).
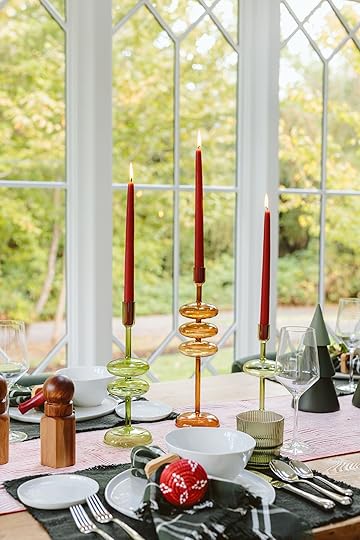

The red candlesticks even make the amber candleholders look more festive. It tricks your eye. The red and white ticking stripe runner could be great on a buffet (or in our case our island where we put out all the food for our casual 30-person ornament exchange party).
And there you have it. A fast and dirty, fun and festive Thanksgiving-to-Christmas casual tablescape. Add more if you are up for it. Just switch out your turkey for a tree and call it a (holi)day.
*Photos by Kaitlin Green
The post A Quick And Casual “Thanksgiving To Christmas Tablescape” (With Only A Couple Swaps) appeared first on Emily Henderson.
November 7, 2024
Revisiting Our Favorite Cozy Rooms To Virtually Retreat Into – Time To Hunker Down And Snuggle Up?

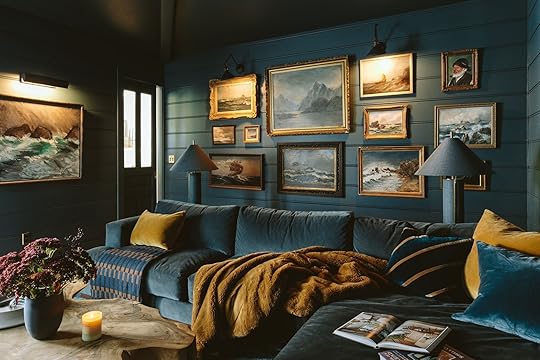
What a week. Who feels like retreating into a cozy, comforting room right now? Add in a pet/child/stuffy, some wine or tea, and some Holiday movies (or a horror movie if that’s more your jam, might feel more appropriate), and snuggle up for a few days (or years?). I really didn’t appreciate the dark cozy room til I moved to Oregon and now that I have one (or two) and have designed a few up here, I want every house to have one – for emotional retreats if nothing else. Regardless of how you are feeling this week, I think cozy rooms can help combat any general unsettling feeling or malaise, even virtually, and even if just for a moment. The room above and below is one of my best friends who lives up here, designed and revealed a couple of years ago (and yes, we are almost done with her living/dining room in her NEW house, too). It turned out soooo good and is JUST the vibes I’m needing right now.

 design by emily henderson and priscilla frost | styled by emily henderson | photos by sara ligorria-tramp | from: my best friends 1970s basement reveal
It was such an incredible basement and while they ended up selling the house and moving into a better room for their growing boys, they still miss this room a lot. The wood paneling on the walls (shout out to Ross Alan Reclaimed) and the huge sectional didn’t hurt. Goodness, I want to be back there right now.
 photo by kaitlin green | from: farmhouse family room reveal
I’m lucky enough to call this room our TV room where we’ve been marathoning Modern Family (1-2 episodes after dinner as a family is such a nice way to unwind – and it’s so tame, network TV baby!).

 photos by kaitlin green | from: farmhouse family room reveal
I have loved this room and want to change NOTHING in it.
 photo by kaitlin green | from: kaitlin’s living room reveal
Kaitlin’s basement, designed last year, has the same cozy, dark vibes, but green. Color drenched in a really warm olive green (walls are Mountain Road by Sherwin-Williams) which took forever to choose to work perfectly with that sectional, but we nailed it.
 photo by kaitlin green | from: kaitlin’s living room reveal
That sectional (Article) is SO GOOD. I have it in navy blue at the mountain house now, and it’s incredibly comfortable and perfect for many bodies snuggling together – deep, soft, all the things. Like a womb. Should we go back? To our Mom’s womb?

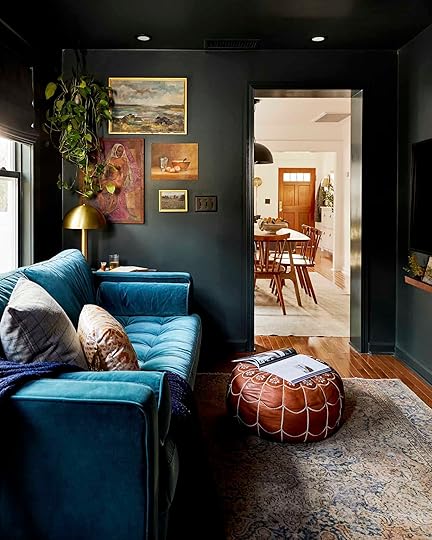 design by velinda hellen for ehd | photos by sara ligorria-tramp | from: sara’s tv room reveal
Ah, Sara Tramp’s den – now that was a small space, so well executed. That dark color on all the walls, trim, and ceiling really made it feel big and cozy at the same time.
 design by velinda hellen for ehd | photo by sara ligorria-tramp | from: sara’s tv room reveal
It makes me miss Sarah- she was my #2 during lockdown for the first year (she’s been a full-time photographer since then and is just the best). This whole week gave me such “lockdown 2020” vibes, in a really bad way. The not knowing what to post when/not sure what or how much to share. The 4 am editing and fear that I didn’t match the tone of the morning because I didn’t predict the outcome of any given night. The anxiety – oh the anxiety. Not just from the election, but from knowing that so many of us just don’t understand each other and how unsettling that can feel. I swear, I try to see everyone’s points of view – more than most people I know. I read Hillbilly Elegy, listened to Trump on Rogan, listened to Musk on Rogan, and read a lot of conservative substacks, free press, etc. I feel really, really helpless. I just don’t understand how we got here. I suppose it’s so hard to break out of our environmental bubbles, and our values are just so different (although, I really don’t think they are!!). Anyway, not talking shit, just feel so helpless in not knowing how to help us feel more united.
 photo by sara ligorria-tramp | styled by emily bowser | from: sara’s cozy primary bedroom reveal
But Sara’s room looks united, cohesive even. And just so unbelievably cozy. I want to squeeze all my former EDH crew right now! And my current team! I love these women so much and I’m so so so grateful for all of them.

 photo by sara ligorria-tramp | styled by emily bowser | from: sara’s cozy primary bedroom reveal
Emily Bowser styled it (per usual, she’s just so great) – speaking of, you are getting a fun Bowser reveal this month (for those of you looking for dope garage inspiration, she’s got you).
 photo by sara ligorria-tramp | from: emily bowser’s multipurpose room reveal
This is Emily Bowser’s guest room that she so geniusly designed – I love that window ledge all around the room that looks so integrated and functional.
 photo by sara ligorria-tramp | styled by emily bowser | from: target’s new threshold collection is hitting the “elevated prairie” trend hard and good
Lastly, the cabin we shot in Arrowhead for a Target job (and my second book) that we all loved so much. The brick floor and wood walls – such cozy vibes.
 photo by sara ligorria-tramp | styled by emily bowser | from: target’s new threshold collection is hitting the “elevated prairie” trend hard and good
Anyway, I hope these comfy-looking retreatable rooms help give you permission to snuggle up tonight and this weekend. Maybe you are celebrating and maybe you are crying. I am giving myself some time for coping in both the good and bad ways (wine and TV) and then next week the good ways (walking, souping, journaling). It’s the busiest time of the year for us and you are about to see a lot of sponsored makeovers and partnerships that we’ve been working so hard on the last few months, so yes, EHD will be returning to our normal calendar tomorrow and over the weekend. Hopefully, a little holiday inspiration will be a nice momentary break in your day and be a reminder there are a few things to look forward to – Thanksgiving, Hanukkah, Christmas, Kwanzaa, and a big break with our loved ones which you bet will include more snuggling in dark cozy rooms. xx
Opening Image Credits: Design by Emily Henderson and Priscilla Frost | Styled by Emily Henderson | Photos by Sara Ligorria-Tramp | From: My Best Friends 1970s Basement Reveal
The post Revisiting Our Favorite Cozy Rooms To Virtually Retreat Into – Time To Hunker Down And Snuggle Up? appeared first on Emily Henderson.
November 5, 2024
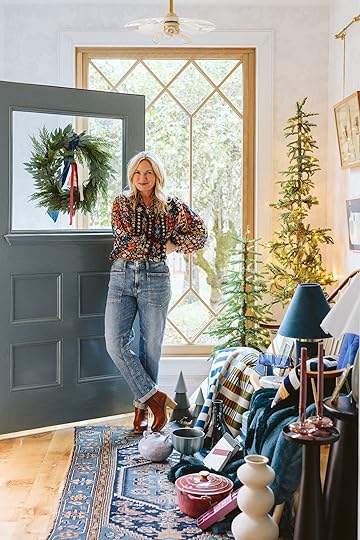
Thoughts On Today’s Election (I’m Both Scared And Hopeful…?)


I woke up filled with hope…and nerves…and excitement…and feeling just really scared…therefore Bert, our pet alpaca seemed like the appropriate mascot for Nov 4, 2024. You see, our sweet, sweet Bert is surprised and scared by his own reflection, multiple times a day. “Intruder!! Alien! New Ugly Lover to mount!!” Whatever he is thinking, he’s both scared and excited, and I really get that today. I wrote a 5-page rambling essay over the weekend with my thoughts and feelings about how and why I haven’t really expressed said thoughts and feelings about the election here. And then I saved it to my journal drafts and started this post. It wasn’t a specific strategy, it just never felt like I was the right one to add to the conversation, which might be wrong but that’s what it was – and it says a lot about this election. It felt to me like once the Democrats had a viable candidate most people made their choice (secretly or vocally), with very few actual “undecideds” to sway. For those voting for Trump the spell seems unbreakable, and no design blogger or “influencer” was going to move the needle. Y’all, we’ve known this guy for 8 years now. He is the house guest that will not leave. We can all quote his nasty insults because they are so frequent and sadly “normal”. This time? … election #3 with this orange fellow? I think people are either 1. reluctantly voting for him, prioritizing other conservative values, 2. are willing to ignore his antics and threats to democracy because his policies benefit them (or make them feel more comfortable), or 3. for many, they have learned to enjoy his brand of personality and governance, finding it all refreshing and rebellious. “Sticking it to the man!” Even if he is the actual man. Regardless it’s all out of fear, right? People are scared of change, scared of moving forward, scared of staying the same, or (for many of us) really scared of going back. Imagine a country where every single person right now is scared. It’s like Saw and Squid Games had a baby, and we all have to take care of it.
I wrote about these same political fears four years ago here and honestly, on the bad days, where I’m angry at those who don’t see things the same way, it has helped me reframe it all and understand the other side. Here’s how I break it down: Republicans are scared that a Democrat will be too progressive and shove “wokism” down our children’s throats, that they’ll dismantle what they consider normal family values, defund the police, take away guns, open the borders, and jack up our taxes to pay for the things that people should really be doing for themselves. I get those fears – I don’t have the same ones, but I’m sure there are some Dems who are more extreme and the conservative news loves to highlight them. Democrats, on the other hand, are afraid that a Republican will dismantle important social and climate programs, restrict our personal freedoms and rights (especially minorities, LBGTQ, and women’s), and privatize everything – inflaming capitalism’s negative effects and making the oppressed even more oppressed. All of these fears, on both sides, come from our personal experiences, values, religions, communities, and peer groups – we don’t just decide to be scared. But we sure do react badly when we are. So we choose a side that aligns more with our values and for a lot of people, it’s being a Republican. But y’all…Trump is not a normal Republican. He is extreme, to put it lightly. We have known this about him for years, he’s been very clear about his goals and yet here we are.
Me? I’m scared of some of the above in a normal election, but this year so much more – I have “Trump 2024” specific fears. I’m scared of the freedom he’ll give the tech world – unregulated AI and social media are real threats to our kids’ mental and physical health and Musk is buying recklessness. I’m scared of the power of the conservative Supreme Court – reversing the social progress we have made towards equal rights on every front (including basic women’s reproductive rights, not to mention racial and LGBTQIA+). It could be really, really bad. Again, he is not a normal Republican. I think many of us would do anything for Mitt Romney to be the candidate. Not Trump. Never Trump.
And yet, I’m also really scared of how we are talking to each other and ironically I’m scared of posting about this all on the internet. I have years of evidence that people are behaving badly right now and that regardless of what anyone says, the attacks will come. I call it the “toddler-dom of the internet’ – a nation full of anonymous kids in a full temper tantrum and there seems to be no parent in charge. The rage that would never exist IRL really thrives on the web – because social media is young and we haven’t yet learned how to properly behave. Our internet frontal lobe is still developing. To be clear, the internet on a good day feels scary, tbh, but during an election cycle with the algorithm pumping out the worst of the worst ugly lies and extreme stories from both sides? It’s a mental minefield.
If you haven’t voted because you weren’t motivated yet, please DO for the love of god. I hear Harris is the better choice:) And if you are on the fence, or feel weird about voting against the party that you’ve identified with for a long time – I get that, but he’s not your guy. Not this time. Again, he’s not a normal Republican.
So all I can say at this point is the cringy phrase of “thoughts and prayers”. Crossing all these sausage fingers and rubbing our pigs and alpacas for good luck. This season of “America, the TV show” will surely be gripping. And I hope for the sake of every. single. American. that our breakout star will be our first female president. Plus, if Trump loses, he and I can go back to having our one special thing in common: our mutual love of a bad self-tan after too much self-indulging. We both do that so well.
*Photo by Kaitlin Green
The post Thoughts On Today’s Election (I’m Both Scared And Hopeful…?) appeared first on Emily Henderson.
November 4, 2024
The New Ways To “Pattern Drench” Your Home

Tomorrow, and likely the rest of the week, will have me in a high-stress state. The last few months of this election have given me some hope (she says tentatively) and yet the looming reality that we could be taken so far backward is staring us dead in the eyes. I’d be lying if I didn’t say I am terrified. I’m sure some of you are ready to be DONE with hearing about this topic, others might disagree with me, but not acknowledging the extremely high stakes we are faced with at this moment in history feels wrong to me. PLEASE VOTE.
But yes, we are a design site and design is what I am here to talk about. Given the current chaos of our cultural temperature, pattern drenching and the newer ways people are implementing it felt apropos…but the good kind of chaos. Happy chaos? Sure:) Let’s start with the traditional way we think about “pattern drenching”…
The Classic WayView this post on InstagramA post shared by The Design Files (@thedesignfiles)
View this post on InstagramA post shared by Heidi Caillier (@heidicaillierdesign)
The term feels pretty self-explanatory but to clarify, classic pattern drenching is taking a room and nearly covering everything in the same or multiple different patterns. Wallpaper is key as shown in the two examples above but then expanding additional patterns to the drapes, rugs, upholstery, textiles, you name it is what is important.
What I also think these two examples so beautifully show is how tone and colors impact the “intensity”. In the room on the left, you have this happy, bright room that could be considered a little on the visually loud side, while the room on the left has a much more tonal and neutral color palette which makes is feel a little quieter (dispute having more patterns).
View this post on InstagramA post shared by Architectural Digest India (@archdigestindia)
This whole home is an INCREDIBLE example of this technique all while having so much of the homeowner’s beautiful culture through so many of the patterns. A total feast for the eyes.
View this post on InstagramA post shared by Architectural Digest (@archdigest)
View this post on InstagramA post shared by Chairish (@chairishco)
Here are two other extremely fun examples! For the room on the left, the wallpaper, bedspreads, and window seat work so perfectly together, but then, if you look at the top of the ceiling where the skylight is there’s a completely unexpected tile moment. You almost think it wouldn’t work but it does and I love it so much. Then the room on the right, I adore how they mixed those printed patterns with handpainted accents. I am such a sucker for a cool handpainted pattern.
Now, let’s move on to the ways pattern drenching has become more popular recently and spoiler alert, most are about choosing your moments…
Not Every WallView this post on InstagramA post shared by Glassette (@glassette)
So yes, pattern drenching may be an overwhelming concept to a lot of us, so there are some ways to still have a pattern-rich room without feeling like it’s too much for your own style.
Take this bedroom above, while there’s only one wall with wallpaper, I consider the wood slat wall to also add a pattern. It’s just more neutral and quiet. Then look at the amazing bedding that has a total of 6 MORE patterns. Basically, think outside the box when thinking of what is considered “a pattern”.
View this post on InstagramA post shared by 1stDibs (@1stdibs)
Another option is to go HAM on multiple intricate patterns in your space but then give your eye a little break with a plain accent wall like they did in this bathroom.
View this post on InstagramA post shared by Heidi Caillier (@heidicaillierdesign)
Or you could give all of your walls a simple pattern with a single material (like this wood paneling) and then choose different pattern scales for the main decor pieces in your room as Heidi did with the bedding, rug, and drapes. So cool, so exciting, but in no way too overstimulating.
Tile PlayView this post on InstagramA post shared by MERIT (@merit_la)
View this post on InstagramA post shared by Architectural Digest Germany (@ad_germany)
Tile is a more permanent material so most of us tend to not take huge risks in this area but if you are up for it, it can make ALL the difference. In the living room on the left, it’s all the same tile and color but the pattern is pretty impactful and makes the room so exciting mixed with those squiggle balusters and cool rug. Then in the kitchen on the right, it is a similar type of tile as the living room but they chose two colors and implemented two patterns! But since the tile doesn’t go all the way to the ceiling it’s just visually stimulating enough without taking over the whole room.
Add A MuralView this post on InstagramA post shared by Cabana Magazine (@cabanamagazine)
View this post on InstagramA post shared by McCory Interiors (@kristenmccory)
If you love the idea of pattern drenching but prefer not to have a bunch of medium to small-scale patterns repeating everywhere, then maybe I show you the mural/pattern mix. Murals are such a beautiful design element that’s inherently large-scale. So when mixed with small-scale patterns through decor pieces it creates such a dynamic visual moment. I think both of the examples above prove that:)
Seating OnlyView this post on InstagramA post shared by Architectural Digest (@archdigest)
For my pattern-drenching purists, you might not be happy that this option is being suggested in this post but hear me out. When you have either a big piece of furniture (like a sectional) or multiple upholstered seating options in one room, covering them all in one or multiple patterns can be super visually impactful. Look at this bold yellow floral sectional with those brightly colored striped pillows and plaid blanket. That’s A LOT of pattern in one room (and it’s awesome).
View this post on InstagramA post shared by Heidi Caillier (@heidicaillierdesign)
Or in this room. There are two different fabric patterns as well as some patterned pillows and a blanket. Sure, this room isn’t “drenched” but you don’t leave that room not thinking about all that pattern. Arlyn wrote a great post about patterned sofas if you’re in the market.
Bedding OnlyView this post on InstagramA post shared by Nickey Kehoe (@nickeykehoe)
Then lastly for those who maybe don’t want to or can’t heavily invest in patterned wallpaper, drapes, new upholstered furniture, etc., playing with your bedding is a really fun and nonpermanent way to pack in a pattern punch.
This photo is from Nickey Kehoe so this bedding is likely not super affordable but there are so many great brands that have incredible options. Just remember to pick a color palette (and stick to it) and mix up the pattern scales like they did in this photo.
That’s it from it today. Hope the happy visuals were a nice break. Ok, now VOTE VOTE VOTE!
Opening Image Credits: Design by Gretchen Raguse | Styled by Gretchen Raguse and Emily Henderson | Photo by Kaitlin Green | From: Gretchen’s First MOTO Reveal: A Tiny Bedroom Comes Alive With The Perfect Pieces From Article (And Fabric On The Walls??)
The post The New Ways To “Pattern Drench” Your Home appeared first on Emily Henderson.
November 3, 2024
The Link Up: Em’s Beauty Restock At The Sephora Sale, Caitlin’s INCREDIBBLE (Yet Affordable) Formal Wedding Guest Dress, And The $10 Purchase That Fixed A Daily Annoyance

While we hope it was a great week, we also desperately hope that everyone has really taken the time to consider what this election means for our future. We hope that you will vote against discrimination, vote against restricting freedoms, and instead vote for restoring the hope that we can all move forward united, fighting for our personal freedoms, our opportunities, and our planet. We can’t just keep our fingers crossed that it will all be ok when we have the opportunity and right to vote our voice. With that said, let’s take a small break with this week’s links.
This week’s house tour is a modern 70s dream home but through the visionary brain of YSG Studio. The color palette is warm and desert-like but with a million textures, patterns, and perfect pops of color, this home is SO exciting to look at. You just have to see for yourself. Go check it out here!
From Emily: Given that the Sephora Savings Event started on Friday, we thought we’d give you a peek inside our shopping carts (well, those of us who needed to make some purchases). So I’ll start! But don’t forget the promo code SAVINGS when you check out. I had to replace my Merit concealer this week (I wear the color Dune if you must know but they have like so many different shades). It covers so well and stays put (why are concealers the hardest????). I also rebought the Charlotte Tilbury highlighter and Liquid Glass Smoothing Blow Out Hair Cream (hair protectant – Dry Bar has the most compelling names), and the daily exfoliant cleanser by Kate Sommerville (and replaced my empty ExfoliKate mask).
From Arlyn: I’ve always loved the Amika dry shampoo, but at $30 a bottle, it just got too spendy for me. I bought this ~$15 one on a whim at Target recently and I think I’m over Amika. It’s really good, guys! I have very dark brown hair, and this one, made of rice starch, disappears with just a few shakes. It has taken a three-day-old grease fest and turned it into something quite passable, and for that, I am eternally grateful to it! I can also use it a few times in a day/days, and not get that caked-on chalky feel others I’ve tried in the past gave me. It’s a win for me!
From Caitlin: As you read this, I’ll be flying back to LA after a whirlwind weekend at my college roommate’s wedding on the East Coast! The dress code was black tie optional – a tricky one to manage on a budget! – but I hit Nordstrom last week and found an INCREDIBLE little black dress that felt a bit more formal than my go-to floral number (but not too formal that I won’t be able to wear it again). Entering the fitting room, my expectations were REALLY low ($118, strapless, form-fitting – it wasn’t screaming “This is the one for you”) but guys, it was MAGICAL. I don’t know if it’s the super-dark black hue or the cut or the material, but there was nary a lump or bump in sight. It looked polished, even though I was bloated beyond belief (pro tip: consider going to the movies AFTER you try on clothes). I got an XL, which is my normal size (usually a 12-14ish), and am so pleased with the fit. ANYWAY – if you’re also the type to re-wear the same dress to every formal event you’re invited to, this is a REALLY good one!
From Mallory: I popped into Sephora earlier this week to snag some more of my all-time favorite deodorant I never shut up about (2 of my best friends bought it too and are obsessed), and I decided to snatch up a few makeup items as well! First off, I’m not the kinda girl that wears a full face of makeup every day and also has a 12-step skincare routine…instead, I use about products total (sunscreen, concealer, mascara, eyebrow stuff, lip stuff) and call it a day. So those 5 products better be GOOD is what I’m sayin. I scooped up my new go-to concealer which I found out about because it has RAVE reviews on TikTok and I get it now. It’s light on your skin and glides on smooth/blends well, but it still has a nice amount of coverage. I love that it’s not cakey and thick like some other concealers. Then my friend Olivia was wearing the most GORGEOUS lipstick/gloss and I asked her where it was from every time she put it on. SO I finally snagged it. It’s the Hourglass Volumizing Glossy Lip Balm (she uses the color Haze but she has dark hair so I snagged it in Slip for a more everyday color on my fairer complexion). Then last but not least I got my trusty mascara. This mascara I’ve also been talking about for YEARS on here because it’s the #1 thing people ask me about when they meet me. It not only volumizes but it lengthens too so your lashes really the most outta it!!
From Gretchen: Some of my favorite buys are often the ones that make your life even 1% better. This week, I have the silliest product that does just that! In my kitchen, I have three small appliances out on my countertop. Are they an eyesore? Yes. Is it ideal? No. But if I can’t see something out, I often don’t remember it exists. So my air fryer, ice maker, and coffee machine stay put. The real annoyance for me has come in the form of scooting these bad boys back and forth to use. They all come with rubber feet that aren’t conducive to moving freely, and that’s a problem when I need to load the back of the machine with water, etc. Thankfully, there is a solution for everything these days. And for just $10 I can add little slider feet to all three of my beastly appliances. It totally solved my problem–now they move so easily, and the only frustration I have left is looking at them.
Also From Gretchen: I recently re-purchased two of my all-time faves from Sephora and I’m kicking myself I didn’t wait for their big sale. Since high school, I’ve been using (and loving) the Laura Mercier Translucent Loose Setting Powder. Don’t worry, it’s not the same container for all those years…though it does last a WHILE. It’s just so good. It takes care of any oily spots I have and still feels so light on my skin. A win, win. Then, I went ahead and re-upped my tried and true foundation, the IT Cosmetics CC+ Cream. This one is a favorite of mine because the shade Fair Light matches me so well. But also because it’s full coverage, that again, doesn’t feel too heavy on the skin. When I slap this on it really just feels like another layer of lotion, in the best way. Honestly, I’ll probably buy another backup of each this weekend because they’re just that good and it’d be nice to have a spare on the shelf!
From Jess: I finally got my everyday Apple Watch wrist strap and have already been complimented twice by two different friends (always the best:)). It’s a classic gold chain link but comes in 4 other metal colors. I have a silver Apple Watch but I like the silver/gold mix. If you want the same color on both, but your watch isn’t the color you want for a strap, they also have covers to solve that problem. Anyway, it’s a pretty affordable, great-looking strap option if you’ve been hunting for one!
Also From Jess: I too took advantage of the Sephora Savings Event and did a little restock/grabbed a few new things I can’t wait to try. First up are the restocks. I love my undereye concealer from Haus Labs. It’s medium coverage, totally buildable, hydrating, and depuffing so ya, I love it. Then my all-time tried and true retinol from Shani Darden. I love it and will likely use it forever. Then speaking of Shani, I decided to try the mini size of her Triple Acid Signature Peel. No downtime and hopefully my face will be bright and full of hope:). I also got convinced to get one of these Dr. Jart sheet masks that are supposed to be sooo good for dry skin. I’ll report back. My lips are also chronically dry and since the internet won’t shut up about these OLEHENRIKSEN Pout Preserve Hydrating Peptide Lip Treatment balms I got one in the color Strawberry Sorbet. Hope they actually help! Lastly, I got an eyeshadow pencil from NUDESTIX in the color Rustique because I too want to look like a cool French girl. Au revoir!
Thanks for stopping by, enjoy the rest of your Sunday and please vote. It matters more than ever.
Opening Image Credits: Photo by Kailtin Green | From: Dreams Coming True!! The Barn Floral Mural Reveal Is Finished And You NEED To See It
The post The Link Up: Em’s Beauty Restock At The Sephora Sale, Caitlin’s INCREDIBBLE (Yet Affordable) Formal Wedding Guest Dress, And The $10 Purchase That Fixed A Daily Annoyance appeared first on Emily Henderson.
November 2, 2024
Gift Guide #1: My Favorite Strangely Affordable (Or Very Worth It) Home Items That Can Make A Big Statement – All Hand Picked By ME

Welcome to my 2024 home gift guide – where I did things very differently this year. After years of combing websites to find the good stuff and then making graphics to show you, I decided to treat myself to days and days of IRL shopping at my favorite retailers (small business and makers gift guide is still in the works, FYI) and collected a ton of really good stuff – ranging from $3 to $200 (most under $100). At first, it was going to be just really affordable cool stuff that looked expensive but I decided to include 3-4 splurgier items – but honestly, most of it is actually so affordable. And as you can see there is certainly a color palette that I’m into So without further ado – let’s do some epic show and tell.
This shopping took hours, but I had so much fun by myself. I threw on a Podcast and combed all three malls in Portland – and thank goodness we have three upcoming makeovers so most of these pieces already have a home (or I’m keeping them because they are that good). And the thing about national retailers that is kinda great these days is that their inventory does turn over seasonally, meaning that pieces won’t be “everywhere” – keeping them still looking and feeling unique, even though it might be from Target, World Market, West Elm, Crate and Barrel, CB2, etc.
Textiles: Velvet Jacquard Blush Pillow | Neutral Striped Pillow | Plaid Blanket | Striped Faux Fur Blanket | Multi-Colored Striped Pillow | Blue Round Pillow
Vessels: Marble Tray | Ceramic Speckle Glaze Vase | Blue Glass Vase | Footed Striped Bowl | Tall Ceramic Vase
Cookware and Glassware: Glass Blue Coupes | Glass Purple Goblet | Butter Dish | Modern Ribbed Baking Dish | Dutch Oven
Other Decor: Green Wood Trees | Velvet Lamp | Scalloped Frame | Dark Green Unruled Notepad | Ruled Notepad (black version) | | Horse Painting | Diamond Taper Candles | Wavy Shade Lamp | Gold Frame | Drink Table
To see me play with all of these cute finds, here’s a little video! (just wait for the ad to play:))
Textiles: Velvet Jacquard Blush Pillow | Neutral Striped Pillow | Plaid Blanket | Striped Faux Fur Blanket | Multi-Colored Striped Pillow | Blue Round Pillow
Vessels: Marble Tray | Ceramic Speckle Glaze Vase | Blue Glass Vase | Footed Striped Bowl | Tall Ceramic Vase
Cookware and Glassware: Glass Blue Coupes | Glass Purple Goblet | Butter Dish | Modern Ribbed Baking Dish | Dutch Oven
Other Decor: Velvet Lamp | Scalloped Frame | Dark Green Unruled Notepad | Ruled Notepad (black version) | Horse Painting | Diamond Taper Candles
All of these are STAND OUT pieces in my mind – some simpler (like a really good-looking but affordable notepad) and some pretty epic (like the velvet lamp that is under $100). The most perfect color for a Dutch oven for $40 (which Emily M. bought from me because it’s so pretty) and that excellent bright blue round pillow from Schoolhouse (and Clare V. collection).

Textiles: Neutral Striped Pillow | Plaid Blanket | Striped Faux Fur Blanket
Vessels: Marble Tray
Cookware and Glassware: Glass Blue Coupes | Glass Purple Goblet | Butter Dish | Modern Ribbed Baking Dish
Other Decor: Velvet Lamp | Scalloped Frame
We have used that Target marble catchall in like 4 shoots recently, as a testament to how good it is (think nuts on coffee table, jewelry in bathroom, keys in entry, etc). And don’t get me started on the bright blue butter dish (which is one of the few things not from a national retailer but I wanted to give it some love – I love Pigeon Toe Ceramics).

Vessels: Chrome Catchall | Black Vase | Red Marble Tray | Tall Ceramic Vase | Marble Box | Ceramic Speckle Glaze Vase | Blue Glass Vase | White Footed Tray | Blue Leather Trays
Other Decor: Velvet Lamp | Spiral Blue Striped Notebook | Spiral Blue Notebook | Scalloped Frame | Dark Green Unruled Notepad | Ruled Notepad (black version) | Glass Candle Holder | Gift Box Set | Glass Ornament
The two vases from Target (the white curvy lady and the blue glass vases) and both really good for flowers/branches (small mouth, wider base) and are such pretty objects on their own. But the black one is so affordable, too, and looks really pretty as an object – with or without flowers.
Vessels: Black Vase | Red Marble Tray | Tall Ceramic Vase | Marble Box | Ceramic Speckle Glaze Vase | Blue Glass Vase
Other Decor: Spiral Blue Striped Notebook | Spiral Blue Notebook | Scalloped Frame | Glass Candle Holder | Gift Box Set | Glass Ornament
I’m very into that burgundy tray (you’ll see it on a coffee table styled out, soon) and that scalloped marble box (bathroom, nightstand, coffee table – it’s so pretty and I love how scallops catch the light). Same with the frame – I’ve started collecting really good, not basic/boring frames and this one I think is really special.
Vessels: Red Marble Tray | Tall Ceramic Vase | Marble Box | Ceramic Speckle Glaze Vase | Blue Glass Vase
Other Decor: Spiral Blue Striped Notebook | Spiral Blue Notebook | Scalloped Frame | Gift Box Set | Glass Ornament
That ceramic vessel is pretty great for those who want a more muted organic palette – but the handles make it look so handmade and special.


Vessels: Chrome Catchall | Black Vase | Red Marble Tray | Blue Glass Vase | White Footed Tray | Blue Leather Trays
Other Decor: Velvet Lamp | Spiral Blue Striped Notebook | Spiral Blue Notebook | Dark Green Unruled Notepad | Ruled Notepad (black version) | Glass Candle Holder | Gift Box Set | Glass Ornament
Honorable mentions to the two pretty notepads and the blue faux leather trays (that I’ve used in two projects now – so affordable and utilitarian, but such a great color).
On Wall Shelf: Green Pillar Candles | Horse Painting | Glass Taper Holder | Glass Blue Coupes | Glass Purple Goblet | Wine Glasses
On Counter: Red and White Striped Candles | Scalloped Candelabra | Gray Striped Napkins | Scalloped Serving Bowl | Footed Striped Bowl | Blue Checkered Tissue-Box Cover | Green Blender | Wooden Bowl | Serving Utensils | Leather Pot Holder | Modern Ribbed Baking Dish | Purple Tree (old Target) | Butter Dish | Red Striped Napkins
On Stovetop: Dutch Oven | Modern Ribbed Casserole Dish
In here I found some pretty awesome stuff for the kitchen that I couldn’t believe how cute and affordable it was – the light blue covered baking dish? SO CUTE (great for sides but also comes bigger in white). The footed blue/green vessel (under $20) and the scallop candle holder (could be year-round on the dining table with nonholiday candles) – both are styling staples. As you can see all of these pieces have something really special about them – either the shape, the texture (the scallop, the round ribbing), or the perfect color.
On Wall Shelf: Glass Taper Holder | Glass Blue Coupes | Glass Purple Goblet | Wine Glasses
On Counter: Gray Striped Napkins | Footed Striped Bowl | Blue Checkered Tissue-Box Cover | Green Blender | Wooden Bowl | Serving Utensils | Leather Pot Holder | Modern Ribbed Baking Dish | Purple Tree (old Target) | Red Striped Napkins
Are we done with organic white on white? I mean, no – it is always in and a classic, but this stuff adds MORE to a home and at these prices, I was just super impressed (that wood bowl with the ribbing on the outside looks so expensive, y’all – it’s the perfect pistachio bowl for your coffee table and its $25). OH, and that is a really good leather trivet if you are in the market for one (I was and bought this for myself).

On Wall Shelf: Green Pillar Candles | Horse Painting | Glass Taper Holder | Glass Blue Coupes | Glass Purple Goblet
On Counter: Scalloped Serving Bowl | Footed Striped Bowl | Blue Checkered Tissue-Box Cover | Green Blender | Wooden Bowl | Serving Utensils | Leather Pot Holder | Modern Ribbed Baking Dish | Butter Dish | Red Striped Napkins
The red stripe napkins are $3 each and while of course, they are excellent Christmas napkins, red is having such a moment that I’d use it in spring and summer, too. They feel really high quality. The glassware that I collected on the shelves are just better than basic – the two-toned glasses are thick and special (and splurgier) while the purple goblets are affordable and so rich. And don’t forget the $8 glass candle holders – so good, so pretty, so affordable. I have them on my coffee table.
On Wall Shelf: Horse Painting | Glass Taper Holder | Glass Blue Coupes | Glass Purple Goblet

On Counter: Red and White Striped Candles | Scalloped Candelabra | Scalloped Serving Bowl | Footed Striped Bowl | Blue Checkered Tissue-Box Cover | Green Blender | Wooden Bowl | Serving Utensils | Leather Pot Holder | Modern Ribbed Baking Dish | Purple Tree (old Target) | Red Striped Napkins | Butter Dish
The green blender is countertop worthy (I just bought it for myself and love it), and while that tissue box cover is on the splurgy side it also comes in black and white and it’s metal. Let’s just say it brings me more joy than I originally predicted (I also love the tray version of it and have it on my coffee table).
Textiles: Plaid Blanket | Blue Round Pillow | Geometric Velvet Pillow | Velvet Jacquard Blush Pillow | Fuzzy White Pillow | Multi-Colored Striped Pillow | Ottoman Pouf
Decor: Gift Box Set | Maroon Lamp | Wavy Shade Lamp | Gold Frame | Marble Tray
I don’t know what I love more – that incredible wavy lampshade on that green lamp – $70!!!!! FOR BOTH!!! Or that really good oxblood dome lamp (splurgier, but very powerful and makes a fast statement in any room). The mustard velvet ottoman is in my home and pairs so pretty with my blue velvet chair. But the Schoolhouse blanket? Certainly a splurge but it’s so incredible – if you have a basic bed or sofa and you want to punch up your room – a pattern like this does it INSTANTLY. And don’t forget that Rejuvenation has incredible velvet pillows in really rich colors (and some neutrals) for those of you who don’t want a pattern).
Textiles: Plaid Blanket | Blue Round Pillow | Geometric Velvet Pillow | Velvet Jacquard Blush Pillow | Fuzzy White Pillow | Multi-Colored Striped Pillow | Ottoman Pouf
Decor: Gift Box Set | Maroon Lamp | Wavy Shade Lamp | Gold Frame
I’m really into velvet apparently, as almost all of these pillows are – it’s just such a pretty texture in really rich colors. The round blue pillow – special and such a punch. The blue/green velvet pillow is also excellent (and the same pattern comes as curtains which look so expensive and custom – patterned curtains are so back, y’all).


Textiles: Blue Round Pillow | Geometric Velvet Pillow | Velvet Jacquard Blush Pillow | Fuzzy White Pillow | Multi-Colored Striped Pillow | Ottoman Pouf
Decor: Wavy Shade Lamp | Gold Frame | Marble Tray

We are still pulling together the rest of the gift guides, so please let us know if you have any requests (we have a fashion/beauty and jewelry coming up as well as a couple of different kids’ guides). I had so much fun shooting this and actually being able to personally touch and feel the pieces to ensure they are high quality, despite being so affordable.
*Photos by Kaitlin Green
The post Gift Guide #1: My Favorite Strangely Affordable (Or Very Worth It) Home Items That Can Make A Big Statement – All Hand Picked By ME appeared first on Emily Henderson.
Emily Henderson's Blog

- Emily Henderson's profile
- 10 followers

