
Emily Henderson's Blog, page 39
September 29, 2024
The Link Up: Em’s Very Cute And Very Comforable Clogs, Caitlin’s Credit Card Hack, And A $4 Lotion That Will Save Your Dry Hands

Happy Sunday everyone! We are very delighted to officially be one week into the fall season. Cozy time, HERE. WE. COME! It was a busy week up in Oregon prepping for a fun shoot week! Oh, and did you catch the river house’s happy beige guest bathroom reveal?? We can’t decide what we love more – The tile? The pony wall? The lighting? The wallpaper? Too many beautiful elements. In other exciting news, our second rug drop with Rugs USA is coming VERY SOON! To celebrate we’re doing a special Fix It Friday where we are giving away 5 rugs from the collection. So if you have a room in need of a new rug email photos and the size you’d need to Jess at jess@emilyhendersondesign.com. Now onto the links!
This week’s house tour was one that Emily sent through Slack “oooo-ing” and “ahhh-ing” over all that incredible wood. Designer Drew McGukin and his partner bought this wonderful little Fire Island home as a calming getaway and that’s exactly what was designed. With flashes of color and pattern, this is such a dreamy escape. Check it out here!
From Emily: As you may or may not know I’ve been wearing the same Rachel Comey clogs for 6 years (probably 12-14 times a year, which is why they’ve lasted so long). I LOVE them because they give a lot of height while still feeling dressed down/casual. But they aren’t that comfortable (as most 5″ heels are) so when I ordered these Kork Ease clogs and tried them on it was an immediate sigh of relief and a big “YES, OK HERE WE GO”. They are so flattering (they lengthen my rather wide and flat feet) and are so comfortable with a big cushy soul while still giving me so much height on the days/nights that I want to feel like that. If I lived in a city (i.e. walked a lot) and worked in an office (i.e. needed to look professional and stylish) I would 100% wear these for 3 of the 4 seasons. IN FACT, Buttercup ate the back of one of them a week after I got them (from an Evereve partnership) and after fake scolding her I immediately bought a new pair knowing that last year they sold out. That’s how much I love them.
From Jess: This past week I’ve been in TOTAL HEAVEN because my brother and SIL just had their first baby!!! I’m an aunt!! I’m staying with them for a couple of weeks to help out and while the baby snuggles are maybe the best thing ever, the constant washing of my hands has left them so dry and nearly cracked. That’s on me for not getting ahead of it but I found this $4 healing hand lotion on my SIL’s desk and it’s made all the difference. It even says it lasts through handwashing. A random rec, yes, but really works!
From Arlyn: I interviewed the creative director for Artifact Uprising a few months back for a story I was working on and she told me they were about to release some great new frame options, particularly in color. Well, they’re out now and I’m absolutely smitten with them! All of my frames are fairly neutral, and while I do love a beautiful wood or even gilded frame, I could see that punchy red or cobalt blue really being a star either on a stand-alone piece or as one interesting place for your eye to go to in a gallery wall. They even have matching mats, though I think I prefer the power of the frame along with a traditional white mat.
Guess who’s back at Target for spooky season??? John Derian! If you know anything about his own shop then you know his products aren’t in the super affordable category. But at Target you get his elevated designs for a steal!
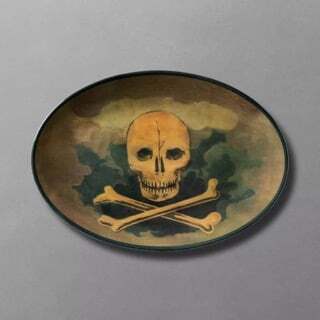
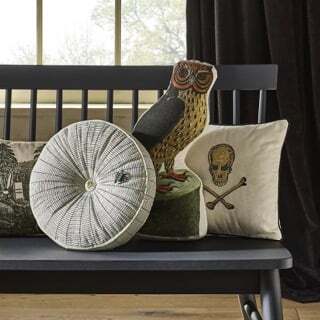

Skull and Cross Bones Melamine Oval Serving Platter | Round Tangled Web Novelty Throw Pillow | Spider and Web Melamine Dessert Stand
From Gretchen: It’s been a busy few weeks over here and thankfully Emily M has swooped back in to help us cross the finish line on a number of projects. Last week we stained the craft shed (art barn) floor and finally had some time to catch up—on fun trips, family time, and our favorite new fashion buys. One morning she came in wearing the cutest clogs that I thought were the same Birkenstock Boston clogs I had recently splurged on (and still love), BUT NO. She revealed they were actually just a really good dupe she found on Amazon! Between these clogs and the Free People sweatshirt dupe Kaitlin turned me onto a few weeks ago, my cart is filling up fast! Emily can attest to the comfort and walkability and I can attest to their cuteness—and they come in so many cute colors!
From Mallory: It’s basically fall now so I’ve been wearing this jacket a ton before and after my workouts!! It’s cropped, cute, and is a fun neoprene-ish fabric  plus it’s on sale right now!
From Caitlin: This one is for all of my fellow credit card dorks out there, so feel free to ignore this one if you just felt your eyes glaze over. I got the Robinhood Gold card back in March and to my surprise, it’s quickly become my go-to card for my daily spend. If offers a flat 3% cash back on all purchases (5% back on travel), there’s “no fee” (it does require an annual $50 Robinhood Gold subscription, but it more than pays for itself with a 4.5% APY on savings, a 3% match on IRAs, and a 1% boost on new brokerage deposits), and it has all the bells and whistles that you’d expect from a major credit card provider (travel protection, roadside dispatch, extended warranty protection, etc.). But all of these perks pale in comparison to the VIRTUAL CARD NUMBERS, which have changed my ADHD life! How many times have you signed up for a free trial, forgotten to cancel, and been surprised by a fat subscription charge on your next credit card statement? (I’ll go first: it’s happened like, a million times.) NO MORE! Now, I can generate a virtual card number that expires within 24 hours. No joke – this lone tool has saved me hundreds of dollars over the past six months. Why did no one think of this sooner?
Also from Caitlin: I am SO INTO these adjustable graphic shelves. They look so good in a cluster! So much impact, so little visual weight. I wish I had the space – would love to spray paint them in a cheery red for a statement that isn’t too overwhelming. Someone, please, let me live vicariously through you!!! (Did I mention that they’re 100% steel?)
Thanks for stopping by and come back tomorrow for a very personal room reveal from an EHD alum.
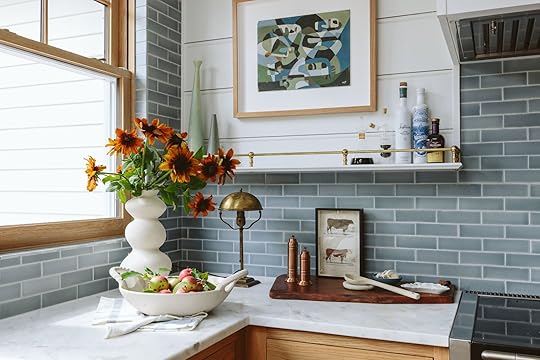
Opening Image Credits: Architect: Anne Usher | General Contractor: JP Macy of Sierra Custom Construction | Interior Designers: Emily Henderson and Max Humphrey | Styling: Emily Henderson | Photos by Kaitlin Green | From: My Brother’s River House Guest Bath Reveal (+ Are Pony Walls Back?)
The post The Link Up: Em’s Very Cute And Very Comforable Clogs, Caitlin’s Credit Card Hack, And A $4 Lotion That Will Save Your Dry Hands appeared first on Emily Henderson.


September 28, 2024
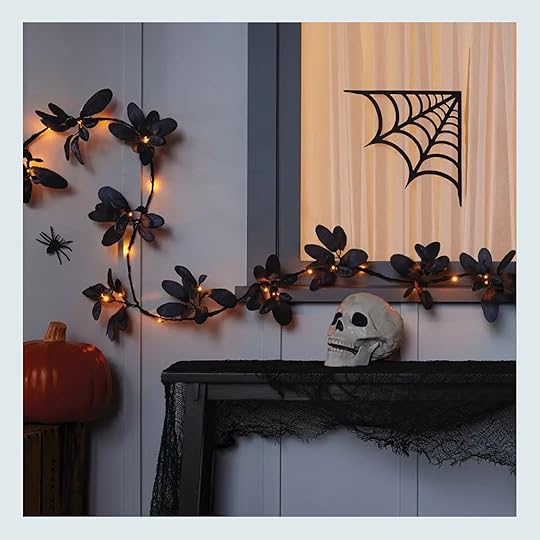
Wait, Where Do I Buy The Best Halloween Stuff For My Front Porch And Yard? My Friends Asked, And Here’s What I Said

I got this question from three of my friends who moved into more “trick or treat” friendly neighborhoods. If you aren’t used to this fun neighborhood pressure you might not know what to do. I personally think that our front porch last year NAILED IT, despite very few people seeing in (besides Dustin our UPS guy) since we are very set back off the road. A few of my favorite tips are:
1. Cemetery – High impact, low cost (or if you want to get the more high quality then you can build the “cemetery collection” over time. Here’s ours from last year
2. Orange and/or purple lights – String lights, bulbs for your porch sconces, up light – at night time these make A MASSIVE DIFFERENCE.
3. Big sprayed branches – I know your city dwellers don’t easily find this, but it’s my favorite almost zero cost/high impact Halloween decor. Throw orange string lights or spider webs on it and you have instant impact.
4. Creepy black stuff in your style – No, you don’t have to put a dead 100-year-old baby doll in a bird cage like I did, but look for anything that could read “creepy” and if it is black it is easier (think side tables to put pumpkins on, candelabras with black candles, spray paint an old doll house black and put faux candles in it).
5. If you are up for it (and it’s in your budget) splurge on 1-2 life-size creepy figures – Skip the animatronics that jump out at you (SO CREEPY but a witch, a ghoul, some big yard ghosts – these go a long way)
6. Spiders, webs, and bats – These are easy to hang with command strips and make a huge impact at very little cost.
As far as where to get this stuff? Here are some of my favorite places with varying styles and prices.
Grandin Road


Halloween Bats with Flashing Eyes (Set of 3) | Corner Spider Web | Black Crows (Set of 4)


Pre-lit Twiggy Trees | Vintage Flicker Light Strand | Towering Reaper
Grandin Road might be my favorite place to shop for outdoor Halloween decorations. The quality is awesome and the style is elevated but still playful. I bought a bunch from them last year (including those pre-lit twiggy trees) and plan on having everything for a very long time.
Halloween.com


Giant 8 Foot Animated Skeleton Decoration | 4 Foot Inflatable Black Cat with Turning Head Decoration | 5 Piece Buried Alive Skeleton Halloween Decoration Kit


5.5FT Life-Size Venetian Victoria Ghost Girl Halloween Prop | Creepy 12 Piece Cemetery Decoration Kit | 6FT Animated Ghostly Go Round with 3 Dolls Halloween Prop
Let’s just say this is a very fun site to scroll through because they have soooo much. Personally, I love all the creepy Victorian-inspired things (those swinging dolls are WILD). But they have it all, especially in the oversized department if you have a big yard.
Target


10′ Giant Spiderweb | 10″ Lit Metal Twig Lantern | Champagne 36″ Posable Skeleton


18.6″ Wood ‘RIP’ Tombstone | 25 Light LED Black Faux Leaves Garland | 17″ Fern Artificial Wreath
My tried and true! As Target’s home style expert for 8 years, I pretty much exclusively decorated with their products during that time but I was never bummed about it. It’s always been good. Their decor understandably skews more festive and cute rather than creepy or scary, but it’s perfect to at least mix in with those other elements. I’ve used those giant spiderwebs for YEARS because they are the best!
Anthropologie/Terrain


BOO Pumpkin Stake Set | Flying Bat Wreath Hanger | Crescent Moon + Bat Iron Stake
If you want to go more “chic Halloween” then Anthro/Terrain is never a bad choice. I just did a little partnership and was so happy with all the pieces I got to choose. Good quality and awesome style. And how cute is that “BOO” pumpkin decoration??
Amazon


Halloween Crow Decorations (set of 6) | Bendable Pumpkin Arms and Legs | 8-inch Floating Candles with Wand Remote
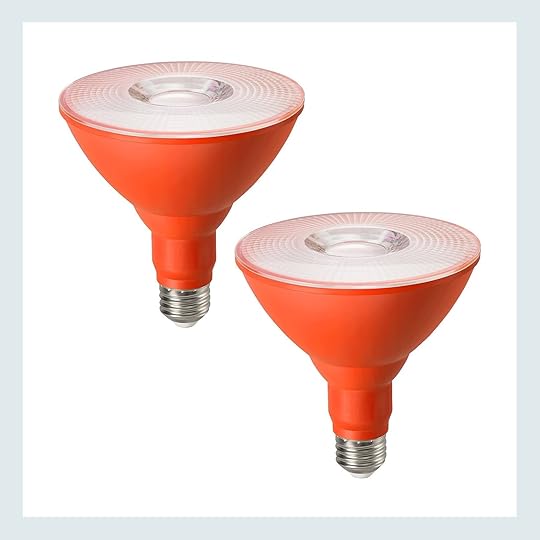


Orange LED Flood Light Bulbs | Outdoor Hanging Grim Reaper | Black Scary Giant Fake Hairy Spider (set of 2)
This is probably an obvious one, but Amazing is such a great resource too. Especially with lighting! Those orange bulbs were the biggest hit last year because at night they totally transform your porch (or wherever you choose to put them). 10000/10. Otherwise, they also kinda have it all but it does take some scrolling:)
Hope this was helpful and that maybe you got a little inspired to decorate this weekend. To see what we did last year go here for the front porch and here for the graveyard. It’s crazy that October is basically here! xx
Opening Image Credits: Styled by Emily Henderson | Photo by Kaitlin Green | From: Our Front Porch Decorated For Halloween (+ How It Looks Spooky At Night For Trick-Or-Treaters)
The post Wait, Where Do I Buy The Best Halloween Stuff For My Front Porch And Yard? My Friends Asked, And Here’s What I Said appeared first on Emily Henderson.
September 27, 2024
Is A.I. Going To Destroy Lifestyle Blogs/Websites?

That is certainly the question du jour in our industry and this is one soup I do not want to eat. My book, Styled, was included in the now-infamous Books3 data set – It was one of the 183,000 books that were used (stolen?) by multi-billion dollar businesses like Meta and OpenAI to train their AI models. The entirety of Styled was ingested so these language models could, you know, learn about design and styling.
Last week I went to New York with Raptive, our programmatic ad network, and partnered with 33 other content creators to launch a campaign to regulate AI online. You see, these major tech companies have built tools that have scraped (and memorized) the contents of the entire internet. These large language models, as they’re called, have ingested every publicly available photo, every paragraph, every recipe, every instruction, and every DIY; now, with the simplest question typed in a search bar, the AI model will regurgitate a generic response, without crediting the sources of its information. This isn’t just a problem for those of us with internet jobs, though – if you’ve ever shared anything online publicly (a photo, a video, a comment to a friend), it has already been used to train at least one AI system.
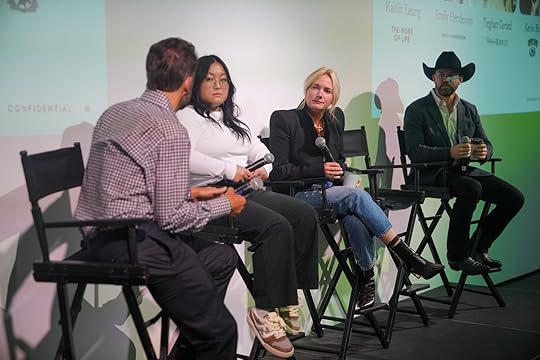
Obviously, AI is here and certainly playing a victim to it isn’t the answer – we aren’t crying and obviously continuing to just work harder to innovate, diversify, and keep long-time readers coming back. So last week, in NYC, I joined a panel with Tieghan of Half Baked Harvest, Kaitlin of Woks of Life, and Kevin of Country Rebel – representing all of the content creators out there whose businesses are being directly impacted by these large language models.
You see, AI is capturing new readers that historically have stumbled upon our human-led sites by typing in “how do you make hummus” or “what size for living room rug.” Now most of us are getting ahead of this already (we’ve been trying to create non-AI-able content for the last two years which I wrote about here), and it’s our job to create such compelling content to keep readers coming back HERE every day – “direct traffic” is our north star.
But what our digital media industry is seeing, as a whole, is a newfound inability to turn searchers into readers. Said another way: let’s pretend that you’re just getting into design. Maybe you’re decorating your house for the first time, and you Google a question like “how high should I hang my curtains?” In the past, a reader might click on a link to our site – and maybe they’d like it, and they’d sign up for the email list, and we’d earn ourselves another regular reader! But now, Google’s Gemini model is serving up our words in a very generic form – the searcher is never even given the option to check out our site.

Ironically, EHD’s search traffic is up in 2024 – our team has been working really hard to make sure that readers can still find us in a sea of generated answers, for which I’m so grateful. But that’s not the case for many other online digital media companies – there are major drops in traffic to more evergreen (year-round, year after year) posts because of AI. We can all see the writing on the wall, so I’m honored to be part of the group working to find solutions on behalf of thousands of small web businesses out there.
Will we be fine? Well, ask print magazines (gone due to blogs – mine included), local news and newspapers (gone because of podcasts and digital media sites), and the early 2010s design blogs (killed by social media and Pinterest). The “information industry” always changes, staying ahead of it has been a very exciting challenge over the past 15 years and it’s just part of social evolution. Being a large player in this industry for this long is remarkable on its own. And listen, I’ll write this blog until I die because I love the hell out of being right here.
As the quantitative futurist Amy Webb recently said on Brene Brown’s podcast – navigating AI is like driving on ice, slamming on the breaks will kill you, you have to steer into the spin. Control the chaos and remain calm. The ice is cold and hard, but it’s here, and unless you want to get out of your car and walk you better learn how to drive on top of it to get where you want to go. I feel confident that Raptive – the tenth-largest digital media company in the world, with an online reach that’s larger than that of Hearst, Twitter, Fox, Reddit, etc. – is well-equipped to negotiate an agreement with AI companies that preserve the richness of humanity on the internet.
What happens if they don’t?

Well, what I warned last week (and what I firmly believe) is that the following three things will happen in this order:
Food, parenting, decor, lifestyle, and fashion blogs will lose traffic and revenue. Creators and our teams will have to find new revenue ASAP. If we can’t, our businesses will close. All doable, but sad for true followers.
The internet will become wildly uninteresting. AI will essentially be its own parasite, sucking the entertainment and fun out of digital discovery.
As lifestyle websites powered by humans disappear, so will the quality “answers” that the AI has been scraping. Instead, it’s likely to serve up inaccurate and certainly un-nuanced answers to your questions. (This is already happening in a small way – like when Google’s Gemini suggested that searchers eat glue and rocks – but researchers know that it has the potential to get much worse, too. When AI models run out of information and begin ingesting AI-generated answers as a new data source, the models break. The entire internet, as we know it, would be rendered unnavigatable and unusable.
Bored by the now generic internet, people will simply pick up their phones and go to TikTok – the platform du jour that has been engineered to be quite an incredible search engine (Instagram, less so). Do I think that Google will disappear? Nope. Those folks are genius and they’ll figure it out, as long as they’re not eaten by a skilled AI model (like Claude, by Anthropic) or a rival search engine (like Perplexity, which functions exactly in the way you probably imagined Ask Jeeves to work about 25 years ago).
What do I think should happen? Glad you asked.

The legal landscape here is fraught, which makes this tricky: tons of AI companies have been sued for copyright infringement and it’s unclear how those court cases will shake out. But I do think that the current business leaders in AI – Google, Meta, OpenAI, Anthropic, Mistral, etc. – have an opportunity here to partner with human creators who have been and hope to continue to create real original content. Serve human responses higher in the algorithm, above the AI-generated answer. Pay us directly for our work, or license it, instead of stealing. Work directly with digital media experts, like the team at Raptive, to identify creators who are adding value to the internet ecosystem. To be fair, there is also some hope here! Caitlin has had some great conversations with startups like ProRata.ai, who are working on attribution technology – basically ensuring that creators are credited (and compensated) when their information is used to power profits for a multi-billion dollar AI business.
I don’t want to sound all doom and gloom. AI has some incredible applications. It can sort through extraordinary amounts of information and it can make connections that seem invisible to humans. It can (and will) radically transform medical diagnosis and treatment. It can empower human learning, creativity, and exploration.

But in the digital media space, it falls short. So I’m advocating for the creators who add richness to our lives – creators who bring us killer dinner party recipes, creators who help us feel more comfortable in our bodies, creators who take us behind the curtain and make us feel less alone. I’m advocating for my fellow authors, whose books were stolen and whose words now shape every answer spit out by a generative AI model (including mine). And I’m advocating for you, too: AI companies have trained models on information stolen from all of us, without offering us an option to opt out. I think we all deserve better. Let’s keep the humanity in the internet – we all know that’s more interesting to read about, anyway What’s your take?
(If you’d also like to help keep the internet interesting, you can sign Raptive’s open letter on AI here. Every signature helps as they continue to advocate for a human-first internet.)
Also, here is a list of all the creators that attended the conference! Please check them out, enjoy their real content, and give them a follow if you like their stuff:)
Feel Good Foodie
My Chic Obsession
I Heart Naptime
Half Baked Harvest
Lil Luna
Style By Emily Henderson
My Modern Met
Hey Grill Hey
Pinch of Yum
The Clean Eating Couple
Play Party Plan
Oh How Civilized
Simple Joy
The House of Wood
Skinnytaste
Leite’s Culinaria
Spend With Pennies
Modern Honey
Tastes Better From Scratch
Sugar Spun Run
The Mediterranean Dish
Bless’er House
The Recipe Critic
Inside the Magic
Easy Family Recipes
The Woks of Life
Camille Styles
Momsdish
Clever Girl Finance
Atlanta Black Star
Country Rebel
The Stay At Home Chef
Mom On Timeout
This Vivacious Life
*Photos via Raptive
The post Is A.I. Going To Destroy Lifestyle Blogs/Websites? appeared first on Emily Henderson.
Is AI Going To Destroy Lifestyle Blogs/Websites?
That is certainly the question du jour in our industry and this is one soup I do not want to eat. My book, Styled, was included in the now-infamous Books3 data set – It was one of the 183,000 books that were used (stolen?) by multi-billion dollar businesses like Meta and OpenAI to train their AI models. The entirety of Styled was ingested so these language models could, you know, learn about design and styling.
Last week I went to New York with Raptive, our programmatic ad network, and partnered with 33 other content creators to launch a campaign to regulate AI online. You see, these major tech companies have built tools that have scraped (and memorized) the contents of the entire internet. These large language models, as they’re called, have ingested every publicly available photo, every paragraph, every recipe, every instruction, and every DIY; now, with the simplest question typed in a search bar, the AI model will regurgitate a generic response, without crediting the sources of its information. This isn’t just a problem for those of us with internet jobs, though – if you’ve ever shared anything online publicly (a photo, a video, a comment to a friend), it has already been used to train at least one AI system.
Obviously, AI is here and certainly playing a victim to it isn’t the answer – we aren’t crying and obviously continuing to just work harder to innovate, diversify, and keep long-time readers coming back. So last week, in NYC, I joined a panel with Tieghan of Half Baked Harvest, Kaitlin of Woks of Life, and Kevin of Country Rebel – representing all of the content creators out there whose businesses are being directly impacted by these large language models.
You see, AI is capturing new readers that historically have stumbled upon our human-led sites by typing in “how do you make hummus” or “what size for living room rug.” Now most of us are getting ahead of this already (we’ve been trying to create non-AI-able content for the last two years which I wrote about here), and it’s our job to create such compelling content to keep readers coming back HERE every day – “direct traffic” is our north star.
But what our digital media industry is seeing, as a whole, is a newfound inability to turn searchers into readers. Said another way: let’s pretend that you’re just getting into design. Maybe you’re decorating your house for the first time, and you Google a question like “how high should I hang my curtains?” In the past, a reader might click on a link to our site – and maybe they’d like it, and they’d sign up for the email list, and we’d earn ourselves another regular reader! But now, Google’s Gemini model is serving up our words in a very generic form – the searcher is never even given the option to check out our site.
Ironically, EHD’s search traffic is up in 2024 – our team has been working really hard to make sure that readers can still find us in a sea of generated answers, for which I’m so grateful. But that’s not the case for many other online digital media companies – there are major drops in traffic to more evergreen (year-round, year after year) posts because of AI. We can all see the writing on the wall, so I’m honored to be part of the group working to find solutions on behalf of thousands of small web businesses out there.
Will we be fine? Well, ask print magazines (gone due to blogs – mine included), local news and newspapers (gone because of podcasts and digital media sites), and the early 2010s design blogs (killed by social media and Pinterest). The “information industry” always changes, staying ahead of it has been a very exciting challenge over the past 15 years and it’s just part of social evolution. Being a large player in this industry for this long is remarkable on its own. And listen, I’ll write this blog until I die because I love the hell out of being right here.
As the quantitative futurist Amy Webb recently said on Brene Brown’s podcast – navigating AI is like driving on ice, slamming on the breaks will kill you, you have to steer into the spin. Control the chaos and remain calm. The ice is cold and hard, but it’s here, and unless you want to get out of your car and walk you better learn how to drive on top of it to get where you want to go. I feel confident that Raptive – the tenth-largest digital media company in the world, with an online reach that’s larger than that of Hearst, Twitter, Fox, Reddit, etc. – is well-equipped to negotiate an agreement with AI companies that preserve the richness of humanity on the internet.
What happens if they don’t?
Well, what I warned last week (and what I firmly believe) is that the following three things will happen in this order:
Food, parenting, decor, lifestyle, and fashion blogs will lose traffic and revenue. Creators and our teams will have to find new revenue ASAP. If we can’t, our businesses will close. All doable, but sad for true followers. The internet will become wildly uninteresting. AI will essentially be its own parasite, sucking the entertainment and fun out of digital discovery. As lifestyle websites powered by humans disappear, so will the quality “answers” that the AI has been scraping. Instead, it’s likely to serve up inaccurate and certainly un-nuanced answers to your questions. (This is already happening in a small way – like when Google’s Gemini suggested that searchers eat glue and rocks – but researchers know that it has the potential to get much worse, too. When AI models run out of information and begin ingesting AI-generated answers as a new data source, the models break. The entire internet, as we know it, would be rendered unnavigatable and unusable.Bored by the now generic internet, people will simply pick up their phones and go to TikTok – the platform du jour that has been engineered to be quite an incredible search engine (Instagram, less so). Do I think that Google will disappear? Nope. Those folks are genius and they’ll figure it out, as long as they’re not eaten by a skilled AI model (like Claude, by Anthropic) or a rival search engine (like Perplexity, which functions exactly in the way you probably imagined Ask Jeeves to work about 25 years ago).What do I think should happen? Glad you asked.
The legal landscape here is fraught, which makes this tricky: tons of AI companies have been sued for copyright infringement and it’s unclear how those court cases will shake out. But I do think that the current business leaders in AI – Google, Meta, OpenAI, Anthropic, Mistral, etc. – have an opportunity here to partner with human creators who have been and hope to continue to create real original content. Serve human responses higher in the algorithm, above the AI-generated answer. Pay us directly for our work, or license it, instead of stealing. Work directly with digital media experts, like the team at Raptive, to identify creators who are adding value to the internet ecosystem. To be fair, there is also some hope here! Caitlin has had some great conversations with startups like ProRata.ai, who are working on attribution technology – basically ensuring that creators are credited (and compensated) when their information is used to power profits for a multi-billion dollar AI business.
I don’t want to sound all doom and gloom. AI has some incredible applications. It can sort through extraordinary amounts of information and it can make connections that seem invisible to humans. It can (and will) radically transform medical diagnosis and treatment. It can empower human learning, creativity, and exploration.
But in the digital media space, it falls short. So I’m advocating for the creators who add richness to our lives – creators who bring us killer dinner party recipes, creators who help us feel more comfortable in our bodies, creators who take us behind the curtain and make us feel less alone. I’m advocating for my fellow authors, whose books were stolen and whose words now shape every answer spit out by a generative AI model. And I’m advocating for you, too: AI companies have trained models on information stolen from all of us, without offering us an option to opt out. I think we all deserve better. Let’s keep the humanity in the internet – we all know that’s more interesting to read about, anyway What’s your take?
(If you’d also like to help keep the internet interesting, you can sign Raptive’s open letter on AI here. Every signature helps as they continue to advocate for a human-first internet.)
Also, here is a list of all the creators that attended the conference! Please check them out, enjoy their real content, and give them a follow if you like their stuff:)
Feel Good FoodieMy Chic ObsessionI Heart NaptimeHalf Baked HarvestLil LunaStyle By Emily HendersonMy Modern MetHey Grill HeyPinch of YumThe Clean Eating CouplePlay Party PlanOh How CivilizedSimple JoyThe House of WoodSkinnytasteLeite’s CulinariaSpend With PenniesModern HoneyTastes Better From ScratchSugar Spun RunThe Mediterranean DishBless’er HouseThe Recipe CriticInside the MagicEasy Family RecipesThe Woks of LifeCamille StylesMomsdishClever Girl FinanceAtlanta Black StarCountry RebelThe Stay At Home ChefMom On TimeoutThis Vivacious Life*Photos via Raptive
The post Is AI Going To Destroy Lifestyle Blogs/Websites? appeared first on Emily Henderson.
September 26, 2024
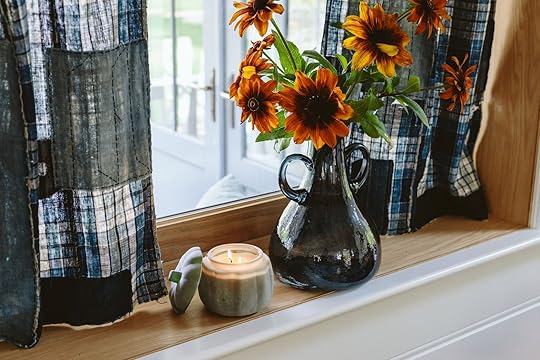
Really Good Affordable Fall Pieces Around My House (Target And Anthro Lovers Pay Attention)
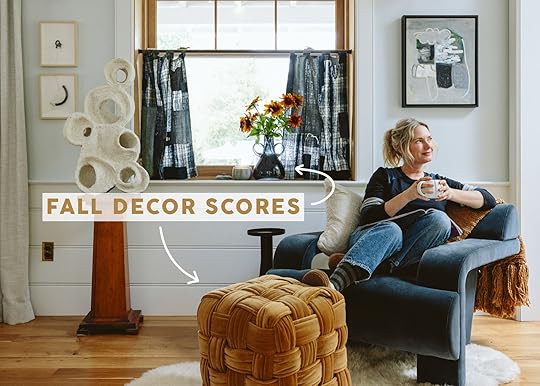
It’s fall show and tell. This season being so incredibly jam packed with work, family activities, and events (three birthdays, the million holidays, and like so many days that the kids don’t have school – anyone else call it “no school November”?) And yet I was SO over summer by the end and ready to hunker down (still waiting to do that TBH). Regardless, we had these two perfect partnerships just for Instagram and I loved the product so much that I hired Kaitlin to shoot them for the blog here, too. So hopefully it’s some eye candy or inspiration, and if you are in the market for some pieces that give fall vibes, know that I love all of these a lot.
Purple and Orange??????? YES!!!
Vase | Table Runner | Wood Pumpkin Board | Candlestick Holders (similar) | Taper Candles (similar) | Pumpkin Candles | Pumpkin Mugs | Cocktail Napkins | Wine Glasses | Plates | Flatware | Napkins
This one really surprised me – orange and purple is not my typical color palette and yet it’s perfectly “harvest festive” and definitely has some Halloween vibes. I loved it. I suppose this works because the “purples” are nuanced – some more brown like the runner and others more mauve like the plates and napkins. And then orange, y’all I typically don’t LOVE orange, but the flowers (which I clipped off a potted plant from Lowe’s) made this all come alive and sing “FALL!” in a really elevated way.

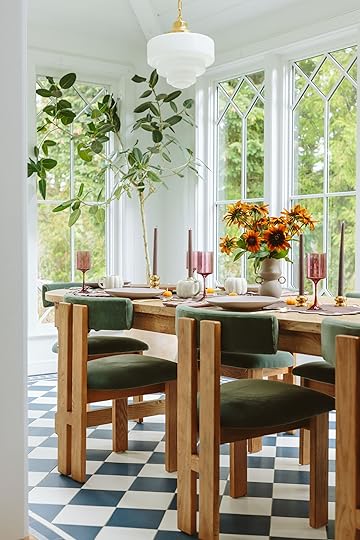
I ordered the runner, cocktail napkins, mugs, vase, and cutting board from Anthro (I had everything else, also from Anthro) and threw in some of their orange candle pumpkins. I swear everything looks good in this room, but I would not have predicted that I would love this as much as I do.

Not my favorite pic and certainly weird that I’m drinking an empty glass by myself (on Gretchen’s 30th birthday no less), but nice to see some “life” in there (and human for scale).


Who knew that I’d end up incorporating so much of this tone of “pink” in my house – our powder bath, the flowers on the mural on the barn, and our guest room. I’m also pleased to say that we have a lot of really pretty mauvey-purple rugs coming in our next rug collection.)

Ottoman | Vase | Candle | Mug | Drink Table | Pillow | Throw Blanket
Target nailed it per usual – After being their spokesperson for 8 years it’s fun to do these looser partnerships. I also hadn’t been in a while compared to how often I used to go and it’s dangerous, y’all. I bought (and love) the ottoman (actually a way better scale for that chair than my old leather ottoman), the rabbit-fur-soft pillow, throw and I had been eyeing that blue glass vase for a long time. It’s so pretty with the light coming through it and looks very expensive.

That candle, my goodness, it smelled so delicious – like pumpkin cookies in a really good way.

It’s just the coziest Also, that drink table is from Target and looks very elevated for the price.
In the kitchen, I put more of those fall flowers in that perfectly wobbly vase that has a really good scale, texture, and shape. It’s big so it can hold a large and tall arrangement. The bowl also looks handmade, with pretty stoneware for our fall apples dripping off our apple tree (still searching for the time to cut and dry them).

Glass Pumpkin | Marble Dish | Candlestick Holders
Likely the most unsuspected love here is the glass pumpkin (so pretty) and the $8 candle holders that look far more high-end for that great price. The little marble round doughnut dish is perfect for jewerly, bathroom styling, or nuts.


Hand Towel | Candle | Vase
Lastly, I threw a few pretty new things in the bathroom – the stoneware vase from Threshold – look at those handles! And the texture is so pretty. And another pretty fall candle that spells so good. A new mauve towel, too BTW I’m not totlaly happy with this bathroom and debating getting a more modern mirror – I like that vintage one, but a black oval would be a better shape. Shout out to my anemonies – those flowers are just ridiculously pretty in the yard right now. Happy fall, y’all.
*Photos by Kaitlin Green
The post Really Good Affordable Fall Pieces Around My House (Target And Anthro Lovers Pay Attention) appeared first on Emily Henderson.
September 25, 2024
How We Stained Our Floor A Checkered Pattern

Oh this project has really ignited a fire in me. Apparently, I really respond to the combination of low risk + complete creative freedom in a bonus room that doesn’t have the normal functional or storage needs, ha. And while I had help (shout out to Gretchen and Emily M) spending the work week on the floor here (while the mural on the outside was painted) was so much fun. As a reminder this room is 1/2 of the barn (the animals are in the other half) and could serve as a flex space – a creative space for the kids for crafting playdates but also an office for us for calls or writing time after the kids get home from school (turns out that gorgeous open-to-the-rest-of-the-house sunroom has zero privacy). I’ll explain more about the function of it on the full reveal (coming soon) but today we are talking floor.

As a reminder, this is what the barn looked like when we first bought the property. So much potential and so many spiders and dirt. Brian and I obviously had no idea what we would need this for (and we obviously don’t NEED this room), but I knew from day one that I would have fun in here, creatively. I loved that it was wood and almost kept it that way, but after one summer of the kids out here, it just felt super gross.
 photo by kaitlin green
So we paneled the walls in builder grade pine, trimmed out the windows and while we loved it, the floor felt unfinished and like it could be a missed opportunity.

We had our contractor sand down the original floors and replace a few boards, too but it was rough and pink and orange and I didn’t love it. It looked way less finished in person (the photos make it look good, TBH).
If you’ve been following along this art barn journey, you might’ve seen the post with Gretchen’s mock-ups where we explored a few pattern options. I was pretty set on a harlequin/checkerboard pattern from the jump and was excited to see that it was still my favorite option after a round of designs. BTW I’m unsure if this is harlequin because usually those are more elongated, so basically these are squares turned on an angle.
 photo by kaitlin green
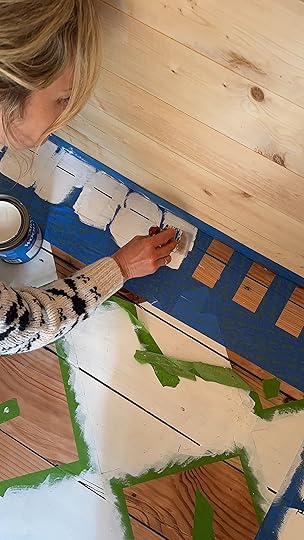
In a case of divine timing, as we were about to start this project, a Lowe’s partnership came through and we were more than happy to work with them to gather all our materials because we would have anyway (head to social to see the reel! For this project, we needed a boat load of tape (I think we went through five rolls, at least). I was going back and forth between using paint or a white stain (yes, that’s a thing!) for the pattern. We went with a white solid color stain from Minwax and I’m glad we did. It was super easy to work with and gave me the look I was going for. We also used the Minwax Polycrylic clear coat in satin when we were done with the pattern to give it a good protection layer, and it’s supposedly the best finishing coat to use if you want the least amount of yellowing. It did darken the wood a bit, to be expected, but I still love how it turned out. We used brushes for the stain and rollers for the clear coat.


Once we had all the tools, we got to work figuring out the geometry of the design and the easiest way to mask it off. Luckily, we had a stack of craft paper for the kids that turned out to be a 12″x12″ square and was sort of essential to the pattern turning out as consistent as it did. We used a measuring tape, a chalk line, and a laser level to double check our work, but ultimately, without the paper as a template this would have taken a lot longer with potentially more mistakes.
We started in the dead center of the room and worked our pattern outwards from there, first lining up six paper squares across the room and gently taping them to the floor with little tape rolls underneath. Then, one by one we outlined the edges of the squares with tape, butting it right up to the edge of the paper with just a small bit of tape overlapping the corners. We went row by row, making sure the paper corners touched and lined up perfectly, then going back through to outline in tape.
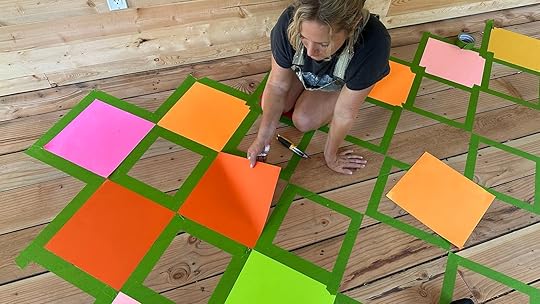
Eventually, these tape outlines formed smaller squares in between–these being the areas of the floor we would leave original wood. We marked these wood squares with a little piece of tape in the center so we wouldn’t be confused when staining. Once the entire floor pattern was taped off, we went back through and peeled up the paper, using a retractable knife to free the taped down corners, making sure to cut slow and straight, as these would need to be the sharp corners for the white stain.

As we mapped out the pattern, we knew we were going to run into some math problems. Before we decided to move forward with the template, we debated about using the planks as a guide, matching up the checkers to the plank’s edges. But this floor is old and unevenly spaced, making that a logistical nightmare. I’m so glad we overlapped the pattern across the boards as if they were solid. I think it makes the space feel more charming and handmade.
But even with the squares, we had to make a decision about where and how they would end. No matter what, the checkers would be truncated at the walls, since we chose to start from the center of the room and work outwards. I think this would’ve looked just fine, but from the beginning I felt like adding a sweet border to the design would just complete the room and drive home the whimsy.
All this to say, we taped off the checkerboard pattern first, leaving about 5″ from each wall bare so we could later add in our border. There was roughly 5″ of blank space on either side of our initial row of six paper squares. We liked this width so we let it dictate the front and back wall border spacing, too. Of course, the math didn’t work out so easily length wise, meaning we had to slice our last two rows of squares into triangles on either side.

Once the first round of tape was down and each square was removed, it was time to paint–or rather, stain. We’d picked up two cans of the Minwax solid color stain because we weren’t sure which white was going to be the right white. In the corner of the room that I had planned to put down a sectional, we tested the two cans. Simply White on the left, Pure White on the right, and a mix of what was left on both paint brushes in the middle. You’d think with a name like Pure White it would be the brighter, more cooler toned of the two. But confusingly, Simply White was the brightest in the bunch and the color we ended up choosing. I think we went through 2, maybe 3, smaller quart cans to complete the floor.

Working from the back of the room to the front, we painted each larger square Simply White, working the product in the direction of the grain. One coat looked great! It dried fairly fast and you could see the wood grain coming through nicely. But it felt a little unfinished, almost like it was a primer.

My sweet Bird came home from school just DYING to help us finish the floor. She was pretty bummed to see the first coat of stain went down without her help and begged me to do a second coat with her. Which ended up being the perfect solution. She was able to participate and the second coat really made everything feel more finished.
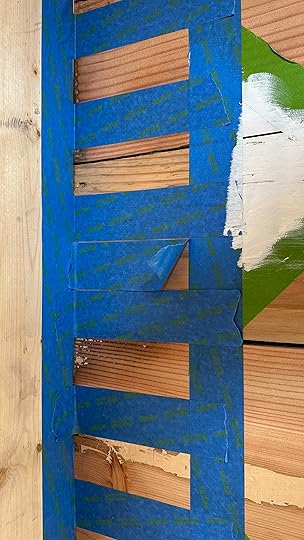

After both checkerboard coats went down and dried, we went back through to tape off the border. I wavered slightly on whether it should be a stripe or a solid or a stripe with a solid thin line at the bottom. We decided on the stripe-only first, telling ourselves we could always add in a thin base stripe where it would meet the checkers, or paint the entire 5″ solid if the stripe felt like too much. Thankfully, it did not, and we ended up leaving it stripe only.
We spaced out the lines just using the 2″ tape we had on hand, again working out from the middle, lining up tape pieces right next to each other and pulling up every other one to reveal our stain zone. When we got to the corners of the room, we had to fudge the spacing a little to get our full stripe widths, so toward the end, some of the stain stripes are more like 2 1/4″. We opted not to turn the corner and combine the stripes fluidly, but rather the back and front walls stretch into the wall and the side wall stripes stop at the base of those front and back borders.
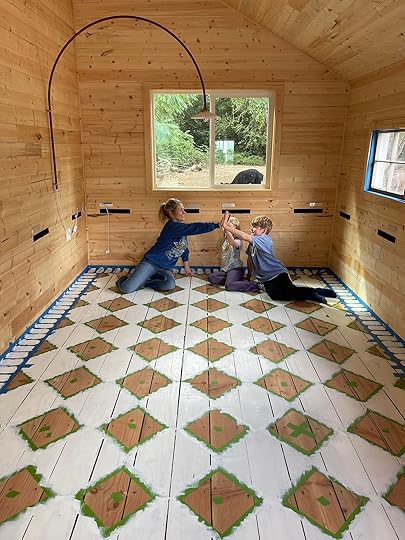

We gave the stripes two coats of stain and waited a few hours for it to dry, just in time for school to let out and our little volunteers came running. They were so excited to peel tape and reveal the floor. It was a family affair getting this tape up, with all four of us working on hands and knees to peel it, while Gretchen time-lapsed the whole thing. Charlie had fun making a hugeeee tape ball and launching it at Brian.
 photo by kaitlin green
So the staining is done–PHEW–and now we had to decide whether or not it was worth it to give it a poly coating. I loveddd how it was looking with the raw pine and was sort of tempted to just leave it at that for fear that the clear finish would change the tone of the wood too much. But I knew that’d be asking for a dirt disaster knowing where this barn is (literally surrounded by dirt which turns to mud in about a month). Adding a clear coat would lock everything in and make wiping up muddy foot prints doable. The last thing I wanted was for our hard work to get ruined by inevitable farm filth.
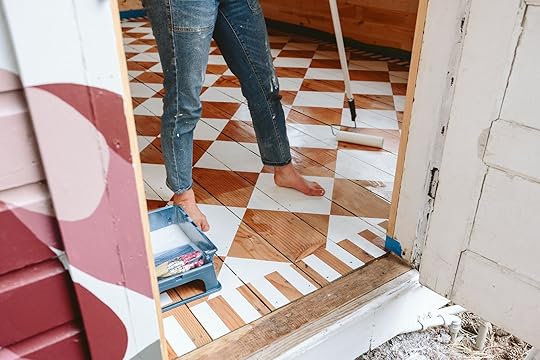 photo by kaitlin green
You can see here that the poly finish just deepened the existing tone instead of yellowing it, which I was so pleased with. I think the slight contrast really helps the floor pop off from the all wood walls, without looking too different. We went with a satin coat but debated on matte. The slight sheen of the satin is actually really pretty and just makes it feel more complete.

 photos by kaitlin green
I gave the floor two coats of poly using a tall roller brush. It was fast and easy. I did go through and use a regular brush to better apply the clear coat into the corners where the wall met the floor. Hot Tip: before you start your clear coat, put down a layer of “baseboard tape” to protect the unfinished wood walls (in our case) from getting excess poly on them. This way we could be a little more fast and loose with the application.
 photo by kaitlin green
This is how it was looking when all was said and done. How cool is this bird’s eye view?? I couldn’t be more happy with how it turned out. The tape peel left us with nice, sharp lines and the two coats of stain feel like just the right amount. The wood qualities come through and the color is just more striking than if we had left it at one (and I don’t think it’s going to chip as easily since its more penetrated into the wood).

 photos by kaitlin green
 photo by kaitlin green
 photo by kaitlin green
If you are thinking that it reminds you of the sunroom you are NOT WRONG. And if you are wondering why we stayed safe with white it’s because we have a lot of color coming in with the quilts and small sectional. Y’all I’m PLEASED AS PUNCH and can not WAIT to finish this space. We shoot it this week so more to come asap. xx
The post How We Stained Our Floor A Checkered Pattern appeared first on Emily Henderson.
September 24, 2024
Patterned Sofas Are the “Magical Unicorn” Of Living Rooms: Arlyn Breaks Down Why They’re So Special + All the Shopping Picks

Most living rooms have a version of this combination: solid fabric or leather sofa + patterned rug. But what if we dare to be a little different and flip the script? What if instead, we did a patterned sofa atop a solid rug (or, if you’re very brave and very good at pattern mixing, a patterned rug, as well)? That, my EHD friends, is where design magic tends to happen; when you take a common practice and mix it up.
Today, I’m here to share an idea that is by no means novel, but still feels fresh and full of personality: the patterned sofa. Now, for anyone who just grimaced, I know, I know. There are so many bad patterend sofas out there, and, like most people burned by the style of the 1980s, you may have a visiceral reaction to this concept. I see you and I understand. After all, I grew up with a gray and peach floral sofa-loveseat set in my family’s formal living room that took a while to recover from (I’m exaggerating, because I actually thought that was the pinnacle of taste when I was five).
Patterend sofas can be good, I promise! One of my favorite designers Heidi Caillier is the American master of the patterned sofa right now. She tends to use a lot of florals and chintz but in a way that’s warm, chic, and forward-thinking…a.k.a. not an easy task. And I say “American” master because, like so many things happening in decorating today, this is a style that has been beloved and widely used in English interiors for many, many decades. Let’s take a quick look at some of the rooms she’s designed using a non-traditional sofa:
View this post on InstagramA post shared by Heidi Caillier (@heidicaillierdesign)
The green chintz sofa is a BDDW sofa (one of Emily’s luxe favorites) in a custom fabric. Below, you can see she paired it with a small settee in a blue toned tartan-like fabric and a small-scale patterned armchair. It works because the color palette is intentional, and the scales are all varied: large florals on large sofa, simple medium plaid on medium sofa, small tribal pattern on armchair.
View this post on InstagramThe Realities Of A Patterned SofaA post shared by Heidi Caillier (@heidicaillierdesign)
If florals aren’t for you, fear not. There are tons of stripes and modern graphic variations on the market. It can be as subtle as a pinstripe, or as bold as a brightly hued cabana stripe. Gingham is a friendly entrance into the patterned sofa world, and plays nicely with so many other prints you might want to bring in via throw pillows, rugs, curtains, etc.
View this post on InstagramA post shared by Francesca Grace | Home Staging + Interior Design (@francescagracehome)
View this post on InstagramA post shared by Architectural Digest (@archdigest)
View this post on InstagramA post shared by Lilse McKenna (@lilsemckenna)
View this post on InstagramA post shared by Taylor Jacobson (@tayliljay)
No matter that print of choice though, the absolute best patterend sofas seem to be (sigh) custom made. That, of course, opens up the world of fabric choices, but typically costs much more money. And speaking of money, the ones you can buy ready-made from a retailer are likely to run you a higher bill than their solid fabric version. Based on what I know about economics (very little) and sofa retailers (a lot), this is mostly just due to supply and demand. Most people out there are not buying a sofa with flowers printed all over its cushions. Fewer are made, which means a manufacturer isn’t getting a bulk deal on pricing as they would say, a whole bunch of cream linen.
Also, patterned fabrics tend to be more expensive than solids in general, either due to the labor of weaving or even digital printing. More design = more money. All of that to say, you don’t enter into the decision to sidestep a solid colored sofa for something with a patterned fabric lightly. It’s an investment; most of the ones I found (keep reading) are at least $2,000 and that’s on the low end. I did find a few great slipcover options from a company called Bemz that makes covers specifically for IKEA sofa models. Those go for between $600 and $1,000, but that’s after the purchase of a sofa. It would be a great purchase if you are looking to refresh an existing IKEA sofa, or even buy one second hand.
Reupholstering an old couch or something second-hand/vintage is also an avenue worth exploring, though that can get pricey really fast. Depending on the city you live in, how much restuffing needs to be done for your cushions, and the size, you’re looking at anywhere from $1,000 to well over $3,000 for labor in addition to fabric. Not to mention the additional labor it takes for matching up patterns, which is a so important for a high-end look.
I know it sounds like I’m talking everywhere here down from the very topic at hand, but I wanted to lay out the realities before we all dream a little bit. Because a patterned sofa is a room maker, a unicorn furniture piece that makes people stop, think “whoa, that’s different” and look again. It’s a “double take” design moment, if you will.
Where To Use Patterned SofasFor anyone interested in dipping their toes in the patterned sofa waters, maybe you’re wondering which room in your home might be the best bet. It can feel scary to make your keystone living room sofa moment that moment. And while I’m all for diving into the deep end, there are other choices! A few ideas I had:
Home office (if you have the space for a smaller sofa)Guest bedroom where you prefer a sleeper sofa Primary bedroom suite that has a sitting area (or even at the foot of the bed if it’s a small armless loveseat)Formal living space (i.e. not the everyday family sofa for lounging and TV watching)In the form of a dining banquette (no, technically not a sofa, but it’s kind of the gateway to a sofa)All of those places would be prime real estate for a patterned sofa or loveseat. It’s kind of like how a powder bathroom is a place people feel safe taking big style risks. Maybe because you can close the door and only get a taste of the drama in small amounts, I think the same can apply to the spots I listed above.
Some More Inspiration If You’re Not ConvincedLook, we all like what we like, and I like color and pattern. That’s no secret around these halls. I can also very much appreciate a quiet, subtle room, but I can’t deny that every time I see an image of a space with a patterned sofa, my heart starts racing a bit the way it did when I saw my middle school crush coming down the G-hall stairs. I’ve done a lot of talking up to this point, but let’s just meander and explore some beautiful (definitely aspirational) rooms that might just inspire you to go for the bold the next time you might be in the market for some seating:
View this post on InstagramA post shared by Cabana Magazine (@cabanamagazine)
If you love a print like I do, Cabana Magazine needs to be your next follow. I promise you won’t be disappointed. I especially love this ode to pattern above, which I think works so well because each fabric is a color story of its own without to many elements. That way, they function more as a block of color than a fabric with a print made of varied shades.
View this post on InstagramA post shared by A L B I O N N O R D (@albionnord)
A pinstripe will always be your easiest transition away from a solid fabric. It just adds a touch of interest without being over the top.
View this post on InstagramA post shared by Architectural Digest (@archdigest)
This, however, is over the top in a very fun, exciting way. I can’t say I’d be this bold in my own home, but I sure do enjoy looking at it. I especially love that all the pillows are a bold stripe with colors pulled from the floral velvet.
View this post on InstagramA post shared by Studio Meghan Eisenberg (@meghan.eisenberg)
Muted colors can really make a floral pattern easier to work with. Meghan Eisenberg make these seem almost like a neutral with her subtle use of textures, earth tones and simple styling.
View this post on InstagramA post shared by @lucymacnicollhome
This room by Lucy MacNicoll Home makes me think of a large-scale Laura Ashley pattern from my childhood. It’s very formal with the skirt and button tufts, but in the right house/room, it could be incredibly charming.
View this post on InstagramA post shared by Michelle Kelly (@kittykellystyle)
Michelle Kelly noted in her Instagram caption that she kept this room simple to let the floral sofa be the real star, and what can I say? It works!
View this post on InstagramA post shared by Heidi Caillier (@heidicaillierdesign)
Another one by Heidi Caillier. I love the warm neutral palette of this fabric because it becomes a very easy, welcoming backdrop for nearly anything. You can see it works with a trio of patterned throw pillows, and adds interest to a room with white walls and soft powdery blue millwork.
And for anyone who thinks a patterned sofa locks you in to a certain style or color palette, the owner of this home could decide to change the curtains to another color or print, paint the bookcase green or even maroon, bring in a rug in a totally different vibe, and BOOM you have a different room with the same sofas. It can be very versatile and in fact, give you a lot more to pull from than solid sofa for any room refreshes down the line.
View this post on InstagramA post shared by Architectural Digest (@archdigest)
I love a thick cabana stripe on a sofa with a modern silhouette like this one in a room by India Mahdavi from a feature in Architectural Digest. Typically, I find more graphic prints on blocky, streamlined pieces, and florals or more eclectic fabrics on leggy sofas or traditional shapes like an English roll arm, for instance.
View this post on InstagramA post shared by Lulu and Georgia (@luluandgeorgia)
Even Sarah Sherman Samuel got in on the pattern action with her repetitive tiger print fabric. She used this sofa in a showhouse she put together using a lot of her Lulu & Georgia designs.
View this post on InstagramA post shared by Sara Ligorria-Tramp (@tramp.studio)
Don’t be afraid to go for it with patterns. Pretty goes with pretty, as you can see in this room by Julia Chasman Design, shot by our friend Sara Ligorria-Tramp and styled by our other friend Emily Bowser.
Patterned Sofa Shopping PicksIt’s fun to virtually window shop for something like a printed fabric sofa because my brain quickly envisions rooms for each of them in a way it doesn’t do for a fairly straight-forward solid linen variety. Each of these has it’s own very strong personality, and they each are saying something different. AND WHO DOESN’T WANT A SOFA THAT TALKS TO YOU? Let them speak to you, go ahead…

1. Priory Sofa by Kelling Home | 2. Scandinavian Midcentury Rosewood Sofa “Monte Carlo”, 1965 | 3. Nickey Kehoe Curved Sofa in Custom Fabric | 4. Midnight Fleur Preston 86″ Sofa (Limited Edition) | 5. House of Hackney Willoughby Velvet Sofa in Florika Print | 6. Winnie English Arm Slipcovered Sofa | 7. English Roll Arm Sofa in Coral Solaire by CW Stockwell | 8. Ekeskog 3 Seater Sofa Cover Regular Fit, Simply Linen, Pink Sippor | 9. Crushed Flower Oil Painting Flower Fabric Sofa 86.61” Upholstered Sofa | 10. Grady Pleated Sofa in Seahaven French Blue | 11. Jylin Woven Athena Sleeper Sofa | 12. Judarn Sculptural Sofa

1. Marconi 3-Seater Tufted Sofa in Piano Cloud by Gianfranco Frattini | 2. Cocobella 3 Seater Sofa in Spring Green Stripe | 3. Seater Sofa, Ikat Stripe, Olive | 4. Schoolhouse x Clare V.® Marc Striped Sofa | 5. The Woven Marija Kori Modular Sectional Bundle | 6. Bedford Sofa in Navy with Samuel and Sons Welting, Plaid | 7. Ekeskog 3 Seater Sofa Cover Regular Fit, Simply Linen, Picnic Check Sun Yellow | 8. Alana Lawson Three-Cushion Tight Back Sofa, Blue Lattice | 9. A Mid Century Italian Sofa in Checkered Jacquard | 10. Bryn 3-Pc Sofa, Soweto Blue by Nikki Chu | 11. Tailored Tuxedo Sofa in Cornflower Classic Ticking Stripe | 12. Roma Sofa in Butter
I love so many of these and could really design an actual space in my home with one if I had the room. Though I’m not in the phase of my current house to be thinking of a new sofa (I’m too busy wiping toddler-sized Greek yogurt and peanut butter hand prints off my existing sectional), this is worthy of opening up the ol’ mental design vault and packing away for another day. I actually have a wildly beautiful, embroidered Manuel Canovas fabric I’ve been hoarding since my magazine days that would be perfect on a small loveseat, so maybe, just maybe, one day when I buy a house and have a few more rooms to work with, I’ll join the patterned sofa club. Here’s to hoping, dreaming and patterned sofas!
Your friend in all things just a little over the top, Arlyn
Opening Image Credit: Design by Emily Henderson | Photo by Sara Ligorria-Tramp | From: Living Room Update – AGAIN – Our New Sofa, My Dream Floral Chaise And The Pop Of Red I Always Wanted In My Life
The post Patterned Sofas Are the “Magical Unicorn” Of Living Rooms: Arlyn Breaks Down Why They’re So Special + All the Shopping Picks appeared first on Emily Henderson.
September 23, 2024
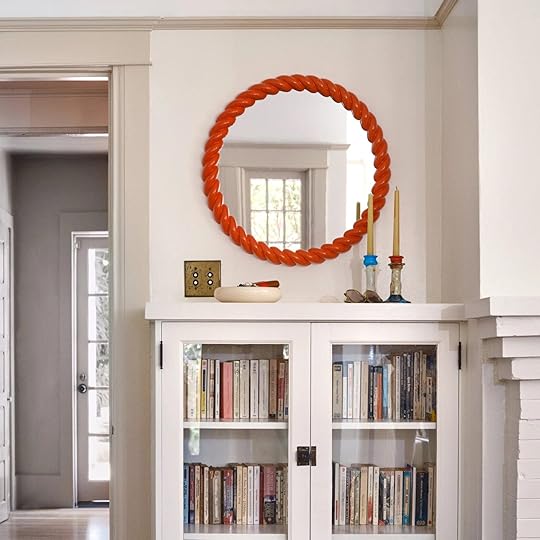
My Brother’s River House Guest Bath Reveal (+ Are Pony Walls Back?)

Another reveal of the rooms that are done in my brother’s house – this one being a really quiet, neutral bathroom that makes me want creamy beige everywhere and dare I say a pony wall (shout out to Max). This bathroom has a small footprint, off the mudroom near the family room, and will be used for guests and dirty kids from the river (probably not that frequently). It turned out really pretty, quiet, clean, and simple with high-quality materials and a timeless contemporary style (with a touch of PNW whimsy). As a reminder, here we are:

The shaded pink area is where we are located in the house (right next to the also finished mudroom:)), and the layout of the bathroom is relatively classic and simple – small vanity, toilet, and shower. The layout was done by Anne Usher (then I came in, with Max Humphrey, to choose the finishes).

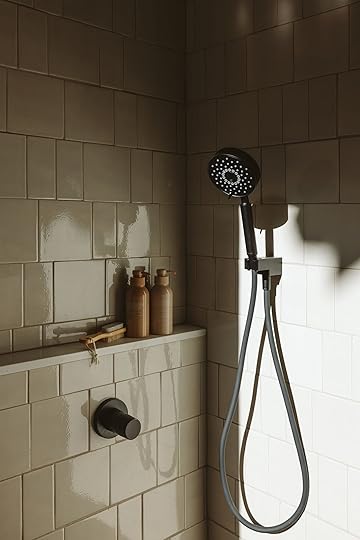
Bathrooms are so hard to shoot (because they are small) but here you can see the whole space – the mix of tiles, the layout with this rather adorable pony wall, and simplicity in shapes and colors with a really nice contrast. As a lover of tile (and I LOVE these creamy tiles) we wanted to see them more instead of more glass, so we added this pony wall with the glass panel above it to help create a sense of a shower “room” and have more visual interest. I pitched this house to Kohler and Ann Sacks early on (3+ years ago), knowing that inventories run deep, quality is high, and we’d be able to make every bathroom feel custom and yet cohesive. So this bathroom is in partnership with Kohler so almost everything is from their many lines of plumbing, vanities, mirrors, and now lighting! And thank god their plumbing designs are so timeless because things change a lot in 3 internet years, but our choices still look really fresh and perfect for the house.
The Plumbing

Wall Tile | Thermotoer Valve Handle | Volume Valve Handle | Handshower
We went with the Purist Faucet line and the Components handles. I love how clean and simple they are (but they look cool). We put the main handles to be reachable from outside the pony wall, further away from the shower so you don’t have to get drenched before you get in.

Showerhead | Showerhead Arm and Flange
For the tile, we chose the MADE Provencal for the walls in two different shapes, staggered them, and paired them with a really warm black hex on the floor. For a contemporary house (read: new build) we wanted to stay within the simple parameters of the home, but keep it warm, timeless, and use high-quality materials that wouldn’t date. But we didn’t want boring. So finding that balance between interest but not trendy felt really good in here.
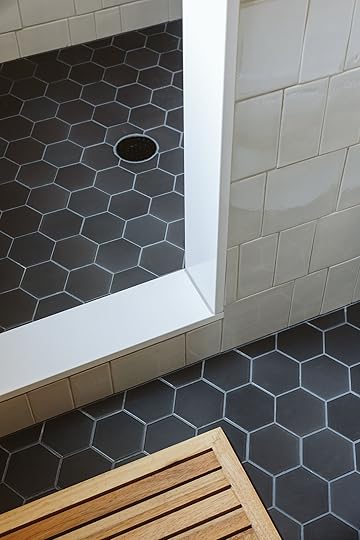
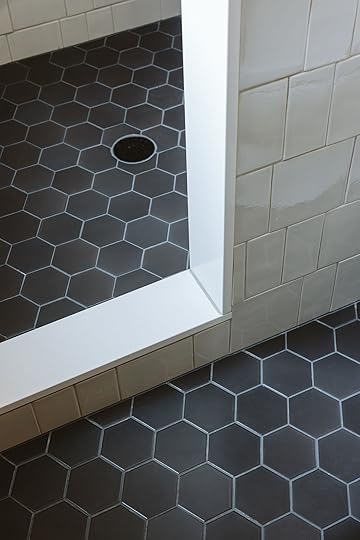
Floor Tile | Trim Stone | Wall Grout | Floor Grout
If you are a grout nerd (which I am – my GOODNESS it changes the look of a tile and room) we chose Dove Gray for the floor, lighter than the tile but not too bright, and Oyster Gray for the walls. The wall grout added depth and brought out the pattern, without making it too busy and we triple obsessed about the tones of the grout to make sure they had the right level of warmth without being too “brown”.
The Vanity
Mirror | Sconce | Vanity | Toliet Paper Holder | Faucet | Sink Handles | Soap Dish | Black Ceramic Tumbler | Towels
For the vanity side, we chose the 36″ Winnow Vanity which is a super transitional style (i.e. can be classic or contemporary). It comes with the stone countertop which makes life so easy (one order and done) and for a guest bath I like to break up the bulkiness and have a shelf at the bottom). This color is mostly black but has a slight blue hue as you can see in the photos.


The mirror is a simple pill-shaped called “The Essential Mirror”, which they sell in so many different styles and finishes and works so well with all the shapes in here – it contrasts the squareness of the vanity and calls back to the shape and finish of the faucet. The sconces are part of Kohler’s newer line called “Jabot” and have a really creamy, oyster-like color which we really liked with the tile and wallpaper. We flanked the mirror with two double sconces (they have single sconces, too) and a semi-flush light fixture that matches.
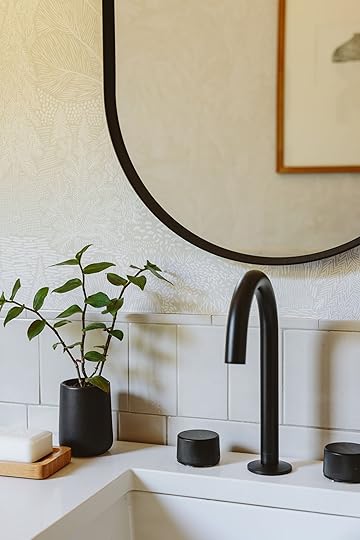
The faucet is part of the Components line which I LOVE – there are a lot of different faucet and handle styles to choose from, again making it easy to customize in a way that you know will look good together. These knobs are easy to twist on and off, hot and cold (obviously), and look so unfussy and simple.
The Natural Light And A Window
Robe Hooks | Bath Towel | Black Planter (vintage) | Hand Towel | Wood Bench (similar) | Toilet | Window
Around 3 pm the light in here gets so dreamy that we had to capture it. There is a window in the shower that floods the room with reflection and brings out all the gloss and texture in the tile. It’s soooo beautiful.

Terra Cotta Pumice Stone | Shampoo | Conditioner | Pumice Stone/Brush
The Tile Pattern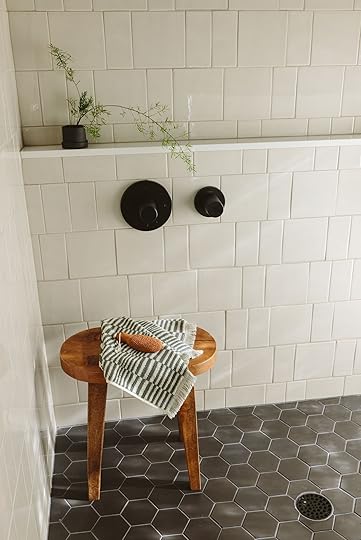

Max Humphrey and I played around with the tile pattern, wanting it to feel staggered and yet random and the tile installer totally got it. I was nervous about some of the lines being too close or not looking random enough but they did a great job.
The Wallpaper
Once again I chose a wallpaper that in person is so perfect, warm and fun to look at but it’s so hard to see in photos. It is QUIET. It’s a Nordic treescape in all of our neutral colors. It brought so much to the room, without adding any busyness or style contrast. We did end up adding wallpaper to now 5 of the spaces in this home and almost all of them have this nature element that brings together the contemporary vibe of the house with the sense of a young fun family.
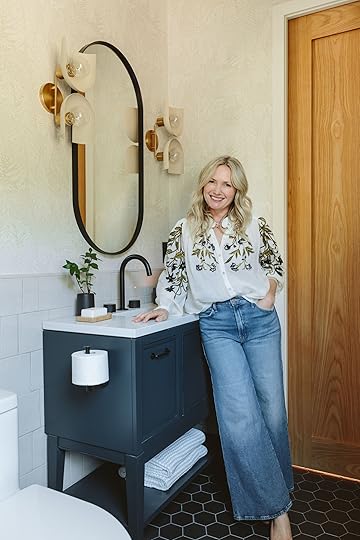
There she is:) It’s a bathroom that people see the most right now and it’s undeniably lovely to be in. The light, airy quality mixed with the high contrast faucets and tile creates a neutral yet interesting bathroom that is totally timeless. The resources are below. A huge thanks to Anne Usher, Sierra Custom Construction, and Max Humphrey for all the work on this project. xx
Bathroom Resources
Tile: Ann Sacks
Trim Stone: Caesarstone
Trim and Ceiling Color: Alabaster by Sherwin-Williams
Hardware: Kohler
Lighting: Kohler
Vanity: Kohler
Mirror: Kohler
Plumbing: Kohler
Wallpaper: Scandinavian Wallpaper
Windows: Marvin
*Architect: Anne Usher
**General Contractor: JP Macy of Sierra Custom Construction
***Interior Designers: Emily Henderson (me!) and Max Humphrey
****Styling: Emily Henderson (me!)
*****Photos by Kaitlin Green
The post My Brother’s River House Guest Bath Reveal (+ Are Pony Walls Back?) appeared first on Emily Henderson.
September 22, 2024
The Link Up: The Portland Meets Paris Collab We Are All IN LOVE With, The Viral Lip Set Jess Tried, And Two Great Parenting Resources

Happy Sunday y’all! Em and Mal headed to NYC this week to chat about the future of AI and content creation. She’s planning to write a whole post about it because it’s all pretty wild. Otherwise, the art barn mural is looking SO GOOD and we can’t wait to show you. But don’t worry we have another River House reveal tomorrow which is also so exciting! Until then let’s get to this week’s links:)
This week’s house tour is the home of Clare Vivier (the founder of one of EHD’s favorite fashion brands, Clare V.!) and it is SO charming!! Her and her family have actually already lived in their 1905 Craftsman home for 23 years. While their home has gone through a few different phases, Clare and her husband are now empty nesters so this is their most recent refresh and boy is it speculator! See all the photos here and we’ll let Caitlin talk about the second reason this tour is VERY exciting. Also, can we note that Arlyn called this trend THE DAY BEFORE this tour came out:)
From Emily: Two of my favorite brands (Schoolhouse and Clare V) launched a collab that is Portland meets Paris (I’m in). Awesome Trays, rugs, and accessories in that slightly irreverent whimsical style. Three cheers for this one!
 photos via schoolhouse


Schoolhouse x Clare V.® Marc Striped Sofa | Schoolhouse x Clare V.® Fernand Circle Mirror | Schoolhouse x Clare V.® Sonia Rectangle Lacquer Tray
More Love From Caitlin: The entire Schoolhouse x Clare V. collab is TO DIE FOR, but I am particularly charmed by these chunky, glossy catch-alls. As Den and I work to combine our styles (catch up on the beginning of that design merger process here, ICYMI), we’ve officially landed on a a bright, happy, loosely 1970s modernist-inspired aesthetic. It’s still a bit funky and whimsical, but in a cleaner, punchier way – prepare yourself for lots of play with shapes, lines, angles, and finishes. These vessels will be right at home in our new entry setup – I can’t wait to show you! (PS. Semi-related, but I’m too excited not to share: we just got a shipping notification for our new sectional, upholstered in a beautiful jade velvet. Anyone want a sneak peek?!)
From Mallory: I just celebrated another bday and every year we make my favorite clam pasta!! It’s so easy, delicious and it’s also Alison Roman’s favorite pasta so there are TWO people telling you it’s very good!! Also, hot tip I always use bucatini instead of spaghetti because it’s the best noodle.
From Gretchen: I’m headed to a music festival this weekend and SO EXCITED! This isn’t my first multi-day music rodeo, so by now I have my packing list pretty dialed. I like to dress up in fun outfits: bright colors, playful patterns, maybe a silly hat and some wild sunglasses. But ultimately I’m a practical girl, and comfort is key. I’ll be rocking pants, not pasties–no hate to those who choose otherwise! On the outfit front, I’m pretty covered with a treasure trove of thrifted leopard pants and tie-dye tops. But colorful shoes I have not. That is until I popped over to Target (are we surprised?) and found these fun and COMFY platform sandals. They are perfectly practical for all the walking I’ll be doing on festival grounds, not to mention easy to clean, but I love that buttery yellow color! They’ll add the perfect pop to my outfits.
From Arlyn: I’ve entered into the part of parenthood that has transitioned from “gotta just keep this baby alive” to “how do I make sure not to totally screw up this kid?” We are in a time of information, for better or for worse; meaning, there is a resource for anyone at any stage of their life with whatever hurdles they have to jump. It can honestly feel incredibly overwhelming to silence the noise and find something you really connect with and trust. Two accounts I’ve really emotionally bonded with as of late are 1,000 Hours Outside and Nurtured First. The first is all about reclaiming childhood and building connection with families in a digital age, and the latter is about nurture-first parenting. It’s hard to remember all the things all the time in every situation, but we’re doing the best we can with what we have, and these two sources give me SO much. Check them out if you’re a parent to young or teenage kids!
From Jess: In line, checking out at Sephora, I grabbed the Charlotte Tilbury Mini Pillow Talk Lipstick & Liner Set in nude pink (there are a few tone options). I had heard SO much about this set that I decided to give it a try and I have to say it’s pretty good y’all. Just enough to give you some solid “oomph” but not so much that you don’t look like yourself. Big fan if anyone else needed yet another rave review:)
Thanks for stopping by and see you tomorrow for the reveal!!! xx
Opening Image Credits: Design by Valerie Legras Atelier | Styled by Velinda Hellen and Erik Kenneth Staalberg | Photo by Sara Ligorria-Tramp | From: The New Design Rules
The post The Link Up: The Portland Meets Paris Collab We Are All IN LOVE With, The Viral Lip Set Jess Tried, And Two Great Parenting Resources appeared first on Emily Henderson.
September 21, 2024
9 Cozy But Extremely Cute Throw-And-Go Jackets That Will Feel Like You’re Wearing A Blanket

Last week, we talked about the new fall jackets we are really eyeing for this fall…and a lot of them are variations of the very trendy (but also extremely classic) barn jacket. Our numbers show that y’all were big fans too! Due to the fall outerwear excitement, today we thought we’d get a little more casual and a lot cozier:) I’d like to think that “coziness” is a part of our EHD ethos. We want to help you create a cozy home and show you comfortable/cozy options to potentially wear on your body (if that’s your preference, of course). So think of these jackets as elevated “throw-on-and-go” soft pieces. Perfect for random errands, school pickup, a fun friend lunch, or any other outing you want to feel comfortable but a little extra cool. Let’s start with my muse!

As I was searching all over the internet for fall jackets, I immediately LOVED this one when I saw it. But it really didn’t fit in the more traditional fall jacket category of last week’s post. I decided to pin for potentially a future roundup. Well, that opportunity came much fast than I thought since the other post was so popular. YAY. So for this one, I just love the ease of dressing it up or down. The way it’s styled with the vintage tee and jeans is so fun and fresh! But switch the jeans for wide leg slacks and the vintage tee for a silky top… it’s perfect for your business casual job. Done and done.
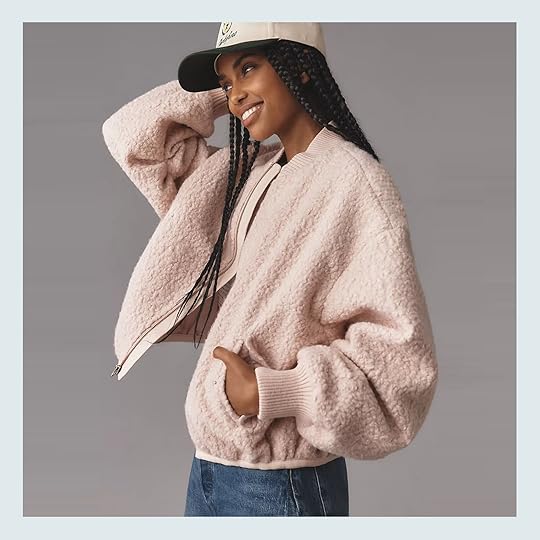
Personally, I have been pretty obsessed with the bomber jacket look for a couple of years now so when I saw this sherpa blush pink version I shrieked! I adore that color, the look of collar and cuffs, plus that amazing nubby fabric is so cozy. Another great option that will work with a ton of looks.
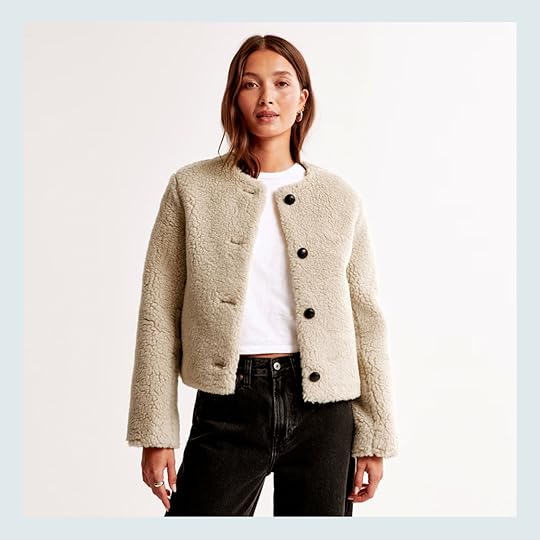
This gal is the “fanciest” on this list but it’s also easy breezy to dress down. I mean look how it’s styled in this photo. I want to be this cool girl! The lack of collar give it edge and how chic are those buttons?
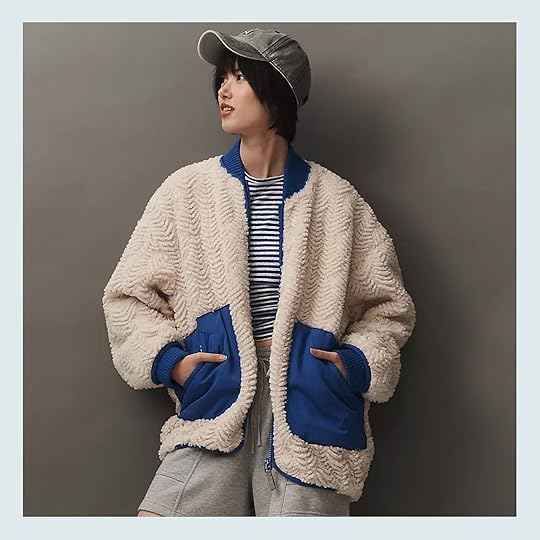
When I showed Gretchen this jacket she had the same reaction I did, “OMG I love this one so much!” The pattern of the sherpa fabric is such a fun and cool detail. Then you add that bold pop of blue and baby, we’ve got a cozy jacket star! It’s another one that just looks so cool and you wouldn’t need to do much else with your outfit. Instant statement piece.

I also found this one early on in my search and thought about sending the link to Emily! It’s got her name written all over it. But since she likely has something similar, the next people I wanted to share it with was all of you:) The piping really elevated the whole look, I think that blue is perfect, and you can’t tell me that doesn’t look so freaking comfortable to wear.

But if you want something a little more understated (and more affordable) this nubby quarter zip is perfect. This incredible, rich merlot color is so pretty and I love that little pop of bright red on the zipper pull for a fun contrast!
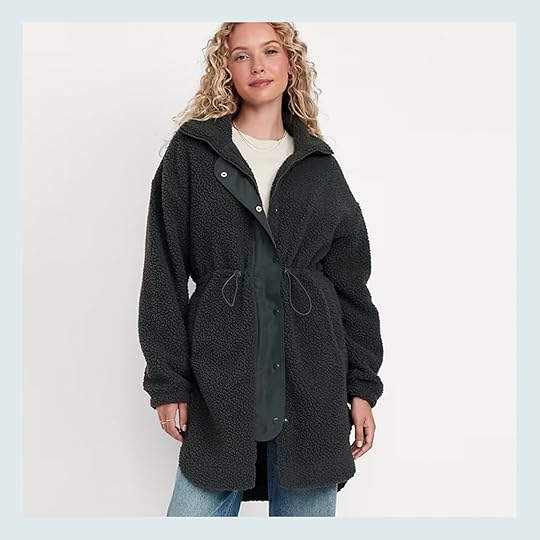
If you want a little more length then this guy could be a great match for you. Think how warm you’ll be! This was one was Gretchen’s favs and she is highly considering buying it which always makes me feel good when I show the team my finds:) Plus, since it’s from Old Navy it’s currently on sale for under $50.

But maybe you want something that feels a little more modern but still is in the cozy fleece world. Well, enter the neoWARM liner. The piping is amazing, love that there’s no collar, and that waist tie brings the whole look home. I can think of so many things to easily wear this too! It’s a no brainer.

Last but not least is this Varley fleece (the same company of the quarter zip Em is wearing in the opening photo). Their quality is great but also look at all the details! That oversized collar is amazing (apparently I’m into a big collar or no collar), those double pockets are so good, and who doesn’t love longer fabric to keep that bum warm and dry. It just looks very “effortless” in the best way.
Ok, that’s my little roundup that I literally couldn’t wait to show you but I hope this was helpful and that now everyone is fully ready for fall.
Love you, mean it.
Opening Image Credits: Photo by Kaitlin Green | From: A Fall Color Trend (Brown) I’m Embracing Hard Right Now
The post 9 Cozy But Extremely Cute Throw-And-Go Jackets That Will Feel Like You’re Wearing A Blanket appeared first on Emily Henderson.
Emily Henderson's Blog

- Emily Henderson's profile
- 10 followers

