
Emily Henderson's Blog, page 269
February 27, 2019
Expert Approved: 10 of the Hardest to Kill House Plants + Planter Roundup
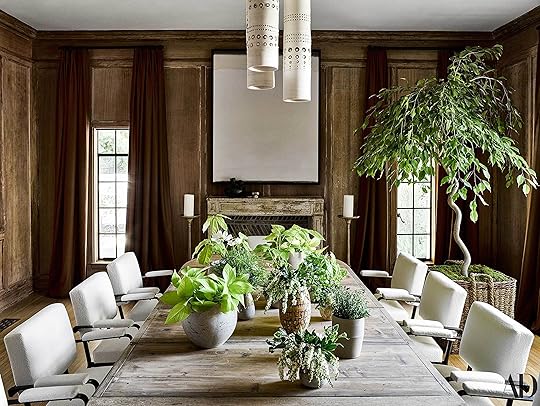 image source | design by nate berkus & jeremiah brent | plant design by rachael freitas
Written by Arlyn Hernandez
Plants. In the PG-censored words of Emily Henderson “What could people need to know? They’re so **bleeping** easy.” Let me rewind for a second, to give you some context. Picture this: All of team EHD, up in the mountains for a staff retreat in early January. The fireplaces are roaring, the soup is flowing, and we’re spit-firing off ideas for our editorial calendar for the first two quarters of 2019. I bring up the fact that I think the craving for plants has replaced the yearning for children for millennials and Gen Z (only sort of kidding), the rest of the team hoops and hollers in agreement, proclaiming that YES, INDEED we should be doing regular plant content. Enter Emily’s comment. She was pretty dumbfounded that we all collectively were SO excited about the potential to write more about plants, not understanding why we would…who would care? Um, everyone Emily, everyone (back me up here…please?).
You guys may or may not know that I used to be the Design Editor at Apartment Therapy, but—sorry Maxwell if this is insider information—every.single.reader was OBSESSED with plants, so I had to imagine that such interest was pretty universal. I can go into a much larger philosophical/societal hypothesis on why I think that young people care so dang much about indoor greenery these days (we’re happy to own something, no backyards, putting off families+student debt, etc.) but instead, I’m going to focus in on what everyone on our team wanted to know more about…what plants can’t I kill easily?
Somehow, we’re all obsessed with plants, but no one seems to be able to claim a green thumb or keep anything alive for extended periods of time. Anyone else around here feel that way? Though, I will say, I’m pretty proud because I’ve kept a fiddle leaf fig tree (that I bought for $30 at Costco!!!!) alive for seven months and find it pretty easy actually…just keep in diffused bright sun, water when the top inch or so of dirt feels dry (or the leaves start getting a little droopy…that tree is expressive and tells you what it needs pretty clearly). Anyhow, I digress. Emily might have plants all figured out, but we didn’t, so I reached out to an dedicated expert for some help. Rachael Freitas of UPCOUNTRY Plant + Design came to the rescue with lots of great tips for any plant newbies as well as 10 house plant varieties to consider if you’re thumb isn’t exactly a verdant shade of green.
I’m going to let Rachael take it from here:
First things first, you gotta master the basics of keeping a plant thriving (then we’ll get into the plants to actually buy). Here are three things to commit to memory (or just write it down…or Pin this article for reference!):
Don’t repot ‘em!
Sounds counter-intuitive to most, but the best way to keep your interior plants alive and well is to keep them in the plastic nursery grow pot they come in, rather than repotting them in your decorative container. When you purchase a plant, also purchase a plant liner. Most nurseries carry them, so just ask for the right size for your plants. From there, choose a cool decorative pot that is a bit bigger so the liner and plant can fit inside. (General rule of thumb: a 6” plant should go in an 8” decorative pot, an 8” plant in a 10” pot, etc. Plus, many really stylish pots rarely have drainage holes or look good with a saucer under them.)
The reason for this is plants want to be able to drain. When you repot them into a decorative pot with no drainage holes, it doesn’t take long for that plant to drown. Additionally, houseplants enjoy the cozy environment their nursery grow pot provides. Keep the roots protected by leaving it in its original home. When the plant starts looking sad, you can repot into a larger nursery pot (also available at most nurseries). But most interior plants can thrive for years in their original container.
Use distilled or filtered water.
Surprise surprise—the fluoride, chlorine and other chemicals added to tap water may be killing your plant. So give them the fighting chance they need by using clean water. Also, water slooooowly. Really allow the water to soak into the roots. Don’t dump water in quickly – it will rush straight past the roots and out the drainage holes.
Pay attention to their environmental cues.
Since plants are living things, they often indicate what they need. See a plant reaching for a window? Rotate it and let all sides get their turn in the sun. Is your plant getting dry and brittle? Move it away from any heat and air sources. Yellow, wilting leaves, and brown tips generally mean it’s waterlogged, so steady that liberal watering hand. Most houseplants like to dry out a bit between waterings. By starting with hardier plants, you can learn their cues as you grow in your green knowledge…before diving into a fiddle leaf fig, let’s say. 


February 26, 2019
Jess’ MOTO: You Have To See How She Hacked Her Rental Kitchen With DIYs


Hi everyone! Missed you. So glad we are back together because man, was I overwhelmed by the love last week when I revealed my living room and cannot tell you how much it meant to me. Are you ready to see my sweet little kitchen I teased in the intro (also head there for befores)? That’s her at the end there! With this one, I had some challenges. Challenges that are EXTREMELY relatable to most renters, I think. Because in a living room or bedroom, you can paint the walls, switch out the lights and hang art to make it feel totally new. BUT in a kitchen (and bathroom), there are typically less than attractive permanent materials that, without involving construction and $$, you must live with. My kitchen had two things going for it, though: That open shelving (hey pretty!) and enough space for a dining nook (what?!). However, there were three things that were a thorn in my side: The floors (that I begrudgingly embraced), the countertop and a broken refrigerator. (Fun fact, my lease stated that my landlord wasn’t required to provide appliances, so it was on me to figure this one out…I asked).
My mind started spinning with ways to functionally rectify these visual “wrongs.” I started with the fridge as that was the most pressing. Or so I thought…
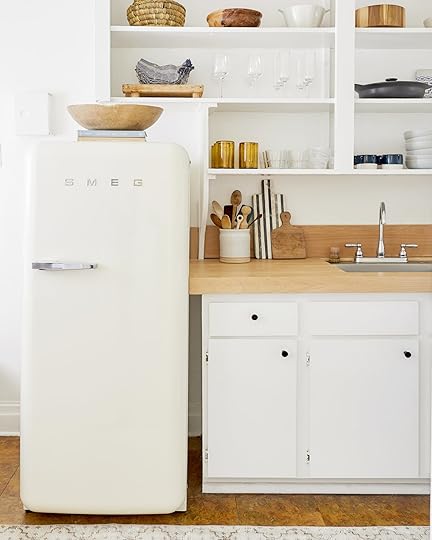
Smeg Fridge | Cabinet Knobs | Recipe Book | Dessert Book | Top Shelf (left to right): Woven Bowls | Wooden Bowl (vintage) | Striped Porcelain Bowl | Wooden Bowl | Second Shelf (left to right): Gold Knot Basket | Napkins (no longer available) | Wine Glasses (no longer available) | Champagne Flutes
Now, there were a couple of restrictions. Obviously, as you can see from the photo, it couldn’t be a tall fridge because of my shelving overhang. So what started out as something SO exciting (the opportunity to display beautiful kitchenwares) became a real burden, real fast. I was left with about two options for refrigerators I didn’t hate that I found online. The other rather obvious other issue was that it couldn’t take up a lot of my precious square footage. I had my breakfast nook to consider! Well, I ended up living with said broken fridge until TWO WEEKS before the shoot. Whoops. I just kept putting it off. It ended up not feeling that pressing since I only kind of cook. I’m trying to cook more but I wouldn’t say I love it. Plus, who really wants to spend money on a fridge they know they aren’t going to love?? (I’m raising my hand).
Then, another serendipitous thing occurred. You may have noticed that that pretty Smeg looks an awful like the one from Velinda’s tiny kitchen reveal. Good eye! It is the EXACT one. There was a bit of a miscommunication and a fridge that opened on the wrong side was sent to Velinda. Smeg, being the wonderful company that they are, sent her the correct one. But the wrong one wasn’t picked up right away, so I thought maybe they might consider letting me keep it and then they wouldn’t have to deal with shipping. They said yes (!!!) and I got the fridge I always dreamed of having. Guys, there is a wine rack inside. Guys, an ACTUAL wine rack to help secure my already strong bond with the Trader Joe’s wine section.

Top Shelf (left to right): Black Wood Vase | Scalloped Neck Pitcher | Blue Handled Vase (vintage) | Pom Mug (similar) | Marbled Vase | Glass Pitcher | Tall Blue Vase | Amber Glass Vase | Paper Vase
That is the only thing in my kitchen that was gifted (I like being upfront about these things). Everything else came straight out of my ever-shrinking wallet. But we are not going to think about that because we have the rest of the kitchen to discuss.
Jess’ MOTO: You Have To See How She Hacked Her Kitchen With DIYs
Hi everyone! Missed you. So glad we are back together because man, was I overwhelmed by the love last week when I revealed my living room and cannot tell you how much it meant to me. Are you ready to see my sweet little kitchen I teased in the intro (also head there for befores)? That’s her at the end there! With this one, I had some challenges. Challenges that are EXTREMELY relatable to most renters, I think. Because in a living room or bedroom, you can paint the walls, switch out the lights and hang art to make it feel totally new. BUT in a kitchen (and bathroom), there are typically less than attractive permanent materials that, without involving construction and $$, you must live with. My kitchen had two things going for it, though: That open shelving (hey pretty!) and enough space for a dining nook (what?!). However, there were three things that were a thorn in my side: The floors (that I begrudgingly embraced), the countertop and a broken refrigerator. (Fun fact, my lease stated that my landlord wasn’t required to provide appliances, so it was on me to figure this one out…I asked).
My mind started spinning with ways to functionally rectify these visual “wrongs.” I started with the fridge as that was the most pressing. Or so I thought…
Smeg Fridge | Cabinet Knobs | Recipe Book | Dessert Book | Top Shelf (left to right): Woven Bowls | Wooden Bowl (vintage) | Striped Porcelain Bowl | Wooden Bowl | Second Shelf (left to right): Gold Knot Basket | Napkins (no longer available) | Wine Glasses (no longer available) | Champagne Flutes
Now, there were a couple of restrictions. Obviously, as you can see from the photo, it couldn’t be a tall fridge because of my shelving overhang. So what started out as something SO exciting (the opportunity to display beautiful kitchenwares) became a real burden, real fast. I was left with about two options for refrigerators I didn’t hate that I found online. The other rather obvious other issue was that it couldn’t take up a lot of my precious square footage. I had my breakfast nook to consider! Well, I ended up living with said broken fridge until TWO WEEKS before the shoot. Whoops. I just kept putting it off. It ended up not feeling that pressing since I only kind of cook. I’m trying to cook more but I wouldn’t say I love it. Plus, who really wants to spend money on a fridge they know they aren’t going to love?? (I’m raising my hand).
Then, another serendipitous thing occurred. You may have noticed that that pretty Smeg looks an awful like the one from Velinda’s tiny kitchen reveal. Good eye! It is the EXACT one. There was a bit of a miscommunication and a fridge that opened on the wrong side was sent to Velinda. Smeg, being the wonderful company that they are, sent her the correct one. But the wrong one wasn’t picked up right away, so I thought maybe they might consider letting me keep it and then they wouldn’t have to deal with shipping. They said yes (!!!) and I got the fridge I always dreamed of having. Guys, there is a wine rack inside. Guys, an ACTUAL wine rack to help secure my already strong bond with the Trader Joe’s wine section.
Top Shelf (left to right): Black Wood Vase | Scalloped Neck Pitcher | Blue Handled Vase (vintage) | Pom Mug (similar) | Marbled Vase | Glass Pitcher | Tall Blue Vase | Amber Glass Vase | Paper Vase
That is the only thing in my kitchen that was gifted (I like being upfront about these things). Everything else came straight out of my ever-shrinking wallet. But we are not going to think about that because we have the rest of the kitchen to discuss.
February 25, 2019
Mountain House Mondays: Our Dining Room Dilemma

This is one of those posts that as I was writing it, ended up changing my mind about the ENTIRE room. But instead of deleting out all the “debates” at the beginning, I left in the thought process that brought me to a big TWIST at the end, so keep reading.
**But before I get into talking about our mountain house, I want to recognize a fellow family blogger’s fire tragedy. Chris Loves Julia were also documenting their mountain cabin renovation of which we have loved following along. Last week, it tragically burned down and well, it shook our office and our family, with almost everyone tearing up so I can’t IMAGINE how they feel. I didn’t want to continue going along, documenting our mountain project, without just recognizing their tragedy and knowing that it might be hard for them to read along. Not sure what else to say except we, like them, are so grateful that no one was inside. They are a great family to support, creating wonderful content and putting good things out into the world so if you don’t follow them, now’s a good time to start. We are so just so, so, so sorry.
It’s another “where we are and where we might go” post on the mountain house, this time in the room that ALWAYS CHALLENGES ME the most: the dining room. Why? Keep reading, but first let’s remind us all what she looked like before.

Besides this strange peninsula in the middle, it was kinda the same shape. We put in new GORGEOUS windows from Marvin (more on that later) and changed out the flooring (from Ross Alan Reclaimed Lumbar—the nicest family with the prettiest wood, so if you live in LA, please go check them out and say hi from us).
What you can’t see is that the walls all had a thick layer of orange peel spray and the corners of the entire house were rounded—like every window, every doorway, everywhere. Do you want to know the most annoying way to blow your budget? Smooth coating walls. More on that later (and we didn’t do that here, actually, they are a slight plaster).

It’s a pretty room with GREAT light, but it’s not there yet. A lot of the elements could change.
LIGHTING

First, once again I have a scale issue and I’ve finally learned my lesson. I, Emily Henderson, like smaller lighting fixtures over dining tables. Sometimes it takes three times, making the same mistake to really get it (Glendale house, Los Feliz dining room and now here). It’s like how I keep buying high waisted wide leg sailor pants and yet I always opt to actually wear a skinny jean. Always. So the other day I told my best friend as I was purging my closet, “I’m making a promise to myself and you that I will NEVER EVER EVER buy another pair of this style.” And then three effing days later, I bought low waisted wide legs as if that’s going to be any better!!!
Anyway. There is a reason for the larger fixtures. Originally we were going to punch through the ceiling and show the joists to match the kitchen, but once we decided on the plumbing in the directly-above master bathroom, we couldn’t. So the ceilings were supposed to be a foot higher. I also wanted glass as to not abstruct the view. They don’t look too overscale in the photos but when you are sitting at the table, they feel big above you. They are seriously beautiful, with black and brass detailing and they give great ambient light. It’s not ideal, as they were custom (from The Urban Electric Company) but I’m hoping my friend’s new 100-year-old huge Tudor will be a good fit for them.
Meanwhile, I’m still trying to figure out what should go there, and I may not know for a while until I for sure decide for or against a banquette going all the way around the windows. I’m leaning towards what we like to call a “micro pendant/sconce” like this:

image source | design by studio joanna laajisto
Next, the ever-controversial pony wall:

A few facts about the pony wall: 1. Yes, the column is load-bearing and as we tried to move it, our engineer said the most we could move it is 12 inches to the right because our huge bathtub sits above it. At one point, we were going to get rid of the “pony” part of it and clad the column in wood, but then we thought that MAYBE we’ll still do a huge dining banquet in which case we’d want that wall. So it was one of those things that we thought to keep for now, deal with later.
But as the coats and boots are being strewn about (it’s right by the backdoor which is how we walk to the woods/lake), I was like ugh, maybe I should make this awkward wall more functional. Many of you shared my same woes on our family room update post, and we even polled it on Instagram Stories last week and it was 53 to 47 to close it up. We are so used to it being open and even though there is still a big opening directly next to it, it’s hard to close things up.
So I did what any professional stylist would do: I hung up a piece of fabric to see how it felt.

The idea would be that we would dry wall the dining room side of it and turn the family room side into a very shallow wall of hooks for coats. MAYBE a low shelf for boots. Kind of like a mini mudroom, similar to:
 image source | design by studio mcgee
The pros of closing up the wall are as follows:
It will be cleaner, architecturally. It makes the dining room feel more enclosed and we can put pretty art on there.
We get some hooks for coats, therefore adding function.
The cons of closing up the wall are as follow:
We like how open it is!
I really don’t want to look at a pile of coats on the wall. Not having the storage means we are forced to hang them in the hall closet, of which I do three times a day.
We would spend more money. We are SO done spending money on this house. I really should pursue a marriage with a handyman or a general contractor. I wonder if Brian would be open to that if he knew how much money our family would save?
We might have to move the electrical unless we don’t take the niche down to the floor, which is annoying and yes involves dealing with an electrician and saving money and we MIGHT need it for code.
A lot of you want us to do floating shelves there which we had considered, but then I have to put something on them and I don’t want to create a space that I have to style. We already have a bar, so it would just be something that would just create visual clutter.
So where are we right now on the pony decision?
Last weekend, as we sat at that table with friends, fabric over the opening, everyone agreed that they missed the openness. Brian was pretty adamant about not closing it up and I was on the fence so I suppose that’s our decision for now.
I do think its a missed opportunity for function, and there is something a little dated about it but I will say this: There is STILL a chance that I will put in a big built-in banquette in which case we’ll want that wall.
Let’s talk about the real problem here…
TABLE & CHAIRS

Right now, we have this IKEA table (I know, it’s pretty darn good) chosen because the day before we were moving all of our stuff up there, we realized that we didn’t have a table and IKEA stocked this one. Turns out we actually really do like it. We brought all our extra dining chairs up there to play around (and sit on), so naturally, I took photos so you could see the difference between wood and black.
What do I really want? A GORGEOUS live-edge table and beautiful yet comfortable chairs.
 image source | design by lora appleton
BUT DO YOU KNOW WHAT DOESN’T ACTUALLY EXIST? REALLY beautiful + unique + REALLY comfortable + sculptural + kid-friendly chairs. It’s not that I haven’t looked, it’s that by nature of being a chair, it can’t actually be all of those things. It’s like trying to find really low-calorie/low fat + really delicious food. It’s just not how life works and you have to compromise somewhere.
I know this because our dining chairs at our Los Feliz house were in fact VERY comfortable but they were kinda boring. My next door neighbor/good friend has them now because I found my dream set of Cherner chairs at the flea market which are a 7 on the comfort scale, but every time I’m hanging out around her dining table, my bum being nestled by the padding on all sides, I regret choosing style over comfort.
So here I will NOT choose style over comfort. It’s a bummer, TRULY. Maybe you are wondering what level of comfort a family could possibly need and I’ll go ahead and say our’s is VERY HIGH.
What makes a chair comfortable?
Upholstery and cushion on both the seat, back and, ideally, arms. Think a club chair at a bar. That’s what I want. But those are rarely if EVER in the style that we want up here, which is more sculptural and minimal, with mixed finishes (ideally wood and upholstery). But upholstery on the arms is by nature NOT kid-friendly. Even if it’s leather, you still have to wipe up the marinara and jelly hand prints.
Large scale. Especially for guys, we don’t want a dinky, light chair.
I love these below, but they are everywhere and that back looks VERY straight.
 image source | design by giancarlo valle
These look more comfortable but I still don’t want to sit for hours and hours (I write at the dining table from 5-7 am most mornings).
 image source | design by grey deco
Something like the below could work, they are large scale and have upholstered seat and arms…but perhaps too contemporary for us.
 image source | design by catherine kwong
Are you ready for this????
After writing this post for three hours on Saturday, I finally realized what needs to happen that will solve all our problems: the light, the pony wall, the comfort, adding style and interest, the need for kid-friendly…
PLOT TWIST IN THE DINING ROOM DESIGN!!

We need to go back to the ORIGINAL plan which was to do a big built-in banquette on the three sides where the windows are and the pony wall. That’s what I ALWAYS wanted because EVERYONE loves sitting in a banquette. We’d make it deep and have a ton of pillows, so I can add much needed softness and texture. We’d likely do leather or a vegan leather for the bench.

We’d obviously need an oval or round table, and then put three chairs on the front side, chairs that the kids can sit in with maybe an upholstered seat but not arms or back, thus checking off two of my boxes: sculptural + kid friendly. I’m not going to be sitting there, my spot is smack dab under a window. And yes I know that it MIGHT be annoying for everyone when the people in the middle have to get out, but it’s worth it. Who opts for a table at a restaurant when there’s a big comfy booth open? People who care nothing about coziness and comfort.
We had dinner there with friends on Friday night and it just didn’t feel good the old way. But by rotating the whole set up and eating breakfast by the window, it became such a happier, more inviting, more desirable space. It’s a space you WANT to actually sit for hours.

By doing a built-in along the window, it gives the pony wall some purpose. Our architect felt that there was a lot of wasted space in the middle up there, but we have kids and open space is FINE. It actually feels really, really good.
Lastly, it solves the light situation because we could simply get rid of the pendant closest to the kitchen and the other one is PERFECT for a rounded table/nook. Even the location of it is perfect.
I get my comfort, a place for me to sit and write and hang out on upholstered cushions. The kids will get their more kid-friendly chairs that are really pretty (I’ll probably just get cushions made for the Paul McCobb chairs that I have or mix up vintage). We keep the pony wall because we love how open it feels and we don’t have to change out the lights. Then we’ll put some low hooks for the kids’ coats on the other side of the pony wall.
BOOM. Even Brian was excited about this new plan.
Thanks for letting me externally process this all with you. I know not everyone will agree with this, but when designing a house, I really try to make EVERY single room as desirable as possible. A room you actually WANT to spend hours in and sometimes you don’t know what that is going to take until you live in a space for a while.
Thoughts? Feelings? Comments?
The post Mountain House Mondays: Our Dining Room Dilemma appeared first on Emily Henderson.
February 24, 2019
The Link Up: A Mind-Blowingly Good House Tour, My Favorite Candle + a New Site Feature

 image source
This was a short week for us but am I alone in thinking that “short” weeks actually end up feeling so much longer than normal weeks? You go into them thinking they’re going to just zip by and HA you’re wrong. Maybe it’s breaking with day-to-day routine that just fudges things up. If anyone has scientific proof that 4-day weeks are ACTUALLY longer than 5-day weeks because of some strange time warp thing that happens, please let me know. Anyway, half the team (including me) was away working on SO MANY SHOOTS this week and I’m tapped out. Buuuut if you were following along on my Insta Stories, you saw that we are starting to shoot THE MOUNTAIN HOUSE and that means reveals right around the corner and I’m SO EXCITED.
Something else I’m so excited about is the launch of our new PROJECTS section of the site. This one was a long-time coming. For at least a year, my old Portfolio section was super outdated, some of the links were dead…it was just all over the place and there really was no way to get to the posts that corresponded with those portfolio projects. But after months of work designing, finding all the posts related to projects we wanted to include, and tagging on the back end (thank you team for working so hard on this), it’s ready for it’s close up. Let’s say, for instance, that you want to see all the reveals from the Portland Project in one place…you can do that . Same with my houses, team EHD MOTOs, previous design projects and all sponsored makeovers. We’ll keep this baby updated as new projects come along and as we start revealing the Mountain House. Dig around, check it out, and let us know how you like it!
Okay, let’s all shake off those Sunday scaries now and get into all the articles, Insta accounts, and products we’re buzzing about right now, and as always, share anything that had you excited this week/made you happy/you bought and just love so much you want to scream it from the rooftops of the comments section. xx
One of Michael’s (and my) favorite candles is Maison Louis Marie’s No. 09 Vallee de Farney. Burn it and feel like the fancy pants person you dream of being. Because let me tell you…it SMELLS LUXURIOUS.
This past week, we lost the great fashion icon Karl Lagerfeld (who evidently left his fortune to his cat…). I turned to one of my fashion icons to start to process what’s next for the fashion industry.
And speaking of fashion, DID YOU SEE THE MONCLER GENIUS PROJECT?????
New Show Review Alert: Russian Doll on Netflix. Ryann said she watched the whole series over the weekend (it’s only eight episodes) because it’s that good. Smart, funny, existential, and Natasha Lyonne is phenomenal. Plus, it was created by women, including light of Ryann’s life Amy Poehler.
Arlyn is obsessed with the Instagram account The Vintage Rug Shop (@vintagerugshop). It was founded by Brittany from @brittanymakes and every.single.thing she posts makes Arlyn want to cry a little. Such beautiful stuff and a great resource for quality vintage rugs. Not inexpensive but GREAT eye candy.
Sara decided to bring her boot game when she shot Jess’s MOTO with these dope backless booties. The insane bonus is that they are currently $33.50!
As you may have read this week, Jess did about a year and a half of product research for her big home reveal. These handmade woven nesting baskets, that come in a set of three, are one of her favorite finds. She loves the beautiful woven detail and how great the quality is.
This week’s comes to us from the Windy City and my lord is she a sophisticated, stunning lady with so maybe quiet yet bold details. Your eyes will be very happy.
Bowser is a HUGE Bulletproof coffee advocate. She lives on it. This instant mix makes it easy for her to have it when she’s traveling or on the go. Her other recommendation is to add it to any coffee (preferably also Bulletproof) in a leak-proof coffee travel mug like this and shake.
Velinda has a teen gift idea (because who ever knows what to buy teens, amiright?). This genuine leather backpack purse. Her sister said this purse style is all the rage in her high school and she wore her last one out, so she’s getting this for her birthday because the quality is high, the design simple and cute, and the price very fair. Hopefully, she doesn’t read the blog since Velinda is disclosing her bday gift. 
February 23, 2019
All the Ways I Wore Stripes This Week


I’m keeping this one short and sweet today because it was A WEEK and time was super limited for writing (you may have noticed I didn’t do much in terms of blog posts this week). Exciting, full of super fun projects, styling and SO MUCH SNOW that made my heart happy but phew…it’s done and now I’m snuggling with my babies in the mountains.
You’ll be happy to hear that I went shopping recently (I mostly hit up Zara and Lou & Grey—which I love so, so much for its cozy loungewear you can dress up), so there are some new favorites in the mix (including new pajamas that the team forced me to show you, so sorry in advance).
Okay, so Monday was a holiday (the office was closed), so I don’t have an outfit to show you. Whoops.
Tuesday:

Striped Top | Jeans (similar) | Coat | Hat (similar) | Boots
Let’s start with the top. It’s new from Lou & Grey and basically a pajama top that can be styled for work. I love the dropped sleeve on it. The jeans are old Madewell but the high waist (and the fact that they’re super tight) make me feel great. The coat is also new from Zara and perfect for these cooler LA winter days, and same for the hat which I’m so bummed isn’t on Zara’s site. Maybe you can find it in store? I gotta tell you, I felt pretty cool in these. The soles are treaded and rubber (I think), so they’re great for walking around the city.
Wednesday:

Striped Turtleneck | Pants | Moto Jacket | Boots
We were headed up to the mountain house on Wednesday, so the two-hour car ride meant I wanted to be comfy. These Lucky Brand utility pants were super comfortable (they come in three colors), and the turtle neck—another score from Lou & Grey—was a home run. Oh, and that moto jacket is from Target and so good for the price.

Pajama Set | Striped Turtleneck | Beanie | Boots
It was a snowy wonderland up there this week, so I gave a test run to my new sweats from Lou & Grey (I promise this post is not sponsored by Lou & Grey…I just really love their stuff). That’s the same turtleneck I had on earlier, and the fuzzy boots and beanie are from Target.
Thursday:

This is all you’re getting from Thursday, unfortunately, but at least I love these new pajamas to show you! They’re a light jersey and you can’t see it in this photo really, but there is a contrast piping that looks really cute in person (subtle, but cute).
Friday:

Top | Jeans | Boots | Apron (similar)
HA the apron and rolling pin. Okay, so that top (from Zara), but because it’s a little see-through and has eyelets, I didn’t have the right bra to wear it properly and show you, so…I threw on an apron because why not? These jeans from Rag & Bone have a really nice stretch to them. I think this particular cut is their “best-selling skinny” or whatever, and I can see why. They’ll be a new go-to when I don’t feel like suffocating in my a-little-too-tight high waist Madewell jeans from Tuesday. Oh, and of course my new favorite Chelsea boots from Nisolo. I seriously wear these all the time (as I do all their shoes).

To help with #bragate, I switched into a new sweater from (you guessed it) Lou & Grey. I love a good colorblock and dropped sleeve (and cozy sweater in general), so this one is a winner!
Hope you had a great week, and see you tomorrow for our link up post + a big site announcement!! xx
To see what I’ve worn this month, check out: What I Wore February Week 1 | What I Wore February Week 2
The post All the Ways I Wore Stripes This Week appeared first on Emily Henderson.
February 22, 2019
Portland Reveal: The 5 Design Elements Every Awesome “Big Kid” Playroom Needs


***Written by Arlyn Hernandez
This fun, playful room right here used to be just plain gross. I’m not talking about dirty beige carpet that’s well past its prime and bad paint, I mean…it wasn’t even a real room. It was a dark storage area in the basement of the Portland Project (keep reading to see the “before”) that until we got our hands on it was, in our opinion, a total waste of potential. Yes, all homes need storage, but this was like a straight up garage-like dump pit that would be a dream for the hoardiest of hoarders that stretched across the entire length of the house.
Let’s take a look at the original floor plan so you can understand:

That “storage” space above looks like it’d be really exciting for anyone who has a ton of stuff, but also, unless you have a business with serious inventory or your family has an inexplicable amount of equipment-heavy activities, who really needs that much space?!? Here’s what it looked like IRL:
Because we shifted things around on the ground floor and added the second floor with three additional bedrooms and two bathrooms, we needed to find space for a laundry room but also felt like a home with (now) five bedrooms needed a larger “hang out” area…hence that expanded media room. Which then, of course, meant moving around this floor plan. We stole from the storage space to create that laundry room and pivoted the bedroom, made room for the new staircase, but also carved out a storage space that felt more than plentiful for a family who already has a garage, a mud room, and a storage shed in the backyard (which you haven’t seen yet). Here’s where we landed so you can get some context of where we are with today’s reveal:

This room could have of course been set up as a FIFTH bedroom (it says “4” up there, but there are five rooms in total), but we thought it’d be a fun opportunity to design it as a playroom/hang out spot for the imaginary kids of the imaginary family that imaginarily live here. And, because so many of you have asked about family-friendly design slash kid room design, we’re going through the five must-have elements to keep in mind when putting together a playroom for bigger kids. Let’s do this.
Use kid-friendly textiles and materials.

When you’re designing a kid-focused room, textiles are SUPER important for longevity. This is not the moment to flex your white sofa and rug muscles, folks. As angelic and well-behaved as your children might be, let’s get real…no one is immune to peanut butter and jelly smears or marker streaks. Here, we went with a velvet on a sofa from Interior Define, which is a great fabric for anyone with kids and pets, as much as you think it wouldn’t be (most people think it’s “fancy” and hence not family-friendly). You can’t snag it or pill it, plus most poly velvets are really easy to wipe (as long as you get to it quickly). Also, a patterned rug like the one we used here from Dash & Albert is key, since the color variations make it easier to hide smaller stains.

Here’s another talking point that most people don’t think about in terms of being kid-friendly: art. Most framed art pieces are stitches waiting to happen if your children are rambunctious animals that flop around a room, walls included. Think about it…glass…falling off a wall, shattering, slicing skin open, let’s move on from this dark, troubling subject, but FOR REAL HOW GENIUS IS WOOD ART? We got these pieces through artist Jennifer Urquhart, and they were just the whimsical touch these walls needed, but also, there’s no fear of these being damaged really or inflicting harm. You don’t have to go seek out wood art like we did here, but there are lots of softer or shatter-proof options like wall hangings, pennants, canvas art, etc.
Inject pattern and color (but carefully).

This is not to say you need pattern and color EVERYWHERE, nor does everything (anything?) need to be crazy bright. A solid bit of advice is to riff off one primary color (here, we went with blue, obvs), and then vary the tones you use so it feels a little more pulled together. Kids toys, books and craft supplies are usually SUPER colorful as it is, so leaving the base of the room a little less over the top will go a long way to not feeling like a scene out of Willy Wonka.

And in terms of pattern, have some fun…it’s a kid’s room after all, but by using one color across the board in both solids and prints, it’ll feel a touch more “grown up” while still being fun. We brought in personality through a checkered throw, wavy and polka dot-y throw pillows, a rug and, of course, the art.
Create zones for work and play.

What’s that they say about all work and no play? Well, you get it. But yeah, for a playroom (or general “kid” area), it’s important to create zones. Your room doesn’t have to be as large as this one either to do that. But carving out a little nook with a desk, chair and task light helps with focusing on things like homework and projects, while a space where baskets of toys, balls, instruments and the like a little removed from the “serious work area” limits distractions.
Also, let’s pause a moment and talk about that amazing wood basketball hoop. We got this one through The Good Mod and it’s SO GOOD. This would work just as easily in a grown man’s digs as it does in this kid playroom. And we’ll get to that swing in just a sec…
Choose lots of comfy (modular) furniture for plenty of hang out spots.
When picking out furniture for a room that’s going to be used predominantly by youngins, it’s a good idea to go with more modular pieces (like those nesting coffee tables from Structube and the Interior Define sofa). The tables can easily be used individually right where they are for things like coloring, snacking, scribbling, but are also easy to split apart and move out of the way for impromptu dance parties or superhero acrobatics.
Sprinkle in the whimsy.

This is the part where you take a mostly age-inclusive room and turn it into something that is obviously much more fun, spirited and jovial. If you stripped away the toys, stuffed animals, swing, and large-scale art and lighting, this would be a perfectly adult room, but it’s that “whimsy” that makes it more youth-appropriate. Here are some of the playful elements we added:
Large-scale lighting: The black floor lamp and white table spotlight (both from IKEA!) that you see in the shot right before this one are just large enough that they feel fanciful without being crazy out of scale.
Overscale art: That abstract piece by Mia Farrington above the sofa is another case of how we played with scale. Since we already had a gallery wall of sorts above the blue velvet sofa (all those cute wood pieces), we knew we wanted a single piece here, and the giant scale of this print just felt so happy and not at all serious.
Lots of pillow shapes and sizes: You don’t see it all here, but the pillows on both sofas aren’t very stiff or “elegant.” There’s a mix of squares, lumbars, round and even cutie little animal pillows to keep things from feeling too surly.
Fun elements: I’m sorry, but how cute is that rope and wood swing from Schoolhouse (just make sure it’s properly installed into a sturdy ceiling!)? The vintage toy plane we borrowed from Aurora Mills also makes our hearts happy. Plus, the larger pillows on the sofa are just the right size to toss on the floor (because all kids, for whatever reason, love being on the ground).
And that’s it! Let us know should you have any questions on any of the above topics or anything in this room we didn’t cover in terms of its renovation. We’ll be sure to pop into the comments and answer! Oh, and here’s a comprehensive Get the Look of the whole room with all the shopping links.

1. Color Block Pillow | 2. Arrows Throw Pillow | 3. Black & White Fabric | 4. Wooden Art Collection by Jennifer Urquhart | 5. Interior Door by Metrie | 6. Sofa | 7. Interior Door Lever by Rejuvenation | 8. Rug | 9. Nesting Tables | 10. Table Lamp | 11. End Table | 12. Wooden Basketball Hoop via The Good Mod | 13. Basketball | 14. Red and Blue Basketball | 15. Guitar | 16. Wire Bins | 17. Clock | 18. Rope Swing | 19. LED lamp | 20. Buffalo Check Tray (set of 2) | 21. Desk | 22. Chair (set of 2) | 23. Pencil Box by Jennifer Urquhart | 24. Stapler | 25. Roman Shades by Hunter Douglas through Decorview | 26. Windows by Milgard | 27. Beach Painting | 28. Mountain Painting | 29. Abstract Art by Mia Farrington | 30. Floor Lamp | 31. Caravan Day Sofa | 32. Marble Pillow | 33. Hannu Fabric | 34. Lucca Pillow | 35. Lumbar Pillow | 36. Plaid Throw | 37. Toy Airplane | 38. Wood Flooring by Hallmark Floors | 39. Pure White by Sherwin-Williams | 40. Door and Window Casing by Metrie | 41. Baseboard by Metrie 42. Beadboard by Metrie
***Photography by Sara Tramp for EHD, design and styling by Emily Henderson and Brady Tolbert (and team). JP Macy of Sierra Custom Homes was the fantastic General Contractor, and Annie Usher and the architect.
For more Portland Project Room Reveals: Living Room | Staircase | Office | Master Bedroom | Master Bathroom | Kitchen | Dining Room | Powder Bathroom | Guest Bathroom | Hall Bathroom | Laundry Room | Guest Bedrooms | Media Room | Family Room
The post Portland Reveal: The 5 Design Elements Every Awesome “Big Kid” Playroom Needs appeared first on Emily Henderson.
The 5 Design Elements Every Awesome “Big Kid” Playroom Needs
***Written by Arlyn Hernandez
This fun, playful room right here used to be just plain gross. I’m not talking about dirty beige carpet that’s well past its prime and bad paint, I mean…it wasn’t even a real room. It was a dark storage area in the basement (keep reading to see the “before”) that until we got our hands on it was, in our opinion, a total waste of potential. Yes, all homes need storage, but this was like a straight up garage-like dump pit that would be a dream for the hoardiest of hoarders that stretched across the entire length of the house.
Let’s take a look at the original floor plan so you can understand:
That “storage” space above looks like it’d be really exciting for anyone who has a ton of stuff, but also, unless you have a business with serious inventory or your family has an inexplicable amount of equipment-heavy activities, who really needs that much space?!? Here’s what it looked like IRL:
Because we shifted things around on the ground floor and added the second floor with three additional bedrooms and two bathrooms, we needed to find space for a laundry room but also felt like a home with (now) five bedrooms needed a larger “hang out” area…hence that expanded media room. Which then, of course, meant moving around this floor plan. We stole from the storage space to create that laundry room and pivoted the bedroom, made room for the new staircase, but also carved out a storage space that felt more than plentiful for a family who already has a garage, a mud room, and a storage shed in the backyard (which you haven’t seen yet). Here’s where we landed so you can get some context of where we are with today’s reveal:
This room could have of course been set up as a FIFTH bedroom (it says “4” up there, but there are five rooms in total), but we thought it’d be a fun opportunity to design it as a playroom/hang out spot for the imaginary kids of the imaginary family that imaginarily live here. And, because so many of you have asked about family-friendly design slash kid room design, we’re going through the five must-have elements to keep in mind when putting together a playroom for bigger kids. Let’s do this.
Use kid-friendly textiles and materials.
When you’re designing a kid-focused room, textiles are SUPER important for longevity. This is not the moment to flex your white sofa and rug muscles, folks. As angelic and well-behaved as your children might be, let’s get real…no one is immune to peanut butter and jelly smears or marker streaks. Here, we went with a velvet on a sofa from Interior Define, which is a great fabric for anyone with kids and pets, as much as you think it wouldn’t be (most people think it’s “fancy” and hence not family-friendly). You can’t snag it or pill it, plus most poly velvets are really easy to wipe (as long as you get to it quickly). Also, a patterned rug like the one we used here from Dash & Albert is key, since the color variations make it easier to hide smaller stains.
Here’s another talking point that most people don’t think about in terms of being kid-friendly: art. Most framed art pieces are stitches waiting to happen if your children are rambunctious animals that flop around a room, walls included. Think about it…glass…falling off a wall, shattering, slicing skin open, let’s move on from this dark, troubling subject, but FOR REAL HOW GENIUS IS WOOD ART? We got these pieces through artist Jennifer Urquhart, and they were just the whimsical touch these walls needed, but also, there’s no fear of these being damaged really or inflicting harm. You don’t have to go seek out wood art like we did here, but there are lots of softer or shatter-proof options like wall hangings, pennants, canvas art, etc.
Inject pattern and color (but carefully).
This is not to say you need pattern and color EVERYWHERE, nor does everything (anything?) need to be crazy bright. A solid bit of advice is to riff off one primary color (here, we went with blue, obvs), and then vary the tones you use so it feels a little more pulled together. Kids toys, books and craft supplies are usually SUPER colorful as it is, so leaving the base of the room a little less over the top will go a long way to not feeling like a scene out of Willy Wonka.
And in terms of pattern, have some fun…it’s a kid’s room after all, but by using one color across the board in both solids and prints, it’ll feel a touch more “grown up” while still being fun. We brought in personality through a checkered throw, wavy and polka dot-y throw pillows, a rug and, of course, the art.
Create zones for work and play.
What’s that they say about all work and no play? Well, you get it. But yeah, for a playroom (or general “kid” area), it’s important to create zones. Your room doesn’t have to be as large as this one either to do that. But carving out a little nook with a desk, chair and task light helps with focusing on things like homework and projects, while a space where baskets of toys, balls, instruments and the like a little removed from the “serious work area” limits distractions.
Also, let’s pause a moment and talk about that amazing wood basketball hoop. We got this one through The Good Mod and it’s SO GOOD. This would work just as easily in a grown man’s digs as it does in this kid playroom. And we’ll get to that swing in just a sec…
Choose lots of comfy (modular) furniture for plenty of hang out spots.
When picking out furniture for a room that’s going to be used predominantly by youngins, it’s a good idea to go with more modular pieces (like those nesting coffee tables from Structube and the Interior Define sofa). The tables can easily be used individually right where they are for things like coloring, snacking, scribbling, but are also easy to split apart and move out of the way for impromptu dance parties or superhero acrobatics.
Sprinkle in the whimsy.
This is the part where you take a mostly age-inclusive room and turn it into something that is obviously much more fun, spirited and jovial. If you stripped away the toys, stuffed animals, swing, and large-scale art and lighting, this would be a perfectly adult room, but it’s that “whimsy” that makes it more youth-appropriate. Here are some of the playful elements we added:
Large-scale lighting: The black floor lamp and white table spotlight (both from IKEA!) that you see in the shot right before this one are just large enough that they feel fanciful without being crazy out of scale.
Overscale art: That abstract piece by Mia Farrington above the sofa is another case of how we played with scale. Since we already had a gallery wall of sorts above the blue velvet sofa (all those cute wood pieces), we knew we wanted a single piece here, and the giant scale of this print just felt so happy and not at all serious.
Lots of pillow shapes and sizes: You don’t see it all here, but the pillows on both sofas aren’t very stiff or “elegant.” There’s a mix of squares, lumbars, round and even cutie little animal pillows to keep things from feeling too surly.
Fun elements: I’m sorry, but how cute is that rope and wood swing from Schoolhouse (just make sure it’s properly installed into a sturdy ceiling!)? The vintage toy plane we borrowed from Aurora Mills also makes our hearts happy. Plus, the larger pillows on the sofa are just the right size to toss on the floor (because all kids, for whatever reason, love being on the ground).
And that’s it! Let us know should you have any questions on any of the above topics or anything in this room we didn’t cover in terms of its renovation. We’ll be sure to pop into the comments and answer! Oh, and here’s a comprehensive Get the Look of the whole room with all the shopping links.
1. Color Block Pillow | 2. Arrows Throw Pillow | 3. Black & White Fabric | 4. Wooden Art Collection by Jennifer Urquhart | 5. Interior Door by Metrie | 6. Sofa | 7. Interior Door Lever by Rejuvenation | 8. Rug | 9. Nesting Tables | 10. Table Lamp | 11. End Table | 12. Wooden Basketball Hoop via The Good Mod | 13. Basketball | 14. Red and Blue Basketball | 15. Guitar | 16. Wire Bins | 17. Clock | 18. Rope Swing | 19. LED lamp | 20. Buffalo Check Tray (set of 2) | 21. Desk | 22. Chair (set of 2) | 23. Pencil Box by Jennifer Urquhart | 24. Stapler | 25. Roman Shades by Hunter Douglas through Decorview | 26. Windows by Milgard | 27. Beach Painting | 28. Mountain Painting | 29. Abstract Art by Mia Farrington | 30. Floor Lamp | 31. Caravan Day Sofa | 32. Marble Pillow | 33. Hannu Fabric | 34. Lucca Pillow | 35. Lumbar Pillow | 36. Plaid Throw | 37. Toy Airplane | 38. Wood Flooring by Hallmark Floors | 39. Pure White by Sherwin-Williams | 40. Door and Window Casing by Metrie | 41. Baseboard by Metrie 42. Beadboard by Metrie
***Photography by Sara Tramp for EHD, design and styling by Emily Henderson and Brady Tolbert (and team). JP Macy of Sierra Custom Homes was the fantastic General Contractor, and Annie Usher and the architect.
The post The 5 Design Elements Every Awesome “Big Kid” Playroom Needs appeared first on Emily Henderson.
February 21, 2019
How to Mix and Match Dining Chairs Like a Boss (+ 28 Pairs We Love)
 photo by Zeke Ruelas | from: ginny’s dining room reveal
There are three approaches when it comes to dining room furniture: matching chairs, matching side chairs + different head chairs, and an eclectic mishmash where no two chairs are the same. Frankly, there are no wrong answers, it’s just a style choice. So…to match or not to match is the big question. Maybe you like the idea of contrast, or you want the people sitting at the ends of your table to feel a little bit special, or you just have so many amazing chair choices that you don’t want to pick just one. (We wouldn’t blame you, there are so many great chairs out there.) So how do you put them together? That’s where this handy post comes in.
In many traditional dining sets, the chairs at each end of the table are styled a little differently: they usually have arms, and are sometimes larger or more ornate to reflect the importance of that position at the table. These days, we don’t take seating charts as seriously, but a little contrast is still a nice look, so for this guide, we’ve chosen to pair up armchairs and side chairs. Of course, you can also use these principles to pair side chairs with other side chairs, or armchairs with other armchairs (if you just really love arms).
Before we get to the shopping bit, let’s take a look at a few real-world examples of mixed chair pairings. Like Ginny’s up top, where two time-honored classics come together. Eames shell chair, meet bentwood. These styles have a lot in common: they’re both light and understated. But there’s an element of contrast, too: the wood tones of the bentwood chairs are a nice balance to the smooth whiteness of the shell chairs. Together with the modern pedestal table, a crowd of shell chairs on their own could feel a little too space age-y, but paired with the bentwood chairs, they’re just right.
 photo by Bethany Nauert | from: lisa’s collected European-vibe dining room
This dining room is a bit more traditional, with upholstered head chairs paired with side chairs that have a rustic vibe. Besides adding a rustic/industrial element to the space, the side chairs also help to lighten up the room. A whole table of upholstered chairs (especially around the hefty trestle table) might feel a bit heavy or stuffy, but pairing them with lighter side chairs creates a nice balance, while making some allowances for comfort. (Because we get it, not everyone wants to sit for hours on a hard chair.)
 photo by Melissa Oholendt | from: the curblys eclectic modern dining room
The Curbly’s dining room is a great example of how to work within the same color palette but bring in contrast, tension and visual interest with mixed silhouettes and materials. This room brings together two chairs you might not think to put together (one very modern, the other vintage). But here’s why they work together: the wood and metal set up a pleasing contrast to the upholstered chairs at the head of the table because proportionately, they are both still visually light and “leggy,” plus the cohesive color palette brings everything together in a way that feels like they always belonged around the same table.
 photo by sara tramp for ehd | from: we gave a deserving single mom a flash makeover
In last year’s Feel Good Flash Makeover (if you haven’t seen the video yet from that post, run don’t walk, and grab your box of tissue on your way over), Emily and the design team paired super sensible black wood chairs (for the kids) with a cozy upholstered armchair to bring in a little softness (for momma after a long work/parenting day…and maybe for homework time sans spaghetti sauce looming disasters). The light blue works to balance the darker chairs, and both silhouettes are visually light and hit at about the same height.
 photo by tessa neustadt | from: new spring target collection
Here’s a look Emily created to showcase Target’s spring collection a few years back, with lots of seating choices that all work together for a super eclectic vibe (even with some of the pieces leaning traditional). For anyone who isn’t brave enough to go with three different chairs, here’s what else would work from this look: rattan chairs + slipper chairs (for a bit more of a funky pairing), or slipper chairs + bench (this one is more “family” friendly and traditional), or rattan chairs + bench (which will come off boho but refined).
Simplified Modern
Do you love clean lines and elegant, understated looks? Do you lean a little more mid-century or industrial? If you’re not about fussy materials or overly artistic silhouettes, this is the board for you.

1. George Armchair // Alba Dining Chair | 2. Prouve Standard Chair // Green Dylan Dining Chair | 3. Remy Arm Chair // Masey Wood Dining Chair | 4. Slope Dining Chair // Henry Chair | 5. Coppice Armchair // Bentwood Chair | 6. Bertaux Armchair // Clark Dining Chair
Okay, so admittedly #1 would get PRICEY, but we aren’t going to pretend we understand everyone’s decorating budgets, so we left it on the board because it’s just so dang cool if you have, um, $3,000 to spend on dining chairs. I’m really digging #2 and think it would really jazz up a super simple table. Plus the green upholstery is a great way to bring in color if say, you don’t want to paint your walls but are craving a little sumptin’ sumptin’. The Windsor-style black chair from #3 is a pretty classic frame, but when paired with a fluffy leather-like upholstered chair, it’s all of a sudden a little bit edgier. For a really mid-century modern friendly pairing, #5 is where it’s at.
Cool Eclectic
If you’re drawn towards the unusual and the quirky and your taste tends to be a bit off the beaten path, then these unexpected pairings will be a perfect fit in your dining room.

1. Castine-Striped Dining Chair // Maple Bentwood Dining Chair | 2. Wire Frame Dining Chair // Zeke Indoor/Outdoor Dining Chair | 3. Bendt Dining Armchair // Workshop Chair | 4. Hoffman Side Chair // Carson Bench | 5. Malou Chair // Emmerson Reclaimed Wood Bench | 6. Antonio Acrylic Chair // Marte Dining Chair
In pairing #1, the slipper chair is pretty voluminous in that it has no openings, so putting it together with something much lighter and simple is the key to a balanced marriage, while in #2 it’s less about opposites and more about a similar airy, wiry frame (with the yellow adding a nice punch to the more industrial West Elm chair). And because we LOVE a chair + bench mashup, #4 and #5 come into the mix but with very different aesthetics. Oh, there probably isn’t a more “opposites attract” pairing than #6: lucite and white upholstered mixed with all wood and caning, but somehow…it works because it screams “I’M COMFORTABLE WITH TAKING RISKS” and who would dare question such confidence?
Modern Luxe
Creating a “luxe” look isn’t all flashy metals and bling. It’s actually a lot more subtle than that (but every pair here has a velvet chair because what’s a glam vibe without some sheeny velvet?). Another pillar of “modern luxe” is interesting silhouettes that feel a little more special and art-y. Let’s take a look.

1. Ibis Dining Chair // Dasilva Upholstered Dining Chair | 2. Azalea Grey Mink Chair // Cerchio Chair | 3. Silver Lining Armless Dining Chair // Elim Velvet Dining Chair | 4. Rust Orange Velvet Chair // Haylee Mono Rattan Chair
The velvet colors here could all be interchanged with anything that works for your decor. For #1, I’d go with the black metal chair as the side and the rust armchair as the head, but in #3, I think the green velvet as the side chairs and the white CB2 chair as the head chair would be SUCH a killer look. There’s also something really nice and balanced about #4, with the persimmon-colored beetle chair and the rattan bucket seat…they work well together because their bodies are similar in shape so it’s less of a blatant style clash.
Soft Neutral
We highly suspect that this is where most of you will feel comfortable. It’s definitely the most “livable” aesthetic, and look, not every piece and every room in your home has to be this big statement or risk. This “Soft Neutral” is exactly what it sounds like: quiet flaxes, heather grays, varied wood tones and straight up comfort. If you find yourself drawn towards classic looks, check out these armchair and side chair pairings, which will fit seamlessly into a more traditional interior without feeling stuffy or overdone.

1. Bacci Chair // Logan Dining Chair | 2. High Back Dining Chair // Dane Dining Chair | 3. Ercol Originals Stacking Chair // Shaw Walnut Bench | 4. Alastair Arm Chair // Owen Metal Frame Chairs | 5. Melrose Dining Chair // Windsor Bench | 6. Natural Linen Armchair // SKOGSTA Chair
The prices on this board really run the gamut, from that nearly $1,300 Rejuvenation bench (that’s SO STUNNING with the chair we paired it with) to an under-$50 IKEA chair (that could easily have come from some boogie boutique somewhere in LA for 10x the price in terms of look…maybe not material or craftsmanship). While #1 is a good coupling of mid-century styling and curves, #2 actually works because they’re opposites (one is sharp and angular, the other is soft and sinuous). Both those chairs from #4 are SUCH great prices and when paired together, they elevate each other. And uh…that blonde wood bench from Target at #5 is so good, I’d say if you don’t have room for it in your dining room, grab it for another area in your home because it’s so good (and under $250).
Okay, you made it this far, and now you’re probably wondering…wait…what about tables? While we didn’t include them specifically in this round up, we have written two different chairs + dining table power couples posts so you can get some idea of how to pair things (like this one and this one). Also, did you know we have all our current furniture pieces (including dining tables for the sake of this post) curated in our SHOP page? Head here for a TON of picks at a variety of price points.
***Thank you so much to contributing market researcher Nancy Mitchell for helping us to pull this piece together.
The post How to Mix and Match Dining Chairs Like a Boss (+ 28 Pairs We Love) appeared first on Emily Henderson.
February 20, 2019
Makeover Takeover: Jess’ Long Awaited (Small Space) Living Room Reveal


***Written by Jess Bunge
Annnnnnd we’re back! The reveal of my teeny tiny living room is here, hopefully, for all of your enjoyment. I love her so so much. We have been through a lot in the past 18 months, five of which it only had a mattress and a little bistro set from IKEA in the kitchen. Yep, five months of not a single. piece. of. furniture. in. this. room. If you are having a hard time pulling the trigger on your home design, trust me when I say I GET YOU. But what I also want to say is that you should just make a decision on something. Even if it’s one small piece, a paint color or simply hanging some curtains. It’s insanely frustrating how easy it is to fall into a rut if you’ve been looking at your space in the same light for a little too long. You won’t believe how much drive will start to flood into your veins once you see the space slightly more filled out. Please learn from me.
But there is a balance, right? You also want to find the right pieces and while money should grow on trees, it doesn’t. So time it does take. Just don’t let the reason why your design is taking forever be because you’re fearful of making a bad decision. If your choice is thoughtful and you love it, go for it. Therapy session complete, because you guys are here for a MAKEOVER REVEAL.
Emily Henderson's Blog

- Emily Henderson's profile
- 10 followers

