Brian Meert's Blog, page 119
May 13, 2018
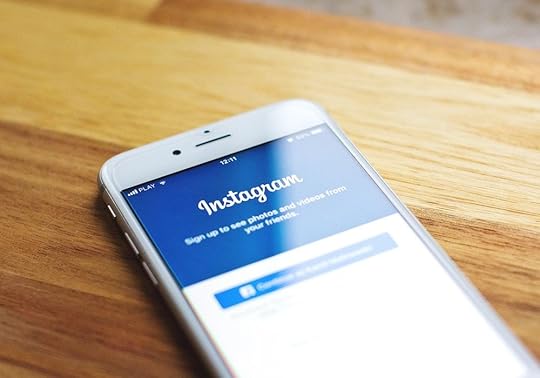
6 Steps to Hosting a Successful Instagram Contest
 May 13, 2018
Carolyn Wilman

One of the best ways to garner engagement on any channel is a sweepstake. When executed properly, your followers and fans will spread your message far and wide, consequently increasing brand awareness and social followers. Here are the six steps you need to take to ensure your Instagram contest is a success.
Step 1: Have a Goal
Why do you want to host a giveaway? What do you hope to achieve? What results do you expect? Do you want to increase social followers, garner engagement, get brand recognition, or promote a new product or service? Your answers will determine the steps you will take to reach your goal, shape the promotion, and find the actions you need to take afterward.
Step 2: Plan It Out
Have you ever shown up at the airport, plunked down your credit card, and said, “Book me on the next flight south”? You don’t do it. You have too many moving pieces in your life: money, time off work, sitter for the dog and kids, neighbor to get the mail. You plan your vacations so when you go, it’s a success.
Marketing is no different. You don’t come into the office in the morning and decide to launch a major campaign by lunch. You know if you did that, the campaign will fail. Instead, look at your goals and create a plan around them. No successful giveaway was ever created on a whim. Even flash giveaways are pre-planned.
Step 3: Have Official Rules
Did you know the official rules are a court actionable, legal and binding contract between you and the entrant? Did you know a poorly executed giveaway could cost you more than just legal fees if things go awry? Include a shortened version of the rules and a link to the full official rules in your post.
When writing your official rules, make sure to include information about eligibility, the start and end date of the contest, and any other requirements such as how the prize will be given to the entrant or how the entries will be judged. Here’s an example of a short contest rule:
The winner will receive one (1) $50 Amazon gift card. Open to residents of the United States and Canada. Contest ends at 11:59 p.m. ET on Saturday, May 5, 2018.
Step 4: State the End and Start Date of Your Contest
Like New Year’s resolutions, your marketing and social media planning should begin in January. Because social media is a fast-paced platform, do not host long giveaways. I recommend no more than two weeks for any social sweepstakes.
When creating your contest, make sure to explicitly state when the contest starts and ends. I constantly see users on Facebook, Twitter, and Instagram asking sponsors when the contest ends.
You can avoid confusion by writing clear contest rules. If your rules are clear and easy to understand, the contest will be easier to manage. Plus, you will avoid fielding questions from confused entrants or receive entries that don’t properly match your entry requirements.
Step 5: Be Consistent
Consistency is key in marketing messaging. You do not what any part of the message to be disjointed. When planning out your contests, ensure there is a flow between one promotion and the next.
When people see consistency, they feel they can rely on you. Think of your friends. Who can you rely on no matter what? Why? They have offered you a constant stream of support over time. Now think of the flaky person you know. Would you call on them? No. Why? Exactly. Do not let your marketing present you as the flaky person on your Instagram contests.
Step 6: Announce Winners Publicly
If you don’t announce your winners publicly, your prospective entrants may feel a bit leery to enter your next giveaway. They may even start to think it’s a scam. Announce your winners publicly because it gives you something else to post, and participants may not read the announcement if you post it in the comments section. Additionally, a separate announcement reinforces your message and publicizes you. Plus, if you use new hashtags for each post, you could attract new followers outside of what you perceive to be your target market as you will appear in different recommendations under Search.
Creating an Instagram contest requires advance planning. If you provide consistency, honest contest rules, and winner announcements, your contest will be successful.
About the Author
Carolyn Wilman (aka @ContestQueen) is a digital marketing strategist and sweepstakes specialist. She works with companies to create and viral market winning promotions, maximizing their ROI and increasing their loyal customers while teaching others how to find, organize, enter, and win giveaways.
The post 6 Steps to Hosting a Successful Instagram Contest appeared first on AdvertiseMint.


May 11, 2018
Why Can’t I Edit or Create Facebook Ad Campaigns?
 May 11, 2018
Anne Felicitas

If you find yourself, to your utter surprise and horror, unable to create or edit a campaign, do not be alarmed. Well, perhaps you should be alarmed, but take comfort in the knowledge that this event is not an unanticipated glitch. In fact, this day was predicted to come since March.
A little over a month ago, in an attempt to abate the public anger stoked by the Cambridge Analytica scandal, Facebook announced that it will stop giving advertisers access to third-party data. With this new ban, Facebook deprived advertisers of information provided by data brokers, information which includes numbers of credit cards owned, household income, and items bought at a store, among numerous others.
“Over the next six months, we will remove the ability to use Partner Categories,” said Chad Kramer, a Facebook representative in an email statement sent in March. “While leveraging third-party data is a common industry practice, and we’ve put good protections in place, we believe this step will help improve people’s privacy on Facebook.”
Since May 10, advertisers—and you— have been unable to create or edit campaigns with Partner Categories built on audiences from the UK, Germany, and France. However, those ads will still run until May 24.
So if you’re in any of the three aforementioned countries, and you’re running ads using Partner Categories, or third-party data, you can bid adieu to those campaigns. They may still run until May 24, but, since yesterday, they are unalterable. The best you can do is run them until their time comes.
The post Why Can’t I Edit or Create Facebook Ad Campaigns? appeared first on AdvertiseMint.
Snapchat to Test Non-Skippable Video Ads
 May 11, 2018
Anne Felicitas
@Snapchat to test non-skippable video ads. #socialmedia #advertising #digitaladvertising
Click To Tweet
In an attempt to increase ad revenue and restore investors’ trust, Snap Inc. will test non-skippable ads in its app, Snapchat.
As reported in Digiday and three other sources, Snap Inc. will test six-second, non-skippable ads in select TV-esque Snapchat shows. Starting May 15, these non-skippable ads will appear in five-minute shows produced by companies such as NBC Universal, Viacom, and Turner.
Despite all of its efforts, launching brand-friendly features and different advertising tools, Snapchat has been unable to increase ad revenue, disappointing advertisers and investors who closely monitor the app’s progress. In its most recent failure, Snapchat faced user backlash after rolling out a redesigned version of its app.
Although the non-skippable ads may attract advertisers, it may also further push away users who are unaccustomed to ads in their Stories. However, Snapchat representatives are confident that the ads will persevere, noting that “so much of the Snapchat generation has gotten accustomed to watching ads to get content.”
The post Snapchat to Test Non-Skippable Video Ads appeared first on AdvertiseMint.
May 10, 2018
Congress Releases All Russian Ads Circulated in Facebook
 May 10, 2018
Anne Felicitas
Congress finally releases all of the fake Russian ads promoted in Facebook #fakenews #russianads #2016presidentialelection
Click To Tweet
Eight months after the demands of an angered public, Congress finally releases all of the politically divisive Facebook ads the Internet Research Agency disseminated during the 2016 US presidential election. The hefty files, which contain thousands of ads from fake Facebook pages, date back from 2015 to 2017.
A few of those pages posing as US organizations included Black Matters, LGBT United, L for Life, Being Patriotic, and Born Liberal. These pages often promoted posts that discussed politically divisive issues such as LGBT rights, Black Lives Matter, gun rights, and immigration.
In one ad, Being Patriotic, a right-leaning political group, argued for people’s right to possess Confederate flags during a time when the ownership of Confederate memorabilia was heavily debated.
“Do not ban American history.” The red caption rested underneath an image of the American and Confederate flag crossing over a bloody United States. The relevance of the ad showed the Internet Research Agency’s keen knowledge of American culture and attitudes.
 Being Patriotic promoted an ad about a controversial topic.
In another ad by Black Matters, the Russian-ran Facebook group featured victims of police brutality. “Keeping an eye on our brother’s [sic] cases and much more,” the ad said.
Because the Russian ads collectively appealed to both sides of the political spectrum, it is clear that the Internet Research Agency was attempting to intensify the divide between the political left and right. However, not all ads were political. Black Matters, for example, published an ad that quoted the song “California Love” by 2Pac and Dr. Dre. L for Life, too, posted apolitical content, in one occasion promoting a cat meme and in another a cityscape seemingly taken from Google images.
 Black Matters poses as a US-based group promoting civil rights.
Apart from ad ID, landing page link, and ad targeting, Congress also released information about the ads’ performance—impressions, clicks, and total spend—giving the public an idea of the ads’ scope and influence. Some ads weren’t influential at all, garnering no impressions or clicks. Others, such as the aforementioned ad by Black Matters garnered 2,740 ad clicks.
Facebook first announced the dissemination of fake ads in September 2017. After the resulting backlash, the social media company implemented changes to prevent future foreign interference by increasing transparency for pages and ads, requiring political advertisers to verify their identities, and including an About feature for all articles posted in its platform. Despite its efforts, the public is not yet ready to forgive, especially after journalists revealed that Cambridge Analytica harvested personal information from 50 million Facebook profiles.
The ads Congress provided are only the tip of the iceberg. Soon, Congress will release 80,000 organic content posted by the Internet Research Agency.
The post Congress Releases All Russian Ads Circulated in Facebook appeared first on AdvertiseMint.
May 9, 2018
Facebook Creates History Tool, Gives Users More Control over Privacy
 May 10, 2018
Anna Hubbel
@Facebook creates a history tool that gives users more control over their privacy. #dataprivacy #facebook
Click To Tweet

At Facebook’s F8 2018 conference, the company announced a new privacy tool currently in the works. The tool, called Clear History, gives users more control over their data.
The Clear History tool is similar to Google’s clear-browsing-data tool because it clears data history; however, it’s different in that it gives users the ability to delete the information websites and apps send to Facebook.
“If you clear your history or use the new setting, we’ll remove identifying information so a history of the websites and apps you’ve used won’t be associated with your account,” VP and Chief Privacy Officer Erin Egan explained in a Facebook post.
Facebook said the Clear History tool will not prohibit the network from sharing aggregated information with third-party agencies. However, the aggregated information it will share will be very general, for example, the gender demographics that tend to use an app or service the most. None of the data will be tied to a personal Facebook profile.
“We can do this without storing the information in a way that’s associated with your account,” said Egan, “and as always, we don’t tell advertisers who you are.”
Facebook says Clear History will take a few months to develop because it requires working diligently with privacy advocates, academics, policymakers, and regulators to ensure the feature works in the best interests of users.
Advertisers will need to keep up with all the changes Facebook has been making to improve its privacy. Only by doing so can they properly create campaigns that both adhere to the network’s improved privacy experiences and employ effective marketing strategies to continue reaching users, even after they have the Clear History option.
The post Facebook Creates History Tool, Gives Users More Control over Privacy appeared first on AdvertiseMint.
Instagram’s New Native Payments Feature May Lead to More Conversions
 May 9, 2018
Anna Hubbel
#Instagram new native payments feature may lead to more conversions. #socialmedia #instagramads #digitaladvertising
Click To Tweet
Exciting things are happening in the world of ecommerce. Instagram recently (and quietly) rolled out a payments feature that allows users to purchase without being redirected to a website outside of the app. This means users can browse and buy without any interruptions to their Instagram activity.
Native payments work like this: users can register a debit or credit card as part of their profile, complete with a security pin. By doing so, they don’t have to keep re-entering their payment information when paying for a product in the app, and businesses lessen the risk of losing customers because of the card-information fill out process. Sometimes the biggest roadblock businesses have between a buyer’s intent to purchase and a completed purchase is the step of filling out card information.
 Users can add debit or credit card information in a few steps.
Because native payments allow users to purchase without interruption, the new feature may be the answer to higher conversion rates. It may also perform better than Instagram’s Shoppable Tags, a shopping feature that redirects users to business websites.
Presently, only a few businesses, such as restaurants and salons, can use the new feature for booking appointments. However, the feature will expand to other businesses, such as movie theaters, in the near future. A limited number of users in the US and UK now have the new payment settings.
 Users can book appointments with native payments.
Snapchat recently launched an identical feature, Shoppable AR, that allows users to purchase directly within the app. With Snapchat and Instagram as big rivals, it will be worth observing which version of native payments users prefer. Snapchat and Instagram may offer unique but equal benefits, but audiences may also prefer one over the other. In any case, advertisers must experiment and see which works best.
So what does this foreshadow about the future of ecommerce? Will all online purchases eventually be made through social media platforms? Well, the power is in the people, so it all depends on what users decide they prefer. But if the current market is any indication, users gravitate towards experiences that are simple and customized just for them. And native platform payments fit well into that equation.
The post Instagram’s New Native Payments Feature May Lead to More Conversions appeared first on AdvertiseMint.
Mobile Ad Spending in 2018 Expected to Surpass TV
 May 9, 2018
Anna Hubbel
Photo Courtesy of Facebook IQEven as you read this, it’s highly likely you’re doing so on your mobile device. That’s why it’s no surprise Emarketer reports that mobile will constitute 69.9 percent of all digital advertising in 2018. Additionally, mobile maintains a 33.9 percent share of all US ad spend, with expectations to reach 47.9 percent by 2022.
If you’re unsure what that means, it may help to know these numbers suggest that mobile ad spending will surpass that of TV, making mobile the leading advertising medium in the world.
Does that help put things into perspective?
#Mobile #AdSpending in 2018 is expected to surpass TV, making it the largest ad medium in the world. #digitaladvertising
Click To Tweet
“Advertisers are pouring dollars into mobile due to growing mobile commerce activity,” forecasting analyst Corey McNair said in an Emarketer article. “Conversions from mobile display ad placements have already surpassed those of desktop.”
The speed at which mobile advertising is growing, in comparison to other media, is astounding. In fact, Emarketer says it will grow three times faster (23.5 percent) than advertising in all other media (6.6 percent) in 2018. As this popularity continues to grow, ad prices are also rising. Especially when it comes to the process of transitioning a different ad format to mobile. For example, for TV ads, it may cost more to transform or repurpose them to fit aspect ratios more conducive to mobile devices.
As mobile advertising dominates the ad market, it becomes increasingly more of a challenge to stand out in users’ feeds. So you may need to think outside the box (maybe outside the TV box) to make your ads stand out in the crowd.
The post Mobile Ad Spending in 2018 Expected to Surpass TV appeared first on AdvertiseMint.
May 8, 2018
You Can Now Upload More Than One Photo or Video to Instagram Stories
 May 8, 2018
Anna Hubbel
Do you ever spend forever deliberating which photo best captures the moment you want to share in your Instagram Story? I know I do. Sometimes two photos of the same event are just different enough that each offers something unique, but not different enough to warrant two separate Stories (without frustrating your followers, that is). And sometimes, if you’re an advertiser trying to market a series of smaller events relating to one, underlying event, it may be impossible to do so in the small time frame allowed in an Instagram Story.
Instagram recently announced a solution to these types of dilemmas. One of the latest updates allows you to upload multiple photos and videos as part of a single Story. That means you can share various moments even after they’re long over. You’re also able to edit each photo or video individually using the creative tools available for Stories.
You can now upload more than 1 photo or video to @Instagram #Stories. #InstagramMoments
Click To Tweet
How It Works
When you navigate to upload media, you’ll notice at the top right of your screen a new icon. By selecting it, you can then choose up to 10 photos or videos from your gallery. After you’ve made your selection and moved on to the edit screen, there will be a preview of your chosen media at the bottom of your screen. To add stickers, text, etc., simply select which photo or video you want to edit from the preview. You can edit each one as you desire.
 Photo Courtesy of Instagram
Once you’re finished editing, your post-edited preview will immediately commence uploading to Stories. Each photo or video will display in the order they were arranged in your pre-uploaded preview.
This update eliminates the anxiety of missing out on the opportunity to share just the right media on Instagram Stories. It also adds some depth and narrative to the experience.
Instagram also announced that its location stickers are now better at identifying places where your photo or video was originally captured. So for example, if you want to share a photo from your trip to Hawaii a week after the fact, the location sticker will provide suggestions of places within the specific area where the photo was taken. If you’re an advertiser, this means you don’t have to worry as much about your visitors forgetting the name of your business because Instagram’s location stickers will help spark their memories.
If you’re a big fan of the platform, you may also be excited about the possibility of the Carousel Ad format coming to Instagram Stories.
The post You Can Now Upload More Than One Photo or Video to Instagram Stories appeared first on AdvertiseMint.
May 7, 2018
How to Install the LinkedIn Pixel to Your Website
 May 5, 2018
Anna Hubbel
Install the @LinkedIn #InsightTag on pages of your website to track #conversions. #digitaladvertising #linkedinpixel
Click To Tweet
You can discover valuable information about your customers by tracking their activity on your business’s website. Various coding tools are available to help you track behaviors so you can measure the success of your ad campaigns and find insights into what you should change. The Facebook Pixel is one such tool. It’s a code you can copy and paste within the backend coding area of your web pages to track visitors’ behaviors across your website.
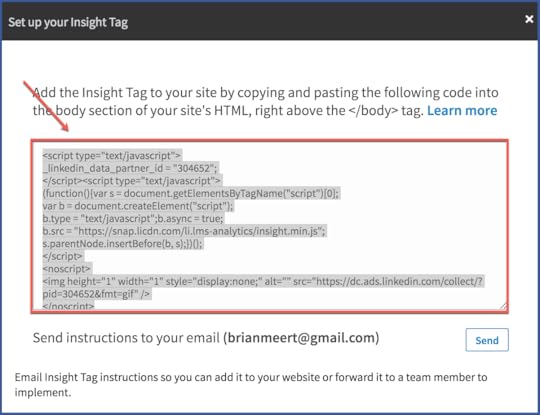
Another tool you may not be as familiar with is the LinkedIn pixel or Insight Tag. Similar to the Facebook Pixel, the Insight Tag is a snippet of Javascript code that drops a cookie on a visitor’s browser whenever they visit a page on your website where you have installed the code. So when visitors click on your LinkedIn ads and are directed to your website, you can see how they interact with your pages containing the code, offering significant, measurable insights for your campaigns.
The actions the LinkedIn pixel tracks are conversions or events. For example, when a visitor completes a download or fills out a registration, that is a conversion. A conversion is essentially any impactful action relevant to your business or campaign goals.
How to Set It Up
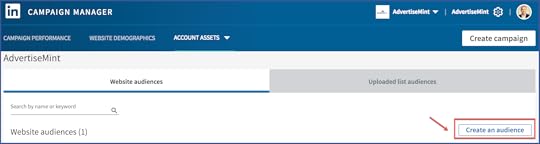
Step 1: Go to your account.
Step 2: Go to “Account Assets” then “Matched Audiences.”
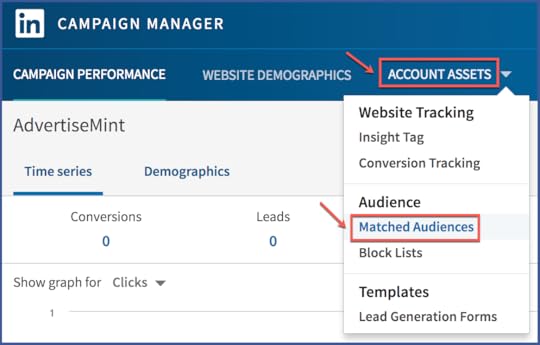
Step 3: Click “Create an Audience.”
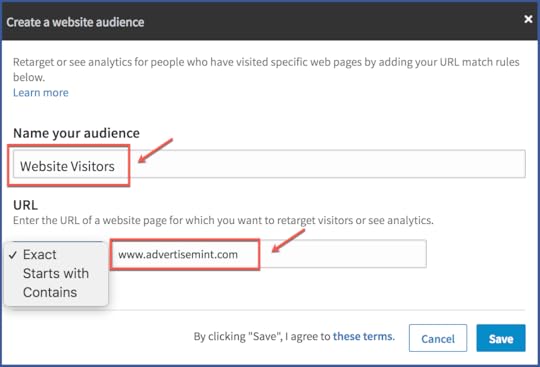
Step 4: Name your audience and enter your website’s URL.
Step 5: Copy the pixel.
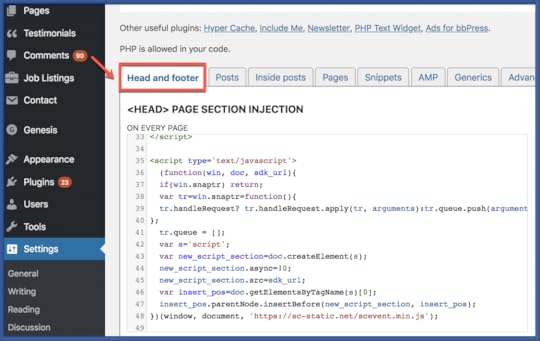
Step 6: Paste the pixel into the header and footer of your WordPress site.
And that’s all there is to it!
The post How to Install the LinkedIn Pixel to Your Website appeared first on AdvertiseMint.
May 6, 2018
Data Download Tool Now Available for Instagram and WhatsApp
 May 6, 2018
Anna Hubbel
Data Download Tool Now Available for Instagram and WhatsApp. #instagram #whatsapp #socialmedia #privacy
Click To Tweet
As users across the globe scramble to get control over their social media data after learning about the Cambridge Analytica scandal, Facebook is making sure everyone knows about the Download Your Information option, which allows users to download all of their data if they choose to delete their Facebook account. With Snapchat also having a way to back up data, it only makes sense that other social networks should also offer the option.
It’s no surprise that Instagram and WhatsApp now offer data downloads for users who wish to either back up their data before deleting their accounts or possess a backup copy of their data for safekeeping.
Instagram Data Download
According to TechCrunch, users can access Instagram’s Data Download feature by going to their privacy settings within the app. They can download data that includes photos, videos, profile information, comments, archived Stories, captions, contacts, settings, searches, followers’ usernames, and non-ephemeral messages. Presently, users can download their information from the Instagram website on desktop or from the privacy settings of the app.
WhatsApp Data Download
WhatsApp’s Data Download tool, according to TechCrunch, is available globally with the next app update. The data users can download includes account information such as profile photos and group names. However, users are unable to download messages, according to TechCrunch, because these can be exported or backed up by some phones.
So why is Facebook making all these data download tools available across all its platforms now? TechCrunch attributes it to the company’s desire to be in compliance with the European Union’s General Data Protection Regulation (GDPR) privacy law. Facebook recently introduced new privacy features to comply with this regulation and to make the platform safer for users. The law takes effect on May 25, so the release of data download tools for Instagram and WhatsApp are rolling out prior to that date.
The post Data Download Tool Now Available for Instagram and WhatsApp appeared first on AdvertiseMint.