Brian Meert's Blog, page 118
May 21, 2018
Facebook Introduces Messenger Tools That Make Reporting Easier
 May 21, 2018
Anna Hubbel
Facebook Introduces Messenger Tools That Make Reporting Easier. #facebook #socialmedia #tech
Click To Tweet

Facebook cracks down on bad experiences across all its social platforms. For example, last month, the company announced its Data Abuse Bounty Program, which rewards users who report data misuse to help Facebook identify app developers abusing its platform. Back in the fall, Facebook stopped allowing self-reported targeting after some advertisers used it to target “Jew haters.” And recently, the company informed advertisers that it’s expanding its efforts to reduce clickbait and deceptive links to low-quality websites. Now, Facebook introduces new tools to its app, Messenger, that make it easier for users to report conversations that violate the network’s Community Standards.
Previously, users could only report Messenger conversations through Facebook reporting tools or through Messenger web—there was nothing for mobile. Now, Facebook says users can report conversations straight through their iOS or Android mobile devices.
Reporting Messenger Conversations
Users can report a conversation they suspect violates Facebook’s Community Standards by doing following:
Step 1: Open Messenger and go to the conversation in question.
Step 2: Tap the name of the person or group involved in the conversation.
Step 3: Scroll to “Something’s Wrong” in the list of options that appear.
Step 4: Choose the category that best fits the conversation, such as harassment, hate speech, or pretending to be someone else.
Facebook says users also have the option to ignore or block the person or group being reported. The network will send a confirmation message to indicate the report was successfully submitted.
“Providing more granular reporting options in Messenger makes it faster and easier to report things for our Community Operations team to review,” Hadi Michel, product manager for Facebook Messenger, says in a news post. Michel adds that the team reviews reports in over 50 languages. “This means our community will see issues addressed faster so they can continue to have positive experiences on Messenger.”
Although Facebook is comprised of a massive network of employees that review content across the globe, the company still can’t do it all on its own. It needs its users to help make its social platforms safe and enjoyable for all.
The post Facebook Introduces Messenger Tools That Make Reporting Easier appeared first on AdvertiseMint.


May 20, 2018
How to Create Great GIFs That Connect with Followers
 May 21, 2018
Anne Hubbel
How to Create Great GIFs That Connect with Followers. #hacks #gifs #graphicdesign
Click To Tweet

Everyone enjoys a good GIF. They’re fun to look at; they can contain unique or relatable messages, and they are great for making users stop mid-scroll. In the marketing sense, GIFs are a smart way to connect with users without coming across as too salesy.
What Does “GIF” Stand For?
“GIF” stands for Graphics Interchange Format. They are low-resolution, looping video images that often look like stop-motion animations or brief snippets of a video clip with a caption. GIFs are short, telling a story or message very quickly. Users often use GIFs in witty responses or comment exchanges with other users. For example, if one user were to say something like “Well, it’s official: I’m now a vegan,” a friend might jokingly respond with the GIF of Michael Scott from an episode of The Office screaming “No, God no! No! Nooooooooo!”

How to Make Your Own GIF
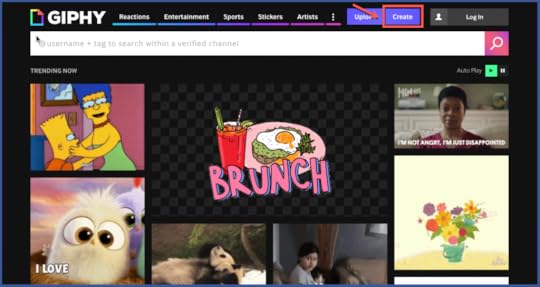
Since GIFs are so popular, there are various ways to make your own quickly. You have conversion sites such as Giphy, Make A Gif, and Gifs.com, to name a few. Depending on which site you choose to make your GIF, the creation process will vary. For this step-by-step guide, I’m using GIPHY to make a quick and witty GIF.
Step 1: Go to Giphy.com and select “Create.”
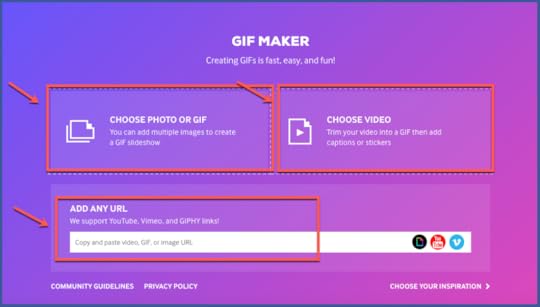
Step 2: Choose whether you want to create your GIF using a photo or existing GIF, a video file, or an existing video link. If you choose one of the file upload options, upload your file.
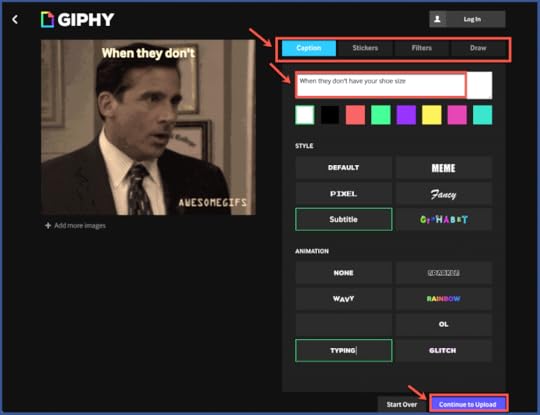
Step 3: Enter the caption you want to appear in your GIF, the color and style you want your caption text to have, and the animation (if any) you want your caption to have. You can also add stickers, filters, or drawings to your GIF, and reposition the caption by clicking on it and moving it. When you’re finished, select “Continue to Upload.”
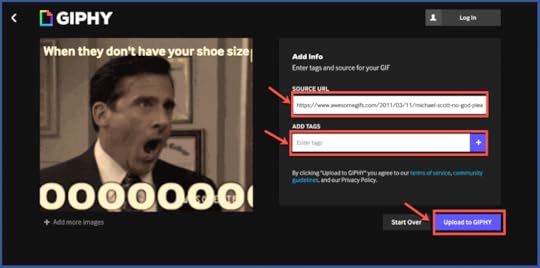
Step 4: Enter tags and a source URL for your GIF, then select “Upload to GIPHY.”
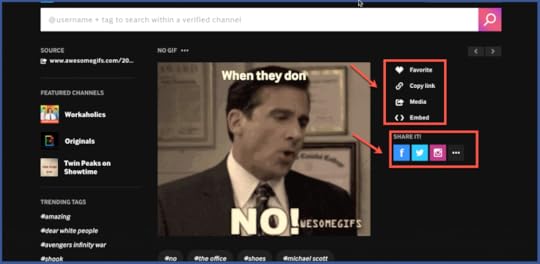
Step 5: When Giphy finishes uploading your GIF, choose one of the options to the right of your GIF to share it. And you’re done!
Make a GIF Using Photoshop
You can also use Photoshop to create a GIF, which is a good option if you want something very unique and original, and you don’t mind a few extra steps.
Here’s a step-by-step guide of how to convert a series of photos you’ve compiled into a GIF with Photoshop, courtesy of HootSuite.
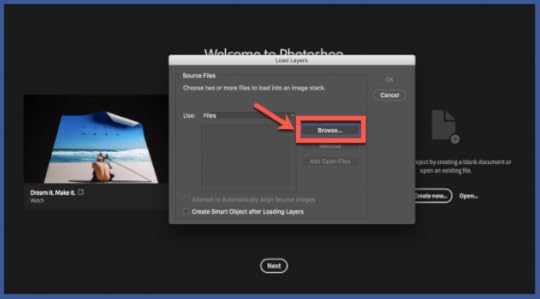
Step 1: Open Photoshop and go to “File” > “Stack” > “Load Files into Stack.” Select “Browse.”
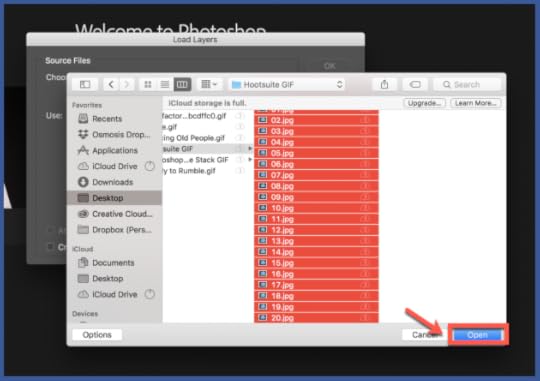
Step 2: Select the range of photos you want in your GIF. Use shift-click to select the whole list of files. Once they’re all selected, click “Open.”
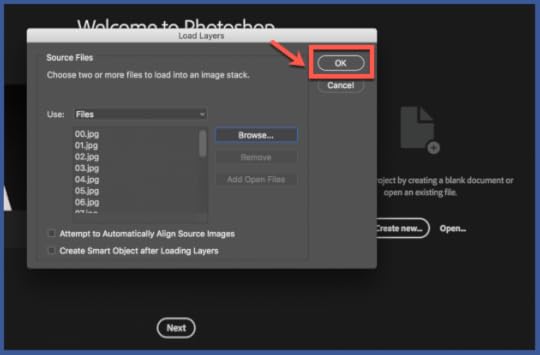
Step 3: When you’re back to the “Load Layers” box, select “OK.”
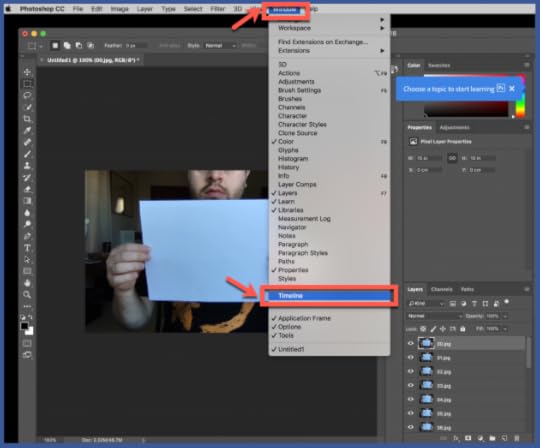
Step 4: At the top navigation menu, go to “Window” and scroll down to “Timeline.”
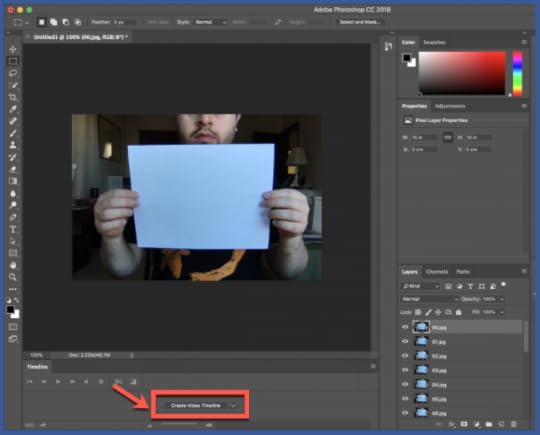
Step 5: Click “Create Video Timeline” when it appears at the bottom of your screen. Change it to “Create Frame Animation.”
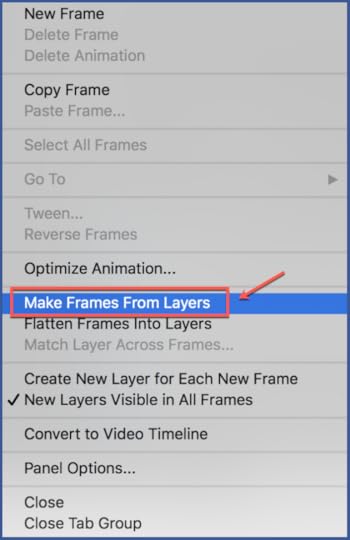
Step 6: Select the menu icon located at the top right of the Timeline panel.

Step 7: In the dropdown menu that appears, select “Make Frames From Layers.”
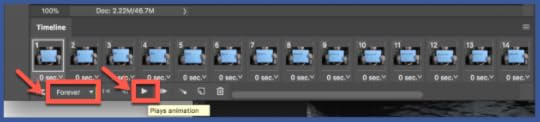
Step 8: The photos you uploaded will appear in the Timeline panel. Drag to reorder them in the order you want them to play. Press the triangular Play button to preview your GIF, making sure “Forever” is selected in the dropdown menu to the left of the Play controls.
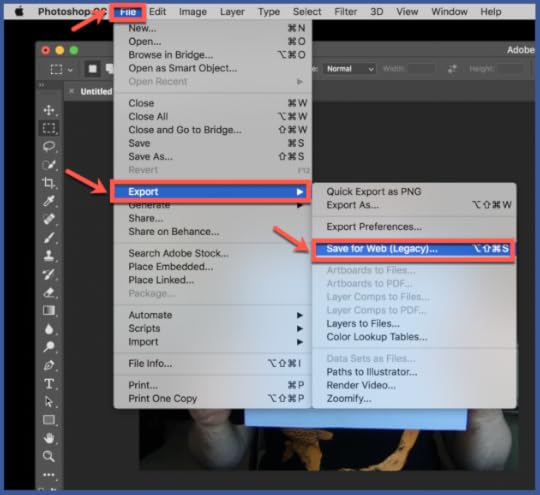
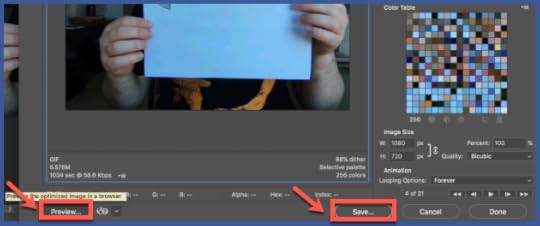
Step 9: Go to “File” > “Export” > “Save for Web (Legacy)”
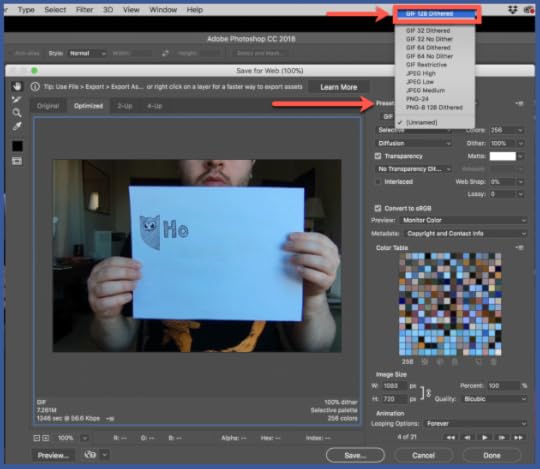
Step 10: You will be directed to an export menu box. Under “Preset,” select “GIF 128 Dithered.”
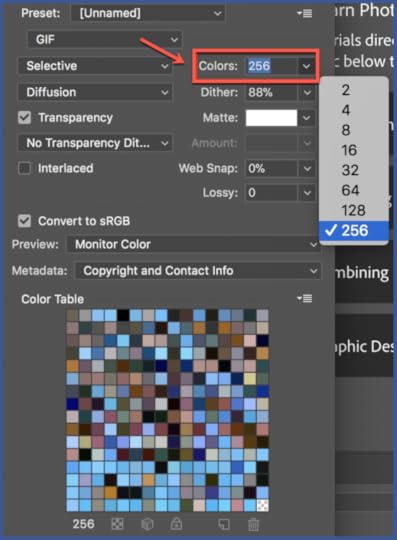
Step 11: In the same export settings menu box, set your “Colors” to 256.
Step 12: Select “Preview” to watch your GIF before pressing “Save” to name and save your GIF to your computer. And you’re done!
Making Your GIF Work for Your Social Media Campaign
If you decide to incorporate GIFs into your social media marketing campaign, it’s important to use GIFs that are relevant to your business or brand. In the first GIF example, with the caption “When they don’t have your shoe size,” this GIF would work well for a shoe brand. It obviously wouldn’t go over as well, however, for a restaurant.
You can also use GIFs for quick demos of your product being used. Perhaps, for example, you create a quick GIF that shows the multiple ways you could wear a scarf you sell. Or a GIF that demonstrates your mascara product being used.
Whatever the purpose of your GIF, explore and experiment with all the social media marketing possibilities available to you in this fun and creative media format.
Happy GIF-making!
The post How to Create Great GIFs That Connect with Followers appeared first on AdvertiseMint.
9 Ways to Make a Stellar Facebook Cover Photo
 May 20, 2018
Anna Hubbel
9 Ways to Make a Stellar Facebook Cover Photo. #facebook #socialmedia #tips
Click To Tweet
Your Facebook cover photo is like the headline of your page: it makes your page stand out from the rest. Facebook cover photos give you the opportunity to get visually creative. It also allows you to establish your brand’s color scheme and aesthetics and to lure users into browsing the rest of your page with interest.
Although it seems like such a simple concept, uploading a banner photo to represent your brand, there are some best practices you should keep in mind when making your Facebook cover photo. This post will walk you through some of the key best cover photo practices so you can make a stellar photo every time.
1. Use the Correct Cover Photo Dimensions
If you don’t use the correct dimensions for your cover photo, the photo may appear skewed, which looks unprofessional. The minimum dimensions are 851 x 315 pixels with a file size under 100kb, so use these numbers when creating your cover photo in Photoshop to ensure it displays on your page exactly the way you expect.
That being said, however, you also want to keep in mind that cover photos display more like a rectangle on desktop and more like a square on mobile. If you use the aforementioned dimensions, make sure elements in your cover photo will still look good on both desktop and mobile; otherwise, Hootsuite says you can also format your cover photo as 820 x 462 pixels to make it display well on both versions.
2. Don’t Violate Any Copyrights
Some people think they can simply look up a good image on Google Images, save it, and upload it as their cover photo. Nuh-uh. Not only is this path uncreative and unprofessional, but it also likely violates someone else’s image copyright. Put in the creative effort to make a sharp, original cover photo. It’ll be worth it.
3. Make Sure Your Image Is Relevant and Family Friendly
The last thing you want to do is offend or turn off users with your cover photo. Keep your cover photo clean and family friendly.
You also don’t want to use a cover photo that’s irrelevant to your brand. The point of a cover photo isn’t just to look good; it should also sum up the basic message or purpose of your business.

4. Don’t Violate Facebook’s Advertising Rules
If you want your cover photo to advertise a product or service, make sure it is in compliance with Facebook’s advertising policies for pages. You wouldn’t want Facebook to flag your page because your cover photo violates the platform’s rules.
5. Create a Template Using Photoshop
Using either the 851 x 315 or the 820 x 462 pixel dimensions, create a cover photo template using Photoshop. You can also mark where you want the text and primary elements to be located. This will make it easier when you update your cover photo: you can just insert your new images and text in the template and save your new photo as a JPG or PNG.
6. Use Clear and Simple Graphics, Text, and Photos
Don’t use an overwhelming amount of wordy text or complex imagery. You want your cover photo to quickly and clearly communicate your message. Users shouldn’t have to spend more than a second or two making sense of your cover photo.
You also want it to be captivating, and a simple look with elements that pop is best. Whether you prefer graphics or a photo, you can make a great-looking cover photo and still clearly communicate your message by keeping it simple.

7. Make Your Cover Photo Complementary to Your Profile Photo
Your cover photo and profile photo should look like a cohesive conjunction of elements. Although they should be different from each other, they should not be drastically different. They should complement each other, in color and size contrasts. You want to make sure that both the profile photo and the cover photo look like they are part of the same brand.
8.Optimize for Mobile
How will your cover photo read on a mobile screen? Is it clear, or is it confusing? Will any of the elements be cut off? Is the text big enough? These are the types of questions you should ask yourself to make sure your cover photo is optimized for mobile.
9. Right-Align the Elements in Your Photo
Although centering elements may in some cases be the preferred choice, Hootsuite says right alignment of your heavier elements reads more aesthetically for cover photos. It directs the eye from a left-to-right motion, landing on your page’s call-to-action button at the bottom right of your cover photo.
Now you’re ready to create a slew of amazing cover photo designs for your Facebook page! If you are the admin of a Facebook fan page, you can also learn how to upload a cover photo to keep fellow fans interested.
The post 9 Ways to Make a Stellar Facebook Cover Photo appeared first on AdvertiseMint.
May 18, 2018
How to Find Out If an App Misused Your Facebook Information
 May 19, 2018
Anna Hubbel
How to Find Out if an App Misused Your Facebook Information. #facebook #apps #security #camrbidgeanalytica
Click To Tweet

We’re all feeling vulnerable after we learned an app took advantage of our personal Facebook information in the Cambridge Analytica scandal. And it happened in such a misleading, violating way, in the guise of a harmless personality quiz app gathering information for “academic purposes.” Even after Facebook said it would alert every user who may have been affected, there is still room for suspicion about the other apps that may be misusing our information.
Facebook recently announced that the company is investigating all apps that had access to significant amounts of data prior to its policy changes in 2014. The ongoing investigation consists of teams of external and internal experts working in two phases. The first phase involves an in-depth, comprehensive review of all apps with this data access. The second phase entails detailed interviews and requests for information with app creators to ensure correct use of gathered data.
So far, Facebook’s investigations have led to the suspension of about 200 apps, pending further examination. As Facebook continues to learn more, it will proceed to ban any apps it identifies as misusers.
You may be thinking, “But I want to know now whether an app misused my Facebook information.” Well, Facebook has a page dedicated specifically to informing you whether your information was potentially misused by one of the apps being investigated. The page includes a table that Facebook updates as more information is discovered about each suspected app. Simply check in with the page every now and then to see if any new updates were added to the table. You have to be logged into your Facebook account in order for the table to update with information specific to your profile.
“There is a lot more work to be done to find all the apps that may have misused people’s Facebook data—and it will take time,” Vice President of Product Partnerships Ime Archibong said in a Facebook blog post. “We are investing heavily to make sure this investigation is as thorough and timely as possible. We will keep you updated on our progress.”
The post How to Find Out If an App Misused Your Facebook Information appeared first on AdvertiseMint.
Authorization to Run Political Facebook Ads: A Timeline
 May 18, 2018
Anna Hubbel
Here’s a timeline of the changes in #Facebook political advertising. #facebookads #politicalads #advertising
Click To Tweet

Starting this month, Facebook will implement its new authorization process for advertisers who want to run political ads. The company provided a timeline for US advertisers only, with plans to introduce the authorization process to other countries in the future.
The new authorization process prevents the misuse of Facebook for political purposes during the elections. Since the public discovered that Russian troll accounts distributed politically divisive ads during the 2016 US presidential election, Facebook has been revealing other ways its platform has been misused for political purposes, such as in the Cambridge Analytica scandal. In response, Facebook has been announcing new ways it plans to crack down on misuse and improve transparency across pages and ads.
The first step of the authorization process has already taken off. On May 7, Facebook required authorized advertisers to label their ads. This means all ads will include a “This is a political ad” label, which advertisers must use to let users know their ad contains political content. Here’s a timeline of the changes in political advertising.
May 22: Political Ads Archive Available to the Public
Although political ads are already being logged into a political ad archive, this archive won’t be available to the public until May 22. Once it’s public, ads in this archive will contain a “paid for by” disclaimer.
May 22: Political Ads Must Have Labels
Advertisers must adhere to all of Facebook’s authorization requirements and include labels on political ads that clearly and transparently indicate that they are political ads.
May 22: Political Ad Labels Become Visible to the Public
Users will be able to see the political ad labels. If a user reports an ad that contains political content but does not have the label, Facebook will review it and, if deemed political, disapprove it and move it to the archive.
May 22: Political Ads Become Publicly Visible in the Archive
Users will be able to see all ads in the political ads archive. All ads include those made since May 7 and going forward. Ads in this archive will be searchable until seven years after creation, at which time they will be removed from the archive.
June 4: Facebook Continues to Review Running Ads
Facebook will conduct an ongoing review to ensure that ads meet the new standards. Advertisers will be advised if their ad does not comply, and they will be expected to recreate it accordingly. Until the ad is changed to meet the new standards, it will simply be disapproved and moved to the political ad archive.
“We’re committed to increasing the transparency of advertising on Facebook,” Facebook’s business team says in its email to advertisers that provides the timeline for the new authorization process. “With your partnership we believe that these steps will help protect the integrity of elections and political advertising on Facebook.”
The post Authorization to Run Political Facebook Ads: A Timeline appeared first on AdvertiseMint.
May 17, 2018
How to Download Your Instagram Data and Delete Your Account
 May 17, 2018
Anna Hubbel
Suppose you want to take all your Instagram data, delete your account, and save it somewhere safe and accessible. How do you do that? It’s simple.
You don’t have to delete your account to acquire a downloadable archive of your Instagram information. However, you do want to retain the archives to know the exact information Instagram has on your social activity. Either way, it’s nice to have the option to see all your data in one organized place and to delete your account if you decide to end your Instagram relationship.
The Information Instagram Gives You in the Downloaded Archive
Here’s a list of the data Instagram gives you when you download the archive of your information:
All of your phone contacts
Your profile information
Your search history
Your connections and who you follow
Posts you’ve liked
Direct messages you’ve sent
Videos and photos you’ve posted
Stories you’ve shared
According to a CNBC article, when you download an archive of your information on Instagram, data about your interactions with ads on the platform is not included. That doesn’t necessarily mean Facebook doesn’t have it logged away somewhere (it most likely does), but it does mean you are unable to download it.
How to Download Your Archived Instagram Data
To download the data Instagram has stored away about you, here’s what you do.
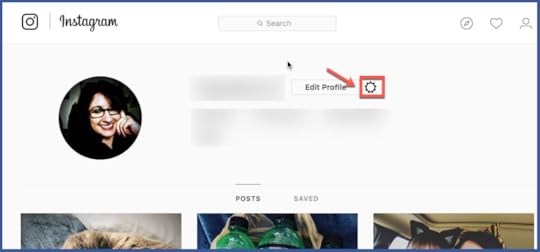
Step 1: Go to Instagram.com on your desktop and navigate to your profile.
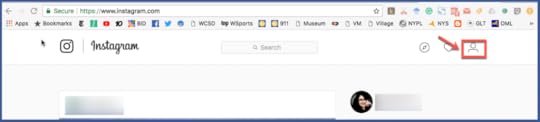
Step 2: Select the gear icon next to the “Edit Profile” button.
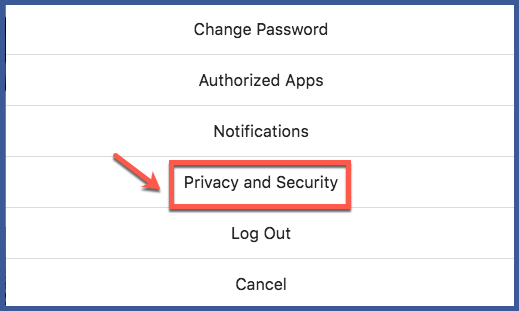
Step 3: In the box of options that appears, select “Privacy and Security.”
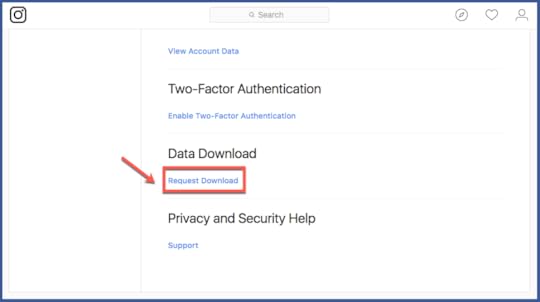
Step 4: Navigate down to “Data Download.” Select “Request Download.”
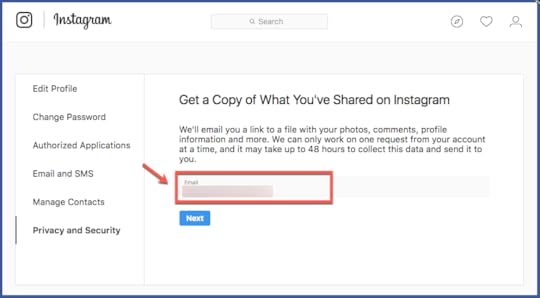
Step 5: Enter the email address you want Instagram to send the download link to. Then select “Next.”
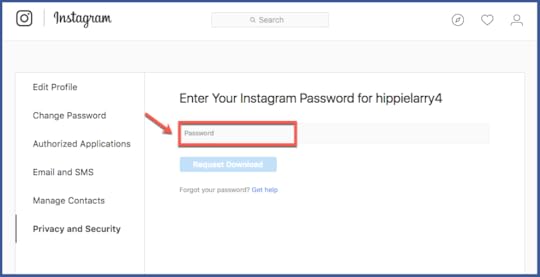
Step 6: Enter your Instagram password to verify your request, then select “Request Download.”
It can take up to 48 hours or less than 30 minutes to receive your download link. It all depends on how active you are on Instagram. After you click the link and everything is downloaded, the zip file opens as a folder containing files of photos, Stories, videos, and text formats for data related to searches, settings, messages, etc.
How to Delete Your Instagram Account
Before you get into the groove of getting rid of your Instagram account altogether, make sure you are fully willing to do so permanently because when you delete your account, it is, in fact, gone for good.
If you do decide to delete your account for good (instead of temporarily deactivating it), here’s what you do:
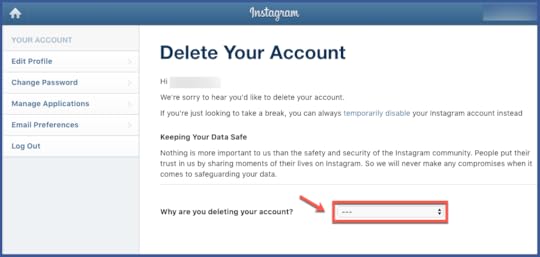
Step 1: Navigate to Instagram’s “Delete Your Account” page. Indicate from the dropdown the reason you are deleting your account.
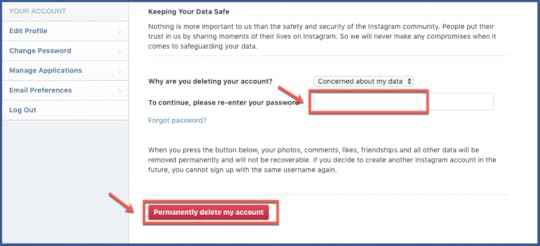
Step 2: Enter your password to verify your request, then select “Permanently delete my account.”
Now that you have the know-how on how to obtain your Instagram data and delete your account (if you so choose), you have more control over your online presence than you did before.
Before you go on to delete your Facebook account as well, you should first review the seven reasons why you may not want to do that quite yet.
The post How to Download Your Instagram Data and Delete Your Account appeared first on AdvertiseMint.
May 16, 2018
Facebook Cracks Down on Clickbait and Low-Quality Websites
 May 16, 2018
Anna Hubbel

The company has been informing its advertising partners that it’s expanding its efforts to reduce clickbait and misleading links to low-quality websites. These unhappy experiences include ads that lure users with a deceptive headline or link users to a website that does not live up to expectations.
Facebook laid out its plan to reduce links to low-quality web page experiences last year in attempts to improve users’ experiences with the platform. But in light of recent investigations placing the platform in a negative light as far as digital experiences go, such as the Cambridge Analytica scandal and the manipulation of politically divisive messages by Russian troll accounts during the 2016 US presidential election, Facebook is putting its foot down. The company told the AdvertiseMint team in an email that this crackdown is intended to generate and promote more informative, high-quality posts.
Chad Kramer, partner manager for Facebook and Instagram, re-emphasized best practices the company advised last year to avoid clickbait ads and poor website experiences to prevent decreased engagement or ad delivery. Those best practices are as follows:
Avoid a Disproportionate Volume of Ads Relative to Content: This includes advertisements but not legally required disclosures or logins to private content, such as paywalls.
Refrain from Using Pop-Up Ads or Interstitial Ads: These types of ads unpleasantly interfere with the user experience.
Make Sure All Landing Pages Comply with Facebook’s Advertising Policies: Facebook’s Advertising Policies prohibit sexually suggestive content, shocking content, and pages that contain malicious or deceptive ads.
Refrain from Distributing Content That Leads to Negative Web Experiences: Negative web experiences include unexpected content experience and clickbait ad content.
According to Kramer, any content rolled out during the months of April and May directing users to landing pages matching the above descriptions will see reduced distribution or will possibly be disapproved altogether. This crackdown took effect starting April 5 for content containing both clickbait ad copy and substandard web experiences. Starting May 9, however, that crackdown has expanded to content containing either one of these deceptive practices.
Facebook has been giving tough love to advertisers lately, including its decisions to improve its privacy tools and manually review ads with sensitive topics.
The post Facebook Cracks Down on Clickbait and Low-Quality Websites appeared first on AdvertiseMint.
Google Requires Political Advertisers to Provide an ID
 May 16, 2018
Anna Hubbel

This month, Google is updating its political content policy and implementing new transparency rules for US election ads. The most noteworthy change is the requirement to provide proof of US identity to ensure there is no unlawful use of Google advertising during US elections. This verification process will take effect starting May 31, 2018.
“To be verified by Google, you’ll have to provide proof of your identity and information about where you’re based, as well as confirm that you’re a US citizen or lawful permanent resident, and are legally permitted to run these ads,” the Google AdWords Team says in an email to advertisers who may be affected.
According to a blog post by Senior Vice President Kent Walker, Google is also requiring advertisers to clearly disclose in their ad who is paying for it. Additionally, over the summer, Walker says Google will release a new Transparency Report with a special focus on election ads.
“This Report will describe who is buying election-related ads on our platforms and how much money is being spent,” Walker explained in his post.
A searchable library is also in the works, which will allow users to locate all election-related Google ads and to see who bought them.
“As we learn from these changes and our continued engagement with leaders and experts in the field, we’ll work to improve transparency of political issue ads and expand our coverage to a wider range of elections,” Walker said in the same post.
This recent advanced focus on election ad transparency online comes in light of discussions about the misuse of the Facebook platform during the 2016 US presidential election. The aforementioned changes by Google resemble those Facebook has made to improve transparency for pages and ads. For example, Facebook too is rolling out a searchable political ads archive this summer that allows users to see the political ads that exist on Facebook and the people who paid for them.
Since Google is not only a social platform but also a search engine experience with limitless uses, the company intends to make the platform secure from every angle, not just advertising.
“Our work on elections goes far beyond improving policies for advertising,” Walker added in his post. “We’re investing heavily in keeping our own platforms secure and working with campaigns, elections officials, journalists, and others to help ensure the security of the online platforms that they depend on.”
Verification appears to be the trending idea for platforms that are trying to boost security. Facebook recently said it will soon require advertisers to verify whether customer email addresses for ad targeting use were rightfully attained.
The post Google Requires Political Advertisers to Provide an ID appeared first on AdvertiseMint.
May 15, 2018
What Is YouTube Advertising?
 May 15, 2018
Anna Hubbel
Here's everything you need to know about #youtubeadvertising. #youtube #digitaladvertising #googleadwords
Click To Tweet

People flock to YouTube on a daily (even hourly) basis to see the next viral video. US audiences aged 18 and over spend, on average monthly, more time watching YouTube than any television network. Those aged 18 to 49 watch more YouTube videos than the top 10 primetime shows combined in the United States, and that’s just on mobile. Users are even more attracted to YouTube because anyone can watch a video at no cost. If this is the case, where does the most popular social video site in the world get its revenue? You guessed it: advertising.
How Does YouTube Advertising Work?
Much like many self-served digital advertising platforms like Facebook and LinkedIn, YouTube advertising all occurs online in Google AdWords. You create your videos and upload it to Google AdWords, choosing the ad targeting and placement for your ads. You bid to display the ad, paying any amount that is within your budget. Once viewers watch your ad, you pay. Once your YouTube and runs, you can view the analytics from Google AdWords. You can run, pause, and stop ads at any time.
What Are the Benefits of YouTube Advertising?
Increasingly more small- and medium-sized businesses are taking their advertising to YouTube. In fact, that number has doubled, and it’s not surprising why. There are various benefits of YouTube advertising, all of which circle around to the most important benefit: a huge audience. YouTube ads have the opportunity to appear across a platform that boasts 1.5 billion monthly viewers. Other benefits include the following:
Real-time insights about views
The ability to show an ad before a viral video
Creative freedom for a video ad
Various ad format options
The ability to identify purchase intent
Increased ad exposure through social media sharing
Various audience targeting options
How Do I Start YouTube Advertising?
First, you must create a Google AdWords account and link it to your YouTube account. When doing so, you much choose the general settings of your account, for example, setting your desired daily budget. Next, you must choose the location where you want your ad to appear. You have the options country, region, city, ZIP code, and IP address.
To run an ad, you must select a video from your YouTube account to promote. When creating your ad, you can choose your targeting options, including device type, demographics, and keywords. After you’re done, you can submit the video ad to YouTube.
Types of YouTube Ads
Often before, during, or after viewers watch a video, they will have to watch a video ad. The ad could be a TrueView In-Stream Video that plays automatically or an Overlay Ad that hovers unobtrusively at the bottom of the video screen or a Discovery Ad that appears within the search results. Whatever the format, ads appear everywhere on the platform. There are a few types of YouTube ads available.

TrueView In-Stream Video Ads: These ads appear on YouTube watch pages, videos from partner sites, and apps in the Google Display Network. They can be no longer than three minutes in length and have the “Skip ad” option after about five seconds. TrueView in-stream ads can play before, during, and after videos. They’re particularly great for creating buying intent.
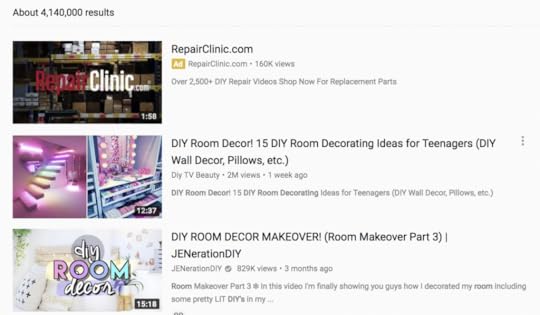
TrueView Video Discovery Ads: Appearing as a thumbnail image, these ads appear on video search results, alongside YouTube videos, and in the YouTube mobile homepage. This format is great for product and brand consideration.
Bumper Ads: An unskippable ad, this format is less than six seconds long and plays before, during, or after a video. Bumper ads appear on YouTube videos, videos on partner sites, and apps on the Display Network. This format is particularly great for brand awareness and reach.
Non-Skippable Video Ads: The least popular format among YouTube users is the non-skippable video ads. Before users can view a video, they must watch the non-skippable ad for the entirety of its 15- to 20-second duration. However, if created uniquely and captivatingly, these ads can be greatly beneficial when you want to ensure that viewers receive your message from beginning to end.
Overlay Ads: Ads in this format can be as simple as a basic text or as colorful as an image complete with a logo and slogan. Overlay Ads appear as a small banner across the bottom of a video screen with the option to either close the ad out of view or click it to be directed to your website. Viewers can still watch their video, as these ads are very unobtrusive. Overlay ads are great for directing web traffic when you don’t necessarily need or want to create a video ad to do so.

Cards and Sponsored Cards: Similar to Overlay Ads, Cards subtly display while the viewer’s chosen video continues to play in the background. Unlike Overlays, Cards appear as small, interactive call-to-action buttons that only expand when clicked. Sponsored Cards are even less intrusive, displaying simply as a small information icon in the top right corner of the video screen. You can also choose to have call-to-action text appear when the icon hovers over. When viewers click the “i” icon, ads chosen by you appear, directing to the landing pages of your choice when clicked.
Whether you realize it or not, TrueView ads are the ones you probably see the most. These are typically the in-stream video ads that play for a few seconds before a button appears that says “Skip ad.” They also come in the form of Discovery Ads, which are thumbnail images (more on that later). One of the best parts about TrueView ads is you only have to pay when viewers watch your ad for at least 30 seconds or if they click on the ad.
Types of Ad Targeting Options
As with other forms of social media advertising, there are multiple targeting options to choose from so you can reach your target audience with your YouTube ads.
Demographics: Target users according to their age, gender, parental status, or household income.
Interests: Target users already interested in certain topics, users that are more tailored to your brand, users that like products and services similar to yours, and life events.
Video Remarketing: Target users that have interacted with your business’s videos in the past.
Placements: Target other YouTube channels, videos, apps, websites, and placements within those websites.
Topics: Target specific topics on YouTube and the Google Display Network.
Keywords: Target specific keywords related to a YouTube video, YouTube channel, or website.
Give careful consideration to which targeting options will deliver the best results for your company. You may also benefit from testing different targeting options and observing the results of each to better inform your campaign.
What Do You Need to Advertise on YouTube?
Getting started in YouTube advertising is simple. The number one thing you will absolutely need is a Google AdWords account and, of course, a YouTube account. Once you have these two prerequisites, all you need is the following:
A skilled video creation team (or person, depending on the size of your business or your creative needs)
Familiarity with YouTube’s video specs
A computer with plenty of storage for your video ads and any complex graphics (e.g., company logo)
Someone to monitor ad insights (to measure the success of your campaigns)
A budget dedicated to YouTube advertising
Compelling and effective ad copy or scripts
You will also want to become familiar with YouTube’s Terms of Service to ensure that all ads you put out there are in compliance. You wouldn’t want your video ad removed because you violated the platform’s terms.
 Tuft & Needle’s founders (from left to right) Daehee Park and JT Marino. Photo courtesy of Pheonix New Times
A YouTube Advertising Success Story
The mattress company Tuft & Needle, which started with just two best college buddies, used YouTube videos to market its brand. The company used a compare-and-contrast approach to demonstrate the high quality of Tuft & Needle mattresses. The company says video ad targeting made it easier to reach customers most likely to buy their product, based on things like website visits or “best mattress” word searches.
“We’ve definitely seen an impact with YouTube,” Tuft & Needle founders Daehee Park and JT Marino say in their YouTube testimonial. They began with just $6,000 but earned $100 million in sales. “Starting on a budget of just $50 to $100 a day, we now dedicate half of our Google advertising to YouTube—it gets results,” the testimonial concludes.
It will be daunting at first, putting your creations out into the big, wide world of YouTube. But if you’re willing to put your creative capabilities to the test, it will be well worth it.
The post What Is YouTube Advertising? appeared first on AdvertiseMint.
May 13, 2018
How to Create a Snapchat Ad the Easy Way
 May 14, 2018
Anna Hubbel
Create a @snapchat ad in 3 easy steps. #digitaladvertising #snapchatads #snapchat
Click To TweetPhoto Courtesy of filecluster
If you have a phone, you can make a Snap ad. It’s that simple.
Snapchat for Business recently published a short YouTube video that gives the simple step-by-step steps for making a Snap ad with the new Snap Publisher tool. And yes, as long as you are in legal possession of a phone or mobile device where you have the Snapchat app and a Snapchat account, it’s as easy as 1, 2, 3.
If you’re hesitant about advertising through Snapchat, I strongly advise that you overcome your skepticism quickly and give it a go. Snapchat has become one of the most popular social media apps amongst Millennials and Gen Zs. It’s fun, spontaneous, and addictive. You can start with a simple Snap ad to test the waters, and then if you like what you see (i.e., your ad drives great results for your campaign), you can explore other products Snapchat has to offer.
So how do you get started?
Step 1: Think of Your Message

When creating your message, make sure it is concise, clear, and to the point.
It should be concise. Your audience isn’t going to sit through your bumbling attempt to convey your message. You need to get your message across succinctly, avoiding wordy, confusing verbiage.
It should be clear. Your audience shouldn’t wonder what your ad is about. Keep it simple and obvious.
It should be to the point. This element goes hand-in-hand with the first two. Get your point quickly in the ad, and don’t make your audience guess what it is. Frankly tell them what you want them to know.
Step 2: Record Your Ad Using Your Phone

Now we’re getting to the good stuff! When you have your idea, you can record content for your Snapchat ad. To begin, you must open with a hook. This is where you demonstrate your unique value to consumers. These first few seconds are crucial to holding your audience’s attention.
Don’t worry about recording a polished video. Instead focus on creating an ad with a clear message, an ad that you would want to watch on your phone.
Step 3: Open Snap Publisher on Your Computer

First things first: Before you throw your hands in the air and say “I’m out,” you’d probably like to know that Snap Publisher is free. That’s a relief, am I right?
Snap Publisher is a new tool that gives you Snapchat-tested templates designed with your campaign objective in mind. It allows you to easily and creatively experiment with different ideas in a matter of minutes.
Once you opened Snap Publisher, you can embellish your recording with graphics and text.
Once you finished decorating your Snap ad, you can run it immediately on Snapchat with Ad Manager. At this point, there are just three things left to do:
Set your budget
Choose your audience
Go live
Boom! You’ve launched a Snap ad campaign. If you decide you like this type of advertising, you can explore other Snapchat advertising products, such as Deep Links or the Snapchat Pixel.
The post How to Create a Snapchat Ad the Easy Way appeared first on AdvertiseMint.