
Cassie Stephens's Blog, page 7
September 12, 2023
14 of My Favorite Fall Art Lessons
.jpg) It's officially my favorite time of the year: FALL! I love it mostly because I'm super into Halloween and all things spooky. I also love that the days are finally cooler...but I do hate that I have less daylight time. Regardless! Fall's my fave and this here post is full of my fave fall art lessons...
It's officially my favorite time of the year: FALL! I love it mostly because I'm super into Halloween and all things spooky. I also love that the days are finally cooler...but I do hate that I have less daylight time. Regardless! Fall's my fave and this here post is full of my fave fall art lessons...AND, like usual, these lessons are free and if you tap the link, you'll be lead to the lesson post which has all the details and (usually) a video for you to share with your students.
So...here you have it: My Favorite Fall Art Lessons!
 Let's kick things off with this Van Gogh-inspired haunted house! My students, especially my older ones, LOVE making spooky drawings. All the details can be found right here.
 Who doesn't love MONSTERS for this spooky season?! I've got several in this blog post, starting with this one. I created this as a sub plan and my sub and kids loved it! Full video lesson here.
  This lesson was one I came up with years ago that I love doing with my third graders and up! Weaving is always a hit. Here's the video lesson here. AND a book I wrote with all sorts of fibers lessons like this one.
 Can you believe this is first grade?! I KNOW! Lesson with video and contemporary artist connection here!
 I always do paper weaving with first grade and sometimes second graders at the start of the school year. This one is always a favorite. All the details here!
 These leaves are PRINTED...with markers! An easy and fun printmaking activity that you can find out all the details about here. Complete with lesson video.
  Sunflowers are perfect this time of year. You can find tons of these flowers at Dollar Tree and they are perfect for making these Andy Warhol-inspired prints.
  One of my favorite things for this time of year: BLACK LIGHT. It's spooky and fun and the kids LOVE it! This lesson on monsters where we used neon paint and oil pastels was a hit with my fourth graders. Lesson and video here.
  Need a collage and shape lesson? WITH contemporary artists connections? Here you go!
 Back in olden times, we didn't have these fancy things called Gelli-Plates. No, y'all, we had to make our own! And I share how in this post but...I wouldn't recommend it. It's not vegan-friendly. It's labor-intensive. And they don't last very long. So...splurge on those gelli-plates cuz you can still do this process!
 Fall is the perfect time to paint landscapes! Here's an oldie (this lesson is almost 10 years old!) but one that I still love.
  Y'all, talk about a throwback: this lesson is from 2012! But it's one I have done for years because the results are always amazing. Check it out!
 Do you have a class that's jsut ahead of the rest for some reason?! Need a fun lesson that they'll love? Here you go, video included!
I'll have more Halloween-ie lessons coming at you next week but until then...here's a fun collage project I know your kids will enjoy!


September 11, 2023
DIY: Let's Sew a Dress from a Shower Curtain IN ONE DAY!
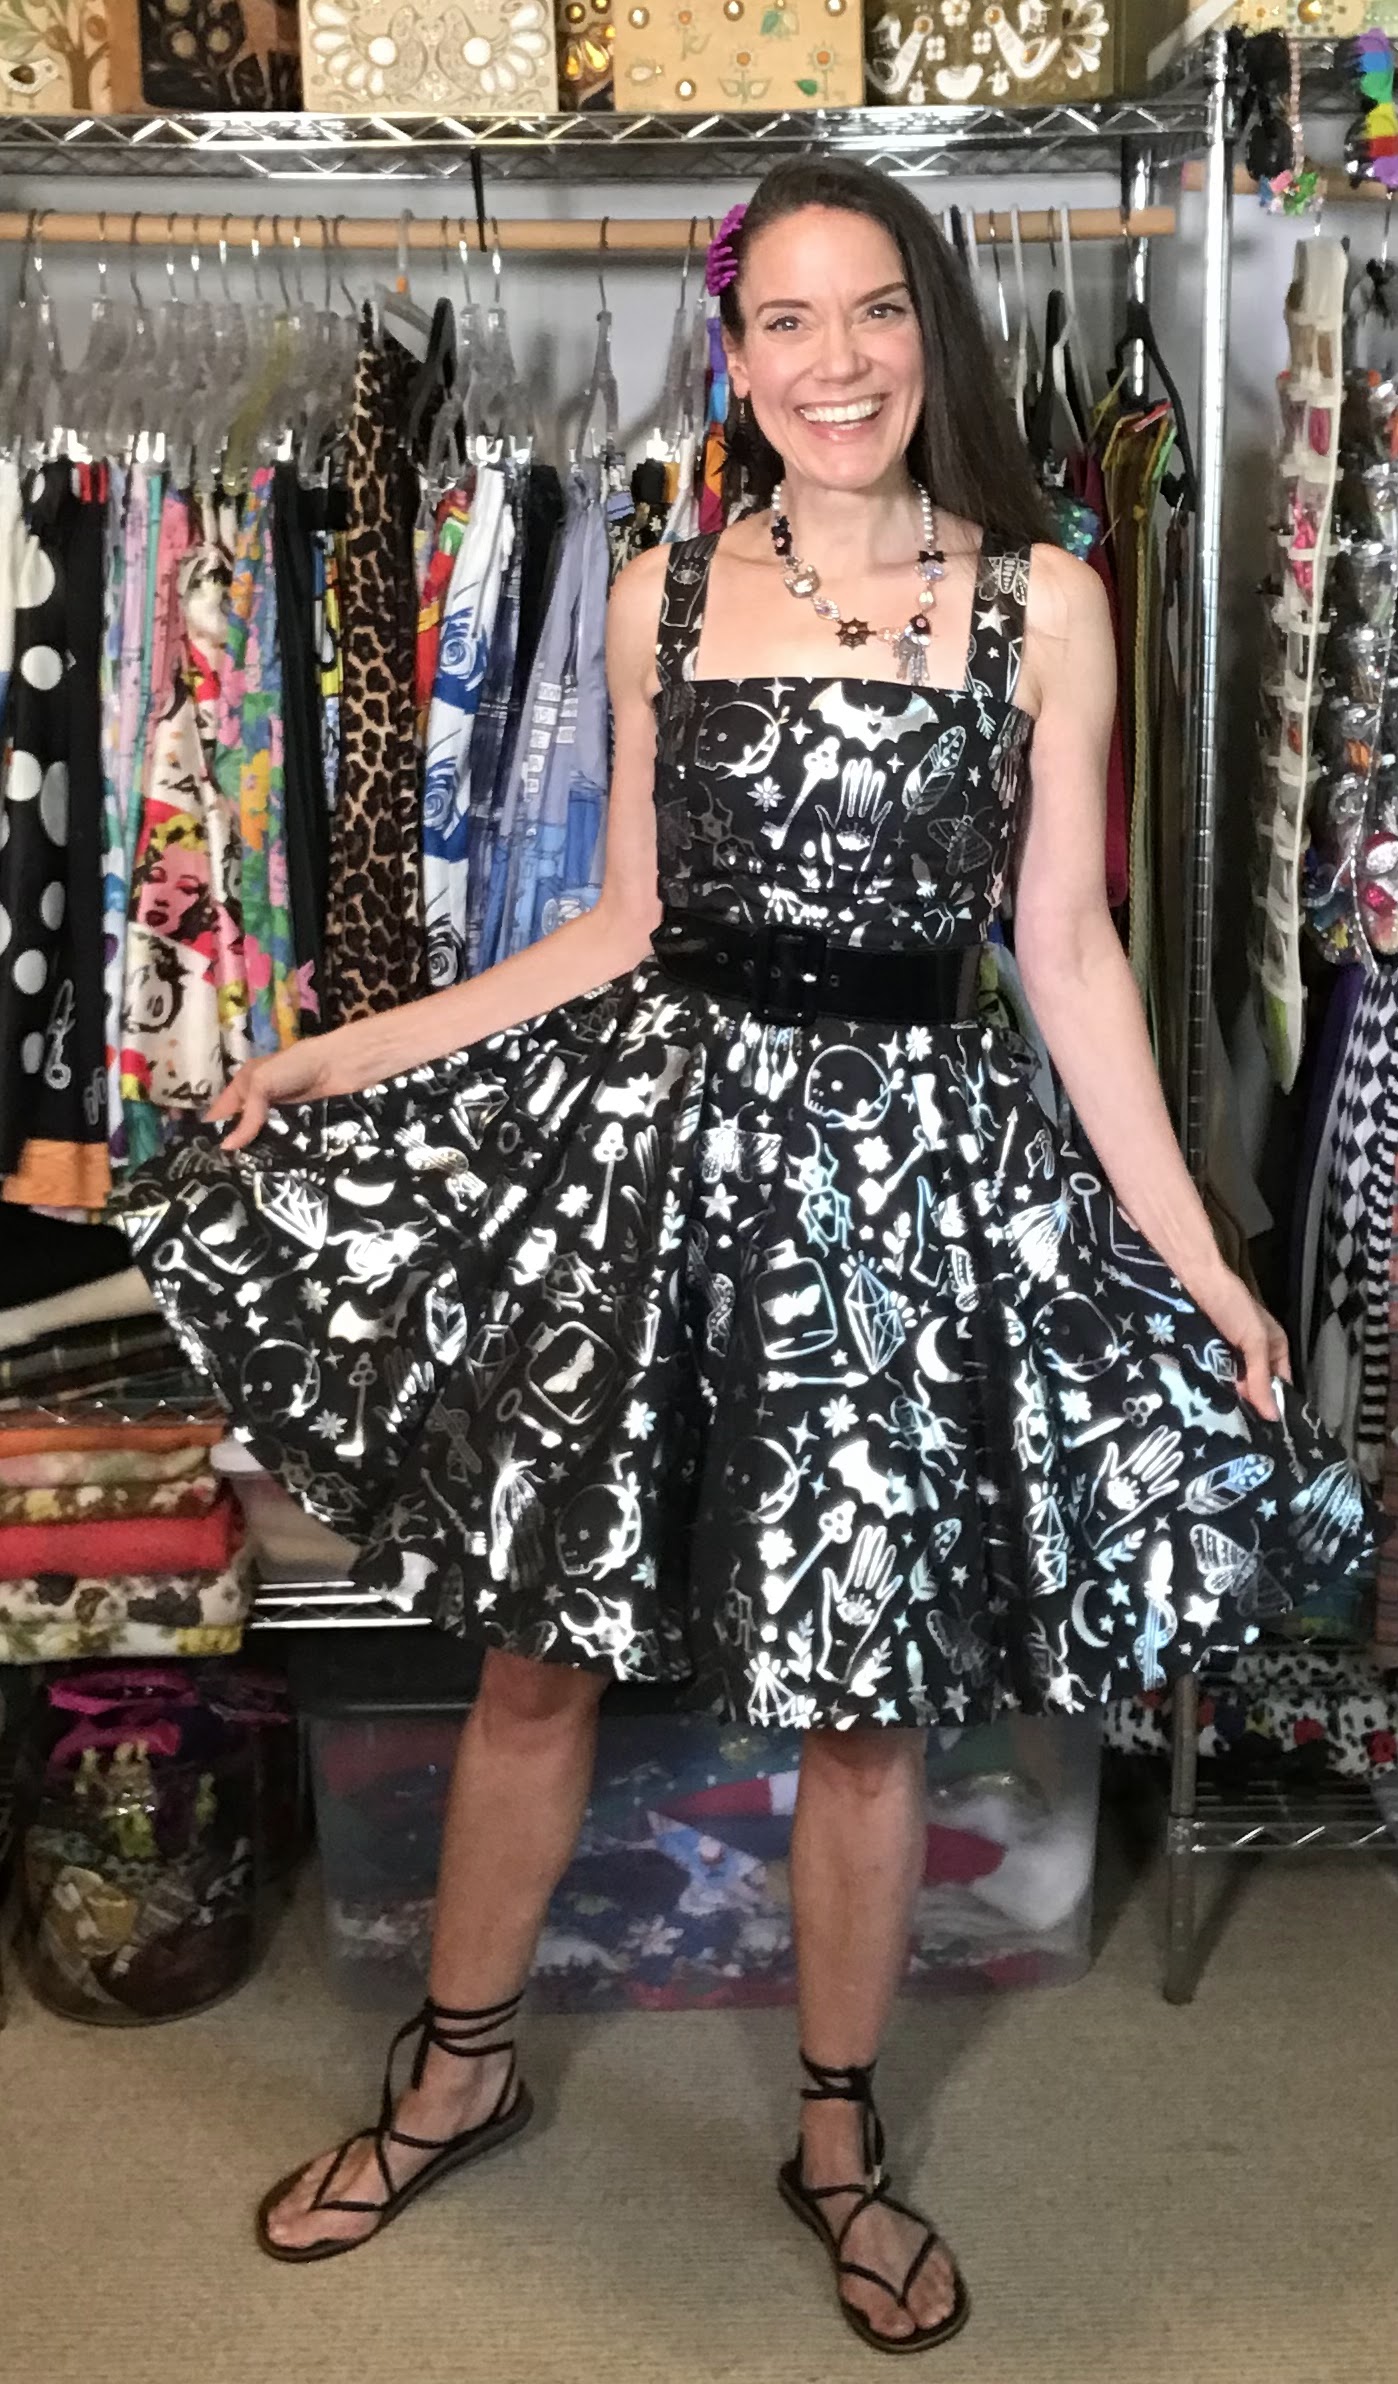
.jpg) Recently, I was out poking around at Ross (for those unfamiliar, this is a discount everything store) and I stumbled upon the cutest shower curtain. It had a big and bold print on the fabric (which I love and is super hard to find) and it was Halloweenie! I'm a big fan of Halloween and I've already stitched up two dresses for the season (one I've not even shared here yet!). So I scooped up this shower curtain for a mere $8.99 and gave myself a challenge:
Recently, I was out poking around at Ross (for those unfamiliar, this is a discount everything store) and I stumbled upon the cutest shower curtain. It had a big and bold print on the fabric (which I love and is super hard to find) and it was Halloweenie! I'm a big fan of Halloween and I've already stitched up two dresses for the season (one I've not even shared here yet!). So I scooped up this shower curtain for a mere $8.99 and gave myself a challenge:SEW A DRESS IN ONE DAY!
Let's see how it went:
 Y'all! I love it!
 I was super surprised that the metallic print on the fabric was so resilient. It didn't chip off when I stitched it which was my big fear. The fabric is super light and flowy, making it perfect for a circle skirt. AND I was surprised to find that when I ironed the fabric, it didn't harm the print!
 I am wearing a crinoline under the dress to help with the poof. I'm a sucker for a poofy skirt.
 I'm returning to Halloween Horror Nights this week...which is in Orlando. Knowing it will be hot, I'm excited that the dress is so lightweight. I can't wait to wear it!
 I paired it with this black belt but I'm thinking I may prefer the black bow. What do you think?
I paired it with this necklace I found at TJMaxx (clearly, I'm a shopper) and some fun earrings and hairclips that I've had for years.
So I'm happy to say...I can sew a dress in a day! From a shower curtain of all things!
AND I just remembered...this isn't my first time using a shower curtain for clothing! Check out this number!
September 6, 2023
DIY: An Eyeball Necklace for Halloween!
.jpg) I just finished making my third Halloween craft of the season! I shared my new Halloween dress in this blog, complete with a video tutorial, here. Then I made another dress...which you can see a sneak peek of in this photo. I can't wait to share it with you but until then...let's make an eyeball necklace! Here's what you'll need:
I just finished making my third Halloween craft of the season! I shared my new Halloween dress in this blog, complete with a video tutorial, here. Then I made another dress...which you can see a sneak peek of in this photo. I can't wait to share it with you but until then...let's make an eyeball necklace! Here's what you'll need:* Large wooden beads* White and black acrylic paint* Skewers* High gloss Mod-Podge* An assortment of beads* Elastic string* Paint markers* Flat paintbrush
And here's a little how-to:
My only real tips:
* Work on these in batches. This will allow dry time between the white paint, the iris, the pupils, the highlights and the red veins. Thankfully, the paint markers dry quickly!
* Lay out your design on a plate. This will keep the beads from rolling all over the place.
* Don't worry about 'mess-ups'. In the end, no one will notice a wonky circle or a misplaced bloody vein. Trust me!
* Have fun! Do this as a craft while watching your favorite horror flick or listening to a spooky podcast to get you in the mood!
 Making these necklaces on elastic means I can easily put them together! And slide 'em over my big ole head.
 I already debuted my necklace with my new dress at Halloween Horror Nights at Universal Studios! It was fun to dress all creepy for the occasion.
 You'll have to know if you decide to give these a try! And stay tuned...I have so many Halloweenie crafts coming your way.
 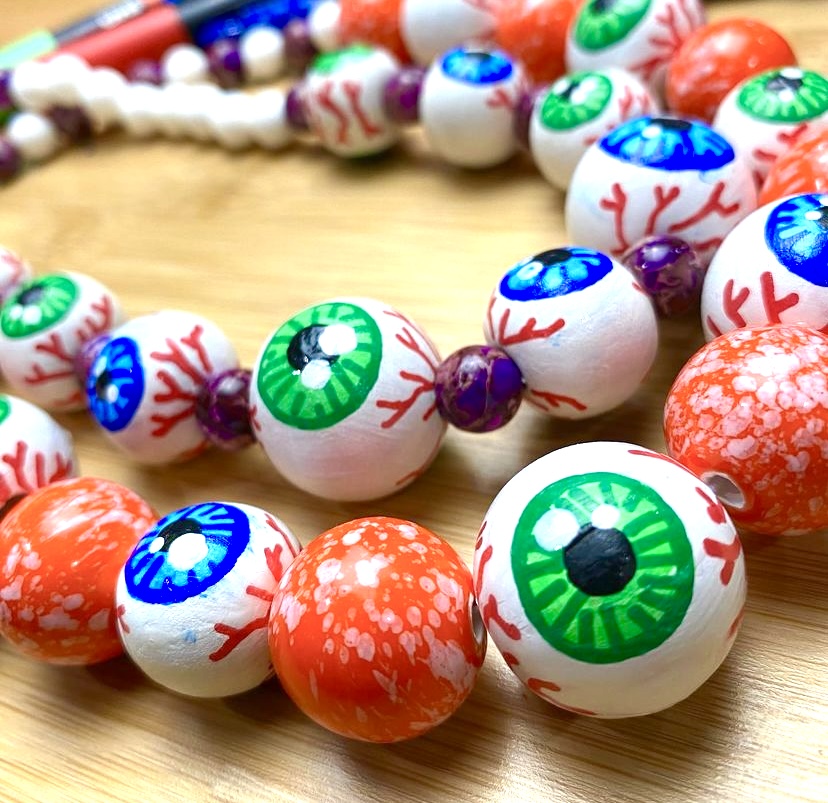 Until then...I have my eye on you!
August 30, 2023
DIY: How to Paint a Personalized Sign for Your Classroom or Favorite Teacher!
.jpg) My niece recently asked me to paint a personalized canvas for her brand new classroom. She sent me some ideas from Pinterest that all looked easy enough so I tackled the project in an afternoon. It was so fun and easy! So I decided to paint a couple more for some super amazing folks...and film the process in case you'd like to do the same! They make for great gifts and seriously took no time at all. Here's the process:
My niece recently asked me to paint a personalized canvas for her brand new classroom. She sent me some ideas from Pinterest that all looked easy enough so I tackled the project in an afternoon. It was so fun and easy! So I decided to paint a couple more for some super amazing folks...and film the process in case you'd like to do the same! They make for great gifts and seriously took no time at all. Here's the process:The key: EMBRACE THE 'MESS-UPS'! And enjoy the process!
 These canvases were about 18" X 12". If you check your local craft store, they often sell canvases of these sizes in a pack of two.
 My niece had requested a pastel palette and I loved the way it looked! I found that you can buy a palette of pastel acrylic paints at the craft store too.
I preferred using a flat brush for the wide lines and a fine point for the details. Other than the canvas, the paint and brushes...this was an inexpensive gift!
 I was super pleased with how they turned out! And I think the recipients were too :)
 I really think these could be personalized too for the person you are creating the canvas for! Art teachers for sure could have a palette in that upper righthand corner!
Not to mention, painting these meant that I was able to take my Creative Vitamins! I got to relax and enjoy creating just for the sake of doing so.
August 29, 2023
Sew a Dress from a Vintage Pattern with Me!
.jpg) To know me is to know that I really love fashion. Particularly, vintage fashion. There's just something about that 1950's fit and flair that gets me. In fact, vintage sewing patterns from the 1950s are what got me into sewing in the first place. I found a stash of patterns on a visit to the thrift store in college. Even though I didn't know how to sew or even own a sewing machine, I bought all the patterns and just stared for hours at the pictures on the front of the pattern envelopes.
To know me is to know that I really love fashion. Particularly, vintage fashion. There's just something about that 1950's fit and flair that gets me. In fact, vintage sewing patterns from the 1950s are what got me into sewing in the first place. I found a stash of patterns on a visit to the thrift store in college. Even though I didn't know how to sew or even own a sewing machine, I bought all the patterns and just stared for hours at the pictures on the front of the pattern envelopes.
 It wasn't until YEARS later that I got a sewing machine and even more years after that when I finally learned how to sew. And I really don't know why I waited so long! Sewing is not rocket science. Especially these days with pattern companies doing a great job of breaking the steps down and folks on YouTube sharing all of their stitching knowledge.
 So when I set about making this dress, I decided to film the process. From my big mistake of not taking the print into account when cutting out the pattern pieces to not following the directions and making the bust too large. I packed as much of it as I could into a video and you can find it right here:
And if you want a tour of my sewing room, you can check that out here:Gotta love it when it's tidy!
 I know what you are thinking: isn't it a little early for a Halloween themed dress? Well...we are going to Halloween Horror Nights in Orlando this weekend so...I don't think so!
  And I gotta say: I've not sewn a dress in A LONG TIME (I think maybe the last was a dress I wore for an art show two years ago!). It felt good to get back into my sewing room again. And I've got a couple more dresses underway so stay tuned!
August 9, 2023
14 of My Favorite Lessons for Dot Day!
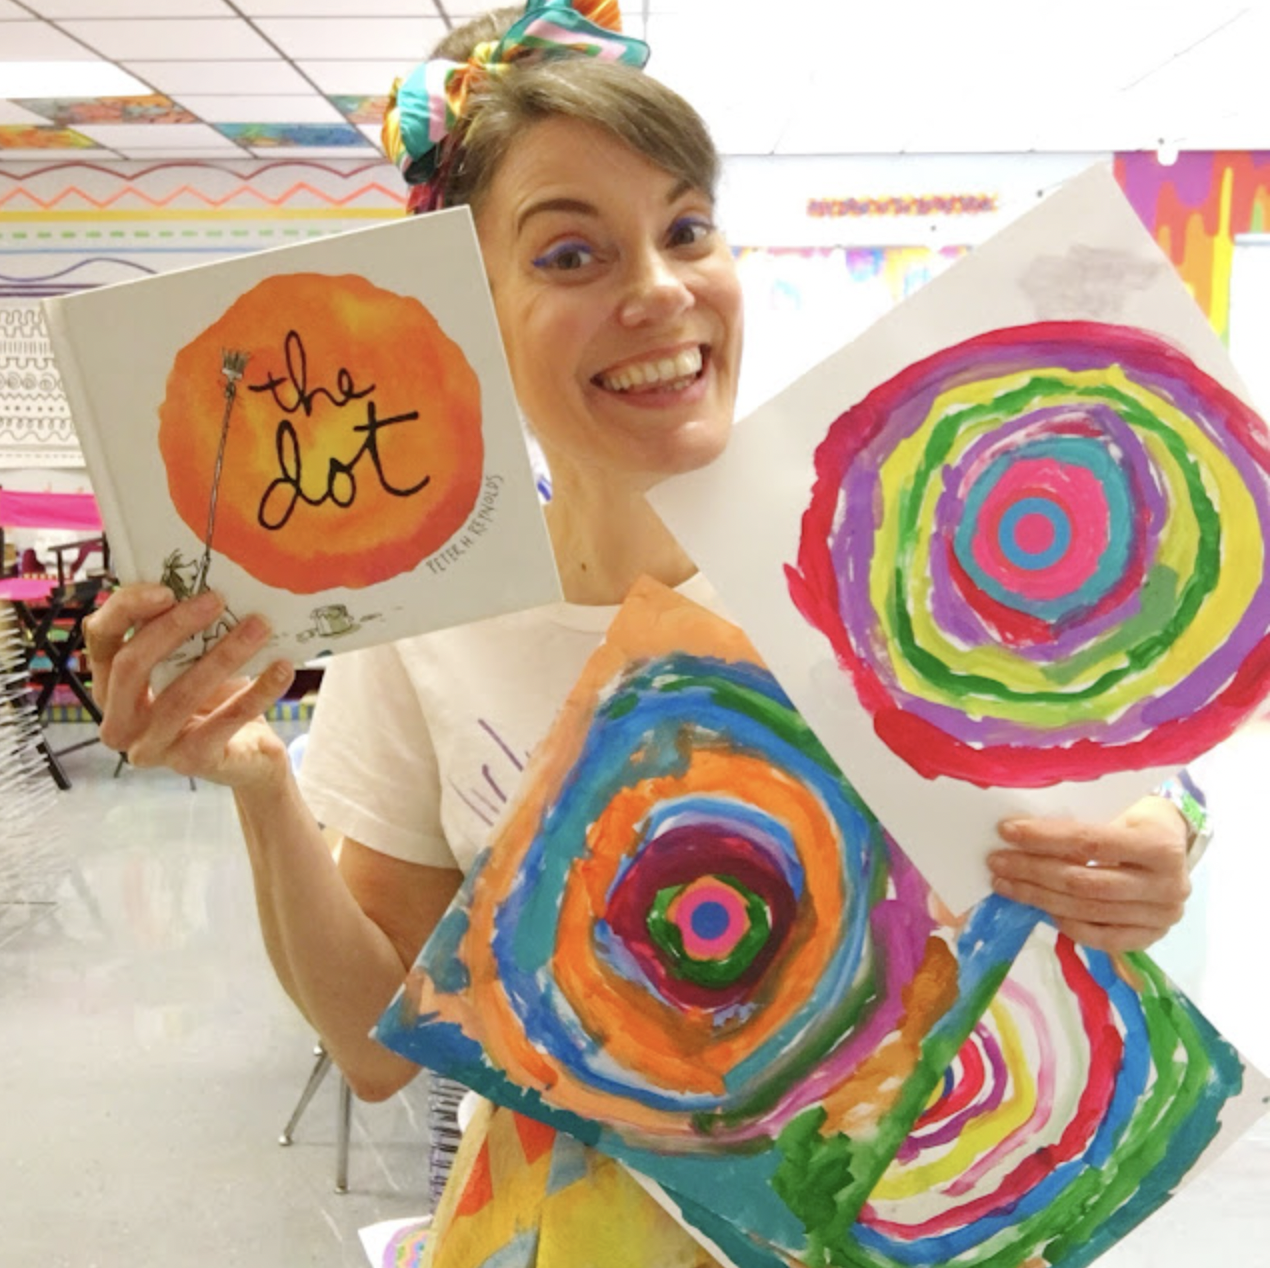
.jpg) The start of the school year is my favorite time to read and celebrate the book The Dot by Peter H. Reynolds. Not only does it teach our students that everyone is an artist and how to embrace a growth mindset but...Dot Day is a celebration of JUST THAT and it takes place every year on September 15th. Perfect timing!
The start of the school year is my favorite time to read and celebrate the book The Dot by Peter H. Reynolds. Not only does it teach our students that everyone is an artist and how to embrace a growth mindset but...Dot Day is a celebration of JUST THAT and it takes place every year on September 15th. Perfect timing!I have kicked the school year off with MANY different Dot Day art lessons and I thought I would pile them all into one big blog post just for you. From simple one-day lessons to longer format lessons, I've got you covered. Be sure to look for the links and give them a tap. Many links contain (free!) handouts and videos for you to use in your art room.
Okay, let's get started!
 #1 A lesson that I have done FOR YEARS with my kindergarten students is this Dot Day lesson. Right after our First Days of Art sculpture project, we dive into painting! If you follow the link, you'll see me teaching painting to my kindergarteners on their third day of art class.
  I've done this lesson a couple of different ways. Sometimes we paint on cardboard pizza rounds (ya know, cuz they are a circle and all) and other times, like here, we paint on squares of paper. Regardless, we always start with a dot sticker right in the middle.
 #2 Last year, I had everyone create a painting the same way as those kindergarten pieces. Once complete, the students cut their paintings into fourths and rearranged them onto another square of paper. Details can be found here.
  Once complete, it was hung as this large collaborative piece!
 #3 Last year we also went Dot Day WILD by doing centers. I LOVE doing centers with the kids because it makes it so, in a short amount of time, they bet to experience an assortment of materials and methods. I created short videos to talk them through the centers so they could just go for it! You can see the end result in this blog post. But be sure to check out my methods and videos for how these were created here.
 #4 Dot Day Printing was one of the kid's favorite dot day activities because they had instant masterpieces! All we used were pizza pans purchased at the Dollar Tree and paint! They signed and gave their paintings a name and we strung them throughout the halls. This was a one day activity with a huge impact.
  We also read Little Spot of Kindness which was a great one to read at the start of the school year!
 #5 If you teach older students (5th and up) or you just want to dive into a longer-format project for Dot Day, you may want to give this string art lesson of mine a try. Video included in post!
 I actually did these at the start of the school year with my fourth graders and they looked amazing for Open House!

#6 Circle loom weaving is one of my most popular blog posts! I think it's because...I found a way to make it easy for kids to learn and enjoy. Even though the blog post is a little bit older, it still has all the video details you and your students need. I've done this lesson successfully with second grade on up. I would recommend that if you do this at the start of the school year, third grade and up is the best age group.
 Even simply painted, these plates are beautiful! Let me walk you through how we make these without the mess of mixed colors and patterns.
 #7 Check out these simple metal relief pieces my third graders created one year! I'm a sucker for Sharpies and foil, y'all. Lesson here.
  So sparkly!
 #8 Need a SIMPLE yet BEAUTIFUL Dot Day display? Try this one!
 Now let me offer an update for that post: PLEASE when doing these coffee filters, PLEASE...do yourself a huge favor...don't dry them on plastic. Have kids create the dots on a STYROFOAM plate and let them dry on said plate. I would apologize for shouting but this is a BIG mistake I see folks make! When it dries on paper, the color leaves the filter and stains the paper. Then you have a sad looking filter! So...listen to your Mama Cass on this one. I beg of you!

#9 Dot Day Party! Why not throw some huge sheets of paepr on the tables, bust out those metallic art supplies like markers, oil pastels and paint, turn on Emily Arrow's the Dot song and let them create their own dots as they dance around the room?! That's how these were created and used as a backdrop for our giant hallway display. Check it out in the link!
 #10 To know me is to know my love of CARDBOARD PIZZA ROUNDS! I buy them in bulk from GFS. Check out the brand called Circle King. I will always love and redo this lesson!
 The best part? The fact that we paint on both sides which turns these circles into an instant mobile! Check out the blog post to see how we display them all!
 #11 Aren't these DIVINE?! And they were so easy to make! All the details and supplies used can be found in this blog post!
#12 This first grade (yes, first grade!) mural was a big undertaking but we kept it up all year. Can you blame us? We started with these Dot Day inspired flowers. Lesson here!
 #13 If Dot Day sneaks up on you OR you go back to school a little later and want to do something quick, this lesson is a fun one and done lesson! And you can find the free handout here!
 #14 Why not take your favorite back to school lessons and just...do them round? That's what I did with my favorite kindergarten lesson!
 Then we hung them all together for our display!
So whether you keep it simple or go hog wild, I do hope I've given you some inspiration here!
Love ya!
August 3, 2023
Videos for those First Days of Art
 During those first days of art class, there is a whole lot we gotta cover: Rules, Routines, More Routines, Consequences and, again, Routines. It can be taxing on our voice (not to mention energy level) and, inevitably, we forget SOMETHING to SOME CLASS and can never remember just what it was we forgot or to whom. It's all very exhausting...and that's just how WE feel. The poor kids literally spend their first week hearing all the Do's and Don't's until it all just becomes a blur. Usually, by the time they reach our door, they are just dying to do something, ANYTHING, other than hear Rules and Routines.
 So, like, what to do?
I can tell you something that has worked well for me: videos!
Creating videos is something I've done for a very long time (subscribe to my YouTube channel and check out all of my teaching videos!). I started with creating lesson videos and noticed just how closely the kids pay attention. I always say they listen to TV Stephens far better than Real Life Stephens (and I don't know how I feel about that but whatever!). So several years ago, I decided to create some Welcome to the Art Room videos, as well as What is Art and Routine videos and I thought I would share them all here today.
In this post, I'll share with you some tips on creating your own videos or...feel free to simply use mine! You can always pause the video and interject. Let's start with the most recent video I created for the first day of art. Here's the graphic I created for the video (on Canva, a free website for easily creating graphics just like this!)

This video is short and sweet where I quickly cover some things on the very first day. I do go back and cover the rules the following art classes but this is just a way to catch a glimpse on that first day. If you'd like to see what a first day looks like for me, check out these videos. This is how I run my art room for first through fourth grade:Not shown: when I stop to play the video. I usually do this after we go through our introductions.
For more behind the scenes of my art room routines, you can check out these videos. It may explain the method behind my madness:
These are routines I establish that first day and how I start each art class.
Throwing this video in here since I reference the behavior system that I use. It's a hit with my students!
I thought I'd also share some older Welcome to the Art Room videos that I created in years past. This might give you some more ideas of what a video you create may need. This one was created during Covid...so you'll notice how different the routines were.And this is my original video.
 I promised some tips on creating your own video so...here we go:
* Keep It Short! Don't overwhelm the kids. Think of this video as the fun "Cliff's Notes" version of all that you plan to cover. A brief tour, a quick introduction and a general view of how you operate your art room is perfect.
* Involve the Staff! Kids love to see their teachers ham it up! This video I created on Art Class Etiquette was always a hit:I also created several "routines" videos and this one they loved because their favorite teachers were featured in it:
* Use Your Phone! I'm always asked "how do you make your videos? What software? Lighting? Microphone?" Guys. GUYS. Your phone is fine! Just prop it up someplace and hit record. And be YOURSELF. Now that is easier said than done. What works for me is to hit record and then make faces at yourself for a minute. Loosen up. Don't worry about messing up. Don't hit the stop button and record again and again. It will just make you frazzled! Just record and know you can edit later. Or not! A bloopers reel may be fun for the kids to see!
If you have an iPhone, iMovie is the easiest editing tool! Watch a 5 minute How-To video on YouTube and you'll have all the basics down. The kids aren't lookin' for perfection. They will love it regardless! Unless they are in 5th grade. Then they pretty much don't like anything ;)
No iPhone? There are PLENTY of free apps out there for editing. Or create the video in TikTok or Reels! That will REALLY get their attention. "YOU HAVE A TIKTOK?!" Yes. And please don't follow me.
So, there you have it! I added this last video in case you are interested in sharing it in your art room. All of the drawings were made on my iPad and I simply recorded myself while drawing!

Need more art teacherin' tips and tricks? Did you know I wrote a whole book on it? And I can tell it's Back to School season as I'm backing up tons of orders each day. You can find it here.
 Have a great start to your school year, friends! And be sure to check out my last blog post for a ton of back to school art lesson ideas!
August 1, 2023
Best Back to School Art Lessons!
.jpg)
There is so much stress at the start of the school year. All the set up, the creating the rules and routines, the prep and organization...it just doesn't end! AND THEN the time spent in meetings and ice-breaker-land when all you can think about is
I HAVE SO MUCH TO DO!
Well, have no fear. I've put together a blog post with some of my very favorite Back to School art lessons. Many of these links to blog posts contain FREE handouts and always free videos lessons. I'm here to help, y'all!
Speaking of help...if you find yourself needing more on all things art teacherin, have you checked out my book Art Teacherin' 101? I can tell it's back to school season as I'm packing and shipping them out as fast as I can. This book walks you through everything to survive your first few weeks and create the best art teacherin' year EVER. You can pick it up here.
 As I share my fave lessons to kick off the school year, I've broken them into a couple of categories. These are my favorite ways to start the school year:
* Collaboration Projects...where students all create a piece of art that will contribute to a large scale piece. I have a blog post of my favorite collaboration lessons here. These are great for BTS time!
* All About Me Projects...what a better way to get to know your students! And for them to feel comfortable in their amazing uniqueness. Those lessons can be found in this post with plenty of links to handouts.
* Sketchbooks...I love doing sketchbooks at the start of the school year and I've done it a ton of different ways. I added all of those in this blog post. Again, lots of free handouts and videos just for you and your studetns!
* Dot Day! More to come on this as I have SO MANY Dot Day lessons. But I did add several at the end of this post.
 Collaboration!
Let's begin with my favorite way to kick off the school year: collaborative projects! This builds community and school pride. We created these painted shapes on the first few days of school.
 Working with our table team, we came up with a positive four letter word to describe our school.


We even created a bunting to explain our word choice. This one was a lot of fun and very impactful to hang throughout the school.
 One year, I got a donation of paintsticks from the hardware store. Each student either decorated or painted the stick for this large-scale piece. Tap the link to see where we hung it and how we created it!
 Many of our collaborative projects are based around a theme. One year, we based it on the song Wonderful World. This was one of my all-time favorite collaborative lessons!
 Busting out paint on those first weeks of school can see...bananas. So why not try your hand at a less messy collab like this one?
I mean, check out that result!
 Another low-mess and low-stress lesson that yields a high impact is this one!
  All you need are colored pencils and sharpies! AND then a lotta help to put the beast together ;) But worth it, I promise!
 This collaboration was a first grade lesson but, really, I think all grades would enjoy this one! We began by painting on paper plates which is perfect at the start of the year if your supply order of paper has yet to arrive. Anyone else always late with that supply order?! Lesson here.
  One of my favorite parts of creating large murals like this is getting the kids involved with creating the collage papers for the background. We call them Painting Parties and they are a fun activity for the start of the school year!

You can find out details on our Painting Parties in this here blog post!

Check out this fun Rizzi-City we did as a collaboration with our papers!
 We did a mascot-themed series of back to school lessons one year. As the tigers, each grade did a tiger lesson. I share more about all the different grade-level mascots here.
  These cuties were created by first grade. Lesson video can be found in this blog post.
 I love doing Monochromatic Selfies with ALL o f my students at the start of the school year. And the video I created to teach this lesson is one of my most viewed on my YouTube channel. You can find the complete lesson and video here!
 Now how you decide to display those selfies is up to you! We created a map and featured them all. I explain the process in this blog post.
 Encouraging individuality is this collaborative lesson based on the book You Be You! We each created a colorful fish and added the to a large collaborative mural. Check it out here! And for a look into how we created these, check out this blog post.
 A collaborative mural that I put up and just could never take down because it was right outside my art room door and I LOVE it is the It's Okay to be Different mural!
 I mean...SO CUTE!
 All About Me!
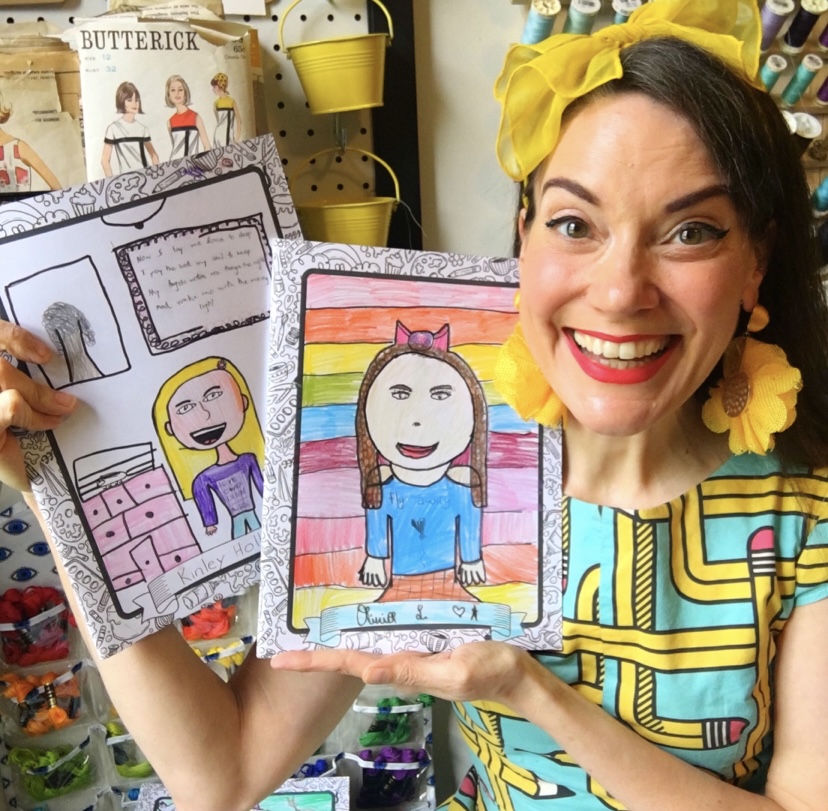
Back to school time is the best time to get to know your students...and for them to get to know one another! That's why Get to Know Me lessons are always a hit. I've done this a couple of different ways. One is by having the kids create a sketchbook with designs that share a little about them. This page was ultimately added to their sketchbook so they could share with family and friends when they took it home. Free sheet can be found here.
 If you want to take it a step further or have older students, why not have them create their own decoder sheet? I know they would love it!
 I REALLY love doing the same lesson with all grades at the start of the year (have you noticed?!). There's just so much stress at the start of the school year already. Why not make one thing a whole lot easier and set up the art room for a lesson for all.
  I mean look how pretty! This is another lesson I shared that was a big hit: Getting to Know Me paper sculptures! Lesson details here.
  We work on these for the first 3 art classes (where we learn rules, routines and the rest) before calling them complete. Then they immediately go in the hallway for the most colorful and fun display! See more here.
  This is the same lesson I love to do with kindergarten...but without the decoder sheet. It's always a hit!
 Sketchbooks!
Sketchbooks is another great way to kick off the school year. I've done sketchbooks many different ways. One of my favorites was upcycling file folders that were donated from the school secretary and let the kids experiment with paint and texture tools on the first days of art. Then we proceeded to add paper, staple and decorate them with fun Duct tape. All the details you could ever ask for right here.
 Looking for something a little less messy? We did our names on our sketchbook covers one year. I also tried my hand at having the kids use folders that they could add paper and handouts too. I liked this process a lot. You can find the free handout in this blog post.
 Did I mention I like to change things up?! Here's another version of our sketchbooks. These are half the size. On the first days of school, we used tempera sticks to decorate the papers which was a lot of fun. Each line told the view a little about us! You can see that lesson here.
 And if you're uncertain how you'd set up Sketchbook Town (as I call it), I got you! I lay it all out here.
I also...created my own sketchbook series with my pals at Prang! You can buy them on Blick, Amazon or any place you buy your art supplies! My kids loved these the best. I actually have created two sketchbooks. One is sold in packs of 12 called Sketch Smart and it's designed for the art room. The other is called Amazing Artist Sketchbook and it's sold individually...but has great pages that would be perfect sheets for Early Finishers!
 Dot Day!
I actually have so many blog posts on the different Dot Day back-to-school lessons we have done that I think I may have to make it into a separate post! I'll drop several of them here...but stay tuned. Or, if you just can't wait, you can use the search bar on my blog and most of them will pop up.
 One of my most recent first day/Dot Day lessons was done on pizza pans! This was a HUGE hit with my students and it got everyone, kindergarten through fourth, painting within the first days of art class. You can check out the lesson here.
 Seriously, y'all. There's a rabbit hole of art lessons about The Dot on this here blog! I promise a whole post is coming sometime this week. For now, here's another super easy Dot Day lesson!
Let's be real: covering all that you need to on those first days doesn't always leave a lot of time for big and elaborate lessons. So...try this one on for size! I have a great handout here. All you need are markers, crayons and circle stickers from the dollar store!
Still want more?! Here's a post on Dot Day ideas.
More first day of school lessons that I may have forgotten can be found here. And here! Oh, my....and HERE. This is what happens when you've been blogging and teaching FOREVER.
The lesson I ALWAYS do with kindergarten on their first day!
July 19, 2023
First Day of Art for Kindergarten
.jpg) People can tell me how they run their classroom all day long and I do love to hear about it because I am a person who LOVES to try new things. I like to throw EVERYTHING at the art teacherin' wall just to see what sticks. But what REALLY helps me is seeing it in action. Sure I can imagine what Call and Response or a behavior management plan my look like but it's so much better to see it happening. So...that's why I love to share what it looks like in my art room. For that reason, I'll be sharing my first day teaching kindergarten right here!If this video looks a little familiar that's because...I have been running my first day of kindergarten the very same way FOR YEARS. If it works, stick with it, right? And I'll be adding links to more blog posts with videos here.
People can tell me how they run their classroom all day long and I do love to hear about it because I am a person who LOVES to try new things. I like to throw EVERYTHING at the art teacherin' wall just to see what sticks. But what REALLY helps me is seeing it in action. Sure I can imagine what Call and Response or a behavior management plan my look like but it's so much better to see it happening. So...that's why I love to share what it looks like in my art room. For that reason, I'll be sharing my first day teaching kindergarten right here!If this video looks a little familiar that's because...I have been running my first day of kindergarten the very same way FOR YEARS. If it works, stick with it, right? And I'll be adding links to more blog posts with videos here.
 This blog post breaks down the lesson and why I teach certain routines on that first day.
 Want more details on where this lesson goes from here and how it becomes my kindergarten unit on line? Try this post!
 If you are craving more First Day videos, here's a compilation of first day lessons with all students.
 If you've never done paper sculptures with your students, they are an absolute blast. ALL kids can have great success right out of the gate. This provides an immediate love for art class which is what we all want, right? I've even done this lesson with my older students as a Getting to Know You activity.
 If you are interested, you could check out my book where I share all of this and so much more!
July 17, 2023
A Bell-Ringer Idea: Calendar of Gratitude
.jpg) On my list of Things That I Wish I Did Regularly are the following:
On my list of Things That I Wish I Did Regularly are the following:JournalingSketchingGratitude-in'-ing ... or something
And I have MANY a reason why I've never really been able to stick with these habits (top of the list: laziness) UNTIL NOW...Allow me to introduce you to a little something I'm callin' my Calendar of Gratitude. My Cal-itude. My Gratit-dar. Okay, so it's a working title but hopefully you get the idea. Here's a lil video explaining it all:
Here's how it works:
* You print out a calendar. If you google "free blank calendar", you'll find bunches. For example, here you go.
* At the end of each day or perhaps the following, you sketch something you are grateful for: a beautiful sunset, fresh fruit, time with family, a cute cat, you get the idea.
* On the reverse, jot down your memory.
and BOOM! you've just sketched, journaled and shown gratitude all in in under 10 minutes!
Not to mention, you now have a sweet little memory of your gratitude. I get so excited everytime I look at mine. Like happy little postage stamp-sized memories.

I'm also super into matcha right now. Anyone else? Currently I'm a matcha latte lady but hope to graduate up to straight matcha soon.

Just a sentence or two in lieu of journaling. It does the trick!

Art teachers, I thought this might be great for those students who you see for a semester every day. I've never taught that age group so you'll have to forgive my ignorance...but I just thought it may be a great bell-ringer to get young artists in the mood and mindset. They could use their medium of choice...I have really enjoyed colored pencils for this.
WANT MORE GRATITUDE PROJECT IDEAS?!
I got you! Check out this FREE download for the elementary age students here.
You can also find a lot of gratitude lessons in that post as well.
Cassie Stephens's Blog

- Cassie Stephens's profile
- 34 followers
Cassie Stephens isn't a Goodreads Author
(yet),
but they
do have a blog,
so here are some recent posts imported from
their feed.

