
Cassie Stephens's Blog, page 9
April 1, 2023
Sewing Room Tour!
.jpg) I finally cleaned my sewing room (after, you know, 10 years or whatever) and I thought I'd offer a little tour! Before we begin, I wanted to share with you all of the links to my favorite things you'll see in my sewing room. If there is anything you spot that I forget to link, please just ask. BUT...you'll have to ask on my YouTube video as leaving comments here on my blog is darn near impossible. A couple of years ago, my blog was flooded with spam comments and I had to make it more difficult to leave a comment. My apologies for that. But the comment section of this video is open:Here are some of my recommended sewing must-haves!My FAVORITE sewing machine for all sewists levelsMy FAVORITE book for new sewistsMy FAVORITE way to store spools of threadMy FAVORITE thread (don't skip and use cheap thread, trust me!)Good scissors ONLY used for sewing is a mustI LOVE this for pin holding when stitching, look how cute!A good cutting mat is a mustThese sewing pins are my favorite
I finally cleaned my sewing room (after, you know, 10 years or whatever) and I thought I'd offer a little tour! Before we begin, I wanted to share with you all of the links to my favorite things you'll see in my sewing room. If there is anything you spot that I forget to link, please just ask. BUT...you'll have to ask on my YouTube video as leaving comments here on my blog is darn near impossible. A couple of years ago, my blog was flooded with spam comments and I had to make it more difficult to leave a comment. My apologies for that. But the comment section of this video is open:Here are some of my recommended sewing must-haves!My FAVORITE sewing machine for all sewists levelsMy FAVORITE book for new sewistsMy FAVORITE way to store spools of threadMy FAVORITE thread (don't skip and use cheap thread, trust me!)Good scissors ONLY used for sewing is a mustI LOVE this for pin holding when stitching, look how cute!A good cutting mat is a mustThese sewing pins are my favorite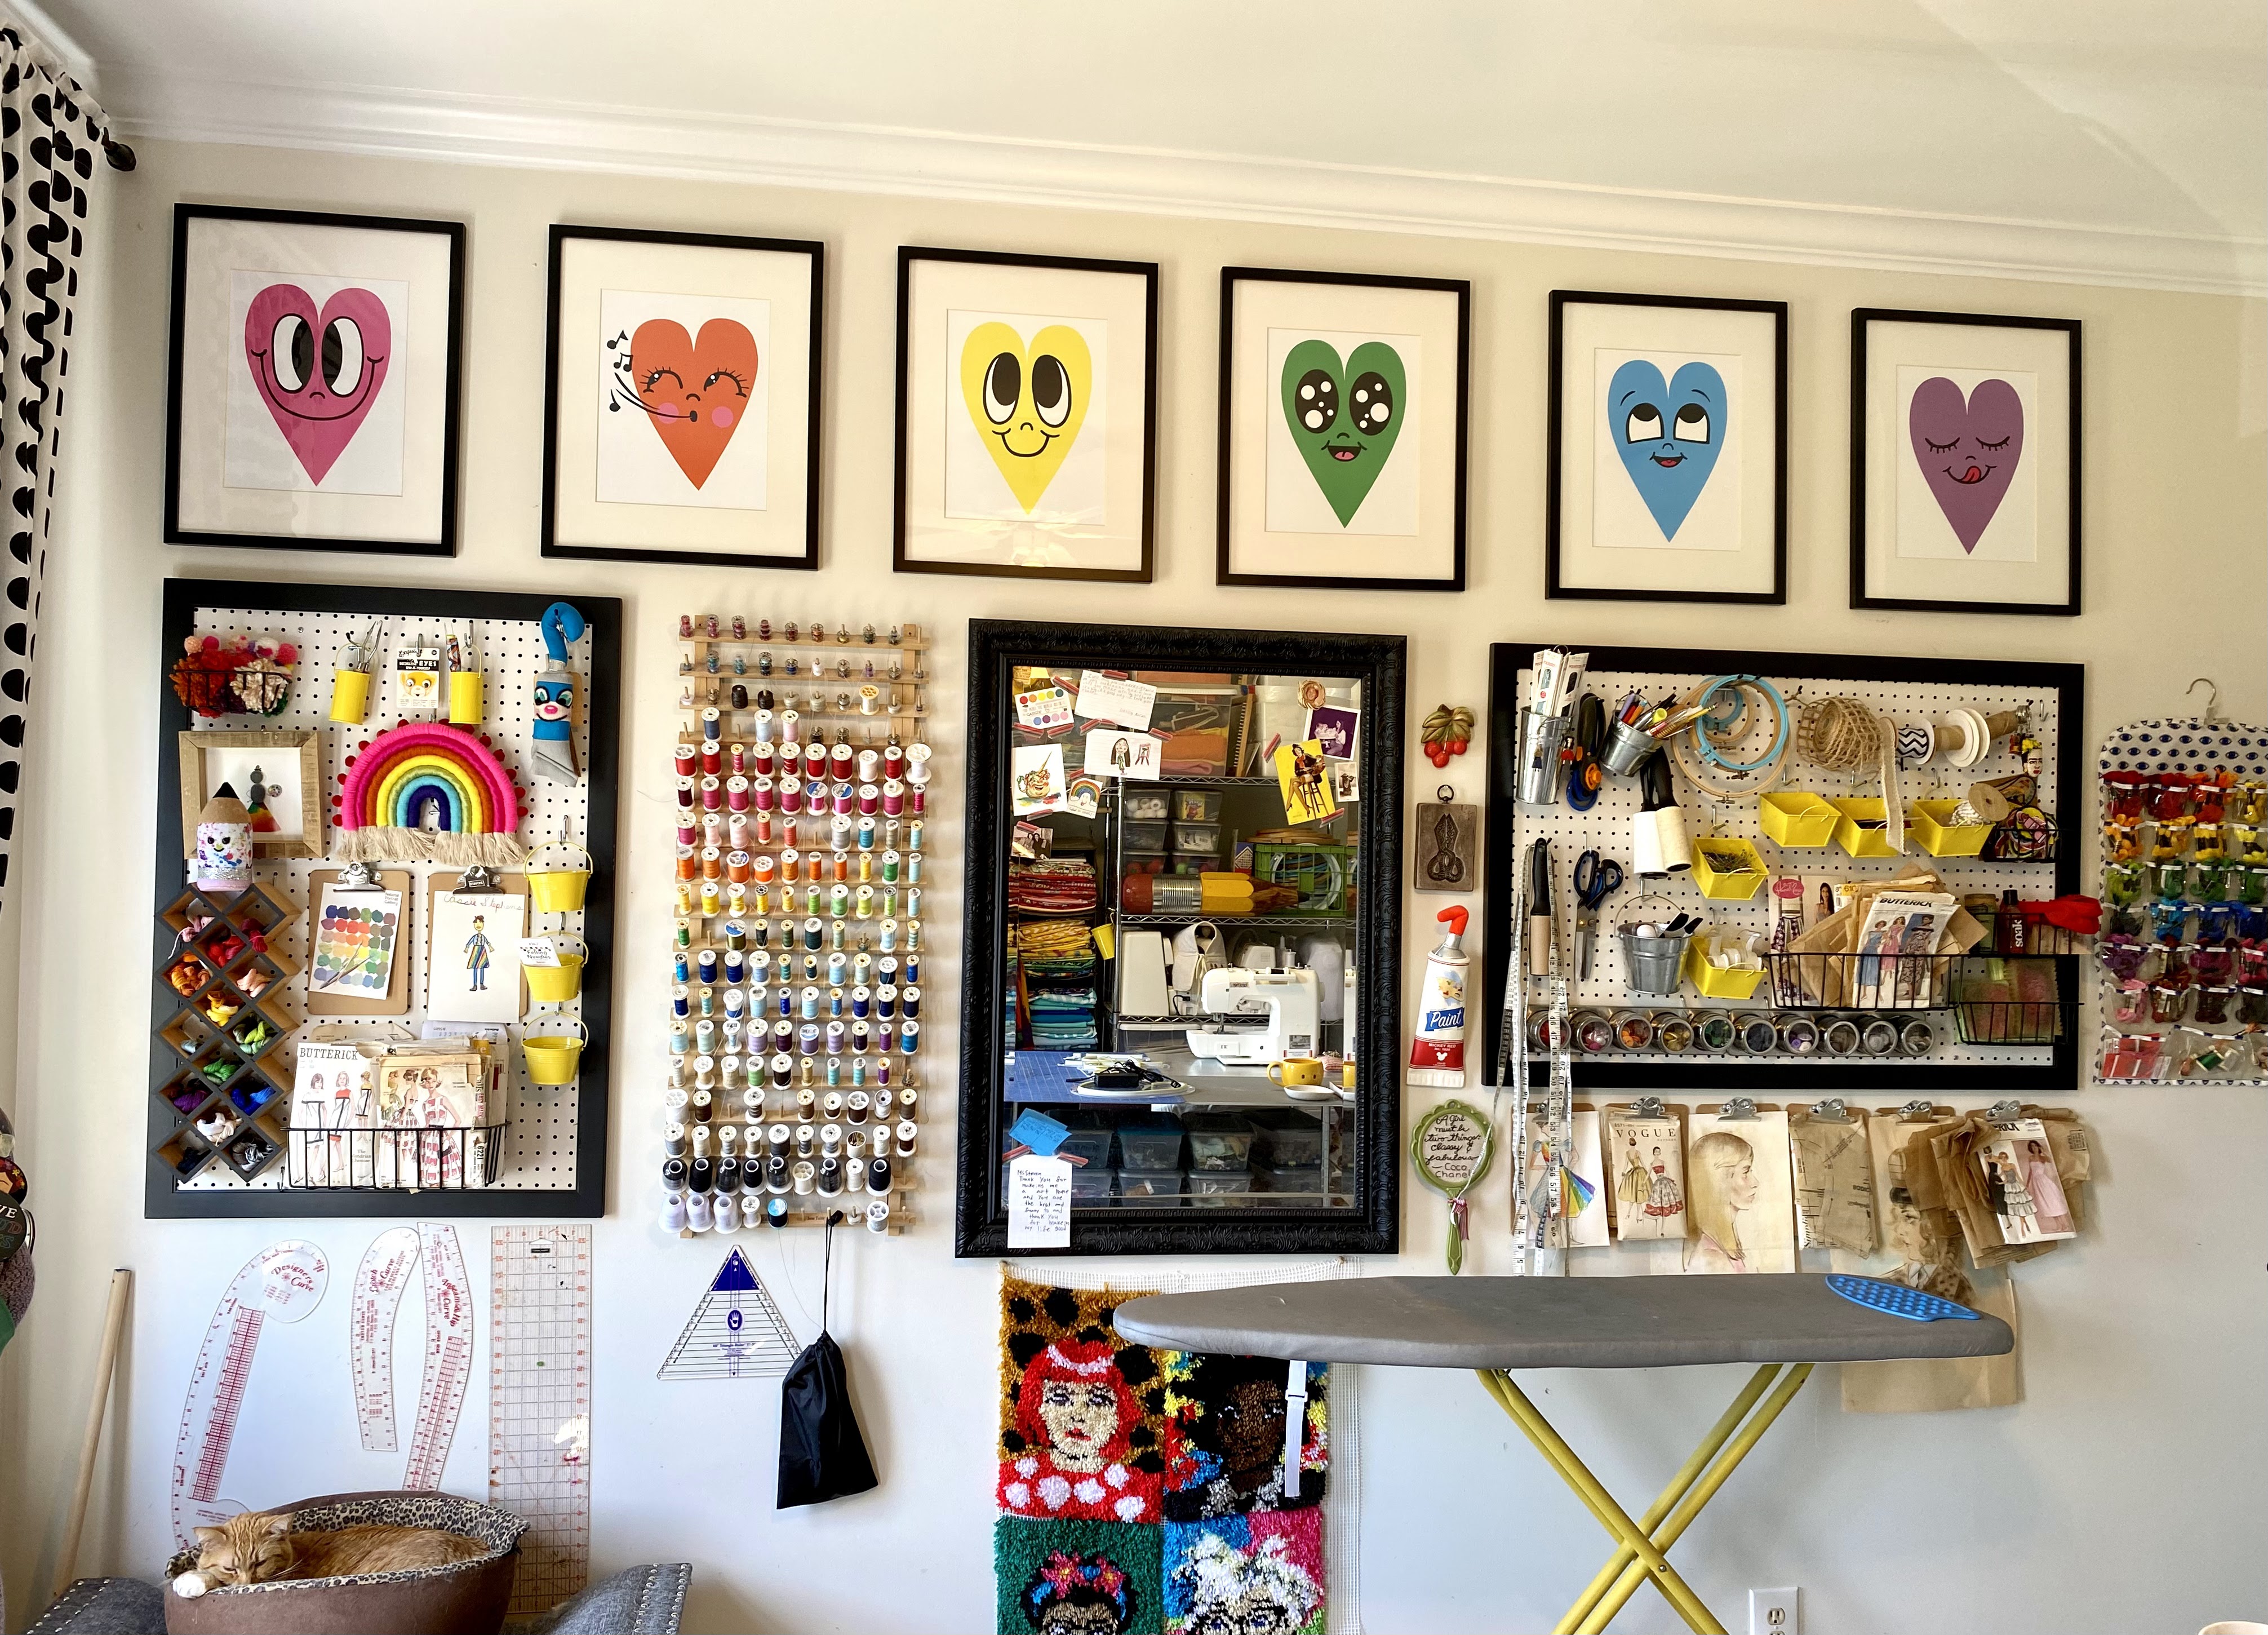 In my video, I failed to mention that I have a roommate in my sewing room: Max. He's our toothless wonder. Though he's not very old, we had to have all of his teeth extracted a year ago. This means he has to eat soft food separately from our other cats (Johnny and Tika) who are wild wolves and would surely devour Max's soft food. Since he eats in my sewing room, he pretty much spends his days in there. With me. And his liter box, ahem.
 I have had many versions of this wall in my sewing room. But what has worked for me the best is to have all of my tools up and visible for me to see and grab. Hence the multiple pegboards and the supplies on the wall. Artwork by my fave, Chris Uphues!
 And I just finished that painted jumpsuit! If you wanna learn how I made it, just get thee here.
  There's probably a ton that I failed to mention so just ask!
 What would I do without wire shelves?! Since leaving teaching in February, I've ordered a ton more for all of my art teacherin' books and supplies. I plan to share a tour of that space, where I 'work' very soon. It's just currently a hot stinky mess.
  AND if you weren't aware that I stepped away from the art room, YEP! I did! After 25 years. I do plan to chat about that in an upcoming podcast next week, so...stay tuned!
 Fabric on hangers is seriously THE ONLY way to go!
 I do hope you enjoyed the tour! Stay tuned for more.


March 30, 2023
DIY Painted Jumpsuit!
 DIY Painted Jumpsuit!
Hey, y'all!
Okay, so...I KNOOOOOW I owe y'all a post about my favorite clay projects that I promised you, like, a couple weeks ago. Holy cats, I just looked...I promised that A MONTH ago.
I'm not sure if y'all are aware but I stepped away from my art room on January 31st. Here I thought I was going to have so much time to return to blogging, creating content and all the rest and look at me. LOOK AT ME! I'm a whole month behind on blogging. Sometimes I wonder, how did I find the time before?! I have no clue. Looking to get back to all the things, including providing y'all with that promised blog post, real soon. But, in the mean time...
 I painted a jumpsuit! And it was super fun and easy. I thought I'd share the process.
 So, here you go:
Now, I found my jumpsuit at the thrift. But if the thrift gods are not in your favor and you just want to get started, I created a whole list of supplies for you right here...including some really cute jumpsuits!
 I will say, this did take some time. Especially since I had to build in time for the paint to dry before flipping and painting the other side. The good news is I worked on two other DIYs at the same time (can't wait to share) so I was able to keep myself busy while I waited.
 This jumpsuit is super comfy to wear and I'm in LOVE with it. I'm totally tempted to wear it to NAEA next month (who else is going?!) BUT I have a feeling it will be a little too warm in San Antonio for that. ALSO...the problem with jumpsuits is...
 When you gotta go to the bathroom! OMG! Thankfully, I can go to the bathroom when I like now that I'm not currently teaching. Pardon me if this is a little too TMI for you BUT...I know you teachers are sitting there nodding your heads. You know what I mean!

Anyway, I just wanted to share! I hope y'all have a fabulous day and I DO HOPE to be back real soon with more posts.
March 1, 2023
Let's Talk Clay! Part 1
 Well hello there, y'all! It's been a minute...and, if you haven't heard, a lot has happened around here. Like, for instance, me stepping away from teaching art in a classroom setting after doing so for 25 years! I KNOW. CRAZY. All the details on THAT very soon but first...a little something that I've been promising on Instagram for quite some time: a big ole post on all things CLAY.
 Let's first cover my supply list of Must-Have's for working with clay:
 * TOOTHBRUSHES! I'm so sorry to shout...actually, I'm not. You will thank me later but THIS is what your kids should be using when they slip and score. Buy this set and use them year after year!
 * WATER DISHES! This is where we keep our slip. In fact, I use the same set of no-spill cups each year, just add more clay to it. When clay time is over, I let the water evaporate and just leave the dried clay inside. When the new year begins, I just add water and we have insta-slip! Kids dip their brushes here. We also have a set of these just for painting...so I don't have to worry about cleaning them out when we switch from clay to painting!
 * DOGGIE DISHES! Okay, so this is an alternative to the no-spill cups. I love these! We use these also when painting. So if the other cups are too much for your budget, try these!
 * DOILIES! Since I started shouting, now I just can't stop. I LOVE doilies...in fact, just scroll below and you'll see a ton of my projects features a texture...it's from theses bad boys! You can also find them at your local thrift store and yard sale so be on the look out!
 *SKEWERS! I think we all know about using skewers with clay but one thing that really always bothered me was how long they were. I was always thinking someone was gonna lose an eye! Not a happy thought. I discovered these shorter skewers a couple years ago and now...this is all we use.
 *TRAYS! Contain all of that dusty mess with trays. I didn't start using trays until recently and I was like WHERE HAS THIS BEEN MY WHOLE ENTIRE LIFE?!
  * GARLIC PRESSES! Oh man. You can't just get one of these. You're gonna need bunches! I found them here...but I have also found them less expensive at the Dollar Tree and Walmart.
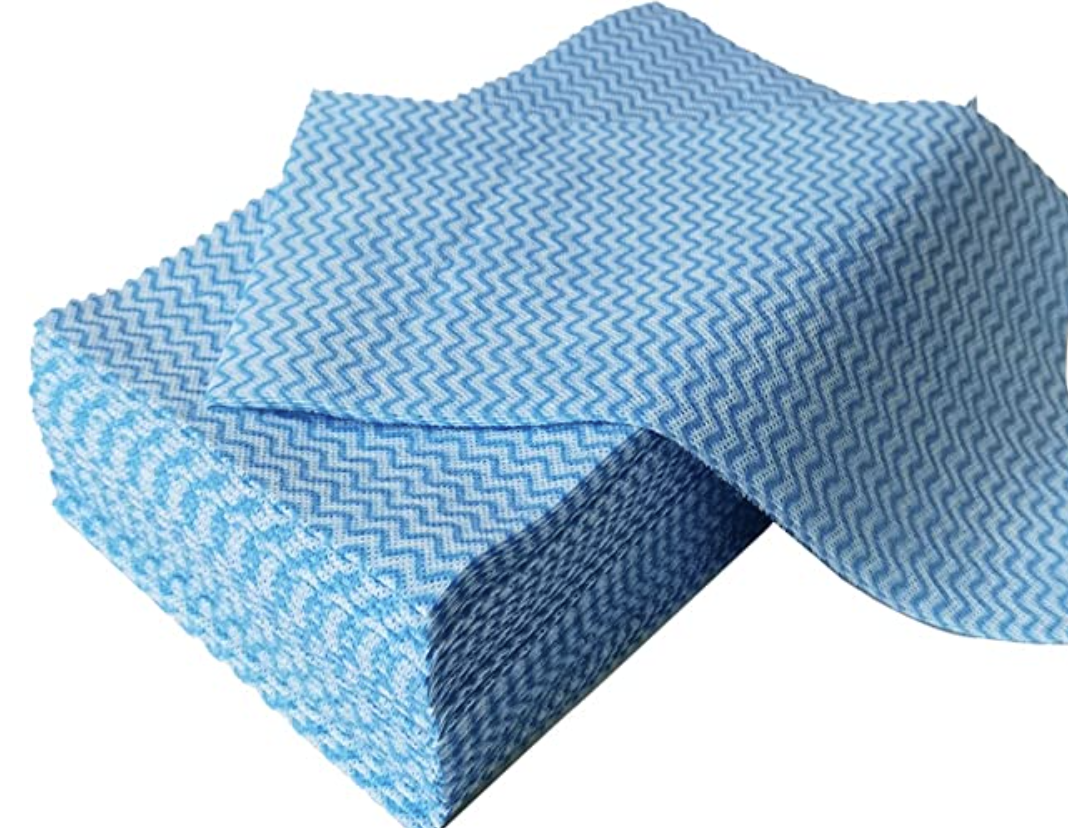 * REUSEABLE TOWELS! Oh man...I cannot tell you how much this saved the MESS in my room this year. Hear me out: I placed a bin of water on each table with a splash of soap and 2 towels. At the end of each art class, the kids used a towel to both clean their hands and the table. This kept the dust mess down! My custodian friend was so happy.
 The other items you'll find on my list are the air dry clays I've used in the past. I'm also sharing glaze (which is only used on kiln fire clay). I purchase my clay locally from The Clay Lady. She also sells the clay mats I strongly recommend. If you purchase your clay locally, you'll be supporting local businesses.
And now...on with the show!
Isn't it crazy to think that we are expected to know about all things clay...just cuz we have an art teacherin' degree?! Well, I created a video sharing everything I know about clay. You can catch even more details in this blog post.
And I talk a whole lot about glaze right here.
Of course, there are plenty of ways to add beautiful color to ceramics without the hassle of a second fire and of the expense of glaze. I'll share a TON of projects in the second installment of this blog post that do not require glaze...and still look amazing. BUT FIRST...
 What is Clay is a video I created several years ago to share with my students on the very first day of working with clay. With my 30 minute classes, we watch the videos and then we spend the rest of class just rolling up our sleeves and getting a little messy. It's a great introduction to clay, no matter what the project. Here's a peak at the video:And now...a moment from our sponsor.
 Me. I'm the sponsor.
 Many of my projects can also be done with air dry clays, either homemade or store-bought. And if you are kiln-less and would like a little more guidance, I wrote a whole book about it! You can find it here.
 Okay, y'all. I really thought I could also add all my favorite clay projects also in this blog post BUT...I think I'll save that for the second installment of this series, so stay tuned. Until then, have a good one!
January 8, 2023
Favorite Lessons for Valentines Day and Celebrating LOVE!
 Let's talk all things Valentine's and celebrating LOVE, shall we? I'm putting together A TON of lessons in this post from weaving to painting, sculpture to clay all for your heart-themed pleasure. So, let's get started!
This Jen Stark lesson was one my students really enjoyed last year. You can find all the details, including a video, right here!
 I did this lesson with my kindergarten and third graders last year and both LOVED it. It's so open ended and allows for big messes and exploration. Try doing this on large paper for big, colorful results. I just happened to have a ton of this large yellow construction paper so that's what we used! Full lesson with video right here.
 Wanna do some printmaking? I've done this lesson with first and second grade in the past. Each one is so sweet and allows students to really spend a lot of time exploring printmaking. A hit, I promise! Lesson right here.
 This lesson is one that everyone seems to love! AND each one of these adorable critters comes complete with a how-to-draw video. SO, all ya gotta do is hit play and walk away! You can find all four videos, including info on how to make the heart prints, right here.
  Of course, it's the Year of the Rabbit! So you could use that rabbit drawing to celebrate.
 If you are looking for a weaving project, here's one that my first graders have done nearly every year. It's a great way to introduce weaving and a little sewing too! All the details with plenty of paper weaving videos here.
 My fourth graders LOVED making these! These giant candy hearts were so fun and made quite the impact when we displayed them with a huge candy heart box. Lesson with video here.
 Follow-up blog post can be found here.
 If you want to go a little smaller in scale, you could try this candy heart drawing on for size! Info with video here.
 Many artists have been inspired by the shape of hearts to create their art. In this lesson, students explored four different artists and a variety of media. It's a fun one and we did it in one art class! Lesson with video here.
 Kindergarten had so much fun exploring printmaking with these hearts. We used a book as our inspiration. Lesson here...and check out the lesson below for the follow up project we did!
 Aren't they gorgeous?! AND kindergarten made them, y'all! All the details here.
 Can you really celebrate Valentine's Day without celebrating the work of Britto? My first graders reviewed pattern and line with this lesson. We also used bleeding tissue paper and paint sticks for this. So, lots of mixed media! All the details can be found here.
 What's Valentine's Day without a box of chocolates? We learned about the artist Peter Anton and created plaster chocolates and a papier mache box in this lesson. Video right here!
 Looking for simple and FUN? Try this Chris Uphues-inspired lesson. This post has a video and a free handout! You can thank me later. The kids LOVE this one!
 Feeling ambitious? Try on a school-wide collaborative! In this, my students, kindergarten through fourth grade, each created a heart using a different medium. You can find out who made what and how it call came together, here.
  Several years ago, I had to do jury duty so I created this lesson for my students to do with my sub. That's right, this here is a SUB PLAN. And she rocked it! And so did the kids, of course. Video lesson here.
  This heart-themed clay project is one that I lead the faculty and staff at my school to create. It was an Our Heart Gives Them Wings project and it was so fun to come together as a staff and create. Here's the video I made for the staff to view.
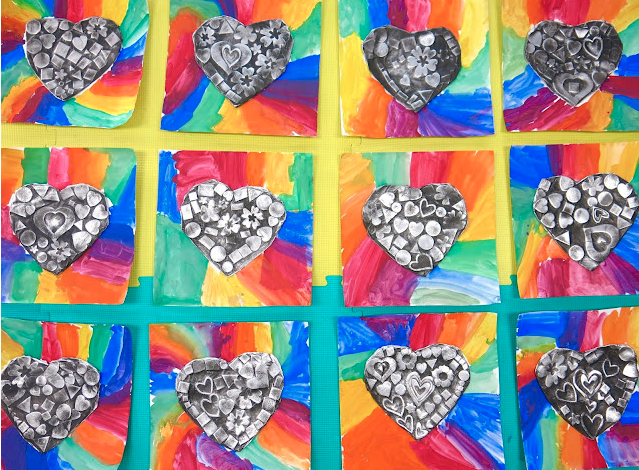
 My second graders used foil and celluclay to create these hearts! I love them, they look so very Jim Dine-y, don't you think? Video lesson and more details right here.
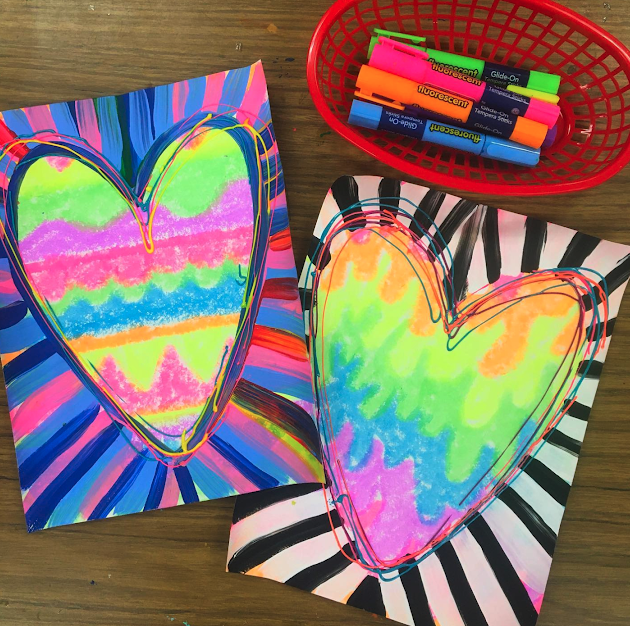
 Need a fast and furious, one day art lesson inspired by an artist? This one IS THE BEST! The kids get messy, explore chalk, learn about J Goldcrown...what more could you ask for? Video and more here!
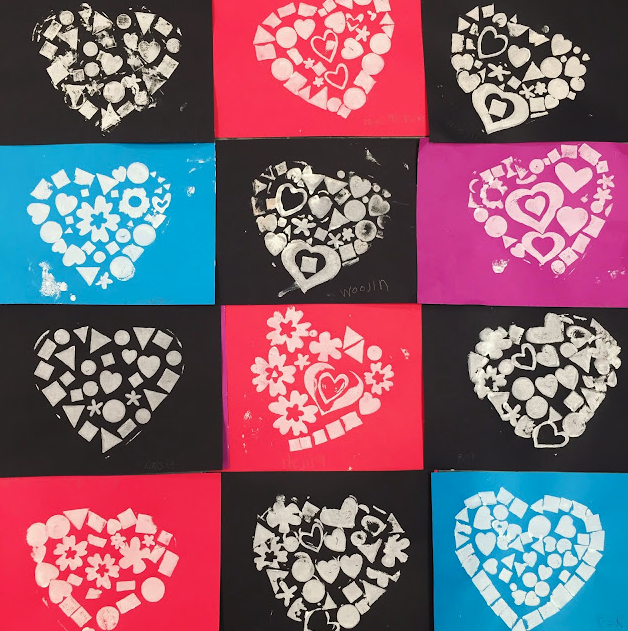
 My first graders used up scraps to create the hearts you see above and below. We also learned about positive and negative space. This was a fun one and the results were so stinkin' pretty! Lesson here.
 AND more Chris Uphues love for y'all. These were collage hearts created by second graders and they were just the cutest thing! We added them to our heart printed background, seen below. Lesson here.
  Whew! AND there you have it! I hope you find something here to get you to Valentine's Day! BUT I really believe we can celebrate love all year 'round, don't you? Enjoy!
January 2, 2023
Favorite Winter Projects for After Winter Break!
 Happy New Year! If you are anything like me, you've spent ZERO time thinking about returning to school next week. Like, I mean, my brain has been switched to ANYTHING-BUT-SCHOOL mode. As it should be, I say. Until, that is, the end of break sneaks up on me!
 So to put your cute little head at a tiny bit of ease, I thought I'd share my favorite winter lessons here in this blog post. Be sure and tap the highlighted link to each as many feature the full lesson WITH VIDEO. For free, of course. Cuz I'm a giver, y'all.
 Let's start off with some ambitiousness, shall we? If you are feeling up to it, might I recommend this tree weaving lesson? In my book, Stitch and String Lab for Kids I share how to create the evergreen tree weaving but you can also find the details here, just flip the plate upside down!
 A lesson that my students love (and everyone who gives this one a shot!) is this Jen Aranyi-inspired winterscape! We create ours on cardboard pizza rounds found at Gordon Food Service (I'm lucky to have one down the road) but they could just as easily be created on white paper! If you are on a cart and want less mess, try doing the sky with the marker/water method, found here!
 Want to introduce your students to printmaking? I love this printmaking lesson that could easily be done with kids of all ages. Okay, look, I'm not gonna lie: I often do the same lesson with multiple grade levels. It's much easier with my 30 minute classes that come back to back (with up to 8-9 classes a day). So, go easy on yourself! If that's what you do, just know that I'm right here with you! Lesson details here.
 This fun lesson introduces students to a wide variety of media from bingo daubers to chalk to...watercolor! Lesson details with video right here!
 I did this project with my first graders and they always love it! We work big, 12X18 paper background but you could definitely work smaller, like even half that size. No bingo daubers? Try Sharpies!
 This lesson for my kindergarteners is similar to that of the penguins which leads me to my next idea: do similar lessons! Less supply prep and less worry on your part. This year I have made an effort to clump lessons by supplies. I'm too old to be runnin around like a waitress, y'all. Lesson with video here.
 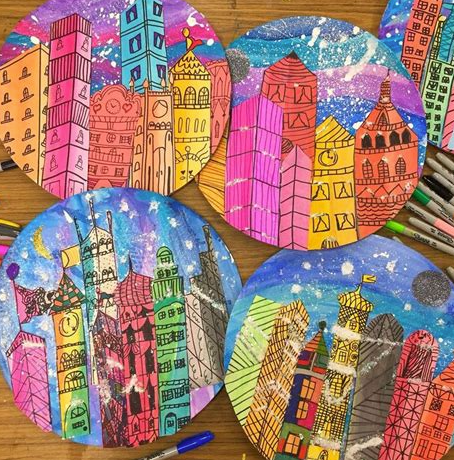 If you feel like tucking into a long lesson, this one might be for you. You know, there's something to be said for long lessons...it means less planning. You could shorten it, however by just making the snowglobes much smaller! Lesson with video here.
  As soon as we return to school, I plan to have my students dive into clay and create clay mugs! Our tradition has been to drink hot chocolate from our mugs once complete. This was inspired by an art lesson we did where we created hot chocolate collages! If you have no kiln, creating these collages and then celebrating with a hot chocolate party may be an idea for you!
 Here's a look at our mugs! Every grade level, except kindergarten, does this every year...so many of them have a collection of mugs at home! We also do another clay project but this one is easily their favorite. Lesson with a couple of videos here.
 It's the year of the Rabbit! Did you know? If you need some quick lessons for your younger students, I piled a bunch of them in this blog post, check it out!
 Need even more cuteness? Here's another lesson that your kids WILL LOVE! My students had so much fun with this one and couldn't wait to take their kittens home. Lesson with video right here.
 Okay, need more ideas? Well, I actually have MUCH more! Just visit here where I did a deeper dive into all of the winter-y lessons on my blog. AND if you want to jump ahead and start working on art for Valentine's day, check out this post. See ya soon!
November 21, 2022
Shape Castles in Paint, Chalk and Oil Pastel Inspired by Paul Klee and Mary Blair

Recently I shared that my students were doing Shape Stations (or centers) in the art room. I did this after the success of both our Dot Day and Line Study stations. I'm loving the exploration the kids are able to do and the kids are loving it...for the same reasons. Not to mention, it's just FUN to try a whole bunch of new ways to create in just a few art classes. Here's a look at our Shape Stations:
And what we did during our Line Study:
And some behind-the-scenes tips on these stations:
Here is a look at the Dot Day stations that started it all:
And since we did two days worth of fun:
Once we finished creating artwork from our line study (lessons which I've yet to share here!), I ventured into shape. Currently, I'm doing shape stations with 2-4th only as kindergarten and first are in the middle of other projects. I do think that these shape stations would work for k-1st except maybe the radial symmetry design. But it's always worth throwing the idea out there to see what the kids come up with, right?
 Here's a little look at what the back table in my art room looked like after I began prepping for our shape study. Initially we were going to do some shape stamps (seen in the upper left hand corner) but after giving that a run through with one class, I decided it was too similar to the sponge stamping. We switched to the bleeding tissue paper shapes in the end.
 Now when I'm working through these station ideas, I also gotta start thinking: what are we gonna do with all of these papers and things we create? Here's a little look at what I've come up with...
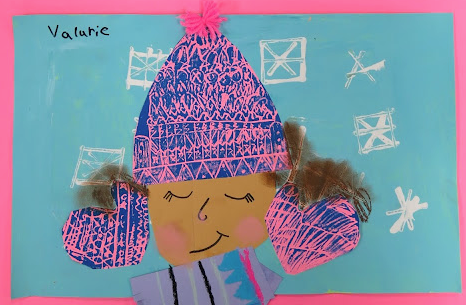
 First grade is currently working on the self portrait in the upper left hand corner. This is a lesson I've done many times, you can check out the lesson here. As for 2-4th, well...I am currently having them all work on those castles! We will all do printing with our stars...and do some embossing too...but as of right now, we are all learning about Mary Blair. Here's the video I created.
 The kids are enjoying working with chalk and oil pastel. I'm excited to give them another opportunity to really explore a variety of supplies.

Above is my example and below is a class of I think thrid graders examples. I will say this...stations means the kids will often work quickly and not always at a slow and 'careful' pace. I'm fine with that. However, I did have a small handful of students later decide the wanted to redo theirs, knowing it was not their best work. I allowed that too.

So far, we've gotten the castles chalked in and now we are ready for the oil pastel.
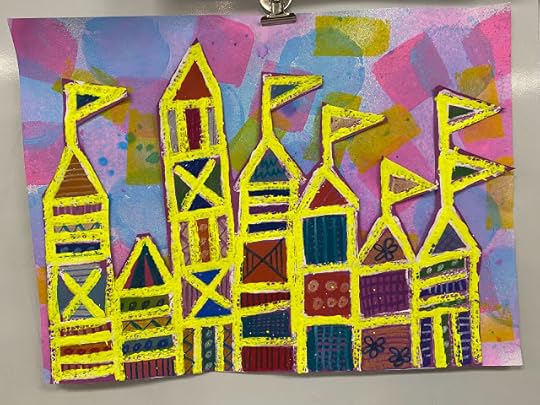
Our backgrounds will be our bleeding tissue paper. Since winter is coming, we are turning it into a winter wonderland with snow...and a little bit of sparkle on the frame. Oh...and PUFFY PAINT. Everyone's favorite!

November 5, 2022
3 Fun Art Lessons to Show Gratitude
 Over the years, I've done a handful of gratitude style projects that my students have not only enjoyed but really sparked joy around the school. I'm breaking these down from most involved to easiest incase you are uncertain which you'd like to do.
Let's start with my favorite: Gallery of Gratitude Modeling Clay Portraits!
 For all the lesson details, you can visit my first blog post where I created a video I shared with my students. This introduced a modeling clay artist as well as walked them through the steps.
  I did this lesson with my fourth grade students. They could choose who to create a portrait of...but, as you can imagine, that got a little tricky. Several students volunteered to create a portrait of a teacher or staff member whom they didn't know well. We talked about how everyone in the school is important, their role in the school and how they make our school better. After the first two 30 minute art classes, we got about this far.
 You can see their completed portraits here, framed in a sparkly Hobby Lobby plate! Students also had to type up why they appreciated the staff member. This was printed on framed paper and hung with the clay piece. Many teachers still have these portraits in their classroom!
 This Gallery of Gratitude was created by all of my students, kindergarten through fourth grade. My older students created the portraits while my kindergarten and first graders added the High Fives and the hearts.
  Here was the set up for my students to create their framed portraits. Teachers names were laid out as well as sparkly paper for the frame.
  Like the other project, students had to express their gratitude toward the chosen staff member.
  If you need a shorter lesson or one that is more student-focused, try this Tiny Gallery of Gratitude on for size! You can download it for free right here!
 There is even a simplified version for younger students, also free, right here. Have fun!
November 1, 2022
Exploring with Shapes: Shape Centers in the Art Room
 Hey there! Not too long ago I shared that I have been creating art-makin' centers or stations or whatever you wanna call them for my students. So far, we've made it through the Line Stations and have recently been using the papers there to create works of art. Now that we've wrapped up that (and the kids loved it so much I assumed it was a hit), we are ready to move on to shape! Here is a look at what my 2nd through 4th grade stations look like:These stations are a little longer than the line making ones. So, for my 30 minute classes, students will get to MAYBE two stations before moving on. I'm keeping the format of them changing stations more open: if they are finished, they are to tidy their area, put away their artwork (with name on it, pretty please!) and move on to any station with an open seat.
 Just like the papers created with the Line Stations, these are just the starting point of our project. Each grade will create something different with their shape explorations. I've been sharing what my students created with their papers, you can check it out on my Instagram. Details to come, I promise!
 In these centers, students will focus on geometric shapes. We will learn more about organic shapes soon. Cardboard printing expanded from line making to creating castles in this station. I can't wait for students to work on these later in class.
 Students will explore cutting geometric shapes as well as printing them in this station.

Students learned about radial symmetry in this station. I had foam stars on hand...but may use different shapes with other grades. I'll keep ya posted! I'm excited how these turned out!

I have a ton of bleeding tissue paper shapes that we are creating a design with in this last station. I have plans for these...stay tuned!
 Since my kindergarten and first graders are working on something else, I'm glad I have an empty table to pile everything on. It's...a lot to keep up with but the kids are having a blast and that's all that matters.
October 29, 2022
The Dot School-Wide Collaborative
 Hello, friends! I'm excited to share that the school-wide collaborative my first through fourth grade students created at THE BEGINNING of the school year (yikes!) is finally installed. Like, finally.
Y'all, while I do love having all students creating a collab at the start of the school year, why do I do it to myself? It's so much work on my end! All the attaching to bulletin board paper and hanging...it's so much! AND I always procrastinate! And yet I do it year after year. Such a glutton for punishment, I guess.
Here's a look inside the process of hanging this beast with some of my tips:
When hanging something this heavy, it takes everything in your tool belt (as well as a helpful music teacherin' friend). Check out my tip on binder clips and long tabs of paper. It helps!

I've not done an official post on how we created these dot paintings but I'll tell you: it was super easy! In fact, it's one of my fave kindergarten lessons which you can find the details on here.

All students began with a dot in the middle of their paper. The paper was prefolded so that each dot was exactly in the middle. Meaning I quarter folded the paper, once in half one way and then in half the other. Dot was placed at the intersection of those two folded lines.
 Like the kidnergarten lesson, each student was then instructed to paint concentric circles around their dot using any colors of tempera paint they liked!
 Once dry, the paintings were cut along those folded lines. They were then rearranged and glued to a black piece of construction paper. This part was tricky so students helped one another.
 Early finishers painted the wording of the sign!
 And then the beast was hung...where it shall stay for a LONG, LONG time. Or the end of the school year where I'll have the students cut it apart to take home their circles (maybe. Or I may leave it up until next year!).
October 19, 2022
Creating Lines with Modeling Clay
.jpg) I recently shared that I created line-making stations for all of my students. You can check out a video and blog post on that here. While I was out, I created this video and sheet as a sub plan for all grades. I've since decided to add it to my early finisher centers! Check out the video I created for the kids here:
I recently shared that I created line-making stations for all of my students. You can check out a video and blog post on that here. While I was out, I created this video and sheet as a sub plan for all grades. I've since decided to add it to my early finisher centers! Check out the video I created for the kids here:
Cassie Stephens's Blog

- Cassie Stephens's profile
- 34 followers
Cassie Stephens isn't a Goodreads Author
(yet),
but they
do have a blog,
so here are some recent posts imported from
their feed.

