
Cassie Stephens's Blog
September 24, 2025
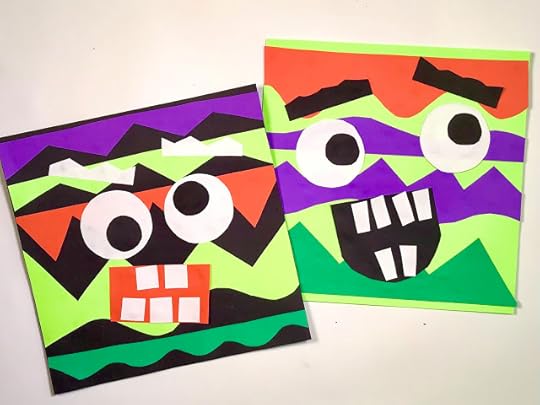
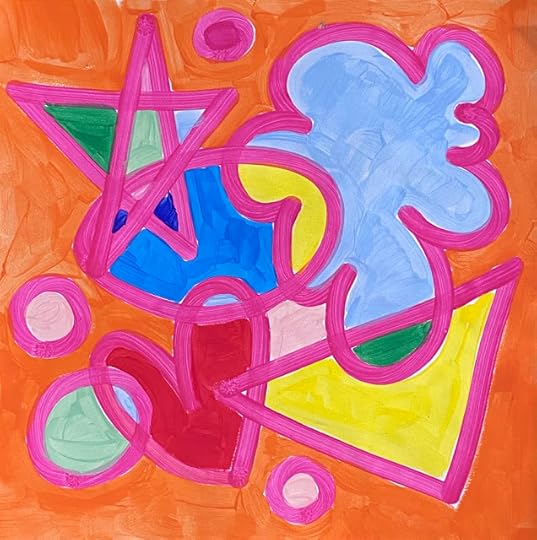
Line and Shape Monster Collage!
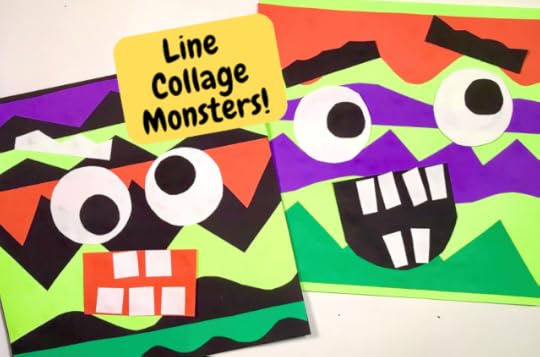
Hi, y'all!
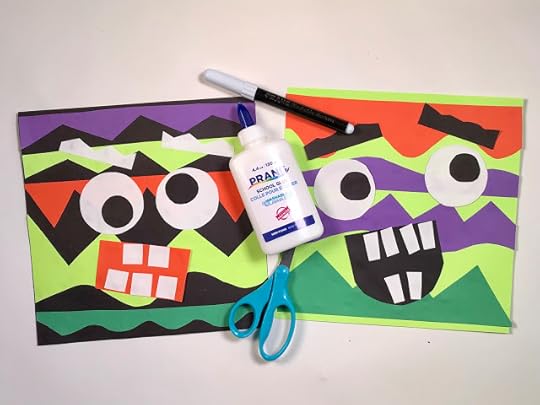
I recently created a lesson with my friends over at Prang using (my favorite!) their Tru-Ray construction paper and Prang's white school glue. You can find the lesson, with the step-by-step process here!
For a link to my favorite Tru-Ray paper and glue used in this lesson, check it out here.
To dive into the video, here ya go:
I hope you like it!
 This lesson is perfect if you are wanting to do a line and shape review and create something a little fun and silly for the Halloween session.
 I shared a variation of this lesson a couple years ago that is more line focused. It's the perfect lesson for pre-K and you can find it here.
 Need some shape books for the lesson? You can find my book Alfred the Ape Knows his Shapes here.
  And another fun book to read would be this one. It's always a hit with the kids!
I hope your artists have fun with this one!


September 23, 2025
Simple Shape Sculpture Lesson!
 One of my VERY favorite lessons of all time is teaching my kindergarteners how to make LINE sculptures. And we do this lesson on the very first day of art class!
 Several years ago, I started doing these shape sculptures with my students when we were finished with our unit on LINE. And I realized...I never shared that lesson with you in video form!
So, I thought I'd create a new video for you and your artists in case you are ready to dive into the wonderful world of SHAPES!
Some troubleshooting for this lesson:
* You'll probably want to start with either a 12" square of paper or a sheet of 9" X 12" construction paper to create the cube.
* So that your students will be able to create shapes that are a good size for the cube, you'll want rectangles of paper that are 12" X 2"
* You'll need glue! Glue sticks may work in a pinch...but I find that the hold is better with glue.
* OF COURSE, you'll probably want a good book to read for your shape lesson. How about THIS ONE?! ;)
You could do this lesson any number of ways!
 For a quick version, you may wish to leave the construction paper blank. This allows the shapes to really take center stage.
  OR...you could use paint sticks or ink-filled bingo daubers and have students do a little bit of a line review. In the video, I wanted to share all three versions! Personally, I like the plain background best but I am always looking for a good review and the lines in the background does just that.
 Don't forget! I just shared a super fun SHAPE painting lesson that is a great tie-in with this project.
 No matter what, I do hope you and your amazing artists have fun! Please let me know if you do this lesson, I would love to see their awesome artwork!
September 21, 2025
A Printed Shape Castle Lesson!
 Hello, friends! I'm coming to you with another SHAPE-themed art lesson. Earlier this week, I shared a super fun painting lesson when introducing the element of art, shape. You can check out that free painting lesson (with video!) here!
A while back, I created this printed castle lesson and shared it when I was doing shape stations with my students. If you'd like to check out more about my shape stations, I have lots of info here.
 One of the lessons that came out of those shape stations was this Paul Klee meets Mary Blair inspired castle project. Today, I thought I'd repackage the lesson into one video that will walk your artists through the process.
 Now, this lesson can be as simple as making printed castles all the way up to using chalk pastels and adding a background. I'll leave that up to you! Just know that I wanted to cater the video to your art teacherin' needs. So keep it a one-day activity with castle printing or take it beyond (as I did with my older students) and add more art supplies.
Regardless, here's the video for you:
For this, you'll need the following supplies:
* Construction paper. I only use Tru-Ray!
* Cardboard, lots of cardboard for printing. ALWAYS have students print with the wavy edge of the cardboard. Check out how we did that in this fun line printing painting!
* Tempera paint. Check out my fave painting supplies here.
* Tissue paper shapes.
* Chalk and oil pastels.
By the way, using puffy paint with students IS NOT for the faint of heart. You gotta keep an eagle eye on those kids when they are using puffy paint or they will ruin their artwork in a blink. So...I recommend doing it in small groups with you or a trustworthy student as the monitor. Trust me on this one!
 This lesson is a long one...if you decide to go the whole thing, just so you know! But the results are pretty fun.
 Of course, you can also skip the cutting out of the castles and adding to the background. Instead, simply have students add "snow" or stars to the background paper to add a little more interest. Maybe even glitter!? BUT that might be a little too much.
 Of course, if you are introducing students to shape, might I recommend MY book?! You can find it here!
 No matter what you do, I hope you and your artists have fun creating!
September 19, 2025
(EASY!) Abstract Shape Painting!
 Hi, y'all! I know, I can hardly believe it either: two blog posts with two lessons in one week?! What can I say, when the ideas start rollin', it's hard to stop 'em!
 So, truth be told, every since I started adding slightly diluted tempera paint to my bingo daubers, I've been coming up with all sorts of fun art lessons! I have several 'in the can' and I'm working to bring them to you and your artists as fast as I can. To always stay up-to-date on my free video lessons, you may want to join my email list! You can do that here.
  Like my most recent videos, I'll start this one with a bit of a Teacher Talk to walk you through the prep for this lesson. I would say this project is appropriate for kindergarten through 3rd grade, depending on what it is you hope to cover with your students. Meaning, if you find that you have older students who need a simple project to remind them of your painting procedures, this may be it! And if you have younger students who are ready to dive into the land of shapes, this one's for you.
 OF COURSE, the best book for the job is Alfred the Ape Knows his Shapes! This book covers EVERYTHING...I really wanted to create a book that wasn't your basic baby shape book like so many out there. I wanted to dive in to organic, geometric, the difference between a form and a shape and so much more!
 And now, for the lesson video:
I found that for this lesson, the prep was pretty easy. I mean, filling those empty bingo daubers was not fun BUT...once they are done, they do last. You can find the empty bingo daubers here.
 I also found that tempera paint works well with this project althought, tempera cakes would work too. For my favorite painting supplies including the paint trays and more, visit here.
 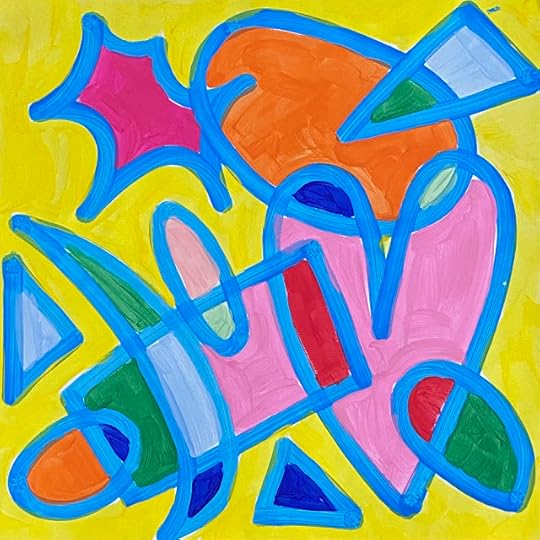 I created this lesson because I thought many of you may be moving on from LINE themed lessons to now...shapes! If you'd like to see my Top Ten Line Themed lessons, visit here!
 And in case you missed my other super fun and colorful painting lesson, see it here.
Oh! AND my cardboard line sculpture lesson! It's here.
 I just love how colorful these are. I think what really does it is that different colors used for the outline.
  For my personal art, I kinda want to paint some funky still life paintings using this method. Kind of a pop art meets cubism. What do you think?!
 I hope you have a chance to try this lesson out! If you do, please lemme know, I would love to see.
 Happy Friday!
September 17, 2025
Line and Pattern Collaborative Painting!
 Hey, friends! I'm coming to you today with a lesson that has been rolling around in my head for a while. I know this time of the school year, so many of us focus on LINES and I thought this painting project, that could serve as a school-wide collaborative, would be perfect!
Like my more recent lesson videos, I'm doing a little bit of a teacher-talk at the start of the video to walk you through the prep process. There isn't much but I do think it's important.
By the way, for A TON MORE line lessons, check out this blog post!
 Okay, let's dive in!
 For this lesson, you'll need:
* 9" square paper* 9" square template if creating a collaborative mural* Paint-filled bingo dauber, 1 per 1-2 students* Tempera paint
 OF COURSE you're gonna need a copy of my book, Larry the Line, right?!
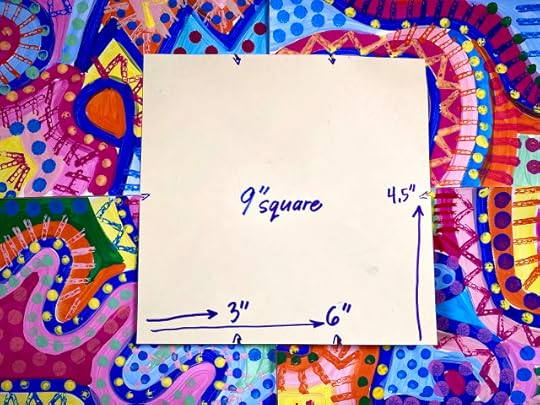 I find that templates work great and just make one per table! Then the kids can add the tick marks so they know where to start and end their first lines. I think the mural would work best if those first lines were all the same. I decided to use a dark blue.
 I've been using the Prang Tempera Paint and really loving how bold and bright the colors are. Looking for a crash course in using tempera paintin the art room? Check out my Top Ten Tips for Tempera Paint here!
 If you do this lesson and post on social media, please be sure and tag me, I'd love to see what you and your artists create! Please do not rewrite this lesson and sell on TPT as your own...I hate to say that every post but, it happens!
Have a great week, friends!
September 11, 2025
20 of My Favorite Fall Lessons!
 Fall is upon us, y'all! Thank goodness as I'm just about over these super hawt Tennessee temps! For the occasion, I thought I'd put together a big ole blog post of my very favorite lessons for fall. Some of these are advanced and would work well with older students too!
To find each of these lessons, just tap on the links. Nearly all of the lessons have a instructional video for your artists and some come with free downloads. As always, these are for you to use with your artists and I provide them for free. PLEASE do not reuse/repackage them and sell them as your own on TPT. I hate that I have to say that...but it happens.
Okay, grab those fall leaves and let's dive in!
 Let's kick things off with this here sculpture lesson! These little pumpkins would be fun for any lil pumpkin to create and they are super easy! Sculpt in one class and paint the next. Done! Find the lesson here.
 My students LOVED anything spooky! This lesson is inspired by a contemporary artist. I know your students will also love the paint smearing aspect of this project! Find it here.

Need a quick in-between-lessons project? Or one that's perfect as a sub plan? Then you may want to try this one with your students!
 My students LOVE drawing sheets and love creating silly characters! This sheet (and video!) is totally free! Have students practice draw along with me on a dry erase board before diving in on their own Candy Corn Characters. Find the video and this free download here.
 Oh man! Did my students love this lesson! We used Gelli plates and Dollar Tree sunflowers to print these on bright and bold copy paper. To give them an Andy Warhol look, we used puffy paint for the outline. These are always show stoppers! You can find the lesson details here.
 If you want to share printmaking with your students but don't want the mess...than have you ever tried Marker Printing?! It's so fun and easy! Check it out here, you'll be amazed!
 To deck the halls with a little bit of spooky, why not try these big-eyed owls on for size? This lesson incoorporates weaving, collage, watercolor painting and more! You can find the lesson video and details here.
 I'm a HUGE fan of Celluclay! For your older students, they could make a pumpkin head planter! Any plastic planter will work...or even a plastic water jug! All the details can be found here.

If not a pumpkin, how about a skull?! I loved making this big guy...and the spider palm plant at the top was just so funny! I think I need to add some eyes to him though, what do you think? All the details here!
 Did someone mention eyeballs?! All you need for this is plaster wrap, aluminum foil and paint! I made tons of these for my Halloween tree. You can check out the process video here. Middle schoolers would LOVE this!
 Aliens and monsters are always fun to create during this time of the year. I love this lesson because students work BIG and use their bingo daubers (you know I love 'em!). You can check out the lesson details here.
 Did someone mention monsters?! These Loud Mouth monsters are inspired by the artist Greg Mike. I also paired it with a lesson for students to have choice in what their monsters could be saying. You can find the handouts for this as well as the video here.
  Looking for some collage lessons?! This one is a riot! I love how all of the Franks turn out differently. Let me walk your artists through the process here!
 Here's a lesson I did every year because it was always such a hit!
 Need a lesson on painting landscapes? I loved this one and each turned out so colorful and happy. We looked at many fall landscapes and the colors of the fall. You can find the lesson details here.
 One of the most popular lessons on my blog is this one! When I did it, I used homemade Gelli plates which are a total pain to make! So if you have Gelli plates you'll love this lesson...and it will be so much easier! You can find the details here.
 Need a fall collage lesson? I did this one with my first grade and they loved it! We painted, printed and collaged. You can check out the details here.
 Need a fun fall weaving lesson? This is it! I would recommend this with small groups if you are working with children in second grade and younger. I did this with my third graders in the spring...so maybe, for this time of year, this would be best suited for fourth grade and up. Lesson here!

More monsters, you say?! Look no further! Here's a lesson I used as a sub plan!

And I saved one of my All-Time Faves for last...this Vincent van Gogh, Starry Night inspired hauted house lesson! All the details here!
And there you have it! Happy fall, y'all!
September 9, 2025
Top Ten Tips: Scissors in the Art Room!
 Last month, I released my latest children's book Scissors, Glue and YOU! While working on my book, I thought through everything I cover when teaching my students how to use these supplies. All of that info was poured into my book with large, bold visuals in a fun-to-read rhyming format.
 To celebrate, I wanted to share with you my Top Ten Tips for using Scissors in the Art Room!
While this may seem like a bit of a dry subject, I promise you, this videos is PACKED with info from how to clean and sharpen your scissors to the difference between leftie and rightie scissors to how to build student hand strength and SO MUCH MORE! I had so much to share...I hope you like the format. I wanted to be super clear on each of these tips so that you and your young artists have success.
 Because I share some of my favorite supplies, like these leftie scissors, I did include links to each in my video. If you don't see them in the copy of the video, I've got them for you here. Starting with these scissors for our left handed friends.
  In the video, I also share several scissors that are perfect for friends who may need assistance. I find these loop scissors to be great.
 For students who may benefit from the loop scissors, these adjustable scissors are great. When the arrow is pointed toward the thumb opening, they provide a spring action. When the spring action is not needed, the arrow can be pointed toward the blade and the scissors will operate like traditional scissors. Check them out here.

These scissors can be used like table top scissors or by squeezing the handle. I like that the plastic case provents the blade of the scissors from harming young artists. You can see them in action in my video and check them out here.
 In my art room, I had a couple of variations of these hand-over-hand scissors. They really helped my students who were learning how scissors work. You can check out these here.
  Another tip I share is to teach our students to have a separate 'home base' for their scissors and glue. This keeps the scissors from getting glue on them and prevents our students from using scissors on a clogged glue bottle. This has happened in my art room too many times...I learned that keeping these two supplies on opposite ends of the work area works well.
 In the video I also share that scissors storage can be expensive if you buy from the online retailers. If you have a limited budget, toilet paper tubes work great! You can even number the tubes and the scissors so students know exactly where to place them.
 I also share how to clean and care for your student's scissors! Goo Gone is a great thing to have in the art room as it removes sticky tape and glue from scissors.
I hope you find the video helpful! It was a lot of fun to create...just for you and your artists!
September 3, 2025
The Coolest Cardboard Sculpture Lesson Yet!
 So I admit, the title of this here blog post is a little self-congratulatory but...WOULD YOU LOOK AT THIS SCULPTURE?! And tell me that it's not super duper fun!
 This lesson is one I came up with while i was playing around with cardboard for THIS cardboard sculpture lesson. While tinkering, I realized I could connect the cardboard to make faces...or busts. Then I even made little people (lesson coming soon!) and just had so much fun.

This lesson is perfect for the start of the school year when you are learning all about lines! It's a great pairing with Larry the Line, OF COURSE but also a book by my friend Barney Saltzburg, Crazy Hair Day!

The prep for this lesson involves the same supplies I used in my sculpture lesson. You'll need to cut some cardboard...but that's really about it! For links to the supplies I recommend, visit here.
 Ready to dive in?! I share some trouble shooting tips in the beginning of the video just for you. You'll see that I did struggle using cardboard squares for the head that were larger than 6" squares. That proved to be too heavy for the pipecleaner, as you can see. That's why my guy has no neck! So...when working with your young artists, keep your cardboard at 5" squares or smaller!If working with young children who struggle with cutting the cardboard, just have a ton of bits cut for them! Allow them to glue and I really recommend Elmer's Glue All for the best stick.
 Of course, painting these would be fun (I do have a lesson on that coming soon!) but I chose to focus on lines. You do you! I'm sharing this lesson for you to take it and run with your artists!
If you are looking for the line sheet I use in the video, it's a free download! You can find it here!

Just a gentle reminder: I share these lessons because I want your students to have fun...and you to have a break! PLEASE do not recreate and/or sell my lessons on TPT. You do not have my permission and, sadly, it happens a lot. I mean, c'mon. That's just not cool.
Have fun and happy creating, friends!
August 29, 2025
My Top 10 Favorite Line Lessons!
 Welcome to my Top Ten Line Lessons!
 Since I have been sharing so many LINE lessons on my blog lately (with more to come, yay!), I thought I'd create a blog post with ALL of my very favorite lessons on line. Consider this your one-stop-shop for all things Line-Lesson-y!
 Of course, we have to kick things off with The Man, The Myth, The Legend: Larry the Line! All my line lessons begin with Larry so if you'd like to get yourself a copy of my book, you can do so here!
 To kick things off, let's start in kindergarten! Right away, we dive into all things LINE by create a line sculpture on the very first day! By the third day, we are ready to put our line knowlege to work with these lines paintings.
 Did you notice in the photo how nicely the artist was holding their paintbrush?! That's because they know all about The Paintbrush Ballerina! This method of teaching painting will totally change how your artists handle their brushes and paint.
 For a little Paintbrush Bootcamp (with free downloads!) visit here!
 After these structured paintings where we paint lines across out paper, we dive in with either watercolor or tempera cakes to add color. You can find this line unit here!
 This line sculpture lesson is one of my all-time faves AND it's what I teach on my first day with kindergarten artists! I also recommend this lesson if you have to do a teaching demo for a job interview. It's always a hit with kids of all ages!
To take a look inside my art room on that very first day of art, you can watch me teach! Check it out here!
 Of course, if you are on a cart or simply don't feel like busting out the paint at the start of the school year (don't blame ya!), you could always do a variation of the line lesson with tempera sticks!
 Then you can finish 'em off with these wild and wacky line monsters! For that lesson, visit here.
 And, of course, if you are doing collage with your students, you DEFINITELY need my new book Scissors, Glue and YOU!
  One of my FAVORITE ways to teach lines is with Line-Making Stations! My artists CRANKED out so much artwork in just a couple of 30 minute art classes. Not only did they learn all about lines but a variety of ways to create them! You can read all about that and check out the video and handouts I created for the occasion here.
 Printed lines was a fave! They really popped with black and white paint on black and white paper. Stay tuned to how we used all of these pieces of art!
 All ya need is cardboard and some paint! Visit the link for the handout!
 I did these stations with my first through fourth graders. Even this cutting station because, let's be honest: they all need the practice!
 Here we used our ink-filled bingo dauber. If you aren't familiar, visit this link and I talk all about 'em!
 For details on how these looked when finished and for some trouble-shooting tips, visit this blog post!
 One year, I did a variation on the kindergarten line sculpture and made it into a school-wide project! We called them our Getting-to-Know-You sculptures!
 I created a couple of totally free downloads and my students used them to create a coded work of art! These were so fun to have on display for open house.
 Here's a little look at what the finished display looked like! Tips and tricks for this lesson can be found here.
 You could also...turn that sculpture into a HAT! I did my sculpture on a paper plate and then wore it like an artsy thinking cap! For the lesson video, visit here!
 Once the paper sculptures are complete, your artists could try their hand at these super fun cardboard line sculptures!
 Of course, modeling clay is fabulous for teaching lines. Let me share this sheet with you as well as walk you and your artists through the process here!
 Keep the line sheet in a sheet protector and it's perfect as a center for those early finishers or for a line making station!
 Looking for a Larry-themed lesson?! Then this new one from my blog is sure to be a hit! You can check it out (with video, of course!) here!
Whatever you do, I hope you have fun AND I hope you have a wonderful long weekend. You've earned it, friends!
August 27, 2025
Let's Draw School Supplies!
.jpg) Hey, y'all! If you are looking for a fun back-to-school lesson that also introduces your artists to their art supplies then look no further! I've got it covered with this super fun school supply art lesson!
Hey, y'all! If you are looking for a fun back-to-school lesson that also introduces your artists to their art supplies then look no further! I've got it covered with this super fun school supply art lesson!To jump directly to the lesson with process photos, visit my friends at Prang right here!Full disclosure: I never used Prang's markers until working with them. They truly are the best markers! I used to use another popular brand (ahem) but always found them to be runnin' outta juice almost straight out of the box. Not only are the Prang markers much juicer and full of color but they are SO GOOD at this marker plus water hack! AND...all the marker tops are the same so that means no searching for that one missing marker top. If you know...you know.
Okay, now on to the lesson!
 In this video, I'll walk your artists thru the steps to draw each and every one of these cute little art supplies. I would recommend having students practice drawing on a dry erase board first or in their sketchbooks. Then they can dive in on their artwork. I would have students draw with pencil first...then trace with permanent marker.
  Now, I couldn't decide which was cuter: the supplies with the faces or the supplies without! So I created both versions in the video so you and your artists can decide.
  I also created free downloads! This way if your students need inspiration or even a coloring sheet, they are all set!

Here's the link!
 This is also a great lesson to keep on hand for a sub! I know the start of the school year can be...a lot so I hope this lesson helps!
 Here's a version without the silly faces! And, of course, a download:

Here's that download!

 Of course, if you are looking for books to read to your students, I got ya covered! Visit here to check out my books and my digital downloads.
Have a great week, friends!
Cassie Stephens's Blog

- Cassie Stephens's profile
- 34 followers
Cassie Stephens isn't a Goodreads Author
(yet),
but they
do have a blog,
so here are some recent posts imported from
their feed.

