
Cassie Stephens's Blog, page 31
July 18, 2019
The Biggest Secret about being an Artist and an Art Teacher
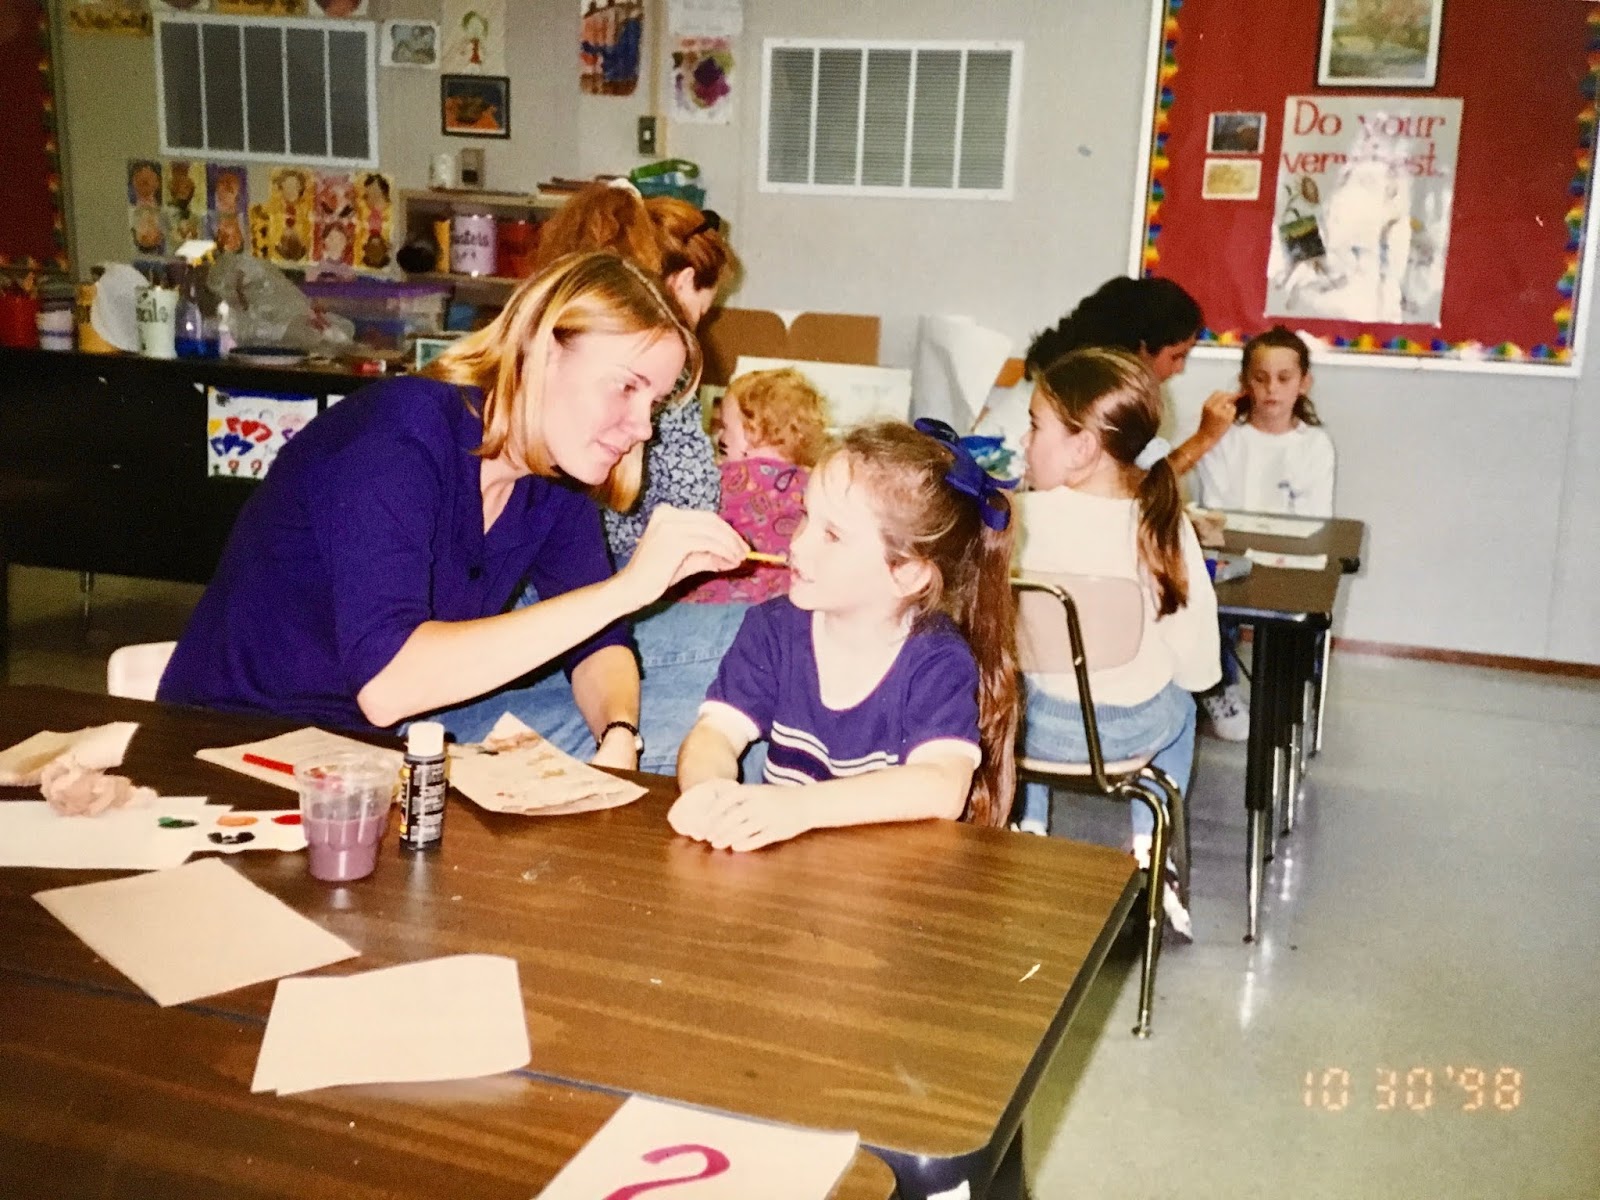 This photo was taken my very first year teaching, in a portable, some 20 years ago. It was field day and my room was being used for the face painting station. I was 23, clueless and completely freaked out about teaching art. I'd moved 6 hours from my home in Indiana to Nashville, Tennessee without knowing a soul or having any idea what in the world I was doing. I wanted to share my journey with you in this podcast episode. I'm not going to go into too much detail here as I want you to take a listen. Think of this blog post as the visual for that episode. What I have to share took me 10 years to figure out...and changed my art teacherin' and art makin' life FOREVER.
 If you like to take a listen, here you go:
 I attended middle and high school in a rural school in Indiana. If you are from Indiana, I attended Northfield High School, just outside Wabash. My graduating class had something like 70 kids. It was super small and, I would NEVER have admitted it at the time, I loved that it was small.
  I was the big, weird, sassy, annoying, artsy, drama kid back in the early 90's. There weren't too many of us weirdos at the school as many kids wanted to fit in. It's human nature. I wanted to fit in too until I realized I just never was gonna. And then I started to embrace that weirdo. As seen here.
 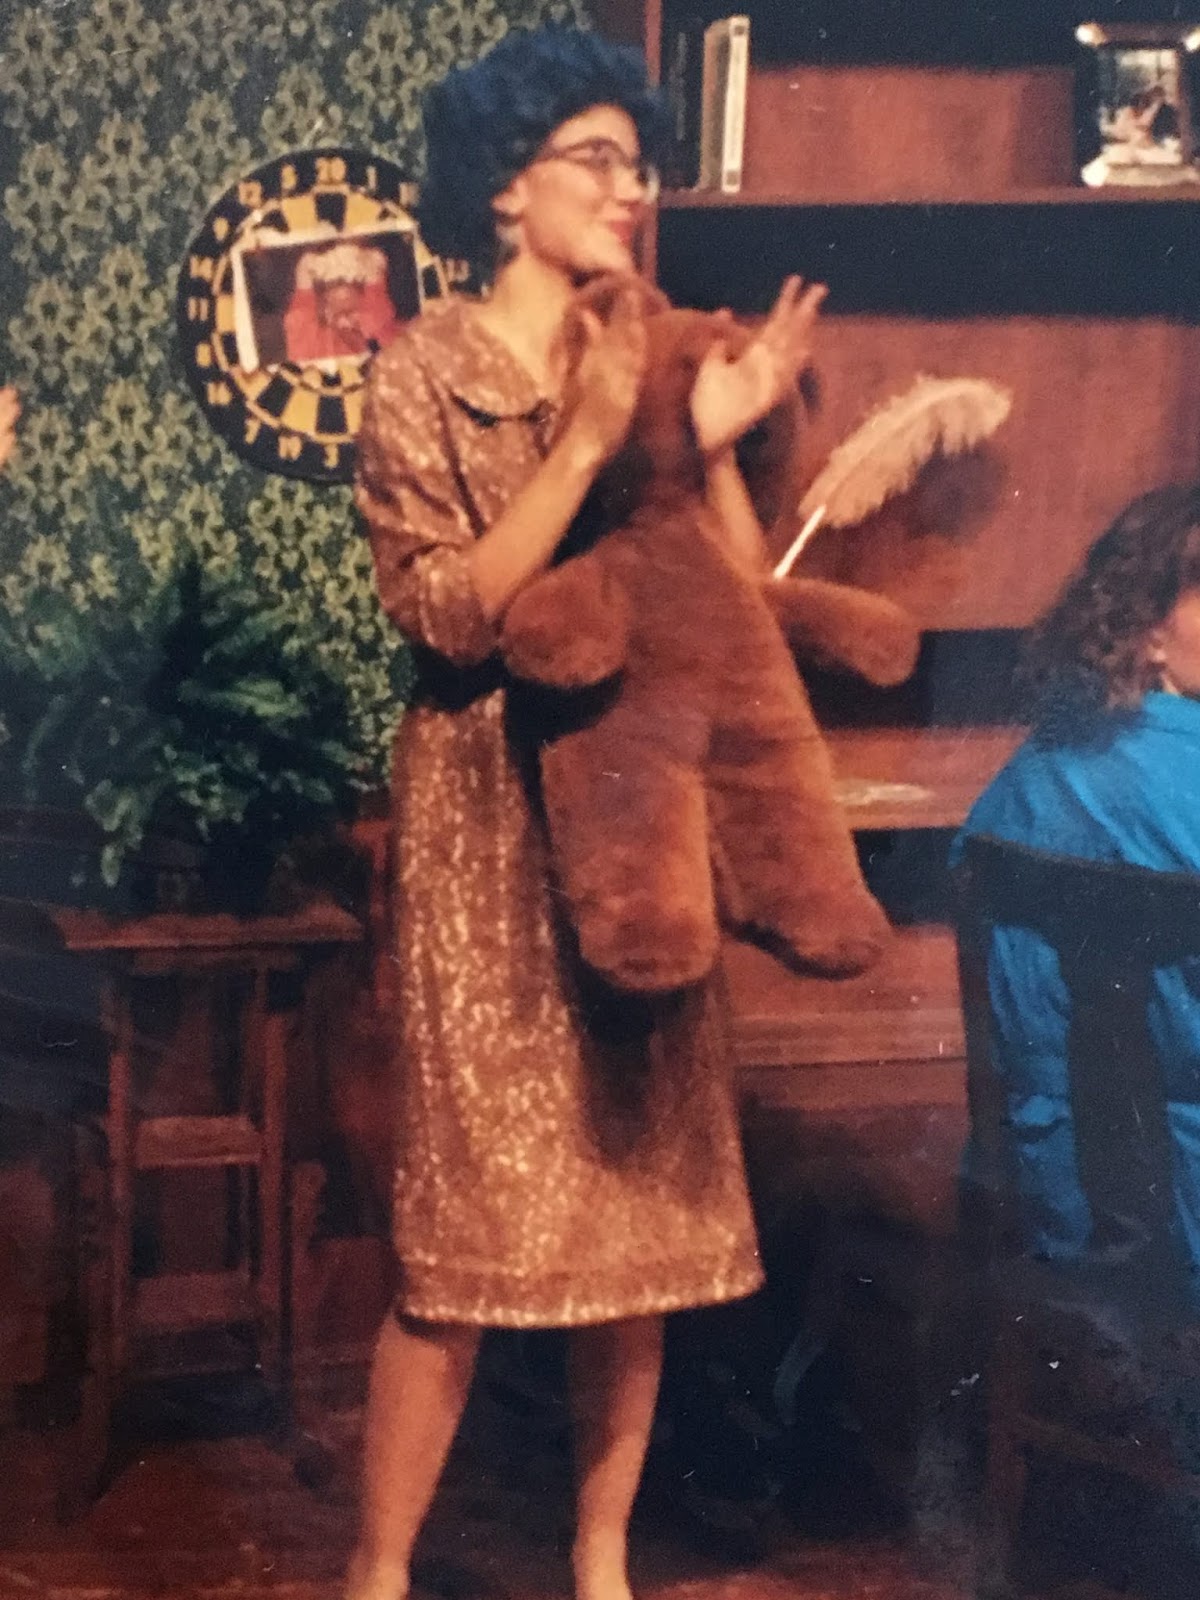 I had the lead role in most of our small productions. I was on the speech team and traveled every Saturday to schools across Indiana reading prose, reading comedy, doing dramatic pieces. It was fun. I found my people. We were all just a buncha kids who didn't fit in but had each other.
  I was pretty confident, for the most part. I didn't mind being me.
 Until I went to college. College was very hard for me, especially my freshman year. I attended Indiana University which had a student body of 30,000. Suddenly, in my mind, every kid was more creative, better at acting and public speaking and more unique than I was. I clammed up. I stopped talking to people. I began to hate myself. When was I going to be as cool and confident as I perceived the people around me to be?
 And then I took an oil painting class the summer of my sophomore year. I literally fell in love. I made big messy paintings full of stories. I don't think I ever finished a single painting! But I loved making them. Suddenly I found something I felt I was good at. I had a purpose...and confidence. Again.
 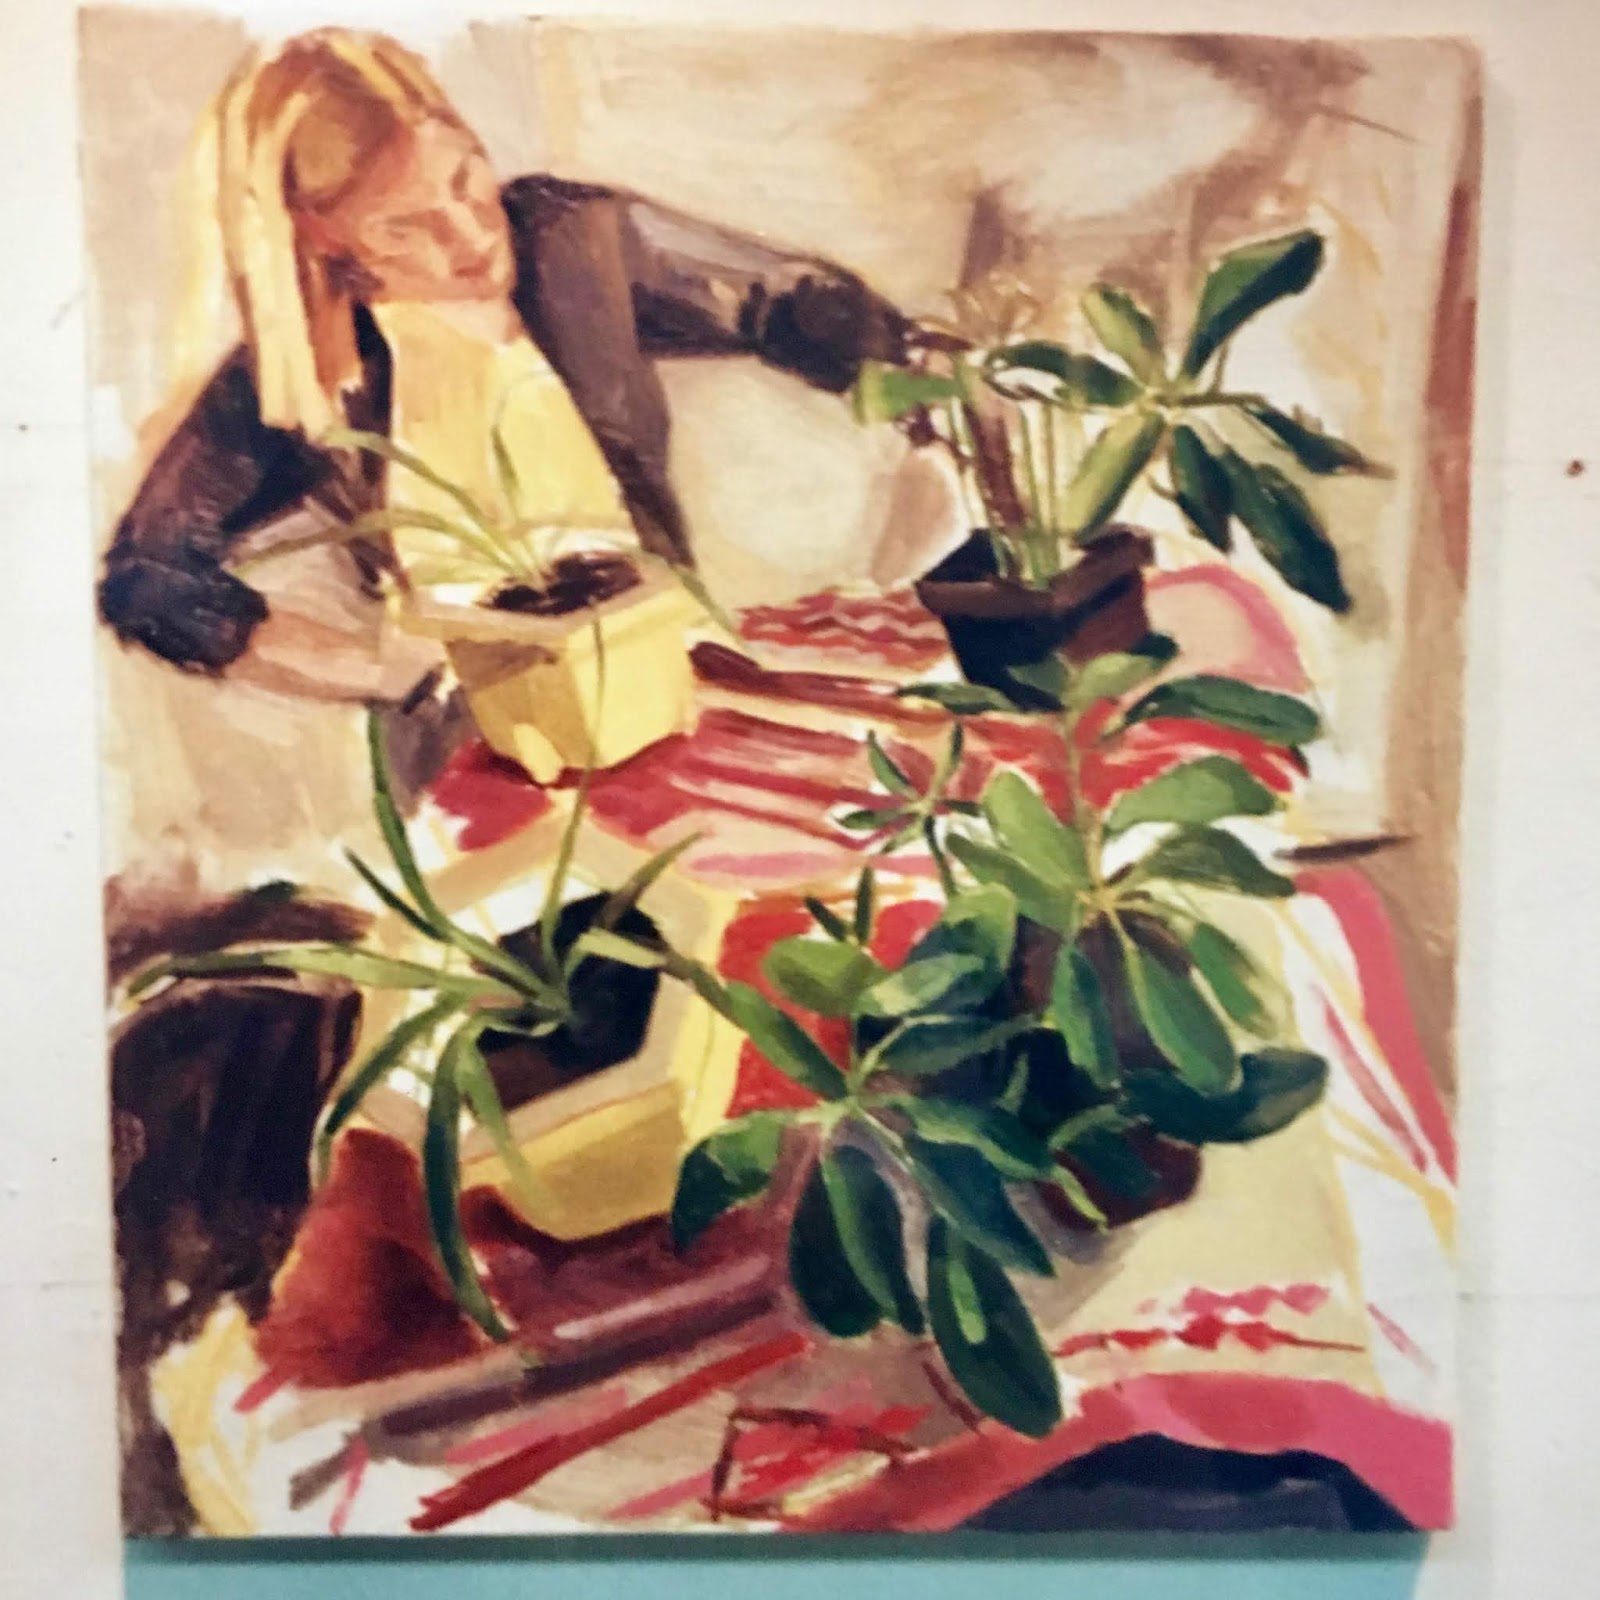 While I was in the BFA painting program, I was also pursuing my art education degree. And that's where I noticed something strange.
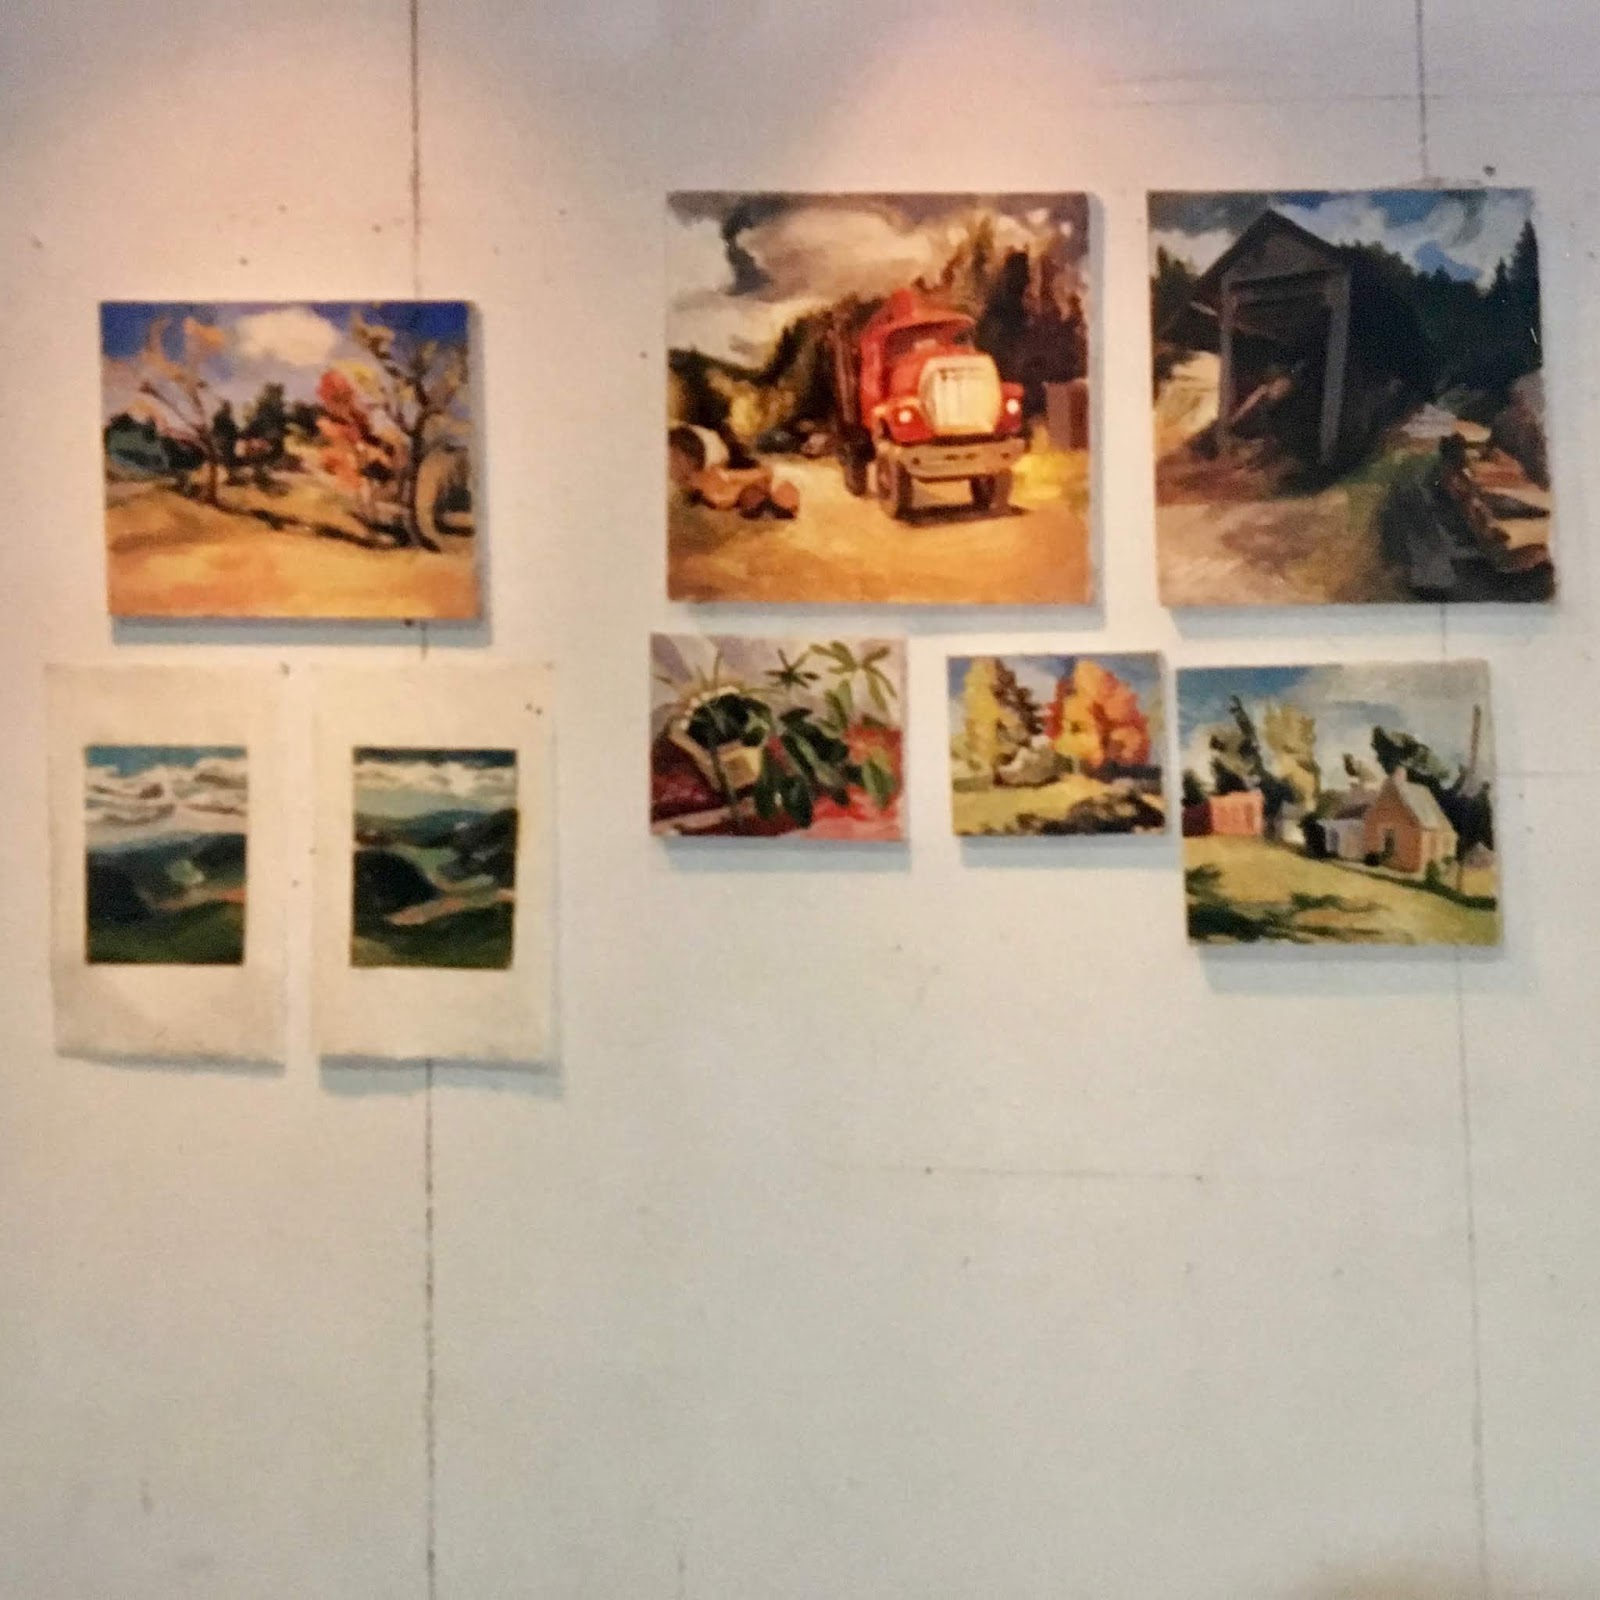 When my painting professors found out I was also getting an ed degree, they stopped taking me seriously...after all, I was not focusing solely on my art so why should they? And my art ed professors? Well, let's just say one of them, after coming to my art showing, said I should stick to painting. She was tired of grading my lame lesson plans.
 The read-between-the-lines I was getting was that I had to pick a side. I had to choose a team. I had to figure out if I wanted to be an Artist or an Art Teacher...because, according to their message, I could NOT be both.
 In August of 1998, I took a job 6 hours from my home in Nashville, Tennessee. I became the K-2nd art teacher at Hickman Elementary.
 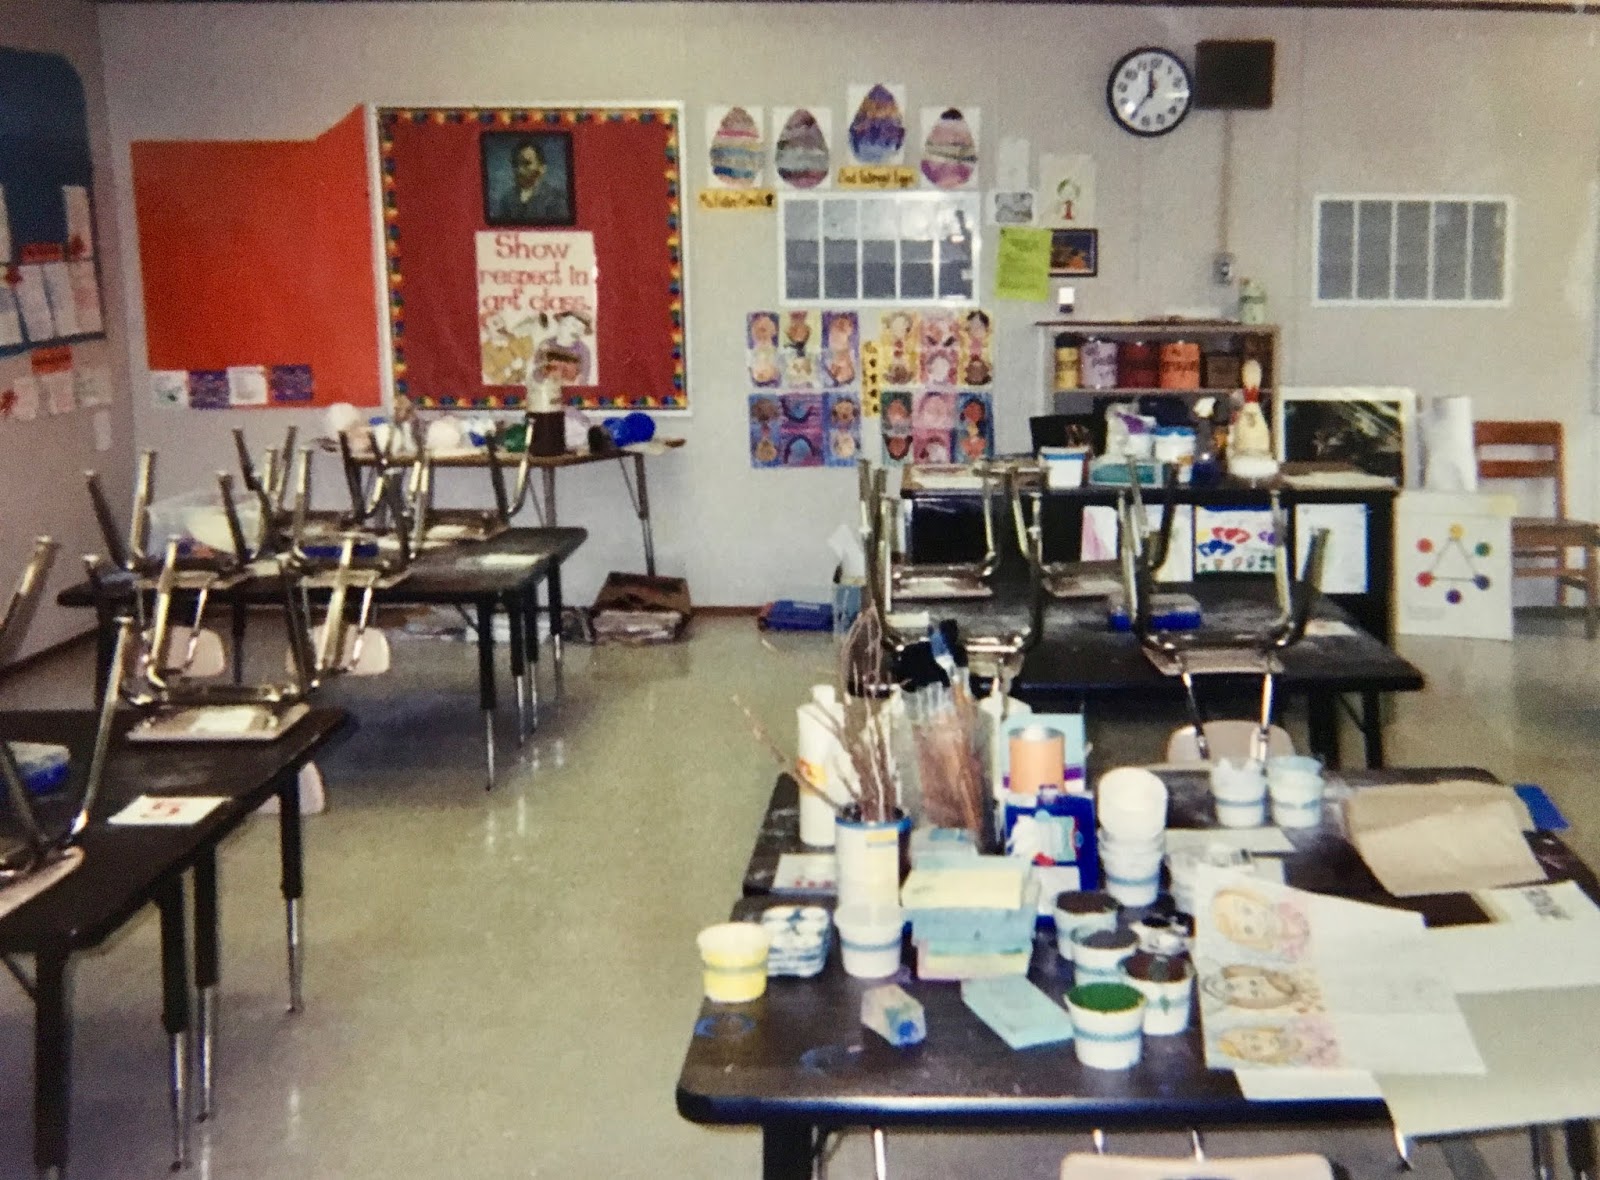 I had a portable classroom that was under the flight path of the Nashville International Airport. I literally had to stop talking and hang on to something every 15 minutes as planes flew overhead. I had no idea what I was doing and I was so scared of messing up. The art education of these kids depended on me and I was CLUELESS. I decided to devote all of my time and energy learning everything I could about being an art teacher.
 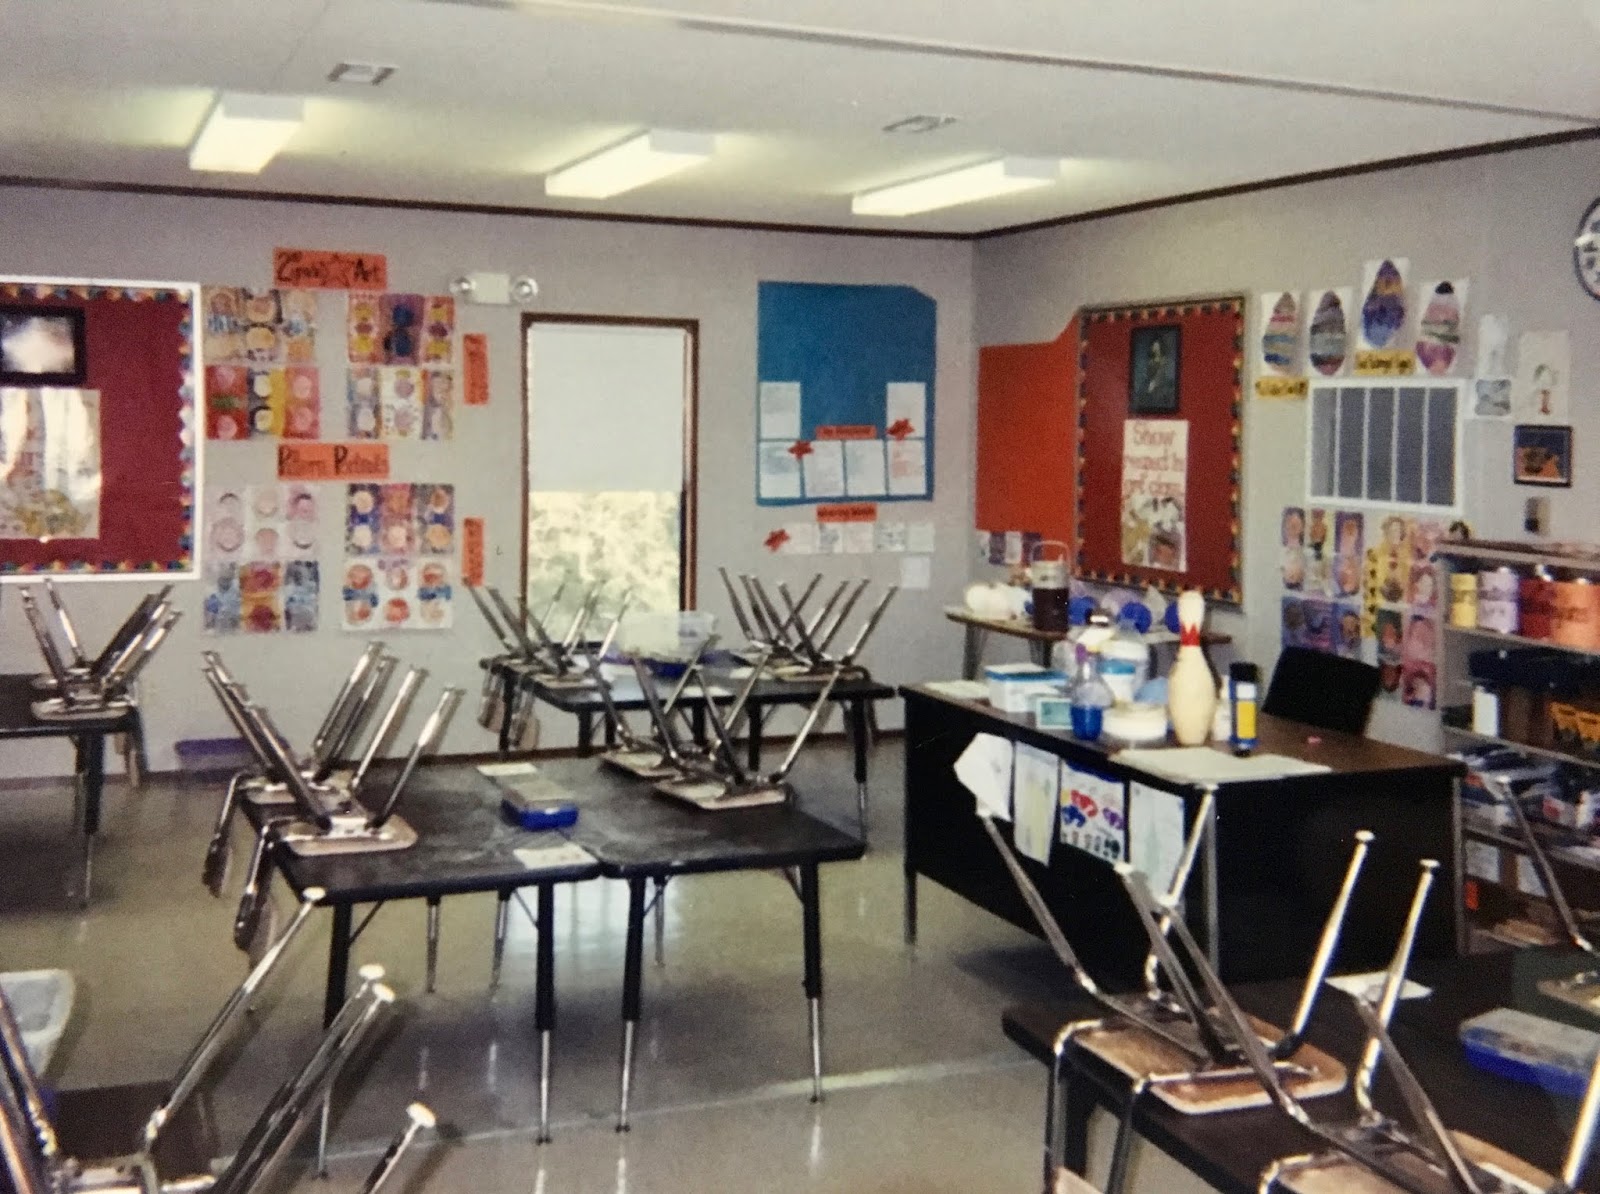 It was then that I decided to join Team Art Teacher.
 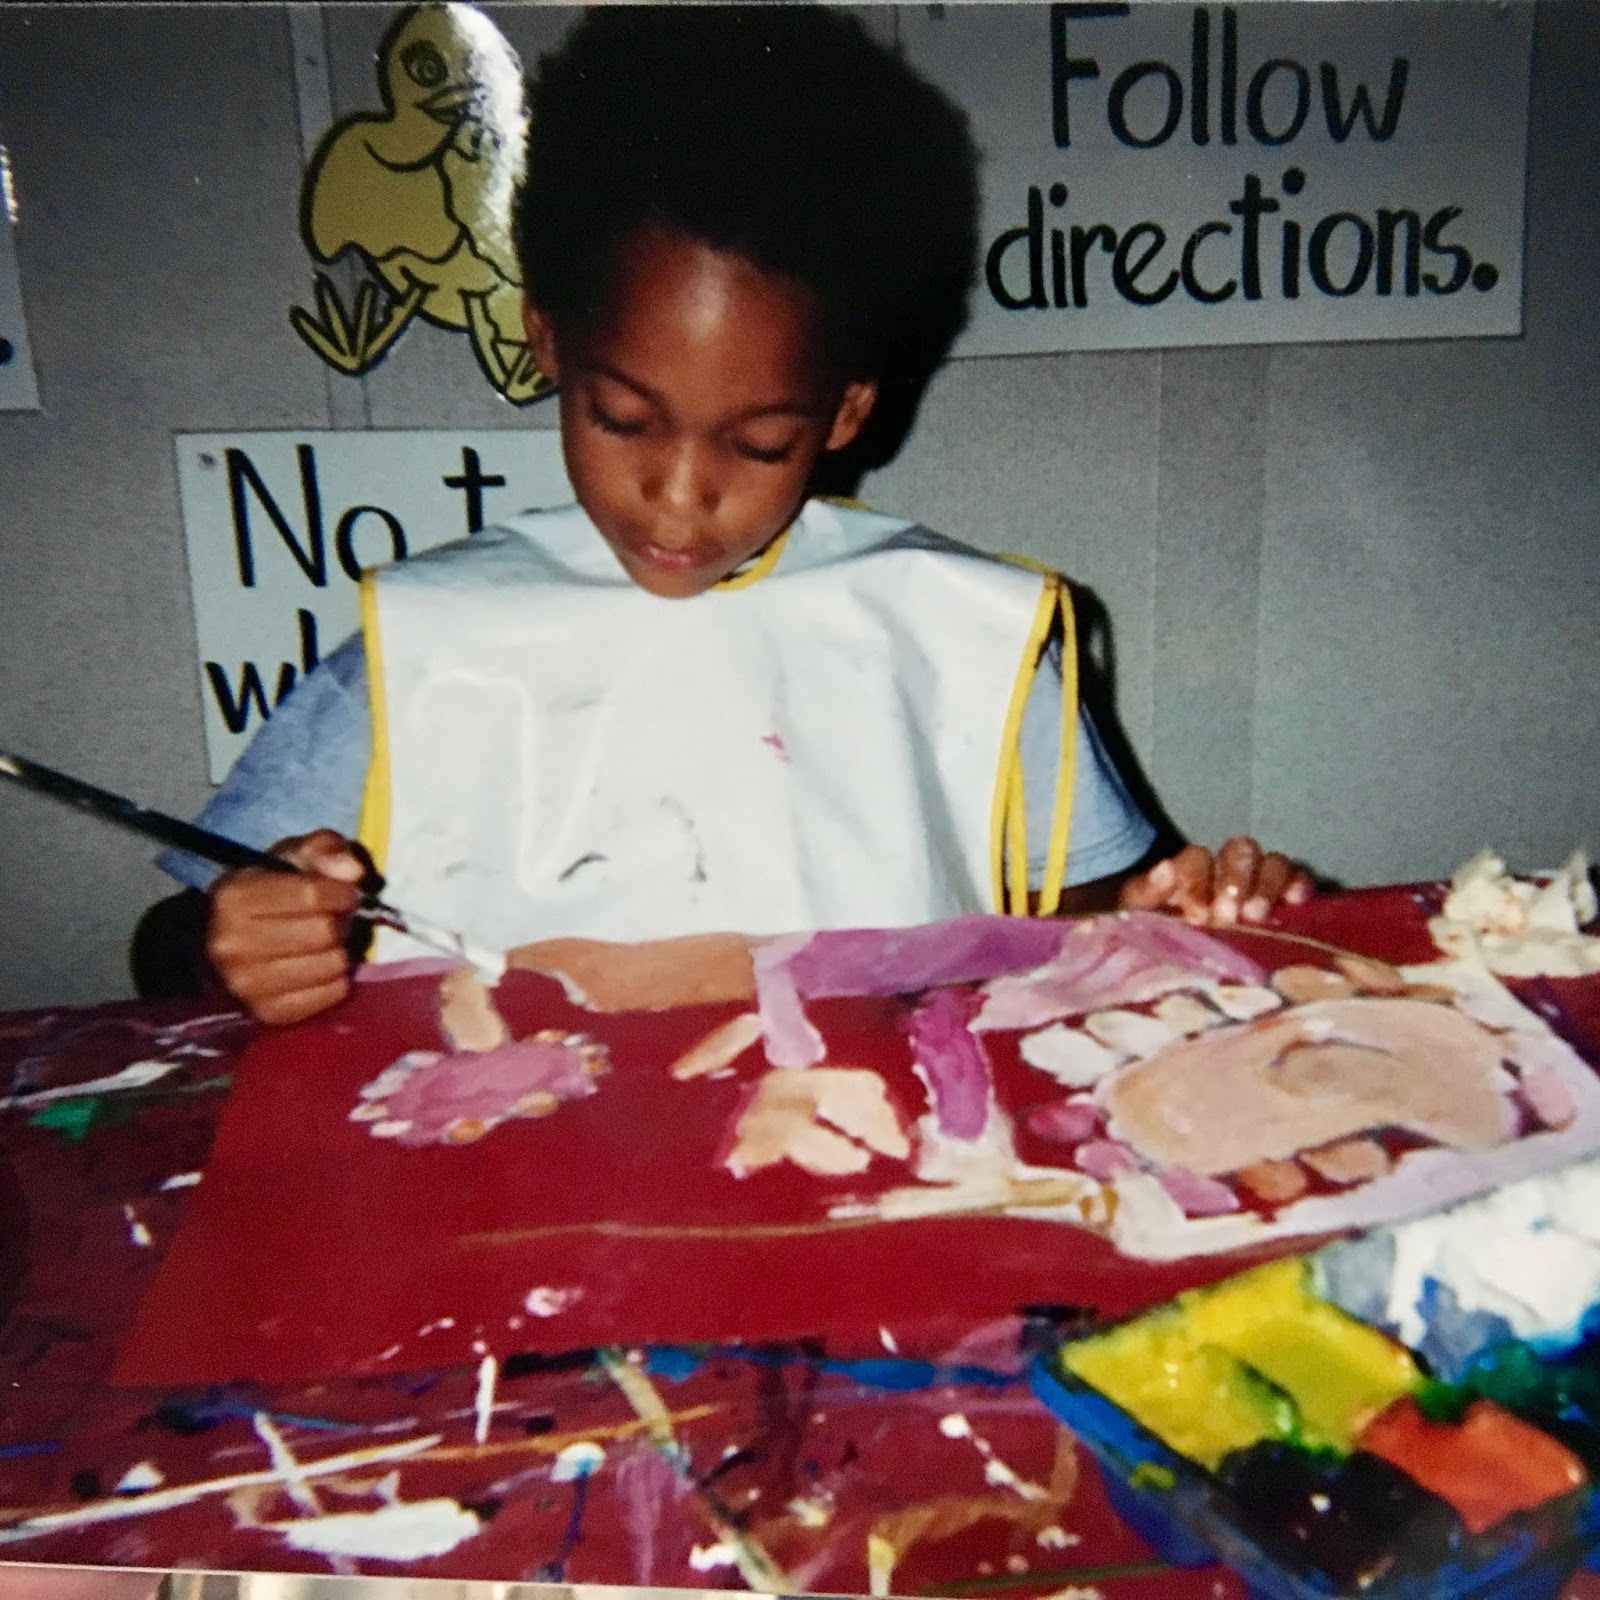 And I spent every moment of the next seven years reading every book, taking every class, decorating my art room, making lesson plans, doing camps...you name it. If it involved teaching art, I was all in. I was gonna be the captain of the flippin' art teacherin' team.
  And I was miserable.
  You know what a miserable person is as an art teacher? A miserable art teacher. I had neglected creating art. I had gotten so far away from my art making side and allowed myself to only focus on teaching. The face in this photo, taken when I first came to my current school about 15 years ago, says it all:
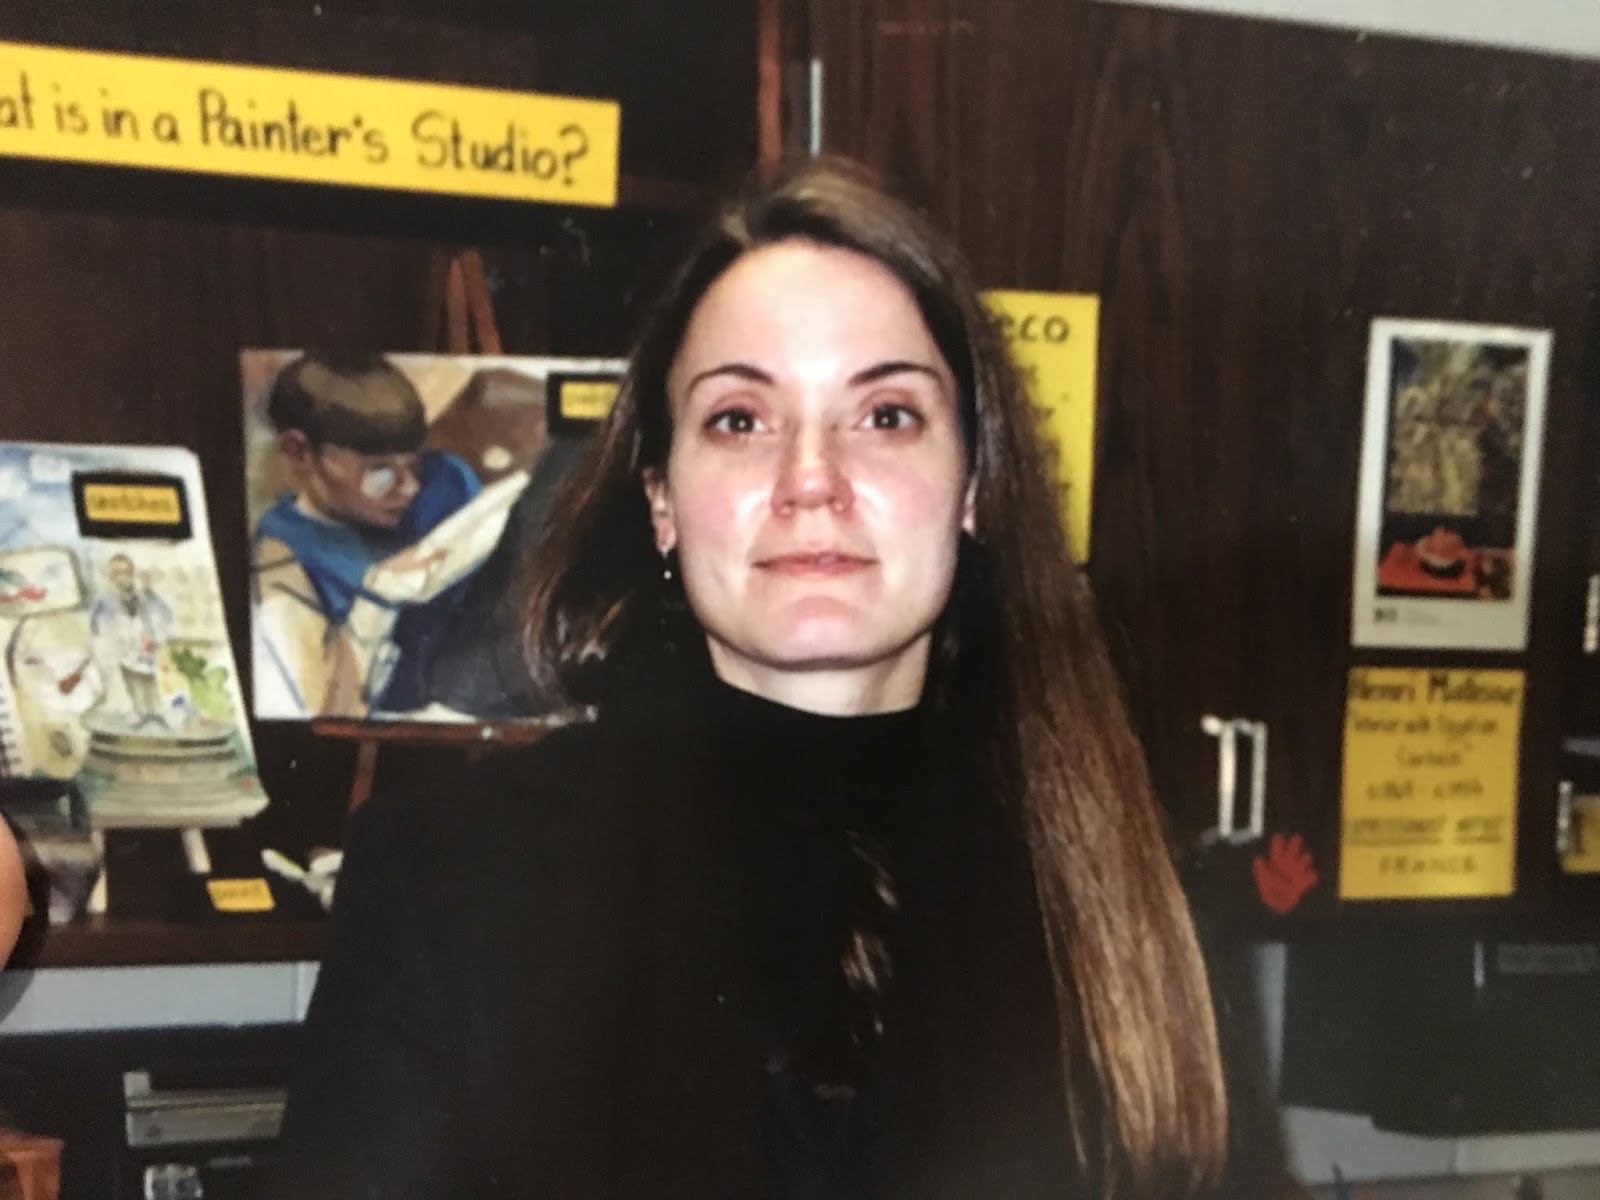 Tired. Bored. Uninspired. Uninspiring.
 I knew I had to change something.
I knew I had to create something.
I knew that I had to rejoin team artist...but how? How could I give up my time to my students and (selfishly, in my mind) make time for me?
You have to, y'all. You HAVE to do both. You HAVE to be an artist and an art teacher. You'll be happy. You'll be fulfilled. You'll be what your students need. But, most of all, you'll be who YOU need. I hope you enjoy this episode...and the many more to come.


July 15, 2019
My Experience on Nailed It!
 As many of you know by now, I was on an episode of the Netflix show called Nailed It! If you've missed the episode, it is Season 3, Episode 3: Masterpiece or Disasterpiece. Over a year ago, I was contacted by Netflix to audition...and after some serious thought, I decided to give it a shot. Here's a sneak peak from the show:Since appearing on the show, I've gotten so many questions that range from what is the audition process like, would you do it again, did you practice baking before hand, what's Wes like in real life and so much more. I decided to take all of those questions and answer them in this podcast. Here's a little taste:
The show was a tremendous amount of fun but I won't spoil it here. Click on the link below to listen to the episode in it's entirety. And while you are at it, you might want to give the other episodes a listen too.
Episode 1: Welcome to Art Teacherin' with Cassie Stephens
Episode 2: Is this IT?!
Episode 3: You're Hired! Now WHAT?!
Episode 4: What Teachers without Children of their Own Want You to Know
Episode 5: The Piano Story (for adult listeners only!)
Episode 6: Discovering Your Art Teacherin' Identity
Episode 7: My Experience on Nailed It!
Episode 8: Discovering Your WHY
Episode 9: The Biggest Secret about Being an Artist and an Art Teacher
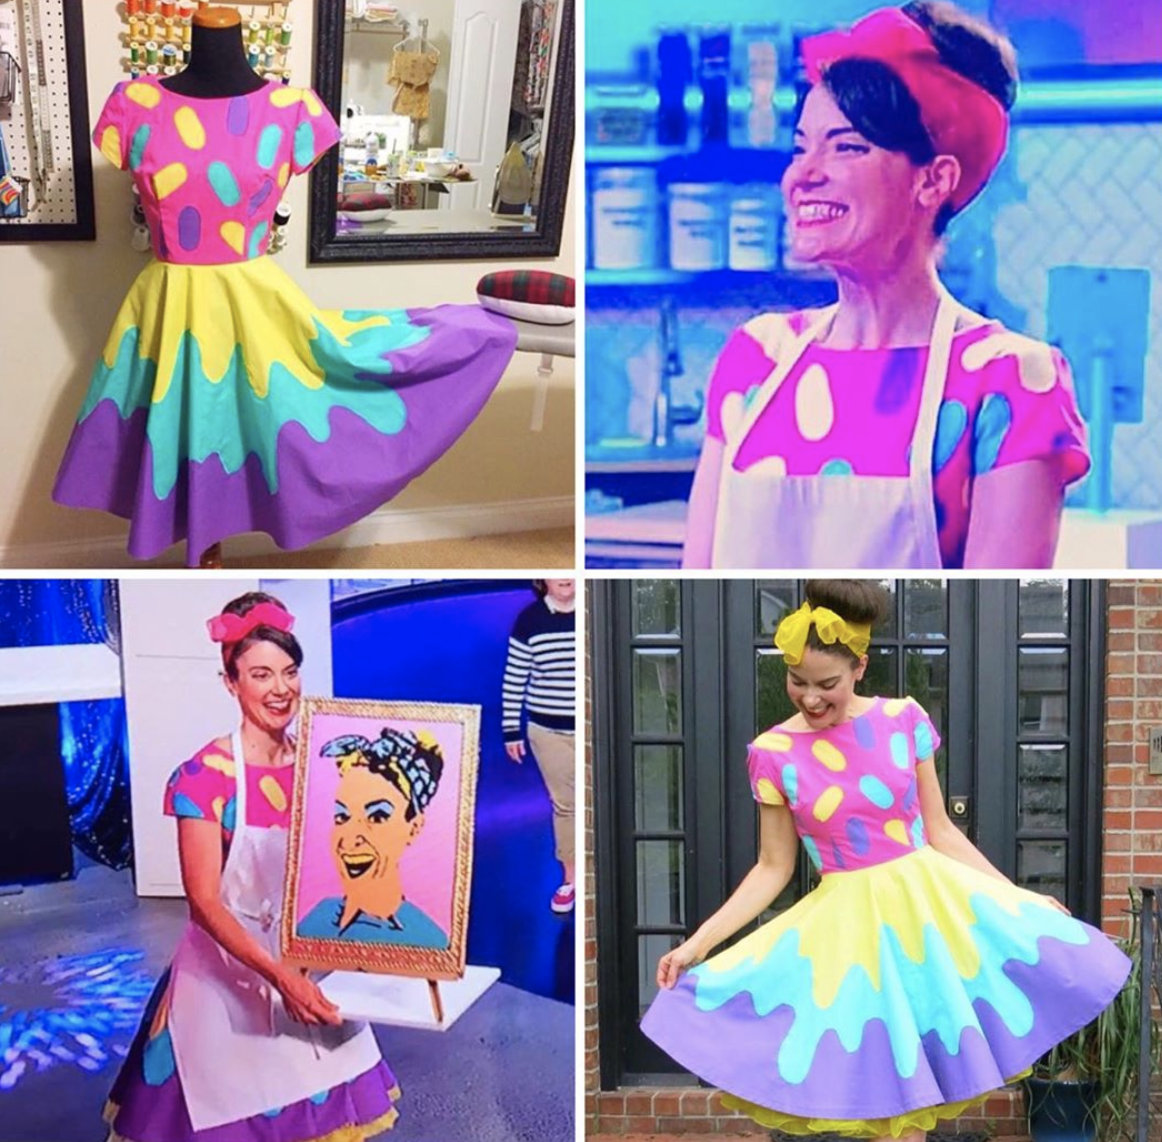
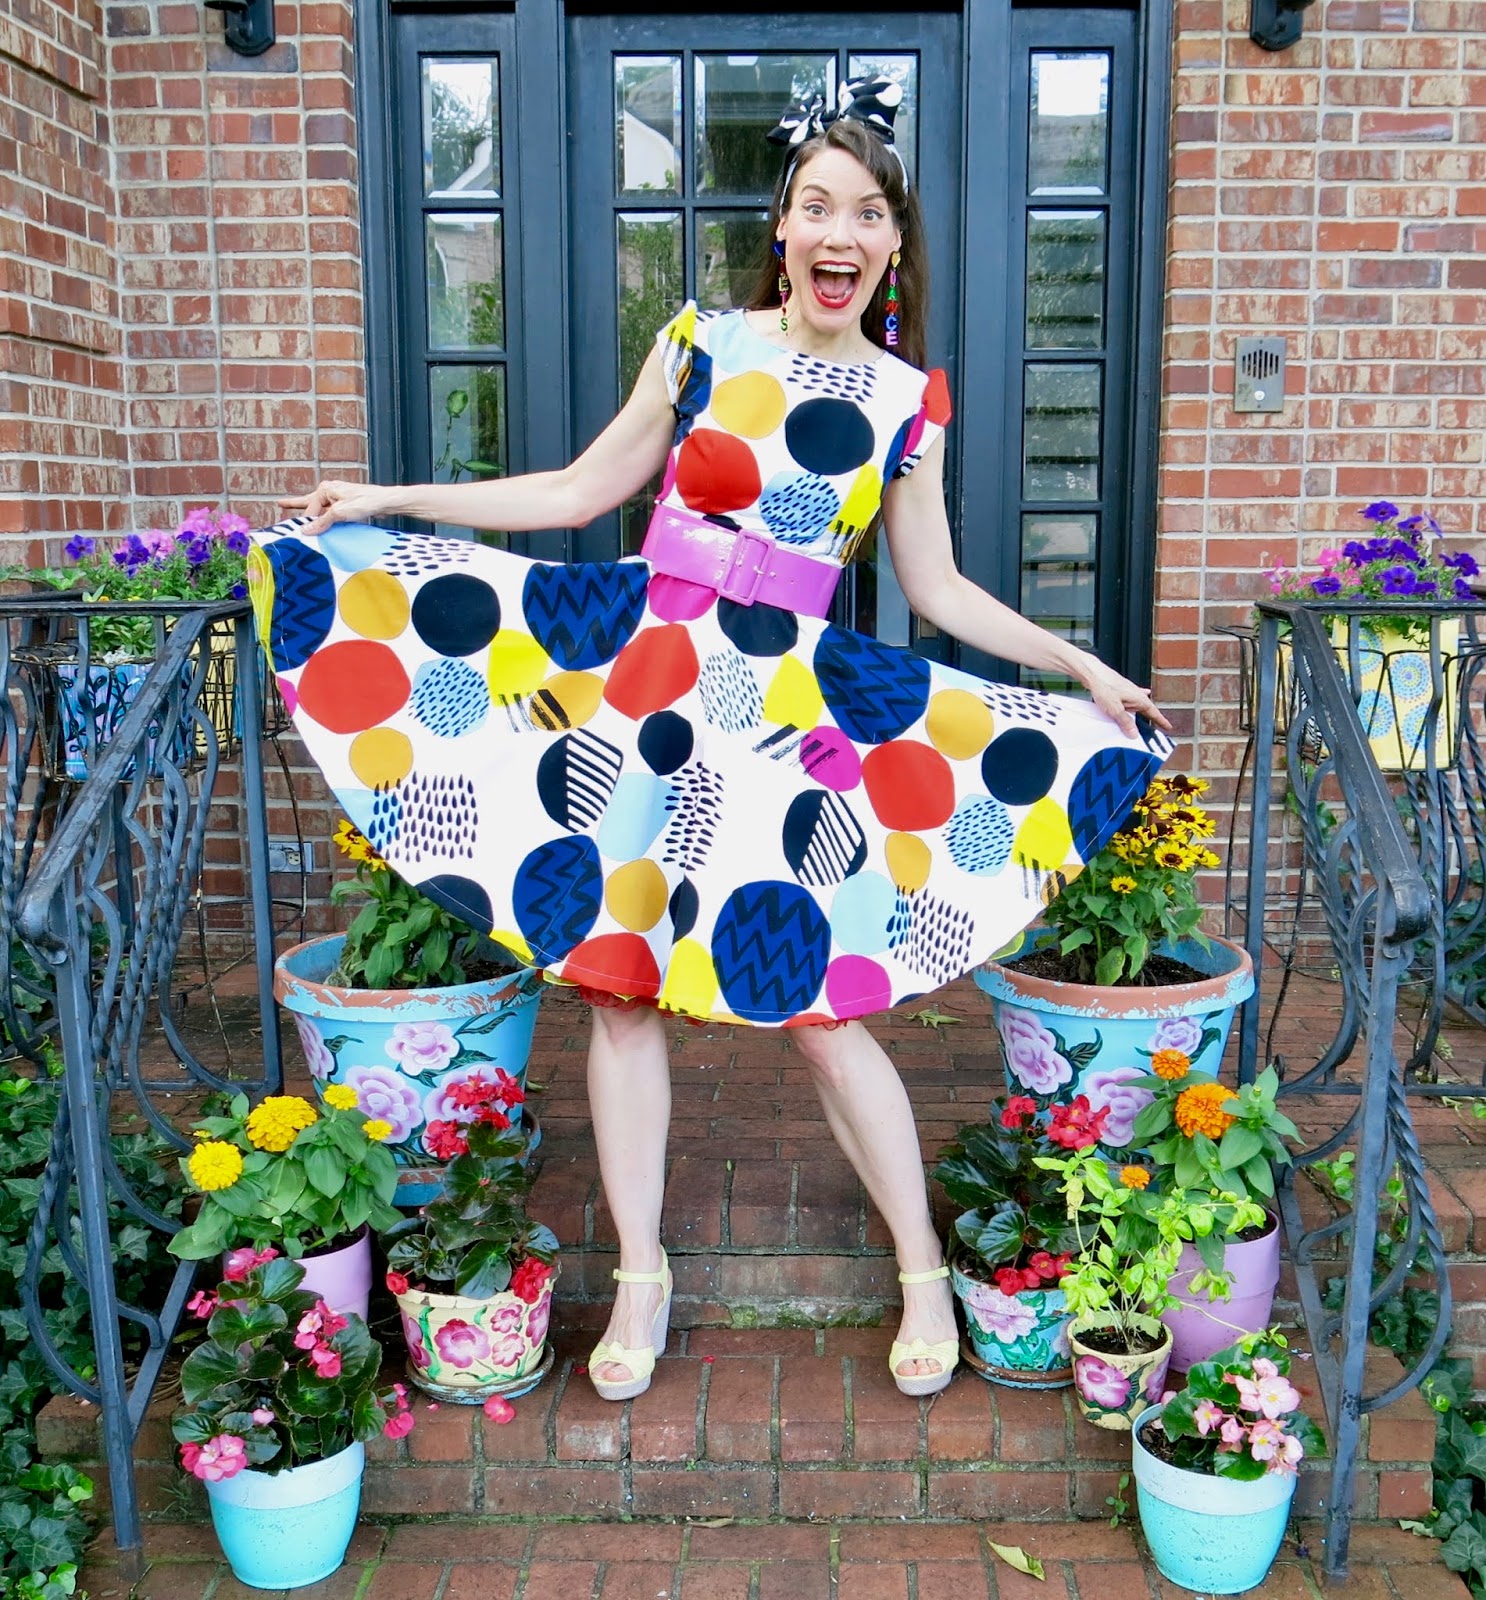
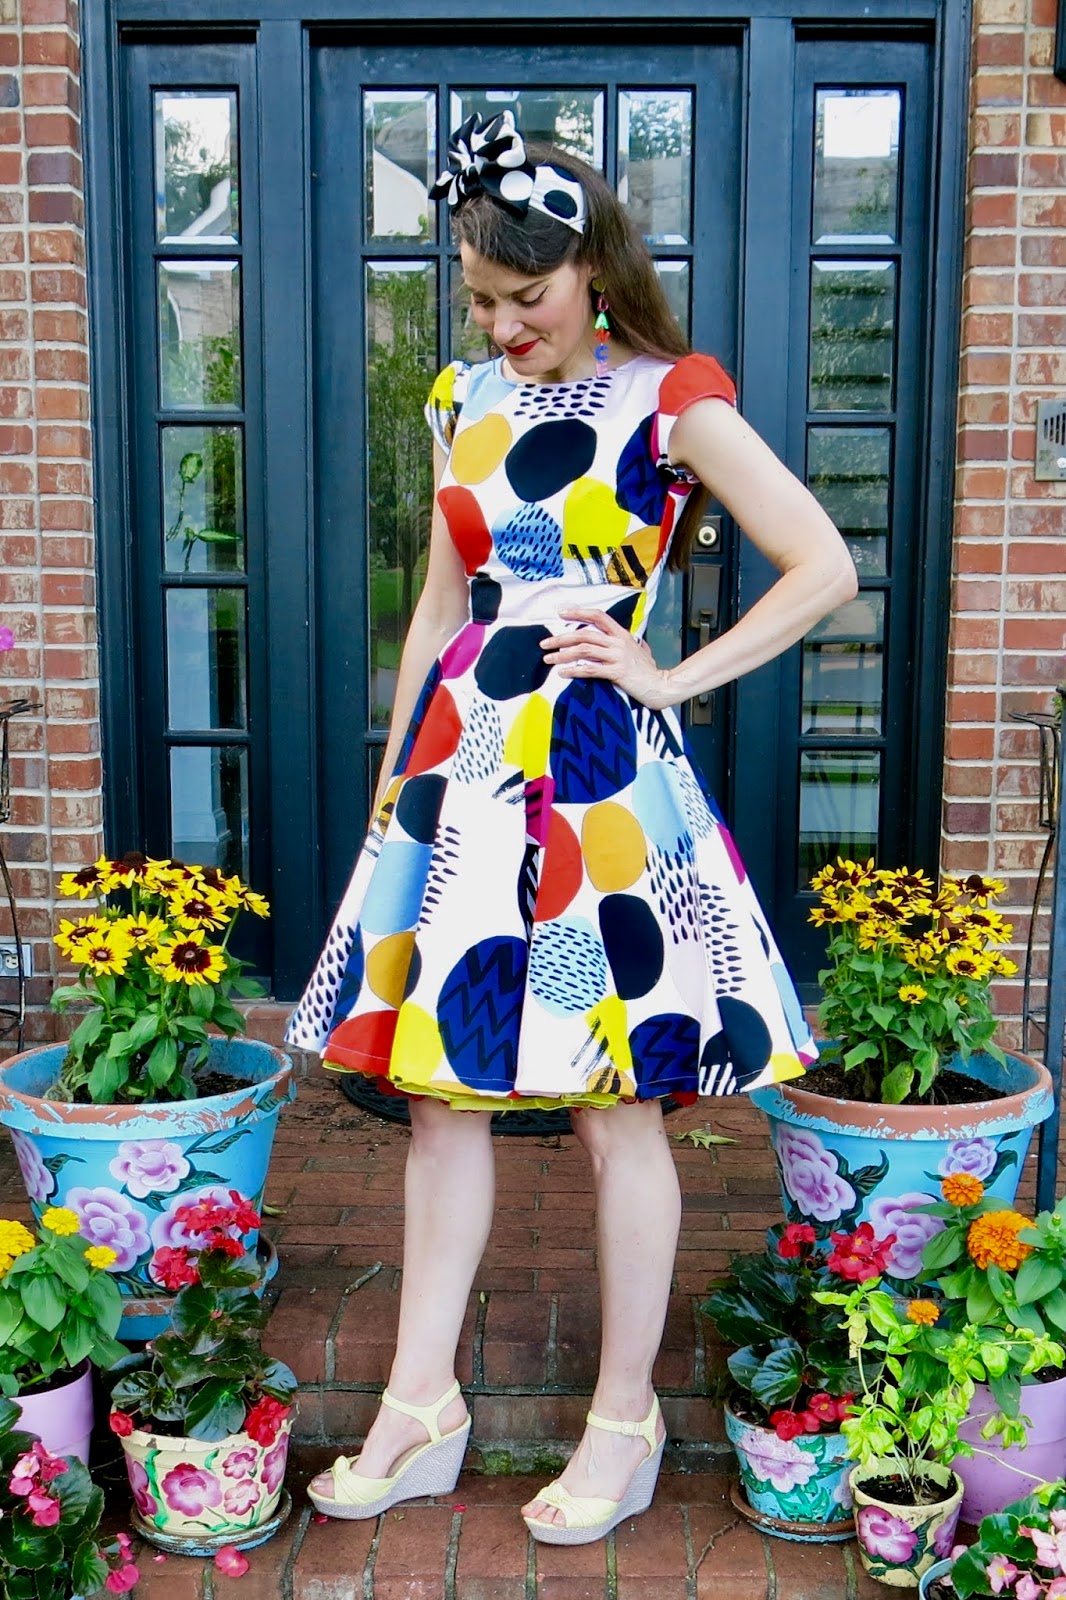
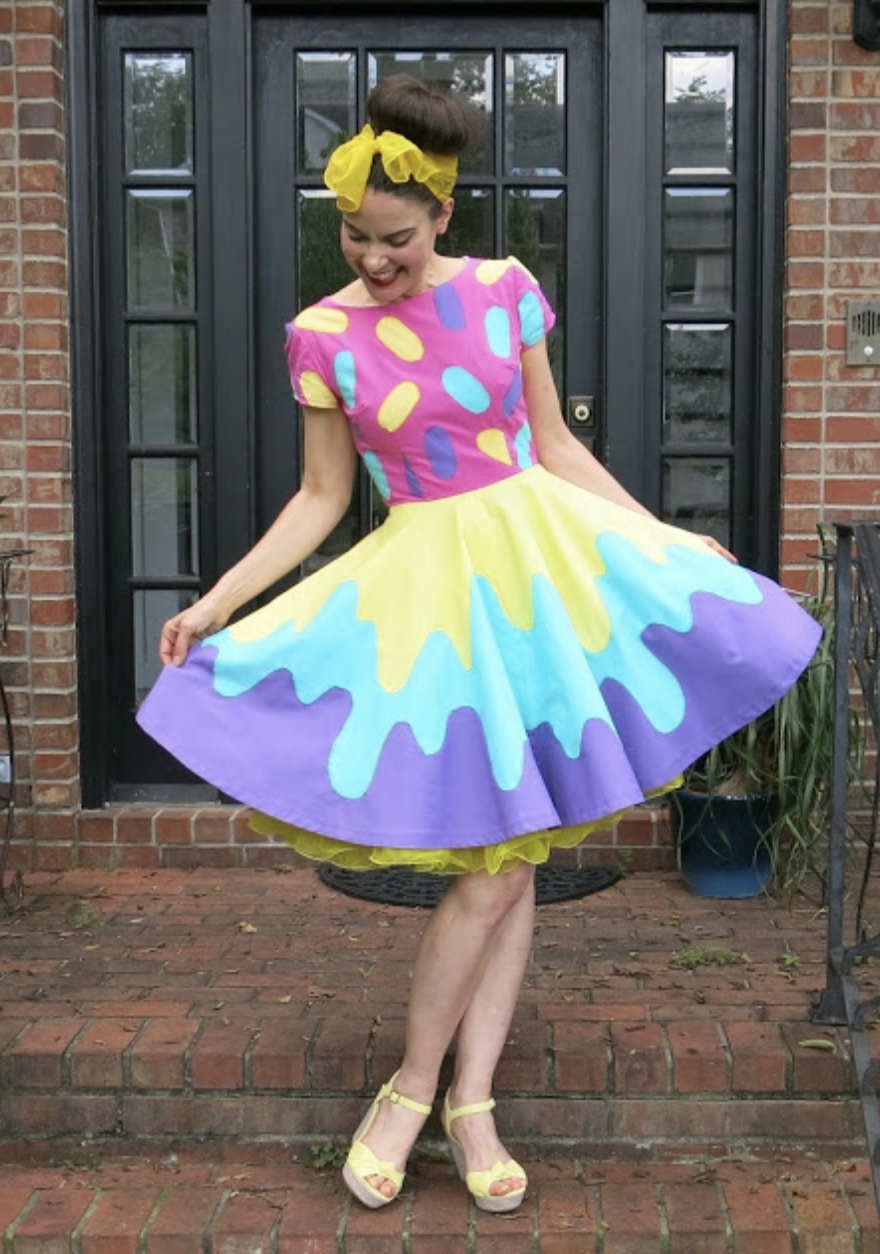 Y'all might recall this dress I made last summer...what I couldn't tell you then was that it was for the show! AND what I didn't know was that they were gonna make me wear an apron the whole time, covering my dress. Dress blog post and details (with video, of course) here.
 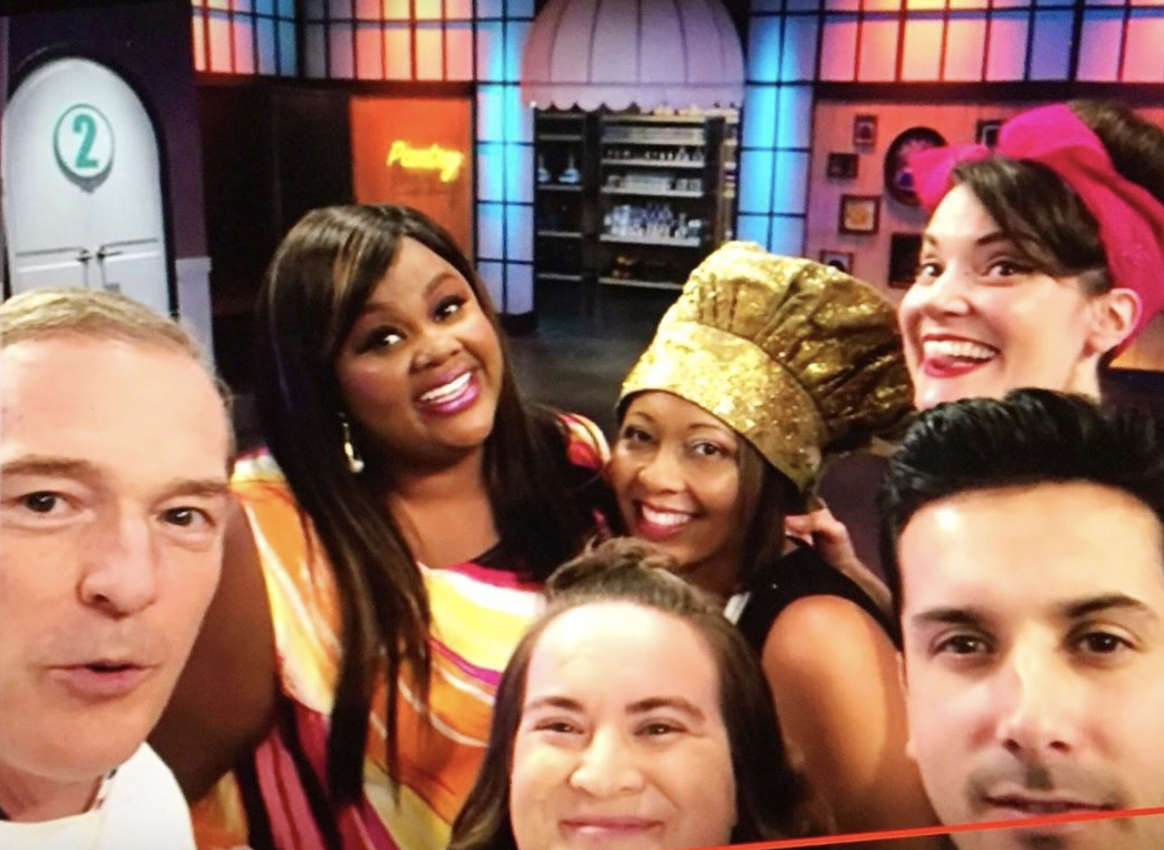 The best fun with the best folks! I hope you enjoy watching the episode and listening to the behind the scenes details!
July 12, 2019
In the Art Room: A Journey to Discovering Your WHY, Part 1
 Images from the paintings created by the teachers in my school after I lead then in a PD to discover their WHY. You can read all about that and see videos of the process here.
If you decide to do a workshop like this in your school or educational setting, please know that this was created by me and I would greatly appreciate acknowledgement. I'd also love to hear from you! My email address is cassieart75@gmail.com.
Yesterday I released three new podcast episodes that I hope you'll take a listen to and enjoy. In this blog post, I want to focus on one of those episodes, Ep. 8: Discovering Your WHY.
Before you listen to this podcast, I want you to know...it's what I'm gonna call a "working podcast". What I mean by that is I want you to carve a mere 20 minutes out of your day, grab some paper and markers, flair pens, crayons, whatever and sit down with me. And think. And dig a little deep. And create. Here's a little more info:
What we're going to cover are three questions. I'll walk you thru them a little bit here...but listening to the podcast is really going to take in all of what I have to share. Each of these questions only requires four responses. I would encourage you to unplug, settle back, and answer from your heart. Not how you think I want you to respond, now how you think your favorite teacher on IG would answer but YOU.
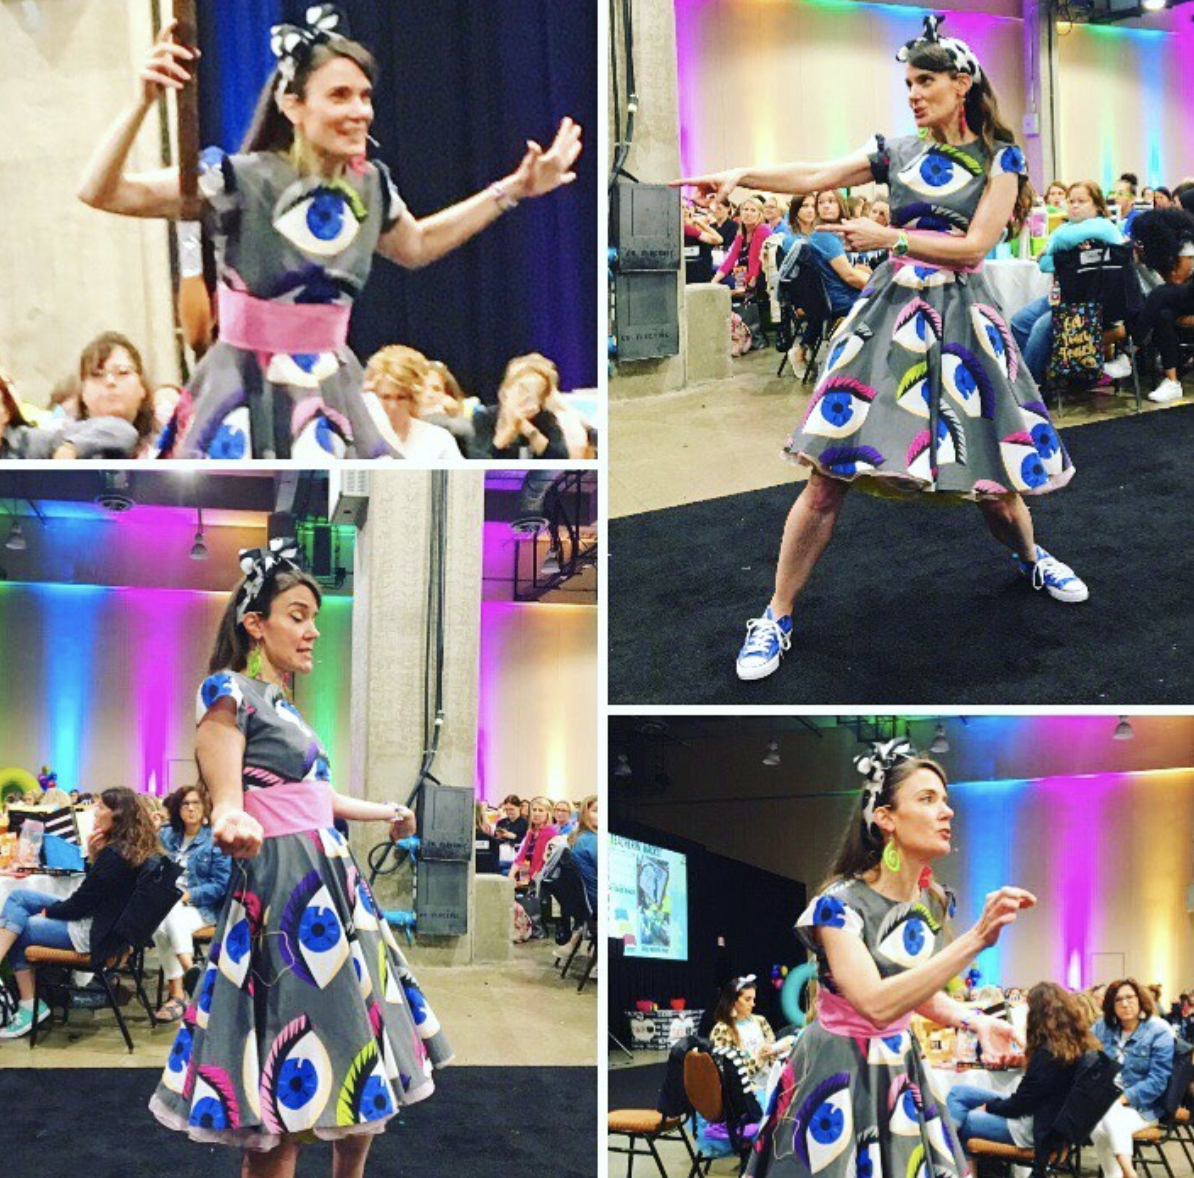 Me lookin' like a crazy person while presenting. I'm just a lil passionate, that's all.
I did this workshop recently in a two and a half hour session at Get Your Teach On. We spent a lot of time thinking and creating and walked out of that workshop with a strong sense of WHY we teach. Discovering this is empowering for you. It will give you a sense of purpose on those days when you need it the most. Not to mention sharing your WHY with your students allows them to know the importance you place on spending your days with them. They will learn their value in your classroom.
I'm going to be sharing a portion of my workshop in this blog post. I won't be sharing my responses to the questions with you here but you can hear them in my podcast.
FINAL THOUGHT: I would love (and share!) to see your responses and creations! Feel free to email me or, if you post to Instagram, tag me in your stories or posts. In doing so, I'll assume you are okay with me sharing your creations here or on my Instagram. Okay! Let's get started!
 You can answer this question any way you like, whether that be literally or figuratively. All I want are four little words. Don't over think this. Your knee-jerk answer is what we're lookin' for.
 Again, same thing. There is no right or wrong answer, just YOUR answer. What YOU want your students to spend time with you doing. What's important to YOU as their teacher.
  You got it? You got your four responses to the three questions? Great. Now let's prioritize those lists with some colorful pie charts. This is where all of those random art supplies you gathered up are going to come in handy.
 Look at your responses to the question of what do you want your students to LEARN. My kids have 30 minute art classes. It's impossible to pack in everything that I wish. So discovering my Top Four and prioritizing them really helped me. I'm hoping it will do the same for you. Here are the pie charts I created.
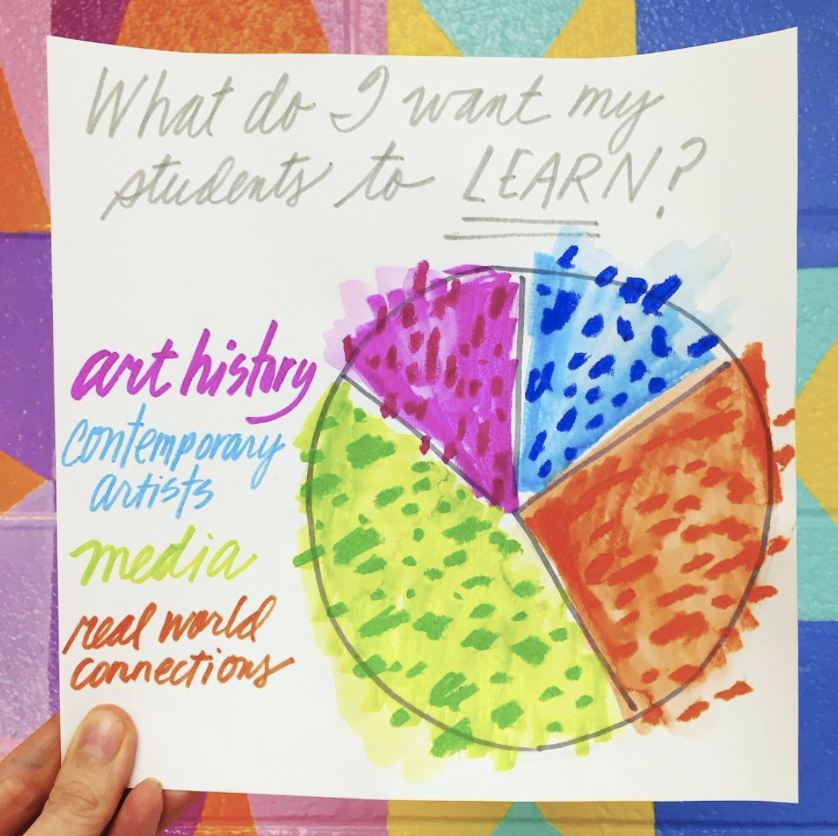 You'll notice that sometimes I answered my questions literally and, other times, figuratively. I also decided to make mine colorful because I wanted to make them attractive enough to hang in my art room.
 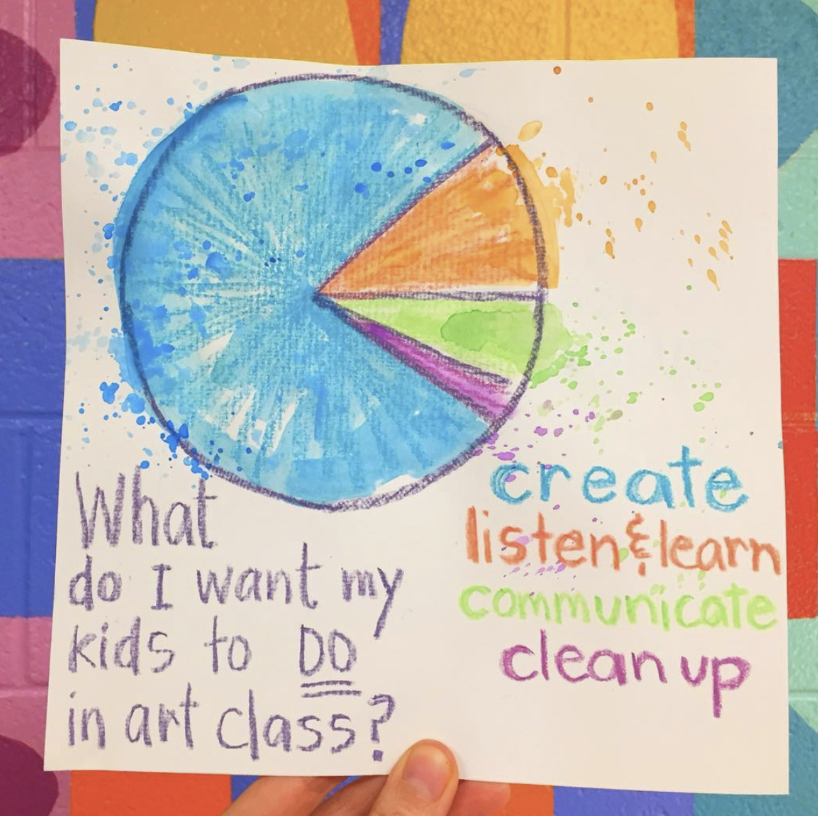 Developing these pie charts really got my wheels turning about my WHY.
 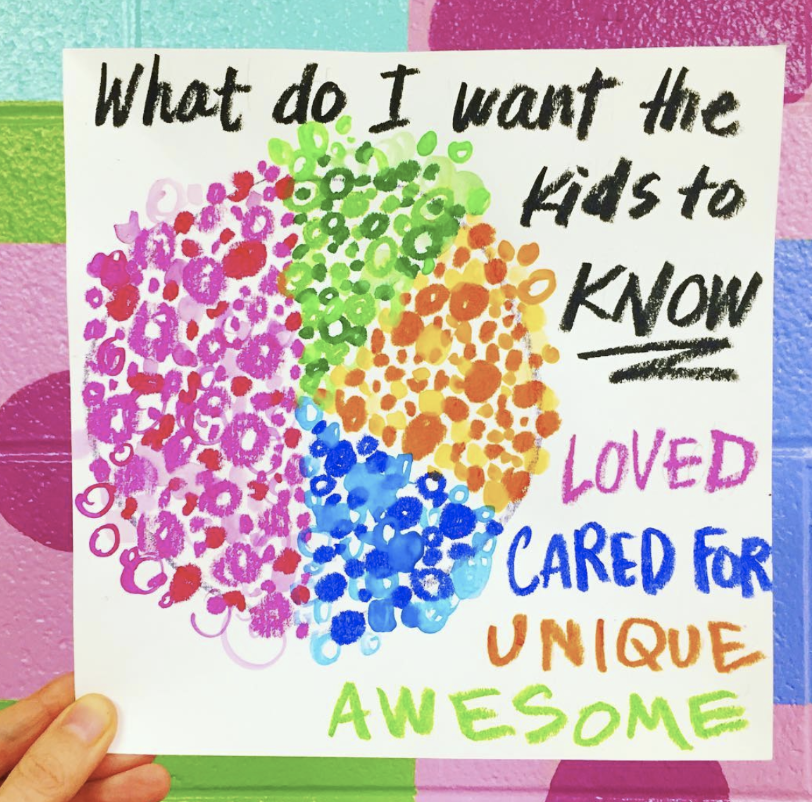 And I hope it does the same for you.
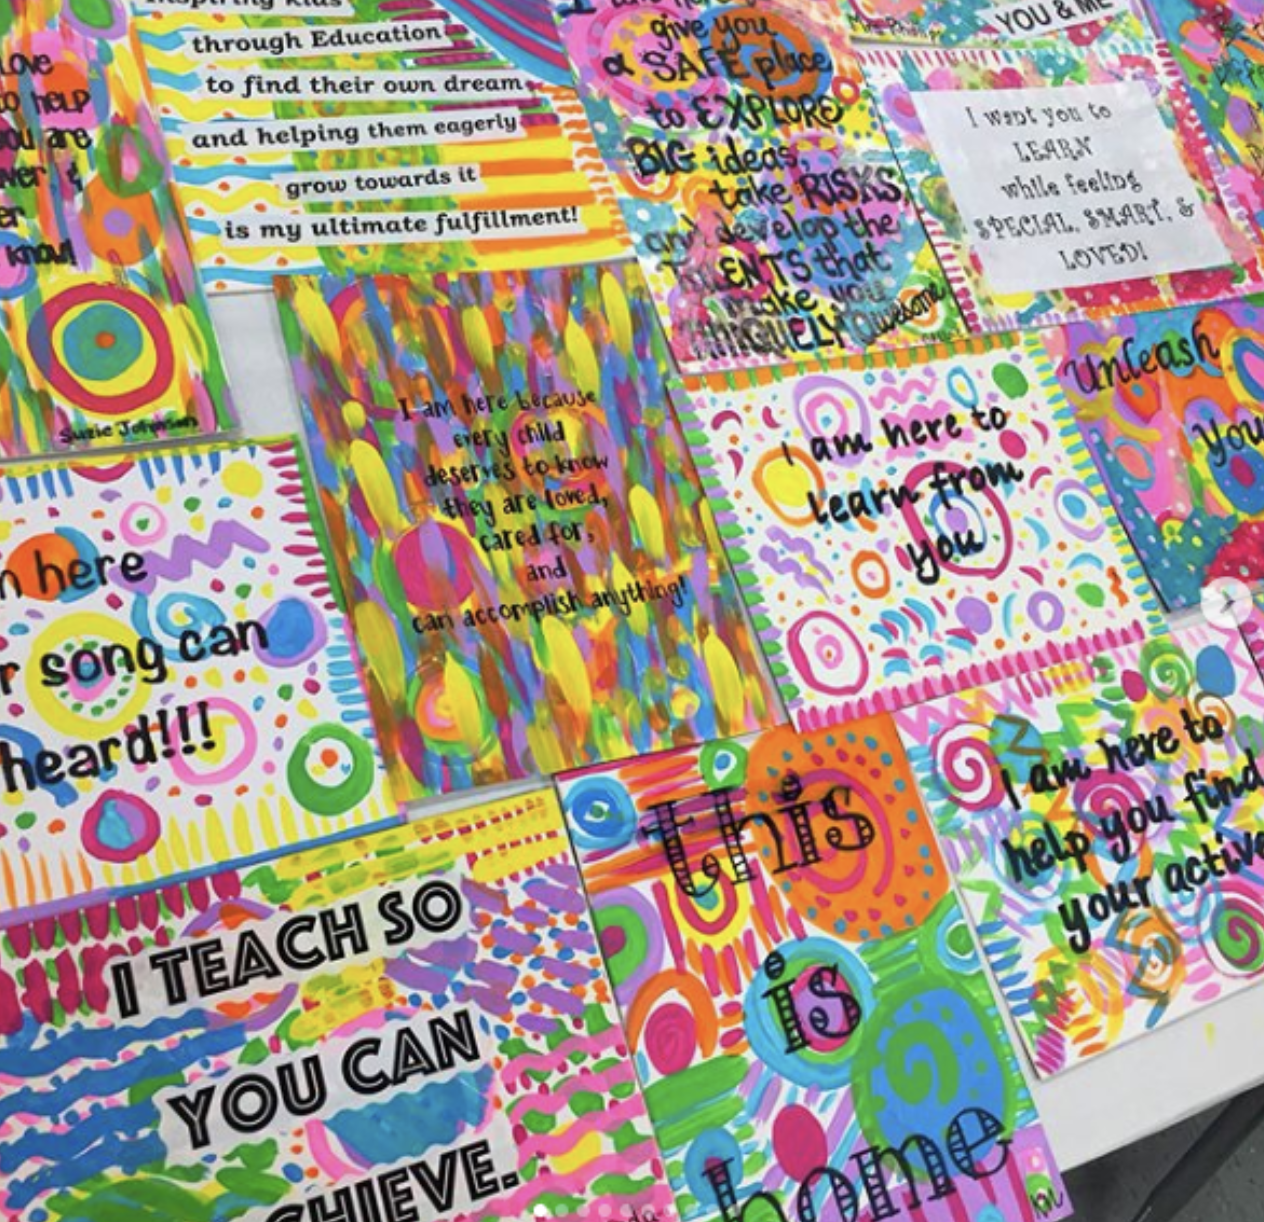
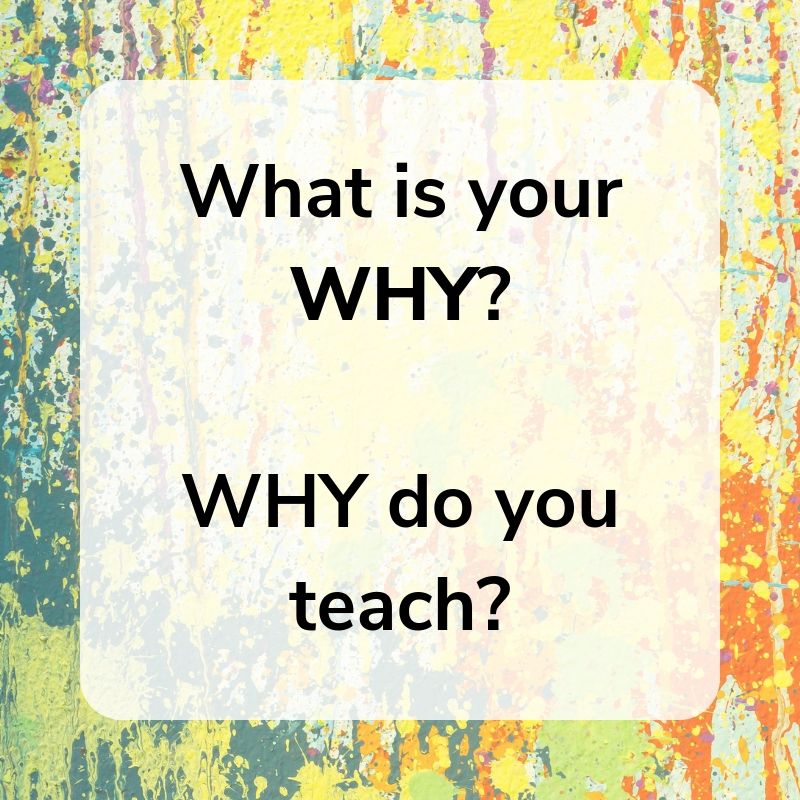 I'm going to end the blog post here and hope that you'll take a listen to the podcast. I feel that I have so much more to say on this topic...so I'm going to say that this one "will be continued...". Until then, I'd love to share with you a my WHY along with that of many other teachers. You can take a look and, hopefully be inspired, right here.
July 10, 2019
DIY: A Dress for Dot Day!
 Oh hey, hello and HIIIIIII! I would just like to say that I know I have officially become the World's Worst Blogger. I've gotten lame with blogging frequently (I swear to you it was on my To Do list to have at least three posts up this week and here we are at numero uno), I'm miserable at responding to comments (mostly because I'm so busy DELETING THE VIAGRA SPAM COMMENTS, like what?!) and I've just been busy. Like, I don't know how or why but my summer has become consumed with stuff that I wouldn't necessarily call fun...and it's all my own evil doing. But I promise (and I know I've been sayin' this for months) that Ima try, nay, I WILL be better. I have some big ideas in my little head and I'm excited to work them out and share them with you.
But WHATEVER. Let's talk about this dress, people!
 I mean, look at that size of that circle skirt, would you?! It's just so...BIG (that's what she said! Sorry...I know the year is 2019 but I will forever be livin' la vida El Office). At the start of spring, I cut out no fewer than 8 dresses from pretty much the same pattern. I had this idea that I just might get a whole lot more sewing done if I did it in batches. You see, I already know the pattern that I love...after years of sewing dresses, I always gravitate towards the same pattern: a 1950's fit and flair. So I cut out and started stitching bunches. And so far...I've only managed to finish two. Le sigh.
 I honestly cannot tell you where my summer time has gone! It's been frustrating for me as I see my days evaporate. And yet I look at my To Do list and I see I'm slowly ticking things off (like my husband...I tick him off daily) and getting maybe JUST MAYBE a little closer to my goals. But that time spent pursuing other things means less time for blogging, sewing and all the other things I love.
 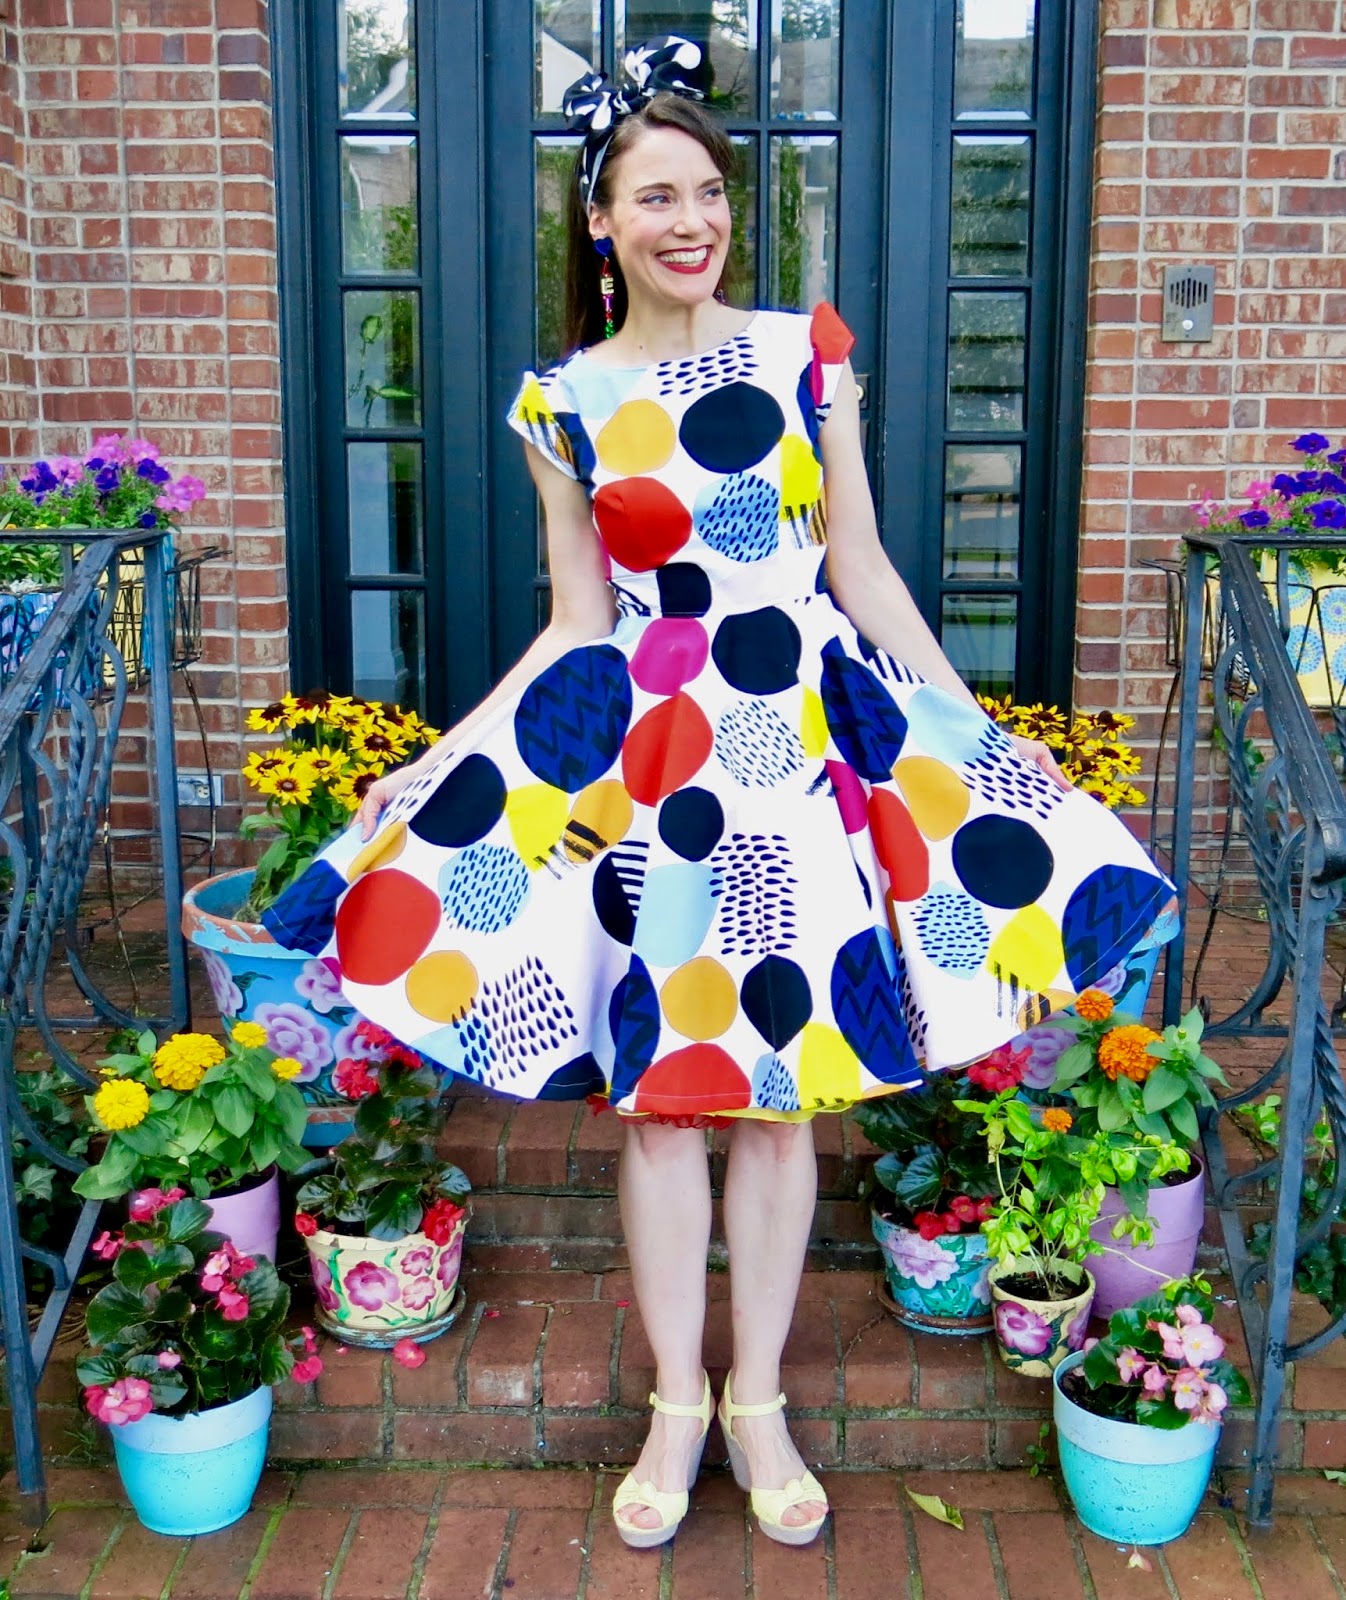 I usually tackle small tasks. Ones that I know I can knock out in a short time frame. Cuz a short time frame matches my short attention span. But now I've got a couple of big dreams and big goals I am trying to reach and ultimately want to share with you. SO...while I'm going to try, nay, I WILL BE BETTER HERE...just know that I'm still around and working on something that I'm excited about. And I hope you will be too.
 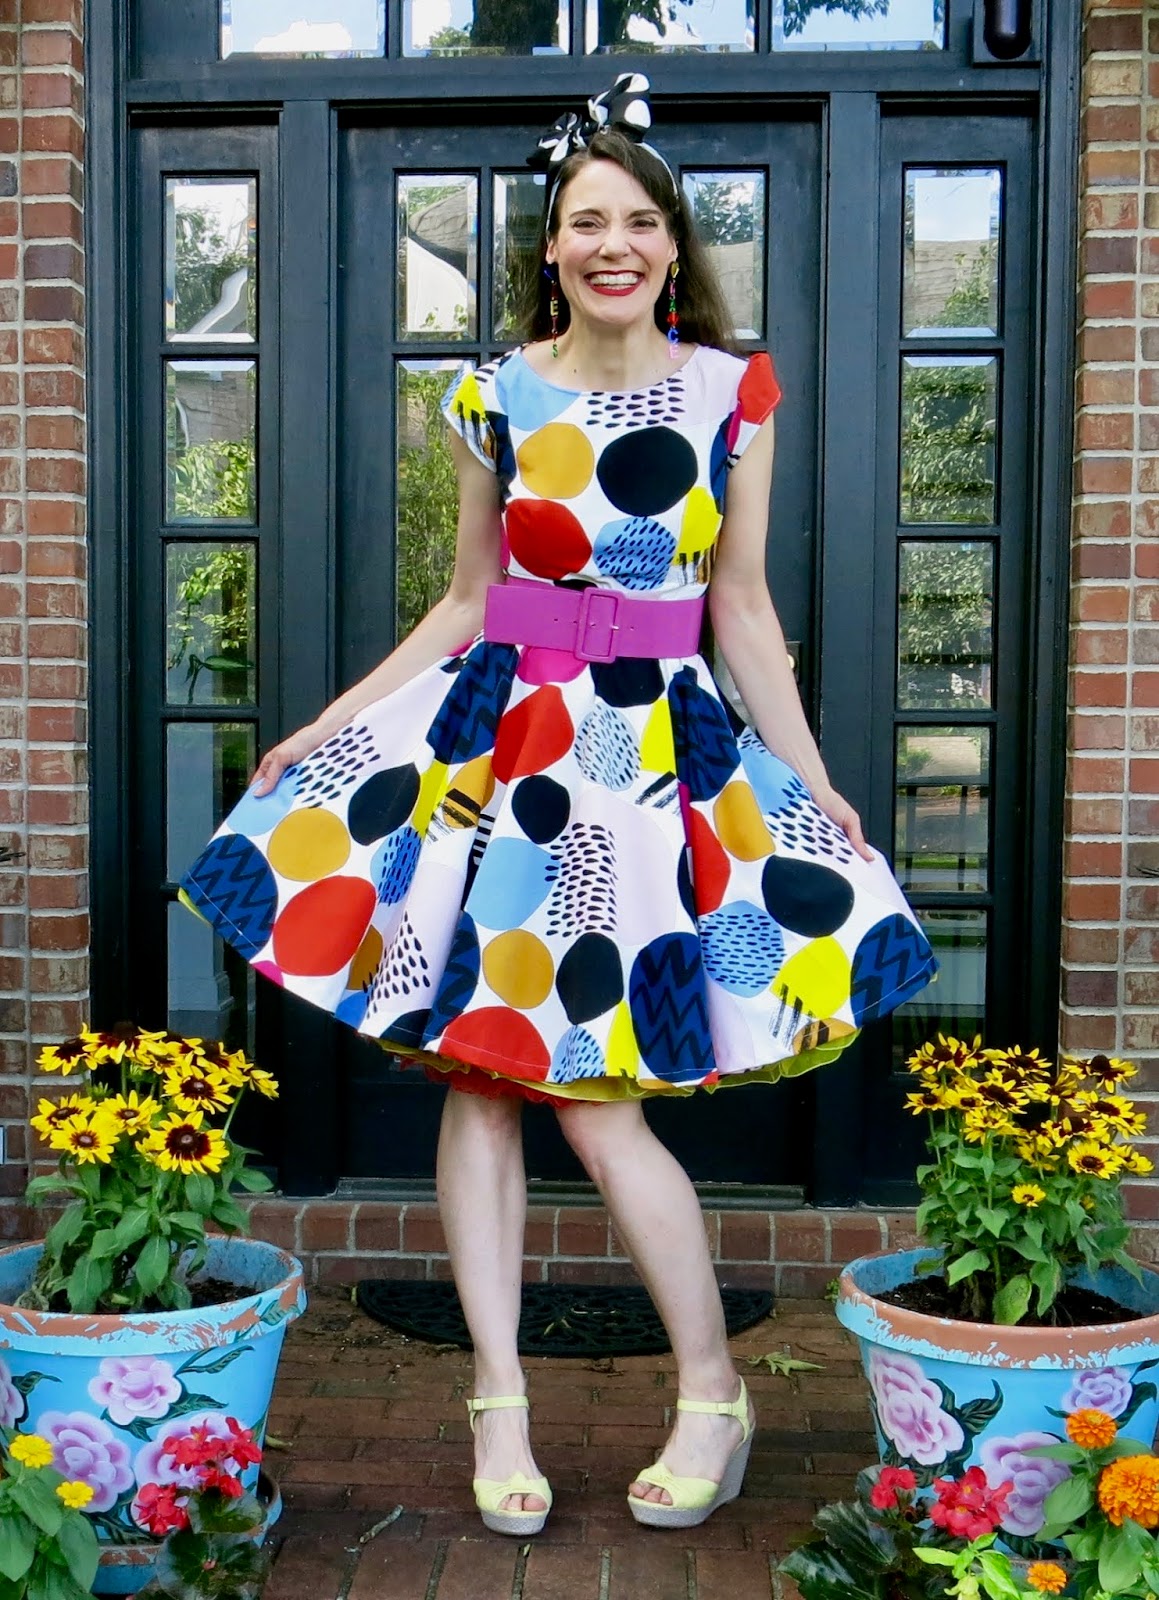 Until then, I love ya lots, Polka Dots! I did make this dress to help celebrate International Dot Day...so I thought I'd share with you just a few of my favorite Dot Day projects. Back to school is upon us and Dot Day is one of my most favorite ways to kick off the school year...so here's a buncha links to my fave projects based on Peter H. Reynolds The Dot:
Round up of my fave Dot Day Projects!
Even more Dot Day Lessons!
Oh my lanta, I just realized after doing a little googling that I have a TON of Dot Day projects! I'll make sure to do a proper blog post soon and link them all...until then, y'all rest up and enjoy the last bits and pieces of your summer. I know Ima try!
June 26, 2019
Cassie Stephens Podcast!
 Hey, y'all! I’m so excited (and nervous with sweaty hands but mostly excited) to share with you the Cassie Stephens Podcast! Creating this podcast was one of the first things I put on my Summertime To Do list and I'm thrilled (and really rather shocked) that I am able to bring it to life. It's been a lotta work and I am equal parts frightened and thrilled to share it with you.
 As you might know, I have worked with The Art of Ed for some time on the podcast Everyday Art Room. I learned so much from that experience and I am so thankful for that opportunity. This week will be my final episode with Everyday Art Room before passing the mic to Nic Hahn who I am positive is going to do an INCREDIBLE job (go, Nic!). I'm excited to hear what she has to share.
While I have much more to share on all things art teacherin in this new podcast, I wanted a place where I could also speak about life: my bouts with depression, feeling lost, hating myself both as a teacher and a human, struggling to figure out just who I am, what I want out of life and how to love the person I am...it sounds dark and sad (but, y’all know me, it wont be for long!) but that is life. The part of life so many of us hide from or refuse to talk about. Well, I want to talk about it. Along with our day to day art teacherin life. Because that IS life: a mixed bag of family, work, feelings and figuring it all out. Here's just a bit more:
Many of you have asked about making the podcast available iTunes and I'm working on that. When it's available there, I will def let you know. Until then, you can find it on Breaker, Google Podcasts, Radio Public, Spotify and Pocket Casts. I'm also trying to figure out how to make it available for you right here!
If you'd like to listen from your laptop or whatever device you are currently using, you can simply click these links to my first six episodes!
Episode 1: Welcome to Art Teacherin' with Cassie Stephens
Episode 2: Is this IT?!
Episode 3: You're Hired! Now WHAT?!
Episode 4: What Teachers without Children of their Own Want You to Know
Episode 5: The Piano Story (for adult listeners only!)
Episode 6: Discovering Your Art Teacherin' Identity
It's been a learning curve for sure as I'm doing all the recording, editing and the rest. You'll have to be patient with me...at least more patient than I've been with myself. You don't know how many times I nearly tossed this idea out the window. But what I want to share with you means so much to me...so I'm gonna keep on trying to make that happen.
Love y'all! And I would love to hear what you think. xo!
June 20, 2019
DIY: Sewing for Beginners (and my New Dress!)
 Summer time is my favorite time to sew...but, sadly, I've not been doing too much of that lately! Right before Art Show Madness, I started getting that sewing itch and decided to do something a little different. Instead of just sewing one dress at a time, I decided to do something that I called Batch Sewing. I know people batch certain tasks or projects like painting or blogging or whatever but I'd never successfully tried it with sewing. I decided to start with seven (7!) dresses. This wasn't too hard as I decided to use just two slightly different sewing patterns. However, the process was SLOW and I eventually hit a wall...right when it came time to put in sleeves (I HATE sleeves!).
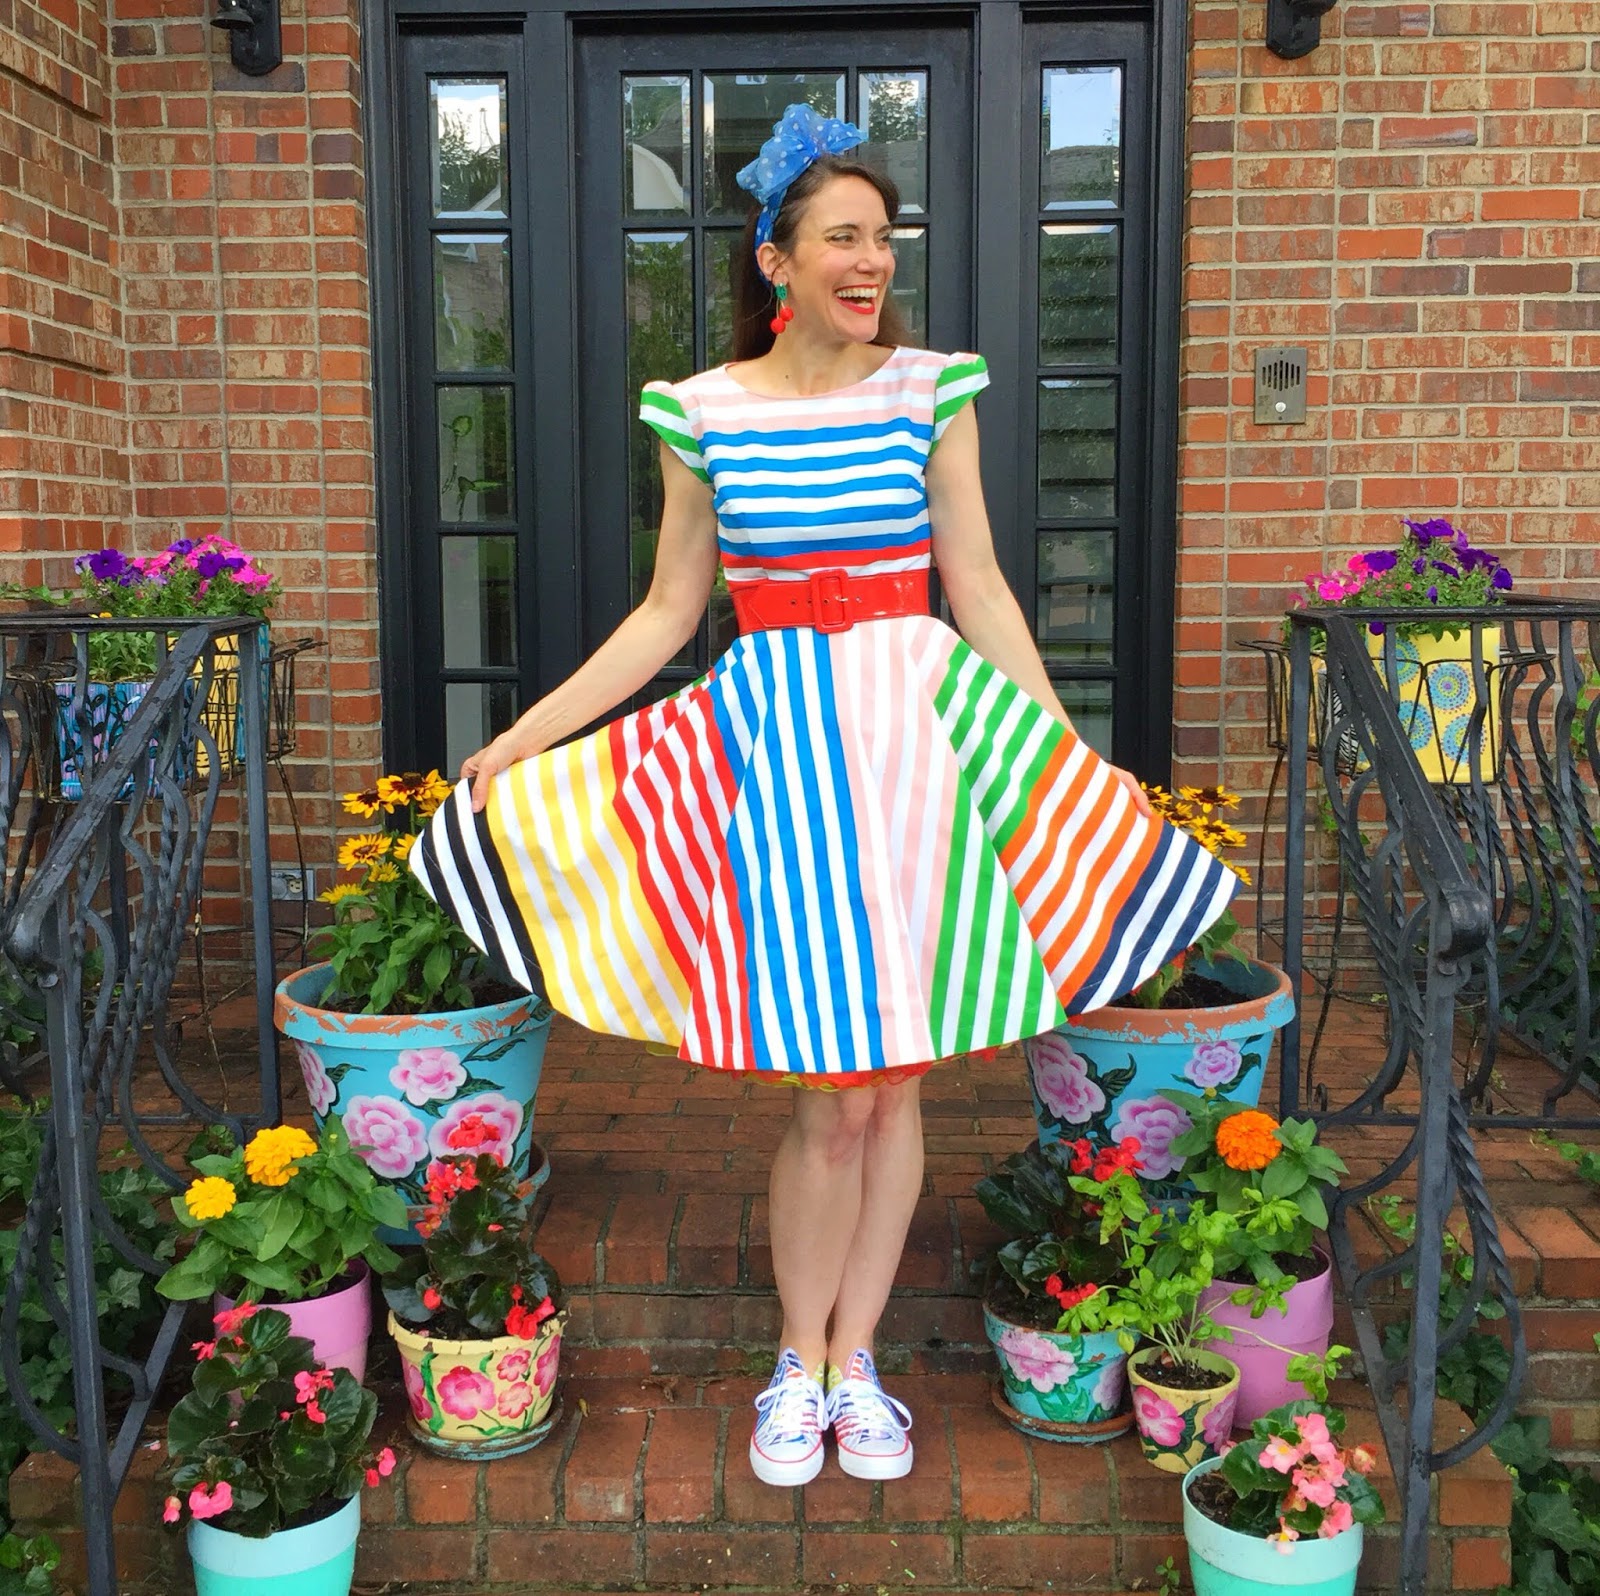
So Mitch suggested that I just start finishing one off, one by one. They were really so close to being done! For this dress, I spent about two hours just putting in the collar, hemming the circle skirt, attaching the bodice to the skirt and putting in the zipper. I managed to finish it off before 9am one summer morning. And here she is, The Stripe-y Masterpiece!
When sharing my sewing progress on Instagram, I always get a ton of sewing questions that I really don't feel qualified to answer. BUT I have sewn a lot of stuff in my day (I should count how many dresses sometimes...but some I know are no longer with us, may they rest in piece) so I do feel like I can help a wannabe sewer out. After all, that's what I am, a wanna be sewer!
I had it in my mind FOR THE LONGEST TIME that I'd never be able to learn to sew actually for realz clothing and yet, here I am...in stripes that MATCH UP BEAUTIFULLY!
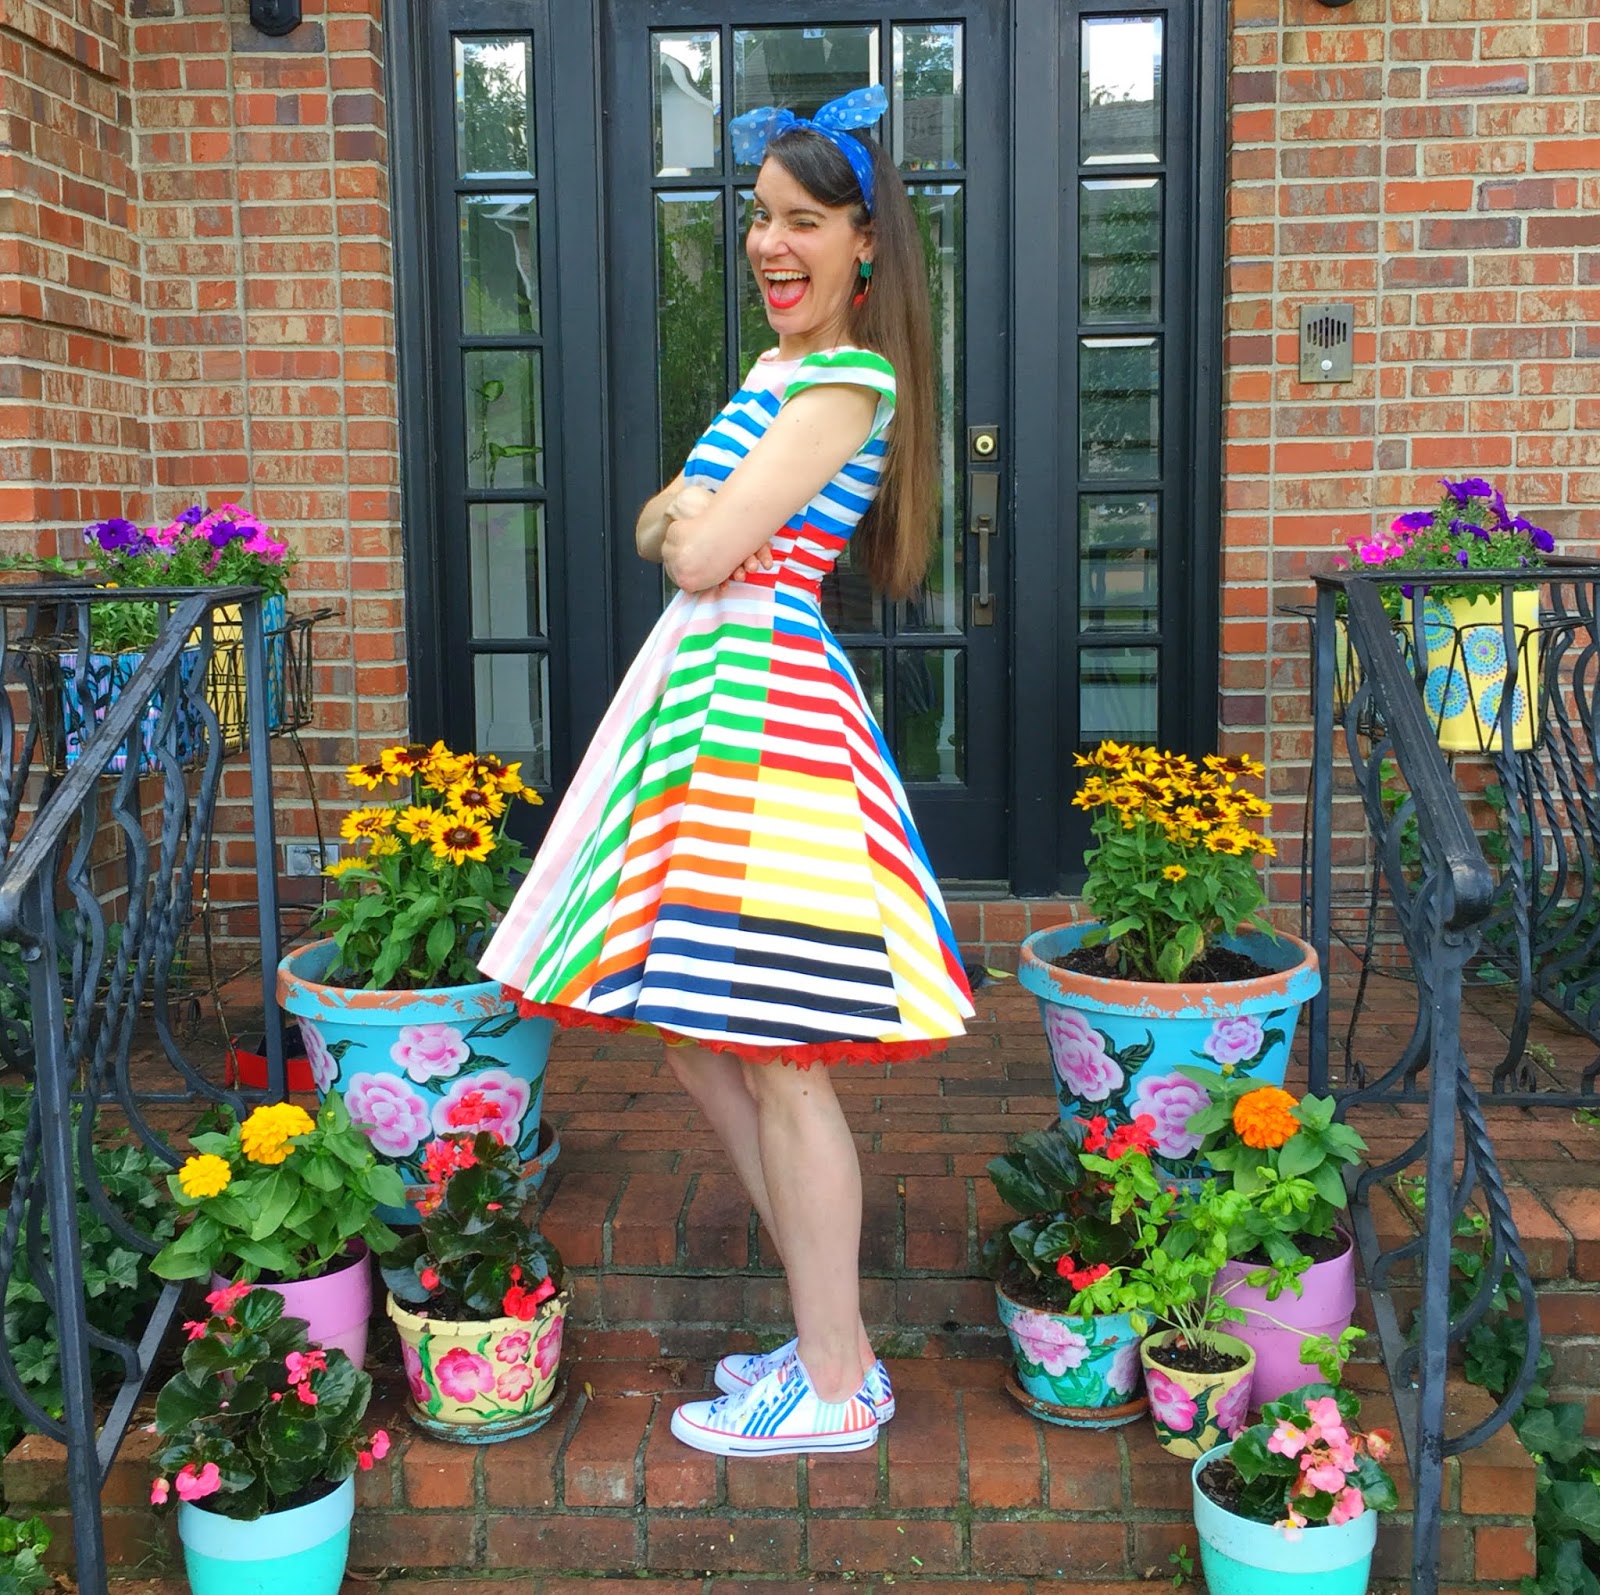 I MEAN. Just look at it. It's pretty magical.
 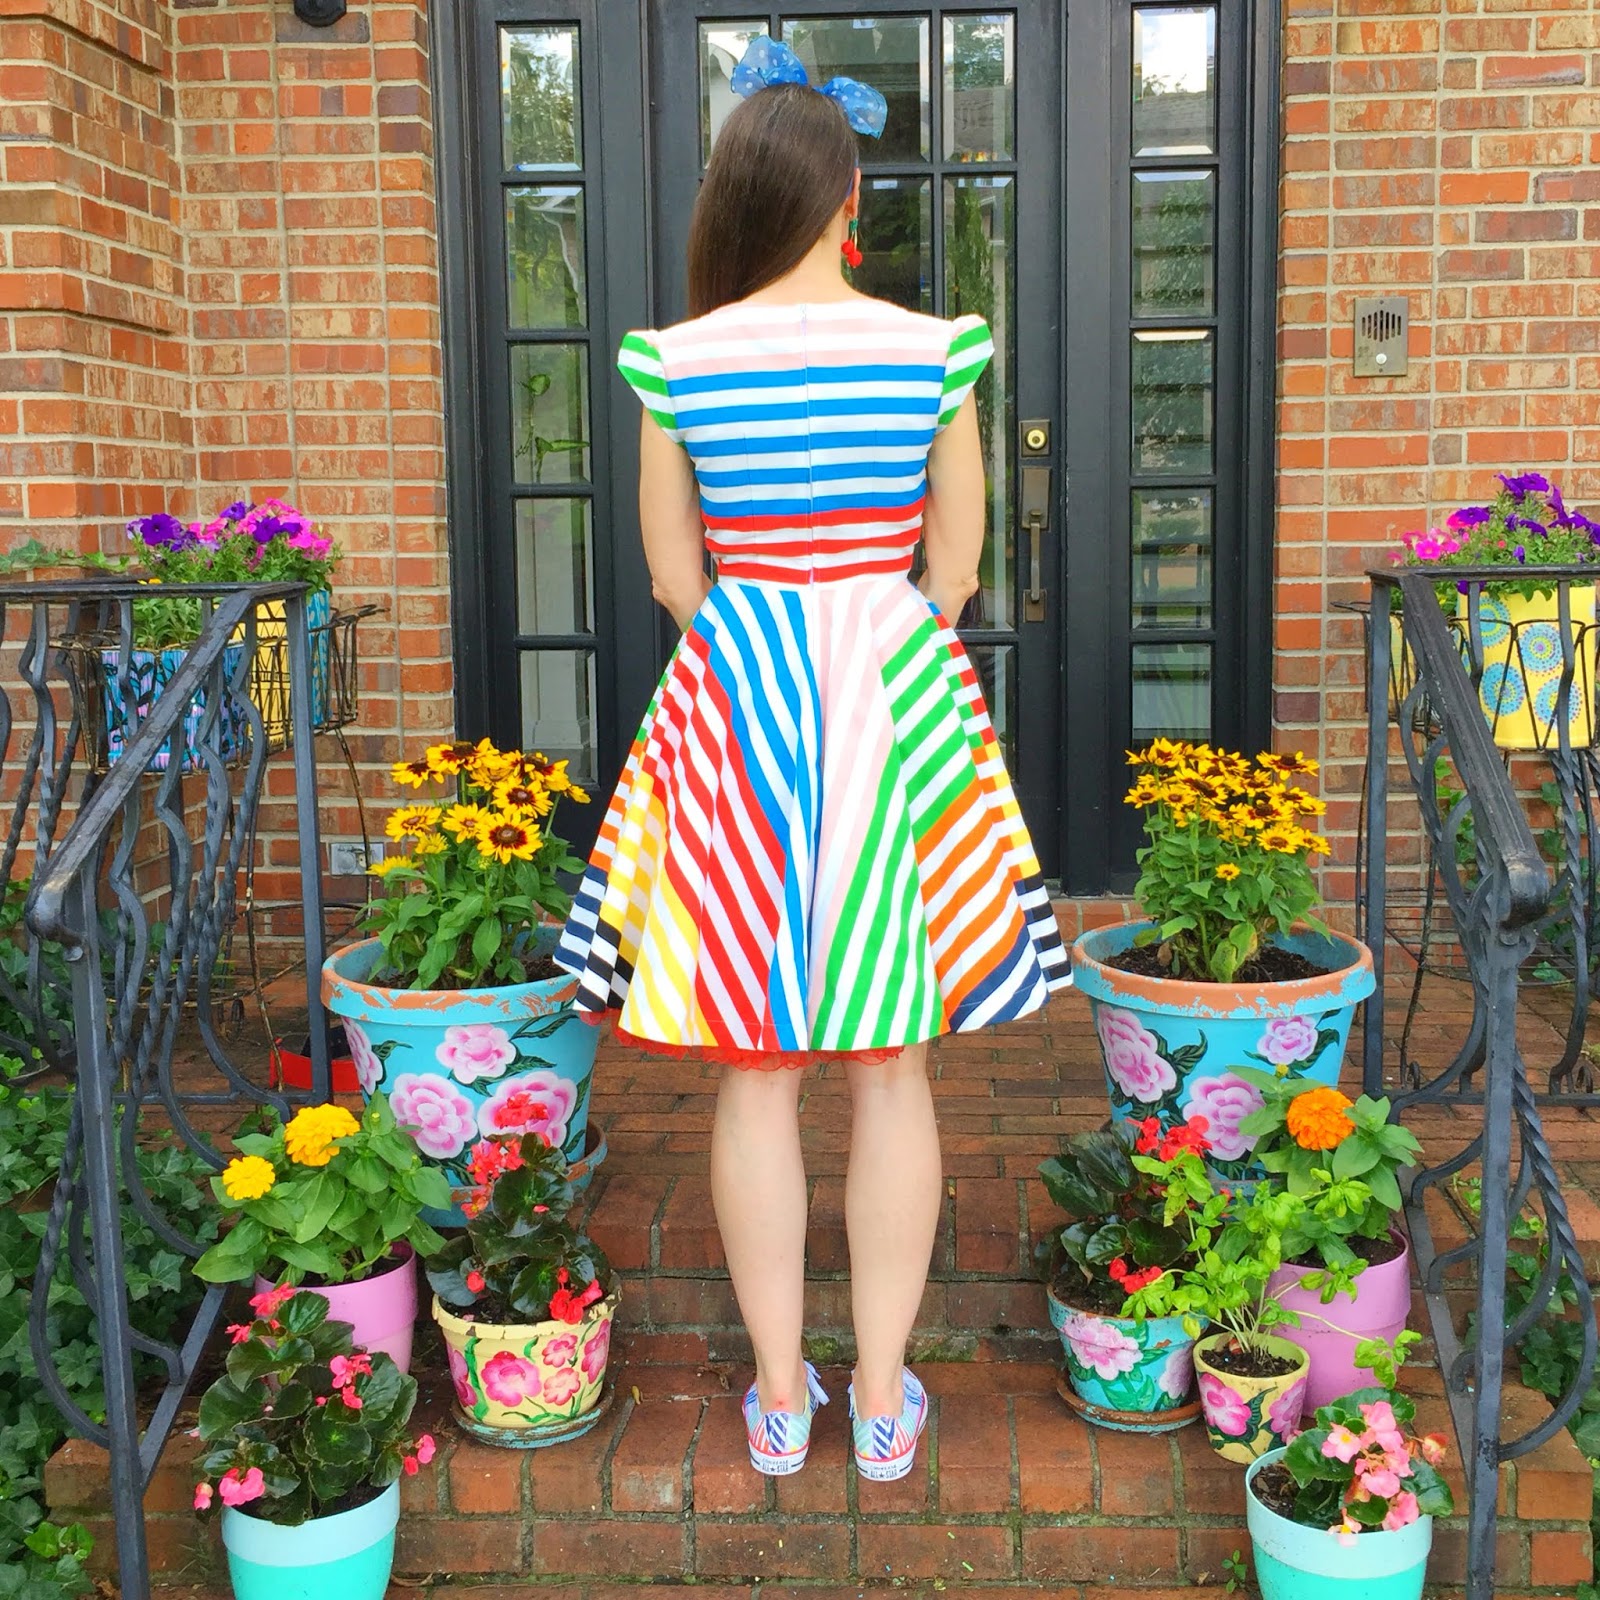 I also get asked quite a bit about sewing patterns to use. What I recommend doing is deciding what you want to sew first: a dress? A skirt? Once you have that figured out, put on your very favorite dress or skirt or whateverness. What do you like about it? The way it fits? The fact that it has pockets? Those can then be what you are looking for in a pattern. Be sure and check out my video as I'm going to walk you thru patterns and finding one that's best for a newbie.
  After sewing many dresses, my favorite to wear is a Fit and Flair. I like a fitted bodice or top and a flairy, flowy skirt. But that's me. That's what I'm comfortable in and flatters my 13 year old chest and my 44 year old hips. You find what works. Then use it. Over and over. At least that's what I do.
 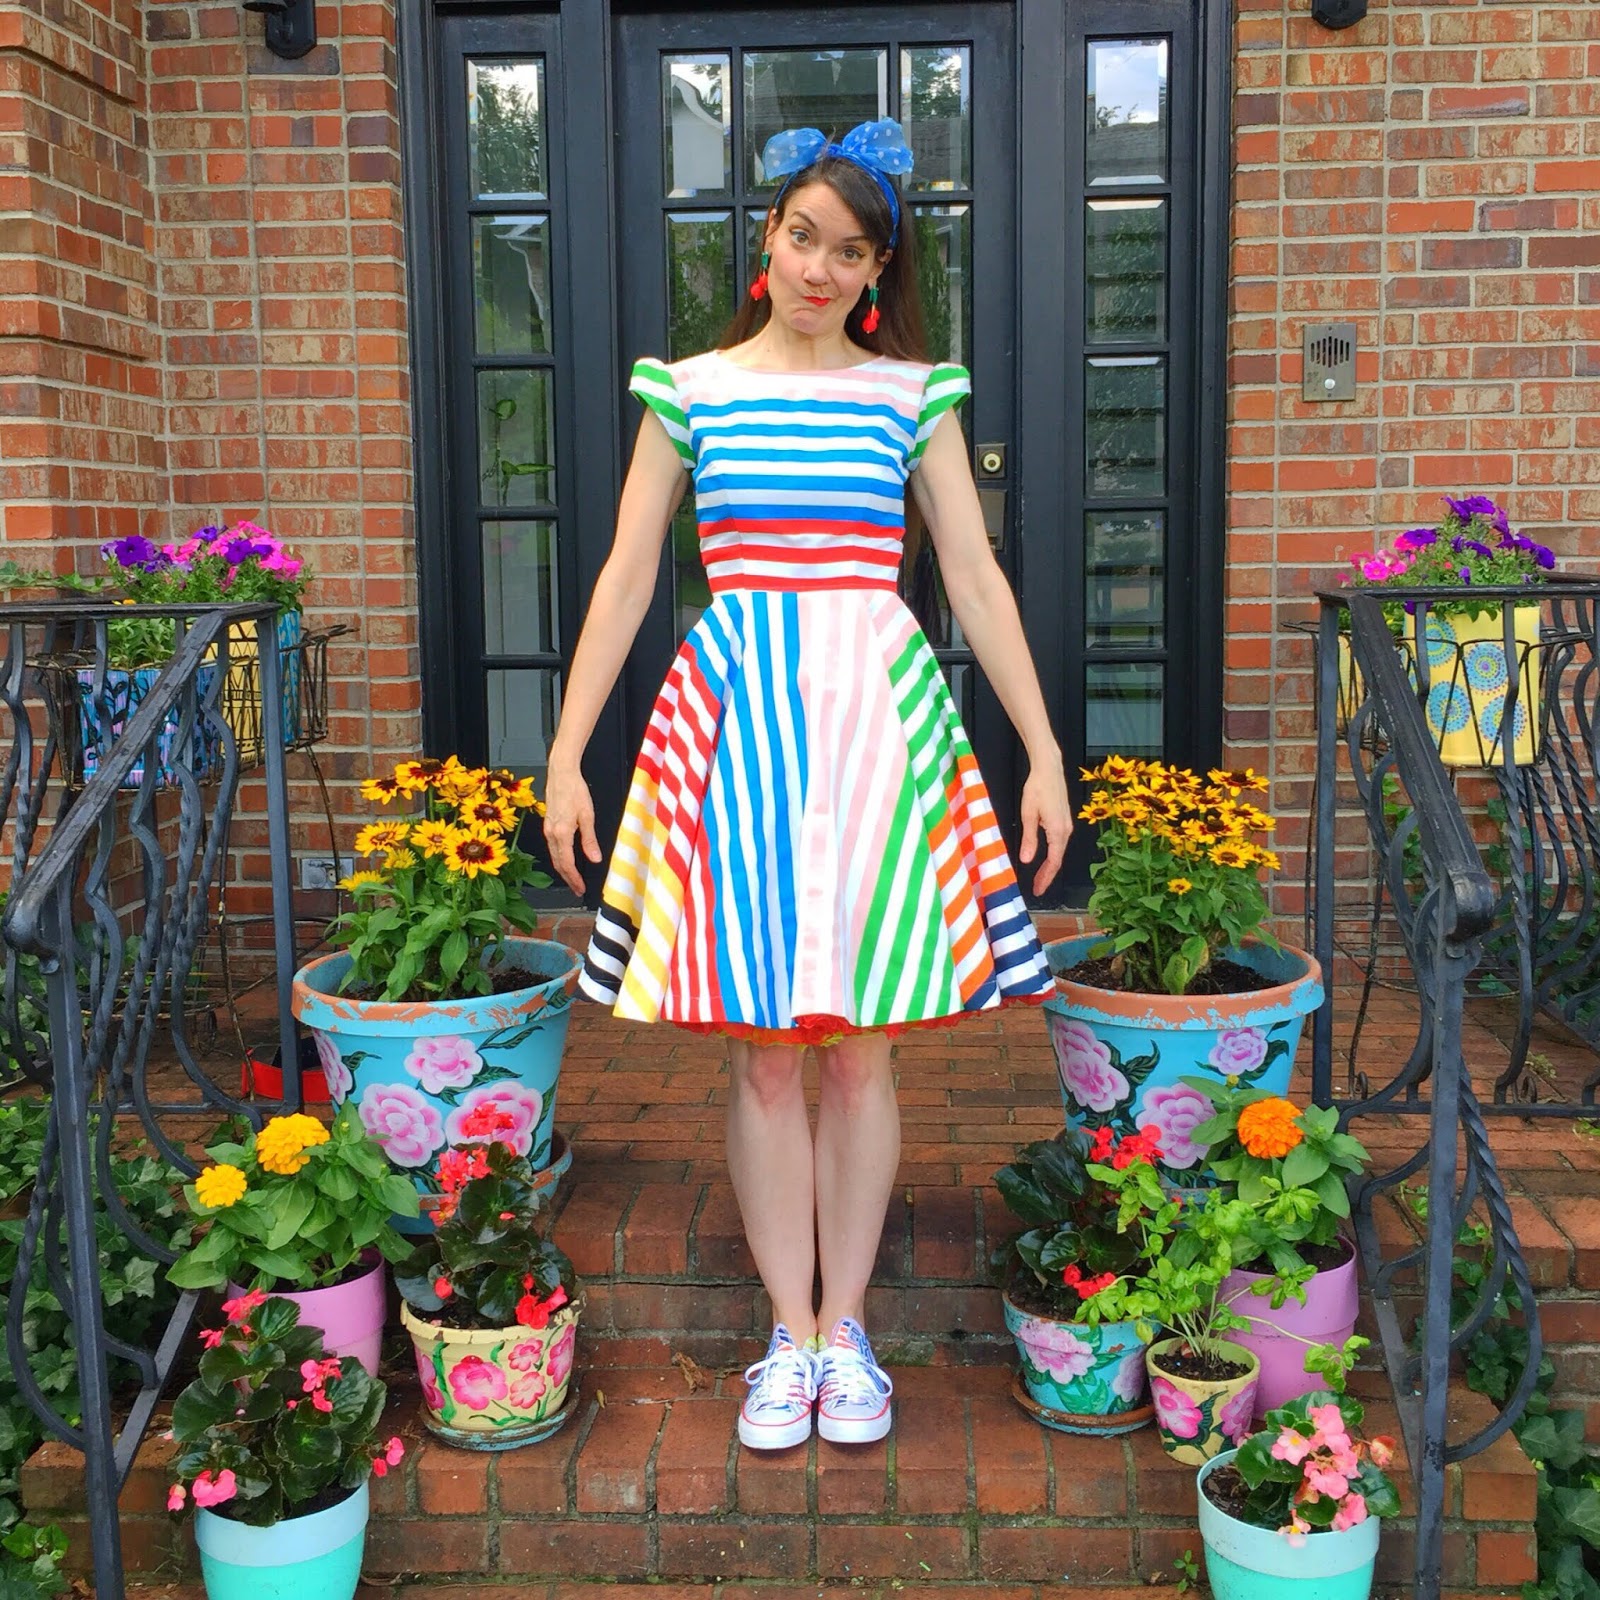 Also, sewing is supposedly about perfection and preciseness. I'm neither. If you can zoom in and get a little closer, you might see that the stripes at my waist are uneven. No bueno. But was it no bueno enough for me to fix it? Nah. Just put a belt on it. AIN'T NOBODY GONNA KNOW. Except you and me.
 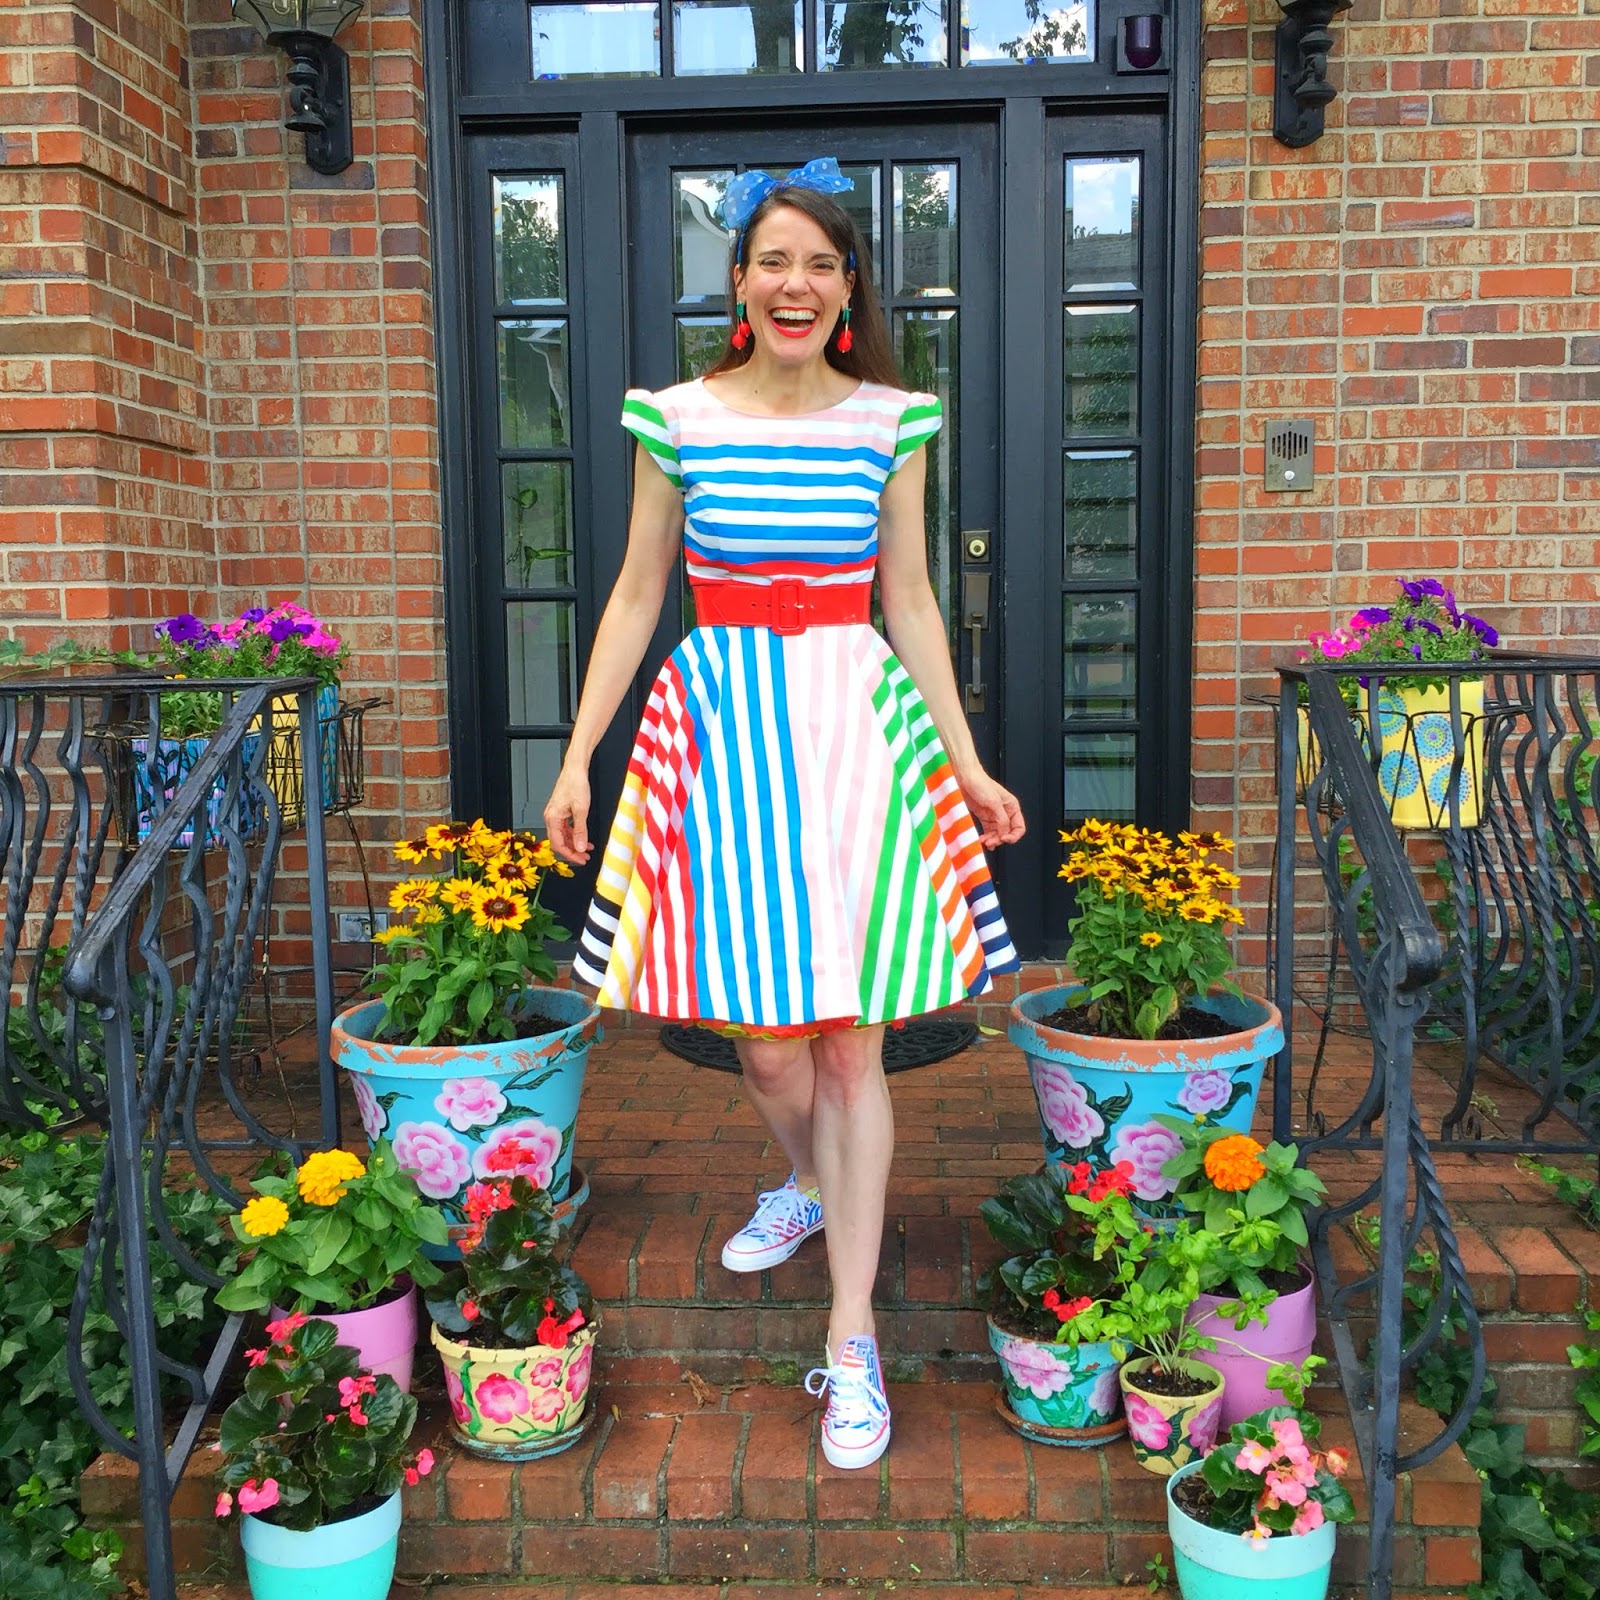 The best part about sewing is the pride you'll feel in having a unique garment that you created and NO ONE ELSE HAS! Yes! You are a true one of a kind so why shouldn't your clothing be?!
  SPEAKING OF SEWING....my new book that is due out next month is now the #1 sewing book right here! Y'all best get to preorderin' and if you do, THANK YOU SO STINKIN' MUCH!!
June 17, 2019
2019 Art Show: 2-D Work!
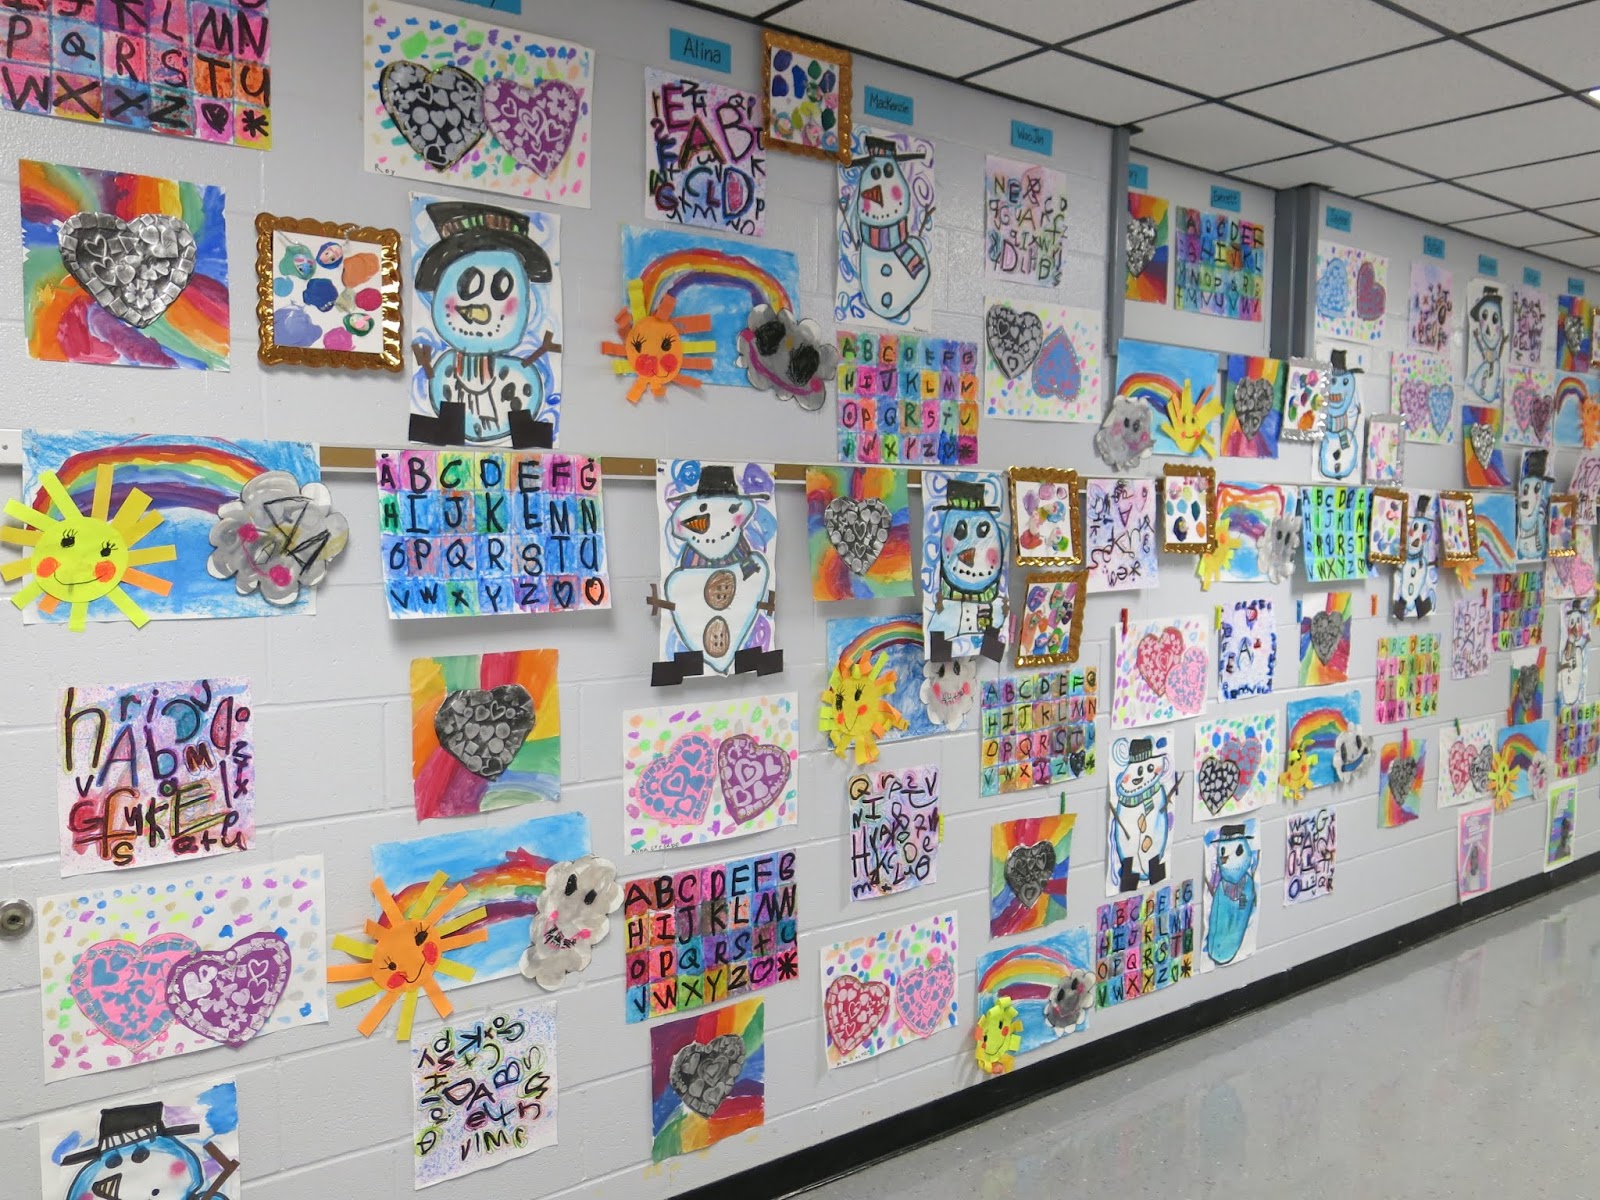 Serving up the final installment of our 2019 art show for y'all today! This here is the 2D portion of our art show where every work of art that every kiddo has created all year long is on display! You can check out our Glow Gallery Tour and our Pirate Gallery Tour here!
 In this blog post, I thought I would share a link to each and every one of these lessons you see! This will give you an idea of what projects I teach (2D, that is) throughout the year. If you are interested in details on this art show: how it's hung, who does the hangin', how it's taken down and sent home, then you might want to watch this tour I created to answer those questions for you:
Please feel free to leave any questions about what you see here or on my YouTube channel and I'll be sure to answer them.
 Let's take a tour of theses projects! We'll start with kindergarten. My kindergarteners always have the biggest amount of artwork because their lessons are shorter. I started the beginning of the year with my lessons on line. Those projects did not make it to the art show as they were sent home at the start of the school year. From there, we did the rainbow lesson and Mouse Paint project.
 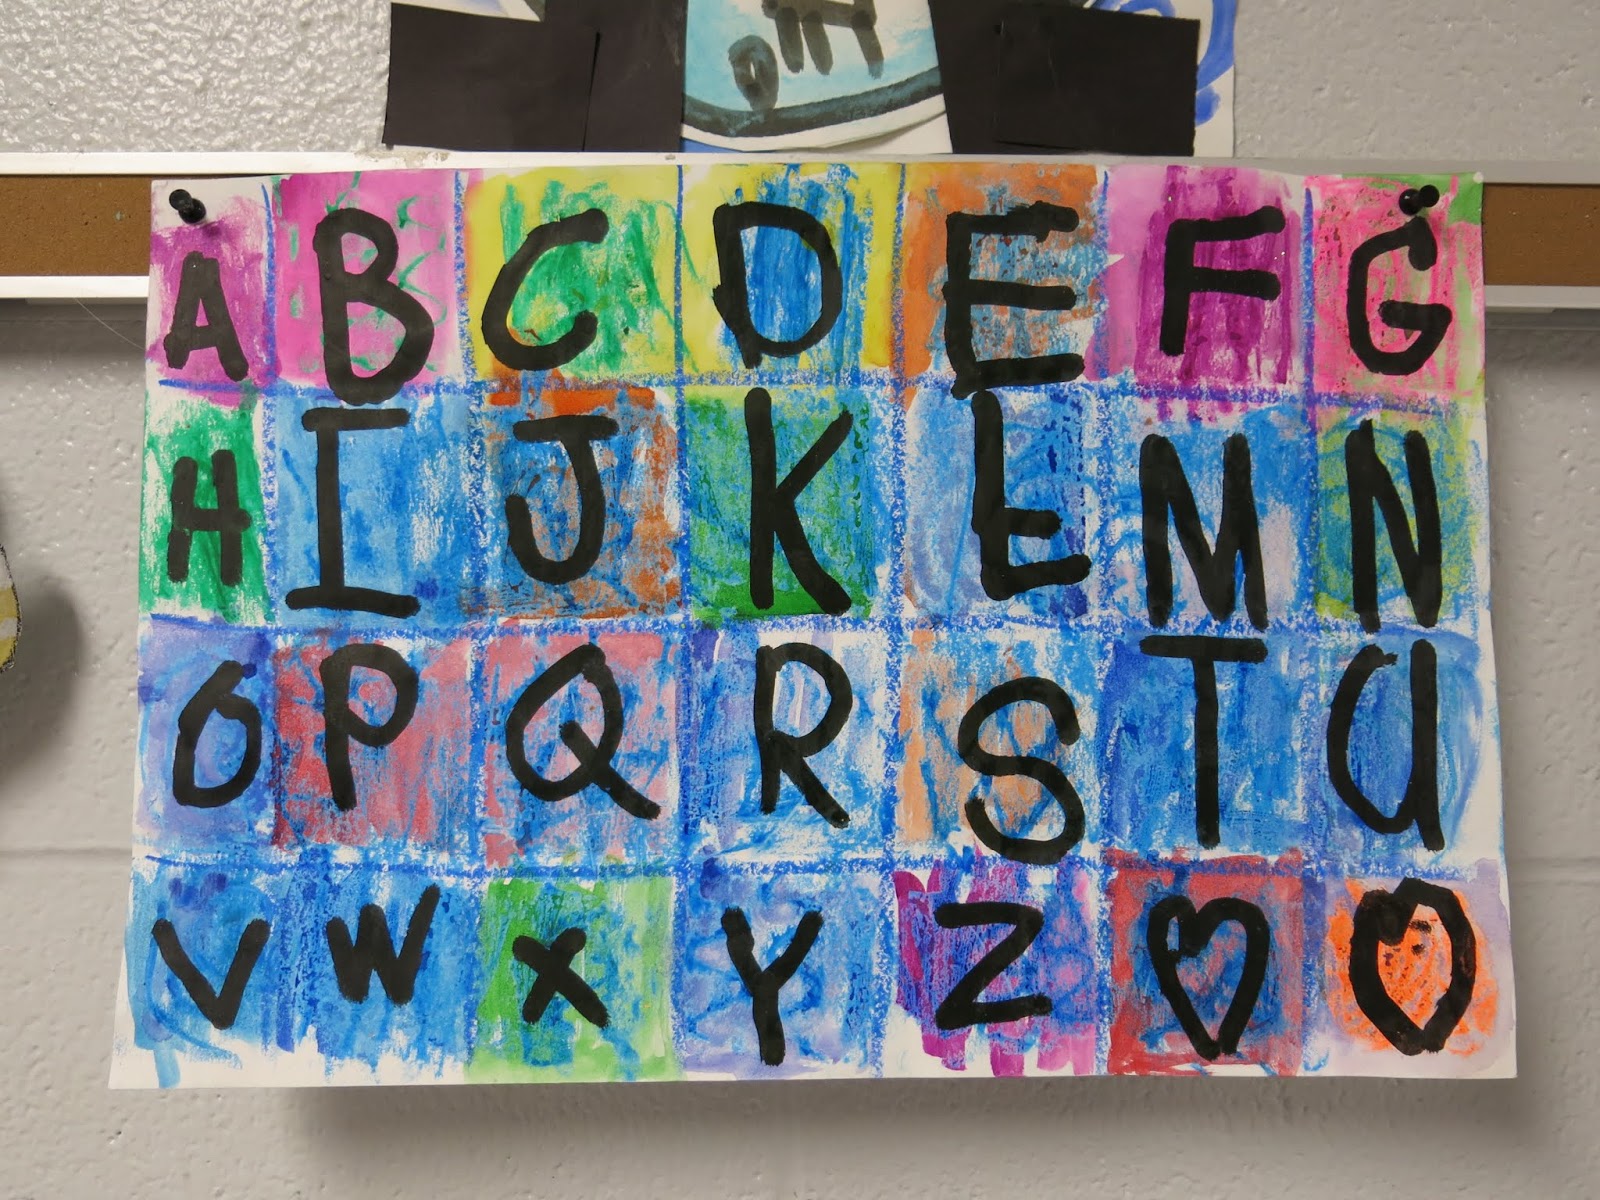 One of the more popular lessons for kindergarten on my blog is this one. This lesson is always followed by my Chicka Chicka Boom Boom project which you can find here.
 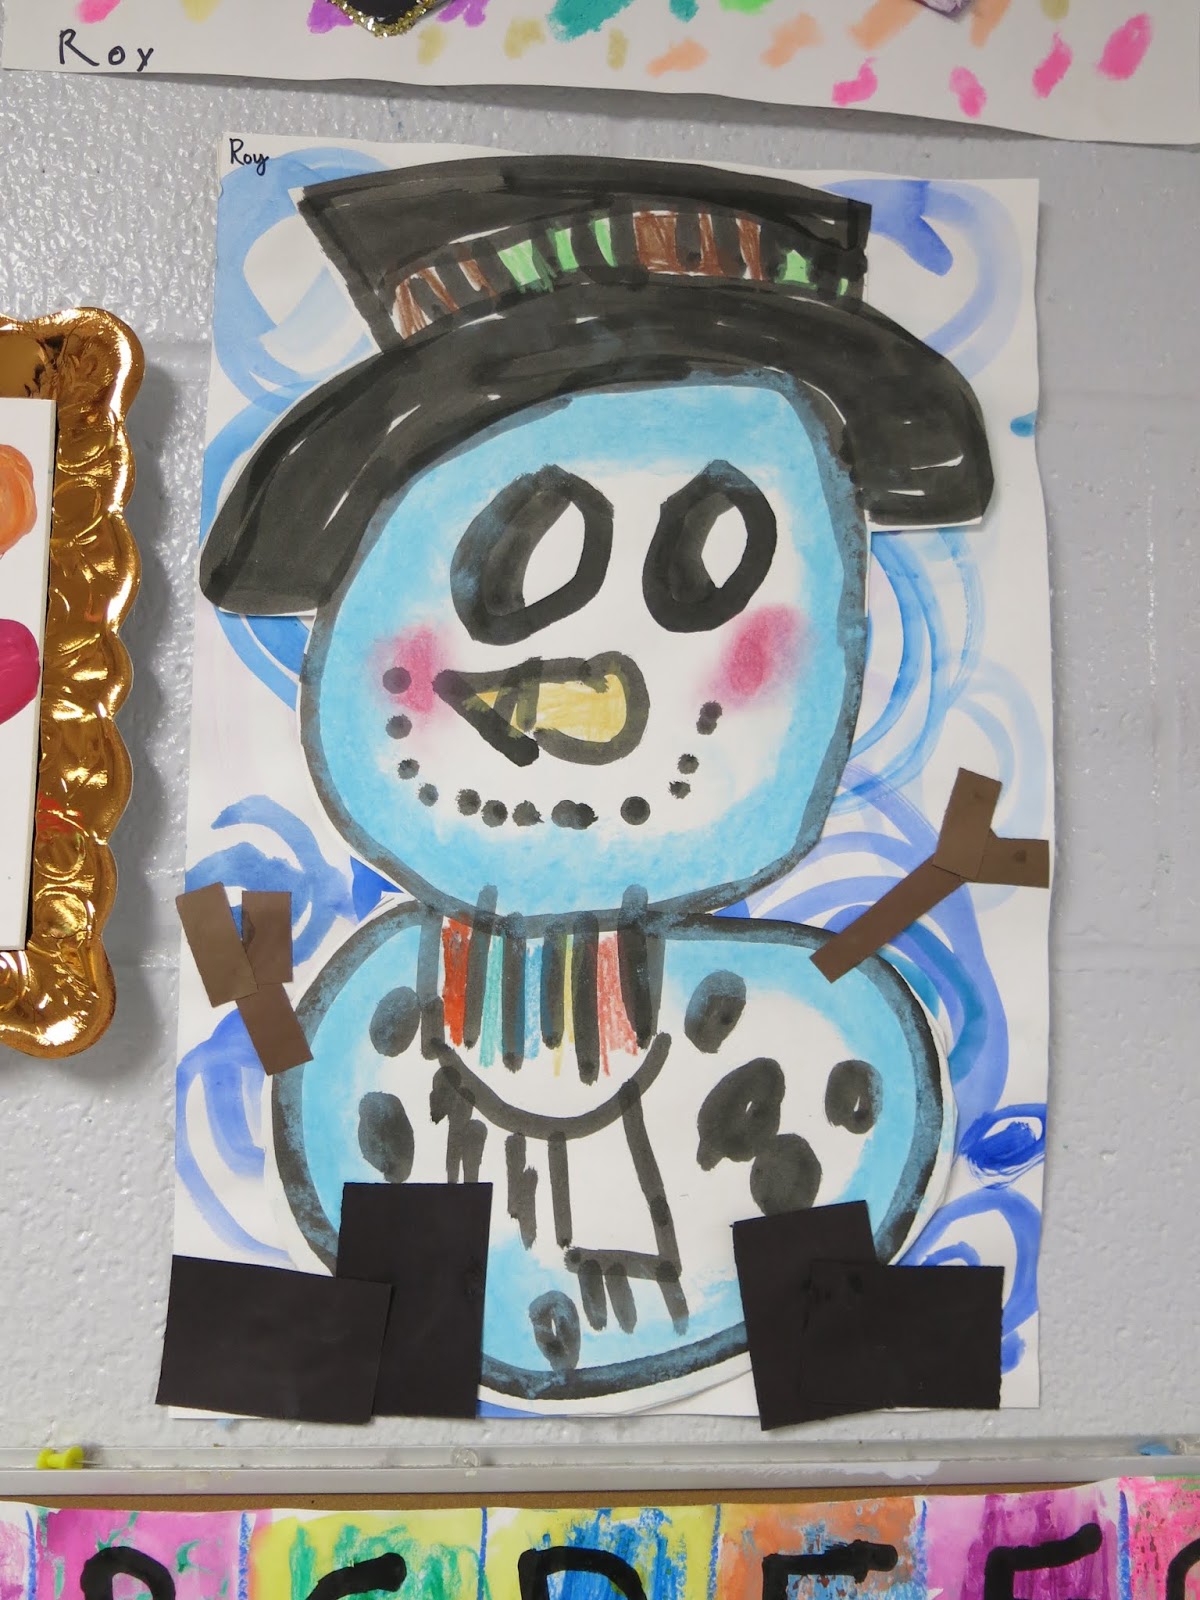 Our snowmen were a lot of fun to create this year too. We learned all about the cold colors and painting spiral lines.
 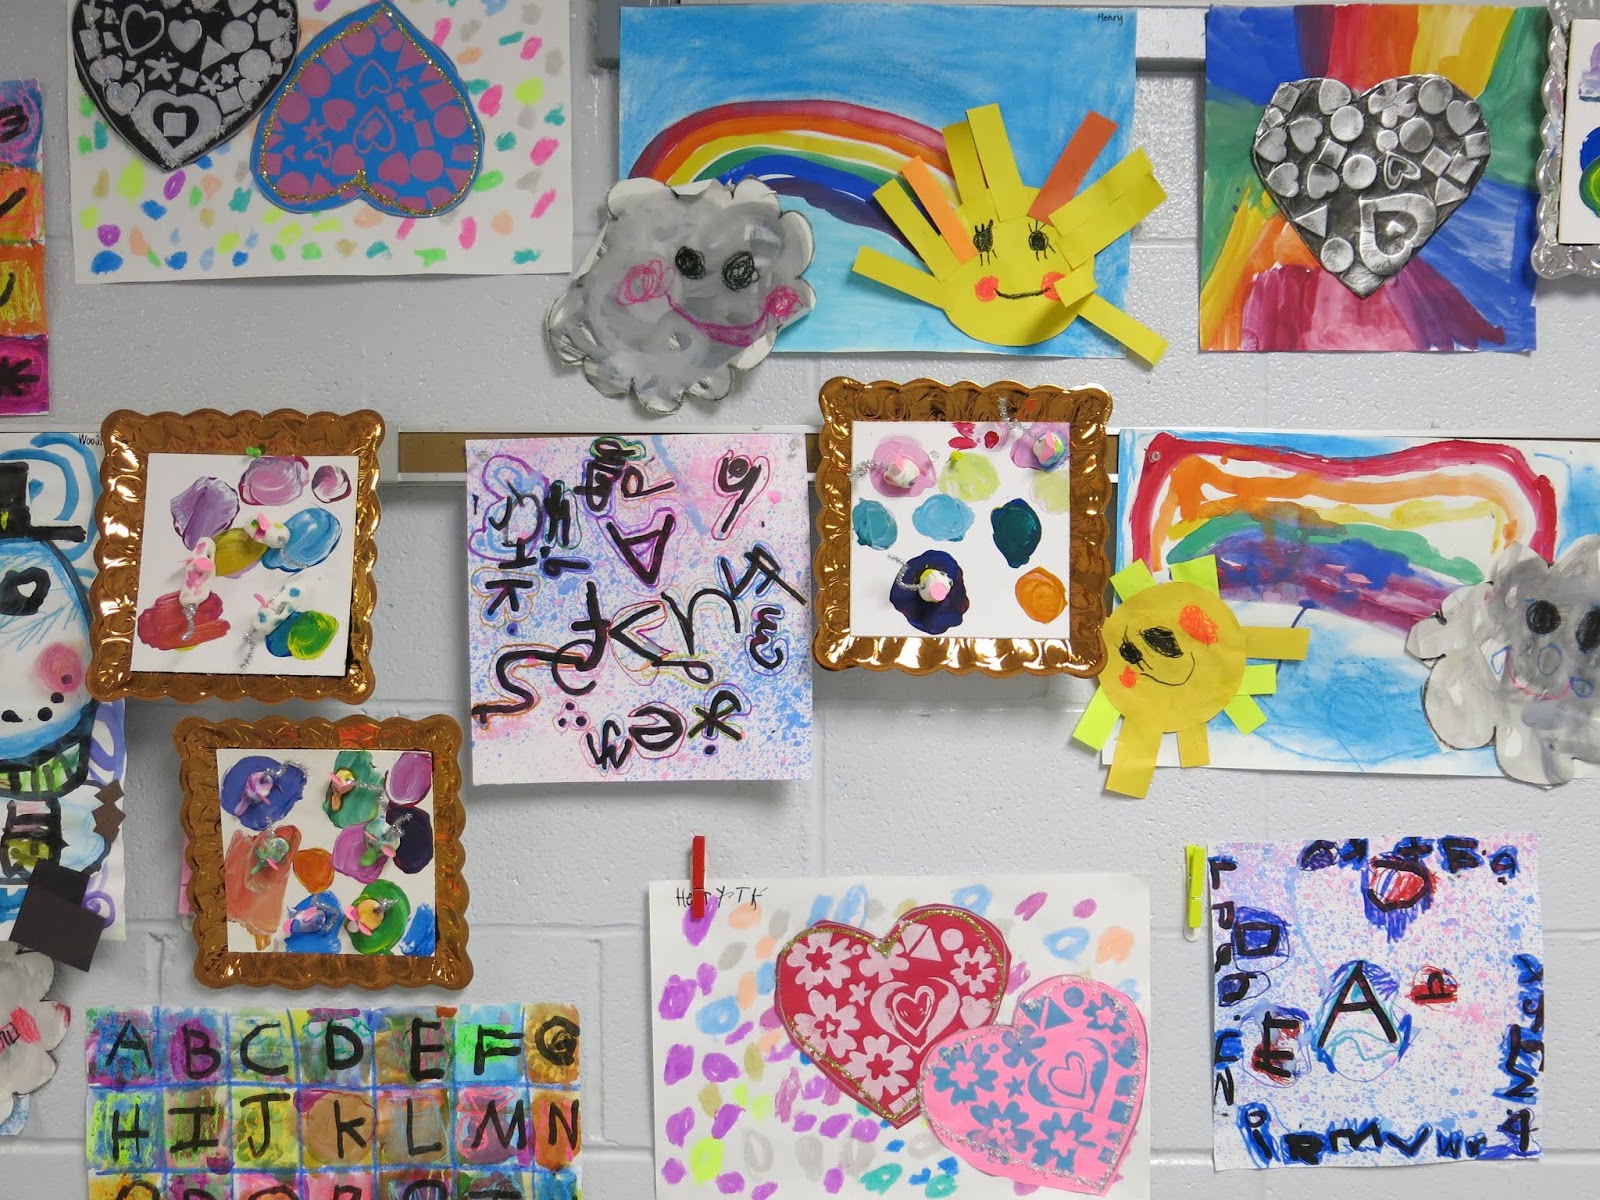 A new lesson I came up with this year were the heart prints. We were able to get many prints created and used our two favorites for our work of art.
 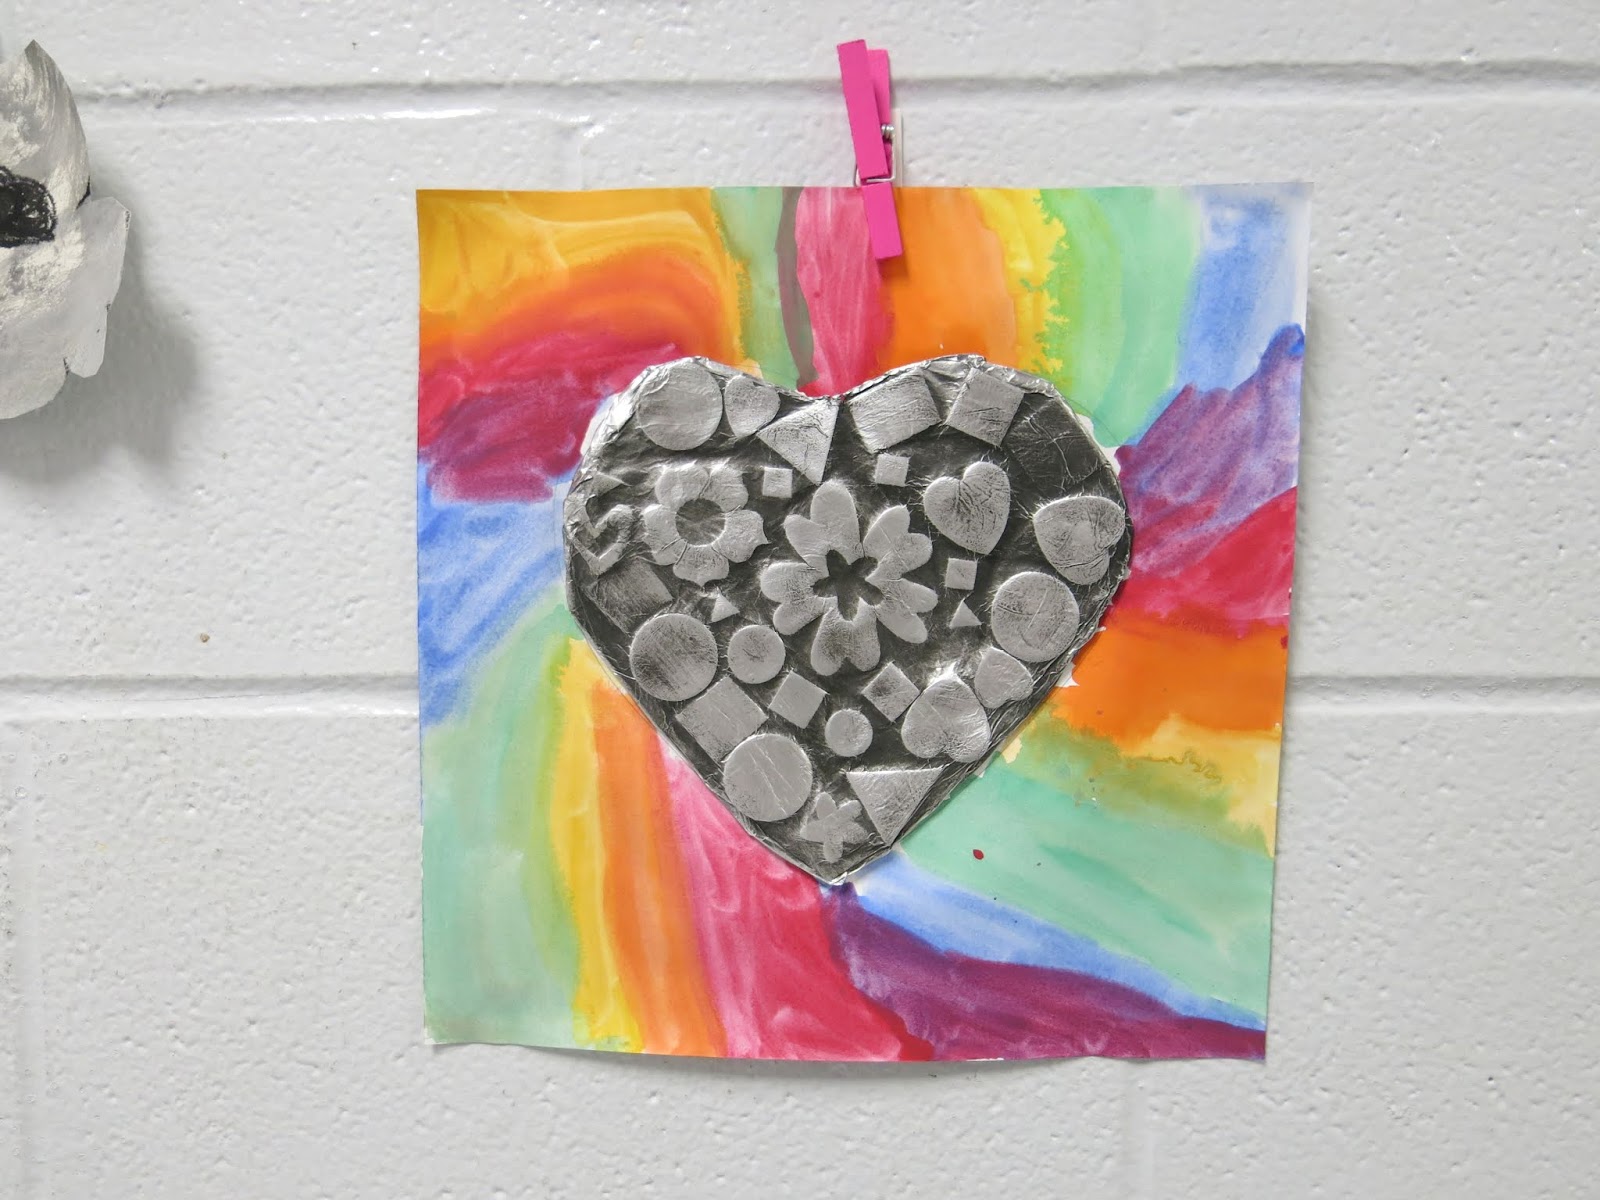 With our printing plates, we created these beauties! Super fun and stunning!
 The kindergarten gallery is almost always my favorite!
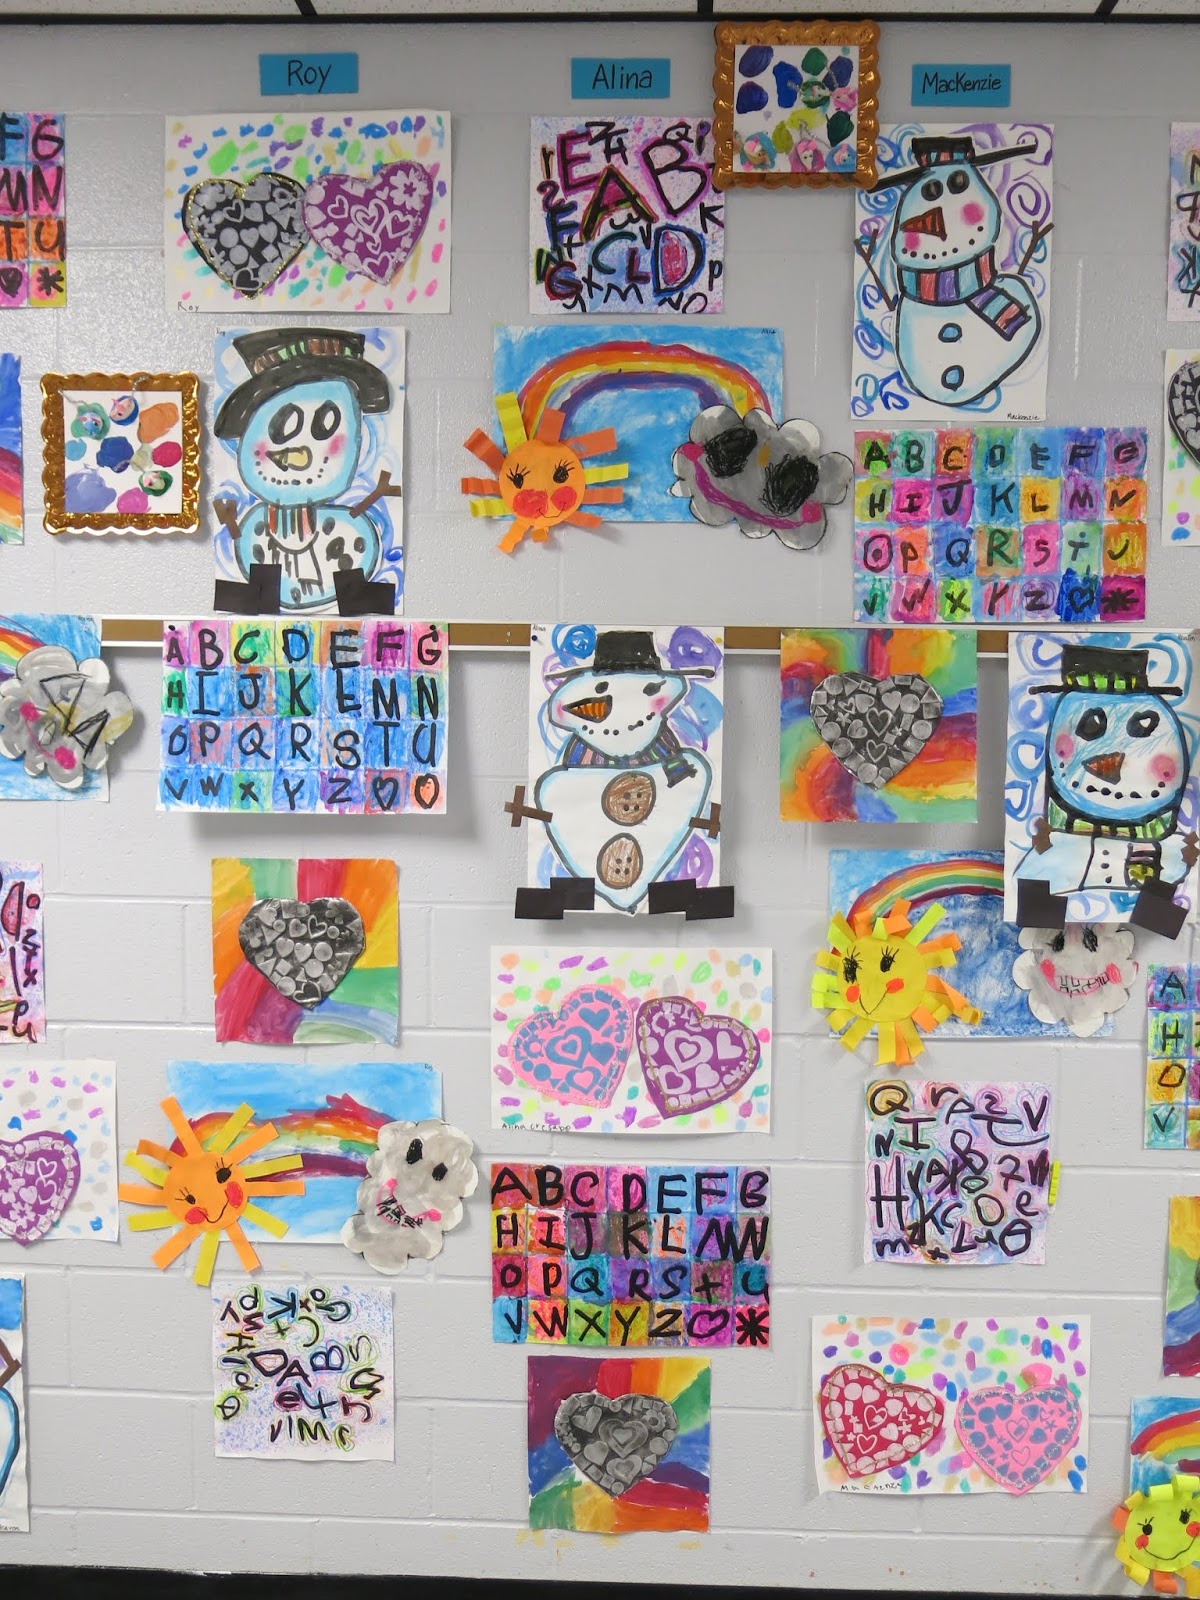
 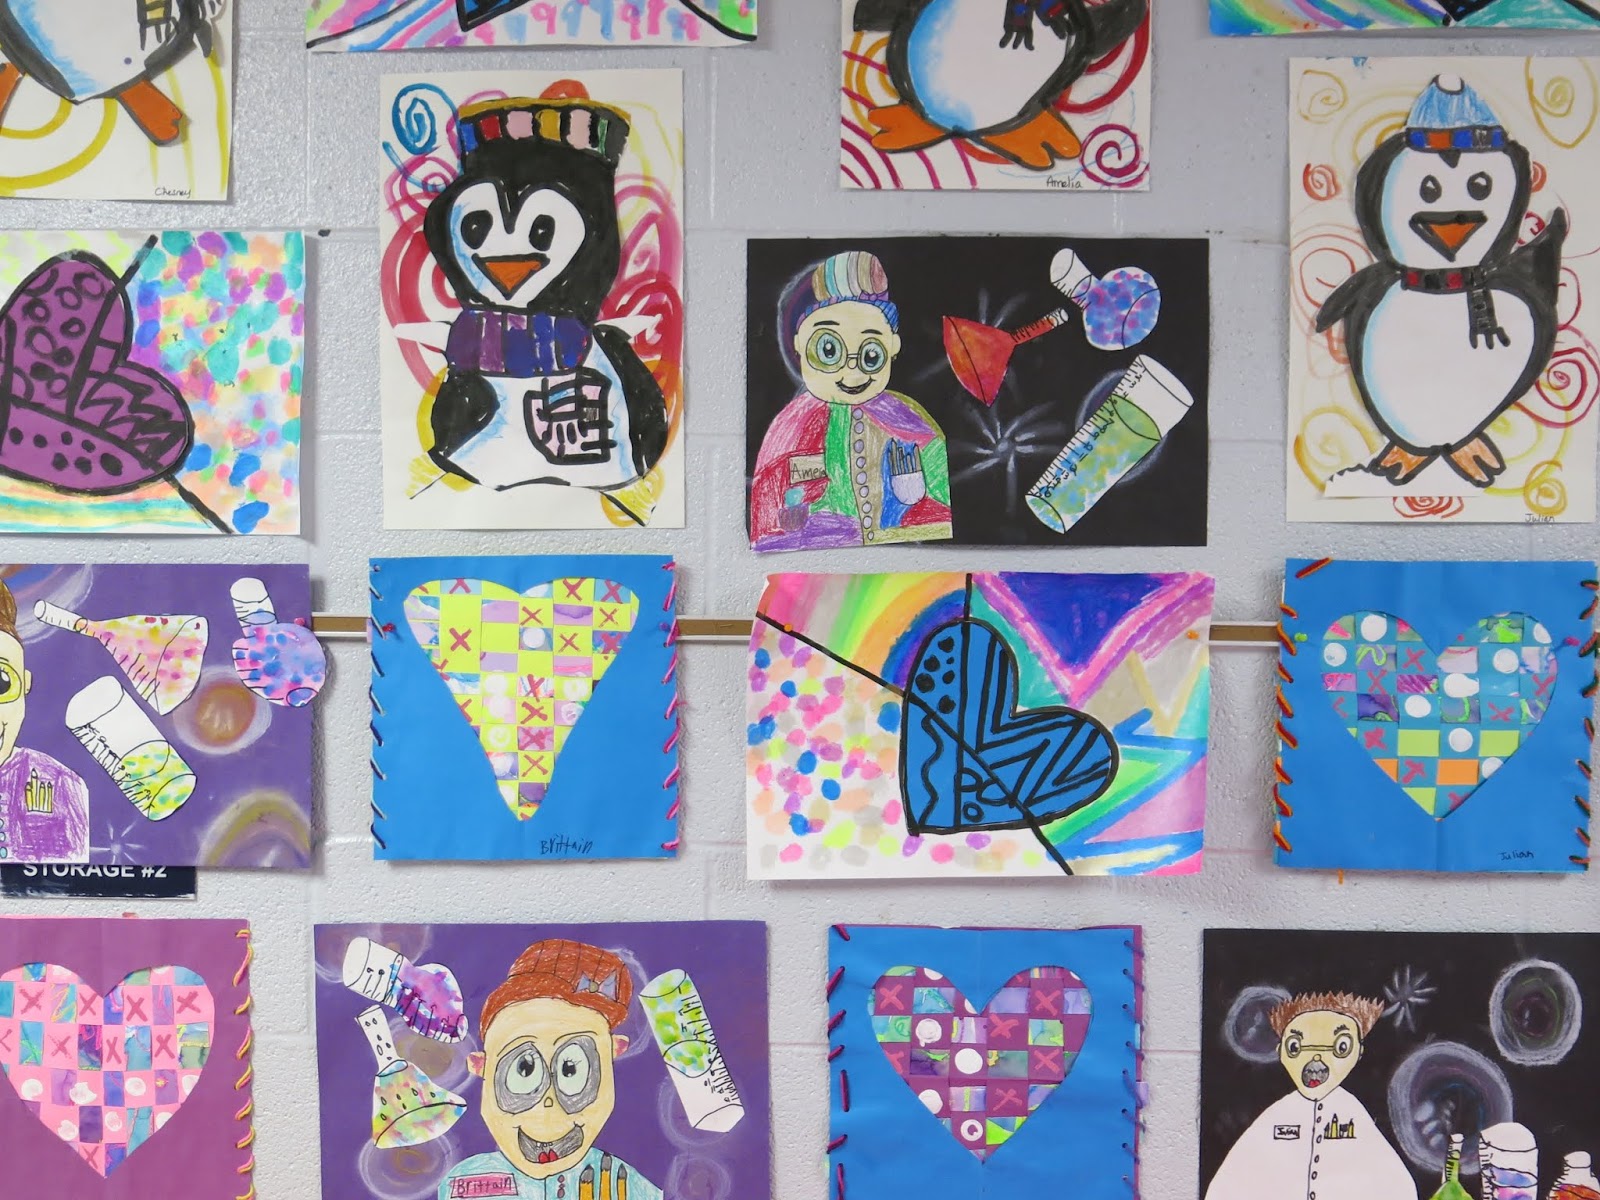 Although first grade sure does take a close second. Let's talk about their projects. One of my favorites this year were our Mad Scientists!
 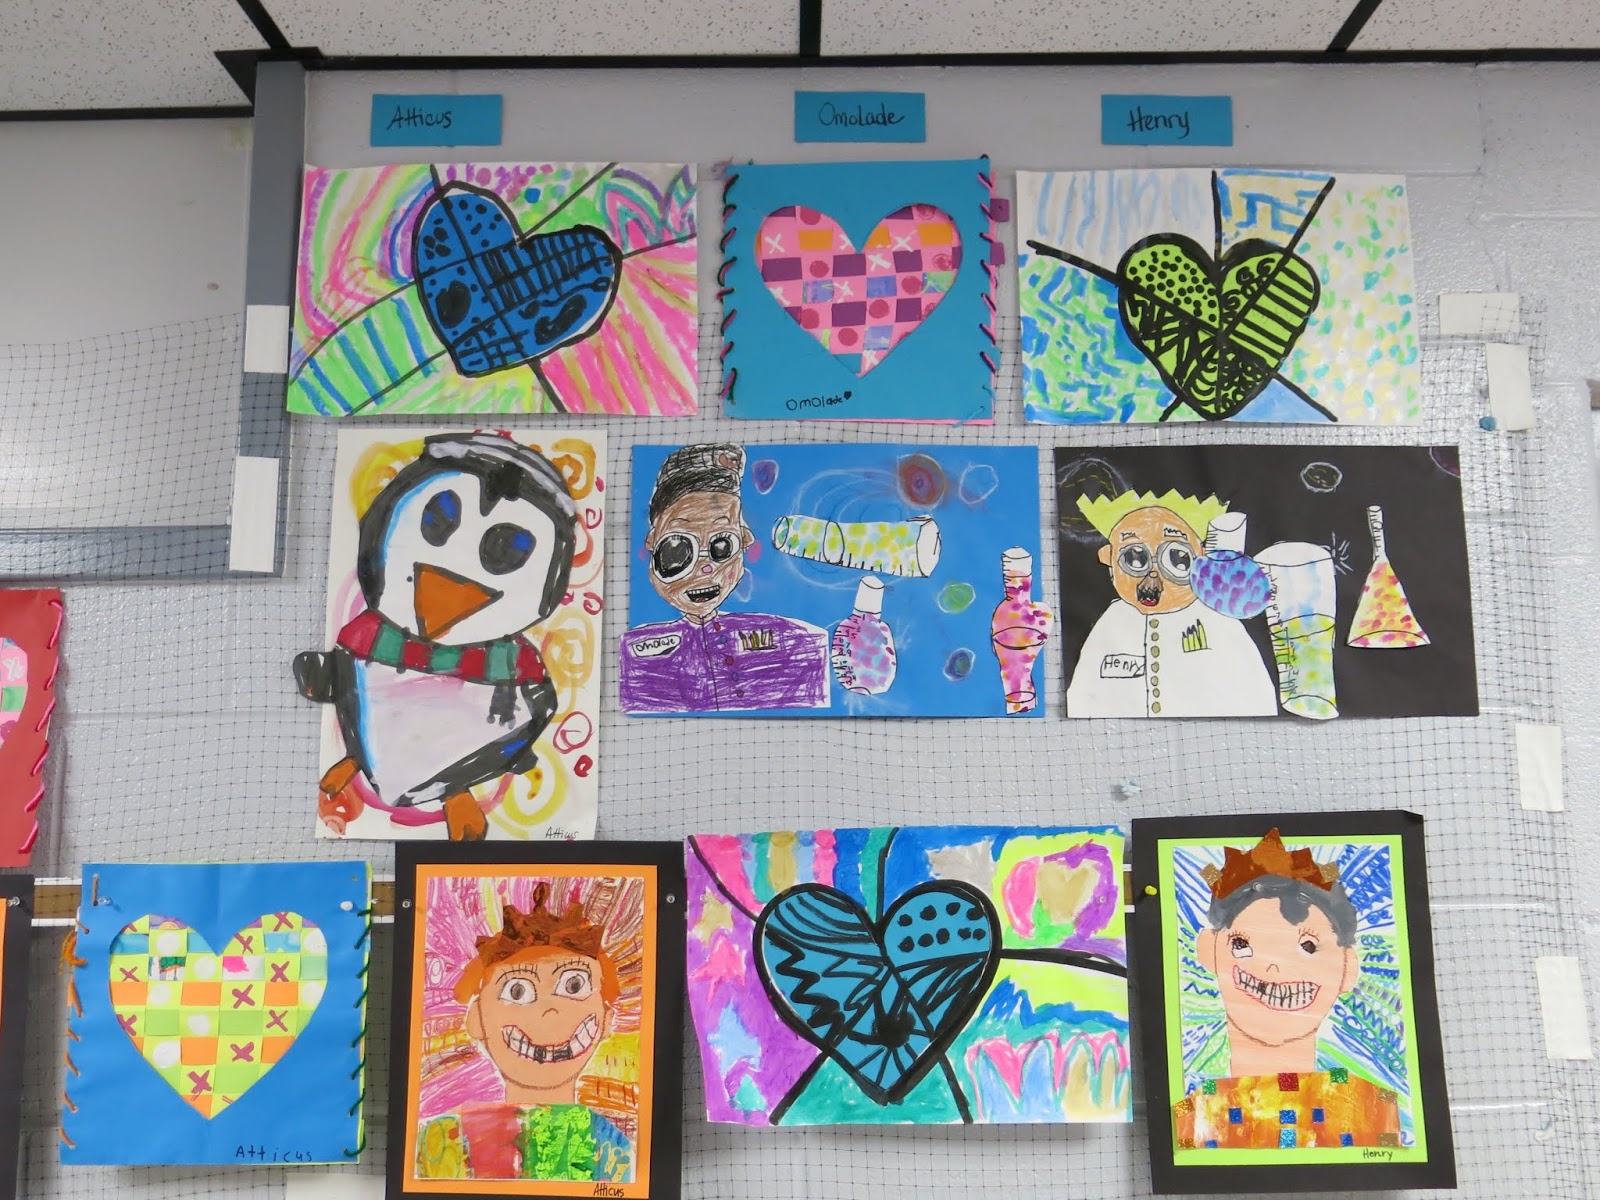 A classic that we've done many years in a row are our Royal Self-Portraits. I love that we have two selfies in this art show: one as royalty and one as kid-genius. Perfect for my kids!
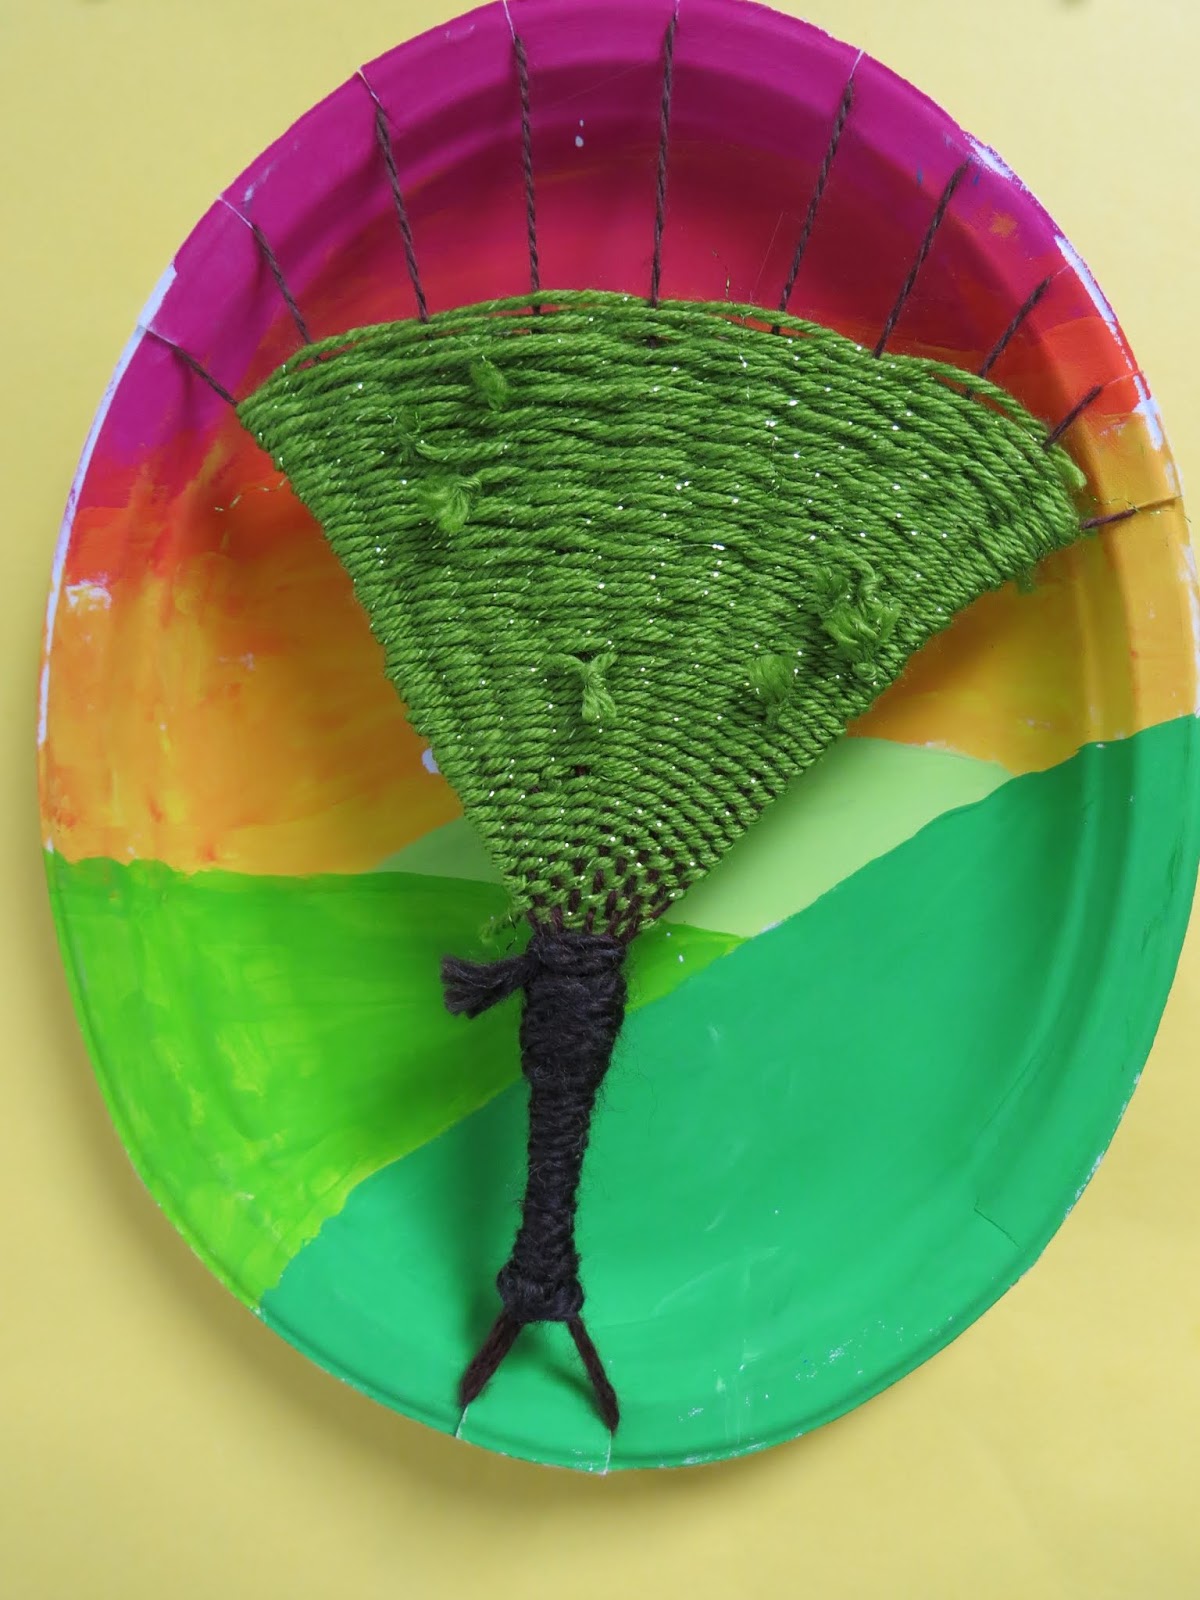
 We also did those heart weavings that you see with the stitched edge. With the heart we cut out from our construction paper for the weaving, we created these Romero Britto inspired pieces. You can see a variation of that lesson here.
 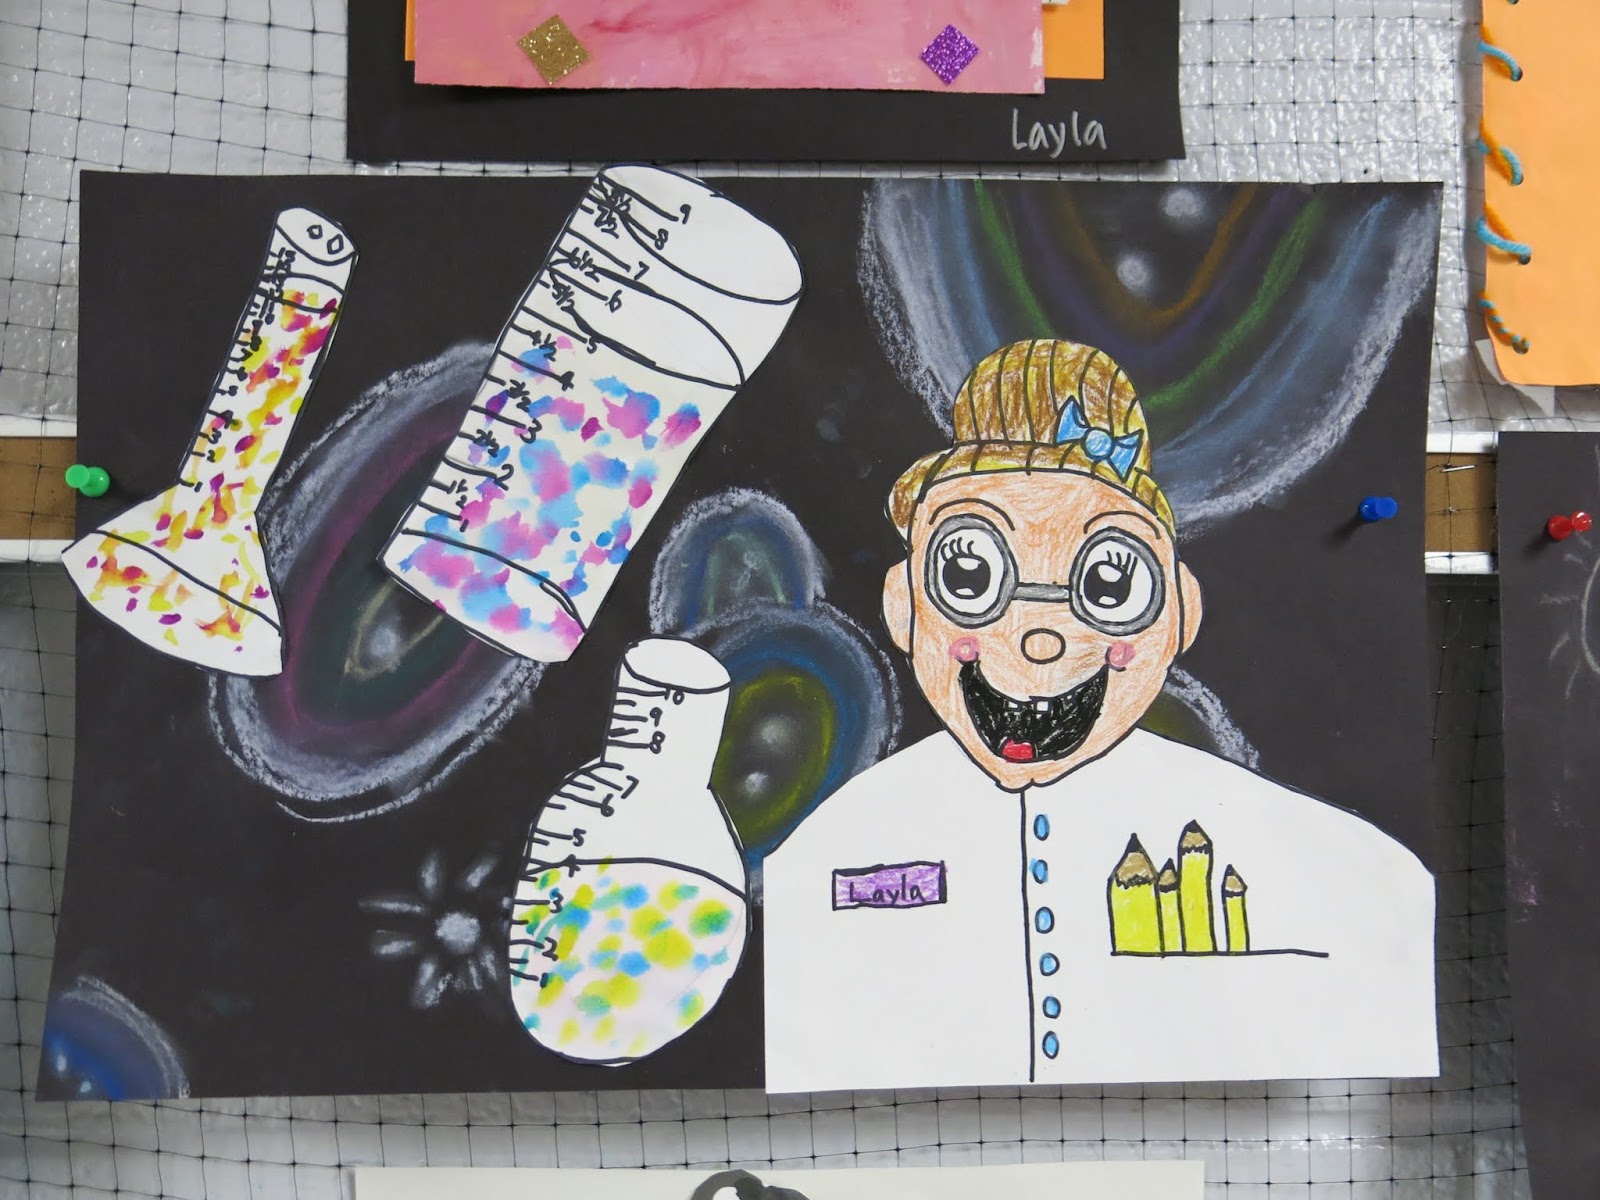 All of the artwork and the kids who created them make me this happy.
 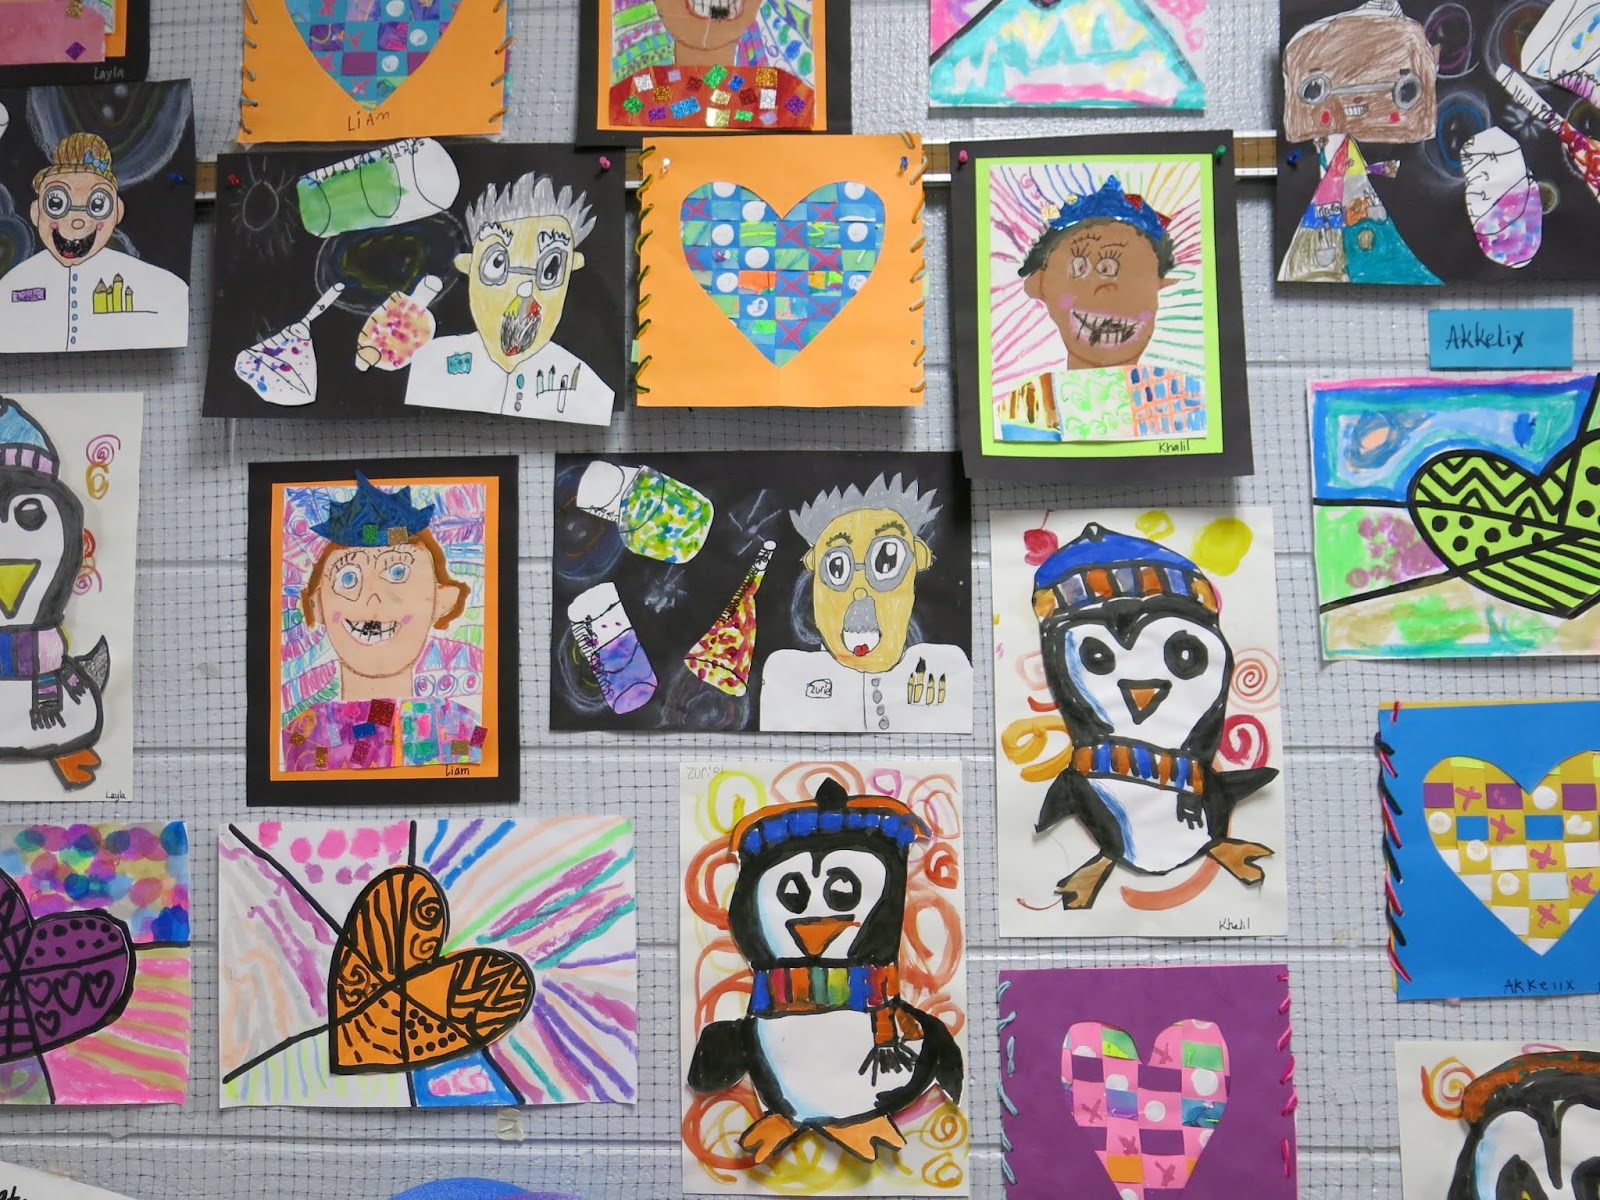 The big penguins you see were created from this lesson here.
 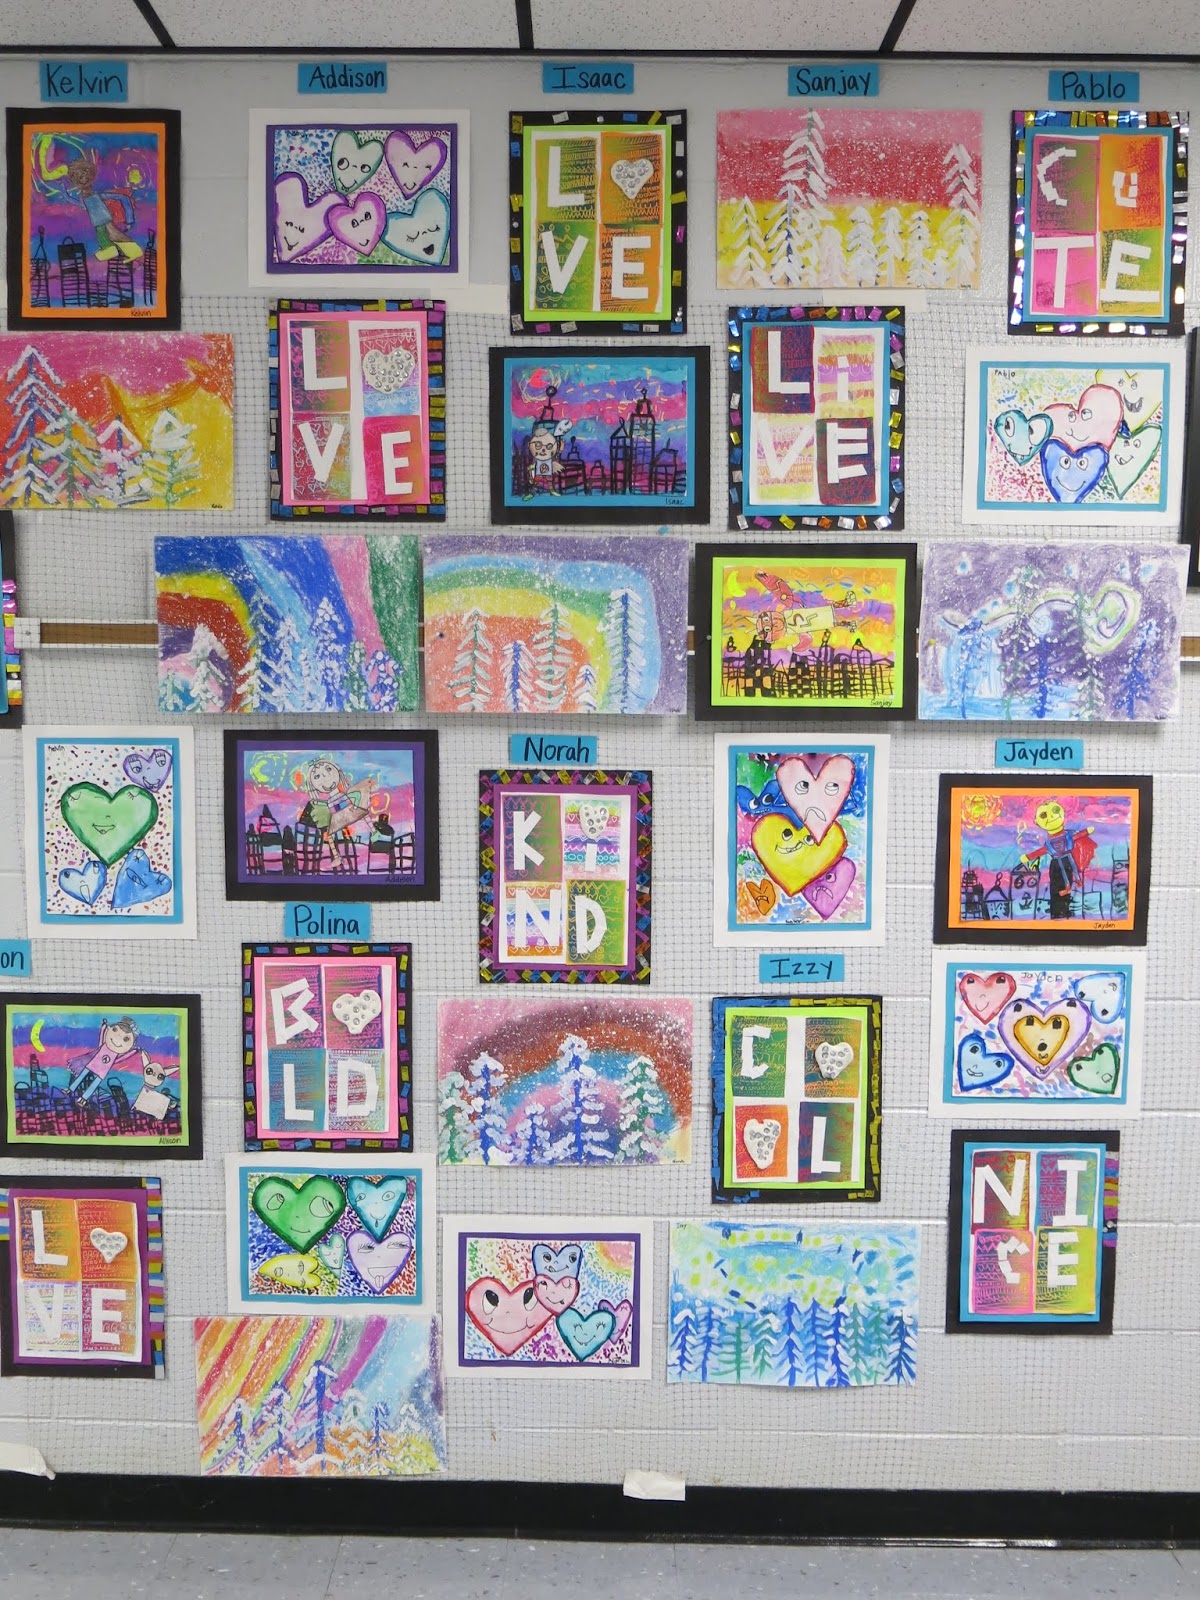 Let's move on down to second grade! These kids had many works of art both in the Glow and Pirate Gallery that their wall seems a little empty. Don't let that fool you: we are always crankin' out some art!
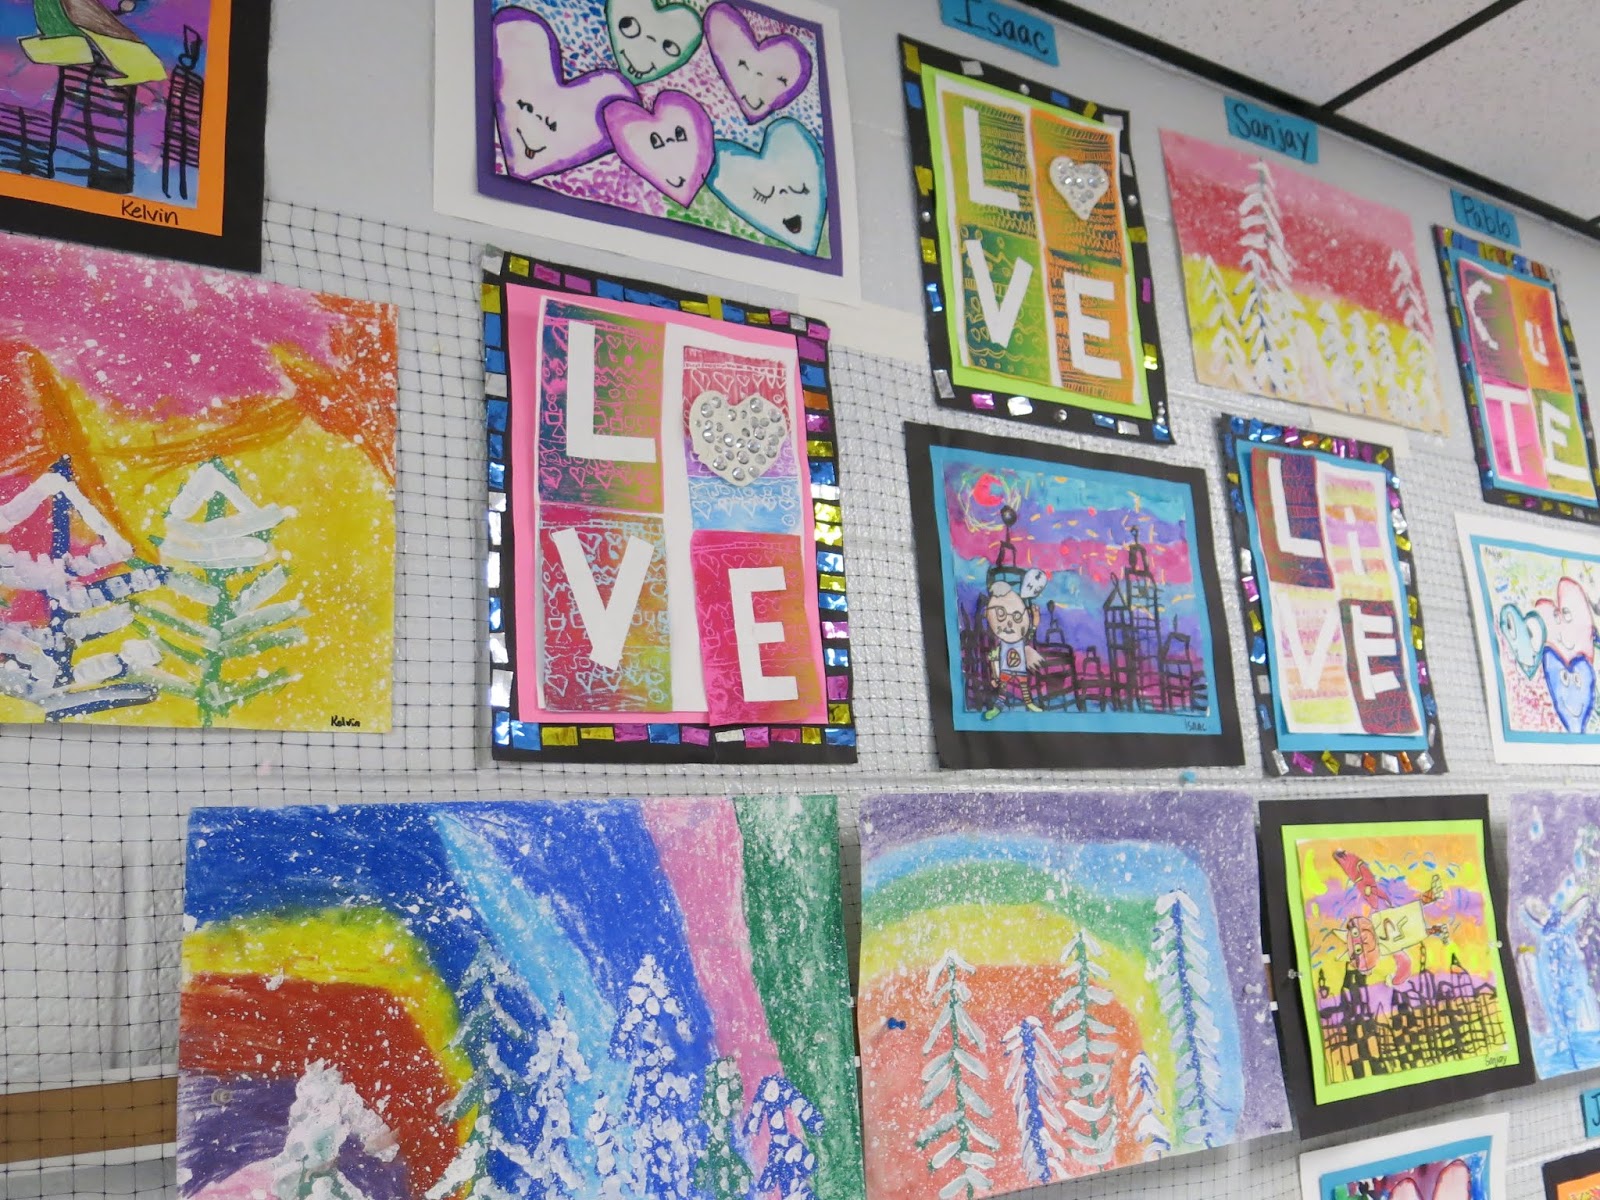 Our Super Hero Selfies can be found here while our Chris Uphues Hearts are here.
  This printmaking lesson is one of our favorites. We seem to improve up on it each year!
  And this lesson is from my String and Stitch Lab for Kids book! Check it out!
 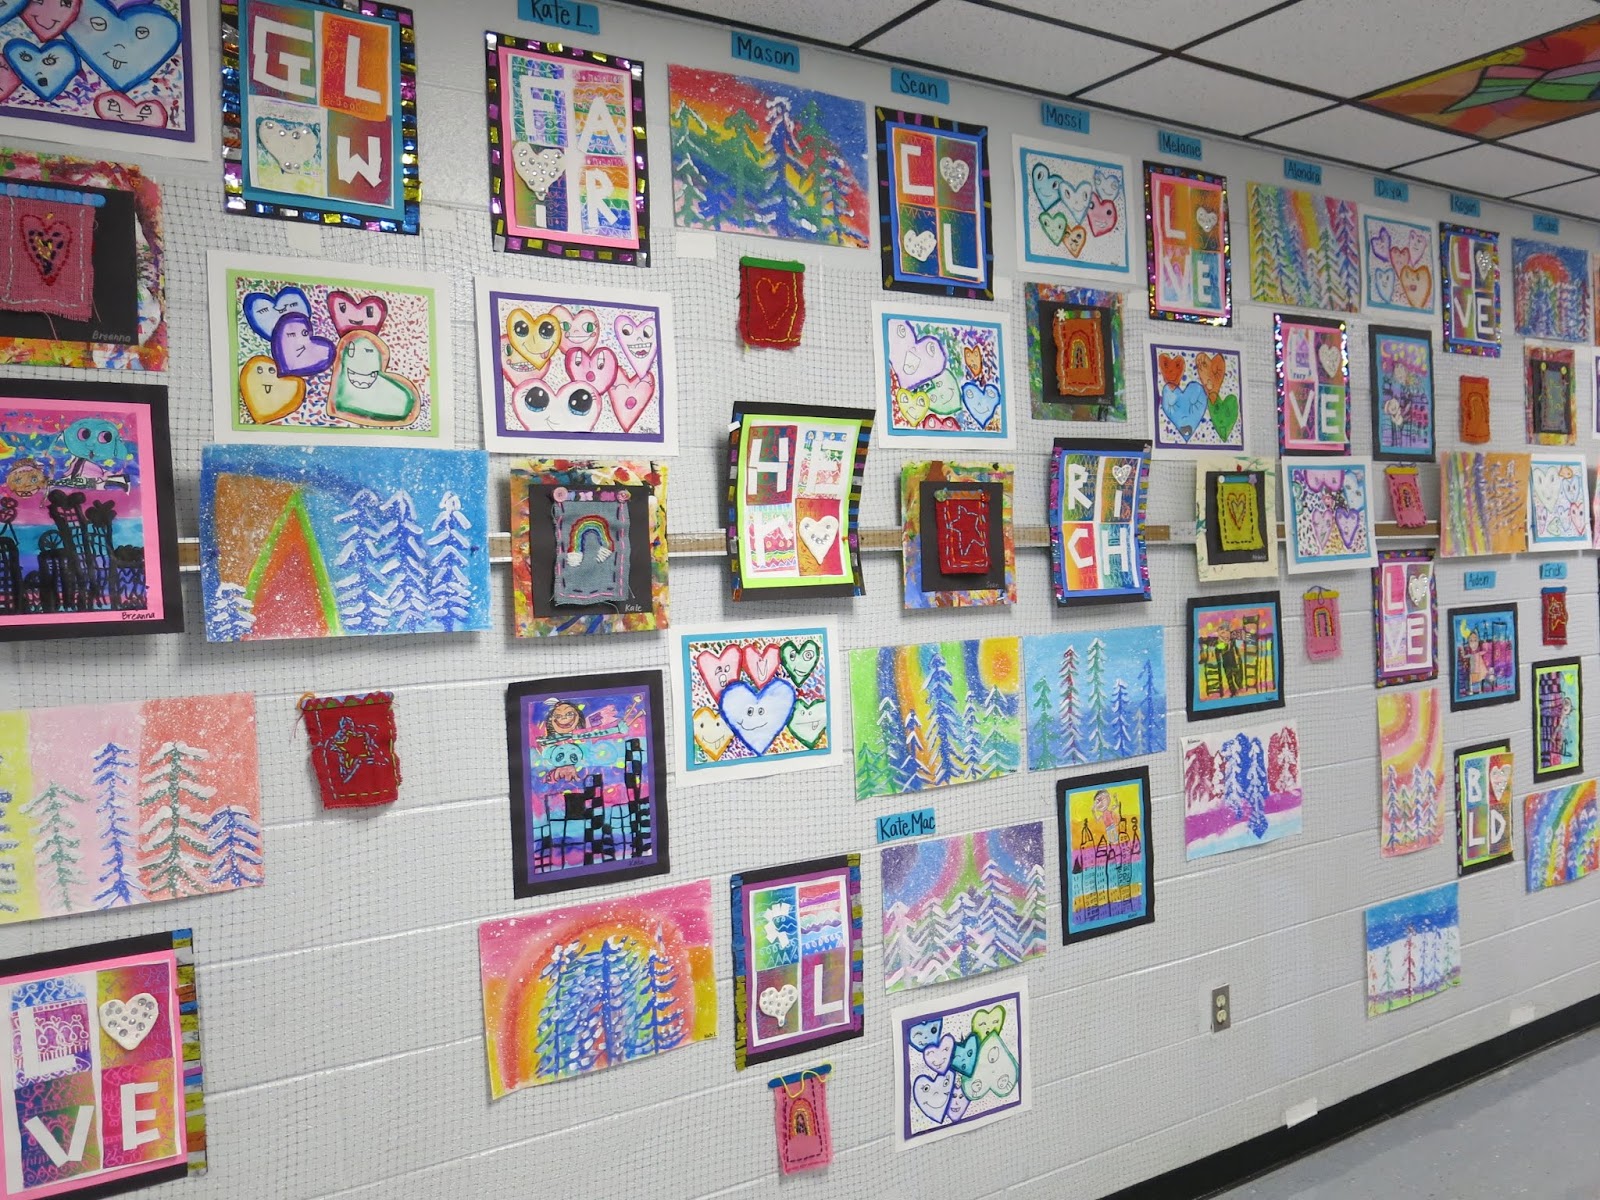 It's a pretty colorful hallway!
 Speaking of, let's move on down to third grade! You'll notice these kids also did the Chris Uphues lesson...in fact, all of my students did as it was a sub plan.
 One lesson of mine that was especially popular was the landscape project! I had run out of paper (omg, an art teacher without PAPER, hello!) and had a lot of cardboard pizza rounds...so we improvised!
The kids also created those amazing Sandra Silberzweig-inspired self portraits!
 My students did two kinds of weaving, tree weaving and circle weaving. Two kid favorites. These are also featured in my new book!
 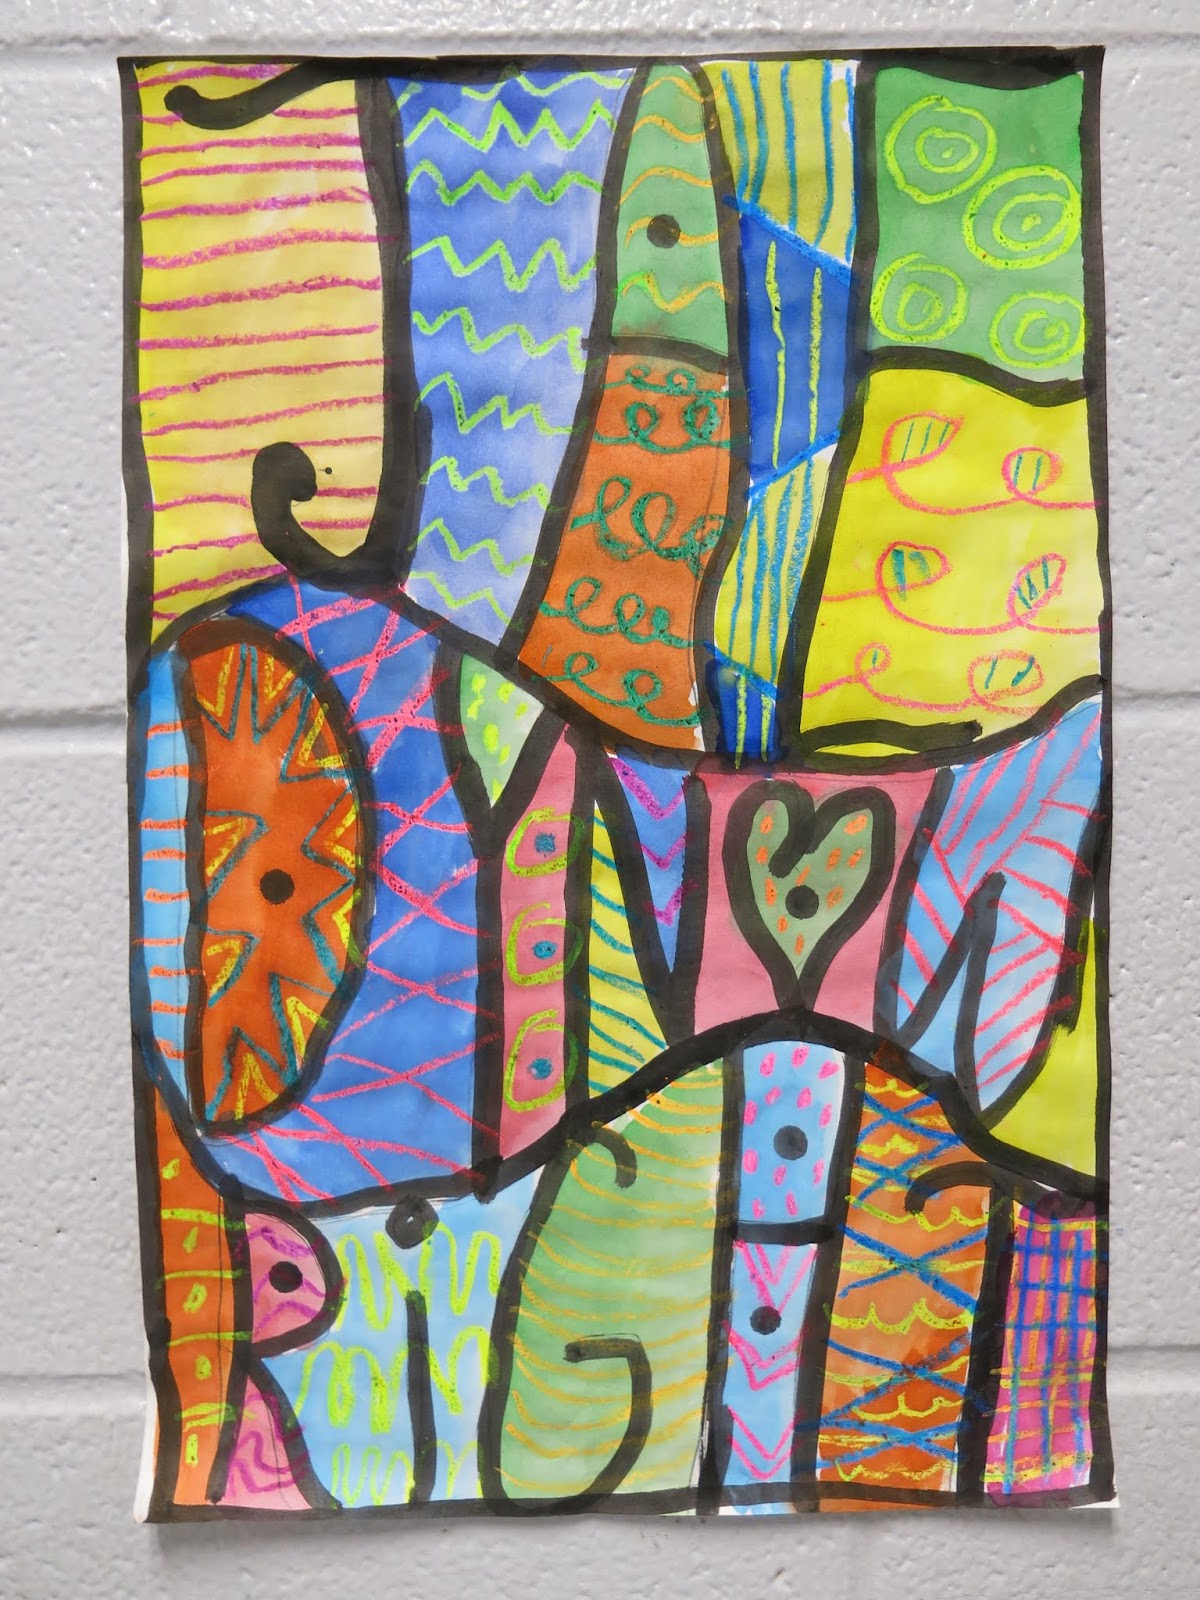 One lesson that I'll be sharing soon is this one! If you can't wait, then check out this blog post as this lesson is a variation.
 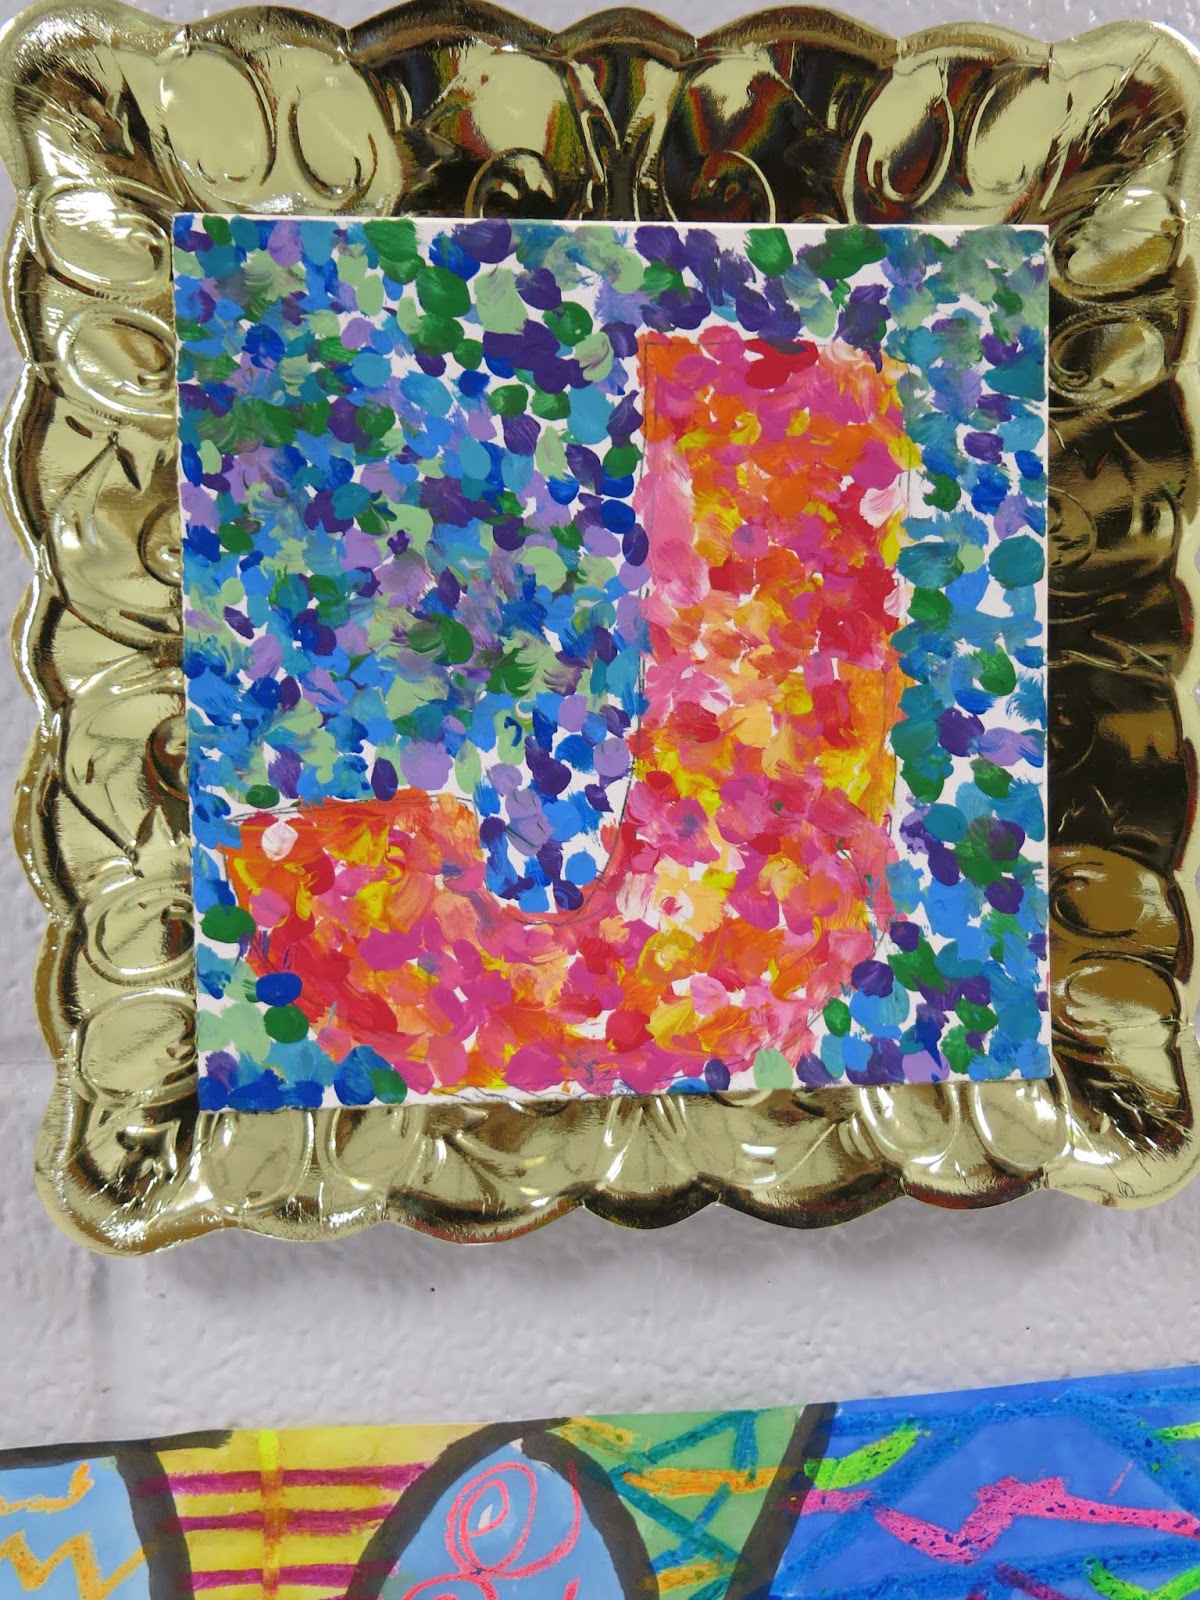 This is another lesson that I'm excited to share with you soon!
 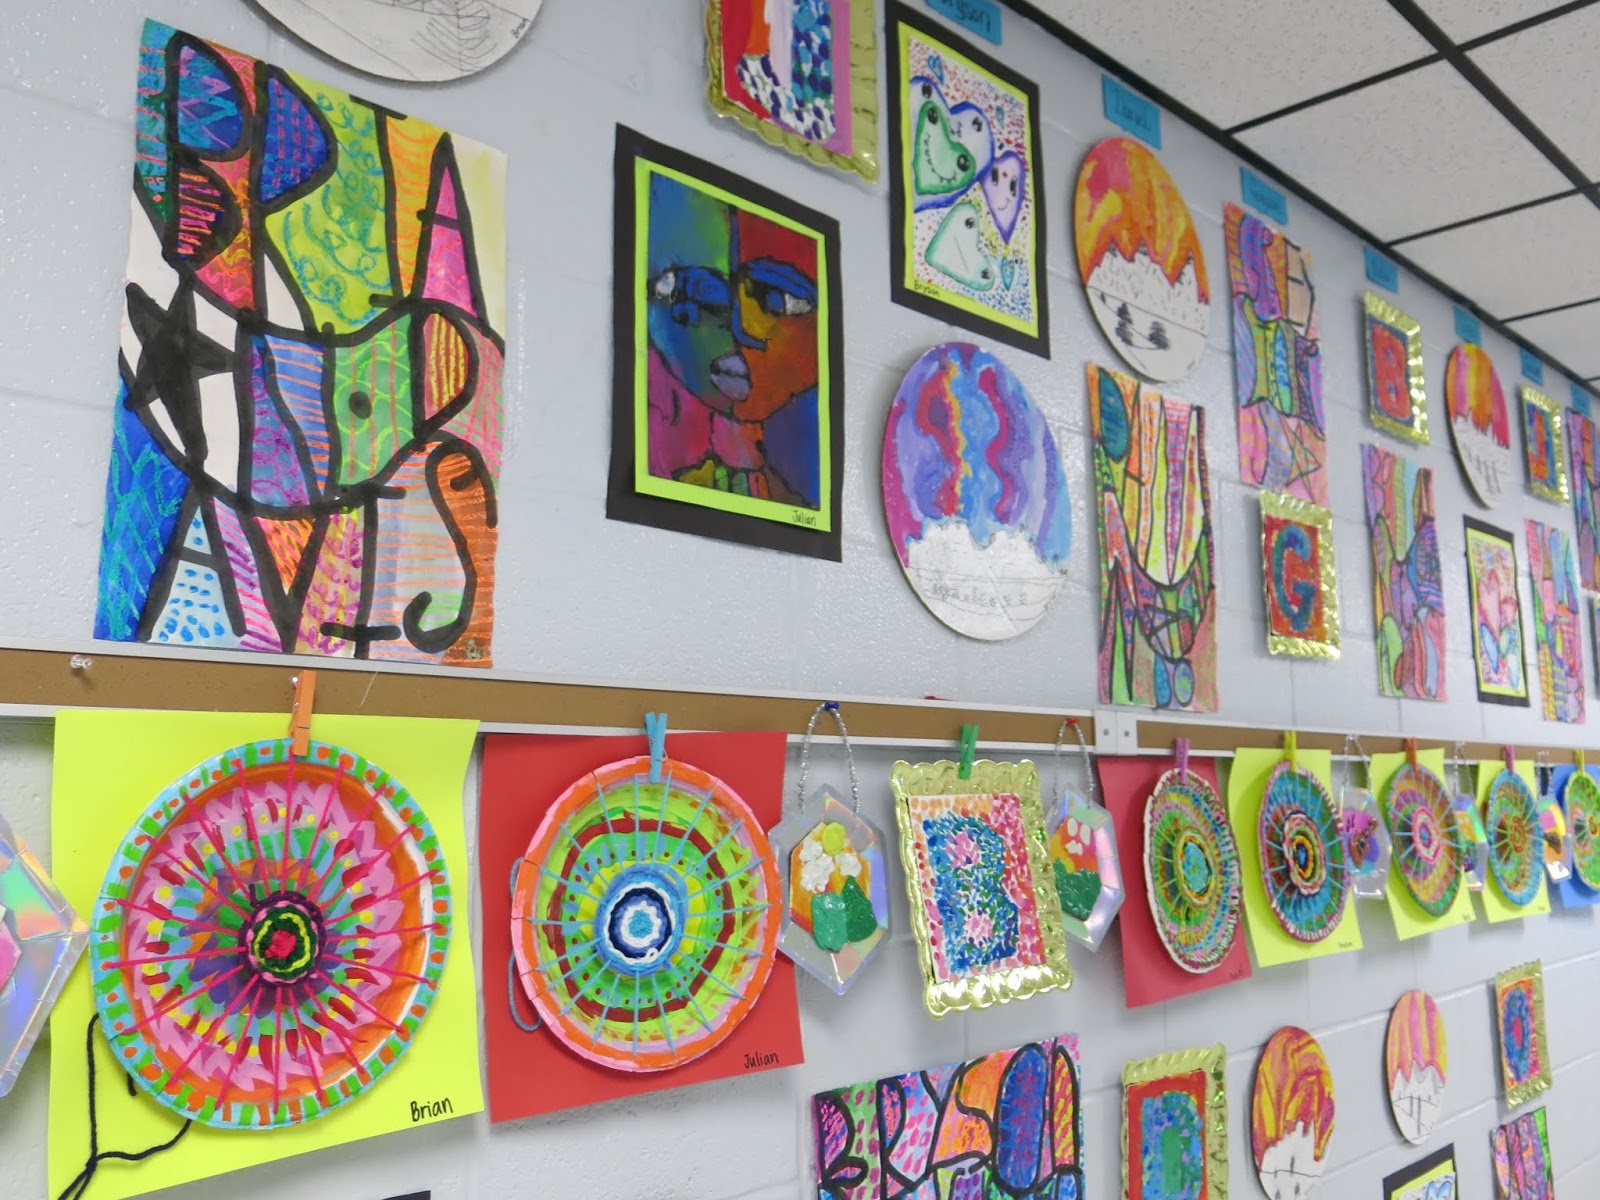 This third grade display brings me so much happiness!
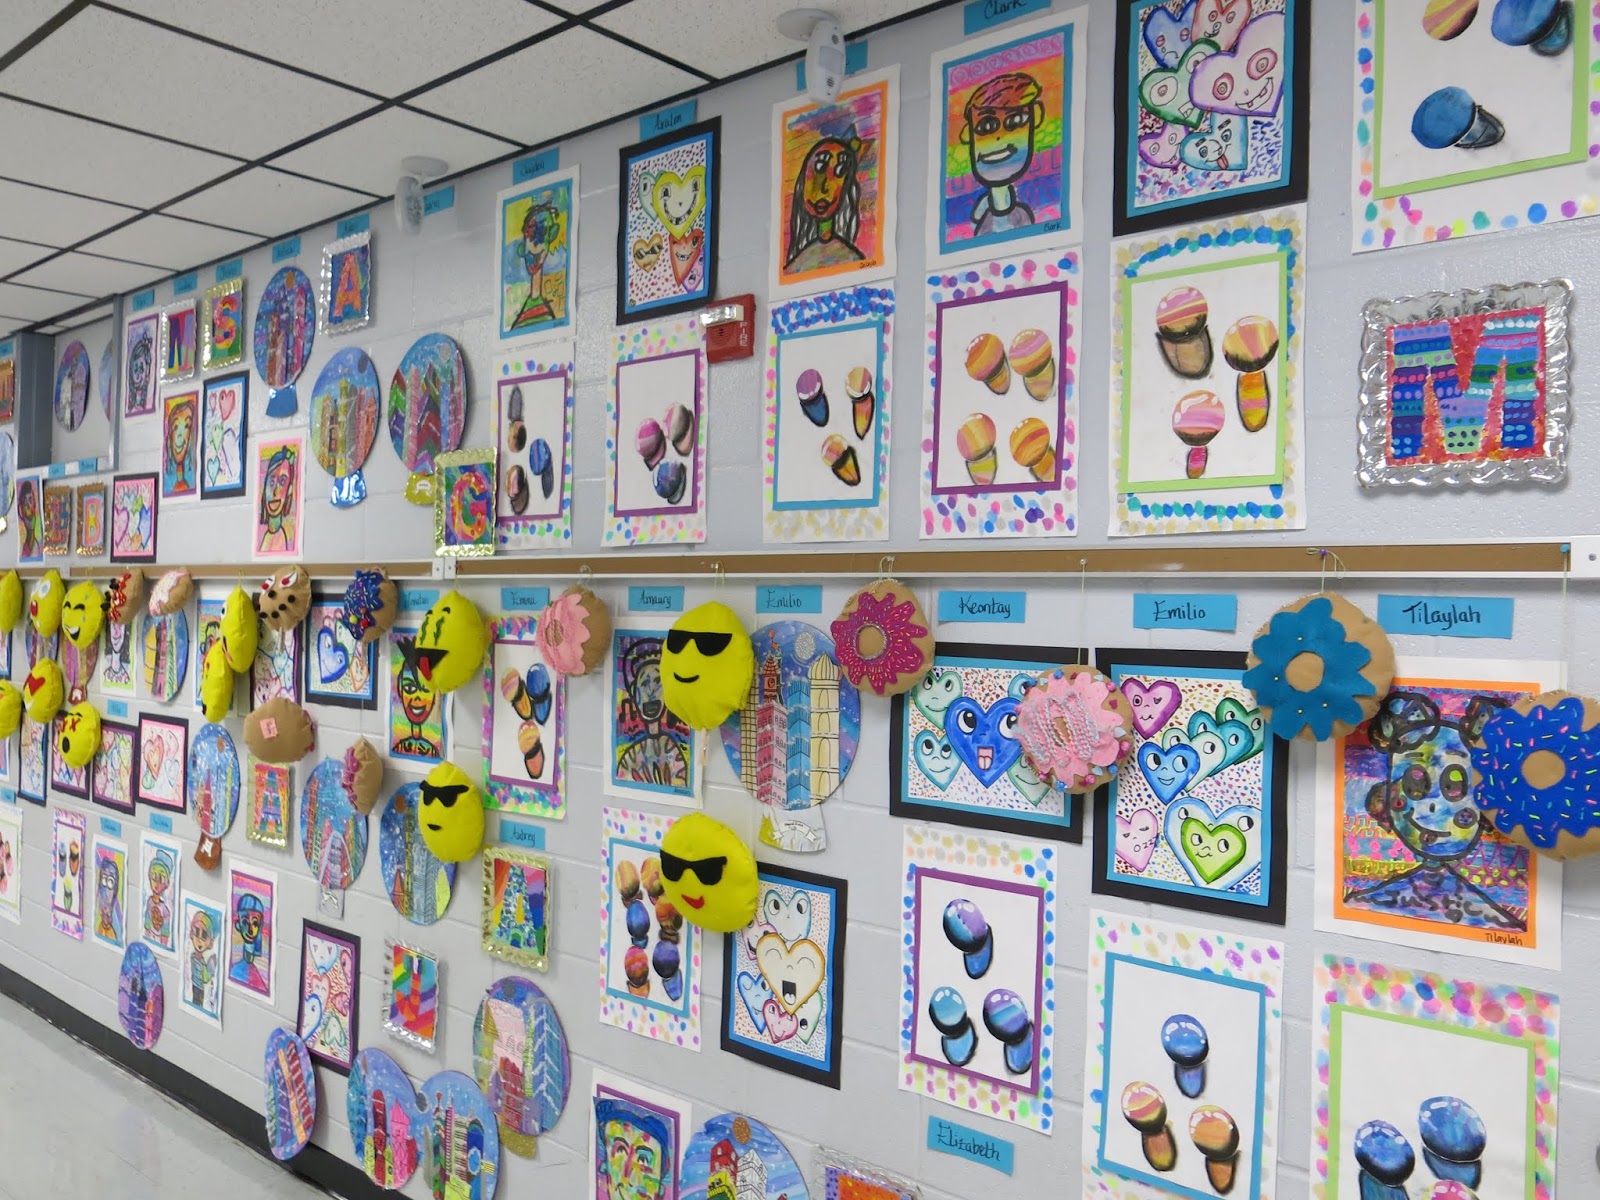 My fourth graders spent the start of their school year making pillows! We made pizza, donut and emoji pillows, all of which are in my sewing book.
 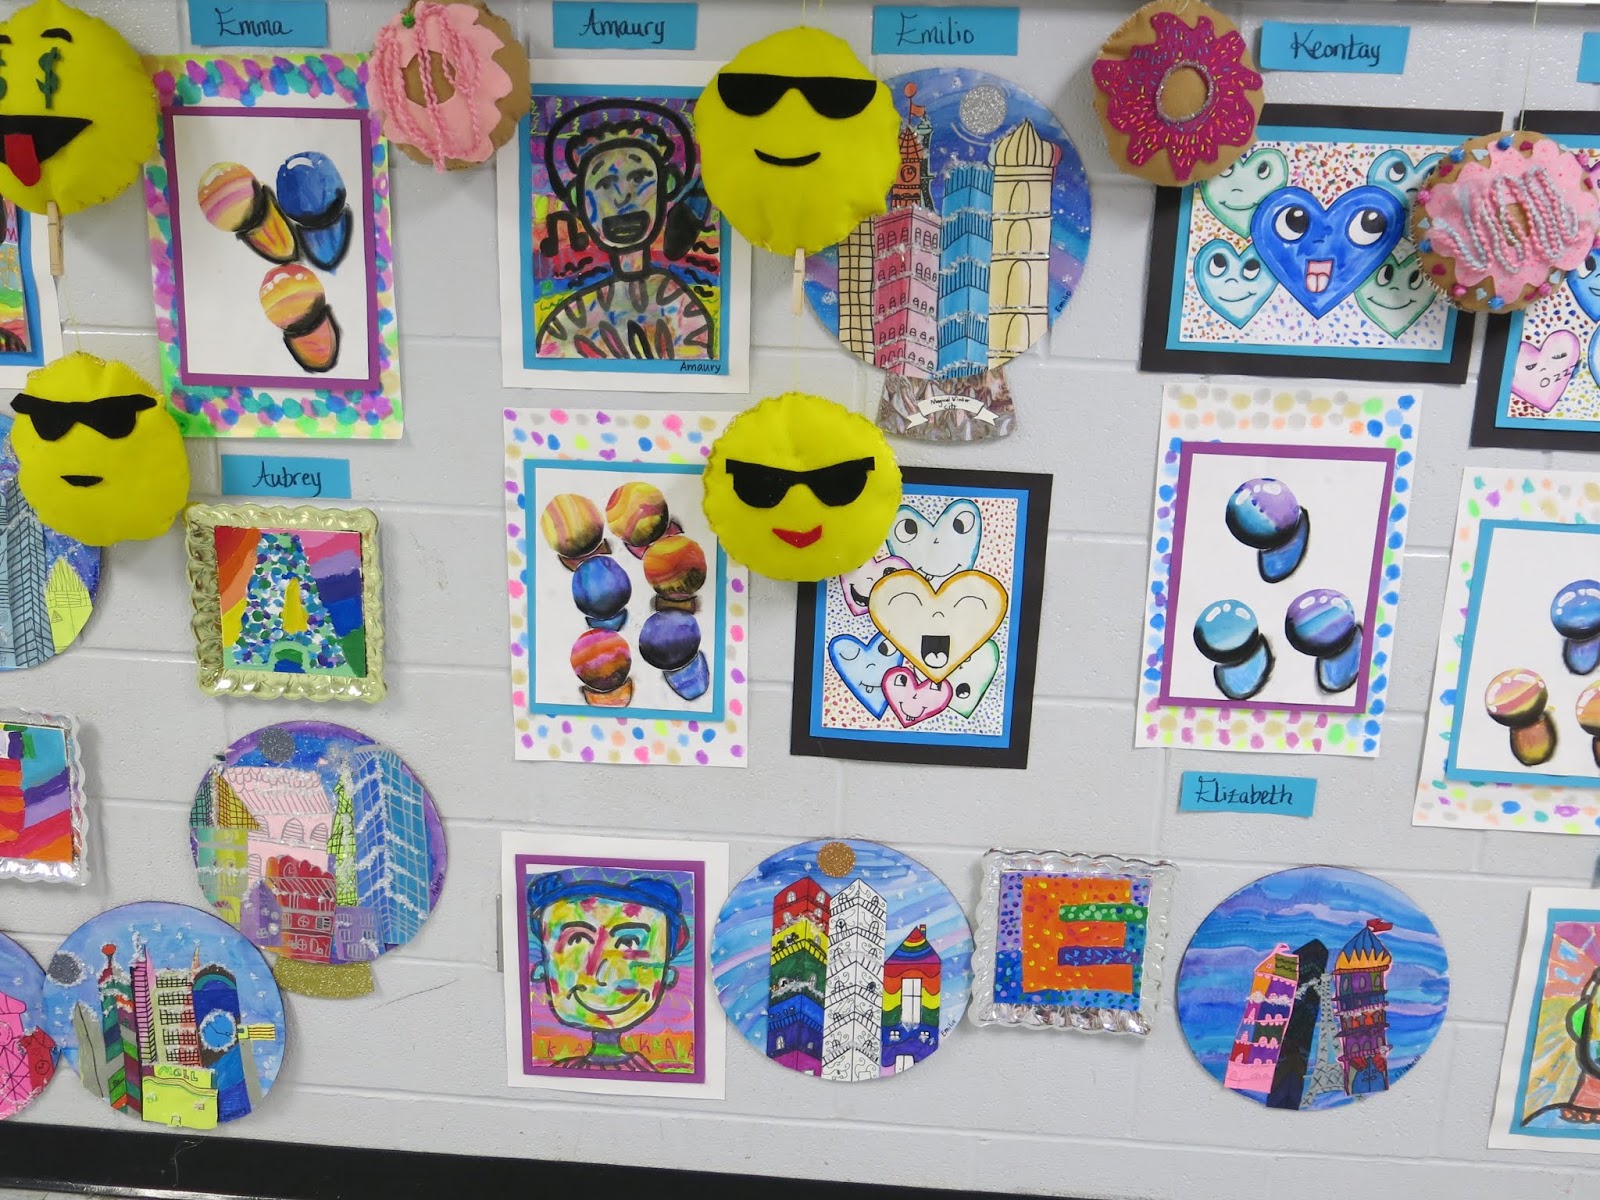 One of my favorite lessons this year was our Snow Globe project!
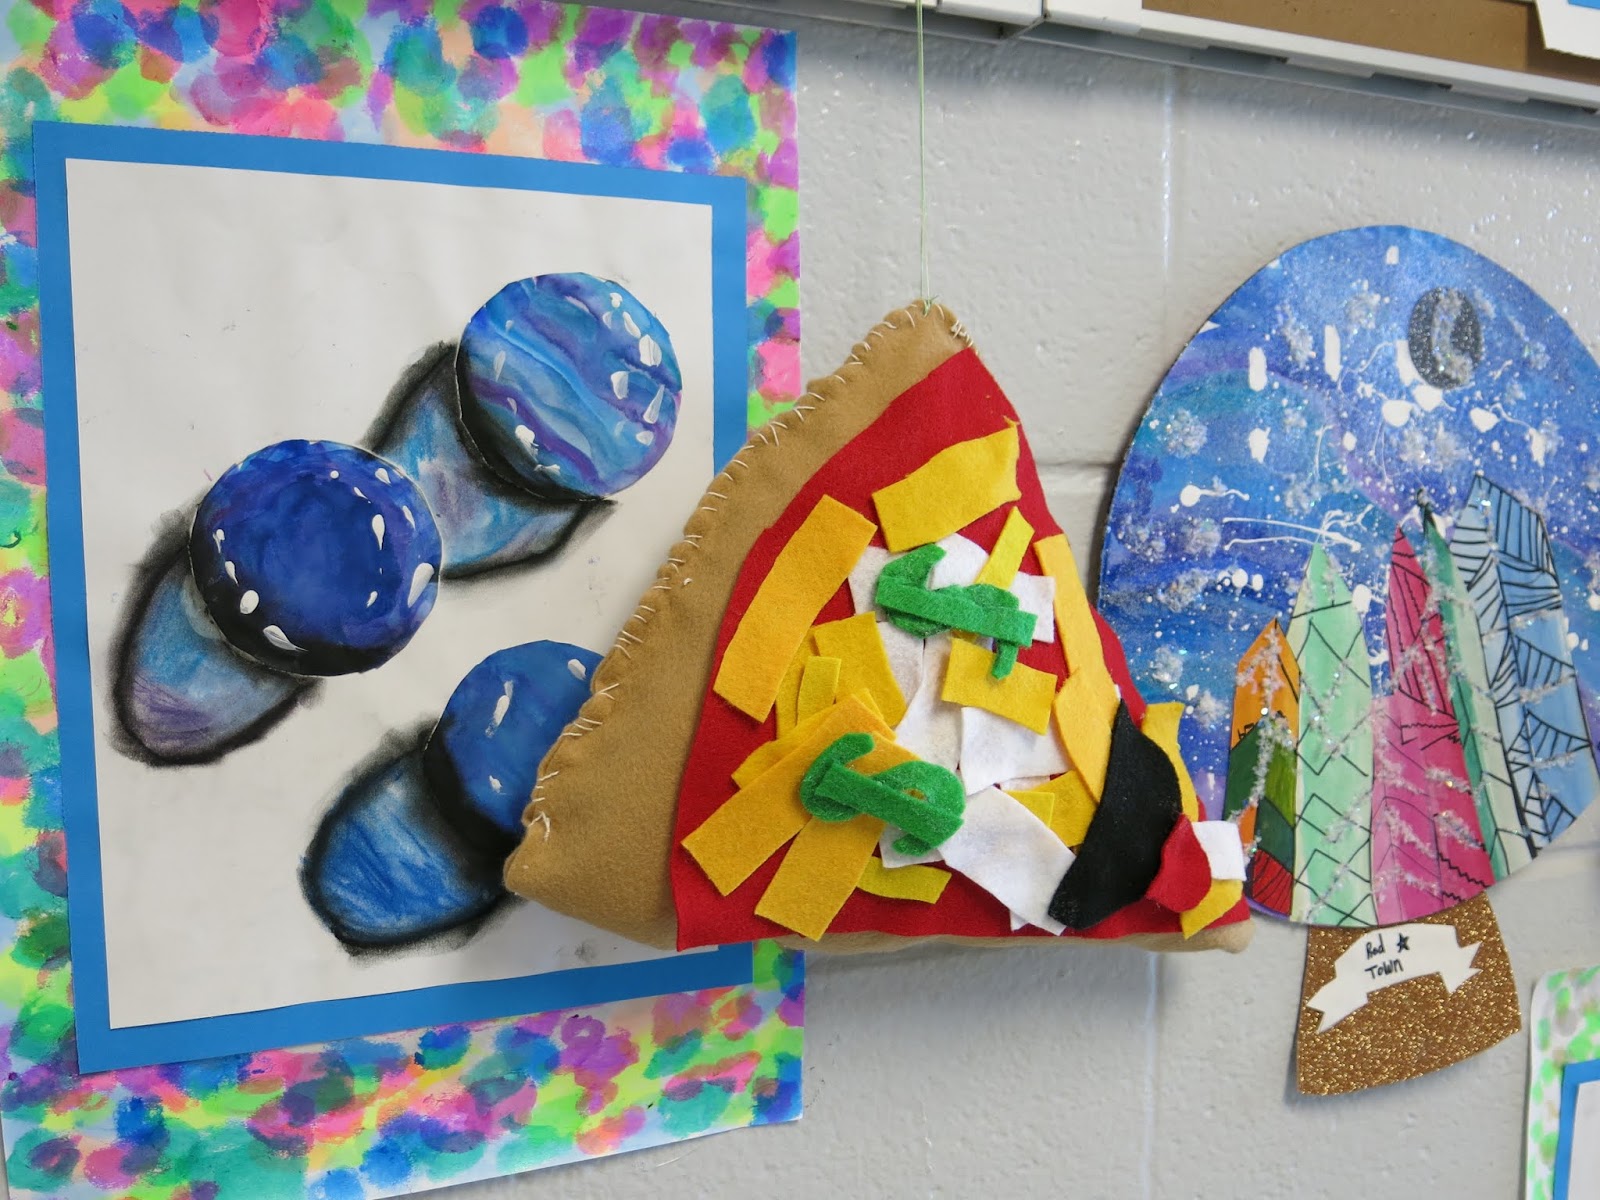 While planning our snow globes, we made tiny paintings that we later used for our marble still life lesson.
  Our Fauve-style self portraits were a lot of fun to create too.
 I hope you enjoyed this art show tour! Be sure and check out the other posts to see all the other works of art these artists created.
June 9, 2019
DIY: Polymer Clay Earrings
 What lengths will you go to in order to avoid unpleasantries? Me, I go to great lengths to dodge sewing.
 The thing is, I get myself into this sewing pickle every single time. It always starts with the super cute fabric. Currently, I'm in to BIG AND BOLD prints that I usually score at IKEA. Case in point: that bold orange print you see in the background there. I'm currently working on sewing it into a dress but I'm closing in on zipper and hem time and I REALLY don't like zipper and hem time.
So, I made earrings to go with my yet to be complete dress!
 Polymer clay (I like to use the brand Sculpey) is a clay that comes in a variety of colors and you bake in the oven to harden. I used it a lot in this book. When I wrote that book, I really wanted to include that kind of clay because my students and I love it so much. I keep a stash at home for when I want to work with it because it's so stinkin' fun. If you are new to polymer clay land, I thought I'd make a little video to walk you through how I made these earrings. Really the only supplies you'll need are the clay, some jump rings, French hook earrings and jewelry tools.
 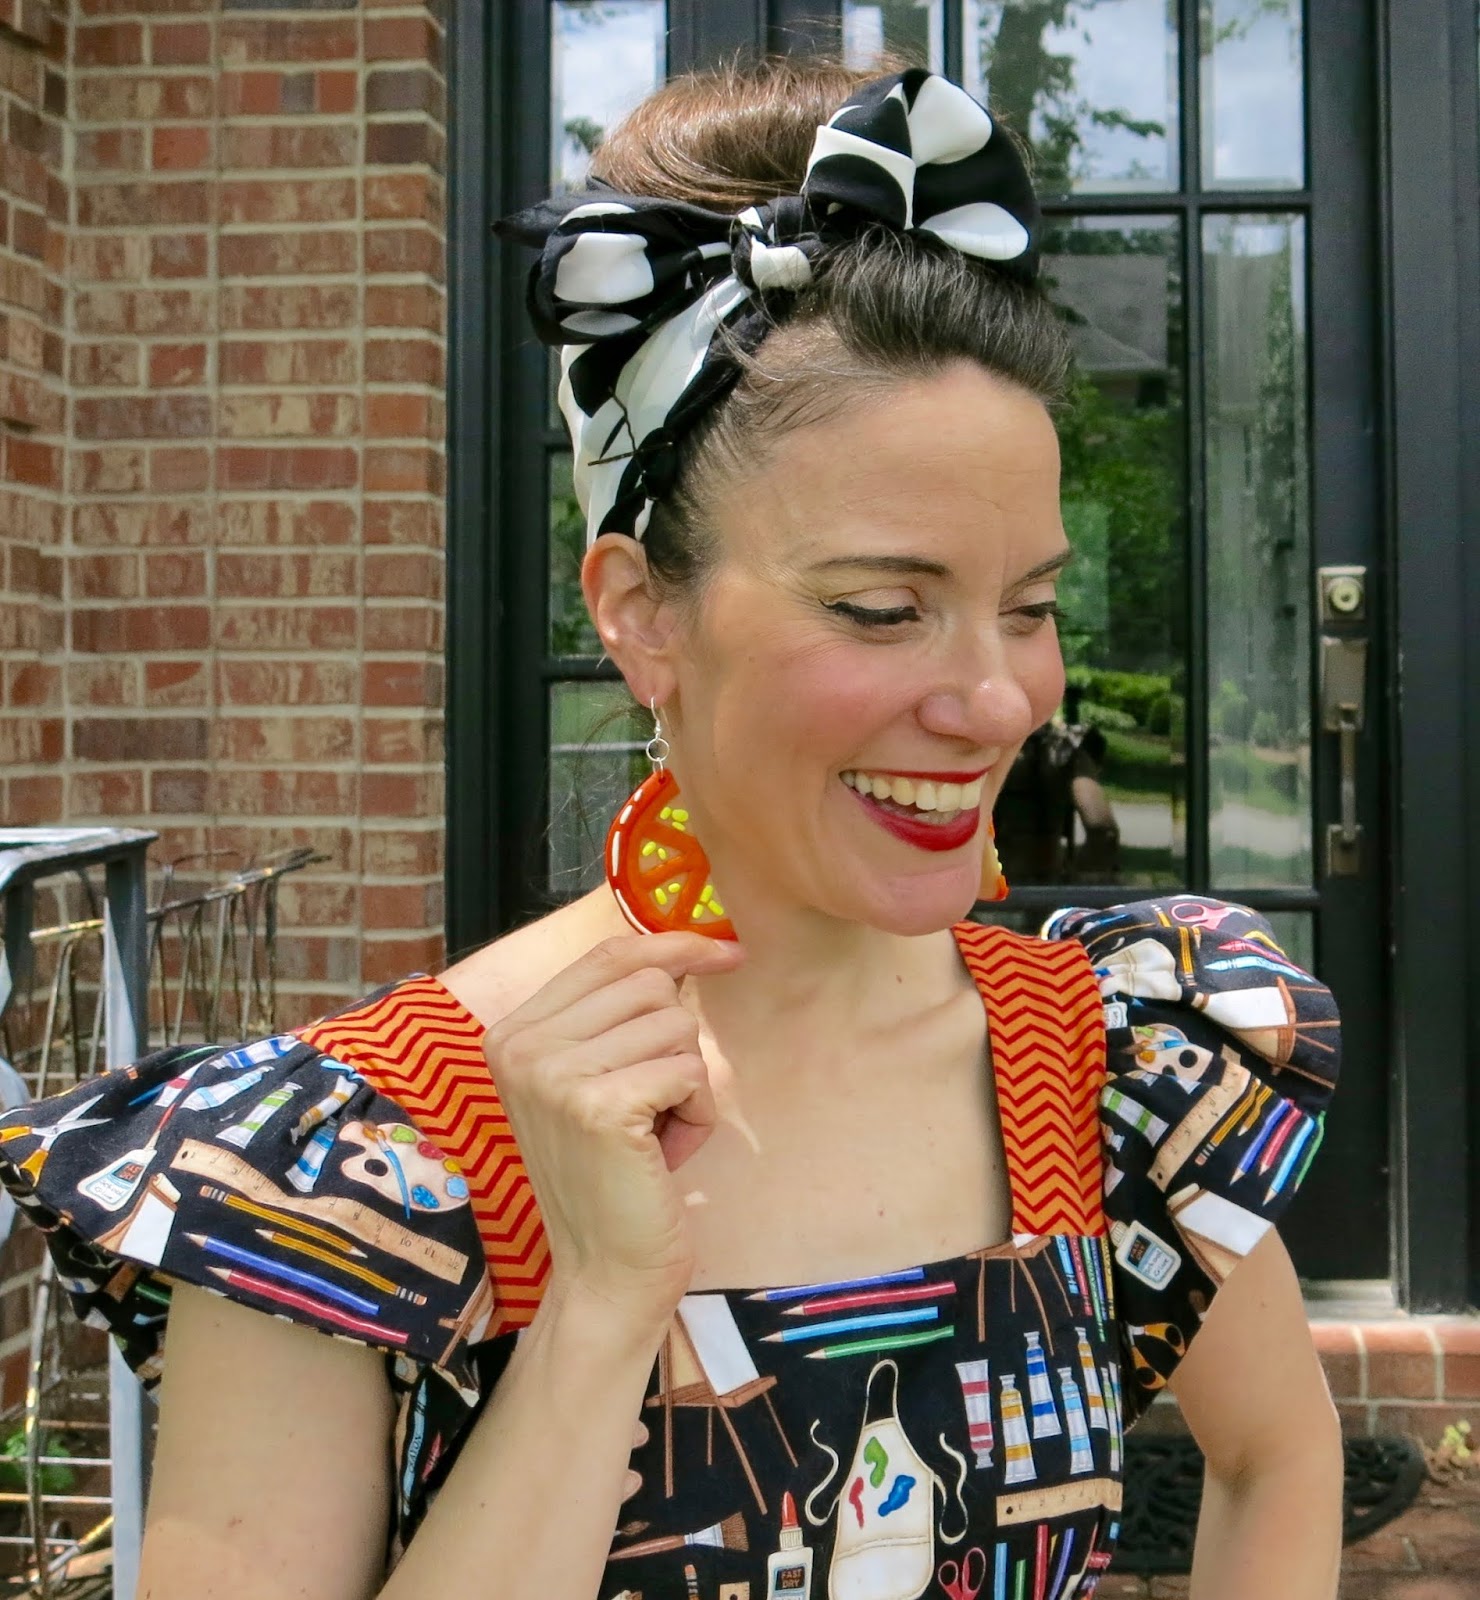 When making polymer clay earrings, just a couple things to remember:
* Polymer clay is self-adhesive. Meaning you don't have to use glue to get the pieces to stick together. Just press and go!
* Keep them light! You wouldn't think these would make for heavy earrings but they can if you aren't careful. In fact, the palette ones below, while my fave, are the most heavy and can only be worn for a short while.
* Don't put the hole too close to the edge of the design. I learned this the hard way. If you make it too close, the clay just might break when you are sliding the jump rings in.
* Don't make the clay too thin. Okay, it's a balance...light enough to be wearable, but not so thin that they break when adding the earrings.
* Allow the clay to cool completely. I have noticed that when I take the clay out of the toaster oven, it tends to still be a little bendy. It will harden as it cools.
* Bake at a lower temp than suggested if using a toaster oven. I like to use a toaster oven because they heat up faster and require less energy than my oven. That being said, they do tend to bake stuff a lot hotter...and I've burnt my share of polymer creations because of it. For that reason, I'd say bake at 200 for about 5-7 minutes.
 My little stash of polymer clay earrings.
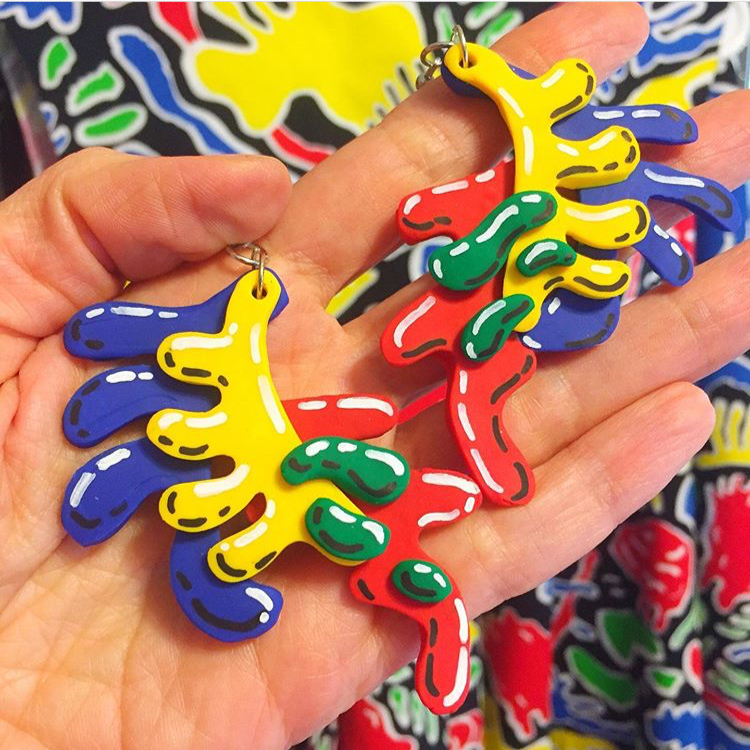 I also dig using paint pens on them when they come out of the oven...although I have noticed that the paint does tend to rub off over time.
 By the way, this here dress was made by me a while back and you can read all about it right here. And if you wanna see more polymer clay jewelry creations, you can go here to see some wild and wacky necklaces!
May 30, 2019
2019 Art Show: Glow Gallery!
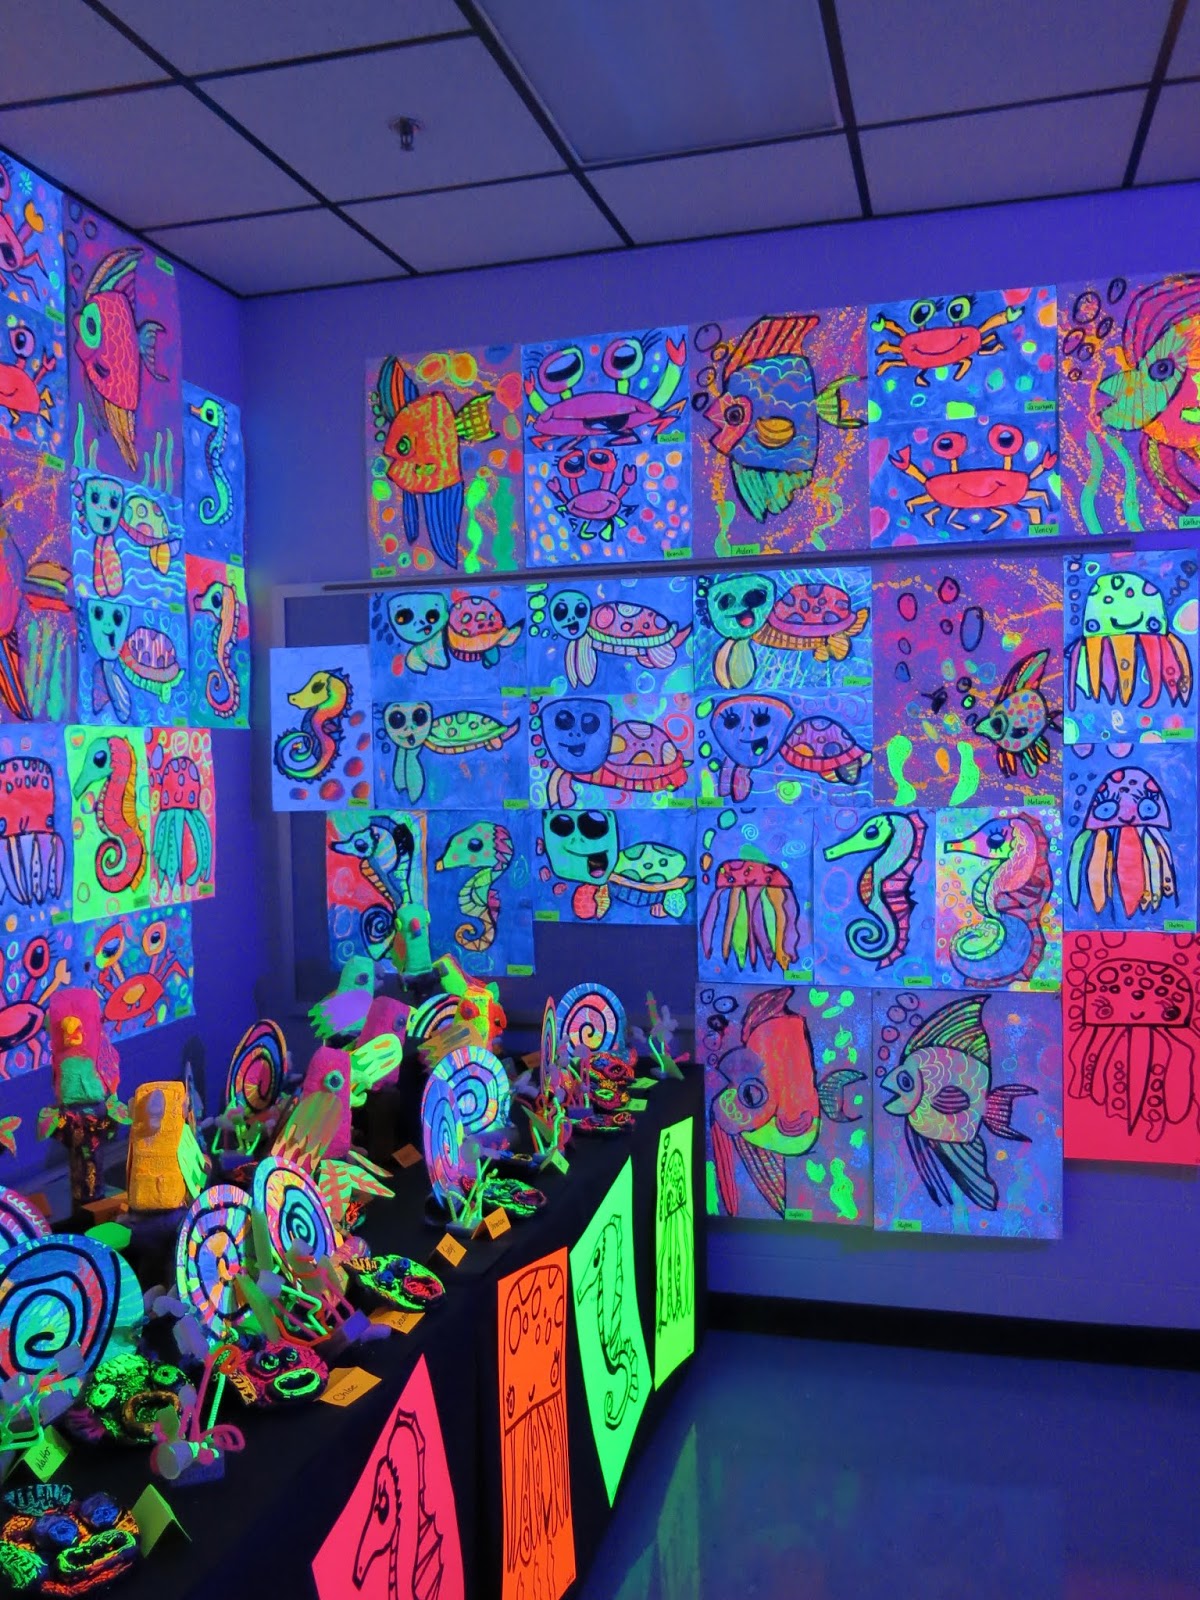
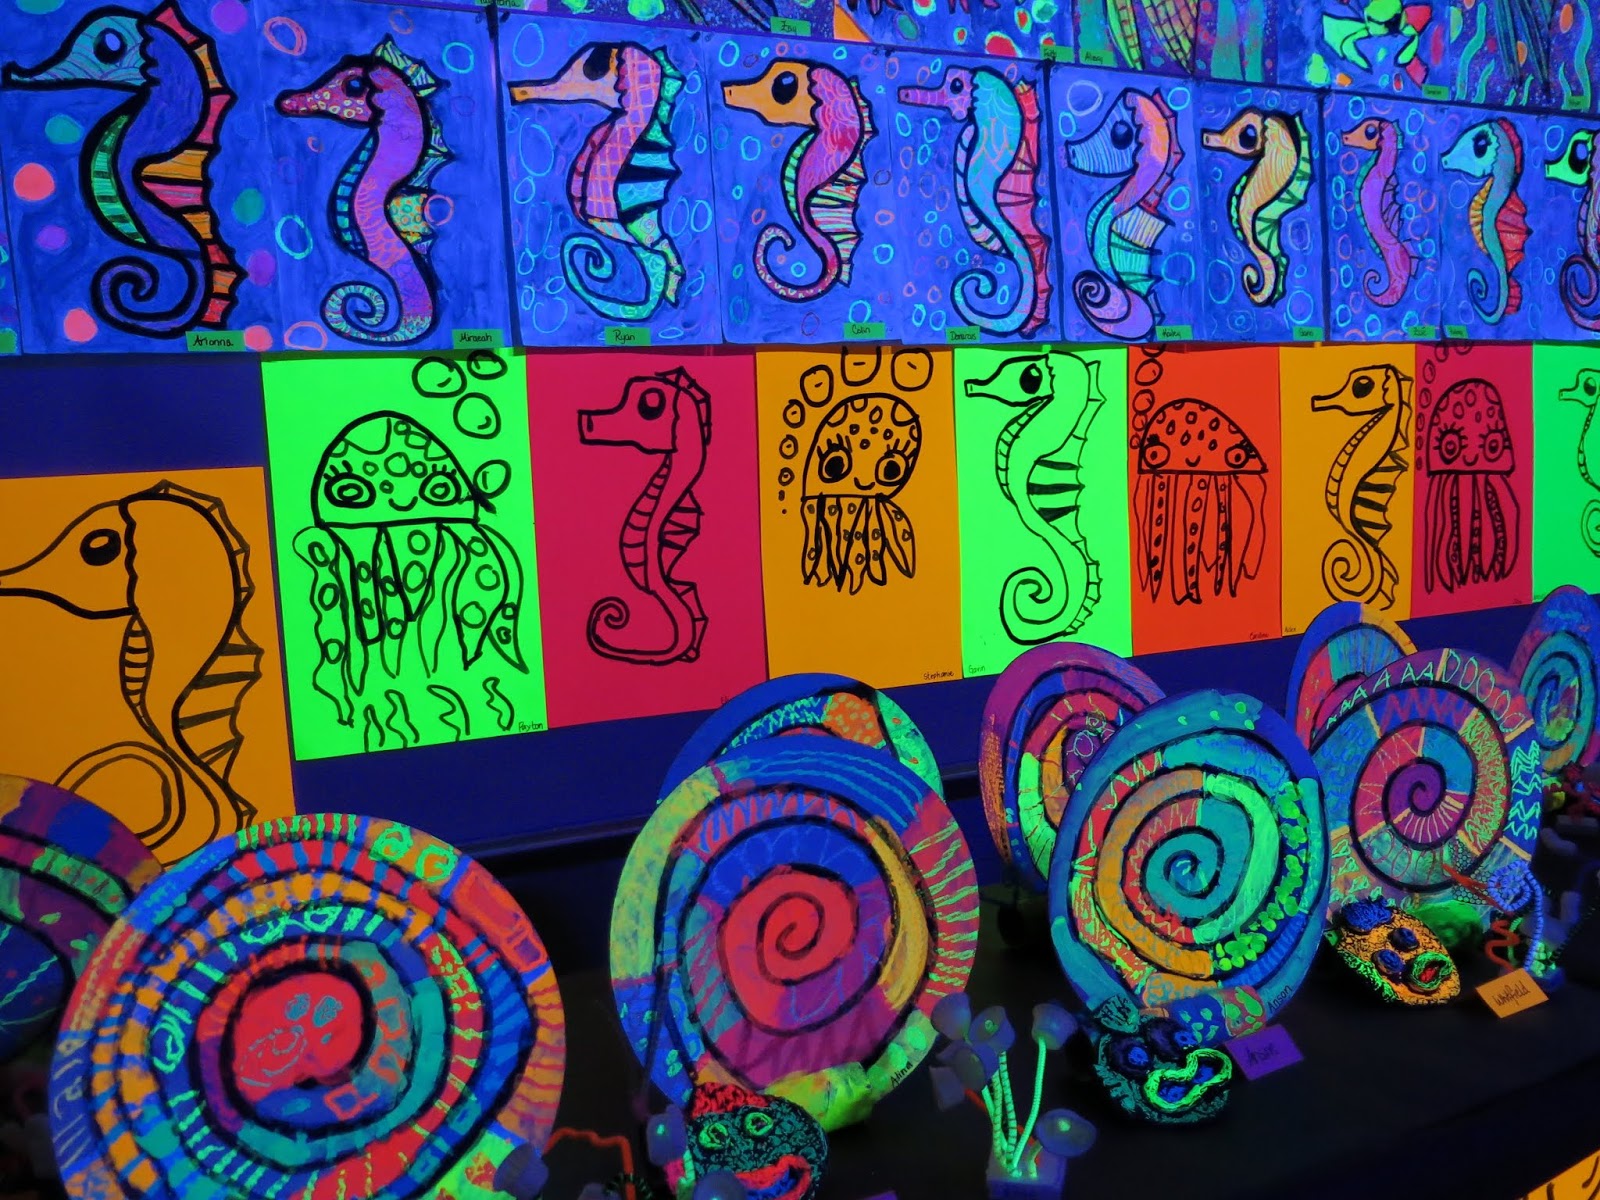
 Hey, friends! Last week, I shared with you the Pirate Gallery, which was one of the three galleries where my student's work was featured at our school wide art show. Today I'm sharing with you our Glow Gallery, the HIT of our art show. Each student had at least one work of art on display with my kindergarten friends having THREE works of art featured. Whew! Here is one side of the gallery with the lights off and the black lights on.
 And here it is with the lights on. Still just as beautiful, says me! I thought I'd take you on a tour of this gallery, complete with lights we used, projects each grade level did and supplies that work the best for black light. So, let's go!
I LOVE going through art shows, don't you?! So much happiness and color, baby, color!
 Full disclosure: This is a spare classroom. I had the luxury of having an entire room to dedicate to the gallery. I spent one entire day with the help of a parent covering the window and setting up the displays. The artwork was simply hot glued to the wall. The best way to do that without damaging the artwork or the walls is to add a flat bit of masking tape to each corner of the artwork on the back. Then add a small dot of hot glue to the tape and stick to the wall. When taking the art down, simply give the work a gentle tug and it will pop right off the wall.
 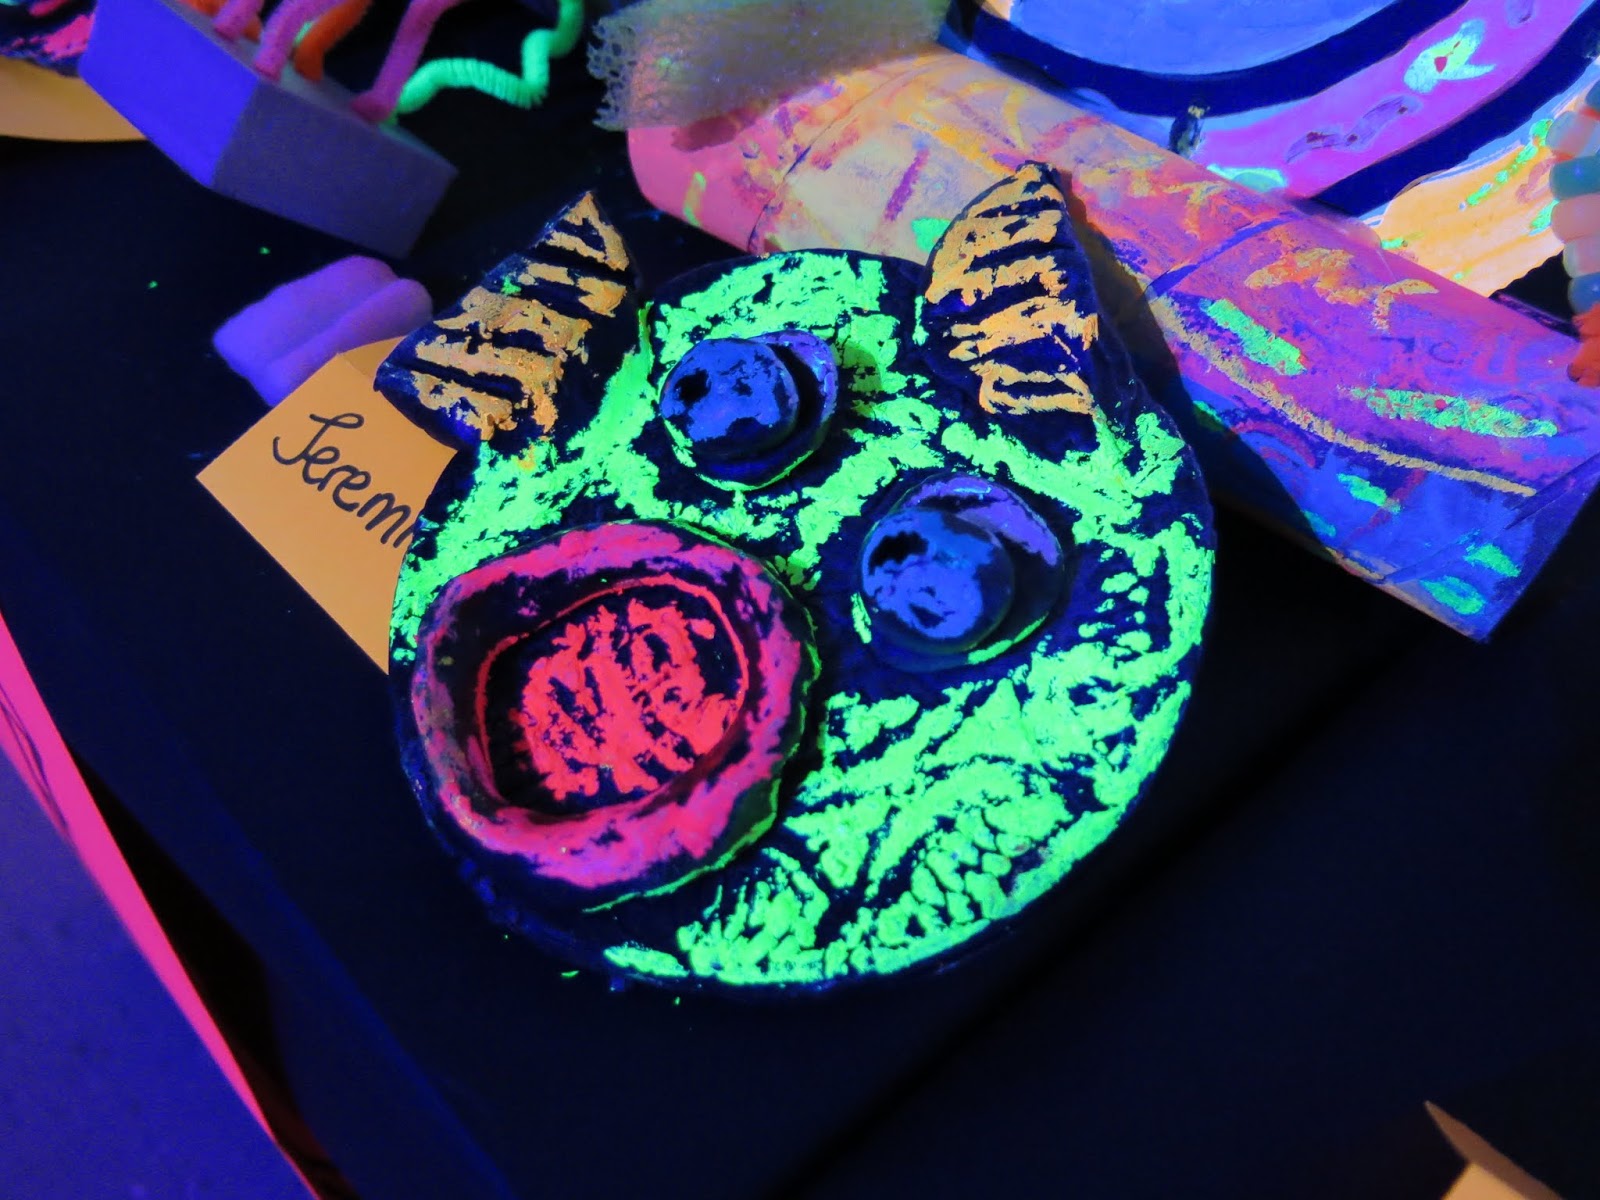 My kindergarteners created three pieces of art for this gallery. The first were these clay slab fish. You can find this lesson here and in my clay book!
  They also made these fun snails from cardboard pizza rounds. They started by painting a spiral with a bingo dauber. Then they added color with fluorescent oil pastels and fluorescent paint (details on supplies in a moment). From there, they were attached to a paper towel tube and antennae were added. So cute! More details on this lesson soon, I hope!
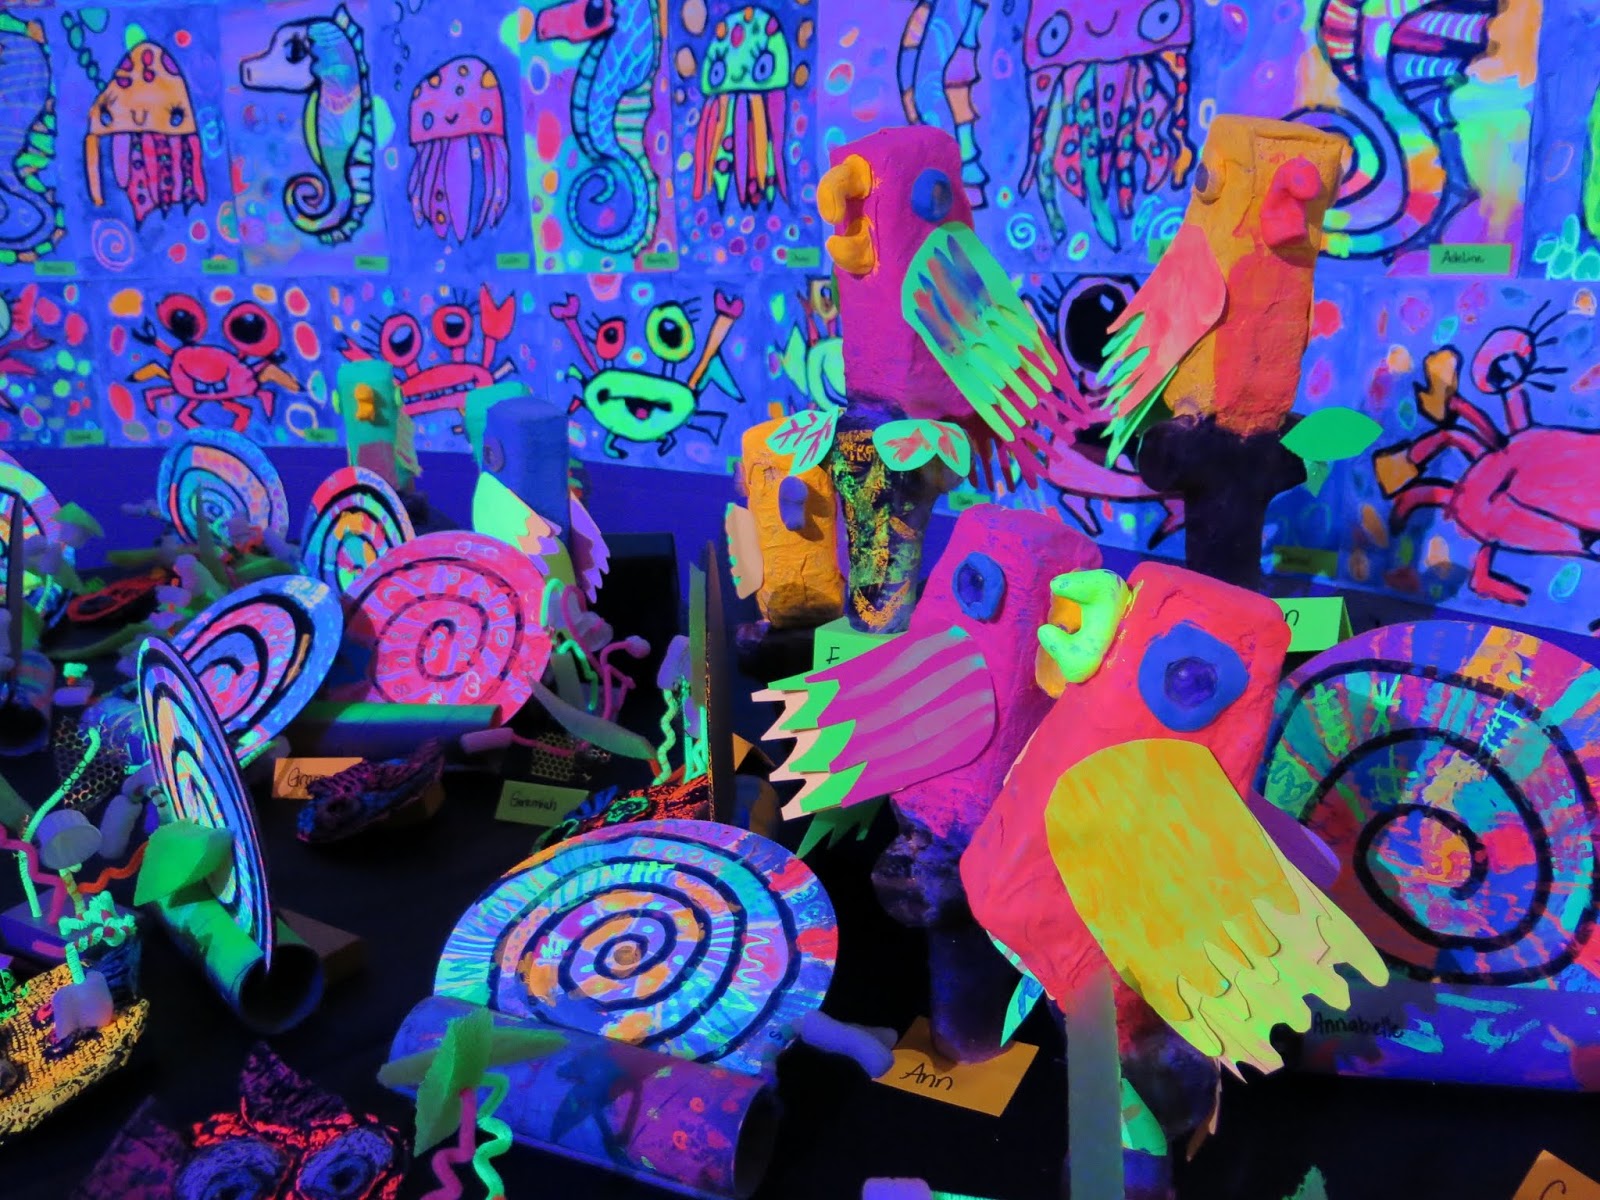 Some of my third graders made these amazing plaster and paper parrots! I think they are one of my favorite projects from the show.
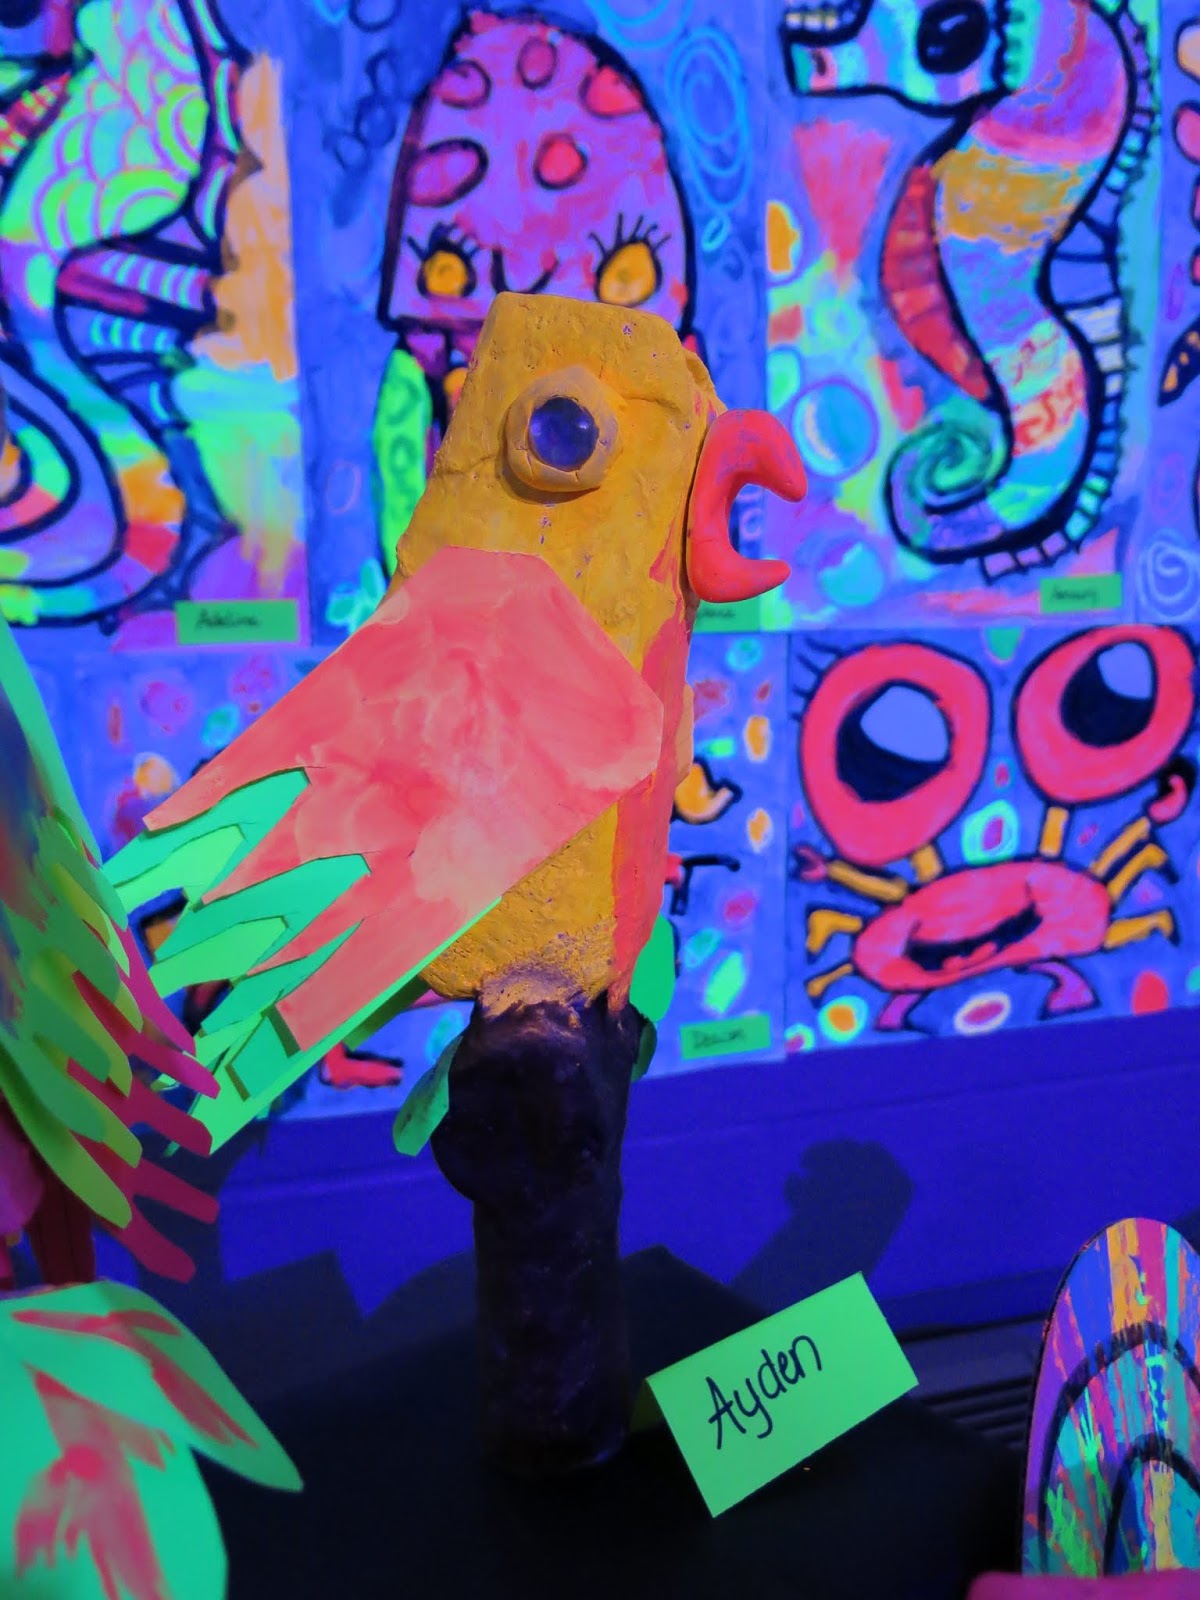 Another lesson which I hope to share with you soon...the kids loved making them!
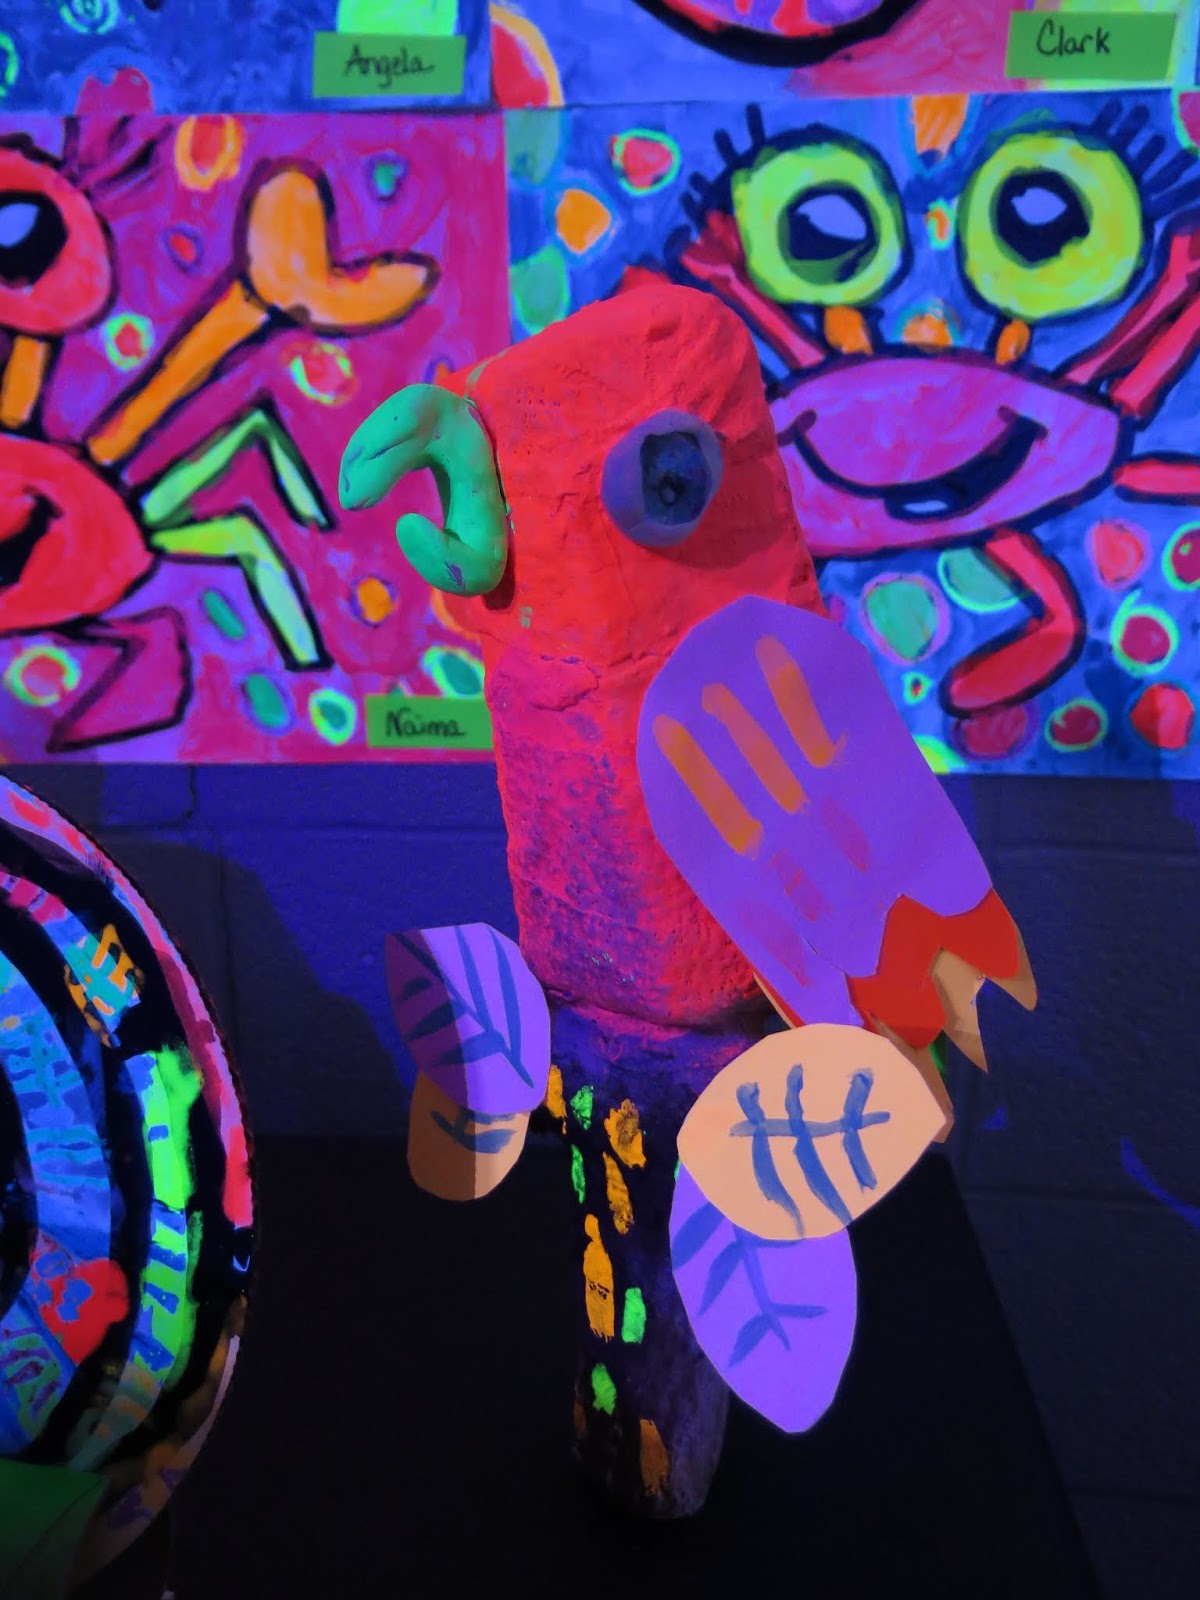 And they were so striking in the black light.
 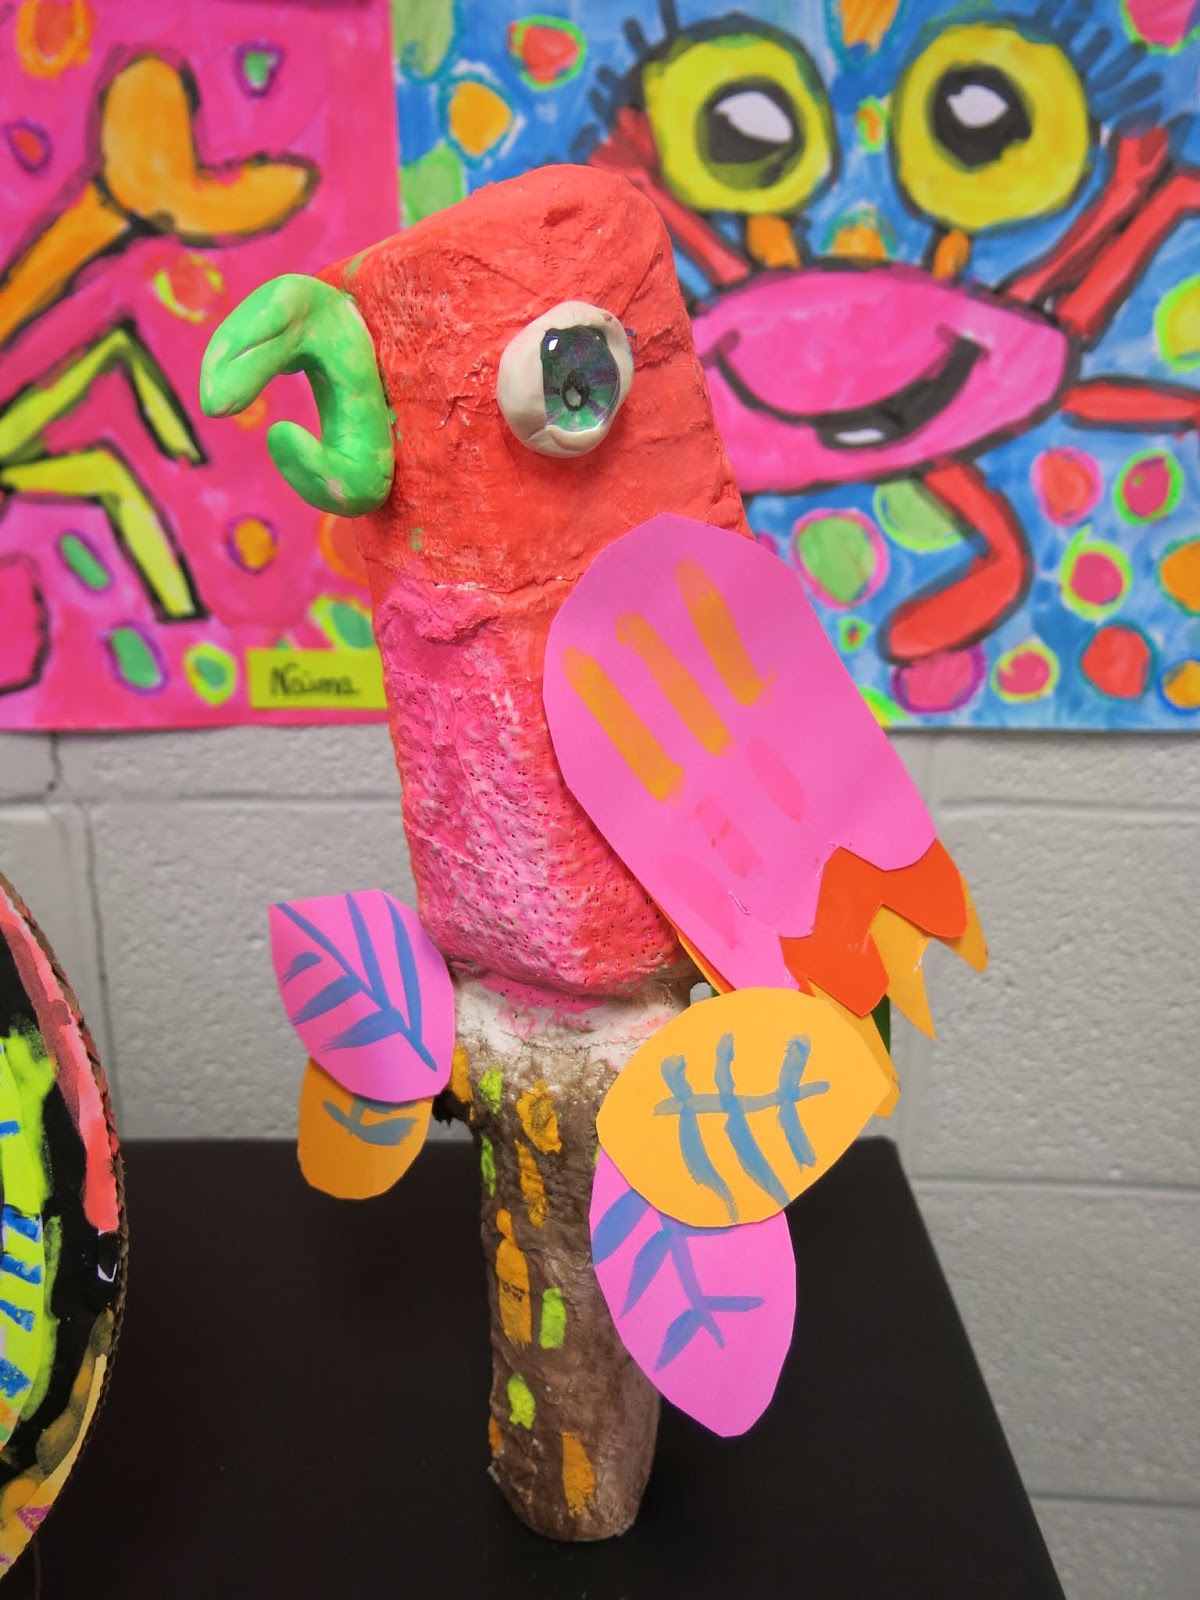 But also great with the lights on.
 Let's talk supplies for a minute because it's important you use the right stuff.
 * Sargent Brand Fluorescent Oil Pastels
* Jack Richeson Fluorescent Tempera Cakes
* Fluorescent Liquid Watercolor (optional)
* Fluorescent Tempera Paint (optional)
The last two we didn't use...we just stuck with the oil pastels and tempera cakes. But I will be getting the other paints for next year.
In a pinch, when time was running short, we did use fluorescent poster board and bingo daubers for some of the drawings. We did this because I only had one 30 minute art class with the kids before the big day...so we worked with the time we had. I wanted to insure that every kiddo had a work of art in this special room.
 On the night of the art show, we did have a couple of teachers at the door to act as Black Light Bouncers as I knew this room would be busy. I didn't want a crowded room to ruin the experience for the kids or have any artwork potentially be damaged. We did have some glow face painting happening which was also fun for the kids. More details on all of the crazy things we had happening at our art show in a future post.
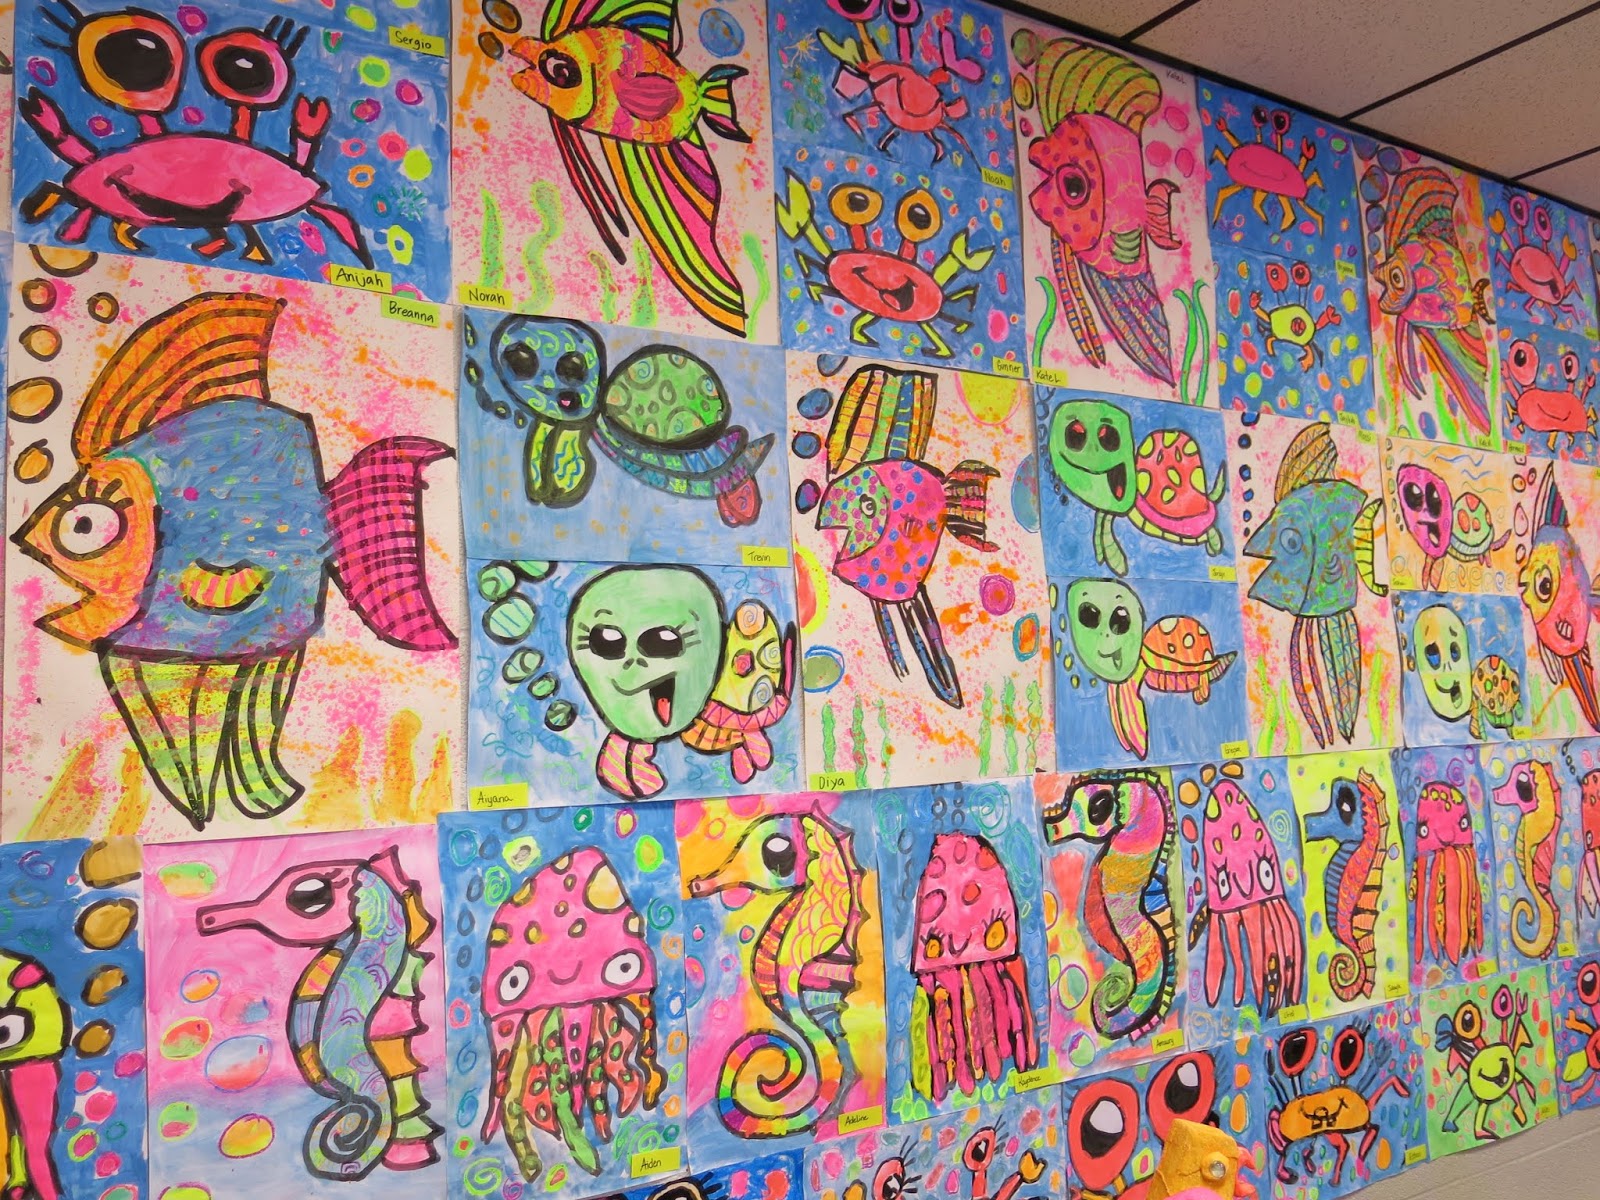 Let me walk you thru who made what! By the way, each of these 2D works of art took only an hour (or two 30 minute art classes for me) to complete.
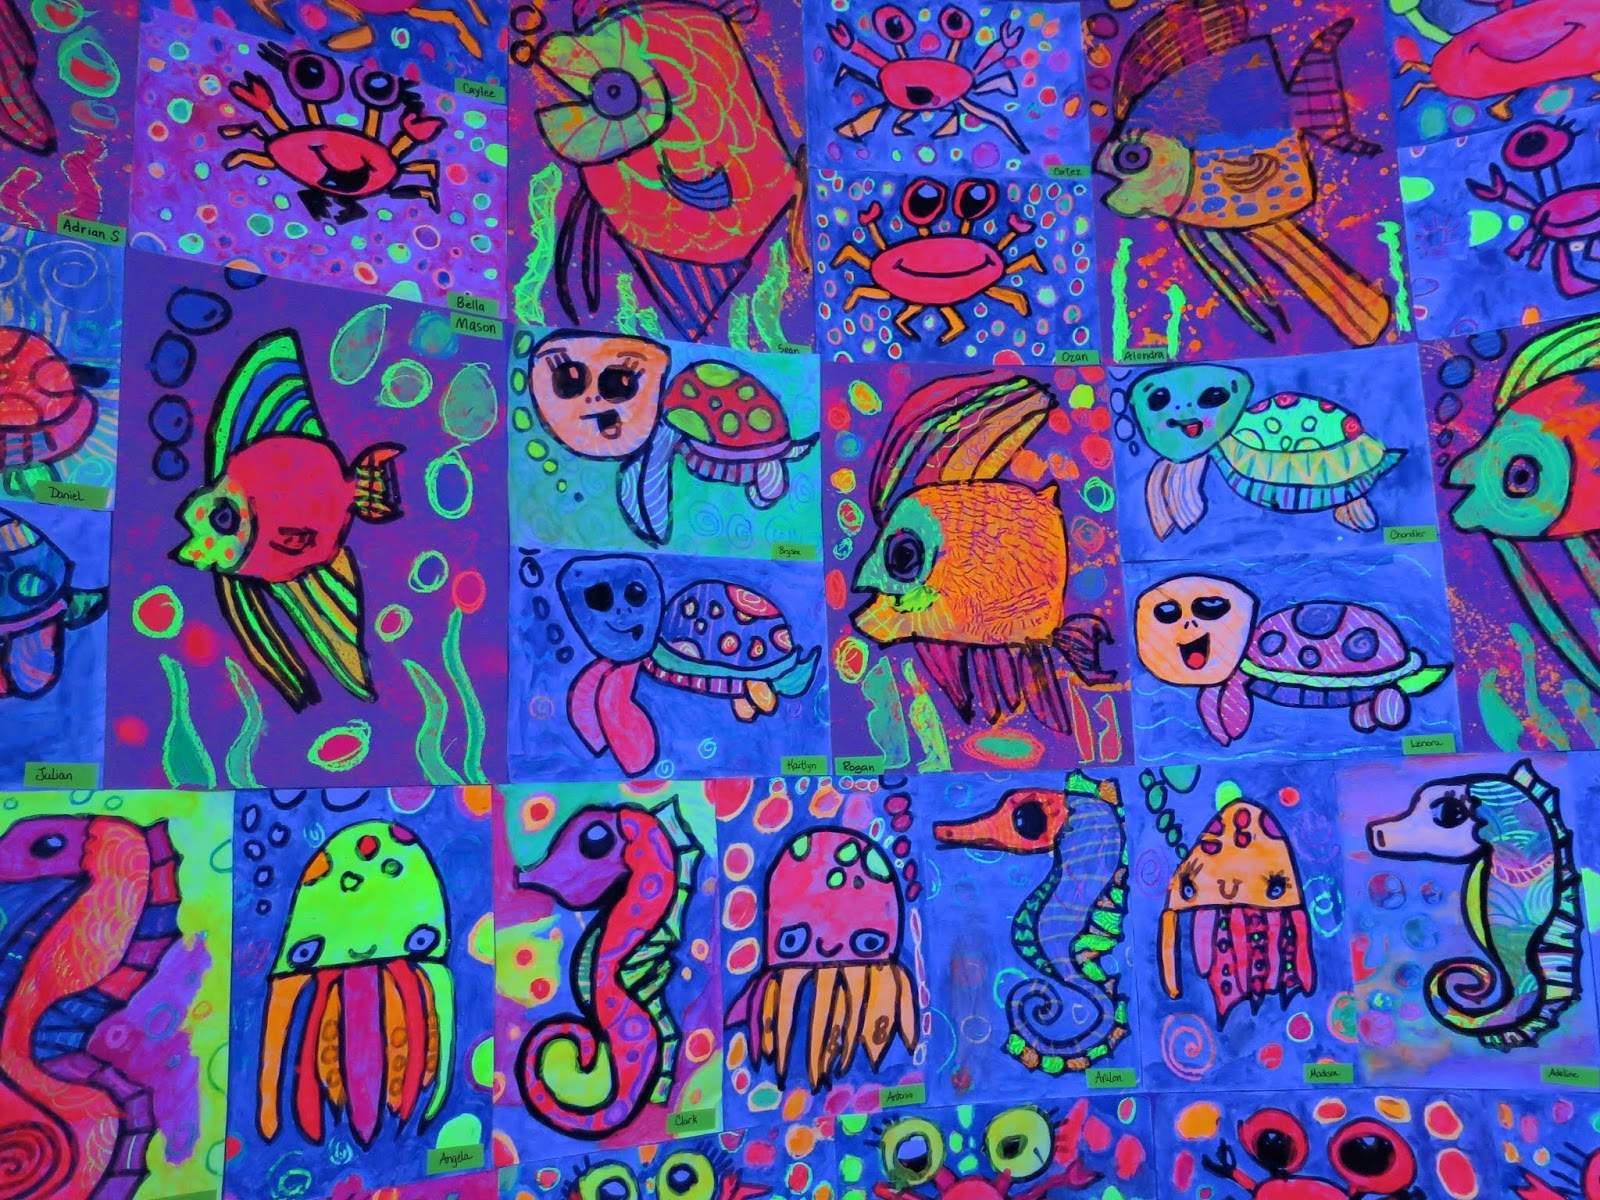
 Some first graders created the octopus (by following along with here) while some of my first graders drew the crab...a guided drawing lesson of mine. I'll be sure to share that with you too. I have a lot of sharing to do!
Some second graders created the GIANT angel fish by following here while others created the octopus on the neon paper due to time limitations.
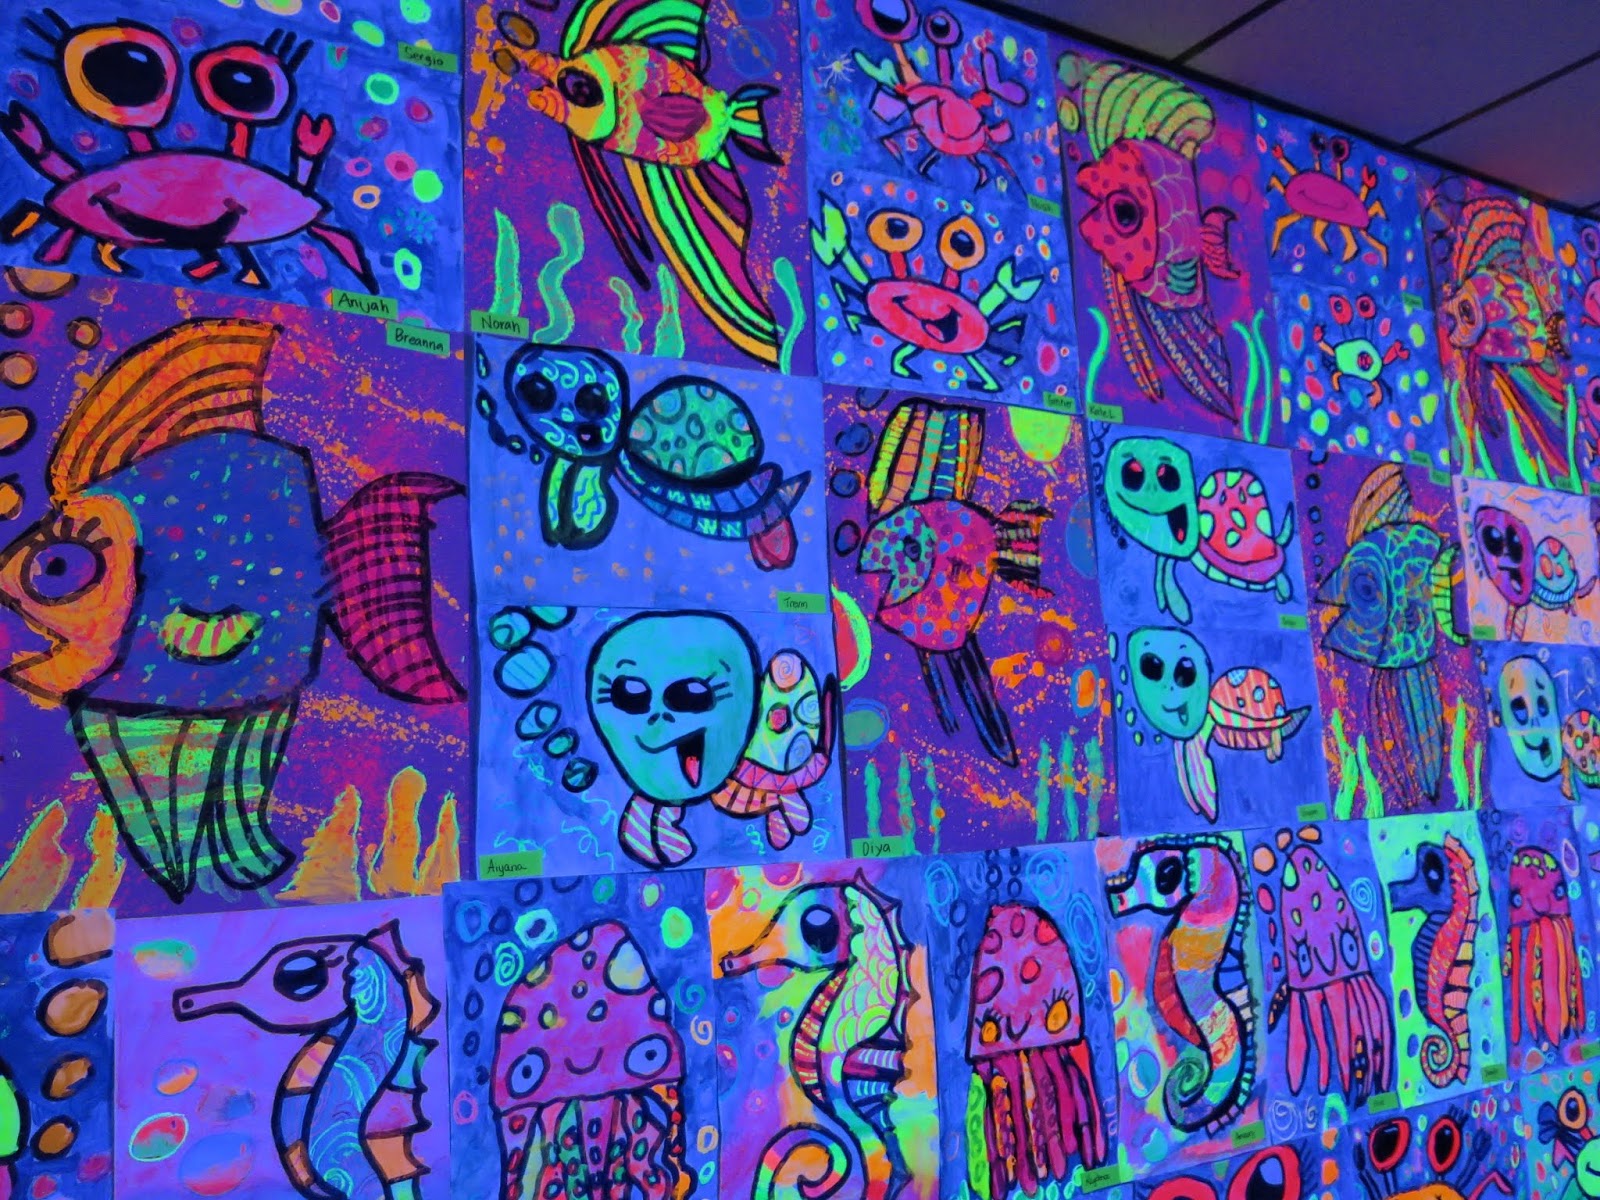 My third graders made the sea turtles and my fourth graders made the sea horses.
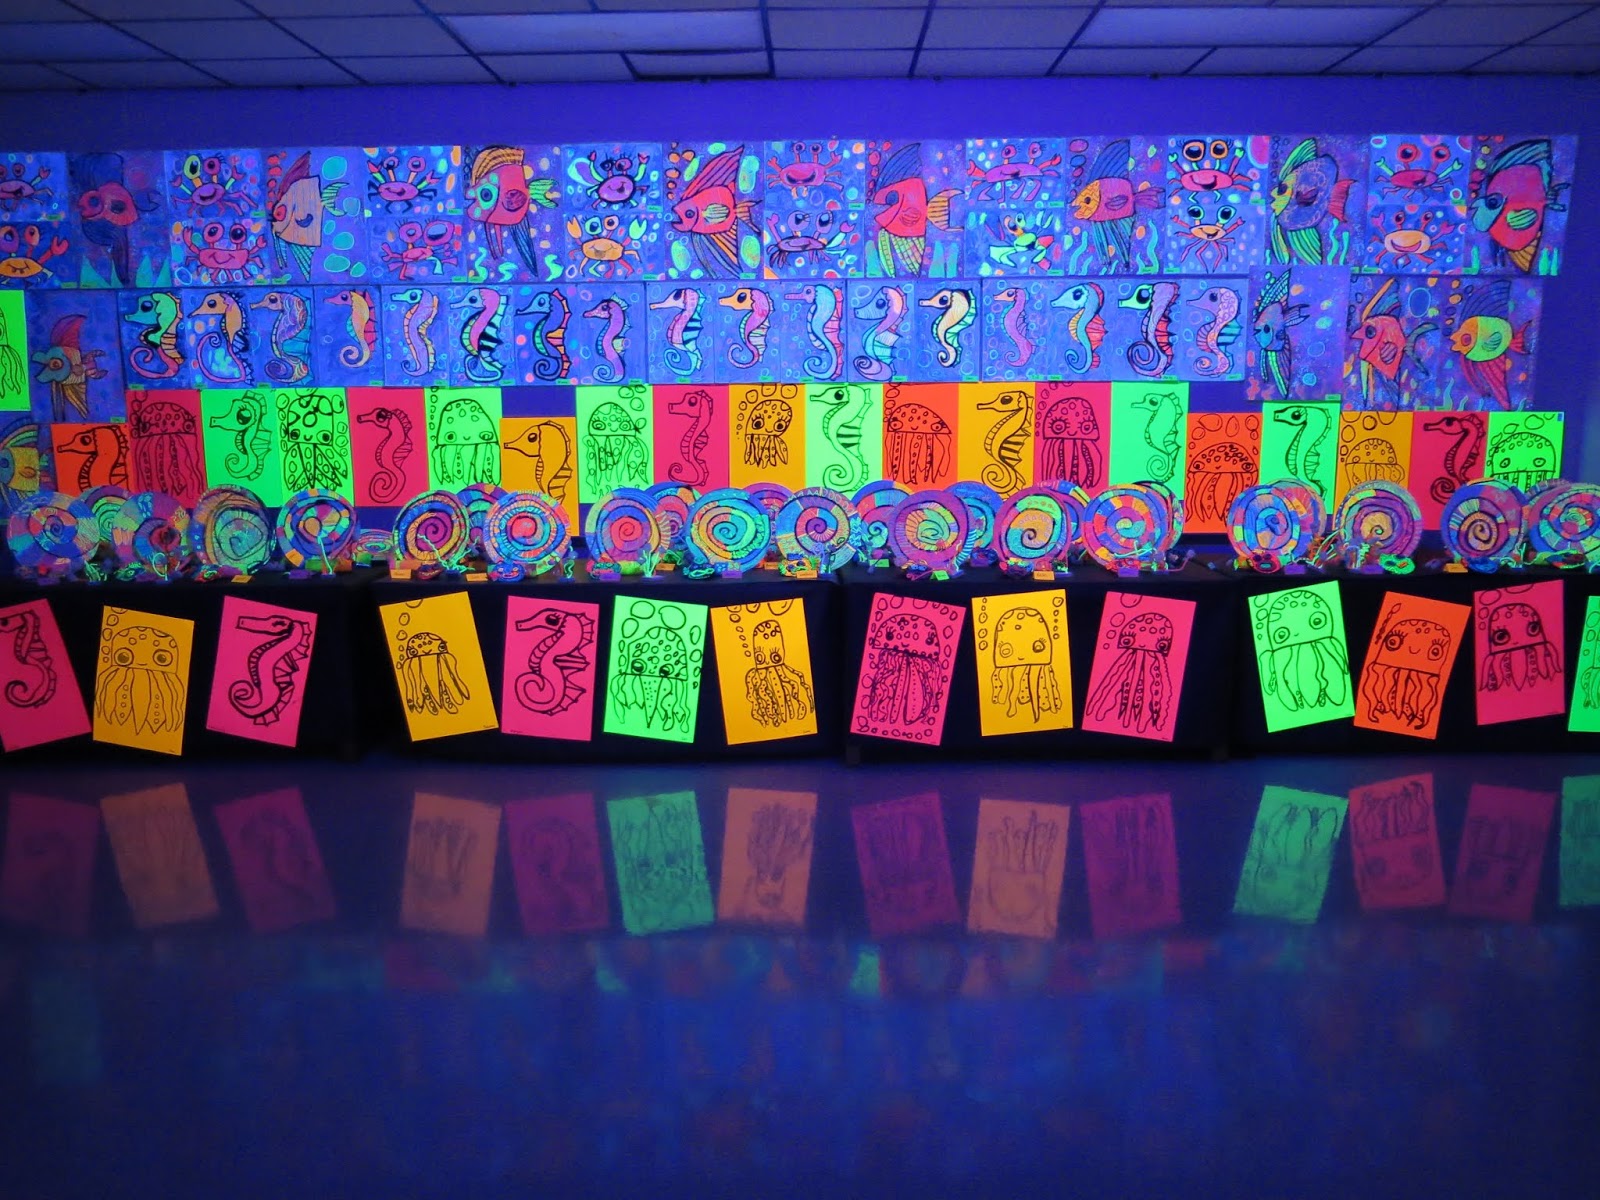 Now, let's talk lighting because that is the true key. It's the reason I avoided doing a gallery like this for so long because I just didn't have a clue what lighting to get. We ended up purchasing three kinds and I'll tell you, this one was easily my fave. Starting out, one is all you need IF you block out all the light in the room, making it completely black.
 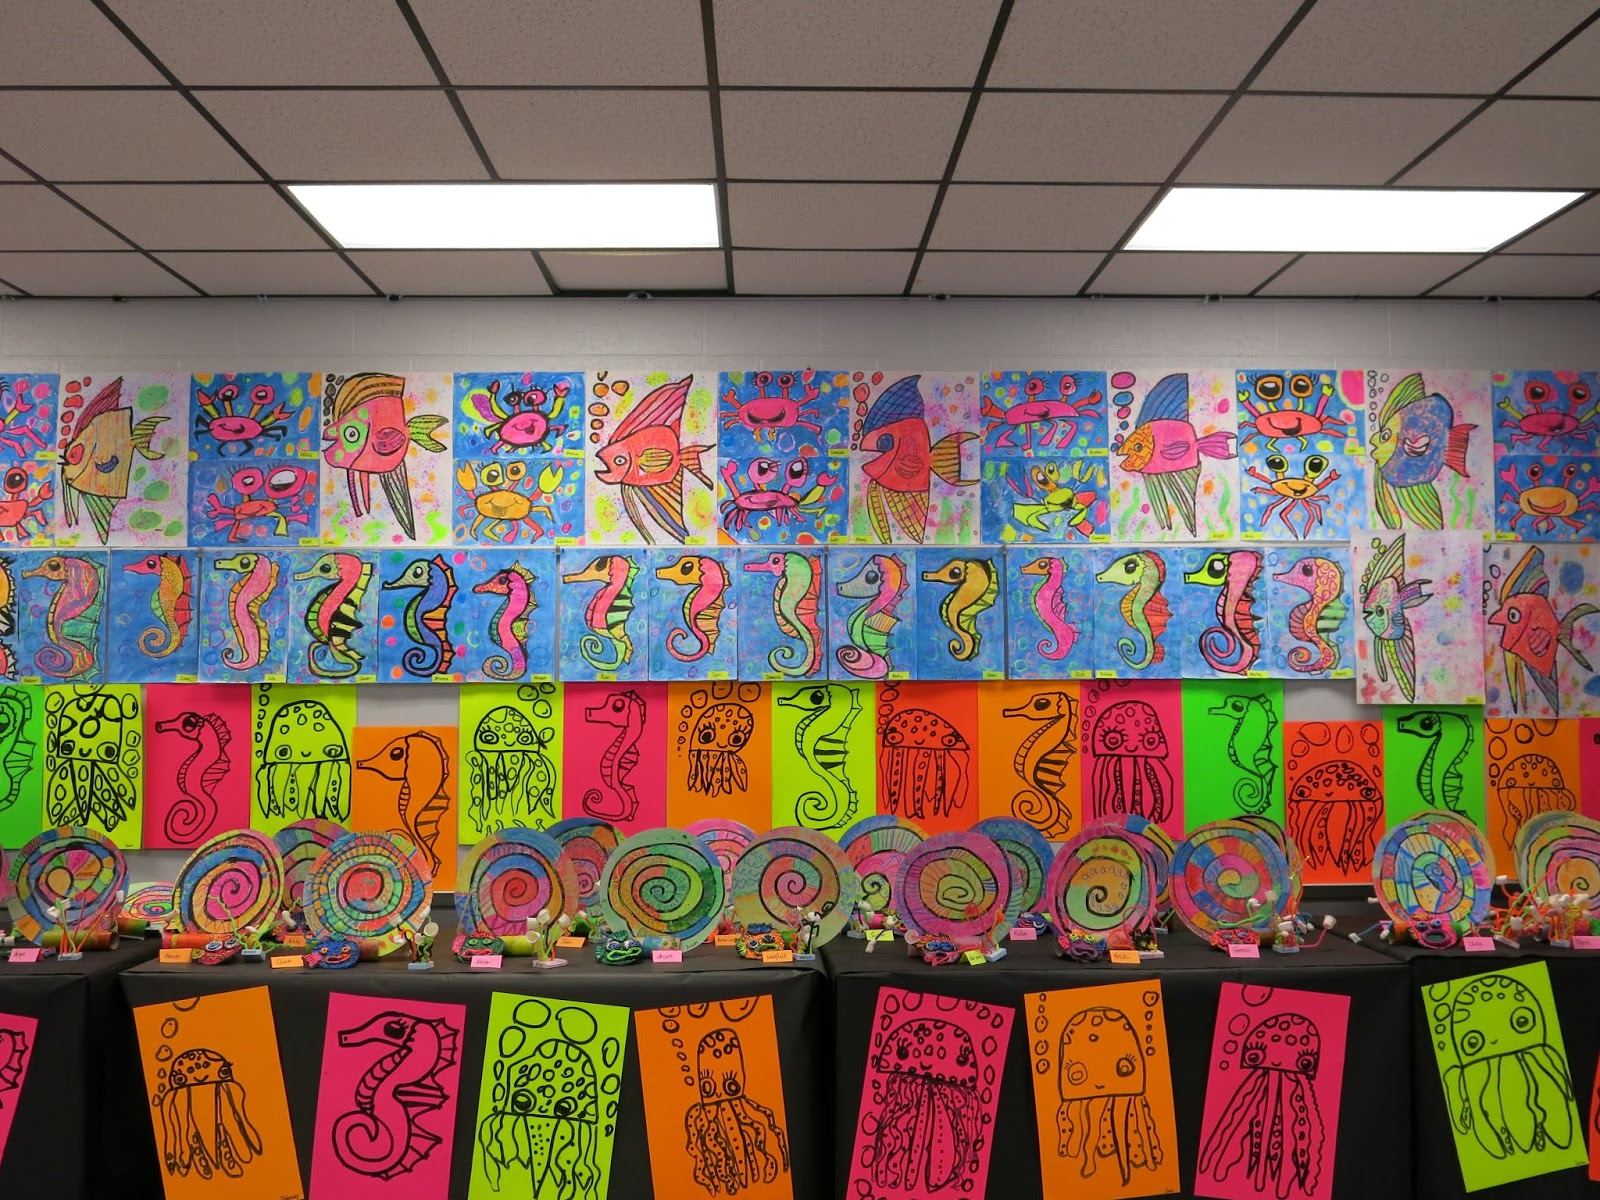 We left the gallery up for several days because my admin loved it so much, she called in nearly everyone in the district to drop by and see it. Even with the lights on, it was stunning.
 Have you done a black light gallery before? What tips do you have? This was my first so I'm sure I have A LOT to learn. I would love to hear from you!
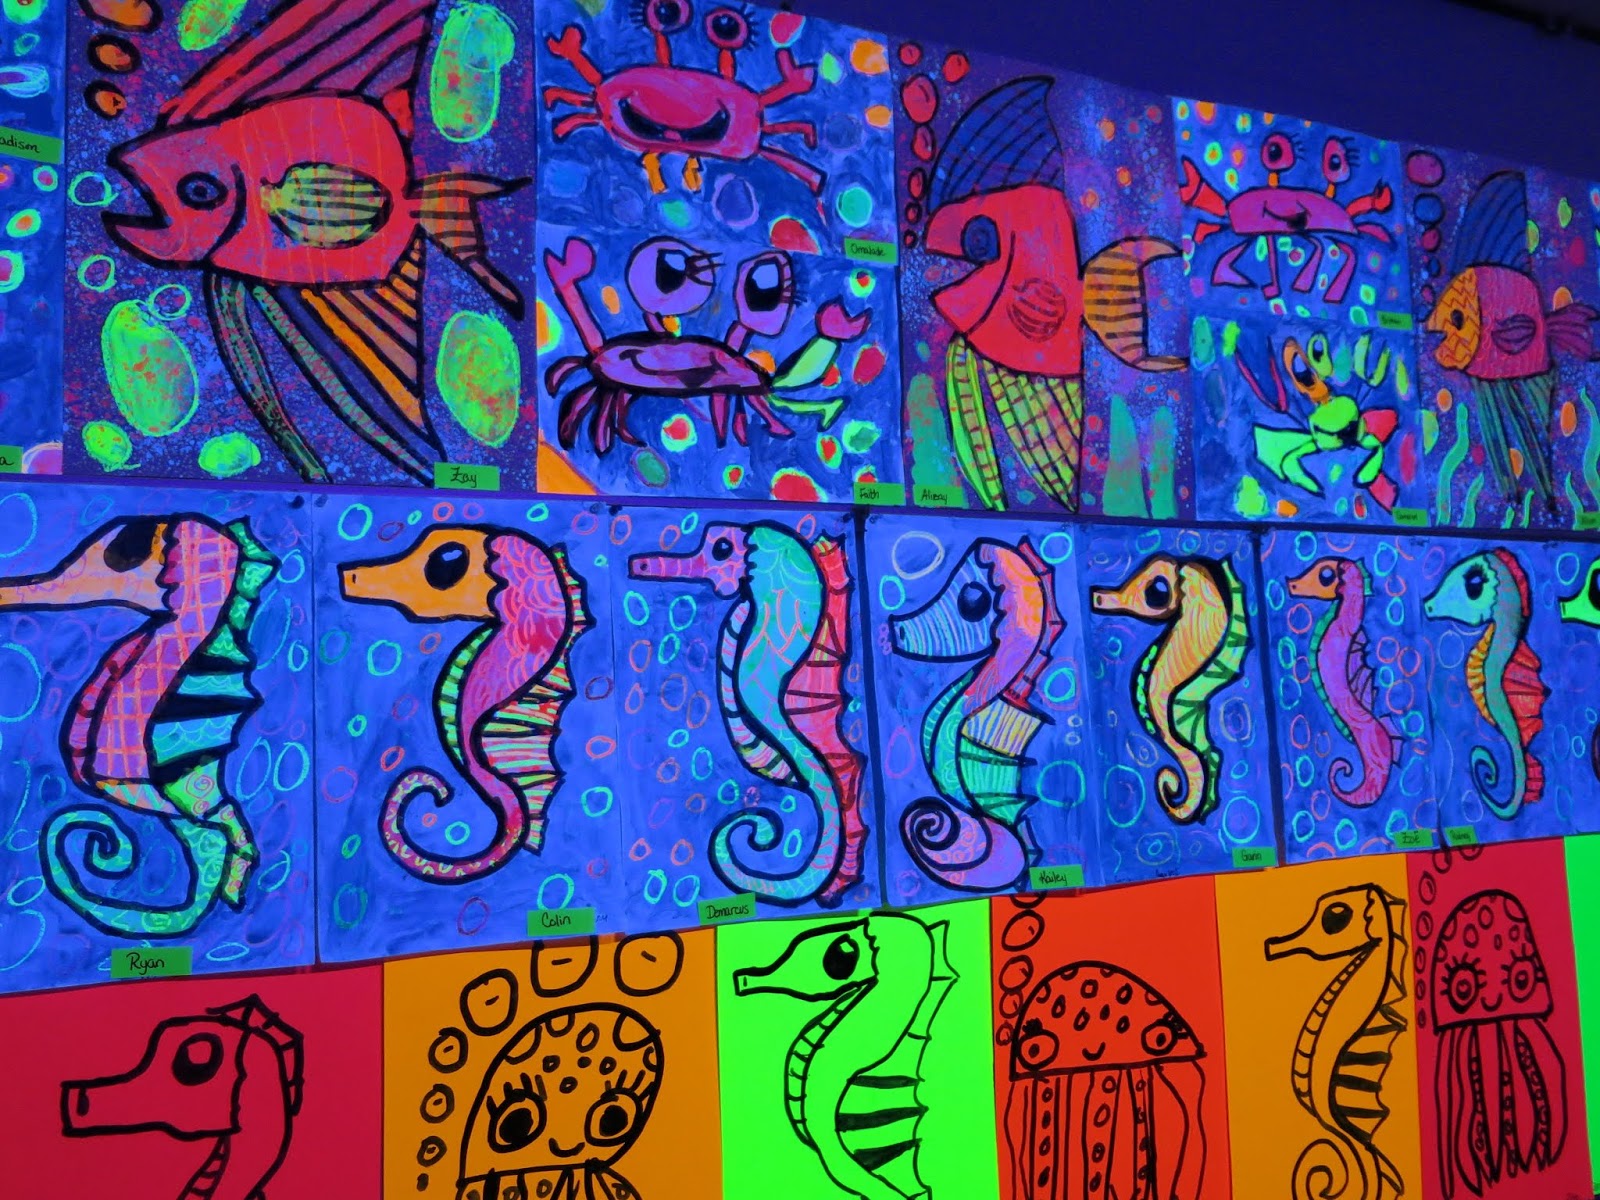 Super excited to start our black light gallery projects next year...even if it's MAY and I'm on summer break, ha!
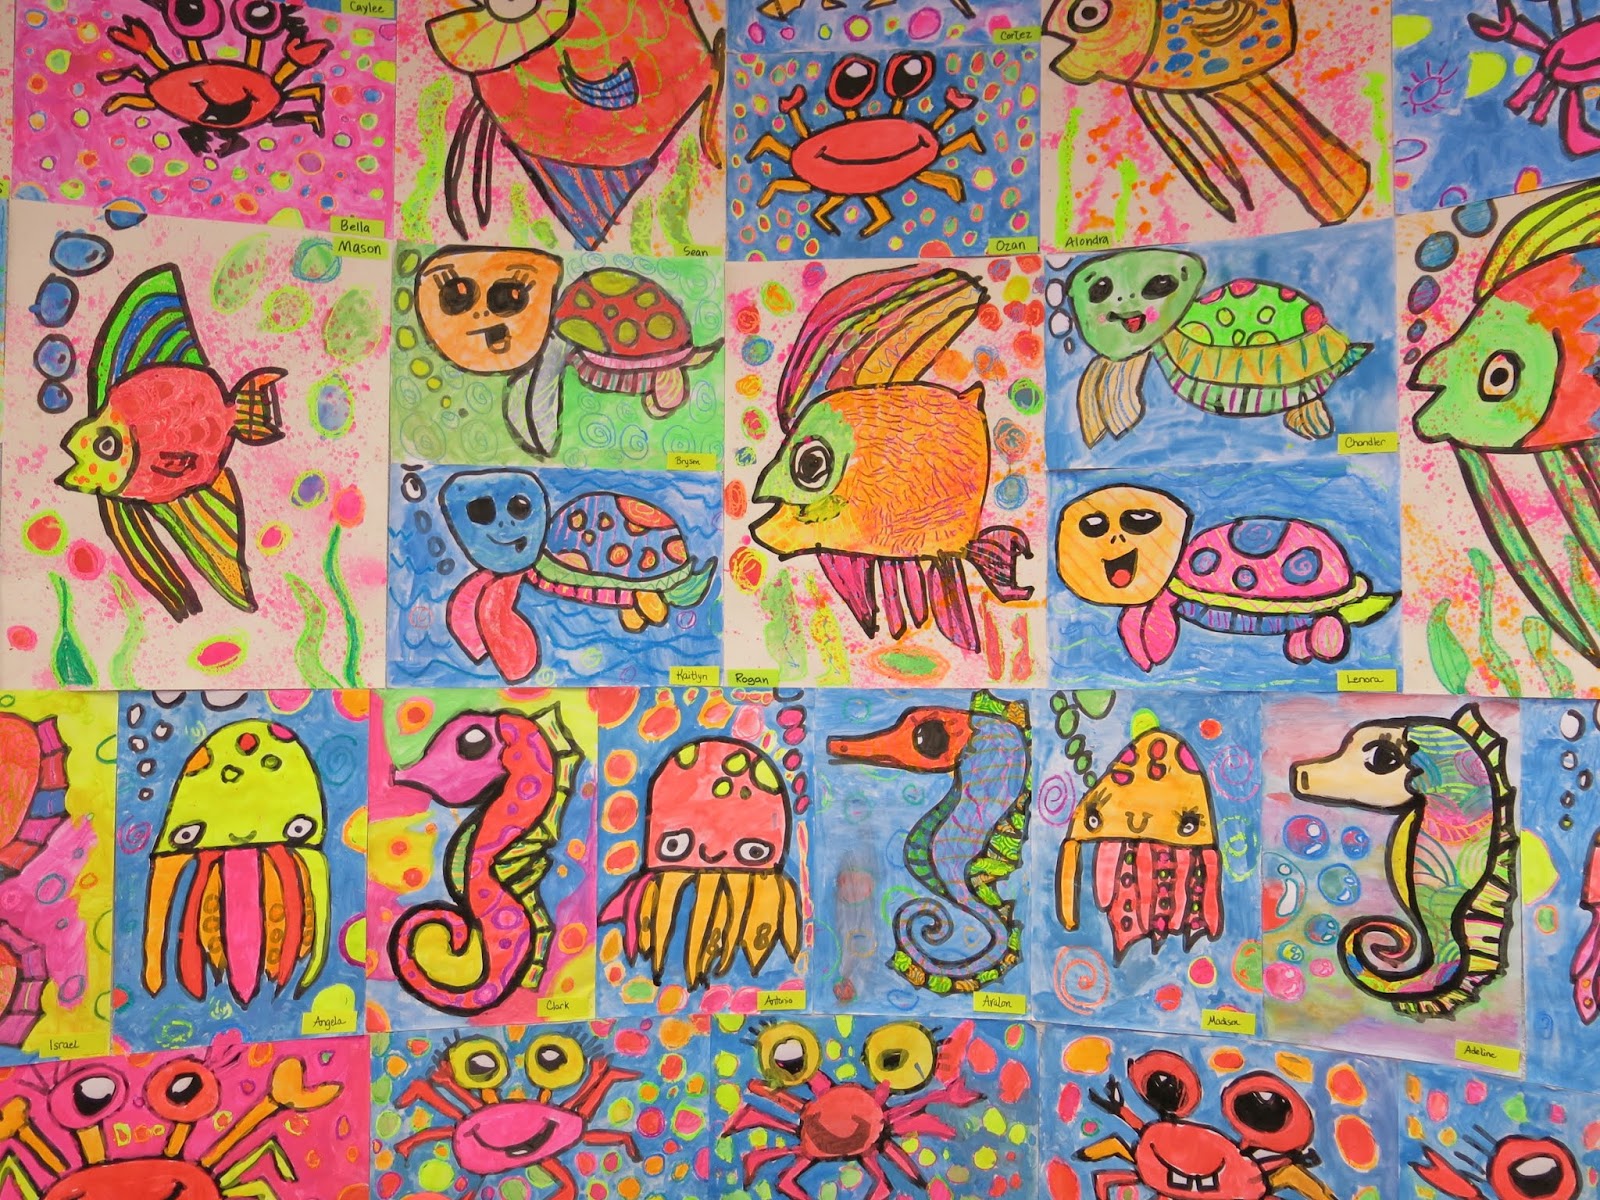
May 27, 2019
In the Art Room: Those Last Days of School
 Real talk for a minute here: the last days of school are INSANE. With schedule changes, field days, assemblies, field trips, art shows, awards days and all the rest, there is lil teachin'/learnin' taking place. The kids are hot, tired and ready to go and the teachers are right there, ready to hold the door open for them as they run off into the sunset of summer. So, instead of fighting that Last Days of School beast, why not embrace it? Ditch the tables and chairs, pull out the blocks, games, drawing books and more, crank up the Alvin and the Chipmunks album (it's what we've been rockin' out to) and HAVE FUN. Here's how I set it up in my art room:
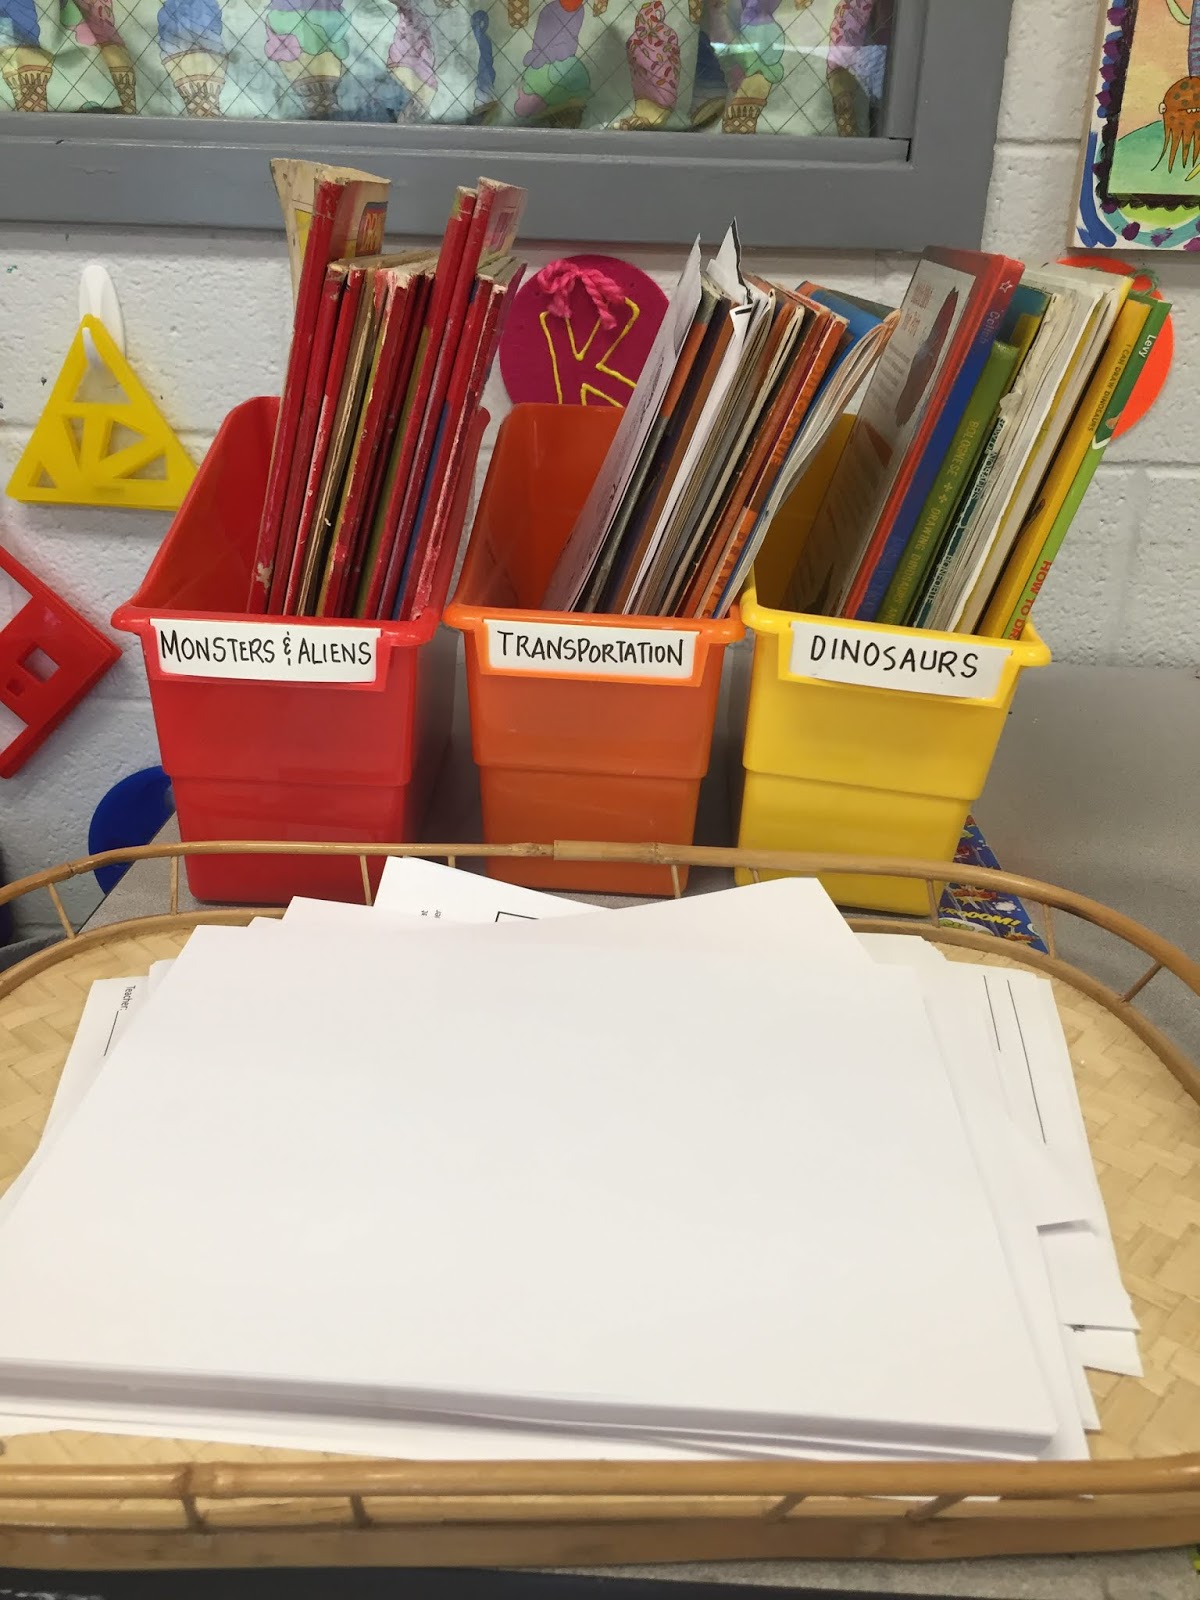
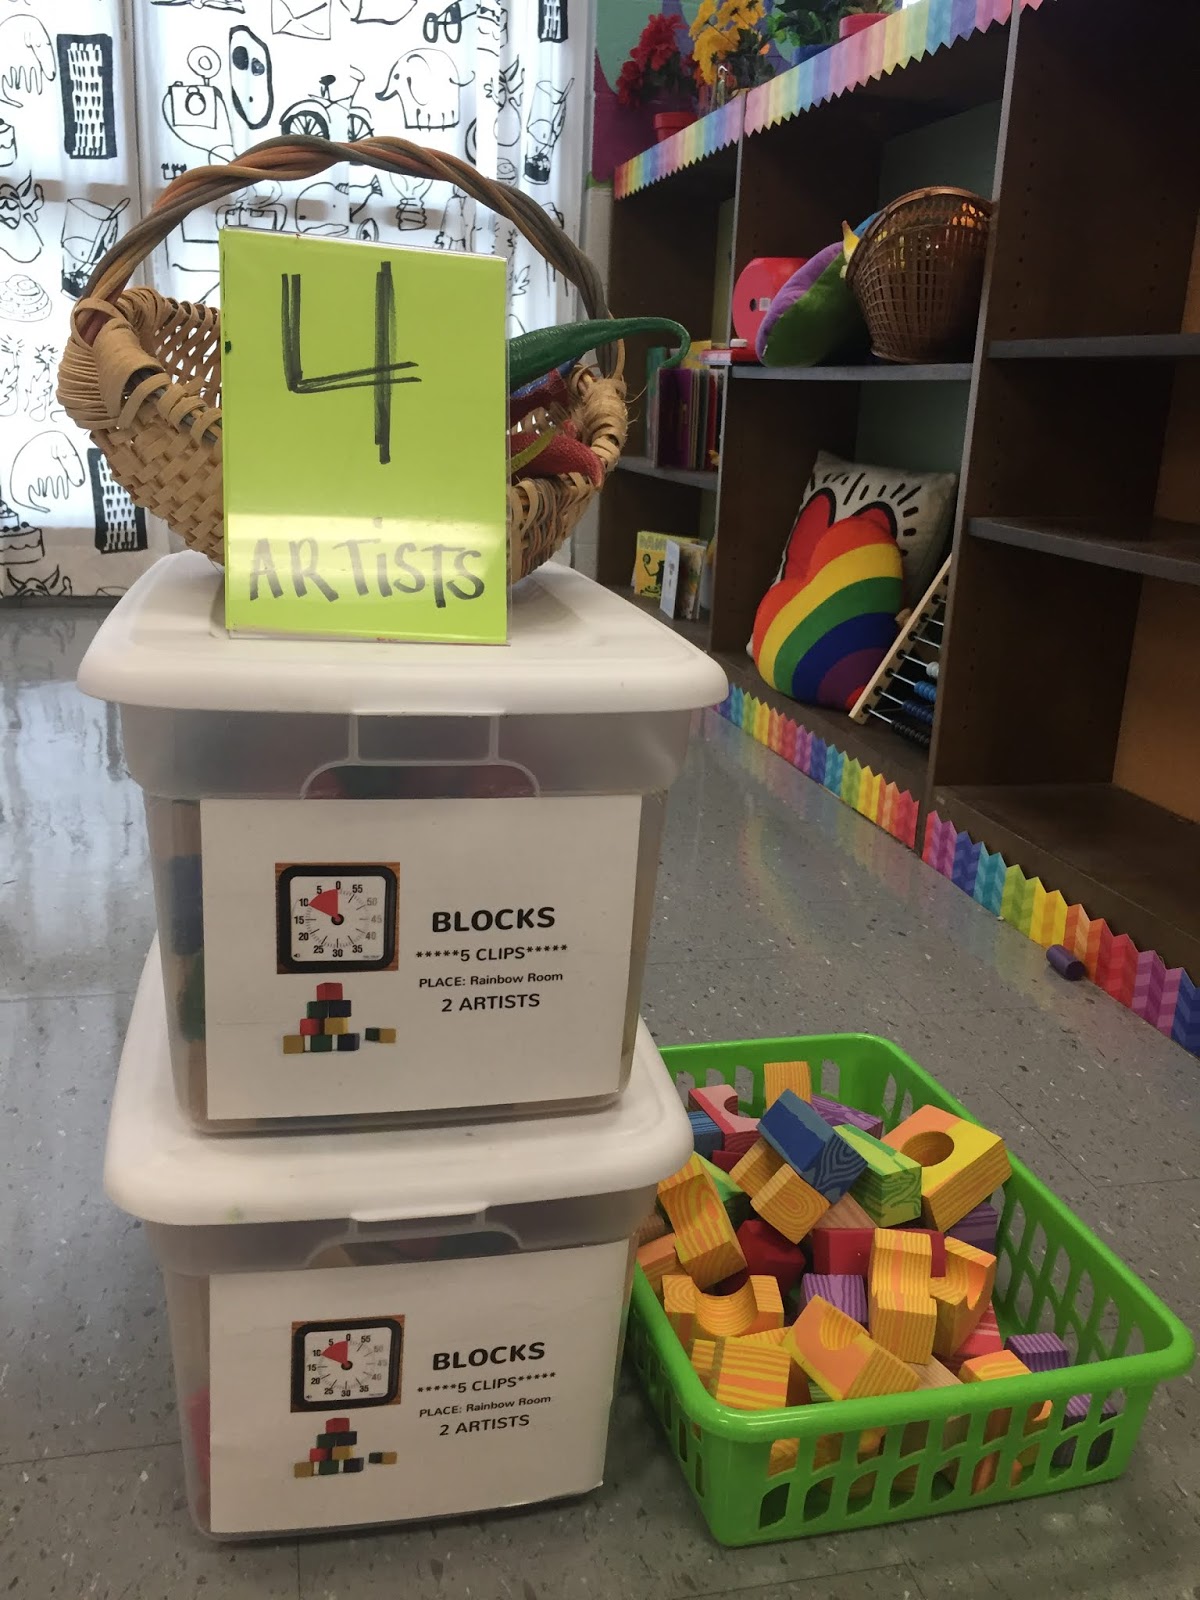 I started by pulling out all of my Early Finish centers. I've accumulated a TON of items for my early finish centers over the years...but the big hits are always the following: blocks (with dinosaurs!), Fashion Plates, spirographs, stitching cards, origami and my how to draw books and drawing prompts. If you click on this link, I'll walk you thru those centers.
 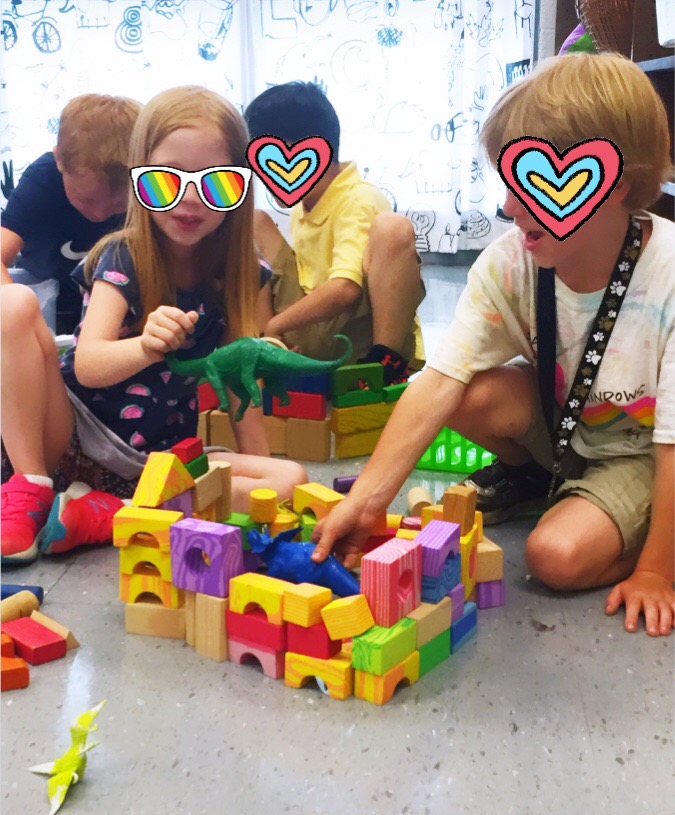 A couple years ago, I created a little video explaining this end of the year set up, which you can watch right here:
In the past, I relied on the kids to read the small labels on the bins to know how many young artists could work at a center. Those little labels are hard to read...and not all the bins are labeled. I used these plastic picture frames from the Dollar Tree for our Field Day activities that worked so well, I decided to use them again here:
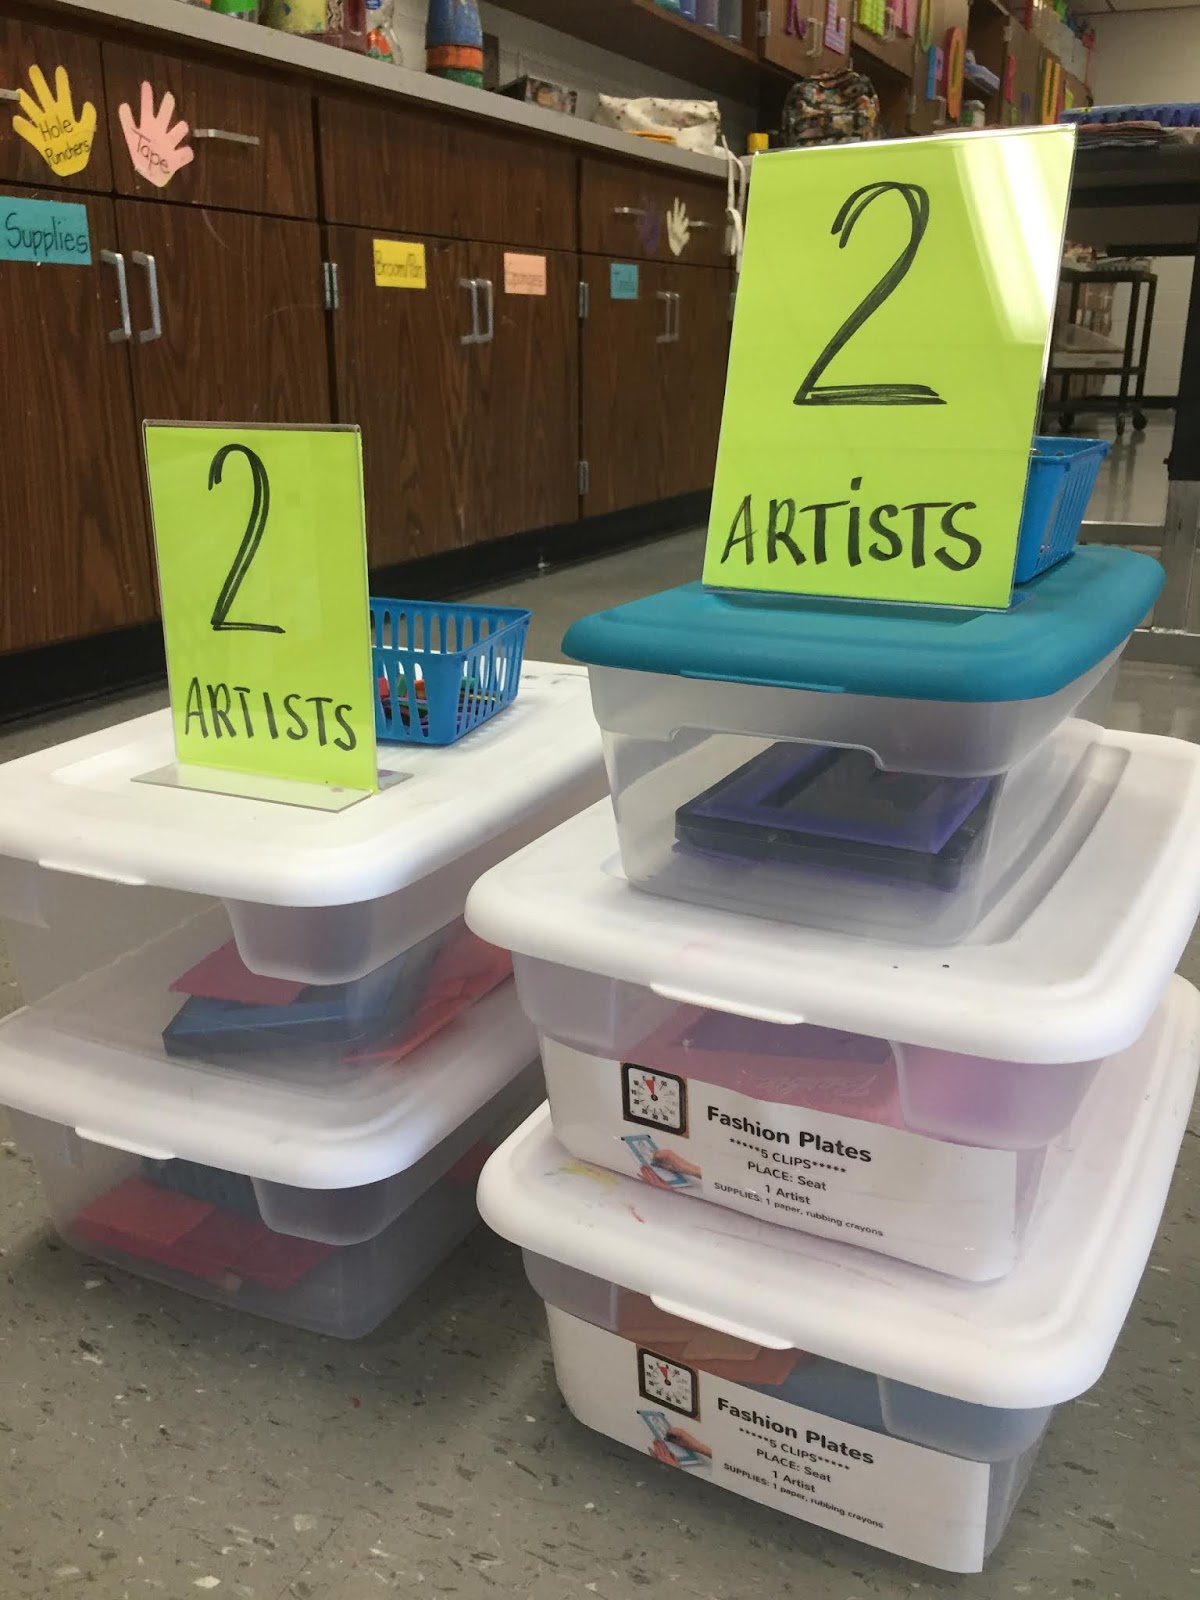 I loved fashion plates as a kid and my students use the set that I once had! I also have a couple more sets that have been gifted or found at the thrift store. Amazon sells a great Super Hero rubbing set that has both boy and girl super hero characters for the kids to create.
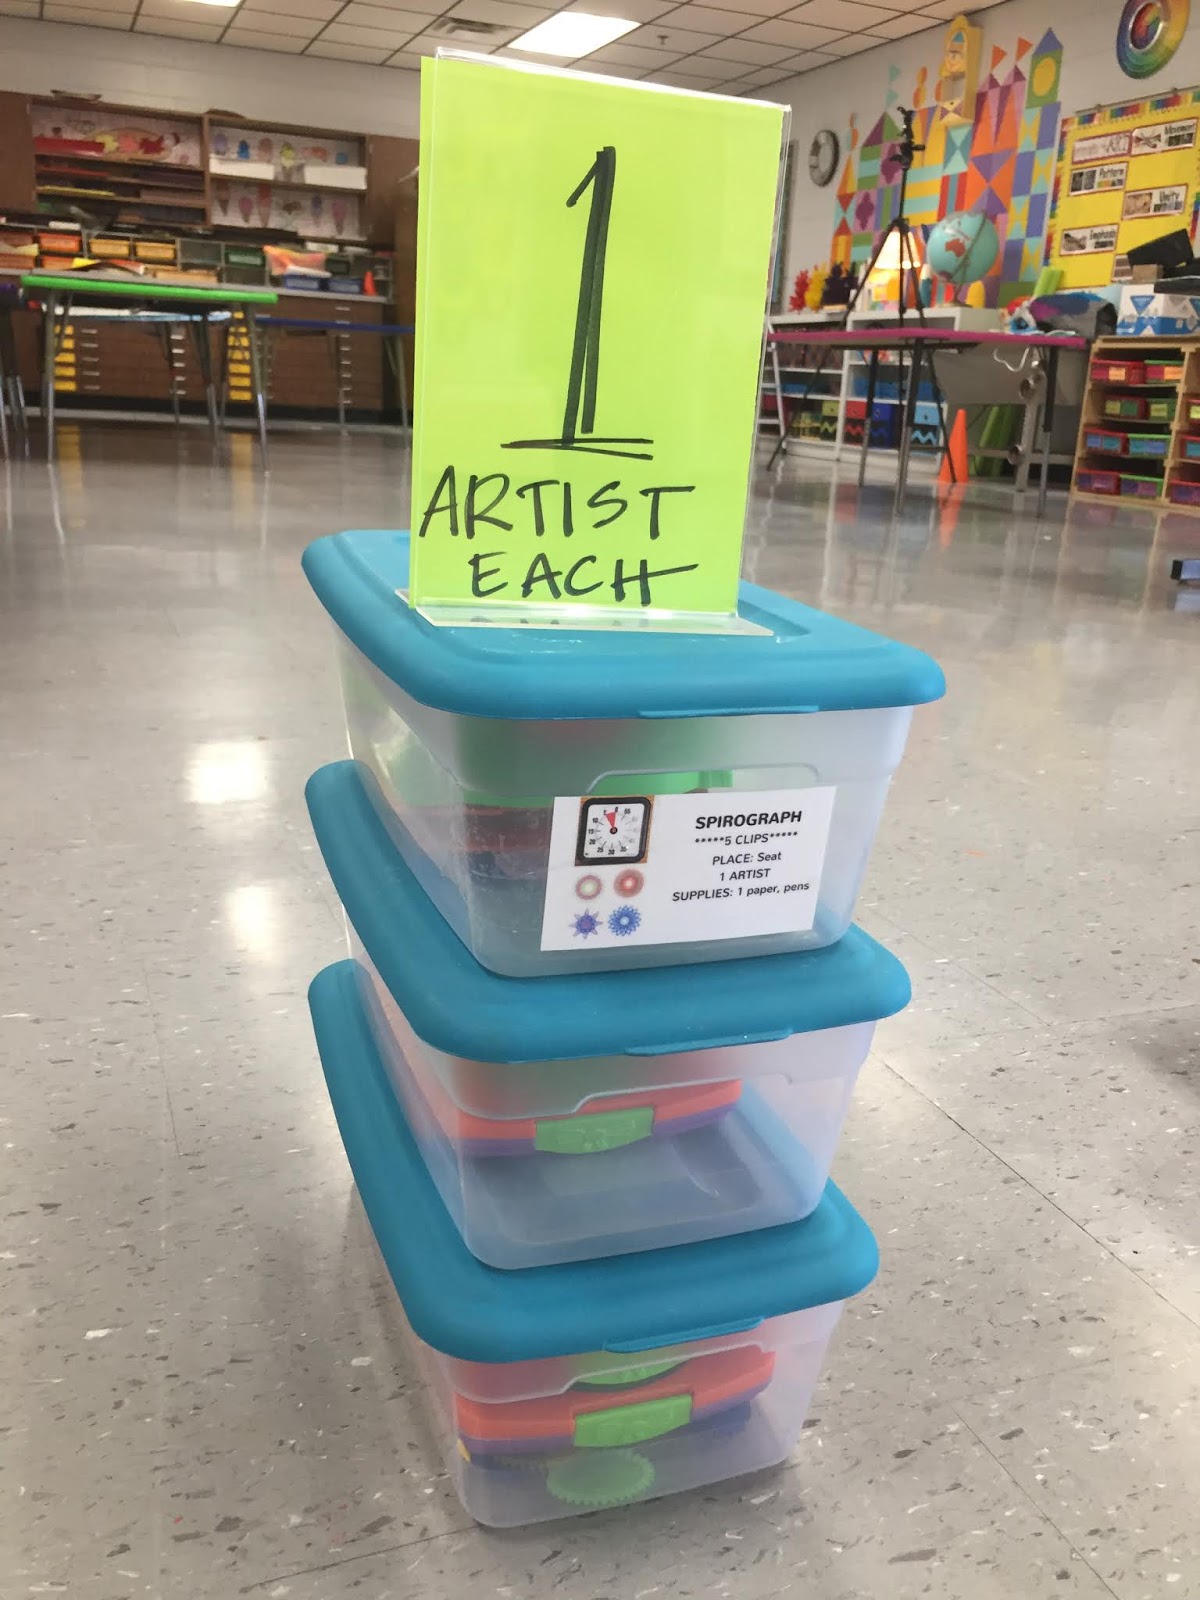
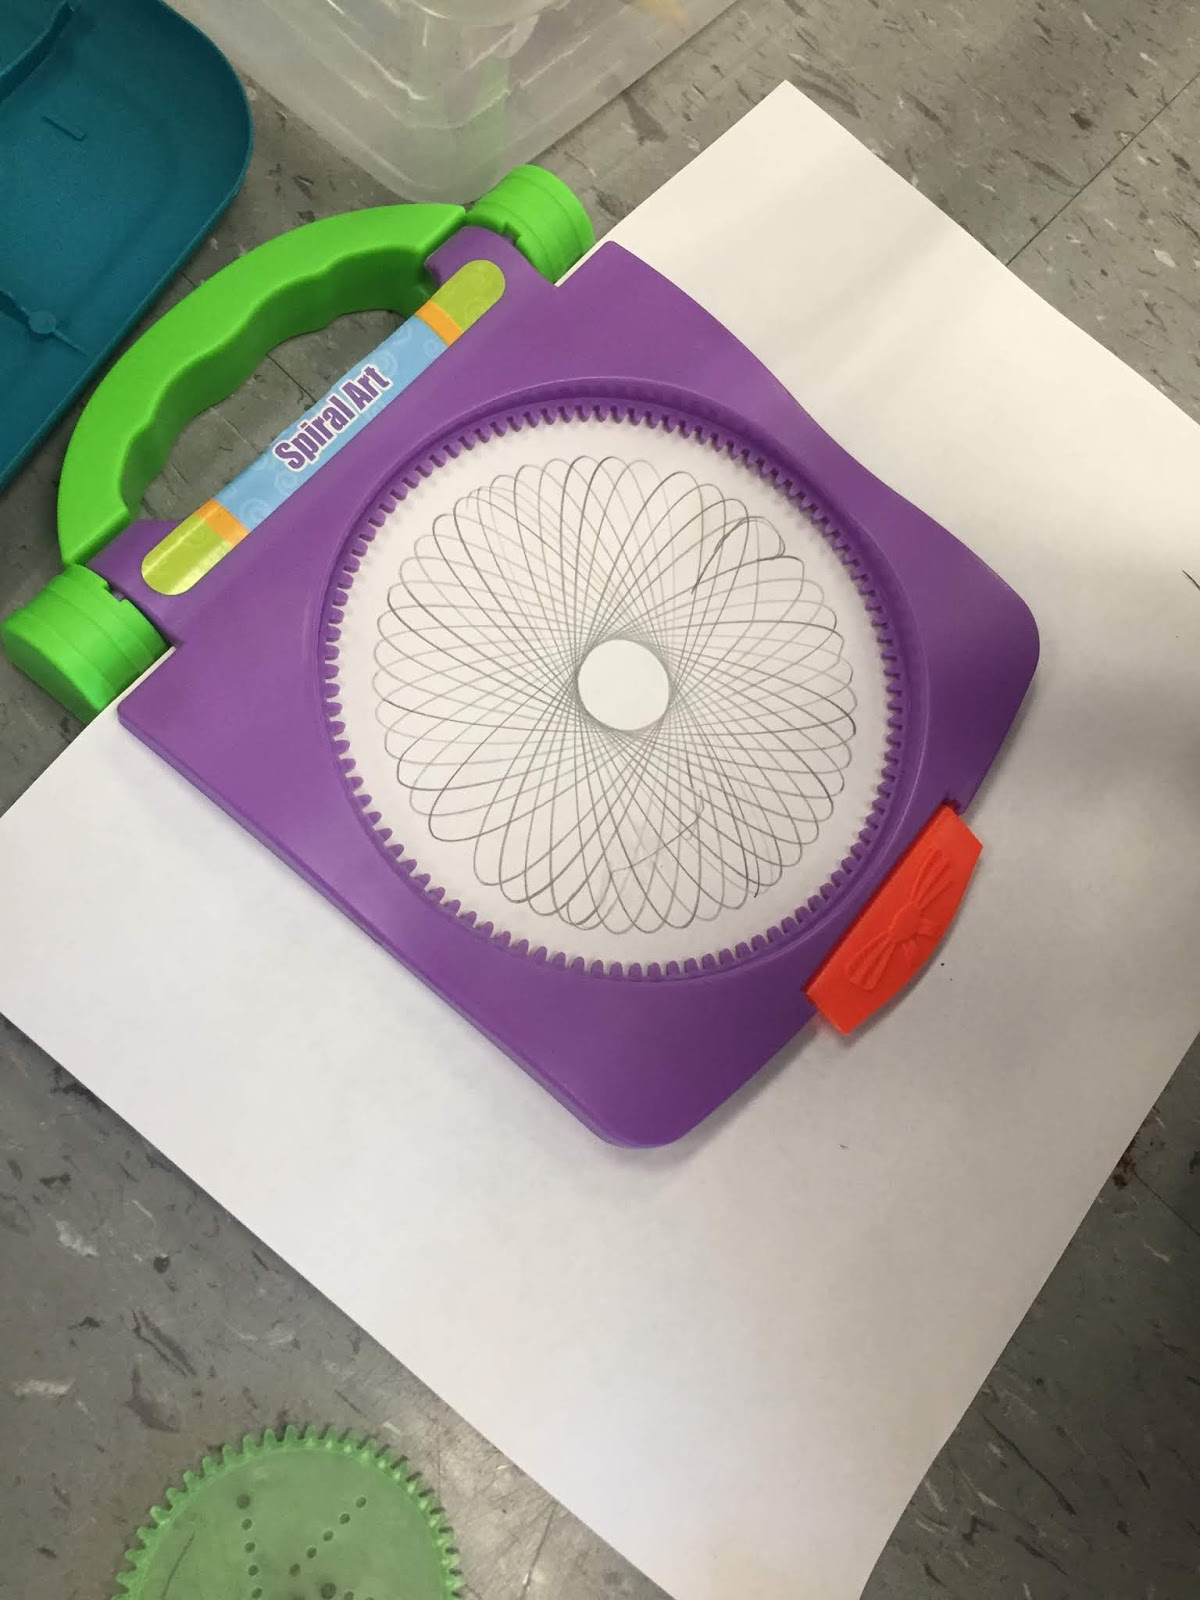
When I picked up a set of Spirographs from the Dollar Tree last year, I wasn't sure how great they'd be...or how well my younger students like first grade would work with them. But check out that amazing design by a firstie! I usually have to give a hand over hand tutorial for the kids because there is a learning curve. I also allow them to use mechanical pencils as they are the only ones with lead that is long and lean enough to fit into the holes of the wheel.
 In this blog post, I share with you how I set up my drawing books for early finishers. I got so tired of the kids just randomly placing the books where ever...so I spray painted the binding of each book to make it easier for them to clean up. Also...I limit them to one paper per artist.
 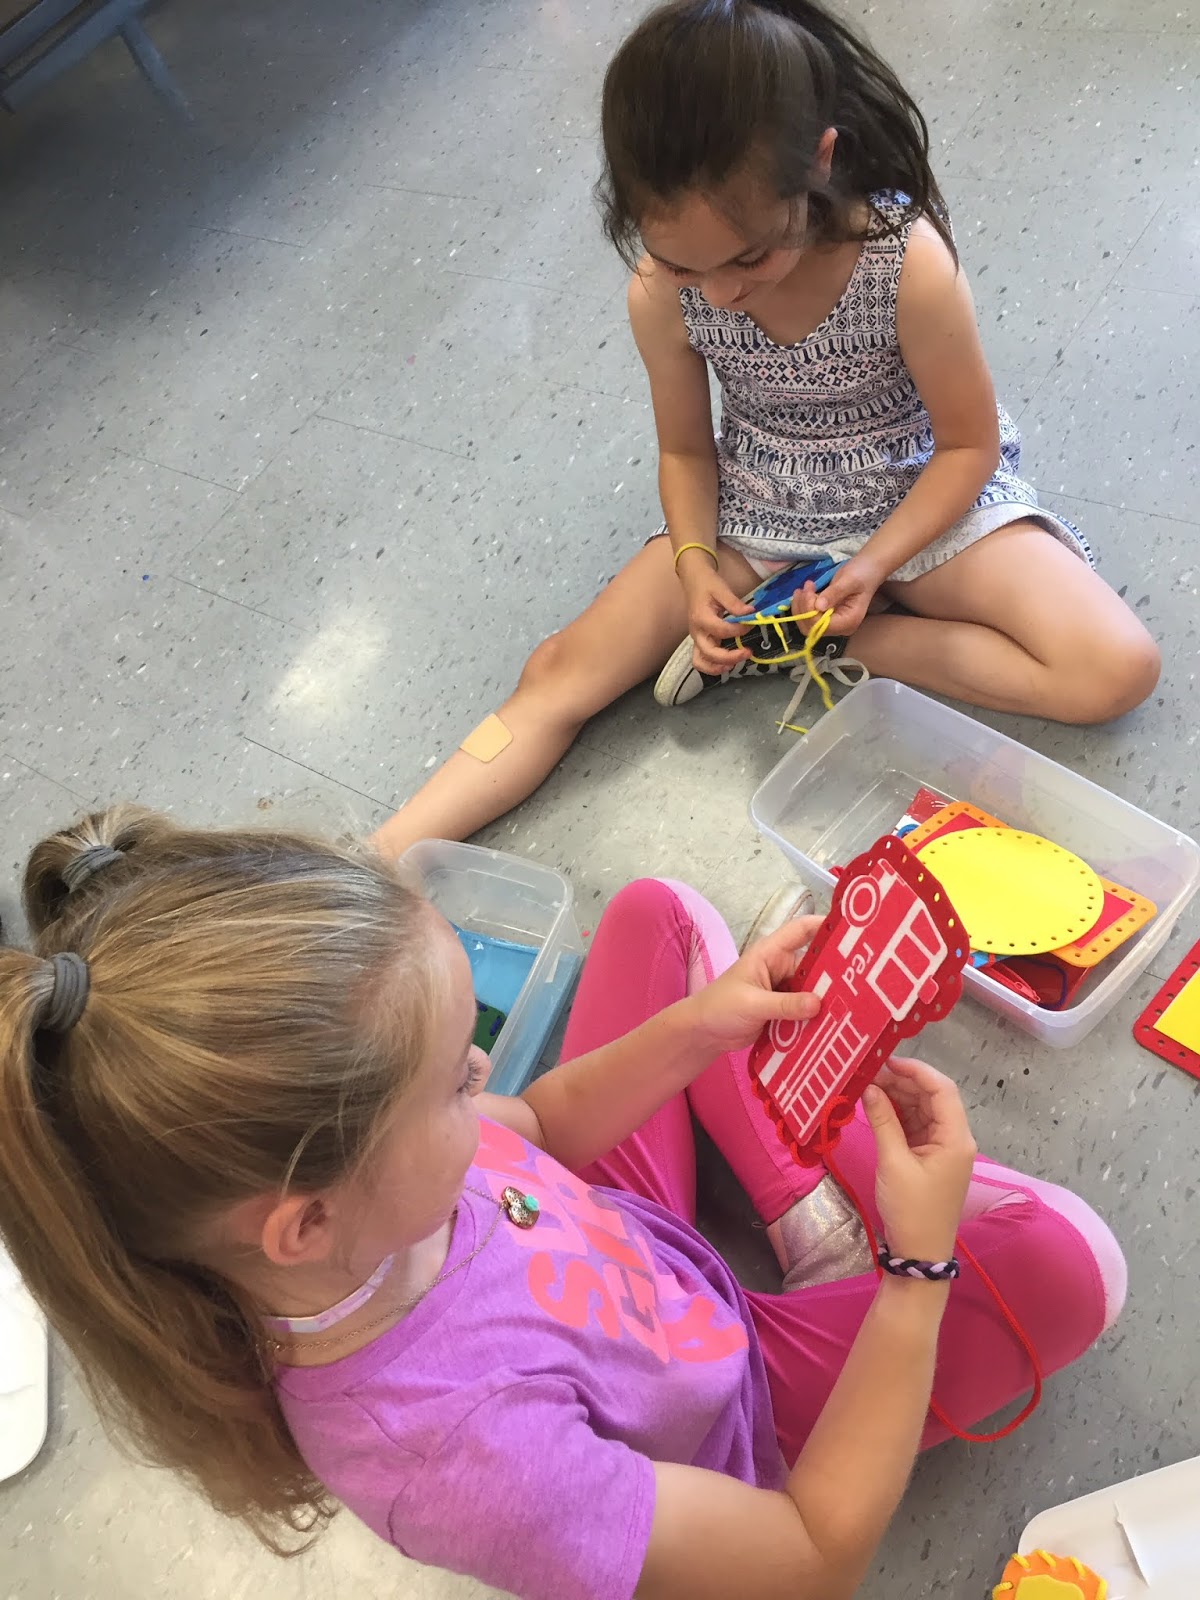 If you are a new teacher with few centers, just know that I don't have a ton either. To be honest, with 30 minute art classes, it's a RARE occasion that my students are able to visit these centers. That's why I love having them available these last days of school. It's fun for me to see what they gravitate toward...and gives me ideas for the new school year. If you have limited resources, keep in mind that the following are free and/or cheap:
* Origami printouts!
* How to Draw printouts!
* Blocks borrowed from a kindergarten classroom!
* Random objects around the art room for observation drawing!
* Pictionary! You don't even have to have the game. Just a dry erase board and a group of kids that can come up with an idea of what to draw on their own as the kids attempt to guess.
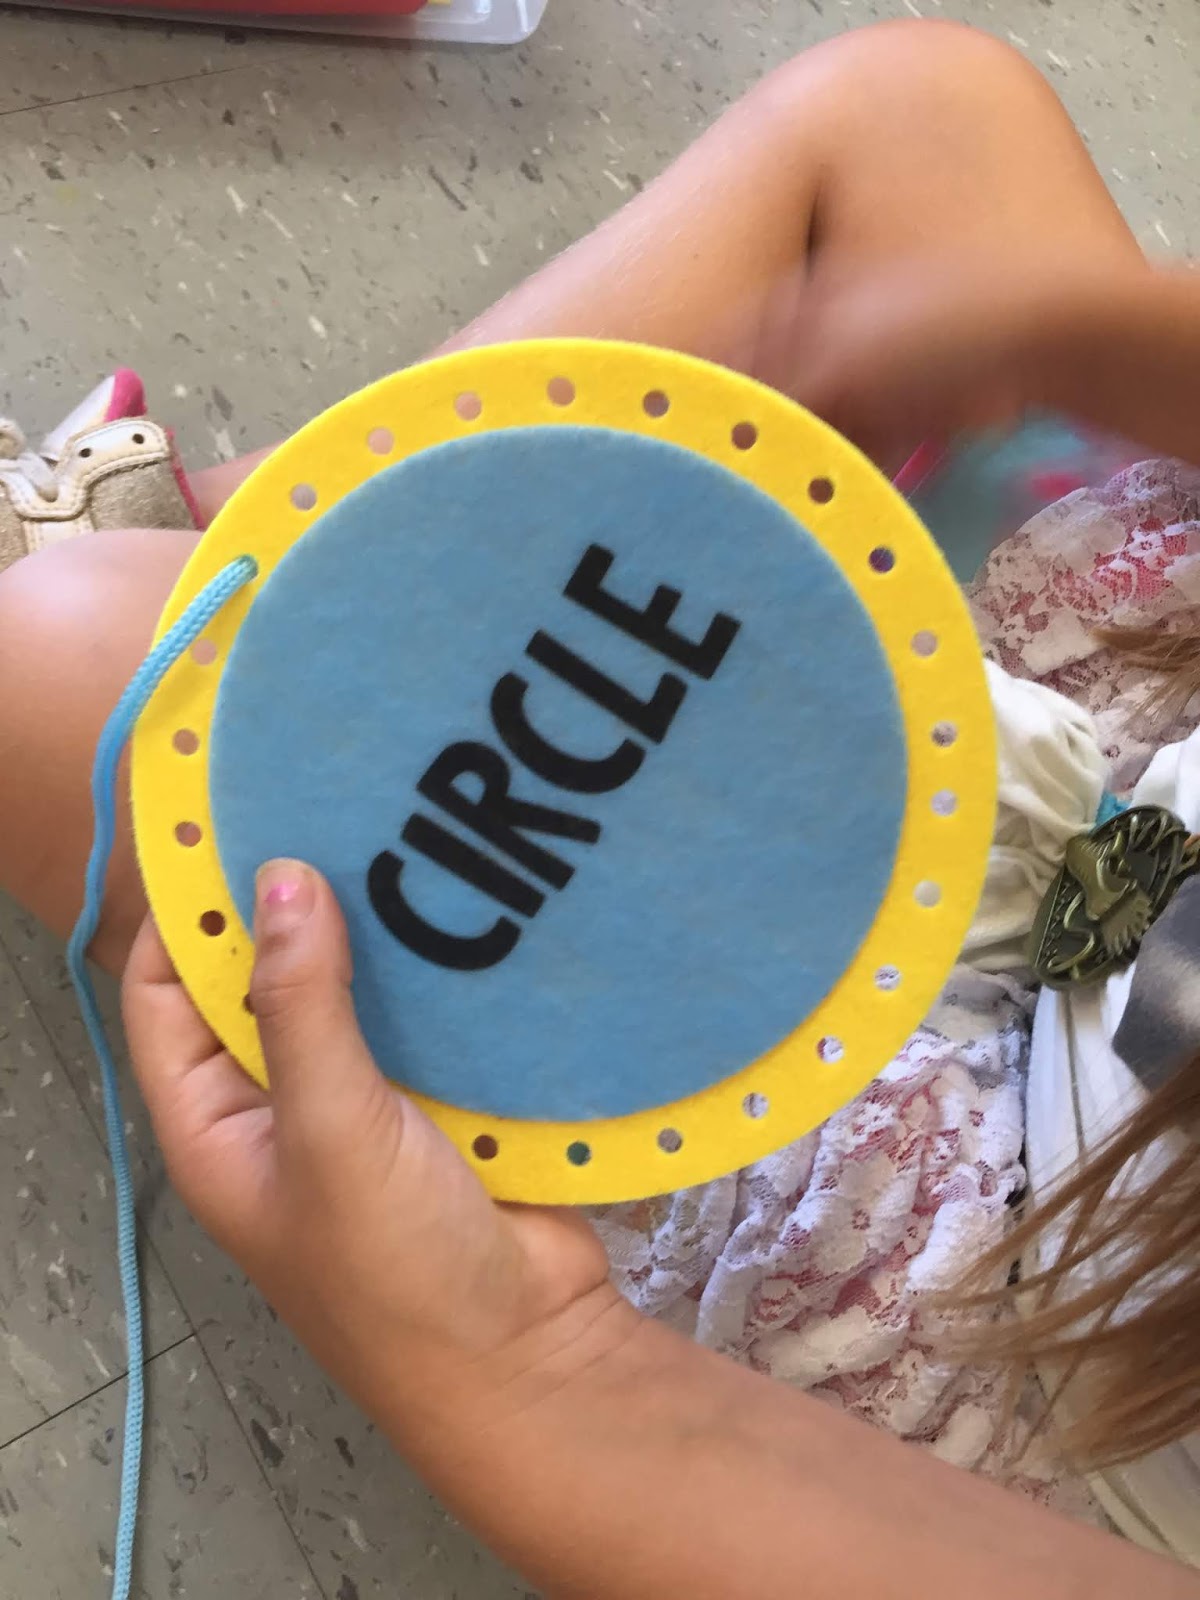 My favorite places to find early finisher/end of school year activities are Target Dollar Spot (where these stitching cards are from), the thrift store, yard sales, end-of-the-year email to teachers asking them to send old games/toys your way and the Dollar Tree.
 When my older students came in, I busted out the dry erase boards and my Pictionary game. I found it at the thrift store and, really, all you need are the cards with the drawing prompts. We sat in a circle of kids (the ones who opted to play) and had a great time playing. One of my favorite things about these days is that I join the kids on the floor! I chat with them, play games and build.
 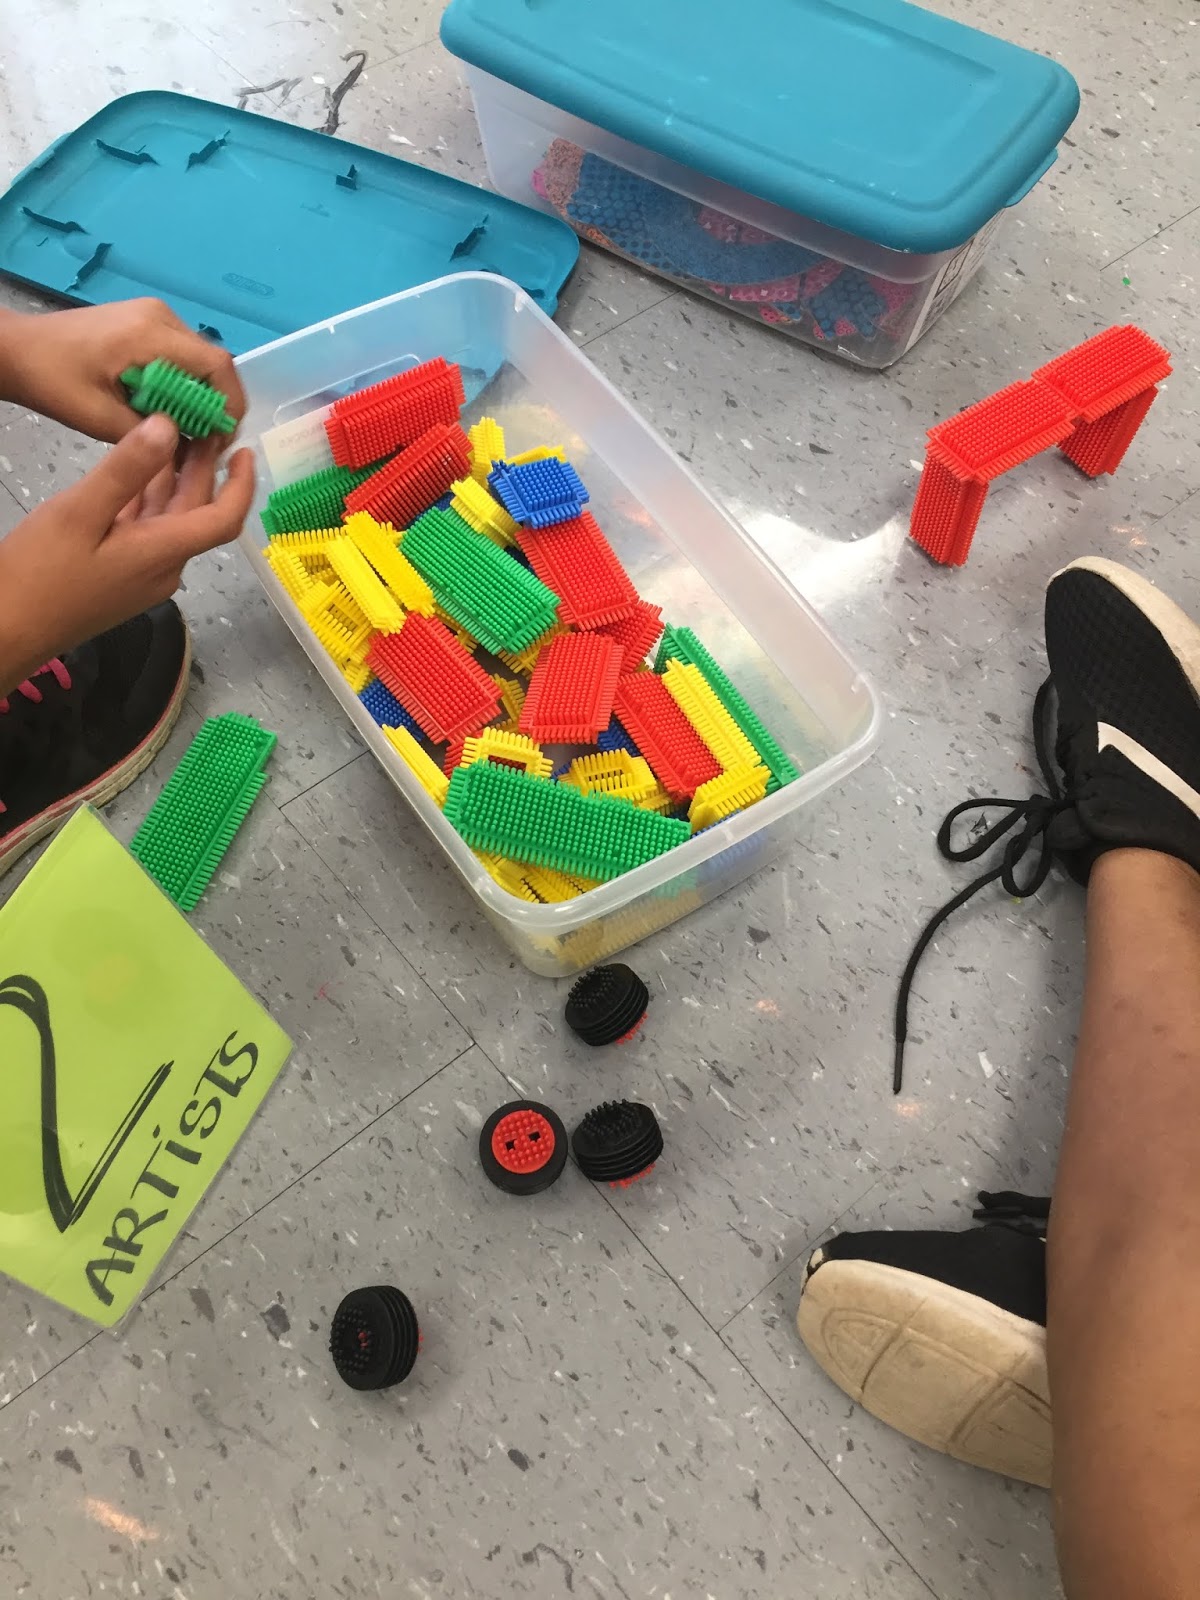 I do tell the kids that after 10 minutes of exploring, they will be given the opportunity to change centers. They can either opt to stay or go, AFTER they've tidied their spot. During clean up, I simply ask that they tidy which ever spot they were working at and then stand silently beside their area. To encourage a quick, calm and quiet clean up, I silently walk around and just place a couple of stickers on the kiddos who rocked their clean up. I learned this trick from my P.E. teacher buddy. She doesn't announce that she's giving stickers, she just places them on the kids who are on task. She only gave out a few and if the kids asked for a sticker, they didn't get one. It worked SO WELL in her gym that I had to try it on the last day in art...it was MAGIC.
  Do y'all do something similar on your last days of art? I'd love to know what you and your kiddos are up to!
Cassie Stephens's Blog

- Cassie Stephens's profile
- 34 followers
Cassie Stephens isn't a Goodreads Author
(yet),
but they
do have a blog,
so here are some recent posts imported from
their feed.

