
Cassie Stephens's Blog, page 30
August 11, 2019
Art Teacherin' 101: My Favorite Art Teacherin' Hacks
 I've been sharing so many classroom management hacks on my Instagram lately (and getting such a great response from teachers, thank you!) that I thought I'd put 'em all together in a video! These are the classroom management hacks I use on the very first days in art class...and they help me out so stinkin' much. I hope you find them helpful too. Here you go: Also, if you wanna hear about what my first day(s) of art were TRULY like, take a listen to this podcast. I didn't exactly practice what I preach (insert eeek-face emoji!):
 In my hacks video, I fail to mention that one of my fave hacks are showing some videos that I've created. I do chat about these in the podcast episode. Here are the videos I share on the first and second days of art:
First day Rules and Routines video!Second day Art Room Etiquette video!
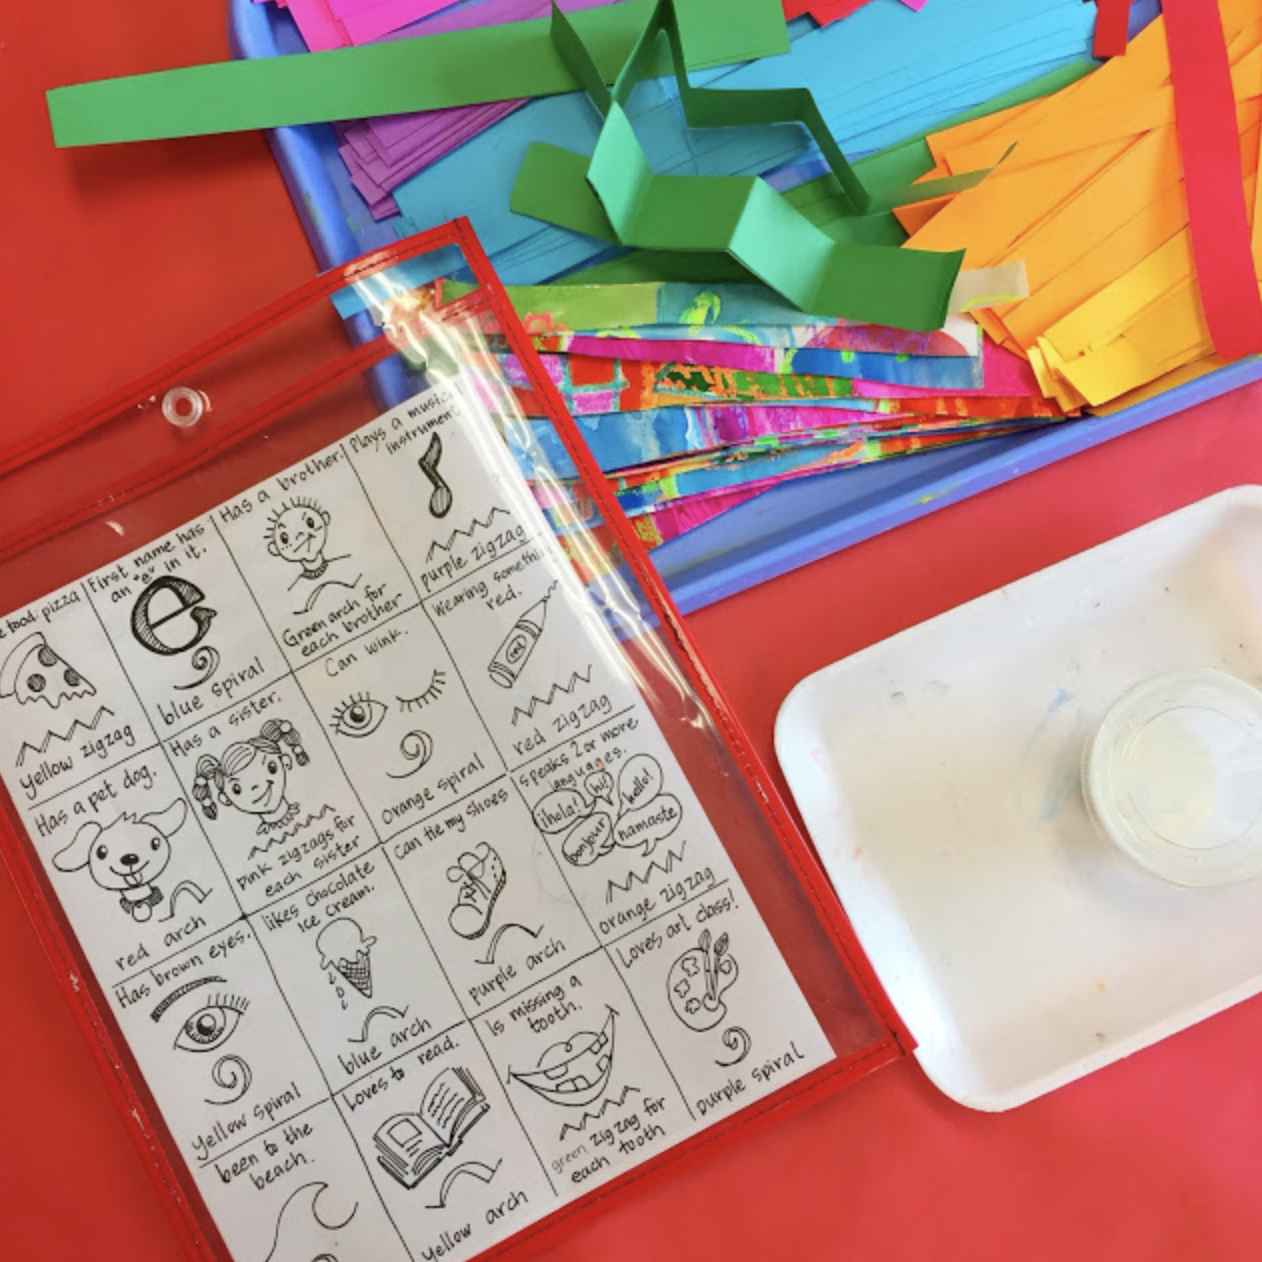
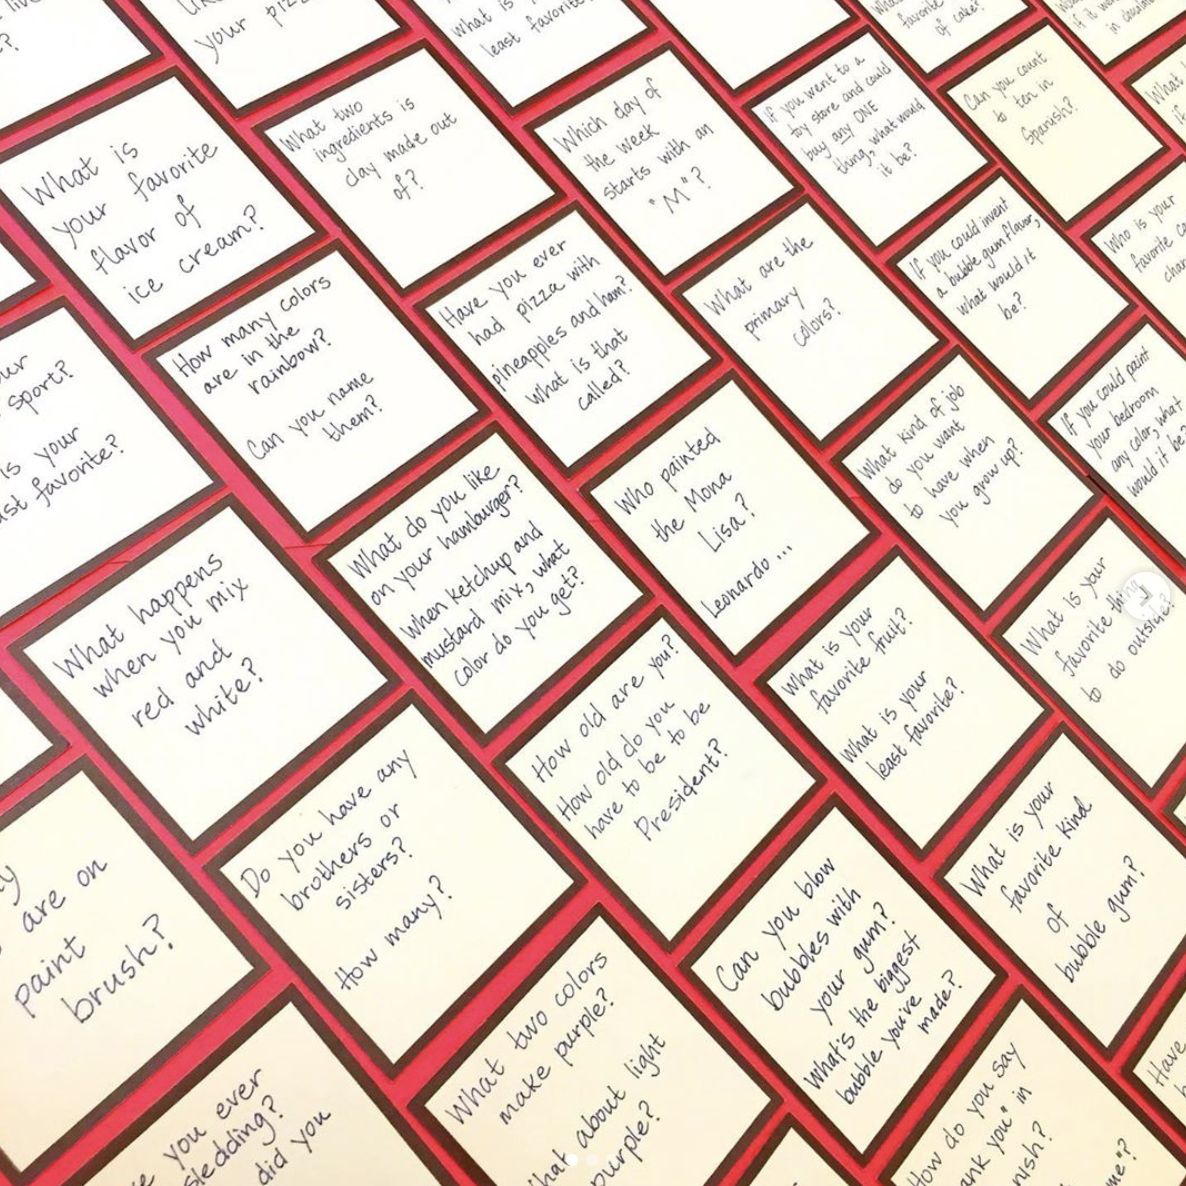 I got a LOT of requests for these questions but, honestly y'all, there is nothing magical about them! They are literally random questions I ask each and every kiddo. Make up your own, I promise you'll love them and so will your students.
  I LOVE this hack: these are my daily schedule folders. I teach the same classes on Monday, same on Tuesday, etc. Since my schedule is different every day, it gets to be...a lot. So I staple my schedule to the front of a daily folder. Then I color copy my class lists and place the color matching list inside the folder. On that class list, I also write my seating chart. What I love about this is that everything is color coded and easy for me to keep up with. AND I love it for a sub! She now can easily see my schedule, my matching class list and seating chart. Been doing this for a couple years now and love it.
 And this is my Happy/Sad board for individual behaviors! I tried hard to explain this in my podcast but it was close to impossible without a visual. So here you are! The goal is for me not to move the button down. If I do, it's after a couple of warnings. Once it's moved down, the kiddo can work to improve their behavior and have it moved back up...if they do, fantastic! If not, well then I need to have a little chat with their teacher. It's such an easy tool and works well for me.
  The colors of paper match my tables and the numbers coordinate with their individual seat spots.
  And it was simply made with flat marbles, puffy paint and velcro on a clipboard!
I hope you find at least a couple of these hacks helpful. Have a wonderful school year!


August 9, 2019
In the Art Room: First Day of Art 2019-2020
 I have been talking SO MUCH on this blog and on my podcast about the first days of school. You can read all about how I set up my art room (complete with a video room tour), my very favorite (and easiest!) classroom management tool, my favorite first day of art projects, my art room rules, and my art room routines by clicking any of these blog post links!
It's all wonderful to hear about how folks do things but I find it's even better to see it in action. So...today I'm sharing a video of all the things we run through on the very first day in art (keep in mind, my classes are 30 minutes in length.)
Here's what I do:
* I do my greeting, which you'll hear.
* We learn our Art Class Catchphrase.
* I introduce the Word of the Day.
* We talk about the Open/Closed sign.
* We talk about the Happy/Sad board.
* We watch this video:
* We stretch!
* We greet each other and I ask a list of silly questions (more on that in an upcoming blog post!).
* We get our assigned seats.
* We learn the lining up routine...and that's it!
 My list of things to cover was much longer but time was not on our side. Notice...we didn't make any art! And we didn't on our second day either as we had rules to review, consequences to chat about, another video to watch, emergency drills to cover and drums to play. I will be posting a video of that second day later this week (or next, mama's tired!).
 Speaking of tired...I'm not as bad off as I would be if I hadn't made a handful of these videos a couple of years ago. They kids LOVE my rules and routines videos! If you don't make videos like those, I encourage you to do so, it will save your sanity, voice and energy.
 Stay tuned...I've been slowly sharing my favorite art room hacks on my Instagram (@cassie_stephenz) and I'll be doing a proper post here. I love sharing what works for me...it just might work fo you!
 Last year, I also shared a "first days glimpse" series of videos...if you want to check those out, you can see them here.
  AND I have been sharing everything in even more detail on my new podcast, Cassie Stephens! You can download and take a listen anywhere. If you feel so inclined to leave a glowing and glorious review, well....I certainly won't stop you. Have a wonderful weekend, friends!
August 6, 2019
Fiber Arts Craft Nights!
 To celebrate the release of my book Stitch and String Lab for Kids, I thought I'd bring back my Facebook and Instagram LIVE nights (click the link to follow my FB page or IG account). I ran this past y'all a while back on my Instagram and it was met with a resounding YES...which made me so happy. I love doing live craft nights. I fell off the wagon last year when I was writing the book...now I have a little more free time to start it back up again! The beauty of the live craft nights is that FB archives them so you can always join the fun at a later date and time.
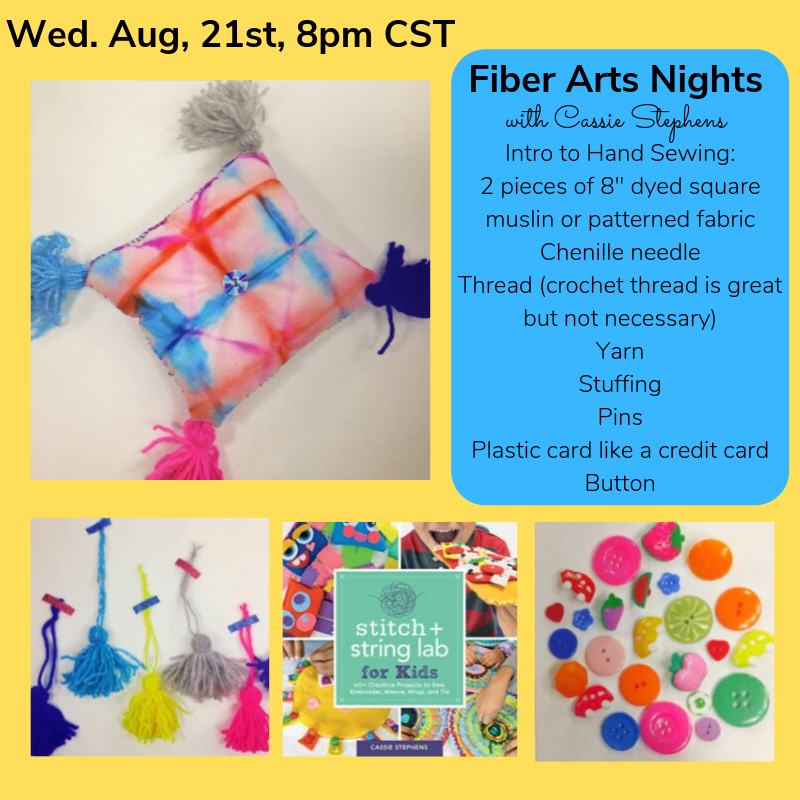
 I said I'd give you all a supply list for the nights...here you go! So take a screen shot so you remember what to have on hand. I tried to think of things you may already have so you wouldn't have to go out and purchase anything. All of these crafts we will be doing are also from my book!
 We'll be doing two crafts on the first night! One to prepare the fabric that we'll use the following week. This way of dying fabric was one I discovered while creating my book and I think you are gonna love it. Then I'll be sharing a simple embroidery for you to do with your students. We'll be doing that on Wednesday, August 14th.
 The following week, we'll be using that dyed fabric to make a stuffed pillow! If you don't use your dyed fabric, any ole fabric can be used. I'll be walking you through the steps of sewing as I share it with my students. This way you can see how I teach them how to thread a needle, stitch and tie a knot. I'll also be sharing how to make tassels that week.
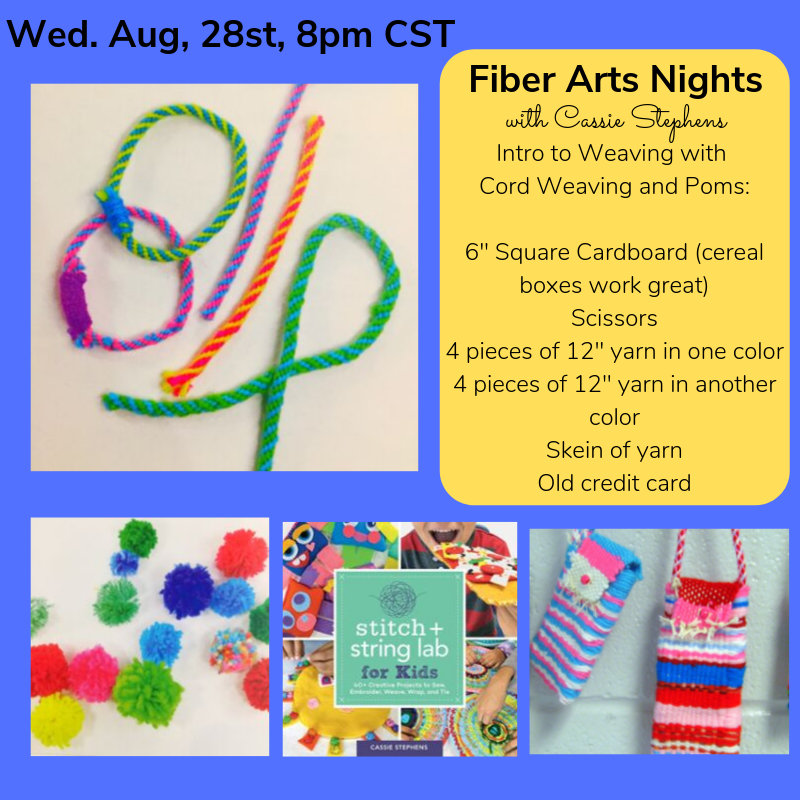 The final week, I'll be sharing with you how to create a cord weaving and how to make pompoms. Cord weaving is a HUGE hit with my students. They absolutely love it and it's one of my favorite things to teach. We use them to add a strap to our woven pouches. I'll also share with you a super easy way to make pom poms -- no special tools required!
 I'm so excited and I do hope you'll join the fun!
 ALSO, IMPORTANT ANNOUNCEMENT! There has been date change to my book launch at Parnassus Books in Nashville. It is now on Sunday, September 15th at 2pm. If you would like to attend (and I would love to see you there!), please RSVP here!
August 5, 2019
In the Art Room: Setting Up Your Art Room
 So I had NO INTENTION of talkin' y'all's ear off in Episode 18: Setting Up Your Art Room but, yous guyz. I HAD SO MUCH TO SAY! So I hope you'll forgive me a little and take a listen. You can do so right here or on whatever your fave place to download podcasts may be. Just a reminder, I no longer chat over on Everyday Art Room. My podcast is called Cassie Stephens because I'm super clever with names. Here's Episode 18!
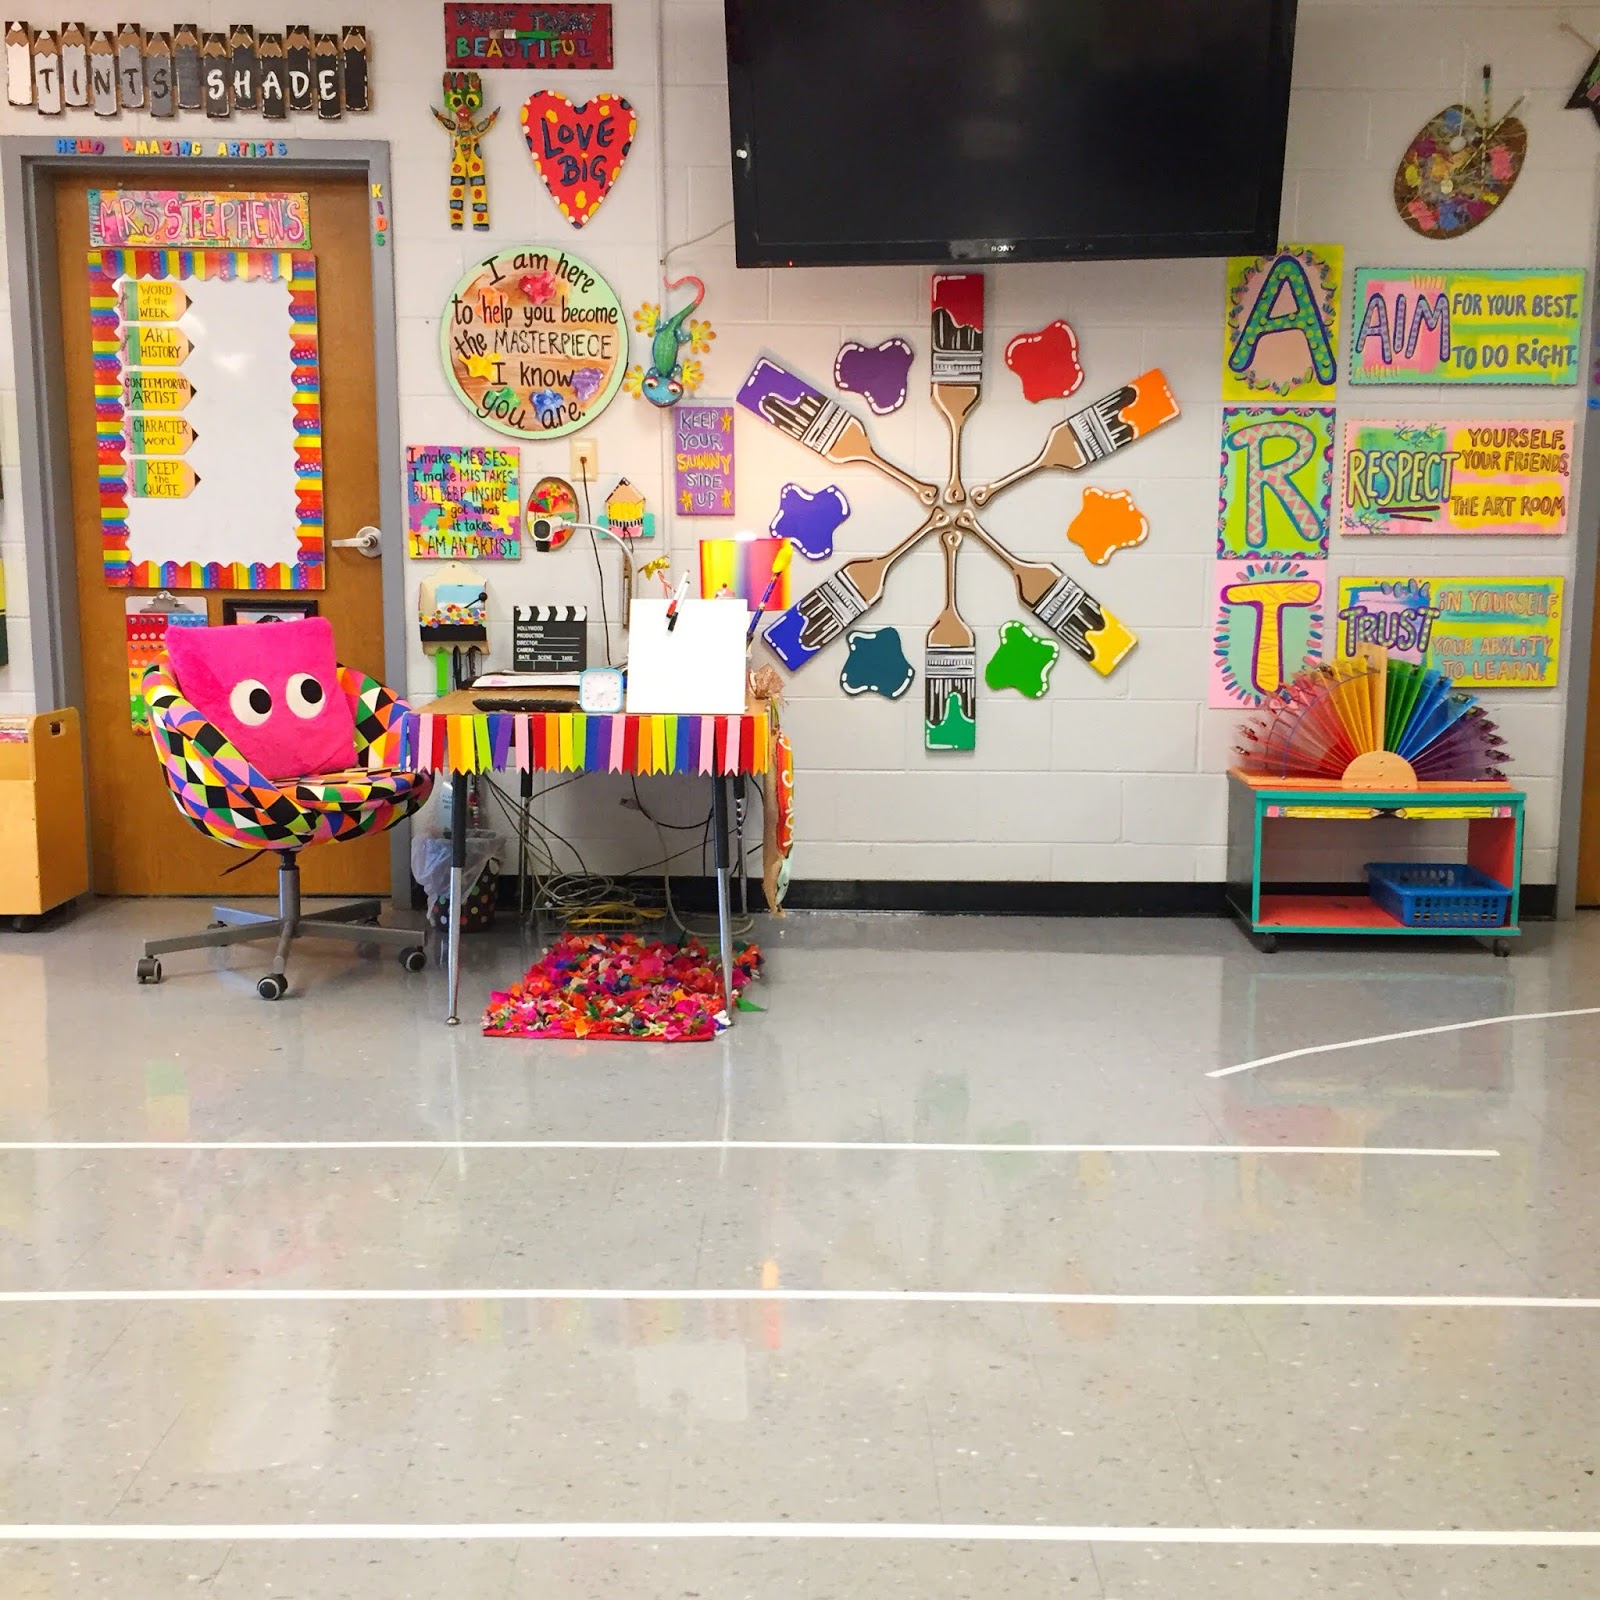
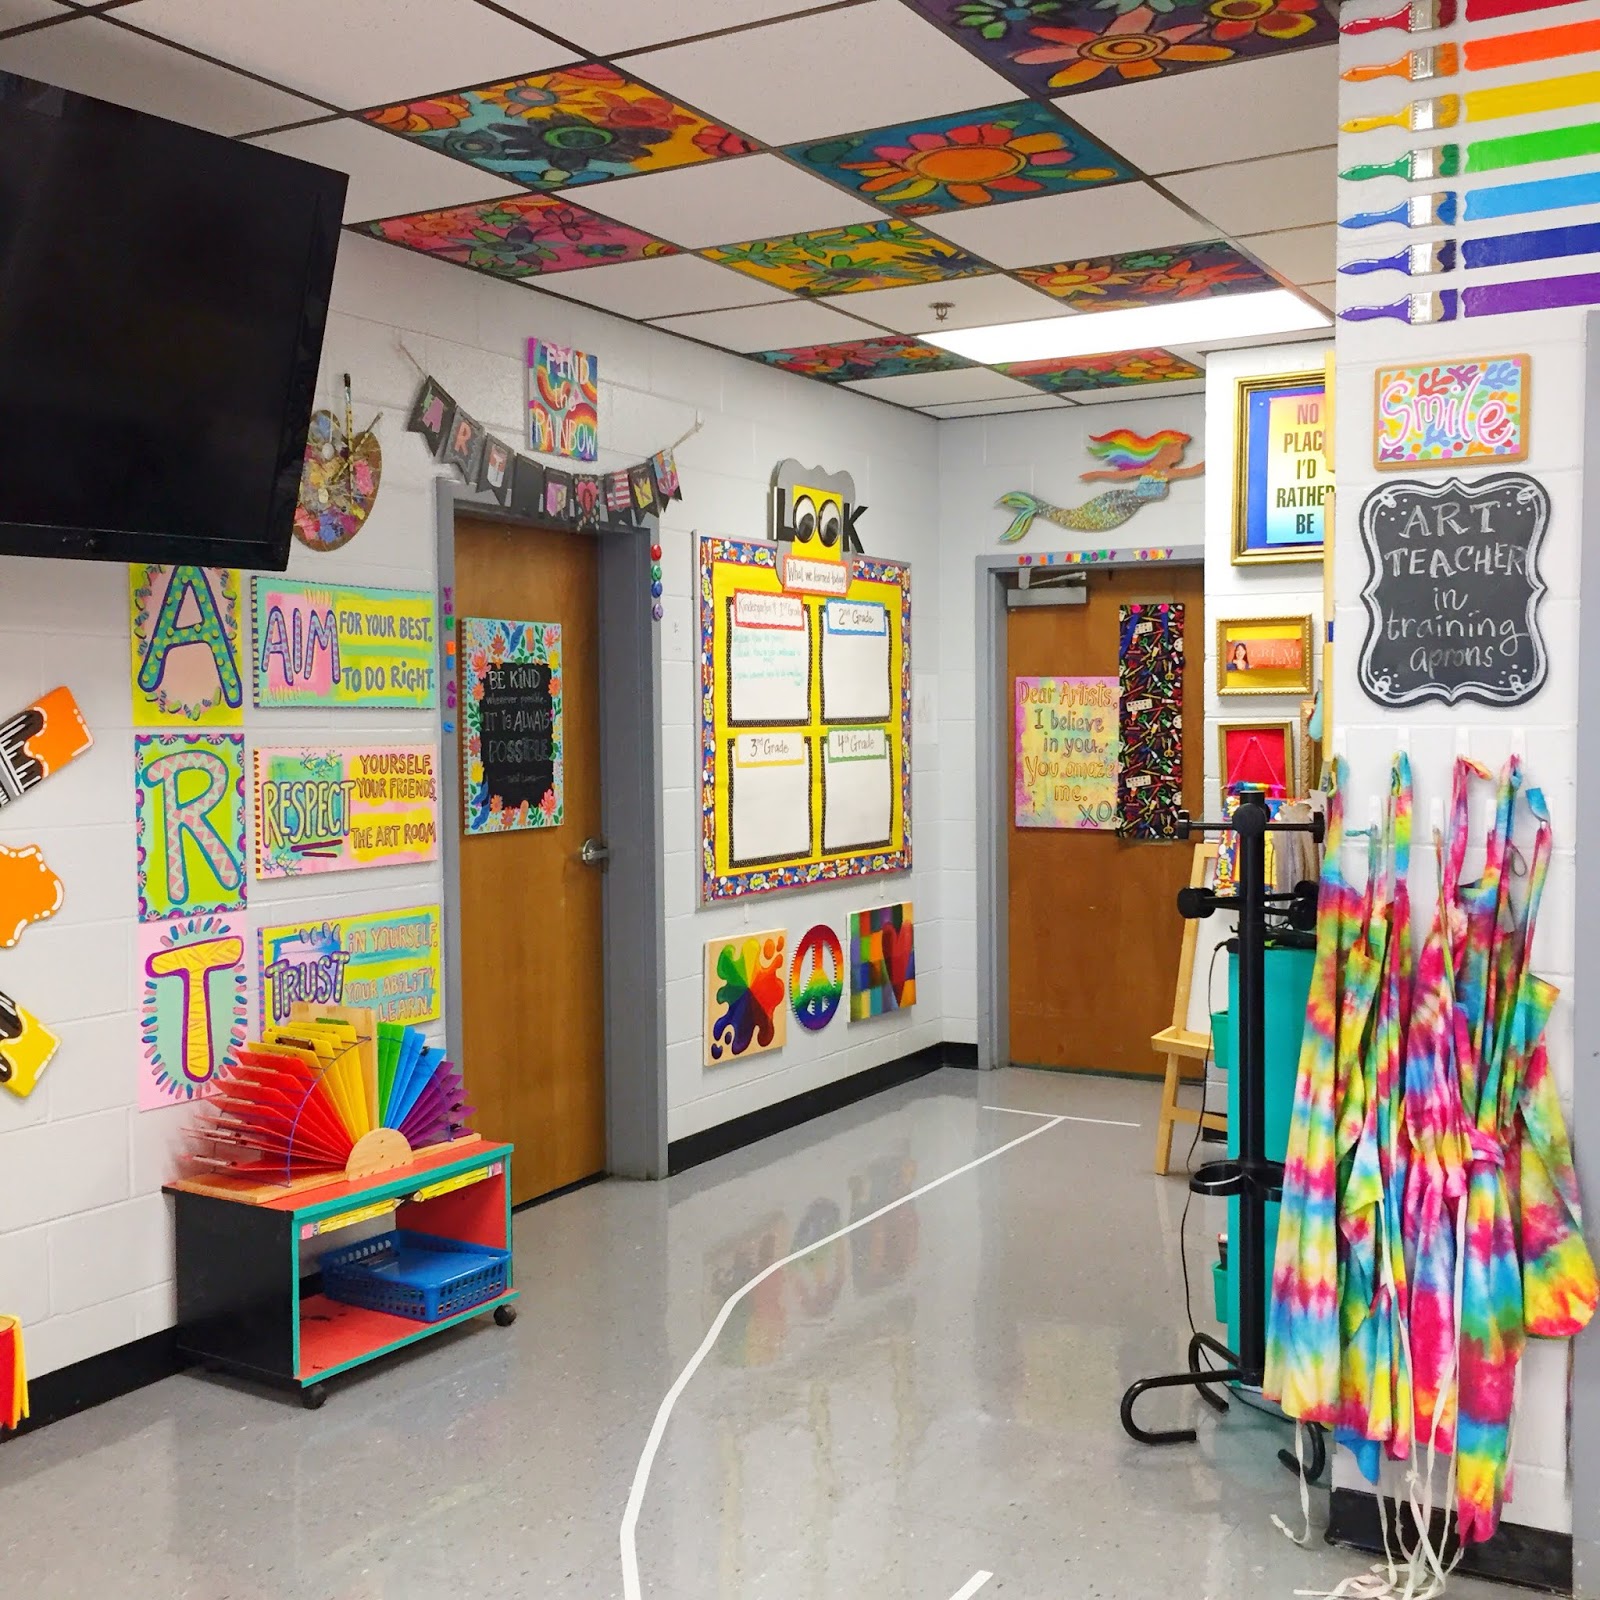
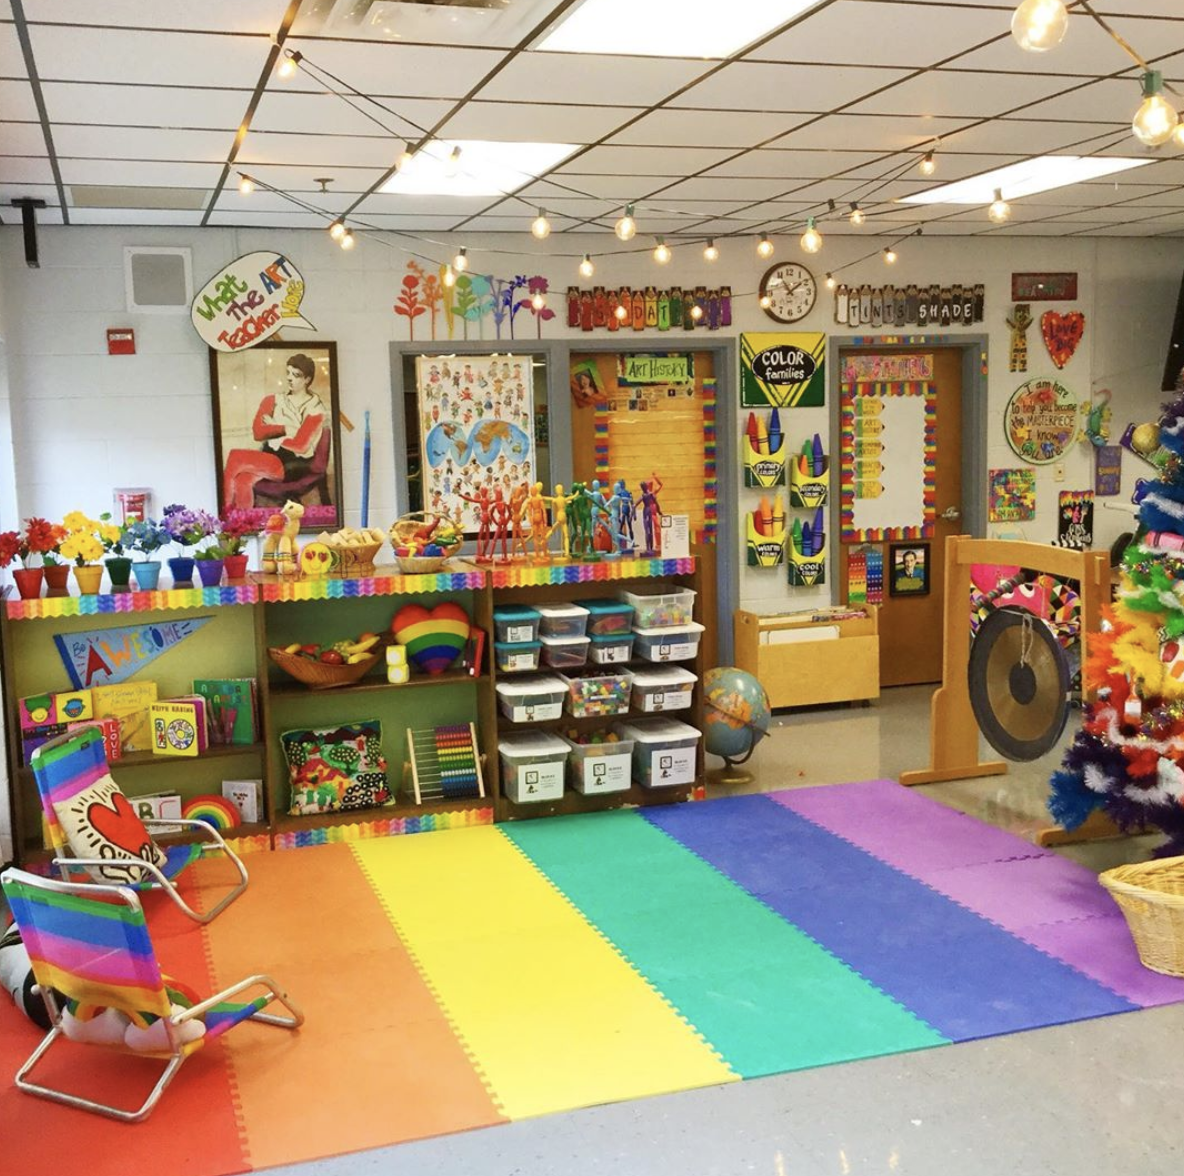 After I set up my art room, I thought I'd do a little tour. I try to do an art room tour each year...and this one might not be that different of a tour than last year as my room has not changed much. AND it would appear that my tour went as long as my podcast...it was such a long video, I decided to break it up into two parts. So here is my first installment:
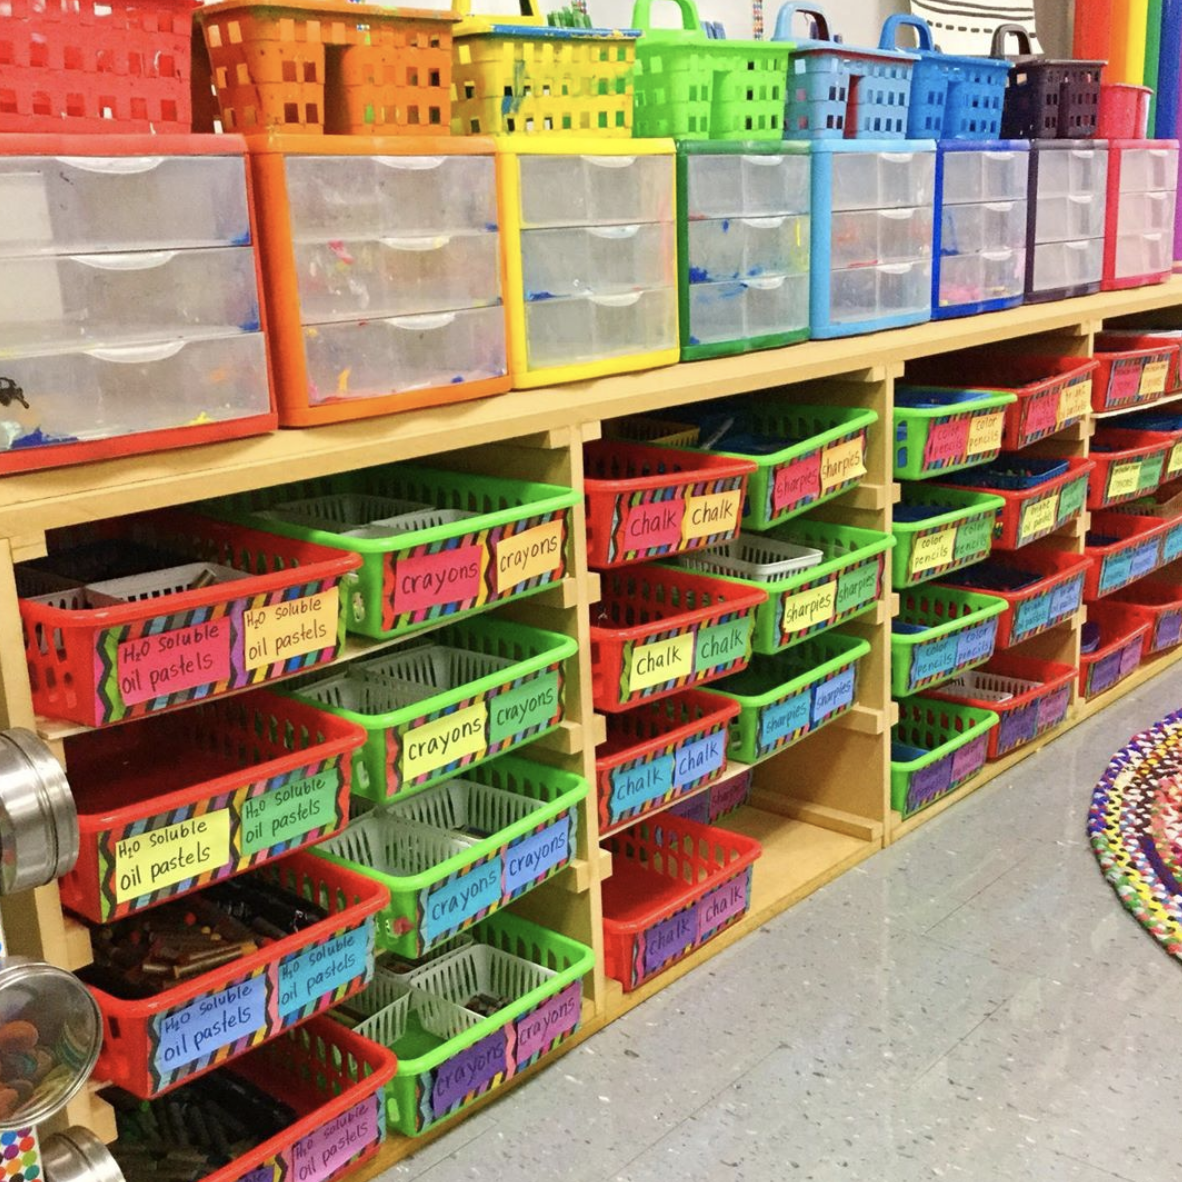
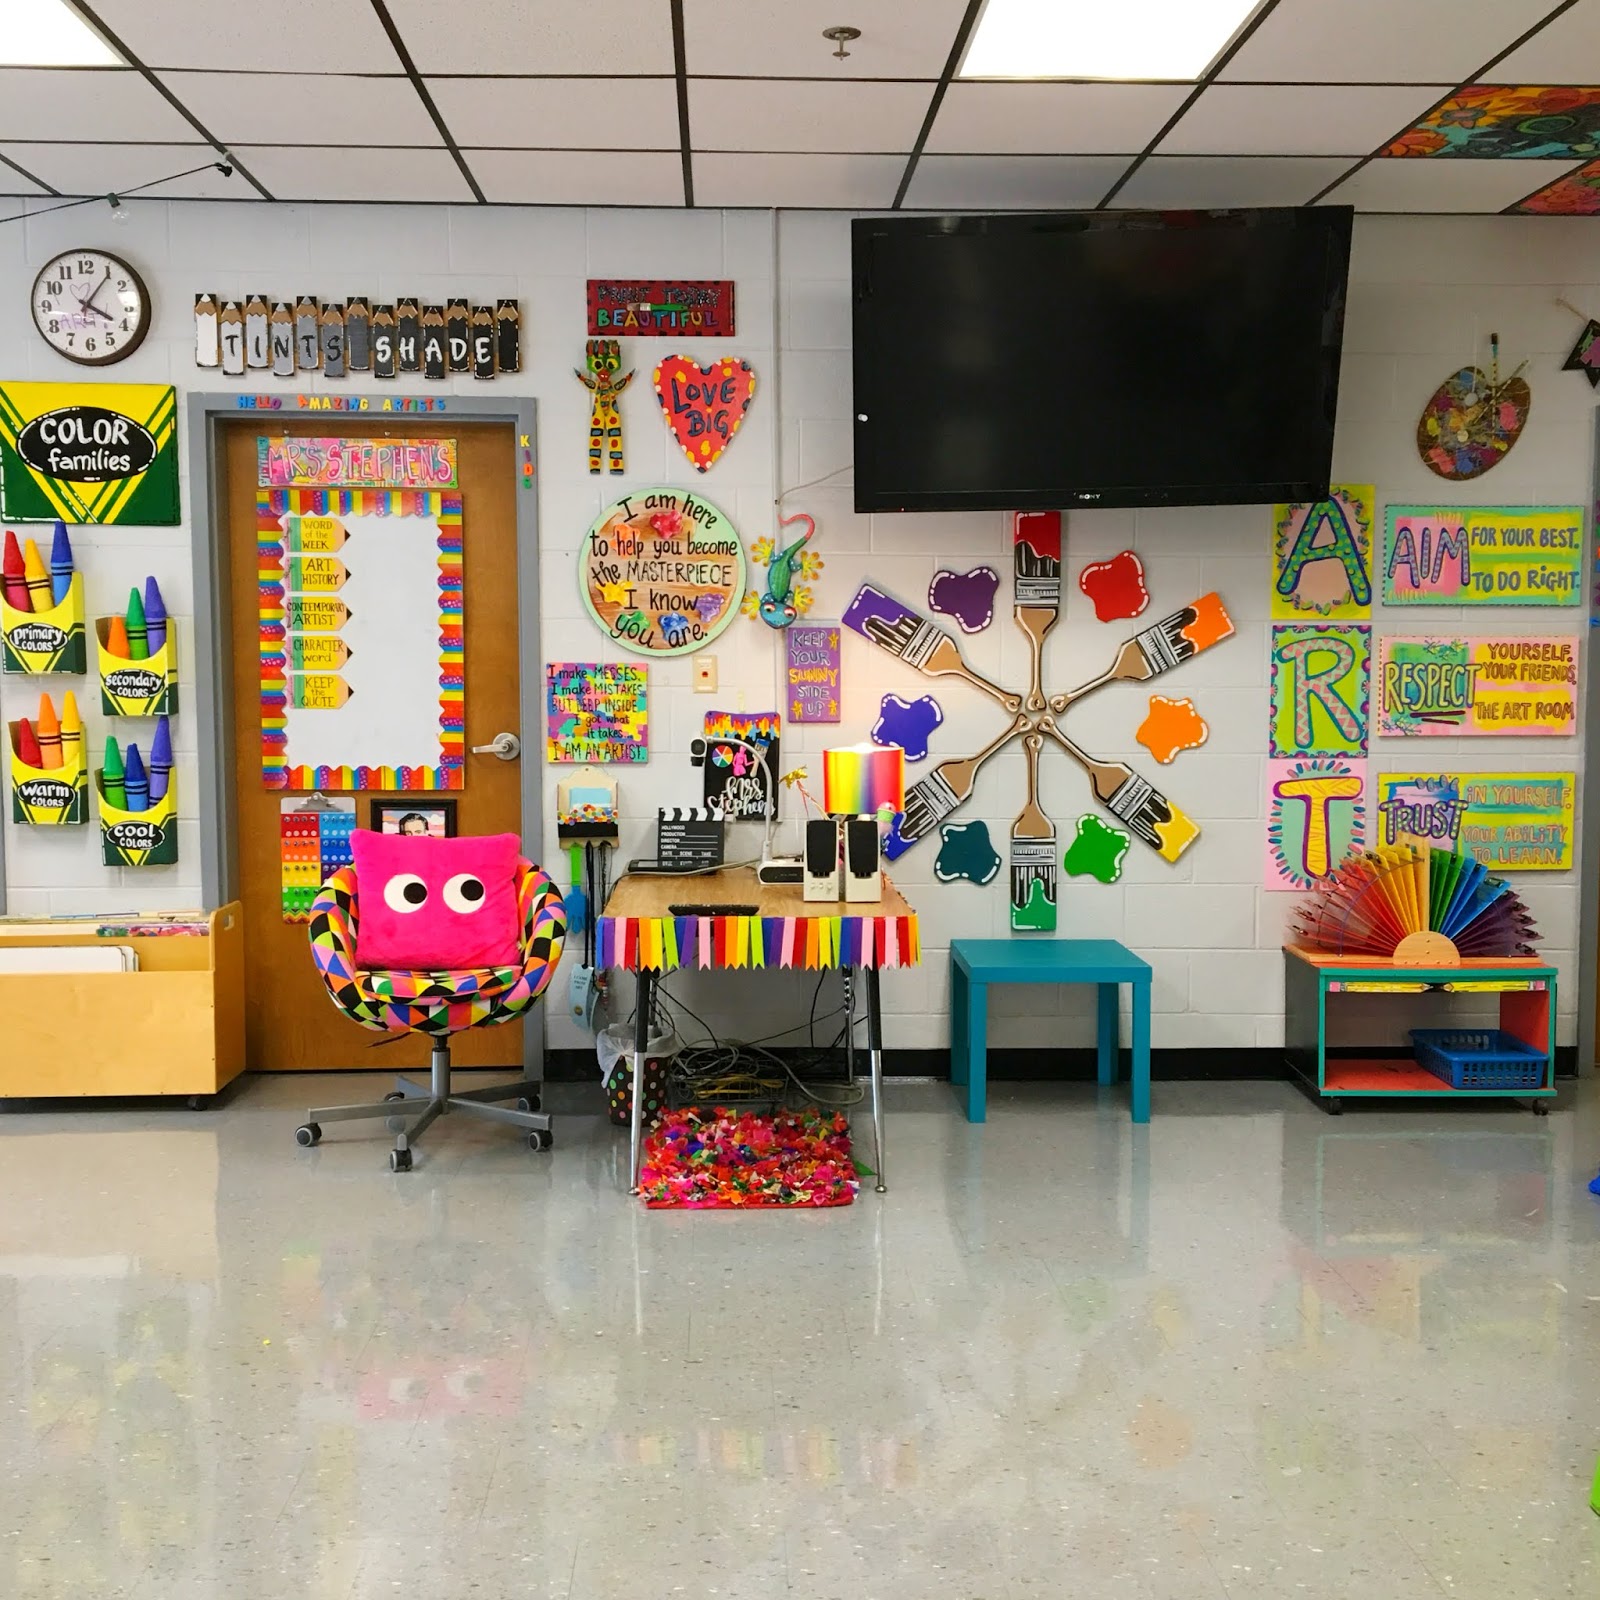
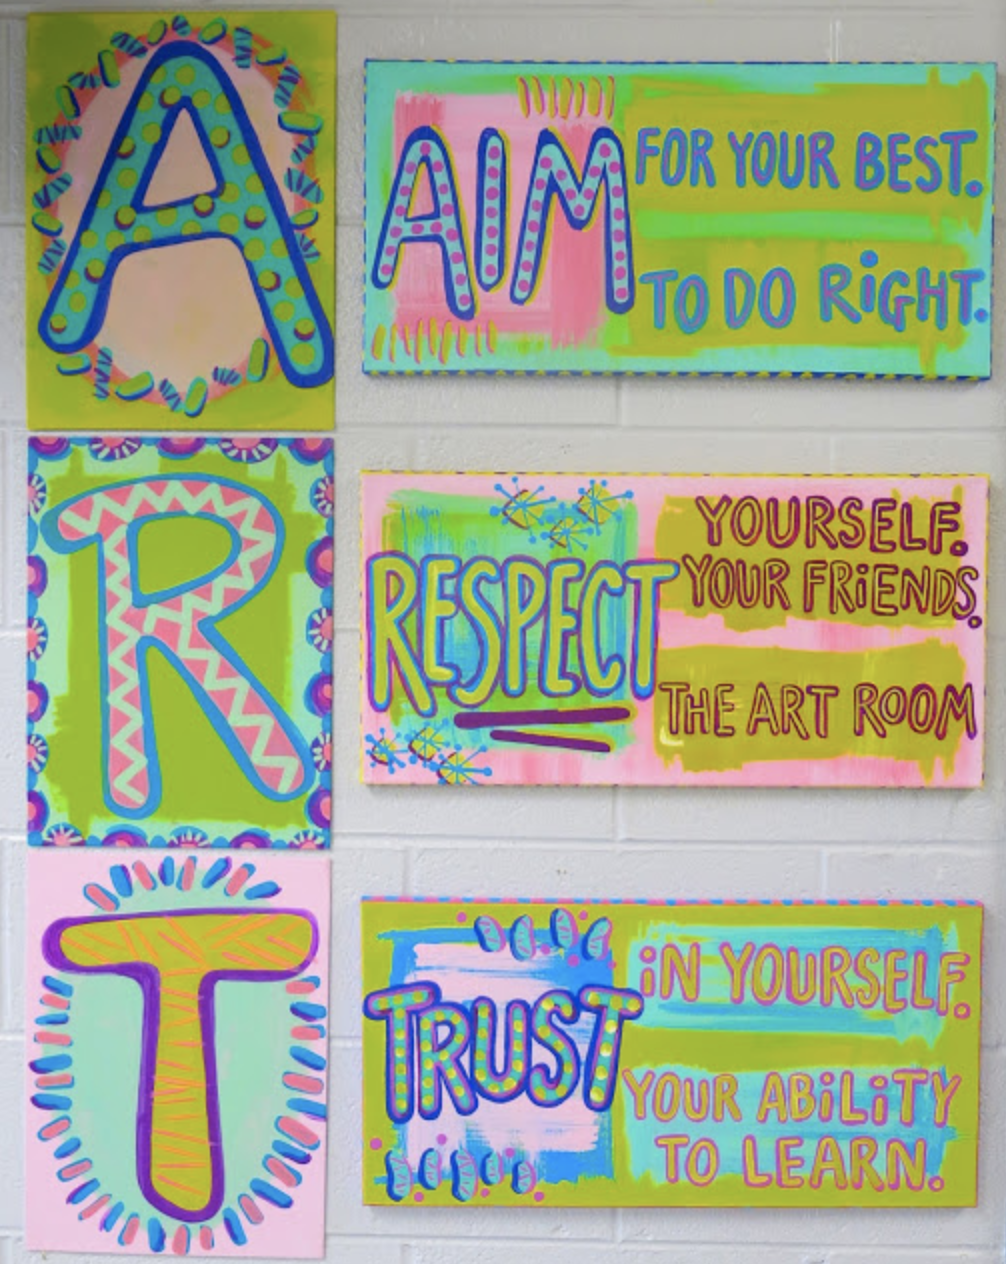
Just about everything you see in my art room was made by me. That was a decision I made a couple of years ago. It really helps me find a creative outlet. You can find just about every DIY from my art room in this blog post!
 Just about everything I reference in the podcast can be seen both in my room tours or in the these photos...but if you have any questions, please feel free to ask. Here's the second half of my room tour:
After revamping my art room a couple of years ago, it has remained pretty much the same. It is definitely a much happier place than it once was. And it's more easy to maintain since I don't redecorate the entire space with a new theme as I once did.
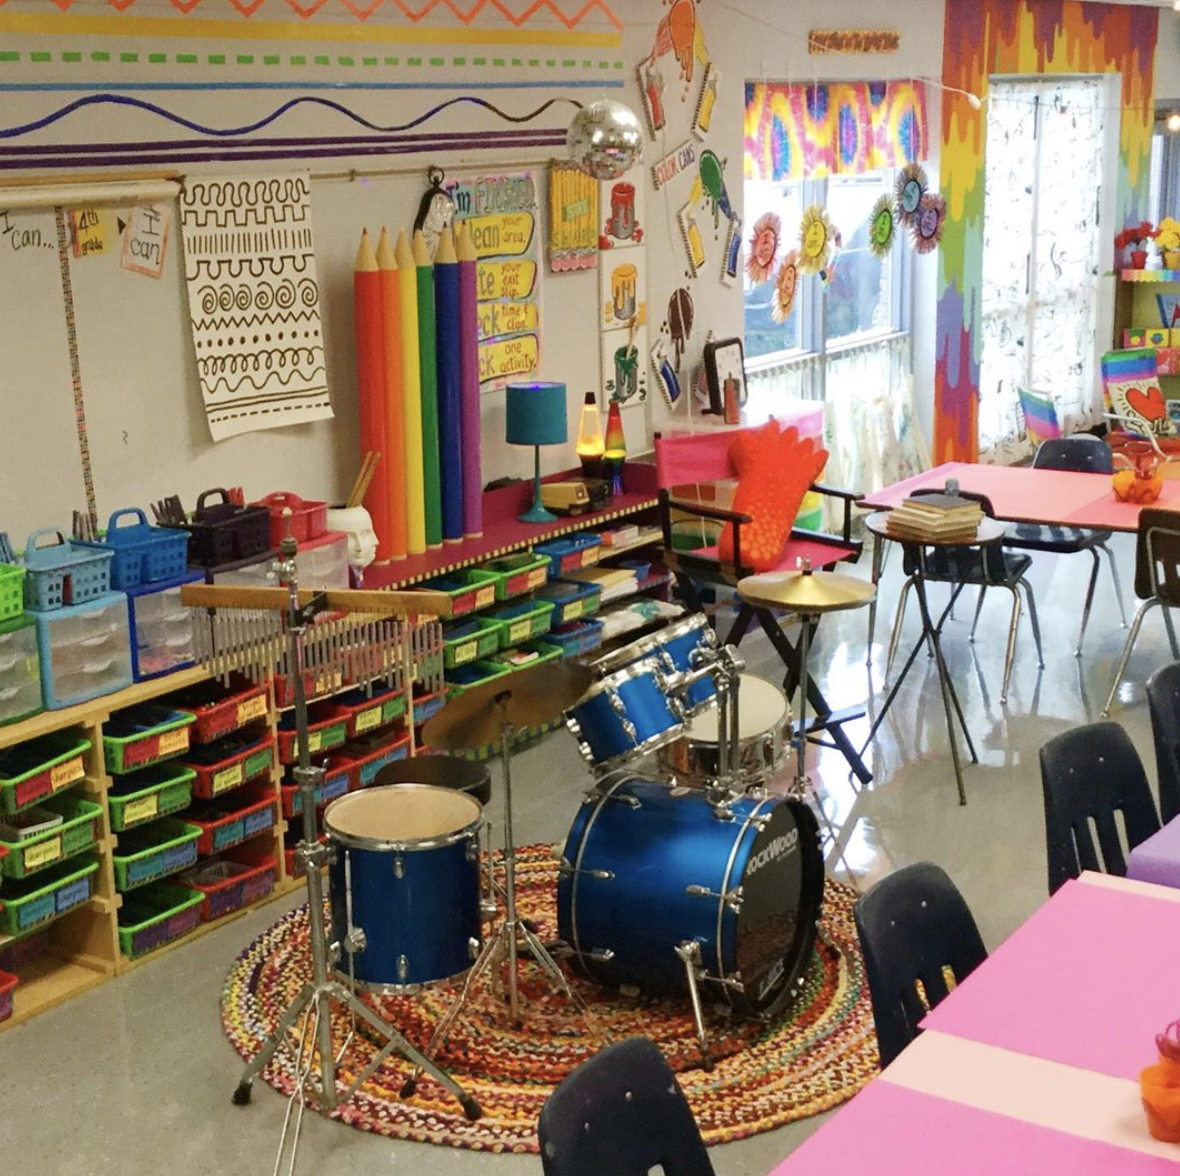 PLEASE keep in mind that I've been in this room for 15 years, teaching for 20...and spent an entire school year in 2017-2018 completely revamping this space. I was in my room on weekends. I was working on new ideas and decor nonstop. I loved every minute of it...it really helped me declutter, decorate to educate and CREATE. It was what my art teacherin' soul needed.
 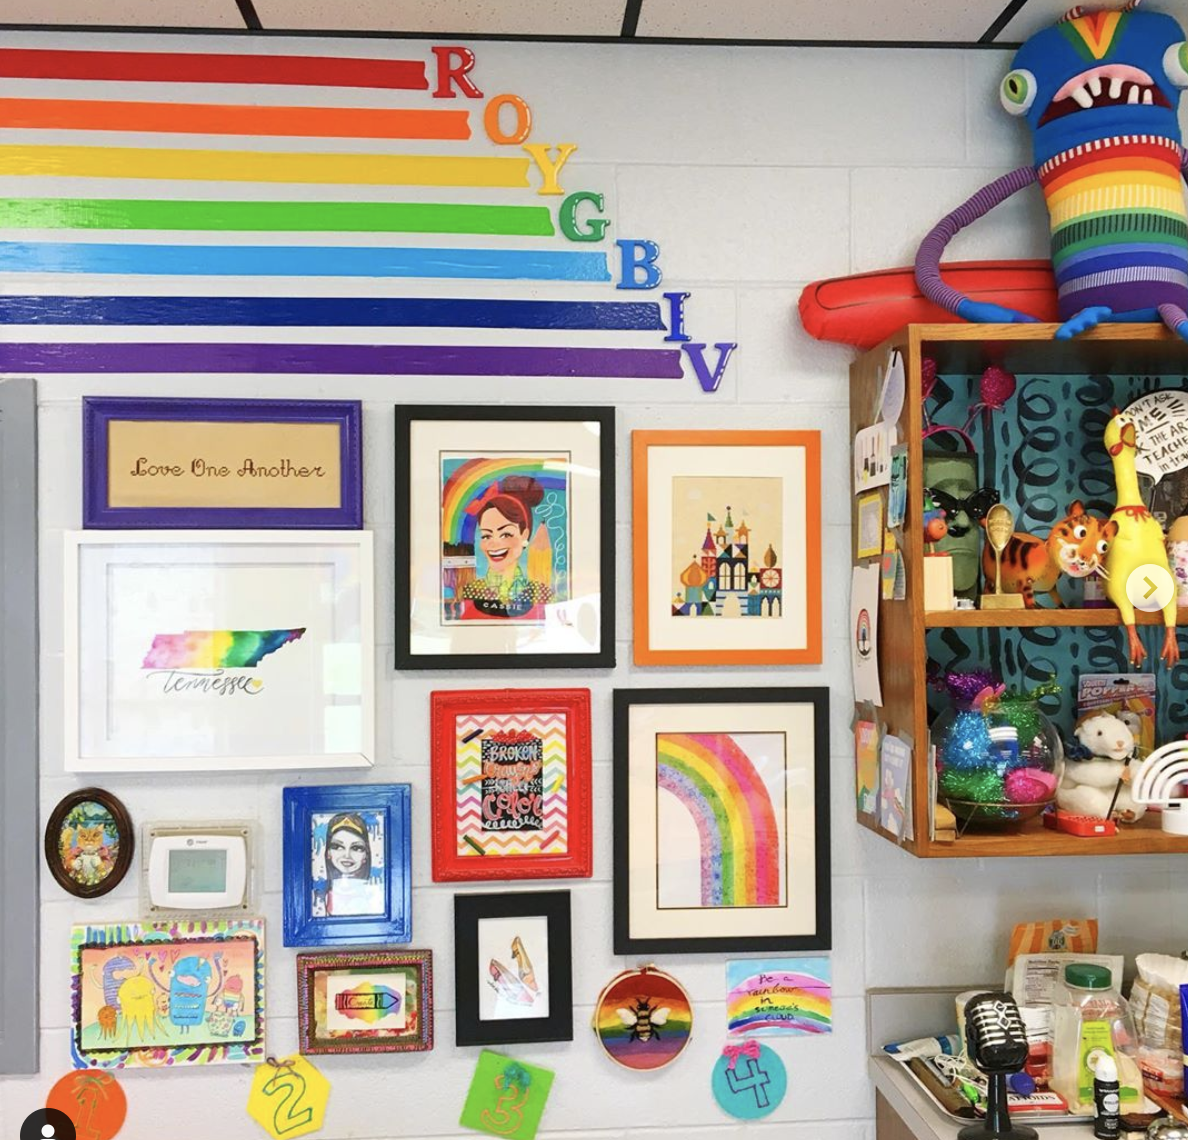 THAT BEING SAID...I know this space can look overwhelming to some art teachers. Just know...you should DO YOU. Do what you have time to do, do what you feel compelled to do, do what YOU need to do do and create that special environment that you wish for your students. BUT do not beat yourself up. Do not be hard on yourself. All good things take time. Spend time deciding what you want for your students. Take a deep breath. Go from there.
  That's what I had to do. I had to really reflect on my space. When I see those BEFORE photos in that before and after post, I just see all that visual noise. Granted, this right here may seem pretty noisy to some but for me...I love it. And I think my students do too.
 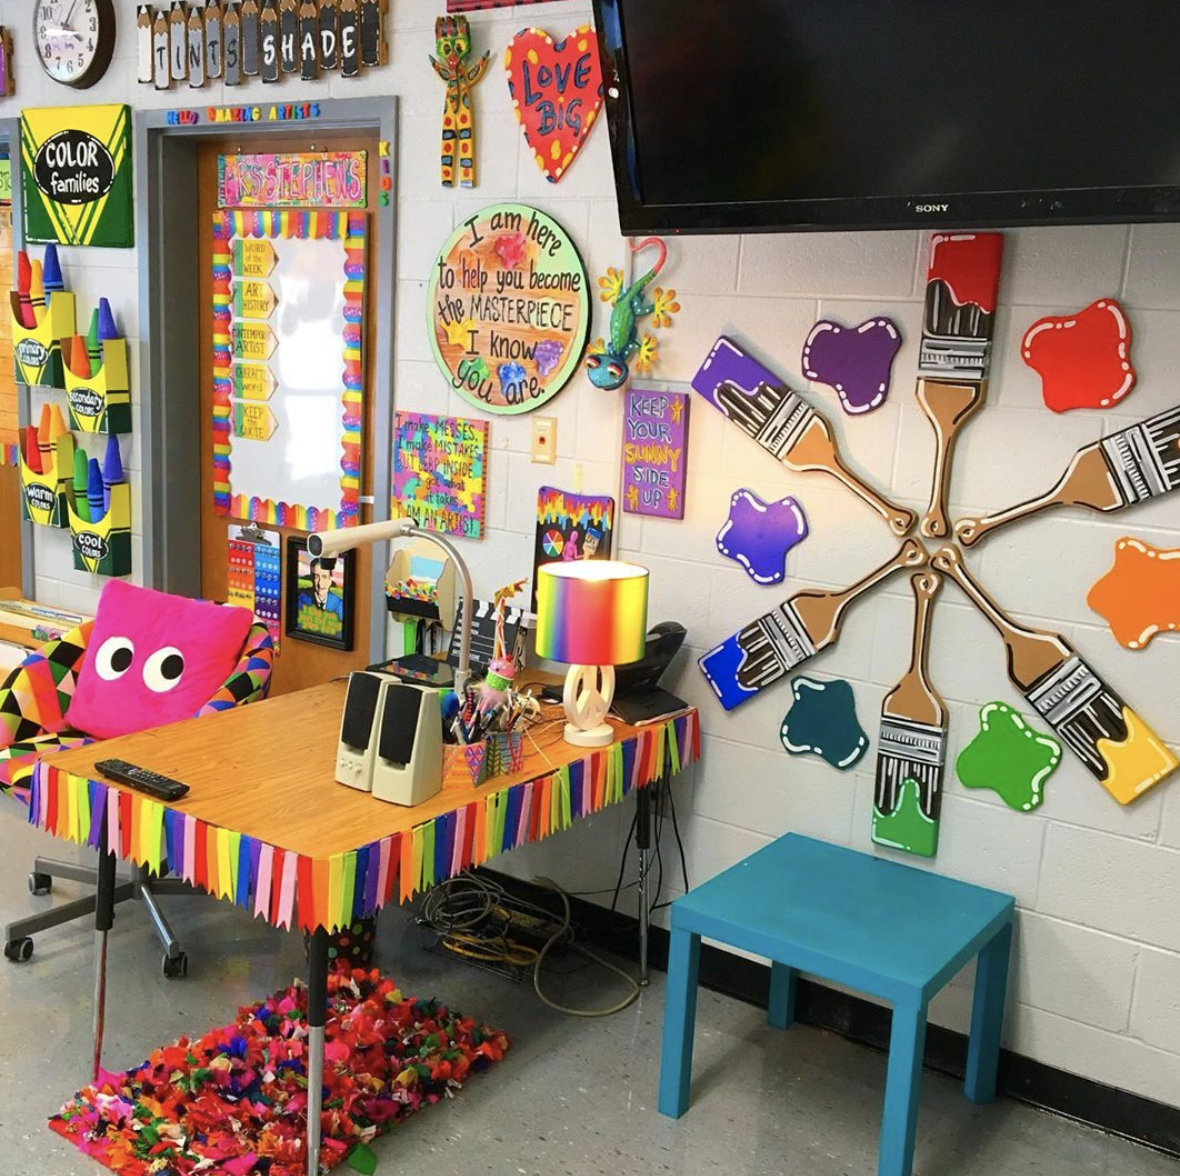 I hope you enjoy the podcast...and I hope it proves to be helpful to you as you begin to bring in this new and amazing school year. And if my room does make you feel a little, I dunno, intimidated...just know that behind every beautifully decorated art room (well, mine anyway) there is a storage closet that looks like THIS:
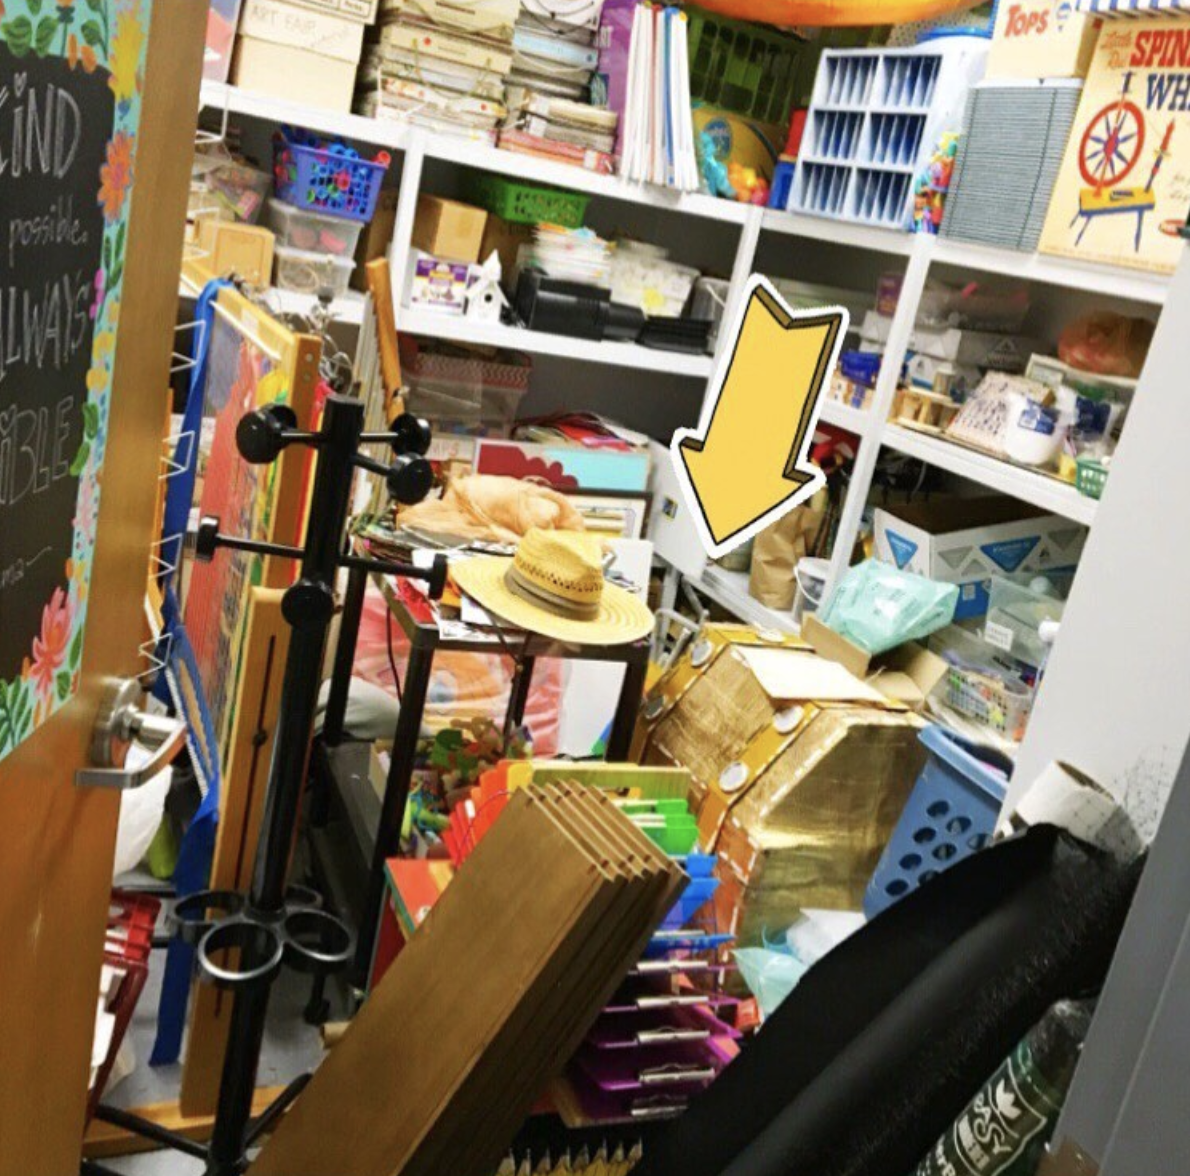 That arrow is pointing to the one thing I need...which I had to climb over the junk to get to. I hate organizing!! It's exhausting and, obviously, I am no good at maintaining it! Feel better? You should!
  Have a wonderful and colorful day, y'all!
August 2, 2019
In the Art Room: Teacher Fill-In-The-Blank for your PD!
 For fun, I created these Teacher Fill in the Blank forms for our first day of professional development (I know, my nerd status just got elevated to Uber Nerd). It started with one I created after getting the idea. I ran it past my admin and she suggested I make a couple more for our opening meeting. I ended up creating these three. They were such a hit today that I thought I'd make them available for you!
 Feel free to download and use! Here they are...credit to yours truly would be greatly appreciated!
 To kick off the meeting, I placed just the fill in the sheets on the tables, not the story. I did this so that the teachers would be more random in their word choices and thereby making the story more funny. The teachers worked in groups at their tables to compile their lists. After about 5-7 minutes, I passed out the paragraphs and the teachers dropped in their words in the order that they'd written them on their first sheet.
 Table by table, one teacher would pop up and read their paragraph. Y'all...they were HILARIOUS! We were dying laughing and it was just about the most perfect way to start our school PD...says me. I love a good belly laugh with friends in the morning.
  If your school, or just the folks at your table during a PD, are looking for a fun time, this is it. Let me know if you do it, I'd love to hear what you think. Have fun and WELCOME BACK!
July 31, 2019
In the Art Room: The Easiest (and Maybe the Only!) Classroom Management Tool You'll Ever Use!
 I've got three new podcast episodes for you this week that I think you'll enjoy...at least I hope! I've been TRYING to jump start my art teacherin' brain these last couple weeks because, GULP, I go back to school tomorrow, y'all. That's MAN-AN-A (where my tilda at, blogger?!). In case you missed, I've been chatting up all things art teacherin' over on my podcast, Cassie Stephens (available for download here, Apple Podcasts, Spotify or simply click on the link!). This week, I covered why our kids are misbehavin', what my three consequences are and...the easiest classroom management tool EVER!
 Take a listen to to that one right here:
 This is also THE CHEAPEST classroom management tool you'll ever use...as all you need is a dry erase board, a marker and a happy/sad face. Shoot man, just draw a happy and a sad face on your board and you are set. Now, if you are like me and you need a visual to go with the podcast, here's a video I made a couple years ago:
In my podcast episode how I started using this board...making it way too complicated. These days, it's super easy and super effective. I think you'll love it. Take a look at this vintage photo below. My art room has changed so much over the last couple of years. You wanna know what's not changed? Me using this board! My desk still sits in this same spot, it's just rotated outward, toward the kids. But the Happy/Sad Board still remains. It works with all of my students, kindergarten through fourth.
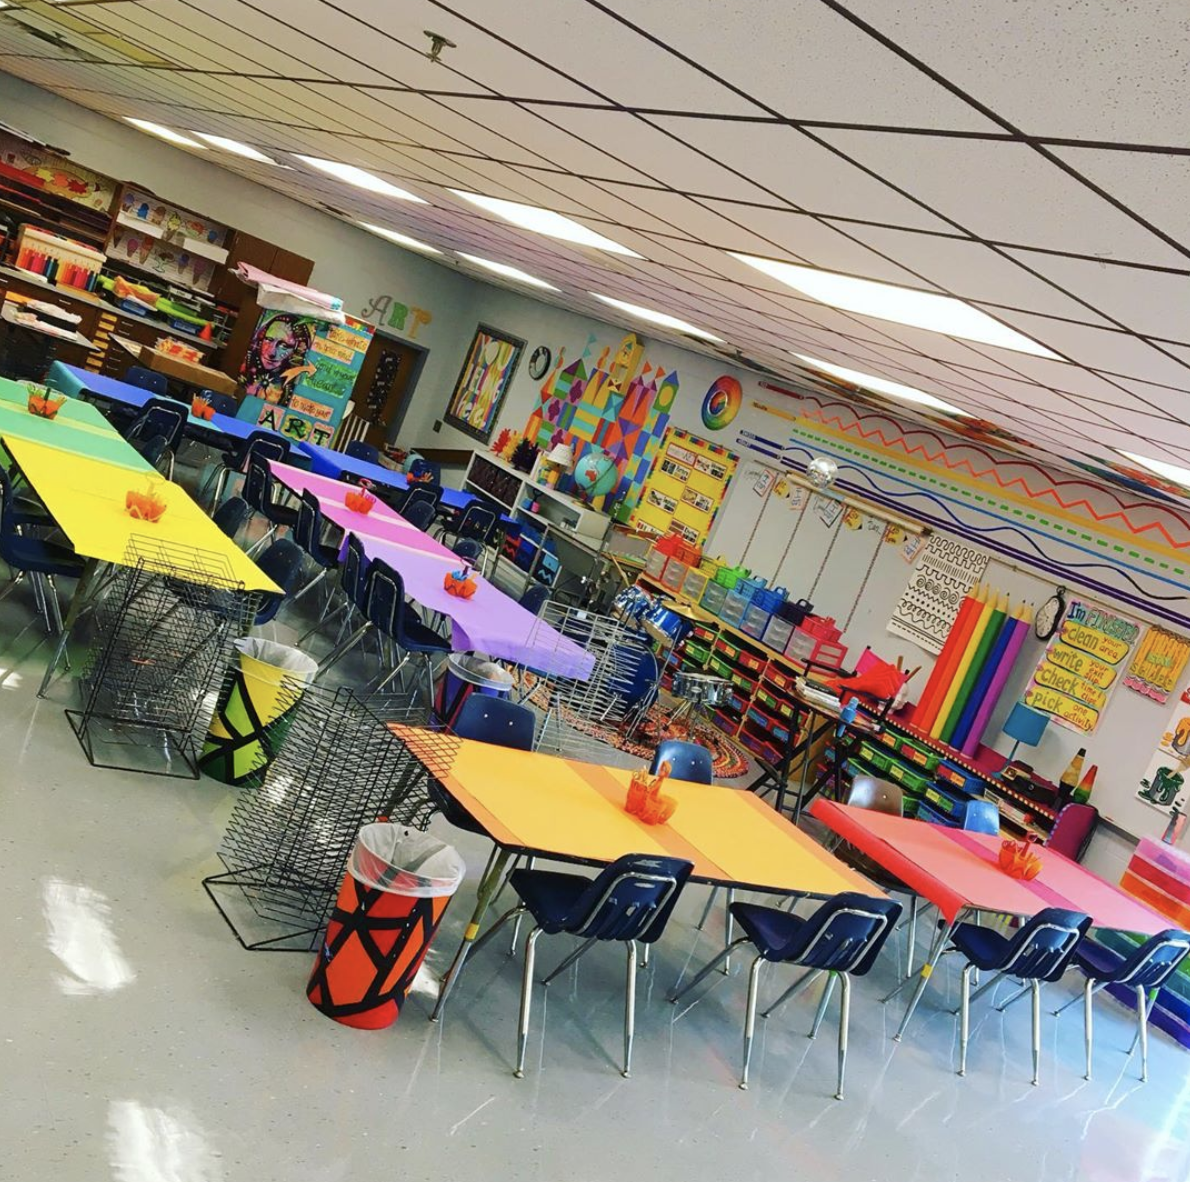
 Below is what my art room looks like now. Look how much crapola I used to have...EVERYWHERE. I was a big believer in more-is-more. I guess I still am but now I'm a bigger believer in decorating to educate. Which is what I hope I do!
 What's missing from this photo? MY HAPPY/SAD BOARD! At the end of the school year, the little easel it sat on broke. I've since ordered me a dry erase board stand that I plan to place front and center.
 One thing I failed to mention in my podcast is what I do with the board when the kids go to their seats to work. Usually the kids are merrily making and need very few reminders. However, when we do, I will sometimes assign a student to be in charge of the board. They'll take it to their seat and mark lines under the happy or the sad as they see fit. Does that mean we sometimes end up with 3452 happy face tallies? YES. But usually the kids do well with it. Every so often, when the class gets a little too chatty or off task, I'll say, "Hey, T, how many happy/sads to we have?" and that will usually get everyone to fall in line. Easy right?
If you wanted to extend this, you could totally use it to keep a class tally of behaviors, if that's your thing. Personally, I cannot keep up with class parties, table tallies, behavior charts, stickers, clips or popsicle sticks. But you COULD use this system at the end of class to determine if the class has had a successful day and deserves to work toward some reward. For me, I'm much too crazy to keep up with any of that stuff...and just racking up the happies seems to work for my students. AND THAT'S THE KEY... you do what works for yourSELF, your STUDENTS, your SET UP and your SITUATION and you'll be amazing. Happy New Year!
July 27, 2019
In the Art Room: First Day of Art Projects!
 BIG NEWS! My podcast is now available on Apple Podcasts! I'm so excited. If you want to keep up with me, be sure and subscribe. Also, a rating and a review would be super duper. Thank you, friends!
I have been talking A LOT here lately, both here and on my podcast, about heading back to school. It's right around the corner for me (next week, ACK!) so it's all I've been thinking (and nightmaring) about. In case you've missed it, I've been sharing about my rules and routines for my art room. Next week, I'll be talking about the three consequences I use in my art room, why students might misbehave in our room and the one classroom management tool I use like crazy. But today...I thought I'd share my very favorite art projects to do on the very first day (follow this link for videos and more)!
FULL DISCLOSURE: I try VERY HARD on those first days to do the SAME project with ALL of my grade level kids. Why? For my sanity, y'all! I gotta work up that stamina again. AND because my focus is rules and routines. Doing the same and simple lesson with my students allows me to focus on the rules and routines...while they are creating. So what I'm sharing with you here today are projects that can be done with 1st-4th (and sometimes kindergarten too but I usually start here for them). The exception to this is when I've done Dot Day projects at the start of the year, where each grade does something different. You can find my fave Dot Day lessons below.
 Last year, this lesson I created was a HUGE hit, both with my students and fellow art teachers. I know the link for the sheets has been broken forever but GUESS WHO FIXED IT! That's right...finally. Follow this link for both FREE downloadable PDFs. You and your kids will love this first day activity!
 While storage was a little tricky, once these guys were finished and up they made for quite the beautiful display. You can see how we displayed them here.
 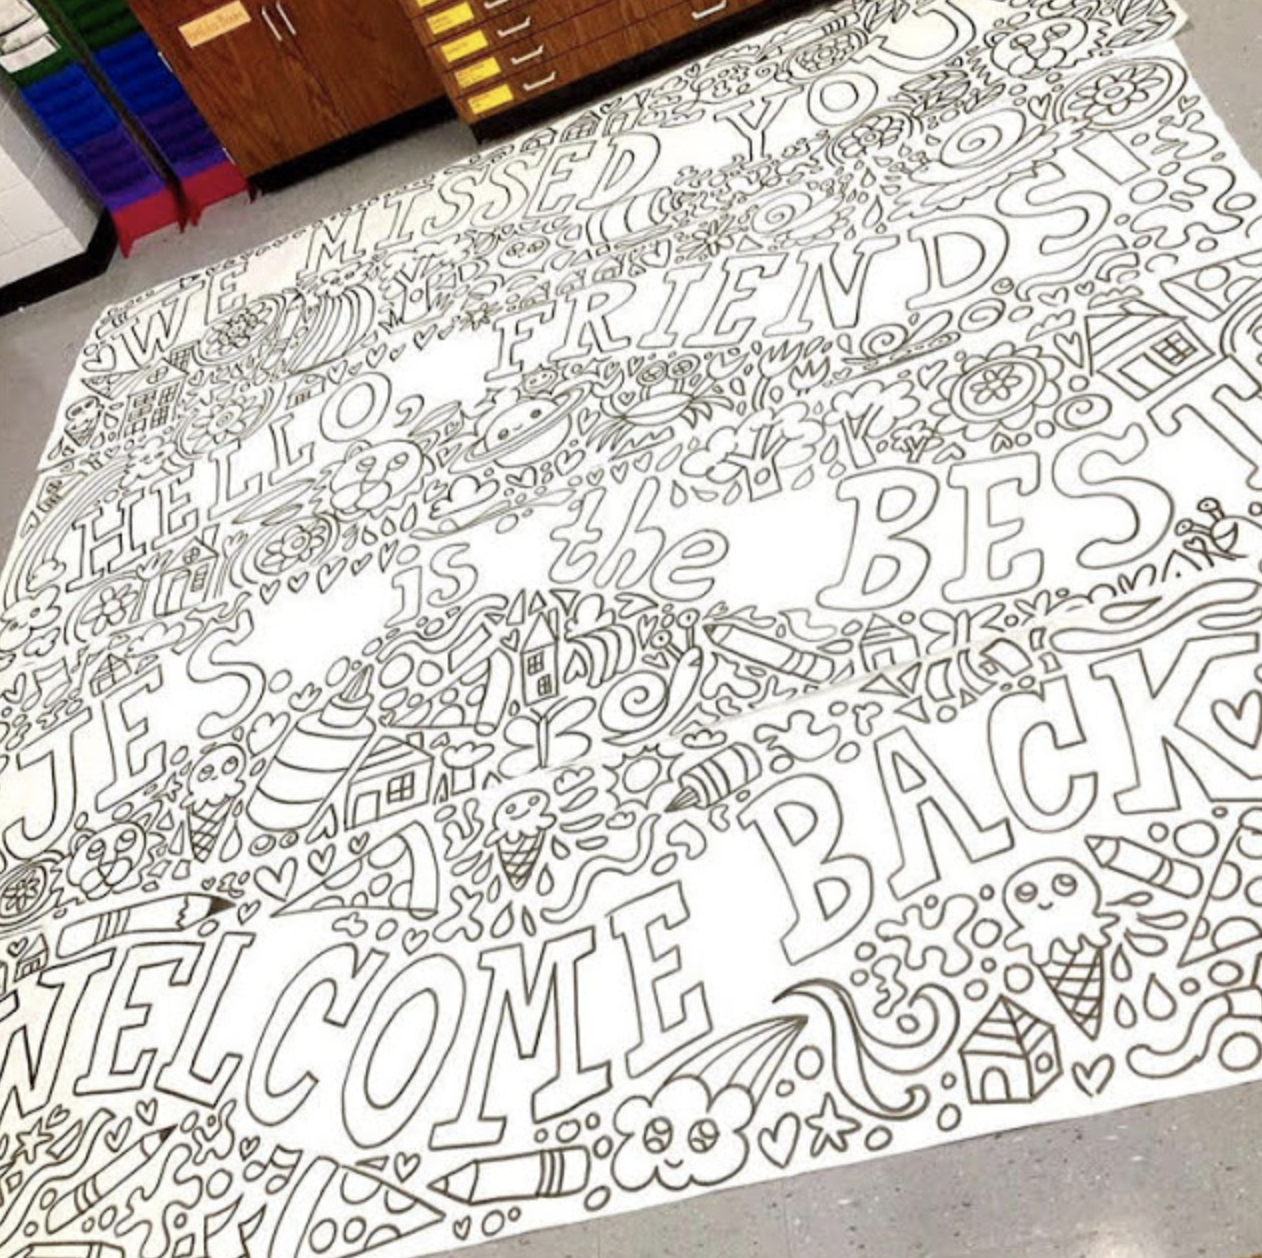 Who's to say kids can't paint in art class on the very first day?! I created these Welcome Back banners for my students to paint at the END of last year...so I could hang next week. But you could make them now, let the kids paint them and hang them up for Open House or just to brighten the halls. More details on how these were created here and here (with video!).
 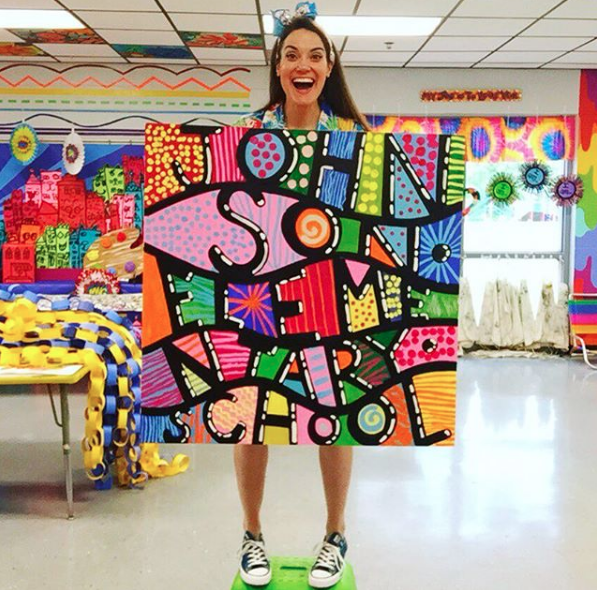 I'm a big fan of having my students create collaborative pieces at the start of the school year. Why? Because they can help establish a culture of community! And they are so pretty. We created this piece a couple of years ago and it was so well received that we have since painted a bunch more for our school library. More details here and here!
 Of course, you cannot go wrong starting off your school year with The Dot by Peter H. Reynolds. I have done a BAZILLION different Dot Day projects, many complete with instructional video. I put 'em all into one big blog post right here. So, need some Dot Day? I got you covered!
 This here is an oldie that I've brought back a couple of times now...three times to be exact! I've created a popular video that you are welcome to share in your art room. You can find the lesson details and video here.
  Having done this lesson a couple of times, I've found different ways to display them. Here's one and then here's one where we took our faces and created a world!
 This lesson has been a HUGE hit on my blog with so many folks bringing wings into their school. It's a super way to start the year. I've got a video just for you (that's free!) right here.
 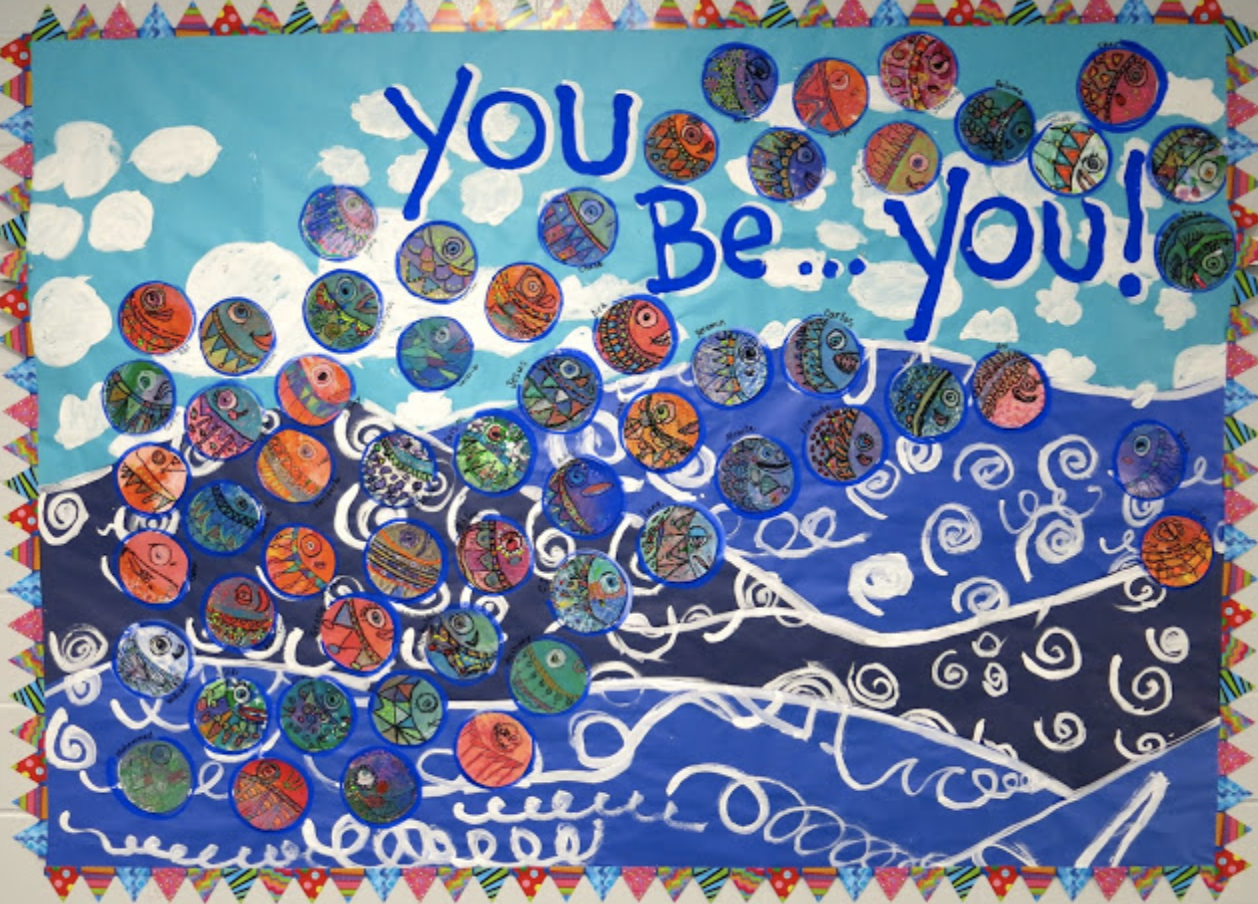 Big ole collaborative murals are my fave thing for my kids to create! This one really sends home a message that I want my kids to receive.
 And this big ole beast, inspired by the author Todd Parr, makes me so happy that I've yet to take it down!
 There are truly so many ways to start your school year...but I would encourage you to START SIMPLE. I know these projects may not seem to be simple. That's because you are just seeing the final results. On that first day, it should be RULES AND ROUTINE city, okay? With some creating mixed in. If you do the same lesson with everyone, then you are making your life a little easier. And when your life is a little easier, then you can focus on rules, routines and getting to know your kiddos (my favorite part). So find what works, have fun, enjoy those first few days by keeping your life easy. Remember, a happy person makes for a happy art teacher. Go easy on yourself and have a wonderful start to your school year.
 More details on these trees here!
July 24, 2019
In the Art Room: ART ROOM RULES!
 I've been chatting alot with y'all lately about routines for the art room...and it seems kinda crazy to address that before talking about rules, doesn't it?! For the longest time...like, I'm talking YEARS, I did not understand the difference between rules and routines. There were times when I would list my rules and they'd be a mile long because they were actually procedures I wanted my kids to follow, not rules. It can all be a little confusing so let me share an analogy with you...
Your art room is the magical masterpiece of a place you wish to create for you and your students. Your RULES are the broad brush stokes of that masterpiece. The solid foundation you wish to create. Your ROUTINES are the small brush strokes, the dabs of color and light that bring your entire work of art together. With rules and routines, your art room are room has the potential to becoming everything you and your students need to create, grow and thrive.
Now...when those rules and routines are disregarded, which can happen for any number of reasons, then there are consequences. I'll be talking more about that next week. For now, let's focus on rules. Here's mine:
 Each one of these is a downloadable PDF which you can find here. In fact, you can read more about my rules by following this link.
For many years, I just came up with rules. I copied rules that other classroom or art teachers used without putting much thought into it. I hate to even admit it, but it's true. In fact, I talk a lot about it in one of this week's podcast episodes. But, incase you missed the prequel, you might wanna listen to the one on routines first. And here's my podcast episode on rules:
 Before you even start thinking about your RULES and ROUTINES, shouldn't you know your WHY? I wish I had. For years I was just blindly going thru my rules, the ones I'd robbed from other folks, without giving it much thought. It was the thing I thought I had to do, get outta the way and off my To Do. Sadly, what I didn't know, is that your WHY sheds light on the tone and climate you wish to create for your art room. Starting there allows you to then shape and form your RULES and your ROUTINES.
 If you've not yet created your WHY, don't worry about it. I walk you through the process in this working podcast. I have LOVED seeing your pie charts and your WHYs...thank you so much for sharing them with me here.
 Painting my WHY was so much fun. It now hangs happily in my Command Center, right where all of my students and I can see it everyday. I talk about my WHY with my students on the very first days of art. And I ask them WHY they want to be in art...WHAT do they hope to learn, do and know. Knowing their stake in their education and owning it, gives them power.
 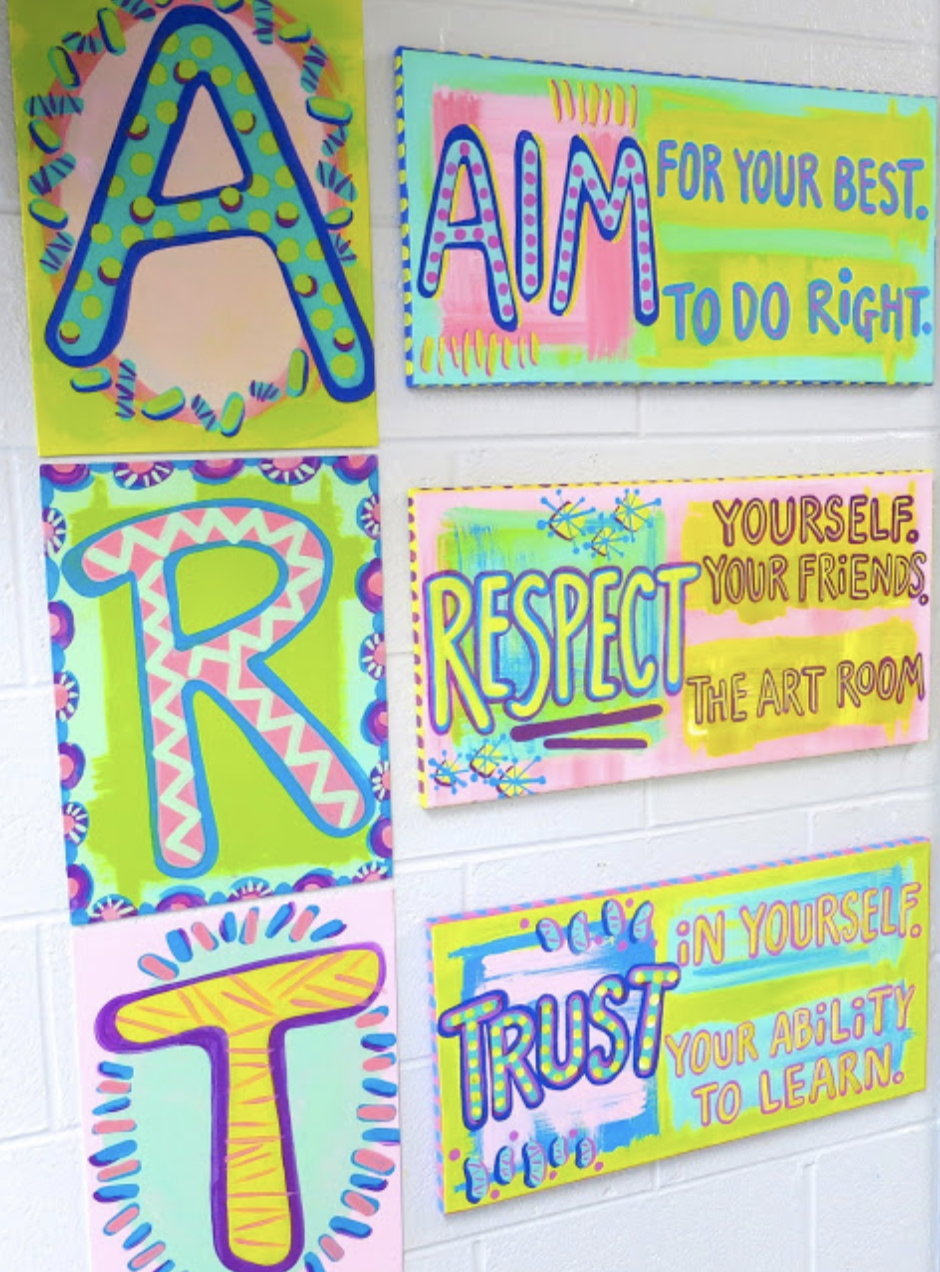 My rules embrace my WHY and help to bring it to life. What are your art room rules? What tone and/or climate do you hope they help your masterpiece of an art room become?
July 22, 2019
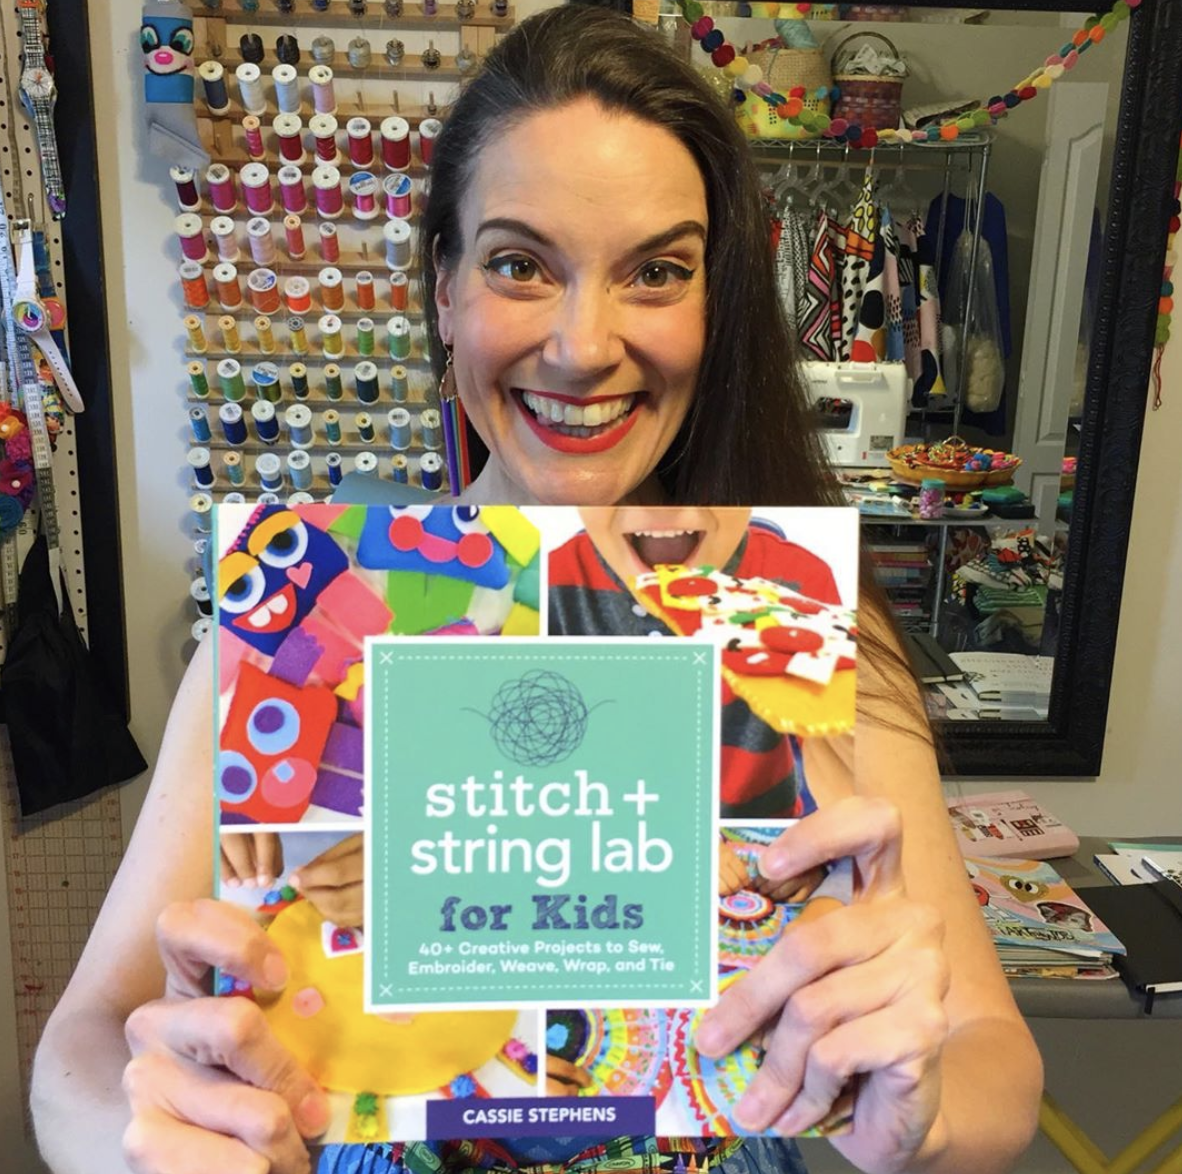
String and Stitch Lab for Kids is...HERE!
 ANNOUNCEMENT: I'll be doing a book launch at Parnassus Books in Nashville on Sunday, August 11th at 2pm. If you'd like to join the fun, please RSVP here. LOVE to see you there!
I CAN'T EVEN BELIEVE IT MYSELF...Stitch and String Lab for Kids is finally (like, FINALLY) here! And I cannot wait for you to see what's inside!
 When I was a kid, fiber arts was my favorite. I didn't have art class in elementary school. So I had to get my art-makin' fix elsewhere. I learned straw weaving in Vacation Bible School. My grandma taught me how to embroider and cross-stitch. And my favorite teacher taught me how to do string art (shown above). As an adult, I've carried with me that love for fibers. When I have free time, y'all know I'm usually sewing up a dress or needle felting some wearable art. It didn't take me long to bring my love of fibers into the art room. Twenty years later...my students have experienced all forms of weaving, needle felting, wet felting, sewing, embroidery and more. I packed ALL of my favorite kid-approved lessons into this book...and I'm so happy. I want to share my love for fibers with you and your kiddos!
 For that reason...I thought it would be fun to bring back the ole Facebook LIVE Craft Nights. I actually STOPPED doing FB/IG LIVES when I was so busy...writing this book. With that behind me, I'd love to get back to crafting with you. Since school is starting soon and I've got a couple other obligations happening, I can currently commit to these three dates. We'll see where we go from there. Here's the line up:
 Mark your calendars and set your alarms! I'll be sharing the supply list shortly. I know if you are anything like me, if I give it to you too far in advance, y'all are just gonna forget all about it. So stay tuned here, follow me here and I'll keep you posted.
 TO CELEBRATE THE BOOK LAUNCH...I created a podcast episode just for you. Have you ever wanted to write a book? Well then I'm spilling the beans on the who, what, when, where, why and HOW in this episode:
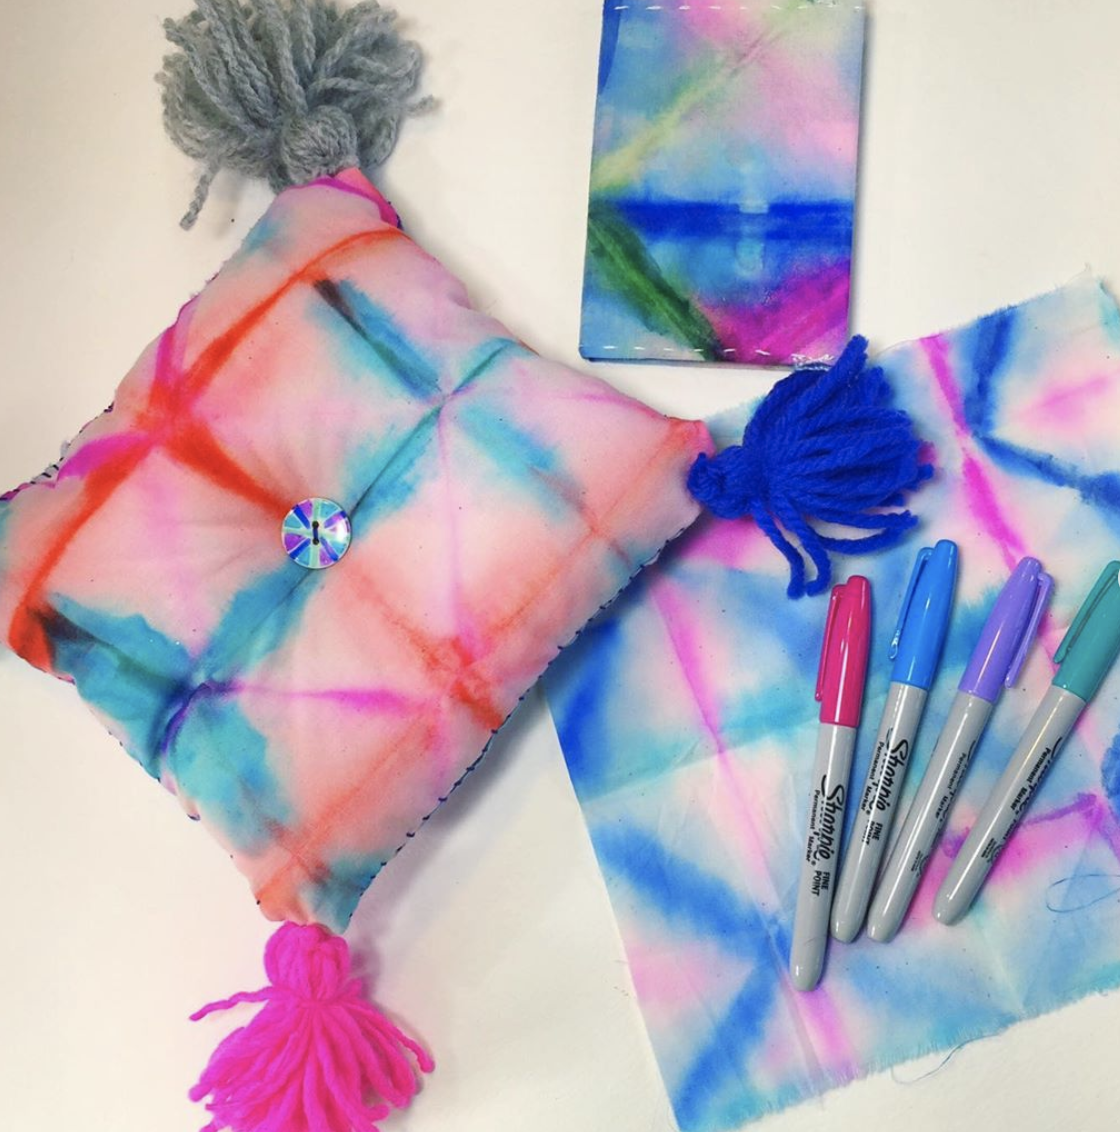 By the way, if these photos are sparking your interest, they are projects from my book. There are 44 projects in my book...quite a bit! If you'd like to see me share more about my book and see some super easy projects for the youngin's, you can see my interview on Nashville's Talk of the Town here.
  If you do receive my book and like it, a review here would be AMAZING! You don't even know just how much a review (preferably a good one!) can mean to me. I would truly appreciate it! The amount of work that goes into making a book is bananas. So a kind word and review is a wonderful thing.
Also! I cannot forget to mention that my first book Clay Lab for Kids is also available here...and again, reviews welcome and much appreciated!
In the Art Room: ART ROOM ROUTINES!
 Remembering all of the routines I wish to cover on the very first days of art was always tough for me...especially in 30 minutes! So a while back, I created this acronym that makes sure I say it all without forgetting a thing. I created this into a downloadable pdf for you right here!
 In this week's podcast episode, I'll be sharing the story of my very first day teaching art. Spoiler Alert: it was a HUGE epic disaster! I thought rules were the only thing you covered on the very first day and, well, you'll just have to take a listen:
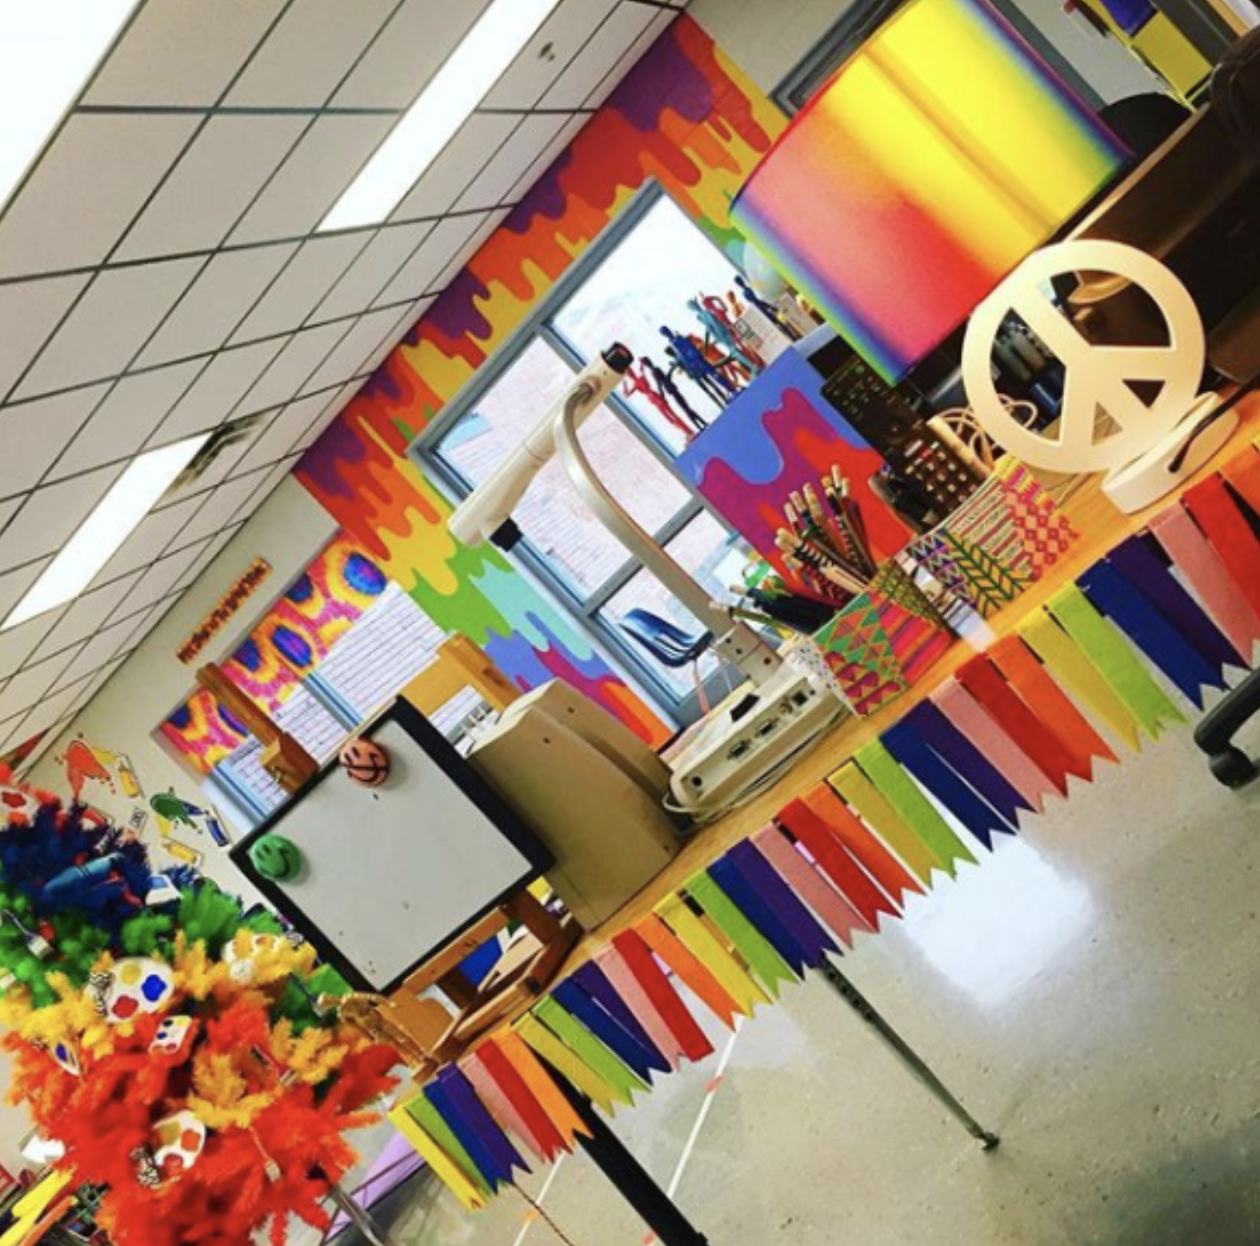
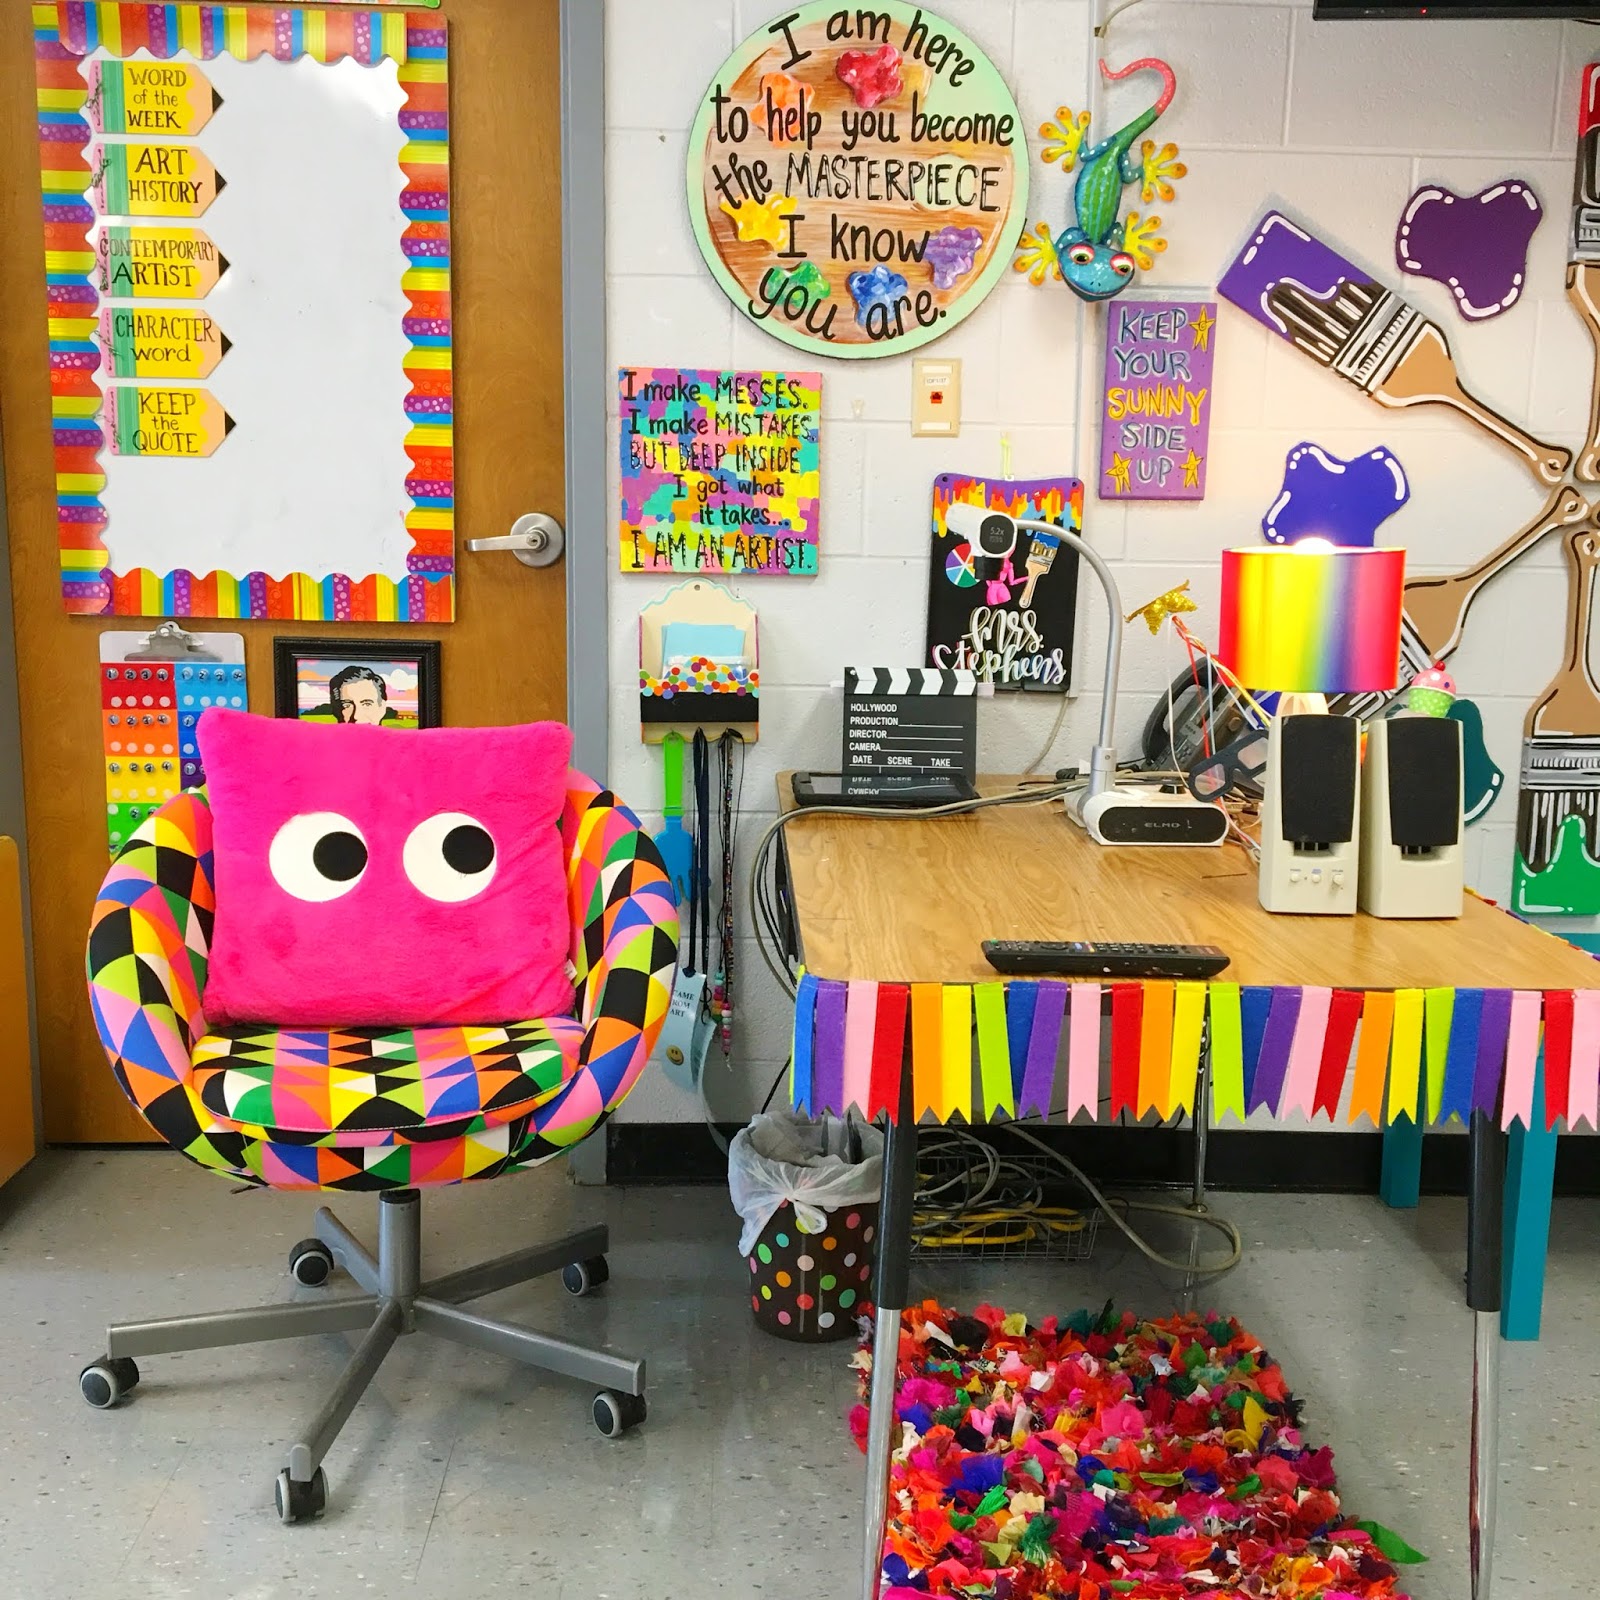
 Last week, I got my room (mostly) set up and ready to go. I filmed a tour and will share later this week! But for now, you can sneak art room peaks here or on my Instagram!
 When I give my art room tour, I'll be sharing links to where to scoop up some of these items...but most of what you see here was made by me!
 And the tutorials for what I've made can be found right here on my blog. If you just cannot wait for an art room tour, here is a peek at last year's:
But back to my routines...I have chatted about W.E.L.C.O.M.E. here...
In fact, I've got a ton of blog posts all about how I have run my first day(s) of art. I'll be chatting about this a lot more here and on my podcast so be sure to subscribe! Here are a bazillion links to videos and blog posts about my W.E.L.C.O.M.E. and my first days of school!
A Glimpse into My First Day, 2018-19
First Day of Art Class, 2018
Art Smart from the Start!
First Day of Art Class 2016-17
Cassie Stephens's Blog

- Cassie Stephens's profile
- 34 followers
Cassie Stephens isn't a Goodreads Author
(yet),
but they
do have a blog,
so here are some recent posts imported from
their feed.

