
Cassie Stephens's Blog, page 2
August 24, 2025
Let's Create Line-Inspired Cardboard Sculptures!
.jpg) The other day I was brainstorming LINE-themed lesson ideas because I know so many of us use line as our inspiration for our first lessons of the new year. AND I GOT SO MANY IDEAS! I'll be sharing them over the next couple of days so be the first to see them, you might want to subscribe to my email list!
The other day I was brainstorming LINE-themed lesson ideas because I know so many of us use line as our inspiration for our first lessons of the new year. AND I GOT SO MANY IDEAS! I'll be sharing them over the next couple of days so be the first to see them, you might want to subscribe to my email list!
 This project was inspired by one of my VERY favorite lessons: Line Paper Sculpture! I've done that project every year with my kindergarten...and one year, did it with the whole school. It's always a hit!
 They always look so amazing. I love having these big, colorful sculptures all over the hallway walls. It's perfect for Open House.
 It's made even more fun with a Getting to Know You sheet on hand so parents and family can 'read' the artists sculptures! You can find these free downloads here!
 Now for this sculpture, you'll be using cardboard, ink-filled bingo daubers and pipe cleaners. There is a little bit of cardboard cutting that will need to take place on your end...so for that, at the start of the video, I chat you through the process and the tools I recommend:
 The first thing you may want is one of these badboys. They are not cheap BUT...I use mine all the time and wish I would have gotten it sooner! It's a cordless cardboard cutter and I love the thing. You can find it here.
 I love these cardboard scissors for cutting the notches. In my art room, I was able to get one pair per table. This would mean less notch cutting for you! But it really does go by quickly.
 If you can't get your hands on that cordless cardboard cutter, than this Canary knife cuts through cardboard VERY well. I have one of these and love it!
 Bingo daubers are my favorite art room tool. I talk about them and all of the lessons I use them with here. To find these, you can visit this link.
And any ole India ink will work. I found this one to be priced well.
 Of course, the inspo for this lesson was my book Larry the Line! You can find it as well as the downloads featured in the video here.

I can't wait to see what your students create. I know they are gonna love these sculptures. So save those boxes...if your school is like mine, they are all over the hallways this time of year!


August 21, 2025
Let's Create Lines with Larry the Line!
.jpg) Hi, friends!
Hi, friends!Since I know so many of you kick off the school year by covering LINES, I thought I'd share a new line lesson with you!
I actually had a brain explosion of line lessons lately...and I CANNOT WAIT to share all of them with you! So be sure and check back here often because I'll be uploading them all over the next couple of days.
Of course, THIS lesson is inspired by the one, the only Larry the Line!
 To know me is to know about Larry the Line. He's been in my art room, inspiring artists for 25 years! A couple of years ago, I turned the short Larry the Line poem I created into a book. You can find it here.
 I am working on creating a whole library of books on the elements of art. So far...I have line and shape (check out Alfred here!)
 But today...we are focusing on LINE.
 For this project, I'll be sharing a wet-on-wet technique as I introduce lines and watercolor paint. I love the low-mess, low-stress activity of watercolor paint and this lesson really shares the magic of the medium.
  Once dry, students can use line idea sheets to add designs to their snakes. For the supplies I am using, visit here.
 And for the video that you are welcome to use in your art-makin' world, visit here:In the video, I use permanent markers to add lines to Larry. For a free download of Larry's Line Gallery, visit here!
 Have you ever tried this technique with your students? They love it and it's like magic!
 However...be CERTAIN that they keep their papers flat. The paint will be super drippy and you'd hate to see their lines get all mixed up. I recommend having students carry their work on a tray when it's time to clean up...or a sturdy tagboard messy mat.
 Even without Larry's line designs, these are super fun. I hope you and your artists have fun creating!
August 17, 2025
15 of My Favorite Lessons for Dot Day!
 If you are like me, then you often struggle with those initial first couple of art lessons. I find a theme always helps me get the wheels turning. And The Dot, a wonderful picture book by Peter H. Reynolds, is always a great place to start.
 I've used this book so many times in my art room that I actually had to buy a second copy as I wore the first one out! I read it ever year to all grades on one of those very first days of art. Speaking of, I shared a little of my first day in a blog post a while back...and realized I had not done a follow up post! I'll be working on that this week.
 For now, I thought I'd share my very favorite Dot Day lessons...all 15 of em! Many of these have videos that you are welcome to use in your art room as well as free downloads. As I share, I'll let you know the level of difficulty and time each of these requires. Okay, let's dive in!
 Let's Create Round Things!
Let's kick things off with an EASY one (and a lesson that comes with a free drawing sheet and video!) For this one, you'll probably want to purchase the Prang Mixed Media Circles so that you aren't left cutting tons of circles yourself.
 After reading The Dot, have students brainstorm and draw as many 'things that are round' that they can think of. Try sliding this free download into a sheet protector so students can draw on it with a dry erase...and save some paper!
 Dots on a Dot!
Here's a fun and easy one that can also be done on the round paper: Dots on a Dot! I love to have a stash of colorful dot sticks in my art room because they come in so stinkin' handy this time of year! For my kindergarters, we usually just use one dot in the middle and paint around it with watercolor or tempera cakes. For my older students, I like to allow them to place a couple of dots and paint. They always look so colorful and fun! Lesson plan here!
 Kindergarten Dots!
Here's the second lesson I do every year with kindergarten. You can see the little dot right in the middle. I have a video of myself teaching this lesson, including introducing painting to my youngest artists, here!
 Dot Day School-Wide Collaborative!
If you have ALL of your students do that same kindergarten lesson, once the painting is dry, try having students cut it into fourths and piece it back together on a sheet of construction paper. THEN...put 'em all together! It truly looks amazing. You can see the lesson details and a look at the collaboration of my entire school here.
 Dot Day Stations!
Probably my all-time fave dot day lesson was this one where my students got to explore a variety of media from walk to marker prints to tempera paint and even spin art! While it was mighty messy with a lot of clean up, it was a blast! You can check out all the details here.
 To make things a little easier, I created short videos to show my students how to create at each station. If you'd like to use those videos or check them out, visit here!

Printed Dots!
If you need a fast and fun activity, this is it! All you need are pizza pans from The Dollar Tree and some tempera paint. Allow the kids to paint on the pan and then pull a print by pressing paper onto the wet surface. You can find a videos and lesson details here.
 Paper Sculpture Dots!
I took my FAVORITE kindergarten lesson and just made the paper round...and viola! We had ourselves some dots! These are so fun springing from the hallway walls. You can find the lesson for this here.
 Cardboard Painted Dots!
A lesson that I LOVED and did over and again for years was this first grade painted dot lesson. We used cardboard pizza rounds (I found mine at Gordon Food Services) and tempera paint. We began the lesson with the black lines created with either bingo daubers or a paintbrush and India ink. Complete lesson here!
 I loved hanging these with paper clips in the ceiling...they always lasted until the Fire Marshall came to visit.
 Coffee Filter Dots!
Of course, making a coffee filter dot is the good ole standby that never fails to look beautiful! However...I do have a word of advice: ALWAYS add the water and allow these to dry on Styrofoam plates. This way, they will retain the color...otherwise, the color will leave the circle and stain the surface below. Details here!

Also! Did you know you can buy those GIANT coffee filters? They are HUGE and would make epically fun dots!
 Dot Day Sub Plans!
Need some sub plans OR...just need something simple because you are covering rules and routines with no time for the messy stuff just yet? Try this FREE download!
 Dot Day Weaving!
Feeling adventurous?! Why not try some circle loom weaving for Dot Day? It's actually the painting portion that you could stop at and skip the weaving...these painted plates always look so fabulous and the kids love making them. We use Chinet plates and tempera paint for the best results. You'll be amazed how pretty these turn out! Check the lesson here.
 Sparkly Dot Relief!
My third graders created these one year. They built their dots with Styrofoam plates before covering them in foil and coloring with sharpies. They were so simmery and sparkly in the halls. Details here!
 Stitched Dots!
Okay, I only recommend this for small groups or kids who are in fourth grade and up! Once we got the hang of these, it was AMAZING fun and the kids loved it. But, just like learning anything new, there was a learning curve we all had to get over. I did create a video that helped a lot! You can check it out here.
 First Grade Flowery Dots!
Yes, first grade! This big mural hung outside the art room for months, it was just too pretty to take down. You can check out how we made it here.
Okay...I actually have EVEN MORE Dot Day lessons but I'll leave you to check them out here.
AND...did you know that I have an email list? I share lots of freebies and lessons there too. To join, just visit here...it will take you to my store with my books but a pop up will allow you to sign up for email.
July 30, 2025
Let's Create a Patterned Self-Portrait with Color Pencils!
 Hello, friends!
If you are looking for the perfect Back-to-School art lesson; one that's low-mess and low-stress (because those first days of school are stressful enough!) then have I got the lesson for you! Kid-friendly video here! But if you'd like visuals to go along with this or a lesson plan, my friends at Prang have you covered! Check it out here.
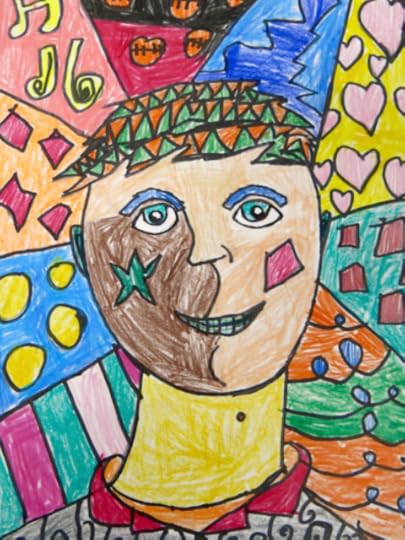
 This is a lesson I did many moons ago with my fourth graders as a part of a Romero Britto unit. I decided to redo the video and give it a bit of an update. But if you'd like to view the original as it does introduce Britto, you can find that lesson here.
  On that first day with my fourth graders, we got this far...which is pretty dang good! In that lesson, we were using a variety of color pencils but...what I really wish we would have had were THESE:
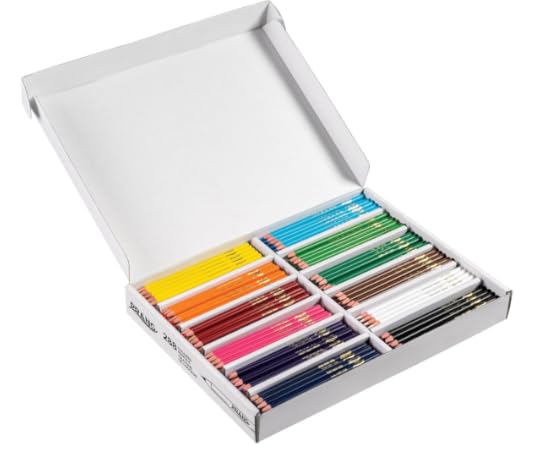 Now...I used to be a big fan of the Prisma Color Art Sticks...don't get me wrong, they are so stinkin' good but they are very pricey. These color pencils have that same rich color and buttery feel when you are coloring. They are larger so easier for students to hold and the triangular shape means they aren't constantly rolling off tables. They are larger than the average color pencil so I can't fit 'em in my pencil sharpener. BUT you should never put color pencils in electric sharpeners anyway as they have a fragile core and tend to break easily, regardless of the brand. So...get some of those metal hand-held pencil sharpeners and your students will be good to go!
 I will say this: working on a size 9" X 12" sheet of drawing paper does make the drawing time-consuming. And it's exhausting for the hand with all the coloring...I say that from creating the video. My hand was tired! You could make the paper a smaller format for students to work on. This would speed up the lesson and make it so you don't have to hear "my hand is tired" all the time.
 You could try cutting that 9" X 12" in half or just trimming it down a little. These drawings were created on that full sheet of paper...so it's doable! You can check out more details on these finished pieces here.
 For the patterned background, it always helps to have idea sheets. So I created a FREE download just for you and your artists! Here it is:
 If you decide to use this sheet in your classroom, I hope you and your students find it helpful. You do not have my permission to copy this sheet to sell it on Teacher Pay Teacher (yes, I have to say that because yes, people do it). Find this free download for you and your artists here!
If you want for your students to create patterns that perhaps symbolize something about them, you might want to share this sheet! Then, when you display their artwork, you can hang this next to their piece. It would be a great conversation starter for parents and family during Open House! Find this sheet here.
 One of my favorite things to do when we return to school is have EVERYONE do the same lesson...it saves my sanity and it makes for an EPIC collaborative display. So put your own spin on this lesson and maybe deck the halls with colorful patterned selfies! You can check out this lesson (with video!) here.
Have fun, friends!
July 21, 2025
Best Back-to-School Art Lessons!
.png) Okay, y'all. It's happening! The emails from admin are rolling in, the BTS stuff is out at stores...it's already (ALREADY!) time to start thinking about heading back to school...and the lessons you plan to kick off your school year with.
Okay, y'all. It's happening! The emails from admin are rolling in, the BTS stuff is out at stores...it's already (ALREADY!) time to start thinking about heading back to school...and the lessons you plan to kick off your school year with.When I'm thinking of my very first lessons, here's what I consider:
* The lesson should involve not-so-messy supplies. I do this because during those first days in the art room, the focus is on the expectations, the routines of the art room and the rules. To also throw into the mix the rules, routines and expectations of said messy supply is overwhelming. So I tend to do lessons that involve supplies my students are very familiar with.
* The lesson should be one where all are successful. I want that first lesson to really set the tone for the art room. I want all students, even those who say, "I'm not an artist" to feel as though they are. So the lessons you'll find here today are ones that are tried and true...and where all students have found success.
* The lesson should be something that could be used for a display. Often we have an open house not long after the school year begins. To highlight the art program, it helps to have something to deck the halls. I'm often looking for a BTS lesson that does just that.
* The lesson should be the same for everyone OR make use of the same art supplies. This one is a hot take...I've gotten some flack for this one. But at the start of the year, I usually do the same lesson with all students, 1st - 4th (kindergarten is a different story and you can find out what I do with them here). But I find that this helps me not to stress and run around prepping 5 different lessons, art supplies and the rest. I do the same thing with everyone...and in the end it makes for a cohesive display and a more relaxed start to the beginning of the school year. You have the whole year to stress! So...let's not kick things off that way!
With those things in mind, I'm going to share with you lessons that I've used over the years for BTS. Feel free to use them in your art teacherin' world! Just tap the link to visit the blog post. There you'll often find free downloads and videos. Let's go!
 Back to School Banners
One way to start the school year is by creating banners for your students. I create my banners with my trusty ink-filled bingo dauber (which you can find here, if interested) and I often create them for my students to color at the END of the school year during field day. Then, when we return to school, I have them up as a way to decorate the halls and welcome students back.
However, you can make them now! They would be the perfect activity during those first days as they would get your students creating, getting to know their classmates and becoming familiar with your art room.
 When it comes to creating the banners, your only limit is your imagination. I've created frames for students to draw selfies and slogans for students to color.
 I used to have a set up like this and allow my students to paint. While this was fun...it was a lot of work and a lot of cleanup after tons of kids painting all day. In the end, I switched to having my students use paint sticks...and that seemed to work so much better! The colors are just as bright...and much less messy. But, you do you!
 For all the details on how I created these banners for my students, visit here!
And if you aren't comfortable creating these rolls, don't worry...I made some for you! You can find all four of them here.
 Getting to Know You Sculptures
Oh man, do I love teaching paper sculptures! In fact, this IS the lesson I do with my kindergarteners on their very first day...I just elevated it to include this Getting to Know You sheet and added some more paper folding and sculpting techniques.
 This lesson makes for such a fun display and a great conversation starter as the kids share with their adults what each part of their sculpture represents. For the TWO TOTALLY FREE downloads, just visit this blog post!
 Sketchbooks
I've done sketchbooks every manner of ways but the one I ultimately did with my first through fourth grade was this one! We created these sketchbook covers on the first days of school and they were always so much fun to put together and have ready for the school year.
 Inspired by the Getting to Know You sculptures, I created these decoder sheets for the covers. You can find them as a free download here.
  If you are interested in how I use, organize, store, operate, all the things sketchbooks in my art room, you can read all about it here.
 And if you'd like to check out the sketchbooks I created for your students with my friends at Prang, you can get them here!
 Self-Portraits
I find that selfies are such a great way to return to school. Of course, for some students, they can seem daunting...so I like to keep them on a small scale. These wee selfies are just 3-4" squares! We went with a monochromatic color scheme but you could do these any way you like! You can find this lesson as well as a video for you and your students here.
 Of course, self-portraits can take on any manner of style. This was such a fun collaborative piece to make that we kept it hanging for years outside the art room! For more collaborative projects like this one, visit here.
  Dot Day
Dot Day is a great way to kick off the school year! Based on the book The Dot by Peter H. Reynolds, it is one that I read to all of my students on their first days of art. So what better way than to dive in with lots of dot-themed art projects?! To find out about this one seen above, tap here!
 For a shorter Dot Day experience, my students LOVED this one! I picked up a bunch of metal pizza pans from Dollar Tree and my students explored monoprinting! You can check out this lesson here.
 If you are feeling a little anxious about the idea of using tempera paint on those first days of school...I got you! Check out my blog post featuring my Top 10 Tempera Painting Tips!
 If you are looking for even more inspiration for back to school lessons, I have MORE in this blog post! BUT...I'm ready for my second copy of coffee so I'll leave it here for the day.
Stay tuned...I'm working on a new video for a lesson that your students will love! It will have a couple of free downloads just for you. I hope to have it for ya next week so...until then!
July 16, 2025
How to Run Your First Day of Art Class!
.jpg) Hi, friends!
Hi, friends!Before we dive in, I just wanna say that what you're about to see here is how I run my first 30 minute art class with my first though fourth grade students. I have shared a lot of videos in the past about my first day of art...and really, this one is no different. EXCEPT...I'm going to walk you thru the method behind my madness so you can understand not only HOW I'm doing something but what and why. I'm also sharing my FREE downloads with ya as well as links to the items I share. But before we dive in...
 If you just want a whole dang book to have and to hold with all of the info I'm about to share (and so much more), you can pick up a copy of my book Art Teacherin' 101 right here.
 Okay, without further ado, here's the video!Now, I share several items in this video from my classroom. If you'd like to take a closer look at those things like my Open/Closed sign, my dry erase board and more then you can find links to all of them right here.
Something I forgot to mention in the video is that I share THIS video at the start of that very first class! I can't believe I forgot to include that. But here it is! And you can find a blog post with more details on this here.
 My dry-erase board is handy because it's small and takes up just a little space on my desk.
These signs can also be found at the Dollar Tree! OR...I do have an Open and Closed sign as a free download for you so just scroll down.
 For my palette behavior system, I created the palettes using plastic palettes! You can find them here.
 Want to hear more about my palette system? I made a blog post and a video all about it! You can find the details here.
 In my book, Art Teacherin' 101, I talk about this "cheat sheet" and how it helps me remember all that I want to cover on that first day. For this free download, just click here!

For the free download of my Open sign, tap here.

For my Closed sign, tap here.
 If you'd like a copy of my Getting to Know You questions, just click here!
Just a reminder: I'm sharing these with y'all so that you have a great start to your school year. Please do not sell these on TPT...I hate that I have to say that but it happens to me and other educators...a lot. It's stealing. So please don't.
 For more info on how I run my very first day of art, please check out this blog post! Here I provide the videos I have created to share with my students.

You can also find more info on my methods here.

And you can find more here!
And stay tuned! I have much more on the first days coming your way. BUT...I also have loads of videos already on my YouTube channel you may enjoy.
Have a great week, friends!
July 8, 2025
My Top Ten Tips for Tempera Painting with Young Artists!
.jpg) Hey there, friends! I hope this here blog post finds you enjoying your summer vacation if you are stateside! I know the last thing you probably wanna think about is TEMPERA PAINT...but I always find it much more relaxing to thing about art, organization, lessons and the like when I'm on a break. So I created a big ole video just for you with my very favorite tips and tricks.
Hey there, friends! I hope this here blog post finds you enjoying your summer vacation if you are stateside! I know the last thing you probably wanna think about is TEMPERA PAINT...but I always find it much more relaxing to thing about art, organization, lessons and the like when I'm on a break. So I created a big ole video just for you with my very favorite tips and tricks. Be sure and subscribe as I have more videos coming your way!
 But before we do...if you would like to peruse some tempera painting lessons, I did put together a blog post of my 20 favorite painting projects here. Not all of these are tempera paint but many are and will, hopefully, get the creative art teacherin' wheels turnin'. Just click here!
 Tip #1: Limit those color palettes!I like to distribute paint with a couple of customized paint trays. For example, on the first day I paint with kindergarten, they all receive a tray of warm color paint. On the next, it may be cool color. This helps keep our paint trays from getting completely demolished by students who are new to learning my painting routines. This method also allows students to learn the warm/cool colors as well as the notion of analogous colors.
 As far as paint goes, I'm using Prang's Tempera Paint. You can find it here.
Tip #2: Ice cube trays for distributing paint!My favorite way to distribute paint is...ice cube trays! I've been doing this since my first year teaching way back in 1998. Back then, we didn't have fancy ice cube trays like these. I had to do the stack-and-sack method of stacking my trays and putting them in plastic garbage bags overnight. Thankfully, we have these neat trays that do an excellent job of keeping paint from drying out.
You can find these lidded ice cube trays, my personal favorite, here.
 Tip #3: Water Containers that Don't Tip!Nothing sucks the life out of a good ole painting party like a water cup spill. You can find dog dishes like mine at the Dollar Tree. I also found them for a heftier price tag here.What I love about them is that no only do they not tip but they also have a spot for my sponges. The sponge is where my students dry their brushes, further removing drippy water from their brush. What I don't love about these is that the water reservoir is shallow and I have to change out the water between classes. So...it's a trade off. If you don't use the sponges or want a deeper water cup, I also love these:
 They legit don't spill!AND they come in a rainbow assortment which is fun if you color code your tables. I also love the wavy rim for resting paintbrushes.
 If you are looking for a way to have students really scrub their brush while cleaning it, you could get some of these Paint Pucks to suction into the bottom of the watercup. OR...you could also use your glue gun and put dots of glue at the bottom of the glue cup and that would do the same thing!
Tip #4: A sponge to further clean the brush!Or, as we call it, Dirty Ole Sponge Bob. If you teach students my trick of drawing an X on the sponge, it will help them remember to wipe their paintbrush AND keep the tip nice and pointy. You can find sponges at the Dollar Tree or you can also find them here.

Tip #5: Contain the mess with TRAYS!Okay, so these trays are a little expensive BUT they are super thick and sturdy which means they will be able to handle the weight of the painting supplies placed on them. However, I have purchased trays from Dollar Tree on their site and was able to purchase an entire box. The only thing is that if they don't have this available in store, you will have to pay for shipping. It's cheaper if you have them shipped to the store and pick up there. The Dollar Tree trays are much thinner and not as sturdy. But I loved them for having my young students create their artwork on. Not only did it help to capture and contain the mess but it also made it so much easier for them to carry their work to the drying rack.
 Tip #6: Distribute paint without the mess!FIFO bottles are a great way to get paint to your students without lugging a gallon of paint around the room. I also love them because you can customize and mix your own colors! You can find them here and learn more about them in the video if you aren't familiar.
 Tip #7: Texture combs are a must with tempera paint!Thick tempera paint is made for texture! And while I used to love to pick up bags of texture making supplies at the dollar store what I found is that I spent so much time at the sink CLEANING. I eventually stopped using them and switched to the ole stand by: the texture comb. They are easy for kids to use without their hands getting too messy and, even better, they are much easier for ME to clean! I love 'em and they are constantly being used in my art room. Find them here.
 Tip #8: Cover those tables with Messy Mats!We don't have time to wash the paint from our tables! I mean, we might have time but do we really wanna spend our time that way? For me, I had classes back to back with no time for cleaning so Messy Mats saved the day with keeping our tables covered and clean. You can color code them with this railboard found here. I also just like the ole standby of tagboard! You can buy a pack of 100 and it will last you for a couple years (maybe longer!) here.

Tip #9: Clean those hands and tables with these!I like to keep a bin of soapy water and a couple of these towels on each table. The kids know that they are ONLY to use these towels during clean up...otherwise you may have friends washing their hands throughout the lesson. I show them how to wring the water from the towel before using it on their hands and table. I swap these out with clean towels and water while the students work so each class has a fresh bin of water. These towels wash up great in the washing machine!
 Tip #10: Only buy the paint colors you need...and you don't need 'em all!Share with your students how to mix paint so you don't have to buy them all! The colors you WILL want to order are: red, magenta, yellow, blue, turquoise (or cyan), white, black and brown. I usually order my paint by the gallon so we don't run out. You can find the paint I buy as well as anything I may have forgotten here.
As for paintbrushes, when I first began teaching, I used what I had in my art room: those coarse, long-handled bristle brushes. They usually wiped more paint OFF the paper than they did put it on! Now I only have students use soft hair brushes like these.
 And of course you need a copy of The Paintbrush Ballerina to share with your students how to use and care for their paintbrush! You can get a copy here. I also created some painting practice sheets that you might find handy as you introduce your students to painting!
 These totally free downloads will have your students handling their paintbrush correctly in no time. Whether they are working with watercolor, tempra or tempra cakes, these sheets will save those paintbrushes! Find them free here.
 I created a video to share with you how I would use these sheets in my art room...I put them in a sheet protector so that students can practice painting with just water! More details here.
  I also created some fancy frames and even a certificate for your artists! Those freebies are here.
 Personally...you could tell me how to paint with children all day long but until I see how someone teaches it, I just don't get it. So! I thought I'd share a series of teaching tempera painting videos here. For lesson details, check out this blog post. Here's another example of me sharing a beginning of the school year paining lesson with students. Lesson details in this blog post!Here's a video of my sharing my painting set up in my art room.
I hope this big ole blog post helps you feel more comfortable busting out the tempera paint in your art room. NOW...it's summer so go put those pjs back on, grab a snack and take a nap!
June 2, 2025
It's here: ROUND Paper and Why It's the Best Thing EVER
 Oh hey there, friends!
I hope this here blog post finds you either on summer vacation or getting dangerously close. Either way, you may find yourself asking "wait, why am I reading an art teacherin' blog?!" Because you are just so dedicated, that's why! Or delusional. Either way, welcome!
You might know that I occasionally work with Prang Art Supplies to craft supplies for you and your students. A couple of years ago, when I was painstakingly cutting out circles for my students to use for Dot Day, with hands cramped, I reached out to my buddies at Prang and said,
"You know what would be REALLY great? If y'all made some round paper outta that good paper you have."
And so...they did!

It's the perfect paper for Dot Day but also...ANYTHING that happens to be round! I thought I'd share not only my fave Dot Day lessons here (I'm only 6 months early as Dot Day is usually celebrated September 15th) but also a FREE download for your artists to brainstorm all the round things.
But first, if you'd like to get your hands on this paper, you can find it here.

I created a FREE download for you and a video that will walk your students through drawing both a pizza and a donut! If you'd like that AND a free lesson plan, just click here!
 For this FREE download, just click here!Get started on your art making adventure here!
 In need of some Dot Day inspo? Then check out this lesson plan! It's one I have used with students as young as kindergarten for years!
 Need some more Dot Day inspo? I created a blog post of my 14 very favorite Dot Day lessons which pair perfectly with this here round paper! You can find them all here.
 And, of course, if you need a good book on SHAPE to reinforce all things dotty and round, then don't forget to check out my book Alfred the Ape Knows his Shapes!

April 30, 2025
Why You NEED Modeling Clay in your Art Room!
.jpg) When I first started teaching my art room had NOTHING in it but a bowling pin, a Leonardo da Vinci board game with the pieces missing, a coffee can of broken crayons and...a TON of modeling clay. I cast the clay aside not thinking I'd ever have use for it. But when my curriculum called for a "clay unit"...and I had no kiln and no budget, this stuff came in super handy. Turns out, my students and I loved it and used it to explore more than just sculpting. It became a vital tool for learning lines, shape, texture and more. Here's how:I love using modeling clay for early finishers, lesson review, preview to sculpture and more! I created these clay sheets just for you! Please feel free to use them in your art room.
When I first started teaching my art room had NOTHING in it but a bowling pin, a Leonardo da Vinci board game with the pieces missing, a coffee can of broken crayons and...a TON of modeling clay. I cast the clay aside not thinking I'd ever have use for it. But when my curriculum called for a "clay unit"...and I had no kiln and no budget, this stuff came in super handy. Turns out, my students and I loved it and used it to explore more than just sculpting. It became a vital tool for learning lines, shape, texture and more. Here's how:I love using modeling clay for early finishers, lesson review, preview to sculpture and more! I created these clay sheets just for you! Please feel free to use them in your art room. Also, I know a lot of you need to turn in lesson plans. My friends at Prang created one for you! You can download it here!
To purchase your modeling clay, here's what I'm using.
Here you go:
 This is a great sheet to use to introduce clay to your students! You can find all of these downloads here.
 I use this sheet after introducing line or when I'm doing a line review with my students. Of course, I read my book Larry the Line and this follow-up activity ties in perfectly! You can find my book Larry the Line here.
 I'm closing in on nearly 200 five-star reviews of my book Larry the Line! I love to see Larry in your art rooms...thank you so much! Get yourself a copy here.

Once my students learn about lines, we move on to shape...so I created these sheets so students can see how to use lines to create shapes. These sheets can be found here!
Of course, my book Alfred the Ape Knows his Shapes is the perfect companion to these shape sheets.

You can pick up a copy of Alfred the Ape Knows his Shapes here!

Thanks, y'all! Enjoy!
April 3, 2025
Let's Celebrate Vincent van Gogh: My Fave Van Gogh Art Lessons!
 Hello, friends!
 Sunday, March 30th was Vincent van Gogh's birthday! I love Vincent and the story of his life. He was one of my favorite artists to share in the art room. When I was writing my book Find Your Way, a decide-your-direction art adventure, I knew I wanted to include van Gogh. I wrote Find Your Way to read to my students while they worked...and they were always fascinated with his artwork and his life.
 In case you are not familiar with my book, YOU are the main character in the book as the events unfold in real time. It all begins, as most adventures do, in the art room. The reader decides which art adventure to take. When I read this book to my students, we voted on which adventures to go on...and they loved it! I share much more about reading this book to my students here.
 In honor of this amazing artist, I thought I'd put together some of my favorite Vincent-inspired art lessons. I also created two FREE downloads just for you and your students to go with their very favorite van Gogh lesson...a James Rizzi and van Gogh mashup!
 The complete lesson with instructional video can be found here. As for the free downloads, just tap the links below the illustrations!
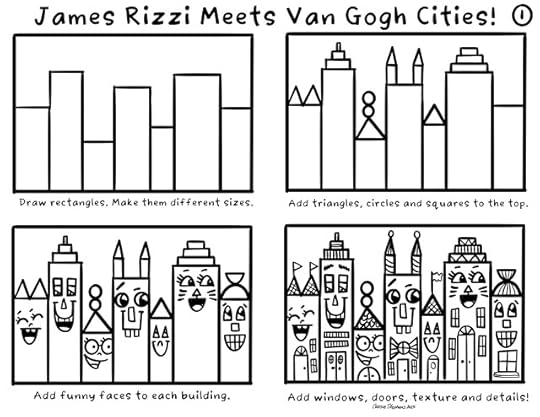 Find the front of the drawing sheet here.
And the back of the sheet here!
 I always keep sheets like these in sheet protectors because...these kids are messy! You can find the sheet with the silly faces and more details on the lesson here.
 Since spring is here, doing a Vincent van Gogh inspired cherry blossom painting might be fun too! I have that lesson available here.
 I'm a big ole fan of Charley Harper so this lesson brings him and Vincent together in one super cute and fun lesson. Details with video here.

There for a while, I was really into crafting this massive masterpiece murals with my students. They are a lot of fun...but a lot of work. When they come together...it's amazing! You can find details on this second grade Starry Night here.
 Of course, mark making and brushstrokes are always important to chat about when learning about van Gogh. This second grade lesson focused on that while also talking about warm and cool colors.
 Here's what the painting exploration looked like after the first day.
 And here's our final touches with India ink. Full lesson here.
 These second grade Super Hero Selfies were always a favorite lesson...it's one we did EVERY year! The sky was inspired by, you guessed it! Van Gogh! Lesson details here.

 Van Gogh also inspired my creations! I created this needle felted light up Starry Night dress and a Sunflowers sweater all thanks to him.
 Most recently, I even made some buttons for a sweater and earrings...both from polymer clay. Lesson how-to here.
 I'll leave ya with another illustration from my book Find Your Way! The book features 7 different artists, over 80 illustrations, 32 different endings, a biography of each artist and a project inspired by each artist too! It was a labor of love...I hope your students enjoy it as much as mine did!
Cassie Stephens's Blog

- Cassie Stephens's profile
- 34 followers
Cassie Stephens isn't a Goodreads Author
(yet),
but they
do have a blog,
so here are some recent posts imported from
their feed.

