
Cassie Stephens's Blog, page 6
January 12, 2024
Pay It Forward Plants!
.jpg)
I have always wanted to be a plant person. But, sadly, after many plants whithered away under my care, I assumed I was not a plant person. Then a sweet friend gifted me a Spider Plant. It grew and thrived and made me so stinkin' happy!
That is, until it started having babies.
Next thing you know, I've got pots and pots of spider plants! And while I love them, I just can't maintain this many plants. Some new babies were not going to be able to stay. But I just couldn't throw them away.
So I got an idea...I pulled all of the yogurt containers and other plastic containers from our recycling and decided to repurpose them into temporary planters! It was fun creating these and I used up some of my extra bits and bobs I had laying around.
 I created little signs that I glued to popsicle sticks and stuck in the dirt.
 I wrote out brief instructions incase someone is a plant newbie. I also named each plant because...why not?! And who wouldn't want a plant named Rosie?! I named each after a grandparent of mine.
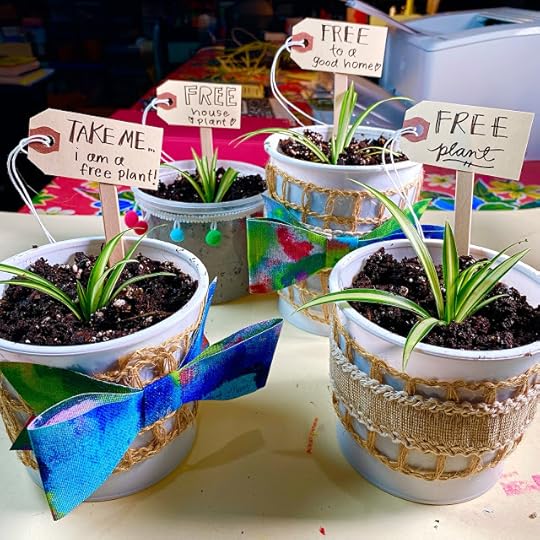
I thought about where to leave these plants. I go to the post office frequently to drop off book orders. I often see people there who are not in the best mood. The employees are great (I love my friends at the post office) but everyone else always looks like they would rather be doing something else. I also meet a lot of older friends...who seem a little lonely. We often chat. I think they would like a plant.
So I left some in the post office to be found and loved.
 And I left some outside a popular shopping plaza for maybe moms and their children to find. Perhaps a project they could enjoy together!
I did spend the rest of the day WORRIED SICK about these plants! So I may add my social media next time so they can be posted and shared...and so that I know they are loving their new home.
This made me happy to do and I look forward to doing it again. I just wanted to share in case you have too many plant friends too!


January 7, 2024
My 12 Favorite Winter Art Lessons!

Need some fun winter art lessons? Here ya go!
 Greetings, art teacherin' and art-lovin' friends!
I got such a wonderful response from my last blog post where I shared my 25 Favorite Lessons for Valentine's Day that I thought I'd continue to share.
Today I'm sharing with you my very favorite WINTER lessons! Around here, we are just now experiencing the cooler temps with winter on the horizon. What better time to incorporate it into your art teacherin' world?
So I present to you my favorite winter lessons, ALL FREE! Just tap the link listed with each lesson and you'll find a kid-friendly video, handouts and lessons. Feel free to use in your art room but, please, be sure and give credit if you decide to post on social media. AND, of course, please do not repackage my lessons and sell on TPT. I know what you are thinking, "Cassie, people do that?!"
YESSSS! All the time! SMH.
Anyway, let's get started!
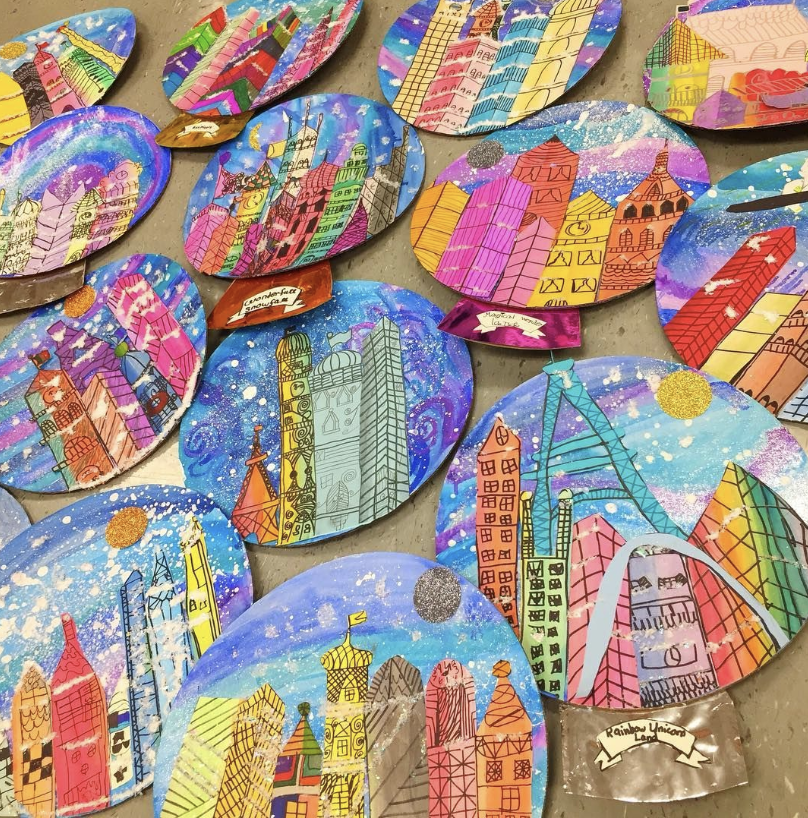
 If you are looking for one of those lessons that, let me be honest, takes a while (sometimes those can be a good thing!) this Snow Globes is for you! The kids do love it! Drawing buildings is their favorite part but we also do a lot of painting and, despite my custodian's protests, we do bust out the glitter. Here's the full lesson with video!
 This lesson could totally be shortened with less painting! We painted these papers to draw on but you could always use colorful construction paper or copy paper to eliminate that step.
 One of my most popular lessons both with teachers and students is the one inspired by Jen Aranyi! Just tap the link and you'll find a video as well as a handout!
 You'll notice we are working on cardboard circles here...one of my very favorite surfaces! You can buy cardboard circles at your local food supplier. I get mine at Gordon Food Services (GFS) where they sell them in a variety of sizes. I like the brand Circle King.
 Ya know how "you live and you learn"? Well...after having done this lesson and others involving "black glue", I'm going to share with you a different and much easier way to get the effect of black glue without making it!
 But before I do that, you can find a video for this super fun and colorful lesson here.
So, don't make black glue. Seriously. Unless you hate yourself and have more time than you know what to do with. Because, honestly, it's the worst and there is a MUCH better way!
When doing this lesson, for example, have students draw their trees with black washable markers. I prefer Prang markers (always! Trust me!). Then, using ELMER'S GLUE ALL (never EVER School Glue), have students trace over their black lines. Overnight, the waterbased marker and the glue will mix and mingle and create...a black glue line! Don't believe me? Check out this blog post and video where I share the process.
 So I've shared with you some lessons I've done with my older kids so let's now focus on kindergarten and first. Here's a lesson I did many years in a row! I love it because it teachers value. Students create tints for the snow and shade for the sky. We also practice our cutting skills with collage. Full lesson here.
 Okay, kindergarten!
 Another super popular winter lesson (and one that the kids love) is this Winter Penguin lesson I did with my first graders. All the details can be found, including a video, here.
  We kick things off with a painting review as well as warm an cool colors. The first graders painted the warm color papers while the kinder did the cool for their lesson, details below. We talked A LOT about holding our paintbrush and brush control.
  Using one of my favorite art supplies: the bingo dauber; we created these penguins! Again, the lesson has all the details so be sure and check it out!
 And here's some kindergarten cuteness! Same method as the first grade project except we did snowmen instead. Full lesson with video here.
  We used chalk after drawing our snowmen to add the pops of color.
 Got that one class that's ahead of the rest and you need a one day lesson for? Well, here ya go!
 Looking to dip your toes into some printmaking? This one is always a hit with my second graders. No printing ink? No problem! Tap the link and I'll show you how to do printmaking with markers!
 Such a fun way to create winter selfies!
 How about a cup of hot chocolate? In this blog post, I share with you this quick lesson as well as five other quick winter projects!
 Don't you love a fast and effective art lesson?!
 One of my favorite all time lessons is for kids to create their own mugs and drink hot chocolate out of them! For all of THOSE details, just tap here!
 Speaking of printmaking: if you have Gelli Plates and have been dying to bust them out, here's your sign. And your lesson!
 Now we took ours a step further by printing on fabric and stitching the into banners but...let's be real: how many of us have sewing machines?! So you can try it with a small group or just enjoy the printmaking process!
 Tis the season to remember just how important collaborations in art can be! For that reason, why not try a big ole winter collaboration on for size?!
 Look how colorful and fun!

What to do with all of those paper snowflakes you teach the kids how to make? Try THIS project on for size! Faux metal tooling with fourth grade -- stunning!


Thanks for checking out this post on my very favorite winter lessons! In case you haven't heard, I've written two new books and have self-published! You can take a closer look and find them both here.
Thank you as always for all of the support, y'all!
December 31, 2023
25 of my Favorite Lessons for Celebrating Love!
 Hello, beautiful humans!
Today I'm sharing my 25 Favorite Valentines/Love-Themed art lessons! From sub plans with handouts to clay and plaster projects, I've got something for everyone...including printmaking with kindergarten! Most of these lessons include kid-friendly videos, some have handouts and all are FREE! I hope you enjoy and...
Happy New Year!
 I know next week means heading back to school...and it's just so hard to do after weeks off. I thought I'd try and ease the sting a little by offering up to you my favorite fun and easy lessons for celebrating LOVE as Valentine's Day is on the horizon. It's never too soon to start those Valentine's themed lessons and NEVER NOT a great opportunity to celebrate all things lovey dovey. Many of these lessons here come with a kid-friendly how-to video and, best of all, they're free! Just tap the highlighted link for more!
The above is a lesson I created for my kindergarten friends but it was so fun that I ended up doing it with several grade levels. It's that time of year when you really just wanna ease on back into art teacherin', right? So why not do so with a project where you just gotta get out one art supply (tempera paint and black oil pastels) and call it a day? It's much more relaxing that way...and when you are happy and relaxed, it will reflect in your teaching (and, hopefully, the students).
 One of my all-time favorite things to teach first grade is...paper weaving! And I know what some of you may be thinking: SERIOUSLY?! Yes...because I got it down to a science! They make the looms, we weave together on a big loom I created, we do this on the floor and help one another...it's so fun! Here's the full lesson!
 Nearly all of these lessons here are inspired by artists! Which means that students learn a little about both contemporary artists as well as artists of the past with these projects. Here we learned about Jen Stark!
 For me, back to school after a long break meant back to the basics...a review of rules, routines and expectations. I cover all of that in my book Art Teacherin' 101...it's always a good time to get a handle on classroom management. No matter how could it is, it could ALWAYS be better, right? I share all of my tips and tricks in that book, if you are interested!
With that being said, I often just used simple supplies like markers when we return to school. But 'just markers' doesn't mean you can't do something super cool! Check out the video here on how we created these optical illusion hearts!
 Of course, sometimes it's fun to just jump right back in with big and exciting projects! I've been all about the plaster and Celluclay in my own artwork lately...and kids do love it! More here.
 Of course, back to school usually means PD meetings. One year, I convinced my admin to let me lead a workshop on creating these clay hearts with wings! I loved doing workshops with my faculty. It was a fun way to get everyone together in a relaxed way (which we never seem to do!) and enjoy creating and each other's company. To teach such a large group, I created a how-to video.
  As you know, teachers are some of the worst students (I'd insert a laugh emoji but we all know it's true!) so having a pre-recorded video will help!
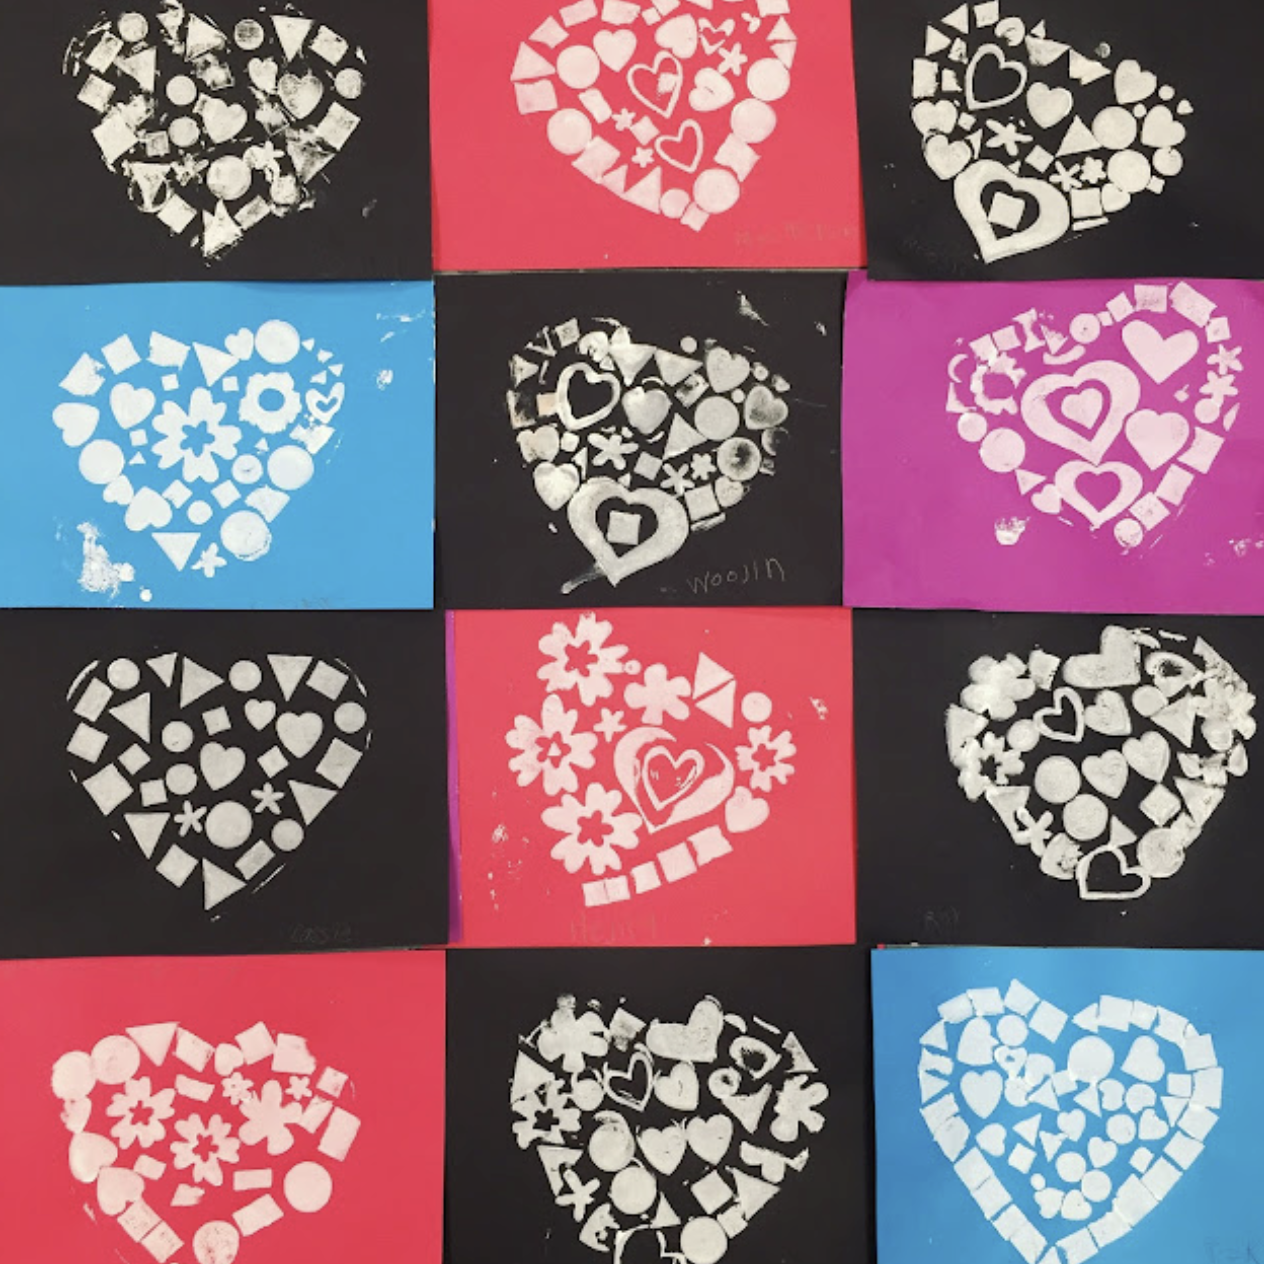
 I've never met a kid who didn't LOVE printmaking! But it can be daunting and super messy...which means a lot of clean up for us. However...you CAN do printmaking with just markers and Styrofoam. Let me show you how we made these!
 This lesson is probably one of my most popular Valentine's projects! I show you how to draw each of these cuties in videos you can find here.
  I'll also show you how to make easy heart stamps with scraps!
 Wanna make these?! My fourth graders loved creating these giant candy hearts! I created a video for them (and you!) here.
 Speaking of candy hearts...complete video to share with your students can be found here!
 Wow! Did we LOVE creating these (see what I did there?!) And I have an easy method for you to make each one successful. You can check it out here!
 This is a project I did with my second graders and they loved it! You can check out the video tutorial and lesson details right here!
 Here's a fun lesson I put together to do in one class period! Well, for me, it took 2 classes as my class period is 30 minutes long. I did this with my fourth graders as a way to introduce them to four different artists...in one lesson! Check it out here.
 Did we have fun with this one! We used old candy heart boxes and plaster to create our own faux chocolates. We also used tagboard and newspaper to create our candy boxes. It was so stinkin' fun. Full lesson here.
 Look how realistic! Did I mention we used puffy paint?! Everything is better with puffy paint.
 I really like to work big with my students. The bigger the paper, the better! It's a challenge with storage...but it's so worth it. These hearts were created on huge squares of paper. We chatted about Britto and did a line review...
 Speaking of line...if you need a book to teach (or review) line with your students, did you hear I wrote a children's book!? Yep! it's called Larry the Line. If you are familiar with my Larry the Line poem, let me tell you this is the longer more in-depth version with idea sheets to be printed and shared in the back! You can pick up a copy here.
 Big thanks to all of you that have purchased a copy and left a review! 83 5-star reviews is so amazing! Thank you all so much for the love and support. Okay, back to the lessons...
 Another super popular lesson on my blog: My Chris Uphues Lesson! This one is perfect for a sub plan as it comes with a free handout.
 Looking for a school-wide project? I have a ton of collaborative ideas on my blog (check out this post). This one involved each grade level creating a heart with a different medium!

This Britto-inspired lesson was another collaborative we did and...it was a sub plan! Check out the lesson video and process here.
 Looking for an easy one day lesson!? Look no further, I got you right here!
 Check out these scrappy hearts made by first grade! This was actually a lesson with a focus on positive and negative space. The kids were so excited by the negative space their cut out hearts created that we filled the space with tissue paper on plastic. More here.
  Aren't they so pretty up close?
 And this is what we did with the hearts we cut out! Just black and white painted designs. Simple and so pretty!
 Do you want to explore printmaking with kindergarten students but you don't know where to start?! Try this easy and fun lesson on for size!
 Once your students are done printmaking, you can take the hearts and create THESE! Aren't they so pretty?!

Got scraps of painted paper laying about?! You're an art teacher, of course you do! Spend some time teaching the kids how to cute out hearts and create these cuties! Use them to hang as mobiles, put them in windows, send to faculty as love notes...the possibilities are endless. Details here.
 Last but not least...check out these James Rizzi birds! Full lesson with video here.
 Thanks for dropping by, y'all! Know that it's TOTALLY OKAY to ease on in to this new school year. The slow you go...the more they will GROW, I promise! Slow it down, focus on what matters and enjoy art teacherin!
Love ya!
December 19, 2023
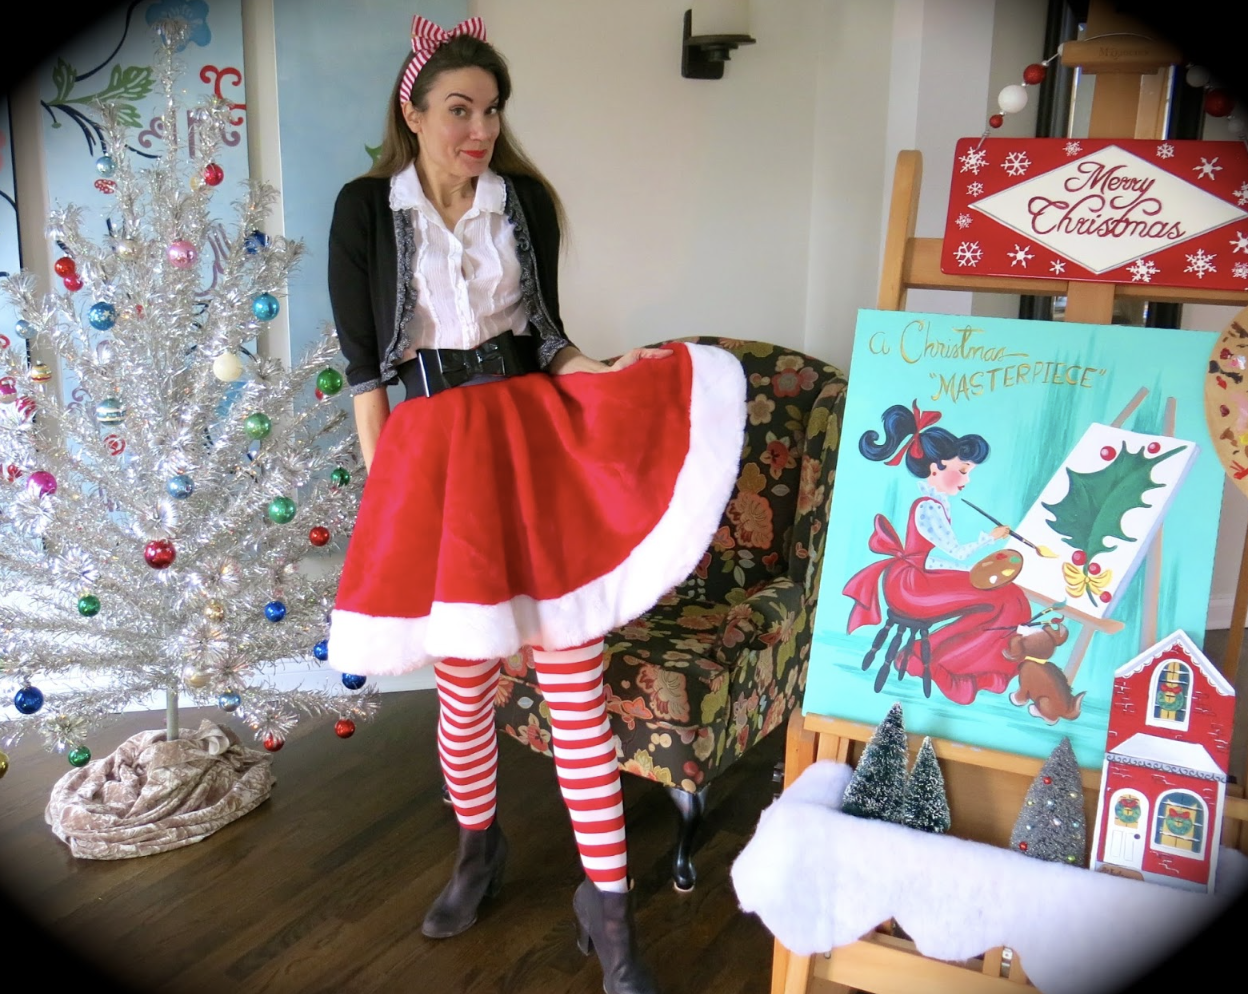
Christmas Tree Skirt to Lady Skirt!
.jpg) So, incase you didn't know: I have a little bit of a thing for taking Christmas tree skirts and transforming them into lady skirts. I've been doing it For-Eve-Ah. In fact, you can check them out here...
So, incase you didn't know: I have a little bit of a thing for taking Christmas tree skirts and transforming them into lady skirts. I've been doing it For-Eve-Ah. In fact, you can check them out here...
 And here...
 Here too...
 Oh, look, another one...
 And just when you thought we were through...

And, I'm sure you can believe this, there's even one more that I didn't document here on my blog! I taught a group of teacher friends years ago in an after-school sewing class how to make one! But...it's been a while. And, since then, I've started creating more video. So I thought it was time for me to update this DIY and create a video how-to! Here ya go:
It's a video that's kinda all over the place so my apologies for that. But it truly is SO EASY. Just remember the following:
* Get a skirt that's 48" and it should be long enough. There are tons on Amazon but...since Christmas is quickly approaching, check those After Christmas sales for tree skirts when they are super marked down!
* Measure your waist and add 2 for the seam allowance.
* Fold the skirt 4 times so you have 8 pieces of fabric folded over.
* Take your waist measurement and divide by 8.
* Using a tape measure, start at the top of the folded skirt and make your way down until you hit that measurement across the top of the triangle (the video shows this best).
* Use a small round plate and chalk to draw the curve onto the fabric and cut.
That's the most important steps to remember as you begin. In the rest of the video, I share how to make a waistband and add a 10" zipper. Although, to be honest, if you need a zipper how-to, I recommend watching another video as I failed to film a portion of that! I swear it hit record! So sorry.
 Just remember: no one is gonna get that close and see small stitches that might drive you bonkers. I mean, shoot, even if you skip the zip and use VERY STRONG velcro (we don't want any wardrobe malfunctions!), you'll be fine.
Merry Christmas, friends!

BY THE WAY...I've not officially shared here even though I've been meaning to...did y'all know I wrote another book?! I finally turned my poem Larry the Line into a children's book! I made it longer, illustrated it and...here it is! It's gotten over 80 5-star reviews from teachers and I'm just so thrilled. You can get a copy here, if ya like!
October 30, 2023
Let's Draw! Candy Corn...that's also a Vampire!
 Let's Draw! A...Vampire Candy Corn because...why not?
 Let me show you how in less than two minutes:
See? Wasn't that super easy and fun?!
Want to draw more Kooky Candy Corns? Well, just tap the link for a download to this drawing sheet and enjoy!
 Let's Draw Candy Corn!
October 13, 2023
DIY: Pumpkin Planter!
.jpg) Hey, y'all! Last week I shared that I created this Skull Planter. While at the same time I was makin' that mess, I also created this cutie! I finally got around to painting it and thought I'd share the process with you.
Hey, y'all! Last week I shared that I created this Skull Planter. While at the same time I was makin' that mess, I also created this cutie! I finally got around to painting it and thought I'd share the process with you.If you are looking for the supplies I used, mainly, Celluclay, you can find it here.
Okay, now for the process!
 Now I don't plan on keeping him out all year like my skull planter so...I did just drop a plant inside that was already in a smaller planter. That way, when the season is sadly over, I can just take it out. However...I love his happy face so much that I may keep him out past Halloween!
 In case you would like to see more things I've crafted from Celluclay (and maybe a little inspo for spooky crafts), check out this blog post!
 Everything about this season makes me so happy. Including this guy!
 Thanks for letting me share!
October 4, 2023
DIY: Skull Planter!
.jpg) I spotted the coolest planter ever the other night at Cracker Barrel: it was a large plastic skull planter and I just had to have it!
I spotted the coolest planter ever the other night at Cracker Barrel: it was a large plastic skull planter and I just had to have it!Until I saw the $40 price tag.
Then I remembered how a while back I made TONS of Halloween decor with one of my long forgotten favorite art supplies: CELLUCLAY. You can check out all of those creations (well, most of them anyway), here.
Here's the how-to video!
 The process is super easy! All you need is Celluclay and a plastic planter...and acrylic paint. That's it! Oh...and maybe a cute little plant. This is one I scored at Walmart years ago on sale. It was so sad and almost dead that I named it Peanut. Peanut is now living it's best life in my brand new skull planter!
 Part of the magic is in the painting when it comes to this kind of thing. I used a base coat of gray and then added a darker gray to the eye sockets and the nostrils to really deepen the look. Then I used diluted off white paint to go over that in the light areas. Finally I used a dry brush and white paint to add the highlights.
  I won't be leaving this outside. Celluclay, since it's waterbased, would probably not fair well outdoors.
  So in my over-crowded plant window, she will go!
 Thanks for letting me share! I actually think I need to make more of these. Why, I have no idea! But it was just so fun and Halloween season is my absolute favorite!
October 3, 2023
How to Draw a Simple Skull and Paint it!
.jpg) I was scrolling through the interwebs as one is inclined to do and stumbled upon this amazing work of art by Damien Hirst:
I was scrolling through the interwebs as one is inclined to do and stumbled upon this amazing work of art by Damien Hirst:
I loved it so much I was immediately inspired to create a lesson based on it! So I created a How-to-Draw-a-Skull video for you and your students. I've been seeing so many art teacher do the paint-squeegee method that, when I saw this work of art, I thought it would be the perfect inspiration. So! If you are interested, here's the kid-friendly video I created for you and your students!
I hope you find the video helpful and fun!
 I tried several paint pull methods. I used my craft store acrylics and, while they worked fine, I do think the colors could have been more opaque. I did find that folding the paper in half and just adding dollops of paint to the crease worked really well. Not only that but then the paint left on the scrapper can be used on the other side!
 The funnier the faces, the better, I think! I do love how the fold breaks up the pattern of paint smear too.
 But what I was really interested in was keeping the skull white (or silver in the case of the video) and the background colorful. That was a fun experiment!
 No matter how they experiment with this one, I know the kids will have fun. Even my little pumpkin looks pleased ;)
 By the way, I'm adding new videos all the time to my YouTube channel...so if you're interested, you can subscribe here and thank you!
Easy Pumpkin Sculptures!
.jpg) Hey, y'all!
Hey, y'all! I'm all about the Halloween projects lately and I came up with one that I know your students will love! I mean...I loved making it so even if you just need a fun little weekend craft to unwind, you may want to try this one on for size.
You can find the supplies for this right here. But really...it's just foil sheets, plaster wrap and acrylic paint. Sticks, felt and pipe cleaners are things the average art teacher has in surplus so...you can add that to your shopping list if necessary. But if you are anything like me, those types of supplies seem to multiply in your supply closet!
I created a kid-friendly video for you to share with your students if you'd like. You can find it here:
 Personally, I know my students would struggle with the face. So! I talk about embracing your mistakes a lot in the video. I also chat about practicing first. I would recommend doing the faces with a paint pen if you have younger students. I know paint pens like Posca markers are expensive...so maybe it's a station students can rotate to when finished.
 But who's to say they have to add a face? They could designs like dots with a sponge brush. Or they could collage a face onto the pumpkin. That might be easier for them. OR you could bust out those googly eyes that also multiply in your closet. I mean, really, the possibilites are endless. Just start with a cute pumpkin base!
 If you need a little time between pumpkins drying, you might want to check out this post. Students could work on this pumpkin drawing activity in addition!
 Full video right here!
 Most of all, have fun! And if you create these cuties, please be sure and tag me on social media. I love to see what you and your students create!
September 18, 2023
DIY: Embroidered Eyeball Earrings!
.jpg) We were traveling to Halloween Horror Nights in Orlando this weekend (our very favorite thing ever) and I decided to take an airplane craft with me. I love to take little embroidery projects with me because they are lightweight and easy to transport. Earrings are my favorite things to embroider: they are quick and easy to make and super lightweight to wear. I've made several now and I've shared the process on each in this blog post!
We were traveling to Halloween Horror Nights in Orlando this weekend (our very favorite thing ever) and I decided to take an airplane craft with me. I love to take little embroidery projects with me because they are lightweight and easy to transport. Earrings are my favorite things to embroider: they are quick and easy to make and super lightweight to wear. I've made several now and I've shared the process on each in this blog post!I broke down the steps so you can make your own!

Now if these eyeball earrings of mine are giving you a little deja vu...that might be because I recently shared an eyeball necklace DIY!
 If you wanna go bigger with your eyeball theme, then
 I even made an eyeball dress! It's one of my favorites. You can check it out here.
  I am in love with these! I now feel like I need a whole set of Halloween embroidered earrings. I'm thinking skulls, pumpkins, ghosts...you name it!
  I also think that if you need a simple intro to embroidery project, this might be it! You can also check out all of my fibers projects here!
Please do lemme know if you make some eyeball earrings so we can be twinsies! Have fun!
Cassie Stephens's Blog

- Cassie Stephens's profile
- 34 followers
Cassie Stephens isn't a Goodreads Author
(yet),
but they
do have a blog,
so here are some recent posts imported from
their feed.


.jpg)