
Cassie Stephens's Blog, page 5
November 30, 2024
My Favorite Art Lessons for Winter!
 Hello, friends! With Thanksgiving break coming to an end, it's time to kinda-sorta start thinking about exactly what is gonna go down in the art room for the next (longest) weeks of your art teacherin' life. Well, have no fear! I've got a TON of projects here that will not only get you to the finish line but will also be projects that are appropriate to continue after Winter Break. Yippie!
 Before we dive in, I thought I'd share my books with you! I've had lots of folks purchase my books for Christmas presents for teachers, art teachers and children...and now is the time to get them, if interested. If purchased soon, we can assume (hope and pray) that they'll arrive in time for the holidays. You can check out all four of my independently published books here. I have written two other books with a publisher...and those can be found on Amazon. Let me take you on a quick book tour:

Art Teacherin' 101 is packed with everything-I-wish-I-woulda-known about teaching art. It has all of my tips and tricks for classroom management as well as discovering just who you are as an art teacher so you can be your very best. If you would like to kick off the new year with some new methods to try, this book is for you!
 Larry the Line is based on a poem I wrote my first year teaching art. I've shared Larry in many blog posts...before writing a longer version of my poem, illustrating it and crafting it into a book! It's a rhyming book which are always fun to read to students...and, added bonus: they remember the names of lines much better this way! You can check out Larry the Line (and read the 175 reviews!) here.
 As a teacher, I could never seem to find a book on shapes that wasn't too baby-ish. All the books seemed to be simply getting children to recognize and name shapes which...most can already do by the time they enter the art room. However, many don't know the difference between a shape and a form, geometric and organic and how shapes can be used to draw. So...I wrote Alfred the Ape Knows His Shapes and I think you'll love it!
 My new book Find Your Way was written to read to my students as they work. I do this with my second through fourth graders (and on up would work but I only teach thru 4th) and it keeps them focused and working quietly. This book is a choose-your-own-adventure style book where you go on art adventures with 7 different artists! From Vincent van Gogh to Frida Kahlo, Money, da Vinci and more, the reader can decide what adventure to take with up to 32 different endings and over 80 illustrations! Find it here.
 Okay! Let's talk winter lessons! If you are looking for something big that involves all your students then crank up those holiday tunes and let's make a big ole Winter Mural. Details here.
 If you are feeling adventurous, run a homeschool group or love working in small groups...OR just have kids who learned to stitch and don't wanna quit (which was the case here) then this project is super! I had fourth graders who had just finished a sewing unit and would come in during recess wanting to sew some more. I came up with this fast sewing project which you can find here, complete with video tutorial!
 If you are looking for a project that really gets the kids drawing and focused, these Snow Glow Cities were the trick for me! Added bonus: it was a long project that took us all the way to the holidays! IYKYK. Video tutorial in the post!
 Okay, lemme just say this: DO NOT start this project...unless you've done weaving (even just paper weaving) with your students first. Otherwise, you will curse my name and probably put a hex on me and my cats. And I don't want that! BUT you could start by spending a couple of days before break painting and prepping the plate before diving into weaving. I promise it's not HARD...but it does require patience which...who has that before break? Full lesson with video here.
  And if you are interested in more sewing and weaving projects, I do have TONS under the "fibers" playlist on my YouTube channel. I am getting ready to upload a ton of new content there so...I encourage you to subscribe! Also, if you'd like to see more of these type of projects, then check out my book: Stitch and String Lab for Kids.
 Now let's chat about some fast -n- furious art projects that all your students will love. I put together several in this blog post, just for you! This Hot Chocolate Collage was a fun pairing with what we did after winter break...
 And that was to make ceramic mugs for our Hot Chocolate Party! I do this every year with my kindergarten-fourth grade students. By the time they leave my school, they have a cabinet of five mugs at home!
 Another spin on yee ole hot chocolate is this bingo dauber lesson! I created a video to walk your students through the process and you can find it here.
 Speaking of a little guided drawing...I created a video that will walk your students through a quick -n- cute cats and dogs drawing video that I promise they will love!
 If I may...offer a little advice during this time of year. Your schedule is going to experience so many interruptions that it's gonna be hard to know what to expect. SO...why not just do the same dang lesson with ALL your student?! Then the supplies can just stay out! ALSO...older students LOVE doing projects that are 'easy' every now and then. It builds confidence and they love doing younger kiddo style of artwork. This lesson is penguin perfect for this idea! Video lesson included!
 Same with this lesson! Fun, colorful and easy. Full video tutorial here.
 This lesson is ALWAYS a hit and now...even better that Prang sells ROUND PAPER! I know, isn't that the best?! Full lesson with video here.
 A lesson I did every year with kindergarten that was always a hit is this painted and collaged winter landscape with a decorated frame!
 I'm gonna add an update to this lesson so listen carefully before you cause yourself a whole lotta headache: don't make black glue. DON'T DO IT. You can still do this lesson HOWEVER...do it the way I share in this lesson and it will be so much easier! Tree lesson here.
 Looking for a fun and easy way to introduce pattern and printmaking? Check this one out!
 Oh, look, another penguin lesson!
 I just uploaded this tutorial last week! It's easy, low mess and low stress. Details here!
And stay tuned! I have lots of winter-themed projects that I'll be sure to share here and on my YouTube channel! Have a great rest of your break!


November 25, 2024
Let's Draw (and Paint) a Wreath!
.jpg) Hey, friends! I shared on social media last week that I had some exciting news...with my friends at Prang, you can now purchase ROUND paper!
Hey, friends! I shared on social media last week that I had some exciting news...with my friends at Prang, you can now purchase ROUND paper!Here's a little more about how that idea came to be:If interested in seeing those round Dot Day activities my students did, visit here.
But...I know that there are TONS of art lessons out there that could be based on a round piece of paper! In fact, I would have loved it for my Snow Globe lesson!
Here's a little peek at the paper Prang has for you:


I was concerned that the paper wouldn't be their good quality stuff but it is! In fact, I was able to paint on it to create this wreath project! I created a video for you to use in your art room or at home. Of course, if you don't have round paper, that's no problem! I walk you through an alternative at the start of the video. Here you go:So, honestly...while creating this video, I wasn't sure if the markers were going to bleed enough to provide color. At first...it seemed nothing was happening. I thought the lesson was just going to be a flop! BUT then I came back an hour later after the paper had dried and it looked AMAZING! So be sure and tell your artists to be patient and let it dry.
 Creating a wreath puts me in mind of Christmas! If you have children who are readers...might I recommend my art-themed choose your own direction book Find Your Way. I've had so much positive feedback from parents, homeschool families and teachers alike! You can find it here.
 November 20, 2024
DIY: Air Dry Clay Vases!
.jpg) Hey there, friends!
Hey there, friends! I'm excited to share a little something I discovered with one of my favorite art supplies: Celluclay(this link will lead you to my Amazon list of supplies). As you might know...I've created a TON of creations with my students and for myself with Celluclay. It's a paper-based air-dry clay that really lends itself to a whole lot of exploration. HOWEVER...one thing I never loved about working with the stuff is painting my creation after the fact. It's got a rough, scratch surface which is difficult to paint AND you have to wait several days for it to dry completely BEFORE you can paint it. That is...until I discovered...you can TINT the clay! Let me show you how:
In this video, I'll share with you two ways of tinting your Celluclay with acrylic paint (although I've not tried it, I'm sure tempera paint would work just fine). You can prep the clay by tinting it ahead of time, wrapping it in plastic and storing in your fridge. This is what I'm doing for a 2-hour class I'm leading today. I've got all my colorful balls stashed in the fridge (ahem). OR...at another class I lead, I had the participants mix up their own clay! I demonstrate both methods in my video.
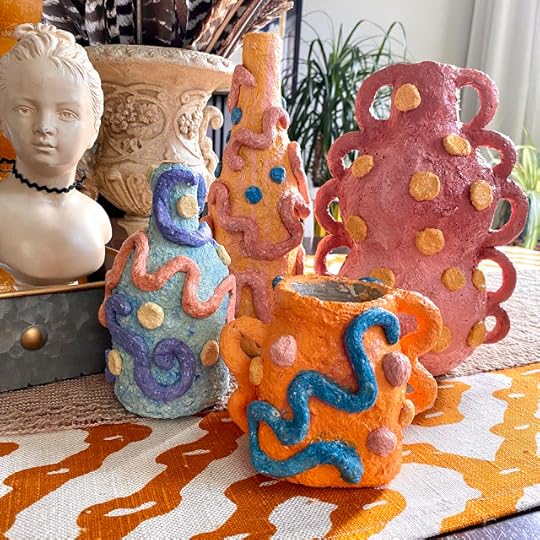 What I love about this method of tinting the clay is that I also don't have to struggle to paint in the small areas. For example, painting around those squiggles would have been a struggle and definitely would have had me questioning my life's choices. Now...I can just create the color of clay that I want!
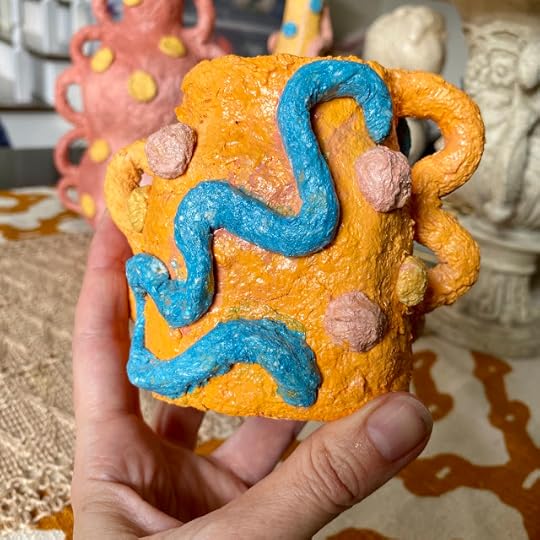 I did cover each piece with a layer of satin-finish ModPodge to help further anchor the pieces in place, give the vases a finish and waterproof them a bit. ModPodge comes in so many different finishes now that it's awesome! They make a sparkle finish, and indoor/outdoor finish...you name it! In a pinch...diluted Elmer's glue also works in place of ModPodge if you can't get your kitten mittens on any.
I have worked with Celluclay with my students in the past. It's fun stuff, especially if you don't have a kiln or you have sculpture projects in mind. For a smaller scale project, my second graders created these sculpted hearts. If you tap the link, you'll find a video of the lesson for you to share with your students:
 This was a lesson we did in just a few 30 minute classes! We used foil that we shaped into a heart as our armature. I pre-prepped the Celluclay which made it so much easier! Once dry, the students used acrylic to add color. We hung these in a little popsicle stick frame.
 My older students created these Celluclay taxidermy heads that were a blast! You can see all the details here.
  But back to the vases...I was going to include in this post all of the things I've created with Celluclay BUT...I've made so much that I think it deserves it's own blog post. So...that will be coming soon. I also have a ton of videos on my YouTube channel if you are curious about more Celluclay exploration. Check the playlist Clay Projects for Adults and Children for more.
  I will warn you: making these vases is HIGHLY addictive! I even thought for a split second that I was going to go into the vase-making business and started day dreaming about opening a booth at a local craft fair! And then I looked around at all my other half finished art creations which were giving me the evil eye and thought....well...let's just take it one day at a time ;)
 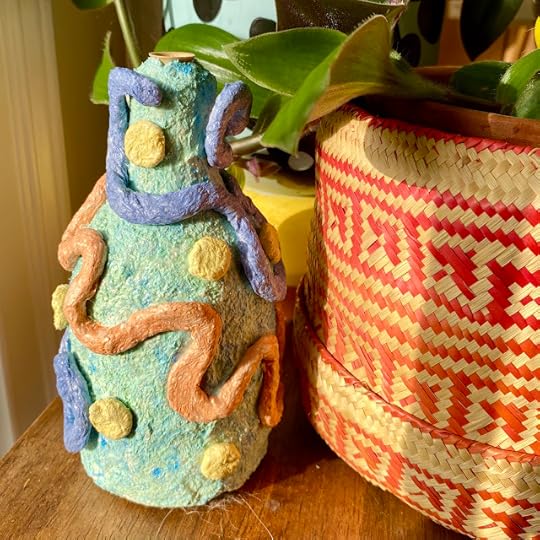 I don't know if you can see this but...look closely at the top of this vase. When the squiggles dried, they did pull away from the vase a little bit. I assume that is because I didn't have the squiggles secured to the vase well enough and they dried, thus pulling away, before the vase itself did. So really make sure you have your bits and pieces anchored down. That seems like a good rule of thumb for all aspects of life ;)
 Please do let me know if you have any questions! You can always drop me a line on my YT channel. Unfortunately, due to spam comments, I did have to turn the comments off here. So sorry!
 BTW...I know I've only shared a little of this big news on my Instagram but...did you know I wrote a Decide Your Direction art adventure book for kids? That's right!! I'm so excited and I'll be talking about this more super soon but until then...yay! I always read to my students while they work but I could never find the perfect "art" novel...so I wrote one! This book introduces 7 different artists and the reader decides which adventures to go on. It has 32 different endings and over 80 illustrations! Like I said, I'll share more here soon but if you just can't wait, you can get yourself a copy here! It's perfect for the holidays...and I'll even sign it for you!
July 30, 2024
Back to School Banners for your First Days of Art!
.jpg)
Well, my friends. The time has come...it's back to school we go!
For many of us, anyway. I know some of y'all kept on teachin' until, like, the end of June which is absolutely WILD to me. First of all, the temperature here in Tennessee during that time of year is literally the surface of the sun. I cannot imagine trying to teach, let alone put kids on a bus, in that type of heat. And, second, let's be real: I'm tapped out come May. Okay...I'll be for-real for-real...I'm tapped out the week after spring break. So those of you that teach into June, y'all deserve a break.
BUT for those of y'all that are heading back, I thought I'd put together a blog post of a simple, fun and IMPACTFUL project for your Back to Schoolin' days.
Let's talk Back to School Banners!
 One of the biggest back-to-school stressers for me was "what am I gonna teach on the first couple days?!" Because, honestly, that's not of great importance. What's VITAL is establishing Rules, Routines, Do's and Please-for-the-love-of-God Don't's. For that, you may want to check out my book, my videos or my podcast. BUT be sure and pop back here later this week as I've got more coming your way.
 BUT...I always want a project that gets the kids excited! AND that gives me something fun, vibrant and happy to hang up as soon as possible. So, for that reason, I'll be sharing my fave tried and true ...Back to School Banners!
 If you tap the link, I've got a video with more detail on these from how they are made to how I use them in my art room. Full disclosure: I usually create these at the END of the school year for my students to paint/color on field day. Then I hang them up in August to have some bright and happy color in the halls when students return. However, they could easily be created and utilized during Back to School!
 Here's how I created these:
* Using large bulletin board paper and an ink filled bingo dauber, I draw the designs in yellow or peach chalk.
(SIDE NOTE: If you'd like to see/read more about bingo daubers and the lessons I have done with them, check out this blog post!)
* The chalk makes it easy to adjust and erase my drawings before tracing them with the "paint marker" or ink-filled dauber.
* No time to create these? That's okay, I made some for you! You can purchase the banners I created right here.
Ideas on how these banners can be used in your art room:
* So...you could go the route that you see above if you are feeling brave enough to bust out paint...on the first days of school. I would HIGHLY not recommend that. Trust me...I speak from experience.
* The above photo was taken before I discovered tempera sticks! These work far better than paint as they are less messy and the kids love them. That is what I'd recommend.
 Now don't feel limited to creating giant coloring sheets as I have done. In fact, why not take it a step further and have students create a huge self-portrait banner?!
 How to make this happen with a room full of kids:
* Create stations! Have students rotate from table to table. One table could have a banner with frames like this where students can draw their self portrait. I provided construction paper crayons and Sharpies for this. A short selfie demo was given first by instructing students to use ONE frame only (ahem) and draw with their marker before adding color with Sharpies. We made the frames extra fancy by coloring those with metallic tempera sticks.
* The other table stations could include your banners! So students are always active, creative, coloring and moving around the room. This would also be a great way to get students acquainted with your art room.
* Why not include a Gratitude Banner where students draw portraits of their teachers and the faculty and staff in the frames? That's similar to a lesson that I did here and here.
 Now, let's take the Back to School Banner in a totally different direction and make Back to School table covers! In my book Art Teacherin' 101, I talk about how I have my tables color coded as I'm sure many of you do too. Each table is referred to as a 'team' and expected to work together. As they do, I give them points for their table in Class Dojo.
Here's where it gets interesting. On Class Dojo, where you would normally put in a student's name, I put in the table color. EVERY class has the opportunity to earn points for their table team. So...if the Red Team earns 5 points in Ms. Smith's first grade class, those points are earned across ALL of the Red Teams in ALL of my classes. This creates a School-Wide incentive to do well of the team.
Does that make sense? Let me tell you...it works great!
 During those first days of school as we get used to our table and the idea of table teams, I roll out (literally) these color coded mats. After hearing rules and routines, we often don't have much time left in class. So we spend that time adding color and kind words to our table covering.
  Students use construction paper crayons to add bright colors to these banners.
 In the past, I ALWAYS used paper to color code the tables on those first weeks of school. After a month, the banners were a mess so they were tossed. Usually, I only had them to signify the table colors those first few days and after that, my students knew their table.
However, when they made these, I really wanted to save them. So...here's what I did:
* Fold the table covering in half LENGTHWISE.
* Slowly put the table covering through the school laminator. Ours was the width of the paper folded lengthwise.
* Once through the laminator, cut along the unfolded edges of the folded banner.
* And Ta-Da! You now have a banner that is laminated on one side!
Because of the crease, you do have to flatten a bit. I simply taped mine to the underside of each table.
Added bonus: now you can draw on them with dry erase markers!

And there ya have it! Some ideas for creating fun and impactful Back to School art!
Stay tuned...I've got more projects coming your way!
AND if you are feeling like you need some classroom management tips...I would really recommend you check this out.
May 15, 2024
Symmetrical Cicada Prints!
 Hey, y'all! The cicadas are coming! Or...in the case of here in Nashville, Tennessee, they are already here. It's been many years since our last cicada summer and while at first I was totally grossed out by these big carcass-leavin' bad boys (and girls), I know rather ... well, I was gonna say "like" but that's a stretch ... appreciate is probably a better word. I appreciate their...gee, what do I appreciate? Their cool look. It's like seeing a bug under a microscope, they are so stinkin' big!
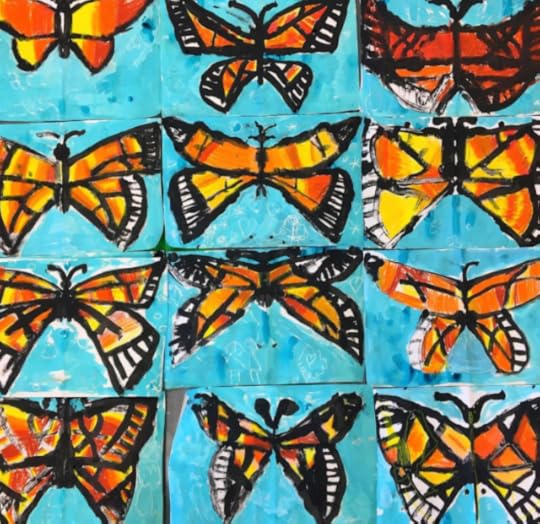
 I've shared several symmetrical printing lessons in the past and they are always a huge hit with all of my students. We've done butterflies (you can find the lesson video in the link)...
 And this is kindergarten!
We've also done hearts (again, full video lesson in this link)...

And now cicadas!
If you are interested in a list of supplies I used, here's a link!
 Have fun and stay tuned! I have more on this project coming your way!
April 29, 2024
How to Design Your Own Fabric!
 If you've been hangin' around this blog for a while (I thank you!) then you might know that I love to make my own clothing. It started with a desire to craft clothing to teach a lesson in (a la Miss Frizzle) and then morphed into wanting to make everything in my wardrobe. One thing I never seemed to be able to accomplish: Designing my own fabric.
Well...when my book Larry the Line came out, I was able to do just that! But it was easy as the pattern from the book was a stripe pattern. So it naturally repeated making for the perfect pattern.
However, there were no stripes in my new book Alfred the Ape Knows his Shapes. So I thought it would be a good time to learn how to design my own fabric. I was so excited with how it turned out! When I shared it on my Instagram, I promised I'd give a tutorial...and, so, here we are!
I hope this helps!
 Now I always get dress-making questions too...which I share a little about in the video. However, I'm no dress-making expert. I just know what I like and what works for me.
 For the bodice of my dress, I use a vintage Simplicity pattern #4343. If you search around on eBay or Etsy, you may find it. For the bottom, I use a circle skirt pattern and always add pockets.
 Creating a pattern was very hard for me to comprehend initially. So I thought I'd kick the video off with a little Post-It tutorial. I hope that helps!
 And, of course, if you'd like a copy of my book, Alfred the Ape Knows his Shapes, I'd love to sign one and send it your way! You can find my books here. And THANK YOU for supporting my small business! I'm an independent seller so...I'm the author, illustrator, social media person, shipper, handler, you name it!
April 25, 2024
How to Read Children's Books in an Engaging Way!
 When I was in art teacherin' school, I could have really benefited from a class about how to read books to kids. I thought that if the story was good, the kids would just listen and enjoy. Oh no...there's so much more to reading a book to children and keeping them engaged! So that I would never forget, I created an acronym: SIMPLE. And in this video, I walk you through it!
Reading and engaging students with books is a fine art but...I've cracked the code! If you follow these easy steps, you'll have em hooked and saying what every teacher wants to hear: READ IT AGAIN!
AND...if you are interested in my books...you can find both Larry the Line and Alfred the Ape Knows his Shapes here! I'm working on a series of books on the Elements of Art for kindergarten through third grade.
Thanks for stopping by!
March 25, 2024
My 10 Favorite Earth Day Art Lessons!
 Hello, friends!
 I know many of you are coming off of Spring Break which means you are officially in the home stretch. That is...unless you teach until the end of June. Then, well, all I can say is...I'm sorry.
BUT I do have some fun Earth Day lessons for you! Nearly all of them are video format which means you can just hit play. I created them during 2020 so most are just simple supplies. I hope you enjoy and find something here that will help you and your students celebrate Earthy Day which is on April 22nd.
Here's the first Earth Day project...
 You can find this lesson right here.
 If you are in need of a fun How-to-Draw and printing lesson, you may like this project right here. Complete with instructional video!
 There is something truly magical about a pop-up card! My students are always fascinated when we make these. You'll find all the kid-friendly instructions in this video right here.

Have you ever made Salt Dough Clay? This would be so fun to do with a small group of students. Perfect for an after school activity, homeschool, scouts, you name it. Using cardboard means you can recycle which is always great for Earth Day. Here's the lesson and video!

So you want to paint with kids buty ou don't wanna get out the paint? I hear ya! My students always love the marker-meets-water trick! Try it out with this lesson!
 Of course, not every Earth Day lesson has to be Earth-art focused. You could simply use it as a jumping point for landscape projects! Here's a fast one that helps students understand the difference between foreground, middle and background.
 If you'd like a project that includes the whole school, you may want to try making a map of the Earth with self-portraits! You can find details on this lesson here.
 If you still have some homemade salt dough clay leftover, you can try making a whole solar system with it!
 If you are looking for a fun and happy kindergarten Earth Day (or any day!) lesson, look no further than here!

And what better way to celebrate Earth Day than a mural dedicated to it? We made this huge mural based on the song What a Wonderful World and it stayed up all year.

Also! Just incase you missed the news...My book Larry the Line now has a companion...
 That's right! I just launched my new book Alfred the Ape Knows His Shapes last week and I'm so excited! I'm working on a series of Elements of Art books as I always wished there was something like that. I did a limited print run and I'm currently...signing all books as they head out the door. So! If you'd like a copy, you can check it out here!
March 11, 2024
My Book Larry the Line and More!
 So...I can't believe I never did this but...I FORGOT TO SHARE ON MY BLOG THAT I WROTE A CHILDREN'S BOOK!
Seriously?!
Yes, seriously, I wrote a children's book and yes, seriously...I forgot to mention it here.
It's official: I'm the worst blogger.
I think I was just so excited that I posted to my other social media accounts right away...and then I was so excited to pack up and send Larry the Line out that I just, well, forgot. But, better late than never, as they say and so...here we are.
I wrote a children's book called Larry the Line!Now for those of you who are the OG's of this here blog, you may already know all about Larry the Line. He's a friend of mine. He can make three straight lines for me!
I came up with the poem during my first year teaching when I was trying to think of a fun and engaging way to teach students about line. It's a short poem and it's aways been a wild hit with my students. I've chatted about it here and here.
And made plenty of videos about it too.
After writing and self-publishing Larry the Line, which you can find here, I decided to also create digital downloads to go with it. I had so many requests for them, especially that clay sheet (see below) I thought I'd make it happen. You can pick the downloads up here. So...sorry I was keepin' secrets from you but now you know!
You can also pick up my other book Art Teacherin' 101 here.
And stay tuned...because I have something big coming soon and I promise, you'll be the first-ish to know. ;)
March 3, 2024
Favorite Art Lessons for Spring!

The weather here in Tennessee has been hinting that spring is on the horizon! Of course, if we all wait a good 15 minutes, then that will change but, for now, I'm embracing the notion of spring! And, with that in mind, I thought I would put together a blog post of my very favorite art lessons for this time of the year.
Be sure and tap the link I've created for these lessons. Many of the lessons contain free hand-outs and/or kid-friendly videos. I know this time of year, before spring break, is exhausting. I do hope to help you out a little bit!
Okay, let's get started...
 This first lesson is one I loved doing with my second grade students in the spring. We used HUGE pieces of paper, ink-filled bingo daubers and were inspired by the contemporary artist Heather Galler. Once our drawings were complete, we added color with liquid watercolor.
 Here's the link to my first blog post about this lesson.
 And here's a link to the follow-up blog post with more details on how we finished our creations!
 Seeing these large and colorful beauties in the hallways always brightened our days!
 Of course, what better way to celebrate spring than with CLAY! My third graders spent a couple of 30-minute art classes creating these. This lesson was posted to my blog before I created video content...so that lets you know it's an oldie! But I do share step-by-step photos...which would be perfect to print out and provide for students.
 Lesson can be found here.
 This lesson could also be done with air dry clay! I shared that in my book Clay Lab for Kids which is FULL of 52 clay projects for those who do not have a kiln!
 If you do have a kiln...I've got a lotta videos and blog posts all about clay. If working with clay frightens you a bit (trust me, I get it. I melted down a kiln once at the expense of $500...so, I GET IT), you might want to start here.
  Since we are on the topic of clay, another fun lesson for spring would be these clay butterflies!
 Not only are these super fun to create but also super fast! My kindergarten students created these butterflies in just one 30 minute class period!
 All the details here.
 If you are looking for more kindergarten clay lessons, check out this blog post where I put 'em all in one place!
 Since we are on the topic of butterflies...check out these created by kindergarten! My other students were so interested in this lesson (and loved the printing process) so much that I ended up doing it with multiple grade levels.
 I created a video for students to follow along here.
 A couple years before that, I did a similar lesson with second graders but used chalk for the wings. I thought they turned out so pretty! Lesson with video here.
 The trees are already starting to blossom here so that means it's the perfect time for THIS lesson! I did this one with second graders when we were learning about Japan and each turned out so beautiful!
 Vincent van Gogh's cherry blossom tree paintings are always so beautiful and they inspired this lesson here!
 Got teachers asking for lessons for Mother's Day? This is one that my kindergarten students created that they loved! You can find the lesson video here.
 In the mood for printmaking? My students LOVED creating these Warhol-inspired prints. We used sunflowers I found at Dollar Tree but real flowers would be fun to use too. Of course, when I busted out the Puffy Paint, that's when the real party started! Full lesson with video here.
 When I shared this printmaking lesson many years ago, GelliPlates were not a thing. I made my own plates! However, I wouldn't recommend it as it's not vegan friendly nor does it last long. Also, who has time to make them?! So if you have GelliPlates or something similar, you will LOVE this lesson!
 Each printing plate yields two of these gorgeous prints!
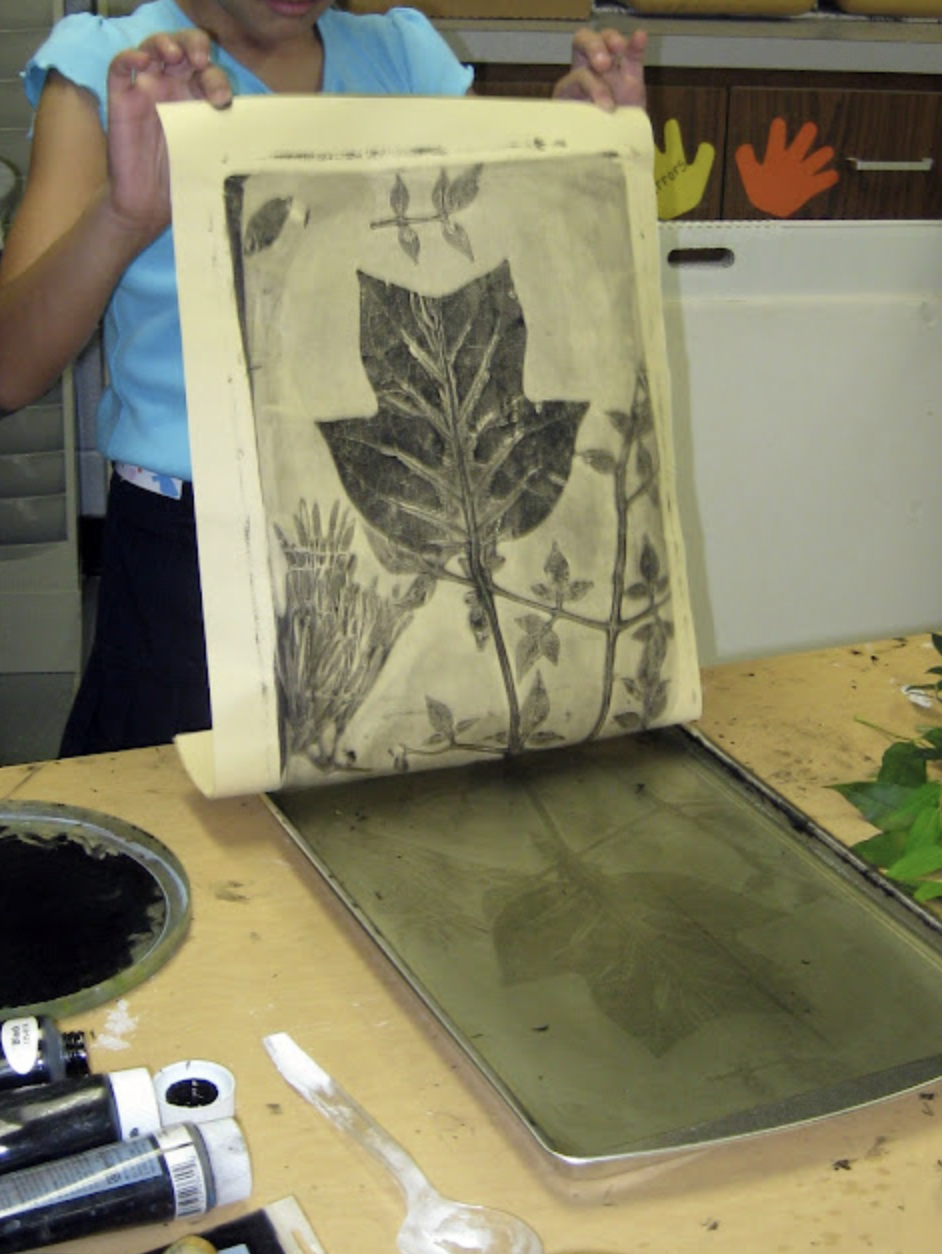
 Bringing nature inside is always fun! I've done so many variations of this leaf relief lesson and it's always a hit! You can find all of the details here.
  I love this one with the watered acrylic painted on top!
 Bright and cheery landscapes are always fun this time of year! A great way to review color mixing and mark making too. This was a hit with my fourth graders.
And just look how pretty! Full blog post here.
 Got a million-trillion popsicle sticks?! Behold! A lesson that is super fun and uses 'em all up! Lesson details with video can be found here.

Details on this cute, little painted paper collage by kindergarten can be found right here!
 My third graders really knocked it outta the park with this lesson! They loved creating the details on the vases. I loved watching them explore warm and cool colors for their backgrounds. This lesson can be found in detail here.

If you've never tried using liquid starch with chalk and seeing the AMAZING results...consider this your sign! This lesson comes with a full video created for fourth grade students. They will love it!

In the mood for some fibers lessons? I'm not gonna lie: this project took A LONG TIME. So if you need something to carry you through to spring break...this might be it!

I promise this lesson won't take nearly as long...and the kids will love it! Especially once they get the hang of weaving. Video lesson here.
If you are looking for even more fibers lessons, you might want to check out my book Stitch and String Lab for Kids!
 So...this lesson is labor intensive because you do have to put the mural together...but when I do large murals like this, they stay up for as long as the walls will hold 'em! This was hung at the start of the school year and left up until the end! Full details here.
 Of course, the idea for that mural came from this one! I created this spring-y mural for Dot Day but I think it would also be fitting for spring. All the details here.
 And there you have it! Over 20 art lessons for spring. I hope you find something here that you can use or are inspired by!
 In case ya missed it...I wrote a children's book! Larry the Line can be found right here. This 48-page rhyming book for kindergarten up to second grade (and beyond!) will introduce all lines to students in a fun and engaging way. I promise, you'll love it!
AND...I've not told anyone this yet so...STAY TUNED! This is a series of books on the Elements of Art and the next installment is coming SOON (I'm so excited!).
 If you've not checked out my other book Art Teacherin' 101, you might wanna! You can find the details here, just scroll down.
Cassie Stephens's Blog

- Cassie Stephens's profile
- 34 followers
Cassie Stephens isn't a Goodreads Author
(yet),
but they
do have a blog,
so here are some recent posts imported from
their feed.


.jpg)